20190307のvue.jsに関する記事は8件です。

Nuxt.jsでTSXを使う

事前準備

  • Nuxt.js + TypeScript 環境
  • Webpackのextensionsに.tsxが入っていること

※ この記事は既に Nuxt.js + TypeScript 環境が整ってる前提の記事になります。

http://kasheight.hatenablog.jp/entry/2018/12/nuxt-typescript
環境構築はこちらの記事が非常にわかりやすかったです。

実装

tsconfig.json

tsconfig.json
{
  "compilerOptions": {
    "jsx": "preserve"
  },
  "include": [
    "src/**/*.tsx" 
  ]
}

compilerOptions"jsx": "preserve" を追加します。

HelloWorld.tsx

HelloWorld.tsx
import Vue, { CreateElement, VNode } from "vue"

interface IData{
  isShow: boolean
}

export default Vue.extend({
  data(): IData {
    return {
      isShow: true
    }
  },
  render(h: CreateElement): VNode {
    return (
      <div>
        <h1>I am a tsx component.</h1>
        {this.isShow && <h2>Hello World</h2> }
      </div>
    )
  }
})

特にパッケージなどは追加せずにtsx が使えます。

HelloWorld.vue

<script lang="tsx"></script>
と書くことで.vueでもtsx が使えるようです。

(propsが正常に動作しないためvue-tsx-supportを使ったほうがよさそう...)

  • このエントリーをはてなブックマークに追加
  • Qiitaで続きを読む

Nuxt.jsで開発をする場合にまずやるべきこと

概要

僕がNuxt.jsで開発をする場合にまずやることを紹介したいと思います。

インストール

僕はcreate-nuxt-appでインストールします。

npx create-nuxt-app <my-project>

入れる拡張は
1. Use a custom server framework → express
2. Choose features to install → Linter / Formatter, Prettier, Axios
3. Use a custom UI framework → bootstrap
4. Use a custom test framework → jest
5. Choose rendering mode → Universal

が個人的に好きです。

次にとりあえず入れとけなパッケージもインストールします。
とりあえずsassを入れます。

npm i -D node-sass sass-loder

次にsass変数をグローバルに使うためのパッケージを入れます。

npm i @nuxtjs/style-resources

Font Awesome入れます。公式のgitにnuxt用の導入方法が載っています

npm i @fortawesome/fontawesome-svg-core @fortawesome/free-regular-svg-icon @fortawesome/free-solid-svg-icons @fortawesome/vue-fontawesome

適当に書き換える

package.jsonにnpm scriptを一つ追加します。lintfixは絶対追加したほうがいいです、エラー内容を人力で追っていくのは時間の無駄です。
herokuにデプロイする場合はそれも追記します。

package.json
{
    // lintfixを追加
    "lintfix": "eslint --fix --ext .js,.vue --ignore-path .gitignore .",
  // herokuデプロイ用
    "heroku-postbuild": "npm run build"
  },
}

.eslintrc.jsにルールを追加します。よく分かってないのですがconsole.logしたら時たまエラーになるので、それの回避です。

.eslintrc.js
  rules: {
    'no-console': process.env.NODE_ENV === 'production' ? 'error' : 'off',
    'no-debugger': process.env.NODE_ENV === 'production' ? 'error' : 'off'
  }

sass変数のあれやこれやの設定はこれこれをみたら良いですよ(宣伝)。

終わり

毎回苦労して初期設定してた気がするけど、そんな大した作業量でもなっかたです。
半年くらい前はeslintrcをゴニョゴニョ編集してた気がしますが進化してるっぽいですね。
あと最新のnuxt.js ver2.40以降はランダムにホットリロードが失敗するというちょっとムカつくバグがあるので気をつけてください。

  • このエントリーをはてなブックマークに追加
  • Qiitaで続きを読む

[Vue.js/Nuxt.js] $refsの命名をする際はキャメルケース、もしくはケバブケースで書かないと動かない

環境

Nuxt.js: ^2.0.0

概要

DOMにrefを指定することで、子コンポーネントのプロパティやメソッドに触ることができる。

今回はrefを指定してあるメソッドを実行したかったのだが、なぜかうまく動かなかった。

原因は、refをスネークケース記法で書いていたことだった。(しょうもない)

このデバッグに時間がかかりすぎたのでここに知見を残しておく。

悪い例

スネークケース

<template>
 <div>
   <ComponentSpecial ref="component_special" />
 </div>
</template>
// undefined
console.log(this.$refs.component_special);

パスカルケース

<template>
 <div>
   <ComponentSpecial ref="ComponentSpecial" />
 </div>
</template>
// undefined
console.log(this.$refs.ComponentSpecial);

動く例

キャメルケース

キャメルケースで書くとドット記法でいけるのでおすすめです。

<template>
 <div>
   <ComponentSpecial ref="componentSpecial" />
 </div>
</template>
// undefined
console.log(this.$refs.componentSpecial);

ケバブケース

ケバブケースの場合はブラケット記法で書くと参照できます。

<template>
 <div>
   <ComponentSpecial ref="component-special" />
 </div>
</template>
// undefined
console.log(this.$refs['component-special']);

参考リンク

探してもあまり見つかりませんでした。

vue.js – Vue $refs和烤肉串案 - 代码日志

  • このエントリーをはてなブックマークに追加
  • Qiitaで続きを読む

How to use vuex in vue.js 3.4.1

Introduction

In this article I will discuss about how we can use vuex in a nutshell. So before we get our hand dirty we should talk a little bit about flux design pattern.

Flux

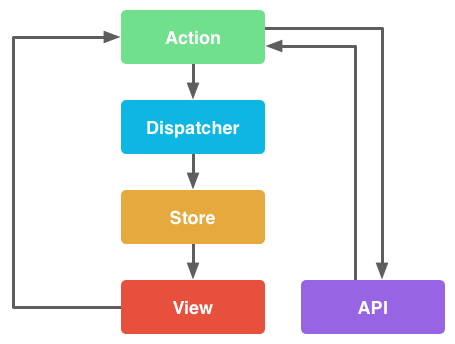
Flux is known as the concept of Unidirectional data flow. It is developed by Facebook while they are working with React. This Vuex pattern will illustrate on how flux work in Vue.js.

Typically, Flux has some individual components as listed below:

  • Action : Helper method that facilitate passing the data to dispatcher.
  • Dispatcher : Receives actions and broadcast payload to registered callback.
  • Stores : Containers for application state & logic that have callback registered to the dispatcher.
  • Controller Views : React component that grab the state from Stores and pass it down via props to child components.

V70cSEC.png

Vuex

  • Create new Vue.js project We will use vue cli for creating new project. In case you don't have vue cli install, please enter this command in your terminal
npm install -g @vue/cli

To create new vue project we have to enter this command:

vue create my-project

It will ask some questions for the project configuration setting. So just choose what ever you like such as test framework and so on.

  • Create a new view component call Counter.vue and add this following code:
<template>
    <figure>
        <button @click="decrement">-</button>
        <span>{{ $store.state.count }}</span>
        <button @click="increment">+</button>
    </figure>
</template>

<script>
export default {
    name: 'Counter',
    methods: {

        // component method handling increment store dispatch action
        increment: function (event) {
            this.$store.dispatch('increment')
        },

        // component method handing decrement store dispatch action
        decrement: function (event) {
            this.$store.dispatch('decrement')
        }

    }
}
</script>

<style>
    span {
        padding: 0 10px;
    }
</style>
  • In store.js add this following code:
import Vue from 'vue'
import Vuex from 'vuex'

Vue.use(Vuex)

export default new Vuex.Store({
  state: {
    count: 0
  },
  mutations: {

    INCREMENT (state) {
      state.count++
    },

    DECREMENT (state) {
      state.count--
    }

  },
  actions: {

    increment ({ commit }) {
      commit('INCREMENT')
    },

    decrement ({ commit }) {
      commit('DECREMENT')
    }

  }
})
  • Now in router.js update home route to match with Counter view component
   {
      path: '/',
      name: 'counter',
      component: () => import('./views/Counter.vue')
    }

Basically we have two actions in our store which are increment and decrement each action send signal to mutations and mutate the state value.

In Counter.vue we bind the value from the state with the respective UI component. That's what we call Controller View in flux.

So this is a short demonstration on how we can use vuex in Vue.js. If you have any further concern or suggestion please email me (phanithken@gmail.com) or leave the comment down bellow. I will try to answer.

And I also put all the sample into Github which you can check it out here
Thank you! Have a nice day :)

  • このエントリーをはてなブックマークに追加
  • Qiitaで続きを読む

vue-routerで指定したパスで404エラーが発生したときの対応方法(Vue.js, AWS S3 + CloudFront)

フレームワーク/環境

  • Vue.js + vue-router
  • AWS S3 + CloudFront

事象

以下のようにvue-routerで指定したパスにアクセスすると404エラー(not found)が発生する。
ただし、localhost上やS3のみ(CloudFront無し)で公開する場合は、404エラーは発生せず正常にアクセスできる。

router.ts
import Vue from 'vue';
import Router from 'vue-router';
import Tools from './views/Tools.vue';
import Info from './views/Info.vue';

Vue.use(Router);

export default new Router({
  mode: 'history',
  base: process.env.BASE_URL,
  routes: [
    {
      path: '/',
      name: 'tools',
      component: Tools,
    },
    {
      path: '/info',
      name: 'info',
      component: Info,
    },
  ],
});

対応方法

概要

「CloudFront」で「Custom Error Response」を作成して、HTTP Error Codeが404(not found)の場合は、レスポンスコードを200にしてindex.htmlを返すようにする

詳細

  1. AWSのコンソールから「CloudFront」を開く
  2. メニューの「Distributions」>対象のIDをクリック
  3. 「Error Pages」タブ>「Create Custom Error Response 」ボタンをクリック
  4. 「Custom Error Response Settings」画面で以下のように設定して、「Yes, Edit」ボタンをクリック
項目名
HTTP Error Code 404: Not Found
Customize Error Response Yes
Response Page Path /index.html
HTTP Response Code 200: OK

感想

エラーが解消されるとテンションが上り、別のエラーに直面してまたテンションが下がる

参照

  • このエントリーをはてなブックマークに追加
  • Qiitaで続きを読む

"npm run build"でエラー"Cannot find module '../package.json'"が発生したときの対応方法

事象

ビルド(npm run build)すると、エラー"Cannot find module '../package.json'"が発生

対応方法

node_modulesを削除して、再インストール(npm install)する

感想

GithubのIssuesは、とりあえずいいねが集中しているコメントを見ればよい

参照

  • このエントリーをはてなブックマークに追加
  • Qiitaで続きを読む

"npm run build"でエラー"Cannot find name 'Buffer'/'http'/‘https'"が発生したときの対応方法

事象

ビルド(npm run build)すると、エラー"Cannot find name 'Buffer'/'http'/‘https'"が発生

エラーログ例

0 info it worked if it ends with ok
1 verbose cli [ '/usr/local/bin/node', '/usr/local/bin/npm', 'run', 'build' ]
2 info using npm@6.4.1
3 info using node@v8.12.0
4 verbose run-script [ 'prebuild', 'build', 'postbuild' ]
5 info lifecycle ztrans@0.1.0~prebuild: ztrans@0.1.0
6 info lifecycle ztrans@0.1.0~build: ztrans@0.1.0
7 verbose lifecycle ztrans@0.1.0~build: unsafe-perm in lifecycle true
8 verbose lifecycle ztrans@0.1.0~build: PATH: 
9 verbose lifecycle ztrans@0.1.0~build: CWD: /Users/user/Desktop/ztrans
10 silly lifecycle ztrans@0.1.0~build: Args: [ '-c', 'vue-cli-service build' ]
11 silly lifecycle ztrans@0.1.0~build: Returned: code: 1 signal: null
12 info lifecycle ztrans@0.1.0~build: Failed to exec build script
13 verbose stack Error: ztrans@0.1.0 build: `vue-cli-service build`
13 verbose stack Exit status 1
13 verbose stack at EventEmitter.<anonymous> (/usr/local/lib/node_modules/npm/node_modules/npm-lifecycle/index.js:301:16)
13 verbose stack at emitTwo (events.js:126:13)
13 verbose stack at EventEmitter.emit (events.js:214:7)
13 verbose stack at ChildProcess.<anonymous> (/usr/local/lib/node_modules/npm/node_modules/npm-lifecycle/lib/spawn.js:55:14)
13 verbose stack at emitTwo (events.js:126:13)
13 verbose stack at ChildProcess.emit (events.js:214:7)
13 verbose stack at maybeClose (internal/child_process.js:915:16)
13 verbose stack at Process.ChildProcess._handle.onexit (internal/child_process.js:209:5)
14 verbose pkgid ztrans@0.1.0
15 verbose cwd /Users/user/Desktop/ztrans
16 verbose Darwin 17.6.0
17 verbose argv "/usr/local/bin/node" "/usr/local/bin/npm" "run" "build"
18 verbose node v8.12.0
19 verbose npm v6.4.1
20 error code ELIFECYCLE
21 error errno 1
22 error ztrans@0.1.0 build: `vue-cli-service build`
22 error Exit status 1
23 error Failed at the ztrans@0.1.0 build script.
23 error This is probably not a problem with npm. There is likely additional logging output above.
24 verbose exit [ 1, true ]

対応方法

tsconfig.jsonで、以下の設定を追加すると解決する

tsconfig.json
"compilerOptions": {
  "types": [
  "node"
],
}

感想

GithubのIssuesは、Stack Overflowと違い、答えが埋もれている。

参照

  • このエントリーをはてなブックマークに追加
  • Qiitaで続きを読む

Firebase+Vue.js 覚書

まえがき

"テイキョウドットコム"の裏側のCMSをFirebaseで作った話.
しばらくフレームワークとしてNuxt.jsを使っていたものの,lang="ts"にしようとしていろいろ躓いたりして面倒だったので,流行り(?)の@vue/cliに全部任せることにした.もうSSRはいいかな.

でもクライアントもサーバ(Firebase Functions)もTypeScriptで書けたらいいじゃん.良いじゃん(断定)

そのうちNuxt.js+TypeScriptちゃんと研究しよ.
Nuxt.jsすき.

Firebase

まずfirebase-toolsで

~/
$ firebase init

今回はHosting, Functions, Firestore, Authenticationを使う

ディレクトリ構造はこう

~/
|- functions/   --- Functionsのコード
|  |- src/         --- .tsファイル群
|  |- lib/         --- コンパイル済み.jsファイル群
|  |- package.json
|     ...
|- src/         --- クライアント側のコード
|  |- common/
|  |- site_name/     --- vue cliで作るディレクトリ
|  |  |- package.json
|  |     ...
|  `- site_name_2/   --- vue cliで作るディレクトリ
|     |- package.json
|        ...
|- public/      --- クライアント側ビルド済みファイル
|  |- site_name/
|  `- site_name_2/
|- .firebaserc
|- firebase.json
|- package.json
   ...

Hosting

表側と裏側の2サイトを用意するので従量プランにアップグレード.
その上で"複数のサイトでプロジェクトのリソースを共有する"の通りに,Hostingサイトと~/public/site_nameを関連付ける.
また,SPAの場合すべてのURLリクエストをindex.htmlに飛ばす必要がある."Hosting 動作をカスタマイズする"の"リライト"の項など参考に各target毎に設定を行う.
こんな感じ.

firebase.json
  "hosting": [ {
    "target": "target_name",
    "public": "public/site_name",
    "rewrites": [ {
      "source": "**",
      "destination": "/index.html"
    } ]
  } ],

vue cliの項に続く.

Authentication

方式はとりあえずメール+パスワード認証にした.あとでGoogleアカウントにしよ.
Firebase Consoleからユーザを作成(CMSを利用するのは限定人数なので)
実際に使えるメールアドレスと,仮の適当なパスワードで作る.
パスワード再設定用メール送信で実際のパスワードを設定させると同時にメール認証が完了する.

Firestore

Firebase Consoleから作成しておく.ロックモードでよい.
Firestoreのreadは全員許可,writeを前項で作ったユーザのみに限定する.
ルールを以下のようにする.uidはユーザを作った時に発行されるやつ.
複数許可したり,emailで絞ることもできる.詳しくはドキュメント参照されたし.

~/firestore.rules
...
allow read;
allow write:
  if request.auth.token.email_verified
  && request.auth.uid in [
    'XXXXXXXXXXXXXXXXXXXXXXXXXXXX',
    'YYYYYYYYYYYYYYYYYYYYYYYYYYYY'
  ];
...

複数fieldを使ったソートのクエリを使う必要があったので,indexを作成しておく.

Functions

functionいっぱい作ってREST APIみたいにするとそれぞれのfunctionの起動に時間がかかるっぽいので、1つのfunctionにexpressを載せる構成にした。
expressのようなFunctionsだけの依存ライブラリは~/functions/package.jsonにインストールしよう.

Vue

~/src
$ vue create site_name

TypeScriptを使う設定にした.その他お好み.
これをサイト数ぶん作る.

pugを使う場合は追加で

~/src/site_name
$ npm i -D pug pug-plain-loader

Firebase Consoleのoverviewにある"アプリにFirebaseを追加して利用を開始しましょう"から,initializaAppするために必要な値を確認し,.envを以下のように設定.
.envの仕様の詳細はドキュメント参照されたし

~/src/site_name/.env.production
VUE_APP_FIREBASE_FUNCTIONS_URL=https://region-name-project-id.cloudfunctions.net/

VUE_APP_FIREBASE_API_KEY=xxx
VUE_APP_FIREBASE_AUTH_DOMAIN=project-id.firebaseapp.com
VUE_APP_FIREBASE_DATABASE_URL=https://project-id.firebaseio.com
VUE_APP_FIREBASE_PROJECT_ID=project-id
VUE_APP_FIREBASE_STORAGE_BUCKET=project-id.appspot.com
VUE_APP_FIREBASE_MESSAGING_SENDER_ID=xxx
...
~/src/site_name/.env.development
VUE_APP_FIREBASE_FUNCTIONS_URL=http://localhost:5001/project-id/us-central1/

おなじ
...

$ firebase serveでローカルで動かすとき,Firestoreだけはローカルで立たないので,.env.developmentでは予め用意したstaging用のFirebaseプロジェクトを使うようにすると◎.(その場合Firestoreだけ使うのでstaging用プロジェクトの料金プランアップグレードは不要)

.envで設定したもののうちVUE_APP_で始まるものは以下のようにクライアントサイドのコードで呼び出せるのでそうなっている.

  • process.env.VUE_APP_XXX
  • <%= VUE_APP_XXX %> (~/src/site_name/public/index.htmlなど)

headのmetaでcanonical urlが欲しいときはVUE_APP_PUBLIC_PATHなど設定しておくと◎.

そして最後にこう

firebase.ts
const config = {
  apiKey: process.env.VUE_APP_FIREBASE_API_KEY,
  authDomain: process.env.VUE_APP_FIREBASE_AUTH_DOMAIN,
  databaseURL: process.env.VUE_APP_FIREBASE_DATABASE_URL,
  projectId: process.env.VUE_APP_FIREBASE_PROJECT_ID,
  storageBucket: process.env.VUE_APP_FIREBASE_STORAGE_BUCKET,
  messagingSenderId: process.env.VUE_APP_FIREBASE_MESSAGING_SENDER_ID,
};

firebase.initializeApp(config);
axios.ts
import axios from 'axios';

export default axios.create({
  baseURL: process.env.VUE_APP_FIREBASE_FUNCTIONS_URL,
});

Build, Serve, Deploy

npm scriptだけ列挙する

~/functions/package.json
    "build": "tsc",
    "watch": "tsc -w",
~/src/site_name/package.json
    "build": "vue-cli-service build --dest=../../public/site_name --mode=development",
    "watch": "vue-cli-service build --dest=../../public/site_name --mode=development --watch",
    "prod": "vue-cli-service build --dest=../../public/site_name --mode=production",
~/package.json
    "build": "run-s build:*",
    "build:functions": "npm --prefix=functions run build",
    "build:site_name": "npm --prefix=src/site_name run build",
    "build:site_name_2": "npm --prefix=src/site_name_2 run build",
    "serve": "firebase serve --project project-id-staging",
    "prod:site_name": "npm --prefix=src/site_name run prod",
    "prod:site_name_2": "npm --prefix=src/site_name_2 run prod",
    "predeploy": "run-s clean prod:*",
    "deploy": "firebase deploy --project project-id",
    "clean": "rm -r public || true",

開発中はnpm run watchを各package.jsonの位置で実行する.またはルートでnpm run build
その後ルートでnpm run serveでFirebase Hostingがローカルで動く.
npm run deployで全部productionビルドしてデプロイする.Functionsはfirebase-toolsが勝手にビルドします.
npm run deploy -- --only functionsとかも可能.詳しくはfirebase-toolsのドキュメント参照されたし

run-snpm-run-allパッケージ

蛇足

alias vs symlink

複数サイト間やVue・Functions間でinterfaceの定義を共有したかったりする.
tsconfig.jsonのpathsで"@common/*": ["../../comon/*"]とするか,
シンボリックリンクln -s ../../common ./commonとするか,
どっちがいいんだろうか?

どちらにせよ実体がtsconfig.jsonやtslint.json/eslint.jsonの外側ディレクトリにあるので,
lintはかからないしwatchしてくれない・・・?

VSCode

プロジェクトルートから見てtsconfigが複数あるので,paths解決やインテリセンス等々を上手にやってくれない.
tsconfigの位置毎にVSCodeを複窓して書いてるけどめんどくさいぞ!
いい方法教えてください.

type safeなstore

Vuex+TypeScript問題に足突っ込む

  • このエントリーをはてなブックマークに追加
  • Qiitaで続きを読む