- 投稿日:2019-03-07T22:49:08+09:00
【SwiftChaining】イベントを送受信するプロトコル
SwiftChainingの解説記事その6です。
SwiftChainingとは何か?というのは、こちらの最初の記事を参考にしてください。
今までの記事では
SwiftChainingで用意されたクラスを使用して、バインディングする方法などを紹介してきました。これまでそれら用意されたクラスに関して「監視対象」とか「値を返せる・返せない」といった表現で説明をしていたのですが、実際のところは何のプロトコルに適合しているかという話になります。今回はそのプロトコルについて解説します。
プロトコル
クラスを
SwiftChainingでイベントの送受信などができるようにするために用意しているプロトコルがあります。以下の3つです。
- Sendable
- Fetchable
- Receivable
独自に作ったクラスでも、これらのプロトコルに適合させることで
SwiftChainingで同じように扱うことができます。Sendable
Sendableに適合したクラスは、監視対象となりイベントの送信ができます。定義は以下のような感じです。
public protocol Sendable: AnySendable {
    // 送信するイベントの型
    associatedtype SendValue
    // chain()で返す型(あまり意識しなくて良い)
    typealias SenderChain = Chain<SendValue, SendValue, Self>
}

extension Sendable {
    // イベントを送信する(実装済。そのまま使う)
    public func broadcast(value: SendValue) { ... }
    // イベントの処理を構築する(実装済。そのまま使う)
    public func chain() -> SenderChain { ... }
}
実装例として、
Intを送ることに限定したNotifierを書いてみると、このようになります。class IntNotifier: Sendable { typealias SendValue = Int func notify(value: Int) { self.broadcast(value: value) } }イベントとして送る値を
SendValueで定義し、イベントを送信するときはbroadcast(value:)を呼びます。必要な実装はこれだけです。この
IntNotifierは、以下のように使うことができます。let notifier = IntNotifier() // chain()を呼べるので、イベントが送信された時に実行される処理を構築できる let observer = notifier.chain().do { print($0) }.end() // 値が送信されてdoが実行され、1がログに出力される notifier.notify(value: 1)Fetchable
Fetchableに適合したクラスは、Sendableのイベントを送信する機能に加え、sync()が呼ばれた時に値を引き出すことができます。定義は以下のようになっています。
public protocol Fetchable: Sendable {
    // 値を返す(要実装)
    func fetchedValue() -> SendValue
    // 値が返せるかをBoolで返す(必要に応じて実装)
    func canFetch() -> Bool
}

extension Fetchable {
    public func canFetch() -> Bool {
        // デフォルトではtrueを返す
        return true
    }
}
Sendableで必要なSendValueに加えて、fetchedValue()を必ず実装する必要があります。返り値に返すのはsync()を呼んだ時に送信される値です。
fetchedValue()で値を引き出せないことがある場合にcanFetch()でfalseを返すとfetchedValue()は呼ばれません。デフォルトはtrueなので、必要があれば実装をしてください。こちらも実装例として、
Intを保持するIntHolderを書いてみるとこのようになります。class IntHolder: Fetchable { typealias SendValue = Int var value: Int = 0 { didSet { if self.value != oldValue { self.broadcast(value: self.value) } } } func fetchedValue() -> Int { return self.value } }以下のように使うことができます。
let holder = IntHolder()

// sync()で初期値の0がログに出力される
let observer = holder.chain().do { print($0) }.sync()

// 値をセットすることでイベントが送信され、1がログに出力される
holder.value = 1
基本的には
broadcast(value:)で送る値とfetchedValue()で返す値は同じものになると思いますが、あえて変えるという使い方も考えられます。例えば、Viewを最初に表示するときはアニメーションしたくないけど、表示中のViewを更新するときはアニメーションさせたいなんていう場合には、
enumなどで値を送ってアニメーションの有無を変えるというのもありでしょう。Receivable
Receivableに適合したクラスは、sendTo()でイベントを受信することができます。定義は以下の通りです。
public protocol Receivable: class {
    // 受信するイベントの型
    associatedtype ReceiveValue
    // 受信した時の処理(要実装)
    func receive(value: ReceiveValue)
}
受け取るイベントの型を
ReceiveValueで定義し、receive(value:)を実装する必要があります。イベントで送信されてきた値がvalueに入ってきますので、受け取った時の処理を書いてください。例として、
Fetchableの例のIntHolderをさらに拡張してみたいと思います。class IntHolder: Fetchable, Receivable { typealias SendValue = Int typealias ReceiveValue = Int var value: Int = 0 { didSet { if self.value != oldValue { self.broadcast(value: self.value) } } } func fetchedValue() -> Int { return self.value } func receive(value: Int) { self.value = value } }以下のように使うことができます。
let sender = IntHolder(0)
let receiver = IntHolder(1)

// syncで値が同期され、receiverは0になる
let observer = sender.chain().sendTo(receiver).sync()

// 0がログに出力される
print(receiver.value)

// イベントが送信され、receiverは2になる
sender.value = 2

// 2がログに出力される
print(receiver.value)
Receivableに関しては、SendableやFetchableのように重要な機能を有しているわけではなく、doを使えば可能なことをsendToで簡単にする程度のものになります。
- 投稿日:2019-03-07T22:39:22+09:00
CS193p class note - 4 More Swift
Memo:
- We have "mutating" keyword only on func. Because for a property, the keyword "let", "var", "get", "set" will let us know whether the property is immutable.
- Swift is "copy on write". It means it only copies the whole bits when the object is mutating.
- You can set the default values for an IBOutlet through
didSetProtocol:
- A type which is a declaration of functionality only. Protocols are a way to express an API more concisely. So a protocol is simply a collection of method and property declaration.
- No data storage of any kind
- What are protocols good for?
- Making API more flexible and expressive
- Blind, structured communication between View and Controller (delegation)
- Mandating behavior (e.g. the keys of a Dictionary must be hashable)
- Sharing functionality in disparate types(String, Array, CountablRange are all Collections)
- Multiple inheritance(of functionality, not data)
- Three aspects to a protocol
- the protocol declaration (which properties and methods are inside)
- a class, struct or enum declaration that makes the claim to implement the protocol
- the code in said class, struct or enum (or extension) that implements the protocol
- In Swift, you need to implement all declared methods/properties in the protocol. But in Objective C, it is possible to mark some methods as optional. Any protocol that has optional methods must be marked
@objc. Any any class that implements an optional protocol must inherit fromNSObject- You must specify whether a property is get only or both get and set
- Any functions that are expected to mutate the receiver should be marked
mutating(unless you are going to restrict your protocol to class implementations only withclasskeyword).- In a class, inits must be marked
required(or otherwise a subclass might not conform).- You are allowed to add protocol conformance via an extension.
- Using extension to provide protocol implementation
String:
- String is not indexed by Int, it is indexed by a different type called String.Index.
NSAttributedString:
let attributes: [NSAttributedString.Key: Any] = [.strokeColor: UIColor.orange,
                                                 .strokeWidth: 5.0]
let attributeText = NSAttributedString(string: "Test", attributes: attributes)
someLabel.attributedText = attributeText
- A String with attributes attached to each character
- It's a class not a struct. It is a completely different data structure than String. To get mutability, you have to use a subclass of it called
NSMutableAttributedString.Function Types:
- You can declare a variable (or parameter to a method or whatever) to be of type "function".
- Often you want to create the function "on the fly"(rather than already-existing ones). You can do this by using a closure
- Array has a method called map which takes a function as an argument. It applies that function to each element of the Array to create and return a new Array.
let primes = [2.0, 3.0, 5.0, 7.0, 11.0]
let negativePrimes = primes.map({-$0}) // [-2.0, -3.0, -5.0, -7.0, -11.0]
let invertedPrimes = primes.map(){1.0/$0} // [0.5, 0.333, 0.2, etc]
let primeStrings = primes.map{String($0)} // ["2.0", "3.0", "5.0", "7.0", "11.0"]
Note that if the last (or only) argument to a method is a closure, you can put it outside the method's parentheses that contain its arguments and if the closure was the only argument, you can skip the () completely if you want.
- Closures with property initialization: you can also execute a closure to do initialization of a property if you want. This is especially useful with lazy property initialization
var someProperty: Type = {
    // construct the value of someProperty here
    return <the constructed value>
}()
- Closures are regular types, so they can be put in Array, Dictionary, etc. When this happens, they are stored in the heap (i.e. they are reference types). They capture variables they use from the surrounding code into the heap too. Those captured variables need to stay in the heap as long as the closure stays in the heap.
- 投稿日:2019-03-07T21:38:04+09:00
Swift MkMapViewで地図アプリ作成してみた(9)- スケールバーとコンパスを追加する
記事一覧
Swift MkMapViewで地図アプリ作成してみた(記事一覧)
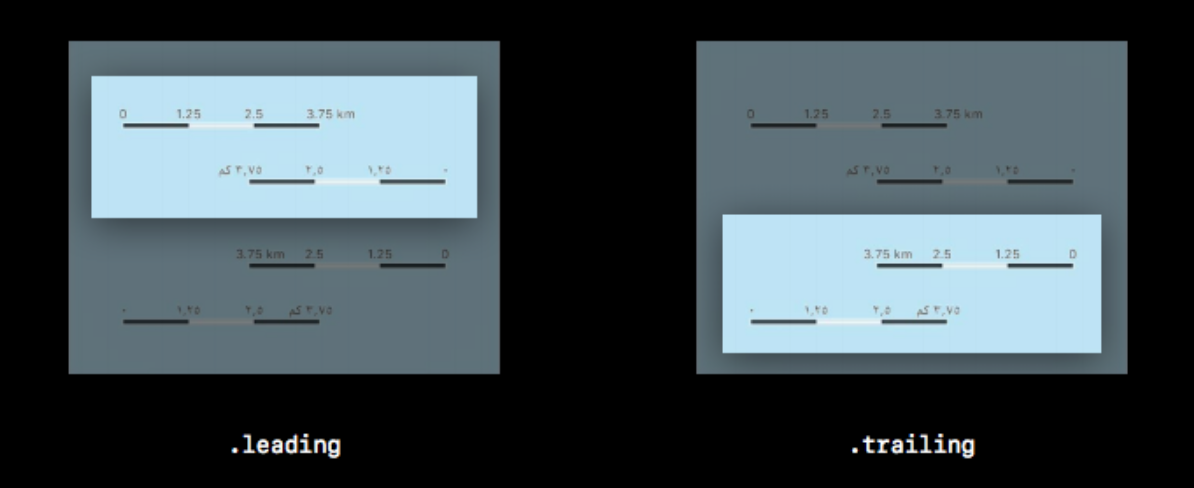
スケールバーを表示する
スケールを変更すると自動でスケールバーを表示する。
ViewController.swift:スケールバーを表示する// スケールバーの表示 let scale = MKScaleView(mapView: mapView) scale.frame.origin.x = 15 scale.frame.origin.y = 45 scale.legendAlignment = .leading self.view.addSubview(scale)legendAlignmentに設定できる値は以下の通り。
1 2 .leading 0を左起点にする .trailing 0を右起点にする
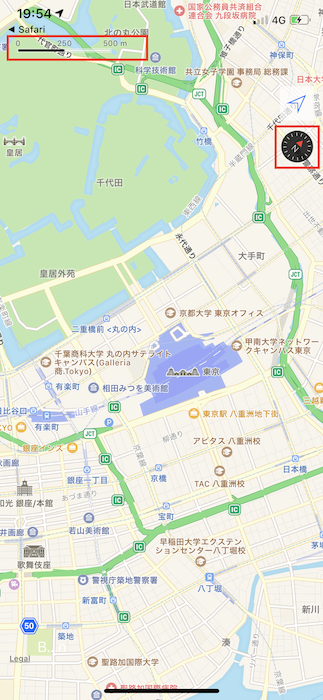
コンパスを表示する
ViewController.swift:コンパスを表示する// コンパスの表示 let compass = MKCompassButton(mapView: mapView) compass.compassVisibility = .adaptive compass.frame = CGRect(x: width - 50, y: 150, width: 40, height: 40) self.view.addSubview(compass) // デフォルトのコンパスを非表示にする mapView.showsCompass = falsecompassVisibilityに設定できる値は以下の通り。
1 2 .hidden 常に非表示 .visible 常に表示 .adaptive 地図の方位を動かしたとき(ノースアップでない時)だけ表示。 デバイスで実行した結果
補足
前回の記事で設定したトラッキングモードを変更するボタンの位置を変えている。
Swift MkMapViewで地図アプリ作成してみた(7)- トラッキングモードを切り替える(自作ボタン)
Swift MkMapViewで地図アプリ作成してみた(8)- トラッキングモードを切り替える(MKUserTrackingButton)ViewController.swift:トラッキングボタンの位置を変更trakingBtn.frame = CGRect(x:width - 50, y:100, width:40, height:40)参考文書
- 投稿日:2019-03-07T20:29:27+09:00
【Swift4.2】EnumEnumerable が使えなくなっていた、、
Xcode10対応
Swift4.2が登場してからかなりお世話になっていたCaseIterable
これ自体はかなり助けられていたのだが、、
2019/03以降のXcode10対応が必須となって、保守していたアプリをXcode10に対応させる必要が生じた、、
Xcode10対応についてXcode9.4.1からXcode10.1でビルドしたが、、まさかのEnumEnumerableのCasesが取得できない、、という自体が発生。
影響範囲を抑えた修正をしたかったが、方法が見当たらなかったので、CaseIterableへの変更にて対応した
もし、なにか情報いただけましたら、教えてください。
参考資料