- 投稿日:2019-03-07T21:55:34+09:00
StyleCop.AnalyzersをCLIで使いたい
結論から言うと
今はできませんが、動くものを開発中です
StyleCop.Analyzers とは
RoslynベースのC#のコードに対する静的解析ツールです。
コーディング規約に違反していないかをチェック/修正まで行ってくれます
.NET Core/Roslyn などと同じくOSSとして公開されています
StyleCop.Analyzers使用方法
VisualStudio/Rider などの統合開発環境を使用している場合は容易に使用できます
導入方法は VisualStudioであれば、NuGet Package Managerなどから導入可能です
残念ながらVS CodeはサポートされていませんCLIで動かす同期
CIやgit commit hookなどでチェックしたいからです
その他に筆者はVS Code派なので...
特にコーディング規約に関わることはレビューで指摘するのは不毛ですので、
出来る限りPull/Merge Requestなどが上がった時点で自動的にチェックしたいという思いがありますCLIで動くStyleCopのツール郡は存在している
StyleCop.Analyzersの前身プロジェクトで、StyleCopというものがあります
StyleCopStyyleCop自身はCLIで動作し、静的解析としては必要十分な条件を満たしています
ただし、既に死んでいるプロジェクトです
StyleCop.Analyzersは開発が続けられており、新しいルールなども追加されています
また、StyleCopにはコードを修正する機能はありませんが、StyleCop.AnalyzersにはありますStyleCop.AnalyzersのCLIツールはあるのか
現時点ではありません
ただし、以下のようなIssuも上がっており、そのうち正式にサポートされるかもしれません
CLI?ですが、いつ実装されるかもわからないものを待つのは辛いです
何度かトライして諦めていた
実は結構前からトライしていたのですが、StyleCop.Analzyersをビルドするために
.NET Frameworkが必要でした
.NET FramworkはWindowsしかサポートしておらず、Mac/LinuxではStyleCop.Analyzersと依存しているライブラリ群をビルドしようとするとエラーとなり諦めていましたが、ようやく周辺環境も整ってきてビルドできるようになりました
Microsoft.Build.Locatorはβ版ではありますが使用できますなので作ってみた (まだ出来上がっていない)
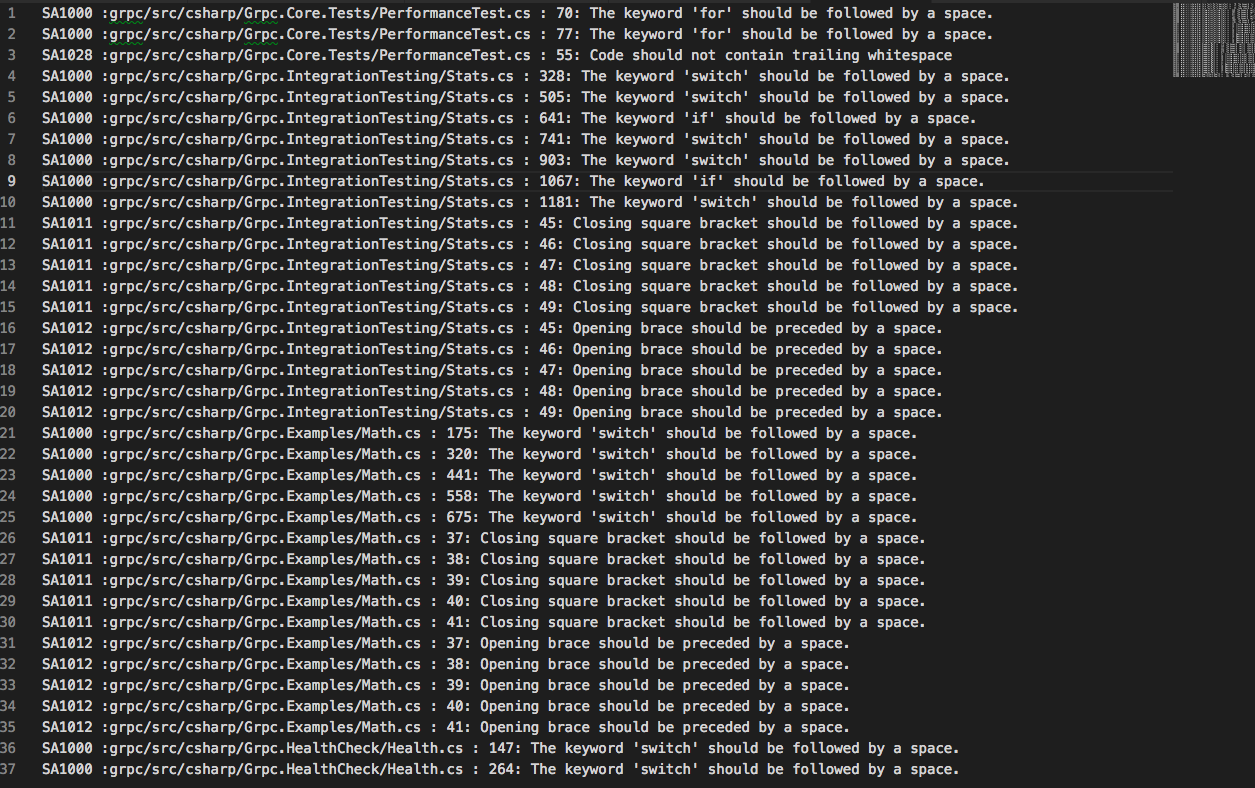
進捗率は50%程度ですが、以下のように出力することができました
試しに解析してみたのは、gRPCのC#のソースコードですdotnet StyleCopAnalyzersCmd.dll -d ./grpc/src/csharpというようなコマンドで使えるようにしたいなと思ってますが、コマンド名がダサいので何か良い案があれば...
余談
まだチェックだけで、コードの修正までは出来ていませんが、チェック処理がある程度ものになった時点で公開したいと思います
CLIツールを作るのに、CySharpさんのMicroBatchFrameworkが非常に便利ですGitHubに公開する際にはこのツールを作るための苦労話なども記載しないと思います
StyleCop.Analyzersの機能の全てがinternalで容易にアクセスできないのが非常に辛い。。。
- 投稿日:2019-03-07T16:02:29+09:00
【C#】フォーマット出力を使ってコードをすっきりさせる
ある文字列を出力したいときに、こんな感じで書いてみました。
(Visual Studio 2017・C#)test.csstring alert = "これは間違いなので確認してください(列番号 : "; int number = 1; System.Console.WriteLine(alert + number.ToString() + ")"); // 実行結果 // これは間違いなので確認してください(列番号 : 1)これでも意図した実行結果にはなるものの、
System.Console.WriteLine(alert + number.ToString() + ")");
の部分がちょっと読みにくいですよね。なので、フォーマット出力に変換します。
test.csstring alert = "これは間違いなので確認してください(列番号 : "; int number = 1; System.Console.WriteLine("{0}{1})", alert, number); // こんな方法もあります1(by @albireo さん) System.Console.WriteLine($"{alert}{number})"); // こんな方法もあります2(by @shoe0227 さん) ちょっと変数を変えて var number = 1; string alert = "これは間違いなので確認してください(列番号 : {0})"; System.Console.WriteLine(alert, number); // 実行結果 // これは間違いなので確認してください(列番号 : 1)比べてみると
System.Console.WriteLine(alert + number.ToString() + ")");
↓
System.Console.WriteLine("{0}{1})", alert, number);
System.Console.WriteLine($"{alert}{number})");
System.Console.WriteLine(alert, number);不要な情報が減って見やすくなりました!
- 文字列が長い
- 変数が長い
- 型変換が必要
といったときにはフォーマット出力がおすすめです。
- 投稿日:2019-03-07T11:57:30+09:00
【C#】【自分用メモ】List内の重複チェック
【目標】
Listで重複チェックをし、被っているものを表示させてくれる仕組みを作りたい。【その1】
順当にFor文で回す。Hoge.csusing System; class Hoge { static void Main() { // リスト string[] berries = new string[]{"blackberry", "blueberry", "strawberry", "cranberry", "raspberry", "blueberry"}; for (int i = 0; i < berries.Count - 1; i++) { for (int j = i + 1; j < berries.Count; j++) { if (berries[i].Equals(berries[j])) { Console.WriteLine("{0}は重複しています。", berries[j]); break; } } } } }まぁなんとネストが深いことやら…。
【その2】
そこでHashSetの出番です。
こちらを参照にさせてもらいました。Hoge.csusing System; using System.Collections.Generic; class Hoge { static void Main() { // リスト string[] berries = new string[]{"blackberry", "blueberry", "strawberry", "cranberry", "raspberry", "blueberry"}; var hashset = new HashSet<string>(); foreach(var berry in berries) { if (hashset.Add(berry) == false) { Console.WriteLine("{0}は重複しています。", berry); break; } } } }以上、備忘録でした。
- 投稿日:2019-03-07T00:56:48+09:00
ObserverをUnityで使ってみようと頑張った話
interfaceすらふわっふわな人が書いてるので間違いが(たぶん)沢山あります。
目標:UnityでObserverパターンをつかってなにか動くものを作る
作るもの:入力された情報が変更されるたびに、動くScrollView
まず、作ってみたObserver
TextObserver.csusing System.Collections; using System.Collections.Generic; using UnityEngine; namespace My{ public interface ITextObserver<T>{ void Notify(string s); } class ShowGetText<T> : ITextObserver<T>{ public void Notify(string s){ Debug.Log(s); } } public class GetText<T> : ITextObserver<T>{ public void Notify(string s){ } } public interface ITextSubject<T>{ void AddObserver(ITextObserver<T> observer); void RemoveObserver(ITextObserver<T> observer); void NotifyObserver(string s); } public class TextOvserver<T> : ITextSubject<T>{ private List<ITextObserver<T>> _observeList = new List<ITextObserver<T>>(); public void AddObserver(ITextObserver<T> observer ){ _observeList.Add(observer); Debug.Log(observer); } public void RemoveObserver(ITextObserver<T> observer){ _observeList.Remove(observer); } public void NotifyObserver(string s){ _observeList.ForEach(o => o.Notify(s)); Debug.Log("Hello"); } } }つぎに、変化をするSubject側
TextSender.cspublic class TextSender : MonoBehaviour { public My.ITextS  ubject<string> Subject{get;} = new My.TextOvserver<string>(); string[] IN_Text = new string[3]; [SerializeField] int index; void Start(){ index = 0; IN_Text[0] = "ラットに20ダメージを与えた"; IN_Text[1] = "ピカピカの薬を手に入れた"; IN_Text[2] = "ラットから30ダメージを受けた"; } // Update is called once per frame void Update() { if(index>2){ index=0; } if(Input.GetMouseButtonDown(1)){ Subject.NotifyObserver(IN_Text[index]); ++index; } } }マウスの右クリックをするたびに文章が変わって0~2でループする。
これを空のGamaObjectに貼り付ける。最後にCanvasのScrollViewに下記のプログラムを貼り付ける
TextShow.csusing System.Collections; using System.Collections.Generic; using UnityEngine; using UnityEngine.UI; public class TextShow : MonoBehaviour,My.ITextObserver<string> { [SerializeField] public TextSender _test; [SerializeField] private ScrollRect scrollRect; [SerializeField] private Text textLog; private string GetText; public RectTransform originalElement; public RectTransform content; int elementNum; void Awake(){ originalElement.gameObject.SetActive(false); } void Start() { scrollRect.verticalNormalizedPosition = 0; _test.Subject.AddObserver(this); textLog.text = GetText; elementNum = 15; } void Update() { if(GetText != textLog.text && GetText != null){ OnSubmit(); DeleteText(); } } public void OnSubmit(){ textLog.text = GetText; Debug.Log(textLog.text); var element = GameObject.Instantiate<RectTransform> (originalElement); element.SetParent(content, true); element.SetAsLastSibling(); element.gameObject.SetActive(true); --elementNum; } public void DeleteText(){ var clones = GameObject.FindGameObjectsWithTag("Element"); if(elementNum <= 0){ Destroy(clones[elementNum]); ++elementNum; } } public void Notify(string s){ GetText = s; } public string OnRecieved(string value){ Debug.Log(value); return value; } }15まで表示で一番古いデータを一つづつ破壊。
NotifyでTextSenderで持っているテキスト内容が変化した文面を教えてくれる。
教えてくれたstring sをGetTextに入れてtextLog.textと内容が違ったらScrollViewに表示みたいな流れになっているはず。
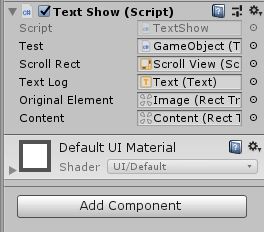
出力された文面はElementのタグを付けたImageが保持するので強制的に分離させるみたいな構造なんだと思う……最後にUnity側で
上記の様に設定。
成果:まだ全然わからん!でもとりあえず、動くものは作れた。
反省:アイテム取得とかダメージとかのメッセージを表示したいと思って色々漁った末にこんな物が出来上がりました。Notifyのところとかなにか使い方間違えている気がするし、Removeの使い所はどうすれば良いのかとかふわっとしている部分は色々ある。TextSenderに情報を集めればアイテム取得やダメージ表示できそうって思っているんだけどTextSenderに集めようとすると2重Observerみたいになってしまうからなにか考え方が間違ってる気がしている。
CやC++はかじったことあるけどC#全然わからない。
interfaceなにそれ!の状態から4日ぐらいかけて勉強。
Observerパターンを初めて組んでみた。ほとんどテラシュールブログさんの
http://tsubakit1.hateblo.jp/entry/2015/10/19/022720
と
人生詰んでるし死ぬ前にゲーム作ってみるさん
http://ntgame.wpblog.jp/2018/07/14/post-1796/
の上2つの記事を素人がいじくり回した結果です。勉強はとりすーぷさんのQiitaや動画、スライドを参考にさせていただきました。
https://learning.unity3d.jp/1324/
上の動画の説明が分かった気に一番なりました!※なにか問題がある部分があれば削除訂正しますのでメールかTwitterまでお願いします。
- 投稿日:2019-03-07T00:30:55+09:00
【WPF】TextBlockで文字を省略したい
目的
TextBlockに設定された文字列が表示しきれない時省略記号を付けたい。
概要
- 文字単位で省略したい時は、TextTrimmingプロパティにCharacterEllipsisを設定します。 → サンプル
- 単語単位で省略したい時は、TextTrimmingプロパティにWordEllipsisを設定します。 → サンプル
- 自分でカスタムしたい時は、自作Converter等で設定します。 → サンプル
動作環境
項目 内容 OS Windows 10 Home プログラミング言語 C#7.0 (.Net Framework4.6) + WPF IDE Visual Studio 2017 Community 1. 文字単位で省略したい(CharacterEllipsis)
xamlを示します。
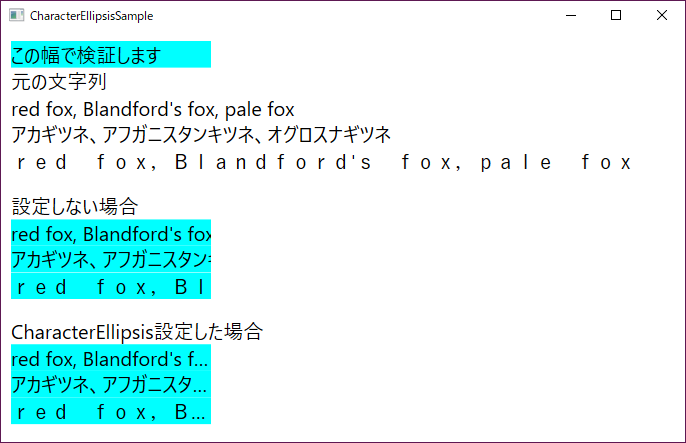
CharacterEllipsisSample.xaml<Window x:Class="TextBlockTrimmingSample.CharacterEllipsisSample" xmlns="http://schemas.microsoft.com/winfx/2006/xaml/presentation" xmlns:x="http://schemas.microsoft.com/winfx/2006/xaml" Title="CharacterEllipsisSample" Height="450" Width="700"> <Window.Resources> <Style TargetType="{x:Type TextBlock}"> <Setter Property="FontSize" Value="20" /> <Setter Property="HorizontalAlignment" Value="Left" /> </Style> </Window.Resources> <StackPanel HorizontalAlignment="Left" Margin="10"> <TextBlock Text="この幅で検証します" Width="200" Background="Aqua" /> <TextBlock Text="元の文字列" /> <TextBlock Text="red fox, Blandford's fox, pale fox" /> <TextBlock Text="アカギツネ、アフガニスタンキツネ、オグロスナギツネ" /> <TextBlock Text="red fox,Blandford's fox,pale fox" /> <TextBlock FontSize="14" /> <TextBlock Text="設定しない場合" /> <TextBlock Text="red fox, Blandford's fox, pale fox" Width="200" Background="Aqua" /> <TextBlock Text="アカギツネ、アフガニスタンキツネ、オグロスナギツネ" Width="200" Background="Aqua" /> <TextBlock Text="red fox,Blandford's fox,pale fox" Width="200" Background="Aqua" /> <TextBlock FontSize="14" /> <TextBlock Text="CharacterEllipsis設定した場合" /> <TextBlock Text="red fox, Blandford's fox, pale fox" Width="200" Background="Aqua" TextTrimming="CharacterEllipsis" /> <TextBlock Text="アカギツネ、アフガニスタンキツネ、オグロスナギツネ" Width="200" Background="Aqua" TextTrimming="CharacterEllipsis" /> <TextBlock Text="red fox,Blandford's fox,pale fox" Width="200" Background="Aqua" TextTrimming="CharacterEllipsis" /> </StackPanel> </Window>上記のxamlの結果を示します。
上の結果からTextTrimmingプロパティにCharacterEllipsisを設定した時は、
1文字でも多く表示し、収まらないない場合末尾に"..."が表示され、
それ以降の文字は表示されないことが確認できました。2. 単語単位で省略したい(WordEllipsis)
xamlを示します。
WordEllipsisSample.xaml<Window x:Class="TextBlockTrimmingSample.WordEllipsisSample" xmlns="http://schemas.microsoft.com/winfx/2006/xaml/presentation" xmlns:x="http://schemas.microsoft.com/winfx/2006/xaml" xmlns:d="http://schemas.microsoft.com/expression/blend/2008" xmlns:mc="http://schemas.openxmlformats.org/markup-compatibility/2006" xmlns:local="clr-namespace:TextBlockTrimmingSample" mc:Ignorable="d" Title="WordEllipsisSample" Height="450" Width="800"> <Window.Resources> <Style TargetType="{x:Type TextBlock}"> <Setter Property="FontSize" Value="20" /> <Setter Property="HorizontalAlignment" Value="Left" /> </Style> </Window.Resources> <StackPanel HorizontalAlignment="Left" Margin="10"> <TextBlock Text="この幅で検証します" Width="200" Background="Aqua" /> <TextBlock Text="元の文字列" /> <TextBlock Text="red fox, Blandford's fox, pale fox" /> <TextBlock Text="アカギツネ、アフガニスタンキツネ、オグロスナギツネ" /> <TextBlock Text="red fox,Blandford's fox,pale fox" /> <TextBlock FontSize="14" /> <TextBlock Text="設定しない場合" /> <TextBlock Text="red fox, Blandford's fox, pale fox" Width="200" Background="Aqua" /> <TextBlock Text="アカギツネ、アフガニスタンキツネ、オグロスナギツネ" Width="200" Background="Aqua" /> <TextBlock Text="red fox,Blandford's fox,pale fox" Width="200" Background="Aqua" /> <TextBlock FontSize="14" /> <TextBlock Text="CharacterEllipsis設定した場合" /> <TextBlock Text="red fox, Blandford's fox, pale fox" Width="200" Background="Aqua" TextTrimming="WordEllipsis" /> <TextBlock Text="アカギツネ、アフガニスタンキツネ、オグロスナギツネ" Width="200" Background="Aqua" TextTrimming="WordEllipsis" /> <TextBlock Text="red fox,Blandford's fox,pale fox" Width="200" Background="Aqua" TextTrimming="WordEllipsis" /> </StackPanel> </Window>上記のxamlの結果を示します。
上の結果からTextTrimmingプロパティにWordEllipsisを設定した時は、
単語単位でできる限り多く表示し、収まらないない場合末尾に"..."が表示され、
それ以降の文字は表示されないことが確認できました。CharacterEllipsis設定時と違うことは1文字単位では省略しないということが確認できました。
3. 自分でカスタムしたい(自作Converter)
多くの場合は、前述のTextTrimmingの設定だけで済むと思いますが中には、末尾に表示される文字を"..."ではなく"(略"みたいな感じで
表示させたい場合もあるかと思います。というわけで自分で指定文字以降は省略などのカスタムしたい場合はConverterを使用します。
また、TextBlockのフォントサイズ等の書式設定も文字列の幅計算時に必要になるため、複数のオブジェクトをバインドさせるためにMultiBindingを使用します。Converterとは?という方はこちらのサイトで紹介されているのでご覧ください。
MultiBindingとは?という方はこちらのサイトで紹介されているのでご覧ください。では、xamlを示します。
CustomizeEllipsisSample.xaml<Window x:Class="TextBlockTrimmingSample.CustomizeEllipsisSample" xmlns="http://schemas.microsoft.com/winfx/2006/xaml/presentation" xmlns:x="http://schemas.microsoft.com/winfx/2006/xaml" xmlns:d="http://schemas.microsoft.com/expression/blend/2008" xmlns:mc="http://schemas.openxmlformats.org/markup-compatibility/2006" xmlns:local="clr-namespace:TextBlockTrimmingSample" mc:Ignorable="d" Title="CustomizeEllipsisSample" Height="450" Width="800"> <Window.Resources> <local:TextBlockTrimmingConverter x:Key="TextBlockTrimmingConverter" /> <Style TargetType="{x:Type TextBlock}"> <Setter Property="FontSize" Value="20" /> <Setter Property="HorizontalAlignment" Value="Left" /> </Style> </Window.Resources> <!-- DataContextに設定されているインスタンス --> <Window.DataContext> <local:CustomTrimmingViewModel /> </Window.DataContext> <StackPanel HorizontalAlignment="Left" Margin="10"> <TextBlock Text="この幅で検証します" Width="200" Background="Aqua" /> <TextBlock Text="元の文字列" /> <TextBlock Text="red fox, Blandford's fox, pale fox" /> <TextBlock Text="アカギツネ、アフガニスタンキツネ、オグロスナギツネ" /> <TextBlock Text="red fox,Blandford's fox,pale fox" /> <TextBlock FontSize="14" /> <TextBlock Text="設定しない場合" /> <TextBlock Text="red fox, Blandford's fox, pale fox" Width="200" Background="Aqua" /> <TextBlock Text="アカギツネ、アフガニスタンキツネ、オグロスナギツネ" Width="200" Background="Aqua" /> <TextBlock Text="red fox,Blandford's fox,pale fox" Width="200" Background="Aqua" /> <TextBlock FontSize="14" /> <TextBlock Text="Converterを使用した場合" /> <TextBlock Width="200" Background="Aqua"> <TextBlock.Text> <MultiBinding Converter="{StaticResource TextBlockTrimmingConverter}" > <!-- EnglishWordはCustomViewModelに記述されています。 --> <Binding Path="EnglishWord" /> <Binding Path="ActualWidth" RelativeSource="{RelativeSource Mode=Self}" /> <Binding RelativeSource="{RelativeSource Mode=Self}" /> </MultiBinding> </TextBlock.Text> </TextBlock> <TextBlock Width="200" Background="Aqua" > <TextBlock.Text> <MultiBinding Converter="{StaticResource TextBlockTrimmingConverter}" > <!-- JapaneseWordはCustomViewModelに記述されています。 --> <Binding Path="JapaneseWord" /> <Binding Path="ActualWidth" RelativeSource="{RelativeSource Mode=Self}" /> <Binding RelativeSource="{RelativeSource Mode=Self}" NotifyOnTargetUpdated="False" /> </MultiBinding> </TextBlock.Text> </TextBlock> <TextBlock Width="200" Background="Aqua" > <TextBlock.Text> <MultiBinding Converter="{StaticResource TextBlockTrimmingConverter}" > <!-- FullWidthEnglishWordはCustomViewModelに記述されています。 --> <Binding Path="FullWidthEnglishWord" /> <Binding Path="ActualWidth" RelativeSource="{RelativeSource Mode=Self}" /> <Binding RelativeSource="{RelativeSource Mode=Self}" NotifyOnTargetUpdated="False" /> </MultiBinding> </TextBlock.Text> </TextBlock> </StackPanel> </Window>上記では、MultibindingをTextBlockのTextプロパティに使用していますが、Convereterにはここで記述した順番でvalues配列に詰められますので、記述する順番に注意してください。
EnglishWordが設定されているTextBlockのMultiBindingのvalues配列の詰められる内容です。
index values[index] 0 EnglishWord 1 ActualWidth 2 TextBlock また、TextBlockからActualWidthプロパティを取得することは可能ですが、それだとConverter処理時ActualWidthに0が入っていることがあり適切な処理ができなかったので、ActualWidthプロパティだけ別にバインドしています。
以下にCustomTrimmingViewModelクラスを示します。
hoge.csusing System.ComponentModel; using System.Runtime.CompilerServices; using System.Windows; namespace TextBlockTrimmingSample { // バインド用のViewModel public class CustomTrimmingViewModel : INotifyPropertyChanged { public CustomTrimmingViewModel() { } private string englishWord = "red fox, Blandford's fox, pale fox"; public string EnglishWord { get { return englishWord; } set { englishWord = value; this.OnPropertyChanged(); } } private string japaneseWord = "アカギツネ、アフガニスタンキツネ、オグロスナギツネ"; public string JapaneseWord { get { return japaneseWord; } set { japaneseWord = value; this.OnPropertyChanged(); } } private string fullWidthEnglishWord = "red fox,Blandford's fox,pale fox"; public string FullWidthEnglishWord { get { return fullWidthEnglishWord; } set { fullWidthEnglishWord = value; this.OnPropertyChanged(); } } public event PropertyChangedEventHandler PropertyChanged; private void OnPropertyChanged([CallerMemberName] string name = null) { this.PropertyChanged?.Invoke(this, new PropertyChangedEventArgs(name)); } } }行っていることは文字列を設定し表示しているだけです。今回は1度設定したら文字列は変更していないので、INotifyPropertyChangedの実装も要らないと思います。
では最後にTextBlockTrimmingConverterクラスを記載します。
TextBlockTrimmingConverter.csusing System; using System.Globalization; using System.Windows.Controls; using System.Windows.Data; using System.Windows.Media; namespace TextBlockTrimmingSample { class TextBlockTrimmingConverter : IMultiValueConverter { // ViewModel -> Viewの通知が動作した時処理されるConverter public object Convert(object[] values, Type targetType, object parameter, CultureInfo culture) { if (values[0] is string == false) throw new ArgumentException("第1引数がstring型ではありません。"); if (values[1] is double == false) throw new ArgumentException("第2引数がdouble型ではありません。"); if (values[2] is TextBlock == false) throw new ArgumentException("第3引数がTextBlock型ではありません。"); var str = values[0] as string; var actualWidth = (double)values[1]; var textBlock = values[2] as TextBlock; double displayWidth = actualWidth - 10; double currentWidth = GetDrawingWidth(str, textBlock); // 省略時に末尾に設定する文字列 string ellipsis = "(略"; // Xaml側でConverterParameterに"(略"を設定している場合は以下でも処理できました // string ellipsis = (string)parameter; if (string.IsNullOrWhiteSpace(str) || displayWidth <= 0) { return str + ellipsis; } if (currentWidth < displayWidth) { return str; } else { string trimmedText = str; while (currentWidth > displayWidth) { trimmedText = trimmedText.Substring(0, trimmedText.Length - 1); currentWidth = this.GetDrawingWidth(trimmedText + ellipsis, textBlock); if (string.IsNullOrWhiteSpace(trimmedText)) { break; } } return trimmedText + ellipsis; } } // 実際の書式設定で文字列の描画幅を取得します private double GetDrawingWidth(string str, TextBlock textBlock) { var formattedText = new FormattedText( str, CultureInfo.CurrentCulture, textBlock.FlowDirection, new Typeface(textBlock.FontFamily, textBlock.FontStyle, textBlock.FontWeight, textBlock.FontStretch), textBlock.FontSize, textBlock.Foreground); return formattedText.Width; } // View -> ViewModelの通知が動作した時処理されるConverter public object[] ConvertBack(object value, Type[] targetTypes, object parameter, CultureInfo culture) { throw new NotImplementedException(); } } }MultiBindingのConverterに設定する場合はIMultiValueConverterを実装しなければなりません。
上記の設定では、省略時に末尾に設定する文字列を直接設定していますが、ソース内のコメントに書いている通りxaml側でConverterParameterに設定しても同じように表示されました。
以下に設定例を記載します。ConverterParameter設定例.xaml<TextBlock Width="200" Background="Aqua" > <TextBlock.Text> <!-- ↓変更点はここです --> <MultiBinding Converter="{StaticResource TextBlockTrimmingConverter}" ConverterParameter="(略" > <!-- FullWidthEnglishWordはCustomViewModelに記述されています。 --> <Binding Path="FullWidthEnglishWord" /> <Binding Path="ActualWidth" RelativeSource="{RelativeSource Mode=Self}" /> <Binding RelativeSource="{RelativeSource Mode=Self}" NotifyOnTargetUpdated="False" /> </MultiBinding> </TextBlock.Text> </TextBlock>これらの結果を以下に示します。
上記の結果から、省略記号をMultiBindingとConverterでカスタムすることができることが確認できました。
ただ、今の文字列省略判定処理は判定を範囲内に収まるまで最後尾から1文字ずつ削る処理を繰り返しているので、設定される文字列が多くなればなるほど、重くなります。
なので2分探索等の探索アルゴリズムを採用された方が早くなると思います。まとめ
- TextTrimmingプロパティにCharacterEllipsisを設定した場合、1文字でも多く表示し
収まらないない場合末尾に"..."が表示されます- TextTrimmingプロパティにWordEllipsisを設定した場合、単語単位でできる限り多く表示し
収まらないない場合末尾に"..."が表示されます- 自分でカスタマイズする場合はMultiBindingとConverterを使用し、自作します
※ Multibindingは記述された順番にオブジェクトがvalues配列に詰められていますので、
Converterを使用するときは記述する順番に注意してください。省略関係で役に立つかもしれないサイト
調べている中で見かけた省略処理関係で役に立つかもしれないサイトのURLも記載しておきます。
- コンテンツエリアがいっぱいになった時にだけ ToolTip を表示する
- TextTrimmingプロパティを設定時、省略後の文字を取得したい
- 文字列の末尾ではなく先頭を省略したい(...こんな感じ)
- 省略記号の代わりに画像を使用したい
- DataGridのセル内にTextBlockを使用し省略機能を追加する
参考サイト
- WPFのデータ変換(https://qiita.com/paralleltree/items/449a96debdade0adb377)
- MultiBindingの使い方と使いどころ(http://joynote.hatenablog.com/entry/2015/06/30/005222)
- Typefaceについて(https://docs.microsoft.com/ja-jp/dotnet/api/system.windows.media.typeface?view=netframework-4.7.2)
- .Netのソースコードを読む(https://qiita.com/Marimoiro/items/e255eecc265cd5a45025)
- INotifyPropertyChanged(https://docs.microsoft.com/ja-jp/dotnet/api/system.componentmodel.inotifypropertychanged?view=netframework-4.7.2)
- IMultiValueConverter(https://docs.microsoft.com/ja-jp/dotnet/api/system.windows.data.imultivalueconverter?view=netframework-4.7.2)
- 2分探索(https://ja.wikipedia.org/wiki/%E4%BA%8C%E5%88%86%E6%8E%A2%E7%B4%A2)
- キツネ-Wikipedia-(https://ja.wikipedia.org/wiki/%E3%82%AD%E3%83%84%E3%83%8D)
雑感
自分で省略記号をカスタムする方法がConverter以外にありましたら教えていただけると嬉しいです。
中身が薄い記事でも時間はかかりますね。。。1
ちなみに省略時に使用される三点リーダのunicodeは\x2026みたいです。2
参考URL : https://referencesource.microsoft.com/#PresentationCore/Core/CSharp/System/Windows/Media/TextFormatting/TextTrailingWordEllipsis.cs,f319f4c292028bf3,references※ソースコードは自己責任でご自由にご利用ください


- 投稿日:2019-03-07T00:06:31+09:00
[WPF][MVVM] コードビハインドは汚さずにボタンでページ遷移する3つの方法
Hyperlink 要素を使うと NavigateUri プロパティにパスを指定することでページ遷移を実現することができますが、Button コントロールには NavigateUri プロパティがありません。
どのようにページを遷移させればよいでしょうか。すぐに思いつくのは、ページのコードビハインドに Click イベントハンドラを実装して NavigationService.Navigate を呼び出すことです。
ただ、MVVM(Model-View-ViewModel)パターンを採用する場合、なるべくコードビハインドは汚したくありません。
ここではコードビハインドを使わずにページを遷移させる方法を3つご紹介します。1. ビューモデルで遷移先のページインスタンスを指定する
NavigationWindow にホストされたページをコマンドバインディングで遷移させる例です。
ビューモデル
ビューからコマンドを受けて遷移を実行します。
Application.Current.MainWindow から NavigationWindow を取得し、Navigate メソッドの引数に Page インスタンスを渡しています。※ICommand の実装(RelyCommand/DelegateCommand/独自 Command 実装)については説明を省略させていただきます。
public ICommand NavigateNextCommand { get; protected set; }
// :
public FirstPageViewModel()
{
    this.NavigateNextCommand = new RelayCommand<object>(this.NavigateNext);
}
// :
protected void NavigateNext(object parameter)
{
    var navigationWindow = (NavigationWindow)Application.Current.MainWindow;
    navigationWindow.Navigate(new SecondPage(), parameter);
}
ビュー
ページのXAMLでボタンにビューモデルのコマンドをバインドします。
<Page.Resources>
    <vm:FirstPageViewModel x:Key="PageViewModel" />
</Page.Resources>
<Page.DataContext>
    <StaticResourceExtension ResourceKey="PageViewModel" />
</Page.DataContext>
    :
    <Button Content="次へ" Command="{Binding NavigateNextCommand}" CommandParameter="パラメータも渡せます" />
CommandParameter でパラメータを渡すこともできます。
渡したパラメータは、たとえば NavigationService.LoadCompleted の NavigationEventArgs から受け取ることができます。
(ビューモデルでパラメータを受け取るためには、それをサポートするMVVMフレームワークを採用するか、自前で渡す仕組みを実装する必要があります)2. ビューモデルで遷移先のページの相対パスを指定する
ビューモデルでコマンドを受けた後、Navigate メソッドの引数にアプリケーションルートからの相対パスを渡します。
protected void NavigateNext(object parameter)
{
    var navigationWindow = (NavigationWindow)Application.Current.MainWindow;
    var uri = new Uri("Views/SecondPage.xaml", UriKind.Relative);
    navigationWindow.Navigate(uri, parameter);
}
ビューモデルのほかの部分やXAMLは「1」と同じです。
3. ビヘイビアを使用してXAMLで遷移先を指定する
ビヘイビア
ボタンコントロールにナビゲーション機能を提供するビヘイビアを定義します。
- 遷移先ページ指定用に Uri 型の依存関係プロパティを定義し、XAMLから指定できるようにします。
- Click イベントハンドラで NavigationService を取得して Navigate メソッドを呼び出します。
※Behavior クラスを使用するために Expression.Blend.Sdk を NuGet しておきます。
public class NavigateButtonBehaivior : Behavior<ButtonBase>
{
    public static readonly DependencyProperty NavigatePageProperty =
        DependencyProperty.Register("NavigatePage", typeof(Uri), typeof(NavigateButtonBehaivior), new UIPropertyMetadata(null));

    public static readonly DependencyProperty NavigateExtraDataProperty =
        DependencyProperty.Register("NavigateExtraData", typeof(object), typeof(NavigateButtonBehaivior), new UIPropertyMetadata(null));

    // 遷移先のページ
    public Uri NavigatePage
    {
        get { return (Uri)GetValue(NavigatePageProperty); }

        set {  SetValue(NavigatePageProperty, value); }
    }

    // 遷移先に渡すパラメータ
    public object NavigateExtraData
    {
        get { return GetValue(NavigateExtraDataProperty); }

        set { SetValue(NavigateExtraDataProperty, value); }
    }

    protected override void OnAttached()
    {
        base.OnAttached();

        this.AssociatedObject.Click += this.AssociatedObjectClick;
    }

    protected override void OnDetaching()
    {
        this.AssociatedObject.Click -= this.AssociatedObjectClick;

        base.OnDetaching();
    }

    // クリックされたときの処理
    private void AssociatedObjectClick(object sender, RoutedEventArgs e)
    {
        if (this.NavigatePage == null)
        {
            return;
        }

        var button = (ButtonBase)sender;
        var navigationService = GetNavigationService(button);
        if (navigationService == null)
        {
            return;
        }

        // 現ページのパッケージURLを取得して相対パスを絶対パスに変換する。
        // ※new Uri(((IUriContext)navigationWindow).BaseUri, this.NavigatePage) だと
        //  ナビゲーションウィンドウXAMLからの相対パスになるので、サブディレクトリとの間で遷移できない。
        var baseUri = BaseUriHelper.GetBaseUri(button);
        var uri = new Uri(baseUri, this.NavigatePage);

        // ナビゲート
        navigationService.Navigate(uri, this.NavigateExtraData);
    }

    protected virtual NavigationService GetNavigationService(DependencyObject element)
    {
        var window = Window.GetWindow(element);
        if (window is NavigationWindow navigationWindow)
        {
            // NavigationWindow の場合
            return navigationWindow.NavigationService;
        }

        var parent = element;
        while ((parent = VisualTreeHelper.GetParent(parent)) != null)
        {
            if (parent is Frame frame)
            {
                // プレーンな(非 Navigation)Window で Frame を使用している場合
                return frame.NavigationService;
            }
        }

        return null;
    }
}
ビュー
ページのXAMLでは、Button に子要素としてナビゲーション用のビヘイビアを追加します。
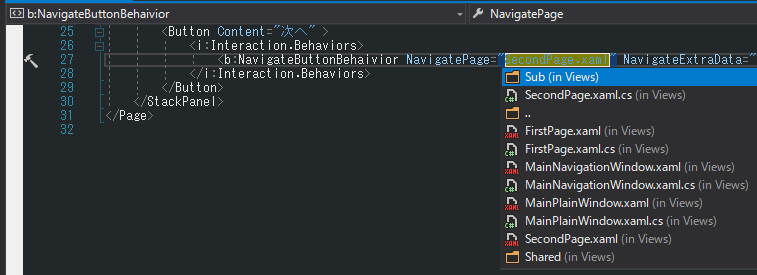
<Page
    :
    xmlns:i="http://schemas.microsoft.com/expression/2010/interactivity"
    xmlns:b="clr-namespace:WpfNavigation.Behaviors">

    <Page.Resources>
        <vm:FirstPageViewModel x:Key="PageViewModel" />
    </Page.Resources>
    <Page.DataContext>
        <StaticResourceExtension ResourceKey="PageViewModel" />
    </Page.DataContext>
        :
    <Button Content="次へ" >
        <i:Interaction.Behaviors>
            <b:NavigateButtonBehaivior NavigatePage="SecondPage.xaml" NavigateExtraData="パラメータも渡せます" />
        </i:Interaction.Behaviors>
    </Button>
Uri 型のプロパティを定義すると、XAMLデザイナでリストからページを選択できるようになります。
設定されるパス文字列は現在のビューからの相対パスとなります。
パス文字列は既定のコンバーター UriTypeConverter によって Uri 型に変換されますが、そのまま Navigate メソッドに渡しても検索することができません。
Navigate メソッドには「パッケージの URI」が必要です。
ビヘイビアでは AssociatedObjectClick で BaseUriHelper.GetBaseUri メソッドを使ってこのページパスの変換を行っています。