- 投稿日:2019-02-26T15:05:35+09:00
コピペで始める Spring Boot
Spring Bootをいちから始めるヒト向けに、とりあえずコピペしたらなんか動く、ってのを目標に記事にしてみます。基本 Building a RESTful Web Service を参考にしています。
環境
$ sw_vers
ProductName:    Mac OS X
ProductVersion: 10.14.3
BuildVersion:   18D109
$ mvn --version Apache Maven 3.6.0 (97c98ec64a1fdfee7767ce5ffb20918da4f719f3; 2018-10-25T03:41:47+09:00) Maven home: /usr/local/Cellar/maven/3.6.0/libexec Java version: 1.8.0_25, vendor: Oracle Corporation, runtime: /Library/Java/JavaVirtualMachines/jdk1.8.0_25.jdk/Contents/Home/jre Default locale: ja_JP, platform encoding: UTF-8 OS name: "mac os x", version: "10.14.3", arch: "x86_64", family: "mac" $いわゆるふつうのMacですが、Mavenさえあれば Windowsでもほぼ同じ手順で動かせると思います。
あと疎通をcurlでおこないます。
$ curl --version
curl 7.54.0 (x86_64-apple-darwin18.0) ...
$
やってみる
まず pom.xmlを下記からコピペで作成しましょう。
$ mkdir myproject && cd $_ $ cat pom.xmlpom.xml<?xml version="1.0" encoding="UTF-8"?> <project xmlns="http://maven.apache.org/POM/4.0.0" xmlns:xsi="http://www.w3.org/2001/XMLSchema-instance" xsi:schemaLocation="http://maven.apache.org/POM/4.0.0 http://maven.apache.org/xsd/maven-4.0.0.xsd"> <modelVersion>4.0.0</modelVersion> <groupId>com.example</groupId> <artifactId>myproject</artifactId> <version>0.0.1-SNAPSHOT</version> <parent> <groupId>org.springframework.boot</groupId> <artifactId>spring-boot-starter-parent</artifactId> <version>2.1.3.RELEASE</version> </parent> <!-- Additional lines to be added here... --> <dependencies> <dependency> <groupId>org.springframework.boot</groupId> <artifactId>spring-boot-starter-web</artifactId> </dependency> </dependencies> <!-- (you don't need this if you are using a .RELEASE version) --> <repositories> <repository> <id>spring-snapshots</id> <url>https://repo.spring.io/snapshot</url> <snapshots><enabled>true</enabled></snapshots> </repository> <repository> <id>spring-milestones</id> <url>https://repo.spring.io/milestone</url> </repository> </repositories> <pluginRepositories> <pluginRepository> <id>spring-snapshots</id> <url>https://repo.spring.io/snapshot</url> </pluginRepository> <pluginRepository> <id>spring-milestones</id> <url>https://repo.spring.io/milestone</url> </pluginRepository> </pluginRepositories> <properties> <java.version>1.8</java.version> </properties> <build> <plugins> <plugin> <groupId>org.springframework.boot</groupId> <artifactId>spring-boot-maven-plugin</artifactId> </plugin> </plugins> </build> </project>sourceとpropertiesファイルを配置するディレクトリを作成します。
$ mkdir -p src/main/java
$ mkdir -p src/main/resources
Spring Bootを起動するおまじないが書いたファイルを作成します。
$ cat src/main/java/nu/mine/kino/springboot/SampleTomcatApplication.javaSampleTomcatApplication.javapackage nu.mine.kino.springboot; import org.springframework.boot.SpringApplication; import org.springframework.boot.autoconfigure.SpringBootApplication; @SpringBootApplication public class SampleTomcatApplication { public static void main(String[] args) { SpringApplication.run(SampleTomcatApplication.class, args); } }WEB機能を記述した、下記のControllerを作成します。
$ cat src/main/java/nu/mine/kino/springboot/GreetingController.javaGreetingController.javapackage nu.mine.kino.springboot; import java.util.concurrent.atomic.AtomicLong; import org.springframework.web.bind.annotation.RequestMapping; import org.springframework.web.bind.annotation.RequestParam; import org.springframework.web.bind.annotation.RestController; @RestController public class GreetingController { private static final String template = "Hello, %s!"; private final AtomicLong counter = new AtomicLong(); @RequestMapping("/greeting") public Greeting greeting( @RequestParam(value = "name", defaultValue = "World") String name) { return new Greeting(counter.incrementAndGet(), String.format(template, name)); } } class Greeting { private final long id; private final String content; public Greeting(long id, String content) { this.id = id; this.content = content; } public long getId() { return id; } public String getContent() { return content; } }環境設定を記述する、propertiesファイルを作成します。
$ cat src/main/resources/application.propertiesapplication.propertiesserver.compression.enabled: true server.compression.min-response-size: 1 server.connection-timeout=5000 server.port=8080 server.address=0.0.0.0server.portは起動するポート番号。デフォルトの8080でよければ実際は記述不要です。
server.addressは他のマシンからも繋がるようにするためのおまじないです。起動
さあ、起動しましょう。
$ pwd
/xxxxx/xxx/myproject

$ mvn spring-boot:run

ばばーーっていろいろ表示されて、、
...
2019-02-26 14:03:46.797  INFO 40644 --- [           main] n.m.k.s.SampleTomcatApplication          :
Started SampleTomcatApplication in 4.749 seconds (JVM running for 11.845)

ってでてればOK!
起動したら別のプロンプトから疎通してみます。
$ curl http://localhost:8080/greeting
{"id":1,"content":"Hello, World!"}
$
めでたく動きましたね!
起動したSpring BootのWEBサーバ(Tomcatですが)は Ctrl-Cなどで止めてあげましょう。
おつかれさまでした。おまけ
jar化する
$ mvn clean packageで、Tomcat込みの実行可能なjarファイルができます。
$ java -jar target/myproject-0.0.1-SNAPSHOT.jarとすることで、先の
mvn spring-boot:runと同じようにTomcatが起動します。。Eclipseで読み込む
$ mvn eclipse:clean eclipse:eclipseで .project/.classpath ファイルが出来るのでEclipseにインポートできるようになります。
戻り値のJSONを整形して返すようにする
application.properties に以下の設定を追加します。
$ cat src/main/resources/application.propertiesapplication.properties... spring.jackson.serialization.indent-output=trueCtrl-Cして
mvn spring-boot:runで再起動してからcurlで繋いでみると、、、$ curl http://localhost:8080/greeting { "id" : 1, "content" : "Hello, World!" }JSONが整形されました。。
関連リンク
- Spring Boot 公式
- Building a RESTful Web Service
- Developing Your First Spring Boot Application
- Appendix A. Common application properties application.properties の設定可能な項目一覧。
- 投稿日:2019-02-26T13:53:22+09:00
【Java】Twitter4Jを使ってTwitterでOAuth認証する方法
概要
JavaのSpringBootでTwitterアカウントを使ったSNSログインの機能を作る
Twitter4J導入編
JavaDocもソースコードも公開されてるので、基本的にはTwitter4J公式を参照
設定の追加
まずは
build.gradleのdependenciesにTwitter4Jを追加build.gradleplugins { id 'java' id 'org.springframework.boot' version '1.5.3.RELEASE' } repositories { mavenCentral() } dependencies { compile 'org.springframework.boot:spring-boot-starter-web' compile 'org.springframework.boot:spring-boot-starter-thymeleaf' compile 'org.springframework.boot:spring-boot-devtools' compile 'org.twitter4j:twitter4j-core:4.0.4' }次に
src/main/resources直下にtwitter4j.propertiesを作成し、Twitter Developers で登録した情報を記載する。twitter4j.propertiesdebug=true #Consumer Key(API Key) oauth.consumerKey=xxxxxxxxxxxxxxxxxxx #Consumer Secret(API Secret) oauth.consumerSecret=xxxxxxxxxxxxxxxxxxxTwitter認証
概要
- TwitterログインはOAuth1.0を使っている
- twitterで認証する流れはこのサイトがわかりやすい:Twitter REST APIの使い方
アクセストークン取得までの流れ
- ユーザーが「Twitterで登録/ログイン」ボタンを押す
- アプリごとに割り当てられたAPI KeyとAPI Secretを使ってリクエストトークンを取得する
- リクエストトークンを使ってユーザーをtwitterの認証画面に飛ばす
- 認証画面からユーザーが戻ってくればアクセストークンが取得できる
実装サンプル
ロジック部分
AuthController.javaimport javax.servlet.http.HttpSession; import org.springframework.beans.factory.annotation.Autowired; import org.springframework.boot.autoconfigure.EnableAutoConfiguration; import org.springframework.stereotype.Controller; import org.springframework.ui.Model; import org.springframework.web.bind.annotation.RequestMapping; import org.springframework.web.bind.annotation.RequestParam; import com.app.sample.model.SessionBean; import twitter4j.Twitter; import twitter4j.auth.AccessToken; import twitter4j.auth.RequestToken; @Controller @EnableAutoConfiguration public class AuthController { @Autowired private Twitter twitter; @Autowired private SessionBean session; /** * 「Twitterで登録/ログイン」ボタンの遷移先 */ @RequestMapping(value = "/auth") public String auth(Model model) throws Exception { RequestToken requestToken = twitter.getOAuthRequestToken(); // RequestTokenをセッションに保存 session.setRequestToken(requestToken); return "redirect:" + requestToken.getAuthenticationURL(); } /** * 認証画面からUserが戻ってくる先 */ @RequestMapping(value = "/auth/complete") public String authComplete(Model model, @RequestParam(name = "oauth_verifier", required = false)String oauthVerifier) throws Exception { // ユーザーがアプリケーションの連携を拒否した場合 if (oauthVerifier == null) { return "redirect:/"; } AccessToken accessToken = twitter.getOAuthAccessToken( session.getRequestToken(), oauthVerifier); // TODO DBなどからAccessTokenを元にUser情報を取得 if (User情報が取れたら) { // TODO 登録済 => マイページに遷移する際の処理 return "redirect:/mypage"; } else { // TODO 未登録 => 新規登録の際の処理 return "redirect:/welcome"; } } }セッション情報
SessionBean.javaimport java.io.Serializable; import org.springframework.context.annotation.Scope; import org.springframework.context.annotation.ScopedProxyMode; import org.springframework.stereotype.Component; import org.springframework.web.context.WebApplicationContext; import twitter4j.auth.RequestToken; @Component @Scope(value = WebApplicationContext.SCOPE_SESSION, proxyMode = ScopedProxyMode.TARGET_CLASS) @SuppressWarnings("serial") public class SessionBean implements Serializable { private RequestToken requestToken; public RequestToken getRequestToken() { return requestToken; } public void setRequestToken(RequestToken requestToken) { this.requestToken = requestToken; } }ちょこっと解説
ユーザーのアクセストークンを取得するために、
1. ユーザーがTwitterの認証画面から戻ってくる際のoauth_verifierというパラメーター
2. 認証画面に飛ばす際に取得したリクエストトークン
が必要なので、リクエストトークンを一時的にセッションに持たせています。ユーザーが認証画面で拒否した場合は
oauth_verifierが付加されずに戻ってくるので、
oauth_verifierの有無で遷移先をハンドリングしています。
- 投稿日:2019-02-26T11:47:46+09:00
STS(Spring Tool Suite)の日本語化を解除する
概要
勢いで日本語化してしまったSTSの日本語化を解除する。
STS.iniを修正する
❯ vim /Applications/STS.app/Contents/Eclipse/STS.ini-javaagent:../Eclipse/dropins/MergeDoc/eclipse/plugins/jp.sourceforge.mergedoc.pleiades/pleiades.jarのような記載があるのでコメントアウトする
mv /Applications/STS.app/Contents/Eclipse/dropins/MergeDoc/eclipse/plugins/jp.sourceforge.mergedoc.pleiades /Applications/STS.app/Contents/Eclipse/dropins/MergeDoc/eclipse/plugins/jp.sourceforge.mergedoc.pleiades-backup設定のキャッシュみたいなのが残るのでリネームしておく
- 投稿日:2019-02-26T10:26:22+09:00
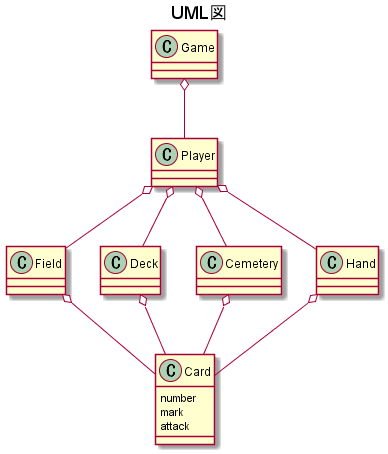
オンラインカードゲームのサーバーサイドを作った①
はじめに?
学校の課題やら趣味のゲーム制作で結構頑張ってカードゲームを作ったので、投下しようと思いました。
今回作ったゲームは、Black Pokerというカードゲームです。
タグを見て来た方の中には、
「おいおい、TCGタグ付いてるくせにトランプゲームじゃねえか」
と思った方もいると思います。
ただこのゲーム、トレーディング要素はないものの、デッキを構築し、山札から引いたカードで攻撃しあうという最近のTCGの要素が詰まったゲームなのです。Black Pokerとは?
1人1セットのトランプを使ったターン制のTCG風トランプゲームです。
(公式サイトより引用)
お互いは山札を良くカットします。
山札の上から1枚捲り、数字・マークの大きい方が先攻となります。
お互いに山札から7枚引きます。
ターンプレイヤーは山札からカードを1枚引き、以下の行為を行います。
① ダメージを1点受け、手札からカードを裏向きで置く (ターン1)
② ダメージを1点受け、裏向きのカードを横に向け、手札からカードを表向きで置く (ターン1)
③ 自身の表向きのカードをn枚選択して、攻撃する (召喚酔いあり)
攻撃を受けたプレイヤーは、場のカードでブロックするもしくはダメージを受けますダメージを受けたプレイヤーは、山札からn枚のカードを墓地へ送ります。
デッキがなくなったプレイヤーはゲームに敗北します。まずはゲーム本体を作る
サーバーサイド開発ではありますが、通信などは置いておいて、まずはコンソールで動作する本体を作成します。
私は以下のような設計をしました
トランプのカード1枚1枚に対応するCardオブジェクトを生成し、Playerがメンバ内のCardを移動させていきます。
疲れたので今回はここまでです。
次回はカードクラスを書いていきます。
- 投稿日:2019-02-26T06:20:06+09:00
September 2019 Calendar
September is the ninth month of the year in the Julian and Gregorian calendars. 1 September is the beginning of the meteorological autumn in the Northern hemisphere, and the beginning of the meteorological spring in the Southern hemisphere. In the Northern Hemisphere September is the seasonal equivalent of March in the Southern Hemisphere.
September marks the beginning of the ecclesiastical year in the Eastern Orthodox Church. It is the start of the academic year in many countries, in which children go back to school after the summer break, sometimes on the first day of the month.
September is the month before the last quarter of the year. So, it’s a great time to think about putting things in front of us. Summer holiday is over, there is quite a long time to winter, weather is usually still warm and soft.
Source: https://www.betacalendars.com/september-calendar.html
- 投稿日:2019-02-26T05:36:23+09:00
August 2019 Calendar
August is the month when summer begins to be getting closer to autumn, although it is still too hot for living in the cities middle of the buildings! It is much better to be near the seas and under the trees in August. Watermelon, ripe melon, sweet corn on the cob, and blueberries are just a few of the gifts of August. August is also the canning season at the same time, which is the time to prepare and put on the fridge the fresh summer vegetables for consuming them in winter.
It is the very common vacation season that people want to take a long break before summer ends and the September comes. September is usually defined as a month of the increasing the work load density continues till the end of year. Therefore, it is the good time to freshen and become ready to work harder by pausing the responsibilities for a while.
It is very important to plan the month of August before arriving. What else will be done in that month? Are there celebrations, birthdays, weddings, special invitations? Will there be meetings, seminars, business events? Get an August 2019 calendar with holidays in your hand and fill in the days of August and see the free days first. Then do your holiday research according to your vacancies, or even complete your reservations, at least pre-bookings if possible. Now it’s time to put a huge “vacation” mark on your August 2019 calendar template! You see, just doing it has increased your motivation, right? A printable calendar is more than a piece of paper. It makes you target-oriented, orderly and purposeful.
- 投稿日:2019-02-26T04:06:12+09:00
July 2019 Calendar
July is the second month of summer and is known for its warm weather. The best thing to do in July is to cool off by swim in the sea or pool, swing in a hammock and take part in parties on a summer evening.
July is the warmest month of the Northern Hemisphere and, on the contrary, it is considered to be the coldest month in the Southern Hemisphere. July is the seasonal equivalent of January of the Northern hemisphere in the Southern hemisphere.
The second half of the year starts with July. In many workplaces, the estimates made at the beginning of the year are reviewed and the course is examined. July is also the month of reviewing decisions taken for the new year. You might even need to do a little revision. Because you may be gone much faster, or slower than you planned.
- 投稿日:2019-02-26T02:59:55+09:00
Autonomous DB(ADW/ATP) に Java の JDBC Thin Driver で接続してみる。(OCI, Oracle Cloud Infrastructure)
表題の通り、Autonomous DB(ADW/ATP) に Java の JDBC Thin Driver で
接続してみます。下記の構成で試すやで彡(゚)(゚)Compute(Java, JDBC Thin Driver) ⇒ Autonomous DB(ADW/ATP)
前回の記事の続きになります。
OCI Database(DBaaS) の PDB に Java の JDBC Thin Driver で
接続してみる。(Oracle Cloud Infrastructure)
https://qiita.com/ora_gonsuke777/items/0e6c7d25d9977de455311. Autonomous DB(ADW/ATP) とは?
Autonomous DB は ORACLE が提供する Full Managed なデータベースの Cloud Service です。
DWH向きの ADW(Autonomous Data Warehouse) と
OLTP向きの ATP(Autonomous Transaction Processing) が有るんやで彡(゚)(゚)Autonomous Data Warehouse
https://docs.oracle.com/cd/E83857_01/paas/autonomous-data-warehouse-cloud/Autonomous Transaction Processing
https://docs.oracle.com/cd/E83857_01/paas/atp-cloud/2. Autonomous DB(ADW/ATP) に接続する時のポイント(※ウォレットが必須)
通常のOracle Databaseへの接続 と Autonomous DB(ADW/ATP)への接続 の違いとして、
ウォレットによる暗号化通信が必須である点が挙げられます。Autonomous Data Warehouse Instanceへの接続について
https://docs.oracle.com/cd/E83857_01/paas/autonomous-data-warehouse-cloud/user/connect-intorduction.html#GUID-CD4C10A6-1C1E-4969-8F67-1433B6CE626AAutonomous Transaction Processing Instanceへの接続について
https://docs.oracle.com/cd/E83857_01/paas/atp-cloud/atpug/connect-intorduction.html#GUID-CD4C10A6-1C1E-4969-8F67-1433B6CE626Asqlplus や SQL Developer での接続については下記マニュアルを参照彡(゚)(゚)
Oracle SQL Developer (18.2)以上で接続
https://docs.oracle.com/cd/E83857_01/paas/autonomous-data-warehouse-cloud/user/connect-sql-dev182.html#GUID-14217939-3E8F-4782-BFF2-021199A908FDConnect with SQL*Plus
https://docs.oracle.com/cd/E83857_01/paas/autonomous-data-warehouse-cloud/user/connect-sqlplus.html#GUID-A3005A6E-9ECF-40CB-8EFC-D1CFF664EC5A何かしらの手段でウォレットを指定する事が、ADW/ATP接続の必須事項となります。
本記事では JDBC Thin driver + TNS_ADMIN による接続を幾つか試してみますやで彡(゚)(゚)3. ウォレット、JDBC Driver Full版 のダウンロードと展開
手順は幾つか有りますが、下記マニュアルの「Plain JDBC using Oracle Wallets」を実行します。
Java Connectivity with Autonomous Database (ATP or ADW) using 18.3 JDBC
https://www.oracle.com/technetwork/database/application-development/jdbc/documentation/atp-5073445.htmlウォレットのダウンロードと展開は下記が参考になります。
自律型データベース(Autonomous Transaction Processing)に Golang を使って接続
https://qiita.com/sugimount/items/69e11c116a895c9feb97# Autonomous DB の Wallet を展開 unzip Wallet_xxxxxx.zipJDBC Driver の最新版(18.3)は現時点(2019/2/26)で下記ですが、最新版を参照して下さい。
Oracle Database 18c (18.3) JDBC Driver & UCP Downloads
https://www.oracle.com/technetwork/database/application-development/jdbc/downloads/jdbc-ucp-183-5013470.htmlojdbc8-full.tar.gz をダウンロードして、Compute上に展開(tar xvzf ~)します。
# JDBC Driver Full版を展開
tar xvzf ojdbc8-full.tar.gz
ウォレットは/home/opc/app/opc/product/18.0.0/client_1/network/adminに、
JDBC Driver は/home/opc/work/ojdbc8-full にそれぞれ展開したものとします。# Wallet(TNS_ADMIN) ls -la /home/opc/app/opc/product/18.0.0/client_1/network/admin total 76 drwxr-xr-x. 3 opc opc 4096 Feb 25 16:26 . drwxr-xr-x. 10 opc opc 4096 Jan 17 06:46 .. -rw-rw-r--. 1 opc opc 6661 Feb 25 15:01 cwallet.sso -rw-rw-r--. 1 opc opc 6616 Feb 25 15:01 ewallet.p12 -rw-rw-r--. 1 opc opc 3242 Feb 25 15:01 keystore.jks -rw-rw-r--. 1 opc opc 87 Feb 25 15:01 ojdbc.properties drwxr-xr-x. 2 opc opc 4096 Jan 17 06:44 samples -rw-r--r--. 1 opc opc 1441 Aug 26 2015 shrept.lst -rw-rw-r--. 1 opc opc 114 Feb 25 15:01 sqlnet.ora -rw-rw-r--. 1 opc opc 155 Feb 4 11:23 sqlnet.ora.bak -rw-rw-r--. 1 opc opc 2771 Feb 25 15:01 tnsnames.ora -rw-rw-r--. 1 opc opc 3336 Feb 25 15:01 truststore.jks -rw-rw-r--. 1 opc opc 19823 Feb 25 15:01 Wallet_xxxxxx.zip # JDBC Driver full ls -la /home/opc/work/ojdbc8-full total 8328 drwx------. 2 opc opc 4096 Aug 20 2018 . drwxrwxr-x. 22 opc opc 4096 Feb 25 15:33 .. -r--r--r--. 1 opc opc 4161744 Aug 2 2018 ojdbc8.jar -r-xr-xr-x. 1 opc opc 11596 Aug 2 2018 ojdbc.policy -r--r--r--. 1 opc opc 144428 Aug 2 2018 ons.jar -r--r--r--. 1 opc opc 307817 Aug 2 2018 oraclepki.jar -r--r--r--. 1 opc opc 1661545 Aug 2 2018 orai18n.jar -r--r--r--. 1 opc opc 205152 Aug 2 2018 osdt_cert.jar -r--r--r--. 1 opc opc 306854 Aug 2 2018 osdt_core.jar -rw-r--r--. 1 opc opc 2595 Aug 20 2018 README.txt -r--r--r--. 1 opc opc 29103 Aug 2 2018 simplefan.jar -r--r--r--. 1 opc opc 1398331 Aug 2 2018 ucp.jar -r--r--r--. 1 opc opc 262415 Aug 2 2018 xdb6.jar4. 方法1:ウォレットのパス(TNS_ADMIN) を JDBC URL に記述
JDBC 18.3 では ウォレットのパスを TNS_ADMIN として
JDBC URL に記述できるようになっています。URLに指定されています。 次に例を示します。
https://docs.oracle.com/cd/E83857_01/paas/atp-cloud/atpug/connect-jdbc-thin-wallet.html#GUID-F1D7452F-5E67-4418-B16B-B6A7B92F26A4
final static String DB_URL="jdbc:oracle:thin:@atpconnection_low?TNS_ADMIN=.";この書き方の場合、接続文字列はtnsnames.oraの記述子を使用します。サンプルは下記
import java.sql.*; public class GetContainerName { public static void main(String[] args) { final String path = "jdbc:oracle:thin:@xxxxxx_high?TNS_ADMIN=/home/opc/app/opc/product/18.0.0/client_1/network/admin"; final String id = "ADMIN"; //ID final String pw = "xxxxxxxxxxxxx"; //password try ( Connection conn = DriverManager.getConnection(path, id, pw); Statement stmt = conn.createStatement(); ResultSet rs = stmt.executeQuery("SELECT NAME FROM V$CONTAINERS"); ) { while (rs.next()) { String cn = rs.getString("name"); System.out.println("Container Name => " + cn); } } catch(SQLException ex) { ex.printStackTrace(); //Error } } }コンパイルと実行は下記。マニュアルの記述の通り oraclepki.jar,
osdt_core.jar, osdt_cert.jarを classpath に含めておくんやで彡(゚)(゚)export JAVA_HOME=/home/opc/work/jdk-11.0.2 export PATH=${JAVA_HOME}/bin:${PATH} javac GetContainerName.java java -classpath /home/opc/work/ojdbc8-full/ojdbc8.jar:\ /home/opc/work/ojdbc8-full/ucp.jar:\ /home/opc/work/ojdbc8-full/oraclepki.jar:\ /home/opc/work/ojdbc8-full/osdt_core.jar:\ /home/opc/work/ojdbc8-full/osdt_cert.jar:. \ GetContainerName Container Name => VRWV9351YZ4NXNS_XXXXXX成功(`・ω・)Ъ
5. 方法2:ウォレットのパス(TNS_ADMIN) を 環境変数に指定
ウォレットのパスをTNS_ADMIN環境変数に指定します。
この場合は JDBC URL に TNS_ADMIN の記述は不要で、ソースは下記彡(゚)(゚)import java.sql.*; public class GetContainerName { public static void main(String[] args) { final String path = "jdbc:oracle:thin:@xxxxxx_high"; final String id = "ADMIN"; //ID final String pw = "xxxxxxxxxxxxx"; //password try ( Connection conn = DriverManager.getConnection(path, id, pw); Statement stmt = conn.createStatement(); ResultSet rs = stmt.executeQuery("SELECT NAME FROM V$CONTAINERS"); ) { while (rs.next()) { String cn = rs.getString("name"); System.out.println("Container Name => " + cn); } } catch(SQLException ex) { ex.printStackTrace(); //Error } } }コンパイルと実行結果は以下の通りです。
export JAVA_HOME=/home/opc/work/jdk-11.0.2
export PATH=${JAVA_HOME}/bin:${PATH}

javac GetContainerName.java

export TNS_ADMIN=/home/opc/app/opc/product/18.0.0/client_1/network/admin

java -classpath /home/opc/work/ojdbc8-full/ojdbc8.jar:\
/home/opc/work/ojdbc8-full/ucp.jar:\
/home/opc/work/ojdbc8-full/oraclepki.jar:\
/home/opc/work/ojdbc8-full/osdt_core.jar:\
/home/opc/work/ojdbc8-full/osdt_cert.jar:. \
GetContainerName

Container Name => VRWV9351YZ4NXNS_XXXXXX
再び成功(`・ω・)Ъ
6. 方法3:ウォレットのパス(TNS_ADMIN) を -D でシステム・プロパティとして指定
ウォレットのパスをシステム・プロパティoracle.net.tns_admin として
-Dオプションで指定します。javaソースは上記 5. と同じなので省略。実行コマンドは下記となります。
export JAVA_HOME=/home/opc/work/jdk-11.0.2
export PATH=${JAVA_HOME}/bin:${PATH}

javac GetContainerName.java

unset TNS_ADMIN

java -classpath /home/opc/work/ojdbc8-full/ojdbc8.jar:\
/home/opc/work/ojdbc8-full/ucp.jar:\
/home/opc/work/ojdbc8-full/oraclepki.jar:\
/home/opc/work/ojdbc8-full/osdt_core.jar:\
/home/opc/work/ojdbc8-full/osdt_cert.jar:. \
-Doracle.net.tns_admin=/home/opc/app/opc/product/18.0.0/client_1/network/admin \
GetContainerName

Container Name => VRWV9351YZ4NXNS_XXXXXX
三たび成功(`・ω・)Ъ
7. まとめ
oraclepki.jar, osdt_core.jar, osdt_cert.jar の classpath指定で
くっそハマった……まずはマニュアルの通りにやるのが、王道ですやね彡(-)(-)
- 投稿日:2019-02-26T02:26:37+09:00
【ImageView】ScaleTypeを変更したときの内部処理
ScaleTypeと表示画像の対応を整理するために作成したサンプルアプリで、
ScaleTypeをFIT_START→FIT_XY→MATRIXと切り替えたときにFIT_STARTとMATRIXのときの画像表示が同じになる現象が発生したので、備忘録としてその際に調査した内容をまとめました。ScaleTypeを変更したときの内部処理
ImageView.javaのソースはこちらにあります。
まず、
ScaleTypeを切り替えるためにsetScaleType()を呼び出します。
引数に指定されたScaleTypeがmScaleTypeに代入されます。ImageView.java#LL.827-838public void setScaleType(ScaleType scaleType) { if (scaleType == null) { throw new NullPointerException(); } if (mScaleType != scaleType) { mScaleType = scaleType; requestLayout(); invalidate(); } }
このmScaleTypeはconfigureBounds()内で分岐条件として使われます。
以下、今回の調査に必要な条件のみを抜粋します。①
mScaleType == MATRIXのとき、以下のような処理が行われます。ImageView#LL.1253-1257if (mMatrix.isIdentity()) { mDrawMatrix = null; } else { mDrawMatrix = mMatrix; }
mMatrixはMatrixの参照を持つ変数です。mDrawMatrixはmMatrixの参照を代入するための変数です。この2つの変数によってMatrixによる画像変換を行うか否かを制御しています。
mMatrixが単位行列(変換前後で画像の状態を変化させないMatrix)の場合、mDrawMatrixにnullを代入しています。②
mScaleType == FIT_CENTER、FIT_END、FIT_STARTのとき、以下のような処理が行われます。ImageView#LL.1302-1306mTempSrc.set(0, 0, dwidth, dheight); mTempDst.set(0, 0, vwidth, vheight); mDrawMatrix = mMatrix; mDrawMatrix.setRectToRect(mTempSrc, mTempDst, scaleTypeToScaleToFit(mScaleType));ネイティブコードを呼び出していたので詳細は確認できなかったのですが、最後の
setRectToRect()によってmScaleTypeに対応したMatrixを計算しているようです。
この処理によってmDrawMatrixの参照先の内容が更新されることがEvaluate Expressionでトレースすることによって分かりました。③
mScaleType == FIT_XYのとき、以下のような処理が行われます。
vwidth、vheightはそれぞれImageViewの幅と高さです。ImageView.java#LL.1244-1245mDrawable.setBounds(0, 0, vwidth, vheight); mDrawMatrix = null;
そして、mDrawMatrixはonDraw()内で分岐条件として使われています。
mDrawMatrixがnullでないときのみMatrixによる画像変換が行われます。ImageView.java#LL.1350-1383@Override protected void onDraw(Canvas canvas) { ... if (mDrawMatrix == null && mPaddingTop == 0 && mPaddingLeft == 0) { mDrawable.draw(canvas); } else { ... if (mDrawMatrix != null) { canvas.concat(mDrawMatrix); } mDrawable.draw(canvas); canvas.restoreToCount(saveCount); } }
以上を踏まえ、改めて状況を整理します。
ScaleTypeをFIT_START→FIT_XY→MATRIXと切り替えたとき、
FIT_START
- ②の処理が行われるので、
mMatrixの参照先のMatrixの内容はFIT_STARTに対応した値になるmDrawMatrixはnullでないので、Matrixによる画像変換が行われるFIT_XY
- ③の処理が行われるので、
mMatrixの参照先のMatrixの内容はFIT_STARTに対応した値のままになる
mDrawMatrixはnullなので、Matrixによる画像変換は行われないMATRIX
- ①の処理が行われるので、
mMatrixの参照先のMatrixの内容はFIT_STARTに対応した値のままになるmDrawMatrixはnullでないので、Matrixによる画像変換が行われるとなるため、
FIT_STARTとMATRIXのときの画像表示が同じになっていました。最後に、この現象を回避するために
ScaleTypeを変更する前にsetImageMatrix()を呼び出します。ImageView.java#LL.871-884public void setImageMatrix(Matrix matrix) { // collapse null and identity to just null if (matrix != null && matrix.isIdentity()) { matrix = null; } // don't invalidate unless we're actually changing our matrix if (matrix == null && !mMatrix.isIdentity() || matrix != null && !mMatrix.equals(matrix)) { mMatrix.set(matrix); configureBounds(); invalidate(); } }
setImageMatrix()の引数に新しい単位行列を代入することでmMatrixが初期化されます。
- 投稿日:2019-02-26T01:52:12+09:00
Optional null の場合、parse して別型かえす
Optional.map で戻るのが Optional だった
Optional.flatMap との違いは...String args = "1"; Integer a = Optional.ofNullable(args).map(o -> Integer.parseInt(o)).orElse(999); Integer b = Optional.ofNullable(args).map(o -> Optional.ofNullable(Integer.parseInt(o))).orElse(999);public<U> Optional<U> map(Function<? super T, ? extends U> mapper) { Objects.requireNonNull(mapper); if (!isPresent()) return empty(); else { return Optional.ofNullable(mapper.apply(value)); } } public<U> Optional<U> flatMap(Function<? super T, Optional<U>> mapper) { Objects.requireNonNull(mapper); if (!isPresent()) return empty(); else { return Objects.requireNonNull(mapper.apply(value)); } }
- 投稿日:2019-02-26T01:23:14+09:00
June 2019 Calendar
The month of June reminds us, who lives in Northern Hemisphere, of summer, swimming, the clear skies and the warmth of the sun. The sixth month of the calendar is significant since places in the Northern Hemisphere experience the longest days and the regions in the Southern Hemisphere the shortest days. Thus, this unique month serves as winter as well as summer in polar opposite ends of the world.
Many celebrations take place in the month of June, especially marriages. According to one etymology, June is named after the Roman goddess Juno who is the goddess of marriage and a married couple’s household. It is considered good luck to get married in this month.
- 投稿日:2019-02-26T00:36:51+09:00
May 2019 Calendar
May is the fifth month of the year in the Julian and its predecessor Gregorian Calendar and the third of seven months to have a length of 31 days. Late May typically points the start of the summer vacation season in the United States which ends on Labor Day, the first Monday of September.
May is the last month of spring in the Northern Hemisphere and autumn in the Southern Hemisphere. Therefore, May in the Southern Hemisphere is the seasonal equivalent of November in the Northern Hemisphere. In May, the winter season in the Southern Hemisphere and the summer season in the Northern Hemisphere are about to begin.
In May, warm and smooth weather spurs people on to participate in nature activities, concerts and open-air events. May is also the time that moms around the world get showered with love for Mother’s Day. But, without question, the most popular holiday in May in the U.S. is Memorial Day, the national holiday that is also known as the unofficial start to summer. There are also lesser-known observances celebrated relatively by lesser-crowded in May apart from those. There are month-long observances like National Photo Month, week-long observances like Youth Traffic Safety Month, and the Star Wars “May the Fourth” holiday revered by sci-fi fans the world over.