- 投稿日:2021-02-27T23:35:09+09:00
配信済みの通知を削除する
通知で埋もれてしまうようなアプリってあると思います。自分のもそうでした。
履歴のように通知に残しておくものもあると思いますが、不要なのを削除してあげると気が利いてるアプリだなと思います通知を出すときに指定したidentifierを指定して、以下のAPIを一発叩けば消すことができます。
UNUserNotificationCenter.current().removeDeliveredNotifications(withIdentifiers: ["identifier"])
- 投稿日:2021-02-27T20:43:22+09:00
【SwiftUI】NavigationViewの基本的な使い方(後編)
前編に引き続きNavigationViewの解説をしていきます。
前回はこちら↓
navigationTitleモディファイア
NavigationViewにタイトルをつけることができるモディファイア。
公式リファレンス↓
実際の動作
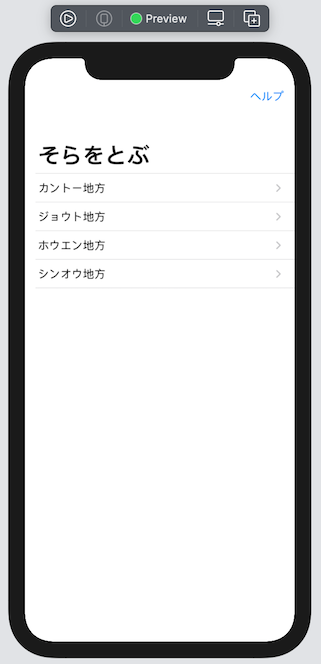
navigationTitleをつけない場合
navigationTitleをつけた場合
一つ目と二つ目のソースコードの差はnavigationTitleをつけたかどうかだけです。
実際のソースコードを見てみましょう。ソースコード
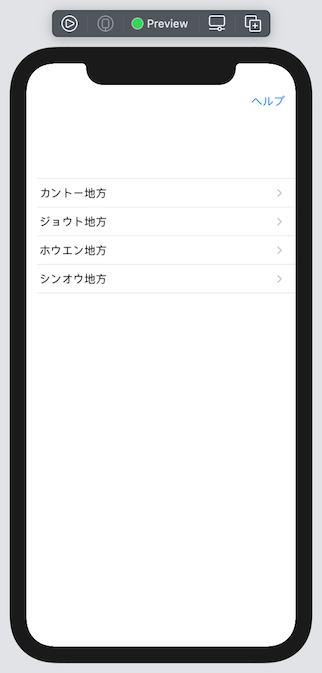
ContentView.swiftimport SwiftUI struct ContentView: View { let regions = ["カントー地方", "ジョウト地方", "ホウエン地方", "シンオウ地方"] var body: some View { VStack{ // ここから HStack{ Spacer() Button(action: {}, label: { Text("ヘルプ") }) } .padding(.horizontal) // ここまではNavigationViewに含まれない NavigationView { List(0..<4) { n in NavigationLink(regions[n], destination: Region(id: n, regionName: regions[n])) } .navigationTitle("そらをとぶ") //ここでタイトルをつけている } } } }
.navigationTitleというコードのみで、フォントの大きさや太さをタイトルっぽくしてくれます。navigaitonTitleには次のような機能もあります。
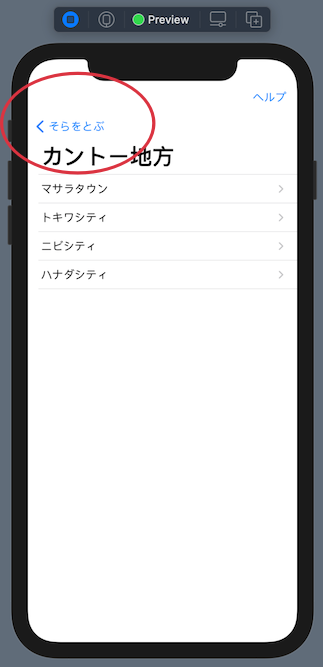
「もどる」ボタンの名前になる
最初の画面からどれかリンクをタップしてみます。
すると、、、
このように、前の画面にもどるためのボタンの名前として、navigationTitleがそのまま使われます。
また、画面遷移のときにアニメーションも自動でつけてくれます。(動画参照)
navigationTitleはどこに書く?
よくある間違い(主に私が)として、次のように書くパターンがあります。
ContentView.swiftNavigationView { List(0..<4) { n in NavigationLink(regions[n], destination: Region(id: n, regionName: regions[n])) } // .navigationTitle("そらをとぶ") //本来はここに書く } .navigationTitle("そらをとぶ") //NavigationViewの外側に書いているこのように書くと、エラーにはなりませんがタイトルは表示されなくなります。
navigationTitleはそもそも、ひとつの画面のタイトルでしかないため、遷移先には引き継がれません。各画面でnavigationTitleをつけることになります。
よって、navigationTitleはNavigationViewの内側に書くものだと認識すると良いでしょう。
参考文献

- 投稿日:2021-02-27T18:23:22+09:00
Apple Watchのコンプリケーション
はじめに
iPhone、Apple Watch用のアプリ開発で調べたことをまとめていきます。
今回はApple Watchのコンプリケーションについてです。環境
Xcode Version12.4
iOS 14.4(実機はiPhone 12 Pro)
watchOS 7.2(実機はApple Watch Watch Series 5)開発アプリ
英単語、短文暗記アプリ
英短文と和文を表示し、iPhoneでスワイプすると次の英短文が表示される。
Apple watchにも同じ英短文が表示される。
自分用に作っているのでエラー処理は不十分です。対応済み
・英短文を記載したテキストファイルを読み込む
・覚えたかどうかをUserDefaultsを使って保存。起動時に読み込み。
・mp3の再生
・Today Extension(Widgetはそのうち対応・・・)
・Action Extension
・Apple Watch
・Apple Watch Extension
GitHub
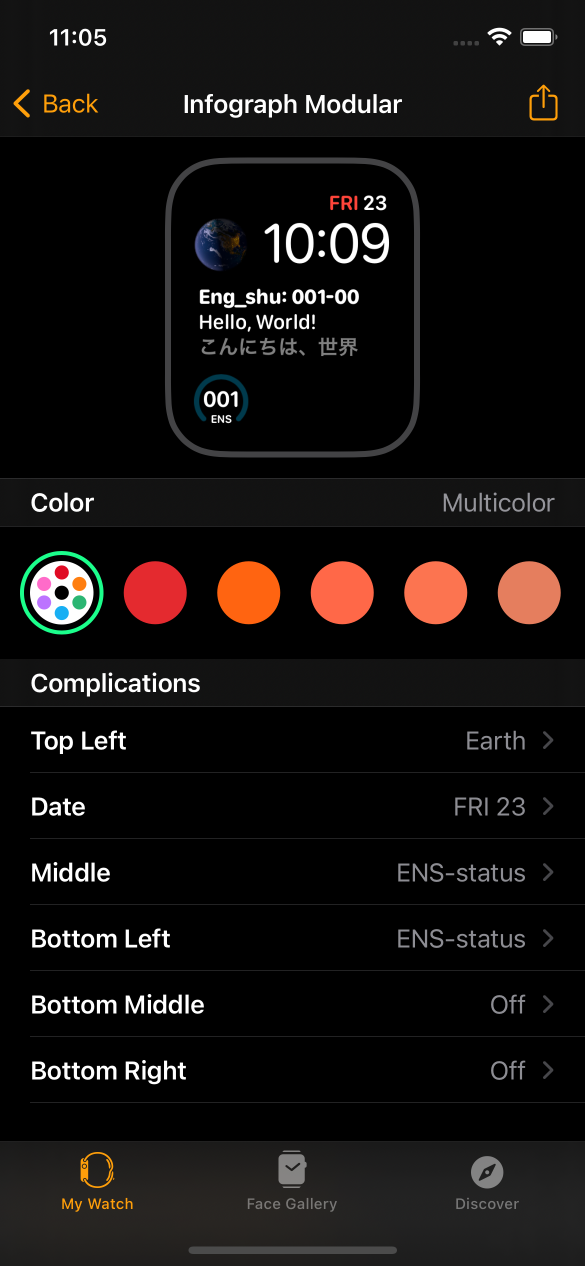
コンプリケーション
・graphicCircular
番号の表示、本日取り組んだ進捗率を円環で表示
毎日0時になったら、進捗率をリセット
・graphicRectangular
iPhoneに同期して番号と英短文と和文を表示実装(ExtensionDelegate.swift)
バックグラウンドで文字盤を更新できるようにするため下記のようにした。
ExtensionDelegate.swiftfunc reloadComplications() { // Update any complications on active watch faces. let server = CLKComplicationServer.sharedInstance() for complication in server.activeComplications ?? [] { server.reloadTimeline(for: complication) } //ComplicationDescriptorsについてはよく分かっていない。 CLKComplicationServer.sharedInstance().reloadComplicationDescriptors() } func handle(_ backgroundTasks: Set<WKRefreshBackgroundTask>) { // Sent when the system needs to launch the application in the background to process tasks. Tasks arrive in a set, so loop through and process each one. for task in backgroundTasks { // Use a switch statement to check the task type switch task { case let backgroundTask as WKApplicationRefreshBackgroundTask: // Be sure to complete the background task once you’re done. self.scheduleBackgroundRefreshTasks() backgroundTask.setTaskCompletedWithSnapshot(true) case let snapshotTask as WKSnapshotRefreshBackgroundTask: // Snapshot tasks have a unique completion call, make sure to set your expiration date snapshotTask.setTaskCompleted(restoredDefaultState: true, estimatedSnapshotExpiration: Date.distantFuture, userInfo: nil) case let connectivityTask as WKWatchConnectivityRefreshBackgroundTask: // Be sure to complete the connectivity task once you’re done. connectivityTask.setTaskCompletedWithSnapshot(false) case let urlSessionTask as WKURLSessionRefreshBackgroundTask: // Be sure to complete the URL session task once you’re done. urlSessionTask.setTaskCompletedWithSnapshot(false) case let relevantShortcutTask as WKRelevantShortcutRefreshBackgroundTask: // Be sure to complete the relevant-shortcut task once you're done. relevantShortcutTask.setTaskCompletedWithSnapshot(false) case let intentDidRunTask as WKIntentDidRunRefreshBackgroundTask: // Be sure to complete the intent-did-run task once you're done. intentDidRunTask.setTaskCompletedWithSnapshot(false) default: // make sure to complete unhandled task types task.setTaskCompletedWithSnapshot(false) } } } func scheduleBackgroundRefreshTasks() { // Get the shared extension object. let watchExtension = WKExtension.shared() // If there is a complication on the watch face, the app should get at least four // updates an hour. So calculate a target date 15 minutes in the future. let targetDate = Date().addingTimeInterval(15.0 * 60.0) // Schedule the background refresh task. watchExtension.scheduleBackgroundRefresh(withPreferredDate: targetDate, userInfo: nil) { (error) in // Check for errors. if let error = error { print("*** An background refresh error occurred: \(error.localizedDescription) ***") return } print("*** Background Task Completed Successfully! ***") } WKExtension.shared().scheduleSnapshotRefresh(withPreferredDate: targetDate, userInfo: nil) { error in if (error == nil) { print("successfully scheduled snapshot. All background work completed.") } } // コンプリケーションデータを更新 reloadComplications() }実装(ComplicationController.swift)
コンプリケーションの更新
ComplicationController.swift// Return the current timeline entry. func getCurrentTimelineEntry(for complication: CLKComplication, withHandler handler: @escaping (CLKComplicationTimelineEntry?) -> Void) { // Call the handler with the current timeline entry handler(createTimelineEntry(forComplication: complication, date: Date())) } // Return future timeline entries. func getTimelineEntries(for complication: CLKComplication, after date: Date, limit: Int, withHandler handler: @escaping ([CLKComplicationTimelineEntry]?) -> Void) { let fiveMinutes = 5.0 * 60.0 let twentyFourHours = 24.0 * 60.0 * 60.0 // Create an array to hold the timeline entries. var entries = [CLKComplicationTimelineEntry]() // Calculate the start and end dates. var current = date.addingTimeInterval(fiveMinutes) let endDate = date.addingTimeInterval(twentyFourHours) // Create a timeline entry for every five minutes from the starting time. // Stop once you reach the limit or the end date. while (current.compare(endDate) == .orderedAscending) && (entries.count < limit) { entries.append(createTimelineEntry(forComplication: complication, date: current)) current = current.addingTimeInterval(fiveMinutes) } handler(entries) } //ComplicationDescriptorsを何に使うのかよく分からない。 func getComplicationDescriptors(handler: @escaping ([CLKComplicationDescriptor]) -> Void) { let mySupportedFamilies = CLKComplicationFamily.allCases // Create the condition descriptor. let conditionDescriptor = CLKComplicationDescriptor( identifier: "complication_Identifier", displayName: "ENS-status", supportedFamilies: mySupportedFamilies) // Call the handler and pass an array of descriptors. handler([conditionDescriptor]) } private func createTimelineEntry(forComplication complication: CLKComplication, date: Date) -> CLKComplicationTimelineEntry { let template = getComplicationTemplate(forComplication: complication, date: date) return CLKComplicationTimelineEntry(date: date, complicationTemplate: template) } func getComplicationTemplate(forComplication complication: CLKComplication, date: Date) -> CLKComplicationTemplate { switch complication.family { case .graphicCircular: // print("graphicCircular") return createGraphicCircleTemplate(forDate: date) case .graphicRectangular: // print("graphicRectangular") return createGraphicRectangularTemplate(forDate: date) case .modularSmall: return createModularSmallTemplate(forDate: date) case .modularLarge: return createModularLargeTemplate(forDate: date) case .utilitarianSmall: return createutilitarianSmallTemplate(forDate: date) case .utilitarianSmallFlat: return createutilitarianSmallTemplate(forDate: date) case .utilitarianLarge: return createutilitarianLargeTemplate(forDate: date) case .circularSmall: return createcircularSmallTemplate(forDate: date) case .extraLarge: return createextraLargeTemplate(forDate: date) case .graphicCorner: return creategraphicCornerTemplate(forDate: date) case .graphicBezel: return creategraphicBezelTemplate(forDate: date) case .graphicExtraLarge: return createGraphicExtraLargeTemplate(forDate: date) @unknown default: fatalError("*** Unknown Complication Family ***") } } //設定する時のプレ画面 func getLocalizableSampleTemplate(for complication: CLKComplication, withHandler handler: @escaping (CLKComplicationTemplate?) -> Void) { let future = Date().addingTimeInterval(25.0 * 60.0 * 60.0) let template = getComplicationTemplate(forComplication: complication, date: future) handler(template) } private func creategraphicBezelTemplate(forDate date: Date) -> CLKComplicationTemplate { // Create the template using the providers. let circularTemplate = CLKComplicationTemplateGraphicCircularStackText(line1TextProvider: CLKSimpleTextProvider(text: "0.491"), line2TextProvider: CLKSimpleTextProvider(text: "0.491")) let template = CLKComplicationTemplateGraphicBezelCircularText(circularTemplate: circularTemplate) return template } private func creategraphicCornerTemplate(forDate date: Date) -> CLKComplicationTemplate { // Create the template using the providers. let gaugeColor = UIColor(red: 0.0, green: 167.0/255.0, blue: 219.0/255.0, alpha: 1.0) let template = CLKComplicationTemplateGraphicCornerGaugeText(gaugeProvider: CLKSimpleGaugeProvider(style: .fill, gaugeColor: gaugeColor, fillFraction: 0), outerTextProvider: CLKSimpleTextProvider(text: "0.491")) return template } private func createextraLargeTemplate(forDate date: Date) -> CLKComplicationTemplate { // Create the template using the providers. let template = CLKComplicationTemplateExtraLargeColumnsText(row1Column1TextProvider: CLKSimpleTextProvider(text: "11"), row1Column2TextProvider: CLKSimpleTextProvider(text: "11"), row2Column1TextProvider: CLKSimpleTextProvider(text: "11"), row2Column2TextProvider: CLKSimpleTextProvider(text: "11")) template.column2Alignment = .leading template.highlightColumn2 = false return template } private func createcircularSmallTemplate(forDate date: Date) -> CLKComplicationTemplate { // Create the template using the providers. let template = CLKComplicationTemplateCircularSmallSimpleText(textProvider: CLKSimpleTextProvider(text: "001")) return template } private func createutilitarianLargeTemplate(forDate date: Date) -> CLKComplicationTemplate { // Create the template using the providers. let template = CLKComplicationTemplateUtilitarianLargeFlat(textProvider: CLKSimpleTextProvider(text: "001")) return template } private func createutilitarianSmallTemplate(forDate date: Date) -> CLKComplicationTemplate { // Create the template using the providers. let template = CLKComplicationTemplateUtilitarianSmallFlat(textProvider: CLKSimpleTextProvider(text: "001")) return template } private func createModularLargeTemplate(forDate date: Date) -> CLKComplicationTemplate { // Create the template using the providers. let template = CLKComplicationTemplateModularLargeTable(headerTextProvider: CLKSimpleTextProvider(text: "001"), row1Column1TextProvider: CLKSimpleTextProvider(text: "001"), row1Column2TextProvider: CLKSimpleTextProvider(text: "001"), row2Column1TextProvider: CLKSimpleTextProvider(text: "001"), row2Column2TextProvider: CLKSimpleTextProvider(text: "001")) return template } // Return a modular small template. private func createModularSmallTemplate(forDate date: Date) -> CLKComplicationTemplate { // Create the data providers. let template = CLKComplicationTemplateModularSmallSimpleText(textProvider: CLKSimpleTextProvider(text: "001") ) return template } // Return a graphic circle template. private func createGraphicCircleTemplate(forDate date: Date) -> CLKComplicationTemplate { // Create the data providers. let userDefaults = UserDefaults.standard if let messageA = userDefaults.string(forKey: "message3") { //改行区切りでデータを分割して配列に格納する。 var dataList:[String] = [] dataList = messageA.components(separatedBy: "\n") //"-"区切りでデータを分割して配列に格納する。 var dataList2:[String] = [] if dataList.count == 5 { dataList2 = dataList[4].components(separatedBy: "-") } else{ dataList2.append("") dataList2.append("") dataList2[0] = "000" dataList2[1] = "0" } // centerTextProviderの実装 let centerText = CLKSimpleTextProvider(text: dataList2[0]) centerText.tintColor = .white let bottomText = CLKSimpleTextProvider(text: "Ens") bottomText.tintColor = .white //dataList[4] = "999" var value:Int = Int(dataList2[1])! if value > 20 { value = 20 } if dataList2[1] == "999" { value = 0 } let value_f:Float = Float(Float(value)/20) // gaugeProviderの実装 // let gaugeColor = UIColor(red: 255/255, green: 122/255.0, blue: 50/255.0, alpha: 1.0) let gaugeColor = UIColor(red: 0.0, green: 167.0/255.0, blue: 219.0/255.0, alpha: 1.0) let gaugeProvider = CLKSimpleGaugeProvider(style: .fill, gaugeColor: gaugeColor, fillFraction: value_f) let circularClosedGaugeTemplate = CLKComplicationTemplateGraphicCircularOpenGaugeSimpleText(gaugeProvider: gaugeProvider, bottomTextProvider: bottomText, centerTextProvider: centerText) return circularClosedGaugeTemplate } else{ // centerTextProviderの実装 let centerText = CLKSimpleTextProvider(text: "000") centerText.tintColor = .white let bottomText = CLKSimpleTextProvider(text: "Ens") bottomText.tintColor = .white let value_f:Float = 0 // gaugeProviderの実装 let gaugeColor = UIColor(red: 0.0, green: 167.0/255.0, blue: 219.0/255.0, alpha: 1.0) let gaugeProvider = CLKSimpleGaugeProvider(style: .fill, gaugeColor: gaugeColor, fillFraction: value_f) let circularClosedGaugeTemplate = CLKComplicationTemplateGraphicCircularOpenGaugeSimpleText(gaugeProvider: gaugeProvider, bottomTextProvider: bottomText, centerTextProvider: centerText) return circularClosedGaugeTemplate } } // Return a large rectangular graphic template. private func createGraphicRectangularTemplate(forDate date: Date) -> CLKComplicationTemplate { let userDefaults = UserDefaults.standard if let messageA = userDefaults.string(forKey: "message3") { //改行区切りでデータを分割して配列に格納する。 var dataList:[String] = [] dataList = messageA.components(separatedBy: "\n") var textString = "" var textString2 = "" if dataList.count == 3 { textString = "Eng_shu: " + dataList[2] } else if dataList.count == 5 { textString = "Eng_shu: " + dataList[4] textString2 = dataList[2] } else{ textString = "Eng_shu" } let textTemplate = CLKComplicationTemplateGraphicRectangularStandardBody(headerTextProvider: CLKSimpleTextProvider(text: textString ), body1TextProvider: CLKSimpleTextProvider(text: dataList[0] ), body2TextProvider: CLKSimpleTextProvider(text: textString2 )) return textTemplate } else{ let textString = "Eng_shu:000-00" let textString2 = "test" let textString3 = "test" let textTemplate = CLKComplicationTemplateGraphicRectangularStandardBody(headerTextProvider: CLKSimpleTextProvider(text: textString ), body1TextProvider: CLKSimpleTextProvider(text: textString2 ), body2TextProvider: CLKSimpleTextProvider(text: textString3 )) return textTemplate } } }

- 投稿日:2021-02-27T17:37:00+09:00
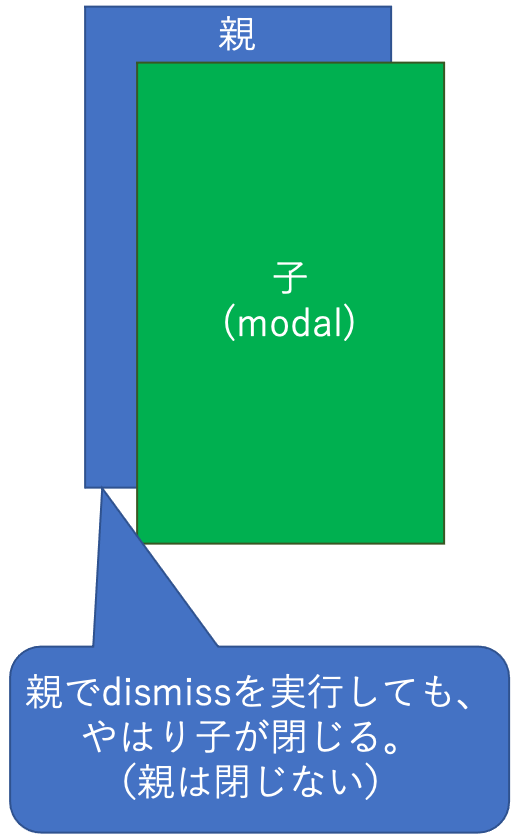
[iOS] [Swift] dismissの仕様を勘違いしていた件
前提環境
- iOS 14.4
- Xcode 12.1 / Swift 5.3
疑問
私は、UIViewControllerの
dismiss(:animated)はシンプルに「自身を閉じる」メソッドだと思い込んでいたのですが、どうやら勘違いでした。
同じ勘違いをされている方も案外多いのでは?と考えてこの記事を書きました。子のコードで
dismissを実行すると、子自身が閉じます。
これは直感通りの挙動です。
一方、Notificationやdelegateなどを介して親のコードで
dismissを実行すると、子が閉じて親は閉じません。
この挙動が私には意味不明でした。
わかったこと
公式リファレンスより:
calling this method on a view controller lower in the stack dismisses its immediate child view controller and all view controllers above that child on the stack. When this happens, only the top-most view is dismissed in an animated fashion
訳:スタックの下位のView Controllerでこのメソッドを呼び出すと、その直接の子ViewControllerとスタック上のその子の上のすべてのViewControllerが閉じられます。これが発生すると、最上部のビューのみがアニメーション化されて閉じられます。
子のコードで
dismissを実行すると子自身が閉じることも、
親のコードでdismissを実行すると子が閉じて親が閉じないことも、
dismissの仕様なんですね。補足
少々気になるのは、公式リファレンスには以下のような記述もあること。
The presenting view controller is responsible for dismissing the view controller it presented.
訳:提示するビューコントローラは、提示したビューコントローラを閉じる責任があります。
すなわち、子を閉じる責務は親にある、ということですよね。
ということは、子のコードで子自身を閉じたい時は、
dismiss(animated: true)じゃなくて、
presentingViewController?.dismiss(animated: true)と書く方が、
よりリファレンスに忠実なのでしょうかねぇ。とりあえず現状、そこまで厳密に捉える必要はないのかなと考えていますが…

- 投稿日:2021-02-27T17:23:45+09:00
【SwiftがWindows10に正式対応】WindowsでiOSアプリ開発を始めたかった
業務ではJavaばかり書いているバックエンド開発者で、Swift初心者です。
今はWindowsが愛機なので先日のニュースを見て、手を出したいなと思っていたiPhoneアプリ開発。
Windows × iPhoneアプリ開発の入門記事はXamarinでやっていた時代のものばかりだったので、メモを残しておきます。
用意するもの
- Window10のPC
- Visual Studio 2019
- Swift
Swiftインストール
https://swift.org/download/
swift toolchainをインストールします。Visual Studio 2019 インストール
https://visualstudio.microsoft.com/
こちらより、(ライセンスを持っていないので)Community版をダウンロードします。
インストールの際は、以下のコンポーネントを入れます。
必須
- Windows 10 SDK (10.0.17763.0以上)
- Windows Universal CRT SDK
- MSVC v142 - VS 2019 C++ x64/x86 ビルド ツール (v14.25以上)
推奨
- Python 3 64 ビット (3.7.8) …入ってるかつパス通せる人は不要
- Git for Windows
- Windows 用 C++ CMake ツール
- JSON エディター
設定
Windows10だとPythonのパスを通してあげないと、swiftコマンドは何やってもエラーになるので以下をコマンドプロンプトから実行します。
path %ProgramFiles(x86)%\Microsoft Visual Studio\Shared\Python37_64;%PATH%さらに、REPL(対話型のSwift実行環境)を使うためには、Swift toolchain→Windows SDKのアクセスを許可する必要があります。
set SWIFTFLAGS=-sdk %SDKROOT% -I %SDKROOT%/usr/lib/swift -L SDKROOT%/usr/lib/swift/windows
swift repl -target x86_64-unknown-windows-msvc %SWIFTFLAGS%
動いた!
これで動作確認をしてみます。
$> swift
Welcome to compnerd.org Swift version 5.3.3-dev (LLVM 3093af41dd, Swift 266905108e).
Type :help for assistance.
1> 1 + 2
$R2: Int = 3
Windows10でSwiftが動いたようです。やったね。
さて、Swift package managerを動かしてみるぞ!と思った矢先
swift package init
error: unable to invoke subcommand: C:\Library\Developer\Toolchains\unknown-Asserts-development.xctoolchain\usr\bin\swift-package ()
2021年2月27日現在、できないようです。非常に残念。
Swift Package Managerのサポートは近日中に、とのこと。待ちます。
できるようになったら記事更新します。
- 投稿日:2021-02-27T16:56:33+09:00
TabBarControllerのitem選択時にTableViewの一番上までスクロール
はじめに
TwitterやInstagramのようなTabBarのitemを選択したら一番上までスクロールするあれを実装したかった。
古い記事が多かったので、書いてみました。
実行環境
Swift5
Xcode 12.4コード
func tabBarController(_ tabBarController: UITabBarController, shouldSelect viewController: UIViewController) -> Bool {
        let tabBarIndex = tabBarController.selectedIndex
        if tabBarIndex == 0 && tabBarController.selectedViewController == tabBarController.viewControllers?[0] {

            let indexPath = NSIndexPath(row: 0, section: 0)
            let navVC = viewController as? UINavigationController
            let yourVC = navVC?.viewControllers[0] as? YourViewController
            yourVC?.tableView.scrollToRow(at: indexPath as IndexPath, at: .top, animated: true)

        }
        return true
    }
条件がtabBarIndexだけだと、画面の切替時にも一番上までスクロールしてしまうので、
選択されているVCを論理積で指定しました。おわりに
少し沼ったので共有させていただきました。
- 投稿日:2021-02-27T16:37:36+09:00
Combine.framework+DiffableDataSourceでリストUIを実装してみる
前置き
こんにちは。@zrn-nsです。
皆さんiPhoneは使っていますか?
iOS搭載のデバイスは価格が高い代わりに、ロングサポートしてくれるのが嬉しいですよね。
僕自身、スマホはiPhone派です。Androidは良い性能のデバイスを買っても、早々にベンダーによるサポートが打ち切られてしまうため、あまり長く使えず勿体ないんですよね。デバイスのサポート期間が長いというのは、エンジニアとしても大きなメリットになります。
多くの端末が最新OSにアップデートできるため、殆どの場合古いOSをサポートする必要がありません。一般的には、最新の2メジャーバージョンのみをサポートすればよいと言われているので、最新の開発機能を利用することができます。昨年9月にiOS14が登場したことで、そろそろiOS12のサポートを終了する事ができます。そうなるとiOS13に追加された幾つかのイケてる機能(SwiftUIやCombine.framework、NSDiffableDataSource等)を使用する事ができるようになります。
これを見据え、それらの機能の予習をしておこうと思います。
今回やること
今回は、iOS13から使えるようになる下記の2機能を使って、簡単なリスト表示機能(引っ張ってリロード、無限ページング付き)を作ってみます。
- Combine.framework
- NSDiffableDataSource
また今後SwiftUIへの以降も見据え、ViewサイドのアーキテクチャとしてMVVMを採用します。
↓動作イメージ↓
Combine.frameworkとは
iOS13から使える、Apple純正の非同期処理用のフレームワークです。
RxSwiftやReactiveSwiftに代表されるイベント通知の仕組みや、Promise/Futureなどの非同期処理の仕組みが含まれています。
SwiftUIで使用することも想定されているようです。NSDiffableDataSourceとは
iOS13から使える、UITableViewやUICollectionViewのDataSourceをより簡単に利用できる仕組みです。
これまでは、表示しているデータが変化した場合には、リストに表示されたセルの追加や削除、移動などを手動で管理する(もしくはreloadDataを呼んでまるごと更新するか)する必要がありましたが、NSDiffableDataSourceを利用すれば、最終的なデータの状態を宣言するだけで、セルの追加や削除、移動などの手続きは自動で行ってくれます。実装
今回作成したサンプルプロジェクトをGithubに上げてありますので、必要に応じてご覧ください。
https://github.com/zrn-ns/CombineSampleViewModelの実装
ViewModelの全体ソース(クリックで開きます)
ViewModel.swiftfinal class ViewModel { @Published private(set) var newsList: [News] = [] @Published private(set) var paging: Paging? = nil { didSet { needsToShowPagingCell = paging?.hasNext ?? false } } @Published private(set) var isLoading: Bool = false @Published private(set) var needsToShowPagingCell: Bool = false func viewDidLoad(vc: UIViewController) { router = Router() router?.viewController = vc fetchNewsFromServer() } func willDisplayNews(_ news: News) { if newsList.count - newsList.lastIndex(of: news)! < 5 { fetchNewsFromServer() } } func willDisplayPagingCell() { fetchNewsFromServer() } @objc func pulledDownRefreshControl() { paging = nil newsList = [] fetchNewsFromServer() } // MARK: - private private var router: Router? private var cancellables: Set<AnyCancellable> = [] private func fetchNewsFromServer() { guard !isLoading else { return } isLoading = true NewsRepository.fetchDataFromServer(paging: paging).sink { [weak self] completion in guard let _self = self else { return } _self.isLoading = false switch completion { case .failure(let error): _self.router?.showError(error) case .finished: break } } receiveValue: { [weak self] (newsList: [News], paging: Paging) in self?.newsList.append(contentsOf: newsList) self?.paging = paging }.store(in: &cancellables) } }部分部分に分けて説明します。
ViewModel側のイベントをViewに伝えるための監視可能プロパティ群
ViewModel.swift@Published private(set) var newsList: [News] = [] @Published private(set) var paging: Paging? = nil { didSet { needsToShowPagingCell = paging?.hasNext ?? false } } @Published private(set) var isLoading: Bool = false @Published private(set) var needsToShowPagingCell: Bool = falseView側からViewModelの変化を監視するためのプロパティです。
@PublishedというPropertyWrapperを付与することで、通常のPropertyに監視可能な要素としての振る舞いを付与する事ができます。また全て@Publishedをつけていますが、これらは簡単に監視可能プロパティを宣言するためであり、必ずしも付与する必要はなく、Publisherなどの監視可能プロパティを自力で宣言する事もできます。
View側のイベントをViewModelに伝えるためのメソッド群
ViewModel.swiftfunc viewDidLoad(vc: UIViewController) { router = Router() router?.viewController = vc fetchNewsFromServer() } func willDisplayNews(_ news: News) { if newsList.count - newsList.lastIndex(of: news)! < 5 { fetchNewsFromServer() } } func willDisplayPagingCell() { fetchNewsFromServer() } @objc func pulledDownRefreshControl() { paging = nil newsList = [] fetchNewsFromServer() }View側でイベントが発生したときに、それをViewModelに伝えるためのメメソッド群です。
イベントに応じて、データの取得などの処理を行っています。データ取得用メソッド
ViewModel.swiftprivate func fetchNewsFromServer() { guard !isLoading else { return } isLoading = true NewsRepository.fetchDataFromServer(paging: paging).sink { [weak self] completion in guard let _self = self else { return } _self.isLoading = false switch completion { case .failure(let error): _self.router?.showError(error) case .finished: break } } receiveValue: { [weak self] (newsList: [News], paging: Paging) in self?.newsList.append(contentsOf: newsList) self?.paging = paging }.store(in: &cancellables) }Repositoryにアクセスしてデータを取得し、取得できたらViewModelの状態を更新しています。
NewsRepository.fetchDataFromServer(paging:)の戻り値はPromiseになっており、非同期処理を実現しています。
(Future/PromiseもCombine.frameworkの機能の一部です)Viewの実装
ViewControllerの全体ソース(クリックで開きます)
ViewController.swiftprivate let NewsCellClassName = String(describing: NewsCollectionViewCell.self) private let NewsCellIdentifier: String = NewsCellClassName private let PagingCellClassName = String(describing: PagingCollectionViewCell.self) private let PagingCellIdentifier = PagingCellClassName class ViewController: UIViewController { enum Section: Int { case news case paging } enum Item: Hashable { case news(news: News) case paging } let viewModel: ViewModel = .init() // MARK: - lifecycle override func viewDidLoad() { super.viewDidLoad() viewModel.viewDidLoad(vc: self) setupSubscription() } // MARK: - outlet @IBOutlet private weak var collectionView: UICollectionView! { didSet { collectionView.delegate = self collectionView.dataSource = collectionViewDataSource collectionView.collectionViewLayout = Self.createLayout() collectionView.refreshControl = refreshControl collectionView.register(UINib(nibName: NewsCellClassName, bundle: nil), forCellWithReuseIdentifier: NewsCellIdentifier) collectionView.register(PagingCollectionViewCell.self, forCellWithReuseIdentifier: PagingCellIdentifier) } } // MARK: - private private var cancellables: Set<AnyCancellable> = [] private lazy var refreshControl: UIRefreshControl = { let control = UIRefreshControl() control.addTarget(viewModel, action: #selector(ViewModel.pulledDownRefreshControl), for: .valueChanged) return control }() private lazy var collectionViewDataSource: UICollectionViewDiffableDataSource<Section, Item> = .init(collectionView: collectionView) { (collectionView: UICollectionView, indexPath: IndexPath, item: Item) -> UICollectionViewCell? in // 要素に対して、どのようにセルを生成するかを定義する switch item { case .news(let news): let cell = collectionView.dequeueReusableCell(withReuseIdentifier: NewsCellIdentifier, for: indexPath) as! NewsCollectionViewCell cell.set(.init(news: news)) return cell case .paging: let cell = collectionView.dequeueReusableCell(withReuseIdentifier: PagingCellIdentifier, for: indexPath) as! PagingCollectionViewCell cell.startAnimating() return cell } } /// イベントの購読の登録を行う private func setupSubscription() { // ニュース一覧 viewModel.$newsList.receive(on: DispatchQueue.main).removeDuplicates().sink { [weak self] _ in self?.updateDataSource() }.store(in: &cancellables) // ページングセル viewModel.$needsToShowPagingCell.receive(on: DispatchQueue.main).removeDuplicates().sink { [weak self] _ in self?.updateDataSource() }.store(in: &cancellables) // ロード中表示 viewModel.$isLoading.receive(on: DispatchQueue.main).removeDuplicates().sink { [weak self] isLoading in UIApplication.shared.isNetworkActivityIndicatorVisible = isLoading if !isLoading { self?.refreshControl.endRefreshing() } }.store(in: &cancellables) } /// CollectionViewのLayoutを作成する private static func createLayout() -> UICollectionViewLayout { UICollectionViewCompositionalLayout { (sectionIndex: Int, layoutEnvironment: NSCollectionLayoutEnvironment) -> NSCollectionLayoutSection? in let itemSize = NSCollectionLayoutSize(widthDimension: .fractionalWidth(1.0), heightDimension: .estimated(50)) let item = NSCollectionLayoutItem(layoutSize: itemSize) let group = NSCollectionLayoutGroup.horizontal(layoutSize: itemSize, subitems: [item]) let section = NSCollectionLayoutSection(group: group) return section } } /// CollectionViewのデータソースを更新する private func updateDataSource() { var snapshot = NSDiffableDataSourceSnapshot<Section, Item>() snapshot.appendSections([.news]) snapshot.appendItems(viewModel.newsList.map({ .news(news: $0) }), toSection: .news) if viewModel.needsToShowPagingCell { snapshot.appendSections([.paging]) snapshot.appendItems([.paging], toSection: .paging) } collectionViewDataSource.apply(snapshot, animatingDifferences: true) } } extension ViewController: UICollectionViewDelegate { func collectionView(_ collectionView: UICollectionView, willDisplay cell: UICollectionViewCell, forItemAt indexPath: IndexPath) { guard let item = (collectionView.dataSource as? UICollectionViewDiffableDataSource<Section, Item>)?.itemIdentifier(for: indexPath) else { fatalError("不正な状態") } switch item { case .news(let news): viewModel.willDisplayNews(news) case .paging: viewModel.willDisplayPagingCell() } } }DiffableDataSource関連のコード
まず、
UICollectionViewDiffableDataSourceの生成を行います。
UICollectionViewDiffableDataSourceの宣言時に、ジェネリック型としてセクションの種類と、そこに表示されるデータ(≒セル)の種類を設定します(今回はSection, Itemというenumで表現しました)。また
UICollectionViewDiffableDataSourceのイニシャライザには、データに対してどのようなセルを生成するかをClosureとして定義して渡す必要があります。
- ニュースの要素(Item.news(news:))に対してはNewsCollectionViewCellを
- ページングの要素(Item.paging)に対してはPagingCollectionViewCellを
返すように実装しました。ViewController.swiftenum Section: Int { case news case paging } enum Item: Hashable { case news(news: News) case paging } private lazy var collectionViewDataSource: UICollectionViewDiffableDataSource<Section, Item> = .init(collectionView: collectionView) { (collectionView: UICollectionView, indexPath: IndexPath, item: Item) -> UICollectionViewCell? in switch item { case .news(let news): let cell = collectionView.dequeueReusableCell(withReuseIdentifier: NewsCellIdentifier, for: indexPath) as! NewsCollectionViewCell cell.set(.init(news: news)) return cell case .paging: let cell = collectionView.dequeueReusableCell(withReuseIdentifier: PagingCellIdentifier, for: indexPath) as! PagingCollectionViewCell cell.startAnimating() return cell } }次に、レイアウトを組み立てます。
    /// CollectionViewのLayoutを作成する
    private static func createLayout(collectionViewWidth: CGFloat) -> UICollectionViewLayout {
        UICollectionViewCompositionalLayout { (sectionIndex: Int, layoutEnvironment: NSCollectionLayoutEnvironment) -> NSCollectionLayoutSection? in
            let itemSize = NSCollectionLayoutSize(widthDimension: .fractionalWidth(1.0),
                                                  heightDimension: .estimated(50))
            let item = NSCollectionLayoutItem(layoutSize: itemSize)
            let group = NSCollectionLayoutGroup.horizontal(layoutSize: itemSize, subitems: [item])
            let section = NSCollectionLayoutSection(group: group)
            return section
        }
    }
UICollectionViewCompositionalLayoutを利用し、レイアウトを構成します。
sectionIndexで渡されたセクションに対して、どのようにレイアウトを組むのか宣言するのですが、今回はただ単にTableViewのように、縦一列のリストのレイアウトを生成しています。
itemSizeは各要素のサイズを示し、今回はwidthDimensionに.fractionalWidth(1.0)を設定することで、CollectionViewの横いっぱいに広がるようなレイアウトを実現しています。また
NSCollectionLayout[Section|Group|Item]という型が登場していますが、それぞれセクション全体、セクション内のグループ、それぞれのアイテムを示しています。
今回は1グループ1アイテムになっているのであまり活用できていませんが、うまく設定すると入れ子のような構造を実現できるようです。次にDiffableDataSourceを更新するためのメソッド定義です。
NSDiffableDataSourceSnapshotを生成し、それをDiffableDataSourceのapply()メソッドに渡すことで、自動的に画面が更新されます。
今回はviewModelに最新のデータが乗っているので、それらをかき集めてSnapshotを生成しています。/// CollectionViewのデータソースを更新する private func updateDataSource() { var snapshot = NSDiffableDataSourceSnapshot<Section, Item>() snapshot.appendSections([.news]) snapshot.appendItems(viewModel.newsList.map({ .news(news: $0) }), toSection: .news) if viewModel.needsToShowPagingCell { snapshot.appendSections([.paging]) snapshot.appendItems([.paging], toSection: .paging) } collectionViewDataSource.apply(snapshot, animatingDifferences: true) }最後に、下記のように、ここまで作成したdataSourceとLayoutをCollectionViewに設定します。
    @IBOutlet private weak var collectionView: UICollectionView! {
        didSet {
            collectionView.dataSource = collectionViewDataSource
            collectionView.collectionViewLayout = Self.createLayout()
            collectionView.register(UINib(nibName: NewsCellClassName, bundle: nil), forCellWithReuseIdentifier: NewsCellIdentifier)
            collectionView.register(PagingCollectionViewCell.self, forCellWithReuseIdentifier: PagingCellIdentifier)
        }
    }
MVVM関連のコード
ViewController.swiftlet viewModel: ViewModel = .init() private var cancellables: Set<AnyCancellable> = [] /// イベントの購読の登録を行う private func setupSubscription() { // ニュース一覧 viewModel.$newsList.receive(on: DispatchQueue.main).removeDuplicates().sink { [weak self] _ in self?.updateDataSource() }.store(in: &cancellables) // ページングセル viewModel.$needsToShowPagingCell.receive(on: DispatchQueue.main).removeDuplicates().sink { [weak self] _ in self?.updateDataSource() }.store(in: &cancellables) // ロード中表示 viewModel.$isLoading.receive(on: DispatchQueue.main).removeDuplicates().sink { [weak self] isLoading in UIApplication.shared.isNetworkActivityIndicatorVisible = isLoading if !isLoading { self?.refreshControl.endRefreshing() } }.store(in: &cancellables) } override func viewDidLoad() { super.viewDidLoad() viewModel.viewDidLoad(vc: self) setupSubscription() } }ViewModelをローカル変数として保持し、ViewModel内の監視可能プロパティ(Publisher)を監視しています。
ViewModel側で@Published付きで宣言された
newsListやneedsToShowPagingCellなどのプロパティは、先頭に$をつけてアクセスすることで、監視可能なPublisherを取得することができます。また、@Publishedを使ったPublisherのイベントの発行タイミングはwillSetのタイミングになっており、
receive(on: DispatchQueue.main)を使わずに監視すると、プロパティの実体が変化する前に処理が行われてしまい、意図しない動作をする可能性があるため注意が必要です。まとめ
今回はiOS13に同梱される予定の機能を幾つか利用してみました。
本当はSwiftUIへの書き換えまでやろうかと思ったのですが、SwiftUIではUIRefreshControlがまだ使えないらしく、一旦後回しにすることにしました?
(やりようはあるようなので、今後時間があれば試してみようと思います)まだReactiveProgrammingに慣れていないため、こう書いたほうがいいよ!みたいなのがあれば、ぜひコメントで教えてください?♂️

- 投稿日:2021-02-27T11:13:04+09:00
Xcodeで、既存のプロジェクトにCore Dataを追加した
はじめに
iOSアプリを途中まで作っていて、あとから
Core Dataを追加した。
Core Dataをつかうこと自体がはじめてCore Dataを後から追加するのはいろいろやることがあるの2点でハマったけれど、なんとかなったので記録する。
環境
下記のバージョンで実施。
- iOS 14.4
- Xcode 12.4
- macOS BigSur 11.1
主な結論
設定値の保管は
UserDefaultsもしくはAppStorageでよいが、あるていどのデータになるとCore DataをつかうべきCoreDataの構成を変えたとき(
EntityもしくはAttribute)は、アップデートする必要がある
@EnvironmentObjectを使うときとは違って、@Environment(\.managedObjectContext)を使ってFetchしたデータの、要素をForEachでViewにわたすと、値渡しではなく参照渡しになる手順
Core Dataの追加
- すでにプロジェクトがあって、
Core Dataを追加したい場合、File > New > File...でCoreData > Data Modelを選択
次に、
EntityとAttributeを追加する。クラス定義ファイルの生成
EntityのInspector > Data Model Inspectorパネルで、Entity > CodegenをManual/Noneに変更- メニューから
Editor > Create NSManagedObject subclass...を選択し、クラス定義ファイルを生成する
Core Dateのデータベース(っていうのかな?)の追加はこれで完了。
Core Dataのデータベースのアップデート時の操作
まず、メニューから
Editor > Add Model Version...をクリックし、指示に従う次に、
InspectorのFile Inspector > Core Data Model > Model Versionで新しく作ったものを選んでおくこれをしておかないと、アプリがクラッシュする(した)。どうやら、データベースの
EntityやAttributeを変更したら、これをやっておかないといけない。リソース
ここまでについて、画像入りの解説記事は、たとえば下記に詳しい:
iOSにユーザーデータを保存する方法と、そのためのコードの書き方: UserDefaults、Core Data、Key Chain、CloudKit - Qiitaプロジェクト作成時に、Life Cycleで
SwiftUI Appを選択していると、AppDelegate.swiftが存在しない。上記記事で、AppDelegate.swiftに関する箇所は読み飛ばした。代わりにやったことは、下記に記す。追加するコード
いろいろ試したが、けっきょく「
Core Dataつきの新規プロジェクトをつくって、ファイルや要素をコピーしてくる」のが手間が少ない気がする。
Persistence.swiftのコピーと修正
新規プロジェクトを作成し、その際に
Use Core Dataにチェックを入れる
Persistence.swiftをコピーしてくる手で変更を要する箇所は、
static var preview: PersistenceController = {
    let result = PersistenceController(inMemory: true)
    let viewContext = result.container.viewContext
    for _ in 0..<10 {
        let newItem = Item(context: viewContext)
        newItem.timestamp = Date()
    }
の
newItem.timestamp = Date()のところ。.timestampとDate()をじぶんのデータベースのAttributeにあわせる。ここは、プレビュー用のテストデータセットなので、値は適当でよい。それと、
init(inMemory: Bool = false) {
    container = NSPersistentContainer(name: "anotherNewCoreData")
    if inMemory {
        container.persistentStoreDescriptions.first!.url = URL(fileURLWithPath: "/dev/null")
    }
の
(name: "anotherNewCoreData")を、じぶんのデータベースのEntityの名前にあわせる。
@mainについて
- 新規プロジェクトをパクる。具体的には
let persistenceController = PersistenceController.sharedContentView() .environment(\.managedObjectContext, persistenceController.container.viewContext)の2箇所。
Content Viewについて
- ここからは個別対応になってきて一般化しがたいが、主には下記。
@Environment(\.managedObjectContext) private var viewContext

@FetchRequest(
    sortDescriptors: [NSSortDescriptor(keyPath: \Item.timestamp, ascending: true)],
    animation: .default)
private var items: FetchedResults<Item>
のところ。
@Environmentを宣言し、@FetchRequestで取りかたを指定し、itemsに格納する。
ItemsはEntityの名称に置き換え、itemsは自分の使いたい変数名にした。private func addItem() { ... } private func deleteItems(offsets: IndexSet) { ... }のところは、呼び方から書き方(
Core Dataへの保存のしかた)まで、流用した。static var previews: some View { ContentView().environment(\.managedObjectContext, PersistenceController.preview.container.viewContext) }はプレビューの使いかた。
小ビューに取得したデータベースのレコードをわたす方法が未だにわからない...
データのわたしかたと操作
親ビューでたとえば
NavigationView{
    List {
        ForEach(records) {record in
            RecordRow(record: record)
        }
    }
と、
recordを下層ビューに渡したとする。受け取った下層ビューはImage(systemName: "checkmark.seal") .onTapGesture { record.isDone.toggle()と書くだけで、タップするトグルされる。
@EnvironmentObjectを使ってrecordsを共有した場合、ModelData.recordsはたしかに共有されているが、ビューに渡したrecordは共有されていない(値渡し)になるので、ModelData.records[index].isDone.toggle()などとしないといけない。ところが、
@Environment(\.managedObjectContext)の場合は、参照渡しになっているので、直接書き換えられる。と理解しているのだけれど違っていたらご指摘ください……
保存のおまけ
新規プロジェクトからの流用ではないが、下記をやっておくとたしかに便利。
ホームボタンを押したときや、アプリを終了したときに、
Core Dateに保存しておいてくれる
Persistence.swiftにstruct PersistenceController { ... func save() { let context = container.viewContext if context.hasChanges { do { try context.save() } catch { // Show some error here } } } }と書いておき、
@mainで@main struct xxxxxxApp: App { let persistenceController = PersistenceController.shared @Environment(\.scenePhase) var scenePhase var body: some Scene { WindowGroup { ... } .onChange(of: scenePhase) { _ in persistenceController.save() } } }これは
How to configure Core Data to work with SwiftUIより。英語だし、ちょっと説明が飛んでいるところもあるけれど、新しい情報なのですごく助かった。
その他リソース
Add, Delete & Save in Core Data in SwiftUI にもずいぶん助けられた。
カピ通信 - SwiftUI もとてもわかりやすい。残念ながら、発見したのが遅かった。最初に見つけていれば、もっとラクだったのになあ!
おわりに
けっこう悩んだけど、動くとおもしろい!!
ネット上の各種リソースに深謝?

- 投稿日:2021-02-27T04:00:02+09:00
7日目2個目設定した時間を経過したら処理を行わせる
7日目のアプリ
ボタンを押すと、半透明になって、0.5秒後に戻る。アプリ。
画面キャプチャ
以下の流れで作りました。
- 7日目1個目のアプリに以下のコードを追記しました。 ``` sender.alpha = 0.5 DispatchQueue.main.asyncAfter(deadline: .now() + 0.5) { sender.alpha = 1.0 }
##できたこと
+ 一定時間経ったら処理を行うときのコードがわかった。
##書いたコードを共有します!
import UIKit
import AVFoundationclass ViewController: UIViewController {
override func viewDidLoad() {
    super.viewDidLoad()
}

var player: AVAudioPlayer!

func playSound(pressedKey: String) {

    let url = Bundle.main.url(forResource: pressedKey, withExtension: "wav")
    player = try! AVAudioPlayer(contentsOf: url!)
    player.play()
}

@IBAction func keyPressed(_ sender: UIButton) {

    playSound(pressedKey: sender.currentTitle!)

    // ボタンを押した瞬間はちょっと薄くなる。
    sender.alpha = 0.5

    //0.5秒後にかっこ内の処理をする
    DispatchQueue.main.asyncAfter(deadline: .now() + 0.5) {
    sender.alpha = 1.0
    }

}
}
##感想
こういうのを自分の中でストックしていけば、なんでもできる!よねきっとw

- 投稿日:2021-02-27T00:58:02+09:00
【Swift】【30秒で読める】アプリ内でレビューを求める方法
早速手順を紹介します!
1. Storekitをインポートする
import StoreKit
2. これをレビューしたいタイミングのところに記述
if let scene = UIApplication.shared.connectedScenes.first as? UIWindowScene {
                SKStoreReviewController.requestReview(in: scene)
            }
おわり!
参考文献
https://zenn.dev/donchan922/articles/61a5684c1a2c520abc8e
https://stackoverflow.com/questions/64029622/swift-app-cannot-find-skstoreproductviewcontroller-in-scope
- 投稿日:2021-02-27T00:20:02+09:00
iOS設定アプリ内のアプリ設定画面を開く
はじめに
位置情報取得や画像取得などについて、初回の許可設定で拒否されてしまうと、その後ずっとそれらのデータを取得できない状態になってしまいます。
このような場合にiOS設定アプリ内の画面から設定変更してもらうために設定画面を自動で表示するのが効果的です。
設定画面の表示方法を説明します。
やり方
決まったURLをopenするだけです。
URLは、UIApplication.openSettingsURLStringで取得できるので、下記のようにそのURLをopenするだけです。設定画面を表示する.swiftlet url = URL(string: UIApplication.openSettingsURLString)! UIApplication.shared.open(url, options: [:], completionHandler: nil)確認環境
Xcode: 12.4
iOS: 14.4