- 投稿日:2021-02-25T23:50:21+09:00
【メモ】Docker環境構築 マイグレーション時のエラーとmysql8.0でのエラー
マイグレーション時のエラー
root@**********:/work# php artisan migrate

   Illuminate\Database\QueryException  : SQLSTATE[HY000] [1045] Access denied for user 'ogge'@'172.26.0.3' (using password: YES) (SQL: select * from information_schema.tables where table_schema = laravel_local and table_name = migrations and table_type = 'BASE TABLE')

  at /work/vendor/laravel/framework/src/Illuminate/Database/Connection.php:669
    665|         // If an exception occurs when attempting to run a query, we'll format the error
    666|         // message to include the bindings with SQL, which will make this exception a
    667|         // lot more helpful to the developer instead of just the database's errors.
    668|         catch (Exception $e) {
  > 669|             throw new QueryException(
    670|                 $query, $this->prepareBindings($bindings), $e
    671|             );
    672|         }
    673|

  Exception trace:

  1   PDOException::("SQLSTATE[HY000] [1045] Access denied for user 'ogge'@'172.26.0.3' (using password: YES)")
      /work/vendor/laravel/framework/src/Illuminate/Database/Connectors/Connector.php:70

  2   PDO::__construct("mysql:host=db;port=3306;dbname=laravel_local", "ogge", "secret", [])
      /work/vendor/laravel/framework/src/Illuminate/Database/Connectors/Connector.php:70

  Please use the argument -v to see more details.
.env
DB_CONNECTION=mysql
DB_HOST=db
DB_PORT=3306
DB_DATABASE=laravel_local
DB_USERNAME=*****
DB_PASSWORD=*****
.env.example
DB_CONNECTION=mysql DB_HOST=db DB_PORT=3306 DB_DATABASE=laravel_local DB_USERNAME=***** DB_PASSWORD=*****database.php'mysql' => [ 'driver' => 'mysql', 'url' => env('DATABASE_URL'), 'host' => env('DB_HOST', 'db'), 'port' => env('DB_PORT', '3306'), 'database' => env('DB_DATABASE', 'laravel_local'), 追記 'username' => env('DB_USERNAME', ''), 'password' => env('DB_PASSWORD', ''), 'unix_socket' => env('DB_SOCKET', ''),以上3つを修正してマイグレーション
root@:*********:/work# php artisan migrate
Migration table created successfully.
Migrating: 2014_10_12_000000_create_users_table
Migrated:  2014_10_12_000000_create_users_table (0.14 seconds)
Migrating: 2014_10_12_100000_create_password_resets_table
Migrated:  2014_10_12_100000_create_password_resets_table (0.06 seconds)
Migrating: 2019_08_19_000000_create_failed_jobs_table
Migrated:  2019_08_19_000000_create_failed_jobs_table (0.03 seconds)
成功だね!!!
その後コンテナに入ってmysqlを立ち上げ?
C:\Users\****\*****\****>docker-compose exec db bash
root@*******:/# mysql -u ***** -p
Enter password:
Welcome to the MySQL monitor.  Commands end with ; or \g.
Your MySQL connection id is 15
Server version: 8.0.23 MySQL Community Server - GPL

Copyright (c) 2000, 2021, Oracle and/or its affiliates.

Oracle is a registered trademark of Oracle Corporation and/or its
affiliates. Other names may be trademarks of their respective
owners.

Type 'help;' or '\h' for help. Type '\c' to clear the current input statement.
どんなユーザーがあるか確認したところエラー
mysql> select user, host from mysql.user;
ERROR 1142 (42000): SELECT command denied to user '****'@'localhost' for table 'user'
rootで入り直して
root@*******:/# mysql -u root -p
Enter password:
Welcome to the MySQL monitor.  Commands end with ; or \g.
Your MySQL connection id is 16
Server version: 8.0.23 MySQL Community Server - GPL

Copyright (c) 2000, 2021, Oracle and/or its affiliates.

Oracle is a registered trademark of Oracle Corporation and/or its
affiliates. Other names may be trademarks of their respective
owners.

Type 'help;' or '\h' for help. Type '\c' to clear the current input statement.
どのユーザーがいるか確認。
hostに%が付いていると,User項目が使えなくなる為,さっきの場合だとコマンドが受け付けてくれなかった。
因みに%はワイルドカードと言うらしく,どんなホストでもサーバーに繋げれるらしい。
※間違ってたらごめんね。【参照】https://rfs.jp/server/mysql/m02/04-11.html
mysql> select host,user from mysql.user;
+-----------+------------------+
| host      | user             |
+-----------+------------------+
| %         | *****            |
| %         | root             |
| localhost | mysql.infoschema |
| localhost | mysql.session    |
| localhost | mysql.sys        |
| localhost | root             |
+-----------+------------------+
6 rows in set (0.01 sec)
権限の確認を行って
mysql> SHOW GRANTS for '*****'@'%';
+-----------------------------------------------------------+
| Grants for *****@%                                        |
+-----------------------------------------------------------+
| GRANT USAGE ON *.* TO `*****`@`%`                         |
| GRANT ALL PRIVILEGES ON `laravel\_local`.* TO `*****`@`%` |
+-----------------------------------------------------------+
2 rows in set (0.01 sec)
終了!!
- 投稿日:2021-02-25T23:50:21+09:00
【メモ】Laravel Docker環境構築 マイグレーション時のエラーとmysql8.0でのエラー
マイグレーション時のエラー
root@**********:/work# php artisan migrate

   Illuminate\Database\QueryException  : SQLSTATE[HY000] [1045] Access denied for user 'ogge'@'172.26.0.3' (using password: YES) (SQL: select * from information_schema.tables where table_schema = laravel_local and table_name = migrations and table_type = 'BASE TABLE')

  at /work/vendor/laravel/framework/src/Illuminate/Database/Connection.php:669
    665|         // If an exception occurs when attempting to run a query, we'll format the error
    666|         // message to include the bindings with SQL, which will make this exception a
    667|         // lot more helpful to the developer instead of just the database's errors.
    668|         catch (Exception $e) {
  > 669|             throw new QueryException(
    670|                 $query, $this->prepareBindings($bindings), $e
    671|             );
    672|         }
    673|

  Exception trace:

  1   PDOException::("SQLSTATE[HY000] [1045] Access denied for user 'ogge'@'172.26.0.3' (using password: YES)")
      /work/vendor/laravel/framework/src/Illuminate/Database/Connectors/Connector.php:70

  2   PDO::__construct("mysql:host=db;port=3306;dbname=laravel_local", "ogge", "secret", [])
      /work/vendor/laravel/framework/src/Illuminate/Database/Connectors/Connector.php:70

  Please use the argument -v to see more details.
.env
DB_CONNECTION=mysql
DB_HOST=db
DB_PORT=3306
DB_DATABASE=laravel_local
DB_USERNAME=*****
DB_PASSWORD=*****
.env.example
DB_CONNECTION=mysql DB_HOST=db DB_PORT=3306 DB_DATABASE=laravel_local DB_USERNAME=***** DB_PASSWORD=*****database.php'mysql' => [ 'driver' => 'mysql', 'url' => env('DATABASE_URL'), 'host' => env('DB_HOST', 'db'), 'port' => env('DB_PORT', '3306'), 'database' => env('DB_DATABASE', 'laravel_local'), 追記 'username' => env('DB_USERNAME', ''), 'password' => env('DB_PASSWORD', ''), 'unix_socket' => env('DB_SOCKET', ''),以上3つを修正してマイグレーション
root@:*********:/work# php artisan migrate

Migration table created successfully.
Migrating: 2014_10_12_000000_create_users_table
Migrated:  2014_10_12_000000_create_users_table (0.14 seconds)
Migrating: 2014_10_12_100000_create_password_resets_table
Migrated:  2014_10_12_100000_create_password_resets_table (0.06 seconds)
Migrating: 2019_08_19_000000_create_failed_jobs_table
Migrated:  2019_08_19_000000_create_failed_jobs_table (0.03 seconds)
成功だね!!!
その後コンテナに入ってmysqlを立ち上げ?
C:\Users\****\*****\****>docker-compose exec db bash
root@*******:/# mysql -u ***** -p
Enter password:

Welcome to the MySQL monitor.  Commands end with ; or \g.
Your MySQL connection id is 15
Server version: 8.0.23 MySQL Community Server - GPL

Copyright (c) 2000, 2021, Oracle and/or its affiliates.

Oracle is a registered trademark of Oracle Corporation and/or its
affiliates. Other names may be trademarks of their respective
owners.

Type 'help;' or '\h' for help. Type '\c' to clear the current input statement.
どんなユーザーがあるか確認したところエラー
mysql> select user, host from mysql.user;

ERROR 1142 (42000): SELECT command denied to user '****'@'localhost' for table 'user'
rootで入り直して
root@*******:/# mysql -u root -p
Enter password:

Welcome to the MySQL monitor.  Commands end with ; or \g.
Your MySQL connection id is 16
Server version: 8.0.23 MySQL Community Server - GPL

Copyright (c) 2000, 2021, Oracle and/or its affiliates.

Oracle is a registered trademark of Oracle Corporation and/or its
affiliates. Other names may be trademarks of their respective
owners.

Type 'help;' or '\h' for help. Type '\c' to clear the current input statement.
どのユーザーがいるか確認。
hostに%が付いていると,User項目が使えなくなる為,さっきの場合だとコマンドが受け付けてくれなかった。
因みに%はワイルドカードと言うらしく,どんなホストでもサーバーに繋げれるらしい。
※間違ってたらごめんね。【参照】https://rfs.jp/server/mysql/m02/04-11.html
mysql> select host,user from mysql.user;
+-----------+------------------+
| host      | user             |
+-----------+------------------+
| %         | *****            |
| %         | root             |
| localhost | mysql.infoschema |
| localhost | mysql.session    |
| localhost | mysql.sys        |
| localhost | root             |
+-----------+------------------+
6 rows in set (0.01 sec)
権限の確認を行って
mysql> SHOW GRANTS for '*****'@'%';

+-----------------------------------------------------------+
| Grants for *****@%                                        |
+-----------------------------------------------------------+
| GRANT USAGE ON *.* TO `*****`@`%`                         |
| GRANT ALL PRIVILEGES ON `laravel\_local`.* TO `*****`@`%` |
+-----------------------------------------------------------+
2 rows in set (0.01 sec)
終了!!
- 投稿日:2021-02-25T23:38:43+09:00
Dockerのコンテナでオレオレ認証局を立ててサーバー証明書に署名する
DockerコンテナでHTTPS通信をする必要があったので、オレオレ認証局コンテナを作成してオレオレルート証明書を発行し、サーバ証明書に署名しました。
オレオレ認証局についての記事はすでにたくさんありますがメモとして残しておきます。
Docker固有の操作は最初の方だけなので、OpenSSLの操作にのみ興味のある方は「オレオレルート証明書の作成」まで飛んでください。
署名の詳しい仕組みについては扱いません。
環境
・Windows 10 Home 20H2
・Docker version 20.10.2オレオレ認証局コンテナの作成
まずはオレオレ認証局コンテナを作成します。
OpenSSLで署名鍵(秘密鍵)や証明書を扱うのでAlpine Linuxのイメージを元にオレオレ認証局のイメージを作っていきましょう。
DockerfileFROM alpine RUN apk add --update openssl && \ rm -rf /var/cache/apk/*PowerShellでDockerfileのあるディレクトリに移動した上でdocker buildコマンドを実行し、コンテナを作ります。
> docker build -t openssl ./イメージができたので、イメージからコンテナを生成するためにdocker-compose.ymlを書いていきます。
docker-compose.ymlversion: '3' services: rootCA: image: openssl hostname: rootCA volumes: - ./rootCA/etc/pki:/etc/pki tty: trueコンテナを停止しても作成した秘密鍵などが消えないように、適当なvolumeを作成しておく必要があります。
> docker compose upオレオレルート証明書の作成
オレオレ認証局コンテナができたので、オレオレルート証明書(自己署名証明書)を発行していきます。
OpenSSLはデフォルトの設定ファイルとしてある場所のopenssl.cnfを参照します。
Alpine Linuxの場合はUbuntuなどと同じく/etc/ssl/openssl.cnfにあります。/etc/ssl # ls cert.pem ct_log_list.cnf misc openssl.cnf.dist certs ct_log_list.cnf.dist openssl.cnf privateCentOSなどの場合は/etc/pki/tls/openssl.cnfにあるようです。
設定ファイルはvolumeの下に置いておきたいのでコピーしておきます。/etc/ssl # cd /etc/pki /etc/pki # cp /etc/ssl/openssl.cnf ./コピーしたファイルを編集していきます。
default_md = sha256 #77行目 デフォルトのハッシュ関数を変更
default_bits = 4096 #108行目 デフォルトの公開鍵のビット数を変更
countryName_default = JP #131行目 デフォルトの国コード
stateOrProvinceName_default = Tokyo #136行目 デフォルトの都道府県名
localityName_default = Shinjuku #139行目 デフォルトの地域
0.organizationName_default = iamMe inc. #142行目 オレオレ認証局の組織
default_bitsは元々は2048ビットで、これは現在のところ十分な強度のあるRSA鍵の長さとされていますが、せっかくなので4096ビットにしてみました。それではいよいよオレオレルート証明書の作成の段階に入っていきます。
ワンライナーで一気にルート証明書を発行する方法もあるようですが今回は順を追ってコマンドを実行していきます。
まずはAES256で暗号化されたパスフレーズ付きの4096bitRSA署名鍵(privkey.pem)を作成します。/etc/pki # mkdir private /etc/pki # openssl genrsa -aes256 -out ./private/privkey.pem 4096この際パスフレーズを尋ねられます。
ここで入力したパスフレーズはprivkey.pemを署名に使用するたびに尋ねられます。署名鍵の中身を確認するには次のコマンドを使用します。
/etc/pki # openssl rsa -text -noout -in ./private/privkey.pem中身は次の通りです。
RSA Private-Key: (4096 bit, 2 primes)
modulus:
    00:d4:a1:1a:5d:88:37:ba:62:c3:80:b2:e2:2b:6d:
    (中略)
    ee:48:41
publicExponent: 65537 (0x10001)
privateExponent:
    00:b2:c6:19:62:d6:aa:f4:5d:21:bf:4d:a7:f7:97:
    (中略)
    0a:a3:59
prime1:
    00:eb:27:a3:28:e3:cd:20:97:7a:d6:24:ff:2a:f9:
    (中略)
    99:83
prime2:
    00:e7:7a:4b:63:5b:7f:44:97:b3:35:90:5e:2e:a6:
    (中略)
    9f:eb
exponent1:
    3a:a8:9c:8e:aa:a4:94:a8:b4:bf:8e:63:08:79:38:
    (中略)
    b9
exponent2:
    56:c9:00:18:c9:46:26:f6:65:47:30:d0:4e:d7:26:
    (中略)
    6f
coefficient:
    00:d7:ec:19:72:d6:48:eb:ec:f5:f8:28:b5:fe:3c:
    (中略)
    b0:93
prime1とprime2は知られるとまずい2つの素数$p$と$q$、privateExponentは$(p-1)(q-1)$でやはり知られるとまずい値です。exponent1やexponent2、coefficientは署名や(RSA鍵を暗号として使う場合の)複号の計算を効率的に進めるための値らしいです。次にさっき編集したopenssl.cnfを読み込んで、自己署名証明書署名要求(cacert.csr)を発行します。
/etc/pki # mkdir cert
/etc/pki # openssl req -new -key ./private/privkey.pem -config openssl.cnf -out ./cert/cacert.csr
いろいろ聞かれますが、openssl.cnfに書き込んだ設定がデフォルトの値に反映されているので入力する箇所はほとんどありません。
You are about to be asked to enter information that will be incorporated
into your certificate request.
What you are about to enter is what is called a Distinguished Name or a DN.
There are quite a few fields but you can leave some blank
For some fields there will be a default value,
If you enter '.', the field will be left blank.
-----
Country Name (2 letter code) [JP]: <=入力せずEnter
State or Province Name (full name) [Tokyo]:  <=入力せずEnter
Locality Name (eg, city) [Shinjuku]:  <=入力せずEnter
Organization Name (eg, company) [iamMe inc.]:  <=入力せずEnter
Organizational Unit Name (eg, section) []:  <=入力せずEnter
Common Name (e.g. server FQDN or YOUR name) []:MY OWN CERTIFICATE AUTHORITY <=好きな名前を入力
Email Address []: <=入力せずEnter

Please enter the following 'extra' attributes
to be sent with your certificate request
A challenge password []: <=入力せずEnter
An optional company name []: <=入力せずEnter
署名要求の中身は次のコマンドで確認します。
/etc/pki # openssl req -text -noout -in ./cert/cacert.csr中身はこんな感じです。
Certificate Request:
    Data:
        Version: 1 (0x0)
        Subject: C = JP, ST = Tokyo, L = Shinjuku, O = iamMe inc., CN = MY OWN CERTIFICATE AUTHORITY
        Subject Public Key Info:
            Public Key Algorithm: rsaEncryption
                RSA Public-Key: (4096 bit)
                Modulus:
                    00:d4:a1:1a:5d:88:37:ba:62:c3:80:b2:e2:2b:6d:
                    (中略)
                    ee:48:41
                Exponent: 65537 (0x10001)
        Attributes:
            a0:00
    Signature Algorithm: sha256WithRSAEncryption
         61:75:01:a6:03:eb:ee:4c:8c:9a:73:fe:32:30:c3:56:48:25:
         (中略)
         2b:62:2c:2b:f5:c4:74:72
RSA Public-Key: (4096 bit)やSignature Algorithm: sha256WithRSAEncryptionに先ほど編集したopenssl.cnfの設定が反映されていることがわかります。
最後に、この証明書署名要求に自分の署名鍵を使って署名してオレオレルート証明書(cacert.pem)を発行します。
etc/pki # openssl x509 -req -in ./cert/cacert.csr -signkey ./private/privkey.pem -days 1000 -out ./cert/cacert.pem
-days 1000は証明書の有効日数の指定です。証明書の中身は次のコマンドで確認します。
/etc/pki # openssl x509 -text -noout -in ./cert/cacert.pem中身はこんな感じです。
Certificate:
    Data:
        Version: 1 (0x0)
        Serial Number:
            2c:b3:0f:be:54:af:3c:2f:1f:bd:a7:6e:6f:41:6f:44:5a:a2:e7:74
        Signature Algorithm: sha256WithRSAEncryption
        Issuer: C = JP, ST = Tokyo, L = Shinjuku, O = iamMe inc., CN = MY OWN CERTIFICATE AUTHORITY
        Validity
            Not Before: Feb 22 14:50:38 2021 GMT
            Not After : Nov 19 14:50:38 2023 GMT
        Subject: C = JP, ST = Tokyo, L = Shinjuku, O = iamMe inc., CN = MY OWN CERTIFICATE AUTHORITY
        Subject Public Key Info:
            Public Key Algorithm: rsaEncryption
                RSA Public-Key: (4096 bit)
                Modulus:
                    00:d4:a1:1a:5d:88:37:ba:62:c3:80:b2:e2:2b:6d:
                    (中略)
                    ee:48:41
                Exponent: 65537 (0x10001)
    Signature Algorithm: sha256WithRSAEncryption
         d3:35:85:95:53:4e:39:fc:26:03:3d:5f:b7:ac:b6:87:31:79:
         (中略)
         be:36:e1:a2:6e:d0:1d:74
当然ですが、IssuerとSubjectが同一です。
公開鍵基盤の仕組みでは、ルート認証局が自分で署名したルート証明書を信頼するほかありません。オレオレルート認証局が署名したサーバー証明書の発行
サーバー証明書を発行してほしいサーバーでの操作
次はサーバー証明書を発行します。
まずサーバーにOpenSSLをインストールします。
私の場合、証明書を発行してほしいのはnode:alpineコンテナなので、インストールもさっきと同じ操作です。/etc/ssl # cd /etc/pki /etc/pki # cp /etc/ssl/openssl.cnf ./openssl.cnfをvolumeの下にコピーして編集していきます。
default_md = sha256 #77行目 デフォルトのハッシュ関数を変更
default_bits = 4096 #108行目 デフォルトの公開鍵のビット数を変更
countryName_default = JP #131行目 デフォルトの国コード
stateOrProvinceName_default = Tokyo #136行目 デフォルトの都道府県名
localityName_default = Shibuya #139行目 デフォルトの地域
0.organizationName_default = YouareYou inc. #142行目 オレオレ認証局の組織
署名鍵の生成と証明書署名要求の作成まではさっきと同じコマンドです。
まず署名鍵(privkey.pem)を生成します。/etc/pki # mkdir private /etc/pki # openssl genrsa -aes256 -out ./private/privkey.pem 4096ここで新たにパスフレーズを決めます。
生成した署名鍵を用いて証明書署名要求(servercert.csr)を作成します。/etc/pki # mkdir cert /etc/pki # openssl req -new -key ./private/privkey.pem -config openssl.cnf -out ./cert/servercert.csr質問されるので答えます。
You are about to be asked to enter information that will be incorporated
into your certificate request.
What you are about to enter is what is called a Distinguished Name or a DN.
There are quite a few fields but you can leave some blank
For some fields there will be a default value,
If you enter '.', the field will be left blank.
-----
Country Name (2 letter code) [JP]: <=入力せずEnter
State or Province Name (full name) [Tokyo]:  <=入力せずEnter
Locality Name (eg, city) [Shibuya]:  <=入力せずEnter
Organization Name (eg, company) [YouareYou inc.]:  <=入力せずEnter
Organizational Unit Name (eg, section) []:  <=入力せずEnter
Common Name (e.g. server FQDN or YOUR name) []:web1.local.com <=サーバーのドメイン名(私の場合はDockerのネットワークでのコンテナ名のエイリアス)
Email Address []: <=入力せずEnter

Please enter the following 'extra' attributes
to be sent with your certificate request
A challenge password []: <=入力せずEnter
An optional company name []: <=入力せずEnter
作ったcacert.csrを何らかの方法でオレオレ認証局にコピーします。
オレオレ認証局での操作
コピーしてきた証明書発行要求に、オレオレ認証局の署名鍵を使って署名します。
他のサーバーの証明書署名発行要求に署名するため、さっきとはコマンドのオプションが違います。# openssl x509 -req -in ./cert/servercert.csr -CA ./cert/servercert.pem -CAkey ./private/privkey.pem -C中身を確認してみましょう。
# openssl x509 -text -noout -in ./cert/web1.local.com.cert.pem
Certificate:
    Data:
        Version: 1 (0x0)
        Serial Number:
            22:91:d6:82:1e:3d:6c:af:eb:06:2a:38:c4:c3:da:f8:05:e0:6c:51
        Signature Algorithm: sha256WithRSAEncryption
        Issuer: C = JP, ST = Tokyo, L = Shinjuku, O = iamMe inc., CN = MY OWN CERTIFICATE AUTHORITY
        Validity
            Not Before: Feb 22 15:26:07 2021 GMT
            Not After : May 28 15:26:07 2023 GMT
        Subject: C = JP, ST = Tokyo, L = Shibuya, O = YouareYou inc., CN = web1.local.com
        Subject Public Key Info:
            Public Key Algorithm: rsaEncryption
                RSA Public-Key: (4096 bit)
                Modulus:
                    00:b9:05:f9:25:82:73:8f:c4:1f:43:45:c1:d3:59:
                    (中略)
                    0e:10:a1
                Exponent: 65537 (0x10001)
    Signature Algorithm: sha256WithRSAEncryption
         05:3a:eb:c5:10:7b:1b:6b:47:f1:ae:30:be:95:b7:1a:a0:38:
         (中略)
         d8:7a:d3:8a:2a:60:f0:99
今回はIssuerとSubjectが異なります。
検証者はこのサーバー証明書の検証鍵を使って署名を検証します。
検証に成功するような証明書を発行できるのは認証局の署名鍵を知っている者(認証局自身)だけなので、このサーバー証明書を発行したのは認証局だということを検証者は確認できます。
また、認証局は証明書を発行する前に証明対象(この場合YouareYou inc.やweb1.local.com)についてきちんと調べる(はず)ので、証明対象が本物であることも検証者は確認できます。
- 投稿日:2021-02-25T20:58:08+09:00
DockerでNode.jsアプリを起動する
概要
先日作ったSlackBotを定期実行したいため、Dockerでnodejsの環境を構築します。
前提条件
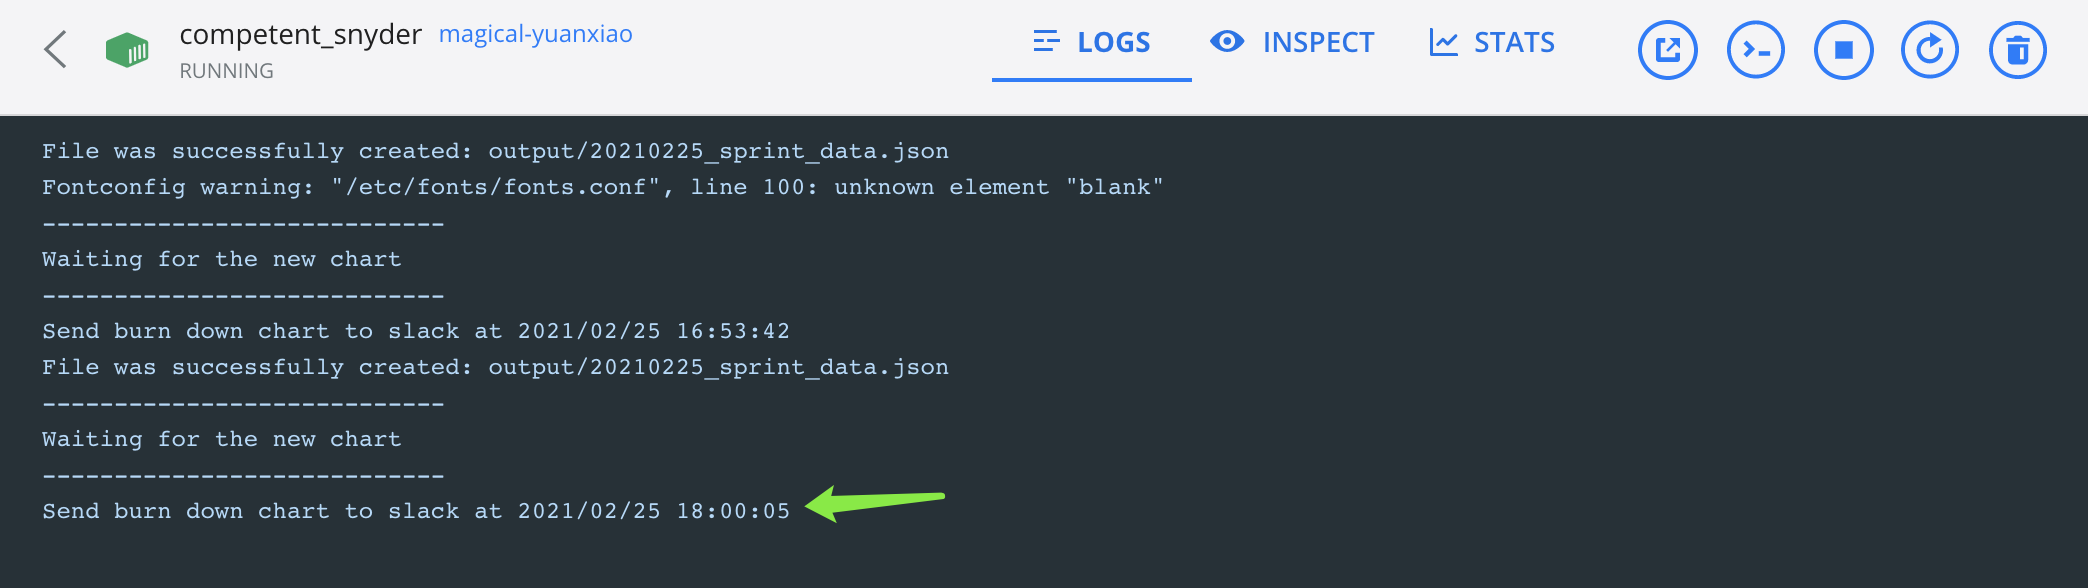
$ docker --version
Docker version 20.10.2, build 2291f61
ジョブフローを毎日18:00に実行する設定済み
job.jsconst schedule = require('node-schedule'); schedule.scheduleJob(`00 00 18 * * 1,2,3,4,5`, run);Dockerイメージを作成する
1、プロジェクトフォルダー直下に
Dockerfileを作成して、以下のコードを貼り付けるFROM node:12.20.1 WORKDIR /app COPY . . RUN npm install ENV TZ Asia/Tokyo EXPOSE 8888 CMD ["node" , "job.js" ]2、
.dockerignoreファイルを設置してnode_modulesなどを転送対象から除外するnode_modules/ .gitignore Dockerfile package-lock.json3、Dockerイメージのビルド
実行コマンド(
magical-yuanxiaoはイメージ名)$ docker build -t magical-yuanxiao .ログ
Successfully built aebb1184bf44
Successfully tagged magical-yuanxiao:latest
コンテナを起動状態で作成する
実行コマンド(
magical-yuanxiaoは先作ったイメージ)$ docker run -p 8888:8888 magical-yuanxiao最後に、
docker ps -aコマンドでコンテナの稼働状況を確認します。自動的に実行される
午後6時に自動投稿を行いました。
参照サイト
https://www.npmjs.com/package/node-schedule
https://qiita.com/kooohei/items/0e788a2ce8c30f9dba53
https://matsuand.github.io/docs.docker.jp.onthefly/engine/reference/builder/

- 投稿日:2021-02-25T20:24:41+09:00
VSCode で環境を汚さず好きなバージョンのPHP開発環境を作る手順
必要なもの
PC(Mac or Window or Linux)
Docker for Desktop(Toolkitではない方)
VSCode(Remote Development拡張機能が必要)
インターネット環境
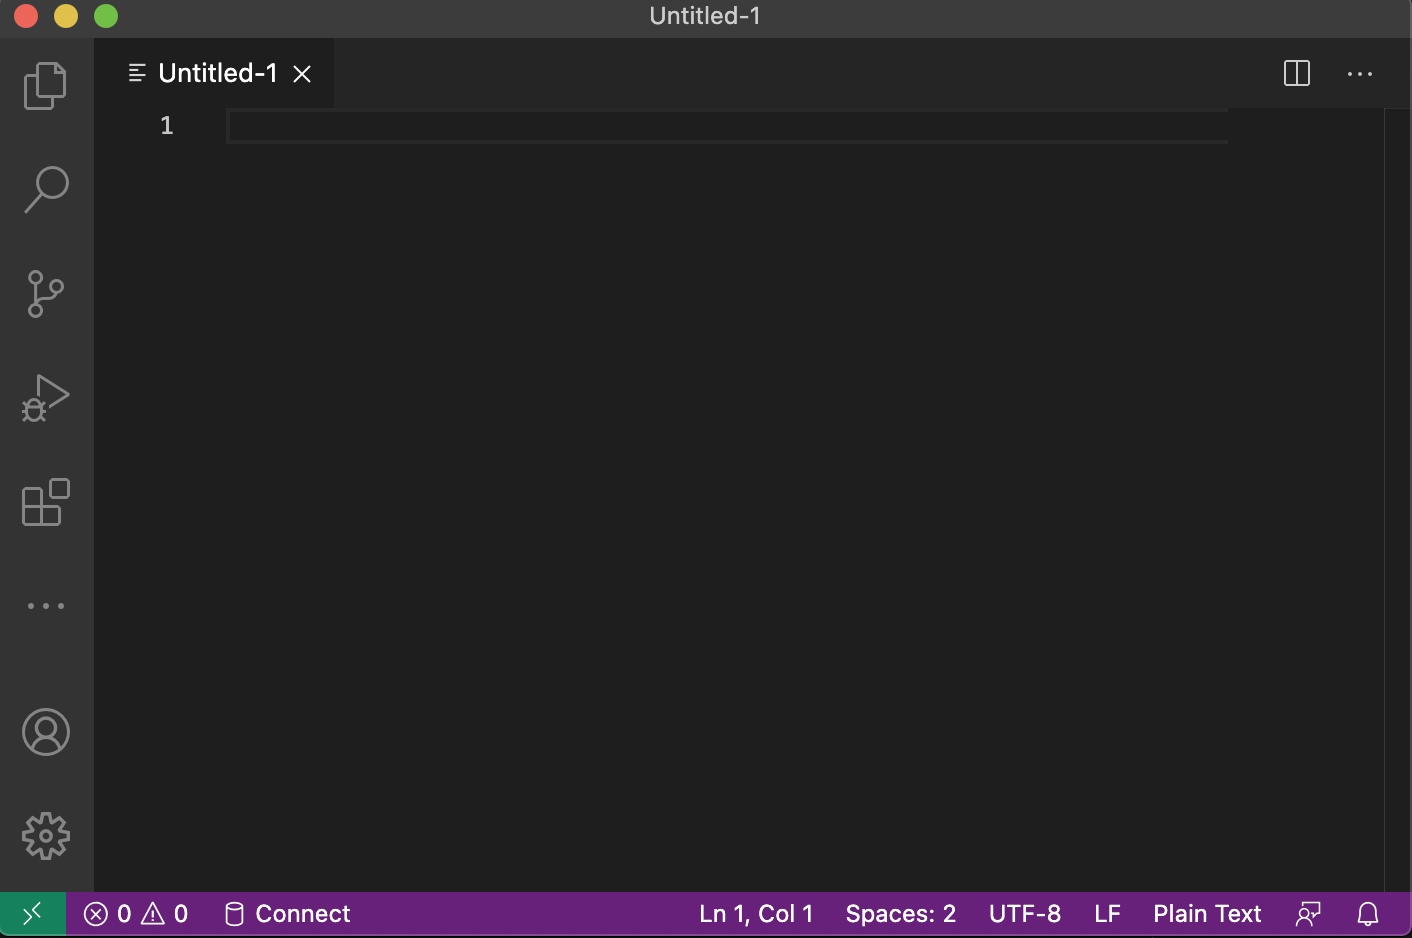
ブラウザ(Chrome等)VSCodeを起動
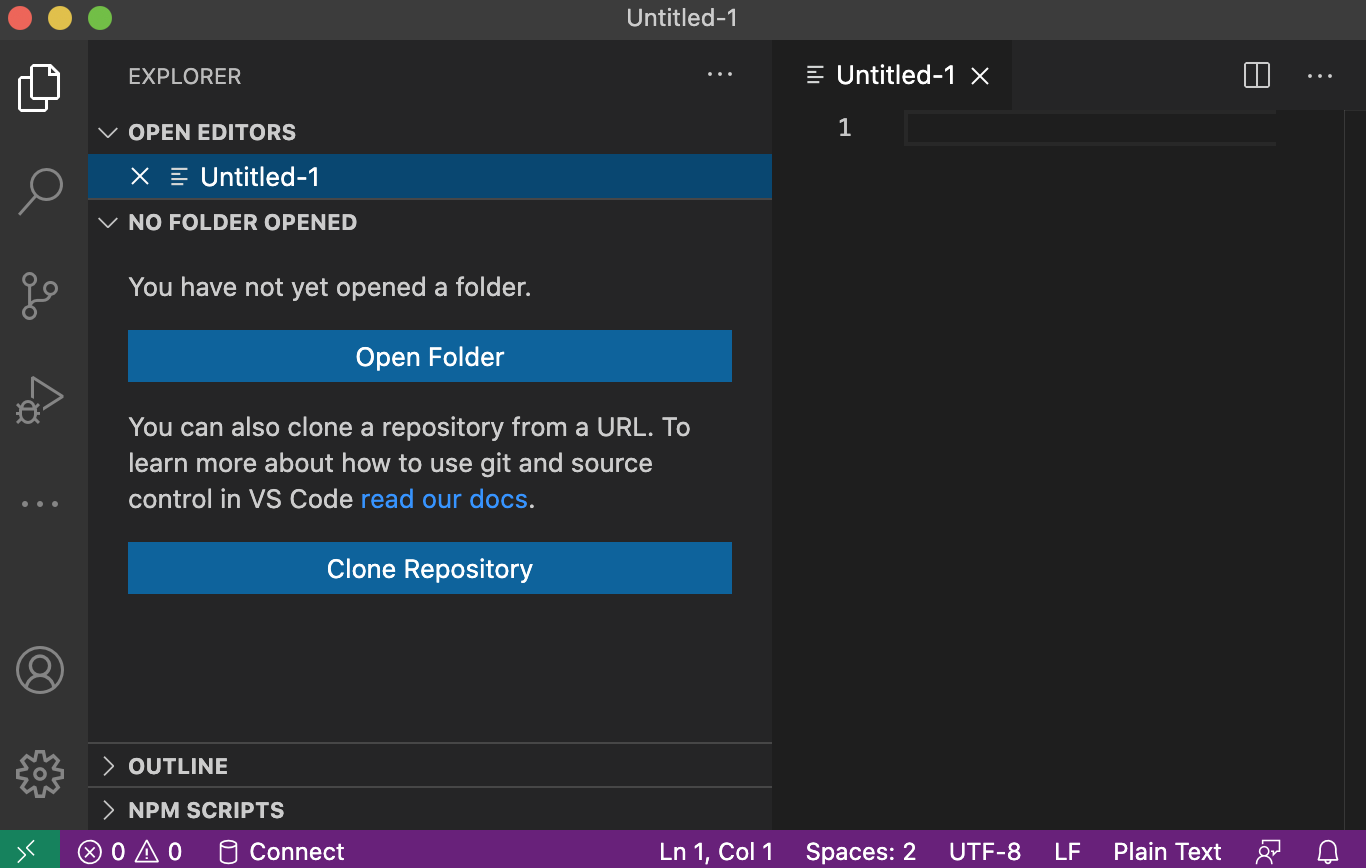
作業フォルダを開く
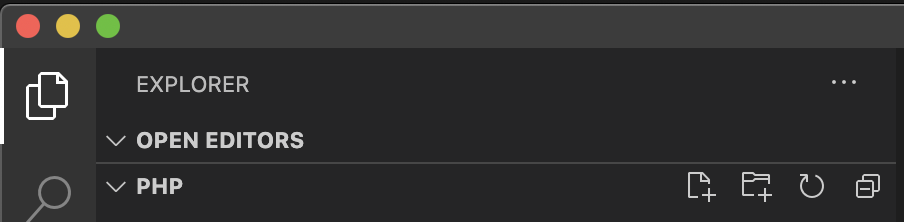
左上に縦に並んでいる中の Explorer ボタン
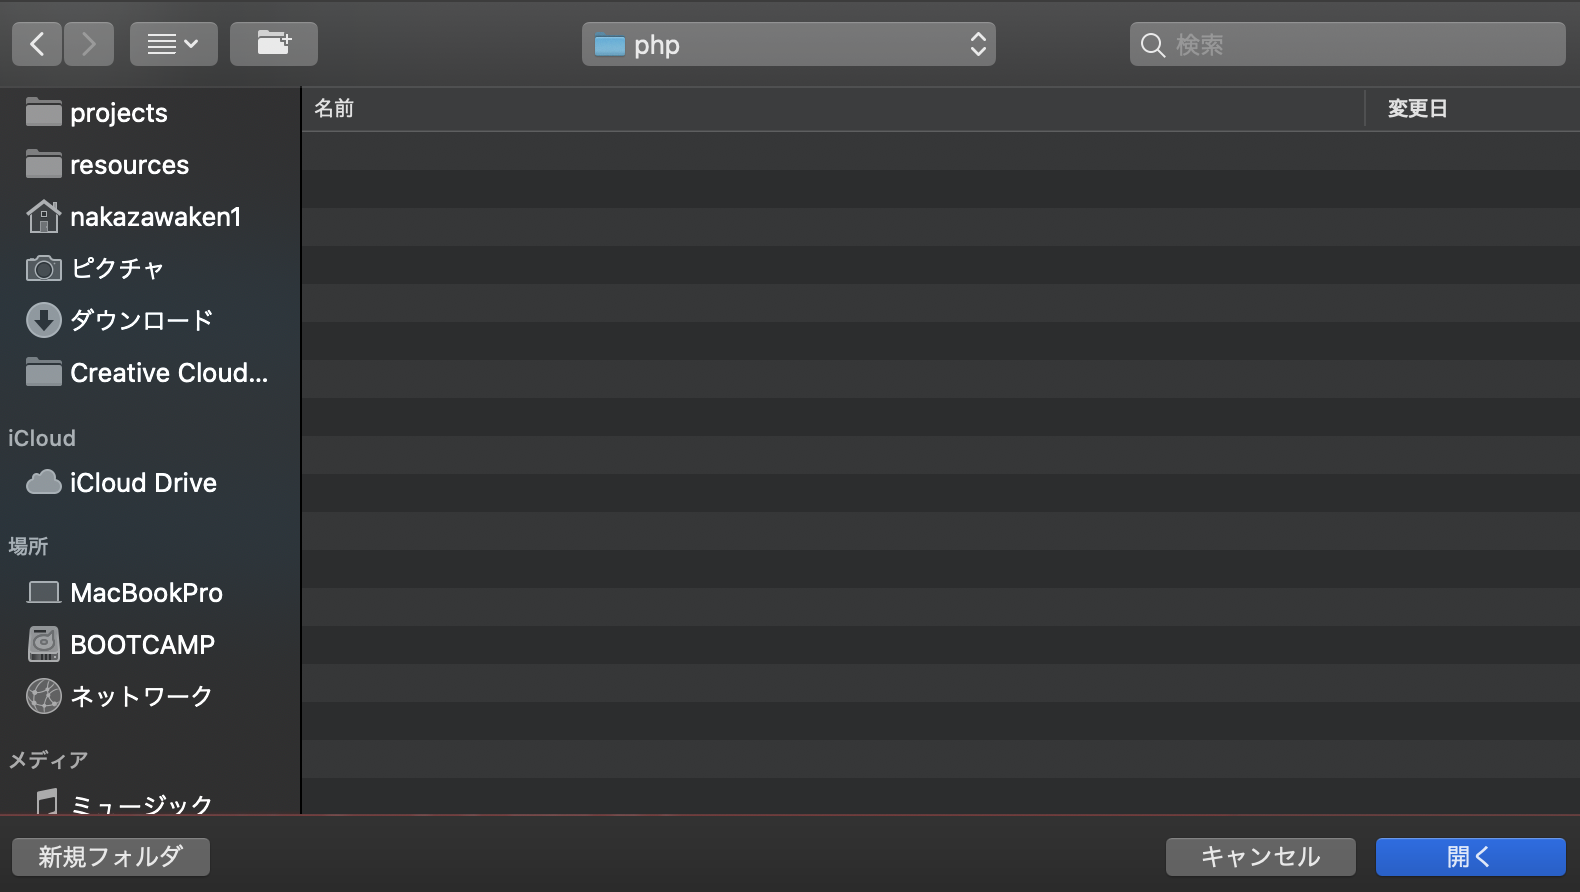
を押します。Open Folderボタンを押し、作業するフォルダを選択します。ここでは空のphpフォルダを選択しました。
Dockerfile 作成
ファイル一覧の PHP(選択したフォルダ) の右側にあるファイル作成ボタン
を押します。
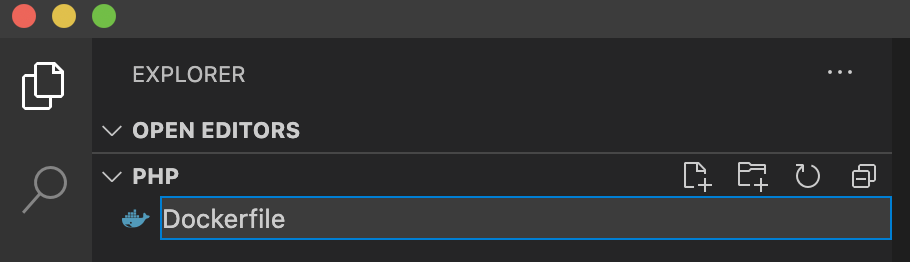
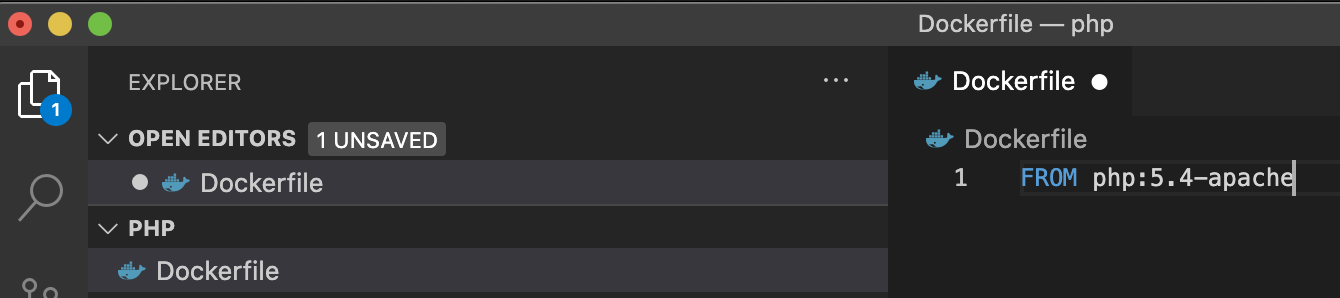
ファイル名部分に Dockerfile と入力します。(Dは大文字)
ファイルの内容は
FROM php:5.4-apacheと入力します。(5.4はPHPのバージョンで好きなバージョンを指定できます。)
CTRL+Sキーを押してファイルを保存します。
Docker開発環境を作成
左下の緑部分
をクリックします。
※緑部分がない場合は、Remote Development拡張機能が入っていないのでインストールしてください。
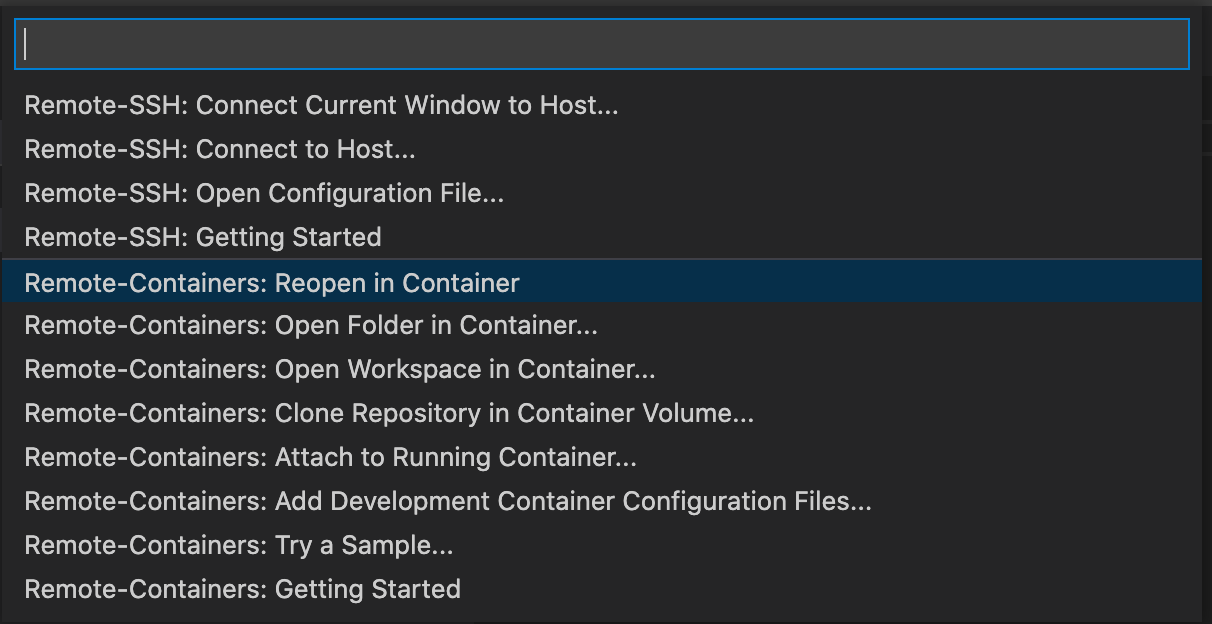
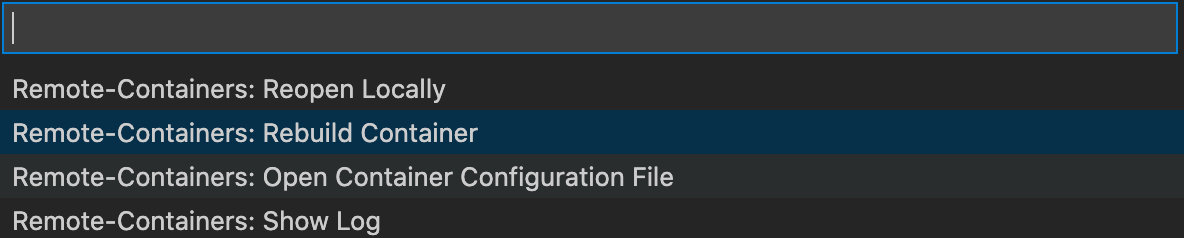
上部中央にリストが表示されるので Remote-Containers: Reopen in Container を選択します。
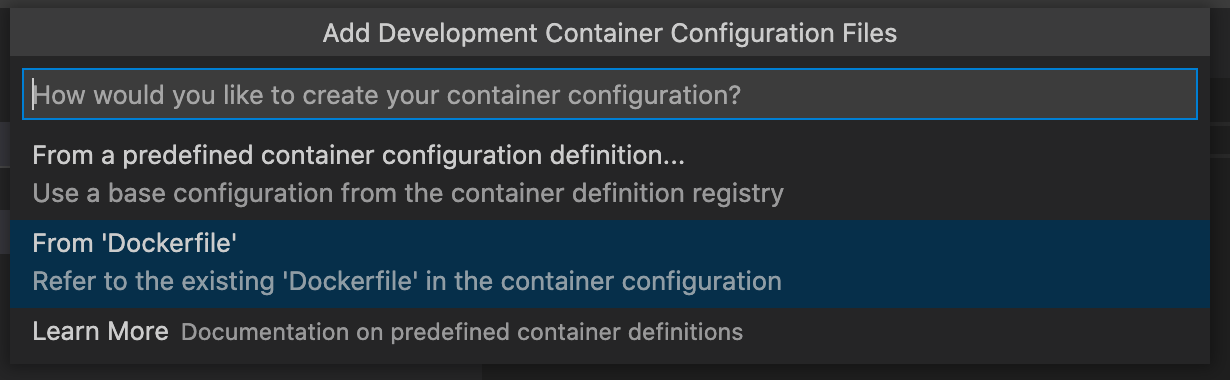
続けてリストが表示されるので、 From 'Dockerfile' を選択します。これで作成したDockerfileからDockerコンテナが起動します。
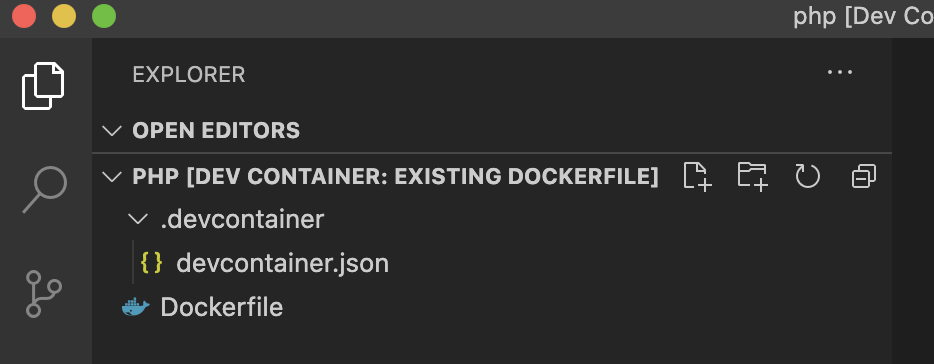
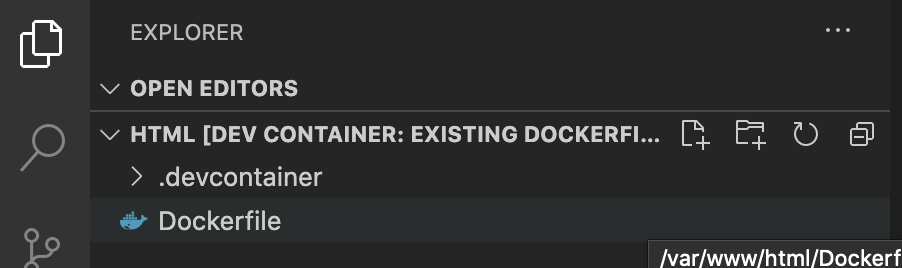
すると、.devcontainer フォルダ、 devcontainer.json が生成されます。このファイルでDocker環境を起動するときの設定ができます。
※これらのフォルダ、ファイルリストは Docker内のものが表示されています。
PHP[DEV CONTAINER:EXISTING DOCKERFILE] がそれを表しています。
ローカルのphpフォルダと内容が同期されるように設定されています。devcontainer.json 設定変更
/var/www/html の内容が同期されるよう設定します。
以下の2行を一番外の{}内に追加します。
"workspaceFolder": "/var/www/html", "workspaceMount": "type=bind,source=${localWorkspaceFolder},target=/var/www/html",修正前// For format details, see https://aka.ms/devcontainer.json. For config options, see the README at: // https://github.com/microsoft/vscode-dev-containers/tree/v0.158.0/containers/docker-existing-dockerfile { "name": "Existing Dockerfile", // Sets the run context to one level up instead of the .devcontainer folder. "context": "..", // Update the 'dockerFile' property if you aren't using the standard 'Dockerfile' filename. "dockerFile": "../Dockerfile", // Set *default* container specific settings.json values on container create. "settings": { "terminal.integrated.shell.linux": null }, // Add the IDs of extensions you want installed when the container is created. "extensions": [] // Use 'forwardPorts' to make a list of ports inside the container available locally. // "forwardPorts": [], // Uncomment the next line to run commands after the container is created - for example installing curl. // "postCreateCommand": "apt-get update && apt-get install -y curl", // Uncomment when using a ptrace-based debugger like C++, Go, and Rust // "runArgs": [ "--cap-add=SYS_PTRACE", "--security-opt", "seccomp=unconfined" ], // Uncomment to use the Docker CLI from inside the container. See https://aka.ms/vscode-remote/samples/docker-from-docker. // "mounts": [ "source=/var/run/docker.sock,target=/var/run/docker.sock,type=bind" ], // Uncomment to connect as a non-root user if you've added one. See https://aka.ms/vscode-remote/containers/non-root. // "remoteUser": "vscode" }修正後// For format details, see https://aka.ms/devcontainer.json. For config options, see the README at: // https://github.com/microsoft/vscode-dev-containers/tree/v0.158.0/containers/docker-existing-dockerfile { "name": "Existing Dockerfile", // Sets the run context to one level up instead of the .devcontainer folder. "context": "..", // Update the 'dockerFile' property if you aren't using the standard 'Dockerfile' filename. "dockerFile": "../Dockerfile", // Set *default* container specific settings.json values on container create. "settings": { "terminal.integrated.shell.linux": null }, "workspaceFolder": "/var/www/html", "workspaceMount": "type=bind,source=${localWorkspaceFolder},target=/var/www/html", // Add the IDs of extensions you want installed when the container is created. "extensions": [] // Use 'forwardPorts' to make a list of ports inside the container available locally. // "forwardPorts": [], // Uncomment the next line to run commands after the container is created - for example installing curl. // "postCreateCommand": "apt-get update && apt-get install -y curl", // Uncomment when using a ptrace-based debugger like C++, Go, and Rust // "runArgs": [ "--cap-add=SYS_PTRACE", "--security-opt", "seccomp=unconfined" ], // Uncomment to use the Docker CLI from inside the container. See https://aka.ms/vscode-remote/samples/docker-from-docker. // "mounts": [ "source=/var/run/docker.sock,target=/var/run/docker.sock,type=bind" ], // Uncomment to connect as a non-root user if you've added one. See https://aka.ms/vscode-remote/containers/non-root. // "remoteUser": "vscode" }左下以下の部分をクリックし、Remote-Containers: Rebuild Container を選択します。
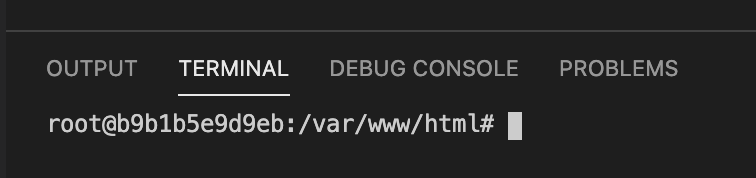
※Dockerfile や devcontainer.json を変更した時はこれで設定を反映させます。ターミナルを確認すると /var/www/html が初期ディレクトリになり、
ここにファイルを作ればサーバで公開されブラウザで確認できるようになります。
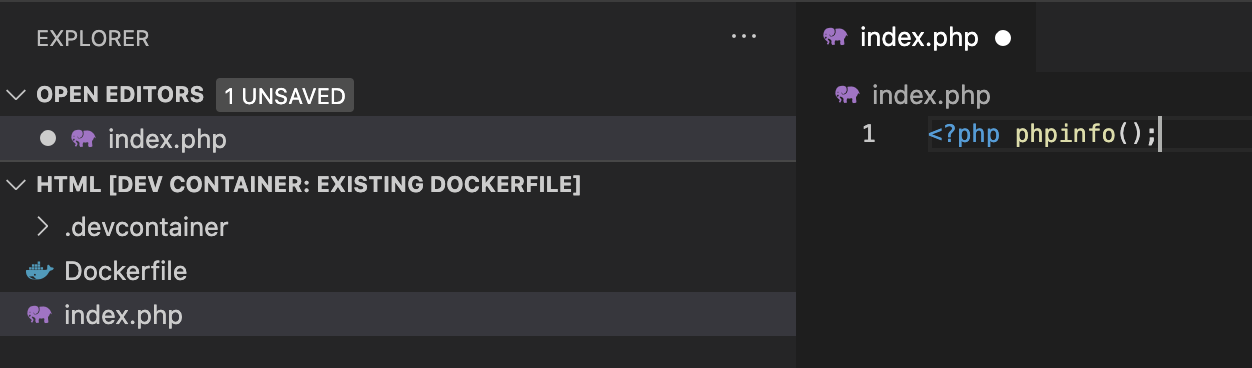
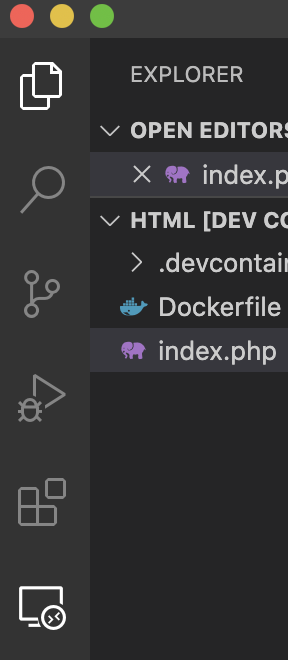
phpファイル配置
ファイル一覧の HTML[DEV... の右側にあるファイル作成ボタン
を押します。
作成された枠の中にファイル名として index.php を入力します。
ファイルの内容に
<?php phpinfo();と入力します。
CTRL+Sでファイルを保存します。
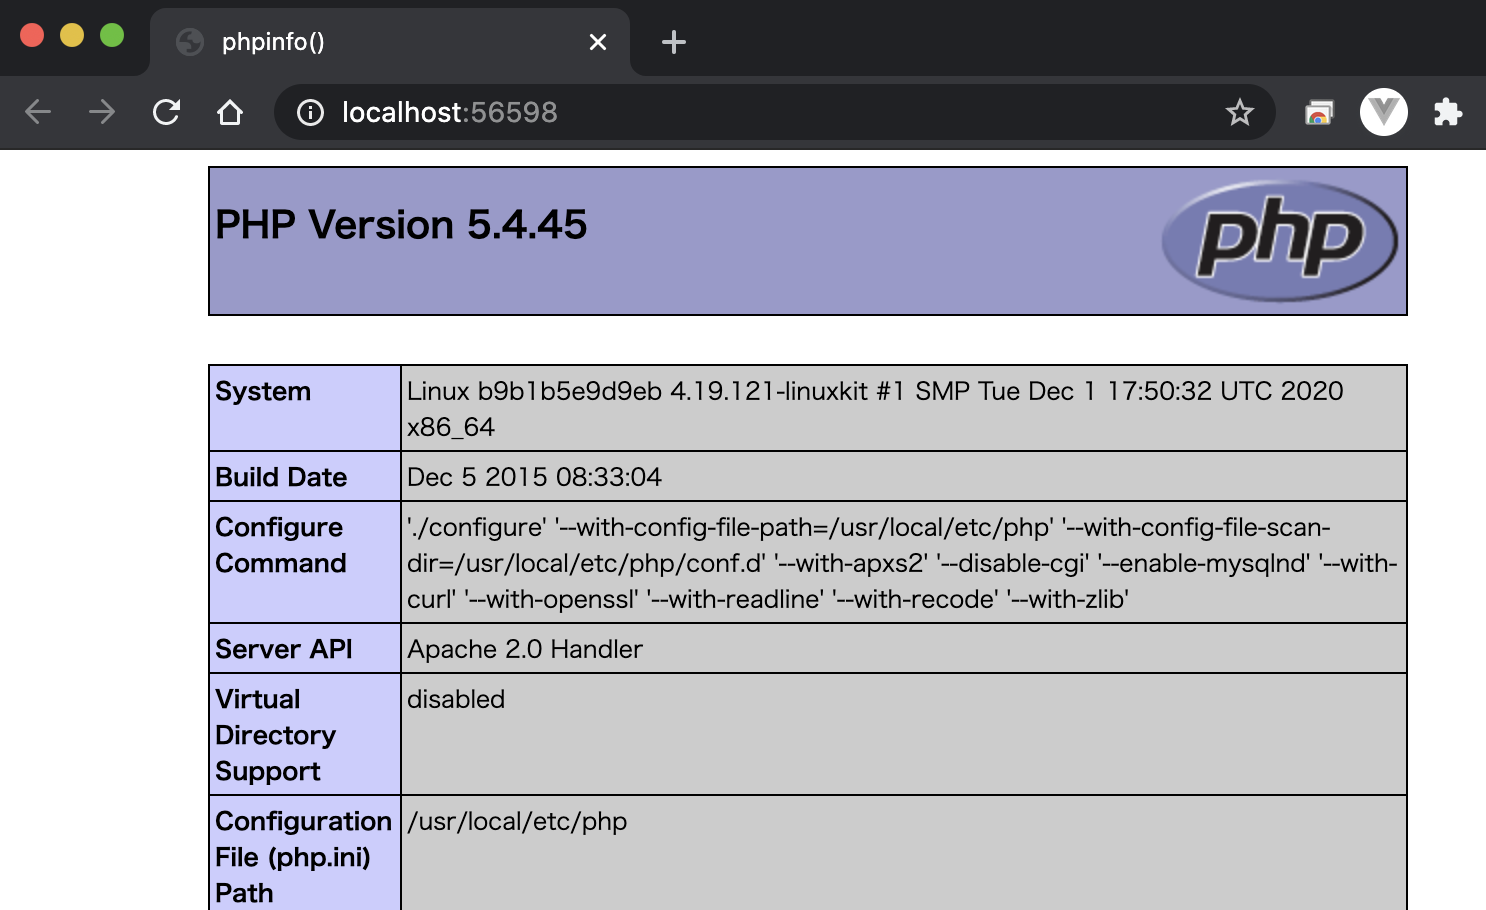
動作確認
TERMINALを開いて、
apachectl startと入力し、Enter を押します。
以下のようになればサーバは起動しています。
左上に縦に並んでいるアイコンの中の Remote Expoloer ボタン
を押します。
PORTS部分に 80 →... の行があるので、右の Open in Browser ボタン
を押します。
phpinfoの情報が表示されれば確認OKです。
※56598の番号は環境によって変わります。


- 投稿日:2021-02-25T19:25:55+09:00
rails + docker環境内で時間を日本時間に合わせる
docker-compose.yml
web: &web
    build: .
    # command: bundle exec rails s -p 3000 -b '0.0.0.0'
    volumes:
      - .:/app
      - gem_data:/usr/local/bundle
    ports:
      - "3000:3000"
    environment:
      WEBPACKER_DEV_SERVER_HOST: webpacker
      WEBPACKER_DEV_SERVER_PUBLIC: 0.0.0.0:3035
      TZ: Asia/Tokyo ← こいつを記載
application.rb
module App
  class Application < Rails::Application
    # Initialize configuration defaults for originally generated Rails version.
    config.load_defaults 6.0
    # config.active_record.default_timezone = :local
    config.i18n.default_locale = :ja # デフォルトのlocaleを日本語(:ja)にする


    config.time_zone = 'Asia/Tokyo' ← 追加
    config.active_record.default_timezone = :local ← 追加


    config.i18n.load_path += Dir[Rails.root.join('config', 'locales', '**', '*.{rb,yml}').to_s]

    initializer(:remove_action_mailbox_and_activestorage_routes, after: :add_routing_paths) { |app|
      app.routes_reloader.paths.delete_if {|path| path =~ /activestorage/}
      app.routes_reloader.paths.delete_if {|path| path =~ /actionmailbox/ }
    }
    # Settings in config/environments/* take precedence over those specified here.
    # Application configuration can go into files in config/initializers
    # -- all .rb files in that directory are automatically loaded after loading
    # the framework and any gems in your application.
    config.paths.add 'lib', eager_load: true
  end
end
これだけで日本時間に変更可能。
#dockerfileは書き換えたら docker-compose down、docker-compose upの手順踏まないと反映されません。
- 投稿日:2021-02-25T14:58:26+09:00
【AWS】ECSで作ったDocker(Laravel)プロジェクトをRoute53、ALB、ACM、お名前ドットコムを使ってHTTPS化してみた
皆さんこんにちは!
今回はDockerで作ったLaravelプロジェクトをRoute53とALB(ApplicationLoadBalancer)とACM(AmazonCertificateManager)を使ってHTTPS化してみたいと思います!
前提条件
・既にDockerで作ったコンテナをECSで作成していること
・お名前ドットコムでドメインを登録していること補足
DockerをまだECSで作成していない方は以下の記事をご覧ください。
【AWS】AWS超初心者が、頑張ってDockerで作ったLaravelプロジェクトをECR、ECS、EC2を使ってAWS上で動かしてみた
また、お名前ドットコムでドメインを登録していない方は登録してから本記事をご覧ください。(お名前ドットコムでない場合も可ですが、その場合説明が異なる部分があると思うのでご了承ください)
リッスンポート
nginx/default.confserver { listen 80; root /work/laravel/public; index index.php; charset utf-8; error_log /var/log/nginx/error_test.log; location / { root /work/laravel/public; try_files $uri $uri/ /index.php$is_args$args; } location ~ \.php$ { fastcgi_split_path_info ^(.+\.php)(/.+)$; fastcgi_pass app:9000; fastcgi_index index.php; include fastcgi_params; fastcgi_param SCRIPT_FILENAME $document_root$fastcgi_script_name; fastcgi_param PATH_INFO $fastcgi_path_info; } }
nginxのコンテナではlisten 80;としているように、80番のポートをリッスンしています。ここが
443になっている場合は適時変えて頂くか、上記のようにlisten 80;としてください。参考記事
本記事を書くにあたって下記の記事を参考させて頂きました。
AWSでWebサイトをHTTPS化 その1:ELB(+ACM発行証明書)→EC2編
僕が説明不十分なところもあるので、分からない点がある場合はこちらの記事を見て頂くとよいかと。
それでは早速説明していきます!!
ACMでSSL証明書の発行
まず初めにHTTPS化するには、SSL証明書の発行を行います。
AWSはこのSSL証明書の発行が無料となっております。(AWS神)
サービス検索欄で「CertificateManager」を入力しましょう。
- 「証明書のリクエスト」をクリック
- 「パブリック証明書のリクエスト」を選択
- ドメイン名を入力(この後Route53で登録するドメインを入力。現段階ではRoute53にECS用のドメインを登録していないので、お好きなドメインをご入力ください。以下、説明用としてここで入力したドメイン名を
www.example.comとします。)- 「DNSの検証」を選択
- タグは登録してもしなくてもどちらでもいいです
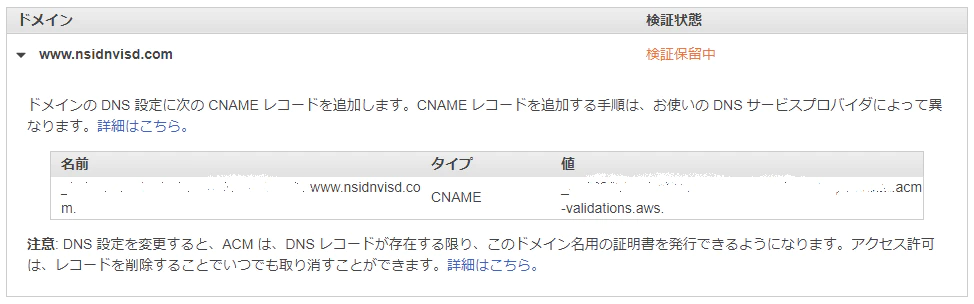
- 「確定とリクエスト」をクリック
すると画像のように名前や値が表示されます。
これをお名前ドットコムで登録します。
「ドメインのDNS設定」から「DNSレコード設定を利用する」をクリック
そして画像のように先ほどCertificateManagerで発行した名前(ホスト名)と値(VALUE)を登録します。(画像のホスト名や値は適当です)
そしてAWSに戻ってRoute53で先ほどCertificateManagerで登録したドメイン名のホストゾーンを作成します。例で言うと
www.example.comと言う名前で登録します。※注意 既にホストゾーンを作成している場合は、新たにホストゾーンを作成しないでください。後ほど、既に作成してあるホストゾーンで先ほど作成したドメイン名をレコード名として作成してください。
そしたら、作成したホストゾーンの「レコードを作成」をクリック。
タイプを「CNAME」にしてお名前ドットコムで登録したときと同じように名前と値を入れて下さい。
CertificateManagerに戻り、「状況」が「発行済み」になればOK!(時間がかかる場合があります)
ALBでHTTPS登録
サービス検索欄で「ECS」と検索し、左のメニュー欄の「ロードバランシング」にある「ロードバランサー」をクリック。
「ロードバランサーの作成」をクリック。
- 「Application Load Balancer(HTTP、HTTPS)」を選択
- 手順1:名前を入力し、「ロードバランサーのプロトコル」をHTTPSにする(ポート番号が443になる)。「アベイラビリティーゾーン」の「VPC」はECSインスタンスで使用しているVPCを選択。「アベイラビリティーゾーン」にいくつかの候補が出るのですべてにチェック
- 手順2:「証明書タイプ」で「ACMから証明書を選択する」にチェック。「証明書の名前」で先ほど作成した証明書を選択
- 手順3:「新しいセキュリティグループを作成する」にチェック。適当にグループ名を入力し、「タイプ」を「HTTPS」にする
- 手順4:名前を適当に入力し、プロトコルは「HTTP」を選択
- 手順5:利用するインスタンスを選択し「登録済みに追加」をクリック
- 手順6:「作成」をクリック
無事作成されればOK!
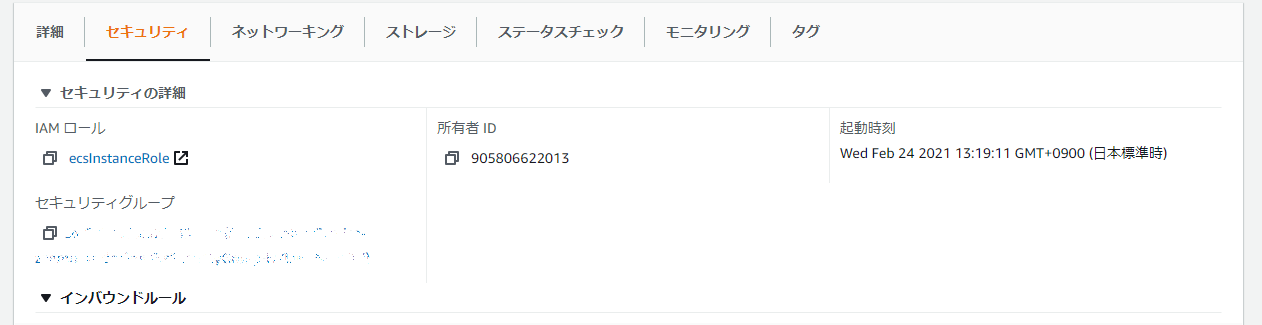
EC2インスタンスのセキュリティ登録
これで最後になるので、あともう一息頑張りましょう!
サービス検索欄で「EC2」と検索。
左のメニューの「インスタンス」の「インスタンス」をクリック。
利用するインスタンスの「インスタンスID」をクリック。
下にある「セキュリティ」タブから「セキュリティグループ」をクリック。
下の「インバウンドルール」から「インバウンドルールを編集」をクリック。
「タイプ」は「HTTP」、「ソース」は先ほど作成したALBのグループ名を選択。
「ルールを保存」をクリック。
これで、独自ドメインかつHTTPS化されたサイトにアクセスすることができます。
例で言うとhttps://www.example.comにアクセスするとDockerで作ったLaravelのサイトが開くようになります。
いかがだったでしょうか??
少し説明不足のところもあると思うので、何かご不明な点があれば遠慮せずにコメント欄にてお申し付けください。
以上、「【AWS】ECSで作ったDocker(Laravel)プロジェクトをRoute53、ALB、ACM、お名前ドットコムを使ってHTTPS化してみた」でした!
良ければ、LGTM、コメントお願いします。
また、何か間違っていることがあればご指摘頂けると幸いです。
他にも初心者さん向けに記事を投稿しているので、時間があれば他の記事も見て下さい!!
あと、最近「ココナラ」で環境構築のお手伝いをするサービスを始めました。
気になる方はぜひ一度ご相談ください!
Thank you for reading


- 投稿日:2021-02-25T12:46:13+09:00
UTMを使ってM1 MacにUbuntu20.04をインストールして、その中でDockerを動かして、その中でUbuntu20.10を動かしてみる
Macの仮想化ソフトウェアというと、VirtualBox、VMware Fusion、Parallels Desktopといったプロダクトが代表的なところかと思いますが、この中でApple M1への対応が進んでいるのはParallels Desktopが先行している状況のようです。
- Apple M1 チップを搭載した Mac への Parallels Desktop 対応状況について
- Mac版仮想化アプリParallels、AppleシリコンM1対応に積極的。仮想PCでWindowsが動くか
- M1 Mac向けにArm版Windows提供? MSとParallelsが正式に協力か
- 仮想化アプリParallels、M1 Mac上でArm Windowsを中断|再開できるテクニカルプレビュー2公開
- Parallels Desktop for Mac with Apple M1 chip (Apple Silicon)
上記のプロダクト以外にMac上で仮想環境を実現する方法としてはAppleが提供しているVirtualization frameworkを利用することで可能とのこと。
Appleの開発者フォーラムではVirtualization frameworkを利用したSimpleVM、vm-lite、virtualというプロダクトのGitHubのリポジトリが紹介されています。
「Setting up Linux VM on Apple Silicon for Docker」という記事にSimpleVMを利用したUbuntu上でDockerを起動するまでの手順が掲載されていたので実際にやってみたところ、Ubuntuが起動することは確認できましたが、vmlinuzとinitrdを準備するところが非常に煩雑だと感じました。
こうなると、やはりVirtualBoxやVMware Fusionのような仮想化のGUIフロントエンドが欲しくなります。そういった声に応えてくれるのがUTMやACVMといったQEMUラッパーです。
- iOSデバイス上に仮想マシンを作成できるアプリ「UTM」がApple Silicon Macをサポートし、M1チップ搭載のMac上にARM64版WindowsやUbuntuをインストール可能に。
- UTMとOpenCoreを利用し、x86版macOS 10.14 MojaveをApple Silicon Mac上で動作させることに成功したもよう。
- Apple M1チップ搭載のMacでARM版Windows 10を動作させるQEMUラッパー「ACVM」がリリース。
前置きが長くなりましたが、それではUTMを使ってM1 MacにUbuntuをインストールしていきましょう。
手順についてはUTMのリポジトリの「Install Ubuntu ARM64 on Apple M1」というWikiか、もしくは、UTMのページの「Ubuntu 20.04」にキャプチャ付きでまとめられてるので、実はここを見れば一発なんですが今回はUTMをインストールするところから説明していきます。UTMのリリースページからMac用のインストールバイナリ(UTM.dmg)をダウンロードしてインストールします。(2020年2月25日時点ではv2.0.22が最新版のようです。)
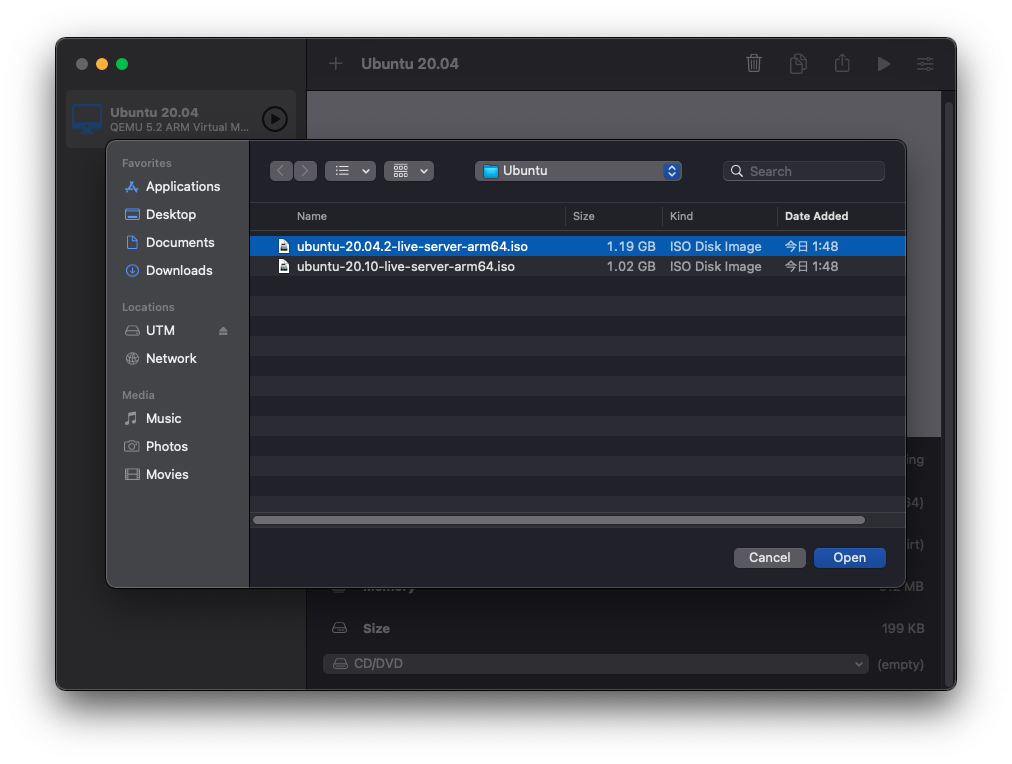
次に、Ubuntu Server for ARMのページからARM版のイメージ(ISOファイル)をダウンロードします。今回は「20.04.2 LTS」を利用することとします。
あとは先程紹介したインストール手順に従い進めていきます。
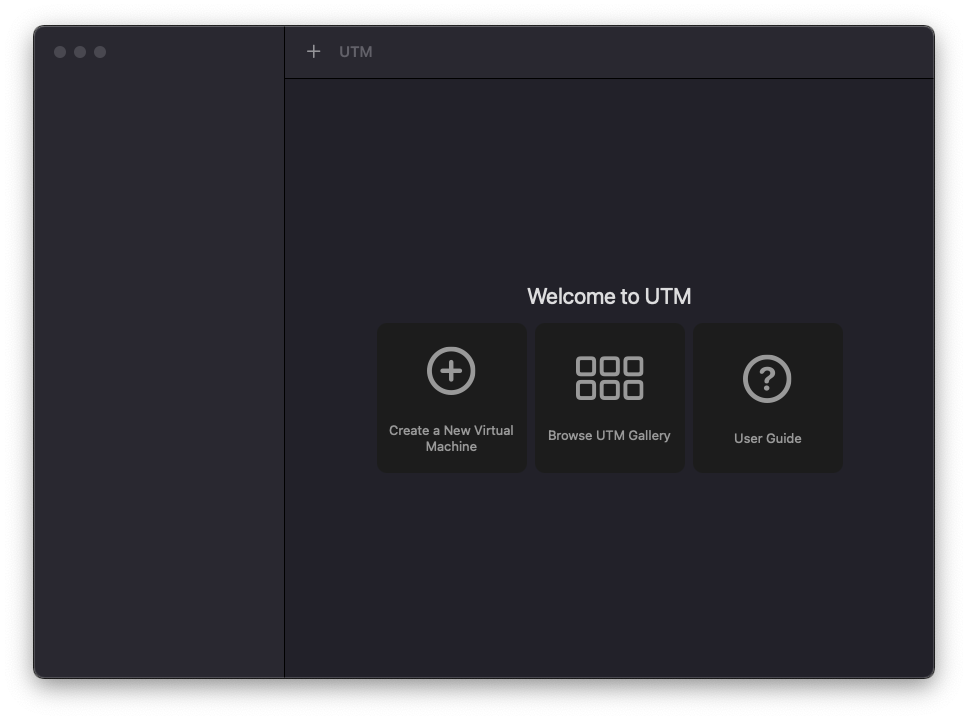
UTMを起動します。
画面上段の「+」ボタン、もしくは、「Create a New Vitural Machine」のアイコンをクリックします。
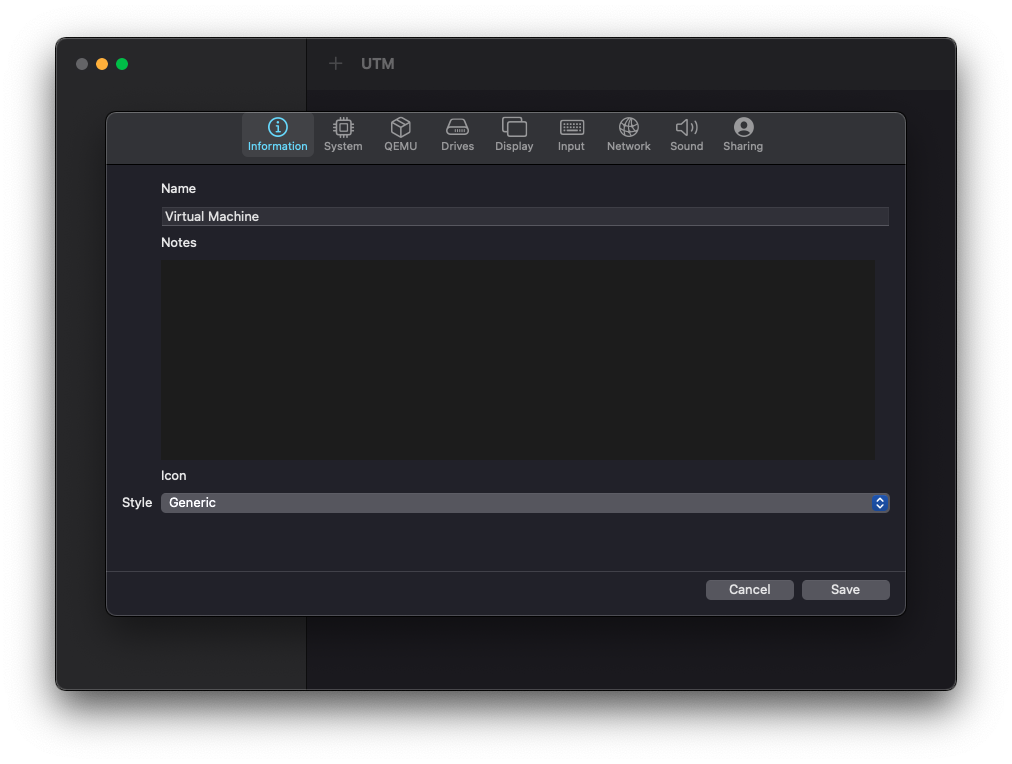
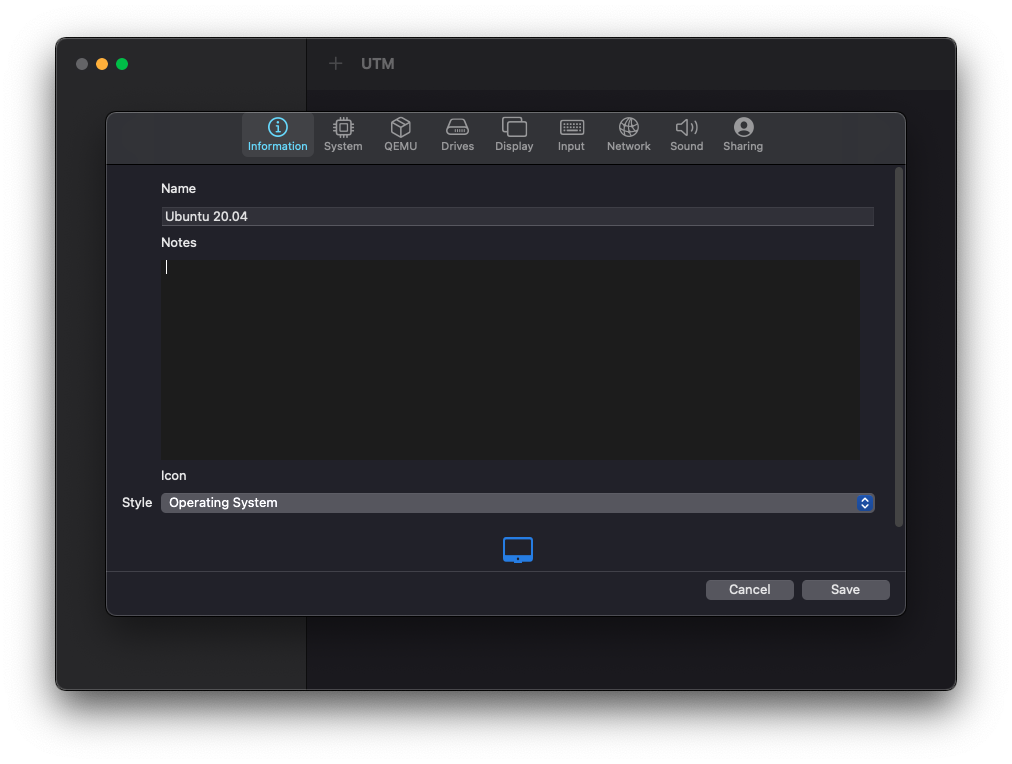
InformationタブのName欄に「Ubuntu 20.04」と入力し、Styleから「Operating System」を選択します。
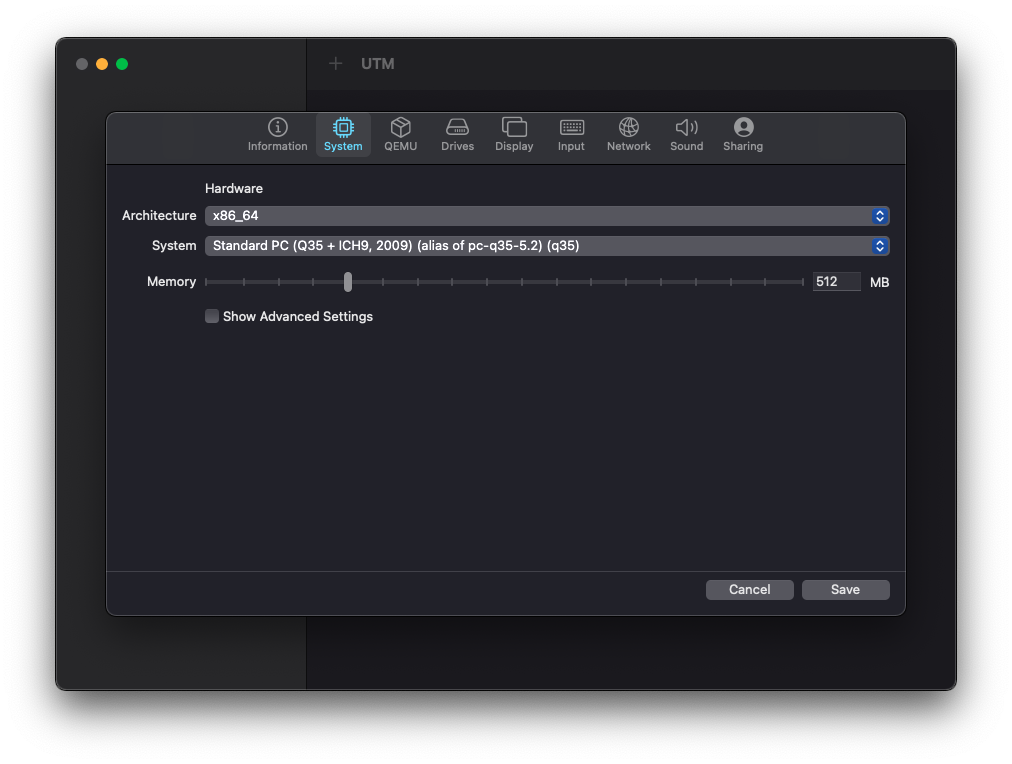
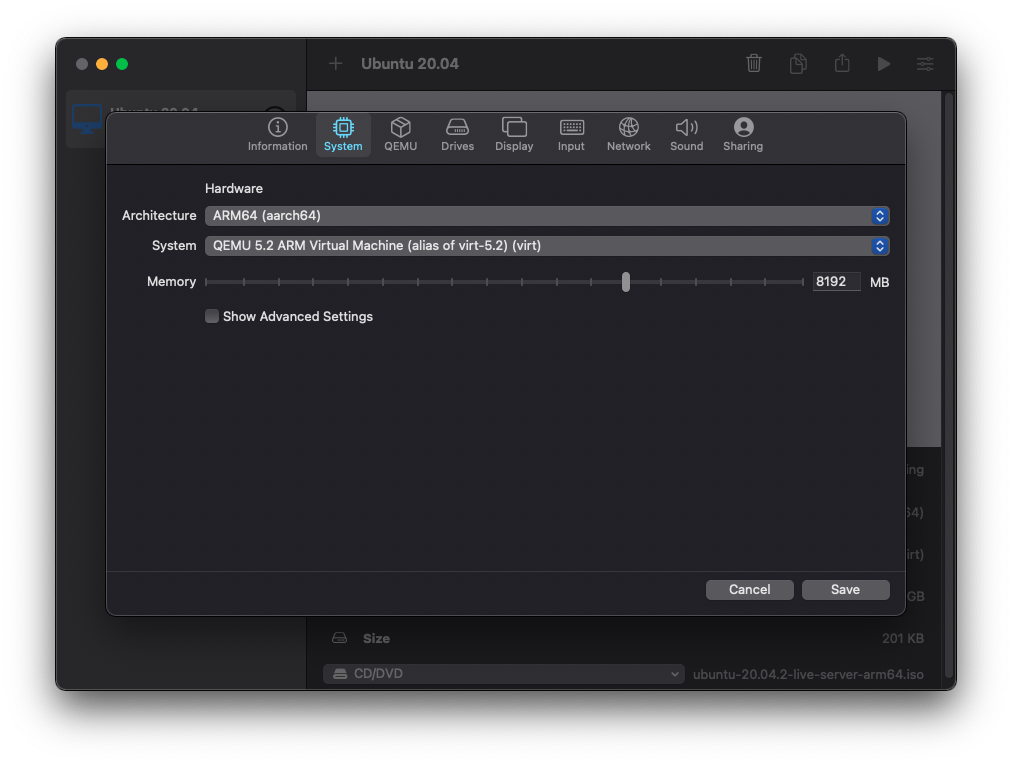
Systemタブに移動します。
Architectureから「ARM64 (aarch64)」を選択すると、自動的にSystemから「QEMU 5.2 ARM Virtual Machine (alias of virt-5.2) (virt)」が選択されます。
Memoryについては環境によって設定可能な値が変わってくると思いますが、今回は8192MB(8GB)で設定してみます。
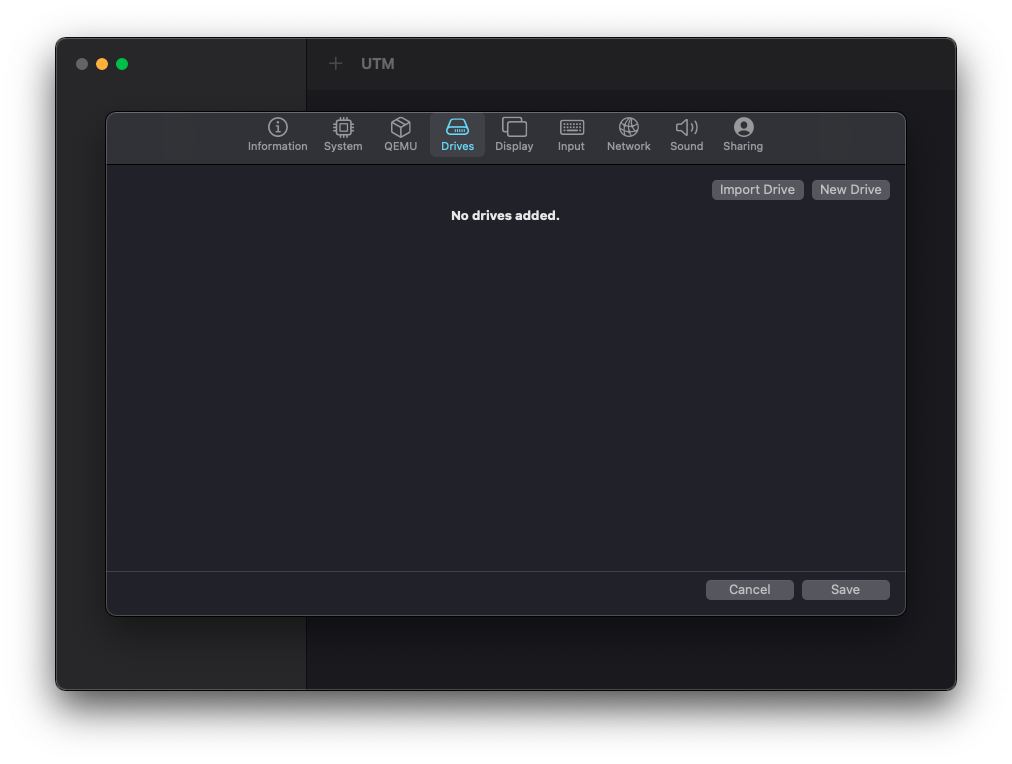
Deviceタブに移動します。
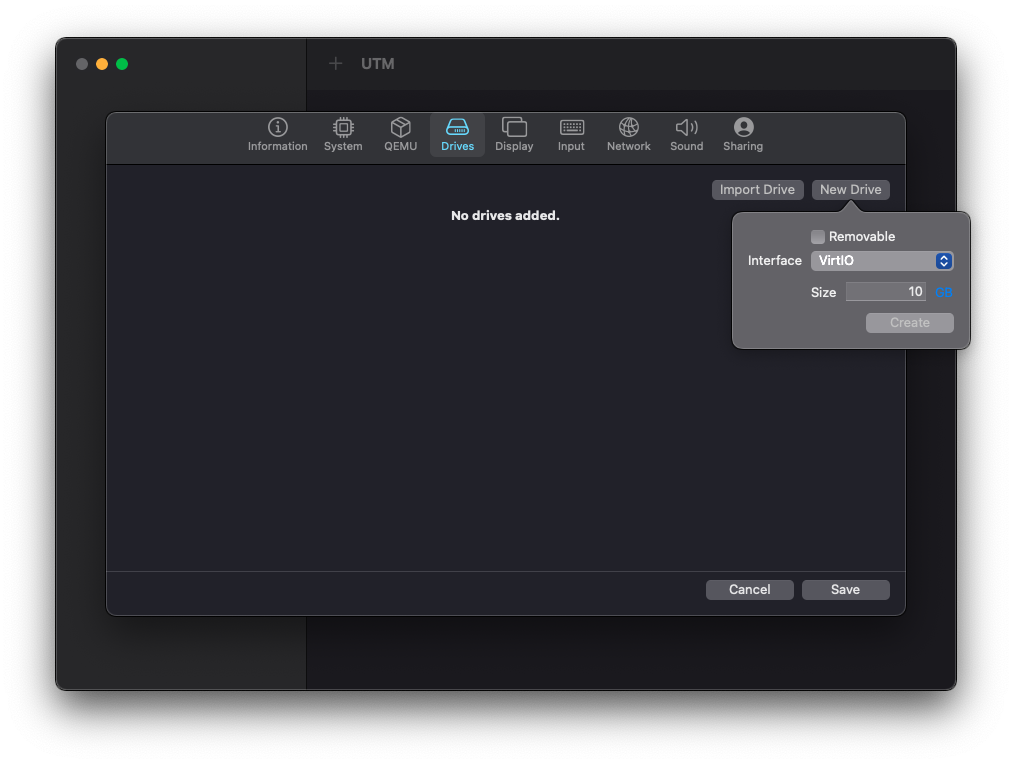
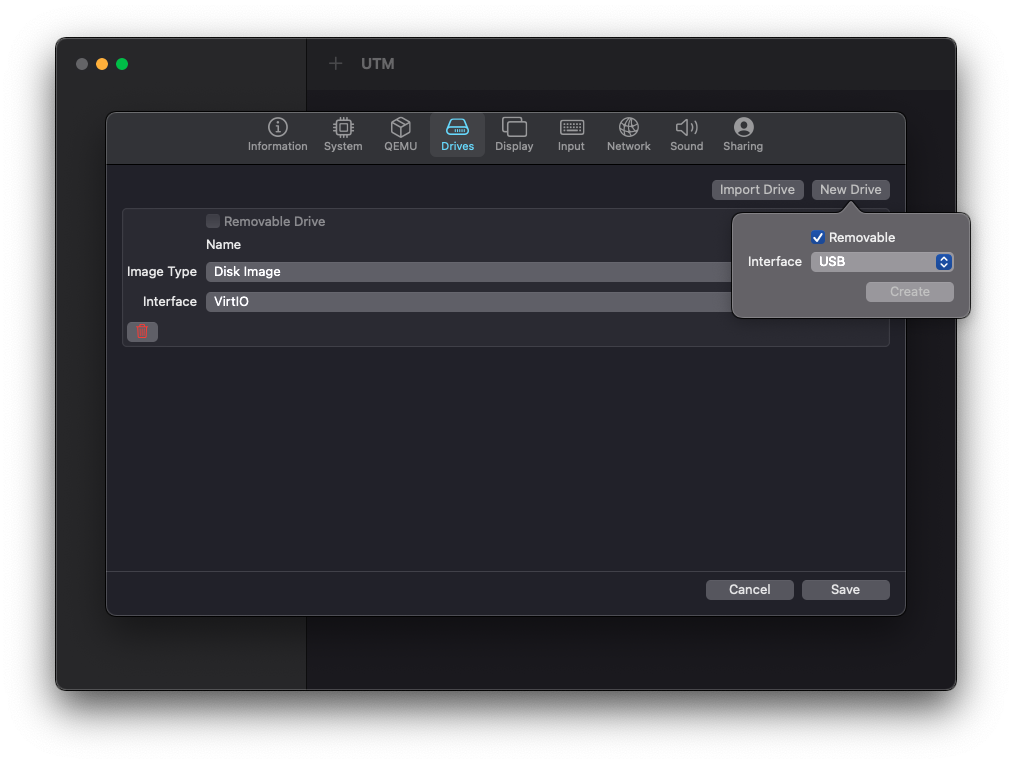
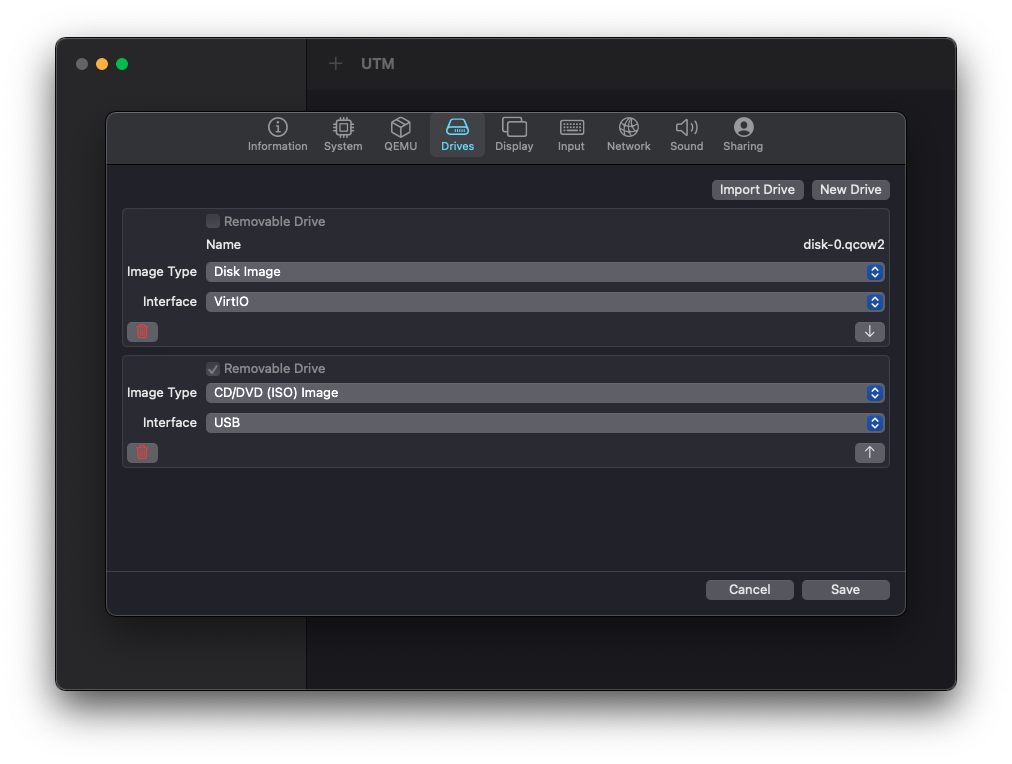
「New Device」ボタンをクリックし、Interfaceで「VirtIO」が選択された状態でSizeに「10GB」と入力します。
「Create」ボタンをクリックします。
もう一度「New Device」ボタンをクリックします。「Removable」にチェックすると、Interfaceで「USB」が選択された状態となります。
「Create」ボタンをクリックします。
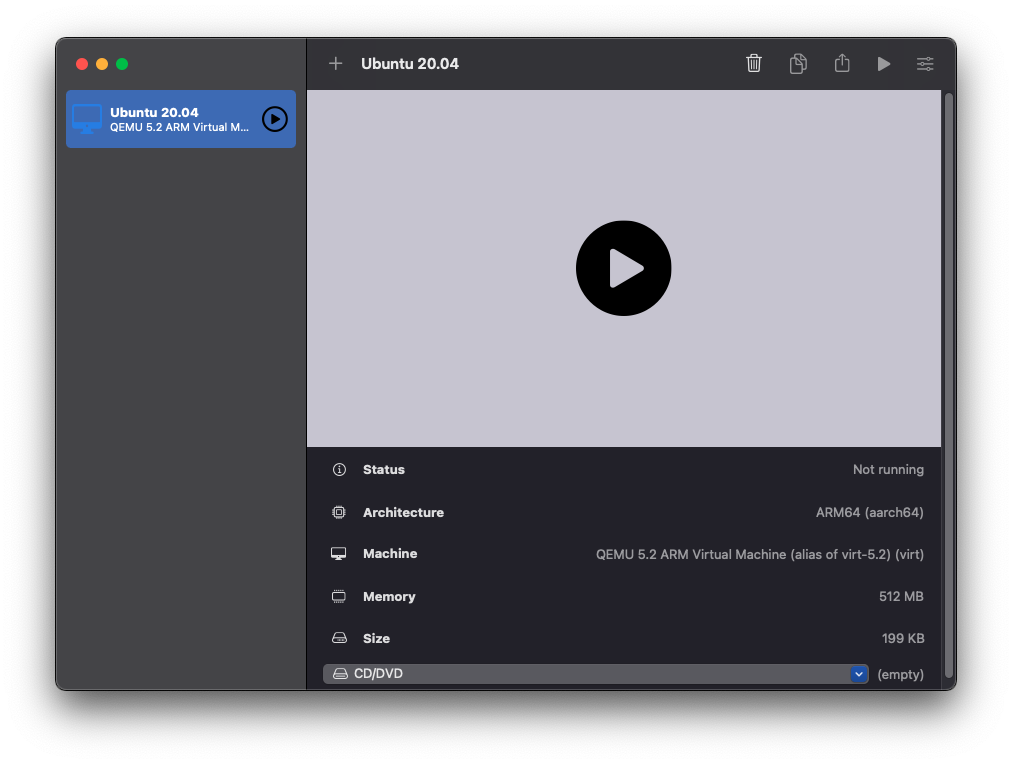
「Save」ボタンをクリックすると、仮想マシンの枠ができあがります。
「CD/DVD」の欄をクリックすると「Browse」と表示されるのでこれをクリックします。
事前にダウンロードしておいたISOファイルを選択します。
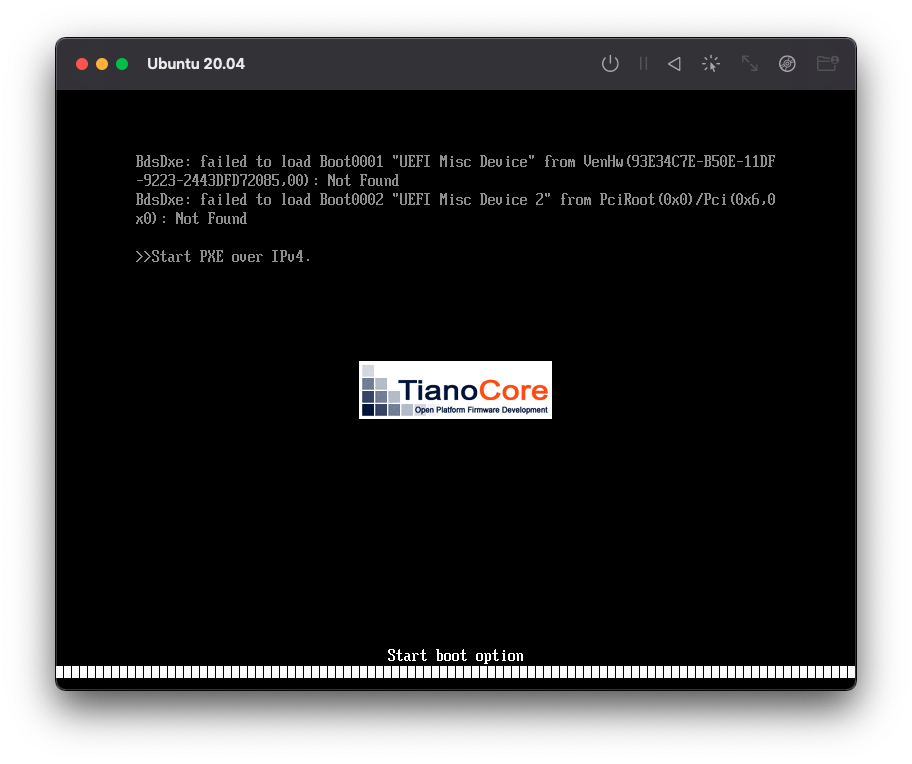
再生アイコン(起動ボタン)をクリックすると仮想マシンが起動します。
事前に作成したCD/DVDドライブより先にハードディスクの方を起動ドライブとして認識しているため起動できない状態となっています。
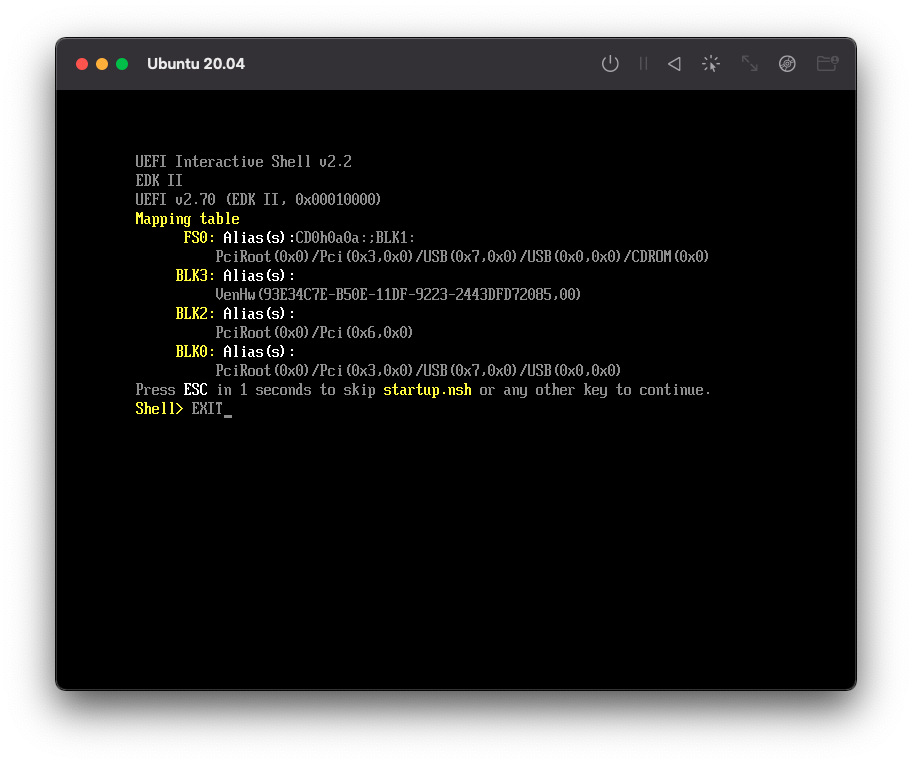
EXITと入力してEnterを押下します。
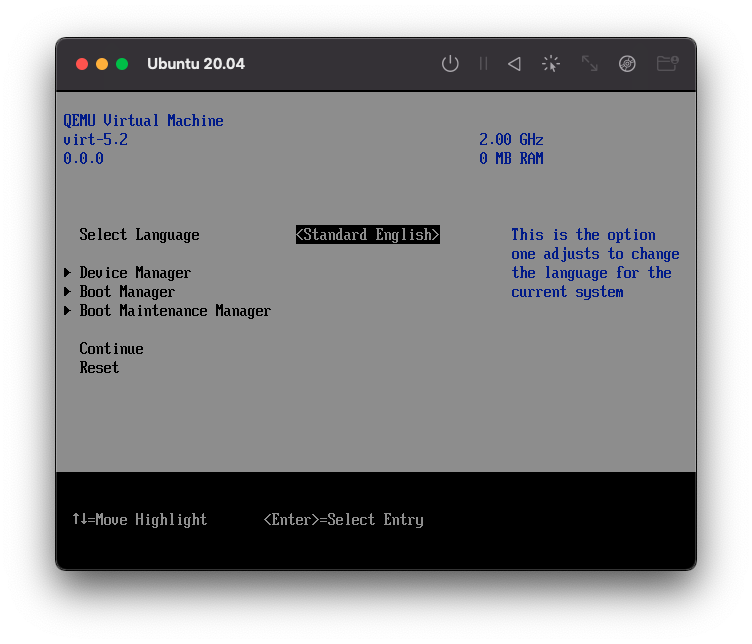
UEFIの設定画面へ遷移します。
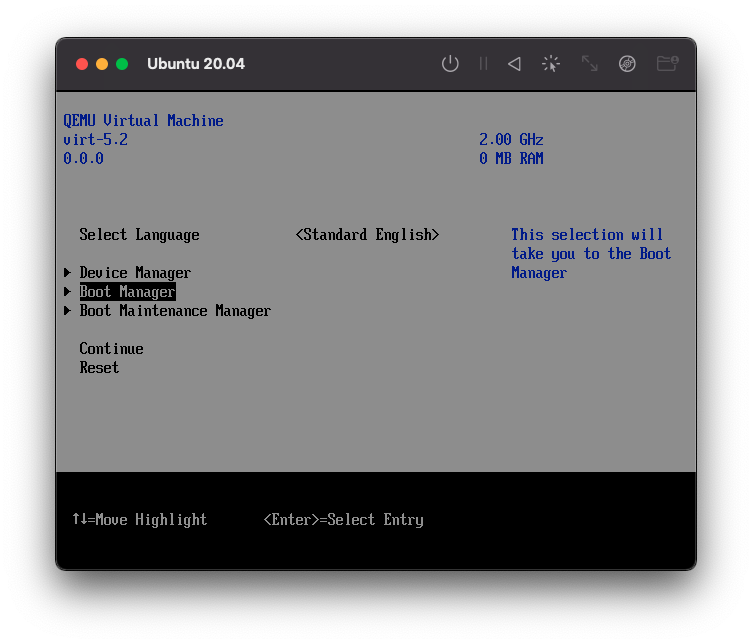
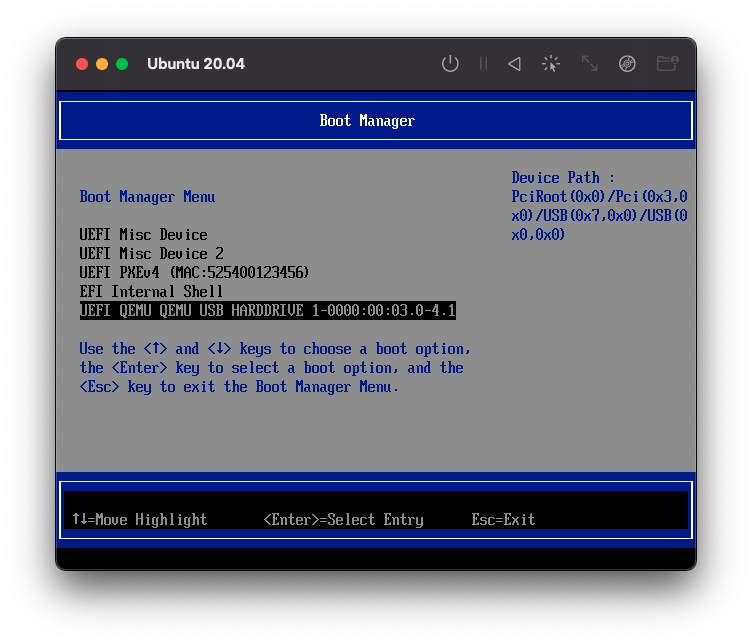
「Boot Manager」を選択します。
「UEFI QEMU QEMU USB HARDDRIVE」を選択します。
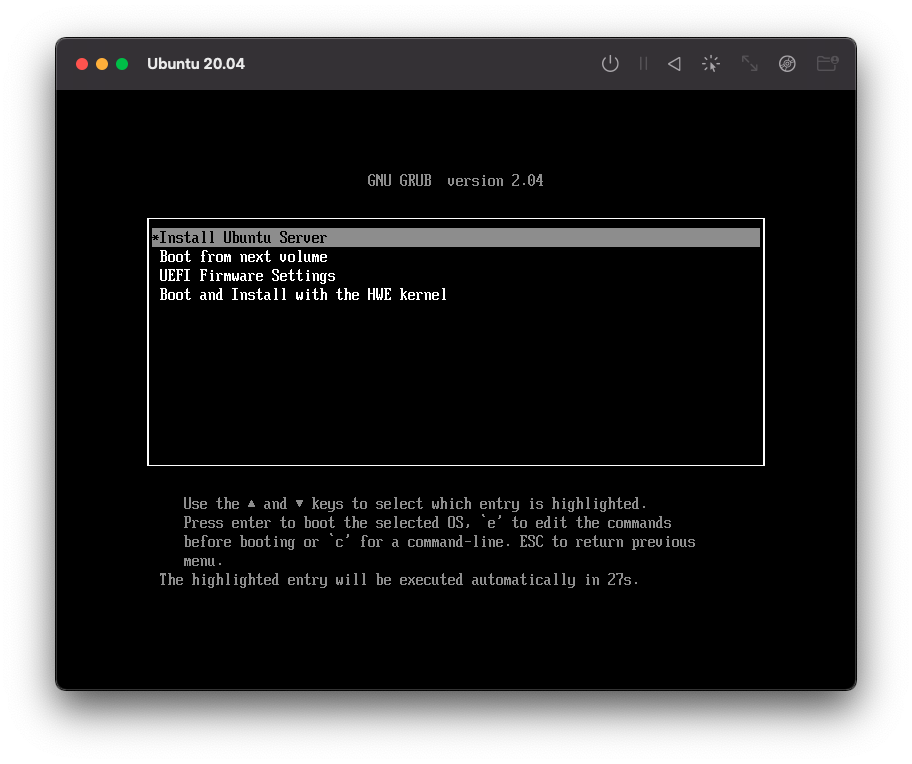
Ubuntuのインストール画面が表示されるので「Install Ubuntu Server」を選択します。
Ubuntuの詳細なインストール手順については割愛します。
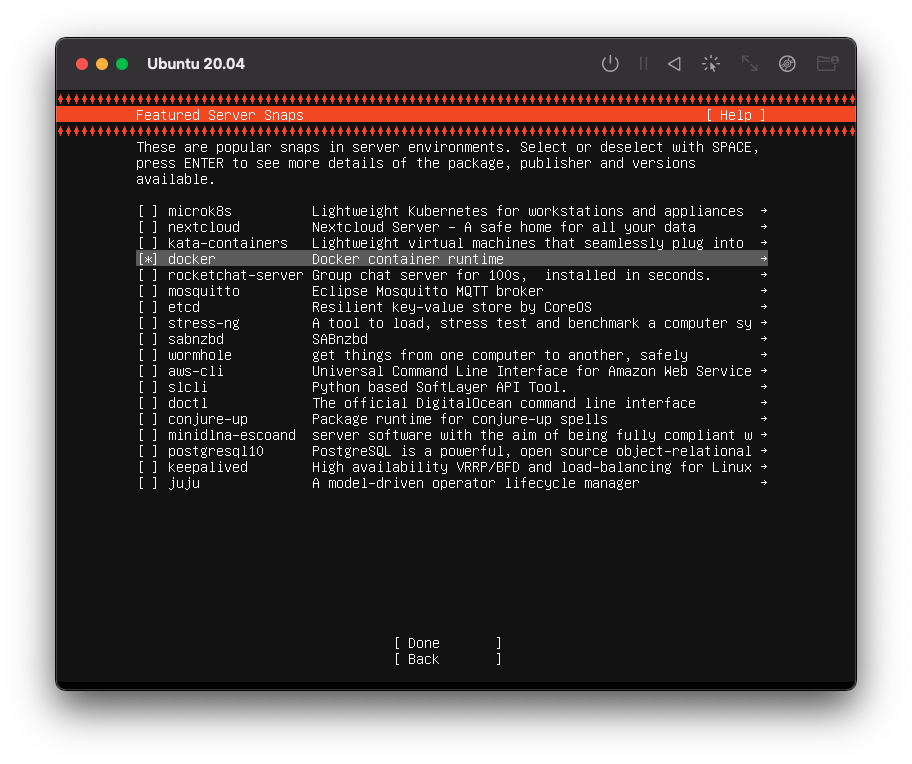
インストール後に利用したいパッケージが決まっているのであれば、「Featured Server Snaps」の画面で選択しておきます。今回はdockerを選択しました。
インストールが完了したら一旦仮想マシンを停止し、CD/DVDの「Clear」を選択して再度仮想マシンを起動します。
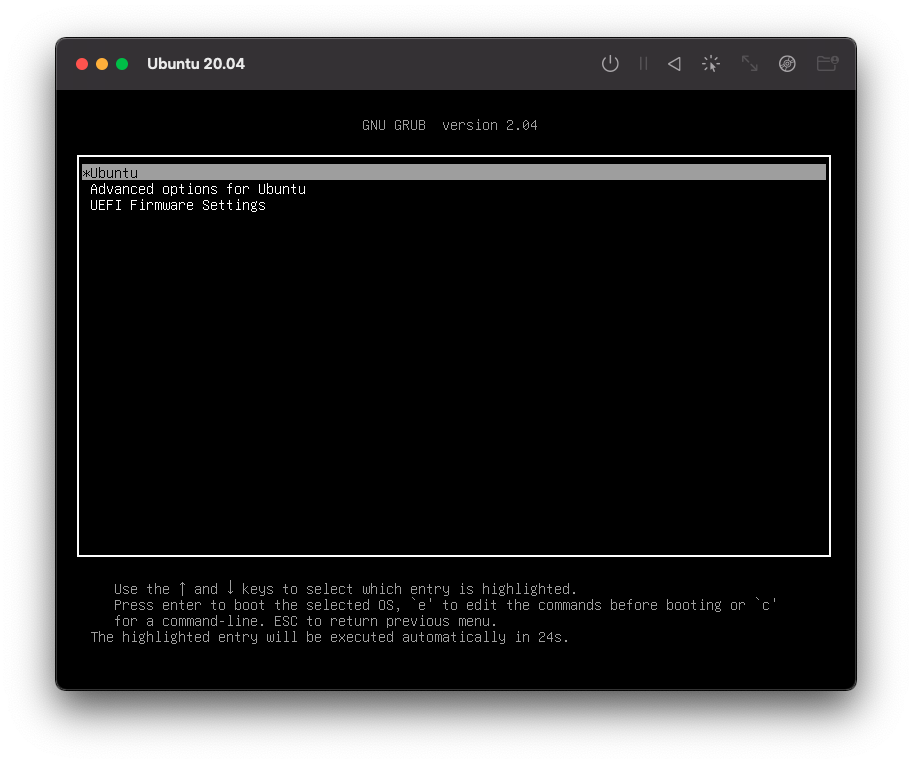
GRUBの画面が表示されますので、「Ubuntu」を選択します。
Ubuntuが起動します。
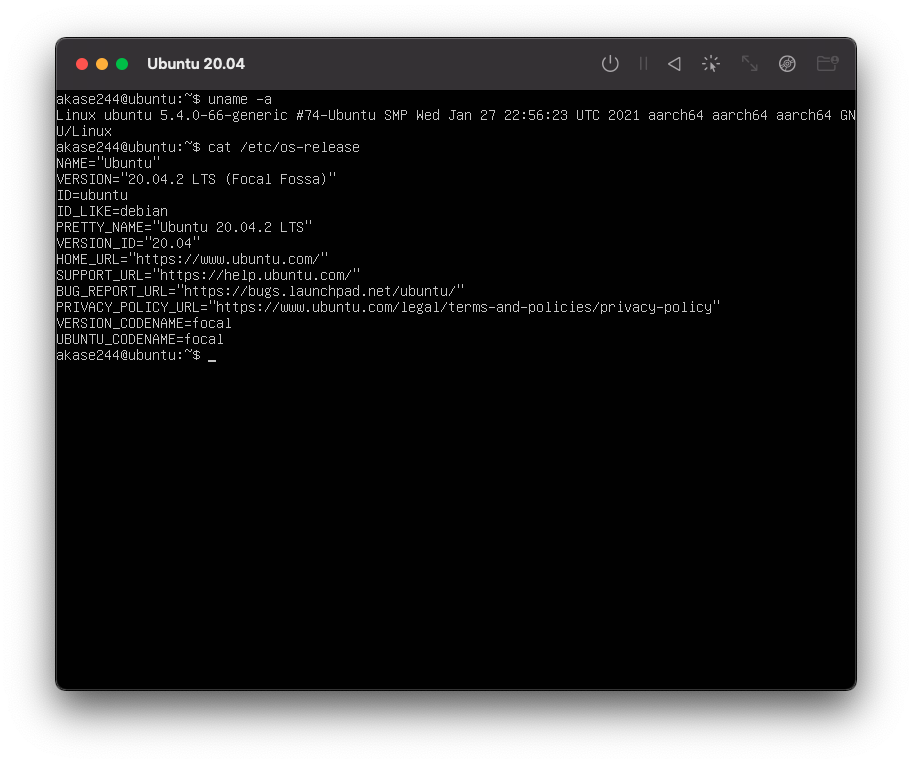
インストール時に設定したアカウントでログインし、unameと/etc/os-releaseを確認してみます。
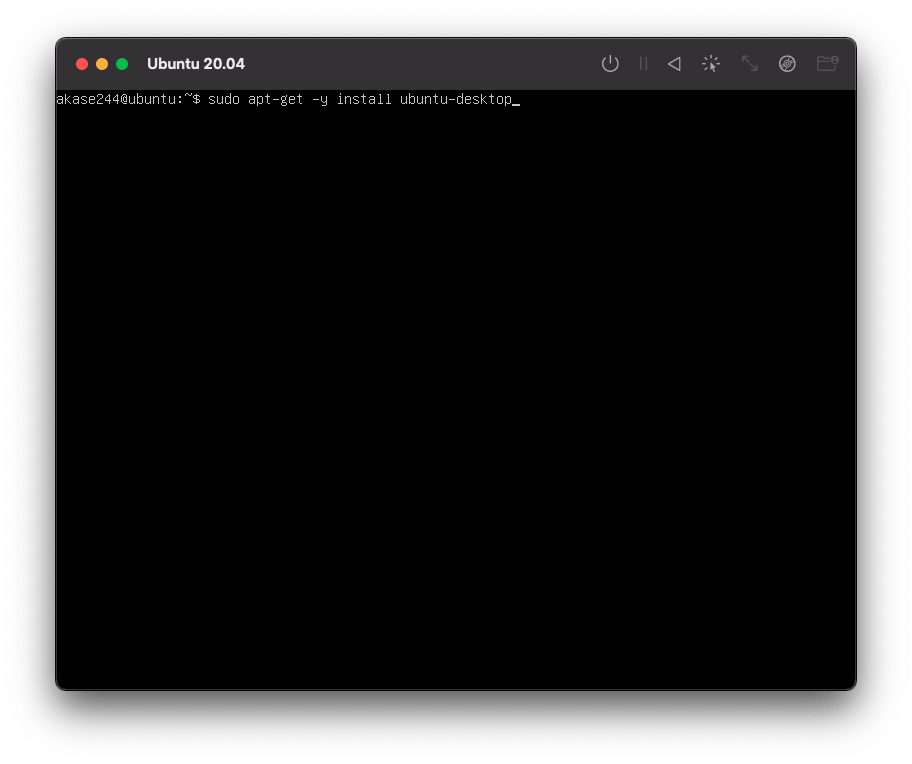
sudo apt-get -y install ubuntu-desktopを実行してデスクトップ環境をインストールしてみます。
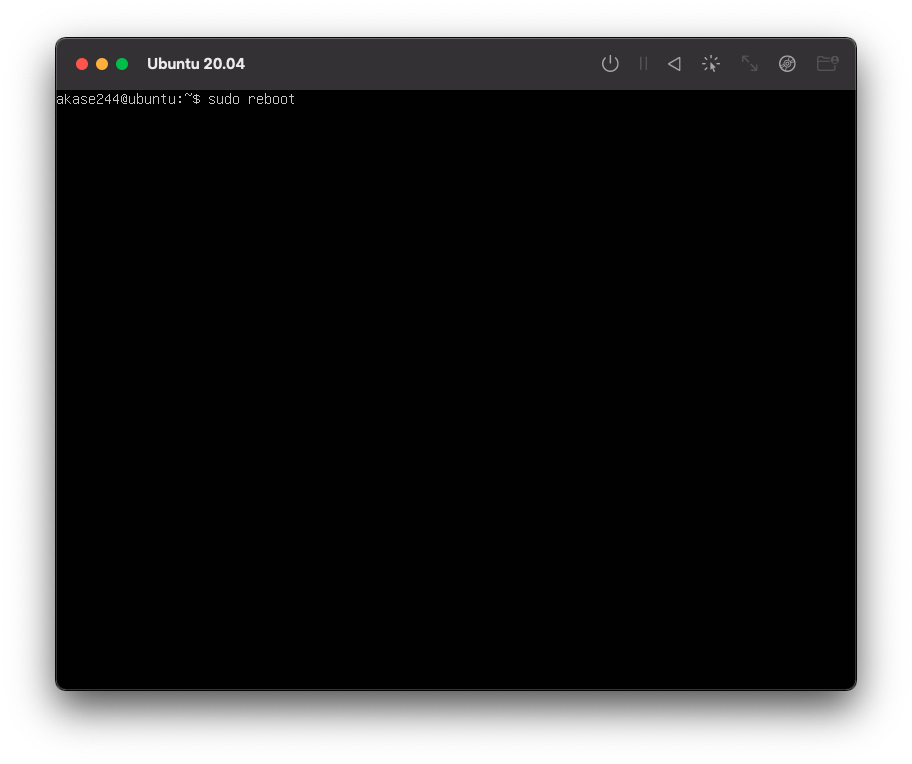
インストールが完了したら
sudo rebootで再起動します。
再起動後はGUIのログイン画面が表示されます。
ログインするとデスクトップ環境が表示されます。
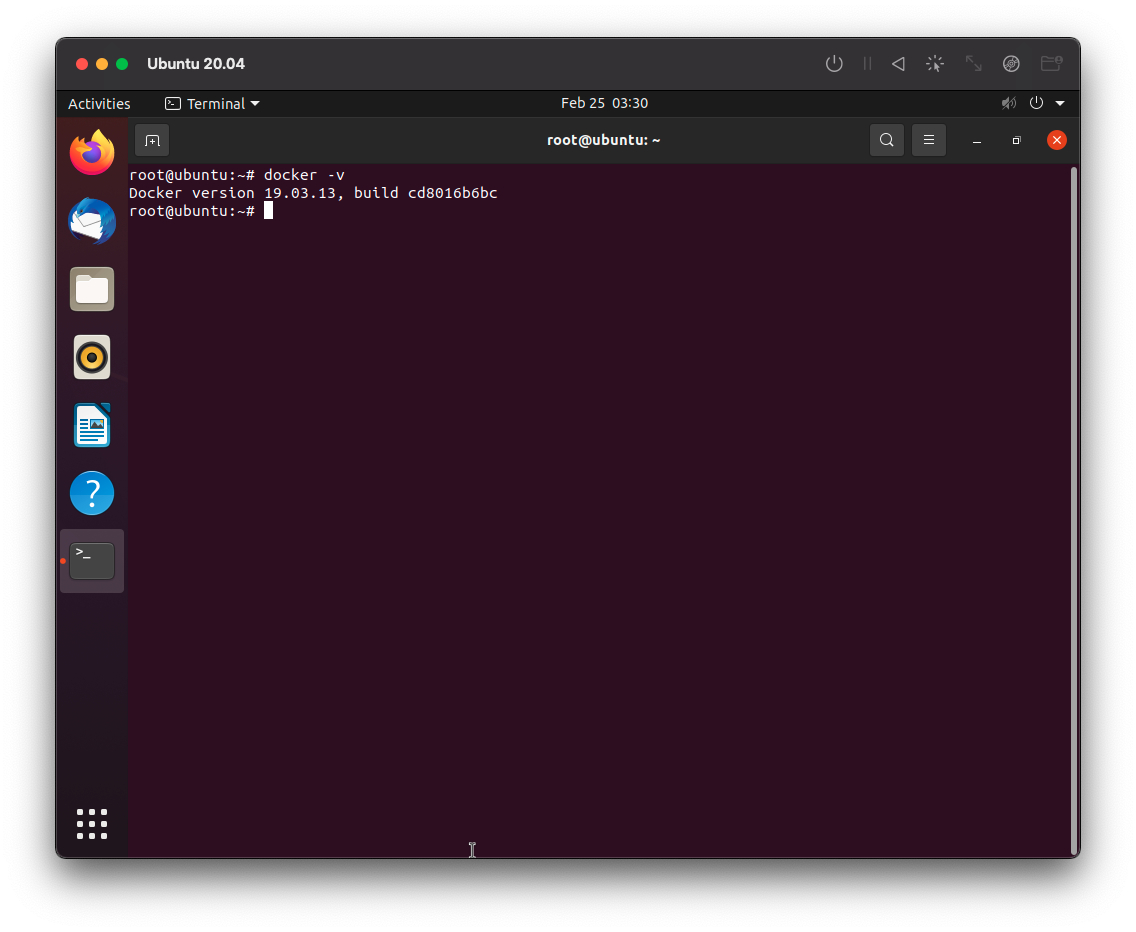
Ubuntuのインストール時にDockerをインストールしていたので、Dockerのバージョン情報を表示してみます。
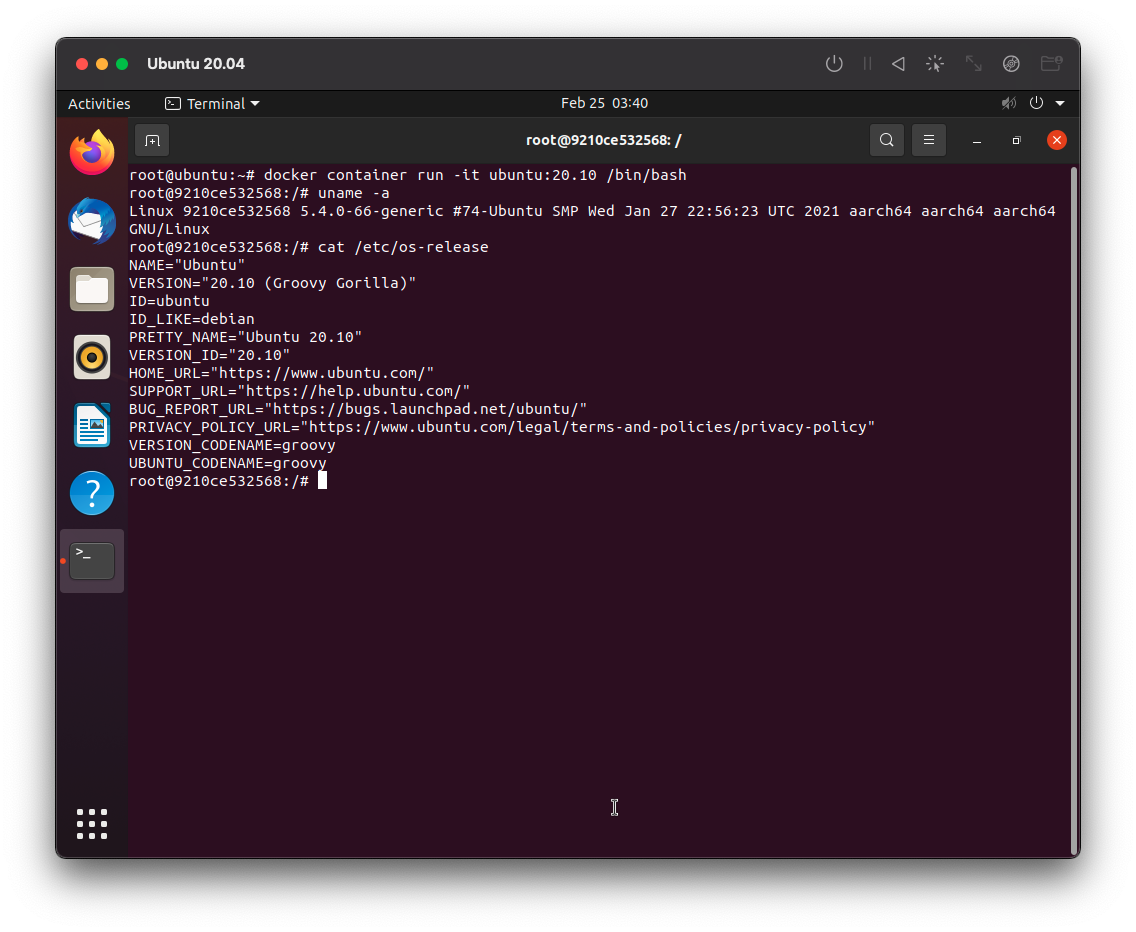
docker image pull (もしくは docker pull)を実行してUbuntu 20.10のイメージを取得し、docker image ls (もしくは docker images)でイメージが取得できているか確認します。
docker container run (もしくはdocker run)でコンテナのシェルを表示し、unameと/etc/os-releaseを確認してみます。


- 投稿日:2021-02-25T12:31:19+09:00
DockerでELKスタックを構築する(2021/02)
はじめに
ELKスタックですね。
Beatsはまだ入れてませんので・・・Elasticスタックではないかなー。以下の記事を参考にしてお勉強として構築してみました。
今回使ったもの
Dockerはインストールされている、という前提で実施しています。
ミドルウェア バージョン 確認URL nginx 1.19.7-alpine http://localhost elasticsearch-oss 7.10.1 http://localhost:9200 logstash-oss 7.10.1 http://localhost:9200/_cat/count/access_log1 kibana-oss 7.10.1 http://localhost:5601 構築スタート
1.作業用フォルダを作成する
作業用フォルダを作成します。
$ mkdir elkwork
$ cd elkwork
Dockerと共有するフォルダを作成します。
$ sudo mkdir -p /data/elkelkフォルダのオーナを変更します。
例ではuser:userとしていますが、私はmyname:staffとしました。(mynameのところは自分のユーザ名)1$ sudo chown user:user data/elkここから、elkフォルダの配下に共有フォルダを作成していきます。
まず、elasticsearch用の共有フォルダを作成します。
$ mkdir data/elk/elasticsearch次に、logstash用の共有フォルダを作成します。
$ mkdir -p data/elk/logstash/pipeline最後にnginx用の共有フォルダを作成します。
$ mkdir -p data/elk/log/nginx2.nginxを起動する
nginxを起動します。
nginx用の共有フォルダを指定するところでエラーが出ましたが、対応済み。2$ docker run -d --restart always -v /Users/myname/Downloads/elkwork/data/elk/log/nginx:/var/log/nginx -p 80:80 nginx:1.19.7-alpinenginxが起動したことを確認します。
3.Elasticsearchを起動する
elasticsearchを起動します。
$ docker run -d --restart always -v /Users/myname/Downloads/elkwork/data/elk/elasticsearch:/usr/share/elasticsearch/data -p 9200:9200 -p 9300:9300 -e "discovery.type=single-node" --name elasticsearch docker.elastic.co/elasticsearch/elasticsearch-oss:7.10.1elasticsearchが起動したことを確認します。
JSONが返却されればOKです。{ "name" : "34db2f5a288c", "cluster_name" : "docker-cluster", "cluster_uuid" : "RZ9UOc4TTv-28XD7Kw5Nqw", "version" : { "number" : "7.10.1", "build_flavor" : "oss", "build_type" : "docker", "build_hash" : "1c34507e66d7db1211f66f3513706fdf548736aa", "build_date" : "2020-12-05T01:00:33.671820Z", "build_snapshot" : false, "lucene_version" : "8.7.0", "minimum_wire_compatibility_version" : "6.8.0", "minimum_index_compatibility_version" : "6.0.0-beta1" }, "tagline" : "You Know, for Search" }4.Logstashを起動する
logstashの設定ファイル(confファイル)を data/elk/logstash/pipeline 直下に作成します。
data/elk/logstash/pipeline/logstash.confinput { file { path => "/var/log/nginx/access.log" start_position => beginning } } filter { grok { match => { "message" => ["%{IPORHOST:[nginx][access][remote_ip]} - %{DATA:[nginx][access][user_name]} \[%{HTTPDATE:[nginx][access][time]}\] \"%{WORD:[nginx][access][method]} %{DATA:[nginx][access][url]} HTTP/%{NUMBER:[nginx][access][http_version]}\" %{NUMBER:[nginx][access][response_code]} %{NUMBER:[nginx][access][body_sent][bytes]} \"%{DATA:[nginx][access][referrer]}\" \"%{DATA:[nginx][access][agent]}\""] } remove_field => "message" } mutate { add_field => { "read_timestamp" => "%{@timestamp}" } } date { match => [ "[nginx][access][time]", "dd/MM/YYYY:H:m:s Z" ] remove_field => "[nginx][access][time]" } useragent { source => "[nginx][access][agent]" target => "[nginx][access][user_agent]" remove_field => "[nginx][access][agent]" } geoip { source => "[nginx][access][remote_ip]" target => "[nginx][access][geoip]" } } output { elasticsearch { hosts => [ 'elasticsearch' ] index => "access_log1" } }logstashを起動します。
$ docker run -d --restart always -v /Users/myname/Downloads/elkwork/data/elk/logstash/pipeline:/usr/share/logstash/pipeline -v /Users/myname/Downloads/elkwork/data/elk/log:/var/log --link elasticsearch:elasticsearch --name logstash docker.elastic.co/logstash/logstash-oss:7.10.1logstashが起動し、ログ転送されたことを確認します。
内容を見ると、ちゃんと転送されているかが非常にギモンですが・・・・。
見やすいように、整形しています。{ "error":{ "root_cause":[{ "type":"index_not_found_exception", "reason":"no such index [access_log1]", "resource.type":"index_or_alias", "resource.id":"access_log1", "index_uuid":"_na_", "index":"access_log1" }], "type":"index_not_found_exception", "reason":"no such index [access_log1]", "resource.type":"index_or_alias", "resource.id":"access_log1", "index_uuid":"_na_", "index":"access_log1" }, "status":404 }5.Kibanaを起動する
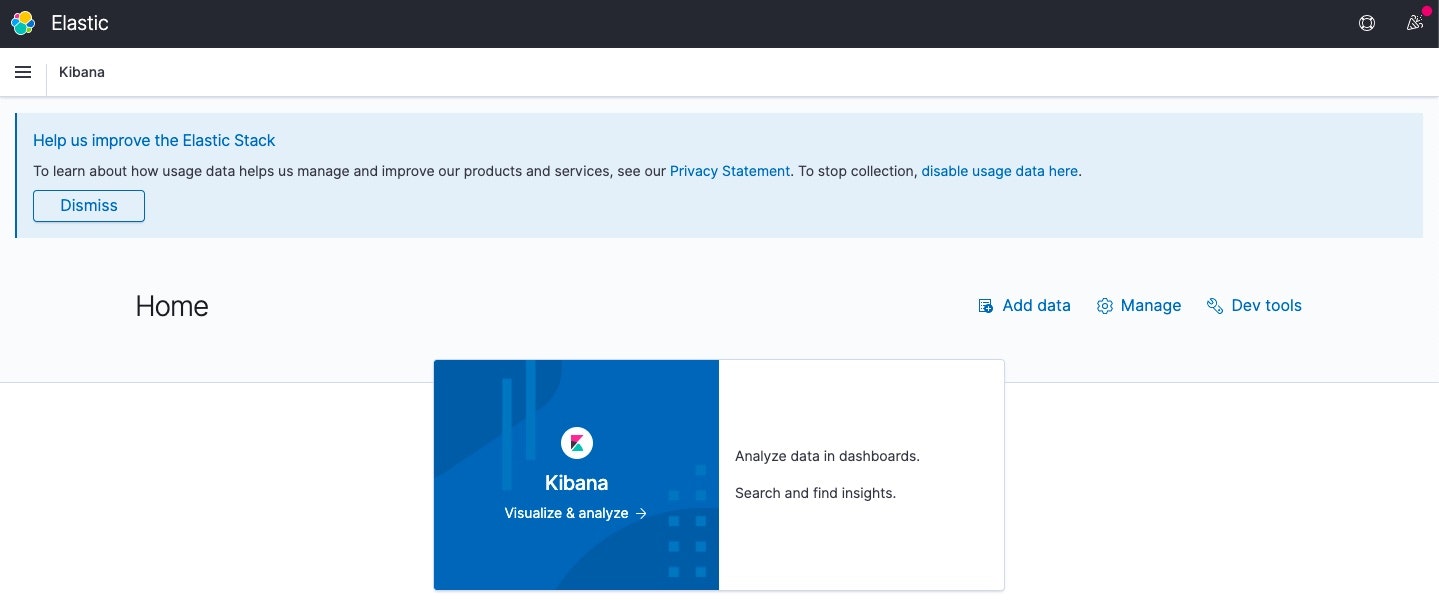
kibanaを起動します。
$ docker run -d --restart always -p 5601:5601 --link elasticsearch:elasticsearch -e ELASTICSEARCH_URL=http://elasticsearch:9200 --name kibana docker.elastic.co/kibana/kibana-oss:7.10.1kibanaが起動したことを確認します。3
6.起動したELKスタックが機能しているかを確認する
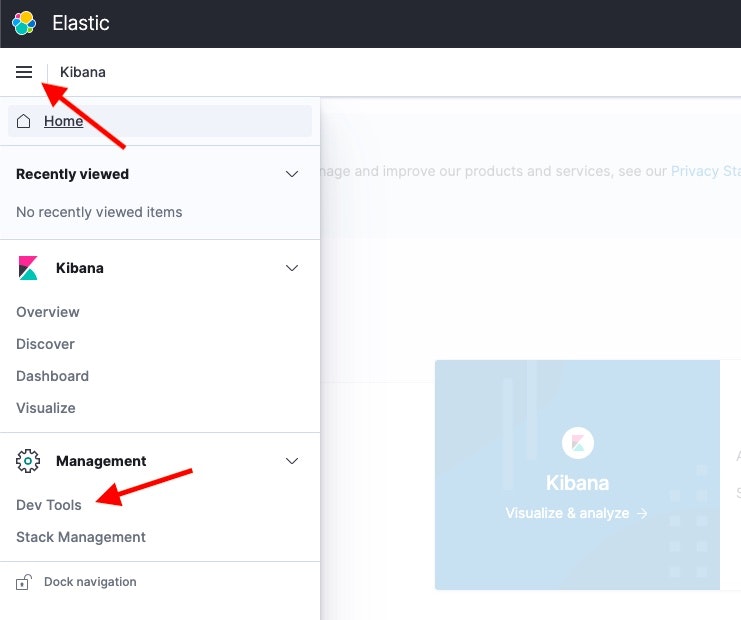
kibanaで、logstashからログが転送されていることを確認します。
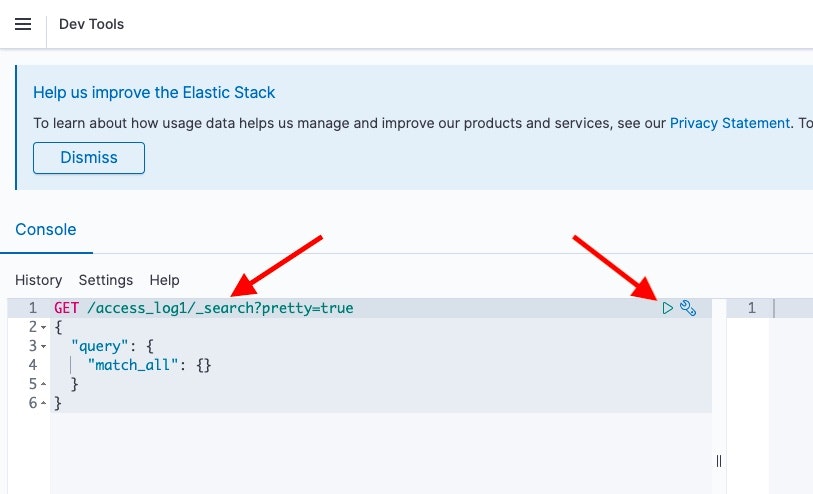
左側のハンバーガーボタンから、Dev Tool を開きます。
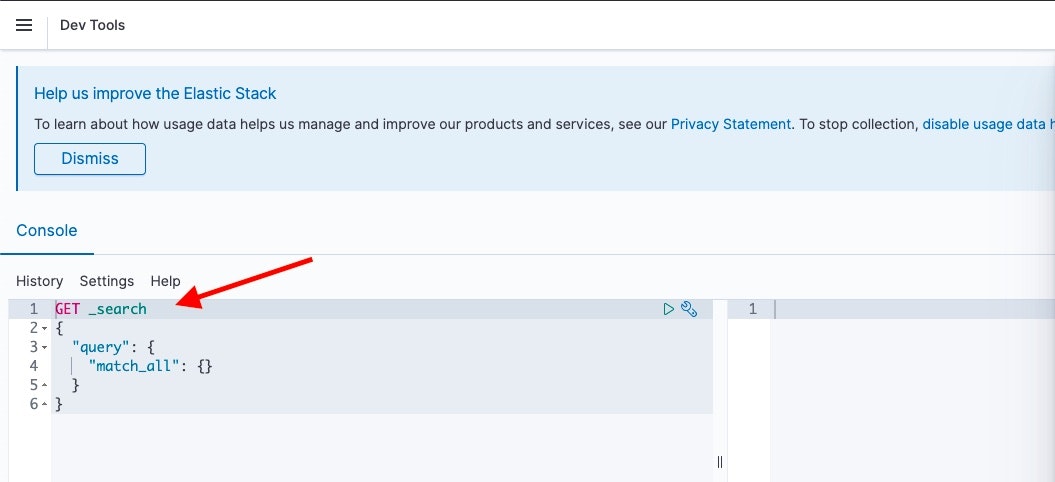
Consoleに GET /access_log1/_search?pretty=true を入力します。
入力したら、 ▶ をクリックします。
右側に、200 - OK で、アクセスログが表示されたら、バッチリです。
まとめ
コンテナって便利だな・・・。
あとは、これで色々お勉強してみます。
構築もお勉強だけど、ELKで何ができるかを考えてみるのもお勉強です。
私は、user:user 指定でエラーがでました。chown: user: illegal group name になったので、myname:staff としています。今のところ、これでエラーは出ていません。Macを利用しています。 ↩
元々 data/elk/log/nginx:/var/log/nginx を指定したのですが、そうすると Error response from daemon が返ってきてしまいました。フルパスを指定する必要があると理解したので、記載の通りフルパスを記載することでエラーを解消しています。参考→docker runでhost osのディレクトリをマウントする際に注意すること ↩
すぐにURLで確認に行くと、「まだだよ」って叱られます。コーヒーを一口飲んで、落ち着いてからアクセスしてください。 ↩
- 投稿日:2021-02-25T11:36:44+09:00
Dockerでwordpressを立てた時にメール送信ができなかった
問題
EC2インスタンス上でDocker(docker-compose)を使ってWordpressを構築した際に、Wordpressの設定変更や問い合わせなどでメール送信ができなかった。
docker-compose.ymlversion: '3' services: db: image: mysql:5.7 volumes: - db_data:/var/lib/mysql restart: always environment: MYSQL_ROOT_PASSWORD: somewordpress MYSQL_DATABASE: wordpress MYSQL_USER: wordpress MYSQL_PASSWORD: wordpress wordpress: depends_on: - db image: wordpress:5.6 ports: - "8000:80" restart: always environment: WORDPRESS_DB_HOST: db:3306 WORDPRESS_DB_USER: wordpress WORDPRESS_DB_PASSWORD: wordpress WORDPRESS_DB_NAME: wordpress volumes: db_data: {}これだとdockerのwordpressイメージの中にメール送信機能(sendmail)が含まれていないため、メール送信ができない。
解決
※SMTPサーバーは使わずに、sendmailを入れてとりあえずメール送信ができるようにする方法です。
DockerfileFROM wordpress:5.6 # sendmailをインストール RUN apt-get update \ && apt-get install -y --no-install-recommends sendmail \ && rm -rf /var/lib/apt/lists/* # sendmailをphpで使うための設定 RUN echo "sendmail_path=sendmail -t -i" >> /usr/local/etc/php/conf.d/sendmail.ini \ # エントリポイントとして使用するスクリプトを作成 RUN echo '#!/bin/bash' >> /usr/local/bin/docker-entrypoint-wrapper.sh \ && echo 'set -euo pipefail' >> /usr/local/bin/docker-entrypoint-wrapper.sh # 1. /etc/hostsにコンテナホスト名のlocalhostエントリを作成 RUN echo 'echo "127.0.0.1 $(hostname) localhost localhost.localdomain" >> /etc/hosts' >> /usr/local/bin/docker-entrypoint-wrapper.sh # 2. sendmailの再起動 RUN echo 'service sendmail restart' >> /usr/local/bin/docker-entrypoint-wrapper.sh # 3. docker-entrypoint.shを呼ぶ RUN echo 'exec docker-entrypoint.sh "$@"' >> /usr/local/bin/docker-entrypoint-wrapper.sh \ && chmod +x /usr/local/bin/docker-entrypoint-wrapper.sh ENTRYPOINT ["docker-entrypoint-wrapper.sh"] CMD ["apache2-foreground"]docker-compose.ymlversion: '3' services: db: image: mysql:5.7 volumes: - db_data:/var/lib/mysql restart: always environment: MYSQL_ROOT_PASSWORD: somewordpress MYSQL_DATABASE: wordpress MYSQL_USER: wordpress MYSQL_PASSWORD: wordpress wordpress: depends_on: - db build: context: . dockerfile: ./Dockerfile ports: - "8000:80" restart: always environment: WORDPRESS_DB_HOST: db:3306 WORDPRESS_DB_USER: wordpress WORDPRESS_DB_PASSWORD: wordpress WORDPRESS_DB_NAME: wordpress volumes: db_data: {}
- 投稿日:2021-02-25T10:00:16+09:00
Laravelの開発環境をDockerで構築しようとしたら公式さんがLaravel Sailって素敵ツールを提供してくれていました
久しぶりにLaravelで開発することになり、最近のDocker開発環境はどうなってるんだろうと調べてみたら、Laravel 8.xから利用できるようになったLaravel Sailが素敵そうだったので調べてみました。
Laravel Sailとは
Laravel Sail - Laravel - The PHP Framework For Web Artisans
https://laravel.com/docs/8.x/sail#introductionLaravel Sailは、LaravelのデフォルトのDocker開発環境と対話するための軽量のコマンドラインインターフェースです。Sailは、Dockerの経験がなくても、PHP、MySQL、Redisを使用してLaravelアプリケーションを構築するための優れた出発点を提供します。
基本的に、Sailは、プロジェクトのルートに保存されるdocker-compose.ymlファイルとsailスクリプトです。このsailスクリプトは、docker-compose.ymlファイルで定義されたDockerコンテナーと対話するための便利なメソッドをCLIに提供します。
Laravel Sailは、macOS、Linux、およびWindows(WSL2経由)でサポートされています。
まさか公式が対応してくれているとは!
インストール
Mac、Windows、Linuxそれぞれのインストール手順がありましたが、基本的には同じ手順でしたので、Macで試してみます。
前提
前提としてDockerアプリが必須となります。Dockerアプリのインストールについては割愛します。
Mac
Installation - Laravel - The PHP Framework For Web Artisans
https://laravel.com/docs/8.x/installation#getting-started-on-macos8.x公式のSailを利用したインストール手順インストール手順にあるコマンド
curl -s https://laravel.build/example-app | bashについて先に調べてみます。コマンドに含まれる
https://laravel.build/example-appへアクセスするとセットアップスクリプトがダウンロードできます。https://laravel.build/example-app へアクセスしてみると以下のスクリプトが取得できます。
composerのコンテナイメージを取得・起動してそのコンテナ内でlaravel new example-appを実行してプロジェクト作成しています。なるほどーhttpsdocker info > /dev/null 2>&1 # Ensure that Docker is running... if [ $? -ne 0 ]; then echo "Docker is not running." exit 1 fi docker run --rm \ -v $(pwd):/opt \ -w /opt \ laravelsail/php80-composer:latest \ bash -c "laravel new example-app && cd example-app && php ./artisan sail:install" cd example-app CYAN='\033[0;36m' LIGHT_CYAN='\033[1;36m' WHITE='\033[1;37m' NC='\033[0m' echo "" if sudo -n true 2>/dev/null; then sudo chown -R $USER: . echo -e "${WHITE}Get started with:${NC} cd example-app && ./vendor/bin/sail up" else echo -e "${WHITE}Please provide your password so we can make some final adjustments to your application's permissions.${NC}" echo "" sudo chown -R $USER: . echo "" echo -e "${WHITE}Thank you! We hope you build something incredible. Dive in with:${NC} cd example-app && ./vendor/bin/sail up" fi実際に実行してみます。途中、端末のパスワードを求められるので入力します。
$ curl -s https://laravel.build/example-app | bash

Unable to find image 'laravelsail/php80-composer:latest' locally
latest: Pulling from laravelsail/php80-composer
852e50cd189d: Pull complete
0266fc315b01: Pull complete
(略)
Digest: sha256:b387b05f2d55d32d9ab1b861b4bc8347f75b36ca2b259231a3359118682dabad
Status: Downloaded newer image for laravelsail/php80-composer:latest


 _                               _
| |                             | |
| |     __ _ _ __ __ ___   _____| |
| |    / _` | '__/ _` \ \ / / _ \ |
| |___| (_| | | | (_| |\ V /  __/ |
|______\__,_|_|  \__,_| \_/ \___|_|

Warning: TTY mode requires /dev/tty to be read/writable.
    Creating a "laravel/laravel" project at "./example-app"
(略)
Discovered Package: laravel/tinker
Discovered Package: nesbot/carbon
Discovered Package: nunomaduro/collision
Package manifest generated successfully.
    74 packages you are using are looking for funding.
    Use the `composer fund` command to find out more!
    > @php artisan key:generate --ansi
    Application key set successfully.

Application ready! Build something amazing.

Please provide your password so we can make some final adjustments to your application's permissions.

Password:

Thank you! We hope you build something incredible. Dive in with: cd example-app && ./vendor/bin/sail up
つおい。もう開発環境の準備が整いました。
ディレクトリを覗いてみるといたせりつくせり感満載です。$ cd example-app $ ls -al total 640 drwxr-xr-x 27 kai 339809989 864 2 19 19:53 ./ drwxr-xr-x 3 kai 339809989 96 2 19 19:51 ../ -rw-r--r-- 1 kai 339809989 220 2 17 01:58 .editorconfig -rw-r--r-- 1 kai 339809989 865 2 19 19:53 .env -rw-r--r-- 1 kai 339809989 815 2 19 19:53 .env.example -rw-r--r-- 1 kai 339809989 111 2 17 01:58 .gitattributes -rw-r--r-- 1 kai 339809989 191 2 17 01:58 .gitignore -rw-r--r-- 1 kai 339809989 181 2 17 01:58 .styleci.yml -rw-r--r-- 1 kai 339809989 3780 2 17 01:58 README.md drwxr-xr-x 7 kai 339809989 224 2 17 01:58 app/ -rwxr-xr-x 1 kai 339809989 1686 2 17 01:58 artisan* drwxr-xr-x 4 kai 339809989 128 2 17 01:58 bootstrap/ -rw-r--r-- 1 kai 339809989 1646 2 17 01:58 composer.json -rw-r--r-- 1 kai 339809989 268563 2 19 19:51 composer.lock drwxr-xr-x 16 kai 339809989 512 2 17 01:58 config/ drwxr-xr-x 6 kai 339809989 192 2 17 01:58 database/ -rw-r--r-- 1 kai 339809989 2614 2 19 19:53 docker-compose.yml -rw-r--r-- 1 kai 339809989 473 2 17 01:58 package.json -rw-r--r-- 1 kai 339809989 1202 2 17 01:58 phpunit.xml drwxr-xr-x 7 kai 339809989 224 2 17 01:58 public/ drwxr-xr-x 6 kai 339809989 192 2 17 01:58 resources/ drwxr-xr-x 6 kai 339809989 192 2 17 01:58 routes/ -rw-r--r-- 1 kai 339809989 563 2 17 01:58 server.php drwxr-xr-x 5 kai 339809989 160 2 17 01:58 storage/ drwxr-xr-x 6 kai 339809989 192 2 17 01:58 tests/ drwxr-xr-x 45 kai 339809989 1440 2 19 19:53 vendor/ -rw-r--r-- 1 kai 339809989 559 2 17 01:58 webpack.mix.js
.gitignore用意されているので、Gitリポジトリへのコミットもはまらずにできそうです。.gitignore/node_modules /public/hot /public/storage /storage/*.key /vendor .env .env.backup .phpunit.result.cache docker-compose.override.yml Homestead.json Homestead.yaml npm-debug.log yarn-error.log
docker-compose.ymlを眺めてみるとlaravelのDockerfileは./vendor/laravel/sail以下のファイルを参照していることがわかります。コメントアウトされていますが、seleniumやPostgreSQL、memcachedにも対応しているみたいです。ポート変更したい場合、環境変数が利用できるようになっているので、例えば
laravel.testのポートを変更したい場合、.envファイルにAPP_PORT=8000などのように追記すると変更できます。Laravel SailでDocker環境構築 | RE:ENGINES
https://re-engines.com/2021/01/25/laravel-sail/docker-compose.yml# For more information: https://laravel.com/docs/sail version: '3' services: laravel.test: build: context: ./vendor/laravel/sail/runtimes/8.0 dockerfile: Dockerfile args: WWWGROUP: '${WWWGROUP}' image: sail-8.0/app ports: - '${APP_PORT:-80}:80' environment: WWWUSER: '${WWWUSER}' LARAVEL_SAIL: 1 volumes: - '.:/var/www/html' networks: - sail depends_on: - mysql # - pgsql - redis # - selenium # selenium: # image: 'selenium/standalone-chrome' # volumes: # - '/dev/shm:/dev/shm' # networks: # - sail mysql: image: 'mysql:8.0' ports: - '${FORWARD_DB_PORT:-3306}:3306' environment: MYSQL_ROOT_PASSWORD: '${DB_PASSWORD}' MYSQL_DATABASE: '${DB_DATABASE}' MYSQL_USER: '${DB_USERNAME}' MYSQL_PASSWORD: '${DB_PASSWORD}' MYSQL_ALLOW_EMPTY_PASSWORD: 'yes' volumes: - 'sailmysql:/var/lib/mysql' networks: - sail healthcheck: test: ["CMD", "mysqladmin", "ping"] # pgsql: # image: postgres:13 # ports: # - '${FORWARD_DB_PORT:-5432}:5432' # environment: # PGPASSWORD: '${DB_PASSWORD:-secret}' # POSTGRES_DB: '${DB_DATABASE}' # POSTGRES_USER: '${DB_USERNAME}' # POSTGRES_PASSWORD: '${DB_PASSWORD:-secret}' # volumes: # - 'sailpostgresql:/var/lib/postgresql/data' # networks: # - sail # healthcheck: # test: ["CMD", "pg_isready", "-q", "-d", "${DB_DATABASE}", "-U", "${DB_USERNAME}"] redis: image: 'redis:alpine' ports: - '${FORWARD_REDIS_PORT:-6379}:6379' volumes: - 'sailredis:/data' networks: - sail healthcheck: test: ["CMD", "redis-cli", "ping"] # memcached: # image: 'memcached:alpine' # ports: # - '11211:11211' # networks: # - sail mailhog: image: 'mailhog/mailhog:latest' ports: - '${FORWARD_MAILHOG_PORT:-1025}:1025' - '${FORWARD_MAILHOG_DASHBOARD_PORT:-8025}:8025' networks: - sail networks: sail: driver: bridge volumes: sailmysql: driver: local # sailpostgresql: # driver: local sailredis: driver: locallaravelコンテナの
Dockerfileを眺めてみるとタイムゾーンを変更したい場合にカスタマイズしたいかなぁと思う程度です。DockerfileFROM ubuntu:20.04 LABEL maintainer="Taylor Otwell" ARG WWWGROUP WORKDIR /var/www/html ENV DEBIAN_FRONTEND noninteractive ENV TZ=UTC RUN ln -snf /usr/share/zoneinfo/$TZ /etc/localtime && echo $TZ > /etc/timezone RUN apt-get update \ && apt-get install -y gnupg gosu curl ca-certificates zip unzip git supervisor sqlite3 libcap2-bin libpng-dev python2 \ && mkdir -p ~/.gnupg \ && chmod 600 ~/.gnupg \ && echo "disable-ipv6" >> ~/.gnupg/dirmngr.conf \ && apt-key adv --homedir ~/.gnupg --keyserver hkp://keyserver.ubuntu.com:80 --recv-keys E5267A6C \ && apt-key adv --homedir ~/.gnupg --keyserver hkp://keyserver.ubuntu.com:80 --recv-keys C300EE8C \ && echo "deb http://ppa.launchpad.net/ondrej/php/ubuntu focal main" > /etc/apt/sources.list.d/ppa_ondrej_php.list \ && apt-get update \ && apt-get install -y php8.0-cli php8.0-dev \ php8.0-pgsql php8.0-sqlite3 php8.0-gd \ php8.0-curl php8.0-memcached \ php8.0-imap php8.0-mysql php8.0-mbstring \ php8.0-xml php8.0-zip php8.0-bcmath php8.0-soap \ php8.0-intl php8.0-readline \ php8.0-msgpack php8.0-igbinary php8.0-ldap \ php8.0-redis \ && php -r "readfile('http://getcomposer.org/installer');" | php -- --install-dir=/usr/bin/ --filename=composer \ && curl -sL https://deb.nodesource.com/setup_15.x | bash - \ && apt-get install -y nodejs \ && curl -sS https://dl.yarnpkg.com/debian/pubkey.gpg | apt-key add - \ && echo "deb https://dl.yarnpkg.com/debian/ stable main" > /etc/apt/sources.list.d/yarn.list \ && apt-get update \ && apt-get install -y yarn \ && apt-get install -y mysql-client \ && apt-get -y autoremove \ && apt-get clean \ && rm -rf /var/lib/apt/lists/* /tmp/* /var/tmp/* RUN setcap "cap_net_bind_service=+ep" /usr/bin/php8.0 RUN groupadd --force -g $WWWGROUP sail RUN useradd -ms /bin/bash --no-user-group -g $WWWGROUP -u 1337 sail COPY start-container /usr/local/bin/start-container COPY supervisord.conf /etc/supervisor/conf.d/supervisord.conf COPY php.ini /etc/php/8.0/cli/conf.d/99-sail.ini RUN chmod +x /usr/local/bin/start-container EXPOSE 8000 ENTRYPOINT ["start-container"]
./vendor/bin/sail upコマンドを実行してDockerコンテナを立ち上げます。
docker-compose upコマンドでも立ち上げることができました。$ ./vendor/bin/sail up Creating network "example-app_sail" with driver "bridge" Creating volume "example-app_sailmysql" with local driver Creating volume "example-app_sailredis" with local driver Pulling redis (redis:alpine)... alpine: Pulling from library/redis ba3557a56b15: Pull complete (略) Digest: sha256:6ea115e574af216b2175f3783bb1119140b24619632e522841c1aac6990f5e79 Status: Downloaded newer image for redis:alpine Building laravel.test (略) Creating example-app_redis_1 ... done (略) Creating example-app_laravel.test_1 ... done Attaching to example-app_mailhog_1, example-app_redis_1, example-app_mysql_1, example-app_laravel.test_1 mailhog_1 | [HTTP] Binding to address: 0.0.0.0:8025 mailhog_1 | 2021/02/19 11:08:44 Using in-memory storage mailhog_1 | 2021/02/19 11:08:44 [SMTP] Binding to address: 0.0.0.0:1025 mailhog_1 | 2021/02/19 11:08:44 Serving under http://0.0.0.0:8025/ mysql_1 | 2021-02-19 11:08:44+00:00 [Note] [Entrypoint]: Entrypoint script for MySQL Server 8.0.21-1debian10 started. redis_1 | 1:C 19 Feb 2021 11:08:44.329 # oO0OoO0OoO0Oo Redis is starting oO0OoO0OoO0Oo redis_1 | 1:C 19 Feb 2021 11:08:44.329 # Redis version=6.0.10, bits=64, commit=00000000, modified=0, pid=1, just started redis_1 | 1:C 19 Feb 2021 11:08:44.329 # Warning: no config file specified, using the default config. In order to specify a config file use redis-server /path/to/redis.conf mailhog_1 | Creating API v1 with WebPath: mysql_1 | 2021-02-19 11:08:44+00:00 [Note] [Entrypoint]: Switching to dedicated user 'mysql' redis_1 | 1:M 19 Feb 2021 11:08:44.330 * Running mode=standalone, port=6379. redis_1 | 1:M 19 Feb 2021 11:08:44.330 # WARNING: The TCP backlog setting of 511 cannot be enforced because /proc/sys/net/core/somaxconn is set to the lower value of 128. redis_1 | 1:M 19 Feb 2021 11:08:44.330 # Server initialized mailhog_1 | Creating API v2 with WebPath: mysql_1 | 2021-02-19 11:08:44+00:00 [Note] [Entrypoint]: Entrypoint script for MySQL Server 8.0.21-1debian10 started. redis_1 | 1:M 19 Feb 2021 11:08:44.331 * Ready to accept connections mysql_1 | 2021-02-19 11:08:44+00:00 [Note] [Entrypoint]: Initializing database files mysql_1 | 2021-02-19T11:08:44.731409Z 0 [System] [MY-013169] [Server] /usr/sbin/mysqld (mysqld 8.0.21) initializing of server in progress as process 45 mysql_1 | 2021-02-19T11:08:44.739160Z 1 [System] [MY-013576] [InnoDB] InnoDB initialization has started. mysql_1 | 2021-02-19T11:08:45.144394Z 1 [System] [MY-013577] [InnoDB] InnoDB initialization has ended. laravel.test_1 | 2021-02-19 11:08:45,721 INFO Set uid to user 0 succeeded laravel.test_1 | 2021-02-19 11:08:45,726 INFO supervisord started with pid 17 mysql_1 | 2021-02-19T11:08:46.142439Z 6 [Warning] [MY-010453] [Server] root@localhost is created with an empty password ! Please consider switching off the --initialize-insecure option. laravel.test_1 | 2021-02-19 11:08:46,730 INFO spawned: 'php' with pid 19 laravel.test_1 | 2021-02-19 11:08:47,733 INFO success: php entered RUNNING state, process has stayed up for > than 1 seconds (startsecs) mysql_1 | 2021-02-19 11:08:49+00:00 [Note] [Entrypoint]: Database files initialized mysql_1 | 2021-02-19 11:08:49+00:00 [Note] [Entrypoint]: Starting temporary server mysql_1 | 2021-02-19T11:08:49.524217Z 0 [System] [MY-010116] [Server] /usr/sbin/mysqld (mysqld 8.0.21) starting as process 92 mysql_1 | 2021-02-19T11:08:49.538476Z 1 [System] [MY-013576] [InnoDB] InnoDB initialization has started. laravel.test_1 | Starting Laravel development server: http://0.0.0.0:80 mysql_1 | 2021-02-19T11:08:49.706431Z 1 [System] [MY-013577] [InnoDB] InnoDB initialization has ended. mysql_1 | 2021-02-19T11:08:49.809603Z 0 [System] [MY-011323] [Server] X Plugin ready for connections. Socket: /var/run/mysqld/mysqlx.sock mysql_1 | 2021-02-19T11:08:49.959222Z 0 [Warning] [MY-010068] [Server] CA certificate ca.pem is self signed. mysql_1 | 2021-02-19T11:08:49.959381Z 0 [System] [MY-013602] [Server] Channel mysql_main configured to support TLS. Encrypted connections are now supported for this channel. mysql_1 | 2021-02-19T11:08:49.961133Z 0 [Warning] [MY-011810] [Server] Insecure configuration for --pid-file: Location '/var/run/mysqld' in the path is accessible to all OS users. Consider choosing a different directory. mysql_1 | 2021-02-19T11:08:49.991284Z 0 [System] [MY-010931] [Server] /usr/sbin/mysqld: ready for connections. Version: '8.0.21' socket: '/var/run/mysqld/mysqld.sock' port: 0 MySQL Community Server - GPL. mysql_1 | 2021-02-19 11:08:50+00:00 [Note] [Entrypoint]: Temporary server started. laravel.test_1 | [Fri Feb 19 11:08:49 2021] PHP 8.0.2 Development Server (http://0.0.0.0:80) started mysql_1 | Warning: Unable to load '/usr/share/zoneinfo/iso3166.tab' as time zone. Skipping it. mysql_1 | Warning: Unable to load '/usr/share/zoneinfo/leap-seconds.list' as time zone. Skipping it. mysql_1 | Warning: Unable to load '/usr/share/zoneinfo/zone.tab' as time zone. Skipping it. mysql_1 | Warning: Unable to load '/usr/share/zoneinfo/zone1970.tab' as time zone. Skipping it. mysql_1 | 2021-02-19 11:08:52+00:00 [Note] [Entrypoint]: Creating database example_app mysql_1 | mysql_1 | 2021-02-19 11:08:52+00:00 [Note] [Entrypoint]: Stopping temporary server mysql_1 | 2021-02-19T11:08:52.783401Z 11 [System] [MY-013172] [Server] Received SHUTDOWN from user root. Shutting down mysqld (Version: 8.0.21). mysql_1 | 2021-02-19T11:08:54.552265Z 0 [System] [MY-010910] [Server] /usr/sbin/mysqld: Shutdown complete (mysqld 8.0.21) MySQL Community Server - GPL. mysql_1 | 2021-02-19 11:08:54+00:00 [Note] [Entrypoint]: Temporary server stopped mysql_1 | mysql_1 | 2021-02-19 11:08:54+00:00 [Note] [Entrypoint]: MySQL init process done. Ready for start up. mysql_1 | mysql_1 | 2021-02-19T11:08:55.019311Z 0 [System] [MY-010116] [Server] /usr/sbin/mysqld (mysqld 8.0.21) starting as process 1 mysql_1 | 2021-02-19T11:08:55.027315Z 1 [System] [MY-013576] [InnoDB] InnoDB initialization has started. mysql_1 | 2021-02-19T11:08:55.193856Z 1 [System] [MY-013577] [InnoDB] InnoDB initialization has ended. mysql_1 | 2021-02-19T11:08:55.297841Z 0 [System] [MY-011323] [Server] X Plugin ready for connections. Bind-address: '::' port: 33060, socket: /var/run/mysqld/mysqlx.sock mysql_1 | 2021-02-19T11:08:55.410836Z 0 [Warning] [MY-010068] [Server] CA certificate ca.pem is self signed. mysql_1 | 2021-02-19T11:08:55.411005Z 0 [System] [MY-013602] [Server] Channel mysql_main configured to support TLS. Encrypted connections are now supported for this channel. mysql_1 | 2021-02-19T11:08:55.413393Z 0 [Warning] [MY-011810] [Server] Insecure configuration for --pid-file: Location '/var/run/mysqld' in the path is accessible to all OS users. Consider choosing a different directory. mysql_1 | 2021-02-19T11:08:55.435750Z 0 [System] [MY-010931] [Server] /usr/sbin/mysqld: ready for connections. Version: '8.0.21' socket: '/var/run/mysqld/mysqld.sock' port: 3306 MySQL Community Server - GPL. mailhog_1 | [APIv1] KEEPALIVE /api/v1/eventsとくにエラーもなくコンテナが起動しました。素晴らしい。
-dオプションをつけることでバックグラウンドで起動することもできました。-dオプションで起動した場合、./vendor/bin/sail stopコマンドでコンテナを終了することができます。http://localhost/ へアクセスするとLaravelアプリが表示されることが確認できます。
MailHogのコンテナも起動しているので、
http://localhost:8025/でダッシュボードが表示できます。
phpMyAdminが使いたい場合
MySQLに関してはphpMyAdminなどの管理ツールは用意されていないので、必要であれば個別に追加するのがよさそうです。
docker-compose.ymlに以下の定義を追加するとphpMyAdminが利用できるようになります。How to add phpmyadmin to laravel 8 sail docker-compose.yml - Stack Overflow
https://stackoverflow.com/questions/66195113/how-to-add-phpmyadmin-to-laravel-8-sail-docker-compose-ymldocker-compose.ymlphpmyadmin: image: phpmyadmin/phpmyadmin links: - mysql:mysql ports: - 8080:80 environment: MYSQL_USERNAME: '${DB_USERNAME}' MYSQL_ROOT_PASSWORD: '${DB_PASSWORD}' PMA_HOST: mysql networks: - sail初期状態だとユーザー名
rootパスワード空でログインできます。
Windows
Installation - Laravel - The PHP Framework For Web Artisans
https://laravel.com/docs/8.x/installation#getting-started-on-windowsWindows Subsystem for Linux 2(WSL2)がインストールされている前提で手順はMacと同じです。
Linux
Installation - Laravel - The PHP Framework For Web Artisans
https://laravel.com/docs/8.x/installation#getting-started-on-linuxMacと同じです。
まとめ
非常に手軽にLaravelの開発環境を構築することができました。Dockerの知識がなくとも利用することができ、開発に集中できるとてもよいツールだったので積極的に利用したいと思います。
参考
Laravel Sail - Laravel - The PHP Framework For Web Artisans
https://laravel.com/docs/8.x/sail#introductionLaravel SailでDocker環境構築 | RE:ENGINES
https://re-engines.com/2021/01/25/laravel-sail/How to add phpmyadmin to laravel 8 sail docker-compose.yml - Stack Overflow
https://stackoverflow.com/questions/66195113/how-to-add-phpmyadmin-to-laravel-8-sail-docker-compose-ymlLaravel Sail なら Docker 開発環境がコマンド 2 撃で構築できる。PHP/MySQLからキューやメール環境までオールインワン
https://www.ritolab.com/entry/217【Docker】Laravel Sailのインストールと使い方を確認 | アールエフェクト
https://reffect.co.jp/laravel/laravel-sail

- 投稿日:2021-02-25T08:26:53+09:00
Flask + Vue + MySQL 構成のDocker環境構築方法 メモ
- Vue.js(フロントエンド)、Flask(バックエンド)、MySQL(DB)構成のアプリをDockerで環境構築したので、構築方法を備忘録としてメモしておく。
全体フォルダ構成
your_app    --- fe  --- app                 # プロジェクトフォルダ
             |       L_ Dockerfile
             |
             L_ be  --- app                 # プロジェクトフォルダ
             |       L_ Dockerfile
             |       L_ requirements.txt    # 依存パッケージリスト
             L_ db  --- data                # DBデータマウント用フォルダ
             |       L_ my.cnf              # 設定ファイル
             L_ docker-compose.yml
docker-compose.yml
- フロントエンド
- 8080ポートを使用する。
- プロジェクトフォルダ
appをバインドマウントする。node_modulesをボリュームマウントすることで、ビルド速度低下を防ぐ。- バックエンド
- 5000ポートを使用する。
- プロジェクトフォルダ
appをバインドマウントする。- データベース
- MySQL 5.7イメージを使用する。
- 3307ポートを使用する。
commandでポートを明示的に指定する必要あり。dataフォルダをバインドマウントする。version: "3" services: # フロントエンド fe: container_name: fe build: ./fe volumes: - ./fe/app:/app - node_modules_volume:/app/node_modules ports: - "8080:8080" links: - be # バックエンド be: container_name: be build: ./be volumes: - ./be/app:/app ports: - "5000:5000" command: flask run --host 0.0.0.0 --port 5000 links: - db # データベース db: image: mysql:5.7 container_name: db environment: MYSQL_ROOT_PASSWORD: rootpass MYSQL_DATABASE: sample_db MYSQL_USER: mysqluser MYSQL_PASSWORD: mysqlpass volumes: - ./db/data:/var/lib/mysql - ./db/my.cnf:/etc/mysql/conf.d/my.cnf ports: - 3307:3307 command: --port 3307 volumes: node_modules_volume:フロントエンド
node.jsのベースイメージからフロントエンドアプリ(Vue.js)用コンテナを作成する。
Dockerfile# ベースイメージ FROM node:13.10.1-alpine3.11 WORKDIR /app # 依存関係のインストール COPY ./app/package*.json ./ RUN npm install # プロジェクトフォルダをカレントディレクトリ(appフォルダ)にコピー COPY ./app . EXPOSE 8080 CMD ["npm", "run", "serve"]
appフォルダ
vue create appコマンドで作成したプロジェクト一式を配置する。バックエンド
- python 3.7ベースイメージからバックエンドアプリ(Flask)用コンテナを作成する。
DockerfileFROM python:3.7 RUN mkdir /app ADD requirements.txt /app ENV PYTHONUNBUFFERED 1 EXPOSE 5000 WORKDIR /app RUN pip3 install -r requirements.txt
requirements.txt
- Flask/MySQL用パッケージを記述する。
SQLAlchemy
Flask-SQLAlchemy
Flask-Cors
marshmallow
marshmallow-sqlalchemy
flask-marshmallow
pymysql
appフォルダ
- Flaskプロジェクトフォルダ一式を配置する。
データベース
コンテナ設定は、
docker-composeのみに記述する。
dataフォルダ
- ホスト側マウント用フォルダ。
my.cnf
- 設定ファイル。
- 文字コードのみ指定する。
[mysqld]
character-set-server=utf8mb4
collation-server=utf8mb4_unicode_ci

[client]
default-character-set=utf8mb4
参考情報