- 投稿日:2021-01-07T21:40:21+09:00
◯◯ケースについてまとめてみた
動機
初投稿です。
vueを学習していく中でコンポーネントや変数の命名に様々な書き方があるようなのでまとめてみました。
本題
キャメルケース
小文字で書き出し、単語ごとに最初の文字を大文字にして記述する書き方
ラクダ(camel)のコブのように見えることが由来だそうです。camelCaseパスカルケース
大文字で書き出し、単語ごとに最初の文字を大文字にして記述する書き方
アッパーキャメルケースとも呼ぶ。PascalCaseケバブケース
全て小文字で書き、単語と単語を「 - (ハイフン)」で繋ぐ書き方
ケバブのように串刺しになっているように見えることが由来。kebab-caseスネークケース
全て小文字で書き、単語と単語を「 _(アンダースコア) 」で繋ぐ書き方
蛇がニョロニョロしているように見えるのが由来なのでしょうか?snake_case参考
- 投稿日:2021-01-07T21:40:21+09:00
命名規則の◯◯ケースについてまとめてみた
動機
初投稿です。
vue.jsを学習していく中でコンポーネントや変数の命名に様々な書き方があるようなのでまとめてみました。
本題
キャメルケース
小文字で書き出し、単語ごとに最初の文字を大文字にして記述する書き方
ラクダ(camel)のコブのように見えることが由来だそうです。camelCaseパスカルケース
大文字で書き出し、単語ごとに最初の文字を大文字にして記述する書き方
アッパーキャメルケースとも呼ぶ。PascalCaseケバブケース
全て小文字で書き、単語と単語を「 - (ハイフン)」で繋ぐ書き方
ケバブのように串刺しになっているように見えることが由来。kebab-caseスネークケース
全て小文字で書き、単語と単語を「 _(アンダースコア) 」で繋ぐ書き方
蛇がニョロニョロしているように見えるのが由来なのでしょうか?snake_case参考
- 投稿日:2021-01-07T20:37:46+09:00
Chrome拡張機能でスピードダイヤルを作ってみた
初めに
突然ですが、スピードダイヤル使ってますか?
そもそもスピードダイヤルって知ってますか?
スピードダイヤルというのは簡単に言うと起動ページでお気に入りのサイトに簡単にアクセスできる機能です。このスピードダイヤル凄く便利なのですがこれをChromeで使おうとなると権限が凄く怪しい拡張機能ばっかりで正直どれを使えばいいのかよく分からないのが現状です。
そこでJavaScriptの勉強も兼ねて自分で作って見ることにしました。作ったもの
https://github.com/TiggeZaki/SpeedDial_Chrome-Extensions/ に公開しています。
chrome://extensions/からパッケージ化されていない拡張機能を読み込むを選んでください。(お金が無くて審査できなかった)使い方
拡張機能を入れれば自動で起動ページを書き換えてくれます。
後は追加ボタンから好きなサイトを登録してください。
こだわったポイント
Chrome拡張機能はローカルファイルにアクセスする際にそれ専用のAPI等は用意されていないためHTML5 File APIを使用してbase64文字列に変換してからchrome.storage.localに保存しました。
//一部抜粋
const reader = new FileReader();
reader.onload = () => {
    if (isUndefined) {
        chrome.storage.local.set({ name: [nameData] });
        chrome.storage.local.set({ url: [urlData] });
        chrome.storage.local.set({ file: [reader.result] });
    } else {
        getValue.name.push(nameData);
        chrome.storage.local.set({
            name: getValue.name,
        });
        getValue.url.push(urlData);
        chrome.storage.local.set({
            url: getValue.url,
        });
        getValue.file.push(reader.result);
        chrome.storage.local.set({
            file: getValue.file,
        });
    }
    location.reload();
};
reader.readAsDataURL(targetFile);
参考文献
Chrome 拡張機能のマニフェストファイルの書き方
Chrome拡張の作り方 (超概要)
Web アプリケーションからのファイルの使用

- 投稿日:2021-01-07T18:59:58+09:00
JavaScriptの便利部品
空文字確認
引数で渡されたオブジェクトが空文字だったらTRUEを返す部品
- 空文字の条件
- Null
- Undefined
- 長さ0のString
- 長さ0のArray
isBlank = function(chkObj) {
  if (chkObj == undefined || chkObj == null) {
    return true;
  }

  if (typeof chkObj == "boolean") {
    return !chkObj;
  } else if (typeof chkObj == "number") {
    return false;
  } else if (typeof chkObj == "string") {
    return (chkObj.length == 0) ? true : false;
  } else if (Array.isArray(chkObj)) {
    return (chkObj.length == 0) ? true : false;
  } else {
    return false
  }
}
使い方
if文の中で真偽(空文字かどうか)判定をして、空文字で無ければその後の処理を行う
等の使い方です。// 例1 let unKnownVal = "test"; if (!isBlank(unKnownVal)) { // 空文字で無ければコンソールに出力 console.log(unKnownVal); } // 例2 let unKnownVal = ""; if(isBlank(unKnownVal)){ // 空文字であればコンソールに出力 console.log(unKnownVal); }
- 投稿日:2021-01-07T17:39:21+09:00
API GatewayからLambdaを呼び出すときにevent.bodyをオブジェクトで受け取る
はじめに
AWS API GatewayからLambdaを呼び出すこと、よくあると思います。
Lambdaではevent.bodyでリクエストボディを取得できますが、
デフォルトではこのbodyは文字列なので、
Content-Type:application/jsonの場合も「JSON文字列」になります。
そのため、一度JSONをパースしてあげないといけません。たとえばNode.jsの場合はこんな感じ。
index.jsexports.handler = async (event) => { const body = JSON.parse(event.body); console.log('api received!', body); const response = { statusCode: 200, body: JSON.stringify([body.hoge, body.fuga, body.piyo]), }; return response; };コード側で
JSON.parse()すること自体は大した手間ではないのですが、
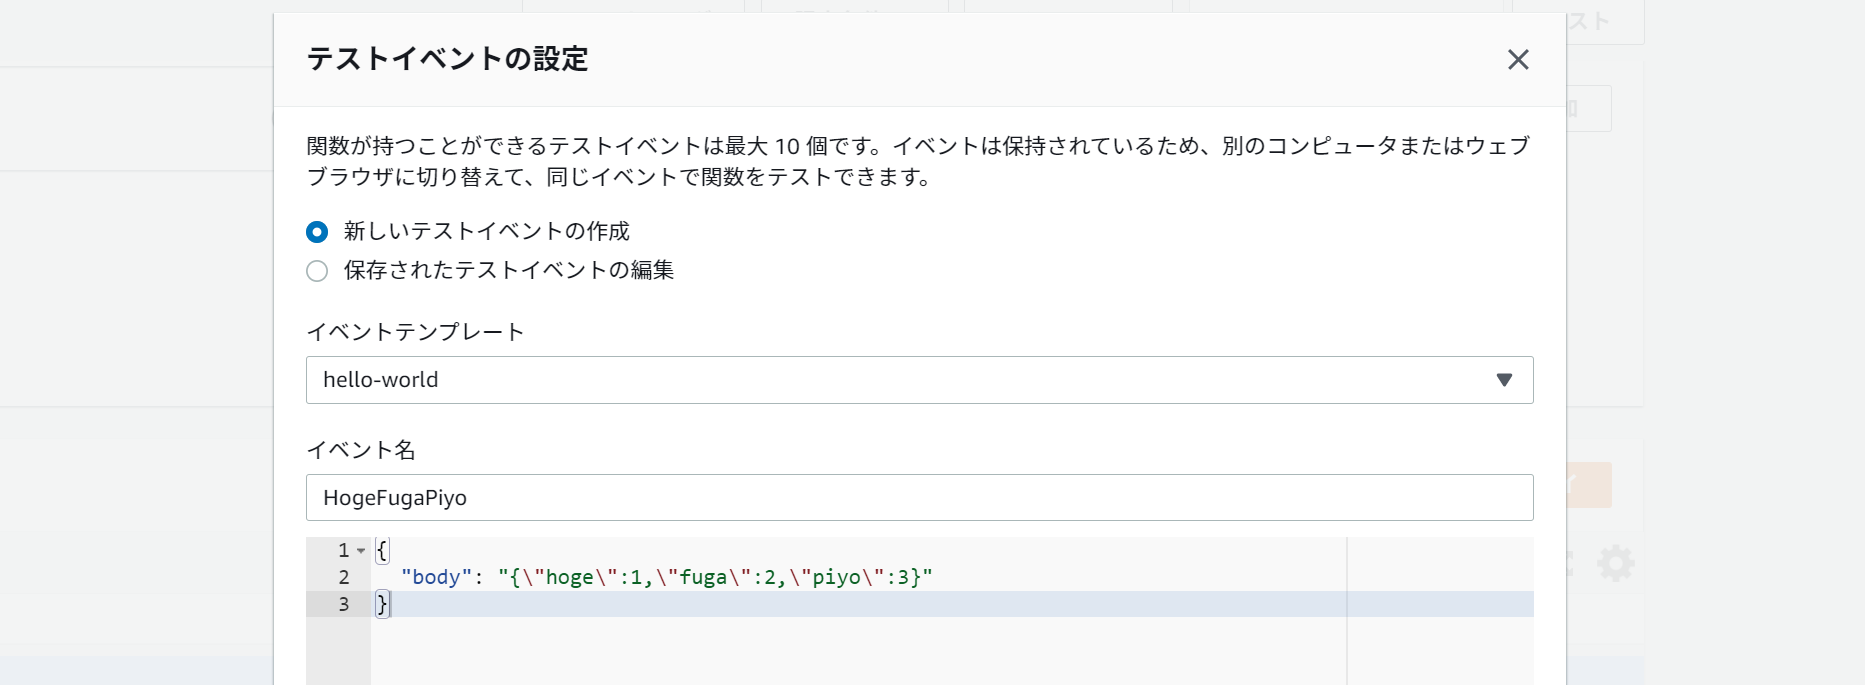
面倒くさいのがテストです。Lambdaの「テストイベントの設定」で、こんな感じで書きたいわけですよ。
{
  "body": {
    "hoge": 1,
    "fuga": 2,
    "piyo": 3
  }
}
しかしながら、これは「JSON文字列」ではなく「JSONオブジェクト」なので、
API Gatewayのevent.bodyとは互換性がありません。
こうしてやらなければならない。。。{ "body": "{\"hoge\":1,\"fuga\":2,\"piyo\":3}" }
これはねぇ、、、辛いですよね。
ダブルクォートのエスケープの嵐で、サクッと手書きで書くことは無理です。解決方法
API Gatewayの「マッピングテンプレート」という機能を使うと、
ちゃんとJSONをオブジェクトにしてからLambdaに飛ばすことができます。Lambda側のトリガー設定から新規REST APIを作成
- 検証用に、ごくごくシンプルな設定でAPIを作成
- 実運用では「オープン」は危険なので要注意
- HTTP APIではマッピングテンプレートが使えないので、REST APIにする
API Gatewayのリソース設定
- API Gatewayのリソース設定に飛んぶ
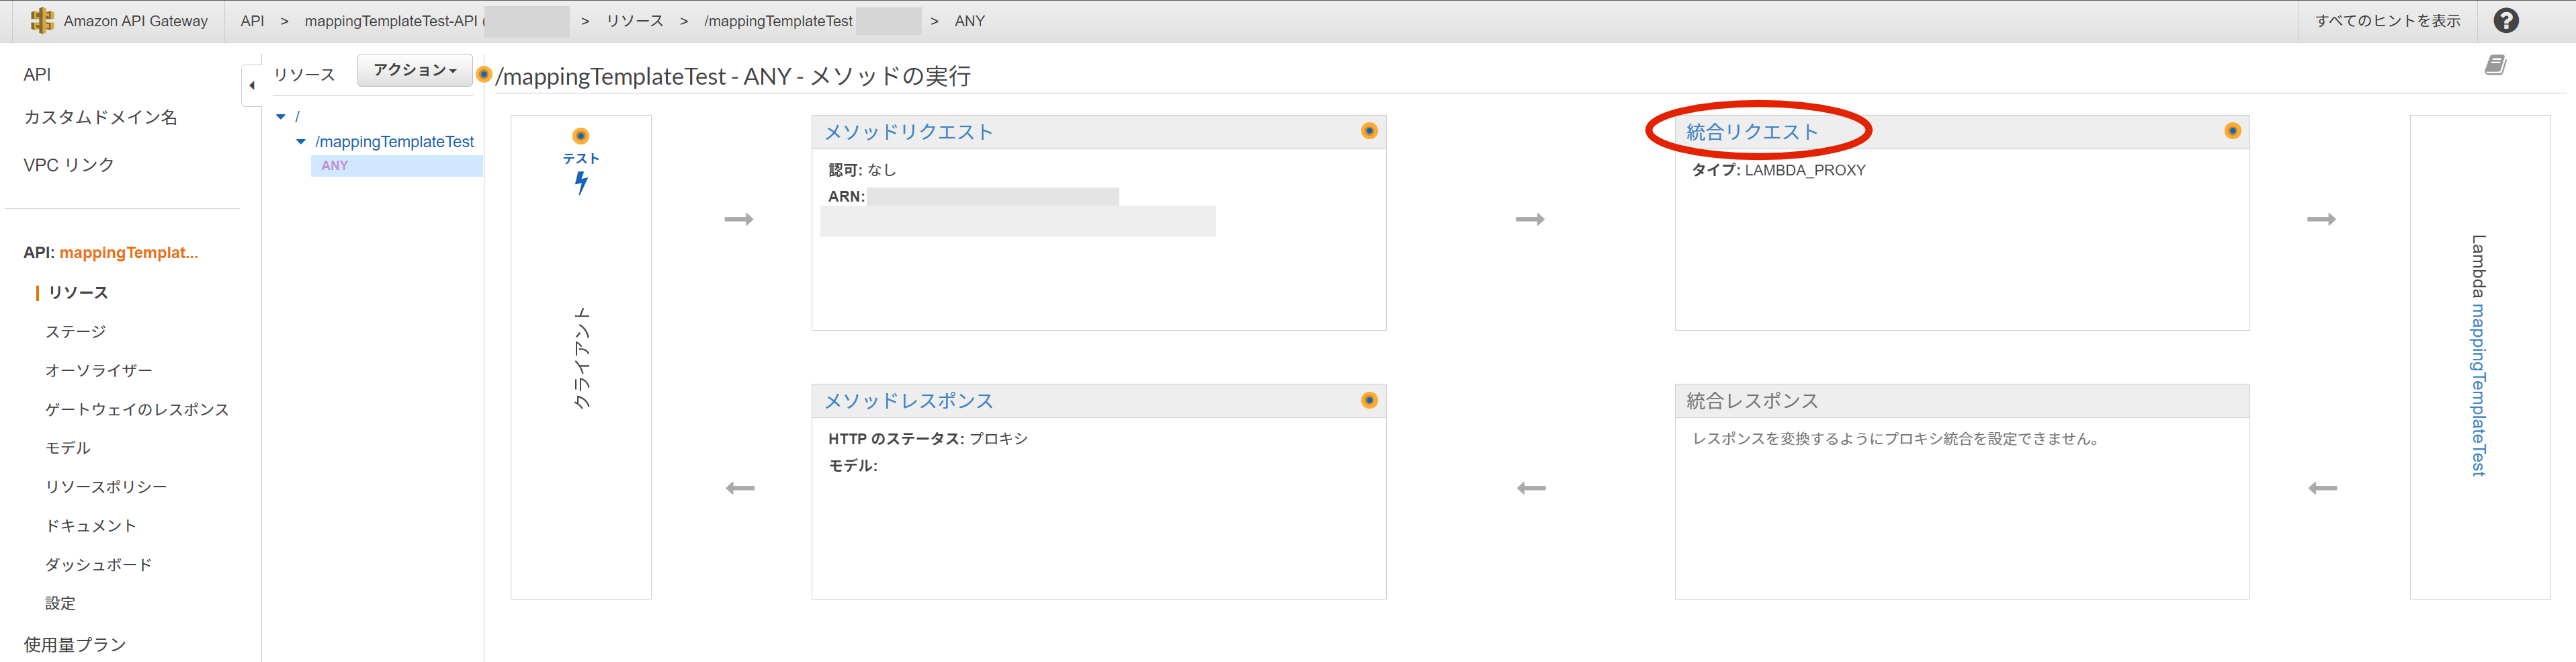
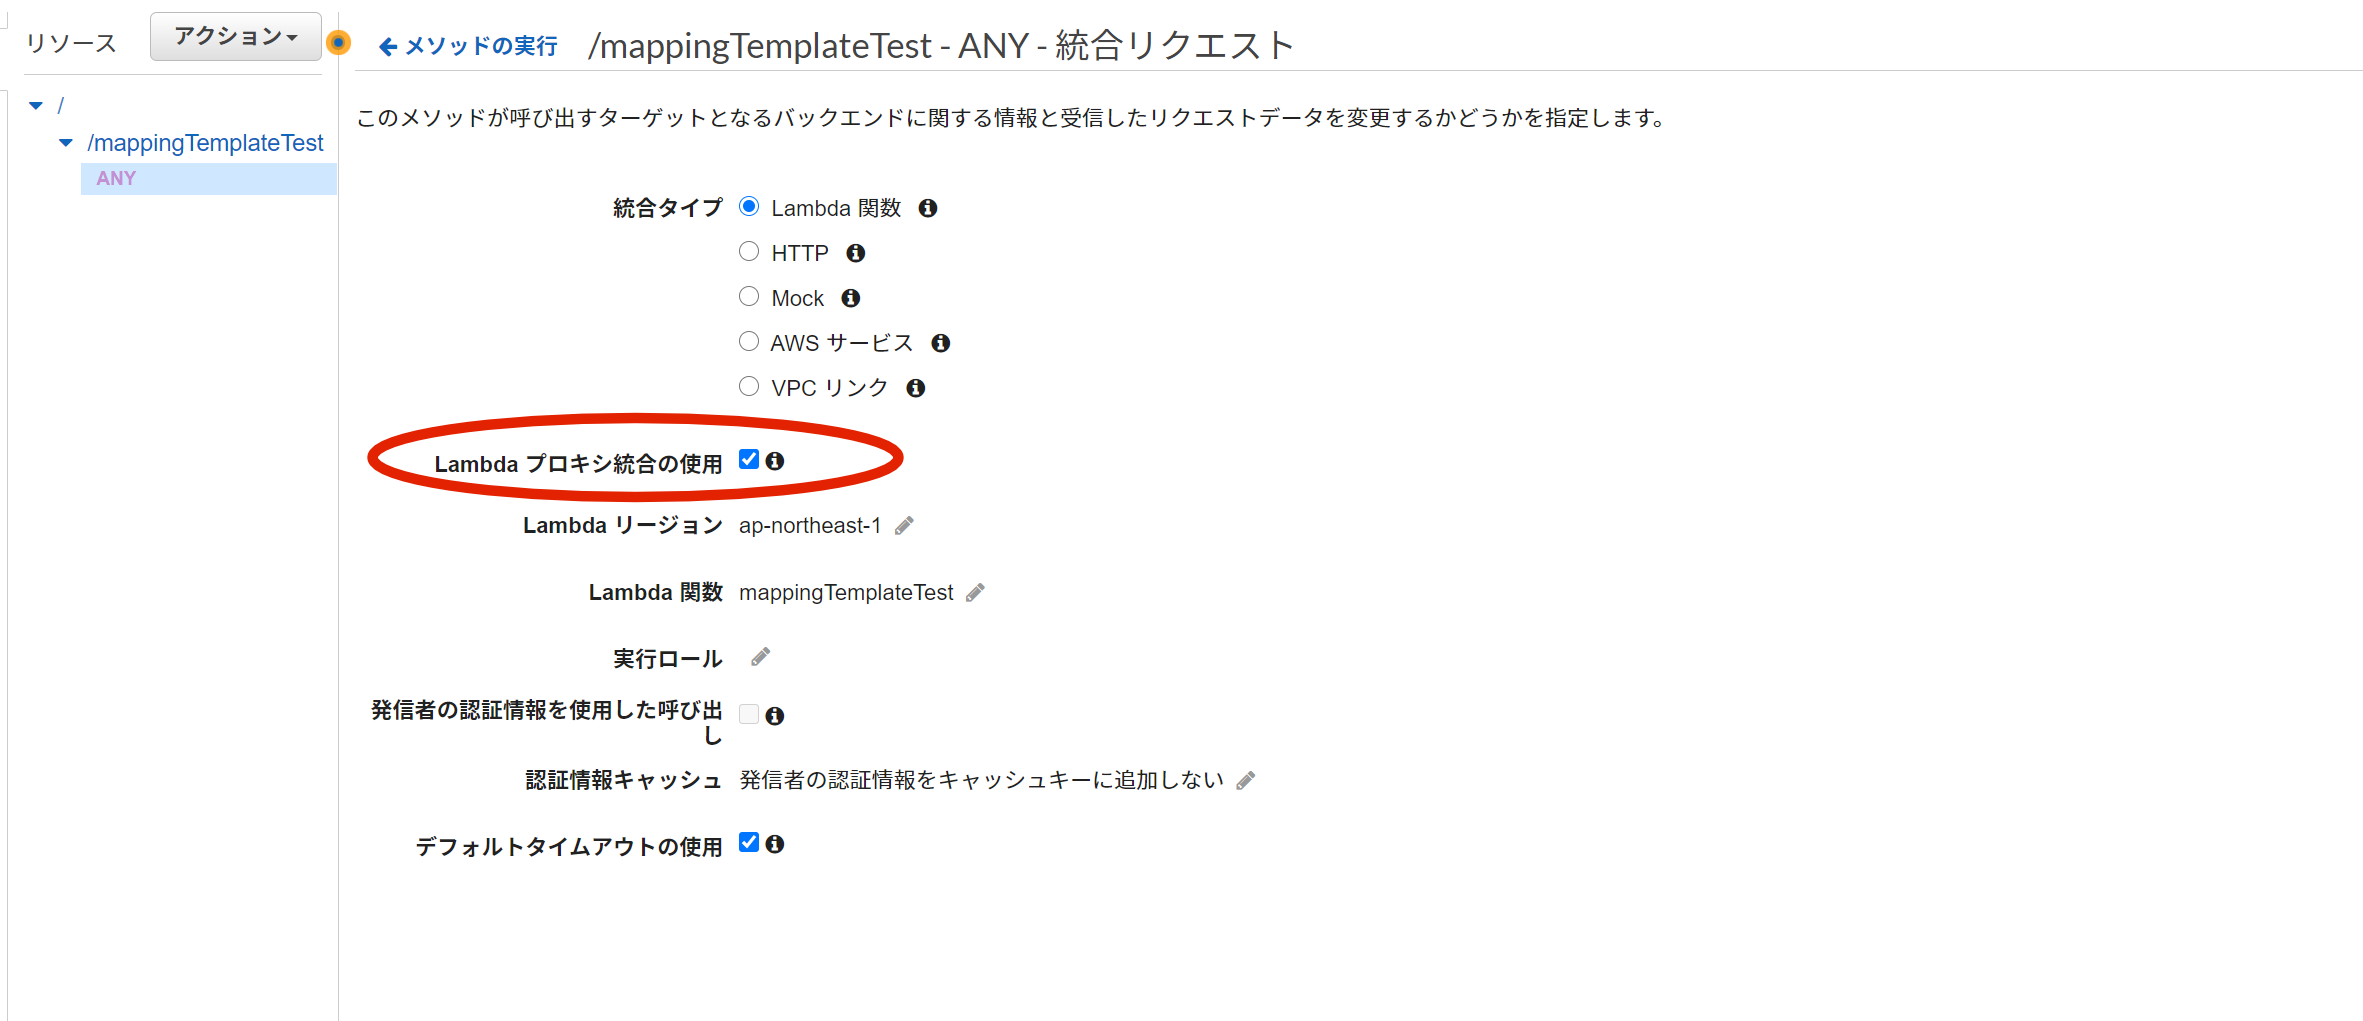
- 「ANY」メソッドの「統合リクエスト」を開く
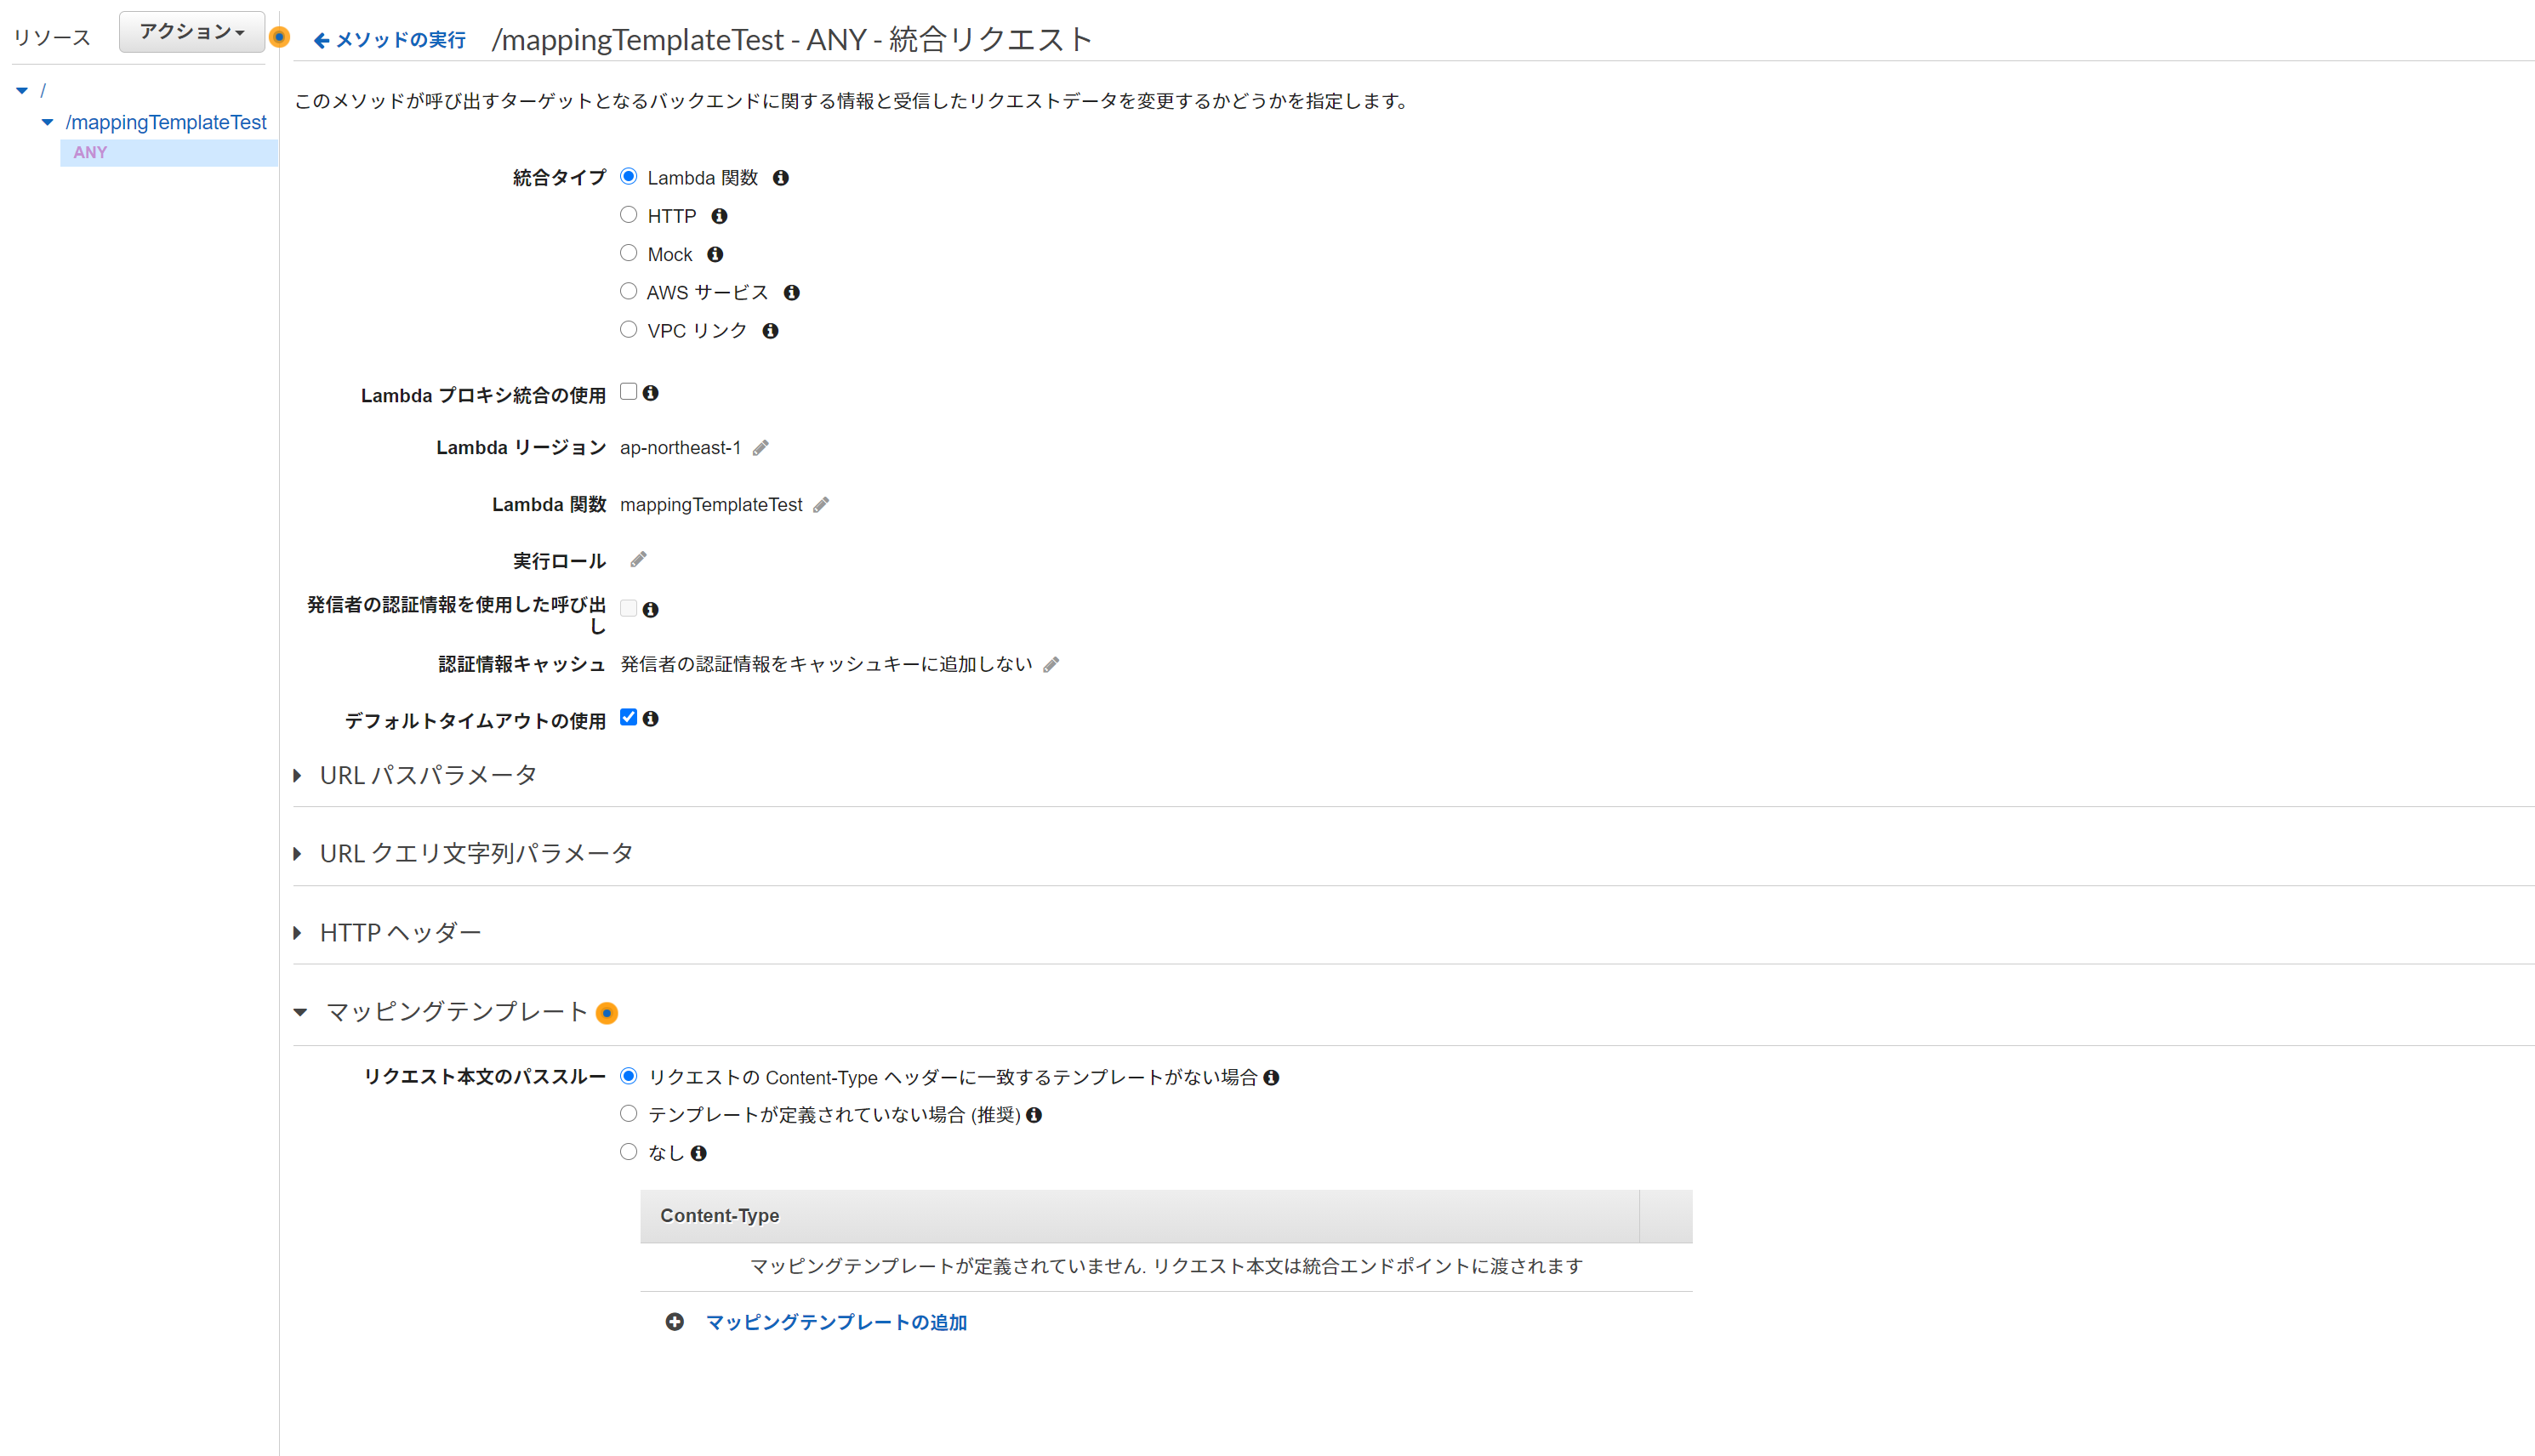
Lambdaから作ったAPIは「Lambdaプロキシ統合の使用」がチェックされているので、このチェックを外す。
チェックを外すとすると詳細な設定項目が現れるので、「マッピングテンプレート」を開く
マッピングテンプレートの設定
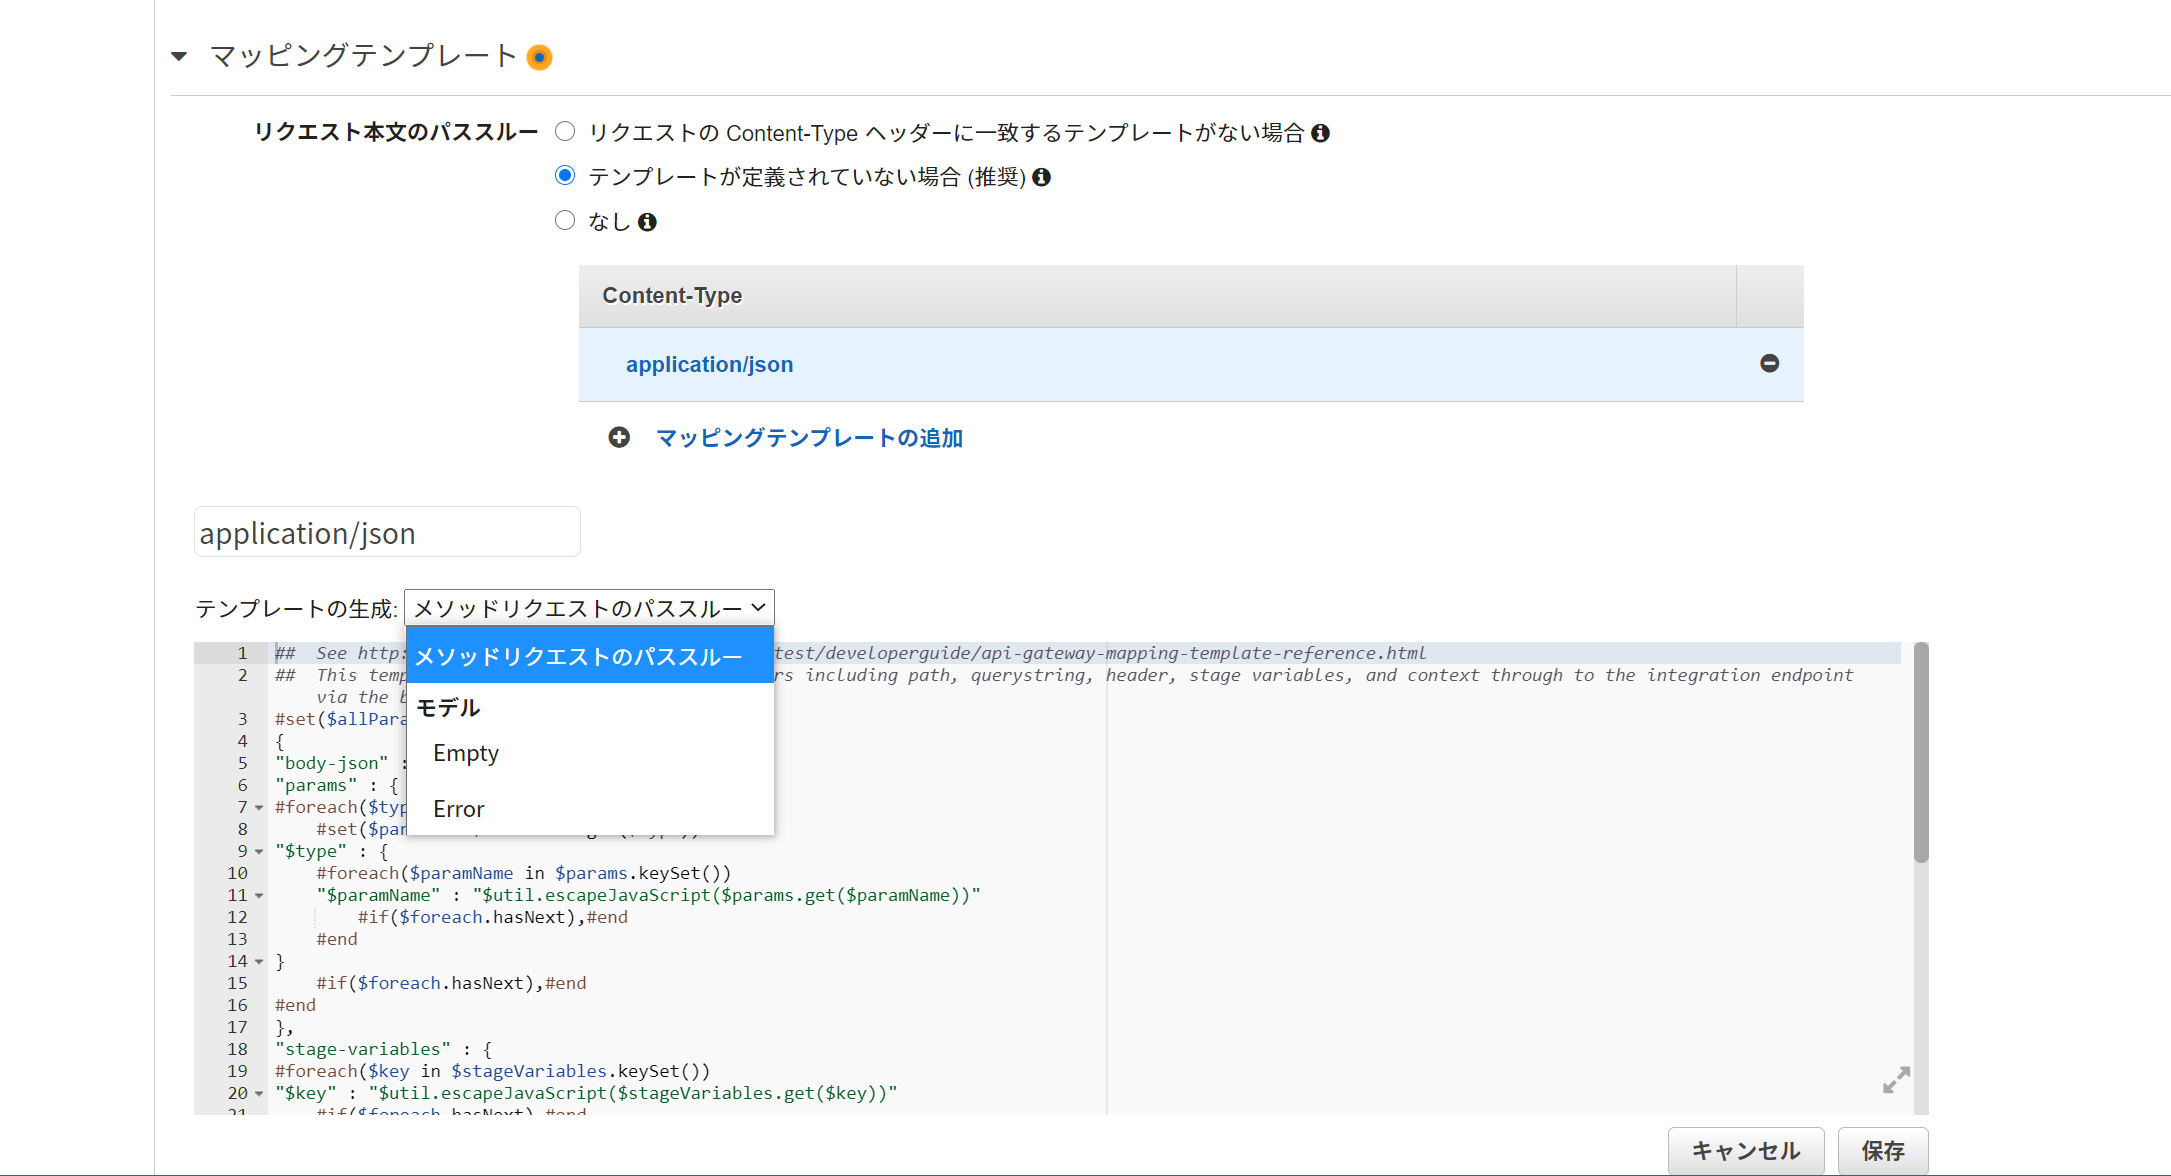
- リクエスト本文のパススルー:「テンプレートが定義されていない場合 (推奨)」を選択
- マッピングテンプレートの追加:「application/json」を入力
- テンプレートの生成:「メソッドリクエストのパススルー」を選択すると、いい感じのプリセットが入る
- 書式が独特なので、一から書くのが大変なのですよね。。このプリセットがとってもありがたい。
- ほとんどプリセットのままで良いのだけど、
body-jsonはcamelCaseのbodyJsonにしておくと、JavaScriptでは扱いやすい
- もしくはシンプルに
bodyでもOK- 編集したら「保存」
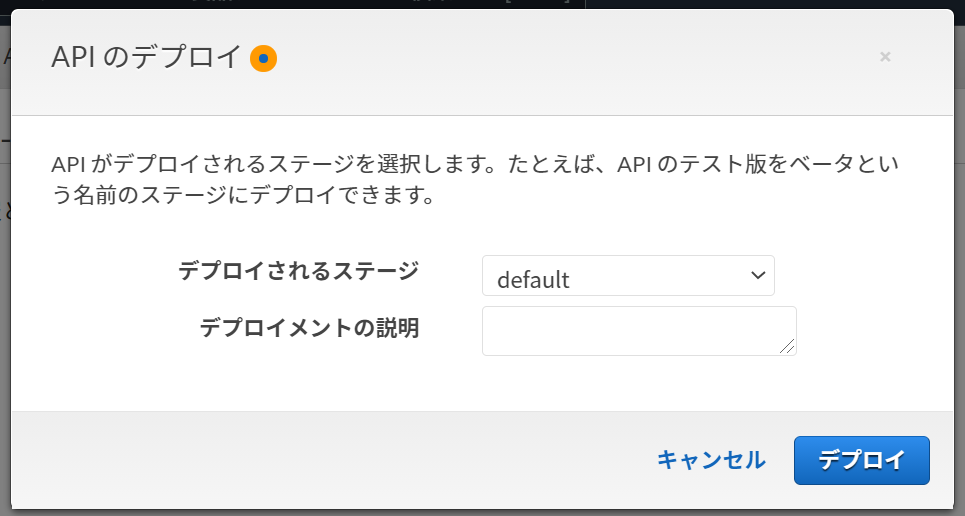
 ##  This template will pass through all parameters including path, querystring, header, stage variables, and context through to the integration endpoint via the body/payload
 #set($allParams = $input.params())
 {
-"body-json" : $input.json('$'),
+"bodyJson" : $input.json('$'),
 "params" : {
 #foreach($type in $allParams.keySet())
     #set($params = $allParams.get($type))
APIのデプロイ
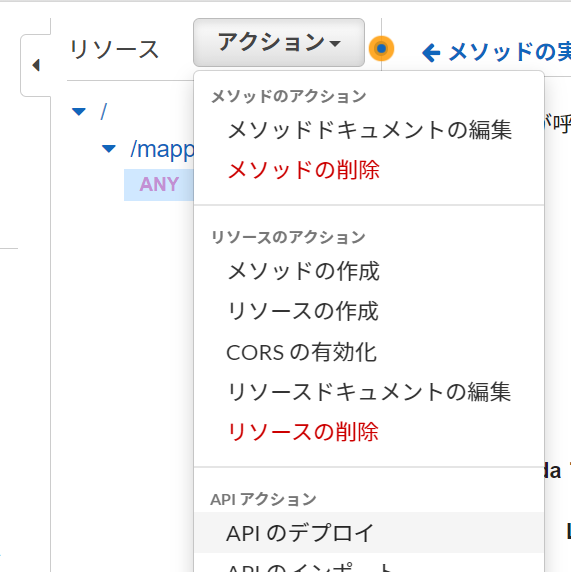
- アクションから「APIのデプロイ」を選択
- ステージ「default」を選んで、説明は書きたければ書いて、「デプロイ」
Lambdaの修正版と実行結果
「Lambdaプロキシ統合の使用」が外れたことで、
レスポンスの作り方も変わります。
statusCodeはAPI Gateway側で定義するので、
Lambdaではシンプルに、正常系のレスポンスをそのままreturnするだけ。index.jsexports.handler = async (event) => { const body = event.bodyJson; console.log('api received!', body); return [body.hoge, body.fuga, body.piyo]; };Lambdaテストイベント
{
  "bodyJson": {
    "hoge": 1,
    "fuga": 2,
    "piyo": 3
  }
}
PCターミナルからcurlでAPI叩いてテスト
$ curl -X POST https://example.amazonaws.com/default/mappingTemplateTest -H 'Content-Type:application/json' -d '{"hoge":1,"fuga":2,"piyo":3}'
[1,2,3]
いい感じですね!
参考サイト
AWS公式
* REST API のデータ変換の設定
* API Gateway で Lambda プロキシ統合を設定するブログ・Qiita
* [AWS]API Gatewayの本文マッピングテンプレートを理解する
* API Gateway + Lambda にFormからPOSTする時のマッピングテンプレートを作成しました
* API Gatewayのマッピングテンプレートの設定例ではまた~。

- 投稿日:2021-01-07T17:14:36+09:00
[TypeScript] 配列の要素だけを使った型を作りたい
やりたいこと
こんな配列を使って、
const names = [
  '佐藤',
  '鈴木',
  '田中',
];
こういう型を作成したい。
type Name = '佐藤' | '鈴木' | '田中';やり方
やり方は至って簡単です。
as constを使うconst names = [ '佐藤', '鈴木', '田中', ] as const; type Name = typeof names[number]; // type Name = "佐藤" | "鈴木" | "田中"参考
https://www.typescriptlang.org/docs/handbook/release-notes/typescript-3-4.html#const-assertions
- 投稿日:2021-01-07T17:07:39+09:00
【JavaScript】letとvarの違い
プログラミング勉強日記
2021年1月7日
今まではとりあえずletを使えばいいと思っていて、letとvarの違いを知らなかった。今日はそのletとvarの違いを学んだので、簡単にまとめる。JavaScriptの変数宣言について
JavaScriptの変数定義方法は、varを使うのが主流だった。
ECMAScript 2015 (ES6)からはletとconstが追加された。letはvarに代わる変数定義方式として用いられ、constは定数を定義するために使われる。constは定数なので、後から変更不可能である。変数定義// letとvarは同じように利用可能である var str1 = "Hello"; let str2 = "Hello";letとvarの違い
変数のスコープの違い
letはブロックスコープで、varは関数スコープである。
letを使って定義した変数はブロックスコープを持っている。varではブロックスコープに対応できないので、ES6でletが追加された。(if文やfor文などの中で定義された変数は、そのブロックの中でしか使えないことをブロックスコープという。)letを使用する場合let num = 100; if(num = 100) { // numが100だったら100を足す(number = 200) let number = num + 100; } console.log(number);実行結果ReferenceError: number is not definedvarを使用する場合var num = 100; if(num = 100) { // numが100だったら100を足す(number = 200) var number = num + 100; } console.log(number);実行結果200このようにvarで宣言された変数にはブロックスコープが存在しない。
varは変数の重複定義ができる
バグにつながる仕様だが、varは同じ変数名で重複定義ができる。
var testVar = "こんにちは"; console.log(testVar); var testVar = "Hello"; console.log(testVar);実行結果こんにちは Helloletで変数を重複定義すると、プログラム実行前にconsoleエラーになる。
参考文献
JavaScriptのletとvarの違いについて現役エンジニアが解説【初心者向け】
JavaScriptの変数宣言はletにすべきか 『入門JavaScriptプログラミング』から解説
- 投稿日:2021-01-07T16:44:36+09:00
GASでプログラミング入門 Vol.8
GASでプログラミング入門 Vol.8
社内サークルにてエンジニアから非エンジニアの方向けにプログラミングを教えるという活動を行っています。
今回はその教材第8弾です。
前回の記事はこちら前回の演習問題の解答例
(1). 下記の配列を宣言して、実行結果の表示になるプログラムを作成して下さい。
let nums = [1, 2, 3, 5, 8, 13];実行結果
numsの0番目のデータは「1」です。
numsの1番目のデータは「2」です。
numsの2番目のデータは「3」です。
numsの3番目のデータは「5」です。
numsの4番目のデータは「8」です。
numsの5番目のデータは「13」です。
解答例コード
function myFunction(){
    let nums = [1, 2, 3, 5, 8, 13];
    for(let i = 0; i < nums.length; i++){
        console.log("numsの" + i + "番目のデータは「" + nums[i] + "」です。");
    }
}
(2). 下記の配列を宣言して、実行結果の表示になるプログラムを作成して下さい。
配列内のデータは可変しても平気なように考慮して、各種果物の個数を数えるようにして下さい。
ただし、配列内に出現する果物の種類は「りんご」、「みかん」、「ぶどう」の3種類のみで、それ以外の種類の果物に関しては個数を数える必要はありません。let fruits = ["りんご", "みかん", "ぶどう", "みかん", "りんご", "りんご"];実行結果
配列内に含まれる「りんご」の個数は3個です。
配列内に含まれる「みかん」の個数は2個です。
配列内に含まれる「ぶどう」の個数は1個です。
解答例コード
function myFunction(){
    let fruits = ["りんご", "みかん", "ぶどう", "みかん", "りんご", "りんご"];
    let apple = 0; // りんごの個数カウント用変数
    let orange = 0; // みかんの個数カウント用変数
    let grape = 0; // ぶどうの個数カウント用変数
    for(let current of fruits){
        if( current == "りんご" ){
            apple++;
        }else if( current == "みかん" ){
            orange++;
        }else if( current == "ぶどう" ){
            grape++;
        }
    }
    console.log("配列内に含まれる「りんご」の個数は" + apple + "個です。");
    console.log("配列内に含まれる「みかん」の個数は" + orange + "個です。");
    console.log("配列内に含まれる「ぶどう」の個数は" + grape + "個です。");
}
なお解答例はあくまで例なので、必ずしも上記のようになっていないといけないわけではありません。
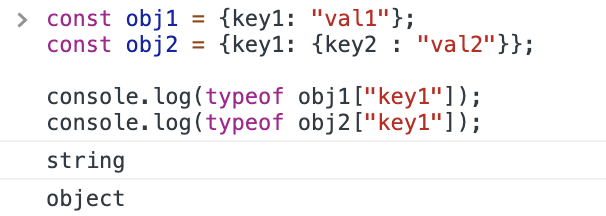
連想配列
今回は前回学んだ配列の一種で、実務でもよく使用される連想配列というものを学んでいきます。
まず連想配列と普通の配列の違いですが、初期化の方法や配列内のデータへのアクセス方法が異なります。let person = {name: "鈴木一郎", age: 30, birthday: "1990/04/02", hobby: "ドライブ"}; console.log("氏名:" + person["name"]); console.log("年齢:" + person["age"]); console.log("誕生日:" + person["birthday"]); console.log("趣味:" + person["hobby"]);まず初期化の文法ですが、
let 連想配列変数名 = {キー名: データ,キー名: データ,...};のように記述します。
続いて、連想配列のデータへのアクセス文法ですが、
連想配列変数名[キー名]のように記述します。
普通の配列との大きな違いは、先頭から数えて何番目という記述の仕方ではなく、データを格納しているキー名で指定するところです。
配列のように数値ではないので、ぱっと見で連想配列内の何のデータへアクセスしているのかがわかりやすくなります。また、下記のような書き方も可能です。
let person = {name: "鈴木一郎", age: 30, birthday: "1990/04/02", hobby: "ドライブ"}; console.log("氏名:" + person.name); console.log("年齢:" + person.age); console.log("誕生日:" + person.birthday); console.log("趣味:" + person.hobby);連想配列変数名.キー名どちらの書き方でも良いので、お好みの記述方法を採用してもらえれば良いと思います。
連想配列の配列
下記のように連想配列のデータを配列で管理することも可能です。
let persons = [
    {name: "鈴木一郎", age: 30, birthday: "1990/04/02", hobby: "ドライブ"},
    {name: "山田太郎", age: 20, birthday: "2000/08/30", hobby: "登山"},
    {name: "佐藤花子", age: 24, birthday: "1996/05/10", hobby: "ショッピング"}
];
for(let person of persons){
    console.log("氏名:" + person.name);
    console.log("年齢:" + person.age);
    console.log("誕生日:" + person.birthday);
    console.log("趣味:" + person.hobby);
}
連想配列内のデータに配列
下記のように連想配列内のデータに配列を作ることも可能です。
let person = {name: "鈴木一郎", age: 30, birthday: "1990/04/02", hobbys: ["ドライブ","映画鑑賞","読書"]};
console.log("氏名:" + person.name);
console.log("年齢:" + person.age);
console.log("誕生日:" + person.birthday);
for(let hobby of person.hobbys){
    console.log("趣味:" + hobby);
}
演習問題
(1). 下記のような実行結果になるように連想配列を作成して下さい。
連想配列のキー名などは任意の名称をつけて下さい。実行結果
ユーザーID:U0001
ユーザー名:鈴木一郎
メールアドレス:suzuki@example.com
電話番号:xxx-xxxx-xxxx
(2). 下記のような実行結果になるようにプログラムを作成して下さい。
連想配列は下記のコードを使用して下さい。let persons = [ {name: "鈴木一郎", age: 30, birthday: "1990/04/02", hobby: "ドライブ"}, {name: "山田太郎", age: 20, birthday: "2000/08/30", hobby: "登山"}, {name: "佐藤花子", age: 24, birthday: "1996/05/10", hobby: "ショッピング"}, {name: "田中次郎", age: 27, birthday: "1993/07/20", hobby: "スノーボード"}, {name: "杉本沙耶香", age: 32, birthday: "1988/02/23", hobby: "アロマセラピー"}, {name: "市井由美子", age: 26, birthday: "1994/03/03", hobby: "漫画"} ];実行結果
年齢が27才以上の人は下記の人たちです。
鈴木一郎さん、趣味はドライブ
田中次郎さん、趣味はスノーボード
杉本沙耶香さん、趣味はアロマセラピー
------------------------------
年齢が26才以下の人は下記の人たちです。
山田太郎さん、誕生日は2000/08/30
佐藤花子さん、誕生日は1996/05/10
市井由美子さん、誕生日は1994/03/03
まとめ
いかがでしたでしょうか。
連想配列を用いることで様々なデータを柔軟に表現及び、管理することが可能です。
実務でもよく使われるデータ構造なので、しっかりと概念を理解しておきましょう。
それではまた次の記事でお会いしましょう。
- 投稿日:2021-01-07T16:27:03+09:00
mapについて(関数型の高階関数は配列をいい感じに扱うための処理)
- 投稿日:2021-01-07T15:42:31+09:00
JavaScript Prime「オブジェクト」�#深いコピー(deep copy)の例題を理解する
JavaScript Primer 第一部:基本文法「オブジェクト」の#オブジェクトの複製の深いコピー(deep copy)が何をしているのか理解できませんでした。学習の過程においては、そんなにこだわるところではなかったかもしれませんが、理解できなくて気持ち悪かったので整理。
以下、JS Primerの解説を引用しておきます。
逆にプロパティの値までも再帰的に複製してコピーすることを、深いコピー(deep copy)と呼びます。 deep copyは、再帰的にshallow copyすることで実現できます。 次のコードでは、deepCloneをshallowCloneを使うことで実現しています。
このように、JavaScriptのビルトインメソッドは浅い(shallow)実装のみを提供し、深い(deep)実装は提供していないことが多いです。 言語としては最低限の機能を提供し、より複雑な機能はユーザー側で実装するという形式を取るためです。
// 引数の`obj`を浅く複製したオブジェクトを返す
const shallowClone = (obj) => { //(5)
    return Object.assign({}, obj);
};
// (3)
// 引数の`obj`を深く複製したオブジェクトを返す
function deepClone(obj) {
    //(4)
    const newObj = shallowClone(obj); // => {level: 1, nest: {level: 2}}
    // プロパティがオブジェクト型であるなら、再帰的に複製する
    // (6)
    Object.keys(newObj) //引数内のオブジェクトのキー(左側)を一つずつ抜き出してくる(forEachに似てる?)
        .filter(k => typeof newObj[k] === "object") // (7)
        .forEach(k => newObj[k] = deepClone(newObj[k])); // (8)
    return newObj;
}
//(1)
const obj = {
    level: 1,
    nest: {
        level: 2
    }
};
//(2)
const cloneObj = deepClone(obj);
// (9)`nest`オブジェクトも再帰的に複製されている
console.log(cloneObj.nest === obj.nest); // => false
以下、実際のプログラムの動きとは違うかもしれませんが、入門者の自分が理解しやすいように流れを整理してみます。
- obj変数にオブジェクトが代入される
- cloneObj変数に、1のobj変数を引数に渡すdeepClone関数が代入すると宣言される。
- 2.で呼ばれたdeepClone関数を実行していく。
- shallowClone関数式を呼び、引数にobjを渡し、newObjに代入する。(関数式はその変数名で参照できる)
- shallowClone関数式の無名関数を実行する。Object.assignメソッドで第一引数のからオブジェクト
{}にobjを合体させ(クローンする)、それを返す。- Object.keysで仮引数内のオブジェクト(newObj)のキーを1つ1つ展開する。
- Array.filterで引数に与えられた関数でnewObjのキーを一つ一つ検査し、該当するプロパティだけで新しい配列を作り、返す。(→if文みたい!)検査内容は、そのキーのデータ型が"object"かどうか(「は?」と思った入門者は下図1参照)。つまり
{level: 2}だけの配列ができる。- それに対してforEachを仕掛けて、一つ一つのプロパティに引数内の無名関数を実行する。deepClone関数(自分)を実行し(自分を呼ぶから再帰的と呼ぶ)、newObjオブジェクトのキー
kのプロパティにその結果を代入する。x-yの処理が{level: 2}に対して再度行われる。newObjを返す。- オリジナルのobjのキー
nestとクローンしたcloneObjのキーnestを比較し、falseとなるので、複製されたオブジェクトとわかる。図1:
以上です。
てか、コピーと謳うのであれば、プログラムのコードでもCloneではなく、Copyとしてくれればよかったのに、と思うのは私だけでしょうか。
- 投稿日:2021-01-07T15:19:20+09:00
【Next.jsチュートリアル】Pre-renderingとData Fetchingを基礎からしっかり学ぶ
前書き
筆者が
Next.jsを仕事で書くことになったので、1から勉強するためにアウトプット記事を書くことにしました。
基本的にはドキュメントを噛み砕いて、翻訳した記事です。間違っているところなどあれば、ご指摘していただけるとありがたいです?♂️以下、本題です。
Pre-renderingとは...?
事前にHTMLを生成することです。
Next.jsではデフォルトで全ページをPre-renderingしてくれています。事前に生成してくれるので、ブラウザの負荷を下げてくれます。また、通常のReactで構築されたページよりもSEO的に有利というメリットもあります。二つのPre-rendering
Pre-renderingには
Static Generation:静的ジェネレーションServer-side Rendering:サーバーサイドレンダリングの二種類があります。
Static Generationはビルドされたタイミングで、Server-side Renderingはアクセス(リクエスト)時にHTMLを構築します。また、ページごとに
Static GenerationとServer-side Renderingを使い分けることもできます。
Static GenerationとServer-side Renderingの使いわけ基本的には
Static Generationが推奨されています。理由は主に二つ。
- SEOに強い
- 表示速度が高速
しかし、
Server-side Renderingを使ったほうが良いパターンもあります。いくつものユーザーが情報を更新できるようなページです。例えば
- SNS
- グループチャット
みたいな感じです。逆に
Static Generationは下記のような用途に向いています。
- ECサイト
- BLOGサイト
などの、基本的に一人のユーザーしか更新できないようなページは
Static Generationが向いていると言えるでしょう。なので...
更新頻度が低いページ:
Static Generation
更新頻度が高いページ:Server-side Renderingみたいに覚えておくと良いかもですね。
Static Generationで外部データを表示させる以降から、静的ジェネレーションでHTMLを生成する場合の外部データの扱いについて見ていきます。
Static Generationデータがある時、ない時
- 外部データがない時:ビルド時にHTMLを読み込む
- 外部データがある時:ビルド時にAPI(外部データ)からデータを取得→読み込む
APIなどの外部データからデータを取得する場合には、
getStaticPropc()を使うようにしてください。getStaticPropc()とは...?
Next.jsにおいて、外部データを取得するために使います。特徴は
- pageコンポーネントでしか使えない
- development環境:リクエスト時に実行
- production環境:ビルド時に実行される。
- 非同期処理(
async/await)で制御可能実際にやってみる。
Next.jsアプリのトップレベルにpostsディレクトリを作成し、pre-rendering.mdとssg-ssr.mdファイルを追加してください。それぞれのファイルの内容は下記。(...と言っても、チュートリアルコピペですが)pre-rendering.md--- title: 'Two Forms of Pre-rendering' date: '2020-01-01' --- Next.js has two forms of pre-rendering: **Static Generation** and **Server-side Rendering**. The difference is in **when** it generates the HTML for a page. - **Static Generation** is the pre-rendering method that generates the HTML at **build time**. The pre-rendered HTML is then _reused_ on each request. - **Server-side Rendering** is the pre-rendering method that generates the HTML on **each request**. Importantly, Next.js lets you **choose** which pre-rendering form to use for each page. You can create a "hybrid" Next.js app by using Static Generation for most pages and using Server-side Rendering for others.ssg-ssr.md--- title: 'When to Use Static Generation v.s. Server-side Rendering' date: '2020-01-02' --- We recommend using **Static Generation** (with and without data) whenever possible because your page can be built once and served by CDN, which makes it much faster than having a server render the page on every request. You can use Static Generation for many types of pages, including: - Marketing pages - Blog posts - E-commerce product listings - Help and documentation You should ask yourself: "Can I pre-render this page **ahead** of a user's request?" If the answer is yes, then you should choose Static Generation. On the other hand, Static Generation is **not** a good idea if you cannot pre-render a page ahead of a user's request. Maybe your page shows frequently updated data, and the page content changes on every request. In that case, you can use **Server-Side Rendering**. It will be slower, but the pre-rendered page will always be up-to-date. Or you can skip pre-rendering and use client-side JavaScript to populate data.さらにライブラリを取り込んでください。
npm install gray-matterトップレベルで
libを作成し、posts.jsを追加してください。内容は下記。(こちらもコピペ)posts.jsimport fs from 'fs' import path from 'path' import matter from 'gray-matter' const postsDirectory = path.join(process.cwd(), 'posts') export function getSortedPostsData() { // Get file names under /posts const fileNames = fs.readdirSync(postsDirectory) const allPostsData = fileNames.map(fileName => { // Remove ".md" from file name to get id const id = fileName.replace(/\.md$/, '') // Read markdown file as string const fullPath = path.join(postsDirectory, fileName) const fileContents = fs.readFileSync(fullPath, 'utf8') // Use gray-matter to parse the post metadata section const matterResult = matter(fileContents) // Combine the data with the id return { id, ...matterResult.data } }) // Sort posts by date return allPostsData.sort((a, b) => { if (a.date < b.date) { return 1 } else { return -1 } }) }そして、
pages/index.jsで下記のようにコードを追加してください。pages/index.jsimport { getSortedPostsData } from '../lib/posts' export async function getStaticProps() { const allPostsData = getSortedPostsData() return { props: { allPostsData } } } export default function Home({ allPostsData }) { return ( <Layout home> {/* Keep the existing code here */} {/* Add this <section> tag below the existing <section> tag */} <section className={`${utilStyles.headingMd} ${utilStyles.padding1px}`}> <h2 className={utilStyles.headingLg}>Blog</h2> <ul className={utilStyles.list}> {allPostsData.map(({ id, date, title }) => ( <li className={utilStyles.listItem} key={id}> {title} <br /> {id} <br /> {date} </li> ))} </ul> </section> </Layout> ) }
HomeコンポーネントにallPostsDataを渡しています。このallPostsDataがブログデータということになります。概要としては、
getStaticProps()内で返すデータを変数(or定数)などに宣言。- ここではコンポーネントのpropsとして渡すため、キー名
propsでreturnしています。- 渡ってきたデータ(
allPostsData)を使って、画面表示をしています。というような感じです。
外部データを使って、表示させる場合には
getStaticPropc()を使うようにしましょう。
Server-side RenderingでData Fetchingもし、リクエストごとにデータを取ってくるとしたら
Server-side Renderingを使うべきです。その場合、getServerSideProps()を使って、データの取得をしてください。
getServerSideProps()を使うことで、ビルド時ではなく、ユーザーのリクエスト毎にデータを取得することができます。以上です。お疲れ様でした?♂️
- 投稿日:2021-01-07T14:14:35+09:00
はじめてのGoogle Assistant向けアプリ開発
はじめに
本記事は、GoogleアシスタントのInteractive Canvasというフレームワークを使用してみて、
色々覚えることが多くてすぐ忘れそうになるので
記事として残しておこうと記載したものです。想定は、Google Nest Hubで動作するゲームです。
公式ドキュメントは基本全て英語である上に、欲しい情報が全て載っていないこともあったので、実践してみないと分からないことが多くありました。
本記事は実践してみたほんの一部の内容ですが、同じように情報少ないと感じている人に役立てれば幸いです。
本記事の内容
今回はこちらの公式のサンプルを例に、説明を付加しながら記載していきます。
https://github.com/actions-on-google/actions-builder-canvas-codelab-nodejsCodeLabも用意されていますので、興味ある方はそちらを見てやっても良いでしょう。
本記事にも一部重複している内容がございます。
https://codelabs.developers.google.com/codelabs/actions-canvas/なお、このサンプルは2DフレームワークのPhaserが使用されています。
この部分の構築については本題から逸れますので、本記事では割愛させていただきます。アプリの見た目と注意点
開発には、シミュレータが用意されていますので、実機のNest Hubがなくても動作確認は一応できます。
が、下の画像の通り、実機とシミュレータではだいぶ表示が異なることが分かりますので、この辺りは注意が必要です。
見た目の部分は、Firebase Hostingにデプロイする形となります。
環境構築
ここは公式に分かりやすく記載されているので、簡潔に書きます。
なお、GCPのプロジェクトの作成方法やAPIの有効化などのGCPの基礎知識に関する内容は割愛しています。
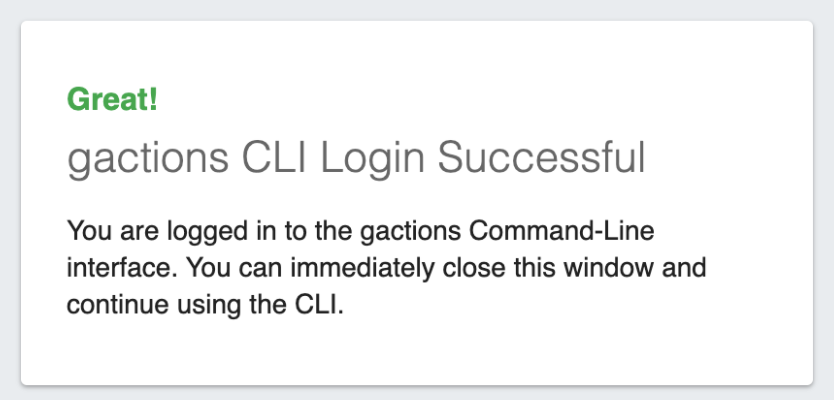
node: 私の環境はv12.16.1でおこなっています。ライブラリ:npm install @assistant/conversationFirebase CLI:npm install -g firebase-toolsgactionsコマンドラインツール: 下記リンクから使用しているOSのパッケージをダウンロードActions SDK and Builder quick start guide
以下はmacでダウンロード後に行っている処理。
tar -zxvf gactions-sdk_linux.tar.gz
cp ./aog_cli/gactions /usr/local/bin
gactions login
ファイル構成
今回参考にしているのは上記の完成しているプロジェクト
completeというディレクトリ内にあるファイルです。(2020/10/8のソースコード)├── firebase.json ├── package.json ├── public【Firebaseにデプロイされる部分)】 │ ├── assets │ │ ├── 見た目に使用されている画像(詳細略) │ ├── css │ │ └── main.css │ ├── index.html │ └── js │ ├── action.js │ ├── log.js │ ├── main.js │ └── scene.js └── sdk【gactionsでデプロイされる部分】 ├── actions │ └── actions.yaml ├── custom │ ├── global │ │ ├── actions.intent.CANCEL.yaml │ │ ├── actions.intent.MAIN.yaml │ │ ├── actions.intent.NO_INPUT_1.yaml │ │ ├── actions.intent.NO_INPUT_2.yaml │ │ ├── actions.intent.NO_INPUT_FINAL.yaml │ │ ├── actions.intent.NO_MATCH_1.yaml │ │ ├── actions.intent.NO_MATCH_2.yaml │ │ ├── actions.intent.NO_MATCH_FINAL.yaml │ │ └── actions.intent.PLAY_GAME.yaml │ ├── intents │ │ ├── guess.yaml │ │ ├── instructions.yaml │ │ ├── play_again.yaml │ │ └── start_game.yaml │ ├── scenes │ │ ├── Game.yaml │ │ └── Welcome.yaml │ └── types │ ├── letter.yaml │ └── word.yaml ├── manifest.yaml ├── settings │ └── settings.yaml └── webhooks ├── ActionsOnGoogleFulfillment │ ├── index.js │ └── package.json └── ActionsOnGoogleFulfillment.yaml各種設定と説明
ここからは断片的になりますが、必要な設定をどこでどのように書けば良いかをメモ的にまとめています。
アプリの表示名と呼び名の設定
sdk/setting/setting.yamlsetting.yamlcategory: GAMES_AND_TRIVIA defaultLocale: en localizedSettings: displayName: Snow Pal sample pronunciation: Snow Pal sample projectId: <PROJECT_ID> usesInteractiveCanvas: trueアプリの呼び名はこちらで設定します。
projectIdには使用しているGCPのプロジェクトIDを入力して下さい。
defaultLocaleは日本語にしたいならjaでOKです。
ちなみにアプリ名が英語だと、なぜか実機から呼び出せなかったので、私は日本語にして動作確認しています。見た目の部分(FirebaseのURL)を設定
sdk/custom/global/actions.intent.MAIN.yamlactions.intent.MAIN.yamlhandler: staticPrompt: candidates: - promptResponse: canvas: url: https://PROJECT_ID.web.app transitionToScene: WelcomeFirebaseのURLは、こちらのurlの部分に記載します。
アプリが起動すると、初めにこのMAIN.yamlに記載されている設定が実行されます。
staticPromptには色々設定できますが、ここでのポイントは、
1. canvasで指定したURLが表示され、
2. 次にWelcomeというシーンに移動するという内容であることを押さえておけば大丈夫かと思います。
intent(インテント)とは?
intentは、アプリを声で操作する際のトリガーとなるキーワードを設定する場所、というイメージです。
インテントには、大きく次の2種類あります。
システムインテント: 初めから定義されている標準的な非会話型のインテント。1番初めに呼び出されるMain, キャンセルした時のCancel, 入力がなかったりどのインテントにもマッチしなかったときの挙動、これらが主に定義されています。
NO_INPUTとNO_MATCHが3つずつ存在するのは、3回ダメならアプリを終了するという挙動にするためだそうです。
sdk/custom/globalにそれらのyamlファイルがあります。
ユーザーインテント: 自分で定義できるカスタムトレーニングフレーズです。詳細は次に記載します。
sdk/custom/intentsに追加していきます。単純なインテント
例えば、タイトル画面からゲームを始めるためのキーワードを、このプロジェクトでは以下のように設定しています。
sdk/custom/intents/start_game.yamlstart_game.yamltrainingPhrases: - "yes" - let's play - okay - let's do it - go for it - "y"全部Yes的な内容ですよね。
これ、実はGoogleさんの自然言語処理の賢さが発揮出来るところでして、どういうことかというと、ここに提供するフレーズの例が多いほど、インテントが正しく一致する可能性が高くなる、と公式のヘルプに書いてあるんです。
ここに書いた文例集(?)から、言語モデルが生成されて、その言語モデルはアシスタントNLUを強化し、さらに理解する能力を高める、と公式に記載されています。
つまり、完全にこれらのフレーズに一致していなくても、似たような言葉でも反応してくれるようになるということです。
例えば、このリストにはないLet's Goでもちゃんと認識してくれます。複雑なインテント
インテントは変数(parameter)に置き換えることもできます。
以下のファイルは、正解の単語を当てるために設定されたインテントです。
sdk/custom/intents/guess.yaml(一部抜粋)guess.yamlparameters: - name: letter type: name: letter - name: word type: name: word trainingPhrases: - ($letter 'A' auto=true) - letter ($letter 'Y' auto=true) - the word is ($word 'home' auto=false) - what about ($word 'water' auto=false) - it's ($word 'Google' auto=false) - I guess its ($word 'red' auto=false) - I guess it's ($word 'house' auto=false) - its ($letter 'B' auto=true) - it is ($letter 'A' auto=true)これは
letterとwordの2つのパラメータを設定しています。
typeには、そのパラメータがどのような内容かを定義されたyamlファイル名を指定しています。
typeはsdk/custom/types/内にyamlファイルとして保存します。letterには各種アルファベットが定義されています。
sdk/custom/types/letter.yaml(一部抜粋)letter.yamlsynonym: entities: a: synonyms: - a b: synonyms: - b (中略) "y": synonyms: - "y" z: synonyms: - z matchType: EXACT_MATCHwordは自由な単語です。
sdk/custom/types/word.yamlword.yamlfreeText: {}インテントには、
yaml

- ($letter 'A' auto=true)

- it's ($word 'Google' auto=false)
フレーズ例 $変数名 値の例 auto=曖昧さを許容する(True)/しない(False)
こんな感じの組み合わせで書きます。もしも上記を
- ($letter 'A' auto=false)とauto=falseにしてしまうと、「A」しか受け付けてくれなくなりますが、auto=trueなら設定したtypeの候補A〜Zどれでも受け付けてくれるようになる、
とこう書くと曖昧さの許容の意味が理解できそうでしょうか。なお、ここで設定したパラメータ名は、後に記載するWebhook(CloudFunction)で以下のように拾うことが出来ます。
app.handle('guess', (conv) => {
  const word = conv.intent.params.word;
  conv.add(`You Said ${word}`);
}
上記は、こちらが例えば「眠い」と喋ったら、アプリが「You Said 眠い」と答える、みたいな処理をイメージして書いています。
(実際のソースコードではありません)良いインテントの設計には
公式の説明より、抜粋して記載しておきます。
* 会話の設計を行う
* 会話を開始するトリガー文を決める
* 会話を成立させるための条件を決める
* レスポンスを決める
* 1つの目的につき1つのIntentを作成する
* 挨拶をするIntent
* 計算結果を返すIntent
* 検索して結果を返すIntentScenes(シーン)とは
Scenesは、イメージするなら場面設定です。
今回参考にしているサンプルは、
*Welcomeというアプリ起動時のスタート画面の場面
*Gameというゲーム中の場面
の2つのシーンで構成されています。昔のRPGで例えるなら、
* タイトル画面
* セーブデータを選択する場面
* フィールドを自由に歩く場面
* 敵に遭遇した時の戦闘場面
などと大まかにシーンが分けられますよね。そしてそれぞれのシーンに対応した設定をしたいですよね。
そんなイメージがこのScenes(シーン)であると私は認識しておりますが、正しい文章で覚えたい方は公式を読んで下さいね。Scenesの構成
シーンにはライフサイクルというものがあります。
公式の説明をコピペしても意味がないので、ざっくりイメージしやすいように記載します。
1.On enterOn Enterは、シーンが呼び出されて最初に呼び出されるフェーズ。
例えば
sdk/custom/scenes/Welcome.yamlを見てみると、最後の2行にこのように書いています。Welcome.yamlonEnter: webhookHandler: greetingこれは、シーン名「Welcome」に入ったら、webhookの「greeting」という関数を実行してね、という意味です。
実際にgreetingでは以下のような処理が記載されています。
(説明のために抜粋しています)
sdk/webhooks/ActionsOnGoogleFulfillment/index.jsindex.jsconst RETURNING_GREETINGS = [`Hey, you're back to Snow Pal!`, `Welcome back to Snow Pal!`, `I'm glad you're back to play!`, `Hey there, you made it! Let's play Snow Pal`]; app.handle('greeting', (conv) => { conv.add(`<speak>${randomArrayItem(RETURNING_GREETINGS)}</speak>`); });Welcomeシーンに入ると、ランダムに選択されたセリフを喋ってくれるようになっていることが分かりますね。
2.ConditionsConditionsは、
条件が整ったのか会話として情報が足りないのかなど状況を判断するフェーズ。このフェーズを私は利用したことがないのですが、条件によって処理を分岐したいときに使用するものだそうです。
例えば、次に説明するSlotが埋まっていればこの処理をする、というような分岐が出来ると公式には説明されています。
詳しい文法は下記リンクに記載されています。
3.Slot fillingSlot fillingは、ユーザから情報収集する場面で使用します。
このフェーズも私は利用したことないのですが、例えば都道府県・名前・年齢を聞くシーンであれば、その3つの情報を聞いたかどうかといった判定に使えるようです。
設定できる項目を見ると、以下のようになっています。
*Slot name: WebhookロジックおよびConditionsで使用される一意のスロット名。
*Type: Slotの値に使用する定義
*This slot is required: Slotを必須にするかどうか
*Assign default value to this slot: デフォルト値を設定するかどうか
*Customize slot value writeback:スロットがいっぱいになると、セッションパラメータに書き戻される値がカスタマイズされるapp.handle('hoge', conv => { // 全てのスロットに値が入ると"FINAL"になる conv.scene.slotFillingStatus // 各スロットの値にアクセスするには conv.scene.slots['slot_name'].<property_name> });
4.PromtsPromtsは、ユーザへの応答。
文字や画像、カードや音声など様々なコンテンツを設定できます。例えば単純な音声の応答(Simple responses)を書いている部分。
参考のプロジェクトでは、初めのシーンWelcomeで以下のように設定されています。Welcome.yaml- handler: staticPrompt: candidates: - promptResponse: canvas: sendStateDataToCanvasApp: true firstSimple: variants: - speech: Try guessing a letter in the word, or guess the entire word if you think you know what it is. - speech: Try guessing a letter in the word, or guess the entire word if you're feeling confident! - speech: Try guessing a letter in the word or guessing the word.見るところは
firstSimpleのspeechです。
この場合、設定された3つの文章のうち、1つがランダムに選択されて応答される、という動作になります。
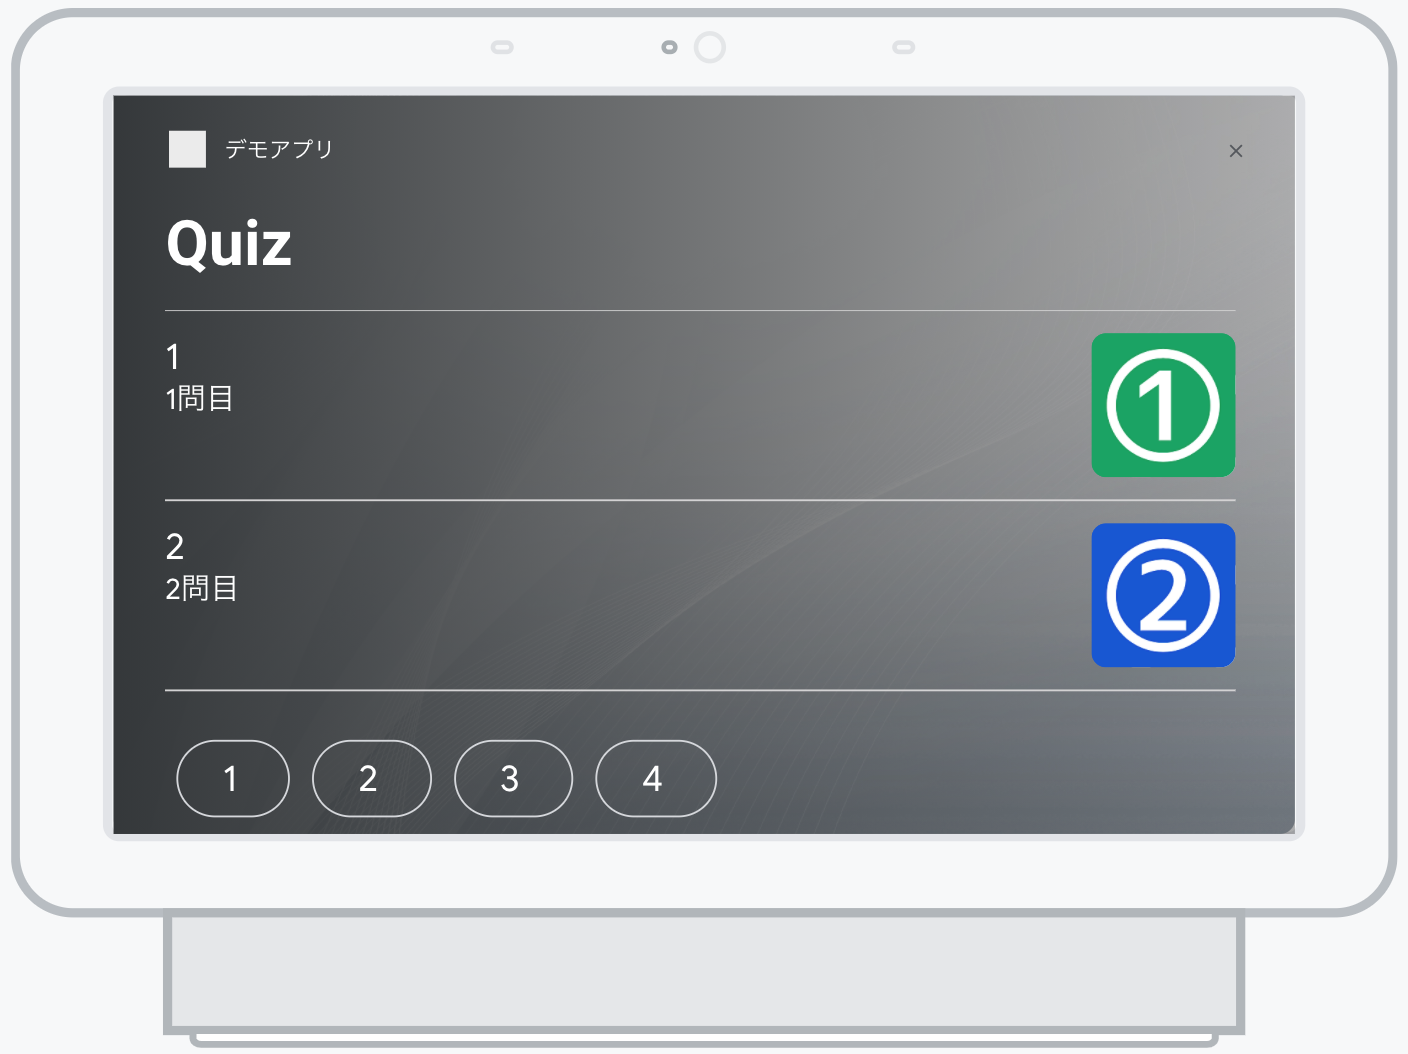
Rich responsesやVisual selection responsesなら、カードや画像イメージ、テーブルの表示が可能です。
今回のサンプルには使用されていませんが、実際にカード形式とリスト形式を用いた画面は次のようになります。card形式onEnter: staticPrompt: candidates: - promptResponse: content: card: image: url: https://{image's URL}.png subtitle: SubTitle text: This is the Demo Application title: Demo Application下の画像の通り、こちらも実機とシミュレータでは表示や色合いが異なります。。
list形式onEnter: staticPrompt: candidates: - promptResponse: content: list: items: - description: 1問目 image: url: https://{image's URL}/sample01.png title: "1" - description: 2問目 image: url: https://{image's URL}/sample02.png title: "2" - description: 3問目 image: url: https://{image's URL}/sample03.png title: "3" - description: 4問目 image: url: https://{image's URL}/sample04.png title: "4" title: Quiz firstSimple: variants: - speech: クイズを選択してください。 suggestions: - title: "1" - title: "2" - title: "3" - title: "4"こちらも実機とシミュレータで表示が異なります。
解像度問題はともかく、画像の位置くらいシミュレータも同じように表示してくれても良いのに...と思うのは私だけでしょうか?
5.Input最後にInput
ユーザが何かしら声や画面へのタッチで入力するフェーズです。
ここで各Intentに合致したのか、Slotに合致したのか、そもそも入力がない場合など、様々な入力によって動作が分岐するフェーズですね。シーンを遷移するには
シーンを遷移する方法は、大きく2つに分かれます。
1. yamlファイルで設定
2. Webhookの中に記載例えば、SecondSceneという名前のシーンに遷移する場合、
yamlに書く場合は、次のように記載します。transitionToScene: SecondSceneWebhookに記載する場合は、例えばhogeというhandler内に次のように書きます。
app.handle('hoge', (conv) => {
  conv.scene.next.name = 'SecondScene';
}
WebHookを増やしていく上で注意点
色々Webhookを増やしたときに躓きやすい点と感じた点です。
それは、増やしたらそのWebhook名を下記のファイルに追記して置かなければ動作しないという点です。動作しないというより、Deploy出来ません。
sdk/webhooks/ActionsOnGoogleFulfillment.yamlActionsOnGoogleFulfillment.yamlhandlers: - name: hoge - name: fuga inlineCloudFunction: executeFunction: ActionsOnGoogleFulfillmentこのように、handlersにname: {Webhook名}を追加しておく必要があります。
結構忘れそうになる部分なので、1つ増やすたびに追記しておくのが望ましいでしょう。おわりに
ざっと粗削りでまとめてしまいましたが、以上が簡単ではありますがGoogleアシスタントでアプリを作る上での基本的な知識でした。
公式に色々書いてあっても、実機とシミュレータの見た目の違いまでは記載されていないので、知りたい方には少しでもお役に立てたのではないかと思います。
さらに詳しく良い情報をご存じの方がいらっしゃいましたら、コメント等いただけるとありがたいです。


- 投稿日:2021-01-07T13:01:44+09:00
【Vue】ドラッグで選択できるようにする方法。(結合ありのテーブルセルをドラッグで選択する)
結合セルがあるテーブルの各セルをドラッグで選択できるようにする。
スプシと同じように、選択範囲の中に結合したセルがあれば、そのサイズに合わせて選択範囲を拡張し、常に範囲が四角になるようにする。
目次
考え方
1. mouse系イベントの活用
ドラッグ選択を実現するためには、mousedown, mouseup, mousemoveイベントを使用する。
イベント 内容 ここでの用途 mousedown ポインティングデバイスのボタンが要素上で押されたときに発生 選択が開始したセルの情報を取得。開始フラグを立てる。 mousemove 要素の上を移動したときに発生 現在選択している要素の情報を取得 mouseup ポインティングデバイスのボタンが要素の上で離されたときに発生 終了フラグ イベントは各セルに仕込むのではなく、tableタグに仕込む。(セルが大量の場合に余計なメモリ消費を防ぐため)
ちなみに、よく目にするclickイベントはmousedownとmouseupを組み合わせて作られている。このため、mousedownなどのイベントを使えなくするとclickイベントも使えなくなる。
2. セルの列方向の位置を算出
結合したセルを扱うため、セルの列番号と実際のセルの位置ズレが発生する。
このため、テーブルの状態をスキャンして、各セルの列方向の位置を求める。
3. watchプロパティの活用
ドラッグに合わせて選択範囲を自動算出するため、Vue.jsのwatchプロパティを使う。
mousemoveイベントで選択中のセルが変化した場合に、watchで検知して、選択範囲を算出する。
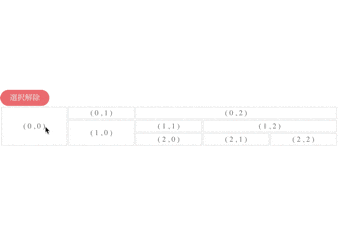
▼位置ズレの例
例えば、(0, 0)位置のセルのcolspanが3の場合、(0, 1)セルの実際の位置は列番号3の位置となる。
実際のコード
mouse系イベントの活用
vue.jsでイベントを仕込むのは超簡単。タグの中に以下を記述。
@イベント名 = "メソッド名"vue.jsのtemplateタグ内<table @mousedown="mouseDown" @mouseup="mouseUp" @mousemove="mouseMove" @click="clickCell" >個別に複数選択できるようにもしておくため
@click="clickCell"も設置しておく。
各イベントの処理は以下。methodの中に記述mouseDown(e){ this.isDrag = true this.startCell = { rowIndex: e.target.parentNode.rowIndex, cellIndex: e.target.cellIndex, rowspan: e.target.rowSpan, colspan: e.target.colSpan } }, mouseUp(e){ this.isDrag = false }, mouseMove(e){ if(this.isDrag == true && e.target.tagName != "TABLE"){ this.endCell = { rowIndex: e.target.parentNode.rowIndex, cellIndex: e.target.cellIndex, rowspan: e.target.rowSpan, colspan: e.target.colSpan } } }引数のeにはイベントが発生した情報が入っている。
e.target.cellIndexのようにして、欲しい情報を抜き出す。
isDragはドラッグ中を示すフラグ。このフラグがtrueの間のみmousemoveでデータを取得し続ける。mousemoveの条件式の
e.target.tagName != "TABLE"は、ポインターの場所によって、targetがtdタグではなくtableタグを指してしまうことがあり、その場合を除外するため。
イベント内で使う全体共通の変数を3つ追加したため、これをdataプロパティに追加する。dataプロパティdata(){ return{ 略 // Drag用 startCell:[], endCell:[], isDrag: false, }以上でマウスのイベントを検知して必要なデータを取得する処理が完了。
セルの列方向の位置を算出
watchプロパティの中で使用するテーブルのセルの実際の列方向位置を算出するプログラムを作成する。
テーブルのデータを渡すと、各セルがどこの列位置になっているかを返す。
外部にjsファイルを作成し、後からvueにimportする。
scantable.jsconst scanTable = (rows) => { const arr = []; const colIndices = [] for(var y=0; y < rows.length; y++) { var row = rows[y] for(var x=0;x<row.table_cells.length;x++) { var cell = row.table_cells[x], xx = x, tx, ty; for(;arr[y] && arr[y][xx]; ++xx); for(tx = xx; tx < xx + (cell.colspan || 1); ++tx) { for(ty = y; ty < y + (cell.rowspan || 1); ++ty) { if( !arr[ty] ) arr[ty] = [] arr[ty][tx] = 1 if ( !colIndices[y] ) colIndices[y] = [] colIndices[y][x] = xx } } } } return colIndices } export { scanTable }引数で配列情報を渡す(変数rowsに格納)と、処理結果を
colIndicesという変数で返す。
▼実際の処理の例引数で渡すテーブルrows= [ { "table_cells": [ { "cell_type": "TD", "rowspan": 1, "colspan": 2, }, { "cell_type": "TD", "rowspan": 1, "colspan": 1, }, { "cell_type": "TD", "rowspan": 1, "colspan": 3, } ] }, { "table_cells": [ { "cell_type": "TD", "rowspan": 2, "colspan": 1, }, { "cell_type": "TD", "rowspan": 1, "colspan": 1, }, { "cell_type": "TD", "rowspan": 1, "colspan": 2, } ] }, { "table_cells": [ { "cell_type": "TD", "rowspan": 1, "colspan": 1, }, { "cell_type": "TD", "rowspan": 1, "colspan": 1, }, { "cell_type": "TD", "rowspan": 1, "colspan": 1, } ] }, ]上記は以下図の元データ
これに作成したscanTableを実行すると、以下となる。
処理結果scanTable(rows) //出力結果 [0, 2, 3] [0, 1, 2] [1, 2, 3]
watchプロパティの活用
watchプロパティを使って、マウスのドラッグがあった場合に自動で選択範囲を算出する処理を作る。
まずは基点となるセル(rowIndexとcellIndex)を求める。
ドラッグは左上から右下のみでなく、右下から左上にいくパターンも考えられる。watchプロパティ// 基点となるrowIndexとcolIndex let startRowIndex = this.startCell.rowIndex if ( startRowIndex > this.endCell.rowIndex ){ startRowIndex = this.endCell.rowIndex } let startColIndex = this.colIndicies[this.startCell.rowIndex][this.startCell.cellIndex] if ( startColIndex > this.colIndicies[this.endCell.rowIndex][this.endCell.cellIndex] ){ startColIndex = this.colIndicies[this.endCell.rowIndex][this.endCell.cellIndex] } let endRowIndex = this.startCell.rowIndex + this.startCell.rowspan - 1 if ( endRowIndex < this.endCell.rowIndex + this.endCell.rowspan - 1 ){ endRowIndex = this.endCell.rowIndex + this.endCell.rowspan - 1 } let endColIndex = this.colIndicies[this.startCell.rowIndex][this.startCell.cellIndex] + this.startCell.colspan - 1 if ( endColIndex < this.colIndicies[this.endCell.rowIndex][this.endCell.cellIndex] + this.endCell.colspan - 1 ){ endColIndex = this.colIndicies[this.endCell.rowIndex][this.endCell.cellIndex] + this.endCell.colspan - 1 }上記処理で、
startRowIndex、endRowIndex、startColIndex、endColIndexの4つのデータを作成。セルを選択する
対象となるセルを算出し、選択中の配列(currentCells)に格納する処理。
      //対象セルの抽出
      const dragSelectedCells = () => {
        for( let i = 0; i <= endRowIndex; i++ ){
          for( let j = 0; j < this.rows[i].table_cells.length; j++ ){
            //範囲拡張チェック
            //colIndexの延長処理
            if( i <= startRowIndex && startRowIndex <= i + this.rows[i].table_cells[j].rowspan - 1
                || i <= startRowIndex && startRowIndex <= i + this.rows[i].table_cells[j].rowspan - 1
                || startRowIndex <= i && i + this.rows[i].table_cells[j].rowspan - 1 <= endRowIndex){
                  if( this.colIndices[i][j] < startColIndex &&  startColIndex <= this.colIndices[i][j] + this.rows[i].table_cells[j].colspan - 1 ){
                    startColIndex = this.colIndices[i][j]
                    dragSelectedCells()
                  }

                  if( this.colIndices[i][j] <= endColIndex &&  endColIndex < this.colIndices[i][j] + this.rows[i].table_cells[j].colspan - 1 ){
                    endColIndex = this.colIndices[i][j] + this.rows[i].table_cells[j].colspan - 1
                    dragSelectedCells()
                  }
            }

            //rowIndexの延長処理
            if( this.colIndices[i][j] <= startColIndex && startColIndex <= this.colIndices[i][j] + this.rows[i].table_cells[j].colspan - 1
                || this.colIndices[i][j] <= endColIndex && endColIndex <= this.colIndices[i][j] + this.rows[i].table_cells[j].colspan - 1
                || startColIndex <= this.colIndices[i][j] && this.colIndices[i][j] + this.rows[i].table_cells[j].colspan - 1 <= endColIndex ){
                  if( i < startRowIndex && startRowIndex <= (i + this.rows[i].table_cells[j].rowspan - 1) ){
                    startRowIndex = i
                    dragSelectedCells()
                  }

                  if( i <= endRowIndex && endRowIndex < (i + this.rows[i].table_cells[j].rowspan - 1) ){
                    endRowIndex = i + this.rows[i].table_cells[j].rowspan - 1
                    dragSelectedCells()
                  }
            }


            if( startRowIndex <= i && i <= endRowIndex
                && startColIndex <= this.colIndices[i][j] && this.colIndices[i][j] <= endColIndex ){
                  this.currentCells.push({
                    rowIndex: i,
                    cellIndex: j,
                    colIndex: this.colIndices[i][j],
                    rowspan: this.rows[i].table_cells[j].rowspan,
                    colspan: this.rows[i].table_cells[j].colspan,
                  })
            }
          }
        }
      }
      dragSelectedCells()
テーブルのセルが選択範囲に該当するかを一つづつチェックしていく。
colspanやrowspanが1以上(結合してあるセル)を含む場合は、再起的に
dragSelectedCells()を実行することで、選択範囲を再計算する。以上でドラッグ選択の記述が完了。
フルコード
vue.js<template> <div> <p>〜TmpAddRow.vue〜</p> <button @click="clear">選択解除</button> <br> <table @mousedown="mouseDown" @mouseup="mouseUp" @mousemove="mouseMove" @click="clickCell" > <template v-for="(tr, rowIndex) in rows"> <tr :key="rowIndex"> <template v-for="(cell, cellIndex) in tr.table_cells"> <td :key="cellIndex" :class="{'is-active': isActive(rowIndex, cellIndex)}" :rowspan="cell.rowspan || 1" :colspan="cell.colspan || 1" > ( {{rowIndex}} , {{cellIndex}} ) </td> </template> </tr> </template> </table> <br> <p>currentCells : {{currentCells}}</p> </div> </template> <script> import { scanTable } from "./scantable" export default { data(){ return{ currentCells:[], // Drag startCell:[], endCell:[], isDrag: false, rows: [ { "table_cells": [ { "cell_type": "TD", "rowspan": 1, "colspan": 2, }, { "cell_type": "TD", "rowspan": 1, "colspan": 1, }, { "cell_type": "TD", "rowspan": 1, "colspan": 3, } ] }, { "table_cells": [ { "cell_type": "TD", "rowspan": 2, "colspan": 1, }, { "cell_type": "TD", "rowspan": 1, "colspan": 1, }, { "cell_type": "TD", "rowspan": 1, "colspan": 2, } ] }, { "table_cells": [ { "cell_type": "TD", "rowspan": 1, "colspan": 1, }, { "cell_type": "TD", "rowspan": 1, "colspan": 1, }, { "cell_type": "TD", "rowspan": 1, "colspan": 1, } ] }, ] } }, methods:{ //セルに選択状態付与 isActive(rowIndex, cellIndex){ return this.currentCells.findIndex((elem) => elem.rowIndex == rowIndex && elem.cellIndex == cellIndex ) > -1 }, //クリックによる選択状態の変更 clickCell(event){ const cell = event.target const tr = event.target.parentNode if(this.isActive(tr.rowIndex, cell.cellIndex)){ const rmIndex = this.currentCells.findIndex((elem)=> elem.rowIndex == tr.rowIndex && elem.cellIndex == cell.cellIndex ) this.currentCells = [ ...this.currentCells.slice(0, rmIndex), ...this.currentCells.slice(rmIndex + 1) ] } else{ this.currentCells = [ ...this.currentCells, { rowIndex: tr.rowIndex, cellIndex: cell.cellIndex } ] } }, //行内の要素(セル数)の最大値を取得する(行作成用) getMaxCellNum(){ return this.rows.reduce((acc, tr) => { if (acc < tr.table_cells.length){ return tr.table_cells.length }else{ return acc } }, 0) }, clear(){ this.currentCells = [] }, //ドラッグ選択 mouseDown(e){ console.log("mouseDown:",e) this.isDrag = true this.startCell = { rowIndex: e.target.parentNode.rowIndex, cellIndex: e.target.cellIndex, rowspan: e.target.rowSpan, colspan: e.target.colSpan } console.log("startcell:",this.startCell) }, mouseUp(e){ console.log("mouseUp:",e) this.isDrag = false }, mouseMove(e){ if(this.isDrag == true && e.target.tagName != "TABLE"){ console.log("mouseMove:",e) this.endCell = { rowIndex: e.target.parentNode.rowIndex, cellIndex: e.target.cellIndex, rowspan: e.target.rowSpan, colspan: e.target.colSpan } console.log("endCell:",this.endCell) } } }, //dragによる選択範囲の算出 computed:{ colIndices(){ return scanTable( this.rows ) } }, watch:{ endCell(){ this.currentCells = [this.startCell] // 基点となるrowとcol let startRowIndex = this.startCell.rowIndex if ( startRowIndex > this.endCell.rowIndex ){ startRowIndex = this.endCell.rowIndex } let startColIndex = this.colIndices[this.startCell.rowIndex][this.startCell.cellIndex] if ( startColIndex > this.colIndices[this.endCell.rowIndex][this.endCell.cellIndex] ){ startColIndex = this.colIndices[this.endCell.rowIndex][this.endCell.cellIndex] } let endRowIndex = this.startCell.rowIndex + this.startCell.rowspan - 1 if ( endRowIndex < this.endCell.rowIndex + this.endCell.rowspan - 1 ){ endRowIndex = this.endCell.rowIndex + this.endCell.rowspan - 1 } let endColIndex = this.colIndices[this.startCell.rowIndex][this.startCell.cellIndex] + this.startCell.colspan - 1 if ( endColIndex < this.colIndices[this.endCell.rowIndex][this.endCell.cellIndex] + this.endCell.colspan - 1 ){ endColIndex = this.colIndices[this.endCell.rowIndex][this.endCell.cellIndex] + this.endCell.colspan - 1 } //対象セルの抽出 const dragSelectedCells = () => { for( let i = 0; i <= endRowIndex; i++ ){ for( let j = 0; j < this.rows[i].table_cells.length; j++ ){ //範囲拡張チェック //colIndexの延長処理 if( i <= startRowIndex && startRowIndex <= i + this.rows[i].table_cells[j].rowspan - 1 || i <= startRowIndex && startRowIndex <= i + this.rows[i].table_cells[j].rowspan - 1 || startRowIndex <= i && i + this.rows[i].table_cells[j].rowspan - 1 <= endRowIndex){ if( this.colIndices[i][j] < startColIndex && startColIndex <= this.colIndices[i][j] + this.rows[i].table_cells[j].colspan - 1 ){ startColIndex = this.colIndices[i][j] dragSelectedCells() } if( this.colIndices[i][j] <= endColIndex && endColIndex < this.colIndices[i][j] + this.rows[i].table_cells[j].colspan - 1 ){ endColIndex = this.colIndices[i][j] + this.rows[i].table_cells[j].colspan - 1 dragSelectedCells() } } //rowIndexの延長処理 if( this.colIndices[i][j] <= startColIndex && startColIndex <= this.colIndices[i][j] + this.rows[i].table_cells[j].colspan - 1 || this.colIndices[i][j] <= endColIndex && endColIndex <= this.colIndices[i][j] + this.rows[i].table_cells[j].colspan - 1 || startColIndex <= this.colIndices[i][j] && this.colIndices[i][j] + this.rows[i].table_cells[j].colspan - 1 <= endColIndex ){ if( i < startRowIndex && startRowIndex <= (i + this.rows[i].table_cells[j].rowspan - 1) ){ startRowIndex = i dragSelectedCells() } if( i <= endRowIndex && endRowIndex < (i + this.rows[i].table_cells[j].rowspan - 1) ){ endRowIndex = i + this.rows[i].table_cells[j].rowspan - 1 dragSelectedCells() } } if( startRowIndex <= i && i <= endRowIndex && startColIndex <= this.colIndices[i][j] && this.colIndices[i][j] <= endColIndex ){ this.currentCells.push({ rowIndex: i, cellIndex: j, colIndex: this.colIndices[i][j], rowspan: this.rows[i].table_cells[j].rowspan, colspan: this.rows[i].table_cells[j].colspan, }) } } } } dragSelectedCells() } } } </script> <style lang="scss" scoped> table{ width: 80%; user-select: none; th,td{ border: thin solid rgba(0, 0, 0, 0.12); text-align: center; color: gray; } th{ background: #ccc; } th, td{ //選択状態 &.is-active{ border: 1px double #0098f7; } } } button{ background: lightcoral; padding: 5px 20px; color: white; border-radius: 50px; } </style>
▼外部のjsファイルscantable.jsconst scanTable = (rows) => { const arr = []; const colIndices = [] for(var y=0; y < rows.length; y++) { var row = rows[y] for(var x=0;x<row.table_cells.length;x++) { var cell = row.table_cells[x], xx = x, tx, ty; for(;arr[y] && arr[y][xx]; ++xx); for(tx = xx; tx < xx + (cell.colspan || 1); ++tx) { for(ty = y; ty < y + (cell.rowspan || 1); ++ty) { if( !arr[ty] ) arr[ty] = [] arr[ty][tx] = 1 if ( !colIndices[y] ) colIndices[y] = [] colIndices[y][x] = xx } } } } return colIndices } export { scanTable }
(参考)ドラッグ選択の処理を外部ファイルに移動
Vueファイルのwatchプロパティに記述している下記処理が長いので、こちらも外部ファイルに移動する。
ポイントは変数をプロパティ名を指定して渡すこと。
.vue//対象セルの抽出 const dragSelectedCells = () => { for( let i = 0; i <= endRowIndex; i++ ){ for( let j = 0; j < this.rows[i].table_cells.length; j++ ){ //範囲拡張チェック //colIndexの延長処理 if( i <= startRowIndex && startRowIndex <= i + this.rows[i].table_cells[j].rowspan - 1 || i <= startRowIndex && startRowIndex <= i + this.rows[i].table_cells[j].rowspan - 1 || startRowIndex <= i && i + this.rows[i].table_cells[j].rowspan - 1 <= endRowIndex){ if( this.colIndices[i][j] < startColIndex && startColIndex <= this.colIndices[i][j] + this.rows[i].table_cells[j].colspan - 1 ){ startColIndex = this.colIndices[i][j] dragSelectedCells() } if( this.colIndices[i][j] <= endColIndex && endColIndex < this.colIndices[i][j] + this.rows[i].table_cells[j].colspan - 1 ){ endColIndex = this.colIndices[i][j] + this.rows[i].table_cells[j].colspan - 1 dragSelectedCells() } } //rowIndexの延長処理 if( this.colIndices[i][j] <= startColIndex && startColIndex <= this.colIndices[i][j] + this.rows[i].table_cells[j].colspan - 1 || this.colIndices[i][j] <= endColIndex && endColIndex <= this.colIndices[i][j] + this.rows[i].table_cells[j].colspan - 1 || startColIndex <= this.colIndices[i][j] && this.colIndices[i][j] + this.rows[i].table_cells[j].colspan - 1 <= endColIndex ){ if( i < startRowIndex && startRowIndex <= (i + this.rows[i].table_cells[j].rowspan - 1) ){ startRowIndex = i dragSelectedCells() } if( i <= endRowIndex && endRowIndex < (i + this.rows[i].table_cells[j].rowspan - 1) ){ endRowIndex = i + this.rows[i].table_cells[j].rowspan - 1 dragSelectedCells() } } if( startRowIndex <= i && i <= endRowIndex && startColIndex <= this.colIndices[i][j] && this.colIndices[i][j] <= endColIndex ){ this.currentCells.push({ rowIndex: i, cellIndex: j, colIndex: this.colIndices[i][j], rowspan: this.rows[i].table_cells[j].rowspan, colspan: this.rows[i].table_cells[j].colspan, }) } } } } dragSelectedCells()Vueファイル内の記述変更
上記記述を以下のように変更する。
.vuethis.currentCells = dragSelectedCells({ startRowIndex: startRowIndex, endRowIndex: endRowIndex, startColIndex: startColIndex, endColIndex: endColIndex, rows: this.rows, colIndices: this.colIndices, currentCells: this.currentCells, })渡す変数が多いのでごちゃごちゃしているが、記述量はシンプルになった。
また、外部から関数を読み込むのでimportに追記。
vueimport { scanTable, dragSelectedCells } from "./scantable"
jsファイルへの追記
関数を外部のjsファイルに移動する。
.jsconst dragSelectedCells = ({ startRowIndex, endRowIndex, startColIndex, endColIndex, rows, colIndices, currentCells, }) => { for( let i = 0; i <= endRowIndex; i++ ){ for( let j = 0; j < rows[i].table_cells.length; j++ ){ //範囲拡張チェック //colIndexの延長処理 if( i <= startRowIndex && startRowIndex <= i + rows[i].table_cells[j].rowspan - 1 || i <= startRowIndex && startRowIndex <= i + rows[i].table_cells[j].rowspan - 1 || startRowIndex <= i && i + rows[i].table_cells[j].rowspan - 1 <= endRowIndex){ if( colIndices[i][j] < startColIndex && startColIndex <= colIndices[i][j] + rows[i].table_cells[j].colspan - 1 ){ startColIndex = colIndices[i][j] dragSelectedCells({ startRowIndex, endRowIndex, startColIndex, endColIndex, rows, colIndices, currentCells, }) } if( colIndices[i][j] <= endColIndex && endColIndex < colIndices[i][j] + rows[i].table_cells[j].colspan - 1 ){ endColIndex = colIndices[i][j] + rows[i].table_cells[j].colspan - 1 dragSelectedCells({ startRowIndex, endRowIndex, startColIndex, endColIndex, rows, colIndices, currentCells, }) } } //rowIndexの延長処理 if( colIndices[i][j] <= startColIndex && startColIndex <= colIndices[i][j] + rows[i].table_cells[j].colspan - 1 || colIndices[i][j] <= endColIndex && endColIndex <= colIndices[i][j] + rows[i].table_cells[j].colspan - 1 || startColIndex <= colIndices[i][j] && colIndices[i][j] + rows[i].table_cells[j].colspan - 1 <= endColIndex ){ if( i < startRowIndex && startRowIndex <= (i + rows[i].table_cells[j].rowspan - 1) ){ startRowIndex = i dragSelectedCells({ startRowIndex, endRowIndex, startColIndex, endColIndex, rows, colIndices, currentCells, }) } if( i <= endRowIndex && endRowIndex < (i + rows[i].table_cells[j].rowspan - 1) ){ endRowIndex = i + rows[i].table_cells[j].rowspan - 1 dragSelectedCells({ startRowIndex, endRowIndex, startColIndex, endColIndex, rows, colIndices, currentCells, }) } } if( startRowIndex <= i && i <= endRowIndex && startColIndex <= colIndices[i][j] && colIndices[i][j] <= endColIndex ){ currentCells.push({ rowIndex: i, cellIndex: j, colIndex: colIndices[i][j], rowspan: rows[i].table_cells[j].rowspan, colspan: rows[i].table_cells[j].colspan, }) } } } return currentCells } export { scanTable, dragSelectedCells }再起処理の度に変数を渡す必要がある。
最後に外部ファイルに渡す関数を追加。
export { scanTable, dragSelectedCells }以上。


- 投稿日:2021-01-07T11:17:21+09:00
JavaScriptの勉強でつまづいたこと3選
概要
エッセイ・ポエムです。1年間必死にJavaScriptを勉強して特に理解しづらかったことを絞りに絞って3つにまとめました
スペック
- プログラミング初心者
- 用途LPのコーディング
- フレームワークjQuery
- 独学
初心者がプログラミングを勉強するときどんな箇所に苦しむのかを
楽しんでいただく記録しておくのが主な目的。ちなみに、各苦しみに対するインテリジェンスな解決法はサポート外です。
- 技術書を読む(理解できなくても読み進めないといけないので辛い作業。頑張ろう!)
- 他人のコードを読む(時間をかけていい作業。謎構文が頻出するので都度調べる。)
- コードを書いてみる(最初は写経でいい。何回か書いているとインプットした知識と知識がつながり合っていく感覚を味わえるはず。)
という力技で苦しみながら覚えました。
つまづいたこと3選
1. 関数?変数??引数?定数???
JavaScriptの文法を勉強していたときに一番パニくっていた箇所。
初心者からみるとみんな同じような言葉に見えるんです。
僕みたいな低スペ初心者に教えるときは、図解で教えてあげてください。
独学者の人は鉛筆とノートを持って丁寧に理解しながら勉強すると覚えやすいですよ。ES5とES6の書き方の違い
今のJavaScriptを初言語として学ぶのはプログラミング初心者にとってはちときつい理由。Google先生で調べたときに情報が混在しているのでとても困る。初心者は情報の取捨選択ができない。
(引数のことずっとインスウって呼んでて赤面したのは僕だけじゃないはず)
2. 返り値?戻り値?
関数とは、コンピュータプログラム上で定義されるサブルーチンの一種で、数学の関数のように与えられた値(引数)を元に何らかの計算や処理を行い、結果を呼び出し元に返すもののこと。
関数(ファンクション)とは - IT用語辞典 e-Words返すって何?戻す?返す?(^^ω^^)??ってパニくる。
    function add (x, y) {
        var result = (x + y)
        return result
    }
    add(1,2) // 3
なるほど、なるほど1と2を受け取って
returnで計算結果を返してるんだな。φ(`д´)メモメモ...function helloWolrd () { console.log('Hello World!') } helloWolrd() // Hello World! // undefined
?!?!
returnしてないけど文字返ってるんじゃないの?コレ?!しかもundefinedって何?!しかも、値何も受け取ってない?!?となるわけです。もうテンパりまくり、次に説明されることなんて頭に入ってきません。3. 関数の呼び出し
初心者の頭というのはプログラムの実行順序を基本的に追いきれません。なぜなら理解に必要な知識がまだないからです。
最初は形から覚えろという言葉通り、とりあえず真似しながら書いていくと思います。そこでパニクリ案件へと化すのが関数の呼び出し方、指定の仕方です。
    function helloWorld () {
        console.log('Hello world!')
    }
    helloWolrd() // Hello World!
                 // undefined
関数を書いたぞ・・・!唸れhelloWorld・・!
helloWorld()!!!とカッコをつけて関数を使うのです。
そう、初心者は関数は使うときは関数名のお尻にカッコをつけるのだ。と覚えました。しかし、、、function helloWorld () { console.log('Hello world!') } $('#button').on('click', helloWorld())ボタンをクリックしても何も起きません。。。
なんということでしょう。リファレンスで言われた通り関数を指定したのに何も起こらないじゃないですかー!
ボタンにクリックイベントを追加したいのでしょうが、コレでは動きませんね。
初心者はなんとか見様見真似でカッコを外すことで実行できるようになりましたが理解までは及んでいません。おわりに
関数はとてもパワフルで面白い機能ですが理解するのって結構難しいんですね。私もまだまだ理解できてません。一応保険をかけておくと、これはポンコツ初心者の私がわからなかったことなのでご承知おきください。
Googleで検索したときに出てくるSEOつよつよサイトが一番勉強の邪魔になったりする。と思ったり・・w


- 投稿日:2021-01-07T08:48:22+09:00
【ServiceNow】外部ライブラリを使って、JavaScriptの小数計算の誤差を解決してみる
概要
ServiceNowでは、サーバ上で実行するためのJavaScriptの関数やクラスを登録できる【Script includes】という機能が存在する。この機能を使用することで、アプリケーションスコープを超えて汎用的に使用する関数やクラスを要求に応じて使用することができる。1
また、ServiceNowの開発で使用する言語はJavaScriptだが、JavaScriptで小数計算を行う際、計算結果に誤差が生じる仕様上の問題が存在する。2
この記事では、ServiceNow上でJavaScriptの小数計算した際に誤差が発生するといった問題を上記の機能を使用して解決していく。
この記事でできること
- ServiceNowでScript includesの使い方がわかる。
- ServiceNowでJavaScript上の小数誤差問題を解決できる。
環境・使用する物
- Version : Orland
- 使用言語 : 日本語
- Script includes
- Business rule
解説
Script includesについて
アクセス方法
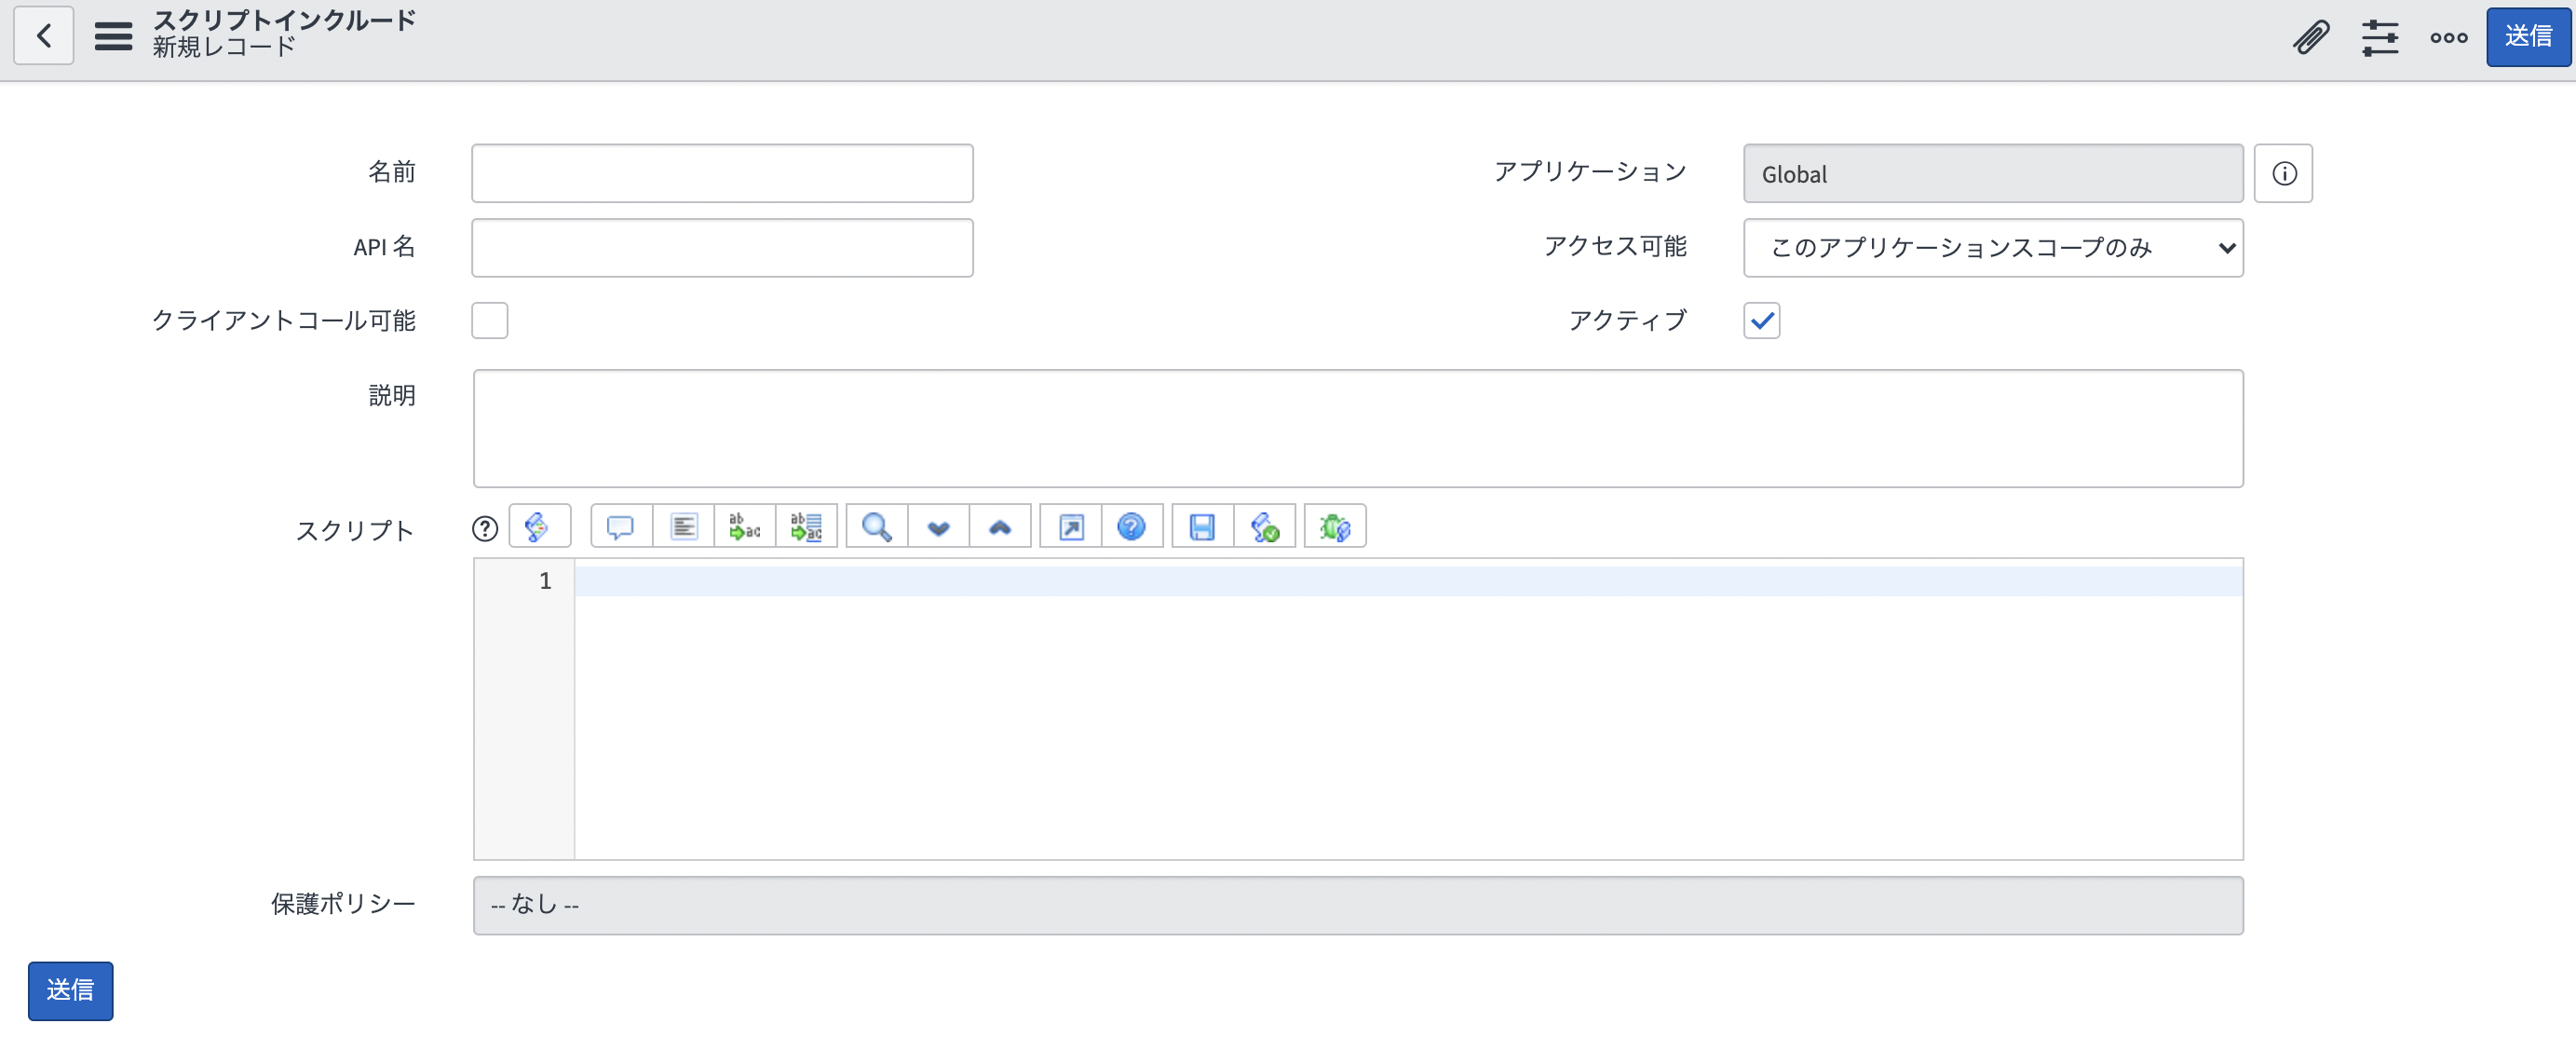
[システム定義] > [スクリプトインクルード]に遷移し、Newボタンをクリックする。Script includesの新規フォームの説明
フィールド名 説明 名前 スクリプトの名前を定義します。クラスを登録する場合、この名前をクラスと一致する必要があります。クラスレスの場合は、関数名と一致させる必要がある。 API名 "現在のアプリケーションスコープ名.名前"で自動入力されます。APIとして名前を定義する。 クライアントコール可能 チェックを入れるとクライアントサイドでも実行にできるようになる。 アプリケーション 現在のアプリケーションスコープが自動入力される。このスクリプトを管理するアプリケーションスコープを定義する。 アクセス可能 現在のアプリケーションスコープのみで使用するか全てのアプリケーシスコープで使用するかを定義する。 アクティブ チェックすることでこのScript includesが有効化できる。 スクリプト 登録する関数・クラスを定義できる。 保護ポリシー スクリプトの保護レベルを定義できる。
・なし
どのユーザも閲覧編集が可能。
・読み取り専用
フィールドの編集を不可にする。
・保護
フィールドを編集不可にした上でスクリプトを権限がないユーザ意外に閲覧できないようにする。JavaScriptの小数誤差
ここは本題ではないので、軽く説明する。
JavaScriptでは小数計算をすると以下のような誤差が生じる。var total = 1.69 + 1.99; gs.addInfoMessage(total);このコードをで実行すると...。
このように本来"3.68"で出力して欲しいところだが"3.6799999999999997"で表示される。これがJavaScriptの小数誤差になる。
JavaScriptの浮動小数点数はIEEE754の規格で実装されているが、IEEE754では、小数がある程度の桁数を超えると誤差を丸める。では、扱う小数が循環小数だった場合、無限に続くその小数はどこかで丸められることになる。それが先ほど結果として現れる。
Script includesで外部ライブラリを使用する上での注意
今回の方法で実装できるScript includesの外部ライブラリは即時関数形式のライブラリのみ使用できる。即時関数形式とは、関数を定義したと同時に実行できる関数のことを指す。
なので、require構文を使用して別のモジュールを読み込むことで動作するようなライブラリを今回の方法で使用することができないので注意!使用する外部ライブラリ
今回使用する外部ライブラリは、上記の注意事項を考慮しBigNumber.jsを使用する。
公式API
GitHubレポジトリ
GitHubからbignumber.jsのファイルからRawをコピーして使用する。実践!
それでは実践。
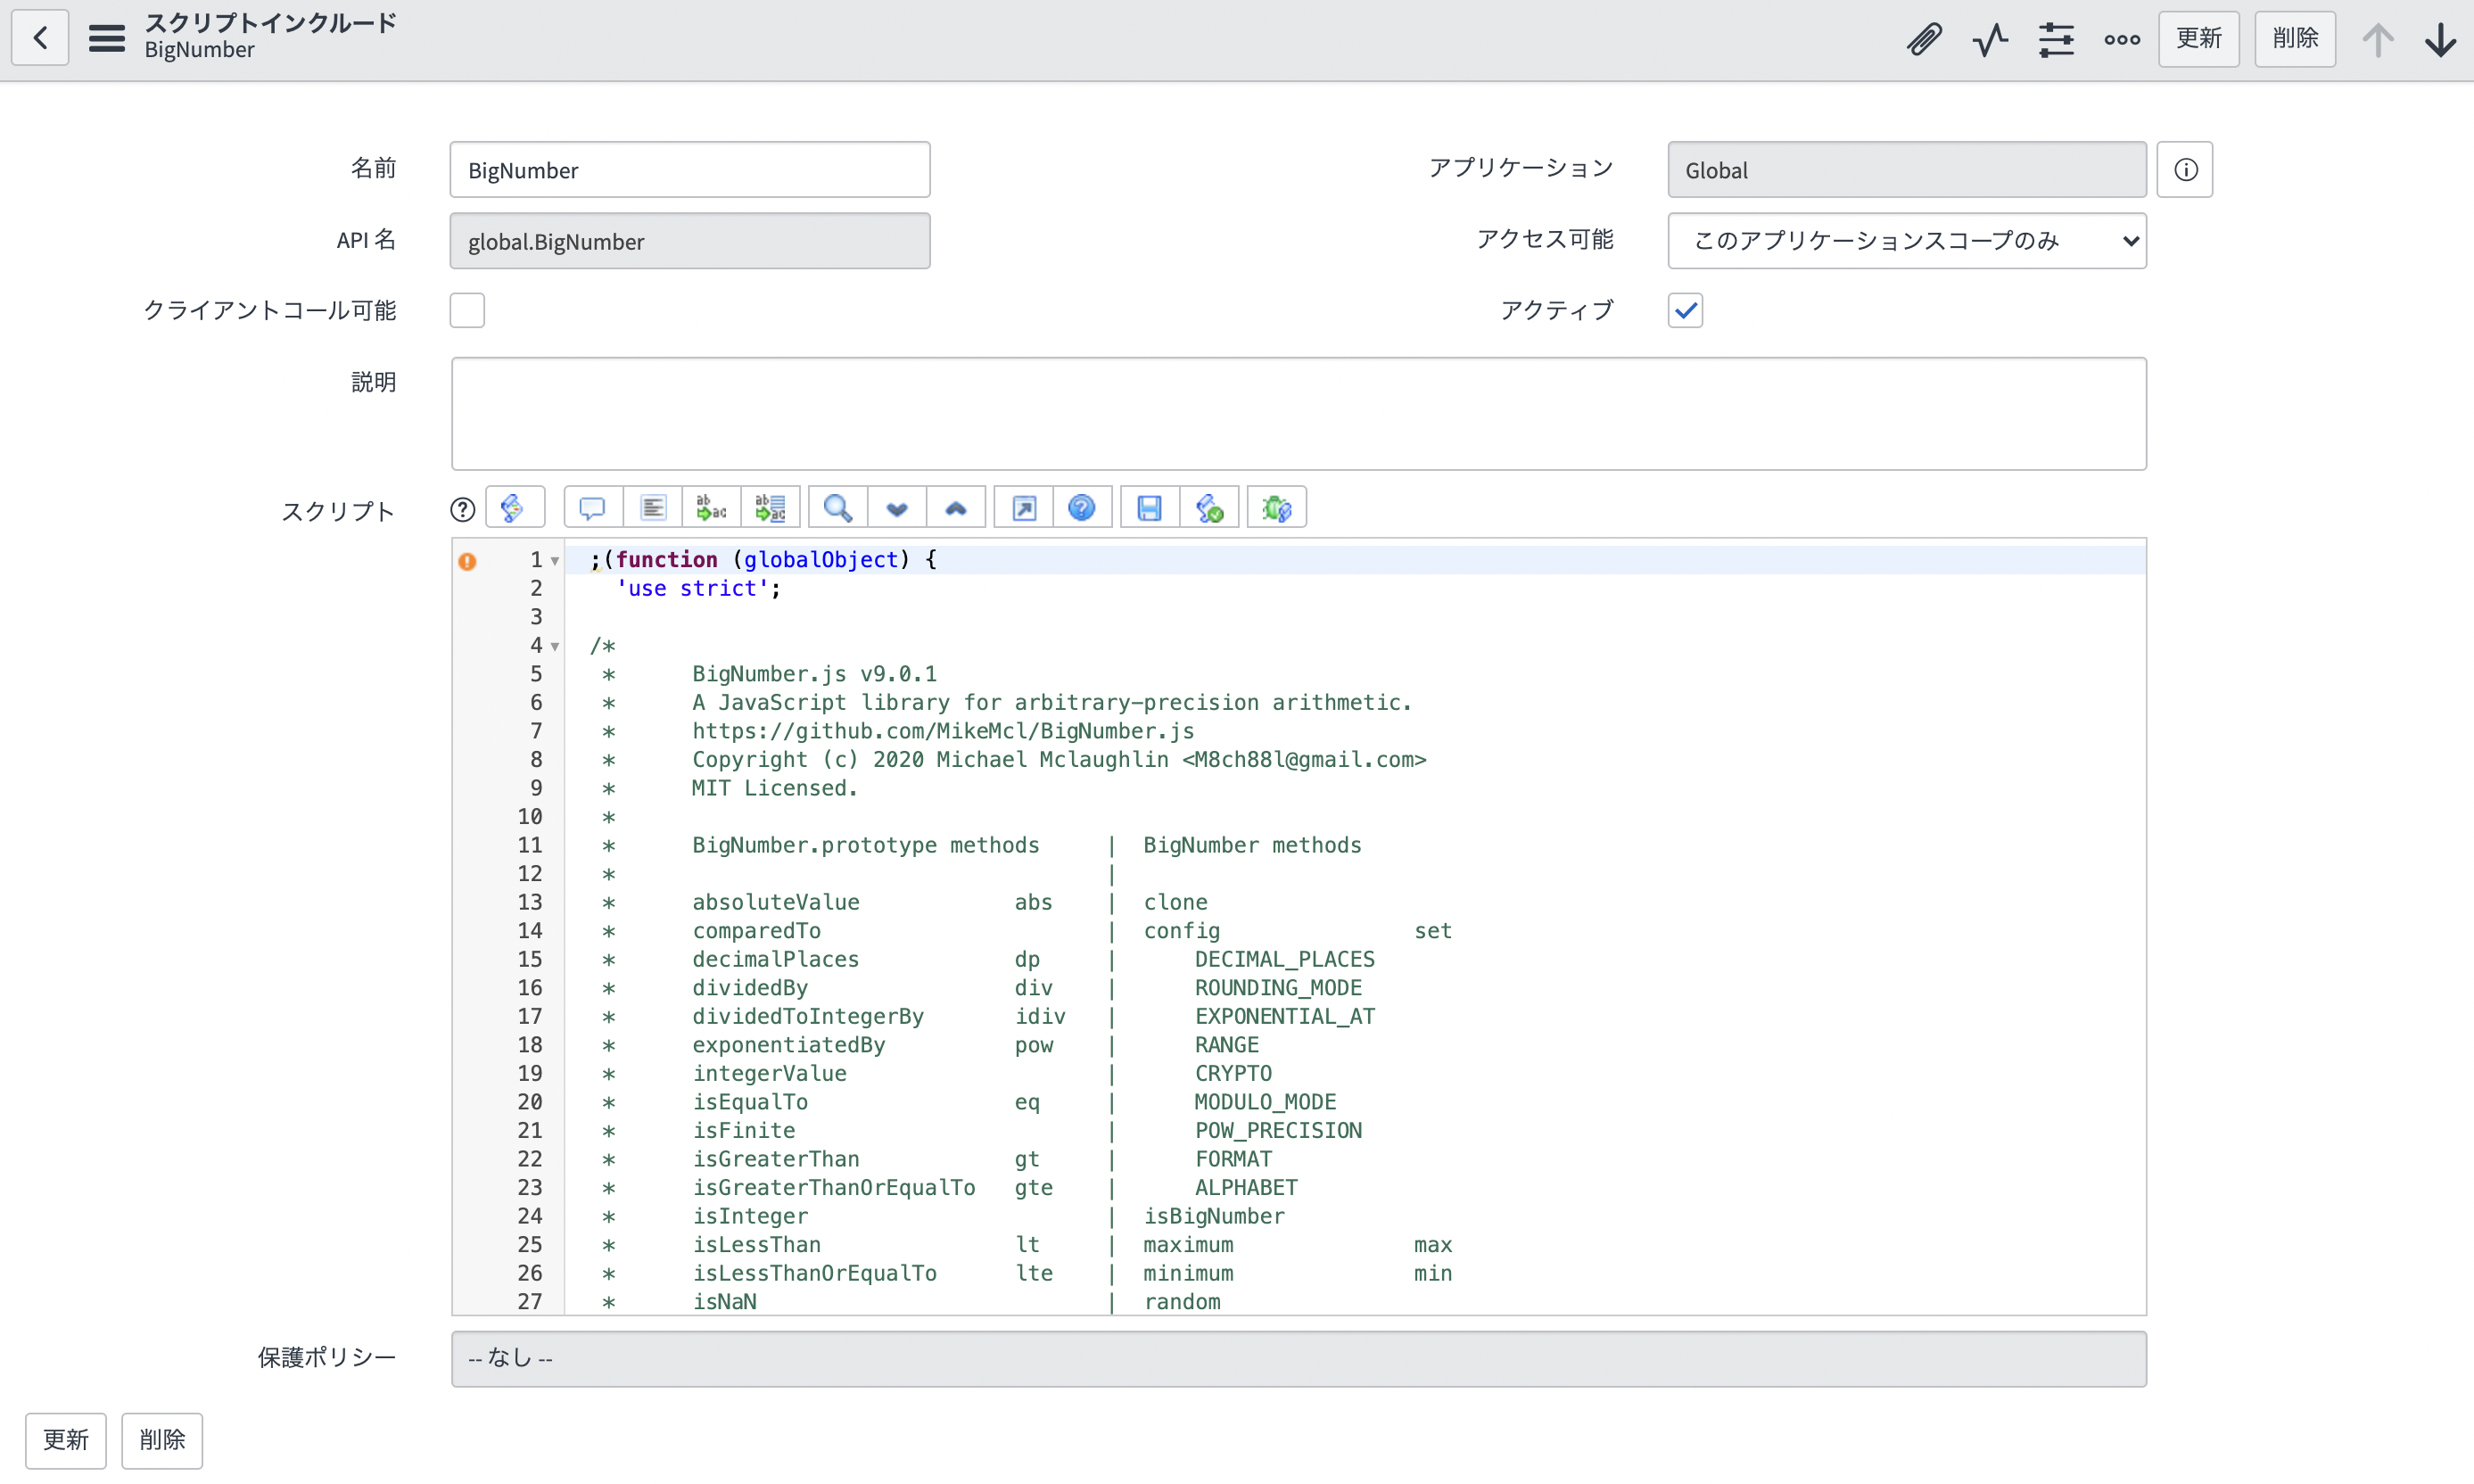
Script includesに以下のように書き込んでいく。
スクリプトフィールドに先ほどコピーしたBigNumber.jsのRawを貼り付ける。
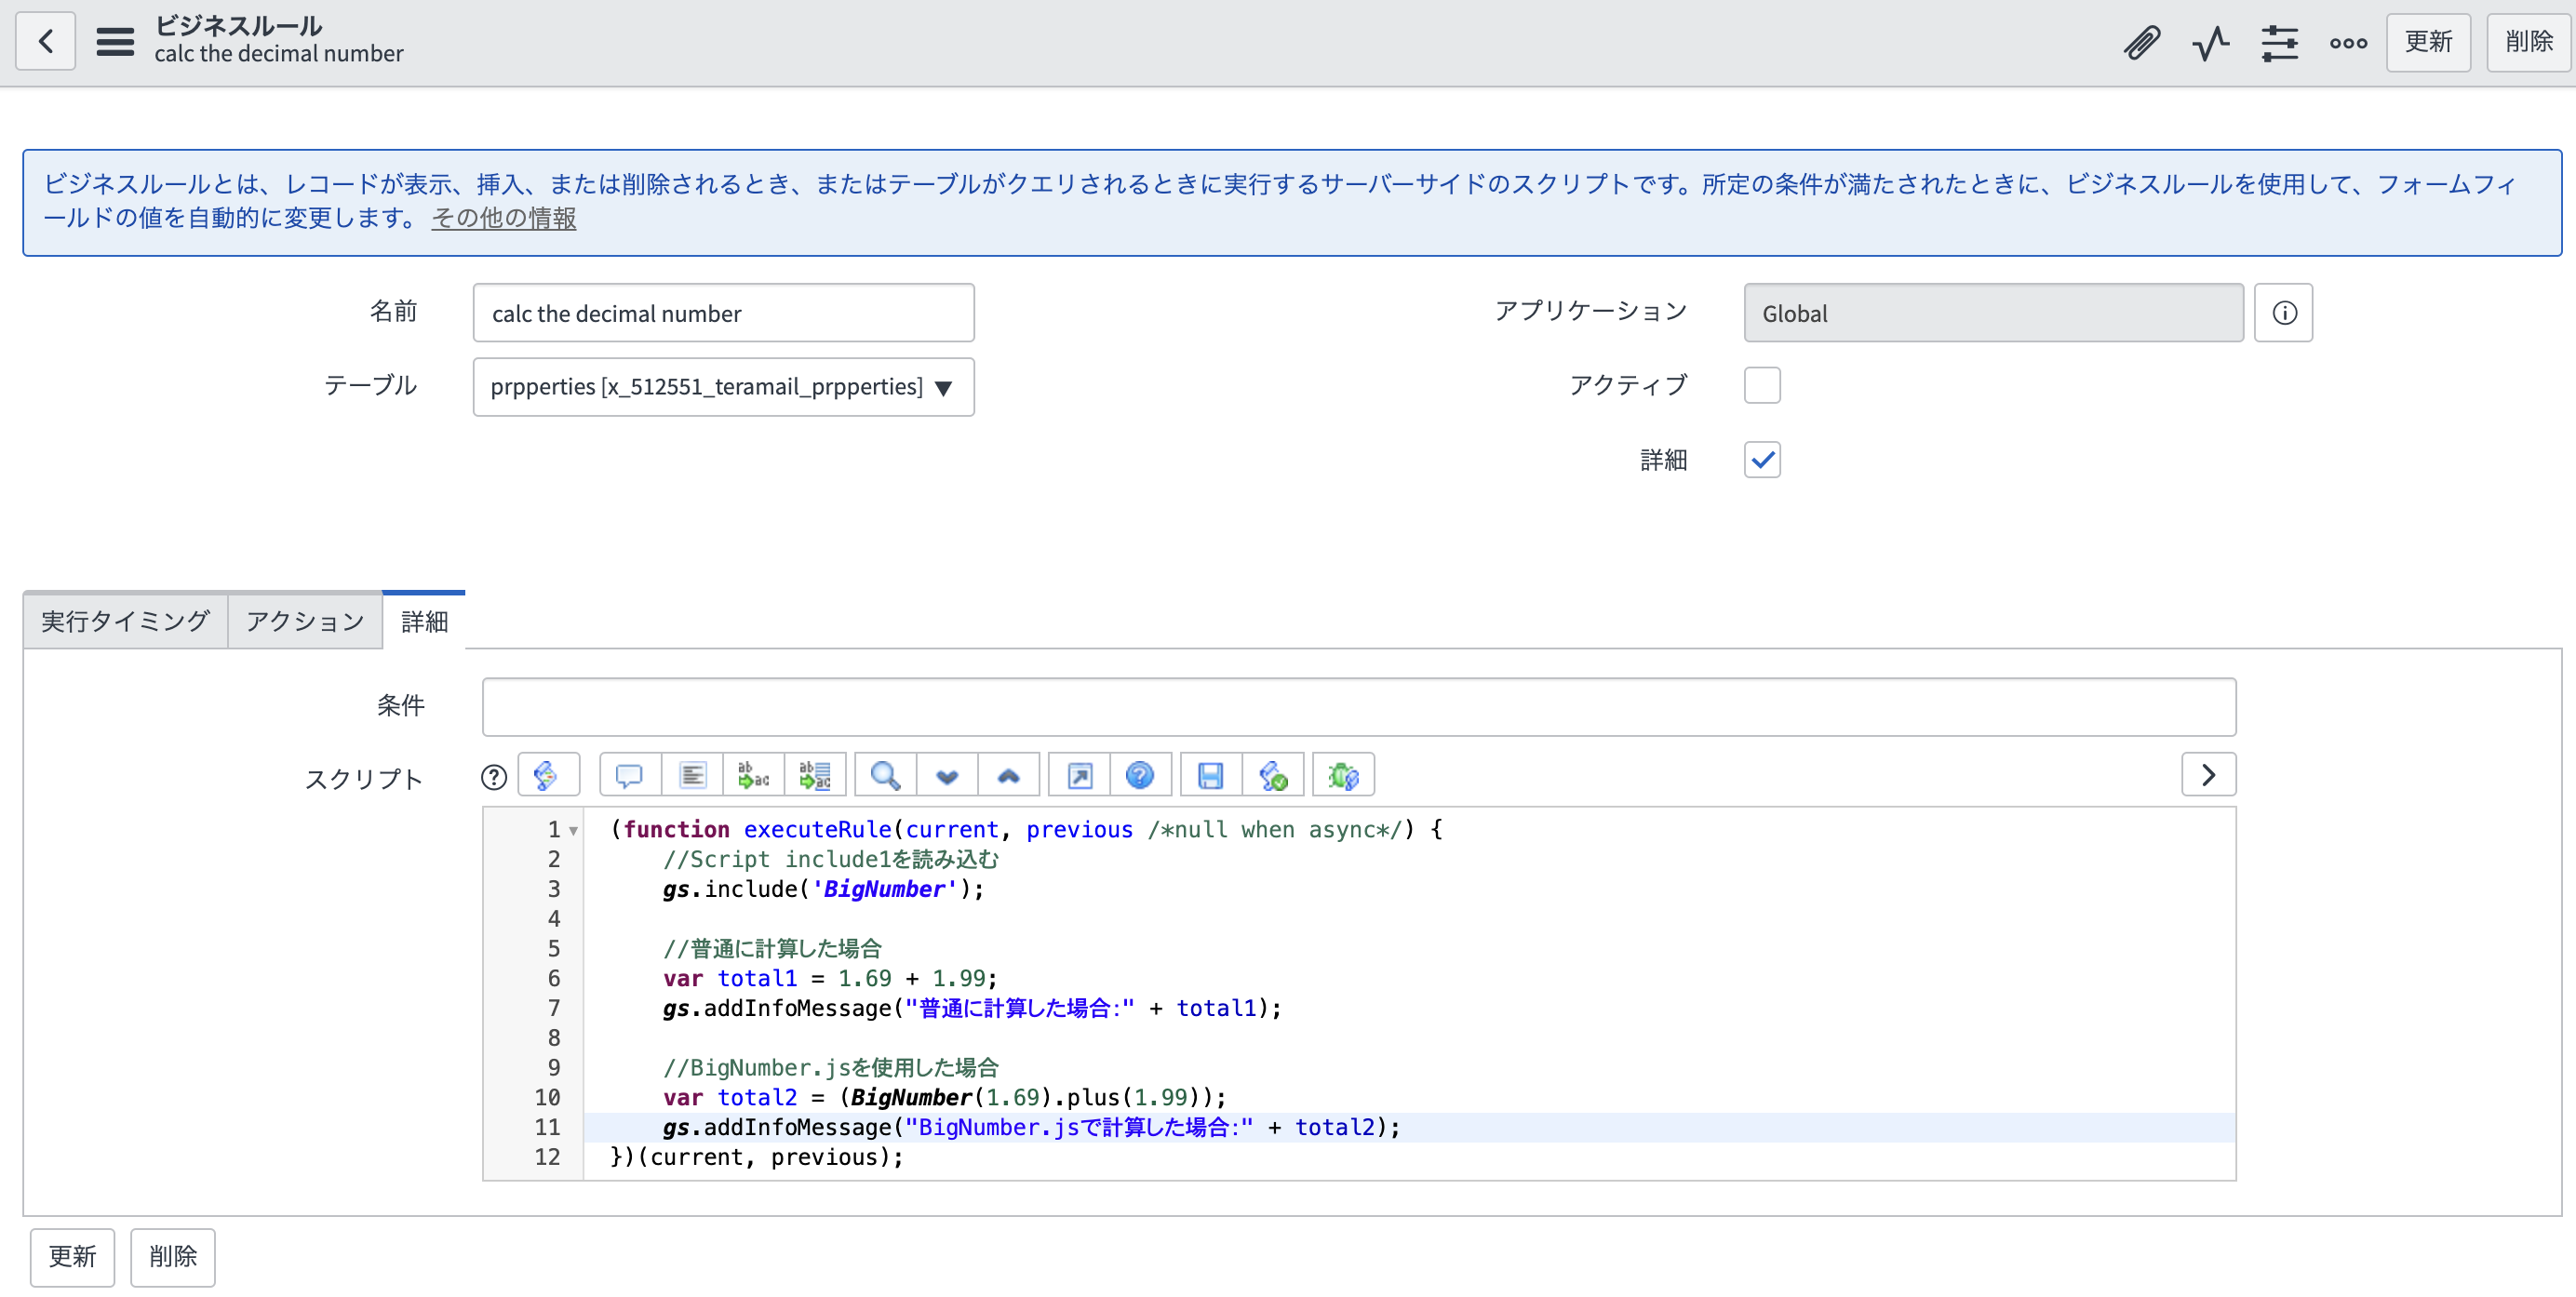
続いて、何かしらのテーブルに以下のビジネスルールを作成する。
今回は、新規で作成したテーブルに、普通に小数計算した場合とBigNumber.jsを使用して計算した場合を記述する。
作成したScriptincludesを使用するには、以下のように記述する。gs.include('Script include name');今回 [Script include name] には [BigNumber]と書く。
このビジネスルールを実行すると以下の画像のようなメッセージを表示される。
画像からわかるようにbignumber.jsを使用することで、小数誤差を解決していることがわかる。結論
JavaScriptで小数計算を行う場合、誤差が生じるため、工夫した処理を実装したり、外部ライブラリを使用することで解決する。今回はServiceNow上で外部ライブラリを使用してJavaScriptの小数計算誤差を解決することができた。
参考文献
neuralworkz - Including JavaScript Library in ServiceNow[2018/2/21]
https://neuralworkz.wordpress.com/2018/02/21/including-javascript-library-in-servicenow/


- 投稿日:2021-01-07T08:28:38+09:00
NodeListからArrayにシャッフルしつつ変換
フルコードは以下。
NodeListからArrayにシャッフルしつつ変換するJavaScriptプログラム - sun610.web.fc2.comポイントは
Math.floor(Math.random() * childr_.length)でランダムインデックスを取得しているiArrayに使用済みインデックスを格納し、同じインデックスを2回以上使用しないようにしている
- 投稿日:2021-01-07T08:24:35+09:00
【JavaScript】文字列に半角空白と全角空白が含まれるか判別する
文字列に半角空白と全角空白が含まれるか判別する方法をまとめました。(JavaScript)
こちらを参考にしました。
Stack Overflow// 半角空白があるか function hasSpaces(str) { if (str.indexOf(' ') !== -1) { return true } else { return false } } // 全角空白があるか function hasZenkakuSpaces(str) { if (str.indexOf(' ') !== -1) { return true } else { return false } } // 適当な文字列(この例では2つスペースがある) const input = 'There is something'; // いくつスペースがあるか格納 let howManySpaces = 0; for (let i=0; i<input.length; i++) { // 半角空白または全角空白があったときの処理 if (hasSpaces(input[i]) === true || hasZenkakuSpaces(input[i]) === true) { howManySpaces++; } } console.log('スペースの数: ' + howManySpaces);
- 投稿日:2021-01-07T00:33:57+09:00
Javascriptで循環配列
こんにちは、Mottyです。今回は配列の記事になります。
循環配列
循環配列はcyclicな配列のことを言います。
普通の配列であれば最後の要素から次の要素へアクセスしようとするとエラーが検出されますが、循環配列では最初の要素にシフトします。循環配列の中の任意の番号から始まり、要素をすべて取り出す方法を考えるとします。この場合、もう1つ同じ配列をコピーしそれにアクセスする方法があります。
ただし以下のデメリットが考えられます。
・2倍のメモリを確保しなければならない
・実装コードが冗長になるnewarray.js//func function write(array, start_num) { array = array.concat(array); //自分の配列同士を結合させる //順次書き込み for(let index = start_num; index < array.length/2 + start_num; index++) { console.log(array[index]); } } //Main var myarray = [0,1,2,3,4,5,6,7,8,9,10,11,12,13,14,15,16,17,18,19]; write(myarray,7);// myarrayを7番目から取り出す //output: 7,8,9,10,11,12,13,14,15,16,17,18,19,20,0,1,2,3,4,5,6上記のデメリットを解消する良い方法はあるのでしょうか(語り風)。
剰余(mod)を使えばcyclicな配列のシフトが可能です。mod.js//func function write(array, start_num) { for(let index = start_num; index < array.length + start_num; index++) { console.log(array[index%array.length]); } } //Main var myarray = [0,1,2,3,4,5,6,7,8,9,10,11,12,13,14,15,16,17,18,19]; write(myarray,7);// myarrayを7番目から取り出す //output: 7,8,9,10,11,12,13,14,15,16,17,18,19,20,0,1,2,3,4,5,6見かけはインデックスを配列の長さで割った余りの数にアクセスしていることになりますが、インデックスが配列の長さを超えた場合にはじめの要素にバックします。これにより配列に循環的な性質を持たせることが可能となります。
下記例ではクリックすると色が変わるボタンを実装しています。
index.html<DOCTYPE! html> <html> <head> <title>循環配列</title> <link rel="stylesheet" type="text/css" href="layout.css"> <script type = "text/javascript" src = "script.js"></script> </head> <body> <button id = "target" value ="button" onclick = "buttonclick()">ThisButton</button> <div id = "area"></div> </div> </body> </html>Layout部分
```layout.csstarget
{
display: inline-block;
text-decoration: none;
background:red;
color:white;
font-size:20px;
width: 120px;
height: 120px;
line-height: 120px;
border-radius: 50%;
text-align: center;
overflow: hidden;
transition: .4s;
}Script部分 ```script.js var colorlist = ["red","orange","yellow","green","blue","purple","black"]; var color_num = 0; function buttonclick() { color_num += 1; document.getElementById("target").style.backgroundColor = colorlist[color_num % colorlist.length]; }
↑色が循環的に変換するボタン仕掛けは、ボタンをクリックする度にカラー配列内に順次アクセスし、CSSに反映させているということしかやっていません。ロジックが配列数によらないので要素を追加・削除したい場合は配列内のプロパティを修正だけでOKです。
まとめ
実情はjavascriptの練習がてらという感じです。型に制限がないっていうのもなかなか慣れないものですね・・・。
参考URL
・循環バッファ
https://ufcpp.net/study/algorithm/col_circular.html・循環配列を用いたキューの実装
https://qiita.com/maebaru/items/fb640c16733301f836f7・wikipedia
https://ja.wikipedia.org/wiki/%E3%83%AA%E3%83%B3%E3%82%B0%E3%83%90%E3%83%83%E3%83%95%E3%82%A1・CycularArray(英語)
https://www.geeksforgeeks.org/circular-array/


- 投稿日:2021-01-07T00:33:57+09:00
循環配列について
こんにちは、Mottyです。今回は配列の記事になります。
循環配列
循環配列はcyclicな配列のことを言います。
普通の配列であれば最後の要素から次の要素へアクセスしようとするとエラーが検出されますが、循環配列では最初の要素にシフトします。循環配列の中の任意の番号から始まり、要素をすべて取り出す方法を考えるとします。この場合、もう1つ同じ配列をコピーしそれにアクセスする方法があります。
ただし以下のデメリットが考えられます。
・2倍のメモリを確保しなければならない
・実装コードが冗長になるnewarray.js//func function write(array, start_num) { array = array.concat(array); //自分の配列同士を結合させる //順次書き込み for(let index = start_num; index < array.length/2 + start_num; index++) { console.log(array[index]); } } //Main var myarray = [0,1,2,3,4,5,6,7,8,9,10,11,12,13,14,15,16,17,18,19]; write(myarray,7);// myarrayを7番目から取り出す //output: 7,8,9,10,11,12,13,14,15,16,17,18,19,20,0,1,2,3,4,5,6上記のデメリットを解消する良い方法はあるのでしょうか(語り風)。
剰余(mod)を使えばcyclicな配列のシフトが可能です。mod.js//func function write(array, start_num) { for(let index = start_num; index < array.length + start_num; index++) { console.log(array[index%array.length]); } } //Main var myarray = [0,1,2,3,4,5,6,7,8,9,10,11,12,13,14,15,16,17,18,19]; write(myarray,7);// myarrayを7番目から取り出す //output: 7,8,9,10,11,12,13,14,15,16,17,18,19,20,0,1,2,3,4,5,6見かけはインデックスを配列の長さで割った余りの数にアクセスしていることになりますが、インデックスが配列の長さを超えた場合にはじめの要素にバックします。これにより配列に循環的な性質を持たせることが可能となります。
下記例ではクリックすると色が変わるボタンを実装しています。
html部分index.html<DOCTYPE! html> <html> <head> <title>循環配列</title> <link rel="stylesheet" type="text/css" href="layout.css"> <script type = "text/javascript" src = "script.js"></script> </head> <body> <button id = "target" value ="button" onclick = "buttonclick()">ThisButton</button> <div id = "area"></div> </div> </body> </html>Layout部分
layout.css#target { display: inline-block; text-decoration: none; background:red; color:white; font-size:20px; width: 120px; height: 120px; line-height: 120px; border-radius: 50%; text-align: center; overflow: hidden; transition: .4s; }Script部分
script.jsvar colorlist = ["red","orange","yellow","green","blue","purple","black"]; var color_num = 0; function buttonclick() { color_num += 1; document.getElementById("target").style.backgroundColor = colorlist[color_num % colorlist.length]; }
↑色が循環的に変換するボタン仕掛けは、ボタンをクリックする度にカラー配列内に順次アクセスし、CSSに反映させているということしかやっていません。ロジックが配列数によらないので要素を追加・削除したい場合は配列内のプロパティを修正だけでOKです。
まとめ
実情はjavascriptの練習がてらという感じです。型に制限がないっていうのもなかなか慣れないものですね・・・。
参考URL
・循環バッファ
https://ufcpp.net/study/algorithm/col_circular.html・循環配列を用いたキューの実装
https://qiita.com/maebaru/items/fb640c16733301f836f7・wikipedia
https://ja.wikipedia.org/wiki/%E3%83%AA%E3%83%B3%E3%82%B0%E3%83%90%E3%83%83%E3%83%95%E3%82%A1・CycularArray(英語)
https://www.geeksforgeeks.org/circular-array/