- 投稿日:2020-11-26T17:59:08+09:00
[Python + Tensorflow2] 安定した機械学習環境構築
概要
現時点(2020/11/26)で安定動作する機械学習環境を構築していきます。
具体的には、
- pyenv導入(macOS, Linuxのみ)
- Miniconca導入
- 機械学習に役立つパッケージたちの導入
の手順で進めていきます。
Tensorflow は NumPy などの他パッケージに依存しており、相性の良いバージョン同士でないと警告文などが頻発します。
この記事は、そのようなバージョン情報等の備忘録です。記事中で紹介する実行環境とパッケージ(一部)は以下のとおりです。
OS Shell Python Tensorflow Windows10 Anaconda Prompt 3.7.9 2.1.0 macOS (intel) bash, zsh, fish 3.7.9 2.0.0 Linux (Ubuntu) bash, zsh, fish 3.7.9 2.2.0 環境構築
Windows の場合
※Windowsでは公式にpyenvを導入できないため、minicondaを直接導入していきます。
miniconda導入
ここから最新のインストーラをダウンロードします。
本記事執筆時の最新版は、Miniconda3-py38_4.9.2-Windows-x86_64.exeです。
ダウンロード完了したらインストーラを起動し、画面の内容に従ってインストールを進めて下さい。
こちらの記事が参考になります: WindowsにMinicondaインストール(2018年)
インストールが完了したら、スタートメニューからAnaconda Promptを起動できることを確認します。
以降の手順は、このプロンプトを使っていきます。
パッケージ導入
この手順では以下のパッケージを導入していきます。
package version python 3.7.9 numpy 1.17.1 scipy 1.5.2 matplotlib 3.3.2 scikit-learn 0.23.2 pandas 1.1.2 jupyter 1.0.0 jupyter_contrib_nbextensions 0.5.1 tensorflow-gpu 2.1.0 [GPU無しの場合] tensorflow 2.1.0 tensorflowをanacondaチャンネル、それ以外をconda-forgeチャンネルからインストールします。
パッケージインストールconda install -c conda-forge -y python==3.7.9 numpy==1.17.1 scipy==1.5.2 matplotlib==3.3.2 scikit-learn==0.23.2 pandas==1.1.2 jupyter==1.0.0 jupyter_contrib_nbextensions==0.5.1 conda install -c anaconda -y tensorflow-gpu==2.1.0macOS の場合
注) ARM系Mac(Apple Silicon)では動作確認ができていません。
brew導入
brewはmacOSへのソフトウェアを導入をサポートしてくれるツールです。
未導入の場合、ターミナルを起動して、以下コマンドを実行してください。brew導入/bin/bash -c "$(curl -fsSL https://raw.githubusercontent.com/Homebrew/install/HEAD/install.sh)"動作確認brew -v -------------------------------------------------- Homebrew 2.5.11 Homebrew/homebrew-core (git revision eb4ff; last commit 2020-11-26) Homebrew/homebrew-cask (git revision e68da2; last commit 2020-11-26)pyenv導入
brewを使ってpyenvをインストールします。
以下のコマンド実行後、画面の内容に従ってインストールしてください。pyenvインストールbrew install pyenvこの後の設定はshellごとに書式が異なるので、まずはshellを確認します。
shell確認echo $SHELL画面に表示されたshellに合わせて、下記コマンドを実行します。
bashの場合echo 'eval "$(pyenv init -)"' >> ~/.bash_profile source ~/.bash_profilezshの場合echo 'eval "$(pyenv init -)"' >> ~/.zshrc source ~/.zshrcfishの場合echo 'pyenv init - | source' >> ~/.config/fish/config.fish source ~/.config/fish/config.fishその他の場合知りません…miniconda導入
以下のコマンドを入力して、インストール可能なminicondaバージョンを確認します。
インストール可能なminiconda一覧の取得pyenv install -l | grep miniconda3. -------------------------------------------------- miniconda3-latest miniconda3-2.2.2 miniconda3-3.0.0 (中略) miniconda3-4.7.10 miniconda3-4.7.12今回は、
miniconda3-4.7.12をインストールします。
miniconda3-latestは最新版のエイリアスなので、こちらでも問題ないです。minicondaのインストールpyenv install miniconda3-4.7.10 -------------------------------------------------- Downloading Miniconda3-4.7.10-Linux-x86_64.sh... -> https://repo.anaconda.com/miniconda/Miniconda3-4.7.10-Linux-x86_64.sh Installing Miniconda3-4.7.10-Linux-x86_64... (中略) Preparing transaction: done Verifying transaction: done Executing transaction: doneパッケージ導入
この手順では以下のパッケージを導入していきます。
package version python 3.7.9 numpy 1.17.1 scipy 1.5.2 matplotlib 3.3.2 scikit-learn 0.23.2 pandas 1.1.2 jupyter 1.0.0 jupyter_contrib_nbextensions 0.5.1 tensorflow 2.0.0 tensorflowをanacondaチャンネル、それ以外をconda-forgeチャンネルからインストールします。
パッケージインストールconda install -c conda-forge -y python==3.7.9 numpy==1.17.1 scipy==1.5.2 matplotlib==3.3.2 scikit-learn==0.23.2 pandas==1.1.2 jupyter==1.0.0 jupyter_contrib_nbextensions==0.5.1 conda install -c anaconda -y tensorflow==2.0.0Linux の場合
pyenv導入
githubからpyenvをインストールします。
インストールというよりはクローンするだけです。pyenvインストールgit clone https://github.com/pyenv/pyenv.git ~/.pyenvこの後の設定はshellごとに書式が異なるので、shellを確認します。
shell確認echo $SHELL画面に表示されたshellに合わせて、下記コマンドを実行します。
bashの場合echo 'export PYENV_ROOT="$HOME/.pyenv"' >> ~/.bash_profile echo 'export PATH="$PYENV_ROOT/bin:$PATH"' >> ~/.bash_profile echo 'if command -v pyenv 1>/dev/null 2>&1; then eval "$(pyenv init -)" fi' >> ~/.bash_profile source ~/.bash_profilezshの場合echo 'export PYENV_ROOT="$HOME/.pyenv"' >> ~/.zshrc echo 'export PATH="$PYENV_ROOT/bin:$PATH"' >> ~/.zshrc echo 'if command -v pyenv 1>/dev/null 2>&1; then eval "$(pyenv init -)" fi' >> ~/.zshrc source ~/.zshrcfishの場合set -Ux PYENV_ROOT $HOME/.pyenv set -Ux fish_user_paths $PYENV_ROOT/bin $fish_user_paths echo 'pyenv init - | source' >> ~/.config/fish/config.fish source ~/.config/fish/config.fishその他の場合正直、fish以外はどうでもいいです…miniconda導入
以下のコマンドを入力して、インストール可能なminicondaバージョンを確認します。
インストール可能なminiconda一覧の取得pyenv install -l | grep miniconda3. -------------------------------------------------- miniconda3-latest miniconda3-2.2.2 miniconda3-3.0.0 (中略) miniconda3-4.7.10 miniconda3-4.7.12今回は、
miniconda3-4.7.12をインストールします。
miniconda3-latestは最新版のエイリアスなので、こちらでも問題ないです。minicondaのインストールpyenv install miniconda3-4.7.10 -------------------------------------------------- Downloading Miniconda3-4.7.10-Linux-x86_64.sh... -> https://repo.anaconda.com/miniconda/Miniconda3-4.7.10-Linux-x86_64.sh Installing Miniconda3-4.7.10-Linux-x86_64... (中略) Preparing transaction: done Verifying transaction: done Executing transaction: doneパッケージ導入
この手順では以下のパッケージを導入していきます。
package version python 3.7.9 numpy 1.17.1 scipy 1.5.2 matplotlib 3.3.2 scikit-learn 0.23.2 pandas 1.1.2 jupyter 1.0.0 jupyter_contrib_nbextensions 0.5.1 tensorflow-gpu 2.2.0 [GPU無しの場合] tensorflow 2.2.0 tensorflowをanacondaチャンネル、それ以外をconda-forgeチャンネルからインストールします。
パッケージインストールconda install -c conda-forge -y python==3.7.9 numpy==1.17.1 scipy==1.5.2 matplotlib==3.3.2 scikit-learn==0.23.2 pandas==1.1.2 jupyter==1.0.0 jupyter_contrib_nbextensions==0.5.1 conda install -c anaconda -y tensorflow-gpu==2.2.0以上で、Tensorflow,Kerasなど安定して動くと思います。
その他、私が個人的に使うライブラリ(一部)
package version channel pywavelets 1.1.1 conda-forge mne 0.19.2 conda-forge peakutils 1.3.3 conda-forge lightgbm 3.1.0 conda-forge 周囲から頂いた質問
- なぜanacondaではなくminiconda? →最新のanacondaを導入すると、同梱パッケージの一部がtensorflow等に対応しておらず、結局一部の同梱物をアンインストールしないといけませんでした。それならはじめから最低限のconda環境を持つminicondaのほうが便利です。
- なぜconda系? → pip管理よりも、conda管理のほうがパッケージ同士の衝突が少ないため。さらに必要であればcudaなどの関連パッケージを自動でインストールしてくれるため。またpip管理よりもconda管理のほうがnumpyが速い(らしい)ため。詳しくはこちら
- pytorchは入れない? →私はKerasの設計思想のほうが好きなので、、
- 投稿日:2020-11-26T14:11:35+09:00
CartPoleゲームでDenseとLSTMを比較
はじめに
OpenAI GymのCartPoleゲームでDenseとLSTMネットワークの効果を比較します。
OpenAIからお借りしたイメージ
https://gym.openai.com/videos/2019-10-21--mqt8Qj1mwo/CartPole-v1/poster.jpg今回はTensorflowを使って、low-levelカスタマイズもあるので、前回 (Actor-Criticモデル強化学習でブロック崩しを挑戦 https://qiita.com/leolui2013/items/b2c5dbc19be5d025c176) より少し難しくなります。(自動微分と勾配テープ、トレーニングループの詳しい説明はTensorflowのドキュメンテーションにありますのでそちらに参考すると分かりやすいと思います。 https://www.tensorflow.org/guide/autodiff , https://www.tensorflow.org/guide/basic_training_loops )
モデルはA2C (Advantage Actor Critic)で、DenseとLSTMを比較するのでネットワークの構成以外にほとんどの変数が同じです。なぜ比較するかと、一番簡単な強化学習モデルはDenseネットワーク(画像ならCNN)だけど、その学習プロセスは1観察データに対して1予測アクションです。そしてLSTMは1シリーズの観察データを入力できますので、より複雑な問題を解けられると思います。ただしその反面は、1シリーズのデータを学習するために、かかる時間が何倍になると予想されます。
この記事は7月にGithubに投稿した記事に基づいて作成します。
https://github.com/leolui2004/cartpole_model_compareやり方
強化学習の部分は一番複雑です。分かりやすくしたいのでclassにします。最初はdenseネットワークのコードを紹介します。
import tensorflow as tf
tf.keras.backend.set_floatx('float32')
import numpy as np

discount = 0.97
model_lr = 0.0001 # 学習率

class ActorCriticModel:
    def __init__(self, ActionNumber):
        self.ActionNumber = ActionNumber
        self.model = self.dense_model()
        self.opt = tf.keras.optimizers.Adam(model_lr) # 今回はAdamを使う

    # Dense層を構築
    def dense_model(self):
        input = tf.keras.layers.Input((4,))
        layer1 = tf.keras.layers.Dense(128, activation='linear')(input)
        layer2 = tf.keras.layers.Dense(32, activation='linear')(layer1)
        logits = tf.keras.layers.Dense(self.ActionNumber)(layer2) # actor部分
        value = tf.keras.layers.Dense(1)(layer2) # critic部分
        return tf.keras.Model(inputs=[input], outputs=[logits, value])

    # アクションを予測する時logitsだけ必要
    def predict(self, input):
        logits, _ = self.model.predict(input)
        return logits

    # ロス関数を定義
    def compute_loss(self, done, state_, memory):
        # ゲーム終了していないと観察データ(state)を取得して使う
        if done:
            reward_sum = 0.
        else:
            reward_sum = self.model(tf.convert_to_tensor(state_, dtype=tf.float32))[-1][0]

        # 報酬を加算
        discounted_rewards = []
        for reward in memory.rewards[::-1]:
            reward_sum = reward + discount * reward_sum
            discounted_rewards.append(reward_sum)
        discounted_rewards.reverse()

        # A2Cのadvantageを考慮して全体ロスを計算
        logits, values = self.model(tf.convert_to_tensor(np.vstack(memory.states), dtype=tf.float32))
        advantage = discounted_rewards - values
        value_loss = advantage ** 2

        policy = tf.nn.softmax(logits)
        entropy = tf.nn.softmax_cross_entropy_with_logits(labels=policy, logits=logits)

        policy_loss = tf.nn.sparse_softmax_cross_entropy_with_logits(labels=memory.actions[0], logits=logits)
        policy_loss *= tf.stop_gradient(advantage)
        policy_loss -= 0.01 * entropy
        total_loss = tf.reduce_mean((0.5 * value_loss + policy_loss))
        return total_loss

    # 勾配テープでトレーニング
    def train(self, done, state_, memory):
        state_ = tf.convert_to_tensor(state_, dtype=tf.float32)
        with tf.GradientTape() as tape:
            loss = self.compute_loss(done, state_, memory)
        grads = tape.gradient(loss, self.model.trainable_variables)
        self.opt.apply_gradients(zip(grads, self.model.trainable_variables))


    def action_choose(self, state):
        logits = self.model.predict(state)
        # 予想したlogits(合計1ではない)を確率(合計1)に転換
        probs = np.exp(logits[0][0])/sum(np.exp(logits[0][0]))
        # 確率に基づいてアクションを選ぶ
        action = np.random.choice(self.ActionNumber, p=probs)
        return action
そしてより簡単に途中で観察データを保存、削除するためにMemoryというclassを作成します。
class Memory:
    # 定義
    def __init__(self):
        self.states = []
        self.actions = []
        self.rewards = []

    # 保存
    def store(self, state, action, reward):
        self.states.append(state)
        self.actions.append(action)
        self.rewards.append(reward)

    # 削除
    def clear(self):
        self.states = []
        self.actions = []
        self.rewards = []
次はゲームプレーの部分です。前回と違った部分は主に最初のランダムアクションがなくなりました。前回説明したことも省略します。
import gym
import matplotlib.pyplot as plt

env = gym.make('CartPole-v0')
episode_limit = 1000
score_avg_freq = 20
score_list = []

# モデルやメモリclassを作成
ACM = ActorCriticModel(2) # CartPoleは左右アクションだけなので2にする
memory = Memory()

for episode in range(episode_limit):
    # 環境を初期化
    state_list, state_next_list, action_list = [], [], []
    score, score_memory, timestep = 0, 0, 0
    memory.clear()
    done = False
    observation = env.reset()
    state = observation

    while not done:
        timestep += 1
        # アクションを予測
        action = ACM.action_choose(np.array(state)[np.newaxis, :])
        observation_next, reward, done, info = env.step(action)

        state_next = observation_next
        state_list.append(state)
        state_next_list.append(state_next)
        action_list.append(action)

        score += reward
        score_memory += reward
        state = state_next

        # ゲーム終了もしくは10ステップごとにメモリに保存
        if done or timestep == 10:
            memory.store(np.array(state_list), np.array(action_list), score_memory)
            if score_memory > 8:
                ACM.train(done, np.array(np.array(state_next)[None, :]), memory)
            state_list, state_next_list, action_list = [], [], []
            score_memory, timestep = 0, 0
            memory.clear()
            if done:
                score_list.append(score)
                print('Episode {} Score {}'.format(episode + 1, score))

env.close()

score_avg_list = []
for i in range(1, episode_limit + 1):
    if i < score_avg_freq:
        score_avg_list.append(np.mean(score_list[:]))
    else:
        score_avg_list.append(np.mean(score_list[i - score_avg_freq:i]))
plt.plot(score_avg_list)
plt.show()
最後にLSTMネットワークのコードを書きたいですがほぼ同じなので違った部分だけ書きます。
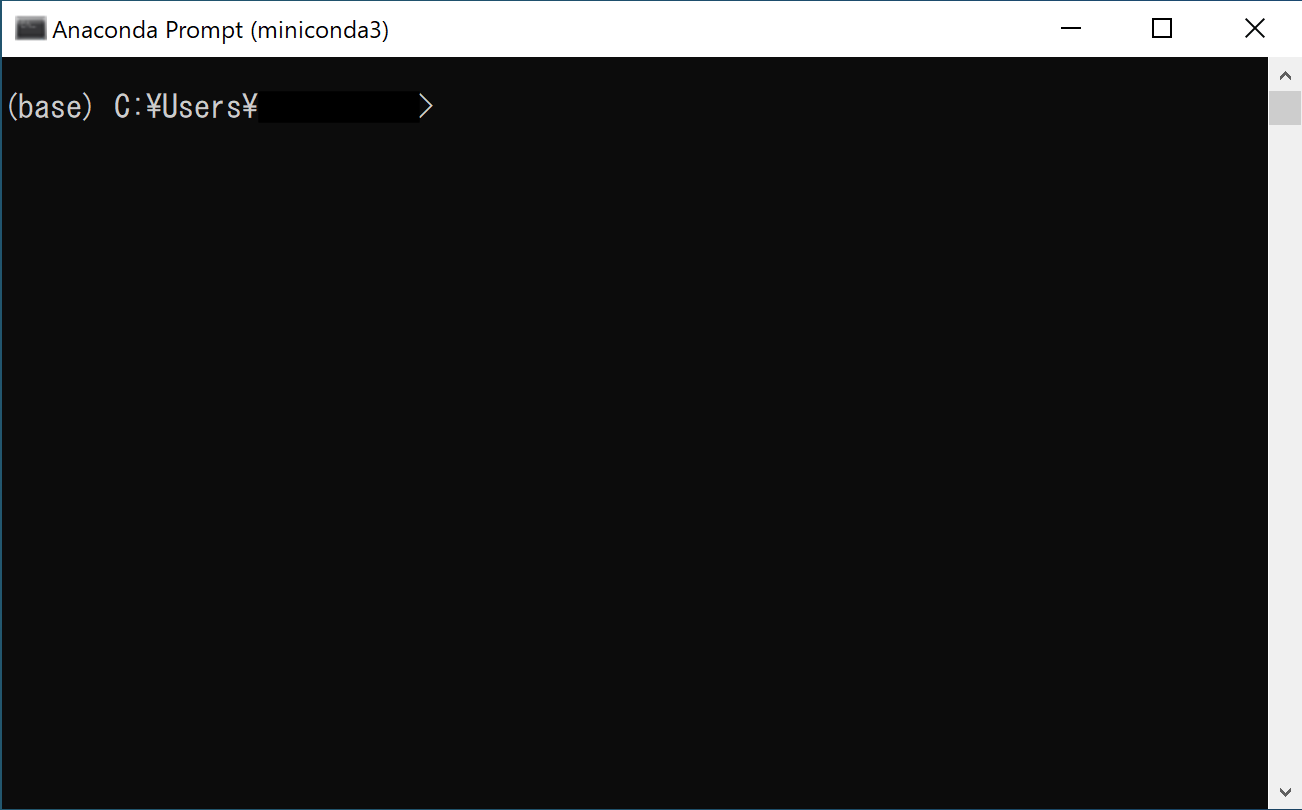
# Denseネットワークの回数は1000回に対してLSTMの方が遥かに多い
episode_limit = 30000
score_avg_freq = 700

# class定義の部分とネットワークの構成も当然違う
self.model = self.lstm_model()

def lstm_model(self):
    input = tf.keras.layers.Input((2, 2))
    # LSTMは基本不安定なので安定させるために3階層と適当なDropoutが必要
    layer1 = tf.keras.layers.LSTM(32, return_sequences=True)(input)
    layer2 = tf.keras.layers.Dropout(0.2)(layer1)
    layer3 = tf.keras.layers.LSTM(64, return_sequences=True)(layer2)
    layer4 = tf.keras.layers.Dropout(0.2)(layer3)
    layer5 = tf.keras.layers.LSTM(128)(layer4)
    layer6 = tf.keras.layers.Dropout(0.2)(layer5)
    layer7 = tf.keras.layers.Dense(64, activation='linear')(layer6)
    layer8 = tf.keras.layers.Dense(32, activation='linear')(layer7)
    layer9 = tf.keras.layers.Dense(16, activation='linear')(layer8)
    logits = tf.keras.layers.Dense(self.ActionNumber)(layer9)
    value = tf.keras.layers.Dense(1)(layer9)
    return tf.keras.Model(inputs=[input], outputs=[logits, value])

# 観察データをシリーズに変換するためにエンコード関数を導入
def encode(a):
    b = [[0,0],[0,0]]
    b[0] = a[0:2]
    b[1] = a[2:]
    return b

state = encode(observation)
state_next = encode(observation_next)
結果
結果はこちらです。1枚目はDense層だけ使いました。2枚目はLSTM層を使いました。X軸訓練回数はDenseの方が1000回、LSTMの方が30000回です。Y軸はスコアです。
結論から言うと、LSTMは学習することが可能です。ただし効果が出るまでにこんなゲームにも10倍以上の訓練回数が必要とみられます。
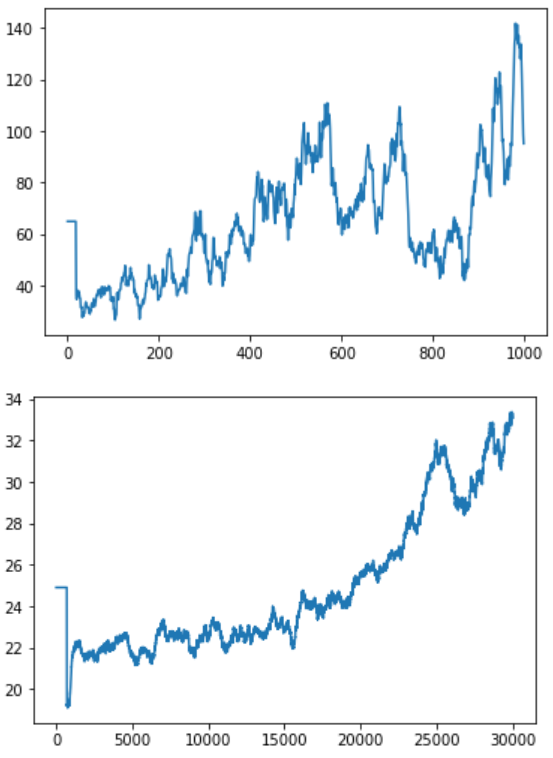
もう一つ
Denseの方を訓練する時この結果が出たことがあります。
これはCatastrophic Forgetting (破滅的忘却?) と言います。実際の理由は不明だけど、途中ですべて学習したことを忘れたら単に訓練回数を上げても解決できないです。この不安定の結果を解消するためにLSTMを推奨すると言われます。

- 投稿日:2020-11-26T10:13:28+09:00
Google ColabのTPU環境でImageDataGeneratorライクなデータ拡張を実現する
はじめに
Keras使用者はImageDataGenaratorを使ってデータ拡張を行うことが一般的なはずだが、TPU環境ではImageDataGeneratorが直接使えない。
そこで、tf.data.Datasetにmapとして適用する関数を各種用意した。ImageDataGenaratorのほぼすべての機能に対応しているが、data_formatは'channels_last'を前提としている。
環境は、TensorFlow(2.3.0)/tf.keras(2.4.0)。基本機能のみ
とりあえずflipとshiftだけあれば良い場合に使う。
パラメータはImageDataGeneratorと同じなので説明は省略。
ただし、fill_modeは'constant'と'reflect'しか使えない。import tensorflow as tf @tf.function def simple_augmentation(images, rescale = 1.0, width_shift_range=0., height_shift_range=0., horizontal_flip=False, vertical_flip=False, cval=0.0, fill_mode='constant' ): img_shape = images.shape[-3:] if rescale != 1.0: images *= rescale if horizontal_flip: images = tf.image.random_flip_left_right(images) if vertical_flip: images = tf.image.random_flip_up_down(images) if width_shift_range != 0 or height_shift_range != 0: width_shift = int(img_shape[1] * width_shift_range) height_shift = int(img_shape[0] * height_shift_range) pad = tf.constant([[0, 0], [height_shift, height_shift], [width_shift, width_shift], [0, 0]]) images = tf.pad(images, pad, mode=fill_mode, constant_values=cval) images = tf.map_fn(lambda image: tf.image.random_crop(image, size=[img_shape[0], img_shape[1], img_shape[2]]), images) return images色変更
ImageDataGeneratorのbrightness_rangeやchannel_shift_rangeのように明るさや色彩を変更したい場合に使う。
ただし、channel_shift_rangeは謎仕様で使いづらいので、別の機能で置き換える。
コントラスト/彩度/色相も変化させられるので、結果的にImageDataGeneratorより高機能になっている。
引数の効果等はtf.imageのオンラインヘルプの該当する項目参照のこと。
tf.imageの内部処理的に色情報は0.0~1.0の範囲でないと機能しないようなので、0~255の画像の場合はrescaleを設定するか、事前に変換したほうが良い。
当然ながら、モノクロ画像ではhueやsaturationは変更できない。@tf.function def color_augmentation(images, rescale = 1.0, brightness_range=0.0, hue_range=0.0, contrast_range=[1.0,1.0], saturation_range=[1.0,1.0], clip_range=[0.,1.] ): if rescale != 1.0: images *= rescale if (images.get_shape()[-1] == 1): hue_range = 0.0 saturation_range = [1.0,1.0] if hue_range>0.5: hue_range=0.5 def color_aug(image): if brightness_range != 0.0: image = tf.image.random_brightness(image, brightness_range) if hue_range != 0.0: image = tf.image.random_hue(image, hue_range) if saturation_range[0] != saturation_range[1]: image = tf.image.random_saturation(image,saturation_range[0], saturation_range[1]) if contrast_range[0] != contrast_range[1]: image = tf.image.random_contrast(image, contrast_range[0], contrast_range[1]) if clip_range[0] != clip_range[1]: image = tf.clip_by_value(image, clip_range[0], clip_range[1]) return image images = tf.map_fn(lambda image: color_aug(image), images) return images変形
回転や拡大縮小のように画像を変形させたい場合に使う。基本機能として実装した機能も含んでいる。
アフィン変換のためにtensorflow-addonsを使用しているが、記事作成時のGoogle Colab環境ではupgradeが必要になるので、事前に!pip install --upgrade tensorflow-addonsをセルで実行しておく。(upgrade後はtensorflow_addonsは0.11.2以上になるはず)パラメータはImageDataGeneratorと同じなので説明は省略。
入力画像が正方形(widthとheightが同じ)であることが前提なので注意。
記事作成時でのtensorflow_addonsでtransformがfill_modeを実装していないためpaddingの処理が必要になっているが、将来的にはfill_modeが実装されるはずなので、その場合はもう少し簡単なコードにできる。@tf.function def transform_augmentation(images, rescale=1.0, zoom_range=[1.,1.], rotation_range=0., shear_range=0., interpolation='BILINEAR', width_shift_range=0., height_shift_range=0., horizontal_flip=False, vertical_flip=False, fill_mode='constant', cval=0.0 ): if rescale!=1.0: images = images*rescale if isinstance(zoom_range,float): zoom_lower = 1.0-zoom_range zoom_upper = 1.0+zoom_range else: zoom_lower, zoom_upper = zoom_range if shear_range>45.0: shear_range = 45 if width_shift_range>0.5: width_shift_range=0.5 if height_shift_range>0.5: height_shift_range=0.5 if zoom_upper>1.5: zoom_upper = 1.5 img_width = images.get_shape()[1] center = img_width/2 if fill_mode.lower()=='constant': fill_mode_no=0 else: fill_mode_no=1 margin = 0 if fill_mode_no == 1 or cval != 0.0: expand = 1.0 if shear_range != 0.0: expand += math.tan(shear_range*3.141519/180) if rotation_range != 0.0: expand *= math.sqrt(2) expand *= zoom_upper margin += int(center*expand - center) shift_max = int(max((width_shift_range*img_width, height_shift_range*img_width))) margin+=shift_max if margin >= img_width: margin=img_width-1 center = center+float(margin) def transform(image): angle = tf.random.uniform(shape=[], minval=-rotation_range, maxval=rotation_range)*3.141519/180 if horizontal_flip: mirror_x = tf.cast(tf.random.uniform(shape=[], minval=0, maxval=2, dtype=tf.dtypes.int32)*2-1, tf.float32) else: mirror_x = 1.0 if vertical_flip: mirror_y = tf.cast(tf.random.uniform(shape=[], minval=0, maxval=2, dtype=tf.dtypes.int32)*2-1, tf.float32) else: mirror_y = 1.0 zoom_x = tf.random.uniform(shape=[], minval=zoom_lower, maxval=zoom_upper) zoom_y = tf.random.uniform(shape=[], minval=zoom_lower, maxval=zoom_upper) width_shift = tf.random.uniform(shape=[], minval=-width_shift_range, maxval=width_shift_range)*img_width height_shift = tf.random.uniform(shape=[], minval=-height_shift_range, maxval=height_shift_range)*img_width shear_val = tf.random.uniform(shape=[], minval=-shear_range, maxval=shear_range)*3.141519/180 if fill_mode_no == 1: image = tf.pad(image, tf.constant([[margin, margin], [margin, margin], [0, 0]]), mode="REFLECT") elif cval != 0.0: image = tf.pad(image, tf.constant([[margin, margin], [margin, margin], [0, 0]]), mode="CONSTANT", constant_values=cval) sinval = tf.sin(angle) cosval = tf.cos(angle) center_mat = [1.0, 0.0, center, 0.0, 1.0, center, 0.0, 0.0] shear_mat=[1.0, 0.0, 0.0, tf.tan(shear_val), 1.0, 0.0, 0.0, 0.0] rotate_mat = [cosval, -sinval, 0.0, sinval, cosval, 0.0, 0.0, 0.0] zoom_mat = [zoom_x*mirror_x, 0.0, 0.0, 0.0, zoom_y*mirror_y, 0.0, 0.0, 0.0] center_mat_inv = [1.0, 0.0, width_shift-center, 0.0, 1.0, height_shift-center, 0.0, 0.0] matrix = [center_mat, shear_mat, rotate_mat, zoom_mat, center_mat_inv] composed_matrix = tfa.image.transform_ops.compose_transforms(matrix) image = tfa.image.transform(image, composed_matrix, interpolation=interpolation) if fill_mode_no == 1 or cval != 0.0: image = tf.image.resize_with_crop_or_pad(image, img_width, img_width) return image images = tf.map_fn(lambda image: transform(image), images) return images標準化
NormalizationやWhiteningの機能が必要な場合に使う。
ImageDataGeneratorでは事前にfitが必要なので、こちらではクラス化してインスタンス作成時にfit処理を実行している。
こちらはTrainingデータだけではなくValidationデータにも適用しないといけないので注意。import numpy as np import tensorflow as tf import scipy from scipy import linalg class ImageStandardization(): def __init__(self, x, rescale = 1.0, samplewise_center=False, samplewise_std_normalization=False, featurewise_center=False, featurewise_std_normalization=False, zca_whitening=False, zca_epsilon=1e-6 ): self.samplewise_center = samplewise_center self.samplewise_std_normalization = samplewise_std_normalization self.rescale = rescale if zca_whitening: featurewise_center = True featurewise_std_normalization = False if featurewise_std_normalization: featurewise_center = True if self.samplewise_std_normalization: self.samplewise_center = True x = np.array(x, dtype=np.float32) if self.rescale != 1.0: x *= self.rescale broadcast_shape = [1, 1, x.shape[3]] if featurewise_center: self.mean = np.mean(x, axis=(0, 1, 2)) self.mean = np.reshape(self.mean, broadcast_shape) x -= self.mean else: self.mean = None if featurewise_std_normalization: self.std = np.std(x, axis=(0, 1, 2)) self.std = np.reshape(self.std, broadcast_shape) x /= (self.std + 1e-6) else: self.std = None if zca_whitening: flat_x = np.reshape( x, (x.shape[0], x.shape[1] * x.shape[2] * x.shape[3])) sigma = np.dot(flat_x.T, flat_x) / flat_x.shape[0] u, s, _ = linalg.svd(sigma) s_inv = 1. / np.sqrt(s[np.newaxis] + zca_epsilon) self.principal_components = (u * s_inv).dot(u.T) self.flatshape = (-1, np.prod(x.shape[-3:])) self.shape = (-1, x.shape[1], x.shape[2], x.shape[3]) else: self.principal_components = None @tf.function def standardize(self, x): if self.rescale != 1.0: x *= self.rescale if self.samplewise_center: def center(image): mean = tf.math.reduce_mean(image, axis=None, keepdims=True) image -= mean return image x = tf.map_fn(lambda image: center(image), x) if self.samplewise_std_normalization: def normalize(image): std = tf.math.reduce_std(image, axis=None, keepdims=True) image *= 1./(std + 1e-6) return image x = tf.map_fn(lambda image: normalize(image), x) if self.mean is not None: x -= self.mean if self.std is not None: x /= (self.std + 1e-6) if self.principal_components is not None: flatx = tf.reshape(x, self.flatshape) whitex = tf.tensordot(flatx, tf.convert_to_tensor(self.principal_components), axes=1) x = tf.reshape(whitex, self.shape) return x使用例
batch_size設定後にmapで適用することを想定している。
下記のように連続して呼び出すこともできる。rescaleを使う場合は一度だけにすること。
uint8の画像が入力されることを想定。rescaleはtransform_augmentationだけで実施している。def filter_img(images): images = tf.cast(images, tf.float32) images = transform_augmentation(images, rescale=1.0/255.0, rotation_range=30, shear_range=30, zoom_range=[0.8, 1.2], horizontal_flip=True, width_shift_range=0.1, height_shift_range=0.1, fill_mode='REFLECT') images = color_augmentation(images, hue_range=0.1, brightness_range=0.2, saturation_range=[0.8,1.2], contrast_range=[0.8,1.2]) return images ds = tf.data.Dataset.from_tensor_slices((x,y)).repeat().batch(batch_size) ds = ds.map(lambda image, label: (filter_img(image), tf.cast(label, tf.float32)))以下は、標準化の使用例。
uint8の画像が入力されることを想定している。Standardizationを他のAugumentationと同時利用する場合はrescaleは使用するとちょっと面倒なので、生成時にデータを渡す際に255で割っておき、filter_img内でも同じ操作をしている。単体で使う場合はrescaleを使用しても問題ない。std = ImageStandardization(x/255.0, zca_whitening=True) def filter_img(images): images = tf.cast(images, tf.float32)/255.0 # cast & rescale images = simple_augmentation(images, horizontal_flip=True, width_shift_range=0.1, height_shift_range=0.1) images = std.standardize(images) return images ds = tf.data.Dataset.from_tensor_slices((x,y)).repeat().batch(batch_size) ds = ds.map(lambda image, label: (filter_img(image), tf.cast(label, tf.float32)))実験用のColabノートブックはこちら
CIFAR100出力サンプル(元画像と拡張後の画像を上下に連結している)
参考
TensorFlow & TensorFlow Addons
https://www.tensorflow.org/api_docs/python/tf
https://www.tensorflow.org/addons/api_docs/python/tfaImageDataGenerator
https://github.com/keras-team/keras-preprocessing/blob/master/keras_preprocessing/image/image_data_generator.pyアフィン変換関係
https://qiita.com/koshian2/items/c133e2e10c261b8646bf
https://imagingsolution.blog.fc2.com/blog-entry-284.html

- 投稿日:2020-11-26T01:00:24+09:00
gcp上でTensorFlowをGPU実行
概要
画像系の機械学習のために、gcpでGPU環境を構築し、TensorFlowを実行しました。
今回はその備忘録です。前提条件
- gcpアカウントがあること
- プロジェクト作成されていること
- GPU割り当て申請がされていること
- ※ここは色々面倒だったので後述します。
GPUの割り当て申請
gcpでGPU使用するには初回のみ申請が必要です。
下記2つの申請が必要です。
- グローバル GPU 割り当て
- 使用リージョンのGPUモデルに対する割り当て
自分の場合、
1回目に使用リージョンのGPUモデルに対する割り当て
リージョン GPUモデル asia-east1 tesla K80 2回目にグローバル GPU 割り当て
GPUs (all regions)をそれぞれ出しています。
1度の申請でまとめて出すことも可能なようです。申請方法ですが、既に詳細に説明されてる記事があったので、
そちらを紹介させて頂きます。ちなみにですが、
自分は申請してないtesla V100の上限もいつのまにか1になっており、
起動することもできました。
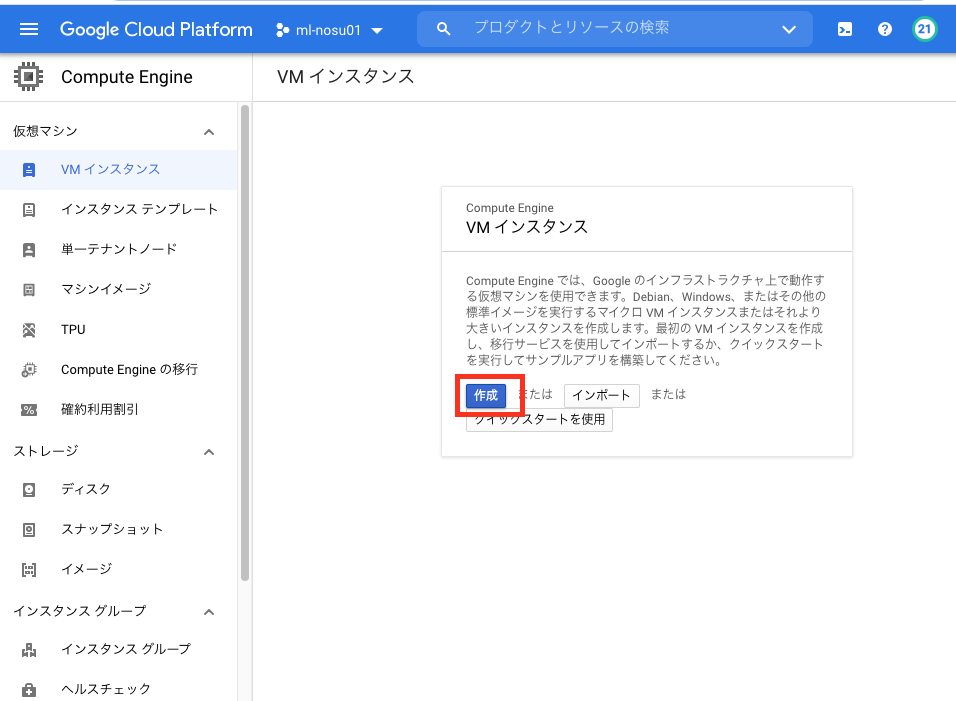
正直GPU割り当てについては手探りでやったので良く分かってません。インスタンス作成(コンソールの場合)
Compute engine -> VMインスタンス
から「作成」をクリック。
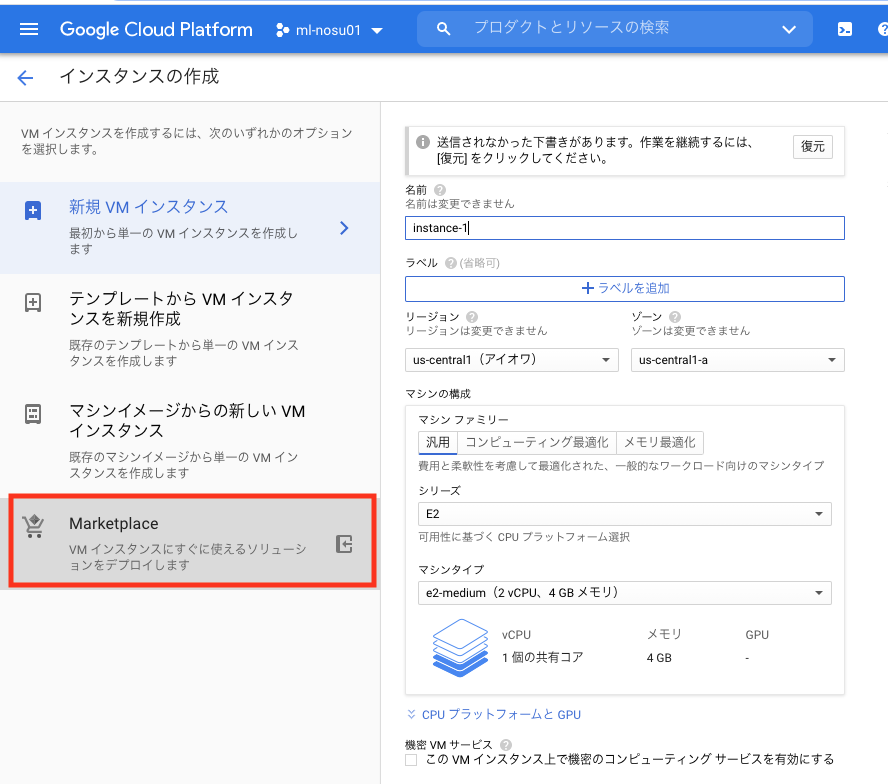
その後、MarketPlaceをクリック。
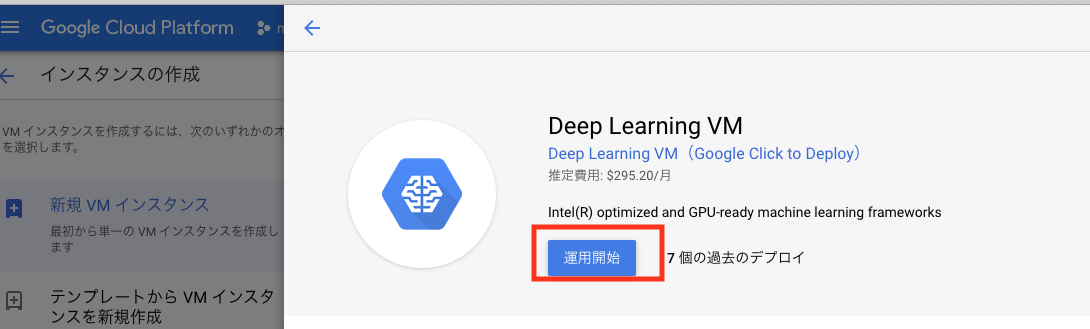
テキストフィールドに「deep learning vm」と入力し、一番先頭に表示されるイメージをクリックします。
適用開始
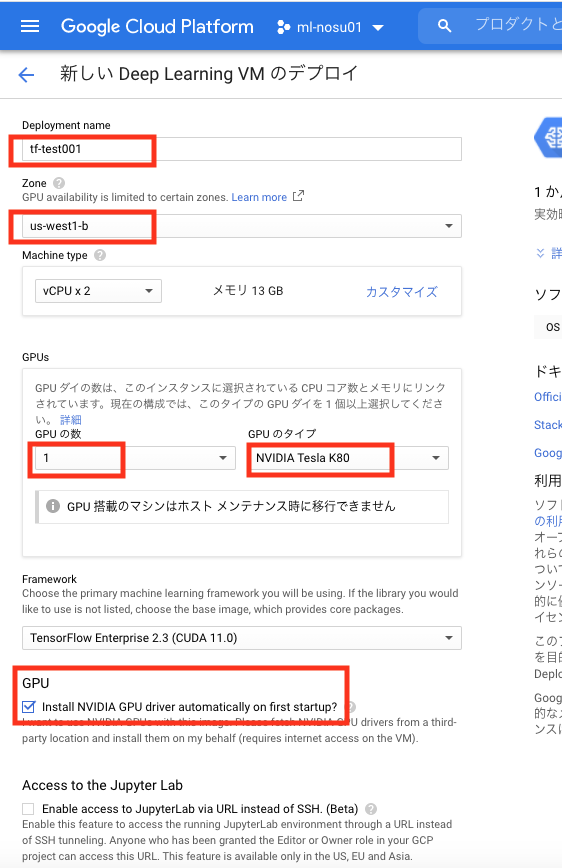
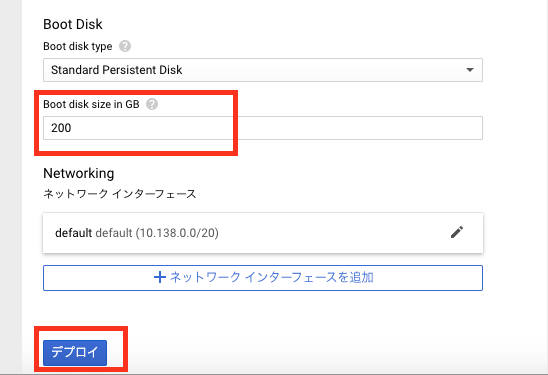
一部の設定を変更後に「デプロイ」をクリックして、インスタンスを起動します。
項目名 設定例 備考 Deployment name tf-test001 インスタンス名です Zone us-west1-b リージョン(us-west1)はGPU割り当て申請時のところにしてください。ゾーン(b)は起動したいGPUがあるところにしてください。ゾーンによっては起動できないGPUがあります GPUの数 1 そのまま GPUのタイプ Tesla K80 特に理由がなければv100以外で選ぶのをおすすめします。v100は人気だからなのかたまにデプロイに失敗することがあります NVIDIA GPUドライバ チェック インスタンス起動時にNVIDIA GPUドライバを自動でインストールするかどうかです。自前で特殊なドライバを入れる場合以外はチェックを入れたほうがいいと思います。 Boot disk size 200 インスタンスのディスクサイズです。200Gより小さいと、起動後にパフォーマンスが下がると警告が出るので基本200で
インスタンス作成(CLIの場合)
CLIで同様にする場合は下記になります。
export IMAGE_FAMILY="tf2-2-3-cu110"
export ZONE="us-west1-b"
export INSTANCE_NAME="tf-test001"
export BOOT_DISK_SIZE="200GB"
export MACHINE_TYPE="n1-highmem-2"
gcloud compute instances create $INSTANCE_NAME \
 --zone=$ZONE \
 --image-family=$IMAGE_FAMILY \
 --image-project=deeplearning-platform-release \
 --maintenance-policy=TERMINATE \
 --accelerator='type=nvidia-tesla-k80,count=1' \
 --metadata='install-nvidia-driver=True' \
 --boot-disk-size=$BOOT_DISK_SIZE \
 --machine-type=$MACHINE_TYPE
ブラウザウィンドウでSSH接続
起動後、しばらく待つと
Compute engine -> VMインスタンス一覧にインスタンスが表示されます。
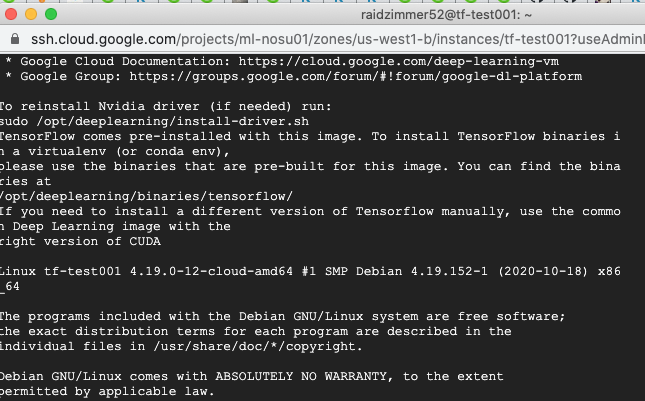
SSH -> ブラウザウィンドウで開く をクリック。
するとSSHのウィンドウが表示されます。
GPUドライバの確認
インスタンス起動時にNVIDIA GPUドライバをインストールするに
チェックを入れて起動したので、すでにNVIDIA GPUドライバがインストールされています。
nvidia-smiコマンドで確認してみますGPUドライバ入ってる場合
$ nvidia-smi
Tue Nov 24 15:42:42 2020
+-----------------------------------------------------------------------------+
| NVIDIA-SMI 450.51.06    Driver Version: 450.51.06    CUDA Version: 11.0     |
|-------------------------------+----------------------+----------------------+
| GPU  Name        Persistence-M| Bus-Id        Disp.A | Volatile Uncorr. ECC |
| Fan  Temp  Perf  Pwr:Usage/Cap|         Memory-Usage | GPU-Util  Compute M. |
|                               |                      |               MIG M. |
|===============================+======================+======================|
|   0  Tesla K80           Off  | 00000000:00:04.0 Off |                    0 |
| N/A   43C    P0    72W / 149W |      0MiB / 11441MiB |    100%      Default |
|                               |                      |                  N/A |
+-------------------------------+----------------------+----------------------+

+-----------------------------------------------------------------------------+
| Processes:                                                                  |
|  GPU   GI   CI        PID   Type   Process name                  GPU Memory |
|        ID   ID                                                   Usage      |
|=============================================================================|
|  No running processes found                                                 |
+-----------------------------------------------------------------------------+
GPUドライバ入ってない場合
$ nvidia-smi
-bash: nvidia-smi: command not found
tensorflow用のdockerを起動する
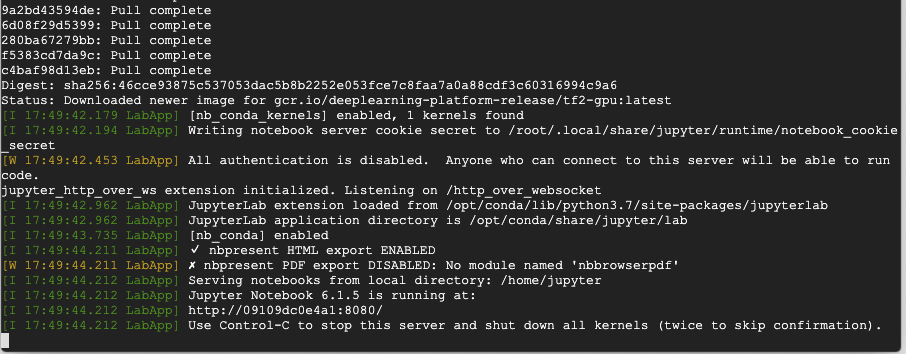
googleが用意したdeep learning向けのコンテナを起動します。
コマンドは下記です。
イメージはdeeplearning-platform-releaseから選びます。
自分はtf2-gpu(tensorflow2向けのGPU用イメージ)を選択してます。docker run -it --rm --name tensorflow-gcp gcr.io/deeplearning-platform-release/tf2-gpu実行後は自動でJupyter Labが起動します。
SSHポートフォワーディングでJupyter Labに接続
SSHポートフォワーディングし、ローカルポートにアクセスするとJupyter Labに繋がるようにします。
$ gcloud compute ssh --zone {インスタンスのゾーン} "{インスタンス名}" -- -N -f -L 28888:localhost:8080
例
gcloud compute ssh --zone us-west1-b "tf-test001" -- -N -f -L 28888:localhost:8080
実行後は
http://localhost:28888でJupyter Labに接続できます。
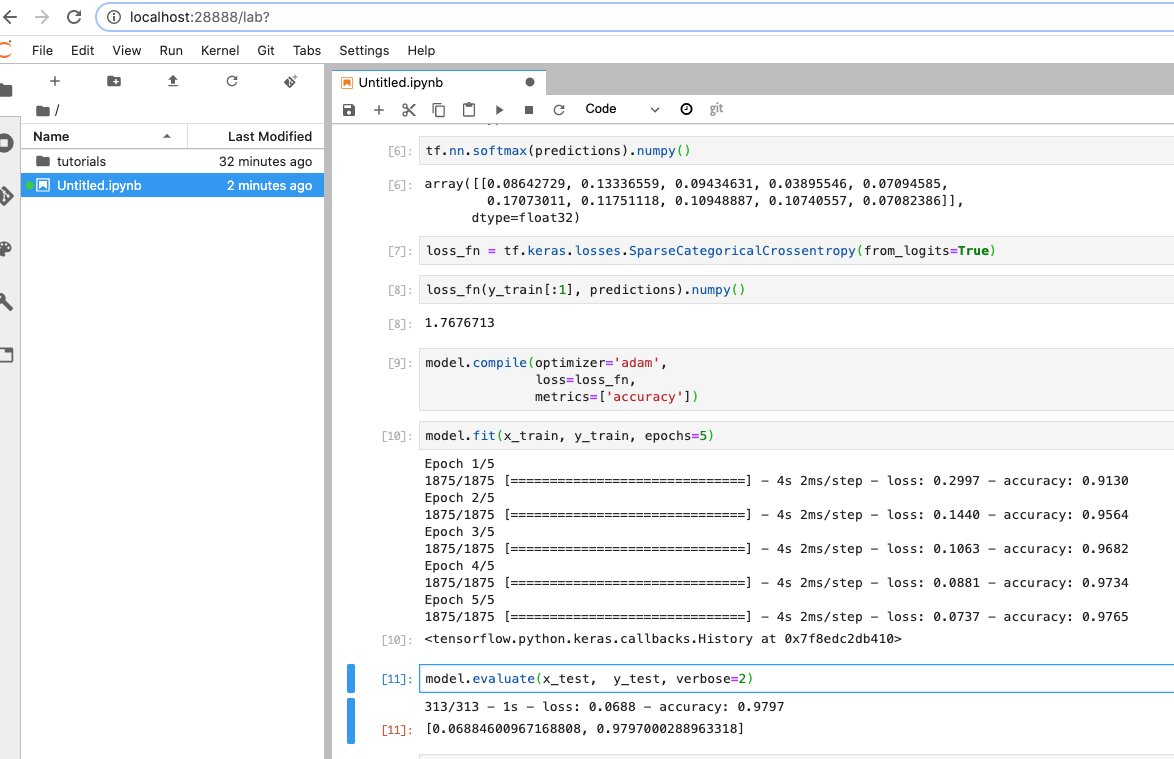
Jupyter Labでtensorflowを実行
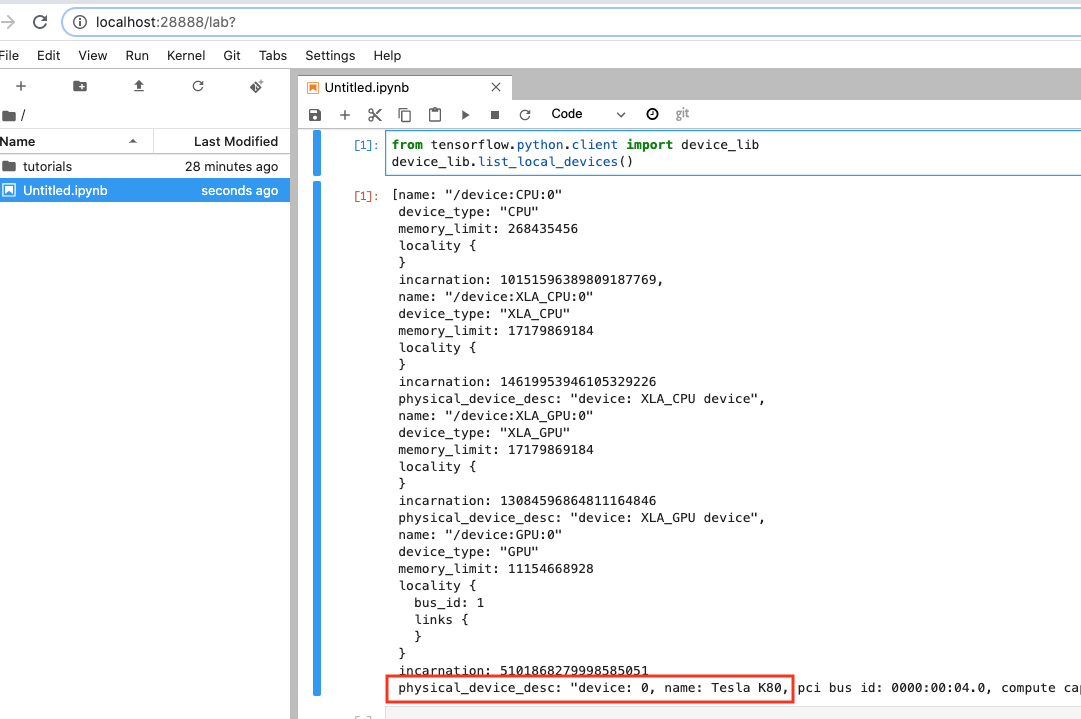
まずは新規のnotebookを作成
次に下記コードでTensorFlowからGPU認識されているか確認します
from tensorflow.python.client import device_lib
device_lib.list_local_devices()
大丈夫そうです。
これでtensorflowをGPU実行できます。
初心者のための TensorFlow 2.0 入門を実行してみました。
その他の参考にした記事