- 投稿日:2020-11-26T21:54:25+09:00
【Android】JavaでSHA256を計算するアプリを作ってみた
雰囲気
なんか、
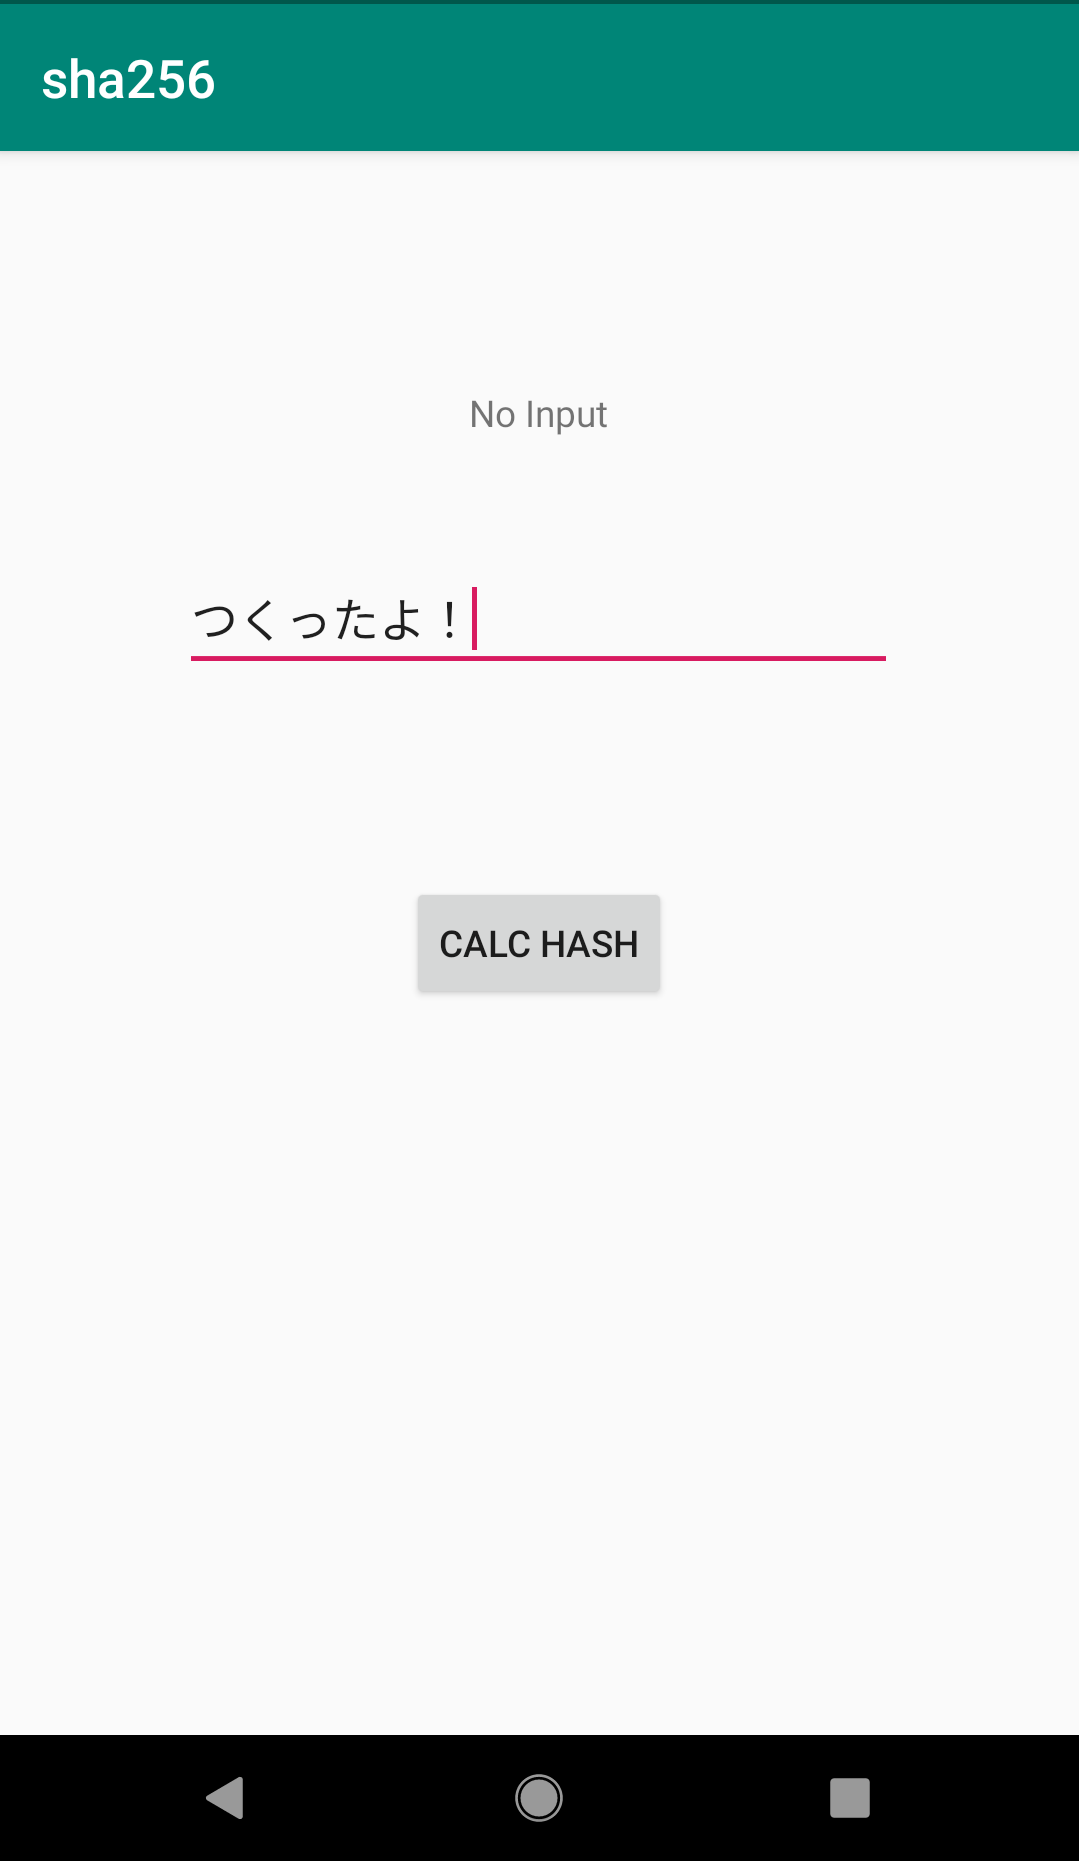
こんな感じで動く。
環境
Windows10
AndroidStudio 3.5.0.0
Android SDK 26.1.1
(Pixel OS10で動作確認)MainActivity.java
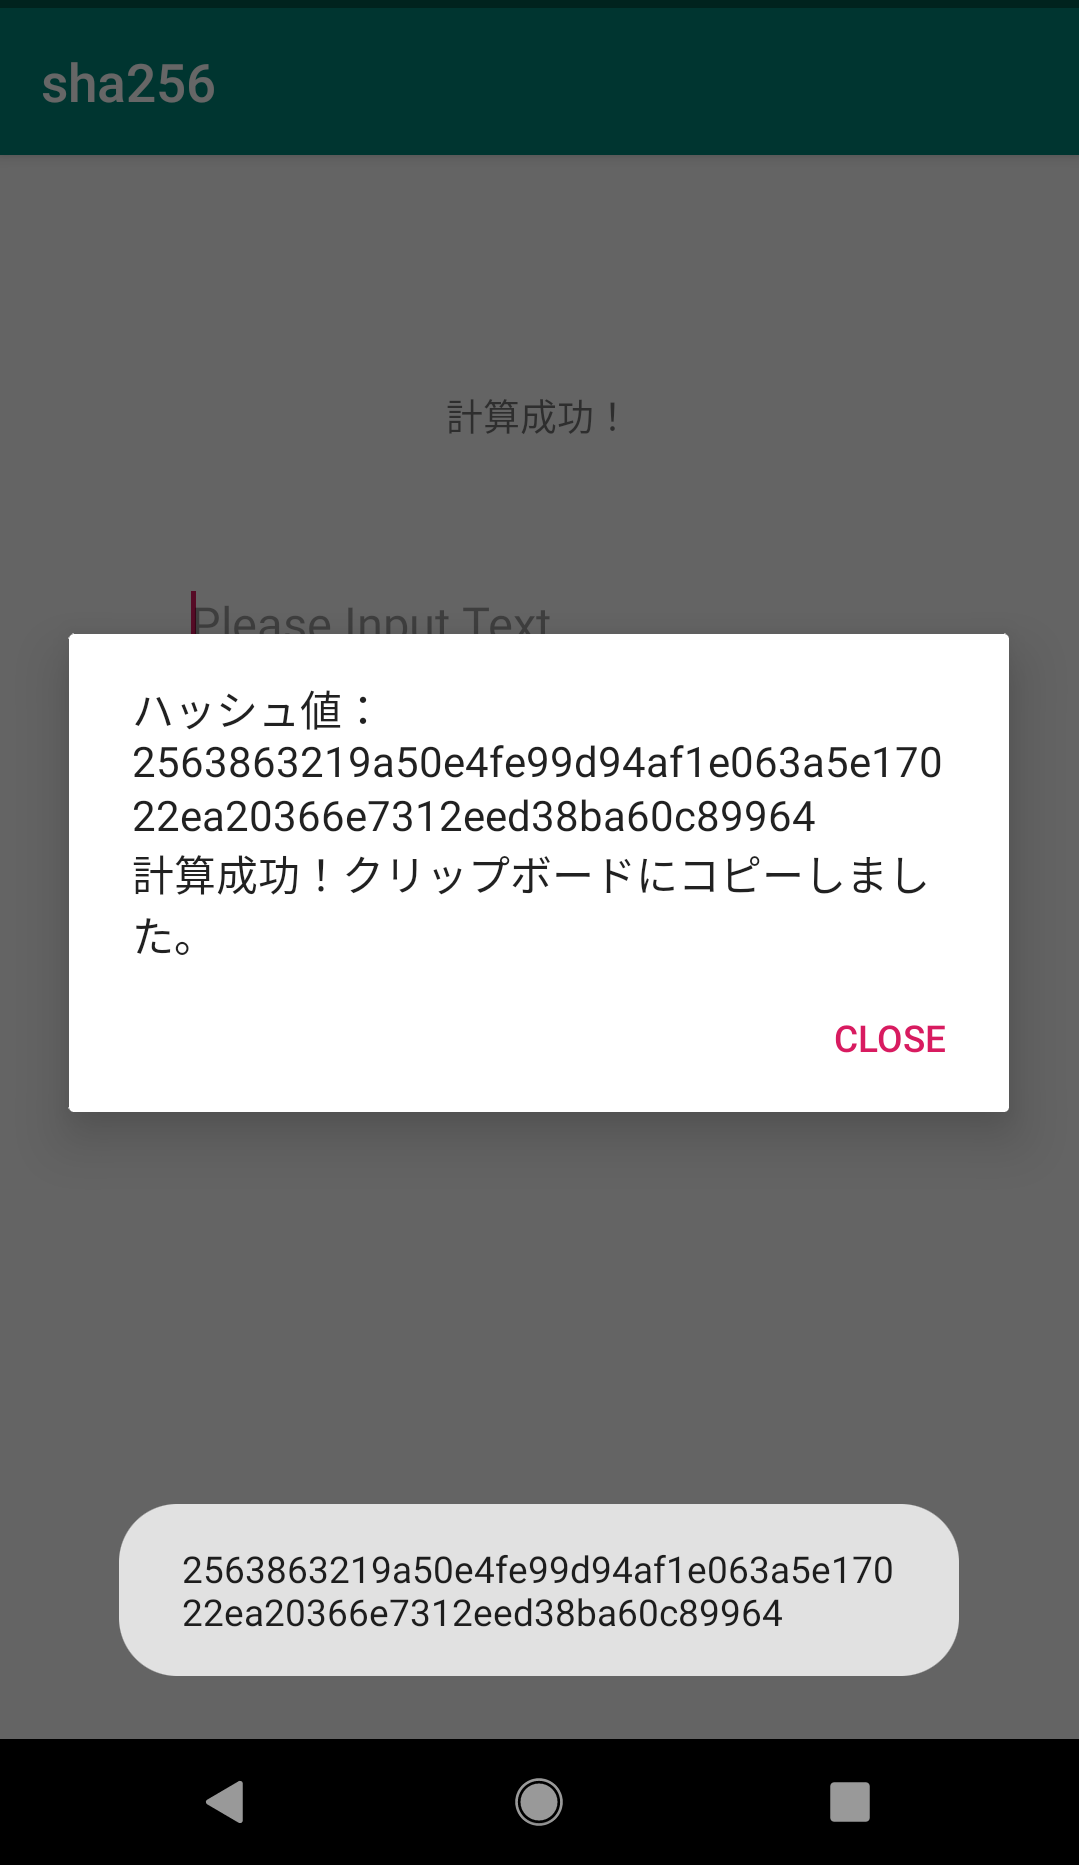
package com.weare2434.sha256;

import androidx.appcompat.app.AppCompatActivity;

import android.content.ClipData;
import android.content.ClipboardManager;
import android.content.Context;
import android.os.Build;
import android.os.Bundle;
import android.view.ActionMode;
import android.view.Menu;
import android.view.MenuItem;
import android.view.View;
import android.widget.Button;
import android.widget.EditText;
import android.widget.TextView;
import android.widget.Toast;
import android.app.AlertDialog;
import java.security.MessageDigest;

public class MainActivity extends AppCompatActivity {
    private EditText editText;
    private Button button;
    private TextView textView;

    @Override
    protected void onCreate(Bundle savedInstanceState) {
        super.onCreate(savedInstanceState);
        setContentView(R.layout.activity_main);

        editText = (EditText) findViewById(R.id.editText);
        button = (Button) findViewById(R.id.button);
        textView = (TextView) findViewById(R.id.textView);

        button.setOnClickListener(new View.OnClickListener() {
            @Override
            public void onClick(View view) {
                String text = editText.getText().toString();
                if (!text.equals("")){
                    textView.setText(text);
                    editText.setText("");

                    //SHA256
                    byte[] cipher_byte;
                    try {
                        MessageDigest md = MessageDigest.getInstance("SHA-256");
                        md.update(text.getBytes());
                        cipher_byte = md.digest();
                        StringBuilder sb = new StringBuilder(2 * cipher_byte.length);
                        for(byte b: cipher_byte) {
                            sb.append(String.format("%02x", b&0xff) );
                        }
                        text = String.valueOf(sb);

                        //クリップボードにテキストを保存
                        ClipboardManager clipboard = (ClipboardManager)
                                getSystemService(Context.CLIPBOARD_SERVICE);
                        clipboard.setPrimaryClip(ClipData.newPlainText("", text));

                        Toast.makeText(view.getContext(), text, Toast.LENGTH_SHORT).show();

                        new AlertDialog.Builder(view.getContext())
                                .setTitle("")
                                .setMessage("ハッシュ値:\n" + text + "\n計算成功!クリップボードにコピーしました。")
                                .setPositiveButton("close", null)
                                .show();
                        text = "計算成功!";
                    } catch (Exception e) {
                        text = "計算失敗!";
                        Toast.makeText(view.getContext(), text, Toast.LENGTH_SHORT).show();

                        new AlertDialog.Builder(view.getContext())
                                .setTitle("")
                                .setMessage(text)
                                .setPositiveButton("close", null)
                                .show();
                    }
                    textView.setText(text);
                }
                else {
                    Toast.makeText(view.getContext(), "入力してください", Toast.LENGTH_SHORT).show();
                    textView.setText("No Input");
                }
            }
        });

        //textViewコピー有効
        textView.setTextIsSelectable(true); // Text Selection をenableにする
        if (Build.VERSION.SDK_INT >= Build.VERSION_CODES.M) {
            textView.setCustomSelectionActionModeCallback(new ActionMode.Callback2() {
                @Override
                public boolean onCreateActionMode(ActionMode mode, Menu menu) {
                    return true;
                }

                @Override
                public boolean onPrepareActionMode(ActionMode mode, Menu menu) {
                    return false;
                }

                @Override
                public boolean onActionItemClicked(ActionMode mode, MenuItem item) {

                    switch (item.getItemId()) {
                        case android.R.id.copy:
                            int min = 0;
                            int max = textView.getText().length();
                            if (textView.isFocused()) {
                                final int selStart = textView.getSelectionStart();
                                final int selEnd = textView.getSelectionEnd();

                                min = Math.max(0, Math.min(selStart, selEnd));
                                max = Math.max(0, Math.max(selStart, selEnd));
                            }

                            final CharSequence selectedText = textView.getText()
                                    .subSequence(min, max);
                            String text = selectedText.toString();

                            ClipboardManager clipboard = (ClipboardManager)
                                    getSystemService(Context.CLIPBOARD_SERVICE);
                            clipboard.setPrimaryClip(ClipData.newPlainText("", text));

                            // ActionModeの終了
                            mode.finish();
                            return true;
                        case android.R.id.cut:
                            return true;
                        case android.R.id.paste:
                            return true;

                        default:
                            break;
                    }
                    return false;
                }

                @Override
                public void onDestroyActionMode(ActionMode mode) {
                }
            });
        }
    }
}
activity_main.xml
<?xml version="1.0" encoding="utf-8"?>
<RelativeLayout xmlns:android="http://schemas.android.com/apk/res/android"
    xmlns:tools="http://schemas.android.com/tools"
    android:layout_width="match_parent"
    android:layout_height="match_parent"
    android:orientation="vertical"
    tools:context="com.weare2434.sha256.MainActivity">


    <EditText
        android:id="@+id/editText"
        android:layout_width="wrap_content"
        android:layout_height="wrap_content"
        android:layout_marginTop="156dp"
        android:ems="13"
        android:inputType="textMultiLine"
        android:hint="Please Input Text"
        android:layout_alignParentTop="true"
        android:layout_centerHorizontal="true" />

    <TextView
        android:id="@+id/textView"
        android:layout_width="wrap_content"
        android:layout_height="wrap_content"
        android:layout_alignParentTop="true"
        android:layout_centerHorizontal="true"
        android:layout_marginTop="90dp"
        android:text="No Input" />

    <Button
        android:layout_width="wrap_content"
        android:layout_height="wrap_content"
        android:layout_centerVertical="true"
        android:layout_centerHorizontal="true"
        android:text="calc HASH"
        android:id="@+id/button"/>
</RelativeLayout>
素晴らしすぎるコピペ元様(順不同、多謝)
【Android】クリップボードにコピーする - Qiita
[Android] EditText をコードで記述する - nyan のアプリ開発
【Android】EditTextでの文字の複数行入力とInputTypeの種類
GitHub
- 投稿日:2020-11-26T21:28:31+09:00
BigDecimal の stripTrailingZeros 使ってる人は気をつけて
はじめに
お仕事で BigDecimal の stripTrailingZeros というメソッドを使っていて悲しくなったので記事にしました

stripTrailingZeros って何?
BigDecimal のメソッドで、末尾のゼロが削除された新しい BigDecimal を返します。
簡単にいうとこんな感じ
0.00 であれば 0
0.10 であれば 0.1何があったのか
動作確認をしていると、 0.00% と表示されてしまうことがありました。
「あれ?ちゃんとエミュレーターでも動き確認してたのになぜ??」
調べてみると stripTrailingZeros が正常に動いてなさそう、、!
なぜ〜〜〜〜

原因
なんと、JDK7 だと正常に動作しないとのこと。。。
そりゃないよ。。
なので一部の Android 端末だと正常に動作しません
※ Google IssueTracker にあげられてました
こんな感じになります。正常に動作するものとしないものが混じってるのがほんと厄介で気付きにくいです。。
fun printStripTrailingZeros(text: String) {
  println(BigDecimal(text).stripTrailingZeros())
}

printStripTrailingZeros("1.0")
printStripTrailingZeros("0.0")
printStripTrailingZeros("0.00")
printStripTrailingZeros("0.10")

// result
// 1
// 0.0
// 0.00
// 0.1
対処方法
画面に表示する際に
compareToで比較して、BigDecimal.ZEROと等しければ 0 を表示するようにしました。
正規表現でも可能ですが、ひとまずはこれで良さそうです(めんどくさいだけ笑)おわりに
他にも何か気をつけた方がいい点あれば教えていただけたら幸いです

みなさんも本当にお気をつけください!!
- 投稿日:2020-11-26T20:17:26+09:00
Androidで始める機械学習2 (FirebaseML CloudAPI)
はじめに
前回 エッジでサンプルを動かす記事を書きましたが、今回はエッジ(MLKitやTensorflowLite)ではなく、FirebaseMLのCloudAPIを利用してみました。
他にもありますが、今回は以下のAPIを試すために、Androidのサンプルアプリを作成しました。
- Text Recognition
- Image Labeling
- Landmark recognition
サンプルアプリについて
写真を撮ると、その画像をFirebaseMLのCloudAPIに投げ、結果を表示します。
右上のボタンでAPIを切り替えられます。
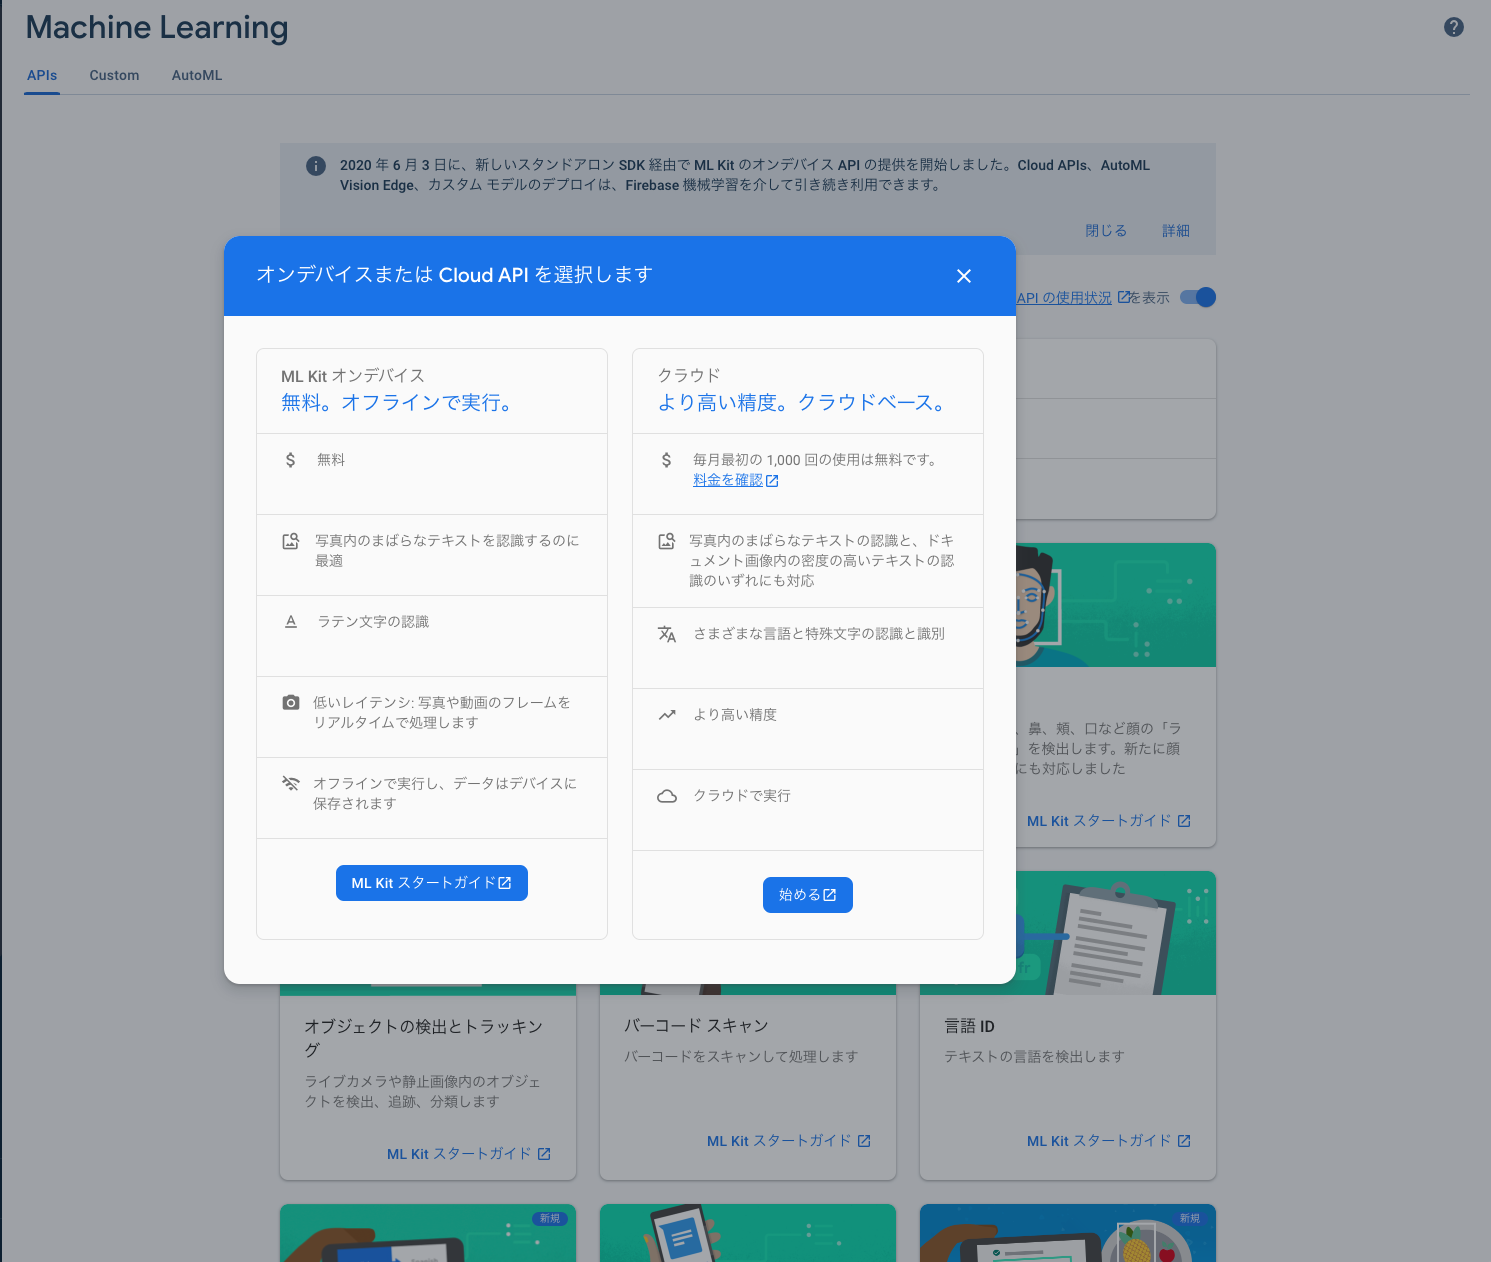
準備
サンプルアプリを動かすための準備です。
- Firebaseプロジェクトを作成します。
app配下にgoogle-services.jsonを置きます。- Firebaseプロジェクトのプランを、Blazeに変更します。
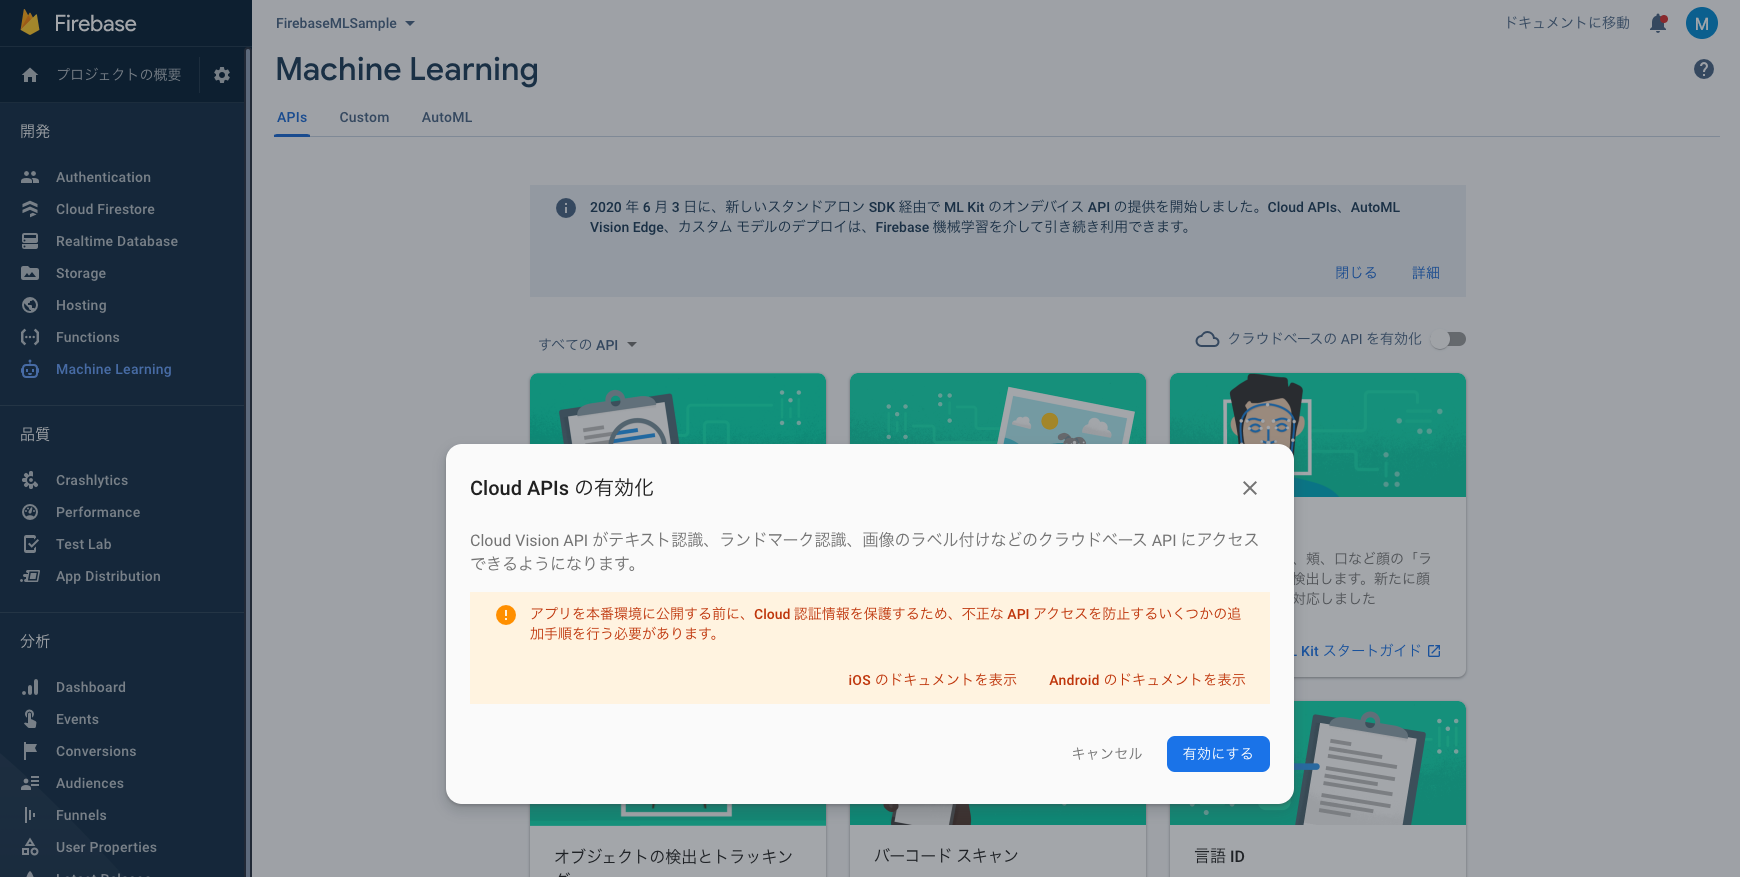
- Firebaseコンソール > Machine Learning に行き、Cloud APIsを有効にします。
MLKitとの違い
オンデバイス向けであるMLKitと被っていそうなAPIがありますが、機能差分があります。
この差分は、Firebaseコンソールで確認することができるので、気になったらコンソールで確認するのが良いです。
大雑把ですが、基本的にどのAPIもMLKitの方が識別までの処理は高速で、モデルの精度はCloudAPIの方が良いようです。
端末側で処理をするか、クラウドで処理するかの違いが、大きく出てる部分じゃないかなと思います。VisionAPIとの違い
GCPでもVisionAPIが提供されていますが、同じです。FirebaseMLの裏はVisionAPIです。
GCPコンソール上でVisionAPIの使用状況を確認することができます。FirebaseMLのCloudAPIでは提供されていない機能が、GCPのVisionAPIにはあります。
動作確認
サンプルアプリを動かしていきます。
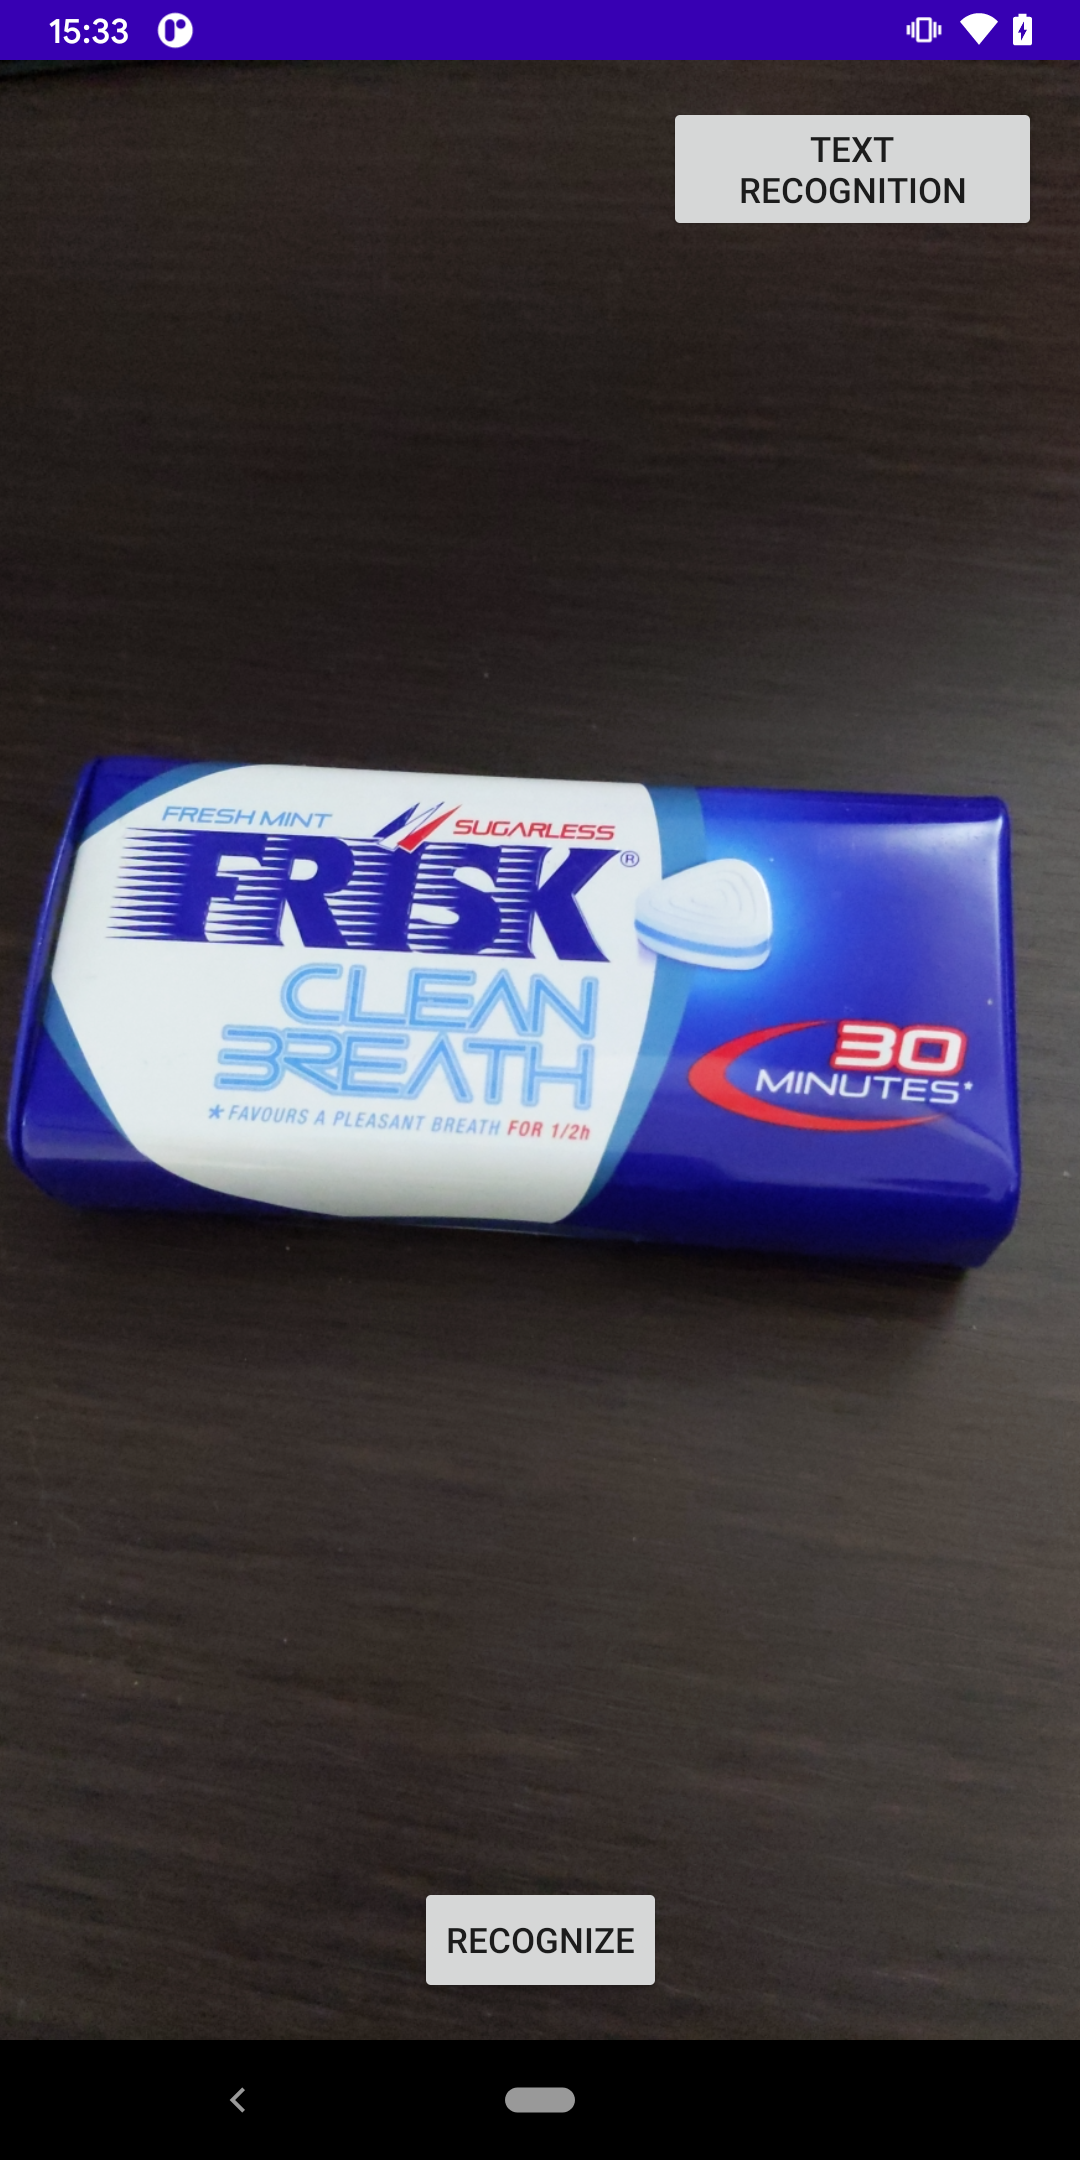
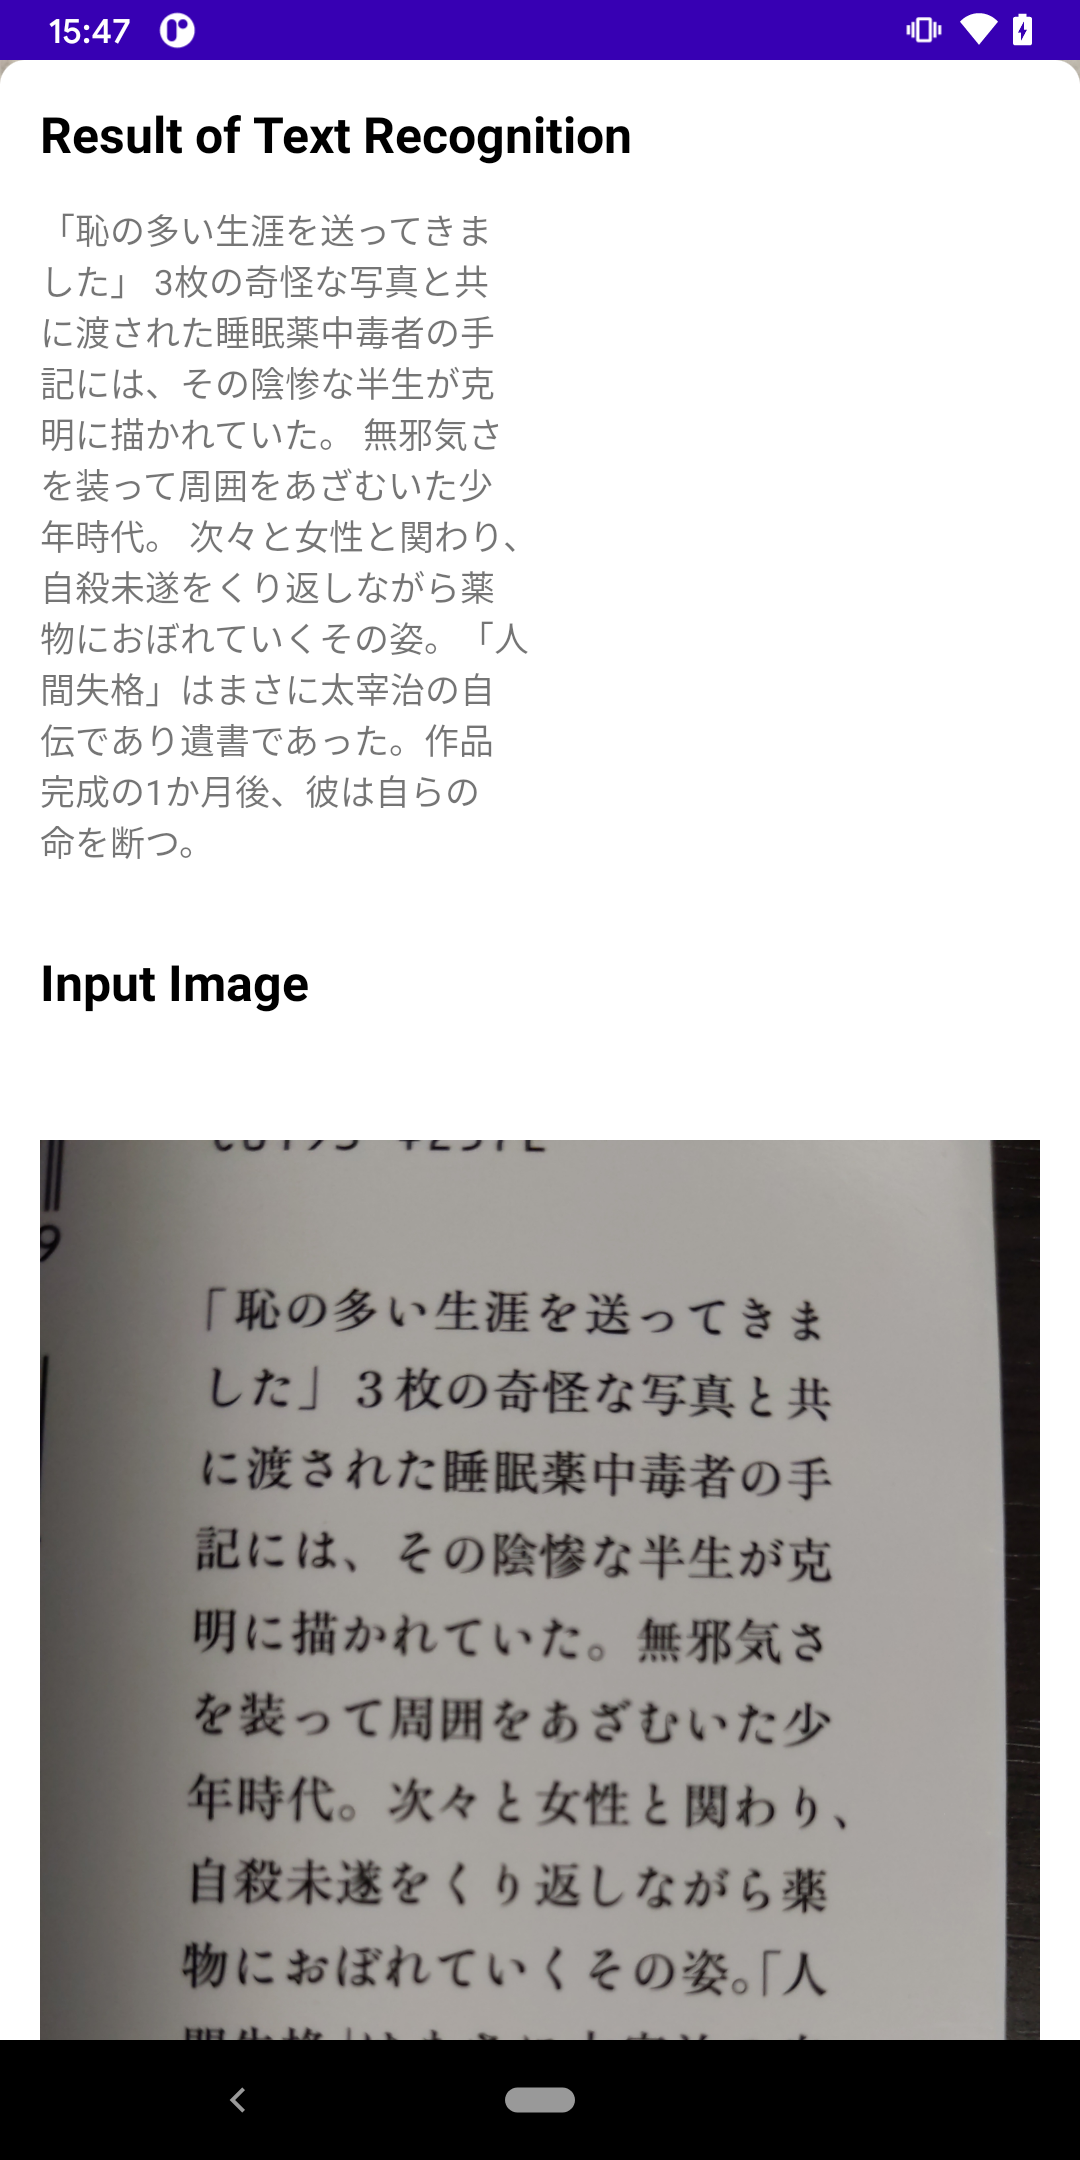
Text Recognition
https://firebase.google.com/docs/ml/android/recognize-text
/**
 * text recognition by ML Vision Api.
 *
 * https://firebase.google.com/docs/ml/android/recognize-text
 */
private fun processImageByCloudTextRecognizer(photoFile: File) {
    // ヒントを与える
    val options = FirebaseVisionCloudTextRecognizerOptions.Builder()
        .setLanguageHints(listOf("ja"))
        .build()
    val detector = FirebaseVision.getInstance().getCloudTextRecognizer(options)

    val bitmap = BitmapFactory.decodeFile(photoFile.absolutePath)
    detector.processImage(FirebaseVisionImage.fromBitmap(bitmap))
        .addOnSuccessListener { firebaseVisionText ->
            Log.d(TAG, "sucess text recognition: recognizedText = ${firebaseVisionText.text}")
        }
        .addOnFailureListener { e ->
            Log.d(TAG, "failed text recognition: errorMessage=${e.message}")
            e.printStackTrace()
        }
}
MLKitは英語(ラテン文字)のみの対応でしたが、CloudAPIは日本語も認識してくれます。
これぐらい綺麗に字が並んでいると、ほぼ完璧に認識してくれるようです。
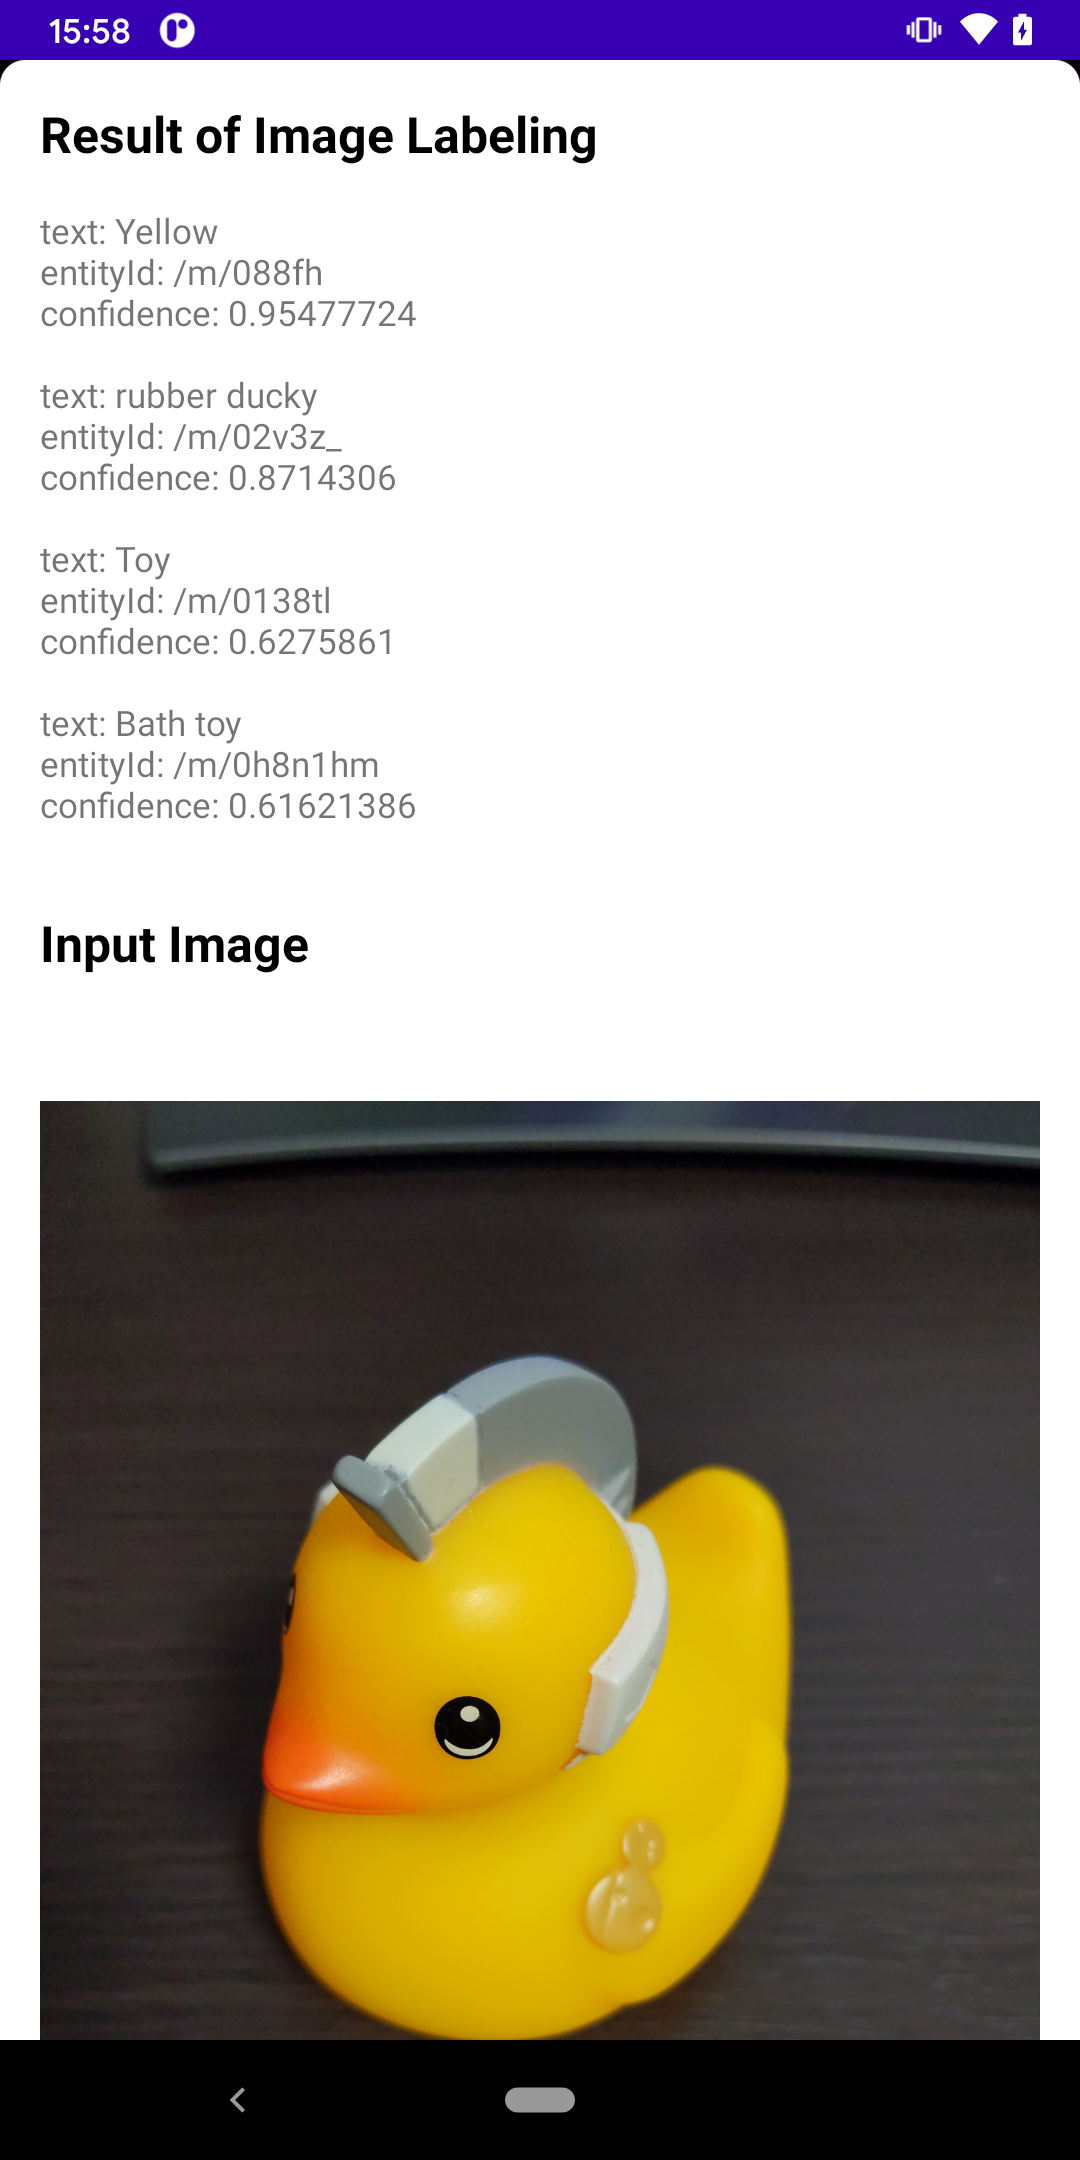
Image Labeling
https://firebase.google.com/docs/ml/android/label-images
private fun processImageByCloudLabelDetector(photoFile: File) {
    val bitmap = BitmapFactory.decodeFile(photoFile.absolutePath)
    FirebaseVision.getInstance().cloudImageLabeler
        .processImage(FirebaseVisionImage.fromBitmap(bitmap))
        .addOnSuccessListener { labels ->
            Log.d(TAG, "success image labeling: labelsSize=${labels.size}")
        }
        .addOnFailureListener { e ->
            Log.d(TAG, "failed image labeling: errorMessage=${e.message}")
            e.printStackTrace()
        }
}
rubber duckyなどのラベルが検出されました。(有名なおもちゃなんでしょうか。)
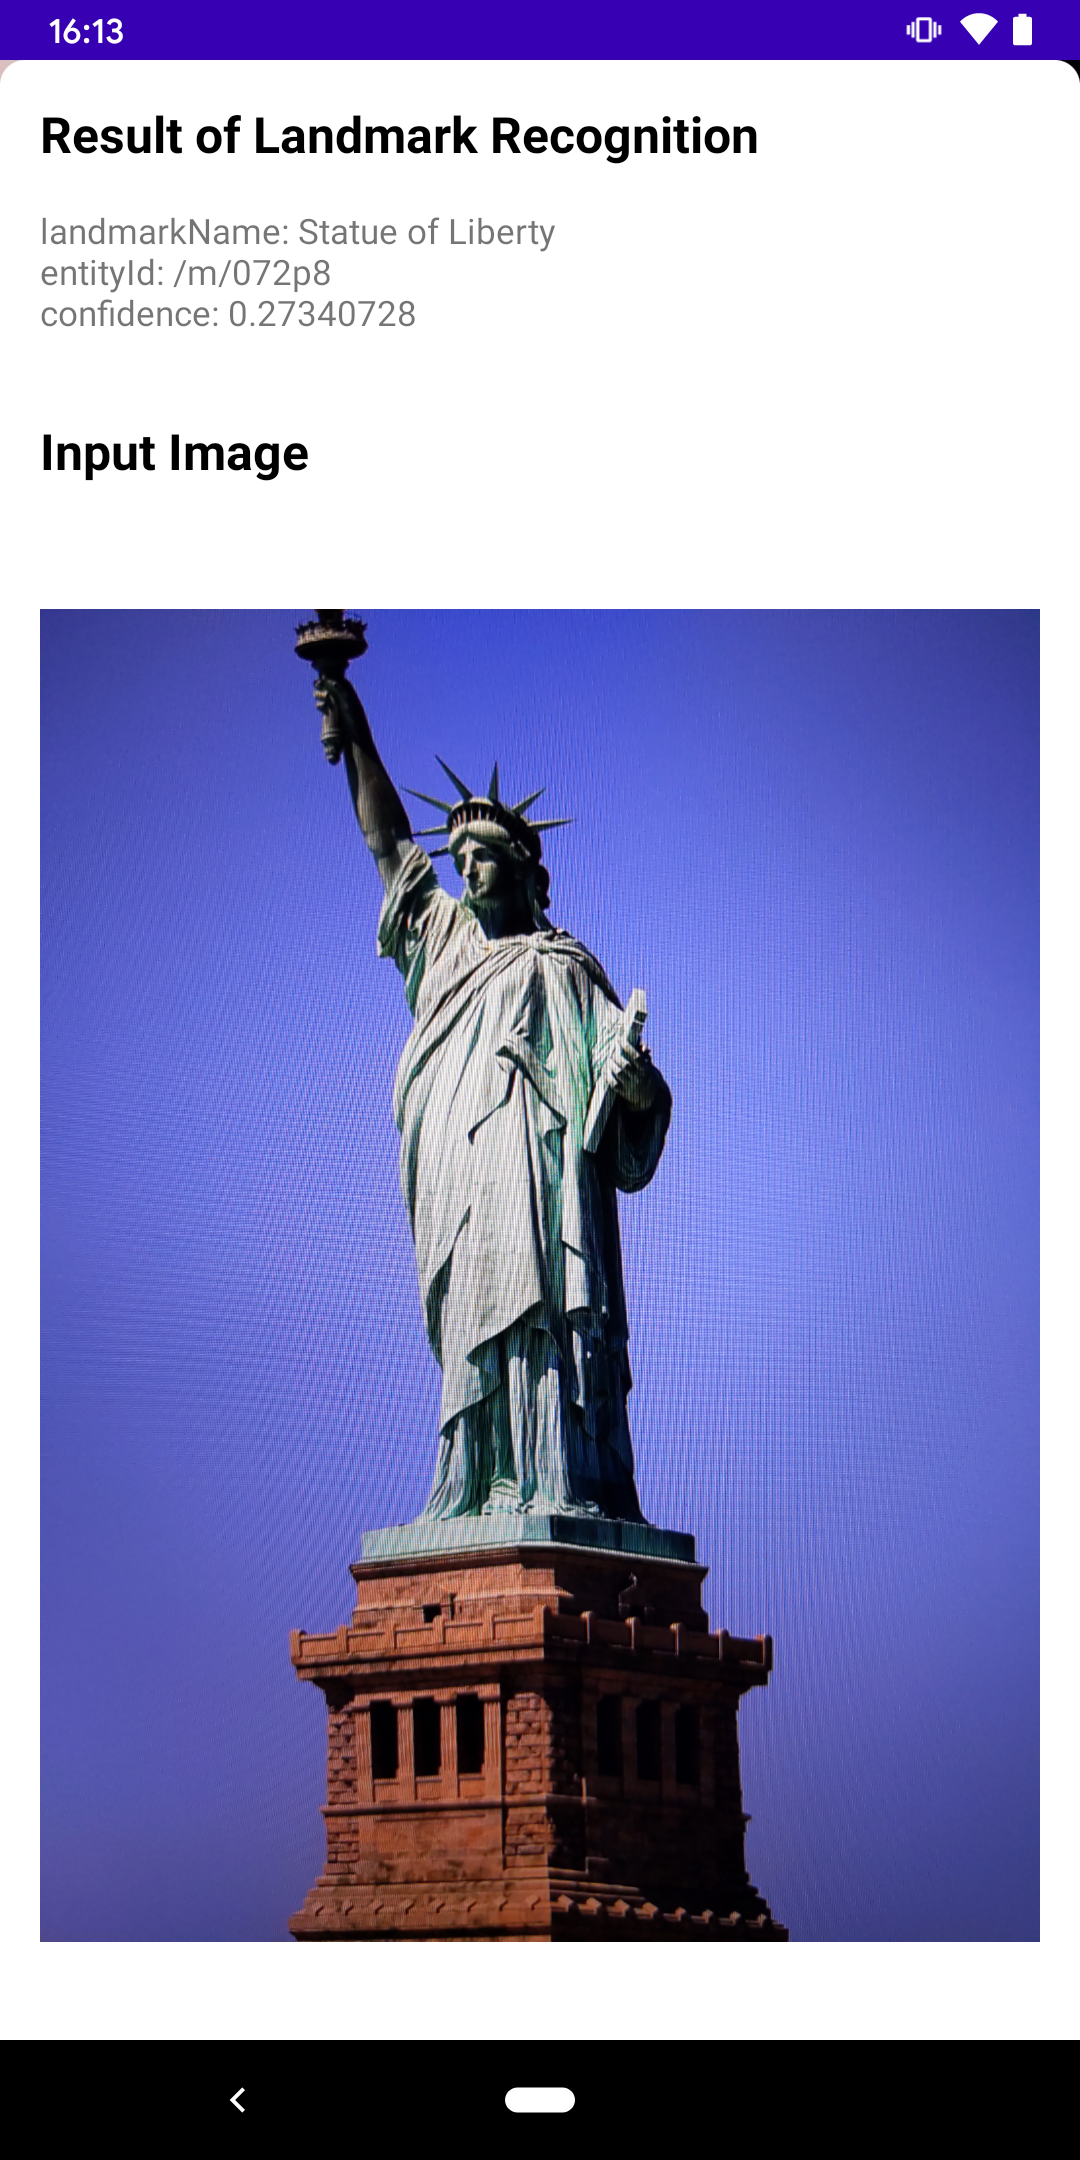
Landmark recognition
https://firebase.google.com/docs/ml/android/recognize-landmarks
private fun processImageByCloudLandmarkDetector(photoFile: File) {
    val bitmap = BitmapFactory.decodeFile(photoFile.absolutePath)
    FirebaseVision.getInstance().visionCloudLandmarkDetector
        .detectInImage(FirebaseVisionImage.fromBitmap(bitmap))
        .addOnSuccessListener { landmarks ->
            Log.d(TAG, "success landmark recognition: landmarksSize=${landmarks.size}")
        }
        .addOnFailureListener { e ->
            Log.d(TAG, "failed landmark recognition: errorMessage=${e.message}")
        }
}
一応認識されましたが、Macbookの画面を撮っているので、精度が低くなっているのかなと思います。(端末内の画像を選べる機能を作ればよかった。。)
まとめ
今回3つ試しましたが、用途によってはこちらも使えそうだなという印象でした。
ユースケースに合わせて適切に使っていきたいですね。余談
サンプルアプリで、プレビュー画面で取得できる画像を都度APIに投げてもよかったんですが、
そうすると結構な呼び出し回数になり、高額な請求が怖かったのでやらなかったです。。また、ネットワークレイテンシもあるので、リアルタイム性が必要なときには不向きかもしれません。
エッジかクラウドか、ユースケースによって適切に使い分けましょう。
- 投稿日:2020-11-26T20:13:13+09:00
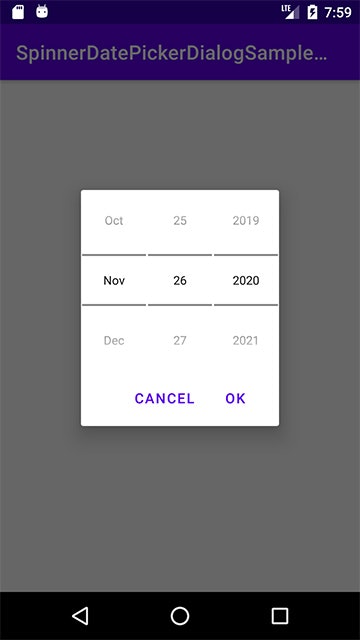
AndroidでSpinner形式のDatePickerDialogを表示する
AndroidでSpinner形式の
DatePickerDialogを表示する方法を解説します。
本記事のサンプルコードについては こちら に置いてあります。
コード
テーマ
テーマを下記のように設定します。
android:datePickerStyleに<item name="android:datePickerMode">spinner</item>を子要素に持つスタイルを設定します。themes.xml<resources> <!-- 省略 --> <!-- DatePickerDialog --> <!-- parentはアプリ全体のテーマに合わせて、 "Theme.MaterialComponents.Light.Dialog" や "Theme.AppCompat.Light.Dialog" にする。 --> <style name="DatePickerDialog" parent="Theme.MaterialComponents.Light.Dialog" /> <style name="DatePickerDialog.Spinner"> <item name="android:datePickerStyle">@style/DatePickerDialogSpinnerDatePickerStyle</item> </style> <style name="DatePickerDialogSpinnerDatePickerStyle"> <item name="android:datePickerMode">spinner</item> </style> </resources>DatePickerDialogの表示
DatePickerDialogの第2引数にさきほどのテーマを指定します。
val datePickerDialog = DatePickerDialog(
        context,
        R.style.DatePickerDialog_Spinner, // 上記のテーマを指定する
        { view, year, month, dayOfMonth ->
            // DatePickerDialogでOKを押した際の処理
        },
        2020, // 初期表示の年 2020年
        10,   // 初期表示の月 11月
        26    // 初期表示の日 26日
)
datePickerDialog.show()
Android 7.0のバグの回避
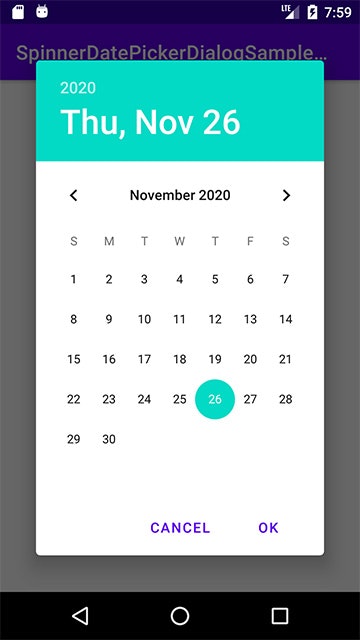
Android 7.0にはバグがあり、上記のようにSpinner表示をしてもCalendar表示のDatePickerDialogが表示されてしまいます。
これを回避するために、Android標準のandroid.app.DatePickerDialogの代わりに、下記のDatePickerDialogを使用してください。
package your.package.name // 適当なパッケージ名に書き換えてください

import android.annotation.SuppressLint
import android.content.Context
import android.os.Build
import android.util.AttributeSet
import android.widget.DatePicker
import java.lang.reflect.Field

/**
 * Android 7.0でspinner表示ができるDatePickerDialog
 */
class DatePickerDialog : android.app.DatePickerDialog {
    constructor(
        context: Context,
        callback: OnDateSetListener?,
        year: Int,
        monthOfYear: Int,
        dayOfMonth: Int
    ) : super(context, callback, year, monthOfYear, dayOfMonth) {
        fixSpinner(context, year, monthOfYear, dayOfMonth)
    }

    constructor(
        context: Context,
        theme: Int,
        callback: OnDateSetListener?,
        year: Int,
        monthOfYear: Int,
        dayOfMonth: Int
    ) : super(context, theme, callback, year, monthOfYear, dayOfMonth) {
        fixSpinner(context, year, monthOfYear, dayOfMonth)
    }

    @SuppressLint("PrivateApi", "DiscouragedPrivateApi")
    private fun fixSpinner(context: Context, year: Int, month: Int, dayOfMonth: Int) {
        if (Build.VERSION.SDK_INT == Build.VERSION_CODES.N) {
            try {
                // android:datePickerModeを取得
                val modeSpinner = 2
                val styleableClass = Class.forName("com.android.internal.R\$styleable")
                val datePickerStyleableField = styleableClass.getField("DatePicker")
                val datePickerStyleable = datePickerStyleableField[null] as IntArray

                val a = context.obtainStyledAttributes(
                    null, datePickerStyleable, android.R.attr.datePickerStyle, 0
                )
                val datePickerModeStyleableField =
                    styleableClass.getField("DatePicker_datePickerMode")
                val datePickerModeStyleable = datePickerModeStyleableField.getInt(null)
                val mode = a.getInt(datePickerModeStyleable, modeSpinner)
                a.recycle()

                if (mode == modeSpinner) {
                    val datePicker = findField(
                        android.app.DatePickerDialog::class.java,
                        DatePicker::class.java,
                        "mDatePicker"
                    )!!.get(this) as DatePicker
                    val delegateClass = Class.forName("android.widget.DatePickerSpinnerDelegate")
                    val delegateField = findField(
                        DatePicker::class.java, delegateClass, "mDelegate"
                    )!!
                    var delegate = delegateField[datePicker]
                    val spinnerDelegateClass =
                        Class.forName("android.widget.DatePickerSpinnerDelegate")

                    // Android 7.0ではdatePickerModeがなぜか無視され、デリゲートはDatePickerClockDelegate
                    // となってしまっている
                    if (delegate.javaClass != spinnerDelegateClass) {
                        delegateField[datePicker] = null // DatePickerClockDelegateを削除
                        datePicker.removeAllViews() // DatePickerClockDelegate viewを削除
                        val createSpinnerUIDelegate = DatePicker::class.java.getDeclaredMethod(
                            "createSpinnerUIDelegate",
                            Context::class.java,
                            AttributeSet::class.java,
                            Int::class.javaPrimitiveType,
                            Int::class.javaPrimitiveType
                        )
                        createSpinnerUIDelegate.isAccessible = true

                        // createSpinnerUIDelegateメソッドを通してDatePickerSpinnerDelegateを生成する
                        delegate = createSpinnerUIDelegate.invoke(
                            datePicker,
                            context,
                            null,
                            android.R.attr.datePickerStyle,
                            0
                        )
                        delegateField[datePicker] = delegate // DatePicker.mDelegateをspinnerに設定
                        datePicker.calendarViewShown = false
                        // DatePickerデリゲートを再度生成
                        datePicker.init(year, month, dayOfMonth, this)
                    }
                }
            } catch (e: Exception) {
                throw RuntimeException(e)
            }
        }
    }

    companion object {
        private fun findField(
            objectClass: Class<*>,
            fieldClass: Class<*>,
            expectedName: String
        ): Field? {
            try {
                val field = objectClass.getDeclaredField(expectedName)
                field.isAccessible = true
                return field
            } catch (e: NoSuchFieldException) {
                // nop
            }
            // 見つからない場合は検索
            for (searchField in objectClass.declaredFields) {
                if (searchField.type == fieldClass) {
                    searchField.isAccessible = true
                    return searchField
                }
            }
            return null
        }
    }
}
参考文献
- 投稿日:2020-11-26T17:54:20+09:00
Android11での内部ストレージのAndroid/data以下に端末でアクセスする方法
ただの備忘録
端末からの操作の話。
Android11から何故か普通のファイラーや、Google Playから入れたファイラーでは、
内部ストレージにあるAndroid/data以下にアクセス出来ない状況が発生した。ただし以下の方法であれば、アクセスが可能
1. 「設定」を開く
2. 「ストレージ」を選択
3. 「ファイル」を選択
4. ファイラーを選択
これで開いたファイラーでは、
Android/data以下にアクセスできる。(出来た)中のデータを選択して圧縮して、コピーや転送も可能だった。
(つまり今まで(Android 10まで)通り使えるっぽい)...アクセスがだるくなっただけ (?)
(セキュリティのためなんだろうけどさ...)注:実験したのはPixel3a,4
- 投稿日:2020-11-26T12:23:26+09:00
Google Play servicesが使えないAndroid端末におけるFirebase SDKの使用可否状況のまとめ
背景
Android端末でGoogle Play services (Google Play開発者サービス)を使用するにはGoogleからのライセンスが必要であり、一部ライセンスがない端末があります。その場合、GMSのSDKが使用できなくなり、かつ一部のFirebaseのSDKが使用できなくなります。
ただし、Firebaseの場合、Google Play servicesがないAndroid端末でも使用可能なSDKがあります。
今回、その使用可否状況のまとめと、使用できない場合の代替案について説明したいと思います。Firebase SDKの使用可否状況
Firebaseのオフィシャルサイトには、それぞれのFirebaseのSDKを使う場合にGoogle Play servicesが必要であるかどうかの記載があります。
Dependencies of Firebase Android SDKs on Google Play services
投稿時点では、FirebaseのSDKは以下の3種類に分類されています。
ただし、以下の状況はすべて最新バージョンのSDKの状況ですので、古いバージョンは適応しない場合があります。また、最新の情報を知りたい場合はFirebaseのドキュメントを確認したほうがいいと思います。1. Play services not required (9つのSDK)
Google Play servicesがない端末でも問題なく使えます。
例えば、HuaweiのHMS端末ではこれらのSDKは使用可能です。
HMS端末についての説明はこちらの記事を参考してください。
Firebaseサービス Library Authentication com.google.firebase:firebase-auth:20.0.1 Cloud Firestore com.google.firebase:firebase-firestore:22.0.0 Cloud Functions com.google.firebase:firebase-functions:19.1.0 Crashlytics com.google.firebase:firebase-crashlytics:17.3.0 In-App Messaging com.google.firebase:firebase-inappmessaging:19.1.2 In-App Messaging com.google.firebase:firebase-inappmessaging-display:19.1.2 Installations service com.google.firebase:firebase-installations:16.3.4 Realtime Database com.google.firebase:firebase-database:19.5.1 Remote Config com.google.firebase:firebase-config:20.0.1 2. Play services recommended (1つのSDK)
Google Play servicesがない場合、一部使えない機能があります。
Firebaseサービス Library Google Analytics com.google.firebase:firebase-analytics:18.0.0 以下は、Firebaseのオフィシャルの説明となります。
Firebase SDK for Google Analyticsはどのデバイスでもイベントを送信できますが、人口統計などの一部の自動インサイトは、GooglePlay開発者サービスを備えたデバイスでのみ利用できます。
つまり、カスタイマイズイベントとほとんどの自動送信イベントは問題なく送信できますが、ジオデータ関連の自動送信イベントなどの自動インサイトは送信できなくなります。
3. Play services required (7つのSDK)
これらのSDKを使うには、Google Play servicesが必須です。
Google Play servicesがない端末の場合、これらのSDKが動作しませんので、代替案が必要となります。
Firebaseサービス Library Google AdMob com.google.android.gms:play-services-ads:19.5.0 App Indexing com.google.firebase:firebase-appindexing:19.1.0 Cloud Messaging com.google.firebase:firebase-messaging:21.0.0 Dynamic Links com.google.firebase:firebase-dynamic-links:19.1.1 ML Vision com.google.firebase:firebase-ml-vision:24.1.0 ML Custom Models com.google.firebase:firebase-ml-model-interpreter:22.0.4 Performance Monitoring com.google.firebase:firebase-perf:19.0.10 使えないSDKの場合の解決策
HMS端末の場合、「Play services required」と「Play services recommended」のSDKに関して、
Huaweiが提供しているHMS CoreとAppGallery Connectの同等のSDKを使用することができます。
具体的には以下の表を参考してください。
Firebaseサービス AppGallery Connect(HMS)サービス APIリファレンス デモアプリ Google Analytics Analytics Kit Analytics Kit APIs Analytics Kit Demo Google AdMob Ads Kit Ads Kit APIs Ads Kit Demo App Indexing - - - Cloud Messaging Push Kit Push Kit APIs Push Kit Demo Dynamic Links App Linking App Linking APIs App Linking Demo ML Vision, Custom Models ML Kit ML Kit APIs ML Kit Demo Performance Monitoring APM APM APIs APM Demo ML KitとFirebase MLの比較に関しては、以下の記事で説明されていますので合わせて確認できます。
HMSとFirebaseの機械学習(ML Kit)の比較
- 投稿日:2020-11-26T09:18:36+09:00
【翻訳】RecyclerView の高度なカスタマイズ
ReciclerViewをカスタマイズする必要があり、公式を調べていたら英語ページに当たったので翻訳しました。
RecyclerView の高度なカスタマイズ
You can customize the
RecyclerViewobjects to meet your specific needs. The standard classes described in Create dynamic lists with RecyclerView provide all the functionality that most developers will need; in many cases, the only customization you need to do is design the view for each view holder and write the code to update those views with the appropriate data. However, if your app has specific requirements, you can modify the standard behavior in a number of ways. This page describes some of the other possible customizations.
RecyclerViewオブジェクトは必要に応じカスタマイズすることができます。RecyclerView でリストを作成する で説明された基本的なクラスで、ほとんどの開発者が必要とするすべての機能を網羅します。たいていの場合、あなたがしなければならないカスタマイズは、それぞれのビューホルダーのためのビューをデザインし、これらのビューを適当なデータで更新するコードを書くことだけです。しかしながら、アプリが特定の要求を持つ場合、いくつかの方法で基本的な動作を変更することができます。このページでは他にできるいくつかのカスタマイズについて説明します。レイアウトを変更する
The
RecyclerViewuses a layout manager to position the individual items on the screen and determine when to reuse item views that are no longer visible to the user. To reuse (or recycle) a view, a layout manager may ask the adapter to replace the contents of the view with a different element from the dataset. Recycling views in this manner improves performance by avoiding the creation of unnecessary views or performing expensivefindViewById()lookups. The Android Support Library includes three standard layout managers, each of which offers many customization options:
RecyclerViewはレイアウトマネージャーを使用して個々のアイテムを画面に配置し、アイテムがユーザーから見えなくなった場合にビューを再利用するタイミングを定義します。ビューを再利用(または再資源化)するために、レイアウトマネージャーはアダプターにビューのコンテンツをデータセットの異なる要素で置換するかを確認します。この挙動でビューをリサイクルすることで、不要なビューを生成したり、高コストなfindViewById()検索の実行を避け、パフォーマンスを改善します。Android サポートライブラリは3つの標準的なレイアウトマネージャーを持ち、そのどれもが様々なカスタマイズ用オプションを提供します。
LinearLayoutManagerarranges the items in a one-dimensional list. Using aRecyclerViewwithLinearLayoutManagerprovides functionality like the olderListViewlayout.GridLayoutManagerarranges the items in a two-dimensional grid, like the squares on a checkerboard. Using aRecyclerViewwithGridLayoutManagerprovides functionality like the olderGridViewlayout.StaggeredGridLayoutManagerarranges the items in a two-dimensional grid, with each column slightly offset from the one before, like the stars in an American flag.
LinearLayoutManagerはアイテムを一次元のリストとして並べます。RecyclerViewをLinearLayoutManagerと組み合わせることで、以前のListViewレイアウトのような機能を使用できます。GridLayoutManagerはアイテムをチェッカー盤のマスのように、二次元のグリッドとして並べます。RecyclerViewをGridLayoutManagerと組み合わせることで、以前のGridViewレイアウトのような機能を使用できます。StaggeredGridLayoutManagerはアイテムを二次元のグリッドとして、各列が前の列と少しずつずれてちょうどアメリカ国旗の星のように並べます。If none of these layout managers suits your needs, you can create your own by extending the
RecyclerView.LayoutManagerabstract class.これらのレイアウトマネージャーでは要件を満たさないのであれば、抽象クラスである
RecyclerView.LayoutManagerを継承して独自のものを作成できます。アニメーションを追加する
Whenever an item changes, the
RecyclerViewuses an animator to change its appearance. This animator is an object that extends the abstractRecyclerView.ItemAnimatorclass. By default, theRecyclerViewusesDefaultItemAnimatorto provide the animation. If you want to provide custom animations, you can define your own animator object by extendingRecyclerView.ItemAnimator.アイテムが変化する際は必ず、
RecyclerViewは見た目を変化させるための アニメーター を使用します。このアニメーターは抽象クラスであるRecyclerView.ItemAnimatorを継承したオブジェクトです。デフォルトではRecyclerViewはDefaultItemAnimatorを使用してアニメーションを提供します。もしカスタムアニメーションを利用したい場合は、RecyclerView.ItemAnimatorを継承して独自のアニメーターオブジェクトを定義できます。リスト要素の選択を可能にする
The
recyclerview-selectionlibrary enables users to select items inRecyclerViewlist using touch or mouse input. You retain control over the visual presentation of a selected item. You can also retain control over policies controlling selection behavior, such as items that can be eligible for selection, and how many items can be selected.To add selection support to a
RecyclerViewinstance, follow these steps:recyclerview-selection ライブラリにより、ユーザーはタッチまたはマウスを使用して
RecyclerViewリストのアイテムを選択することができます。選択されたアイテムの表示は引き続き制御できます。また、選択可能なアイテムや選択できる数といった動作を制御するポリシーも引き続きコントロール可能です。
RecyclerViewインスタンスに selection support を追加するには、次のステップに従います:
- Determine which selection key type to use, then build a
ItemKeyProvider.There are three key types that you can use to identify selected items:
Parcelable(and all subclasses likeUri),String, andLong. For detailed information about selection-key types, seeSelectionTracker.Builder.
Implement
ItemDetailsLookup.
ItemDetailsLookupenables the selection library to access information aboutRecyclerViewitems given aMotionEvent. It is effectively a factory forItemDetailsinstances that are backed up by (or extracted from) aRecyclerView.ViewHolderinstance.Update item
ViewsinRecyclerViewto reflect that the user has selected or unselected it.The selection library does not provide a default visual decoration for the selected items. You must provide this when you implement
onBindViewHolder(). The recommended approach is as follows:
- In
onBindViewHolder(), callsetActivated()(notsetSelected()) on theViewobject withtrueorfalse(depending on if the item is selected).- Update the styling of the view to represent the activated status. We recommend you use a color state list resource to configure the styling.
Use
ActionModeto provide the user with tools to perform an action on the selection.Register a
SelectionTracker.SelectionObserverto be notified when selection changes. When a selection is first created, startActionModeto represent this to the user, and provide selection-specific actions. For example, you may add a delete button to theActionModebar, and connect the back arrow on the bar to clear the selection. When the selection becomes empty (if the user cleared the selection the last time), don't forget to terminate action mode.Perform any interpreted secondary actions
At the end of the event processing pipeline, the library may determine that the user is attempting to activate an item by tapping it, or is attempting to drag and drop an item or set of selected items. React to these interpretations by registering the appropriate listener. For more information, see
SelectionTracker.Builder.Assemble everything with
SelectionTracker.BuilderThe following example shows how to put these pieces together by using the
Longselection key:In order to build a
SelectionTrackerinstance, your app must supply the sameRecyclerView.Adapterthat you used to initializeRecyclerViewtoSelectionTracker.Builder. For this reason, you will most likely need to inject theSelectionTrackerinstance, once created, into yourRecyclerView.Adapterafter theRecyclerView.Adapteris created. Otherwise, you won't be able to check an item's selected status from theonBindViewHolder()method.Include selection in the activity lifecycle events.
In order to preserve selection state across the activity lifecycle events, your app must call the selection tracker's
onSaveInstanceState()andonRestoreInstanceState()methods from the activity'sonSaveInstanceState()andonRestoreInstanceState()methods respectively. Your app must also supply a unique selection ID to theSelectionTracker.Builderconstructor. This ID is required because an activity or a fragment may have more than one distinct, selectable list, all of which need to be persisted in their saved state.
使用する選択キーを定義し、その上で
ItemKeyProviderを構築する
選択されたアイテムを識別するために使用できるキーは3種類あります。Parcelable(とUri等のすべてのサブクラス)、String、Longです。選択キータイプの詳細な情報は、selectionTracker.Builderを参照してください。
ItemDetailsLookupを implement する
ItemDetailsLookupにより、selection ライブラリはMotionEventから与えられるRecyclerViewアイテムについての情報にアクセスできます。これはRecyclerView.ViewHolderインスタンスによりバックアップ(または抽出された)ItemDetailsインスタンスを効果的に作成します。
RecyclerView内のアイテムViewsを、ユーザーの選択または選択解除を反映するよう更新する
selection ライブラリは選択されたアイテムのためのデフォルト表示を提供しませんが、onBindViewHolder()を implement する際はこれを提供しないとなりません。推奨される方法は次の通りです:
onBindViewHolder()内で、Viewオブジェクトに対しsetActivated()(※setSelected()ではない)を(アイテムが選択されているかどうかによって)trueかfalseと一緒に呼び出します。- アクティベート状態を表現するためのビューのスタイルを更新します。スタイル設定には カラー状態リストリソース を使用することを推奨します。
ユーザーに選択時の動作を実行するツールを提供するために
ActionModeを使用する
selection が変化した際に通知するSelectionTracker.selectionObserverを登録します。最初に selection が生成されたときに、これをユーザーに明示する為にActionModeを開始し、selection 特有の動作を提供します。例えばActionModeバーに削除ボタンを追加し、バー上の戻る矢印記号を selection のクリアに紐づけることができます。selection が空になったとき(ユーザーが最後に selection をクリアした場合)は、 ActionMode を消去するのを忘れないようにしてください。インタープリタで二次的な動作を実行する
一連のイベントプロセスの最後には、ライブラリはユーザーがアイテムをタップすることでアクティベートしようとしたのか、アイテムまたは選択されたアイテム群をドラッグ&ドロップしようとしたのかを判定します。これらの解釈に対し、適切なリスナーを登録して対応します。より詳しい情報はselectionTracker.Builderを参照してください。全てを
selectionTracker.Builderと一緒にアセンブルする
下記の例はLong型の selection キーを使用してこれらのパーツをまとめる方法を示しています:
KOTLIN / JAVA
SelectionTrackerインスタンスを構築するために、アプリはRecyclerViewを初期化するのに使用したのと同じRecyclerView.AdapterをSelectionTracker.Builderに渡さなければなりません。このため、おそらくSelectionTrackerインスタンスを一旦生成し、RecyclerView.Adapterが生成された後でRecyclerView.Adapterに挿入する必要があります。一方で、onBindViewHolder()メソッドからアイテムの選択状態を確認することはできません。アクティビティのライフサイクルイベントの中に selection を含める
アクティビティのライフサイクル を通して選択状態を保存するため、アプリはアクティビティのonSaceInstanceState()とonResotreInstanceState()のそれぞれから、 SelectionTracker のonSaveInstanceState()とonRestoreInstanceState()メソッドを呼ぶ必要があります。また、SelectionTracker.Builderのコンストラクタに対し一意の selection ID を渡さなければなりません。この ID はアクティビティやフラグメントが、saved state に保持される必要のあるすべての、1つ以上の明確な、選択可能なリストを持つために必須となります。
RecyclerView のカスタマイズを色々と調べているのですが、なかなか難しいですね。(ちょっと特殊な要件があるのも一因ですが)
ドキュメントを読んでもわかったような、わからないような…
手を動かした内容もそのうちQiitaに書き残したいところです。