- 投稿日:2020-11-24T19:54:50+09:00
[iOS]XcodeのInfo.plist
概要
iOSアプリの開発したことない状態で、iOSアプリの検証してて、「Info.plistでどうたらすればいいんじゃね?」
みたいなこと言われて、よくわかんなかったので調べて自分の理解を自分の言葉でまとめたもの。そもそも漠然としていだいていた疑問として以下があった。
- Build Settingsとかとどんな位置づけの違いがあんねん・・・。
- ユーザー自身が定義する定数を記載できるらしい?User-Definedとかいうのも聞いたことあんぞ・・・
- っていうかInfo.plistとかいうファイル、今の案件のプロジェクト内に見当たらないんだが・・・
Info.plistとは?
ざっくりいうと以下の設定を行うというファイルらしい。
- 実行ファイルを実行するシステムにあらかじめ知らせておくべき情報
- ビルド時のユーザー定義定数(ただし、Configure毎に分けたい場合は、その値はBuild SettingsのUser-Definedに記述)
Build Settingsとの位置づけの違い
Build Settingsは、その名の通りビルド(=ソースコードをコンパイル)して実行ファイルを作る際の設定だが、
Info(Info.plist)は、実行ファイルを実行するシステムが、実行ファイルを読むときにあらかじめ知っておく必要のある設定
が主な位置づけみたい。
https://developer.apple.com/documentation/bundleresources/information_property_list
を見た感じだと。
User-Definedとの関係
Build SettingsのUser-Definedでソース内で利用する定数をConfigure(デフォルトでDebug, Releaseが用意されているアレ)毎に設定でき、その定数を読み込むためにはInfo.plist経由で読む必要があって、Info.plistにもUser-Definedで定義した定数について記述してやらないとダメ、ってことらしい。
https://medium.com/@abhishek1nacc/user-defined-build-setting-f4bba59a5d6c
を見た感じだと。
加えて、Configureによらない定数は、Info.plistに直接書いてもいいみたい。
Info.plistに設定する項目
わかりやすいものとしては、以下のようなものがあるみたい。
- Bundle display name: 実機でアプリアイコンの下に表示されるアプリ表示名
- Icon file: アプリアイコン画像ファイル
- Bundle identifier: アプリのユニークキー。Apple Developer Programでも設定が必要だったような。
Info.plistのパス設定
Target > Build Settings > Packaging - Info.plist Fileで設定する。
「Info.plist」というファイル名である必要はない模様。参考
Information Property List
Info.plist - iPhoneアプリ開発の虎の巻
User Defined Build Setting
- 投稿日:2020-11-24T18:50:50+09:00
Swift Decodable(Codable) 色んなJSONデータパターンのまとめ 【備忘録】
自分がAPIから取得したJSONのレスポンスパラメータで、色々な構造パターンがあったので備忘録も兼ねてまとめてみたいと思います。
そのままプロパティに適用できるパターン
一番手間がない形式でシンプルにデコード用クラスを定義できる
var data = """
{
  "id": 1,
  "name": "Taro",
}
""".data(using: .utf8)!

struct User: Decodable {
    let id: Int
    let name: String
}

let user: User = try JSONDecoder().decode(User.self, from: data)
print(user)
キーとプロパティが一致しないパターン
Swiftの変数名の命名規則はローワーキャメルケースなので、CodingKeyを使って揃えることができる
var data = """
{
  "ID": 1,
  "Name": "Taro",
}
""".data(using: .utf8)!

struct User: Decodable {
    let id: Int
    let name: String

    enum CodingKeys: String, CodingKey {
        case id = "ID"
        case name = "Name"
    }
}

let user: User = try JSONDecoder().decode(User.self, from: data)

print(user)
データ構造に配列があるパターン
デコードメソッドの引数に配列で渡す
var data = """
[
    {
        "id": 0,
        "name": "Mike"
    },
    {
        "id": 1,
        "name": "John"
    },
    {
        "id": 2,
        "name": "Mary"
    }
]
""".data(using: .utf8)!

struct User: Decodable {
    let id: Int
    let name: String
}

let user: [User] = try JSONDecoder().decode([User].self, from: data)

print(user)
ネストが深いパターン(自動デコード)
別のデコード用のstructを作る(あんまり自動で済むパターンないですが)
var data = """
{
    "id": 0,
    "name": {
        "last": "Suzuki",
        "first": "Taro"
    }
}
""".data(using: .utf8)!

struct User: Decodable {
    let id: Int
    let name:Name

    struct Name: Decodable {
        let last: String
        let first: String
    }
}

let user: User = try JSONDecoder().decode(User.self, from: data)
print(user)
ネストが深いパターン(手動デコード)
おそらくこっちのがよくあるパターン 別のstructを作らずに済む
取得しない値(キー用意していない変数)は 辞書型ならnestedContainer、 配列ならnestedUnkeyedContainerで取得できる階層ごとに別のCodingKeyを用意してあげる
var data = """
{
    "id": 0,
    "name": {
        "last": "Suzuki",
        "first": "Taro"
    }
}
""".data(using: .utf8)!

struct User: Decodable {
    let id: Int
    let lastName: String
    let firstName: String

    enum CodingKeys: String, CodingKey {
        case id
        case name
    }

    enum NameKeys: String, CodingKey {
        case lastName = "last"
        case firstName = "first"
    }

    init(from decoder: Decoder) throws {
        let values = try decoder.container(keyedBy: CodingKeys.self)
        id = try values.decode(Int.self, forKey: .id)

        let nameValues = try values.nestedContainer(keyedBy: NameKeys.self, forKey: .name)
        lastName = try nameValues.decode(String.self, forKey: .lastName)
        firstName = try nameValues.decode(String.self, forKey: .firstName)
    }
}

let user: User = try JSONDecoder().decode(User.self, from: data)
print(user)
キーが存在しない時があるパターン (自動デコード)
プロパティをオプショナル型にする
var data = """
{
    "id": 0
}
""".data(using: .utf8)!

struct User: Decodable {
    let id: Int
    let name: String?
}

let user: User = try JSONDecoder().decode(User.self, from: data)
print(user)
キーが存在しない時があるパターン (手動デコード)
decodeIfPresentやif let (変数) = try? decode~~などを使って、もしキーが存在すればのデコードをするvar data = """ { "id": 0 } """.data(using: .utf8)! struct User: Decodable { let id: Int let name: String enum CodingKeys: String, CodingKey { case id case name } init(from decoder: Decoder) throws { let values = try decoder.container(keyedBy: CodingKeys.self) id = try values.decode(Int.self, forKey: .id) name = try values.decodeIfPresent(String.self, forKey: .name) ?? "" } } let user: User = try JSONDecoder().decode(User.self, from: data) print(user)取得しない値が配列になっているパターン (手動デコード)
あんまりQiitaで見かけないのでこのパターンも記載(JSONデータの例が雑ですみません
)
var data = """
{
    "id": 0,
    "names": [
        {
            "name": "太郎(日本名)"
        },
        {
            "name": "テンプレマン(ニックネーム)"
        },
        {
            "name": "Taro(アメリカネーム)"
        }
    ]
}
""".data(using: .utf8)!

struct User: Decodable {
    let id: Int
    let name: [String]

    enum CodingKeys: String, CodingKey {
        case id
        case names
    }

    enum NameKeys: String, CodingKey {
        case name
    }

    init(from decoder: Decoder) throws {
        let values = try decoder.container(keyedBy: CodingKeys.self)
        id = try values.decode(Int.self, forKey: .id)

        var names = try values.nestedUnkeyedContainer(forKey: .names)
        var nameArray: [String] = []

        while !names.isAtEnd {
            let nameDic = try names.nestedContainer(keyedBy: NameKeys.self)
            let nameValue = try nameDic.decode(String.self, forKey: .name)
            nameArray.append(nameValue)
        }
        name = nameArray
    }

}

let user: User = try JSONDecoder().decode(User.self, from: data)
print(user)
どっちかのキーで返ってくるパターン
EnumにDecodableを準拠させたプロパティを用意して、それを使って分岐で両方デコードする
var data1 = """
{
    "id": 0,
    "name": "Taro"
}
""".data(using: .utf8)!

var data2 = """
{
    "id": 1,
    "name": {
        "last": "Suzuki",
        "first": "Ichiro"
    }
}
""".data(using: .utf8)!

struct User: Decodable {
    let id: Int
    let name: NameType

    enum CodingKeys: String, CodingKey {
        case id
        case name
    }

    init(from decoder: Decoder) throws {
        let values = try decoder.container(keyedBy: CodingKeys.self)
        id = try values.decode(Int.self, forKey: .id)
        name = try values.decode(NameType.self, forKey: .name)
    }

    enum NameType: Decodable {
        case firstNameOnly(String)
        case fullName(Name)

        init(from decoder: Decoder) throws {
            let nameType = try decoder.singleValueContainer()

            if let nameValue = try? nameType.decode(Name.self) {
                self = .fullName(nameValue)
            }
            else {
                let nameValue = try nameType.decode(String.self)
                self = .firstNameOnly(nameValue)
            }
        }
    }
}

struct Name: Decodable {
    let last: String
    let first: String

    private enum NameKeys: String, CodingKey {
        case last
        case first
    }

    init(from decoder: Decoder) throws {
        let nameValues = try decoder.container(keyedBy: NameKeys.self)
        last = try nameValues.decode(String.self, forKey: .last)
        first = try nameValues.decode(String.self, forKey: .first)
    }
}

let user1: User = try JSONDecoder().decode(User.self, from: data1)
print(user1)
let user2: User = try JSONDecoder().decode(User.self, from: data2)
print(user2)
感想
もし記載ミス等あればご指摘お願いします
(JSONデータ例が雑なのは悪しからず。。)
パースって大変ですよね(白目)追記
仕事時に参考にしていた記事
【Swift】Codableについて備忘録
レスポンスのJSONが異なるAPIにオプショナルを使わず対応する方法(Swift)
Codableについて色々まとめた[Swift4.x]
- 投稿日:2020-11-24T18:46:23+09:00
[iOS]XcodeのSchemeとTargetとConfiguration
Scheme, Target, Configuration
ビルド時の目的に応じて、設定値や処理を分けたいときに使える機能。
- iOSアプリが通信するバックエンドシステムのURLが環境毎に異なる
- アプリのログ出力を開発フェーズ毎に分けたい(開発時、テスト時、本番リリース時)
それぞれの概念がよくわかっていないので調べて、自分がしっくりくる言葉に落とし込んでみる。
それぞれの関係を表したイメージ図
Schemeとは?
ざっくりいうと、
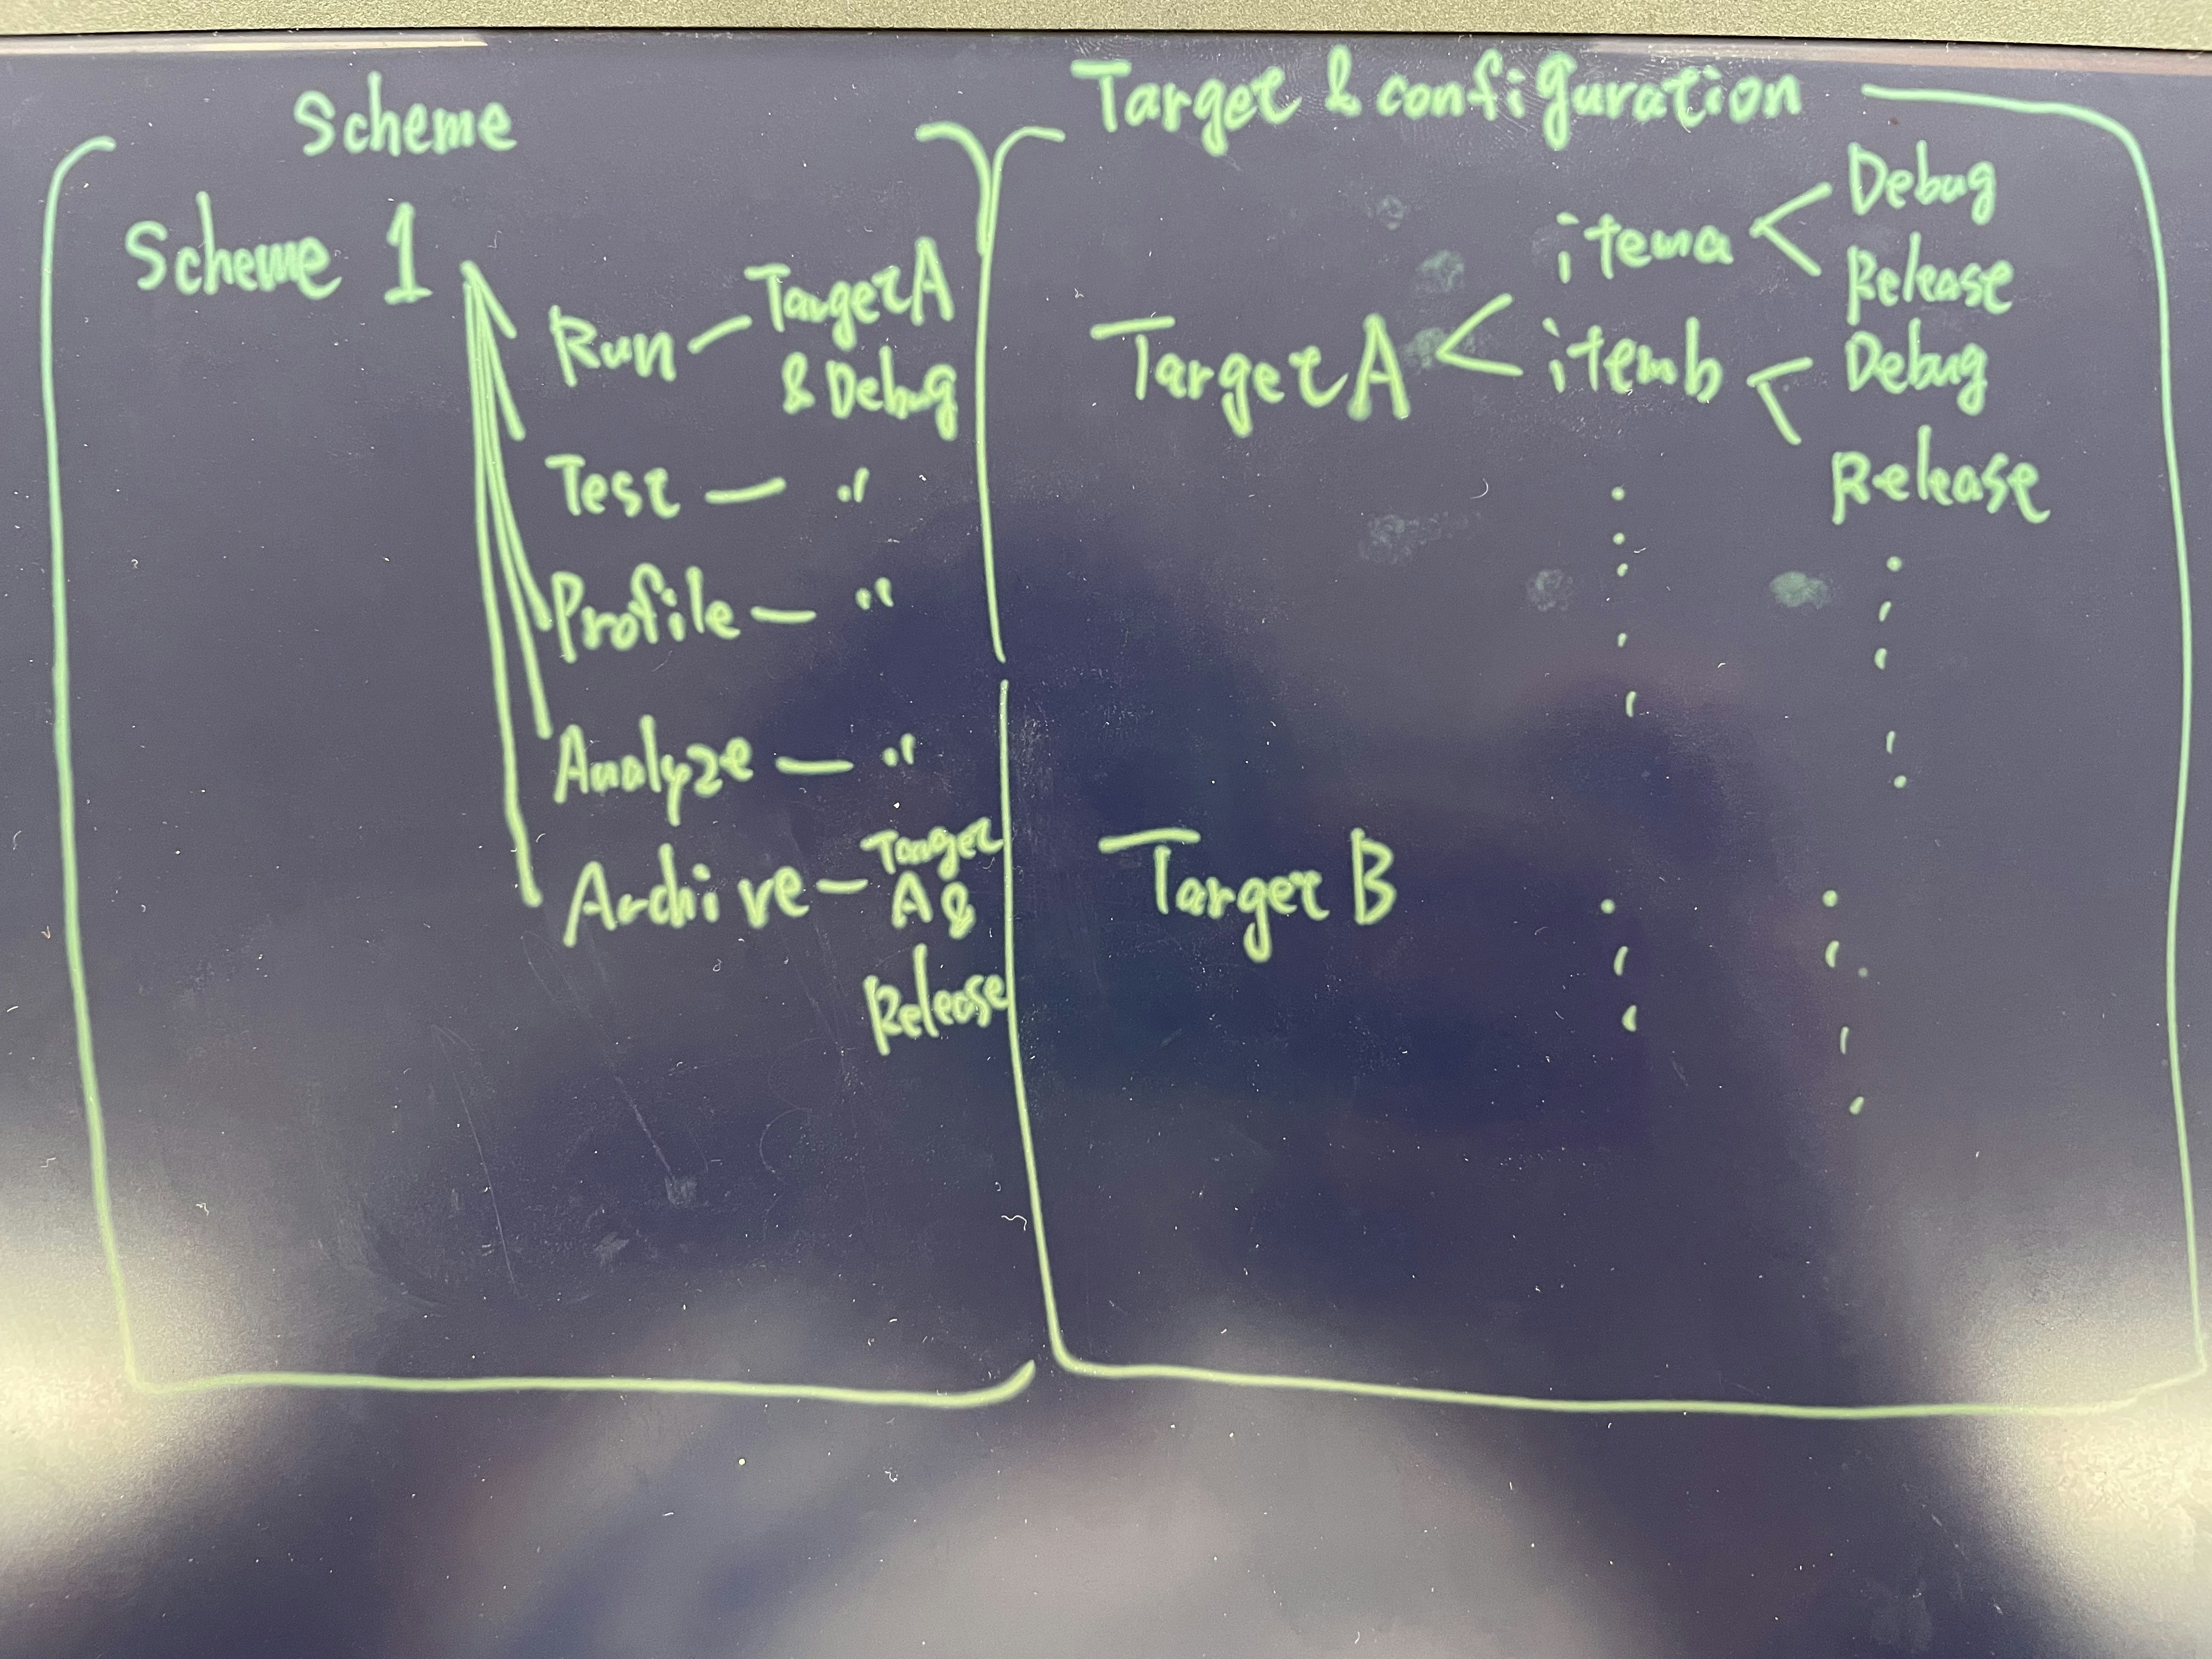
ビルドを伴う5つの処理(Run, Test, Profile, Analyze Archive)それぞれにおいて、採用する「Target」とTarget内の「Configuration」を紐付けてまとめてラベル付けしたもの
Xcode4から登場した機能である。
Xcode3までは、ビルド・実行に関する大量の設定項目をビルドの目的に応じて設定、切り替えて実施していたが、
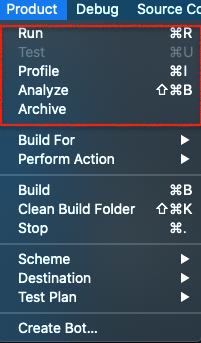
目的に応じた設定が異なる箇所は少ない(=ほとんどの部分は共通化できる)じゃんということで生まれた機能らしい。スキームの設定画面(Product > Scheme > Edit Scheme...)では
「Build」「Run」「Test」「Profile」「Analyze」「Archive」
と並んでいるが、これらは別に上から順に実行されるわけではない。
実際には、ユーザーがどれを実行したいかを選択する(Product > Run/Test/Profile/Analyze/Archive)ことになる。
意味合いは以下の通り。
- Build: ビルド(=ソースコードのコンパイル)。
- Run: Schemeで指定しているTargetをConfigrationの値でビルドし、選択した端末orシミュレータで実行する
- Test: Schemeで指定しているTargetをConfigrationの値でビルドし、ユニットテストを実行する
- Profile: Schemeで指定しているTargetをConfigrationの値でビルドしInstrumentsを使いつつ選択した端末orシミュレータで実行する
- Analyze: Schemeで指定しているTargetをConfigrationの値でビルドし、静的解析を行う
- Archive: Schemeで指定しているTargetをConfigrationの値でビルドし、配布可能な形式のファイル(.ipa)を生成する。
Target
ビルド時の設定リスト。
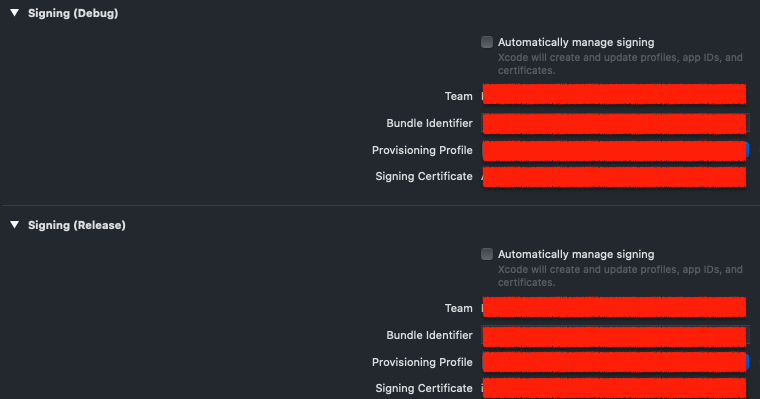
「Signing & Capabilities」, 「Build Settings」の各設定項目については、デフォルトで「Debug」, 「Release」というConfigurationが用意されており、それぞれの値を設定できる模様。Signing & Capabilities
Build Settings
Targetの単位は、「アプリ自体」「ユニットテスト用アプリ」「UIテスト用アプリ」というふうに大きく設定が異なる場合にTargetを分けるといいらしい。
Configuration
デフォルトではDebugとReleaseが用意されており、同一Target内での設定値の出し分けに使う。
参考
What are “analyze”, “test” and other checkboxes in “Build” part of scheme in Xcode?
All About Schemes
Xcode Profile vs Analyze
What is difference between build and archive in Xcode

- 投稿日:2020-11-24T18:36:12+09:00
【Swift】 TableViewCell に画像を入れる【初心者】
はじめに
TableViewCellに画像を入れる方法について調べたので、メモとしてまとめる事にしました。
storyboardにTableViewとTableViewCellを準備
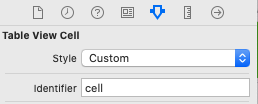
cellにIdentifierを付ける
今回はIdentifierは「cell」にしました。
Assets.xcassetsに画像ファイルを入れる
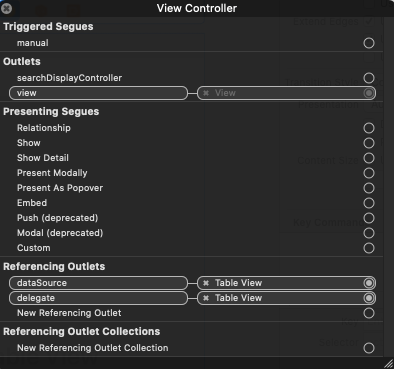
TableViewをdatasouceとdelegateに繋ぐ
UITableViewDelegate,UITableViewDatasourceを追加
ViewController.swiftclass ViewController: UIViewController,UITableViewDelegate,UITableViewDataSource {配列を準備
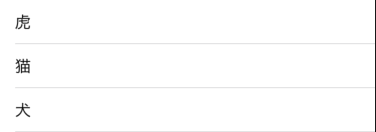
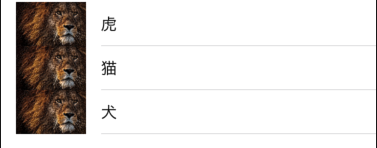
ViewController.swiftlet animalArray = ["虎", "猫","犬"] //画像用 let imageArray = ["lion", "cat", "dog"]セルの設定
ViewController.swift//セルの個数を指定する func tableView(_ tableView: UITableView, numberOfRowsInSection section: Int) -> Int { return animalArray.count } //セルに値を設定する func tableView(_ tableView: UITableView, cellForRowAt indexPath: IndexPath) -> UITableViewCell { //セルを取得 let cell = tableView.dequeueReusableCell(withIdentifier: "cell", for: indexPath) //セルに表示する値を設定 //テキストラベル cell.textLabel?.text = animalArray[indexPath.row] return cell }
①1つの画像を全てのcellに入れる
ViewController.swift//①画像(1つの画像を全てのcellに入れる) cell.imageView?.image = UIImage(named: "lion")
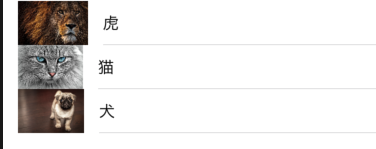
②cellの1つずつに別の画像を入れる
ViewController.swift//②画像を複数入れる cell.imageView?.image = UIImage(named: imageArray[indexPath.row])
③cellの1つずつに別の画像を入れる(同じサイズにリサイズ)
CGSizeのwidth:50,height:50を変更する事で画像サイズを変更できます。
ViewController.swift//③画像を同じサイズにリサイズ cell.imageView?.image = UIImage(named: imageArray[indexPath.row])?.resize(size: CGSize(width: 50, height: 50))
リサイズメソッド
ViewController.swiftextension UIImage { func resize(size: CGSize) -> UIImage { let widthRatio = size.width / self.size.width let heightRatio = size.height / self.size.height let ratio = (widthRatio < heightRatio) ? widthRatio : heightRatio let resizedSize = CGSize(width: (self.size.width * ratio), height: (self.size.height * ratio)) // 画質を落とさないように以下を修正 UIGraphicsBeginImageContextWithOptions(resizedSize, false, 0.0) draw(in: CGRect(x: 0, y: 0, width: resizedSize.width, height: resizedSize.height)) let resizedImage = UIGraphicsGetImageFromCurrentImageContext() UIGraphicsEndImageContext() return resizedImage! } }全てのコード
①②のコードはコメントアウトしてあります。
ViewController.swiftimport UIKit class ViewController: UIViewController,UITableViewDelegate,UITableViewDataSource { let animalArray = ["虎", "猫","犬"] //画像用 let imageArray = ["lion", "cat", "dog"] override func viewDidLoad() { super.viewDidLoad() // Do any additional setup after loading the view. } //セルの個数を指定する func tableView(_ tableView: UITableView, numberOfRowsInSection section: Int) -> Int { return animalArray.count } //セルに値を設定する func tableView(_ tableView: UITableView, cellForRowAt indexPath: IndexPath) -> UITableViewCell { //セルを取得 let cell = tableView.dequeueReusableCell(withIdentifier: "cell", for: indexPath) //セルに表示する値を設定 //テキストラベル cell.textLabel?.text = animalArray[indexPath.row] //①画像(1つの画像を全てのcellに入れる) // cell.imageView?.image = UIImage(named: "lion") //②画像を複数入れる // cell.imageView?.image = UIImage(named: imageArray[indexPath.row]) //③画像を同じサイズにリサイズ cell.imageView?.image = UIImage(named: imageArray[indexPath.row])?.resize(size: CGSize(width: 50, height: 50)) return cell } } //リサイズメソッド extension UIImage { func resize(size: CGSize) -> UIImage { let widthRatio = size.width / self.size.width let heightRatio = size.height / self.size.height let ratio = (widthRatio < heightRatio) ? widthRatio : heightRatio let resizedSize = CGSize(width: (self.size.width * ratio), height: (self.size.height * ratio)) // 画質を落とさないように以下を修正 UIGraphicsBeginImageContextWithOptions(resizedSize, false, 0.0) draw(in: CGRect(x: 0, y: 0, width: resizedSize.width, height: resizedSize.height)) let resizedImage = UIGraphicsGetImageFromCurrentImageContext() UIGraphicsEndImageContext() return resizedImage! } }終わりに
初学者のため、もし間違いがあれば教えていただければ幸いです。
参考サイト


- 投稿日:2020-11-24T17:45:05+09:00
[iOS] [Swift] ローカル通知とアプリのライフサイクルについて
はじめに
これはiOS アプリでプッシュ通知についての記事です。
これから学ぶ知識
- 通知
- AppDelegate / SceneDelegate
- UNNotificationContent
- UNNotificationTrigger
- UNNotificationRequest
通知
概要
スマートフォンを使っていると 1 日に 1 度はみることのある通知は、ユーザーがアプリを開いていなくてもアプリに関する情報を伝えられるというメリットが強力です。
例えば、アラームアプリはユーザーがアプリを開いていなくてもその時刻が来たことを適切に伝えてくれます。
また、通知にはいくつかの種類がありますが、よく使われるのは以下のものです。
アラート(リスト) アラート(バナー) バッジ サウンド No Imageアプリケーションのライフサイクル
プログラム上では通知を受け取った際のアプリの状態によって処理が変わってきます。
状態というのはアプリが今起動しているかやアプリが画面上に表示されているかといったもののことです。そこで、通知と紐付けて、iOS アプリケーションにおけるライフサイクルを確認しましょう。
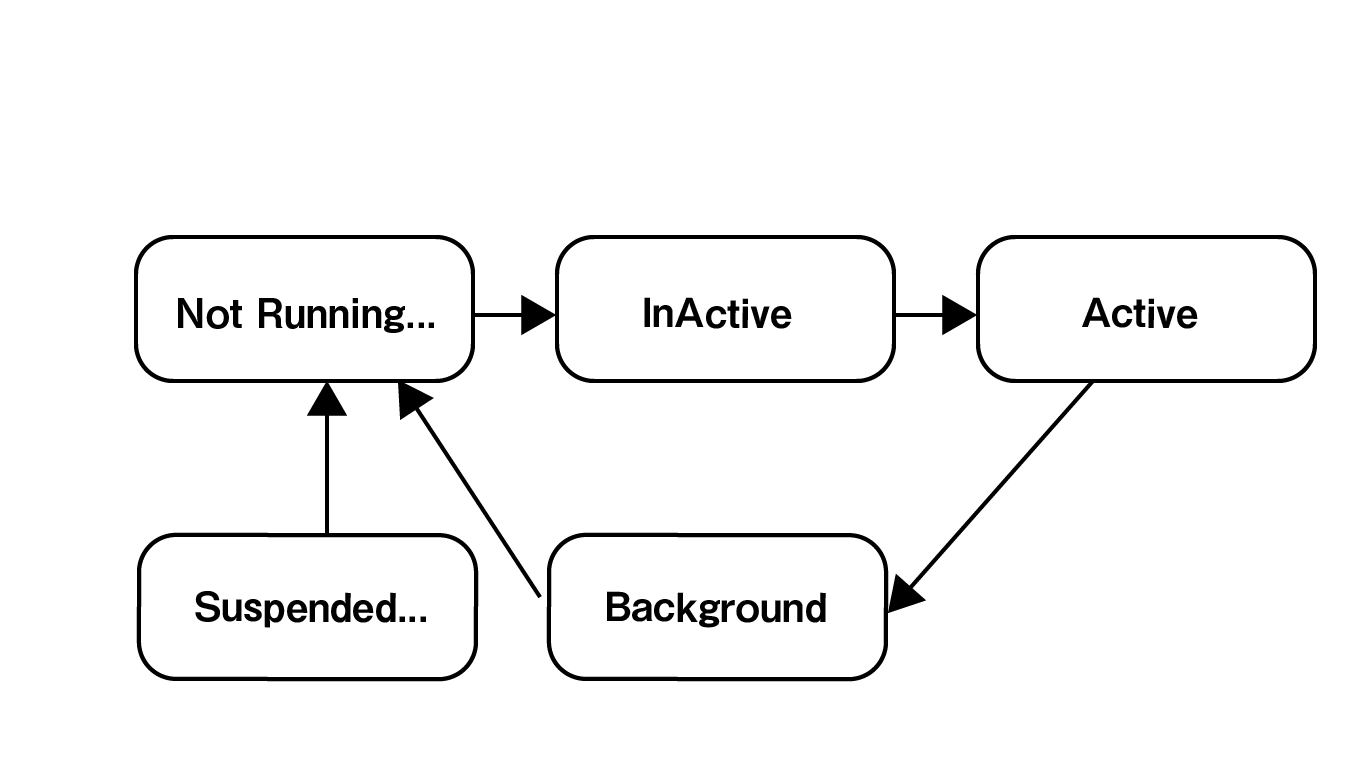
ライフサイクルとは生まれてから消えるまでの過程のことです。フォアグラウンド(Foreground)
フォアグラウンドとはアプリケーションが画面上に表示されている状態のことを指します。
Active/In Activeの 2 種類に細かく分けられます。バックグラウンド(Background)
バックグランドとはアプリケーションが画面上に表示されていない状態のことを指します。
Backgroundの状態で一定時間起動が続くと、システムが自動的に
Suspended(停止状態)に切り替えてくれます。
アプリケーションのライフサイクル
種類 説明 例 Activeアプリが現在操作中である 使用中 InActiveアプリの操作から一時的に離れている状態であるが、アプリは表示されている コントロールセンター・通知センターを表示している状態 ForegroundActiveとInActiveの状態の総称Background別のアプリケーションが表示されている状態。アプリは起動していてバックグランドで特定のタスクが可能 Suspended一定時間の Background状態が続くと自動的にこの状態になるNot Runningアプリが完全に停止している状態 細かく分けられるものの、アプリケーションにはフォアグラウンドとバックグラウンドの状態があることが重要です。
SuspendedとNot Runningに関してはシステムが自動で管理する部分もありあまり開発者でも意識することはありません。AppDelegate について
AppDelegate とは
@UIApplicationMainの属性をもつクラスで、アプリごとに 1 つのみ存在します。SceneDelegateについて
SceneDelegateとはAppDelegateとは異なり、アプリごとに複数存在することがあります。iOS13から導入された
Multiple Windowsによって一つのアプリを複数のウィンドで操作できることがあるため、アプリケーションのライフサイクルはAppDelegateよりもSceneDelegateの方が優先されるようになりました。(UIApplicationDelegate#applicationDidBecomeActiveはSceneDelegateが設定されている場合は呼ばれません。)例えば、アプリがActiveなのかそうでないのかを判断する場合は以下の2つのメソッドを実装する必要があります。
func sceneDidBecomeActive(_ scene: UIScene)
- シーンのライフサイクルがアクティブになった際に呼ばれます。
func sceneWillResignActive(_ scene: UIScene)
- シーンのライフサイクルがアクティブでなくなった際に呼ばれます。
許可について
通知はアプリをインストールしてくれた全てのユーザーに対して送ることができるわけではありません。
実際に通知を送るには下の画像の様に予めユーザーに許可をとる必要があります。
通知許可アラート 通知の許可を送るコード
以下のコードで
アラートバッジサウンドの3つに対して許可のリクエストをすることができます。// プッシュ通知の許可を依頼する際のコード UNUserNotificationCenter.current().requestAuthorization([.alert, .badge, .sound]) { (granted, error) in // [.alert, .badge, .sound]と指定されているので、「アラート、バッジ、サウンド」の3つに対しての許可をリクエストした if granted { // 「許可」が押された場合 } else { // 「許可しない」が押された場合 } }通知を送信する
UNMutableNotificationContent通知を送信する際に
UNMutableNotificationContentというクラスを作成します。下の例は、その通知によって付与されるバッジの数・通知のタイトル・通知を受信した際のサウンドを決定しています。
// MARK: 通知の中身を設定
let content: UNMutableNotificationContent = UNMutableNotificationContent()
content.title = notificationTitle
content.sound = UNNotificationSound.default
content.badge = 1
UNNotificationTrigger
次に
UNNotificationTriggerというクラスを作成します。
UNNotificationTriggerはトリガーという言葉が含まれていることから分かる様に、いつ通知を発行するのかを設定するためのものです。
実際には以下の4つのクラスを使用してトリガーを作成します。
UNCalendarNotificationTrigger
- カレンダーを元にするトリガー
DateComponentsを用いて特定の時間帯になると通知が発行される- 次の朝9時
- 毎朝9時
UNLocationNotificationTrigger
- 位置を元にするトリガー
- ある特定の地域に位置していると通知が発行される
UNTimeIntervalNotificationTrigger
- 時間差を元にするトリガー
- 60秒後
- 1週間後
UNPushNotificationTrigger
- リモート通知におけるトリガー
作成例
ある日付データ
notificationDateに対して年/月/日/時間/分が同じ際に一回のみ通知される際のトリガーは以下のように書けます。// MARK: 通知をいつ発動するかを設定 // カレンダークラスを作成 let calendar: Calendar = Calendar.current let trigger: UNCalendarNotificationTrigger = UNCalendarNotificationTrigger(dateMatching: calendar.dateComponents([.year, .month, .day, .hour, .minute], from: notificationDate), repeats: false)
UNNotificationRequest次に
UNNotificationRequestというクラスを作成します。
UNNotificationRequestは先ほどのUNNotificationContentとUNNotificationTriggerの二つを用いて作成することができます。作成例
// MARK: 通知のリクエストを作成
let request: UNNotificationRequest = UNNotificationRequest(identifier: UUID().uuidString, content: content, trigger: trigger)
identifierにはUUID().uuidStringという一意の(重複して生成されることのない)文字列を使用します。通知ごとにユニークで他と被ることがない必要があります。通知を登録(送信)する
最後に作成した通知リクエストを通知センターに登録して、通知を送信します。
コールバック引数の中で、実際にエラーが返ってきたかどうかをerror: Error?引数によって判断することができます。// MARK: 通知のリクエストを実際に登録する UNUserNotificationCenter.current().add(request) { (error: Error?) in // エラーが存在しているかをif文で確認している if error != nil { // MARK: エラーが存在しているので、エラー内容をprintする } else { // MARK: エラーがないので、うまく通知を追加できた } }通知を受け取った際の処理を実装する
設定した時刻になり、ユーザーが通知を受信したときの処理をする必要があります。
UNUserNotificationCenterDelegateに準拠した上で、以下の 2 つのメソッドを実装する必要があります。class ClassA: UNUserNotificationCenterDelegate { // フォアグラウンドの状態でプッシュ通知を受信した際に呼ばれるメソッド func userNotificationCenter(_ center: UNUserNotificationCenter, willPresent notification: UNNotification, withCompletionHandler completionHandler: @escaping (UNNotificationPresentationOptions) -> Void) { completionHandler([.banner, .list]) } // バックグランドの状態でプッシュ通知を受信した際に呼ばれるメソッド func userNotificationCenter(_ center: UNUserNotificationCenter, didReceive response: UNNotificationResponse, withCompletionHandler completionHandler: @escaping () -> Void) { completionHandler() } }通知を受け取った際に、アプリが画面に表示されている(フォアグラウンド)か、そうではない(バックグランド)かで、別のメソッドを実装する必要があることが分かると思います。
頭にある
ClassAは例で、実際には以下のようにAppDelegateがUNUserNotificationCenterDelegateを準拠して 2 つのメソッドを実装します。extension AppDelegate: UNUserNotificationCenterDelegate { // フォアグラウンドの状態でプッシュ通知を受信した際に呼ばれるメソッド func userNotificationCenter(_ center: UNUserNotificationCenter, willPresent notification: UNNotification, withCompletionHandler completionHandler: @escaping (UNNotificationPresentationOptions) -> Void) { completionHandler([.banner, .list]) } // バックグランドの状態でプッシュ通知を受信した際に呼ばれるメソッド func userNotificationCenter(_ center: UNUserNotificationCenter, didReceive response: UNNotificationResponse, withCompletionHandler completionHandler: @escaping () -> Void) { completionHandler() } }
具体的なサンプル
+ボタンから作成したプッシュ通知を一覧画面で確認できるアプリです


- 投稿日:2020-11-24T15:13:06+09:00
[iOS]Xcodeでシミュレーターを使ってアプリを検証する
1. シミュレーターの起動とアプリ起動
1.1. シミュレーターの起動
- XCodeウィンドウ上部の「端末設定ボタン」を押下
- 開かれるリスト内のiOS Simulatorsから、起動したい端末を選択
1.2. シミュレーターでアプリを起動
- XCodeウィンドウ上部の「TARGETボタン」を押下
- ビルドしたいターゲットを選択
2. シミュレーター端末のOSバージョン確認
- Xcodeの上部メニューにあるWindow > Devices and Simulators を選択
- Simulatorsタブを選択
- 端末一覧が表示されるので、OSバージョンを確認したい端末を押下すると確認できる。
3. シミュレーター端末のインストール
デフォルトだと、そのXCodeインストール時の最新のiOSでしか各シミュレーター端末が使えない。過去バージョンiOSでシミュレーターを起動したい場合は、自分でダウンロードしてインストールする必要がある。
3.1. ダウンロード&インストール
- XCodeウィンドウ上部の「端末設定ボタン」を押下
- Download Simulatorsを押下
- DLしたいiOSバージョンを選択して、Check and Install Nowを押下
- ダウンロード完了後にXCode再起動
3.2. 新しいシミュレーター端末の登録
- Devices and Simulatorsを開く
- Simulatorsタブを選択
- 左下にある+ボタンを押下
- 「Create a new simulator」ダイアログで端末、OSバージョン、そして名付けを行ってCreateを押下
- 投稿日:2020-11-24T11:36:39+09:00
[iOS14]ScrollViewReaderを使って簡単なチャットの実装
今までのチャットの実装の難しさとiOS14からの手法
UIKitでチャットアプリを実装する際、UITableViewを使うことが多いかと思います。
LINEのようなチャットの場合は特に高さの計算、一番下へスクロールの実装が難しいですね。
今までの経験により、実装も複雑になりバグも多かったりしました。
iOS14になってからは、SwiftUIのScrollViewReaderが出てきて、だいぶチャットの実装が楽になりました。環境
- Xcode12.2
- iOS14.2(SwiftUI2)
ScrollViewReaderとは
プログラム的にスクロールできるようになります。
ScrollViewReader - Apple公式ドキュメントScrollView { ScrollViewReader { (proxy: ScrollViewProxy) in ... } }ScrollViewReaderのクロージャーで
ScrollViewProxyにアクセスが可能になります。これを保存しておき、
scrollToでプログラム的にスクロールします。func scrollTo<ID>(_ id: ID, anchor: UnitPoint? = nil) where ID : Hashable簡単なチャットで使ってみた
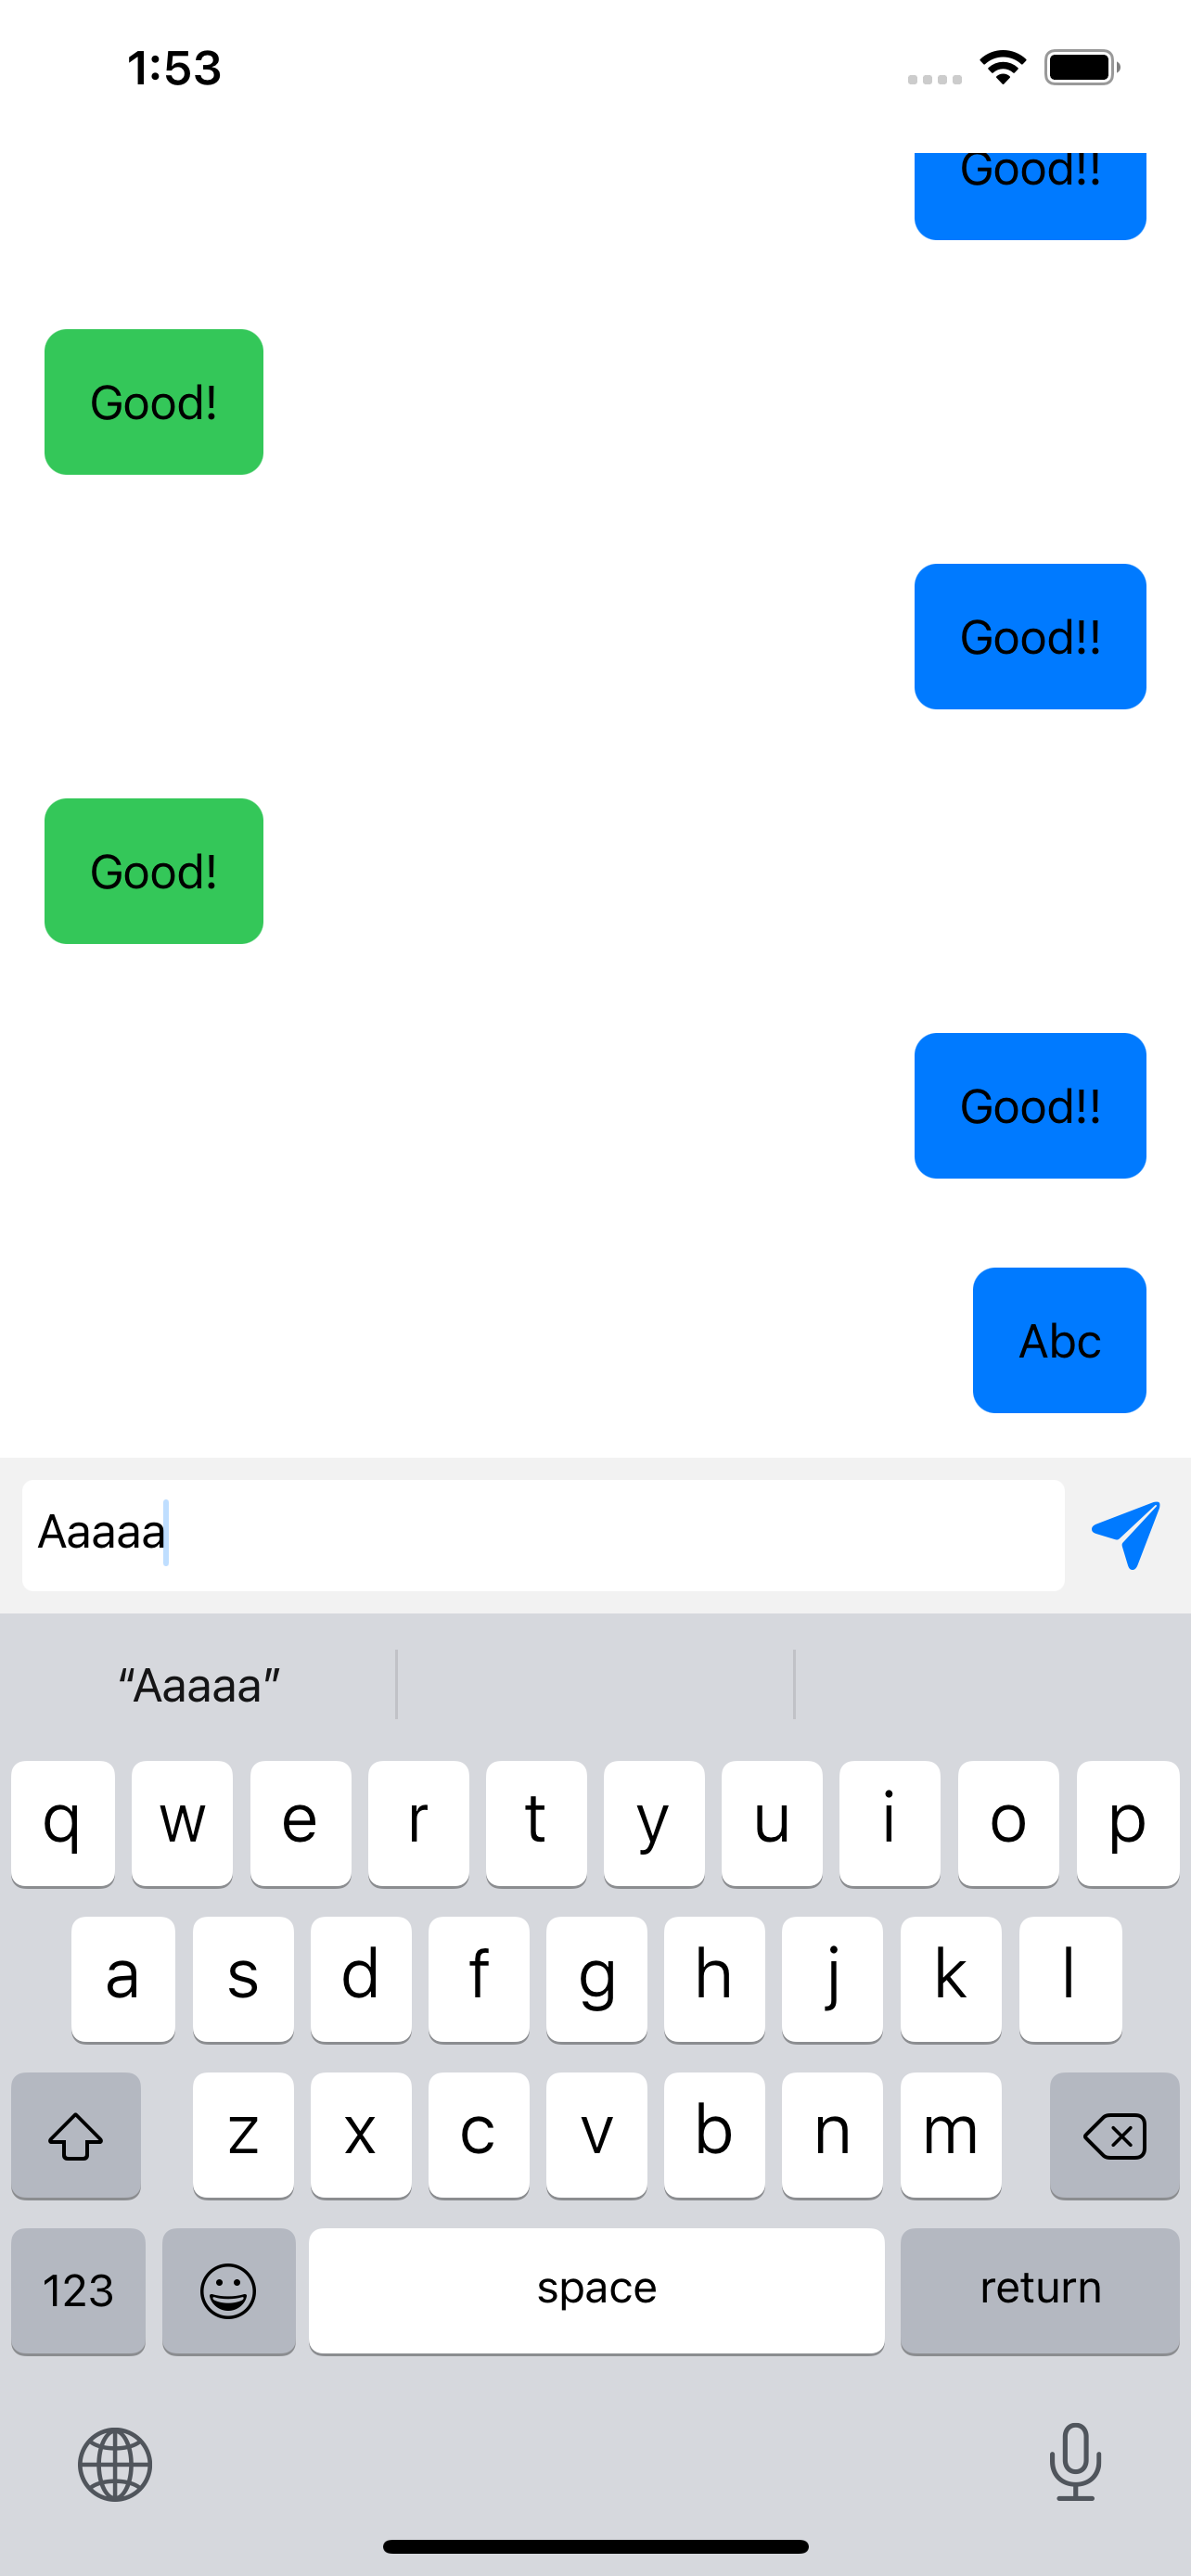
struct ContentView: View {

    @ObservedObject private var viewModel: ViewModel = .init()

    @State var text: String = ""
    @State var value: ScrollViewProxy?

    var body: some View {
        VStack {
            ScrollView {
                ScrollViewReader { value in
                    LazyVStack(alignment: .center, spacing: 16) {
                        //チャットの表示
                        ForEach.init(self.viewModel.messages, id: \.id) { message in
                            ChatView.init(message: message)
                        }
                    }.onAppear {
                        self.value = value //ScrollViewProxyを保存する
                        self.value?.scrollTo(self.viewModel.messages.count, anchor: .bottom) //初めに表示された時に一番下までスクロールする
                    }.animation(.easeInOut)
                }
            }

            //テキスト入力欄
            VStack {
                ...
            }.background(Color(white: 0.95))
        }
    }
}

extension ContentView {

    //送信ボタンを押した時
    func sendText() {
        viewModel.send(text: text)
        text = ""
        guard let message = viewModel.messages.last else { return }
        debugPrint(message)
        //わずかにタイミングをずらさないと、スクロールできない
        DispatchQueue.main.asyncAfter(deadline: .now() + 0.1, execute: {
            withAnimation {
                //一番下にアニメーションする
                self.value?.scrollTo(message.id, anchor: .bottom)
            }

        })
    }

}
スクショ
ソースコード
https://github.com/usk-sample/ScrollViewReaderTest
参考
https://developer.apple.com/documentation/swiftui/scrollviewreader
https://qiita.com/giiiita/items/be38b9f0135a12bfd49c
https://medium.com/better-programming/build-a-chat-app-interface-with-swiftui-96609e605422
https://developer.apple.com/tutorials/swiftui/animating-views-and-transitions
https://www.raywenderlich.com/5815412-getting-started-with-swiftui-animations