- 投稿日:2020-11-18T23:29:18+09:00
アクセス修飾子まとめ【Swift】
はじめに
コードを書く際にあまり意識していなかったのと、理解が曖昧だったので備忘録として投稿します。
アクセス修飾子とは?
アクセス修飾子とは、クラスや関数等にアクセス制限を設けるために利用します。
internal
- 同じモジュール内であればアクセスすることができる。
モジュールとは
モジュールとは
importして読み込んで利用するFrameworkを作成するための仕組み。private
- 一番制約の厳しいアクセス修飾子。
- 同じファイル内からのアクセスのみ許可されている。
- クラス単位ではなく、ファイル単位のアクセス制御であることに注意がいる。( Swift4から
extensionでprivateプロパティにアクセスできるようになった。)fileprivate
- 同じファイル内からのアクセスのみ許可されている。
public
- 別のモジュールからでもアクセスできる。
- 継承やオーバーライドが不可能
open
- 別のモジュールからでもアクセスできる。
- 継承やオーバーライドが可能
アクセス修飾子の使い分け
アクセスレベルを特に意識しない場合
- 何もつけない or
internalアクセスレベルを意識する場合
public・・・別のモジュールからも使えるようにしたいopen・・・別のモジュールからも使えて、継承やオーバーライドさせたい。private・・・実装を他からは隠したい。fileprivate・・・実装を他からは隠したいが、特定のコード間では共有したい。補足
fileprivateを使うよりprivateにして、共有したいコードを同じソースファイルにextensionを使ってまとめるほうがいい。参考
- 投稿日:2020-11-18T21:27:30+09:00
iOSの言語設定を取得する方法(Swift)
はじめに
iOSの言語設定を取得する方法を紹介します。
環境
PC
- OS:macOS Big Sur 11.0.1
- Xcode:12.2 (12B45b)
- Swift:5.3.1
シミュレータ
- 機種:iPhone SE (2nd generation)
- OS:iOS 14.2
結論
- アプリがローカライズされていない
Locale.currentではうまく取得できないので、Locale.preferredLanguagesからLocaleを生成し直す- アプリがローカライズされている
- アプリ単位で優先する言語を指定できるので、「おまけ」に書いたようにローカライズの設定を使うのがベター
言語設定の取得を試す
結論に至るまでにいろいろ試したので、過程を紹介します。
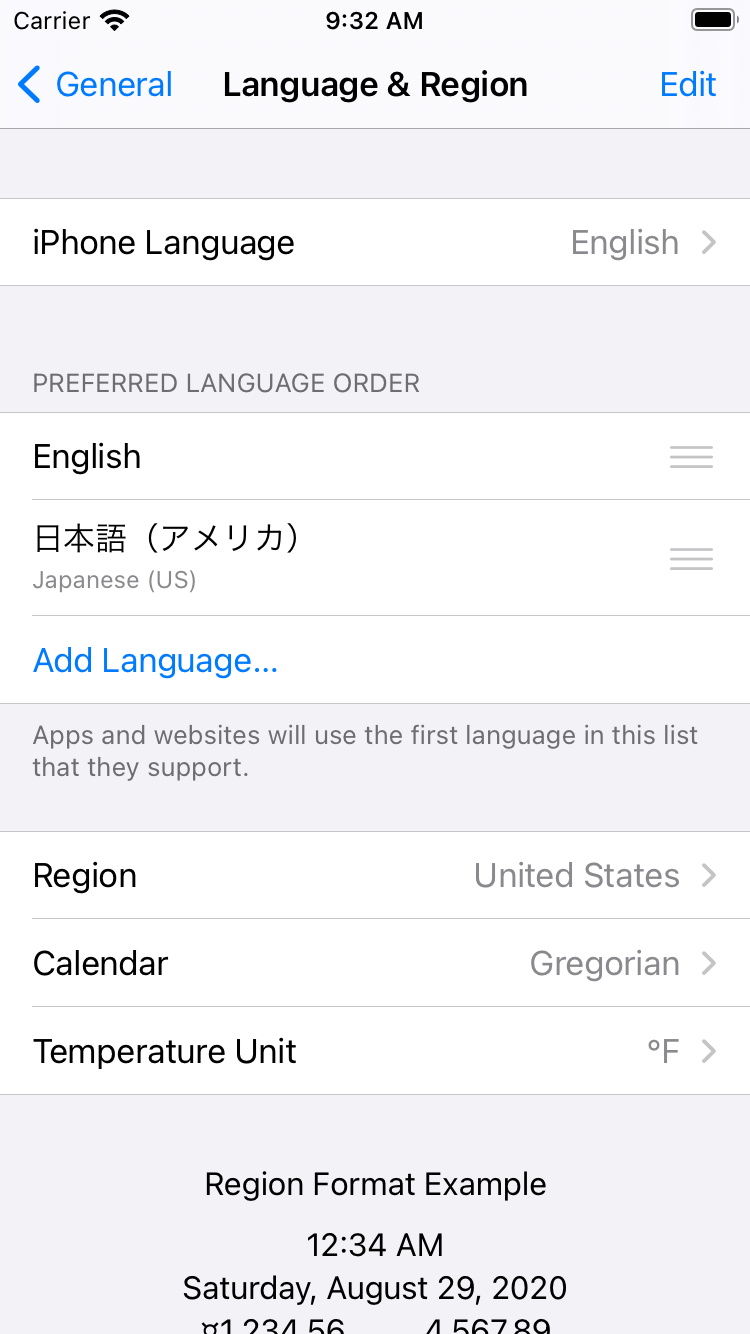
PREFERRED LANGUAGE ORDER(使用する言語の優先順序): English > 日本語 (アメリカ)
地域: United States(アメリカ合衆国)まずはシミュレータのデフォルト設定で試してみます。
Language & Region(言語と地域)
プロパティ 戻り値 Locale.preferredLanguages["en", "ja-US"]Locale.current.descriptionen (current)Locale.current.languageCodeenLocale.current.regionCodenilほぼ予想通りの結果ですが、
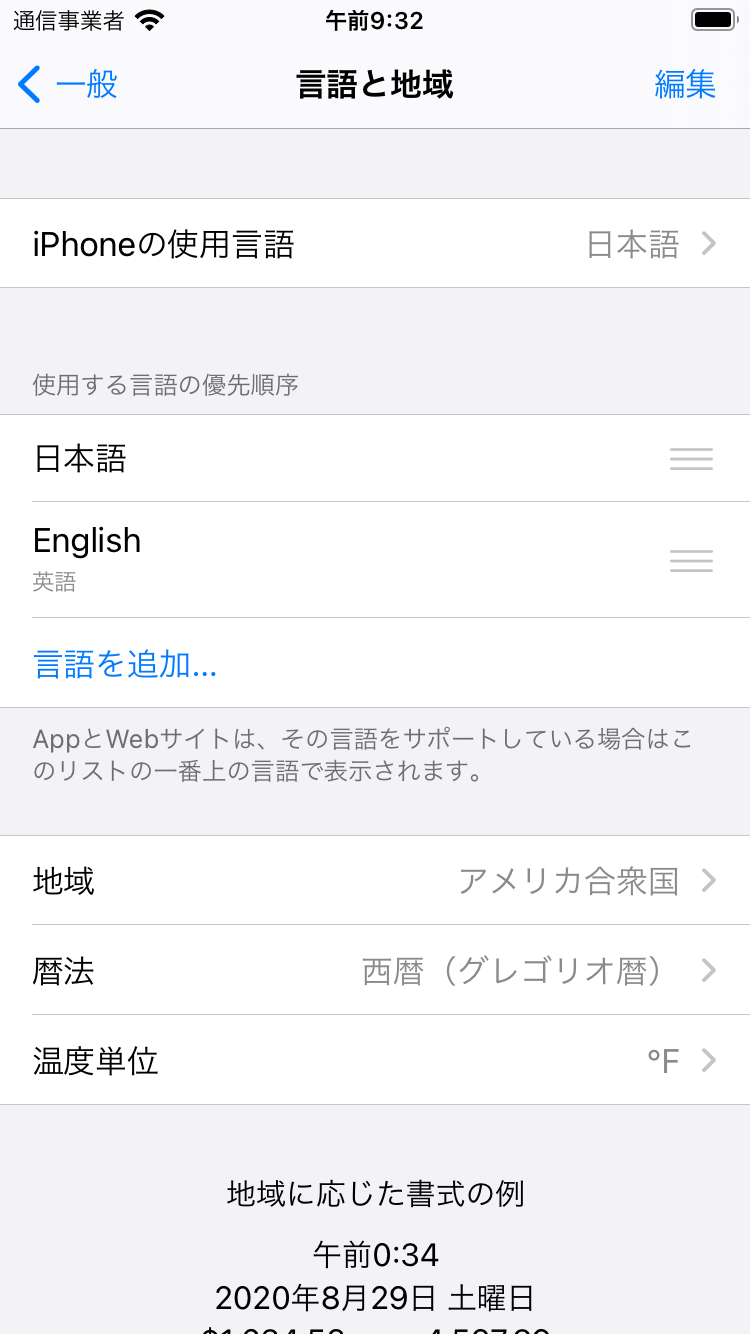
ja-USという表記を初めて見たのと、regionCodeがnilなのは意外でした。使用する言語の優先順序: 日本語 > English
地域: アメリカ合衆国次に、使用する言語の優先順序を入れ替えます。
地域は英語→日本語表記になったので変わったように見えますが、変えていません。
Language & Region(言語と地域)
プロパティ 戻り値 Locale.preferredLanguages["ja-US", "en"]Locale.current.descriptionen_US (current)Locale.current.languageCodeenLocale.current.regionCodeUS
Locale.preferredLanguagesが入れ替わったのは予想通りでしたが、他は私の中では予想外でした。
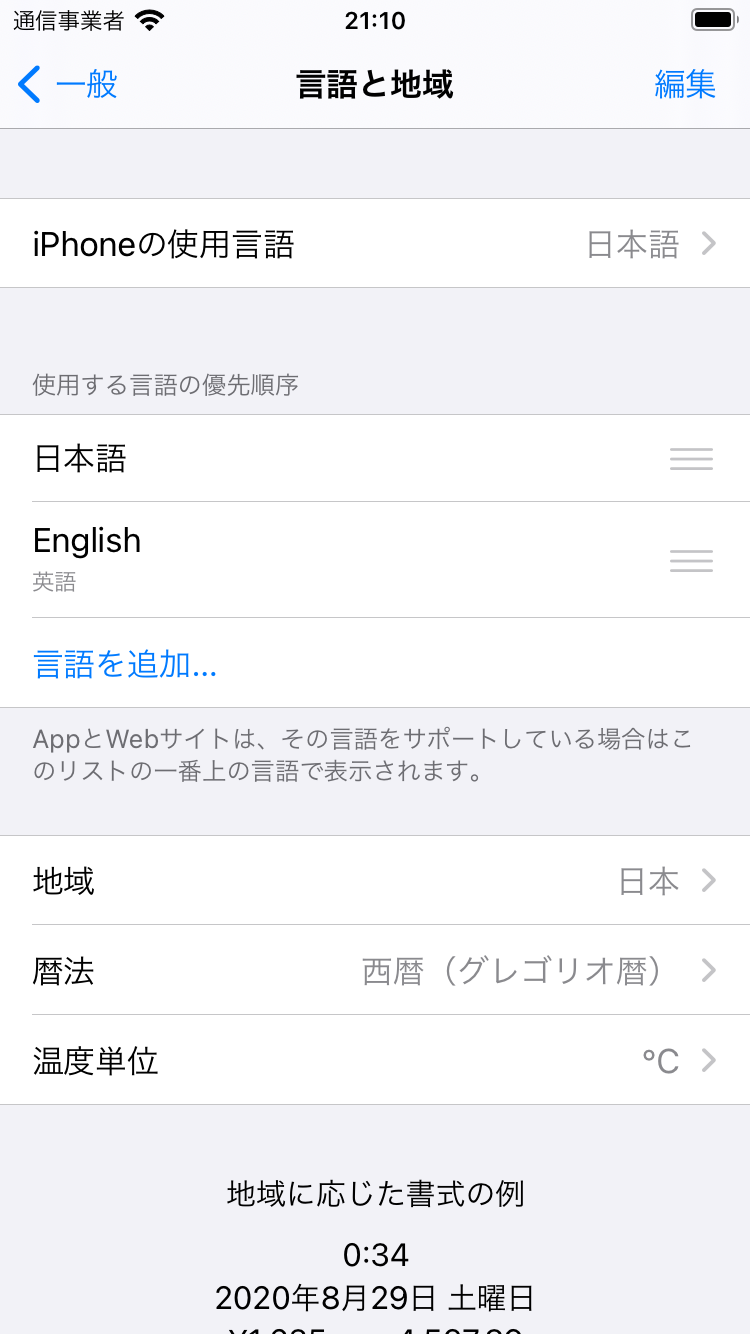
優先順序を入れ替えたことによって「iPhoneの使用言語」が日本語に変わったので、Locale.current.○○のプロパティも日本になると思いました。使用する言語の優先順序: 日本語 > English
地域: 日本使用する言語の優先順序をそのままに、地域を日本に変えます。
Language & Region(言語と地域)
プロパティ 戻り値 Locale.preferredLanguages["ja-JP", "en-JP"]Locale.current.descriptionen_JP (current)Locale.current.languageCodeenLocale.current.regionCodeJPなんかいろいろおかしい気がしますw
シミュレータだからなのか、言語や地域の変更後に再起動していないからなのか、原因はわかりません。
正しい挙動という可能性ももちろんあります。おわりに
いろいろ試してもよくわかりませんでした。
何となくわかったのが、preferredLanguagesの要素は{languageCode}-{regionCode}で構成されているということです。iOSの言語と地域について詳しい方がいたら、コメントなどで教えていただけると嬉しいです

追記:
Twitter でAppleの公式ドキュメントを教えていただきました。
言語IDやロケールIDについて詳しく書いてあるので、こちらを読めば深く理解できそうです。
https://developer.apple.com/library/archive/documentation/MacOSX/Conceptual/BPInternational/LanguageandLocaleIDs/LanguageandLocaleIDs.html#//apple_ref/doc/uid/10000171i-CH15おまけ:言語設定の取得をローカライズ文字列に任せる
iOSの言語設定がうまく取得できなかったので、代替案を考える必要があります。
Localizable.stringに"language" = "en";のようなキーと値を持たせ、言語設定の取得をローカライズ文字列に任せる方法を思いつきましたw
他にいい方法があれば教えてくださいみなさんはアプリ内でなくサーバーから言語設定に応じた文字列を取得する場合、どのように言語設定をサーバーに渡しているのだろう…
追記:
@k_katsumi さんにTwitterでいろいろ教えていただきました当てになるのはpreferredLanguagesで、そこから言語コードだけ、とか分解して取りたいならその値からLocaleを作り直すといいっすよ。
— kishikawa katsumi (@k_katsumi) November 18, 2020
let locale = Locale(identifier:Locale.preferredLanguages[0])
print(locale.languageCode)
print(locale.regionCode)
print(locale.scriptCode)その上で、ケースバイケースで難しいんですけどたいていの場合はユーザーが指定した(望んでいる)ローカライズの設定に従うようにLocalizable.stringを当てにするっていうのはかなりベターな方法だと思います。
— kishikawa katsumi (@k_katsumi) November 18, 2020ローカライズされているアプリは、OS単位でなくアプリ単位でも優先する言語を指定できるので、ローカライズの設定に従うのはベターな方法でした。
おまけとして書きましたが、こちらの方法を採用するのがよさそうです。参考リンク
- Locale | Apple Developer Documentation
- NSLocale | Apple Developer Documentation
- current | Apple Developer Documentation
- preferredLanguages | Apple Developer Documentation
- description | Apple Developer Documentation
- languageCode | Apple Developer Documentation
- regionCode | Apple Developer Documentation
- [iOS]中国語対応のために端末の言語環境の値を取得したときにハマったこと - Qiita
- 言語設定を取得したい場合はLocale.prefferedLanguagesを使う - Qiita
- 投稿日:2020-11-18T21:27:30+09:00
iOSの言語設定を取得するベストプラクティス(Swift)
はじめに
iOSの言語設定を取得するベストプラクティスを紹介します。
環境
PC
- OS:macOS Big Sur 11.0.1
- Xcode:12.2 (12B45b)
- Swift:5.3.1
シミュレータ
- 機種:iPhone SE (2nd generation)
- OS:iOS 14.2
結論
- アプリがローカライズされていない
Locale.currentではうまく取得できないので、Locale.preferredLanguagesからLocaleを生成し直す- アプリがローカライズされている
- アプリ単位で優先する言語を指定できるので、「おまけ」に書いたようにローカライズの設定を使うのがベター
- OS単位の言語設定を取得したい場合は、ローカライズされていないときと同様の方法でいい
言語設定の取得を試す
結論に至るまでにいろいろ試したので、過程を紹介します。
PREFERRED LANGUAGE ORDER(使用する言語の優先順序): English > 日本語 (アメリカ)
地域: United States(アメリカ合衆国)まずはシミュレータのデフォルト設定で試してみます。
Language & Region(言語と地域)
プロパティ 戻り値 Locale.preferredLanguages["en", "ja-US"]Locale.current.descriptionen (current)Locale.current.languageCodeenLocale.current.regionCodenilほぼ予想通りの結果ですが、
ja-USという表記を初めて見たのと、regionCodeがnilなのは意外でした。使用する言語の優先順序: 日本語 > English
地域: アメリカ合衆国次に、使用する言語の優先順序を入れ替えます。
地域は英語→日本語表記になったので変わったように見えますが、変えていません。
Language & Region(言語と地域)
プロパティ 戻り値 Locale.preferredLanguages["ja-US", "en"]Locale.current.descriptionen_US (current)Locale.current.languageCodeenLocale.current.regionCodeUS
Locale.preferredLanguagesが入れ替わったのは予想通りでしたが、他は私の中では予想外でした。
優先順序を入れ替えたことによって「iPhoneの使用言語」が日本語に変わったので、Locale.current.○○のプロパティも日本になると思いました。使用する言語の優先順序: 日本語 > English
地域: 日本使用する言語の優先順序をそのままに、地域を日本に変えます。
Language & Region(言語と地域)
プロパティ 戻り値 Locale.preferredLanguages["ja-JP", "en-JP"]Locale.current.descriptionen_JP (current)Locale.current.languageCodeenLocale.current.regionCodeJPなんかいろいろおかしい気がしますw
シミュレータだからなのか、言語や地域の変更後に再起動していないからなのか、原因はわかりません。
正しい挙動という可能性ももちろんあります。おわりに
いろいろ試してもよくわかりませんでした。
何となくわかったのが、preferredLanguagesの要素は{languageCode}-{regionCode}で構成されているということです。iOSの言語と地域について詳しい方がいたら、コメントなどで教えていただけると嬉しいです
追記:
Twitter でAppleの公式ドキュメントを教えていただきました。
言語IDやロケールIDについて詳しく書いてあるので、こちらを読めば深く理解できそうです。
https://developer.apple.com/library/archive/documentation/MacOSX/Conceptual/BPInternational/LanguageandLocaleIDs/LanguageandLocaleIDs.html#//apple_ref/doc/uid/10000171i-CH15おまけ:言語設定の取得をローカライズ文字列に任せる
iOSの言語設定がうまく取得できなかったので、代替案を考える必要があります。
Localizable.stringに"languageCode" = "en";のようなキーと値を持たせ、言語設定の取得をローカライズ文字列に任せる方法を思いつきましたw
他にいい方法があれば教えてくださいみなさんはアプリ内でなくサーバーから言語設定に応じた文字列を取得する場合、どのように言語設定をサーバーに渡しているのだろう…
追記:
@k_katsumi さんにTwitterでいろいろ教えていただきました当てになるのはpreferredLanguagesで、そこから言語コードだけ、とか分解して取りたいならその値からLocaleを作り直すといいっすよ。
— kishikawa katsumi (@k_katsumi) November 18, 2020
let locale = Locale(identifier:Locale.preferredLanguages[0])
print(locale.languageCode)
print(locale.regionCode)
print(locale.scriptCode)実際に
preferredLanguagesからLocaleを作り直し、各プロパティを確認しました。print(Locale.preferredLanguages) // ["ja-JP", "en-JP"] let language = Locale.preferredLanguages.first! print(language) // ja-JP let locale = Locale(identifier: language) print(locale.description) // ja-JP (fixed) print(locale.languageCode ?? "nil") // ja print(locale.regionCode ?? "nil") // JP print(locale.scriptCode ?? "nil") // nil適切に
languageCodeやregionCodeを取得できました。
自分で生成したLocaleだとdescriptionの括弧内が(current)でなく(fixed)になるようです。その上で、ケースバイケースで難しいんですけどたいていの場合はユーザーが指定した(望んでいる)ローカライズの設定に従うようにLocalizable.stringを当てにするっていうのはかなりベターな方法だと思います。
— kishikawa katsumi (@k_katsumi) November 18, 2020ローカライズされているアプリは、OS単位でなくアプリ単位でも優先する言語を指定できるので、ローカライズの設定に従うのはベターな方法でした。
おまけとして書きましたが、こちらの方法を採用するのがよさそうです。@treastrain さんも採用しているとのことです。
完全に出遅れてしまったけど、私も各 Localizable.strings に
— treastrain / Tanaka.R (@treastrain) November 18, 2020
"key" = "ja";
"key" = "en";
"key" = "zh-HK";
を書いて、それを拾って判定してる。 https://t.co/2B0BiEZllv参考リンク
- Locale | Apple Developer Documentation
- NSLocale | Apple Developer Documentation
- current | Apple Developer Documentation
- preferredLanguages | Apple Developer Documentation
- description | Apple Developer Documentation
- languageCode | Apple Developer Documentation
- regionCode | Apple Developer Documentation
- [iOS]中国語対応のために端末の言語環境の値を取得したときにハマったこと - Qiita
- 言語設定を取得したい場合はLocale.prefferedLanguagesを使う - Qiita
- 投稿日:2020-11-18T20:52:31+09:00
カプセル化について
カプセル化とは
データとメソッドを1つのオブジェクトにまとめてその内容を隠蔽すること!だそうです。
オブジェクト外から直接アクセスすることを出来なくして、不正なアクセス・意図しない変更から守ることができるのです!オブジェクト指向の1種
オブジェクト指向の構成要素3つのうちの1つになるそうです。
構成要素は以下の3つです。
- 継承
- カプセル化
- ポリモーフィズム
カプセル化するには?
データを保護することがカプセル化です。
その保護をするために、アクセス修飾子と言うものを使ってアクセスを制限していきます。アクセス修飾子
アクセス修飾子には制限の範囲に合わせて使うものが変わってきます。
以下が一覧になります。
私も使いこなせているわけではないですが。(privateしか使ったことありません)
カプセル化ではprivateを使用します。
- open モジュール外からもアクセスできる。
- public モジュール外からもアクセスできる。 サブクラス化されない。 overrideできない。
- internal モジュール内ならアクセスできる。 デフォルトでこれになっている。
- fileprivate ファイル内ならアクセスできる。
- private クラスなど宣言内でしかアクセスできない。(カプセル化に使用)
使ってみた
実際にカプセル化を学ぶきっかけになったコードになります。
tableViewを使用するアプリを作成していて、セルに表示する内容を書くコードだけ別のクラスに書くように指示がありました。
この場合、別のクラスでcheckIconやlabelを使用しようとすると、エラーになります。class TableViewCell: UITableViewCell { //privateを付けることで他のクラスからアクセスできない @IBOutlet private var checkIcon: UIImageView! @IBOutlet private var label: UILabel! func configure(isChecked: Bool, name: String) { //チェックされているときには表示して、チェックされていない時は表示しないという処理を書く checkIcon.image = nil if isChecked == true { checkIcon.image = UIImage(named: "check") }else{ checkIcon?.image = nil } label.text = name } }カプセル化した値は外から変更できないのか?
結論:できます。
そもそもカプセル化とはデータを保護し、異常なデータ変更や意図しない変更を防ぐためにあります。
直接変更しなければ良いのです。
その方法は、関数を使うことです。
1度関数を通せば意図的な変更になりますし、異常な変更を加えるコードであっても、その変更に対応できるコードを関数内に書くことでエラーを防ぐことができるそうです。カプセル化はオブジェクト指向
データを直接変更するのではなく(バグが発生する可能性があるため)、関数などのオブジェクト自体がデータの変更を行う。これがオブジェクト指向になります。
カプセル化はオブジェクト指向の重要な構成要素になります。参考サイト
https://jpazamu.com/encapsulation/
https://dev.classmethod.jp/articles/swift3_scoped_access_level/
- 投稿日:2020-11-18T17:00:14+09:00
Mac M1でhomebrewをインストールできるの?
Rosettaを使用しないとまだ使えない
現状、ターミナルからhomebrewをインストールしようとするとこのような出力が表示されます。
$ /bin/bash -c "$(curl -fsSL https://raw.githubusercontent.com/Homebrew/install/master/install.sh)"

Homebrew is not (yet) supported on ARM processors!
Rerun the Homebrew installer under Rosetta 2.
If you really know what you are doing and are prepared for a very broken experience you can use another installation option for installing on ARM:
  https://docs.brew.sh/Installation
出力通り、Rossetaを経由しないとダメみたいですね。
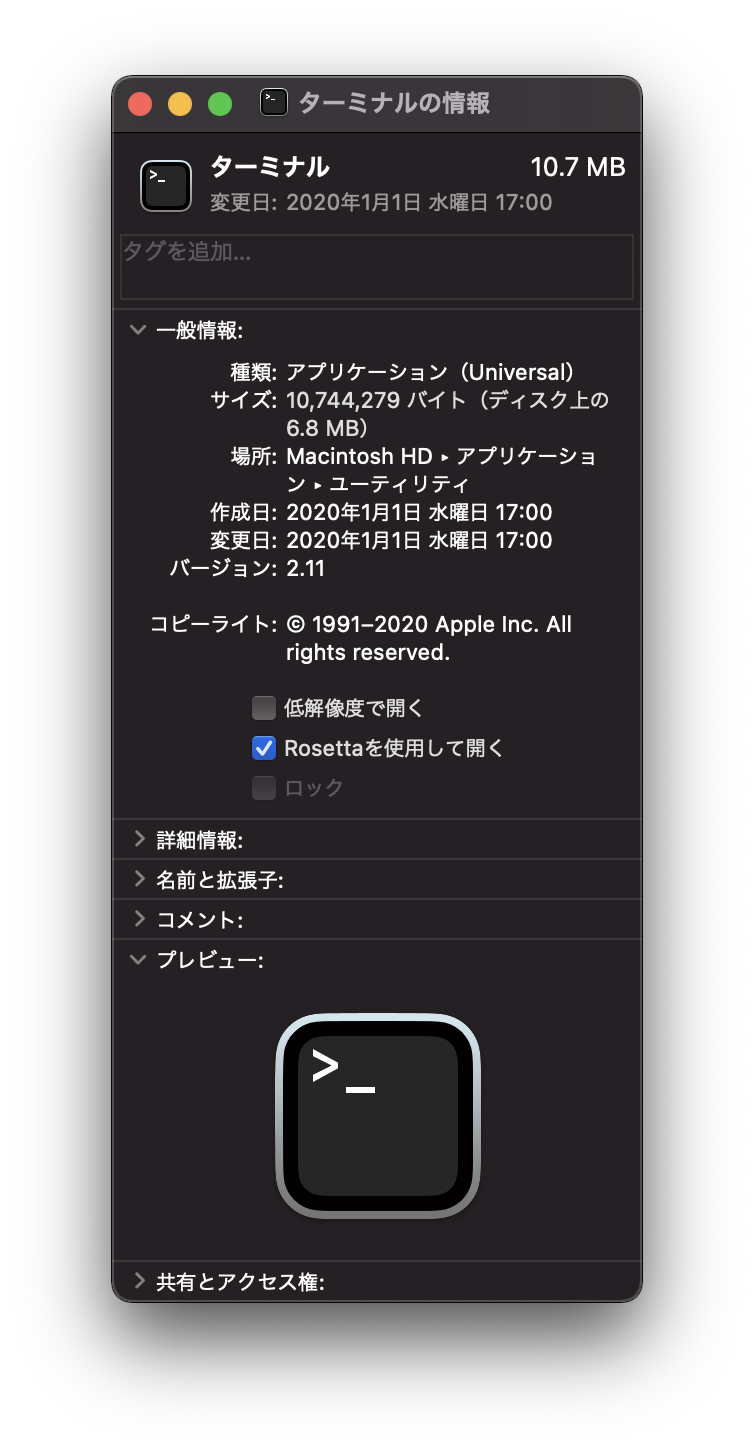
ターミナルをRossetaを使用して開くようにする
- ターミナルの情報を開きます。
Rosettaを使用して開くにチェックそうすることでhomebrewのインストールが可能になります。
$ brew doctor

Please note that these warnings are just used to help the Homebrew maintainers
with debugging if you file an issue. If everything you use Homebrew for is
working fine: please don't worry or file an issue; just ignore this. Thanks!

Warning: You are using macOS 11.0.
We do not provide support for this released but not yet supported version.
You will encounter build failures with some formulae.
Please create pull requests instead of asking for help on Homebrew's GitHub,
Twitter or any other official channels. You are responsible for resolving
any issues you experience while you are running this
released but not yet supported version.

- 投稿日:2020-11-18T17:00:14+09:00
Mac M1(Apple Silicon)でhomebrewをインストールできるの?
今まで通りにインストールしようとしたら...
現状、ターミナルから今まで通りhomebrewをインストールしようとするとこのような出力が表示されます。
$ /bin/bash -c "$(curl -fsSL https://raw.githubusercontent.com/Homebrew/install/master/install.sh)"

Homebrew is not (yet) supported on ARM processors!
Rerun the Homebrew installer under Rosetta 2.
If you really know what you are doing and are prepared for a very broken experience you can use another installation option for installing on ARM:
  https://docs.brew.sh/Installation
今まで通りではダメみたいですね。
対策1 ターミナルをRossetaを使用して開くようにする
- ターミナルの情報を開きます。
Rosettaを使用して開くにチェックそうすることでhomebrewのインストールが可能になります。
$ brew doctor

Please note that these warnings are just used to help the Homebrew maintainers
with debugging if you file an issue. If everything you use Homebrew for is
working fine: please don't worry or file an issue; just ignore this. Thanks!

Warning: You are using macOS 11.0.
We do not provide support for this released but not yet supported version.
You will encounter build failures with some formulae.
Please create pull requests instead of asking for help on Homebrew's GitHub,
Twitter or any other official channels. You are responsible for resolving
any issues you experience while you are running this
released but not yet supported version.
対策2 /opt/homebrewに保存するように実行する
https://docs.brew.sh/Installation では
However do yourself a favour and install to /usr/local on macOS Intel, /opt/homebrew on macOS ARM, and /home/linuxbrew/.linuxbrew on Linux.
とあります。
macOS ARMでは/opt/homebrewにインストールしてねと案内されています。実行コマンド
cd /opt
mkdir homebrew
curl -L https://github.com/Homebrew/brew/tarball/master | tar xz --strip 1 -C homebrew
まとめ
せっかくのARMなので極力Rosetta使用したくないですよね。
いずれはuniversalに移行するのに...状況に応じてインストールしましょう!
- 投稿日:2020-11-18T12:10:39+09:00
写真アプリのようにカスタマイズアニメーション遷移したい!
はじめに
iOS基本アプリ「写真」は写真を選択すると拡大しpresentできます。このようにしたい、もしくはこれを応用すればいろんなアニメーション作りたいときに参考にしてください。ネット上では様々なサンプルがたくさんありますが、自分なりに理解している部分をメモしました。
今回の説明
- CollectionViewからCellを選択する、選択イメージが拡大されながら遷移する。
- イメージ表示画面から閉じるボタンをタップし、CollectionViewへ縮小しながら閉じる。
処理するイメージはこんな感じ。
登場人物(クラス、デリゲート) *図の説明
HogeViewController
CollectionViewをもつViewController。以下を用意します。
- 選択したセルの変数
- 選択したイメージのスナップショット変数
- 遷移処理
HogeViewController : TransitioningDelegate
遷移する際に必要なAnimatorインスタンス生成処理定義します。
- presentの時のAnimator生成ファクトリメソッド
- dismissの時のAnimator生成ファクトリメソッド
Animator: NSObject, UIViewControllerAnimatedTransitioning
実際にアニメーション処理が定義されている。主にアニメーションするイメージを取得し、アニメーション処理を行う。
アニメーションをカスタマイズしたいならこのクラスを修正することになる。
- 遷移元、遷移先のViewControllerのインスタンスを持っている
- 遷移元のスナップショットをもっている
FugaViewController
閉じる処理、特に何もすることはない。
コードから説明
HogeViewControllerfunc collectionView(_ collectionView: UICollectionView, didSelectItemAt indexPath: IndexPath) { // 選択されているセル情報をインスタンス変数に保存 selectedCell = collectionView.cellForItem(at: indexPath) as? CollectionViewCell // 選択されているイメージ(アニメーション対象)情報をインスタンス変数に保存 selectedCellImageViewSnapshot = selectedCell?.locationImageView.snapshotView(afterScreenUpdates: false) // 遷移処理 let fugaViewController = UIStoryboard(name: "Main", bundle: nil).instantiateViewController(withIdentifier: "FugaViewController") as! FugaViewController // 遷移アニメーションプロトコールを委任 fugaViewController.transitioningDelegate = self fugaViewController.modalPresentationStyle = .fullScreen fugaViewController.data = data present(fugaViewController, animated: true) }UIViewControllerTransitioningDelegate// プロトコールメソッドの処理を定義 extension HogeViewController: UIViewControllerTransitioningDelegate { // presentをする時のAnimatorのインスタンスを生成 func animationController(forPresented presented: UIViewController, presenting: UIViewController, source: UIViewController) -> UIViewControllerAnimatedTransitioning? { // 要確認: プロジェクトの構造により、ターゲットのViewControllerが違う場合があるため、デバックで確認しターゲットViewControllerを確認する必要がある。 // もし、取得できなかったら修正が必要。(ターゲットが違う場合、エラーは発生しないが、アニメーションはしない。) guard let hogeViewController = presenting as? HogetViewController, let fugaViewController = presented as? FugaViewController, let selectedCellImageViewSnapshot = selectedCellImageViewSnapshot else { return nil } animator = Animator(type: .present, hogeViewController: hogeViewController, fugaViewController: fugaViewController, selectedCellImageViewSnapshot: selectedCellImageViewSnapshot) return animator } // dismissをする時のAnimatorのインスタンスを生成 func animationController(forDismissed dismissed: UIViewController) -> UIViewControllerAnimatedTransitioning? { // // 要確認: プロジェクトの構造により、ターゲットのViewControllerが違う場合があるため、デバックで確認しターゲットViewControllerを確認する必要がある。presentと同様な対応が必要。 guard let fugaViewController = dismissed as? FugaViewController, let selectedCellImageViewSnapshot = selectedCellImageViewSnapshot else { return nil } animator = Animator(type: .dismiss, hogeViewController: self, fugaViewController: fugaViewController, selectedCellImageViewSnapshot: selectedCellImageViewSnapshot) return animator } }Animatorenum PresentationType { case present case dismiss var isPresenting: Bool { return self == .present } } // 実際のアニメーション処理を定義する。 final class Animator: NSObject, UIViewControllerAnimatedTransitioning { // アニメーションインターバル static let duration: TimeInterval = 1.25 // 遷移元、遷移先の両方のインスタンス変数、また遷移元のスナップショット変数 private let type: PresentationType private let hogeViewController: HogeViewController private let hugaViewController: FugaViewController private var selectedCellImageViewSnapshot: UIView // 遷移元の座標情報 private let cellImageViewRect: CGRect private let cellLabelRect: CGRect // インスタンス生成 init?(type: PresentationType, hogeViewController: HogeViewController, fugaViewController: FugaViewController, selectedCellImageViewSnapshot: UIView) { self.type = type self.hogeViewController = hogeViewController self.fugaViewController = fugaViewController self.selectedCellImageViewSnapshot = selectedCellImageViewSnapshot guard let window = hogeViewController.view.window ?? fugaViewController.view.window, let selectedCell = hogeViewController.selectedCell else { return nil } // 遷移元の座標情報を取得 self.cellImageViewRect = selectedCell.locationImageView.convert(selectedCell.locationImageView.bounds, to: window) // これも遷移元の座標情報 self.cellLabelRect = selectedCell.locationLabel.convert(selectedCell.locationLabel.bounds, to: window) } // インターバル func transitionDuration(using transitionContext: UIViewControllerContextTransitioning?) -> TimeInterval { return Self.duration } // 遷移の際にアニメーションする内容を定義 func animateTransition(using transitionContext: UIViewControllerContextTransitioning) { // アニメーションするビュー let containerView = transitionContext.containerView // 遷移先のビューを貼り付ける guard let toView = fugaViewController.view else { transitionContext.completeTransition(false) return } containerView.addSubview(toView) // 遷移元、遷移先のアニメーションするターゲットのスナップショットを取得する。 guard let selectedCell = hogeViewController.selectedCell, let window = hogeViewController.view.window ?? fugaViewController.view.window, let cellImageSnapshot = selectedCell.locationImageView.snapshotView(afterScreenUpdates: true), let controllerImageSnapshot = fugaViewController.locationImageView.snapshotView(afterScreenUpdates: true), let cellLabelSnapshot = selectedCell.locationLabel.snapshotView(afterScreenUpdates: true), let closeButtonSnapshot = fugaViewController.closeButton.snapshotView(afterScreenUpdates: true) else { transitionContext.completeTransition(true) return } let isPresenting = type.isPresenting // アニメーション終了後処理 let backgroundView: UIView let fadeView = UIView(frame: containerView.bounds) fadeView.backgroundColor = fugaViewController.view.backgroundColor // presentアニメーション if isPresenting { selectedCellImageViewSnapshot = cellImageSnapshot backgroundView = UIView(frame: containerView.bounds) backgroundView.addSubview(fadeView) fadeView.alpha = 0 } else { // dismissアニメーション backgroundView = hogeViewController.view.snapshotView(afterScreenUpdates: true) ?? fadeView backgroundView.addSubview(fadeView) } // アニメーション処理 toView.alpha = 0 [backgroundView, selectedCellImageViewSnapshot, controllerImageSnapshot, cellLabelSnapshot, closeButtonSnapshot].forEach { containerView.addSubview($0) } let controllerImageViewRect = fugaViewController.locationImageView.convert(fugaViewController.locationImageView.bounds, to: window) let controllerLabelRect = fugaViewController.locationLabel.convert(fugaViewController.locationLabel.bounds, to: window) let closeButtonRect = fugaViewController.closeButton.convert(fugaViewController.closeButton.bounds, to: window) [selectedCellImageViewSnapshot, controllerImageSnapshot].forEach { $0.frame = isPresenting ? cellImageViewRect : controllerImageViewRect $0.layer.cornerRadius = isPresenting ? 12 : 0 $0.layer.masksToBounds = true } controllerImageSnapshot.alpha = isPresenting ? 0 : 1 selectedCellImageViewSnapshot.alpha = isPresenting ? 1 : 0 cellLabelSnapshot.frame = isPresenting ? cellLabelRect : controllerLabelRect closeButtonSnapshot.frame = closeButtonRect closeButtonSnapshot.alpha = isPresenting ? 0 : 1 UIView.animateKeyframes(withDuration: Self.duration, delay: 0, options: .calculationModeCubic, animations: { UIView.addKeyframe(withRelativeStartTime: 0, relativeDuration: 1) { self.selectedCellImageViewSnapshot.frame = isPresenting ? controllerImageViewRect : self.cellImageViewRect controllerImageSnapshot.frame = isPresenting ? controllerImageViewRect : self.cellImageViewRect fadeView.alpha = isPresenting ? 1 : 0 cellLabelSnapshot.frame = isPresenting ? controllerLabelRect : self.cellLabelRect [controllerImageSnapshot, self.selectedCellImageViewSnapshot].forEach { $0.layer.cornerRadius = isPresenting ? 0 : 12 } } UIView.addKeyframe(withRelativeStartTime: 0, relativeDuration: 0.6) { self.selectedCellImageViewSnapshot.alpha = isPresenting ? 0 : 1 controllerImageSnapshot.alpha = isPresenting ? 1 : 0 } UIView.addKeyframe(withRelativeStartTime: isPresenting ? 0.7 : 0, relativeDuration: 0.3) { closeButtonSnapshot.alpha = isPresenting ? 1 : 0 } }, completion: { _ in // アニメーション終了後、削除 self.selectedCellImageViewSnapshot.removeFromSuperview() controllerImageSnapshot.removeFromSuperview() backgroundView.removeFromSuperview() cellLabelSnapshot.removeFromSuperview() closeButtonSnapshot.removeFromSuperview() toView.alpha = 1 transitionContext.completeTransition(true) }) } }参考URL
下記のURLのソースみなら練習のため、クラス名を変えました。
FirstViewControllerをHogeViewController、SecondViewControllerをFugaViewControllerにしています。英語が得意な方は下記のリンクをご参考ください。
https://github.com/tungfam/CustomTransitionTutorial

- 投稿日:2020-11-18T12:10:39+09:00
写真アプリのようにカスタマイズしたアニメーションで遷移したい!
はじめに
iOS基本アプリ「写真」は写真を選択すると拡大しpresentできます。このようにしたい、もしくはこれを応用すればいろんなアニメーション作りたいときに参考にしてください。ネット上では様々なサンプルがたくさんありますが、自分なりに理解している部分をメモしました。
今回の説明
- CollectionViewからCellを選択する、選択イメージが拡大されながら遷移する。
- イメージ表示画面から閉じるボタンをタップし、CollectionViewへ縮小しながら閉じる。
処理するイメージはこんな感じ。
登場人物(クラス、デリゲート) *図の説明
HogeViewController
CollectionViewをもつViewController。以下を用意します。
- 選択したセルの変数
- 選択したイメージのスナップショット変数
- 遷移処理
HogeViewController : TransitioningDelegate
遷移する際に必要なAnimatorインスタンス生成処理定義します。
- presentの時のAnimator生成ファクトリメソッド
- dismissの時のAnimator生成ファクトリメソッド
Animator: NSObject, UIViewControllerAnimatedTransitioning
実際にアニメーション処理が定義されている。主にアニメーションするイメージを取得し、アニメーション処理を行う。
アニメーションをカスタマイズしたいならこのクラスを修正することになる。
- 遷移元、遷移先のViewControllerのインスタンスを持っている
- 遷移元のスナップショットをもっている
FugaViewController
閉じる処理、特に何もすることはない。
コードから説明
HogeViewControllerfunc collectionView(_ collectionView: UICollectionView, didSelectItemAt indexPath: IndexPath) { // 選択されているセル情報をインスタンス変数に保存 selectedCell = collectionView.cellForItem(at: indexPath) as? CollectionViewCell // 選択されているイメージ(アニメーション対象)情報をインスタンス変数に保存 selectedCellImageViewSnapshot = selectedCell?.locationImageView.snapshotView(afterScreenUpdates: false) // 遷移処理 let fugaViewController = UIStoryboard(name: "Main", bundle: nil).instantiateViewController(withIdentifier: "FugaViewController") as! FugaViewController // 遷移アニメーションプロトコールを委任 fugaViewController.transitioningDelegate = self fugaViewController.modalPresentationStyle = .fullScreen fugaViewController.data = data present(fugaViewController, animated: true) }UIViewControllerTransitioningDelegate// プロトコールメソッドの処理を定義 extension HogeViewController: UIViewControllerTransitioningDelegate { // presentをする時のAnimatorのインスタンスを生成 func animationController(forPresented presented: UIViewController, presenting: UIViewController, source: UIViewController) -> UIViewControllerAnimatedTransitioning? { // 要確認: プロジェクトの構造により、ターゲットのViewControllerが違う場合があるため、デバックで確認しターゲットViewControllerを確認する必要がある。 // もし、取得できなかったら修正が必要。(ターゲットが違う場合、エラーは発生しないが、アニメーションはしない。) guard let hogeViewController = presenting as? HogetViewController, let fugaViewController = presented as? FugaViewController, let selectedCellImageViewSnapshot = selectedCellImageViewSnapshot else { return nil } animator = Animator(type: .present, hogeViewController: hogeViewController, fugaViewController: fugaViewController, selectedCellImageViewSnapshot: selectedCellImageViewSnapshot) return animator } // dismissをする時のAnimatorのインスタンスを生成 func animationController(forDismissed dismissed: UIViewController) -> UIViewControllerAnimatedTransitioning? { // // 要確認: プロジェクトの構造により、ターゲットのViewControllerが違う場合があるため、デバックで確認しターゲットViewControllerを確認する必要がある。presentと同様な対応が必要。 guard let fugaViewController = dismissed as? FugaViewController, let selectedCellImageViewSnapshot = selectedCellImageViewSnapshot else { return nil } animator = Animator(type: .dismiss, hogeViewController: self, fugaViewController: fugaViewController, selectedCellImageViewSnapshot: selectedCellImageViewSnapshot) return animator } }Animatorenum PresentationType { case present case dismiss var isPresenting: Bool { return self == .present } } // 実際のアニメーション処理を定義する。 final class Animator: NSObject, UIViewControllerAnimatedTransitioning { // アニメーションインターバル static let duration: TimeInterval = 1.25 // 遷移元、遷移先の両方のインスタンス変数、また遷移元のスナップショット変数 private let type: PresentationType private let hogeViewController: HogeViewController private let hugaViewController: FugaViewController private var selectedCellImageViewSnapshot: UIView // 遷移元の座標情報 private let cellImageViewRect: CGRect private let cellLabelRect: CGRect // インスタンス生成 init?(type: PresentationType, hogeViewController: HogeViewController, fugaViewController: FugaViewController, selectedCellImageViewSnapshot: UIView) { self.type = type self.hogeViewController = hogeViewController self.fugaViewController = fugaViewController self.selectedCellImageViewSnapshot = selectedCellImageViewSnapshot guard let window = hogeViewController.view.window ?? fugaViewController.view.window, let selectedCell = hogeViewController.selectedCell else { return nil } // 遷移元の座標情報を取得 self.cellImageViewRect = selectedCell.locationImageView.convert(selectedCell.locationImageView.bounds, to: window) // これも遷移元の座標情報 self.cellLabelRect = selectedCell.locationLabel.convert(selectedCell.locationLabel.bounds, to: window) } // インターバル func transitionDuration(using transitionContext: UIViewControllerContextTransitioning?) -> TimeInterval { return Self.duration } // 遷移の際にアニメーションする内容を定義 func animateTransition(using transitionContext: UIViewControllerContextTransitioning) { // アニメーションするビュー let containerView = transitionContext.containerView // 遷移先のビューを貼り付ける guard let toView = fugaViewController.view else { transitionContext.completeTransition(false) return } containerView.addSubview(toView) // 遷移元、遷移先のアニメーションするターゲットのスナップショットを取得する。 guard let selectedCell = hogeViewController.selectedCell, let window = hogeViewController.view.window ?? fugaViewController.view.window, let cellImageSnapshot = selectedCell.locationImageView.snapshotView(afterScreenUpdates: true), let controllerImageSnapshot = fugaViewController.locationImageView.snapshotView(afterScreenUpdates: true), let cellLabelSnapshot = selectedCell.locationLabel.snapshotView(afterScreenUpdates: true), let closeButtonSnapshot = fugaViewController.closeButton.snapshotView(afterScreenUpdates: true) else { transitionContext.completeTransition(true) return } let isPresenting = type.isPresenting // アニメーション終了後処理 let backgroundView: UIView let fadeView = UIView(frame: containerView.bounds) fadeView.backgroundColor = fugaViewController.view.backgroundColor // presentアニメーション if isPresenting { selectedCellImageViewSnapshot = cellImageSnapshot backgroundView = UIView(frame: containerView.bounds) backgroundView.addSubview(fadeView) fadeView.alpha = 0 } else { // dismissアニメーション backgroundView = hogeViewController.view.snapshotView(afterScreenUpdates: true) ?? fadeView backgroundView.addSubview(fadeView) } // アニメーション処理 toView.alpha = 0 [backgroundView, selectedCellImageViewSnapshot, controllerImageSnapshot, cellLabelSnapshot, closeButtonSnapshot].forEach { containerView.addSubview($0) } let controllerImageViewRect = fugaViewController.locationImageView.convert(fugaViewController.locationImageView.bounds, to: window) let controllerLabelRect = fugaViewController.locationLabel.convert(fugaViewController.locationLabel.bounds, to: window) let closeButtonRect = fugaViewController.closeButton.convert(fugaViewController.closeButton.bounds, to: window) [selectedCellImageViewSnapshot, controllerImageSnapshot].forEach { $0.frame = isPresenting ? cellImageViewRect : controllerImageViewRect $0.layer.cornerRadius = isPresenting ? 12 : 0 $0.layer.masksToBounds = true } controllerImageSnapshot.alpha = isPresenting ? 0 : 1 selectedCellImageViewSnapshot.alpha = isPresenting ? 1 : 0 cellLabelSnapshot.frame = isPresenting ? cellLabelRect : controllerLabelRect closeButtonSnapshot.frame = closeButtonRect closeButtonSnapshot.alpha = isPresenting ? 0 : 1 UIView.animateKeyframes(withDuration: Self.duration, delay: 0, options: .calculationModeCubic, animations: { UIView.addKeyframe(withRelativeStartTime: 0, relativeDuration: 1) { self.selectedCellImageViewSnapshot.frame = isPresenting ? controllerImageViewRect : self.cellImageViewRect controllerImageSnapshot.frame = isPresenting ? controllerImageViewRect : self.cellImageViewRect fadeView.alpha = isPresenting ? 1 : 0 cellLabelSnapshot.frame = isPresenting ? controllerLabelRect : self.cellLabelRect [controllerImageSnapshot, self.selectedCellImageViewSnapshot].forEach { $0.layer.cornerRadius = isPresenting ? 0 : 12 } } UIView.addKeyframe(withRelativeStartTime: 0, relativeDuration: 0.6) { self.selectedCellImageViewSnapshot.alpha = isPresenting ? 0 : 1 controllerImageSnapshot.alpha = isPresenting ? 1 : 0 } UIView.addKeyframe(withRelativeStartTime: isPresenting ? 0.7 : 0, relativeDuration: 0.3) { closeButtonSnapshot.alpha = isPresenting ? 1 : 0 } }, completion: { _ in // アニメーション終了後、削除 self.selectedCellImageViewSnapshot.removeFromSuperview() controllerImageSnapshot.removeFromSuperview() backgroundView.removeFromSuperview() cellLabelSnapshot.removeFromSuperview() closeButtonSnapshot.removeFromSuperview() toView.alpha = 1 transitionContext.completeTransition(true) }) } }参考URL
下記のURLのソースみながら練習したため、クラス名を変えた説明になっています。
(FirstViewControllerをHogeViewController、SecondViewControllerをFugaViewControllerにしています。)英語が得意な方は下記のリンクをご参考ください。
https://github.com/tungfam/CustomTransitionTutorial