- 投稿日:2020-11-18T22:52:11+09:00
LeetCodeに毎日挑戦してみた 1.Two Sum(Python、Go)
はじめに
無料英単語サイトE-tanを運営中の@ishishowです。
プログラマとしての能力を上げるために毎日leetcodeに取り組み、自分なりの解き方を挙げていきたいと思います。
Leetcodeとは
leetcode.com
ソフトウェア開発職のコーディング面接の練習といえばこれらしいです。
合計1500問以上のコーデイング問題が投稿されていて、実際の面接でも同じ問題が出されることは多いらしいとのことです。Go言語入門+アルゴリズム脳の強化のためにGolangとPythonで解いていこうと思います。(Pythonは弱弱だが経験あり)
1日目
Two Sum
- 問題内容(日本語訳)
整数の配列と整数が与えられた
nums場合target、合計がtarget。になるように2つの数値のインデックスを返します。各入力には**正確に*1つの解があると想定でき、同じ*要素を2回使用することはできません。
回答は任意の順序で返すことができます。
Example 1:
Input: nums = [2,7,11,15], target = 9
Output: [0,1]
Output: Because nums[0] + nums[1] == 9, we return [0, 1].
Example 2:
Input: nums = [3,2,4], target = 6
Output: [1,2]
Example 3:
Input: nums = [3,3], target = 6
Output: [0,1]
この問題は辞書型に値を代入していき、(Target - 値)が存在した時に処理を終えればよさそうでした。
ちなみに、私は最初に全探索でループ処理を二回で記述したのですが、RunTimeErrorになってしまい、解答を見ました。。。
Pythonのループ処理は遅い。。
- 解答コード
  class Solution(object):
      def twoSum(self, nums, target):
          d = {}
          for i in range(len(nums)):
              if (target - nums[i]) in d:
                  return [d[target - nums[i]],i]
              else:
                  d[nums[i]] = i
          return 0
- 私の最初のコード(RunTimeErrorになる)
  class Solution(object):
      def twoSum(self, nums, target):
          a = len(nums)
          for i in range(a):
              j = i+1
              while j!=a:
                  if nums[i] + nums[j] == target:
                      return [i,j]
                  j +=1
          return 0
エラーになったのでa=len(nums)にする苦し紛れの処理も虚しく、辞書型で書き直しました。。。
- Goでも書いてみます!
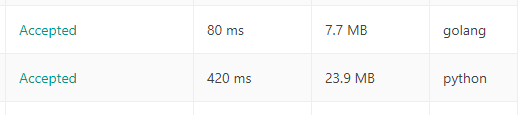
  func twoSum(nums []int, target int) []int {
    m := make(map[int]int)
    for i, v := range nums {
        idx, ok := m[target-v]
        if ok {
            return []int{idx, i}
        }
        m[v] = i
    }
    return nil
  }
Goだと実行時間が全然違いました!
※左からRunTime, Memory, 実効言語
- 自分メモ(Go)
makeを使う理由
Maps(連想配列)の初期値を指定しない場合、変数は
nil (nil マップ)に初期化されます。
nil マップは要素を格納することができず、要素を格納する場合はマップの初期化を行う必要があります。idx, ok := m[target-v]はその値があったらokにTrueが入る。
Goはarrayが固定長のため、スライスを使うことが多い。
Goの書き方が曖昧なので調べながらやっていますが、これをやり切ればかなりの実力が付きそうです!
参考にした記事
- 投稿日:2020-11-18T20:51:29+09:00
新卒がGoと楽天APIで宿探しBOT作ってみた
概要
4回目の投稿です。
以前、@yagi_engさんがスピーカーを務めたLINEBOTの勉強会に参加してきたので、復習がてら作成記事を書きます。
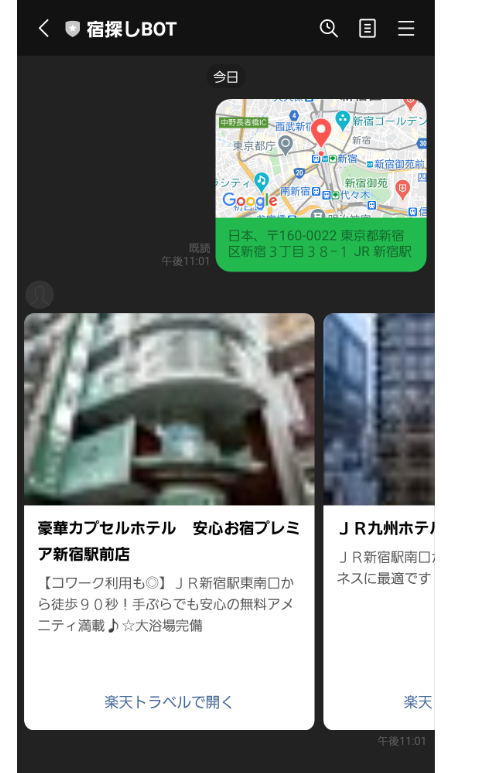
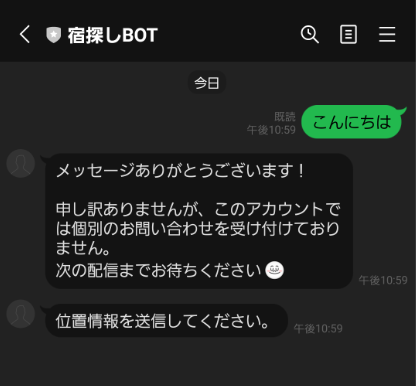
今回はGoで下記のように自分の位置情報を送信すると、周辺のホテル情報を返すLINEBOTを作成しました。
機能としては大きく2つです。
- 位置情報以外の情報(画像やテキスト)を送信すると、「位置情報を送信してください。」と定型文を返す。
- 位置情報を送信すると、周辺のホテル情報を最大10件返す。
各種ツール
- go 1.14
- VS Code 1.51.1
- Docker 19.03.13
- ngrok 2.3.35
- github.com/line/line-bot-sdk-go v7.6.0+incompatible
- 楽天トラベル施設検索API (version:2017-04-26)
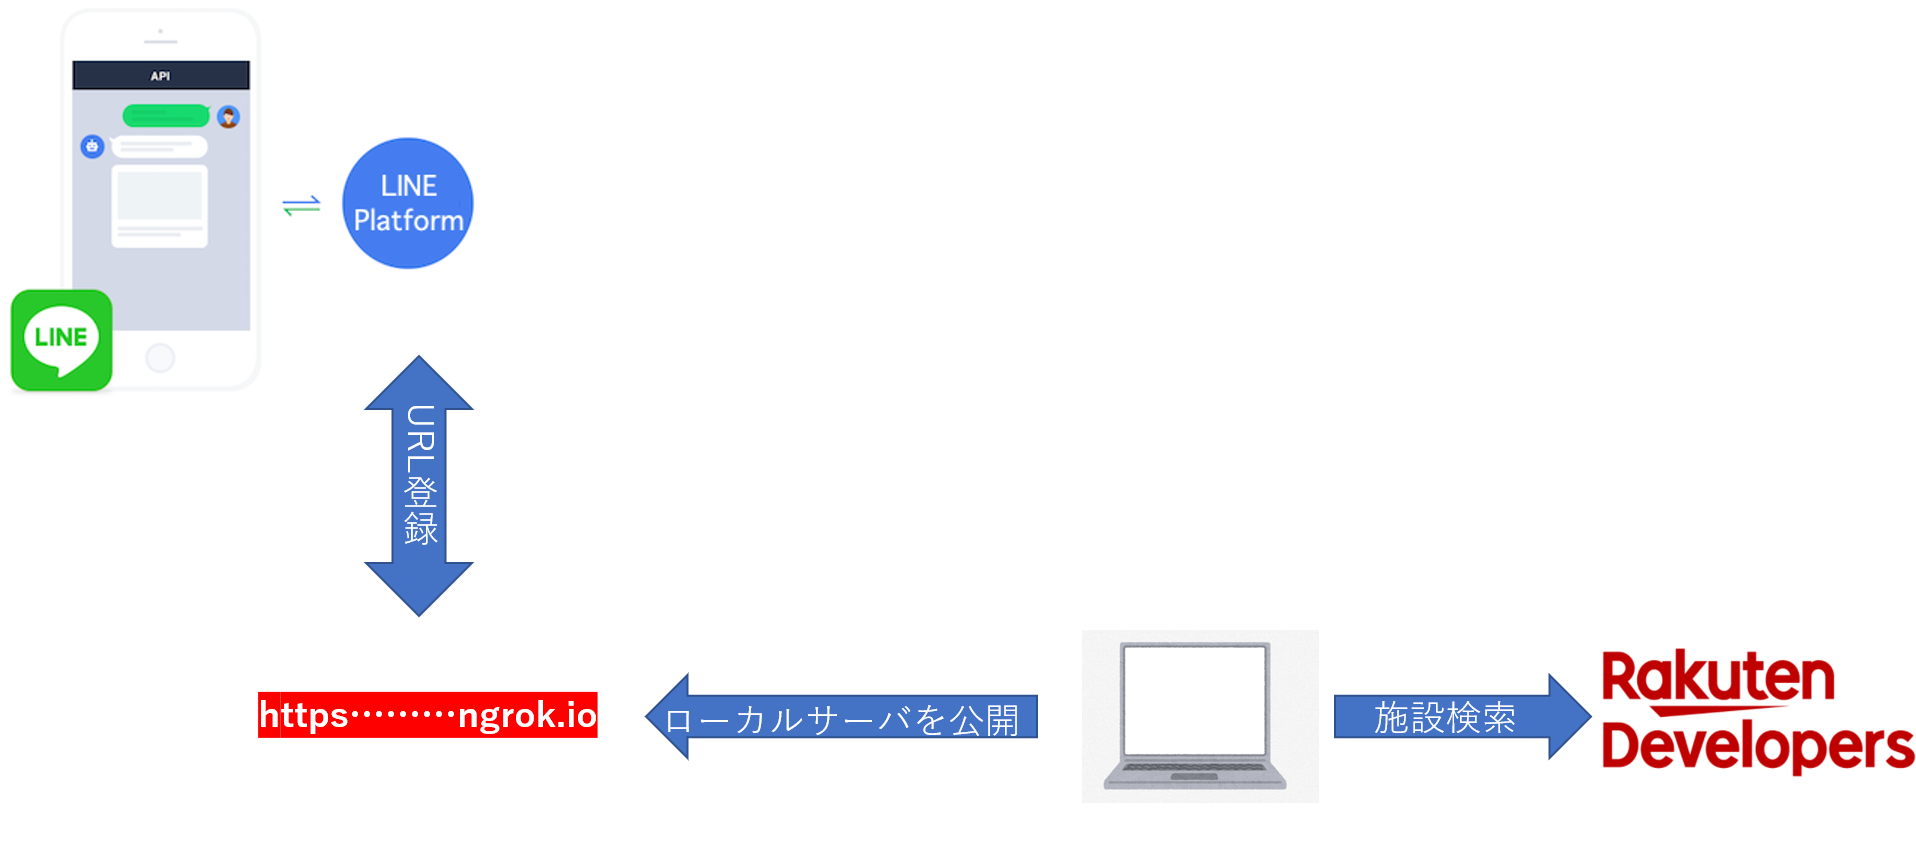
構成
ローカルで立ちあげたサーバをngrokを使って外部公開し、LINF Platformに登録する形をとっています
周辺のホテル情報の検索には楽天トラベル施設検索APIを利用しています。
ツールの準備をする
LINE Developersに登録する
実装に入る前にまずは、LINEが提供するMassaging APIを利用するために下記の三つを行い、APIを利用するための
Channel secret及びChannel access tokenを取得する必要があります。取得にはLINEのアカウントが必要になります。楽天APIに登録する
楽天APIの利用には
アプリIDが必要になります。
Rakuten Developersより、アプリIDの発行を行うことができます。
こちらも利用には楽天会員のアカウントが必要になります。line-bot-sdkを取得する
実装には
line-bod-sdk-goを利用するため、go get します。go get github.com/line/line-bot-sdk-go/linebot環境構築
DockerでGoの開発環境を構築する
こちらの記事を参考にDockerでコンテナを作り、8080ポートを割り当ててます。CONTAINER ID IMAGE COMMAND CREATED STATUS PORTS NAMES e56630e11723 linebot_app "bash" 2 days ago Up 2 seconds 0.0.0.0:8080->8080/tcp linebot_app_1定型文の応答
ローカルホストの立ち上げ
まずはmain関数でローカルホストを立ち上げます。
func main() {
    http.HandleFunc("/callback", callback)
    log.Fatal(http.ListenAndServe(":8080", nil))
}
これで
localhost:8080/callbackにアクセスすると、callback関数が実行されるようになります。次にcallback関数の実装です。
https://github.com/line/line-bot-sdk-goの手順に沿って実装していきます。
実装は下記のようになってます。(
hotelInfoBack()は記事後半で説明します。)func callback(w http.ResponseWriter, r *http.Request) { //チャネル作成時に取得したChannel secret及びChannel access tokenを引数に渡す bot, err := linebot.New(config.SECRET, config.TOKEN) if err != nil { log.Fatal(err) } //http.Requestを*linebot.Eventにパースする。 events, err := bot.ParseRequest(r) if err != nil { if err == linebot.ErrInvalidSignature { w.WriteHeader(400) //Bad Request } else { w.WriteHeader(500) //Internal Server Error } return } for _, event := range events { //リクエストのイベントがメッセージの受信かどうか if event.Type == linebot.EventTypeMessage { //受信したメッセージの種類による分岐 switch event.Message.(type) { case *linebot.LocationMessage: //位置情報を受信した場合 hotelInfoBack(bot, event) default: //位置情報以外を受信した場合 _, err = bot.ReplyMessage(event.ReplyToken, linebot.NewTextMessage(backMsg)).Do() //bakcMsg = "位置情報を送信してください。" if err != nil { log.Print(err) } } } } }WebhookURLの登録
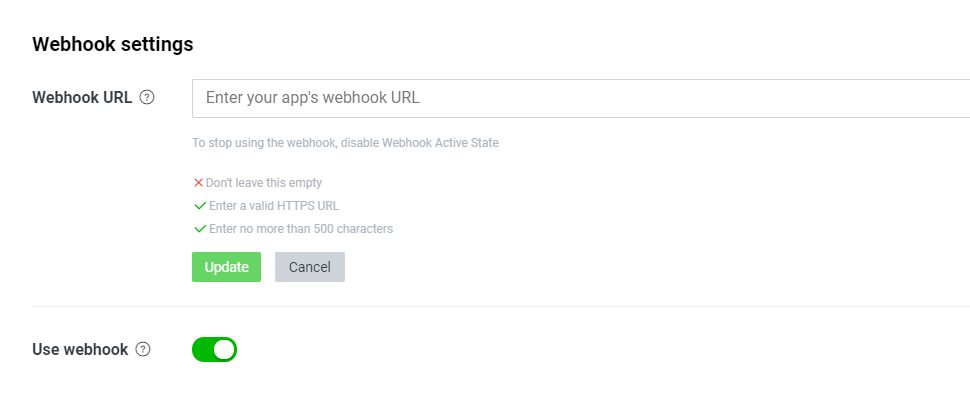
定型文返答の実装まで終わったら、作成したチャネルのMessageing APIタブからWebhookURLの登録を行います。
ngrokを使って、外部からローカルのサーバにアクセスするためのURLを発行します。(ngrokの使い方はこちら)
発行したhttps://......ngrok.io/callback入力し、updateをクリックすれば、登録は完了です。
起動
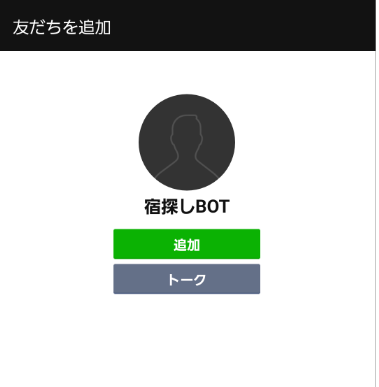
作成したチャネルのMessageing APIタブのQRコードを読み取り、友達追加します。
go runでローカルのサーバを立ち上げてから、メッセ―ジを送信すると定型文が返って来るようになりました....が余計なメッセージも返って来ています。
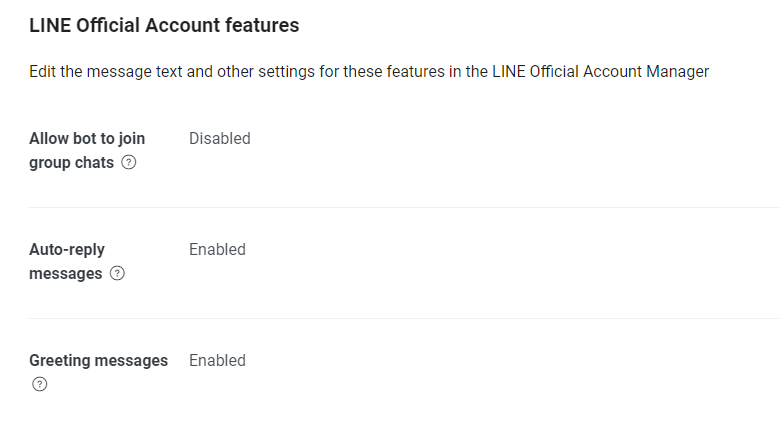
自動応答機能をオフにする
上記の問題は、MassaginAPIタブの
Auto-reply messagesの設定を変更することで解決できます。
画面右側のeditをクリックして、応答メッセージをオフにすれば、余計なメッセージが返ってくることはなくなります。
ホテル情報の応答
応答のための処理
hotelInfoBack()を実装していきます。func hotelInfoBack(bot *linebot.Client, e *linebot.Event) { msg := e.Message.(*linebot.LocationMessage) //受信した位置情報から、緯度経度を取得する lat := strconv.FormatFloat(msg.Latitude, 'f', 2, 64) lng := strconv.FormatFloat(msg.Longitude, 'f', 2, 64) //ホテル情報を取得する replyMsg, couldGetInfo := getHotelInfo(lat, lng) //取得に失敗した場合は、定型文(エラーが発生しました。)を返す。 if !couldGetInfo { _, err := bot.ReplyMessage(e.ReplyToken, linebot.NewTextMessage(errorMsg)).Do() if err != nil { log.Print(err) } } //応答するカルーセルテンプレートを作成する res := linebot.NewTemplateMessage( "ホテル一覧", linebot.NewCarouselTemplate(replyMsg...).WithImageOptions("rectangle", "cover"), ) //応答を返す _, err := bot.ReplyMessage(e.ReplyToken, res).Do() if err != nil { log.Print(err) } }受信した位置情報に含まれる緯度経度を引数に
getHotelInfo()を実行し、周辺のホテル情報を取得しています。
応答にはMessaging APIに用意されているカルーセルテンプレートを使います。(詳しくはこちら)ホテル情報を取得する
楽天APIの利用
ホテル情報の検索には楽天トラベル施設検索APIを利用します。
今回は下記のパラメータをリクエストURLにセットして検索を行います。https://app.rakuten.co.jp/services/api/Travel/SimpleHotelSearch/20170426?[parameter]=[value]…
入力パラメータ名 format(レスポンス形式) json latitude(緯度) 送信された位置情報の緯度 longitude(経度) 送信された位置情報の経度 serchRadius(検索範囲 : km max = 3) 1 datumType(緯度経度の表示形式) 1 : 世界測地系 applicationID 発行したアプリID 尚、今回利用する出力パラメータは以下のようになります。
出力パラメータ名 HotelSpecial(施設特色) HotelName (施設名称) HotelThumbnailURL (施設画像サムネイルURL) HotelInformationURL(施設情報ページURL) パースする構造体の作成
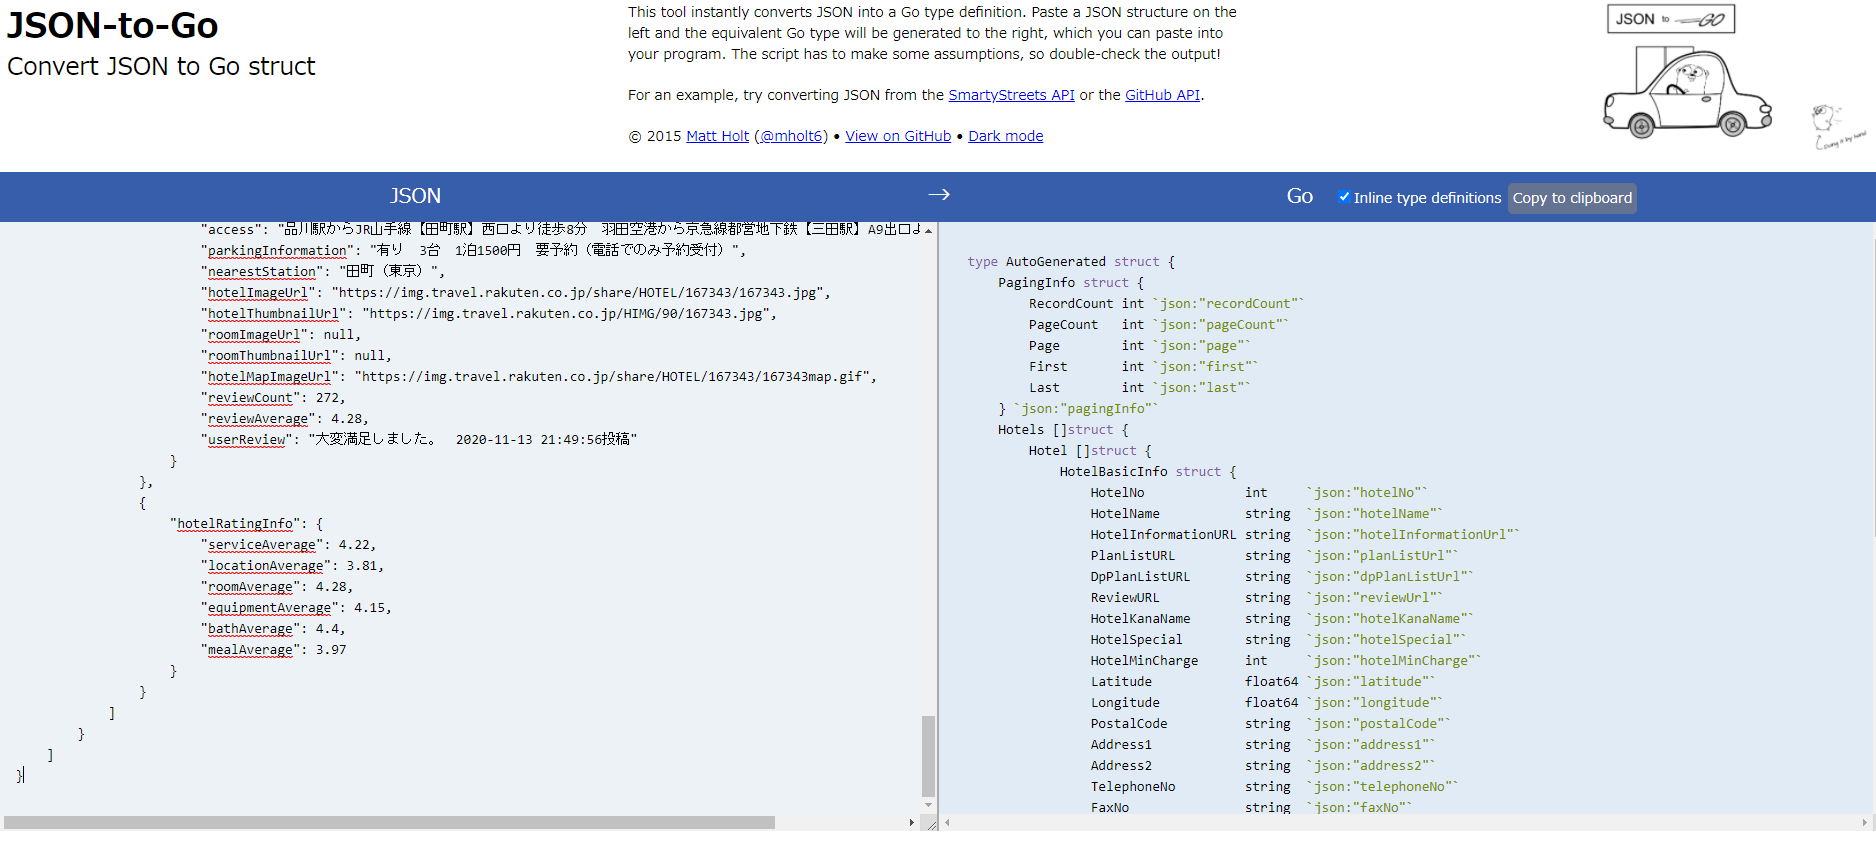
今回は取得したjsonを構造体にparseしています。
APIテストフォームより、適当なjsonを取得し、json整形ツールに入れてから、JSON-to-Goを使うことでパースする構造体のコードを取得することができます。
利用する出力パラメータのみを残した下記の構造体を使います。
type response struct {
    Hotels []struct {
        Hotel []struct {
            HotelBasicInfo struct {
                HotelName           string `json:"hotelName"`
                HotelInformationURL string `json:"hotelInformationUrl"`
                HotelSpecial        string `json:"hotelSpecial"`
                HotelThumbnailURL   string `json:"hotelThumbnailUrl"`
            } `json:"hotelBasicInfo,omitempty"`
        } `json:"hotel"`
    } `json:"hotels"`
}
ホテル情報取得の実装
getHotelInfo()の実装です。func getHotelInfo(lat, lng string) ([]*linebot.CarouselColumn, bool) { url := fmt.Sprintf(apiURL, lat, lng, config.API_ID) r, err := http.Get(url) if err != nil { return nil, false } defer r.Body.Close() body, err := ioutil.ReadAll(r.Body) if err != nil { return nil, false } var res response //構造体にパースする if err = json.Unmarshal(body, &res); err != nil { return nil, false } var ccs []*linebot.CarouselColumn //カルーセルカラムの作成 for index, hotel := range res.Hotels { if index == 10 { break } cc := linebot.NewCarouselColumn( hotel.Hotel[0].HotelBasicInfo.HotelThumbnailURL, cutOutCharacters(hotel.Hotel[0].HotelBasicInfo.HotelName, 40), cutOutCharacters(hotel.Hotel[0].HotelBasicInfo.HotelSpecial, 60), linebot.NewURIAction("楽天トラベルで開く", hotel.Hotel[0].HotelBasicInfo.HotelInformationURL), ).WithImageOptions("#FFFFFF") ccs = append(ccs, cc) } return ccs, true }引数で受け取った緯度経度を使い、APIをたたいて取得したjsonを構造体にパースしています。
構造体スライスを取得したら、それをもとにfor文を回して、カルーセルカラムを作っていきます。
応答で返すカルーセルテンプレートはカルーセルカラムの配列をフィールドとして持っています。(詳しくはこちら)
今回はカルーセルカラムにAPIから取得した、ホテル名、ホテルサムネイル画像、ホテル特色をセットしています。
また、linebot.NewURIAction()で楽天トラベルのホテルページへアクセスするactionを作成し、カルーセルカラムにセットしています。尚、応答で返せるカルーセルカラムは最大10件となっています。
また、カルーセルカラムに設定する一部フィールドには文字数の制限があるため、文字を切り出す処理を書いています。//cutOutCharacters 先頭から指定文字数だけを切りだす("abcde",3) → "abc" func cutOutCharacters(s string, count int) string { if utf8.RuneCountInString(s) > count { return string([]rune(s)[:count]) } return s }参考


- 投稿日:2020-11-18T17:30:45+09:00
Go で AWS のプライベート VPC リソースにアクセスする
やりたいこと
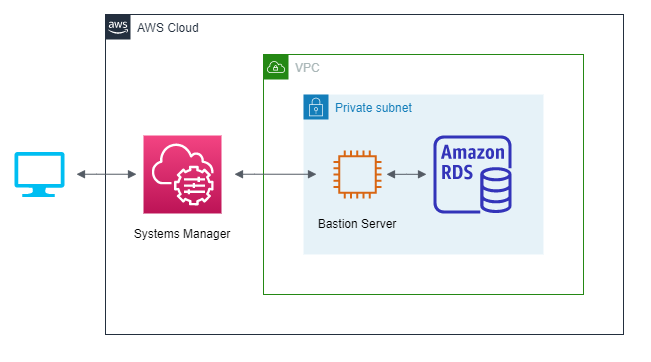
AWS Systems Manager 経由で SSH トンネルを使用してプライベート VPC リソースにアクセスしたいと考えています。どうすればよいですか?
こちらの記事で紹介されているように、AWS Systems Manager Session Manager を利用することで、VPC 内に用意した踏み台サーバ経由でプライベート VPC 内のリソース (RDS など) にアクセスすることができます。
本来は SSH Client と AWS CLI を組み合わせて SSH トンネリング (ポートフォワーディング) を行うのですが、今回はこれを Go 言語と aws-sdk-go でやってみようと思います。
これにより、いちいちsshコマンドを叩かずにプライベート VPC リソースに対してプログラムを実行できるのでかっこいいです(たぶん)。検証環境
VPC 内の Private Subnet に RDS インスタンス (MySQL) と踏み台用の EC2 インスタンスがある環境を想定します。
図のようにローカル PC から Session Manager 経由で踏み台サーバに接続し、最終的にプライベートな RDS インスタンスに対して
SHOW DATABASESを実行することをゴールとします。上記の検証環境を再現する CloudFormation テンプレートを用意したのでお手元で試したい方は下記の詳細をご参照ください。
詳細
次のテンプレートを使用して CloudFormation スタックを作成すると検証環境を作成できます(
ap-northeast-1限定)。AWSTemplateFormatVersion: 2010-09-09 Description: Create private RDS and bastion instance in VPC Metadata: AWS::CloudFormation::Interface: ParameterGroups: - Label: default: VPC Configuration Parameters: - VPCCIDR - PrivateSubnetACIDR - PrivateSubnetCCIDR - Label: default: DB Configuration Parameters: - DBMasterUsername - DBMasterPassword - Label: default: Bastion Configuration Parameters: - BastionKeyPair - BastionImageId ParameterLabels: VPCCIDR: default: VPC CIDR PrivateSubnetACIDR: default: Private Subnet A CIDR PrivateSubnetCCIDR: default: Private Subnet C CIDR DBMasterUsername: default: Database Master Username DBMasterPassword: default: Database Master Password BastionKeyPair: default: Bastion Server Key Pair Name BastionImageId: default: Bastion Server Image ID (DO NOT CHANGE) Parameters: VPCCIDR: Type: String Default: 10.1.0.0/24 PrivateSubnetACIDR: Type: String Default: 10.1.0.1/26 PrivateSubnetCCIDR: Type: String Default: 10.1.0.64/26 DBMasterUsername: Type: String Default: root DBMasterPassword: Type: String BastionKeyPair: Type: String BastionImageId: Type: AWS::SSM::Parameter::Value<String> Default: /aws/service/ami-amazon-linux-latest/amzn2-ami-hvm-x86_64-gp2 Resources: VPC: Type: AWS::EC2::VPC Properties: CidrBlock: !Ref VPCCIDR EnableDnsSupport: true EnableDnsHostnames: true InstanceTenancy: default Tags: - Key: Name Value: ssm-bastion-example-vpc PrivateSubnetA: Type: AWS::EC2::Subnet Properties: AvailabilityZone: ap-northeast-1a CidrBlock: !Ref PrivateSubnetACIDR VpcId: !Ref VPC Tags: - Key: Name Value: ssm-bastion-example-private-subnet-a PrivateSubnetC: Type: AWS::EC2::Subnet Properties: AvailabilityZone: ap-northeast-1c CidrBlock: !Ref PrivateSubnetCCIDR VpcId: !Ref VPC Tags: - Key: Name Value: ssm-bastion-example-private-subnet-c PrivateRouteTable: Type: AWS::EC2::RouteTable Properties: VpcId: !Ref VPC Tags: - Key: Name Value: ssm-bastion-example-private-route PrivateSubnetRouteTableAssociationA: Type: AWS::EC2::SubnetRouteTableAssociation Properties: SubnetId: !Ref PrivateSubnetA RouteTableId: !Ref PrivateRouteTable PrivateSubnetRouteTableAssociationC: Type: AWS::EC2::SubnetRouteTableAssociation Properties: SubnetId: !Ref PrivateSubnetC RouteTableId: !Ref PrivateRouteTable VPCEndpointSecurityGroup: Type: AWS::EC2::SecurityGroup Properties: GroupDescription: Serucity group for vpc endpoint VpcId: !Ref VPC SecurityGroupIngress: - IpProtocol: tcp FromPort: 443 ToPort: 443 CidrIp: !Ref VPCCIDR VPCEndpointSSM: Type: AWS::EC2::VPCEndpoint Properties: ServiceName: com.amazonaws.ap-northeast-1.ssm VpcEndpointType: Interface VpcId: !Ref VPC SubnetIds: - !Ref PrivateSubnetA SecurityGroupIds: - !Ref VPCEndpointSecurityGroup PrivateDnsEnabled: true VPCEndpointSSMMessages: Type: AWS::EC2::VPCEndpoint Properties: ServiceName: com.amazonaws.ap-northeast-1.ssmmessages VpcEndpointType: Interface VpcId: !Ref VPC SecurityGroupIds: - !Ref VPCEndpointSecurityGroup SubnetIds: - !Ref PrivateSubnetA PrivateDnsEnabled: true VPCEndpointEC2Messages: Type: AWS::EC2::VPCEndpoint Properties: ServiceName: com.amazonaws.ap-northeast-1.ec2messages VpcEndpointType: Interface VpcId: !Ref VPC SecurityGroupIds: - !Ref VPCEndpointSecurityGroup SubnetIds: - !Ref PrivateSubnetA PrivateDnsEnabled: true VPCEndpointS3: Type: AWS::EC2::VPCEndpoint Properties: ServiceName: com.amazonaws.ap-northeast-1.s3 VpcEndpointType: Gateway VpcId: !Ref VPC RouteTableIds: - !Ref PrivateRouteTable BastionRole: Type: AWS::IAM::Role Properties: Description: EC2 role for SSM AssumeRolePolicyDocument: Version: 2012-10-17 Statement: - Effect: Allow Principal: Service: - ec2.amazonaws.com Action: - sts:AssumeRole ManagedPolicyArns: - arn:aws:iam::aws:policy/AmazonSSMManagedInstanceCore BastionInstanceProfile: Type: AWS::IAM::InstanceProfile Properties: Roles: - !Ref BastionRole BastionSecurityGroup: Type: AWS::EC2::SecurityGroup Properties: GroupDescription: Security group for bastion server GroupName: ssm-bastion-example-bastion-sg VpcId: !Ref VPC BastionServer: Type: AWS::EC2::Instance Properties: ImageId: !Ref BastionImageId InstanceType: t2.micro SubnetId: !Ref PrivateSubnetA SecurityGroupIds: - !Ref BastionSecurityGroup IamInstanceProfile: !Ref BastionInstanceProfile KeyName: !Ref BastionKeyPair Tags: - Key: Name Value: ssm-bastion-example-bastion-server DBSecurityGroup: Type: AWS::EC2::SecurityGroup Properties: GroupDescription: Security group for bastion exmaple db GroupName: ssm-bastion-example-db-sg VpcId: !Ref VPC SecurityGroupIngress: - SourceSecurityGroupId: !Ref BastionSecurityGroup IpProtocol: tcp FromPort: 3306 ToPort: 3306 DBSubnetGroup: Type: AWS::RDS::DBSubnetGroup Properties: DBSubnetGroupDescription: DB subnet group for bastion example db DBSubnetGroupName: ssm-bastion-example-db-sng SubnetIds: - !Ref PrivateSubnetA - !Ref PrivateSubnetC Tags: - Key: Name Value: ssm-bastion-example-db-sng DB: Type: AWS::RDS::DBInstance Properties: DBInstanceClass: db.t2.micro Engine: MySQL AllocatedStorage: 5 PubliclyAccessible: false DBSubnetGroupName: !Ref DBSubnetGroup VPCSecurityGroups: - !GetAtt DBSecurityGroup.GroupId MasterUsername: !Ref DBMasterUsername MasterUserPassword: !Ref DBMasterPassword Outputs: BastionInstanceId: Description: Bastion server instance id Value: !Ref BastionServer DBEndpoint: Description: Database endpoint Value: !GetAtt DB.Endpoint.Addressスタック作成時に次のパラメータを適切に設定してください。
VPC CIDR
- 作成する VPC の CIDR ブロックです
- 既存の VPC とぶつかる場合は適切な値に変更してください
Private Subnet A CIDR,Private Subnet C CIDR
- 作成する Private Subnet の CIDR ブロックです
VPC CIDRを変更した場合はこちらも適切な値に変更してくださいDatabase Master Password
- 作成する RDS インスタンスのマスタパスワードです
Bastion Server Key Pair Name
- 踏み台サーバに接続するためのキーペア名です
- キーペアは予め作成し、秘密鍵をローカル PC にダウンロードしておいてください
どうやって実装するか
SSH Client と AWS CLI の処理を Go で書ければ実現可能なはずです。
SSH Client + AWS CLI の場合の処理の流れは次の通りです。
- SSH Client から ProxyCommand として
aws ssm start-sessionを実行する
- AWS CLI は SSM の StartSession を呼んでセッションを開始する
- StartSession のレスポンスとして得られた URL とトークンを使って踏み台インスタンスと WebSocket で通信する
- SSH Client が ProxyCommand の通信を利用して RDS のポートをローカルポートにフォワーディングする
SSH Client の処理は
golang.org/x/crypto/sshパッケージを利用することで実装可能です。問題は AWS CLI の処理です。
aws-sdk-go のSSM.StartSession()で WebSocket 通信用の URL とトークンを得ることができますが、その後の WebSocket 通信の仕様が明らかにされていないのでどう使えばよいのか全くの不明です。AWS CLI の実装を見ると、 Boto3 の
SSM.Client.start_sessionで得られた出力を session-manager-plugin に渡していることが分かります。https://github.com/aws/aws-cli/blob/2.1.10/awscli/customizations/sessionmanager.py
どうやら WebSocket 通信はこの session-manager-plugin に任せているようです(session-manager-plugin はバイナリ形式で配布されているため実装の詳細は不明)。
WebSocket 通信の仕様を頑張って解読するのは不毛な上、いつ変更されるかもわからないので今回は AWS CLI 同様に session-manager-plugin を呼び出す形で実装することにします。
AWS CLI と全く同じ呼び出し方をしてあげれば問題なく使えるはずです。
また、AWS CLI と session-manager-plugin 間のインタフェースは互換性を保つためにそう簡単には変更されないものと予想されます。実装
go.modmodule port-forward go 1.15 require ( github.com/aws/aws-sdk-go v1.36.0 github.com/go-sql-driver/mysql v1.5.0 golang.org/x/crypto v0.0.0-20200622213623-75b288015ac9 )main.gopackage main import ( "database/sql" "encoding/json" "errors" "flag" "fmt" "io" "io/ioutil" "net" "os" "os/exec" "path" "runtime" "strconv" "github.com/aws/aws-sdk-go/aws" "github.com/aws/aws-sdk-go/aws/session" "github.com/aws/aws-sdk-go/service/ssm" "github.com/go-sql-driver/mysql" "golang.org/x/crypto/ssh" "golang.org/x/crypto/ssh/knownhosts" ) type config struct { instanceID string region string user string keyPath string localPort uint16 dbHost string dbPort uint16 dbUser string dbPass string } func main() { conf := &config{} var localPort, dbPort uint flags := flag.NewFlagSet("port-forward", flag.ContinueOnError) flags.StringVar(&conf.instanceID, "instance-id", "", "bastion server instance id") flags.StringVar(&conf.region, "region", "ap-northeast-1", "aws region") flags.StringVar(&conf.user, "ssh-user", "ec2-user", "ssh user for bastion server") flags.StringVar(&conf.keyPath, "key", "", "ssh key file path") flags.UintVar(&localPort, "local-port", 9090, "local port for port-fowarding") flags.StringVar(&conf.dbHost, "db-host", "", "database host") flags.UintVar(&dbPort, "db-port", 3306, "database port") flags.StringVar(&conf.dbUser, "db-user", "root", "database user") flags.StringVar(&conf.dbPass, "db-pass", "", "database password") if err := flags.Parse(os.Args[1:]); err != nil { os.Exit(2) } conf.localPort = uint16(localPort) conf.dbPort = uint16(dbPort) if err := run(conf); err != nil { fmt.Fprintln(os.Stderr, err) os.Exit(1) } os.Exit(0) } func run(conf *config) error { sess, err := session.NewSession(&aws.Config{ Region: aws.String(conf.region), }) if err != nil { return err } svc := ssm.New(sess) proxyCmd, closeSession, err := openSession(svc, conf.instanceID) if err != nil { return err } defer closeSession() sshConfig, err := newSSHClientConfig(conf.user, conf.keyPath) if err != nil { return err } client, killProxyCmd, err := newSSHClientWithProxyCommand(conf.instanceID, 22, proxyCmd, sshConfig) if err != nil { return err } defer killProxyCmd() defer client.Close() done, err := portForward(conf.localPort, client, conf.dbHost, conf.dbPort) if err != nil { return err } defer done() if err := printDBList("localhost", conf.localPort, conf.dbUser, conf.dbPass); err != nil { return err } return nil } // openSession AWS Systems Manager Session Manager のセッションを開始し、 // session-manager-plugin を実行する *exec.Cmd とセッションを終了する関数を返す。 func openSession(svc *ssm.SSM, instanceID string) (*exec.Cmd, func() error, error) { in := &ssm.StartSessionInput{ DocumentName: aws.String("AWS-StartSSHSession"), Parameters: map[string][]*string{ "portNumber": {aws.String("22")}, }, Target: aws.String(instanceID), } out, err := svc.StartSession(in) if err != nil { return nil, nil, err } close := func() error { in := &ssm.TerminateSessionInput{ SessionId: out.SessionId, } if _, err := svc.TerminateSession(in); err != nil { return err } return nil } cmd, err := sessionManagerPlugin(svc, in, out) if err != nil { defer close() return nil, nil, err } return cmd, close, nil } // sessionManagerPlugin session-manager-plugin を実行する *exec.Cmd を返す。 func sessionManagerPlugin( svc *ssm.SSM, in *ssm.StartSessionInput, out *ssm.StartSessionOutput, ) (*exec.Cmd, error) { command := "session-manager-plugin" if runtime.GOOS == "windows" { command += ".exe" } encodedIn, err := json.Marshal(in) if err != nil { return nil, err } encodedOut, err := json.Marshal(out) if err != nil { return nil, err } region := *svc.Config.Region profile := getAWSProfile() endpoint := svc.Endpoint cmd := exec.Command(command, string(encodedOut), region, "StartSession", profile, string(encodedIn), endpoint) return cmd, nil } // getAWSProfile 有効な AWS Profile を取得する。 func getAWSProfile() string { profile := os.Getenv("AWS_PROFILE") if profile != "" { return profile } enableSharedConfig, _ := strconv.ParseBool(os.Getenv("AWS_SDK_LOAD_CONFIG")) if enableSharedConfig { profile = os.Getenv("AWS_DEFAULT_PROFILE") } return profile } // newSSHClientConfig *ssh.ClientConfig を生成する。 func newSSHClientConfig(user string, keyPath string) (*ssh.ClientConfig, error) { key, err := ioutil.ReadFile(keyPath) if err != nil { return nil, err } signer, err := ssh.ParsePrivateKey(key) if err != nil { return nil, err } hostKeyCallback, err := newHostKeyCallback() if err != nil { return nil, err } return &ssh.ClientConfig{ User: user, Auth: []ssh.AuthMethod{ ssh.PublicKeys(signer), }, HostKeyCallback: hostKeyCallback, }, nil } // newHostKeyCallback ~/.ssh/known_hosts を参照して // ホストの公開鍵を確認する ssh.HostKeyCallback を返す。 func newHostKeyCallback() (ssh.HostKeyCallback, error) { home, err := os.UserHomeDir() if err != nil { return nil, err } knownHosts := path.Join(home, ".ssh", "known_hosts") cb, err := knownhosts.New(knownHosts) if err != nil { return nil, err } return func(hostname string, remote net.Addr, key ssh.PublicKey) error { // net.Pipe() から生成した net.Conn で ssh.Conn を作ると // remote.String() の値が "pipe" となり net.SplitHostPort() が失敗してしまう。 // https://github.com/golang/crypto/blob/5f87f3452ae9/ssh/knownhosts/knownhosts.go#L336 // // hostname には `${instance-id}:22` が入っているので // それを返す net.Addr に差し替えておく。 if remote.String() == "pipe" { remote = &addrImpl{ network: remote.Network(), addr: hostname, } } err := cb(hostname, remote, key) var ke *knownhosts.KeyError if errors.As(err, &ke) { // known_hosts と一致しない場合はエラー if len(ke.Want) > 0 { return ke } f, err := os.OpenFile(knownHosts, os.O_WRONLY|os.O_APPEND, 0644) if err != nil { return err } defer f.Close() // 未知のホストの場合は known_hosts に追記する line := knownhosts.Line([]string{remote.String()}, key) fmt.Fprintln(f, line) return nil } return err }, nil } // addrImple net.Addr の実装。 type addrImpl struct { network string addr string } func (s *addrImpl) Network() string { return s.network } func (s *addrImpl) String() string { return s.addr } // newSSHClientWithProxyCommand ProxyCommand を利用した *ssh.Client を返す。 func newSSHClientWithProxyCommand( host string, port uint16, proxyCmd *exec.Cmd, conf *ssh.ClientConfig, ) (*ssh.Client, func() error, error) { c, s := net.Pipe() proxyCmd.Stdin = s proxyCmd.Stdout = s proxyCmd.Stderr = os.Stderr if err := proxyCmd.Start(); err != nil { return nil, nil, err } done := func() error { return proxyCmd.Process.Kill() } addr := fmt.Sprintf("%s:%d", host, port) conn, chans, reqs, err := ssh.NewClientConn(c, addr, conf) if err != nil { defer done() return nil, nil, err } client := ssh.NewClient(conn, chans, reqs) return client, done, nil } // portForward ポートフォワードを行う。 func portForward( localPort uint16, sshClient *ssh.Client, remoteHost string, remotePort uint16, ) (func(), error) { listener, err := net.Listen("tcp", fmt.Sprintf(":%d", localPort)) if err != nil { return nil, err } remoteAddr := fmt.Sprintf("%s:%d", remoteHost, remotePort) done := make(chan struct{}) go func() { defer listener.Close() for { select { case <-done: return default: } localConn, err := listener.Accept() if err != nil { var ne net.Error if errors.As(err, &ne) && ne.Temporary() { continue } fmt.Fprintln(os.Stderr, "accept failed: ", err) return } remoteConn, err := sshClient.Dial("tcp", remoteAddr) if err != nil { fmt.Fprintln(os.Stderr, "dial failed: ", err) return } go func() { defer localConn.Close() defer remoteConn.Close() if _, err := io.Copy(remoteConn, localConn); err != nil { fmt.Fprintln(os.Stderr, "copy failed: ", err) } }() go func() { if _, err := io.Copy(localConn, remoteConn); err != nil { fmt.Fprintln(os.Stderr, "copy failed: ", err) } }() } }() return func() { close(done) }, nil } // printDBList RDS に接続し DB 一覧を出力する。 func printDBList(host string, port uint16, user, password string) error { conf := mysql.NewConfig() conf.User = user conf.Passwd = password conf.Addr = fmt.Sprintf("%s:%d", host, port) conf.Net = "tcp" dsn := conf.FormatDSN() db, err := sql.Open("mysql", dsn) if err != nil { return err } res, err := db.Query("SHOW DATABASES") if err != nil { return err } defer res.Close() var database string for res.Next() { if err := res.Scan(&database); err != nil { return err } fmt.Println(database) } if err := res.Err(); err != nil { return err } return nil }前述の通り session-manager-plugin がインストールされている必要があります。
次のように踏み台サーバのインスタンス ID ・ RDS インスタンスのエンドポイント・秘密鍵のパスなどを与えて実行します。
(デフォルトでは RDS インスタンスの 3306 ポートがローカルの 9090 ポートにフォワーディングされます)$ go run main.go -instance-id i-xxxxxx -key ~/.ssh/bastion.key -db-host xxxx.xxxx.ap-northeast-1.rds.amazonaws.com -db-pass xxxx information_schema mysql performance_schemaプライベート VPC 内の RDS インスタンスに
SHOW DATABASESを実行して得られた DB 一覧が出力されます。コードの解説
要点だけを解説します。
メインの処理は
run()関数に実装されています。func run(conf *config) error { sess, err := session.NewSession(&aws.Config{ Region: aws.String(conf.region), }) if err != nil { return err } svc := ssm.New(sess) proxyCmd, closeSession, err := openSession(svc, conf.instanceID) if err != nil { return err } defer closeSession() sshConfig, err := newSSHClientConfig(conf.user, conf.keyPath) if err != nil { return err } client, killProxyCmd, err := newSSHClientWithProxyCommand(conf.instanceID, 22, proxyCmd, sshConfig) if err != nil { return err } defer killProxyCmd() defer client.Close() done, err := portForward(conf.localPort, client, conf.dbHost, conf.dbPort) if err != nil { return err } defer done() if err := printDBList("localhost", conf.localPort, conf.dbUser, conf.dbPass); err != nil { return err } return nil }次のような流れになっています。
openSession()で Session Manager のセッションを開始newSSHClientWithProxyCommand()で session-manager-plugin を ProxyCommand として使う SSH Client を生成portFoward()で RDS インスタンスのポートをローカルのポートにフォワーディング- ローカルポートに対してクエリを実行
openSession()// openSession AWS Systems Manager Session Manager のセッションを開始し、 // session-manager-plugin を実行する *exec.Cmd とセッションを終了する関数を返す。 func openSession(svc *ssm.SSM, instanceID string) (*exec.Cmd, func() error, error) { in := &ssm.StartSessionInput{ DocumentName: aws.String("AWS-StartSSHSession"), Parameters: map[string][]*string{ "portNumber": {aws.String("22")}, }, Target: aws.String(instanceID), } out, err := svc.StartSession(in) if err != nil { return nil, nil, err } close := func() error { in := &ssm.TerminateSessionInput{ SessionId: out.SessionId, } if _, err := svc.TerminateSession(in); err != nil { return err } return nil } cmd, err := sessionManagerPlugin(svc, in, out) if err != nil { defer close() return nil, nil, err } return cmd, close, nil }
SSM.StartSession()を叩いてセッションを開始します。
AWS CLI の実装と、SSH の ProxyCommand 設定での呼び出し方を参考に実装しています。
SSM.StartSession()の入出力を JSON エンコードしたものを session-manager-plugin に与える必要があるので、ここで session-manager-plugin を実行するための*exec.Cmdも生成してしまっています(実際に生成している箇所はsessionManagerPlugin())。
newSSHClientWithProxyCommand()// newSSHClientWithProxyCommand ProxyCommand を利用した *ssh.Client を返す。 func newSSHClientWithProxyCommand( host string, port uint16, proxyCmd *exec.Cmd, conf *ssh.ClientConfig, ) (*ssh.Client, func() error, error) { c, s := net.Pipe() proxyCmd.Stdin = s proxyCmd.Stdout = s proxyCmd.Stderr = os.Stderr if err := proxyCmd.Start(); err != nil { return nil, nil, err } done := func() error { return proxyCmd.Process.Kill() } addr := fmt.Sprintf("%s:%d", host, port) conn, chans, reqs, err := ssh.NewClientConn(c, addr, conf) if err != nil { defer done() return nil, nil, err } client := ssh.NewClient(conn, chans, reqs) return client, done, nil }与えられた
*exec.Cmdを ProxyCommand として使用する SSH Client を生成します。
net.Pipe()を使用してコマンドの入出力を SSH Client に結び付けるのがポイントです。
portFoward()// portForward ポートフォワードを行う。 func portForward( localPort uint16, sshClient *ssh.Client, remoteHost string, remotePort uint16, ) (func(), error) { listener, err := net.Listen("tcp", fmt.Sprintf(":%d", localPort)) if err != nil { return nil, err } remoteAddr := fmt.Sprintf("%s:%d", remoteHost, remotePort) done := make(chan struct{}) go func() { defer listener.Close() for { select { case <-done: return default: } localConn, err := listener.Accept() if err != nil { var ne net.Error if errors.As(err, &ne) && ne.Temporary() { continue } fmt.Fprintln(os.Stderr, "accept failed: ", err) return } remoteConn, err := sshClient.Dial("tcp", remoteAddr) if err != nil { fmt.Fprintln(os.Stderr, "dial failed: ", err) return } go func() { defer localConn.Close() defer remoteConn.Close() if _, err := io.Copy(remoteConn, localConn); err != nil { fmt.Fprintln(os.Stderr, "copy failed: ", err) } }() go func() { if _, err := io.Copy(localConn, remoteConn); err != nil { fmt.Fprintln(os.Stderr, "copy failed: ", err) } }() } }() return func() { close(done) }, nil }ポートフォワードを行います。
Listener.Accept()で得られたローカルポートのnet.Connと SSH Client から RDS インスタンスにDial()して得られたnet.Connとを goroutine 内で相互にio.Copy()することでポートフォワードを実現できます。無限ループ内で
Accept(),Dial()することで複数のコネクションを扱うことが可能です。参考