- 投稿日:2020-09-27T18:53:01+09:00
WSL上でnodenvをインストール、任意のバージョンを有効化
nodenvを取得
参考 : https://github.com/nodenv/nodenv#basic-github-checkout
git clone https://github.com/nodenv/nodenv.git ~/.nodenv
cd ~/.nodenv && src/configure && make -C src
環境変数を設定
上記サイトで
2.Add ~/.nodenv/bin to your $PATH for access to the nodenv command-line utility.
    For bash:
        $ echo 'export PATH="$HOME/.nodenv/bin:$PATH"' >> ~/.bash_profile
と説明されているので、
echo 'export PATH="$HOME/.nodenv/bin:$PATH"' >> ~/.bash_profileとして、
.bash_profileのファイル上で、PATHに追記します。
※WSLだと.bashrcに追記すれば行けるかもしれません。~/.nodenv/bin/nodenv initを実行すると、
# Load nodenv automatically by appending
# the following to ~/.bash_profile:

eval "$(nodenv init -)"
のように表示されるので、
eval "$(nodenv init -)"を.bash_profileの末尾(先程のPATHの設定の次)に追記します。
※WSLだと.bashrcに追記すれば行けるかもしれません。プラグインをインストール
mkdir -p "$(nodenv root)"/plugins
git clone https://github.com/nodenv/node-build.git "$(nodenv root)"/plugins/node-build
git clone https://github.com/nodenv/nodenv-update.git "$(nodenv root)"/plugins/nodenv-update
nodeの環境を作成、有効化
nodenv install --listを実行すると、インストール可能なバージョンの一覧が表示されます。
数字から始まるバージョンにだけ絞る場合は、grepを使って以下のように絞ります。nodenv install --list | grep -E "^ *[0-9]+.+$"・ ・ ・ 14.10.0 14.10.1 14.11.0 14.12.0ここでは、最新のバージョンをインストール
※2020.09.27時点では、14.12.0nodenv install 14.12.0nodenv versionsを実行し、インストールされたバージョンが表示されることを確認します。
先程インストールしたバージョンを有効にします。
nodenv shell 14.12.0特に何か表示されるわけではないので、
node -vを実行し、先程有効化したバージョンが正しく表示されることを確認します。
v14.12.0システムごとに独立した環境を作成
pyenvのvritualenvのようなものがないため、versions配下のバージョンのディレクトリをコピーして、独立した環境用のディレクトリを作ると、nodenvで使用可能になります。
たとえば、node v14.12.0 の環境から、
node-studyの環境を作りたい場合は、cd ~/.nodenv/versions/ /bin/cp -Ra 14.12.0 node-studyのようにして、ディレクトリをコピーします。
nodenv versionsでnodenv環境の一覧を表示すると、
$ nodenv versions
* system (set by /home/*****/.nodenv/version)
  14.12.0
  node-study
先ほど作成した環境が表示されるはずです。
nodenv shell node-studyのようにすると、先ほど作成した環境が適用されます。
- 投稿日:2020-09-27T15:19:29+09:00
自作npmコマンドの作成方法
my-npm-commandとかで自作npmコマンドを蹴る方法のメモNode.js 12.18.3、npm 6.14.8で確認
手順
- Node.jsのプロジェクトを作成
npm initとか適当に- package.jsonに以下を追加
"bin": {
  "my-npm-command": "./index.js"
}
- Node.jsのCLIを作成
- 以下はサンプル
index.js#!/usr/bin/env node console.log('my-npm-command');
npm linkを叩き、my-npm-commandを実行して動いてればOK
- 外したくなったら
npm unlink
- 投稿日:2020-09-27T12:16:49+09:00
初心者が今はやりの技術を調べてみた
目的
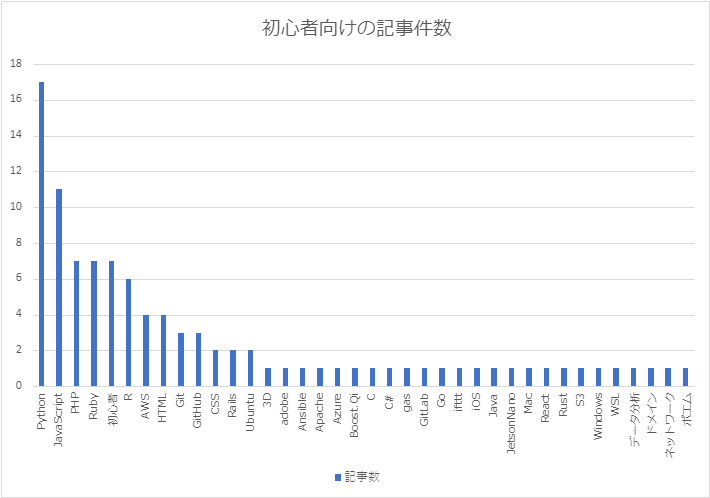
今回、Node.jsを使ってQiitaAPIを使っていろいろやってみようということで、今、初心者向けには何が流行っているのかを調べてみました。
調査方法
QiitaAPIを使って、「初心者」という単語を含んでいる記事を検索しました。
プログラム実行時点(2020年9月27日11時30分時点)で投稿時間が新しいものから上位100件を対象としています。コード
// axiosモジュールを読み込む
const axios = require('axios');

// main()関数を定義する
async function main() {
    // QiitaAPIで「初心者」という単語で記事を検索する
    let response = await axios.get('https://qiita.com/api/v2/items?per_page=100&query=' + encodeURIComponent('初心者'));
    // 結果を出力する
    for (let i=0; i<response.data.length; i++) {
        console.log(response.data[i].tags[0].name);
}

main();
結果
2020年9月27日11時30分時点の結果をExcelで集計しています。
考察
やはり、初心者向けはPythonやJavaScriptの記事が多いことが分かりました。
次に多いのがPHPやRubyということで、いまだに根強い人気があるのかなという印象です。
※私が勉強したことあるJavaについては少なくなってきているという印象です。今後
今回はExcelを使って分析しましたが、Python使って分析できるようになってみようと思います。
- 投稿日:2020-09-27T09:40:49+09:00
anyenv and Node.js 設定
TypeScript で React 開発を行うための環境構築。
Node.js を anyenv で選択可能にする。環境設定
Homebrew update(2020/09/21 Mon)
$ brew --version
Homebrew 2.4.3
Homebrew/homebrew-core (git revision c0f2a; last commit 2020-07-06)

# To update homebrew itself
$ brew update

$ brew --version
Homebrew 2.5.1
Homebrew/homebrew-core (git revision a0a0f; last commit 2020-09-21)
anyenv install
# install anyenv
$ brew intall anyenv

# すでにインストールされていたため、upgrade
$ brew upgrade anyenv

$ anyenv --version
anyenv 1.1.2

$ anyenv version
nodenv: 12.14.1 (set by /Users/kazuhiro/.anyenv/envs/nodenv/version)

# 環境変数の設定
$ echo 'eval "$(anyenv init -)"' >> ~/.bash_profile

# bash 起動(~/.bash_profile の読み込み)
$ exec $SHELL -l

$ anyenv install nodenv
$ exec $SHELL -l
anyenv plugin install
- anyenv-update
- nodenv-default-packages
# install anyenv-update
$ mkdir -p $(anyenv root)/plugins
$ git clone https://github.com/znz/anyenv-update.git $(anyenv root)/plugins/anyenv-update

# install nodenv-default-pakages
$ mkdir -p "$(nodenv root)"/plugins
$ git clone https://github.com/nodenv/nodenv-default-packages.git "$(nodenv root)/plugins/nodenv-default-packages"

# set default pacakges
$ cat << EOF > $(nodenv root)/default-packages
yarn
typescript
ts-node
typesync
EOF
Node.js intall
$ nodenv install -l
$ nodenv install 14.4.0
$ nodenv global 14.4.0
$ nodenv versions
  12.14.1
* 14.4.0 (set by /Users/kazuhiro/.anyenv/envs/nodenv/version)
$ node --version
v14.4.0
package update
# 以下のコマンドですべて更新される
$ anyenv update
資料
- 投稿日:2020-09-27T06:59:04+09:00
textlintをnode.jsで動かす
$ mkdir textlint-test $ cd textlint-test $ npm init --yes $ npm install --save-dev textlint $ npm install --save-dev textlint-rule-no-todo $ npm install --save-dev textlint-rule-max-kanji-continuous-len $ npm install --save-dev express $ npm install --save-dev ejs $ npm install --save-dev cors $ mkdir viewsapp.js// vim:set ts=2 et: // https://qiita.com/chenglin/items/5e563e50d1c32dadf4c3 express.jsのcors対応 const TextLintEngine = require('textlint').TextLintEngine; const express = require('express'); const cors = require('cors') const bodyParser = require('body-parser'); const app = express(); // 他からAPIリクエストできるように許可 app.set("view engine", "ejs"); // postデータのjsonをパースするおまじない app.use(bodyParser.urlencoded({ extended: true })); app.use(bodyParser.json()); // allow cors app.use(cors()); // 18080番ポートで待ちうける app.listen(18080, () => { console.log('Running at Port 18080...'); }); //app.post('/api/request', (req, res, next) => { app.post(['/api/request', '/textlint/api/request'], (req, res, next) => { const req_text = req.body.text; const options = { rules: [ "no-todo", "max-kanji-continuous-len", ], rulesConfig: { "no-todo": true, "max-kanji-continuous-len": true, }, }; const engine = new TextLintEngine(options); engine.executeOnText(req_text).then(results => { res.json({ messages: results[0].messages }); }); }); app.get("/", function (req, res) { res.render("index.ejs"); }); // その他のリクエストに対する404エラー app.use((req, res) => { var url = req.protocol + '://' + req.headers.host + req.url; console.log(url); res.sendStatus(404); });index.ejs<!DOCTYPE html> <html lang="ja"> <head> <meta charset="UTF-8"> <title>Title</title> <link rel="stylesheet" href="https://stackpath.bootstrapcdn.com/bootstrap/4.3.1/css/bootstrap.min.css" integrity="sha384-ggOyR0iXCbMQv3Xipma34MD+dH/1fQ784/j6cY/iJTQUOhcWr7x9JvoRxT2MZw1T" crossorigin="anonymous"> <script src="https://code.jquery.com/jquery-3.3.1.min.js" integrity="sha256-FgpCb/KJQlLNfOu91ta32o/NMZxltwRo8QtmkMRdAu8=" crossorigin="anonymous"></script> <script src="https://stackpath.bootstrapcdn.com/bootstrap/4.3.1/js/bootstrap.min.js" integrity="sha384-JjSmVgyd0p3pXB1rRibZUAYoIIy6OrQ6VrjIEaFf/nJGzIxFDsf4x0xIM+B07jRM" crossorigin="anonymous"></script> </head> <body> <form> <div class="form-group"> <label for="lint_textarea">Example textarea</label> <textarea class="form-control" id="lint_textarea" rows="10" placeholder="Write something here..."></textarea> <button type="button" class="btn btn-primary" id="btn_lint">Save</button> </div> </form> <div> <p><strong>lint結果</strong><p> <ul id="textlint_output"></ul> </div> <script type="text/javascript"> (function () { 'use strict'; $('#btn_lint').on('click',function () { let text = $('#lint_textarea').val(); let textData = JSON.stringify( { 'text': text, }); let textlint_url = location.protocol + "//" + location.host + "/textlint/api/request"; $.ajax({ type: 'POST', url: textlint_url, data: textData, contentType: 'application/json', }).done(function (data, textStatus, jqXHR) { // https://qiita.com/georgeOsdDev@github/items/34197e63d0fad307fba6 $("#textlint_output").empty(); let lines = text.split('\n'); data.messages.forEach(function(m){ let li = document.createElement('li'); $(li).text(m.line + "行目" + m.column + "文字目 [" + m.ruleId + "]: <" + m.message + ">「" + lines[m.line -1] + "」") $("#textlint_output").append(li); }); }).fail(function (jqXHR, textStatus, errorThrown) { console.log("failed"); }); }); }()); </script> </body> </html>$ node app.js Running at Port 18080...

- 投稿日:2020-09-27T03:00:34+09:00
node.jsで起動したtextlintに問い合わせる
手抜き
nginxでnode.jsの8080ポートへ
/つけるかつけないか要注意https://www.xmisao.com/2014/05/09/nginx-proxy-pass.html
http://example.com/name/foo
proxy_pass http://127.0.0.1/; -> http://127.0.0.1/foo
proxy_pass http://127.0.0.1; -> http://127.0.0.1/name/foohttps://stackoverflow.com/questions/33426771/nginx-proxy-pass-gives-extra-slash
-location /wp {でなくlocation /wp/ {/etc/nginx//etc/nginx/default.d/textlint.conflocation /textlint/ { proxy_redirect off; proxy_set_header Host $http_host; proxy_set_header X-Forwarded-Host $http_host; proxy_set_header X-Real-IP $remote_addr; proxy_set_header X-Forwarded-For $proxy_add_x_forwarded_for; allow <許可IP>; deny all; proxy_pass http://127.0.0.1:8080/; }サーバー側node.js
CORS(Cross-Origin Resource Sharing)対応しておかないと問い合わせできないので許可する
https://qiita.com/chenglin/items/5e563e50d1c32dadf4c3
app.js// vim:set ts=2 et: const TextLintEngine = require('textlint').TextLintEngine; const express = require('express'); const cors = require('cors') const bodyParser = require('body-parser'); const app = express(); // postデータのjsonをパースするおまじない app.use(bodyParser.urlencoded({ extended: true })); app.use(bodyParser.json()); // allow cors app.use(cors()); // 8080番ポートで待ちうける app.listen(8080, () => { console.log('Running at Port 8080...'); }); app.post('/api/request', (req, res, next) => { const req_text = req.body.text; const options = { rules: [ "no-todo", "max-kanji-continuous-len", ], rulesConfig: { "no-todo": true, "max-kanji-continuous-len": true, }, }; const engine = new TextLintEngine(options); engine.executeOnText(req_text).then(results => { res.json({ messages: results[0].messages }); }); }); // その他のリクエストに対する404エラー app.use((req, res) => { var url = req.protocol + '://' + req.headers.host + req.url; console.log(url); res.sendStatus(404); });クライアントは単純にindex.html
flask用にinputのhidden属性でURLを取得する
index.html<!DOCTYPE html> <html lang="ja"> <head> <meta charset="UTF-8"> <title>Title</title> <link rel="stylesheet" href="https://stackpath.bootstrapcdn.com/bootstrap/4.3.1/css/bootstrap.min.css" integrity="sha384-ggOyR0iXCbMQv3Xipma34MD+dH/1fQ784/j6cY/iJTQUOhcWr7x9JvoRxT2MZw1T" crossorigin="anonymous"> <script src="https://code.jquery.com/jquery-3.3.1.min.js" integrity="sha256-FgpCb/KJQlLNfOu91ta32o/NMZxltwRo8QtmkMRdAu8=" crossorigin="anonymous"></script> <script src="https://stackpath.bootstrapcdn.com/bootstrap/4.3.1/js/bootstrap.min.js" integrity="sha384-JjSmVgyd0p3pXB1rRibZUAYoIIy6OrQ6VrjIEaFf/nJGzIxFDsf4x0xIM+B07jRM" crossorigin="anonymous"></script> </head> <body> <input type="hidden" name="textlint_url" value="http://localhost/textlint/api/request"> <form> <div class="form-group"> <label for="lint_textarea">Example textarea</label> <textarea class="form-control" id="lint_textarea" rows="10" placeholder="Write something here..."></textarea> <button type="button" class="btn btn-primary" id="btn_lint">Save</button> </div> </form> <script type="text/javascript"> (function () { 'use strict'; $('#btn_lint').on('click',function () { console.log("1"); let text = $('#lint_textarea').val(); let textData = JSON.stringify( { 'text': text, }); console.log(textData) let textlint_url = $('input[name=textlint_url]').val(); console.log(textlint_url) $.ajax({ type: 'POST', url: textlint_url, data: textData, contentType: 'application/json', }).done(function (data, textStatus, jqXHR) { console.log(data); }).fail(function (jqXHR, textStatus, errorThrown) { console.log("failed"); }); }); }()); </script> </body> </html>
- 投稿日:2020-09-27T00:35:13+09:00
森から木へと向かうコーディング手順
前置き
コーディングの際、個人的には普段から私が実践している方法なのですが
意外と実践していない人を多く見かけるので今回は記事にしてみました。仮に、商品一覧を表示する画面のサーバーサイドを実装するとします。
仕様書は以下のような、よくある内容のものです。チェック処理
種別 項目 内容 必須 ユーザーID 必須 商品ID 桁 ユーザーID 1~3桁 桁 商品ID 1~3桁 取得条件
値 条件 テーブル カラム リクエスト.ユーザーID = ユーザーマスタ ユーザーID リクエスト.商品ID = 商品マスタ 商品ID さて、このような仕様をソースコードに起こしていくとします。
千差万別だとは思いますが、
みなさんはどういう手順を踏んで実装に移して行きますか?木から森
まずはよくみかける手順です
①とりあえず処理を羅列
Wood.tsfunction getProductMaster(userId: number, productId: number) { // DBから取得 return productMaster; } function main(userId: number, productId: number) { if (!userId) { throw new Error(); } if (!productId) { throw new Error(); } if (userId < 0 || userId > 999) { throw new Error(); } if (productId < 0 || productId > 999) { throw new Error(); } let productMaster = this.getProductMaster(userId, productId); return productMaster; }②ソースが長くなってきたところでメソッド化
Wood.tsfunction isValid(userId: number, productId: number) : boolean { if (!userId) { return false; } if (!productId) { return false; } if (userId < 0 || userId > 999) { return false; } if (productId < 0 || productId > 999) { return false; } return true; } function getProductMaster(userId: number, productId: number) { // DBから取得 return productMaster; } function main(userId: number, productId: number) { if (!this.isValid(userId, productId)) { throw new Error(); } let productMaster = this.getProductMaster(userId, productId); return productMaster; }これでも悪いというわけではないのですが
今回の場合は、簡単な仕様なので処理の流れの全体像をすぐに把握することができます。しかし、複雑な仕様をソースに起こしていく場合、
ただ上から順に処理を羅列していくと
ソース量が膨大になってきた時に
ソースコードの全体像が見えなくなり
ソースコードの森の中で迷子になってしまうやもしれません。これは木から森という、
細かい粒度から大きい粒度の大枠が出来上がっていくために
だんだんと全体像が見えなくなっていき、森の中で迷子になってしまうのです。そこで今度は処理の順(シーケンシャル)にソースを起こしていくのではなく、
まずは処理全体のアウトラインをつかみ、
先に大枠をソースに起こしておいて
森から木へと、外側から内側方向へとソースを起こしていくようにします。森から木
①アウトラインだけの中身が空のメソッドを用意して、
処理の全体像を把握しやすくするForest.tsfunction isValid(userId: number, productId: number) : boolean { // todo: チェック処理 return true; } function getProductMaster(userId: number, productId: number) { // DBから取得 return productMaster; } function main(userId: number, productId: number) { if (!this.isValid(userId, productId)) { throw new Error(); } let productMaster = this.getProductMaster(userId, productId); return productMaster; }②空のメソッドの中身を埋めていく
Forest.tsfunction isValid(userId: number, productId: number) : boolean { if (!userId) { return false; } if (!productId) { return false; } if (userId < 0 || userId > 999) { return false; } if (productId < 0 || productId > 999) { return false; } return true; } function getProductMaster(userId: number, productId: number) { // DBから取得 return productMaster; } function main(userId: number, productId: number) { if (!this.isValid(userId, productId)) { throw new Error(); } let productMaster = this.getProductMaster(userId, productId); return productMaster; }こういった書き方をすると、だんだん処理が増えていくうちに
すごい膨大な1メソッドになっちゃった!
ということが自然と防げるために可読性の良いソースになっていきます。もちろんそれでも単一責任法則を考慮し、
メソッドの債務が重責になってきた際には
後からメソッドの切り出しをしていくことは必要です。