- 投稿日:2020-09-23T21:56:03+09:00
【Unity】動画で見るSlerp
Vector3のSLerpを動画にしました。
SLerpをなんとなく使っている人に見ていただけると幸いです。
動画で見るLerpも投稿していますのそちらも参考に。動画
投稿用
— TANUKEINA (@FH1b4mzzirXPoiM) September 13, 2020
Slerpサンプル1 pic.twitter.com/mHnTSWlUk7投稿用
— TANUKEINA (@FH1b4mzzirXPoiM) September 13, 2020
Slerpサンプル2 pic.twitter.com/tmpvOFXeS6オブジェクトの色も線形補間(Color.Lerp)によって変化させています。
Slerp(Vector3 a, Vector3 b, float t);
引数
- Vector3 a :開始点
- Vector3 b :終了点
- float t :二点の補間値
計算式は
Slerp(a,b;t) = \frac{sin[(1-t)Ω]}{sinΩ}a + \frac{sin[tΩ]}{sinΩ}ba,bの二点間を球面的に補間するということを表してるわけですが、
これだけ見るとなんだかよくわかりませんね。
この辺は私がわざわざ説明するより、先人達の記事の方が何倍もわかりやすいので以下にリンクを貼っておきます。○×つくろ〜ドットコム その57 クォータニオンを"使わない"球面線形補間
SlerpExample
SlerpExample.csusing System.Collections; using System.Collections.Generic; using UnityEngine; public class SlerpExample : MonoBehaviour { public Transform sunrise; public Transform sunset; //始点から終点までの時間 public float journeyTime = 1.0f; [System.NonSerialized] public float fracComplete; private float startTime; private void Start() { startTime = Time.time; } private void Update() { //弧の中心 Vector3 center = (sunrise.position + sunset.position) * 0.5f; //弧を中心にするため調整 center -= new Vector3(0, -1, 0); //中心を基準として円弧を補間する Vector3 riseRelCenter = sunrise.position - center; Vector3 setRelCenter = sunset.position - center; fracComplete = (Time.time - startTime) / journeyTime; transform.position = Vector3.Slerp(riseRelCenter, setRelCenter, fracComplete); transform.position += center; } }ColorLerp
Lerpの記事から少し改良しています。
ColorLerp.cssing System.Collections; using System.Collections.Generic; using UnityEngine; public class ColorLerp : MonoBehaviour { public enum LerpType { Lerp, Slerp } public LerpType lerpType; private LerpExample lerpExample; private SlerpExample slerpExample; private Material mat; private void Start() { mat = this.GetComponent<Renderer>().material; lerpExample = GetComponent<LerpExample>(); slerpExample = GetComponent<SlerpExample>(); } void Update() { switch (lerpType) { case LerpType.Lerp: mat.color = Color.Lerp(Color.blue, Color.red, lerpExample.fractionOfJourney); break; case LerpType.Slerp: mat.color = Color.Lerp(Color.blue, Color.red, slerpExample.fracComplete); break; } } }まとめ
- Slerpは球面線形補間をするメソッド
- 回転表現に使用できる
- Quaternionだと理解しにくいので動画を見て、直感的に理解してくれたら幸いです
- 投稿日:2020-09-23T21:50:13+09:00
C#でExcelブックの「名前」を全消去する
動機
古ーいExcelファイルをコピーしてつかっていると、ときどき出るコレがうざすぎて、C#アプリからExcelブックの「名前」を削除するソフトをつくってみた。
手動で消す場合
全選択ができず、1つずつ消す羽目になる。数が多いとストレスがえぐい・・
ほんとMS Officeってクソ・・・注意事項
むやみに「名前」を消すと、数式やマクロが動作しなくなるおそれがあります。
そのエクセル自体で使用していなくても、ほかのツールがそのエクセルファイル内の「名前」の使用を前提にしたシステムになっている場合もありえます。ソースコード
using System;
using System.Drawing;
using System.Runtime.CompilerServices; // to use [MethodImpl(MethodImplOptions.NoInlining)]
using System.Runtime.InteropServices;
//using System.Text.RegularExpressions;
using System.Windows.Forms;

using Excel = Microsoft.Office.Interop.Excel;
//using Microsoft.Office.Core;

class ExcelNameRemover : Form
{
    Button btnStartTryGet;


    [MethodImpl(MethodImplOptions.NoInlining)]
    void TryGetActiveBook()
    {
        try {
            var oExcelApp = (Excel.Application)Marshal.GetActiveObject("Excel.Application");

            if (oExcelApp == null) {return;}

            dynamic book;
            book = oExcelApp.ActiveWorkbook;

            var res = MessageBox.Show("Are you sure to delete all names in the excel: \"" + book.Name+"\"", "Confirmation", MessageBoxButtons.OKCancel );
            if (res == DialogResult.OK ) {
                dynamic names = book.Names;
                int count=0;
                foreach(dynamic name in names){
                    name.Delete();
                    count++;
                    GC.Collect();
                    GC.WaitForPendingFinalizers();
                }
                Console.WriteLine(count.ToString() + " names are deleted.");
            }
        }
        catch(Exception e) {
            if (e is Microsoft.CSharp.RuntimeBinder.RuntimeBinderException ||
                e is COMException ) {

                Console.WriteLine(e);
                // もみ消す
                return;
            }
            throw e;
        }
        finally {
        }
    }


    ExcelNameRemover()
    {
        Controls.Add(btnStartTryGet = new Button(){
            Text = "Remove all names",
            Location = new Point(0, 0),
            Width = 200
        });
        btnStartTryGet.Click += (s,e)=>{
            TryGetActiveBook();
            GC.Collect();
            GC.WaitForPendingFinalizers();
        };
    }

    [STAThread]
    static void Main(string[] args)
    {
        //DumpTextOfActiveSheet();
        Application.Run(new ExcelNameRemover());
    }
}
コンパイル方法
※dllのパスは環境に依存すると思います。
compile.batcsc ^ /r:C:\Windows\assembly\GAC_MSIL\Microsoft.Office.Interop.Excel\15.0.0.0__71e9bce111e9429c\Microsoft.Office.Interop.Excel.dll ^ /r:C:\Windows\assembly\GAC_MSIL\office\15.0.0.0__71e9bce111e9429c\Office.dll ^ %*
compile.bat ファイル名.cs
でコンパイルできます。


- 投稿日:2020-09-23T17:28:01+09:00
C# .NET のDataGridView入力イベントでハマった
おしごとでDataGridViewで一覧表示・編集するアプリを作っていて、タイトルの通りハマった話。
セルに入力があった場合に別の列の値を参照してDBに書込みに行くような処理を書いていた。
DataGridViewは:
- 列により入力可否を設定 (デザイナー画面で「列の編集」を開き、動作>ReadOnlyで設定)
- DataGridViewにKeyDownイベントを設定
- KeyDownイベントでは入力セルのある行で特定の列の値を取得してアレコレ
こんな感じでやっていたのだけど、どういうわけか入力時に処理が走らない。
そのうえ入力不可の列でキーを叩くとイベントが走っている。(これは想定内で、イベントハンドラで対応しているのでOK)ReadOnly:falseの列ではKeyDownイベントが発生しない
ググってみると、どうやらセル入力時にはセルそのものではなくセルの中にTextBoxが配置され、そのTextBoxを編集しているらしい。
【参考】
DataGridViewでセルが編集中の時にキーイベントを捕捉する
でも同じやり方で過去に作った同じ.NET 4.6.1のアプリだと動いているんだよなあ…何が違うんだろう。
ちょっとモヤモヤするけど、とりあえず解決したので備忘録がてら。
- 投稿日:2020-09-23T14:50:52+09:00
Jtf8JsonでDictionaryのキーにCustom Formatterを利用する
はじめに
.NETでJSONを扱うにあたり、Utf8Jsonというライブラリがあります。
UTF-8ネイティブな.NET用のJSONライブラリにはSystem.Text.Jsonもありますが、参照型を扱う場合にデフォルトコンストラクタが必要なことから、私はUtf8Jsonを使うことがあります。
ここではUtf8Json使う場合に、Dictionaryオブジェクトのキーに組み込み型ではない、自作のクラスや構造体を使う方法を紹介したいと思います。
対象の自作クラス
こんなImmutableなデフォルトコンストラクタを持たないクラスや構造体を、Dictionaryのキーに利用します。
    public readonly struct EmployeeId
    {
        public EmployeeId(int intValue)
        {
            IntValue = intValue;
        }

        public int IntValue { get; }
    }
Custom Formatterを利用する
Utf8Jsonでは独自クラスでJSONのシリアライズを明示的に指定したい場合、IJsonFormatterを実装する必要がありますが、Dictionaryのキーに利用する場合は、IJsonFormatterに追加してIObjectPropertyNameFormatterを実装する必要があります。
EmployeeIdの例では、intのプロパティのみをシリアライズ・デシリアライズしたいので、Formatterを次のように実装します。public sealed class EmployeeIdFormatter : IJsonFormatter<EmployeeId>, IObjectPropertyNameFormatter<EmployeeId> { public void Serialize(ref JsonWriter writer, EmployeeId value, IJsonFormatterResolver formatterResolver) { writer.WriteInt32(value.IntValue); } public EmployeeId Deserialize(ref JsonReader reader, IJsonFormatterResolver formatterResolver) { return new EmployeeId(reader.ReadInt32()); } public void SerializeToPropertyName(ref JsonWriter writer, EmployeeId value, IJsonFormatterResolver formatterResolver) { writer.WriteInt32(value.IntValue); } public EmployeeId DeserializeFromPropertyName(ref JsonReader reader, IJsonFormatterResolver formatterResolver) { return new EmployeeId(reader.ReadInt32()); } }Customer Formatterを利用する
標準のFormatterに追加して、上記のFormatterを利用したい場合、つぎのように実装しましょう。
CompositeResolver.RegisterAndSetAsDefault(
    new IJsonFormatter[] {new EmployeeIdFormatter()},
    new[] {StandardResolver.Default});

var employeeNames = new Dictionary<EmployeeId, string>
{
    [new EmployeeId(0)] = "Steve Jobs",
    [new EmployeeId(1)] = "Bill Gates"
};
var organization = new Organization(employeeNames);
var jsonBytes = Utf8Json.JsonSerializer.Serialize(organization);
これで次のようなJSONが得られます。
{0:"Steve Jobs",1:"Bill Gates"}以上です。
- 投稿日:2020-09-23T14:50:52+09:00
Utf8JsonでDictionaryのキーにCustom Formatterを利用する
はじめに
.NETでJSONを扱うにあたり、Utf8Jsonというライブラリがあります。
UTF-8ネイティブな.NET用のJSONライブラリにはSystem.Text.Jsonもありますが、参照型を扱う場合にデフォルトコンストラクタが必要なことから、私はUtf8Jsonを使うことがあります。
ここではUtf8Json使う場合に、Dictionaryオブジェクトのキーに組み込み型ではない、自作のクラスや構造体を使う方法を紹介したいと思います。
対象の自作クラス
こんなImmutableなデフォルトコンストラクタを持たないクラスや構造体を、Dictionaryのキーに利用します。
    public readonly struct EmployeeId
    {
        public EmployeeId(int intValue)
        {
            IntValue = intValue;
        }

        public int IntValue { get; }
    }
Custom Formatterを実装する
Utf8Jsonでは独自クラスでJSONのシリアライズを明示的に指定したい場合、IJsonFormatterを実装する必要がありますが、Dictionaryのキーに利用する場合は、IJsonFormatterに追加してIObjectPropertyNameFormatterを実装する必要があります。
EmployeeIdの例では、intのプロパティのみをシリアライズ・デシリアライズしたいので、Formatterを次のように実装します。このとき、JSONの仕様上、連想配列(Dictionary)のキーは文字列である必要があるため( @ktz_alias さんに指摘いただきました。ありがとうございました!)、異なるインターフェースIObjectPropertyNameFormatterで変換を実装します。
public sealed class EmployeeIdFormatter : IJsonFormatter<EmployeeId>, IObjectPropertyNameFormatter<EmployeeId>
{
    public void Serialize(ref JsonWriter writer, EmployeeId value, IJsonFormatterResolver formatterResolver)
    {
        writer.WriteInt32(value.IntValue);
    }

    public EmployeeId Deserialize(ref JsonReader reader, IJsonFormatterResolver formatterResolver)
    {
        return new EmployeeId(reader.ReadInt32());
    }

    public void SerializeToPropertyName(ref JsonWriter writer, EmployeeId value, IJsonFormatterResolver formatterResolver)
    {
        writer.WriteInt32(value.IntValue);
    }

    public EmployeeId DeserializeFromPropertyName(ref JsonReader reader, IJsonFormatterResolver formatterResolver)
    {
        return new EmployeeId(reader.ReadString());
    }
}
Custom Formatterを利用する
標準のFormatterに追加して、上記のFormatterを利用したい場合、つぎのように実装しましょう。
CompositeResolver.RegisterAndSetAsDefault(
    new IJsonFormatter[] {new EmployeeIdFormatter()},
    new[] {StandardResolver.Default});

var employeeNames = new Dictionary<EmployeeId, string>
{
    [new EmployeeId(0)] = "Steve Jobs",
    [new EmployeeId(1)] = "Bill Gates"
};
var jsonBytes = Utf8Json.JsonSerializer.Serialize(employeeNames);
これで次のようなJSONが得られます。
{"0":"Steve Jobs","1":"Bill Gates"}以上です。
- 投稿日:2020-09-23T09:29:49+09:00
Azure Functions v3の.Net Core デプロイをAzure DevOpsのPipelinesで行う方法
はじめに
Azure Functionsではデプロイセンターから自動でPipelineの作成を行う機能がありますが、.Net Core 3.1用のPipelinesは自動生成できなかっため(2020年8月時)Azure DevOps上で作成する必要があります。
ここではAzure Functions v3向けのPipelinesの作成手順を記載します。開発環境
- Windows 10
- Visual Studio 2019
- .Net Core 3.1
Azure Functionsの作成
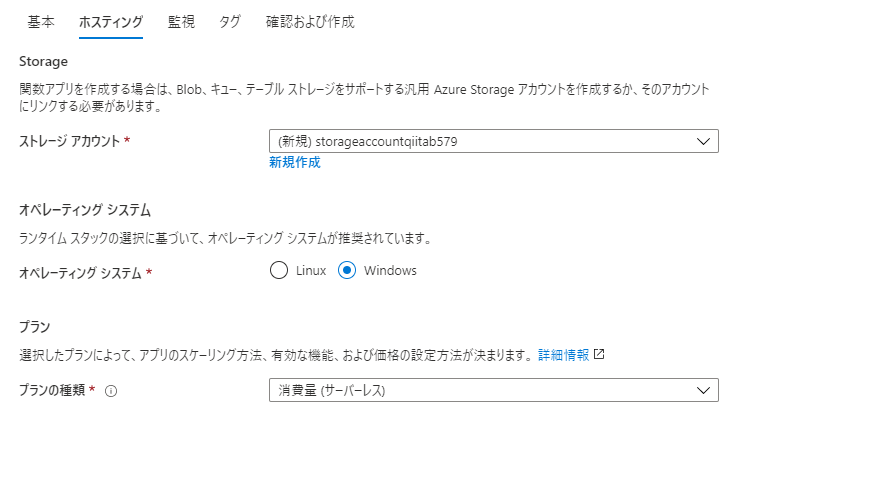
Azure PortalでAzure Functionsを作成します。
Azure Functions v3にするにはランタイムスタックを「.Net Core」、バージョンを「3.1」とします。
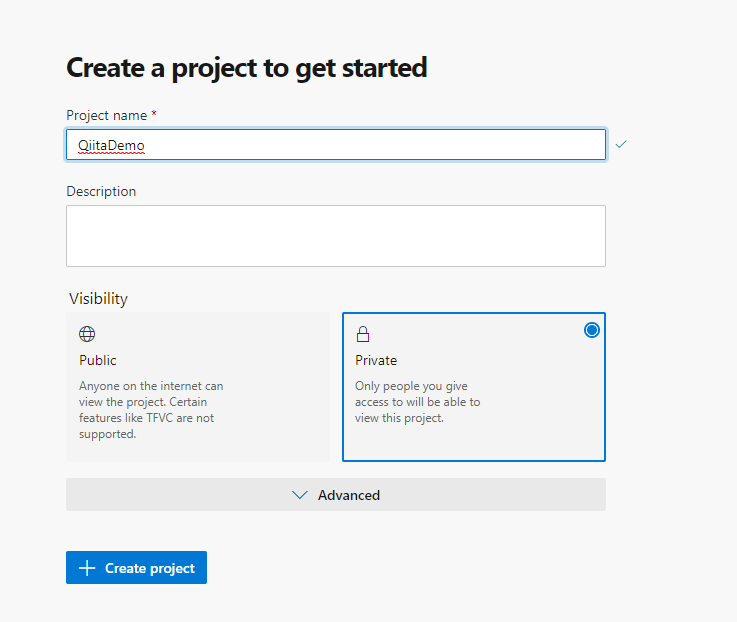
Azure DevOpsのプロジェクト作成
Azure DevOpsで任意のプロジェクトを作成します。
コードの作成
Visual StudioでAzure Functionsのプロジェクトを作成します。
今回はHttpトリガーの関数で作成しました。
GitでAzure DevOpsのプロジェクトにリポジトリをpushしてソースコードが共有されていることを確認する。
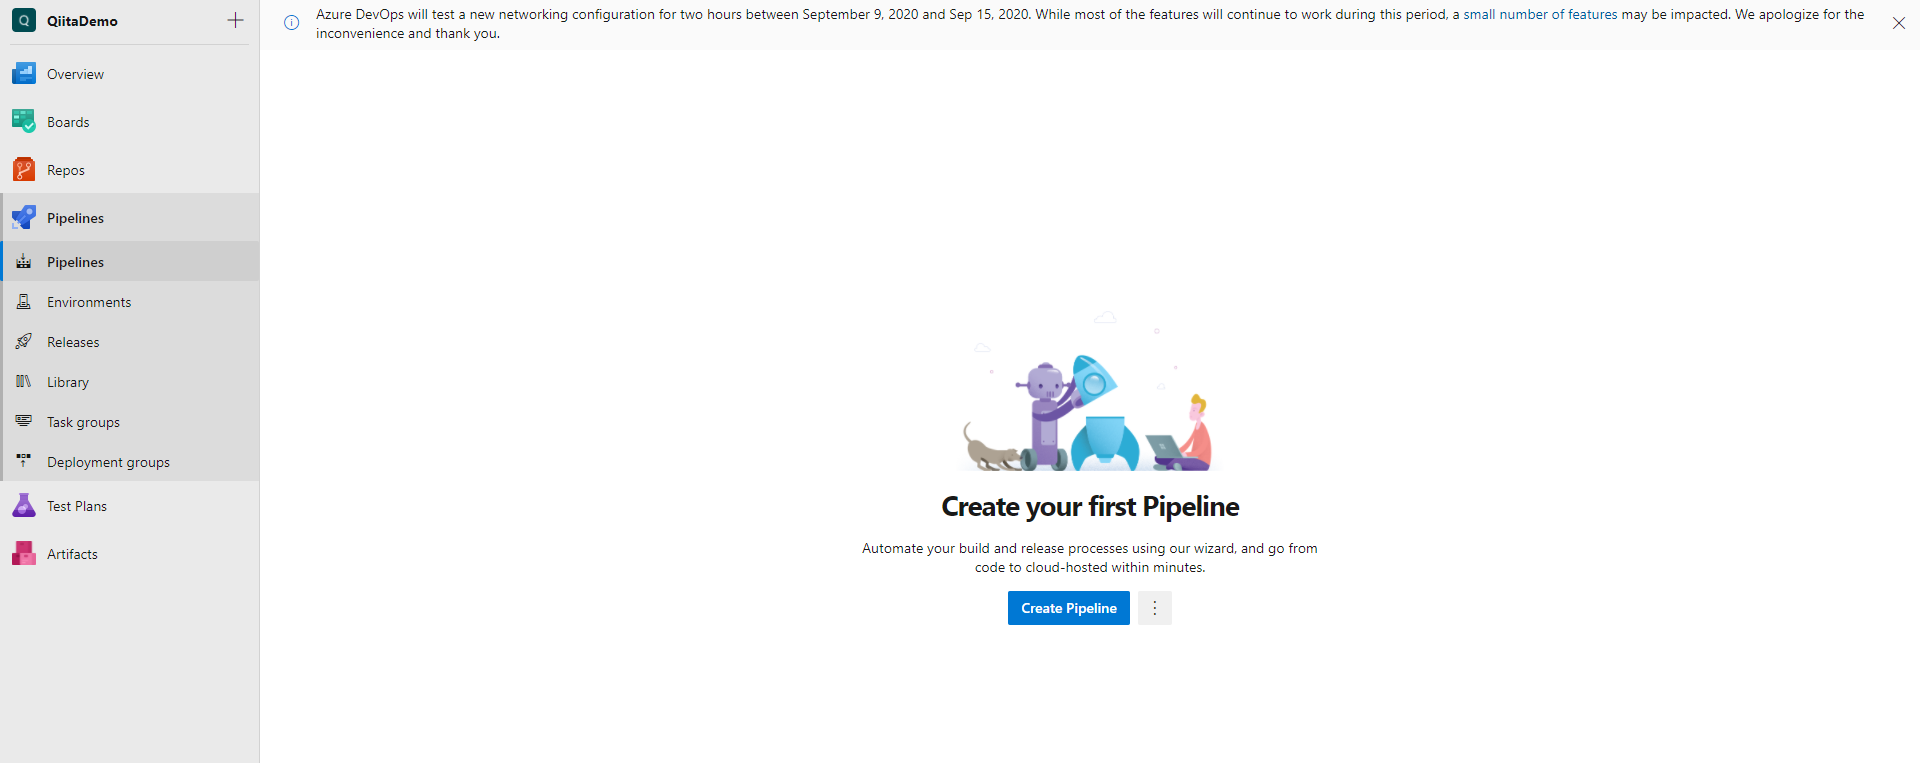
Pipelinesの作成
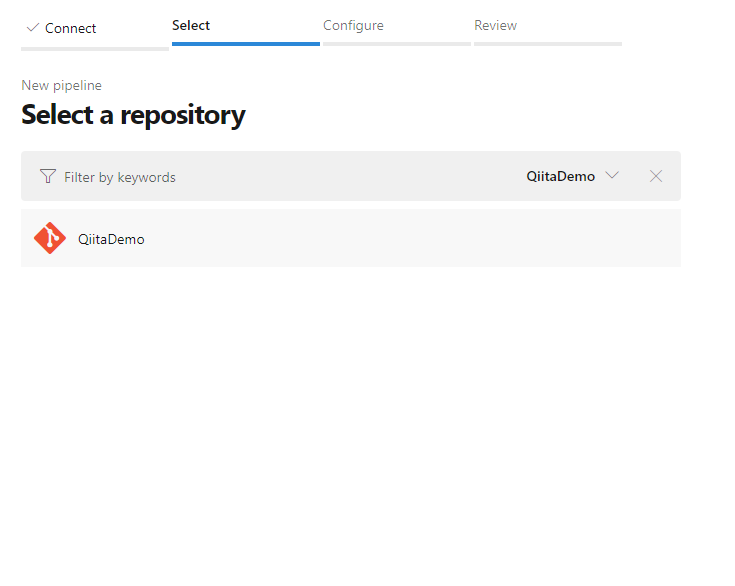
Azure Repos Gitを選択
Functionsのソースコードがあるリポジトリを選択
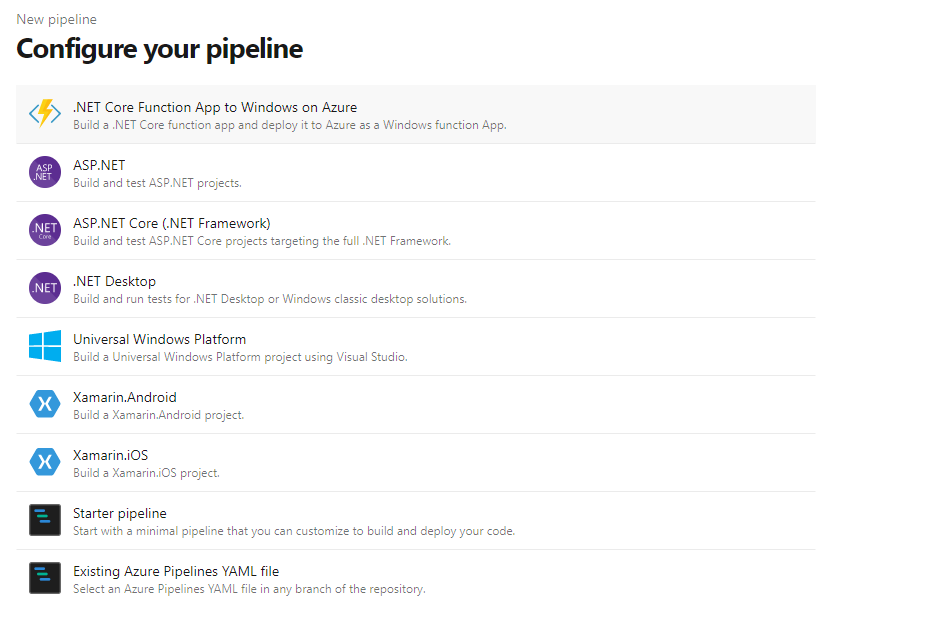
.Net Core Function App to Windows on Azureを選択
対象のAzure Functions Appを選択
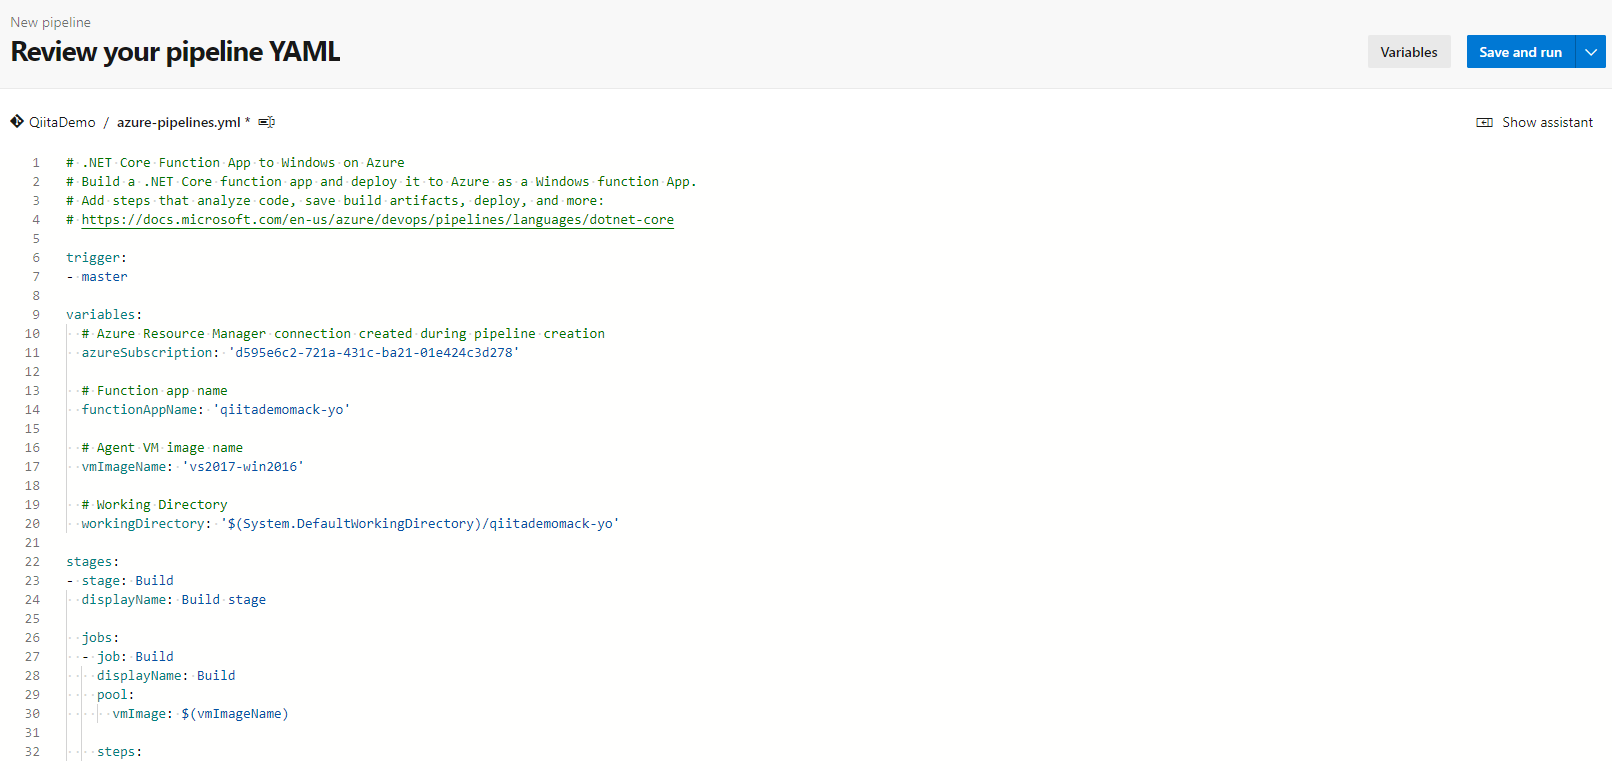
YAMLが自動生成されるので、Save and runを選択
commitの情報を書く
実行するとFunctionsの関数に関数が追加されます。
まとめ
Pipelineでは.Net CoreのAzure Functions向けテンプレートが存在するためそれを使いましょう。
もともとは別のやり方でを紹介するつもりだったのですが、もっと楽な方法があることが知れたので良かったです…


- 投稿日:2020-09-23T01:53:41+09:00
MagicLeapで任意の平面にオブジェクトを置く方法
ここの記事の続き : MagicLeapで床にオブジェクトを配置する方法
基本的な開発環境やシーンの構成は同じ
開発環境
Unity : 2019.3.7f1
LuminOS : 0.98.11, APILevel 8
MagicLeap : UnitySDK 0.24.1
MagicLeap : ToolKit 特にバージョン表記等はないので現時点(2020/09/23)での最新今回開発したアプリのリポジトリはこちら
PlaneCheckシーンにサンプルが配置してあります
完成するもの
任意の平面を判定するやつ pic.twitter.com/bJ8k1Udb5k
— 松本隆介 (@matsumotokaka11) September 22, 2020
下準備
この辺りは前回の記事と同様なので飛ばしても大丈夫です
ProjectSettings > MagicLeap > ManifestSettingsにて以下の項目にチェックを入れました
- ControllerPose
- LowLatencyLightwear
- WorldReconstruction
シーンの構成
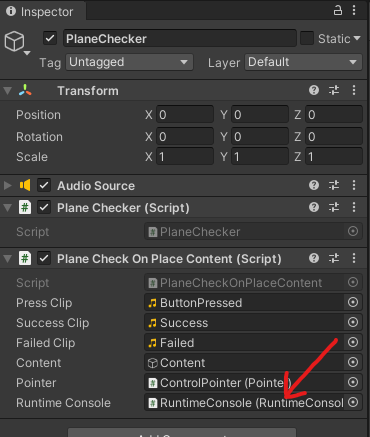
基本的には前回とはあまり変わってませんがどの平面を判定しているかを確認するためRuntimeConsoleを新たに追加しました
RuntimeConsoleは
MagicLeap-Tools > Prefabs > Debuggingにあるプレハブをシーン上に配置していますPlaneCheckerオブジェクトにアタッチしているスクリプトで参照するので紐づけます
スクリプト
前回作成したFloorCheckerをさらに改造したPlaneCheckerを作成します
using System.Collections;
using System.Collections.Generic;
using UnityEngine;

#if PLATFORM_LUMIN
using UnityEngine.XR.MagicLeap;
#endif


namespace PlaneCheck
{
    /// <summary>
    /// MagicLeapToolsのFloorOnPlaceを改造したクラス.
    /// 任意の平面を判定する.
    /// </summary>
    public class PlaneChecker : MonoBehaviour
    {
        readonly float HeadLocationIdleThreshold = 0.003f;
        readonly float HeadRotationIdleThreshold = .3f;
        readonly int HistoryCount = 5;
        readonly float HeadIdleRequiredDuration = .2f;


        public Vector3 Location
        {
            get;
            private set;
        }

        List<Vector3> headLocationHistory;
        List<Quaternion> headRotationHistory;
        float headLocationVelocity;
        float headRotationVelocity;
        Transform mainCamera;
        bool headLocationIdle;
        bool headRotationIdle;
        bool headTemporarilyIdle;
        bool headIdle;
        bool placementValid;


        void Awake()
        {
            mainCamera = Camera.main.transform;

            if (FindObjectOfType<MLSpatialMapper>() == null)
            {
                Debug.LogError("PlaceOnFloor requires and instance of the MLSpatialMapper in your scene.");
            }
        }


        void OnEnable()
        {
            headLocationHistory = new List<Vector3>();
            headRotationHistory = new List<Quaternion>();
        }


        void Update()
        {
            if (Time.frameCount < 3)
            {
                return;
            }

            HeadActivityDetermination();
        }


        IEnumerator HeadIdleTimeout()
        {
            yield return new WaitForSeconds(HeadIdleRequiredDuration);
            headIdle = true;
        }


        void HeadActivityDetermination()
        {
            //history:
            headLocationHistory.Add(mainCamera.position);
            if (HistoryCount < headLocationHistory.Count)
                headLocationHistory.RemoveAt(0);

            headRotationHistory.Add(mainCamera.rotation);
            if (HistoryCount < headRotationHistory.Count)
                headRotationHistory.RemoveAt(0);

            //location velocity:
            if (headLocationHistory.Count == HistoryCount)
            {
                headLocationVelocity = 0;
                for (int i = 1; i < headLocationHistory.Count; i++)
                {
                    headLocationVelocity += Vector3.Distance(headLocationHistory[i], headLocationHistory[i - 1]);
                }
                headLocationVelocity /= headLocationHistory.Count;

                //idle detection:
                if (headLocationVelocity <= HeadLocationIdleThreshold)
                {
                    if (!headLocationIdle)
                    {
                        headLocationIdle = true;
                    }
                }
                else
                {
                    if (headLocationIdle)
                    {
                        headLocationIdle = false;
                    }
                }
            }

            //rotation velocity:
            if (headRotationHistory.Count == HistoryCount)
            {
                headRotationVelocity = 0;
                for (int i = 1; i < headRotationHistory.Count; i++)
                {
                    headRotationVelocity += Quaternion.Angle(headRotationHistory[i], headRotationHistory[i - 1]);
                }
                headRotationVelocity /= headRotationHistory.Count;

                //idle detection:
                if (headRotationVelocity <= HeadRotationIdleThreshold)
                {
                    if (!headRotationIdle)
                    {
                        headRotationIdle = true;
                    }
                }
                else
                {
                    if (headRotationIdle)
                    {
                        headRotationIdle = false;
                    }
                }
            }

            //absolute idle head determination:
            if (headLocationIdle && headRotationIdle)
            {
                if (!headTemporarilyIdle)
                {
                    headTemporarilyIdle = true;
                    StartCoroutine(HeadIdleTimeout());
                }
            }
            else
            {
                if (headTemporarilyIdle)
                {
                    headIdle = false;
                    headTemporarilyIdle = false;
                    StopCoroutine(HeadIdleTimeout());
                }
            }
        }


        /// <summary>
        /// 指定したRayの位置に任意の面があるか否か、ある場合はその座標も返す.
        /// </summary>
        /// <param name="ray"></param>
        /// <param name="surfaceType"></param>
        /// <returns></returns>
        public (bool, Vector3) LookingAtFloorDetermination(
            Ray ray,
            MagicLeapTools.SurfaceType surfaceType)
        {
            RaycastHit hit;
            if (Physics.Raycast(ray, out hit))
            {
                MagicLeapTools.SurfaceType surface = MagicLeapTools.SurfaceDetails.Analyze(hit);

                if (surface == surfaceType)
                {
                    Location = hit.point;
                    placementValid = true;
                    return (true, Location);
                }
                else
                {
                    placementValid = false;
                    return (false, Vector3.zero);
                }
            }
            else
            {
                placementValid = false;
                return (false, Vector3.zero);
            }
        }


    }
}
この部分で任意の平面かの判定をとっています
        /// <summary>
        /// 指定したRayの位置に任意の面があるか否か、ある場合はその座標も返す.
        /// </summary>
        /// <param name="ray"></param>
        /// <param name="surfaceType"></param>
        /// <returns></returns>
        public (bool, Vector3) LookingAtFloorDetermination(
            Ray ray,
            MagicLeapTools.SurfaceType surfaceType)
        {
            RaycastHit hit;
            if (Physics.Raycast(ray, out hit))
            {
                MagicLeapTools.SurfaceType surface = MagicLeapTools.SurfaceDetails.Analyze(hit);

                if (surface == surfaceType)
                {
                    Location = hit.point;
                    placementValid = true;
                    return (true, Location);
                }
                else
                {
                    placementValid = false;
                    return (false, Vector3.zero);
                }
            }
            else
            {
                placementValid = false;
                return (false, Vector3.zero);
            }
        }
判定することが出来る平面はMagicLeapToolsのSurfaceDetils.csに定義されています
今回のサンプルでは床、壁、天井の三種類を判定することにしました
PlaneCheckerを利用するPlaneCheckOnPlaceContent.cs
基本的な構成は前回のFloorCheckOnPlaceContent.csとあまり変わっていません
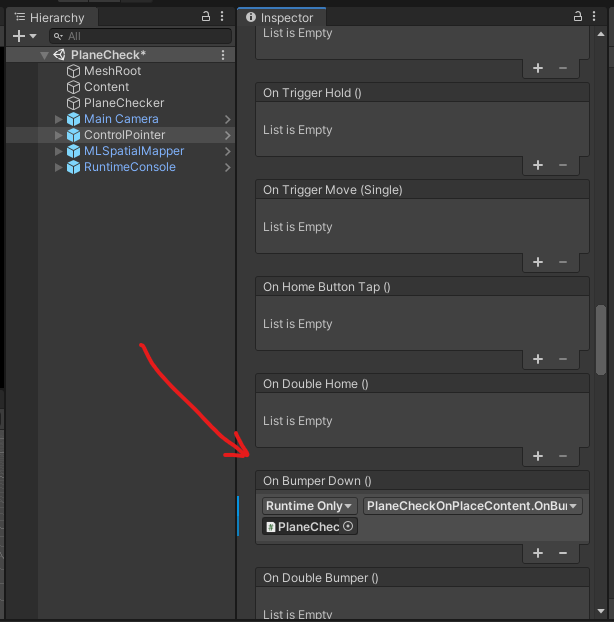
Bumperボタンを押下したら判定を切り替えるようにしています
ControlPointerオブジェクトのControlInputにOnBumperButtonDown()を登録
using MagicLeapTools;
using UnityEngine;

namespace PlaneCheck
{

    /// <summary>
    /// トリガを入力したときに任意の平面を判定し、床の場合はオブジェクトを配置するサンプル.
    /// </summary>
    [RequireComponent(typeof(PlaneChecker),typeof(AudioSource))]
    public class PlaneCheckOnPlaceContent : MonoBehaviour
    {

        [SerializeField] AudioClip pressClip;
        [SerializeField] AudioClip successClip;
        [SerializeField] AudioClip failedClip;
        [SerializeField] GameObject content;
        [SerializeField] Pointer pointer;
        [SerializeField] RuntimeConsole runtimeConsole;
        PlaneChecker planeChecker;
        AudioSource audio;
        SurfaceType[] surfaceTypes;
        int index = 0;

        void Start()
        {
            planeChecker = GetComponent<PlaneChecker>();
            audio = GetComponent<AudioSource>();

            // RuntimeConsoleに自分が指定した文字列だけ表示したい.
            runtimeConsole.errors = false;
            runtimeConsole.logs = false;
            runtimeConsole.warnings = false;

            // 今回はこの三種類のみをチェック.
            surfaceTypes = new[]
            {
                SurfaceType.Floor,   // 床.
                SurfaceType.Wall,    // 壁.
                SurfaceType.Ceiling, // 天井.
            };
        }


        public void OnBumperButtonDown()
        {
            index = (int)Mathf.Repeat(index + 1, surfaceTypes.Length);
            runtimeConsole.logText.text = surfaceTypes[index].ToString();
        }


        public void OnTriggerDown()
        {
            audio.PlayOneShot(pressClip);
            (bool onSurfaceType, Vector3 pos ) result = planeChecker.LookingAtFloorDetermination(new Ray(pointer.Origin, pointer.Direction), surfaceTypes[index]);
            if (result.onSurfaceType)
            {
                audio.PlayOneShot(successClip);
                content.transform.position = result.pos;
            }
            else
            {
                audio.PlayOneShot(failedClip);
            }
        }


    }
}
完成
これでデプロイ or ZeorIterationで確認すれば↓の様な動作になります
ただしRuntimeConsoleは実機にデプロイ時にしか動作しないので実機での確認のほうがどの平面を判定しているかがわかりやすいです任意の平面を判定するやつ pic.twitter.com/bJ8k1Udb5k
— 松本隆介 (@matsumotokaka11) September 22, 2020
感想
これで任意の平面にオブジェクトを配置したりできるようになりました
なんか家具の配置確認アプリ的なもので天井にランプをつるすとか、壁に絵を飾るとかの確認に使うのがメイン所の使い方かな?