本日はJDKインストール、Androidstudioダウンロードをした。
今回のこと ドットインストールのAndroidデータベース入門を進めていて、Android Studio内のターミナルを使っていた時の出来事です。 コマンドラインを使ってエミュレーターの中に入り、データベースの中身を操作する、ということをやりました。 その際のエラーが解決できたので、備忘録として書いていきます。 どう解決したか もうすでにターミナルを使って、エミュレーターの中に入り、データベースのファイルがあるdatabasesディレクトリに移動していることを仮定して書いていきます。 まずは、lsでdatabasesディレクトリの中身を見ます。 generic_x86_arm:/data/data/パッケージ名/databases $ ls 実行結果 (db拡張子のファイル) (右と同じファイル)-journal では、このファイルを、「sqlite3 ファイル名」でsqliteを起動しましょう。 generic_x86_arm:/data/data/パッケージ名/databases $ sqlite3 ファイル名 実行結果 sh: sqlite3: inaccessible or not found あれ、ちがう結果になった。。。 原因を調べてみたところ、 「Google Playが実装された仮想デバイスは、root権限でログインできない」とのことでした。 参考サイト https://teratail.com/questions/186703 「Play ストア」欄に、三角マークがついていないものを新たにダウンロードなりして、それを起動しましょう。 起動出来たら、上のほうで省略しましたが「adb shell」からまた同じ手順でコマンドを入力していきましょう。 恐る恐る「sqlite3 ファイル名」と入力すると、 実行結果 SQLite version 3.28.0 2020-05-06 18:46:38 Enter ".help" for usage hints. sqlite> できたーーー!! こんな感じの文が出てきたら起動が成功です。 結論 仮想デバイスがGoogle Playが実装されているかそうでないか、確認してみよう。 参考にさせていただきました Androidデータベース入門 (全10回) - プログラミングならドットインストール(有料サービス) Android - ADBコマンドをroot権限で使いたい|teratail
ドットインストールのAndroidデータベース入門を進めていて、Android Studio内のターミナルを使っていた時の出来事です。 コマンドラインを使ってエミュレーターの中に入り、データベースの中身を操作する、ということをやりました。
その際のエラーが解決できたので、備忘録として書いていきます。
もうすでにターミナルを使って、エミュレーターの中に入り、データベースのファイルがあるdatabasesディレクトリに移動していることを仮定して書いていきます。
まずは、lsでdatabasesディレクトリの中身を見ます。
generic_x86_arm:/data/data/パッケージ名/databases $ ls
実行結果 (db拡張子のファイル) (右と同じファイル)-journal
では、このファイルを、「sqlite3 ファイル名」でsqliteを起動しましょう。
generic_x86_arm:/data/data/パッケージ名/databases $ sqlite3 ファイル名
実行結果 sh: sqlite3: inaccessible or not found
あれ、ちがう結果になった。。。
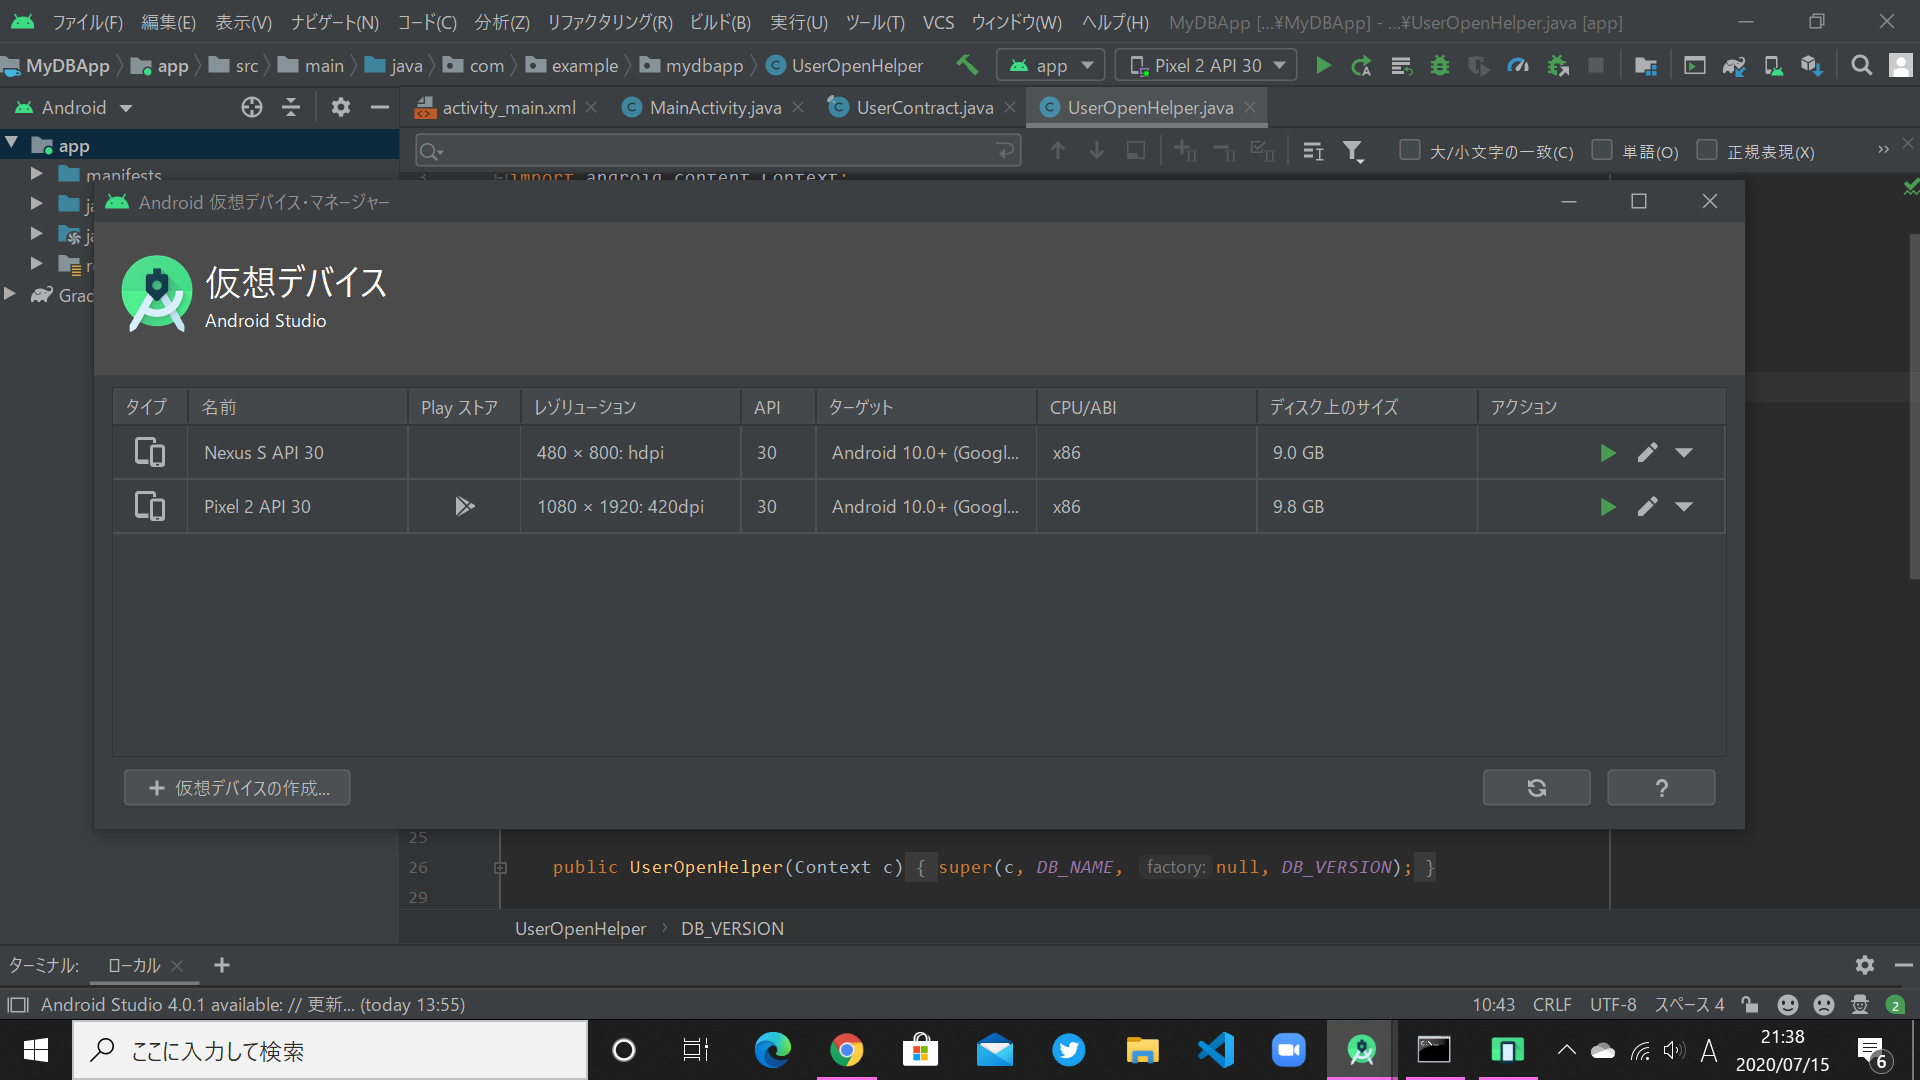
原因を調べてみたところ、 「Google Playが実装された仮想デバイスは、root権限でログインできない」とのことでした。 参考サイト https://teratail.com/questions/186703
「Play ストア」欄に、三角マークがついていないものを新たにダウンロードなりして、それを起動しましょう。
起動出来たら、上のほうで省略しましたが「adb shell」からまた同じ手順でコマンドを入力していきましょう。 恐る恐る「sqlite3 ファイル名」と入力すると、
実行結果 SQLite version 3.28.0 2020-05-06 18:46:38 Enter ".help" for usage hints. sqlite>
できたーーー!! こんな感じの文が出てきたら起動が成功です。
仮想デバイスがGoogle Playが実装されているかそうでないか、確認してみよう。
Androidデータベース入門 (全10回) - プログラミングならドットインストール(有料サービス) Android - ADBコマンドをroot権限で使いたい|teratail
問題 CameraにOnRenderImageをoverrideしたスクリプトをアタッチする形式でポストエフェクトを作成したところUnityEditor上では意図通りの動作を確認できるのに、Androidの実機で確認すると画面が真っ黒になるという問題に遭遇しました。 解決方法 .shaderでZTest Alwaysを使うようにすると、意図通り動くようになりました。 例 Shader "Custom/HorizontalScaleShader" { Properties { _MainTex ("Base (RGB)", 2D) = "white" {} [PowerSlider(1)]_HorizontalScale ("HorizontalScale", Range(0.01,1.00)) = 1 } SubShader { Pass { Tags { "RenderType"="Opaque" } ZTest Always CGPROGRAM #pragma vertex vert #pragma fragment frag #include "UnityCG.cginc" sampler2D _MainTex; float _HorizontalScale; struct v2f { half4 pos : POSITION; half2 uv : TEXCOORD0; }; float4 _MainTex_ST; v2f vert(appdata_base v) { v2f o; o.pos = UnityObjectToClipPos(v.vertex); o.uv = TRANSFORM_TEX(v.texcoord, _MainTex); return o; } half4 frag(v2f i) : COLOR { half2 uv = half2(i.uv); float horizontalScale = _HorizontalScale; uv.x = horizontalScale*uv.x+(1.0-horizontalScale)*0.5; fixed4 col = tex2D(_MainTex, uv); return col; } ENDCG } } FallBack "Diffuse" } 結果 実機で動いた 参考文献 https://forum.unity.com/threads/graphics-blit-not-working-for-android.534835/
CameraにOnRenderImageをoverrideしたスクリプトをアタッチする形式でポストエフェクトを作成したところUnityEditor上では意図通りの動作を確認できるのに、Androidの実機で確認すると画面が真っ黒になるという問題に遭遇しました。
OnRenderImage
.shaderでZTest Alwaysを使うようにすると、意図通り動くようになりました。
.shader
ZTest Always
例
Shader "Custom/HorizontalScaleShader"
{
      Properties {
        _MainTex ("Base (RGB)", 2D) = "white" {}
        [PowerSlider(1)]_HorizontalScale ("HorizontalScale", Range(0.01,1.00)) = 1
    }

    SubShader {
        Pass {
            Tags { "RenderType"="Opaque" }
            ZTest Always

            CGPROGRAM
            #pragma vertex vert
            #pragma fragment frag
            #include "UnityCG.cginc"

            sampler2D _MainTex;
            float _HorizontalScale;

            struct v2f {
                half4 pos : POSITION;
                half2 uv : TEXCOORD0;
            };

            float4 _MainTex_ST;

            v2f vert(appdata_base v) {
                v2f o;
                o.pos = UnityObjectToClipPos(v.vertex);
                o.uv = TRANSFORM_TEX(v.texcoord, _MainTex);
                return o;
            }

            half4 frag(v2f i) : COLOR {
                half2 uv = half2(i.uv);
                float horizontalScale = _HorizontalScale;
                uv.x = horizontalScale*uv.x+(1.0-horizontalScale)*0.5;
                fixed4 col = tex2D(_MainTex, uv);
                return col;
            }

            ENDCG
        }
    }
    FallBack "Diffuse"
}
実機で動いた
https://forum.unity.com/threads/graphics-blit-not-working-for-android.534835/
FlutterのAddToAppを試す際にハマった箇所があったので共有します。 Flutterの公式ドキュメントには、host app(つまりFlutterを利用する側のネイティブアプリ)のsettings.gradleに下記のようなコードを書くとされています。 include ':app' // assumed existing content setBinding(new Binding([gradle: this])) // new evaluate(new File( // new settingsDir.parentFile, // new 'my_flutter/.android/include_flutter.groovy' // new )) FlutterのAddToAppを試そうとした際に、弊社のAndroidは基本的にKotlinで書かれているため上記のコードを書くことができませんでした。 そのため、host側に include ':app' setBinding(new Binding([gradle: this])) evaluate(new File( settingsDir.parentFile, 'my_flutter/.android/include_flutter.groovy' )) include ':my_flutter' project(':my_flutter').projectDir = new File('../my_flutter') 上記のコードを書いて、flutter_settings.gradle という名前で新たにファイルを追加しました。 ここから../my_flutter以下のsettings.gradleを読み込んで、host側のsettings.gradle.ktsに apply { from("flutter_settings.gradle") } 上の一行を足せば、settings.gradle.ktsからもflutterプロジェクト以下のsettings.gradleを読み込むことができるようになります。
FlutterのAddToAppを試す際にハマった箇所があったので共有します。
Flutterの公式ドキュメントには、host app(つまりFlutterを利用する側のネイティブアプリ)のsettings.gradleに下記のようなコードを書くとされています。
include ':app'                                    // assumed existing content
setBinding(new Binding([gradle: this]))                                // new
evaluate(new File(                                                     // new
  settingsDir.parentFile,                                              // new
  'my_flutter/.android/include_flutter.groovy'                         // new
))
FlutterのAddToAppを試そうとした際に、弊社のAndroidは基本的にKotlinで書かれているため上記のコードを書くことができませんでした。
そのため、host側に
include ':app'
setBinding(new Binding([gradle: this]))
evaluate(new File(
    settingsDir.parentFile,
    'my_flutter/.android/include_flutter.groovy'
))

include ':my_flutter'
project(':my_flutter').projectDir = new File('../my_flutter')
上記のコードを書いて、flutter_settings.gradle という名前で新たにファイルを追加しました。
ここから../my_flutter以下のsettings.gradleを読み込んで、host側のsettings.gradle.ktsに
apply { from("flutter_settings.gradle") }
上の一行を足せば、settings.gradle.ktsからもflutterプロジェクト以下のsettings.gradleを読み込むことができるようになります。
Segmentation faultが発生したときの出力 $ emulator @30_x86 -verbose emulator: Android emulator version 30.0.12.0 (build_id 6466327) (CL:N/A) emulator: Found AVD name '30_x86' emulator: Found AVD target architecture: x86 emulator: argv[0]: 'emulator'; program directory: '/opt/android-sdk/emulator' emulator: Found directory: /opt/android-sdk/system-images/android-30/google_apis_playstore/x86/ emulator: emuDirName: '/opt/android-sdk/emulator' emulator: Found directory: /opt/android-sdk/system-images/android-30/google_apis_playstore/x86/ emulator: Probing for /opt/android-sdk/system-images/android-30/google_apis_playstore/x86//kernel-ranchu-64: file exists emulator: try dir /opt/android-sdk/emulator emulator: Trying emulator path '/opt/android-sdk/emulator/qemu/linux-x86_64/qemu-system-x86_64' emulator: Found target-specific 64-bit emulator binary: /opt/android-sdk/emulator/qemu/linux-x86_64/qemu-system-x86_64 emulator: Adding library search path: '/opt/android-sdk/emulator/lib64' emulator: Adding library search path: '/opt/android-sdk/emulator/lib64/gles_angle' emulator: Adding library search path: '/opt/android-sdk/emulator/lib64/gles_angle9' emulator: Adding library search path: '/opt/android-sdk/emulator/lib64/gles_angle11' emulator: Adding library search path: '/opt/android-sdk/emulator/lib64/gles_swiftshader' emulator: Adding library search path: '/opt/android-sdk/emulator/lib64/libstdc++' emulator: Adding library search path for Qt: '/opt/android-sdk/emulator/lib64/qt/lib' emulator: Silencing all qWarning(); use qCWarning(...) instead: QT_LOGGING_RULES=default.warning=false emulator: Setting Qt plugin search path: QT_QPA_PLATFORM_PLUGIN_PATH=/opt/android-sdk/emulator/lib64/qt/plugins emulator: Setting Qt to use software OpenGL: QT_OPENGL=software emulator: Setting QML to use software QtQuick2D: QMLSCENE_DEVICE=softwarecontext emulator: Overriding pre-existing bad Qt high dpi settings... emulator: Setting LD_PRELOAD to /opt/android-sdk/emulator/lib64/qt/lib/libfreetype.so.6 emulator: Running :/opt/android-sdk/emulator/qemu/linux-x86_64/qemu-system-x86_64 emulator: qemu backend: argv[00] = "/opt/android-sdk/emulator/qemu/linux-x86_64/qemu-system-x86_64" emulator: qemu backend: argv[01] = "@30_x86" emulator: qemu backend: argv[02] = "-verbose" emulator: Concatenated backend parameters: /opt/android-sdk/emulator/qemu/linux-x86_64/qemu-system-x86_64 @30_x86 -verbose emulator: autoconfig: -skin 1080x1920 emulator: autoconfig: -skindir (null) emulator: autoconfig: -kernel /opt/android-sdk/system-images/android-30/google_apis_playstore/x86//kernel-ranchu-64 emulator: Target arch = 'x86' emulator: Auto-config: -qemu -cpu qemu32 emulator: Auto-detect: Kernel image requires new device naming scheme. emulator: Auto-detect: Kernel does not support YAFFS2 partitions. emulator: autoconfig: -ramdisk /opt/android-sdk/system-images/android-30/google_apis_playstore/x86//ramdisk.img emulator: Using initial system image: /opt/android-sdk/system-images/android-30/google_apis_playstore/x86//system.img emulator: Using initial vendor image: /opt/android-sdk/system-images/android-30/google_apis_playstore/x86//vendor.img emulator: autoconfig: -data /home/naoya/.android/avd/30_x86.avd/userdata-qemu.img emulator: autoconfig: -initdata /home/naoya/.android/avd/30_x86.avd/userdata.img emulator: autoconfig: -cache /home/naoya/.android/avd/30_x86.avd/cache.img emulator: Increasing RAM size to 2048MB emulator: VM heap size 0MB is below hardware specified minimum of 512MB,setting it to that value emulator: System image is read only emulator: Found 1 DNS servers: 192.168.1.1 emulator: VERBOSE: FeatureControlImpl.cpp:172: WARNING: unexpected system image feature string, emulator might not function correctly, please try updating the emulator. emulator: VERBOSE: FeatureControlImpl.cpp:175: Unexpected feature list: emulator: VERBOSE: FeatureControlImpl.cpp:177: Vulkan emulator: VERBOSE: FeatureControlImpl.cpp:179: emulator: found magic skin width=1080 height=1920 bpp=16 emulator: registered 'boot-properties' qemud service emulator: Adding boot property: 'qemu.cmdline' = 'androidboot.logcat=v:* androidboot.consolepipe=qemu_pipe,pipe:logcat' emulator: Adding boot property: 'qemu.logcat' = 'start' emulator: CPU Acceleration: working emulator: CPU Acceleration status: KVM (version 12) is installed and usable. emulator: GPU emulation enabled using 'host' mode emulator: Initializing hardware OpenGLES emulation support emulator: VERBOSE: MultiDisplay.cpp:308: create display 0 emulator: VERBOSE: MultiDisplay.cpp:398: setDisplayPose 0 x 0 y 0 w 1080 h 1920 dpi 0 Segmentation fault (コアダンプ) 解決手段 起動させたいAVDのconfig.iniに以下を追加する。 hw.gpu.mode = swiftshader_indirect config.iniは~/.android/avd/<AVDの名前>.avdにある。 発生環境 OS: ArchLinux GPU: NVIDIA RTX2070
$ emulator @30_x86 -verbose

emulator: Android emulator version 30.0.12.0 (build_id 6466327) (CL:N/A)
emulator: Found AVD name '30_x86'
emulator: Found AVD target architecture: x86
emulator: argv[0]: 'emulator'; program directory: '/opt/android-sdk/emulator'
emulator:  Found directory: /opt/android-sdk/system-images/android-30/google_apis_playstore/x86/

emulator: emuDirName: '/opt/android-sdk/emulator'
emulator:  Found directory: /opt/android-sdk/system-images/android-30/google_apis_playstore/x86/

emulator: Probing for /opt/android-sdk/system-images/android-30/google_apis_playstore/x86//kernel-ranchu-64: file exists
emulator: try dir /opt/android-sdk/emulator
emulator: Trying emulator path '/opt/android-sdk/emulator/qemu/linux-x86_64/qemu-system-x86_64'
emulator: Found target-specific 64-bit emulator binary: /opt/android-sdk/emulator/qemu/linux-x86_64/qemu-system-x86_64
emulator: Adding library search path: '/opt/android-sdk/emulator/lib64'
emulator: Adding library search path: '/opt/android-sdk/emulator/lib64/gles_angle'
emulator: Adding library search path: '/opt/android-sdk/emulator/lib64/gles_angle9'
emulator: Adding library search path: '/opt/android-sdk/emulator/lib64/gles_angle11'
emulator: Adding library search path: '/opt/android-sdk/emulator/lib64/gles_swiftshader'
emulator: Adding library search path: '/opt/android-sdk/emulator/lib64/libstdc++'
emulator: Adding library search path for Qt: '/opt/android-sdk/emulator/lib64/qt/lib'
emulator: Silencing all qWarning(); use qCWarning(...) instead: QT_LOGGING_RULES=default.warning=false
emulator: Setting Qt plugin search path: QT_QPA_PLATFORM_PLUGIN_PATH=/opt/android-sdk/emulator/lib64/qt/plugins
emulator: Setting Qt to use software OpenGL: QT_OPENGL=software
emulator: Setting QML to use software QtQuick2D: QMLSCENE_DEVICE=softwarecontext
emulator: Overriding pre-existing bad Qt high dpi settings...
emulator: Setting LD_PRELOAD to /opt/android-sdk/emulator/lib64/qt/lib/libfreetype.so.6
emulator: Running :/opt/android-sdk/emulator/qemu/linux-x86_64/qemu-system-x86_64
emulator: qemu backend: argv[00] = "/opt/android-sdk/emulator/qemu/linux-x86_64/qemu-system-x86_64"
emulator: qemu backend: argv[01] = "@30_x86"
emulator: qemu backend: argv[02] = "-verbose"
emulator: Concatenated backend parameters:
 /opt/android-sdk/emulator/qemu/linux-x86_64/qemu-system-x86_64 @30_x86 -verbose
emulator: autoconfig: -skin 1080x1920
emulator: autoconfig: -skindir (null)
emulator: autoconfig: -kernel /opt/android-sdk/system-images/android-30/google_apis_playstore/x86//kernel-ranchu-64
emulator: Target arch = 'x86'
emulator: Auto-config: -qemu -cpu qemu32
emulator: Auto-detect: Kernel image requires new device naming scheme.
emulator: Auto-detect: Kernel does not support YAFFS2 partitions.
emulator: autoconfig: -ramdisk /opt/android-sdk/system-images/android-30/google_apis_playstore/x86//ramdisk.img
emulator: Using initial system image: /opt/android-sdk/system-images/android-30/google_apis_playstore/x86//system.img
emulator: Using initial vendor image: /opt/android-sdk/system-images/android-30/google_apis_playstore/x86//vendor.img
emulator: autoconfig: -data /home/naoya/.android/avd/30_x86.avd/userdata-qemu.img
emulator: autoconfig: -initdata /home/naoya/.android/avd/30_x86.avd/userdata.img
emulator: autoconfig: -cache /home/naoya/.android/avd/30_x86.avd/cache.img
emulator: Increasing RAM size to 2048MB
emulator: VM heap size 0MB is below hardware specified minimum of 512MB,setting it to that value
emulator: System image is read only
emulator: Found 1 DNS servers: 192.168.1.1
emulator: VERBOSE: FeatureControlImpl.cpp:172: WARNING: unexpected system image feature string, emulator might not function correctly, please try updating the emulator.

emulator: VERBOSE: FeatureControlImpl.cpp:175: Unexpected feature list:

emulator: VERBOSE: FeatureControlImpl.cpp:177: Vulkan
emulator: VERBOSE: FeatureControlImpl.cpp:179:

emulator: found magic skin width=1080 height=1920 bpp=16

emulator: registered 'boot-properties' qemud service
emulator: Adding boot property: 'qemu.cmdline' = 'androidboot.logcat=v:* androidboot.consolepipe=qemu_pipe,pipe:logcat'
emulator: Adding boot property: 'qemu.logcat' = 'start'
emulator: CPU Acceleration: working
emulator: CPU Acceleration status: KVM (version 12) is installed and usable.
emulator: GPU emulation enabled using 'host' mode
emulator: Initializing hardware OpenGLES emulation support
emulator: VERBOSE: MultiDisplay.cpp:308: create display 0
emulator: VERBOSE: MultiDisplay.cpp:398: setDisplayPose 0 x 0 y 0 w 1080 h 1920 dpi 0
Segmentation fault (コアダンプ)
起動させたいAVDのconfig.iniに以下を追加する。
config.ini
hw.gpu.mode = swiftshader_indirect
config.iniは~/.android/avd/<AVDの名前>.avdにある。
~/.android/avd/<AVDの名前>.avd
OS: ArchLinux GPU: NVIDIA RTX2070
AndroidManifist.xmlを編集 下記を追記 xml <uses-permission android:name="android.permission.INTERNET" /> AndroidManifest.xml <?xml version="1.0" encoding="utf-8"?> <manifest xmlns:android="http://schemas.android.com/apk/res/android" package="com.websarva.wings.android.webviewtest"> <uses-permission android:name="android.permission.INTERNET" /> <application android:allowBackup="true" android:icon="@mipmap/ic_launcher" android:label="@string/app_name" android:roundIcon="@mipmap/ic_launcher_round" android:supportsRtl="true" android:theme="@style/AppTheme"> <activity android:name=".MainActivity"> <intent-filter> <action android:name="android.intent.action.MAIN" /> <category android:name="android.intent.category.LAUNCHER" /> </intent-filter> </activity> </application> </manifest>
下記を追記 xml <uses-permission android:name="android.permission.INTERNET" />
xml

<uses-permission android:name="android.permission.INTERNET" />
<?xml version="1.0" encoding="utf-8"?>
<manifest xmlns:android="http://schemas.android.com/apk/res/android"
    package="com.websarva.wings.android.webviewtest">

    <uses-permission android:name="android.permission.INTERNET" />

    <application
        android:allowBackup="true"
        android:icon="@mipmap/ic_launcher"
        android:label="@string/app_name"
        android:roundIcon="@mipmap/ic_launcher_round"
        android:supportsRtl="true"
        android:theme="@style/AppTheme">
        <activity android:name=".MainActivity">
            <intent-filter>
                <action android:name="android.intent.action.MAIN" />

                <category android:name="android.intent.category.LAUNCHER" />
            </intent-filter>
        </activity>
    </application>

</manifest>