- 投稿日:2020-07-13T23:33:50+09:00
glueでmysqlのintカラムがnullになる
- 投稿日:2020-07-13T22:26:29+09:00
Rails & React & Webpacker & MySQL環境構築マニュアル
突然ですが、環境構築って毎朝髭を剃るのと同じぐらい面倒で苦手です。
この記事をご覧になっているということは、少なからずあなたも環境構築に苦手意識があるのではないでしょうか。社内のメンバーからも「環境構築はコンビニでたむろするヤンキーぐらい苦手」という声を良く耳にします。
私は思います、この環境構築という最初のハードルが、クリエイティブな行動を阻害していると!
環境構築の手間さえ省ければ、きっとこの世の中にはもっと多くのサービスが創出されると確信しています!
そこで今回は、"RailsをAPIサーバーとして利用"し、"Reactで描画を行う"サービスをつくりまくるための環境構築マニュアルを公開します!以下すべてに当てはまる人が本記事の対象読者です
- なんかオシャレっぽいからMac使ってます!
- プログラミングスクール卒業したから個人アプリつくりたいぜ!
- React.jsっていうJavascriptのモダンなフレームワークを身につけて周りと差を付けたいぜ!
- react-railsとかのGemを使わない方法でRailsとReact間のやりとりを疎結合にしたい!
- Docker?なにそれ美味しいの?(本記事ではDockerの解説はしません)
0. 事前インストール
名前 説明 Ruby いわずもがな Rails いわずもがな MySQL いわずもがな brew パッケージ管理 (主にサーバー側) yarn パッケージ管理 (主にフロント側) 1. Railsアプリの作成
rails new アプリ名 -–skip-turbolinks --webpack=react --database=mysql --api人生に何回この『rails new』コマンドを打ったかでRailsエンジニアとしての価値が決まると、まことしやかに噂される。
ちなみにオプションは必要であれば書き換えてOKです2. Webpackerのインストール
Webpackerとは、Rails標準装備のモジュールバンドラーで、Webpackのラッパーです。
バンドラーというのは束ねる人のことです。
HTML、CSS、JSなど色々な形式のファイルを束ねてくれるやつです。ちなみにラッパーは韻を踏む人のことではありません。
サランラップとかのラッパーです。『包む』という意味です。
Webpackerは内部でWebpackを呼び出しているので、WebpackerはWebpackのラッパーです。ちなみにフロントエンドに興味があるなら、Webpackの知識はある程度あった方が良いです。
"Babel"とか"ES6"とかそういうワードとセットで覚えるとGOODです!rails webpacker:install rails webpacker:install:react3. MySQLのインストール
今回はDBにMySQLを使ってみます。
私は普段の業務ではPostgreSQLを使用しているのですが、プログラミングスクール卒の方はMySQLに慣れていると思うので。
新規プロダクトのDB選定はその現場で使い慣れているものを使用しているところが多いような気がしています。
違ったらすみません。
ちなみに余談of余談ですが、個人的にはNoSQLのMongoDBとかに興味があったりします。
理由は、「なんとなく知ってたらイケてるエンジニアっぽいから」です。今回はbrewというパッケージマネージャー経由でMySQLをインストールします
brew install mysql4. MySQLユーザーの作成
MySQLがインストールできたら、今回のアプリで使用するためのユーザーを作成します。
各コマンドについては、特に詳しく説明する必要もなさそうなので割愛します。・ルートユーザーにログイン
mysql -u root -p・ユーザー作成
好きなユーザー名とパスワードを設定
create user 'ユーザー名'@'localhost' identified by 'パスワード';・作成したユーザーの確認
作成したユーザーが表示されていれば成功
select User,Host from mysql.user;・権限付与
grant all on *.* to '[ユーザー名]'@'localhost';・config/database.ymlの設定変更
ユーザーの作成が一通り終わったら、作成したユーザーとRailsを紐付けます。
RailsのDB設定はdatabase.ymlに記述するのがルールです。default: &default adapter: mysql2 encoding: utf8mb4 pool: <%= ENV.fetch("RAILS_MAX_THREADS") { 5 } %> username: <%= ENV['DATABASE_USERNAME'] %> password: <%= ENV['DATABASE_PASSWORD'] %> host: <%= ENV['DATABASE_HOST'] %> development: <<: *default database: app_name_development test: <<: *default database: app_name_test production: <<: *default database: app_name_production username: <%= ENV['APP_NAME_DATABASE_USERNAME'] %> password: <%= ENV['APP_NAME_DATABASE_PASSWORD'] %>『app_name_○○』はRails newした時のアプリ名に置き換えてください
usernameやpasswordはGitHubで公開しちゃうと見えてしまうので
gem『dotenv』等を使って隠蔽することをおすすめします。
ちなみにdotenvで作成した『.env』ファイルをGit管理から外しておかないと意味が無いので、作ったら『.gitignore』に『.env』を忘れずに追加しましょう!
「何を言っているのかわからない...」という人は「dotenv 環境変数」とかで調べてみよう!
「わからないことを調べる」のは、エンジニアの基本です!
この『調べる』をいかに深堀りしてできるかが、成長の近道のような気がしています。5. データベースの作成
rake db:create6. Railsサーバーの起動
rails s7. Webで確認
「Yay! You’re on Rails!」が表示されていれば成功
環境構築はもう少し続きます。
もう6合目ぐらいには来てます。もう少し。8. Webpackerの設定(任意)
・splitchunks
チャンクを自動分割してくれるWebpackのプラグインです。
ファイルサイズの節約ができたりするけど、別になくても良いです。config/webpack/environment.jsの変更
const { environment } = require('@rails/webpacker');
environment.splitChunks();
module.exports = environment;
app/views/top/show.html.erb
javascript/packs/の中にある「index」という名前の付いたファイルを参照するの意。
<%# splitchunksを使う場合 %> <%= javascript_packs_with_chunks_tag 'index' %> <%# splitchunksを使わない場合 %> <%= javascript_pack_tag 'index' %>9. ルーティング設定
config/routes.rb
Rails.application.routes.draw do
  # ルートページ設定
  root "top#show"
end
10. エントリーポイントの作成
・ルートページのコンロトーラー作成
app/controllers/top_controller.rb
class TopController < ApplicationController

  def show
  end

end
・Reactで描画するためのid属性を追加
app/views/layouts/application.html.erb
<!DOCTYPE html>
<html>
  <head>
    <title>アプリケーションタイトル</title>
    <%= csrf_meta_tags %>
    <%= csp_meta_tag %>
    <%= javascript_pack_tag 'application' %>
  </head>

  <body>
    <div id="root"> ←これです
      <%= yield %>
    </div>
  </body>
</html>
・Reactのエントリーポイント作成
app/javascript/packs/index.jsx
app/views/top/show.html.erbから参照されるファイル
このファイルがReactの入り口です。
非同期、ルーティング、状態管理等、React用のパッケージをimportして設定しています。
各パッケージのインストールは後で行います。// このファイルがRailsのViewから呼ばれる一番最初のファイルです(EntryPoint) import React from 'react'; import { render } from 'react-dom'; import { Provider } from 'react-redux'; import { createStore, applyMiddleware } from 'redux'; import thunk from 'redux-thunk' import { Router, Route, Switch, IndexRoute, useLocation } from 'react-router-dom'; import { createBrowserHistory } from 'history'; import { composeWithDevTools } from 'redux-devtools-extension'; // reducer import rootReducer from '~/src/reducers/'; // Component import Top from '~/src/components/tops/'; const middleWares = [thunk]; // 開発環境の場合、開発ツールを使用するための設定 const enhancer = process.env.NODE_ENV === 'development' ? composeWithDevTools(applyMiddleware(...middleWares)) : applyMiddleware(...middleWares); const store = createStore(rootReducer, enhancer); const customHistory = createBrowserHistory(); render( <Provider store={store}> <Router history={customHistory}> <Route render={({ location }) => ( <div> <Switch location={location}> <Route exact path='/' component={Top} /> </Switch> </div> )}/> </Router> </Provider>, document.getElementById('root') )・Reactコンポーネント作成
app/javascript/src/components/tops/index.jsx
Reactコンポーネントの記述にはjsxという拡張子のファイルを使用します。
JSファイルの中にHTMLを記述します。
最初はJSの中にHTMLタグを書くことに気持ち悪さを感じますが、その内慣れます。import React from 'react'; const Top = () => ( <h1> <center>アプリケーションのタイトル</center> </h1> ) export default Top;・Reactリデューサーをまとめる処理の作成
app/javascript/src/reducers/index.js
import { combineReducers } from 'redux';
import { reducer as formReducer } from 'redux-form';

import top from '~/src/modules/tops/';

export default combineReducers({
  form: formReducer,
  top,
});
ここでまとめたものがReduxのstoreに格納されます。
Reduxとは状態を一元管理してくれるパッケージのことです。
storeとは状態を格納する箱のことです。Reduxの一番重要な機能です。
Reactの開発において、Reduxの利用は必須ではありませんが、React単体だとプロダクトの規模が大きくなるにつれて状態管理が辛くなるので、初めから入れておいた方がいいです。
LPとか規模の小さいプロダクトならなくても良いです。・Reactモジュール作成
ディレクトリ構成はducksパターンを採用。
ducksパターンというのは『action type』、『action creator』、『reducer』を1つのファイルにまとめて記述する考え方のことです。設計の概念です。何かをインストールするとかではないです。app/javascript/src/modules/tops/index.js
// action-type
const TOP_INITIAL = 'TOP_INITIAL';

// reducer
const initialState = {
  top: null,
}

export default function top(state = initialState, action) {
  switch (action.type) {
    case TOP_INITIAL:
      return {
        ...state,
      }
    default:
      return state
  }
}

// action-creator
export const topInitial = () => ({
  type: TOP_INITIAL,
});
通常は『action type』、『action creator』、『reducer』それぞれでファイルを作成するところ、ducksパターンを取り入れると1つのファイルにまとまるので、単純にファイル数が少なくて済みます。
中規模プロダクトでも全然耐えられる設計概念なのでおすすめです。
「action typeって何?」と思った人はRedux公式で調べてみましょう!11. 必要なパッケージインストール
yarnというパッケージマネージャーを使用してインストールします。
似た様なパッケージマネージャーで『npm』がありますが、『yarn』は『npm』の上位互換です。
yarnでインストールしたパッケージは、ルートディレクトリ直下の『package.json』というファイルに自動で追加されます。
『yarn add パッケージ名』でパッケージの追加
『yarn remove パッケージ名』でパッケージの削除です。yarn add redux react-redux react-router-dom redux-devtools-extension redux-form redux-thunk axios @babel/preset-react babel-plugin-root-importもし興味があれば『@reduxjs/toolkit』、『@material-ui/core』もおすすめです
12. パス指定設定ファイルの作成(任意)
独学でReactを少しでも開発したことがある方なら一度はこう思ったはず
「React相対パス地獄なりがち。」
Reactはimport時の相対パス指定地獄に陥りがちです。
そうならないよう『babel-plugin-root-import』を入れることをおすすめします。
実は上記11.の『yarn add』の中にこっそり入っているので、コマンドをコピペして実行した方は私の策略によりすでに入っています。『.babelrc』というファイルを作ってそこに設定を記述します。
『.babelrc』ファイルを作る場所はルートディレクトリ直下。.babelrc
{
  "plugins": [
    [
      "babel-plugin-root-import",
      {
        "paths": [
          {
            "rootPathSuffix": "./app/javascript/src",
            "rootPathPrefix": "~/src/"
          },
        ]
      }
    ]
  ]
}
上記設定は『./app/javascript/src』というパス指定を『~/src/』という文字列でも指定できるように設定しているだけです。
これで、Reactコンポーネントでのimport時に『~/src/○○』が使えるようになるので、相対パス地獄から抜け出せます。
ちなみに『"~/src/"』の部分は『"~/"』でも『"@/src/"』でも好きに設定できます。13. webpack-dev-serverの起動
./bin/webpack-dev-server自動コンパイルしてくれる開発用サーバーです。
常にコードの監視もしているので、Reactのコードを書き換えると自動でブラウザ上の描画も書き換えてくれます。
(ちなみにRailsのModelやController、Viewなどは監視対象外なので変更しても自動描画はされません。素直に『command + R』でブラウザ更新しましょう。)お疲れ様でした
これでRails & Reactの開発環境が整った...はずです。
http://localhost:3000/に「アプリケーションのタイトル」が表示されていれば無事成功です!
それでは楽しい3R(Ruby on Rails on React)開発を!トラブルシューティング
An error occurred while installing mysql2 (0.5.3), and Bundler cannot continue.
Make sure that gem install mysql2 -v '0.5.3' --source 'https://rubygems.org/' succeeds before bundling.
上記エラーメッセージが表示されてbundle installが失敗する場合↓
sudo xcodebuild -license acceptで解決できる場合もある
- 投稿日:2020-07-13T20:53:15+09:00
PlantUMLを使ってER図をテキストベースで作成する
背景
外部キー制約が完璧に作成されている環境であれば、リバースエンジニアリングで自動でER図を作成してくれるツールは結構あるかと思います。
ただし、外部キー制約がメンテされていない環境だと、手動でリレーションを判断する必要があります。
そのような状況において便利な、PlantUMLを使ってテキストベースでER図を作成する方法をご紹介します。使い方
コンフルエンス上でPlantUMLを使ってER図を作成する方法をご紹介します。
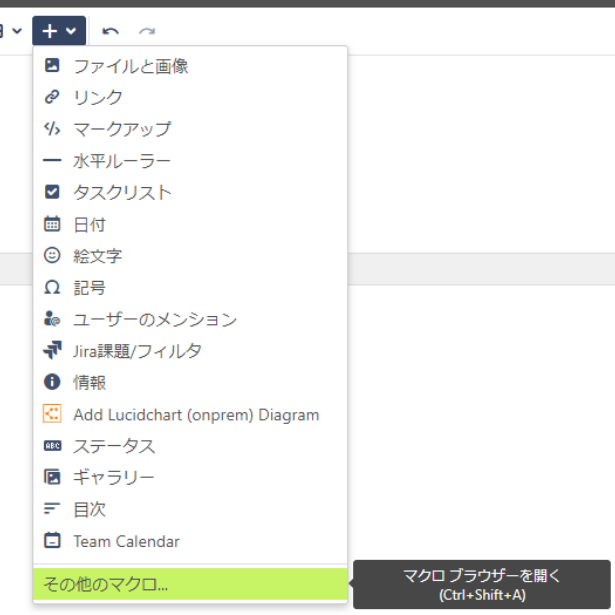
1.記事を書く画面で「+」→「その他のマクロ」
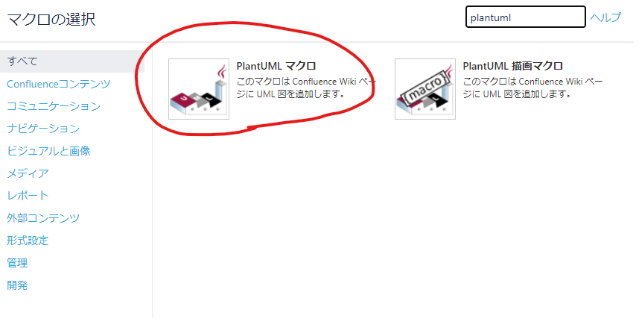
2. PlantUMLマクロを選択
3.「挿入」を押す
4.↓の枠がでてくるので、この中にER図描画用の情報を記入すればOK。コンフルを保存すれば、ER図ができあがり。
テンプレート
@startuml
' ER図を見やすくするための設定
' monotone color
skinparam monochrome true
' shadow off
skinparam shadowing false
' change font
skinparam defaultFontName Ricty Diminished
' hide the spot
hide circle
' avoid problems with angled crows feet
skinparam linetype ortho

' 1. table list
object table1
object table2
object table3

' 2. column list
table1 : column1_1
table1 : column1_2
table2 : column2_1
table2 : column2_2
table3 : column3_1
table3 : column3_2
table3 : column3_3

' 3. relation list
table1 }o--||  table2: (column1_1=column2_1)
table1 ||--o{ table3 : (column1_2=column3_1)

@enduml
大きく分けて3つのブロックに分かれており、
- テーブルリスト
- カラムリスト
- リレーション
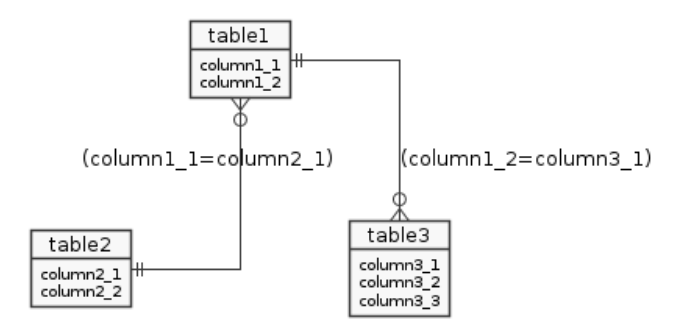
をそれぞれ列挙すればOKです。↓こんな感じで出力されます。
補足的にJOINの条件を (column1_1=column2_1)といったテキストで表示させています。(これは無くすこともできます)
リレーションのバリエーション
リレーションのバリエーションは↓ですべてカバーできると思います。
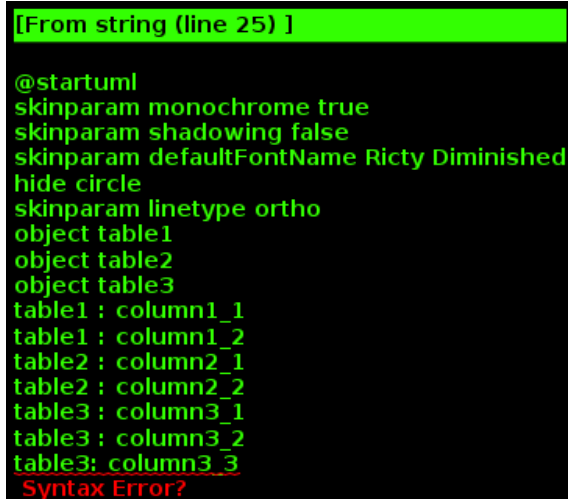
N:1
Member }o--||  TPref: (mePrefID-prPrefID)
Member }|--||  TPref: (mePrefID-prPrefID)

1:N
Member ||--o{  TPref: (mePrefID-prPrefID)
Member ||--|{  TPref: (mePrefID-prPrefID)

1:1
Member ||--||  TPref: (mePrefID-prPrefID)
Member |o--||  TPref: (mePrefID-prPrefID)
Member ||--o|  TPref: (mePrefID-prPrefID)


N:N ※基本的にないはず
Member }o--o{  TPref: (mePrefID-prPrefID)
Member }|--|{  TPref: (mePrefID-prPrefID)
構文エラー時
エラーがあると↓のような画面が表示されるため、エラーメッセージを参考にデバッグします。
まとめ
PlantUMLを使ってER図をテキストベースで作成する方法をご紹介しました。
さくっとER図をテキストベースで作りたい時や、リレーションを手動で指定する必要がある時等に重宝しそうです。※ER図を見やすくするための設定として、いくつかのサイトを参考にさせていただきましたが、URLを忘れてしまいまして、引用として紹介できていないことをお詫びいたします。


- 投稿日:2020-07-13T17:59:53+09:00
MySQLで You can't specify target table 'xxxx' for update in FROM clause を回避する方法
問題が発生...
select文の結果をwhere区に使おうとすると
You can't specify target table 'syainTbl' for update in FROM clauseというエラーが発生。元々のSQL文は以下
update
    syainTbl
set
    status = 999
where
    user_id in
    (select
        user_id
     from
     syainTbl where status = 2);
syainTblというテーブルのstatusというカラムの値が2のレコードのstatusを999に変更したい、
という文である。原因
どうやらMySQLでは同一テーブルのサブクエリからのUPDATE文はエラーが発生する模様。
上記の文では、where区内のサブクエリにsyainTblを使用しているため、syainTblのカラムはupdateできない
ということらしい。解決方法
以下の通り、select文でラップしてaliasを付けてあげるとうまくいく。
update
    syainTbl
set
    status = 999
where
    user_id in
    (select
        user_id
     from
     (select user_id from syainTbl where status = 2)tmp);
where区の副問合せに直接テーブル名が指定されていなかったらOK、ってことなんでしょうか。
- 投稿日:2020-07-13T15:42:33+09:00
MySQLのver.を間違えてインストールしたので削除した
macbookpro
macos catalina ver.10.15.5
プロセッサ 1.4 GHz クアッドコアIntel Core i5
グラフィックス Intel Iris Plus Graphics 645 1536 MB行ったこと
homebrewでmysql8.0をインストールゴール
mysql 8.0をアンインストールし,mysql5.7をインストールしたいこれから行うこと
macbookのターミナルで実行する
$ brew uninstall mysql以前の不要なファイルも削除する
sudo rm -rf /usr/local/Cellar/mysql*
sudo rm -rf /usr/local/bin/mysql*
sudo rm -rf /usr/local/var/mysql*
sudo rm -rf /usr/local/etc/my.cnf
sudo rm -rf /usr/local/share/mysql*
sudo rm -rf /usr/local/opt/mysql*
sudo rm -rf /etc/my.cnf削除できたので下記のコマンドでインストールする
$ brew install mysql@5.7これでできました。
- 投稿日:2020-07-13T15:05:04+09:00
golangでミニマムなREST APIを作る
この記事は何?
注) golang初学者の私が初学者のために書いています。
https://tutorialedge.net/golang/creating-restful-api-with-golang/ のチュートリアル(英語だったが平易な文章で書かれてる。本当に)の内容をベースにして、challengeにあるupdate機能の追加の問題とMySQLを導入してみたという掛け算的内容です。
なので、上記チュートリアルが終了した段階からスタートするため悪しからず。チュートリアル中のコードで参考になったこと。
https://qiita.com/ngplus6655/items/a38660313383d3ff2136環境
ubuntu18.04LTS
go1.12.17 linux/amd64github.com/gorilla/mux
github.com/jinzhu/gormupdateArticleを追加
まずはチュートリアル中のchallengeの内容を説いてみた
func updateArticle(w http.ResponseWriter, r *http.Request){
    vars := mux.Vars(r)
    id := vars["id"]
    reqBody, _ := ioutil.ReadAll(r.Body)
    var updateArticle Article
    json.Unmarshal(reqBody, &updateArticle)
    for index, article := range Articles {
        if article.Id == id {
            updateArticle.Id = id
            Articles[index] = updateArticle
        }
    }
}
returnSingleArticleと同様urlのidパラメータから編集するarticleを特定し、直接Articlesスライスの要素に代入しています。
直前にupdateArticle.Id = idとしているのは、パラメータidと送られたjsonデータのidが不一致だとArticleに対してIDがユニークではなくなるため。マルチプレクサにupdateArticleを登録
myRouter.HandleFunc("/article/{id}", updateArticle).Methods("PUT")curlしてみる
curl -X PUT  -H "Content-Type: application/json" -d '{"id": "1", "Title": "Updated Post", "desc": "the description for my updated post", "content": "my articles content"}' http://localhost:10000/article/1

curl -X GET http://localhost:10000/all
[{"Id":"1","Title":"Updated Post","desc":"the description for my updated post","content":"my articles content"},
{"Id":"2","Title":"Hello 2","desc":"Article Description","content":"Article Content"},
{"Id":"3","Title":"Hello 3","desc":"Article Description","content":"Article Content"}]
意図したとおりにidが1の要素を更新できました。
mysqlの導入
完成形
main.gopackage main import ( "fmt" "log" "net/http" "encoding/json" "io/ioutil" "strconv" "github.com/gorilla/mux" "github.com/jinzhu/gorm" _ "github.com/jinzhu/gorm/dialects/mysql" ) type Article struct { gorm.Model Title string `json:"Title"` Desc string `json:"desc"` Content string `json:"content"` } type Articles []Article func connectDB() (*gorm.DB, error) { db, err := gorm.Open("mysql", "ユーザ名:パスワード@/test?charset=utf8&parseTime=True&loc=Local") return db, err } func initDb() *gorm.DB { db, err := connectDB() if err != nil { log.Fatalln("データベースの接続に失敗しました。") } return db } func idParamToUint(r *http.Request) uint { vars := mux.Vars(r) id, _ := strconv.Atoi(vars["id"]) var uid uint = uint(id) return uid } func ParseJsonArticle(w http.ResponseWriter ,r *http.Request) Article { reqBody, _ := ioutil.ReadAll(r.Body) var article Article json.Unmarshal(reqBody, &article) json.NewEncoder(w).Encode(article) return article } func homePage(w http.ResponseWriter, r *http.Request){ fmt.Fprintf(w, "Welcome to the HomePage!") fmt.Println("Endpoint Hit: homePage") } func returnAllArticles(w http.ResponseWriter, r *http.Request){ fmt.Println("Endpoint Hit: returnAllArticles") db := initDb() var articles Articles db.Find(&articles) json.NewEncoder(w).Encode(articles) } func returnSingleArticle(w http.ResponseWriter, r *http.Request){ fmt.Println("called returnSingleArticle") uid := idParamToUint(r) db := initDb() var article Article db.Where("id = ?", uid).First(&article) json.NewEncoder(w).Encode(article) } func createNewArticle(w http.ResponseWriter, r *http.Request) { fmt.Println("called createNewArticle") db := initDb() article := ParseJsonArticle(w, r) db.Create(&article) if db.NewRecord(article) { log.Println("新規articleの保存に失敗しました。") } } func updateArticle(w http.ResponseWriter, r *http.Request){ fmt.Println("called updateAtricle") uid := idParamToUint(r) db := initDb() updatedArticle := ParseJsonArticle(w, r) var article Article db.Where("id = ?", uid).First(&article) article.Title = updatedArticle.Title article.Desc = updatedArticle.Desc article.Content = updatedArticle.Content db.Save(&article) } func deleteArticle(w http.ResponseWriter, r *http.Request) { fmt.Println("called deleteAtricle") uid := idParamToUint(r) db := initDb() db.Delete(Article{}, "id = ?", uid) } func handleRequests() { myRouter := mux.NewRouter().StrictSlash(true) myRouter.HandleFunc("/", homePage) myRouter.HandleFunc("/all", returnAllArticles) myRouter.HandleFunc("/article/{id}", returnSingleArticle).Methods("GET") myRouter.HandleFunc("/article", createNewArticle).Methods("POST") myRouter.HandleFunc("/article/{id}", updateArticle).Methods("PUT") myRouter.HandleFunc("/article/{id}", deleteArticle).Methods("DELETE") log.Fatal(http.ListenAndServe(":10000", myRouter)) } func main() { fmt.Println("Rest API v2.0 - Mux Routers") db, err := connectDB() if err != nil { log.Fatalln("データベースの接続に失敗しました。") } defer db.Close() db.AutoMigrate(&Article{}) handleRequests() }MySQLのインストール
$ sudo apt install mysql-server mysql-client
$ mysql --version
mysql  Ver 14.14 Distrib 5.7.30, for Linux (x86_64) using  EditLine wrapper
起動
$ sudo service mysql start初期設定->データベース作成->ユーザ追加
参考 https://qiita.com/houtarou/items/a44ce783d09201fc28f5
$ sudo mysql_secure_installation
$ sudo mysql -u root -p

mysql> CREATE DATABASE test;
mysql> set global validate_password_policy=LOW;
mysql> CREATE USER '名前'@'localhost' IDENTIFIED BY 'パスワード';
mysql> grant all on test.* to ユーザ名@localhost;
Article構造体の再定義
type Article struct {
    gorm.Model
    Title string `json:"Title"`
    Desc string `json:"desc"`
    Content string `json:"content"`
}
type Articles []Article
IDやらタイムスタンプをGORMのモデル構造体に切り替えます。
スライスのArticlesはもう使いませんが一括で扱うところが出てくるので型として定義します。データベース接続
func connectDB() (*gorm.DB, error) {
    db, err := gorm.Open("mysql", "ユーザ名:パスワード@/テーブル名?charset=utf8&parseTime=True&loc=Local")
    return db, err
}

func initDb() *gorm.DB {
    db, err := connectDB()
    if err != nil {
        log.Fatalln("データベースの接続に失敗しました。")
    }
    return db
}
/all
func returnAllArticles(w http.ResponseWriter, r *http.Request){
    db := initDb()
    var articles Articles
    db.Find(&articles)
    json.NewEncoder(w).Encode(articles)
}
先に定義した構造体をインスタンス化し、db.find関数ですべての行のデータを格納します。
/article/{id} GET
func idParamToUint(r *http.Request) uint {
    vars := mux.Vars(r)
    id, _ := strconv.Atoi(vars["id"])
    var uid uint = uint(id)
    return uid
}

func returnSingleArticle(w http.ResponseWriter, r *http.Request){
    uid := idParamToUint(r)
    db := initDb()
    var article Article
    db.Where("id = ?", uid).First(&article)
    json.NewEncoder(w).Encode(article)
}
urlパラメータのidはstring型ですが、MySQLに登録されているidはuint型です。そのためstring型をuint型に型変換する関数の定義をしています。
strconvパッケージのstringToUintは、uint64型がreturnされてしまうため使わず、いったんint型にしています。
それから、GORMのdb.Where関数つかってidが一致するarticleを一つだけ取り出します。/article POST
func ParseJsonArticle(w http.ResponseWriter ,r *http.Request) Article {
    reqBody, _ := ioutil.ReadAll(r.Body)
    var article Article
    json.Unmarshal(reqBody, &article)
    json.NewEncoder(w).Encode(article)
    return article
}

func createNewArticle(w http.ResponseWriter, r *http.Request) {
    fmt.Println("called createNewArticle")
    db := initDb()
    article := ParseJsonArticle(w, r)
    db.Create(&article)
    if db.NewRecord(article) {
        log.Println("新規articleの保存に失敗しました。")
    }
}
まずは、関数として(updateでも再利用するため)リクエストボディで送られてくるJSONをパースし、構造体として扱えるようにします。
GORMのCreate関数でMySqlにあたらしい行を追加します。※ 編集しました(2020/7/16)
log.Fatalln -> log.Printlnに変更しました。
データの保存に失敗したときにプログラムを終了させる必要はないと考えるからです。/article/{id} PUT
func updateArticle(w http.ResponseWriter, r *http.Request){
    uid := idParamToUint(r)
    db := initDb()

    updatedArticle := ParseJsonArticle(w, r)

    var article Article
    db.Where("id = ?", uid).First(&article)

    article.Title = updatedArticle.Title
    article.Desc = updatedArticle.Desc
    article.Content = updatedArticle.Content
    db.Save(&article)
}
CRUDで最も複雑なupdateですが、今までの組み合わせで実現できました。ここでは、Article構造体を二つインスタンス化させています。
一つはMySQLから引っ張ってきたデータ用、もう一つはリクエストボディから更新後のデータとして入ってくるupdatedArticleで、一つ目のArticleに二つ目のupdatedArticleを代入後Save関数を呼び出しています。/article/{id} DELETE
func deleteArticle(w http.ResponseWriter, r *http.Request) {
    uid := idParamToUint(r)
    db := initDb()
    db.Delete(Article{}, "id = ?", uid)
}
GORMのDelete関数によって簡単に実装できました
handleRequests関数
func handleRequests() {
    myRouter := mux.NewRouter().StrictSlash(true)
    myRouter.HandleFunc("/", homePage)
    myRouter.HandleFunc("/all", returnAllArticles)
    myRouter.HandleFunc("/article/{id}", returnSingleArticle).Methods("GET")
    myRouter.HandleFunc("/article", createNewArticle).Methods("POST")
    myRouter.HandleFunc("/article/{id}", updateArticle).Methods("PUT")
    myRouter.HandleFunc("/article/{id}", deleteArticle).Methods("DELETE")
    log.Fatal(http.ListenAndServe(":10000", myRouter))
}
ポイントは、"article/{id}" の.Methods("GET")省略していないところです。
仮に省略してしまうとPUTやDELETEをつけてcurlしても、すべてGETメソッドのreturnSingleArticle関数にルーティングされてしまいます。まとめ
GORMとGorilla/muxパッケージでいい感じにRestAPIを作れた。
特にGORMに関しては、公式ページが日本語化されていて楽だった。
急いでクライアント側も作らなくては!
- 投稿日:2020-07-13T06:35:51+09:00
VagrantでSymfony 5 の環境を作成してみた(ubuntu 20.04、nginx、php 7.4、mysql 8)
自分で開発環境を作ってみたいと思ったので、ググりながら勉強しながら作成した内容です。間違いなどありましたら教えていただけるとありがたいです。
また、公式によりますとVagrantでsymfonyの環境を作成するには、laravelのhomesteadの環境で作成するのが簡単なようです
Using Symfony with Homestead/Vagrant (Symfony Docs)
参考
- Ubuntu 18.04にNginx、PHP 7.4、MySQL 5.7をインストールする - Qiita
- vagrantを使用したlaravelの環境構築
- How To Install PHP 7.4 on Ubuntu 20.04/18.04/16.04
- nginx の最新版を Ubuntu 18.04 に apt インストールする
- Install MySQL 8 on Ubuntu 20.04 LTS
試したバージョン
- Vagrant 2.2.9
- VirtualBox Version 6.0.22 r137980 (Qt5.6.3)
1. ubuntuにsshするまで
1-1. ubuntuのboxを追加
Enter your choice:と聞かれるので3を選択する$ vagrant box add bento/ubuntu-20.04 ==> box: Loading metadata for box 'bento/ubuntu-20.04' box: URL: https://vagrantcloud.com/bento/ubuntu-20.04 This box can work with multiple providers! The providers that it can work with are listed below. Please review the list and choose the provider you will be working with. 1) hyperv 2) parallels 3) virtualbox 4) vmware_desktop Enter your choice: 3 ==> box: Adding box 'bento/ubuntu-20.04' (v202005.21.0) for provider: virtualbox box: Downloading: https://vagrantcloud.com/bento/boxes/ubuntu-20.04/versions/202005.21.0/providers/virtualbox.box Download redirected to host: vagrantcloud-files-production.s3.amazonaws.com ==> box: Successfully added box 'bento/ubuntu-20.04' (v202005.21.0) for 'virtualbox'!$ vagrant box list #boxが追加されていることを確認 bento/ubuntu-20.04 (virtualbox, 202005.21.0)1-2. 仮想マシンでubuntuを立ち上げる
好きなディレクトリを作成し、そこで作業をする
$ vagrant init bento/ubuntu-20.04
A `Vagrantfile` has been placed in this directory. You are now
ready to `vagrant up` your first virtual environment! Please read
the comments in the Vagrantfile as well as documentation on
`vagrantup.com` for more information on using Vagrant.
VagrantFileができているので、config.vm.networkのコメントを外しておく
$ vi Vagrantfile- # config.vm.network "private_network", ip: "192.168.33.10" + config.vm.network "private_network", ip: "192.168.33.10"$ vagrant up #仮想マシン起動$ vagrant status #起動されていることを確認 Current machine states: default running (virtualbox) The VM is running. To stop this VM, you can run `vagrant halt` to shut it down forcefully, or you can run `vagrant suspend` to simply suspend the virtual machine. In either case, to restart it again, simply run `vagrant up`.$ vagrant ssh #仮想マシンにsshvagrant@vagrant:~$ sudo apt-get update #apt-getをupdateしておく2. nginxのインストール
vagrant@vagrant:~$ sudo apt install -y nginxvagrant@vagrant:~$ nginx -v #バージョン確認 nginx version: nginx/1.18.0 (Ubuntu)vagrant@vagrant:~$ systemctl status nginx #起動していることを確認 active (running) になっていたらOK ● nginx.service - A high performance web server and a reverse proxy server Loaded: loaded (/lib/systemd/system/nginx.service; enabled; vendor preset: enabled) Active: active (running) since Sun 2020-07-12 20:47:53 UTC; 16s ago Docs: man:nginx(8) Main PID: 13662 (nginx) Tasks: 2 (limit: 1074) Memory: 4.4M CGroup: /system.slice/nginx.service ├─13662 nginx: master process /usr/sbin/nginx -g daemon on; master_process on; └─13663 nginx: worker process Jul 12 20:47:53 vagrant systemd[1]: Starting A high performance web server and a reverse proxy server... Jul 12 20:47:53 vagrant systemd[1]: Started A high performance web server and a reverse proxy server.vagrant@vagrant:~$ sudo systemctl enable nginx #自動起動を設定 Synchronizing state of nginx.service with SysV service script with /lib/systemd/systemd-sysv-install. Executing: /lib/systemd/systemd-sysv-install enable nginx3. phpのインストール
3-1. インストール
vagrant@vagrant:~$ sudo apt install -y php php-cli php-fpm php-json php-pdo php-mysql php-zip php-gd  php-mbstring php-curl php-xml php-pear php-bcmath

省略

vagrant@vagrant:~$ php --version
PHP 7.4.3 (cli) (built: May 26 2020 12:24:22) ( NTS )
Copyright (c) The PHP Group
Zend Engine v3.4.0, Copyright (c) Zend Technologies
    with Zend OPcache v7.4.3, Copyright (c), by Zend Technologies
4. phpをnginxで動くようにする
4-1. fastcgi_paramsに追加
vagrant@vagrant:~$ sudo vim /etc/nginx/fastcgi_params↓を追加する
fastcgi_param SCRIPT_FILENAME $document_root$fastcgi_script_name;4-2 sites-available/default を修正
vagrant@vagrant:~$ sudo vim /etc/nginx/sites-available/default↓のように修正
-        index index.html index.htm index.nginx-debian.html;
+        index index.php index.html index.htm index.nginx-debian.html;
- #location ~ \.php$ { - # include snippets/fastcgi-php.conf; - # - # # With php-fpm (or other unix sockets): - # fastcgi_pass unix:/var/run/php/php7.4-fpm.sock; - # # With php-cgi (or other tcp sockets): - # fastcgi_pass 127.0.0.1:9000; - #} + location ~ \.php$ { + include snippets/fastcgi-php.conf; + + # With php-fpm (or other unix sockets): + fastcgi_pass unix:/var/run/php/php7.4-fpm.sock; + # With php-cgi (or other tcp sockets): + # fastcgi_pass 127.0.0.1:9000; + include fastcgi_params; + }vagrant@vagrant:~$ sudo service nginx restart #nginx再起動4-3. 確認
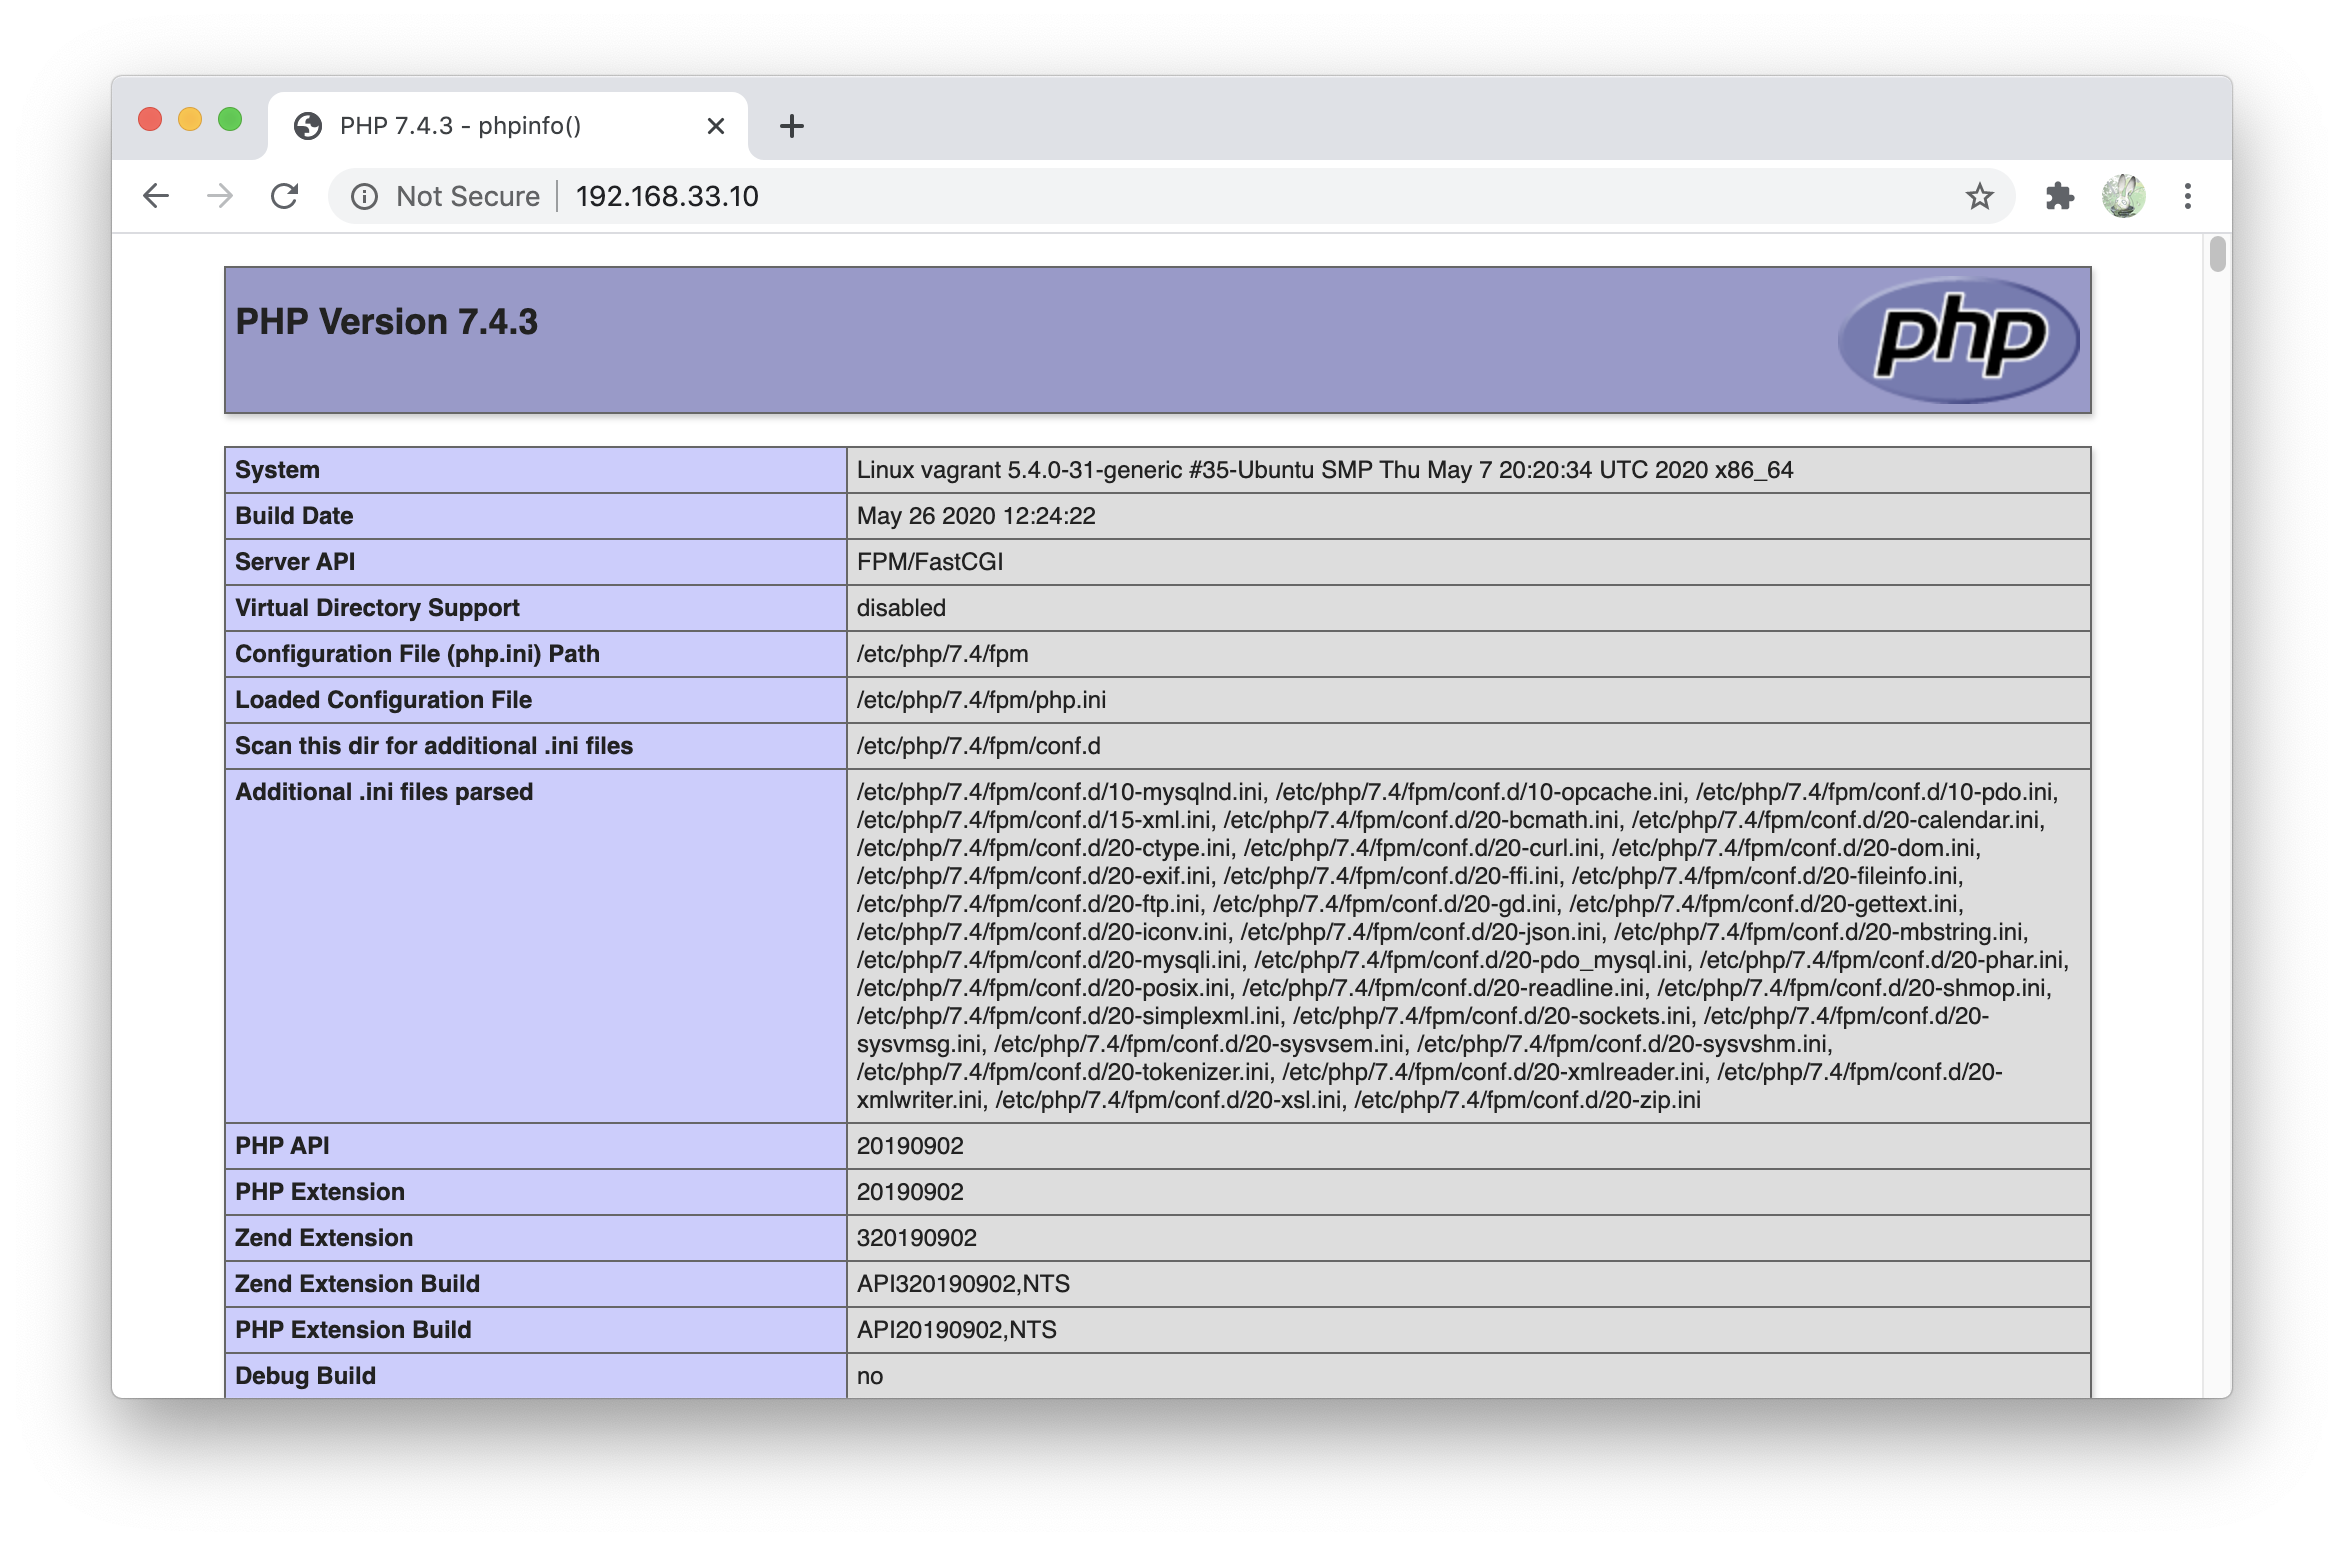
vagrant@vagrant:~$ sudo sh -c "echo '<?php phpinfo();' > /var/www/html/index.php" #nginxのルートにindex.php作成最初にVagrantfileで設定したipアドレスにブラウザからアクセス
5. mysqlのインストール
vagrant@vagrant:~$ sudo apt install -y mysql-servermysqlのパスワードを設定し、"sample"と言う名前のスキーマを作成する
vagrant@vagrant:~$ sudo mysql Welcome to the MySQL monitor. Commands end with ; or \g. Your MySQL connection id is 8 Server version: 8.0.20-0ubuntu0.20.04.1 (Ubuntu) Copyright (c) 2000, 2020, Oracle and/or its affiliates. All rights reserved. Oracle is a registered trademark of Oracle Corporation and/or its affiliates. Other names may be trademarks of their respective owners. Type 'help;' or '\h' for help. Type '\c' to clear the current input statement.mysql> ALTER USER 'root'@'localhost' IDENTIFIED WITH mysql_native_password BY 'root'; -- パスワードをrootに設定 Query OK, 0 rows affected (0.00 sec) mysql> create database sample character set utf8mb4 collate utf8mb4_general_ci; -- データベースを作成する Query OK, 1 row affected (0.00 sec) mysql> show schemas; -- 確認 +--------------------+ | Database | +--------------------+ | information_schema | | mysql | | performance_schema | | sample | | sys | +--------------------+ 5 rows in set (0.01 sec) mysql> quit Bye vagrant@vagrant:~$6. composerダウンロード
注意
https://getcomposer.org/download/
composerのダウンロードページには以下のようにWARNINGがあるため、composerのダウンロードは必ず公式の方を参照してください。
Google翻訳
警告:インストールコードを再配布しないでください。インストーラのバージョンごとに異なります。代わりに、このページにリンクするか、Composerをプログラムでインストールする方法を確認してください。
vagrant@vagrant:~$ php -r "copy('https://getcomposer.org/installer', 'composer-setup.php');"
vagrant@vagrant:~$ php -r "if (hash_file('sha384', 'composer-setup.php') === 'e5325b19b381bfd88ce90a5ddb7823406b2a38cff6bb704b0acc289a09c8128d4a8ce2bbafcd1fcbdc38666422fe2806') { echo 'Installer verified'; } else { echo 'Installer corrupt'; unlink('composer-setup.php'); } echo PHP_EOL;"
Installer verified
vagrant@vagrant:~$ php composer-setup.php
All settings correct for using Composer
Downloading...

Composer (version 1.10.8) successfully installed to: /home/vagrant/composer.phar
Use it: php composer.phar

vagrant@vagrant:~$ php -r "unlink('composer-setup.php');"
vagrant@vagrant:~$ sudo mv composer.phar /usr/local/bin/composer
vagrant@vagrant:~$ composer -V
Composer version 1.10.8 2020-06-24 21:23:30
7. symfonyのセットアップ
7-1. ブラウザで見れるまで
vagrant@vagrant:~$ cd /var/www/html/

vagrant@vagrant:/var/www/html$ sudo chmod 777 . #ローカルの開発環境なので雑に777に設定

vagrant@vagrant:/var/www/html$ composer create-project symfony/website-skeleton symfony #symfonyというフォルダでプロジェクト作成
symfonyのバージョンを指定する場合は
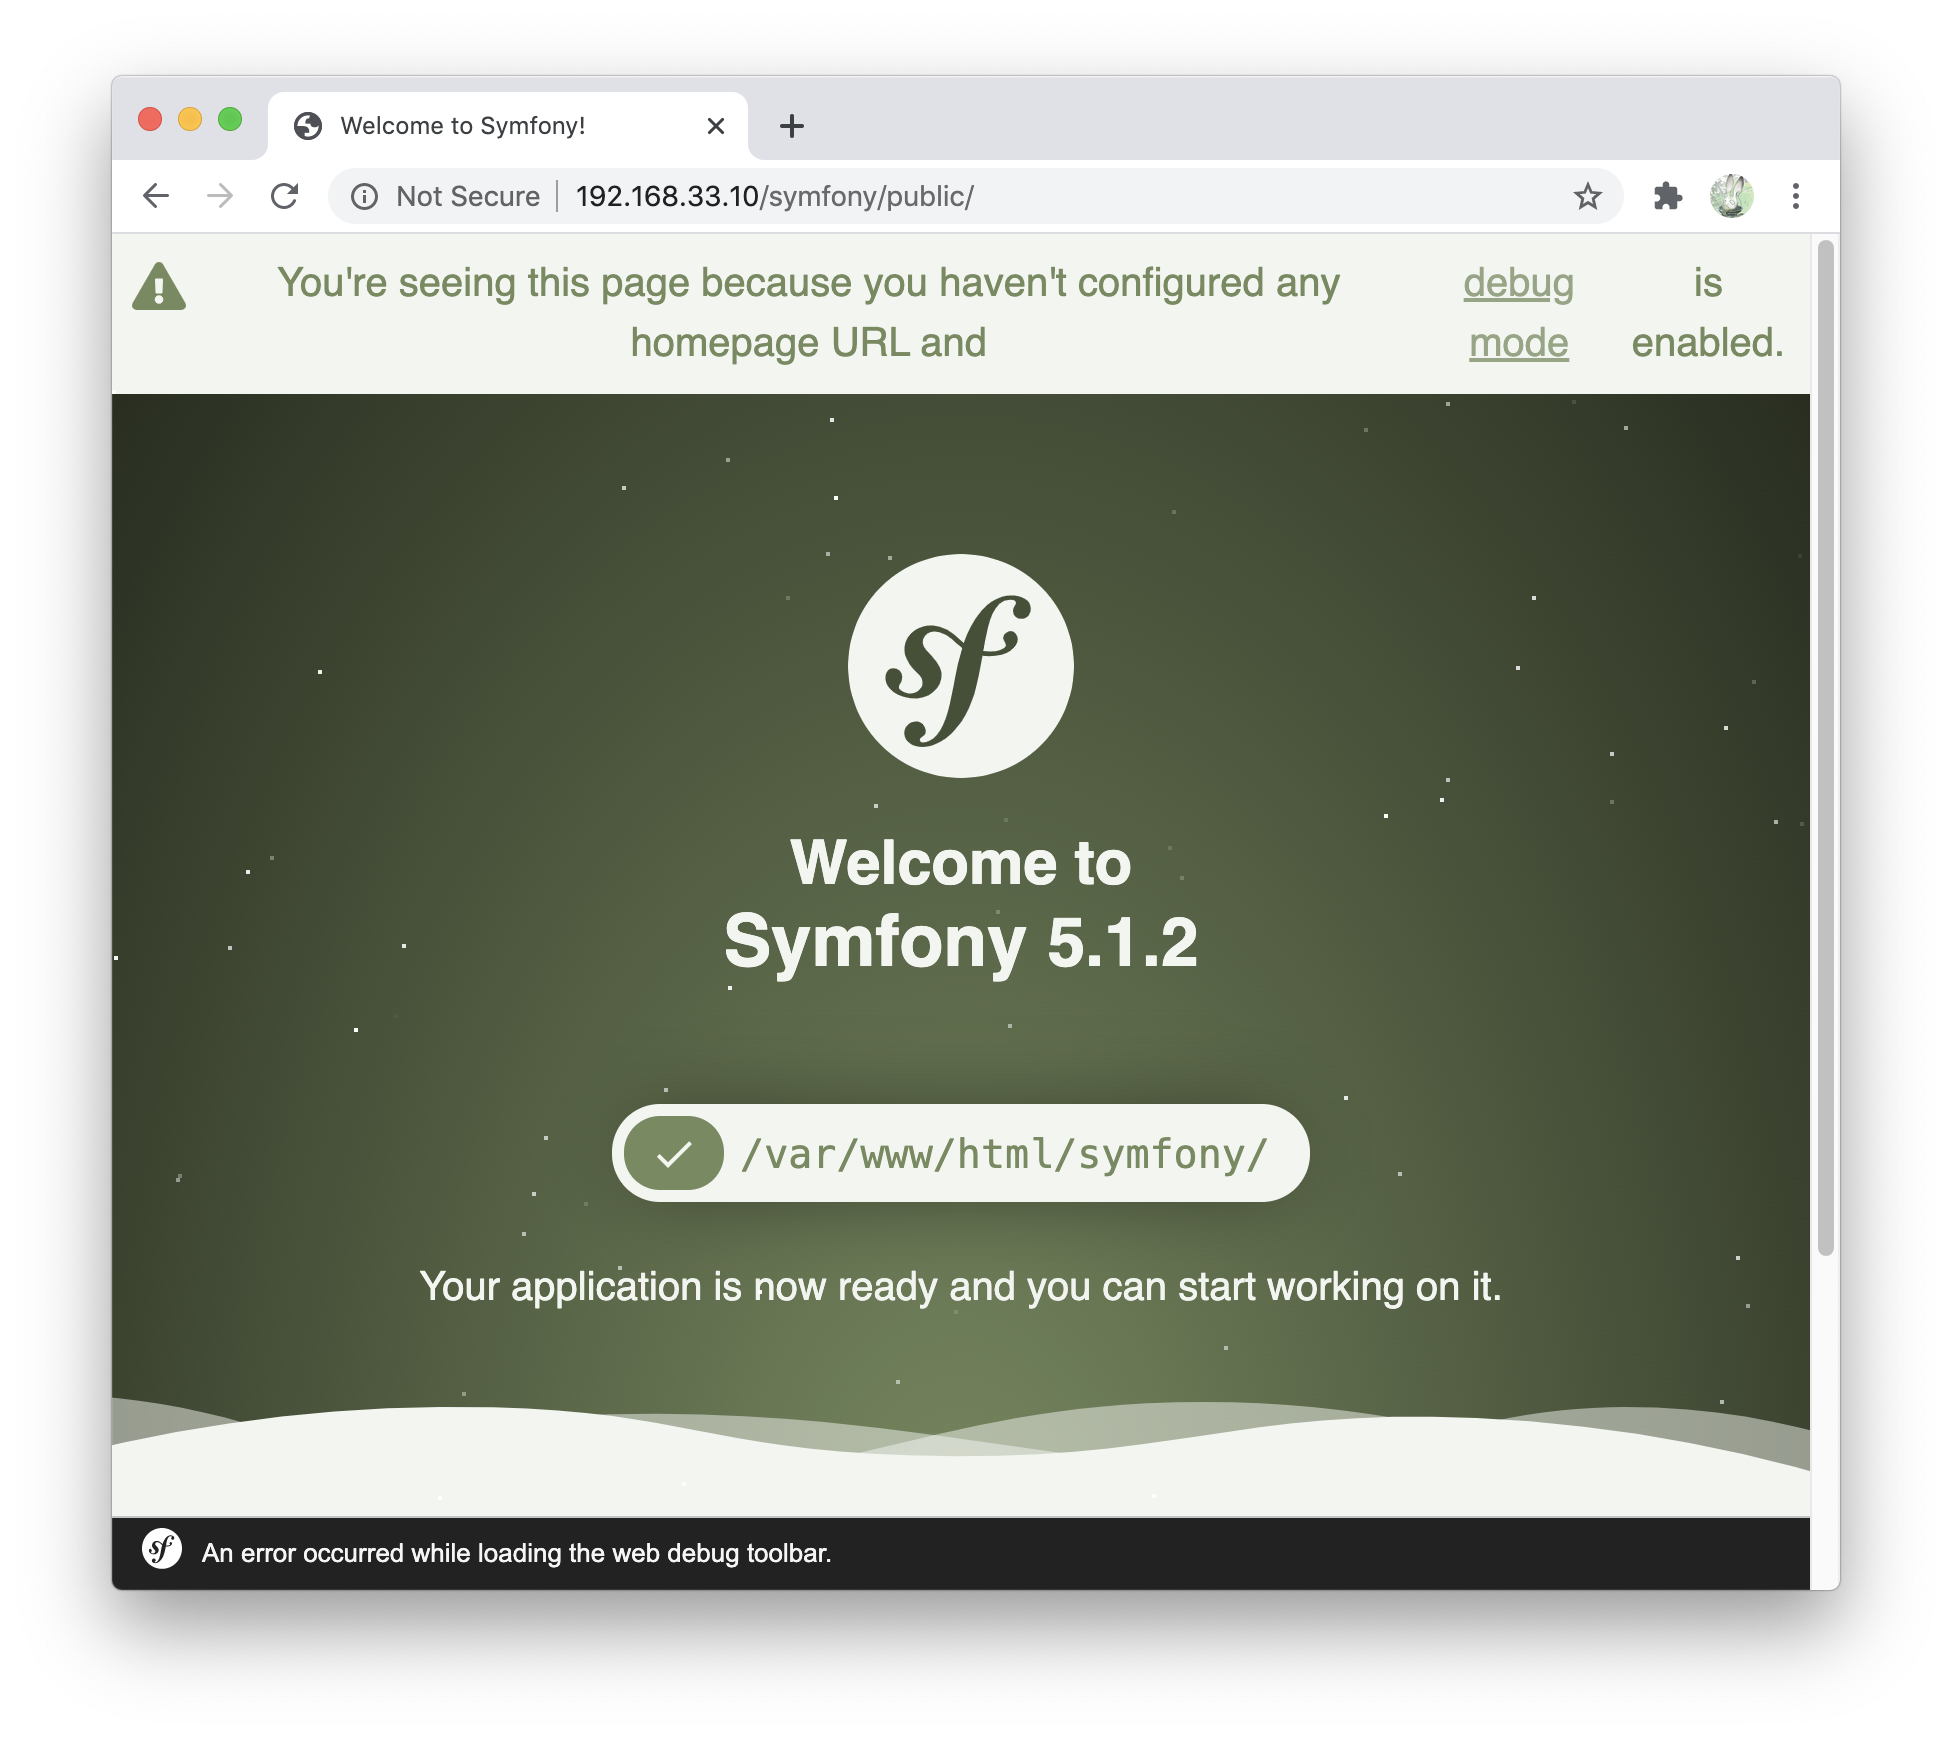
composer create-project symfony/website-skeleton:^5.1 symfonyプロジェクトが作成されて↓にブラウザでアクセスするとsymfonyが動作していることを確認できる
http://192.168.33.10/symfony/public/
7-2. nginxの設定
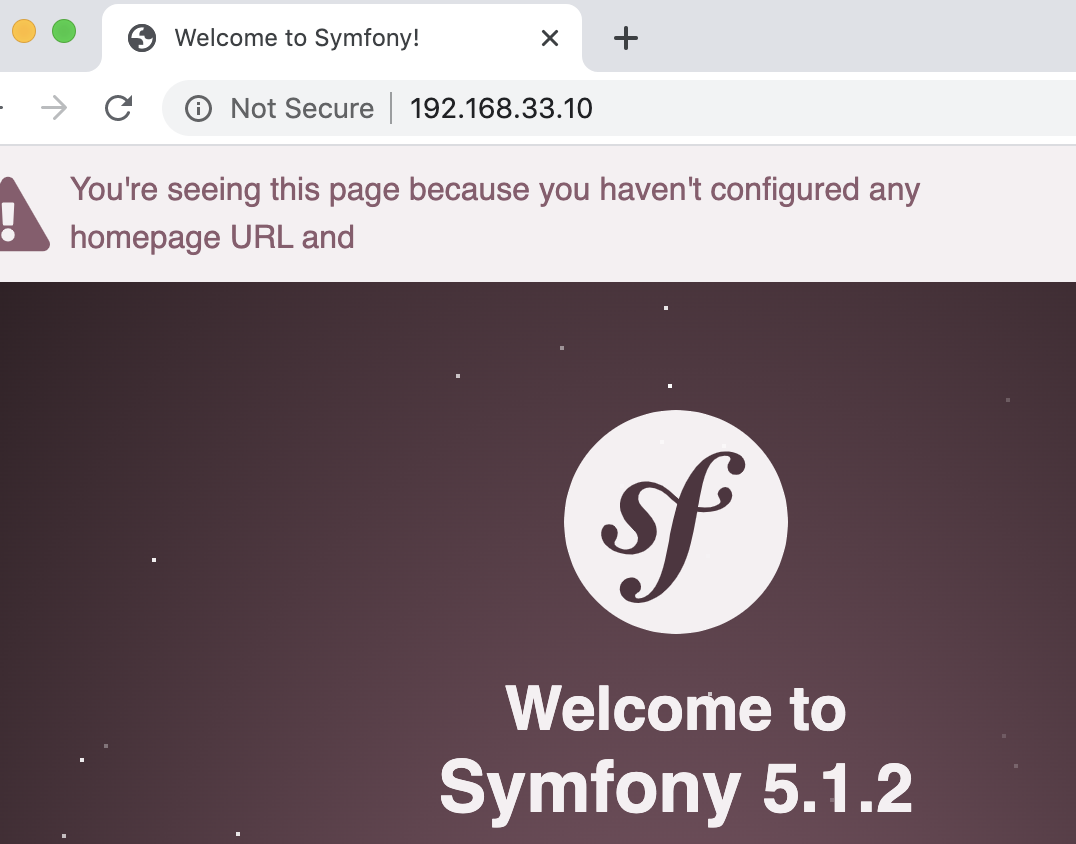
トップページのurlを
http://192.168.33.10/symfony/public/からhttp://192.168.33.10で実行できるようにし、ルーティング(どんなurlでアクセスされても/var/www/html/symfony/public/index.phpの処理を実行する)も設定するvagrant@vagrant:/var/www/html$ sudo vim /etc/nginx/sites-available/default↓のように変更する
-        root /var/www/html;
+        root /var/www/html/symfony/public;
location / { # First attempt to serve request as file, then # as directory, then fall back to displaying a 404. - try_files $uri $uri/ =404; + # try_files $uri $uri/ =404; + try_files $uri $uri/ /index.php; }vagrant@vagrant:/var/www/html$ sudo service nginx restart #nginx再起動http://192.168.33.10/ でsymfonyの画面が表示されたことを確認
ルーティングの確認
vagrant@vagrant:/var/www/html$ cd /var/www/html/symfony/
vagrant@vagrant:/var/www/html/symfony$ php bin/console make:controller ProductController #コントローラ作成
↓が作成された
src/Controller/ProductController.php<?php namespace App\Controller; use Symfony\Bundle\FrameworkBundle\Controller\AbstractController; use Symfony\Component\Routing\Annotation\Route; class ProductController extends AbstractController { /** * @Route("/product", name="product") */ public function index() { return $this->render('product/index.html.twig', [ 'controller_name' => 'ProductController', ]); } }http://192.168.33.10/product にアクセスしてProductControllerの内容が表示されたことを確認できました
7-3. データベースに保存する
.envを書き換える/var/www/html/symfony/.env- DATABASE_URL=mysql://db_user:db_password@127.0.0.1:3306/db_name?serverVersion=5.7 + DATABASE_URL=mysql://root:root@127.0.0.1:3306/sample?serverVersion=8.0公式( Databases and the Doctrine ORM (Symfony Docs) )の通りにEntityを作成してみて、接続できる確認してみる
vagrant@vagrant:/var/www/html/symfony$ php bin/console make:entity

 Class name of the entity to create or update (e.g. GrumpyJellybean):
 > Product

 created: src/Entity/Product.php
 created: src/Repository/ProductRepository.php

 Entity generated! Now let's add some fields!
 You can always add more fields later manually or by re-running this command.

 New property name (press <return> to stop adding fields):
 > name

 Field type (enter ? to see all types) [string]:
 > string

 Field length [255]:
 > 255

 Can this field be null in the database (nullable) (yes/no) [no]:
 > no

 updated: src/Entity/Product.php

 Add another property? Enter the property name (or press <return> to stop adding fields):
 > price

 Field type (enter ? to see all types) [string]:
 > integer

 Can this field be null in the database (nullable) (yes/no) [no]:
 > no

 updated: src/Entity/Product.php

 Add another property? Enter the property name (or press <return> to stop adding fields):
 >


  Success!


 Next: When you're ready, create a migration with php bin/console make:migration
src/Entity/Product.phpとsrc/Repository/ProductRepository.phpが作成される
vagrant@vagrant:/var/www/html/symfony$ php bin/console make:migration #migrationファイル作成


  Success!


 Next: Review the new migration "src/Migrations/Version20200712212921.php"
 Then: Run the migration with php bin/console doctrine:migrations:migrate
 See https://symfony.com/doc/current/bundles/DoctrineMigrationsBundle/index.html
src/Migrations/Version20200712212921.phpが作成される
vagrant@vagrant:/var/www/html/symfony$ php bin/console doctrine:migrations:migrate #migration実行

                    Application Migrations


WARNING! You are about to execute a database migration that could result in schema changes and data loss. Are you sure you wish to continue? (y/n)y
Migrating up to 20200712212921 from 0

  ++ migrating 20200712212921

     -> CREATE TABLE product (id INT AUTO_INCREMENT NOT NULL, name VARCHAR(255) NOT NULL, price INT NOT NULL, PRIMARY KEY(id)) DEFAULT CHARACTER SET utf8mb4 COLLATE `utf8mb4_unicode_ci` ENGINE = InnoDB

  ++ migrated (took 55.7ms, used 18M memory)

  ------------------------

  ++ finished in 59.4ms
  ++ used 18M memory
  ++ 1 migrations executed
  ++ 1 sql queries
vagrant@vagrant:/var/www/html/symfony$ mysql -uroot -proot sample -e 'show tables;' #テーブルができているか確認 mysql: [Warning] Using a password on the command line interface can be insecure. +--------------------+ | Tables_in_sample | +--------------------+ | migration_versions | | product | +--------------------+
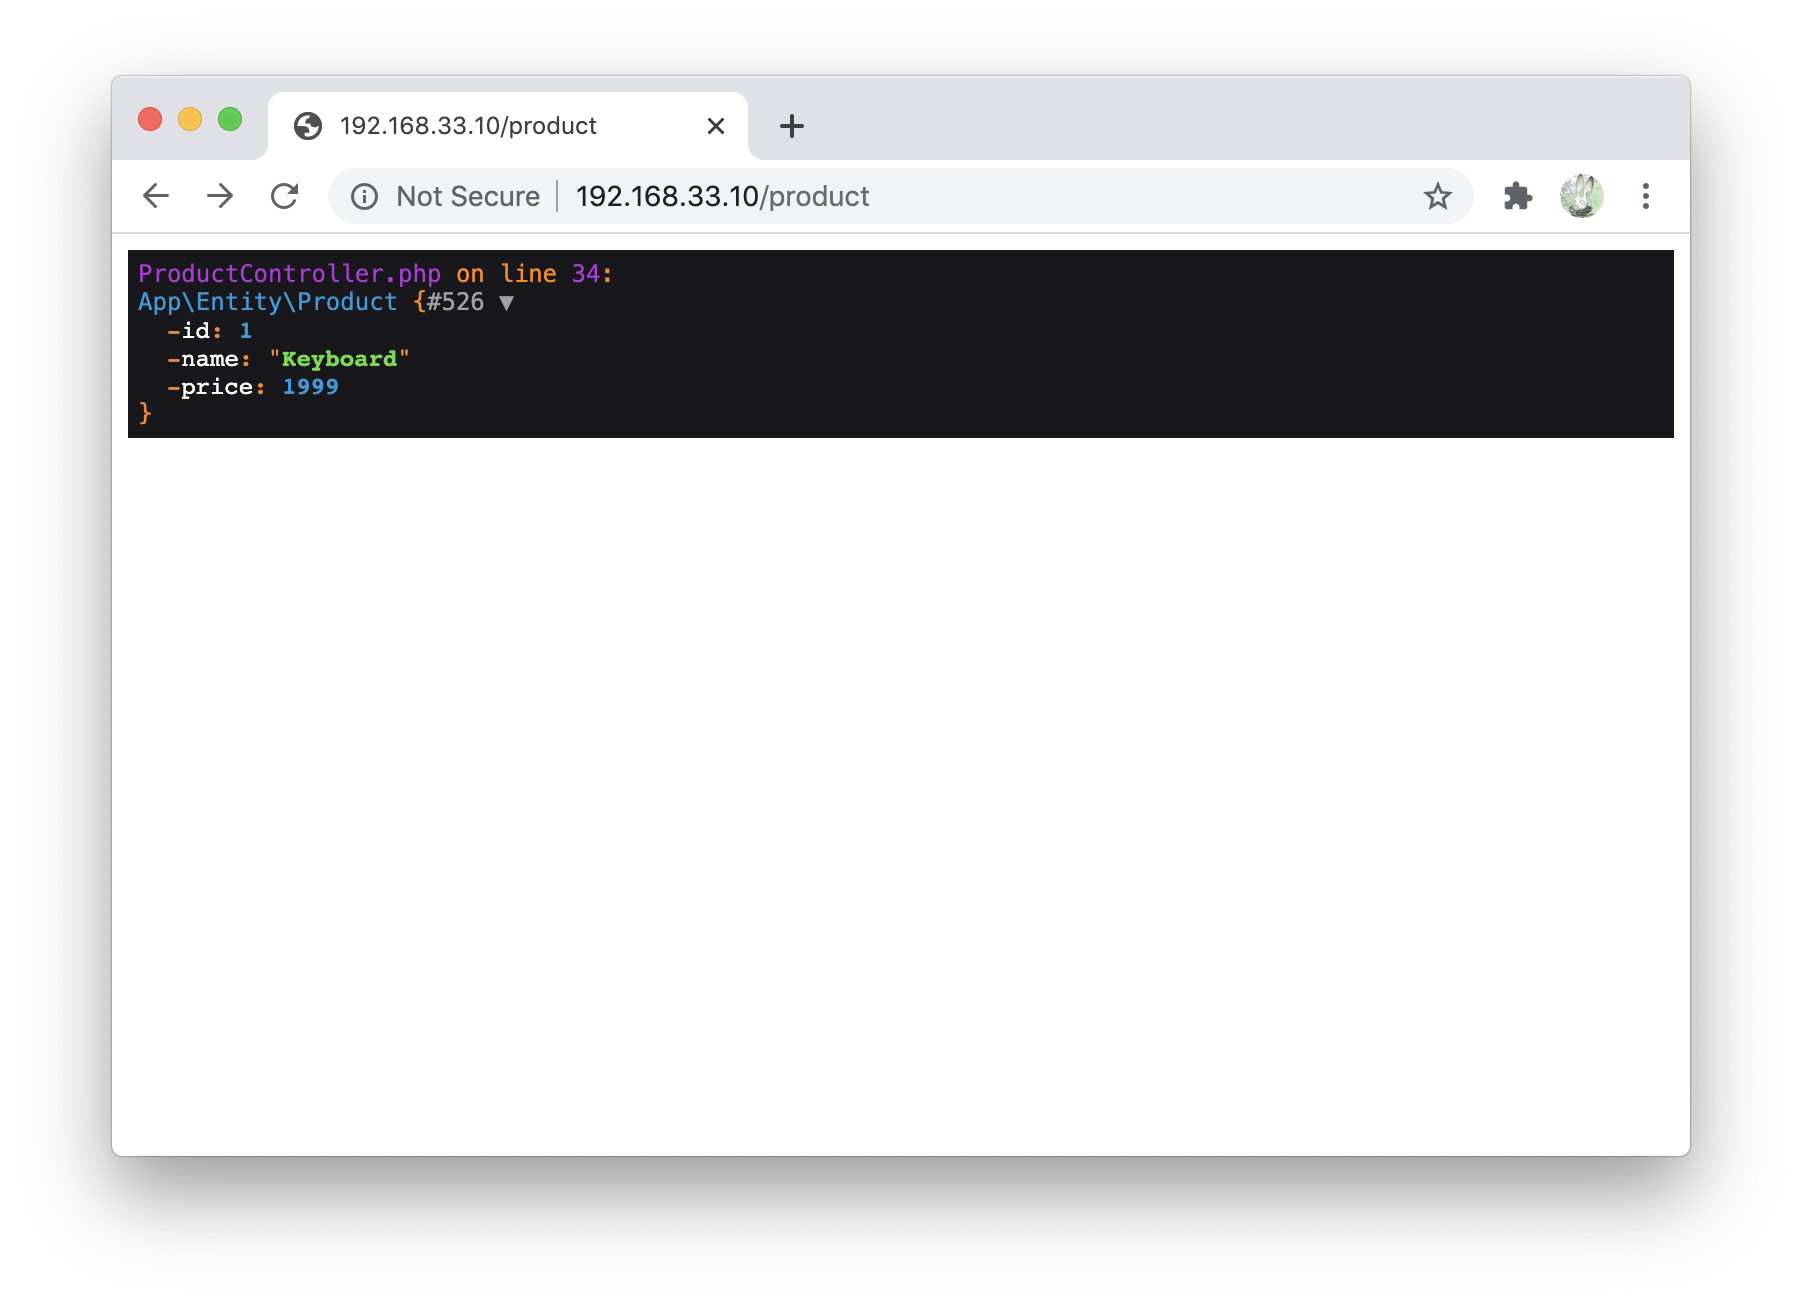
ProductController修正src/Controller/ProductController.php<?php namespace App\Controller; + use App\Entity\Product; use Symfony\Bundle\FrameworkBundle\Controller\AbstractController; use Symfony\Component\Routing\Annotation\Route; class ProductController extends AbstractController { /** * @Route("/product", name="product") */ public function index() { + // 保存 + $entityManager = $this->getDoctrine()->getManager(); + $product = new Product(); + $product->setName('Keyboard'); + $product->setPrice(1999); + $entityManager->persist($product); + $entityManager->flush(); + + // 取得 + $id = 1; + $product = $this->getDoctrine() + ->getRepository(Product::class) + ->find($id); + if (!$product) { + throw $this->createNotFoundException( + 'No product found for id '.$id + ); + } + dd($product); return $this->render('product/index.html.twig', [ 'controller_name' => 'ProductController', ]); }テーブルへのアクセスができました
最後まで見ていただいてありがとうございましたm(_ _)m