- 投稿日:2020-06-24T20:02:27+09:00
【C#】Arduinoで取得したセンサ値をシリアル通信からCSV出力する
概要
題名の通りです
やっぱりみんなpythonが好きらしく,C#でやっている人は少なかったので情報共有
今回はArduinoからのセンサ出力をWindowsコンソールアプリケーションを用いてCSVに出力するまでの道のりです
環境
windows10
Visual Studio 2019
Arduino IDE
Arduino Pro mini
適当な光センサ実装
Arduino IDE側
const int analogInPin = A0;

int sensorValue = 0;

void setup() {
  Serial.begin(9600);
}

void loop() {
  sensorValue = analogRead(analogInPin);

  Serial.print("sensor = ");
  Serial.print(sensorValue);
  Serial.print("\n");

  delay(2);
}
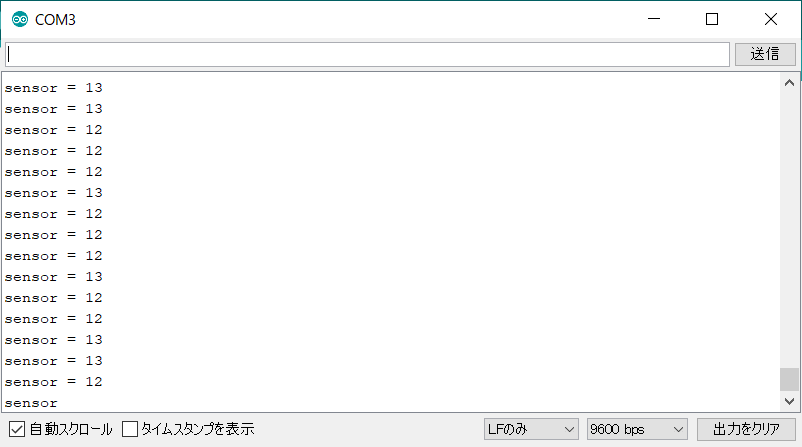
シリアルモニタ結果はこんな感じ
このウィンドウ名の通り今回のシリアルポートはCM3
ツールタブ押してシリアルポート見ても確認できます
後,bpsは9600であることも覚えておきますVisual Studio側
まず今回必要なパッケージを.NETからインストールします
①System.Text.Encoding.CodePages
csvに出力する際にあのShift-Jisを使います
そして案の定Shift-Jisは適してないと怒られます
Windowsの呪いは恐ろしいです
そして調査したところ,
Encoding.RegisterProvider(CodePagesEncodingProvider.Instance);
と魔法の言葉を打てば大丈夫らしいです(投げやり)1.VSのプロジェクトタブからNuGetパッケージの管理を選択
2.参照タブの検索ボックスにSystem.Text.Encoding.CodePagesと入力
3.一番上のやつをインストール,私のはver.4.7.1でした
②System.IO.Ports
私のSystem.IO.Portsは旧バージョンだったらしくコンパイル時にSerialPort型が名前空間にないと怒られました
最新verの方は必要ないと思いますが私のような症状が出たのであればインストールしてみてください
1.VSのプロジェクトタブからNuGetパッケージの管理を選択
2.参照タブの検索ボックスにSystem.IO.Portsと入力
3.一番上のやつをインストール,私のはver.4.7.0でした
ソースコード
ArduinoSerial_DataToCSV.csusing System; using System.IO.Ports; using System.Text; namespace ArduinoSerial_DataToCSV { class Program { static void Main(string[] args) { //キー入力に使用 var outChar = ""; //現在時刻 DateTime dt = DateTime.Now; String now_time = dt.ToString(); now_time = now_time.Replace("/", ".").Replace(" ","_").Replace(":","-"); String PATH = @"C:/Users/○○/~/"+now_time+"_SensorData.csv"; //EncodeをShift-Jisに対応 Encoding.RegisterProvider(CodePagesEncodingProvider.Instance); //シリアルポート取得 SerialPort sp = new SerialPort("COM3"); //csv出力 var sw = new System.IO.StreamWriter(PATH, false, System.Text.Encoding.GetEncoding("shift_jis")); //Arduino側のサンプリング周波数 sp.BaudRate = 9600; sp.Open(); while (true) { //センサ値1行分取得 string data = sp.ReadLine(); //csv出力 sw.WriteLine(data); Console.WriteLine(data); //Q入力でプログラム終了 if (Console.KeyAvailable) { outChar = Console.ReadKey().Key.ToString(); if (outChar == "Q") { return; } } } } } }実行結果
1行目がうまくいかない不具合があるけどよくわからずじまい
疲れたので修正するならまた今度参考資料
Arduino日本語リファレンス
http://www.musashinodenpa.com/arduino/ref/index.php.NET CoreでShift-JISを取り扱う方法
https://blog.hitsujin.jp/entry/2019/01/27/200055


- 投稿日:2020-06-24T19:32:04+09:00
View を支える添付プロパティ
はじめに
オレオレ解釈の覚書 その12
依存関係プロパティに関連して、添付プロパティのまとめです。
本文
添付プロパティも実体は依存関係プロパティと同じ DependencyProperty になります。依存関係プロパティは、コントロールやウィンドウに対して直接定義し、実装していました。一方で添付プロパティはこうした処理に手を加えることなく、別のクラスで定義し、名前の通りコントロールに値を添えることができます。よく見かけるところでは、Grid.Row や DockPanel.Dock などがあります。
実際に定義してみましょう。下記のようなヘルパークラスを作成し、DependencyProperty を宣言、初期化します。これにアクセスするための静的メソッドを用意して、対象となるコントロールを引数として要求します。メソッド内でコントロールと DependencyProperty は紐づけられ、値が管理されます。これが添付プロパティの実装で、コントロール以外の領域で値を保管できるようになりました。
AttachedPropertyusing System.Windows; namespace TestApp.Views.Controls { public class ControlAttachedProperty { public static readonly DependencyProperty RemarkProperty = DependencyProperty.RegisterAttached( "Remark", typeof(string), typeof(ControlAttachedProperty), new FrameworkPropertyMetadata(string.Empty)); public static string GetRemark(DependencyObject target) => (string)target.GetValue(RemarkProperty); public static void SetRemark(DependencyObject target, string value) => target.SetValue(RemarkProperty, value); } }作成した添付プロパティは Xaml 上でほかのプロパティと同じようにバインドさせることができます。保管された値は静的メソッドを介して C# 側からも取得、変更ができます。
View<Window x:Class="TestApp.Views.MainWindow" xmlns="http://schemas.microsoft.com/winfx/2006/xaml/presentation" xmlns:x="http://schemas.microsoft.com/winfx/2006/xaml" xmlns:i="http://schemas.microsoft.com/xaml/behaviors" xmlns:controls="clr-namespace:TestApp.Views.Controls"> <Grid> <TextBlock x:Name="textBlock" controls:ControlAttachedProperty.Remark="ほげ"/> </Grid> </Window>View(CodeBehind)using System.Windows; namespace TestApp.Views { public partial class MainWindow : Window { public void Hoge() { // コントロールを指定して添付プロパティを取得、設定する var remark = ControlAttachedProperty.GetRemark(this.textBlock); ControlAttachedProperty.SetRemark(this.textBlock, "ふが"); } } }ただし、添付プロパティはこのままで使用するより、以前お話ししたような添付ビヘイビアとして「ふるまい」を定義するために使われる方が多いと思われます。プロパティの変更を監視したり、特定のイベントを購読することで、決められたタイミングで処理を実行させます。
AttachedBehaviorusing System.Windows; using System.Windows.Input; namespace TestApp.Views.Behaviors { public class WindowAttachedBehavior { public static readonly DependencyProperty DraggableAnywhereProperty = DependencyProperty.RegisterAttached( "DraggableAnywhere", typeof(bool), typeof(WindowAttachedBehavior), new PropertyMetadata(OnDraggableAnywhereChanged)); public static bool GetDraggableAnywhere(DependencyObject obj) => (bool)obj.GetValue(DraggableAnywhereProperty); public static void SetDraggableAnywhere(DependencyObject obj, bool value) => obj.SetValue(DraggableAnywhereProperty, value); private static void OnDraggableAnywhereChanged(DependencyObject sender, DependencyPropertyChangedEventArgs e) { if (!(sender is Window window)) return; if ((bool)e.OldValue) window.MouseLeftButtonDown -= MouseLeftButtonDown; if ((bool)e.NewValue) window.MouseLeftButtonDown += MouseLeftButtonDown; } private static void MouseLeftButtonDown(object sender, MouseButtonEventArgs e) { if (!(sender is Window window)) return; if (e.ButtonState != MouseButtonState.Pressed) return; window.DragMove(); e.Handled = true; } } }おわりに
添付プロパティについてでした。
実装箇所が違うだけで依存関係プロパティと大きな差はありませんが、既存の処理を汚さずに追加でき、汎用的なものは使いまわせるため、実装の幅をさらに広げることができます。
ビヘイビアとしては、プロパティを定義する必要がない BlendBehavior を使う場合が多いですが、添付ビヘイビアはプロパティがあることにより Style へ登録できるため、リソースファイルで一括適用できたりします。どちらも一長一短です。
話は変わりますが、相互作用処理の回で Prism の InteractionRequest の破棄がコミットされことをコメントで教えて頂きました。
Prism 以外のフレームワークとして、尾上さん(@ugaya40) が作成された Livet があります。日本語の文献が豊富にあり導入のハードルが低く、WPF に的を絞られていたため、私も Prism と並行して愛用しておりました。
かつての Livet はすべての機能がひとまとまりになったライブラリで、Prism とは競合する機能も多く、同一ソリューション内での共存は控えていました。ところが現在は、機能ごとにライブラリが細かく分離されており、使いたい部分だけを個別に導入できるようになっています。Prism をベースにしつつも、Livet だけに存在する機能を部分的に取り入れることが可能になりました。Livet には InteractionRequest と類似する機能として、柔軟で汎用性の高い Messenger が提供されており、これは今も健在です。次回はこの Messenger について簡単にまとめてみます。
- 投稿日:2020-06-24T16:40:28+09:00
WinRTで音声合成
WinRT で音声合成を試します。従来の API よりも扱える音声が増えたことを確認します。C# を使用します。
この記事のコードは以下のリポジトリに掲載しています。
他の言語での利用については以下の記事を参照してください。
JavaScript との比較については以下の記事を参照してください。
Windows の音声合成
Windows 10 でサポートされる音声の一覧です。
日本語以外の言語を使用する場合は追加します。
今回はすべての言語を追加した状態でテストします。
音声一覧
従来の API と WinRT とで結果が異なります。
Windows 10 での新しい音声は OneCore という枠組みで扱われます。従来の API では OneCore の音声が扱えません。
従来の API
.NET Framework の System.Speech.Synthesis で音声一覧を取得します。
voices-net/Program.csusing System; using System.Speech.Synthesis; class Program { static void Main() { var synth = new SpeechSynthesizer(); foreach (var voice in synth.GetInstalledVoices()) { var vi = voice.VoiceInfo; Console.WriteLine("{0}: {1}", vi.Culture, vi.Description); } } }実行結果ja-JP: Microsoft Haruka Desktop - Japanese en-GB: Microsoft Hazel Desktop - English (Great Britain) en-US: Microsoft David Desktop - English (United States) en-US: Microsoft Zira Desktop - English (United States) es-ES: Microsoft Helena Desktop - Spanish (Spain) es-MX: Microsoft Sabina Desktop - Spanish (Mexico) fr-FR: Microsoft Hortense Desktop - French it-IT: Microsoft Elsa Desktop - Italian (Italy) de-DE: Microsoft Hedda Desktop - German ko-KR: Microsoft Heami Desktop - Korean pl-PL: Microsoft Paulina Desktop - Polish pt-BR: Microsoft Maria Desktop - Portuguese(Brazil) ru-RU: Microsoft Irina Desktop - Russian zh-CN: Microsoft Huihui Desktop - Chinese (Simplified) zh-HK: Microsoft Tracy Desktop - Chinese(Traditional, HongKong SAR) zh-TW: Microsoft Hanhan Desktop - Chinese (Taiwan)一部の音声しか取得できません。SAPI ではレジストリを参照することで OneCore の音声を取得できますが、その方法は System.Speech.Synthesis では使えません。
また、System.Speech.Synthesis は.NET Core 3.1 では動きません。WinRT に移行するようにということのようです。
WinRT
ほぼすべて(後述)の音声が取得できます。
voices/Program.csusing System; using Windows.Media.SpeechSynthesis; class Program { static void Main() { foreach (var voice in SpeechSynthesizer.AllVoices) { Console.WriteLine("{0}: {1}", voice.Language, voice.Description); } } }実行結果fr-FR: Microsoft Hortense - French (France) en-GB: Microsoft George - English (United Kingdom) en-US: Microsoft David - English (United States) es-ES: Microsoft Pablo - Spanish (Spain) de-DE: Microsoft Stefan - German (Germany) it-IT: Microsoft Cosimo - Italian (Italy) en-AU: Microsoft Catherine - English (Australia) en-CA: Microsoft Linda - English (Canada) ca-ES: Microsoft Herena - Catalan (Catalan) en-GB: Microsoft Hazel - English (United Kingdom) en-GB: Microsoft Susan - English (United Kingdom) en-IN: Microsoft Heera - English (India) da-DK: Microsoft Helle - Danish (Denmark) en-US: Microsoft Zira - English (United States) es-ES: Microsoft Helena - Spanish (Spain) es-ES: Microsoft Laura - Spanish (Spain) de-DE: Microsoft Hedda - German (Germany) es-MX: Microsoft Sabina - Spanish (Mexico) fi-FI: Microsoft Heidi - Finnish (Finland) fr-CA: Microsoft Caroline - French (Canada) de-DE: Microsoft Katja - German (Germany) fr-FR: Microsoft Julie - French (France) hi-IN: Microsoft Kalpana - Hindi (India) ja-JP: Microsoft Ayumi - Japanese (Japan) it-IT: Microsoft Elsa - Italian (Italy) ar-EG: Microsoft Hoda - Arabic (Egypt) ja-JP: Microsoft Haruka - Japanese (Japan) ko-KR: Microsoft Heami - Korean (Korean) pl-PL: Microsoft Paulina - Polish (Poland) pt-BR: Microsoft Maria - Portuguese (Brazil) pt-PT: Microsoft Helia - Portuguese (Portugal) ru-RU: Microsoft Irina - Russian (Russia) zh-CN: Microsoft Huihui - Chinese (Simplified, PRC) zh-CN: Microsoft Yaoyao - Chinese (Simplified, PRC) zh-HK: Microsoft Tracy - Chinese (Traditional, Hong Kong S.A.R.) zh-TW: Microsoft Hanhan - Chinese (Traditional, Taiwan) zh-TW: Microsoft Yating - Chinese (Traditional, Taiwan) he-IL: Microsoft Asaf - Hebrew (Israel) hi-IN: Microsoft Hemant - Hindi (India) de-AT: Microsoft Michael - German (Austria) hr-HR: Microsoft Matej - Croatian (Croatia) hu-HU: Microsoft Szabolcs - Hungarian (Hungary) id-ID: Microsoft Andika - Indonesian (Indonesia) en-US: Microsoft Mark - English (United States) en-AU: Microsoft James - English (Australia) de-CH: Microsoft Karsten - German (Switzerland) en-CA: Microsoft Richard - English (Canada) ja-JP: Microsoft Ichiro - Japanese (Japan) ar-SA: Microsoft Naayf - Arabic (Saudi) ms-MY: Microsoft Rizwan - Malay (Malaysia) nb-NO: Microsoft Jon - Norwegian (Bokmal) nl-BE: Microsoft Bart - Dutch (Belgium) nl-NL: Microsoft Frank - Dutch (Netherlands) pl-PL: Microsoft Adam - Polish (Poland) es-MX: Microsoft Raul - Spanish (Mexico) pt-BR: Microsoft Daniel - Portuguese (Brazil) cs-CZ: Microsoft Jakub - Czech (Czech Republic) bg-BG: Microsoft Ivan - Bulgarian (Bulgaria) ro-RO: Microsoft Andrei - Romanian (Romania) en-IE: Microsoft Sean - English (Ireland) ru-RU: Microsoft Pavel - Russian (Russia) sk-SK: Microsoft Filip - Slovak (Slovakia) sl-SI: Microsoft Lado - Slovenian (Slovenia) sv-SE: Microsoft Bengt - Swedish ta-IN: Microsoft Valluvar - Tamil (India) th-TH: Microsoft Pattara - Thai (Thailand) tr-TR: Microsoft Tolga - Turkish (Turkey) vi-VN: Microsoft An - Vietnamese (Vietnam) fr-CA: Microsoft Claude - French (Canada) zh-CN: Microsoft Kangkang - Chinese (Simplified, PRC) fr-CH: Microsoft Guillaume - French (Switzerland) zh-HK: Microsoft Danny - Chinese (Traditional, Hong Kong S.A.R.) el-GR: Microsoft Stefanos - Greek (Greece) en-IN: Microsoft Ravi - English (India) fr-FR: Microsoft Paul - French (France) zh-TW: Microsoft Zhiwei - Chinese (Traditional, Taiwan)SAPI でレジストリを指定して取得した結果と比較すると、以下の2つの音声が取得できません。
取得できなかった音声fr-CA: Microsoft Nathalie - French (Canada) ja-JP: Microsoft Sayaka - Japanese (Japan)これらは音声の設定にも現れませんが、Chromium 版 Edge では使えます。隠れキャラなのでしょうか。
音声合成
音声を指定してしゃべらせます。
speak/Program.csusing System; using System.Threading.Tasks; using Windows.Media.Core; using Windows.Media.SpeechSynthesis; using Windows.Media.Playback; class Program { static void SetVoice(SpeechSynthesizer synthesizer, string v) { foreach (var voice in SpeechSynthesizer.AllVoices) { if (voice.DisplayName == v) { synthesizer.Voice = voice; break; } } } static async Task Main() { var voice = "Microsoft Ichiro"; var text = "こんにちは、世界"; var synthesizer = new SpeechSynthesizer(); SetVoice(synthesizer, voice); var stream = await synthesizer.SynthesizeTextToStreamAsync(text); var player = new MediaPlayer(); player.Source = MediaSource.CreateFromStream(stream, stream.ContentType); var tcs = new TaskCompletionSource<int>(); player.MediaEnded += (sender, o) => tcs.SetResult(0); player.Play(); await tcs.Task; } }再生が終了するまで待つようになっています。
参考までにハマったポイントを書いておきます。
ストリームの変換
当初、
SpeechSynthesizer.SynthesizeTextToStreamAsync()から返されるSpeechSynthesisStreamが直接受け取れるMediaPlayer.SetStreamSource()を使おうとしましたが、obsolete でした。MediaPlayer.SetMediaSource may be altered or unavailable after Windows 10. Use MediaPlayer.Source instead.
代替の
MediaPlayer.SourceはIMediaPlaybackSourceを受け取るため変換が必要です。player.Source = MediaSource.CreateFromStream(stream, stream.ContentType);以下に変換方法についての質問がありますが、1番目の回答では引数が足りないため、2番目の回答から
ContentTypeの部分を補う必要があります。今回は WinRT の
MediaPlayerを使用しましたが、以下の記事では WPF のSoundPlayerを使用しています。こちらはStreamへの変換が必要になります。終了待ち
再生は非同期で行われるため、再生が終わるまでプログラムが終了しないように待ちます。
再生の終了は
MediaEndedで通知されるので、TaskCompletionSourceに値をセットしてTaskを終了させます。var tcs = new TaskCompletionSource<int>(); player.MediaEnded += (sender, o) => tcs.SetResult(0); player.Play(); await tcs.Task;以下を参考にしました。
TaskCompletionSourceの使い方は JavaScript のPromiseに近いと思いました。csproj
csproj ファイルでは以下のように WinRT を参照しています。
(抜粋)<ItemGroup> <Reference Include="System.Runtime.WindowsRuntime"> <HintPath>C:\Windows\Microsoft.NET\Framework\v4.0.30319\System.Runtime.WindowsRuntime.dll</HintPath> <Private>False</Private> </Reference> <Reference Include="Windows"> <HintPath>$(MSBuildProgramFiles32)\Windows Kits\10\UnionMetadata\10.0.17763.0\Facade\windows.winmd</HintPath> <Private>False</Private> </Reference> <Reference Include="Windows.Foundation.FoundationContract"> <HintPath>$(MSBuildProgramFiles32)\Windows Kits\10\References\10.0.17763.0\Windows.Foundation.FoundationContract\3.0.0.0\Windows.Foundation.FoundationContract.winmd</HintPath> <Private>False</Private> </Reference> <Reference Include="Windows.Foundation.UniversalApiContract"> <HintPath>$(MSBuildProgramFiles32)\Windows Kits\10\References\10.0.17763.0\Windows.Foundation.UniversalApiContract\7.0.0.0\Windows.Foundation.UniversalApiContract.winmd</HintPath> <Private>False</Private> </Reference> </ItemGroup>以下を参考にしました。
- 投稿日:2020-06-24T12:26:41+09:00
View を支える依存関係プロパティ
はじめに
オレオレ解釈の覚書 その11
依存関係プロパティについてです。
本文
依存関係プロパティとは簡単に言えば Xaml 上でバインドできるコントロールのプロパティです。身近なところで言えば TextBox.Text や CheckBox.IsChecked などがこれに当たります。その実体は DependencyProperty という静的なフィールドで、DependencyObject から派生したクラスで定義します。例えば TextBox.Text であれば以下のようになります。(実際の System.Windows.Controls.TextBox とは異なります。あくまでイメージです。)
TextBoxusing System.Windows; namespace TestApp.Views.Controls { public class TextBox : DependencyObject { // 依存関係プロパティ public static readonly DependencyProperty TextProperty = DependencyProperty.Register( "Text", typeof(string), typeof(TextBox)); // CLR ラッパープロパティ public string Text { get => (string) this.GetValue(TextProperty); set => this.SetValue(TextProperty, value); } } }依存関係プロパティは DependencyProperty にメタ情報を渡して初期化するだけで、Xaml からバインドするための準備ができてしまいます。ただし、プログラム(C#側)からアクセスする際には、DependencyObject のメソッドを経由する必要があり、通常のプロパティと使用感が合いません。例のようにラッパープロパティを用意してインターフェースに統一感を持たせるのが一般的で、これによりコントロールの利用者は依存関係プロパティの存在を意識せずにアクセスすることができます。
宣伝
上記のようにすれば依存関係プロパティを定義できますが、初期化のくだりは多くの場合で規則的になり、いくつも用意する際は面倒ですし、バグの温床にもなります。拙作ですが、NuGet にて公開中の下記のライブラリでは、初期化の際に要求されるメタ情報を省略することができます。ラッパープロパティを用意することが暗黙のルールであることを利用し、必要な情報を補っています。

 TextBoxusing Plow.Wpf; using System.Windows; namespace TestApp.Views.Controls { public class TextBox : DependencyObject { // 依存関係プロパティ public static readonly DependencyProperty TextProperty = DependencyPropertyExtensions.Register(); // CLR ラッパープロパティ public string Text { get => (string) this.GetValue(TextProperty); set => this.SetValue(TextProperty, value); } } }
おわりに
ViewModel で登場した変更通知プロパティとは異なり、依存関係プロパティはほとんどのコントロールで必要なものがある程度用意されているため、新たに追加する機会は少ないかもしれません。とはいえ、ユーザーコントロールとしてまとめた際や、既存のコントロールを拡張する場合に登場するため、頭の片隅には置いておきたいですね。
次回はこれを応用した添付プロパティについてまとめます。
- 投稿日:2020-06-24T10:49:58+09:00
【Unity】マップエディタを作ってみました【エディタ拡張】
1.エディタ拡張とは
Unityのエディタはカスタマイズできます。
自作でウィンドウを作成したり、インスペクターを拡張したりなど。
Unity公式マニュアルからの画像
https://docs.unity3d.com/2020.2/Documentation/Manual/editor-EditorWindows.html2.マップエディタとは
ゲームのマップを作成する際のツールです。
Unityでは2D用にタイルマップが用意されているので、確認してみると良いと思います。
六角形やクォータービュー(IsometricView)のものなど汎用性高いです。
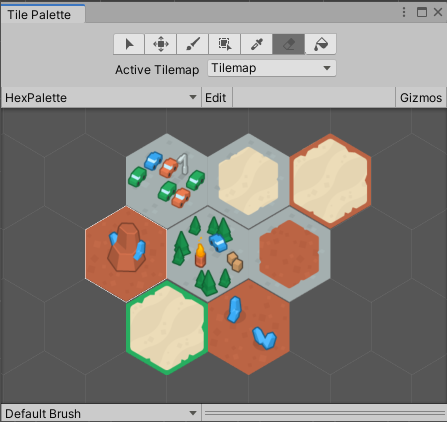
Unity公式マニュアルからの画像
https://docs.unity3d.com/ja/2020.1/Manual/class-Tilemap.html3.目的・ターゲット
・自分の備忘録として残す
エディタ拡張の基本的知識の定着のため・情報の公開
エディタ拡張に興味のある方向けに、「何ができるか」「何の知識が必要か」といった情報を公開4.概要・前提
現在制作中の
Temple Runのようなエンドレスランタイプのゲームの障害物になるマップデータの開発効率向上のためにマップエディタの開発を目指しました。必要な知識
・基礎的なエディタ拡張などの知識があれば大丈夫です。(カスタムウィンドウ作成知識やOnGUI関数)
・エンジンの概念とGUI制作の知識があれば、なおよしです。開発環境は
・MacOS Catalina 10.15.5
・Unity 2019.3.0f6
・Visual Studio for Mac 8.6.35.実装
実装内容についてざっくり、以下で説明します。
エディタ拡張特有のモノやGUIに関係することについて解説します。
CSV読み書きなどについては、今回は解説致しません。
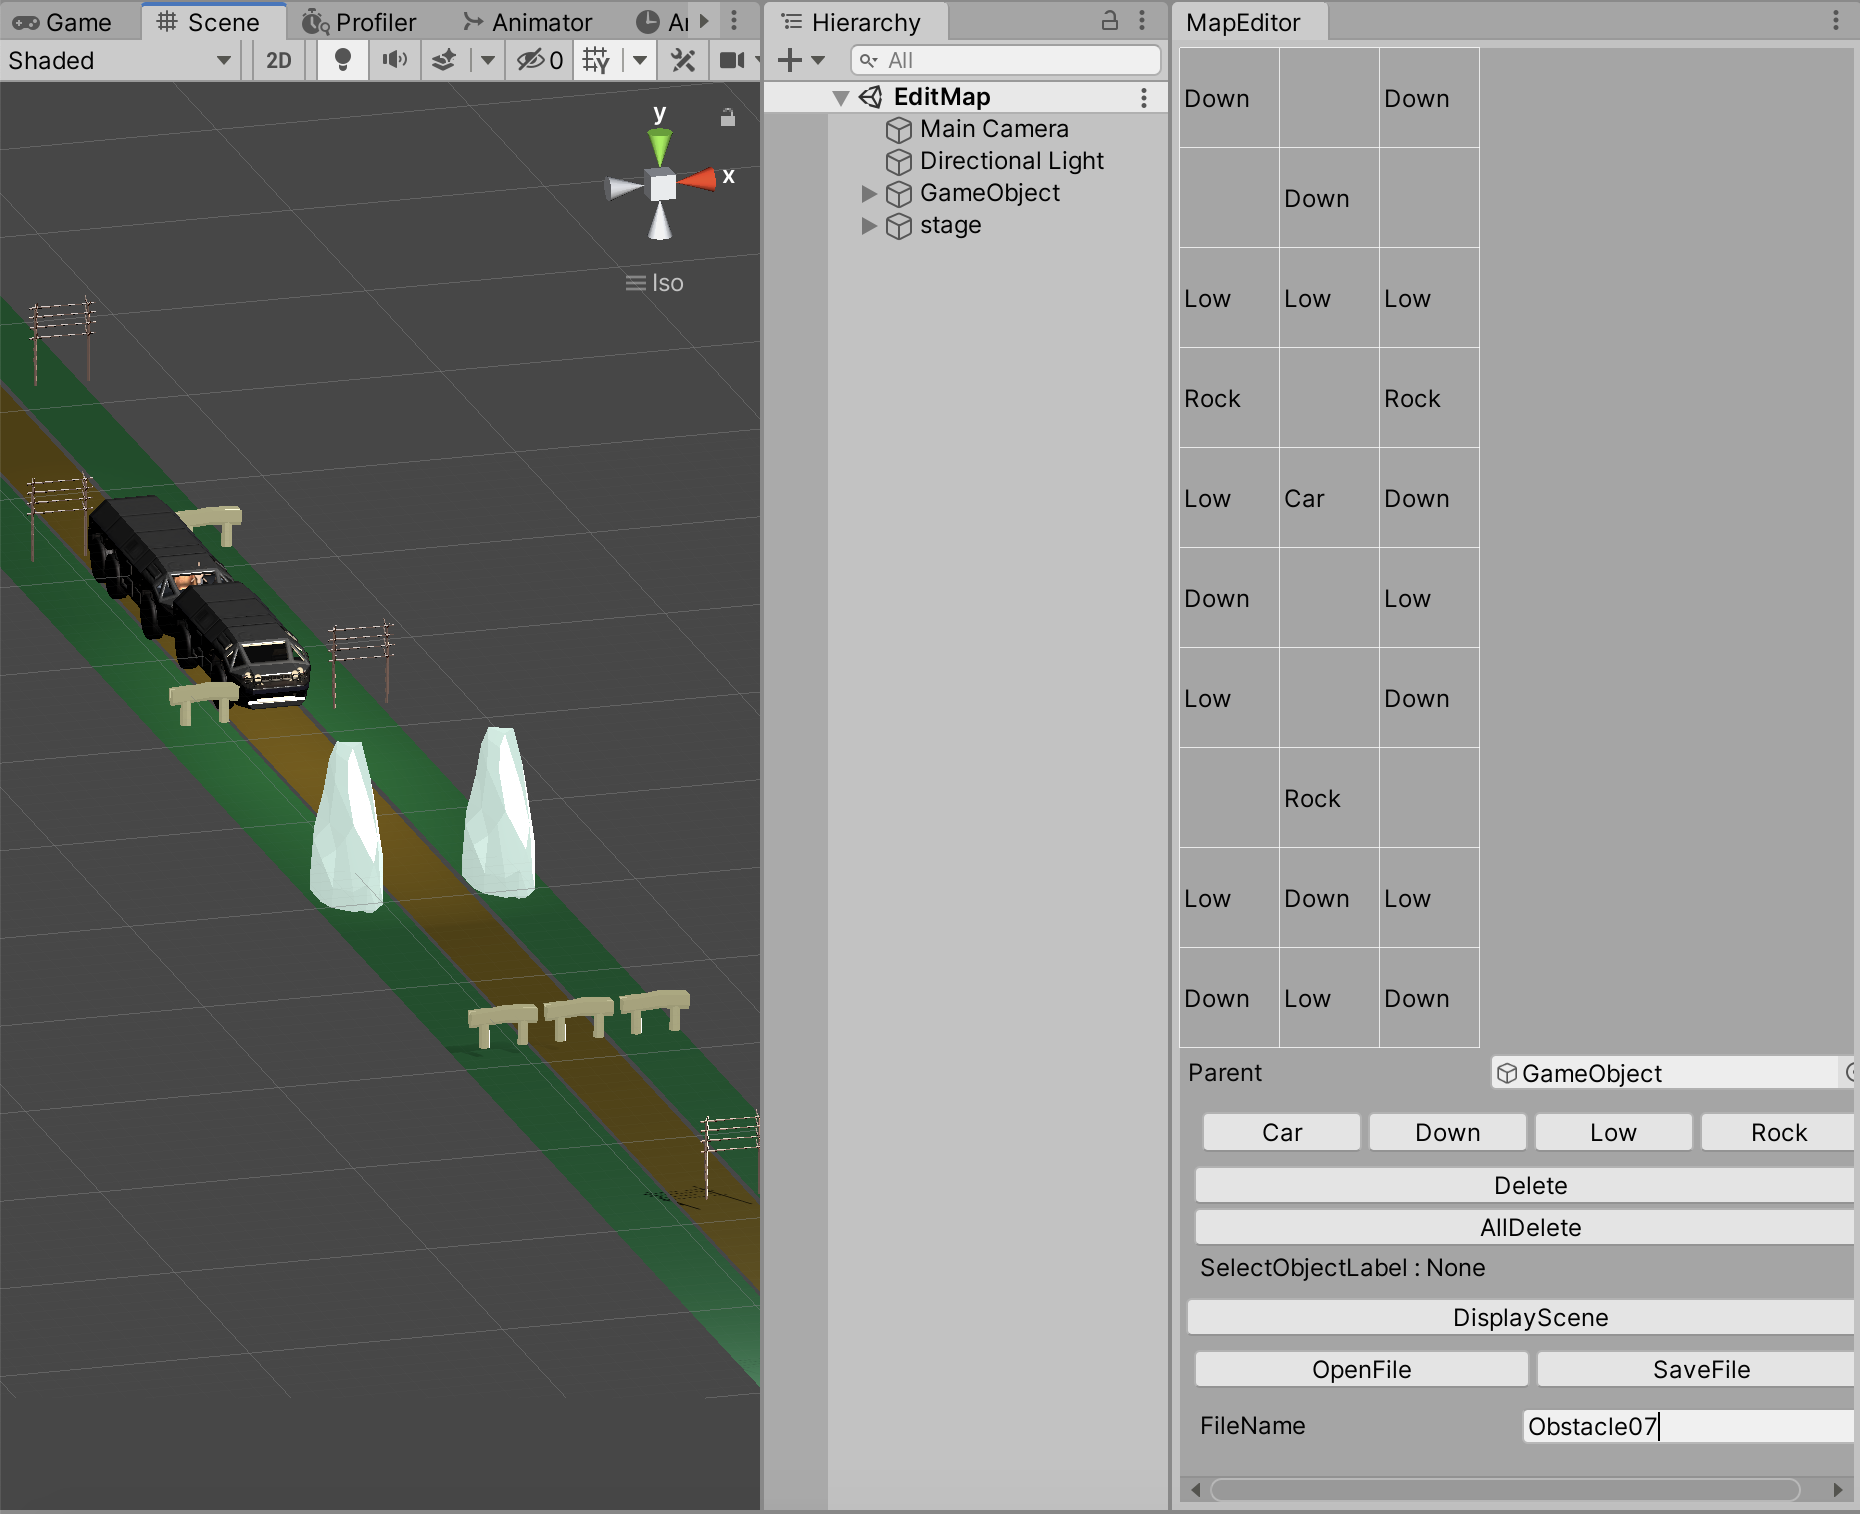
5.1 全体説明
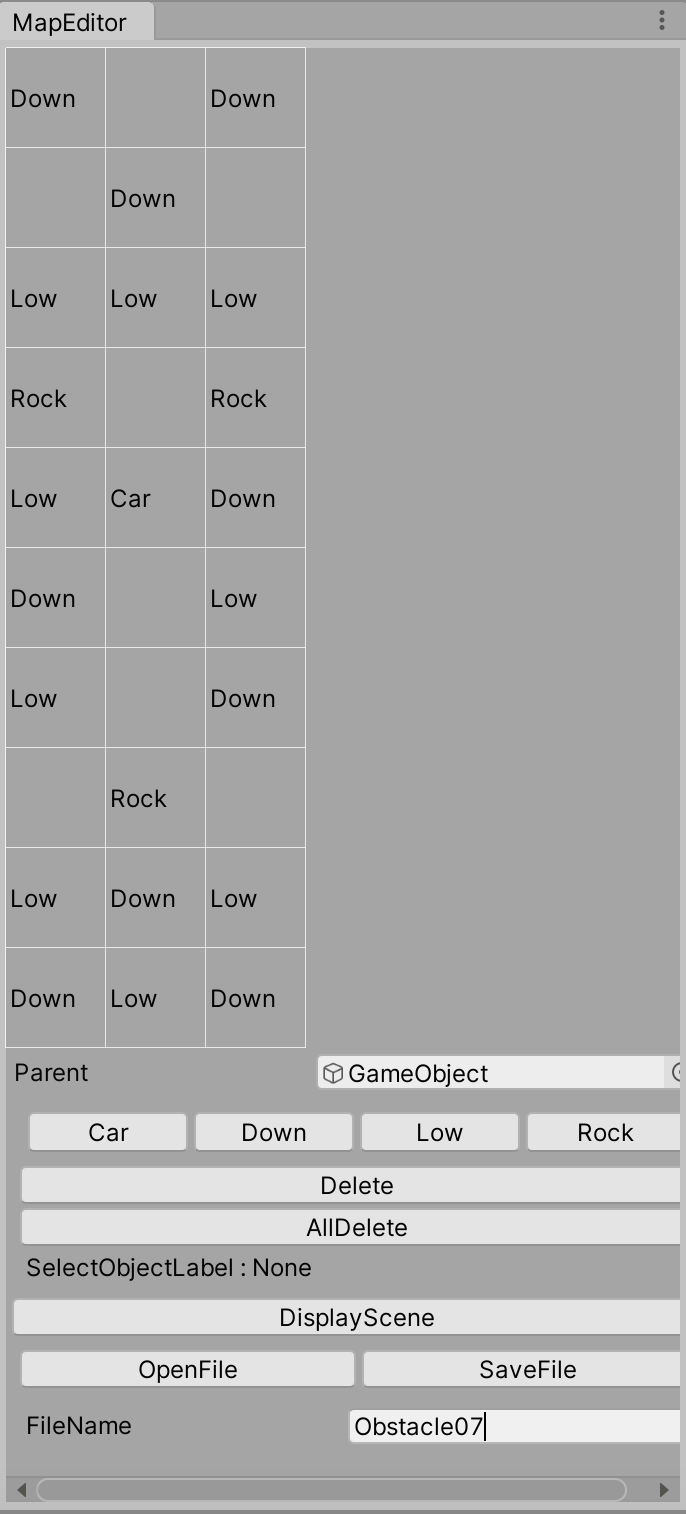
上の画像は現時点での完成図です。MapEditorウィンドウ
CSV形式のファイルの読み書きを行います。
ファイルの読み込みは、「FileName」に既存のファイル名を入力し、「OpenFile」ボタンをクリックすることで、ファイルを読み込み、上部分のグリッドにオブジェクト名が表示されます。
ファイルの書き出しは、「FileName」にファイル名を入力した状態で、「SaveFile」ボタンをクリックすることで、書き出すことができます。
ファイルの新規作成は、既存でないファイル名を、「FileName」に入力した状態で、「SaveFile」ボタンをクリックすることでできます。(ファイルの更新と新規作成の挙動が同じでよろしくないです。)
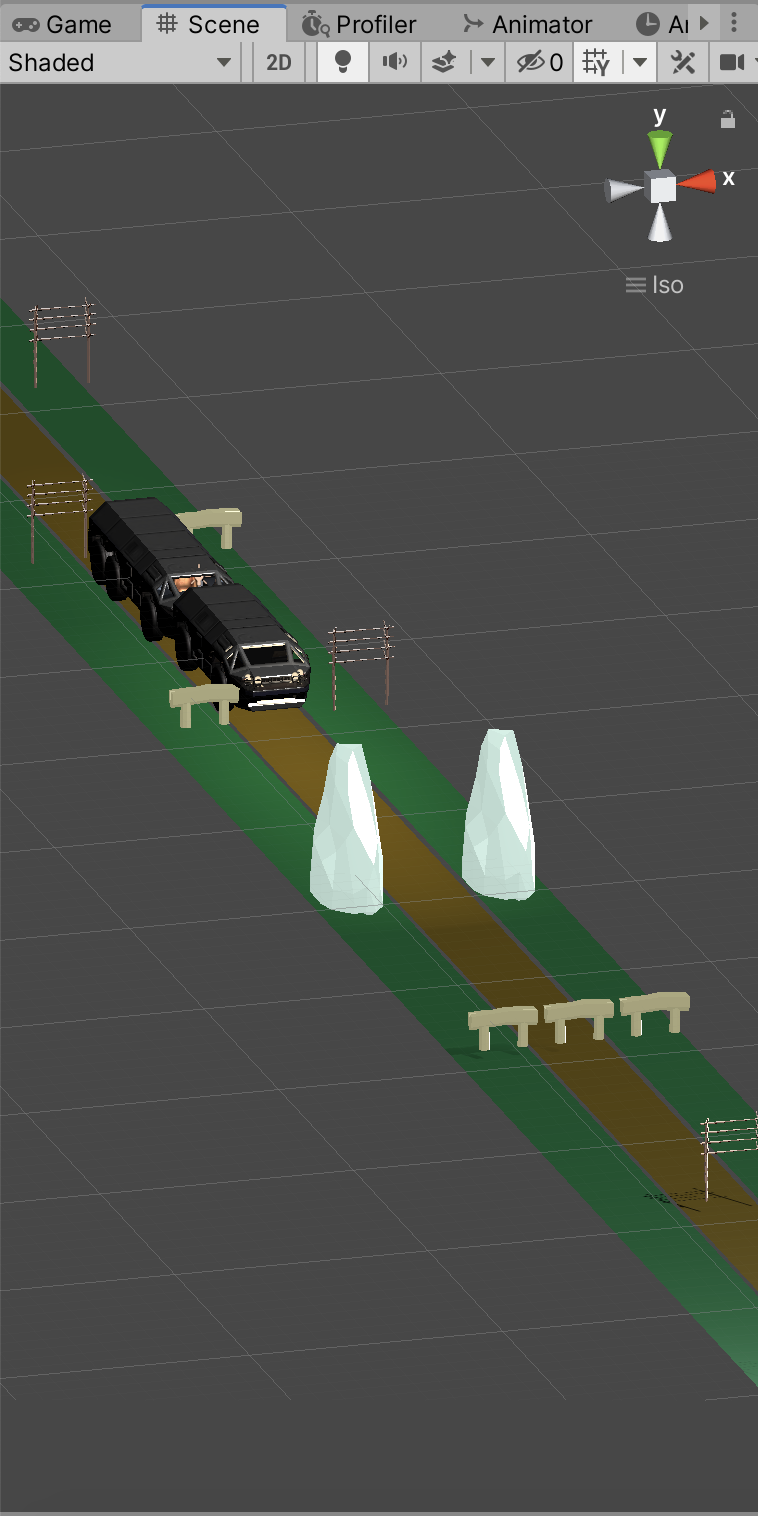
実際のデータ入力は、オブジェクトボタン(上図ではCarやDownなど)をクリックで選択肢した状態で、上部のグリッド内をクリックすることで、データを入力することができます。Sceneウィンドウ
実際にオブジェクトを生成して、
ビュワーとして見ることができます。本来なら、ここでグリッドを表示して、データ入力や更新できるのが最良でした。5.2 各ウィンドウの説明
MapEditorウィンドウ
Gridの描画MapEditor.cs// グリッド1マスのサイズ private const float c_GridSize = 50f; // グリッドの行列数 private readonly Vector2 c_GridCount = new Vector2(3,10); /// <summary> /// エディタ上にグリッドを描画する /// </summary> private void GridDraw() { // 始点の初期化 var GridPosX = new Vector2(0, 0); var GridPosY = new Vector2(c_GridSize * c_GridCount.x, 0); // 横ラインのGrid for (int i = 0;i <= c_GridCount.y; i++) { // Handles:3D GUI の制御と描画のカスタマイズを行うクラス Handles.DrawLine(GridPosX, GridPosY); GridPosX.y += c_GridSize; GridPosY.y += c_GridSize; } // 始点の初期化 GridPosX = new Vector2(0, 0); GridPosY = new Vector2(0, c_GridSize * c_GridCount.y); // 縦ラインのGrid描画 for (int j = 0; j <= c_GridCount.x; j++) { Handles.DrawLine(GridPosX, GridPosY); GridPosX.x += c_GridSize; GridPosY.x += c_GridSize; } }ここの部分の肝はDrawLine関数だと思いますが、関数名通りに2点間で線を引いてくれます。
与えられたグリッドの行列数とサイズを用いいて線を引いているだけです。Handles.DrawLine(Vector2 p1,Vector2 p2);Unity公式マニュアル
https://docs.unity3d.com/2020.2/Documentation/ScriptReference/Handles.DrawLine.html
オブジェクト名の表示MapEditor.cs// グリッド1マスのサイズ private const float c_GridSize = 50f; // String表示用の座標を格納しとくRect配列(2Dのposと縦横サイズ) private Rect[,] m_RectList; // 生成するオブジェクト名が入るString配列 private string[,] m_ObjectNameList; /// <summary> /// Rectの配列を生成する(String型のオブジェクト名を表示する時に座標として使う) /// </summary> private void CreateRect() { for (int _y = 0; _y < c_GridCount.y; _y++) { for (int _x = 0; _x < c_GridCount.x; _x++) { var rect = new Rect(new Vector2(_x * c_GridSize, _y * c_GridSize), new Vector2(c_GridSize, c_GridSize)); m_RectList[_x, _y] = rect; } } } /// <summary> /// グリッドにオブジェクトの名前を表示する /// </summary> private void DrawString() { for(int i=0; i < c_GridCount.y; i++) { for(int j = 0; j < c_GridCount.x; j++) { // 名前のリストに入力があれば表示する if (m_ObjectNameList[j, i] != null) { GUI.Label(m_RectList[j, i], m_ObjectNameList[j, i]); } } } }処理としては、初期化時に計算したRectの配列を用いて、Grid上にゲームオブジェクト名を表示させます。
上記のEditorMapウィンドウの画像のグリッドでは、オブジェクトがある所と空白の所があり、空白でない場合にGUIラベルとしてオブジェクト名を表示するような処理です。
ここの部分の肝はRectかと思います。下記に公式のマニュアルを載せておきます。
Unity公式マニュアル
https://docs.unity3d.com/ja/current/ScriptReference/Rect.html
GUILayout : ボタンやテキストフィールド、ラベルなど
UI作成を行う際に使うクラスです。Unity公式マニュアル
https://docs.unity3d.com/ja/current/ScriptReference/GUILayout.htmlButton
// テキストを表示させる場合
public static bool Button (string text, params GUILayoutOption[] options);

// 画像を差し込む場合
public static bool Button (Texture image, params GUILayoutOption[] options);
EditorGUILayout : スクロールビューやオブジェクトフィールド
エディタ上でUI作成を行う際に使うクラスです。Unity公式マニュアル
https://docs.unity3d.com/ja/current/ScriptReference/EditorGUILayout.htmlオブジェクトフィールド
public static Object ObjectField (string label, Object obj, Type objType, bool allowSceneObjects, params GUILayoutOption[] options);Sceneウィンドウ
ビュワーとして使っています。
MapEditorウィンドウ内のDisplaySceneボタンをクリックすることで、シーン上に実際にオブジェクトを生成し、確認することができます。6.最後に
全体のコードは、後日GitHubにてアップします。
個人的には、エディタ拡張は学習コストが低い割りに、メリットが大きいと思うので、実際に触ってみると良いと思います。
今後は、ユーザビリティを高めるように調整して、より開発効率が上がるようなものにしたいと思います。
そのため、この記事は随時更新されると思います。


- 投稿日:2020-06-24T10:34:23+09:00
C#/WinRT - OCR
例によって
csc.exeでコンパイル
※WinRTはデフォルトだと入ってない。試してみたが、
はっきり言って精度は期待できない。参考にしたサイトはあとで追記します
コンパイルバッチ
ダブルクオートつかった行は 「^」 で改行つなげないようなので1行にまとめた。
compile.batcsc /r:C:\Windows\Microsoft.NET\assembly\GAC_MSIL\System.Runtime.WindowsRuntime\v4.0_4.0.0.0__b77a5c561934e089\system.runtime.windowsruntime.dll ^ /r:C:\Windows\Microsoft.NET\assembly\GAC_MSIL\System.Runtime.InteropServices.WindowsRuntime\v4.0_4.0.0.0__b03f5f7f11d50a3a\System.Runtime.InteropServices.WindowsRuntime.dll ^ /r:C:\Windows\Microsoft.NET\assembly\GAC_MSIL\System.Runtime\v4.0_4.0.0.0__b03f5f7f11d50a3a\System.Runtime.dll ^ /r:C:\Windows\Microsoft.NET\assembly\GAC_MSIL\WindowsBase\v4.0_4.0.0.0__31bf3856ad364e35\WindowsBase.dll ^ /r:C:\Windows\Microsoft.NET\assembly\GAC_64\PresentationCore\v4.0_4.0.0.0__31bf3856ad364e35\PresentationCore.dll ^ "/r:C:\Program Files (x86)\Windows Kits\10\References\10.0.18362.0\Windows.Foundation.UniversalApiContract\8.0.0.0\Windows.Foundation.UniversalApiContract.winmd" "/r:C:\Program Files (x86)\Windows Kits\10\References\10.0.18362.0\Windows.Foundation.FoundationContract\3.0.0.0\Windows.Foundation.FoundationContract.winmd" %*ソースコード
using System;
using System.IO;
using System.Runtime.CompilerServices;
using System.Collections.Generic;
using System.Threading.Tasks;
using Windows.Graphics.Imaging;
using Windows.Media.Ocr;
using Windows.Storage;
using Windows.Storage.Streams;
using Windows.Foundation;


class OcrTest
{
    [System.STAThread]
    static void Main(string[] args)
    {
        if(args.Length==0){return;}
        Task<string> ret = LoadImageAndOcr(args[0]);
        Console.WriteLine(ret.Result);
    }

    static async Task<OcrResult> detect(SoftwareBitmap bitmap)
    {
        var ocrEngine = OcrEngine.TryCreateFromUserProfileLanguages();
        var ocrResult = await MyWaitUtil<OcrResult>.GetResultWithWaiting( ocrEngine.RecognizeAsync(bitmap) );
        // https://docs.microsoft.com/ja-jp/uwp/api/windows.media.ocr.ocrresult.lines?view=winrt-19041
        return ocrResult;
    }

    static async Task<string> LoadImageAndOcr(string path)
    {
        var inputFile = await MyWaitUtil<StorageFile>.GetResultWithWaiting(
            StorageFile.GetFileFromPathAsync( Path.GetFullPath(path) )
        );

        SoftwareBitmap softwareBitmap;
        // https://docs.microsoft.com/ja-jp/windows/uwp/audio-video-camera/imaging
        using (var stream = await MyWaitUtil<IRandomAccessStream>.GetResultWithWaiting(inputFile.OpenAsync(Windows.Storage.FileAccessMode.Read)))
        {
            // Create the decoder from the stream
            var decoder = await MyWaitUtil<BitmapDecoder>.GetResultWithWaiting(
                BitmapDecoder.CreateAsync(stream)
            );

            // Get the SoftwareBitmap representation of the file
            softwareBitmap = await MyWaitUtil<SoftwareBitmap>.GetResultWithWaiting((decoder.GetSoftwareBitmapAsync()));
        }

        OcrResult t = await detect(softwareBitmap);

        return t.Text;
    }
}

// IAsyncOperationのGetAwaiterがないとか謎のコンパイルエラーがでたので、その対策として実装した
public static class MyWaitUtil<T>
{
    public static async Task<T> GetResultWithWaiting(IAsyncOperation<T> task)
    {
        while(task.Status != AsyncStatus.Completed){
            if (task.Status == AsyncStatus.Error || task.Status == AsyncStatus.Canceled){
                Console.WriteLine("Error or Canceled");
                return default(T);
            }
            await Task.Delay(1);
        };
        return task.GetResults();
    }
}

// https://www.moonmile.net/blog/archives/8584
- 投稿日:2020-06-24T00:55:05+09:00
NPocoの紹介 -機能編- インターセプター
NPocoの紹介 -機能編- インターセプター
最初の記事はこちら
今回はインターセプターについて紹介します。
ソースはこちら
インターセプターについて
各処理の前や後に処理を組み込むためのものです。
基底のインターフェースとして
IInterceptorが用意されており、組み込みポイント毎にさらに継承したインターフェースが用意されています。登録するには?
インターセプターを登録するには
Database.Interceptorsプロパティに実装クラスのインスタンスを追加します。using Database database = new Database(con); database.Interceptors.Add(new LoggingInterceptor());次に各インターセプターの紹介をします。
IExecutingInterceptor
クエリの実行前、実行後に呼び出されます
私はクエリのロギングのために使っています。
public class LoggingInterceptor : IExecutingInterceptor
{
    public void OnExecutedCommand(IDatabase database, DbCommand cmd)
    {
        var fmtCmd = ((Database)database).FormatCommand(cmd);
        //実運用ではコンソールではなくILogger<>を使っている
        Console.WriteLine(fmtCmd);
    }

    public void OnExecutingCommand(IDatabase database, DbCommand cmd)
    {
        //noop
    }
}
IConnectionInterceptor
コネクションが開いた、閉じたときに呼ばれるようです(使ったことない)
IExceptionInterceptor
例外発生時に呼ばれます。
例外ログを残したり、
一意制約違反判定を行い一意制約違反であれば別例外にラップしてスローといった使い方を私はしています。
IDataInterceptor
クエリ自動生成によるInsert, Update, Delete時に呼ばれます。
falseを返すと実行を中止します。私は共通列への値のセットを行うために使っています。
//共通列を定義した基底クラスを用意
//各エンティティクラスはこれを継承
public abstract class AbstractEntity
{
    [Column("created_at")]
    public DateTime? CreatedAt { get; set; }

    [Column("updated_at")]
    public DateTime? UpdatedAt { get; set; }
}
public class CommonColumnInterceptor : IDataInterceptor { public bool OnDeleting(IDatabase database, DeleteContext deleteContext) { return true; } public bool OnInserting(IDatabase database, InsertContext insertContext) { if (insertContext.Poco is AbstractEntity aEntity) { DateTime now = DateTime.Now; aEntity.CreatedAt = now; aEntity.UpdatedAt = now; } return true; } public bool OnUpdating(IDatabase database, UpdateContext updateContext) { if (updateContext.Poco is AbstractEntity aEntity) { DateTime now = DateTime.Now; //更新対象列指定時のUpdateがうまくいかないので //それに対応するには別途拡張した仕組みを用意する必要があります。 aEntity.UpdatedAt = now; } return true; } }ITransactionInterceptor
トランザクションの開始、コミット、ロールバックで呼ばれるようです。(使ったことない)