- 投稿日:2020-06-03T23:00:07+09:00
FIDO2(WebAuthn)に入門してみた
始めに
この記事は、 WebAuthn を使用したユーザの登録フローに関する学習メモです。
作成したソースコード一式はこちらに格納しておきます。
FIDO2 について
TL; DR
FIDOという非営利団体が推進する認証技術、規格のこと
生体認証などで用いられるような専用の機器が不要
FIDO2 = WebAuthn + CTAP
W3C WebAuthn
FIDO認証のサポートを可能にするためにブラウザおよびプラットフォームに組み込まれている標準Web APIのこと。登録と認証の機能を持つ。
navigator.credentials.create():publicKeyオプションと併用すると、新規に認証情報を作成します。
navigator.credentials.get():publicKeyオプションと併用すると、既存の認証情報を取得します。CTAP(Client to Authentication Protocol)
名前の通り、クライアントと認証器の通信プロトコルです。
認証サーバを実装する上では、CTAPの仕様に関する理解は不要ですが、覗いてみると結構楽しいです。
仕組みの概要
FIDOのプロトコルでは、標準的な公開鍵暗号方式を用いて、認証を実現しています。
以下、基本的な処理シーケンス。
- クライアントとサーバ間でパスワード等の認証情報をやり取りしないため、従来のID/Password方式の認証方式よりも安全だと言われている。
- クライアント側に認証に必要な秘密鍵を保持することで、ユーザがパスワードを記憶する必要がない。
- 認証に使用する端末を紛失した場合は、パスワードの紛失と同じようにセキュリティリスクが存在する。
サービスの認証にFIDO2を導入するためには
- 認証サーバを自作する
- 有料のサービスを使用する
と、2通りの方法がありますが今回は学習目的のため、自分で実装します。
認証サーバ(Relying Party)を自作してみる
実装言語・FW
- 認証サーバ;Nest.js v6.13.3
- クライアント;Angular v9.0.4
- Database;MongoDB
のMANスタックで実装してみました。お好きな言語、FWで作ってみてください。
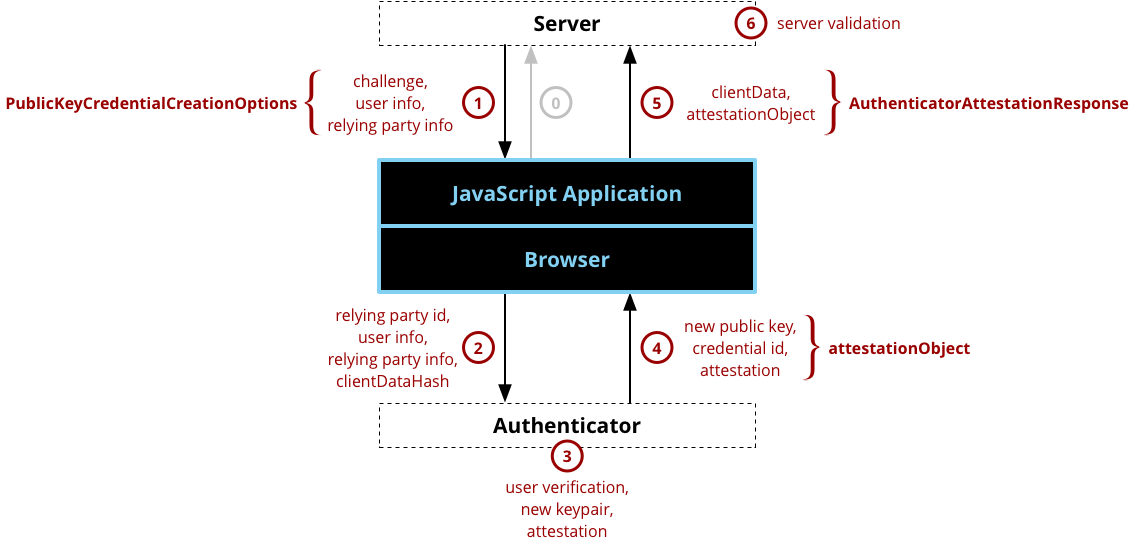
登録の処理シーケンス
※MDMより引用
処理概要
認証サーバに対して、challengeの生成をリクエストする。
認証サーバで生成したchallenge, ユーザ情報、サーバの情報をクライアントにレスポンスする。
取得したデータを元にパラメータを組み立て、
navigator.credentials.create()を呼び出す。非対称鍵ペア(公開鍵と秘密鍵)とAttestationを生成する。(Attestation; 公開鍵がユーザが所持する認証器から生成されたものであることを保証するための仕組み)
生成したデータをクライアントに返却する。
認証器から取得した認証情報をサーバに送信する。
認証情報の検証を行う。
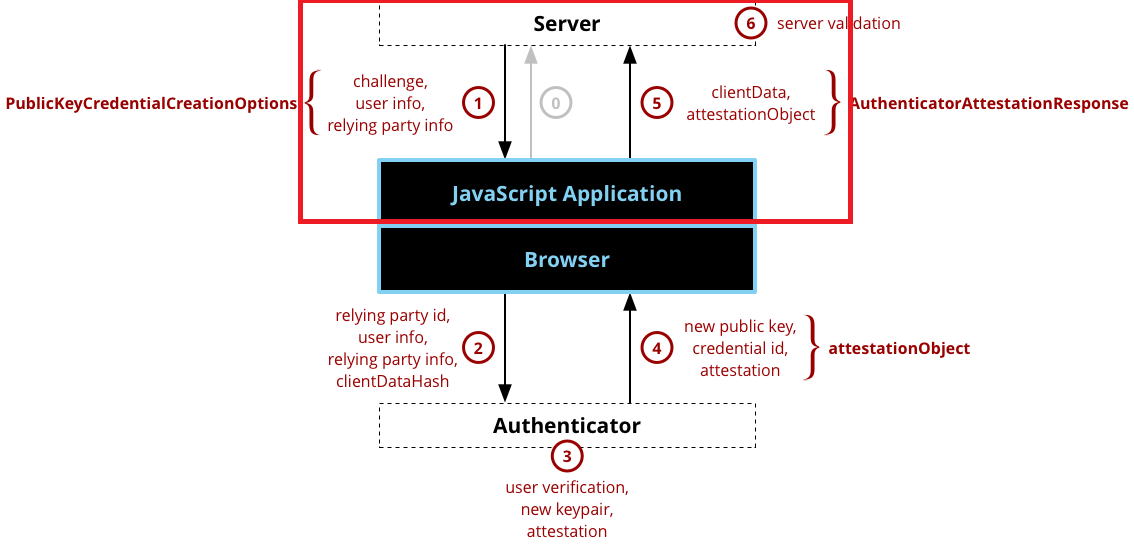
WebAuthnで規定されていない箇所(上図の0, 1, 5, 6)に関しては自分で仕様を考えて実装する必要があります。
従って、今回作成するのは以下の赤枠部分となります。(認証サーバとJavaScript Application)
実装のポイント
全部を載せると、とんでもな量になってしまうのでかいつまんでポイントを説明します。実装の細かい点は、リポジトリを参照してください。
0. challengeの生成リクエスト ~ 1. challenge、ユーザ情報、サーバ情報のレスポンス
WebAuthnによって仕様が定義されているわけではないため、自分で設計をする必要があります。
今回は、クライアントから以下のようなリクエストを発行してみました。
POST http://localhost:3000/webauthn/register HTTP/1.1
Content-Type: application/json

{
  "email": "test-user-001@example.com"
}
それを受ける認証サーバは以下のように実装しています。
webauthn.controller.ts@Controller('webauthn') export class WebauthnController { constructor(private readonly webauthnSercice: WebauthnService) { } /** * challenge生成のエンドポイントです。 * @param createUserDto リクエストボディー */ @Post('/register') async register(@Body() createUserDto: CreateUserDto): Promise<ResponseData> { const userCreationOptions = await this.webauthnSercice.createUserCreationOptions(createUserDto); if (!userCreationOptions) { throw new HttpException({ status: HttpStatus.INTERNAL_SERVER_ERROR, error: 'database error.', }, HttpStatus.INTERNAL_SERVER_ERROR); } const responseData = new ResponseData(); responseData.status = HttpStatus.CREATED; responseData.data = userCreationOptions; return responseData; } // ... 省略 }webauthn.service.ts@Injectable() export class WebauthnService { private readonly ORIGIN = 'http://localhost:4200'; constructor(@InjectModel('User') private userModel: Model<User>) { } /** * 認証器が鍵の生成に必要なパラメータを生成します。 * @param createUserDto リクエストボディー */ async createUserCreationOptions(createUserDto: CreateUserDto): Promise<UserCreationOptions> { // 少なくとも16バイト以上のランダムに生成されたバッファーを生成する const challenge = Buffer.from(Uint8Array.from(uuid(), c => c.charCodeAt(0))); const userId = Buffer.from(Uint8Array.from(uuid(), c => c.charCodeAt(0))); const userCreationOptions: UserCreationOptions = { email: createUserDto.email, challenge: base64url.encode(challenge), rp: { name: 'webauthn-server-nestjs-sample', }, user: { id: base64url.encode(userId), name: createUserDto.email, displayName: createUserDto.email, }, attestation: 'direct', }; // DBに保存する const saveResult = await this.saveUser(userCreationOptions); if (!saveResult) { return null; } return userCreationOptions; } /** * ユーザをDBに保存します。 * @param userCreationOptions ユーザの認証情報 */ private async saveUser(userCreationOptions: UserCreationOptions): Promise<User> { // ユーザが保存済みがどうか確認する const user = await this.userModel.findOne({ email: userCreationOptions.email }).exec(); if (user) { throw new HttpException({ status: HttpStatus.CONFLICT, error: 'user already exists.', }, HttpStatus.CONFLICT); } const newUser = new this.userModel(userCreationOptions); return newUser.save(); } }ポイントは2つあります。
- challengeは、認証サーバで生成する。また、生成するchallengeは、少なくとも16バイト以上でランダムに生成されたバッファであること。
これを満たすために、今回はuuid(v4)を元にバッファを生成しています。
const challenge = Buffer.from(Uint8Array.from(uuid(), c => c.charCodeAt(0)));
- 特に定められていないが、レスポンスはWebAuthn APIで扱いやすい形式で返却するほうが望ましい。
これを踏まえて、今回は以下のようなレスポンスをクライアントに返却しています。
HTTP/1.1 201 Created
X-Powered-By: Express
Content-Type: application/json; charset=utf-8
Content-Length: 333
ETag: W/"14d-LWc+sLb+7AIGIewNEbfdcmI1pHw"
Date: Mon, 01 Jun 2020 14:28:49 GMT
Connection: close

{
  "status": 201,
  "data": {
    "email": "test-user-001@example.com",
    "challenge": "MTJjMGUzMmEtMzM3My00ODAzLThiMTMtZGU3YmFhMzdhZWY5",
    "rp": {
      "name": "webauthn-server-nestjs-sample"
    },
    "user": {
      "id": "MjA4YTI3NWQtYmFhYi00ZDQyLTliODEtMWNmMzQ1NjMxYTY1",
      "name": "test-user-001@example.com",
      "displayName": "test-user-001@example.com"
    },
    "attestation": "direct"
  }
}
パラメータ 概要説明 challenge 署名の正当性を検証するためのランダムな文字列。サーバで生成したランダムバッファをbase64urlエンコードしたもの。 rp 認証サーバの情報 user ユーザの登録情報 attestation 認証からCredentialをどのように受け取るかを記したもの。 directの他にもnoneやindirectといったパラメータが存在する。
詳細は、Attestation Conveyance Preference Enumerationを参照してください。2.
navigator.credentials.create()呼び出し ~ 5. サーバに送信認証サーバから取得したデータを元に
navigator.credentials.create()呼び出しに必要なパラメータを作成します。// challengeの生成要求 const registerResponse = await this.createChallenge(email); // navigator.credentials.create()呼び出しのために必要なパラメータの組み立て const publicKeyCredentialCreationOptions: PublicKeyCredentialCreationOptions = { challenge: Buffer.from(base64url.decode(registerResponse.data.challenge)), rp: registerResponse.data.rp, user: { id: Buffer.from(base64url.decode(registerResponse.data.user.id)), name: registerResponse.data.user.name, displayName: registerResponse.data.user.displayName, }, attestation: registerResponse.data.attestation, pubKeyCredParams: [{ type: 'public-key' as 'public-key', alg: -7, }], authenticatorSelection: { authenticatorAttachment: 'cross-platform', requireResidentKey: false, userVerification: 'discouraged' } }; // ... 省略
パラメータ 概要説明 pubKetCredParams 認証器の鍵作成に用いるアルゴリズムを指定する。今回は、-7 (ECDSA-SHA256)を指定しています。 authenticatorSelection 認証器の種類を限定できる。今回は、Yubikeyのようなクロスプラットフォームの認証器を使用したかったため、 cross-platformを指定しています。
navigator.credentials.create()を呼び出し、そのレスポンスを認証サーバに送信する。という一連の流れが以下になります。sign-up.component.ts@Injectable({ providedIn: 'root' }) export class SignUpService { constructor(private readonly httpClient: HttpClient) { } /** * ユーザの登録処理を実行します。 * @param email メールアドレス */ async signUp(email: string): Promise<boolean> { // challengeの生成要求 const registerResponse = await this.createChallenge(email); // `navigator.credentials.create()呼び出しのために必要なパラメータの組み立て const publicKeyCredentialCreationOptions: PublicKeyCredentialCreationOptions = { challenge: Buffer.from(base64url.decode(registerResponse.data.challenge)), rp: registerResponse.data.rp, user: { id: Buffer.from(base64url.decode(registerResponse.data.user.id)), name: registerResponse.data.user.name, displayName: registerResponse.data.user.displayName, }, attestation: registerResponse.data.attestation, pubKeyCredParams: [{ type: 'public-key' as 'public-key', alg: -7, }], authenticatorSelection: { authenticatorAttachment: 'cross-platform', requireResidentKey: false, userVerification: 'discouraged' } }; // 明示的にPublicKeyCredentialにキャストする const attestationObject = await this.createAttestationObject(publicKeyCredentialCreationOptions) as PublicKeyCredential; console.log(attestationObject); // 公開鍵をサーバに送信する return this.registerPublicKey(attestationObject); } /** * WebAuthn認証サーバに対して、チャレンジの生成要求を行います。 * @param email メールアドレス */ private async createChallenge(email: string): Promise<User> { const registerResponse = await this.httpClient.post<User>(Uri.USER_REGISTER, { email }, { headers: { 'Content-Type': 'application/json' }, observe: 'response', }).toPromise(); console.log(registerResponse.body); return registerResponse.body; } /** * 認証器に対して公開鍵の生成要求を行います。 * @param publicKeyCreationOptions 認証情報生成オプション */ private async createAttestationObject(publicKeyCreationOptions: PublicKeyCredentialCreationOptions): Promise<Credential> { return navigator.credentials.create({ publicKey: publicKeyCreationOptions }); } /** * 認証情報をBase64Urlエンコードして認証サーバにPOSTします。 * @param credential 認証器で生成した認証情報 */ private async registerPublicKey(publicKeyCredential: PublicKeyCredential): Promise<boolean> { const attestationResponse = await this.httpClient.post(Uri.ATTESTATION_RESPONSE, { rawId: base64url.encode(Buffer.from(publicKeyCredential.rawId)), response: { attestationObject: base64url.encode(Buffer.from(publicKeyCredential.response.attestationObject)), clientDataJSON: base64url.encode(Buffer.from(publicKeyCredential.response.clientDataJSON)), }, id: publicKeyCredential.id, type: publicKeyCredential.type }, { headers: { 'Content-Type': 'application/json' }, observe: 'response' }).toPromise(); return attestationResponse.body ? true : false; } }6. 認証情報のチェック
クライアントから以下のようなリクエストが送信されてきます。
POST http://localhost:3000/webauthn/response HTTP/1.1
Content-Type: application/json

{
   "rawId":"MLzRnn5P7mRPTK5sATEmKiJfhvV1TJgGXHCbWu3mKrcSZW-oZQ4LwZ3kqeN6KRfESWDbJfv8EXdXHr53XhOQiAvV1Gti4XR9gJaQY45HQK_xw98VxP7e9EnOLjdi6_5a3nLs4lAkQjJ1TqY4IJBnFNSbue7nUAotIQ6kD3ubYR5S",
   "response":{
      "attestationObject":"o2NmbXRoZmlkby11MmZnYXR0U3RtdKJjc2lnWEcwRQIgO3T6_LkyjbSDnIyWX29oe7dUflpm6nt2BB9U1sdVcTwCIQDacpQ3-TAMhaTsFPM039VvjHqSQDUFzC_YaYHkk88v72N4NWOBWQKpMIICpTCCAkqgAwIBAgIJANhaddxx4y8sMAoGCCqGSM49BAMCMIGlMQswCQYDVQQGEwJDTjESMBAGA1UECAwJR3Vhbmdkb25nMREwDwYDVQQHDAhTaGVuemhlbjEzMDEGA1UECgwqU2hlbnpoZW4gRXhjZWxzZWN1IERhdGEgVGVjaG5vbG9neSBDby4gTHRkMR4wHAYDVQQLDBVFeGNlbHNlY3UgRmlkbyBTZXJ2ZXIxGjAYBgNVBAMMEUV4Y2Vsc2VjdSBGaWRvIENBMB4XDTE4MDExOTAzNDY1OVoXDTI4MDExNzAzNDY1OVowgawxCzAJBgNVBAYTAkNOMRIwEAYDVQQIDAlHdWFuZ2RvbmcxETAPBgNVBAcMCFNoZW56aGVuMTMwMQYDVQQKDCpTaGVuemhlbiBFeGNlbHNlY3UgRGF0YSBUZWNobm9sb2d5IENvLiBMdGQxHjAcBgNVBAsMFUV4Y2Vsc2VjdSBGaWRvIFNlcnZlcjEhMB8GA1UEAwwYRXhjZWxzZWN1IEZpZG8gVTJGIDAwMDAyMFkwEwYHKoZIzj0CAQYIKoZIzj0DAQcDQgAEtwOC4SZp2EpDMVxiZS-P_2wp_ZBNMEFKTruWGdg38qM4r_jT5r_a1vxW0UN89LFY1m1BpXuUAeeCn36DriitcaNaMFgwCQYDVR0TBAIwADALBgNVHQ8EBAMCB4AwHQYDVR0OBBYEFERWGpXZomZNMqJn2_6GzguxnlkmMB8GA1UdIwQYMBaAFKyJLw-sy4g7nHYTZwKpZqyJzZ-bMAoGCCqGSM49BAMCA0kAMEYCIQCpPai4VwA59-PiHq8SYjS9qcffQD-3oFnfR9njRpY5UwIhAMlMszhSeaf0xaAPC48ZYSB_ZeZ8vgnkQOFjfctD_EFmaGF1dGhEYXRhWQEFSZYN5YgOjGh0NBcPZHZgW4_krrmihjLHmVzzuoMdl2NBAAAAAAAAAAAAAAAAAAAAAAAAAAAAgTC80Z5-T-5kT0yubAExJioiX4b1dUyYBlxwm1rt5iq3EmVvqGUOC8Gd5KnjeikXxElg2yX7_BF3Vx6-d14TkIgL1dRrYuF0fYCWkGOOR0Cv8cPfFcT-3vRJzi43Yuv-Wt5y7OJQJEIydU6mOCCQZxTUm7nu51AKLSEOpA97m2EeUqUBAgMmIAEhWCBwt4oPucNcbc8PIR7gFdM9tWAr0NCKc9HjzPvB4h0wvSJYIK09jRBM_VY8ms4y5pnsfURZjwTcvmu6noWK7GXpCNxy",
      "clientDataJSON":"eyJ0eXBlIjoid2ViYXV0aG4uY3JlYXRlIiwiY2hhbGxlbmdlIjoiWlRjNE4yUTNZbUV0TUROaU15MDBaVGxtTFdFek1EWXROamhtTTJRek1UQXdPV1JpIiwib3JpZ2luIjoiaHR0cDovL2xvY2FsaG9zdDo0MjAwIiwiY3Jvc3NPcmlnaW4iOmZhbHNlfQ"
   },
   "id":"MLzRnn5P7mRPTK5sATEmKiJfhvV1TJgGXHCbWu3mKrcSZW-oZQ4LwZ3kqeN6KRfESWDbJfv8EXdXHr53XhOQiAvV1Gti4XR9gJaQY45HQK_xw98VxP7e9EnOLjdi6_5a3nLs4lAkQjJ1TqY4IJBnFNSbue7nUAotIQ6kD3ubYR5S",
   "type":"public-key"
}
パラメータ 概要説明 rawId 公開鍵のID。 response 認証器が生成した情報。attestationObject, clientDataJSONというパラメータを持ち、認証器が生成した情報を検証する際に使用する。 id rawIdをbase64urlエンコードしたもの。 type 'public-key'固定 それを受ける認証サーバは以下のように実装しています。
webauthn.controller.ts@Controller('webauthn') export class WebauthnController { constructor(private readonly webauthnSercice: WebauthnService) { } // ... 省略 /** * 認証器で生成した認証情報を受け取るエンドポイントです。 * @param createCredentialDto リクエストボディー */ @Post('/response') async response(@Body() createCredentialDto: CreateCredentialDto): Promise<ResponseData> { const verifyResult = await this.webauthnSercice.isValidCredential(createCredentialDto); const responseData = new ResponseData(); verifyResult ? responseData.status = HttpStatus.OK : responseData.status = HttpStatus.INTERNAL_SERVER_ERROR; return responseData; } // 省略 }webauthn.service.ts@Injectable() export class WebauthnService { private readonly ORIGIN = 'http://localhost:4200'; constructor(@InjectModel('User') private userModel: Model<User>) { } // ... 省略 /** * 認証器が生成した認証情報の検証を行います。 * @param createCredentialDto 認証器が生成した認証情報 */ async isValidCredential(createCredentialDto: CreateCredentialDto): Promise<boolean> { // clientDataJSONをデコードし、JSON形式にパースする const clientData: DecodedClientDataJson = JSON.parse(base64url.decode(createCredentialDto.response.clientDataJSON)); Logger.debug(clientData, 'WebAuthnService', true); // originの検証を行う if (clientData.origin !== this.ORIGIN) { throw new HttpException('Origin is not correct.', HttpStatus.BAD_REQUEST); } // challengeの検証を行う const count = await this.userModel.findOne({ challenge: Buffer.from(clientData.challenge) }).count(); Logger.debug(count, 'webauthnService#isvalidCredential', true); if (count === 0) { throw new HttpException('Challenge is not collect.', HttpStatus.BAD_REQUEST); } // attestationObjectの検証を行う const validateResult = await this.verifyAuthenticatorAttestationResponse(createCredentialDto); // 公開鍵をDBに登録する this.userModel.findOneAndUpdate({ challenge: Buffer.from(clientData.challenge) }, { $set: { id: createCredentialDto.id } }, error => { if (error) { Logger.error(error); throw new Error('Update failed.'); } }); return validateResult.verified; } /** * AttestationObjectの検証を行います。 * @param createCredentialDto 認証器が生成した認証データ */ private async verifyAuthenticatorAttestationResponse(createCredentialDto: CreateCredentialDto): Promise<VerifiedAuthenticatorAttestationResponse> { // 認証器でbase64urlエンコードされているので、認証サーバでデコードする const attestationBuffer = base64url.toBuffer(createCredentialDto.response.attestationObject); // attestationObjectをCBORデコードする const ctapMakeCredentialResponse: CborParseAttestationObject = Decoder.decodeAllSync(attestationBuffer)[0]; Logger.debug(ctapMakeCredentialResponse, 'WebAuthnService', true); const response: VerifiedAuthenticatorAttestationResponse = { verified: false, }; if (ctapMakeCredentialResponse.fmt === 'fido-u2f') { const authDataStruct = this.parseMakeCredAuthData(ctapMakeCredentialResponse.authData); if (!authDataStruct.flags) { throw new Error('User was NOT presented durring authentication!'); } const clientDataHash = crypto.createHash('SHA256').update(base64url.toBuffer(createCredentialDto.response.clientDataJSON)).digest(); const reservedByte = Buffer.from([0x00]); const publicKey = this.convertToRawPkcsKey(authDataStruct.cosePublicKey); const signatureBase = Buffer.concat([reservedByte, authDataStruct.rpIdHash, clientDataHash, authDataStruct.credID, publicKey]); const pemCertificate = this.convertPemTextFormat(ctapMakeCredentialResponse.attStmt.x5c[0]); const signature = ctapMakeCredentialResponse.attStmt.sig; response.verified = this.verifySignature(signature, signatureBase, pemCertificate); const validateResult = this.verifySignature(signature, signatureBase, pemCertificate); // Attestation Signatureの有効性を検証する return validateResult ? { verified: validateResult, authInfo: { fmt: 'fido-u2f', publicKey: base64url.encode(publicKey), counter: authDataStruct.counter, credId: base64url.encode(authDataStruct.credID), }, } : response; } } /** * AuthDataをCBORパースします。 * @param authData 認証器の信頼性、セキュリティ等のバイナリデータ */ private parseMakeCredAuthData(authData: Buffer): CborParseAuthData { const rpIdHash = authData.slice(0, 32); authData = authData.slice(32); const flagsBuf = authData.slice(0, 1); authData = authData.slice(1); const flags = flagsBuf[0]; const counterBuf = authData.slice(0, 4); authData = authData.slice(4); const counter = counterBuf.readUInt32BE(0); const aaguid = authData.slice(0, 16); authData = authData.slice(16); const credIDLenBuf = authData.slice(0, 2); authData = authData.slice(2); const credIDLen = credIDLenBuf.readUInt16BE(0); const credID = authData.slice(0, credIDLen); authData = authData.slice(credIDLen); const cosePublicKey = authData; return { rpIdHash, flagsBuf, flags, counter, counterBuf, aaguid, credID, cosePublicKey, } as CborParseAuthData; } /** * COSEエンコードされた公開鍵をPKCS ECDHA Keyに変換します。 * @param cosePublicKey COSEエンコードされた公開鍵 */ private convertToRawPkcsKey(cosePublicKey: Buffer): Buffer { /* +------+-------+-------+---------+----------------------------------+ | name | key | label | type | description | | | type | | | | +------+-------+-------+---------+----------------------------------+ | crv | 2 | -1 | int / | EC Curve identifier - Taken from | | | | | tstr | the COSE Curves registry | | | | | | | | x | 2 | -2 | bstr | X Coordinate | | | | | | | | y | 2 | -3 | bstr / | Y Coordinate | | | | | bool | | | | | | | | | d | 2 | -4 | bstr | Private key | +------+-------+-------+---------+----------------------------------+ */ const coseStruct = Decoder.decodeAllSync(cosePublicKey)[0]; const tag = Buffer.from([0x00]); const x = coseStruct.get(-2); const y = coseStruct.get(-3); return Buffer.concat([tag, x, y]); } /** * バイナリ形式の公開鍵をOpenSSL PEM text形式に変換します。 * @param publicKeyBuffer バイナリの公開鍵 */ private convertPemTextFormat(publicKeyBuffer: Buffer): string { if (!Buffer.isBuffer(publicKeyBuffer)) { throw new Error('publicKeyBuffer must be Buffer.'); } let type; if (publicKeyBuffer.length === 65 && publicKeyBuffer[0] === 0x04) { publicKeyBuffer = Buffer.concat([ Buffer.from('3059301306072a8648ce3d020106082a8648ce3d030107034200', 'hex'), publicKeyBuffer, ]); type = 'PUBLIC KEY'; } else { type = 'CERTIFICATE'; } const b64cert = publicKeyBuffer.toString('base64'); let pemKey = ''; for (let i = 0; i < Math.ceil(b64cert.length / 64); i++) { const start = 64 * i; pemKey += b64cert.substr(start, 64) + '\n'; } pemKey = `-----BEGIN ${type}-----\n` + pemKey + `-----END ${type}-----\n`; return pemKey; } /** * 署名の妥当性を検証します。 * @param signature 署名 * @param data データ * @param publicKey 公開鍵 */ private verifySignature(signature: Buffer, data: Buffer, publicKey: string): boolean { return crypto.createVerify('SHA256') .update(data) .verify(publicKey, signature); } }いくつかポイントを絞って説明します。認証サーバでは、認証器が生成した情報を以下のように検証します。
- リクエストで受け取ったchallengeがサーバで生成されたchallengeと一致するか?
- リクエストで受け取ったoriginが期待するoriginと一致するか?
- attestationObjectが妥当かどうか?
challenge, originの検証
// clientDataJSONをデコードし、JSON形式にパースする
const clientData: DecodedClientDataJson = JSON.parse(base64url.decode(createCredentialDto.response.clientDataJSON));
リクエストボディに含まれる
clientDataJSONをbase64Urlデコードし、JSONにパースすると以下のようなJSONを取得できます。{ "challenge": "upYb6sib9exL7fvSfQhIEazOkBh8_YJXVPzSx0T16B0", "origin": "http://localhost:4200", "type": "webauthn.create" }従って、origin, challengeは以下のように実施しています。
// originの検証を行う
if (clientData.origin !== this.ORIGIN) {
  // do something
}
// challengeの検証を行う
const count = await this.userModel.findOne({ challenge: Buffer.from(clientData.challenge) }).count();
Logger.debug(count, 'webauthnService#isvalidCredential', true);
if (count === 0) {
  // do something
}
origin:予め期待しているoriginと一致するかどうか検証
challenge:検索条件として、リクエストに含まれるchallengeを指定し、検索結果の数で検証
※challengeがぶつかることは想定していないです。一応、uuidから生成しているので、、
AttestationObjectの検証
AttestationObjectは、base64urlエンコードされているCBORとなっています。実際の構成は以下の通りとなっています。
※W3Cより引用
検証では、AttestationObjectをパースして得られるパラメータを使用して、Attestation Signatureの有効性を検証します。
実際の検証ロジックは、fido-seminar-webauthn-tutorialを参考にしました。
webauthn.service.ts/** * AttestationObjectの検証を行います。 * @param createCredentialDto 認証器が生成した認証データ */ private async verifyAuthenticatorAttestationResponse(createCredentialDto: CreateCredentialDto): Promise<VerifiedAuthenticatorAttestationResponse> { // 認証器でbase64urlエンコードされているので、認証サーバでデコードする const attestationBuffer = base64url.toBuffer(createCredentialDto.response.attestationObject); // attestationObjectをCBORデコードする const ctapMakeCredentialResponse: CborParseAttestationObject = Decoder.decodeAllSync(attestationBuffer)[0]; Logger.debug(ctapMakeCredentialResponse, 'WebAuthnService', true); const response: VerifiedAuthenticatorAttestationResponse = { verified: false, }; if (ctapMakeCredentialResponse.fmt === 'fido-u2f') { const authDataStruct = this.parseMakeCredAuthData(ctapMakeCredentialResponse.authData); if (!authDataStruct.flags) { throw new Error('User was NOT presented durring authentication!'); } const clientDataHash = crypto.createHash('SHA256').update(base64url.toBuffer(createCredentialDto.response.clientDataJSON)).digest(); const reservedByte = Buffer.from([0x00]); const publicKey = this.convertToRawPkcsKey(authDataStruct.cosePublicKey); const signatureBase = Buffer.concat([reservedByte, authDataStruct.rpIdHash, clientDataHash, authDataStruct.credID, publicKey]); const pemCertificate = this.convertPemTextFormat(ctapMakeCredentialResponse.attStmt.x5c[0]); const signature = ctapMakeCredentialResponse.attStmt.sig; response.verified = this.verifySignature(signature, signatureBase, pemCertificate); const validateResult = this.verifySignature(signature, signatureBase, pemCertificate); // Attestation Signatureの有効性を検証する return validateResult ? { verified: validateResult, authInfo: { fmt: 'fido-u2f', publicKey: base64url.encode(publicKey), counter: authDataStruct.counter, credId: base64url.encode(authDataStruct.credID), }, } : response; } }完成イメージ
終わりに
自分で実装してみることで、「完全に理解した!」から「なんも分からん」くらいにはなれたと思います。
次は、認証のフローについて書きます。
参考


- 投稿日:2020-06-03T23:00:07+09:00
FIDO2(WebAuthn)に入門してみた - ユーザ登録編
始めに
この記事は、 WebAuthn を使用したユーザの登録フローに関する学習メモです。
作成したソースコード一式はこちらに格納しておきます。
FIDO2 について
TL; DR
FIDOという非営利団体が推進する認証技術、規格のこと
生体認証などで用いられるような専用の機器が不要
FIDO2 = WebAuthn + CTAP
W3C WebAuthn
FIDO認証のサポートを可能にするためにブラウザおよびプラットフォームに組み込まれている標準Web APIのこと。登録と認証の機能を持つ。
navigator.credentials.create():publicKeyオプションと併用すると、新規に認証情報を作成します。
navigator.credentials.get():publicKeyオプションと併用すると、既存の認証情報を取得します。CTAP(Client to Authentication Protocol)
名前の通り、クライアントと認証器の通信プロトコルです。
認証サーバを実装する上では、CTAPの仕様に関する理解は不要ですが、覗いてみると結構楽しいです。
仕組みの概要
FIDOのプロトコルでは、標準的な公開鍵暗号方式を用いて、認証を実現しています。
以下、基本的な処理シーケンス。
- クライアントとサーバ間でパスワード等の認証情報をやり取りしないため、従来のID/Password方式の認証方式よりも安全だと言われている。
- クライアント側に認証に必要な秘密鍵を保持することで、ユーザがパスワードを記憶する必要がない。
- 認証に使用する端末を紛失した場合は、パスワードの紛失と同じようにセキュリティリスクが存在する。
サービスの認証にFIDO2を導入するためには
- 認証サーバを自作する
- 有料のサービスを使用する
と、2通りの方法がありますが今回は学習目的のため、自分で実装します。
認証サーバ(Relying Party)を自作してみる
実装言語・FW
- 認証サーバ;Nest.js v6.13.3
- クライアント;Angular v9.0.4
- Database;MongoDB
のMANスタックで実装してみました。お好きな言語、FWで作ってみてください。
登録の処理シーケンス
※MDMより引用
処理概要
認証サーバに対して、challengeの生成をリクエストする。
認証サーバで生成したchallenge, ユーザ情報、サーバの情報をクライアントにレスポンスする。
取得したデータを元にパラメータを組み立て、
navigator.credentials.create()を呼び出す。非対称鍵ペア(公開鍵と秘密鍵)とAttestationを生成する。(Attestation; 公開鍵がユーザが所持する認証器から生成されたものであることを保証するための仕組み)
生成したデータをクライアントに返却する。
認証器から取得した認証情報をサーバに送信する。
認証情報の検証を行う。
WebAuthnで規定されていない箇所(上図の0, 1, 5, 6)に関しては自分で仕様を考えて実装する必要があります。
従って、今回作成するのは以下の赤枠部分となります。(認証サーバとJavaScript Application)
実装のポイント
全部を載せると、とんでもな量になってしまうのでかいつまんでポイントを説明します。実装の細かい点は、リポジトリを参照してください。
0. challengeの生成リクエスト ~ 1. challenge、ユーザ情報、サーバ情報のレスポンス
WebAuthnによって仕様が定義されているわけではないため、自分で設計をする必要があります。
今回は、クライアントから以下のようなリクエストを発行してみました。
POST http://localhost:3000/webauthn/register HTTP/1.1
Content-Type: application/json

{
  "email": "test-user-001@example.com"
}
それを受ける認証サーバは以下のように実装しています。
webauthn.controller.ts@Controller('webauthn') export class WebauthnController { constructor(private readonly webauthnSercice: WebauthnService) { } /** * challenge生成のエンドポイントです。 * @param createUserDto リクエストボディー */ @Post('/register') async register(@Body() createUserDto: CreateUserDto): Promise<ResponseData> { const userCreationOptions = await this.webauthnSercice.createUserCreationOptions(createUserDto); if (!userCreationOptions) { throw new HttpException({ status: HttpStatus.INTERNAL_SERVER_ERROR, error: 'database error.', }, HttpStatus.INTERNAL_SERVER_ERROR); } const responseData = new ResponseData(); responseData.status = HttpStatus.CREATED; responseData.data = userCreationOptions; return responseData; } // ... 省略 }webauthn.service.ts@Injectable() export class WebauthnService { private readonly ORIGIN = 'http://localhost:4200'; constructor(@InjectModel('User') private userModel: Model<User>) { } /** * 認証器が鍵の生成に必要なパラメータを生成します。 * @param createUserDto リクエストボディー */ async createUserCreationOptions(createUserDto: CreateUserDto): Promise<UserCreationOptions> { // 少なくとも16バイト以上のランダムに生成されたバッファーを生成する const challenge = Buffer.from(Uint8Array.from(uuid(), c => c.charCodeAt(0))); const userId = Buffer.from(Uint8Array.from(uuid(), c => c.charCodeAt(0))); const userCreationOptions: UserCreationOptions = { email: createUserDto.email, challenge: base64url.encode(challenge), rp: { name: 'webauthn-server-nestjs-sample', }, user: { id: base64url.encode(userId), name: createUserDto.email, displayName: createUserDto.email, }, attestation: 'direct', }; // DBに保存する const saveResult = await this.saveUser(userCreationOptions); if (!saveResult) { return null; } return userCreationOptions; } /** * ユーザをDBに保存します。 * @param userCreationOptions ユーザの認証情報 */ private async saveUser(userCreationOptions: UserCreationOptions): Promise<User> { // ユーザが保存済みがどうか確認する const user = await this.userModel.findOne({ email: userCreationOptions.email }).exec(); if (user) { throw new HttpException({ status: HttpStatus.CONFLICT, error: 'user already exists.', }, HttpStatus.CONFLICT); } const newUser = new this.userModel(userCreationOptions); return newUser.save(); } }ポイントは2つあります。
- challengeは、認証サーバで生成する。また、生成するchallengeは、少なくとも16バイト以上でランダムに生成されたバッファであること。
これを満たすために、今回はuuid(v4)を元にバッファを生成しています。
const challenge = Buffer.from(Uint8Array.from(uuid(), c => c.charCodeAt(0)));
- 特に定められていないが、レスポンスはWebAuthn APIで扱いやすい形式で返却するほうが望ましい。
これを踏まえて、今回は以下のようなレスポンスをクライアントに返却しています。
HTTP/1.1 201 Created
X-Powered-By: Express
Content-Type: application/json; charset=utf-8
Content-Length: 333
ETag: W/"14d-LWc+sLb+7AIGIewNEbfdcmI1pHw"
Date: Mon, 01 Jun 2020 14:28:49 GMT
Connection: close

{
  "status": 201,
  "data": {
    "email": "test-user-001@example.com",
    "challenge": "MTJjMGUzMmEtMzM3My00ODAzLThiMTMtZGU3YmFhMzdhZWY5",
    "rp": {
      "name": "webauthn-server-nestjs-sample"
    },
    "user": {
      "id": "MjA4YTI3NWQtYmFhYi00ZDQyLTliODEtMWNmMzQ1NjMxYTY1",
      "name": "test-user-001@example.com",
      "displayName": "test-user-001@example.com"
    },
    "attestation": "direct"
  }
}
パラメータ 概要説明 challenge 署名の正当性を検証するためのランダムな文字列。サーバで生成したランダムバッファをbase64urlエンコードしたもの。 rp 認証サーバの情報 user ユーザの登録情報 attestation 認証からCredentialをどのように受け取るかを記したもの。 directの他にもnoneやindirectといったパラメータが存在する。
詳細は、Attestation Conveyance Preference Enumerationを参照してください。2.
navigator.credentials.create()呼び出し ~ 5. サーバに送信認証サーバから取得したデータを元に
navigator.credentials.create()呼び出しに必要なパラメータを作成します。// challengeの生成要求 const registerResponse = await this.createChallenge(email); // navigator.credentials.create()呼び出しのために必要なパラメータの組み立て const publicKeyCredentialCreationOptions: PublicKeyCredentialCreationOptions = { challenge: Buffer.from(base64url.decode(registerResponse.data.challenge)), rp: registerResponse.data.rp, user: { id: Buffer.from(base64url.decode(registerResponse.data.user.id)), name: registerResponse.data.user.name, displayName: registerResponse.data.user.displayName, }, attestation: registerResponse.data.attestation, pubKeyCredParams: [{ type: 'public-key' as 'public-key', alg: -7, }], authenticatorSelection: { authenticatorAttachment: 'cross-platform', requireResidentKey: false, userVerification: 'discouraged' } }; // ... 省略
パラメータ 概要説明 pubKetCredParams 認証器の鍵作成に用いるアルゴリズムを指定する。今回は、-7 (ECDSA-SHA256)を指定しています。 authenticatorSelection 認証器の種類を限定できる。今回は、Yubikeyのようなクロスプラットフォームの認証器を使用したかったため、 cross-platformを指定しています。
navigator.credentials.create()を呼び出し、そのレスポンスを認証サーバに送信する。という一連の流れが以下になります。sign-up.component.ts@Injectable({ providedIn: 'root' }) export class SignUpService { constructor(private readonly httpClient: HttpClient) { } /** * ユーザの登録処理を実行します。 * @param email メールアドレス */ async signUp(email: string): Promise<boolean> { // challengeの生成要求 const registerResponse = await this.createChallenge(email); // `navigator.credentials.create()呼び出しのために必要なパラメータの組み立て const publicKeyCredentialCreationOptions: PublicKeyCredentialCreationOptions = { challenge: Buffer.from(base64url.decode(registerResponse.data.challenge)), rp: registerResponse.data.rp, user: { id: Buffer.from(base64url.decode(registerResponse.data.user.id)), name: registerResponse.data.user.name, displayName: registerResponse.data.user.displayName, }, attestation: registerResponse.data.attestation, pubKeyCredParams: [{ type: 'public-key' as 'public-key', alg: -7, }], authenticatorSelection: { authenticatorAttachment: 'cross-platform', requireResidentKey: false, userVerification: 'discouraged' } }; // 明示的にPublicKeyCredentialにキャストする const attestationObject = await this.createAttestationObject(publicKeyCredentialCreationOptions) as PublicKeyCredential; console.log(attestationObject); // 公開鍵をサーバに送信する return this.registerPublicKey(attestationObject); } /** * WebAuthn認証サーバに対して、チャレンジの生成要求を行います。 * @param email メールアドレス */ private async createChallenge(email: string): Promise<User> { const registerResponse = await this.httpClient.post<User>(Uri.USER_REGISTER, { email }, { headers: { 'Content-Type': 'application/json' }, observe: 'response', }).toPromise(); console.log(registerResponse.body); return registerResponse.body; } /** * 認証器に対して公開鍵の生成要求を行います。 * @param publicKeyCreationOptions 認証情報生成オプション */ private async createAttestationObject(publicKeyCreationOptions: PublicKeyCredentialCreationOptions): Promise<Credential> { return navigator.credentials.create({ publicKey: publicKeyCreationOptions }); } /** * 認証情報をBase64Urlエンコードして認証サーバにPOSTします。 * @param credential 認証器で生成した認証情報 */ private async registerPublicKey(publicKeyCredential: PublicKeyCredential): Promise<boolean> { const attestationResponse = await this.httpClient.post(Uri.ATTESTATION_RESPONSE, { rawId: base64url.encode(Buffer.from(publicKeyCredential.rawId)), response: { attestationObject: base64url.encode(Buffer.from(publicKeyCredential.response.attestationObject)), clientDataJSON: base64url.encode(Buffer.from(publicKeyCredential.response.clientDataJSON)), }, id: publicKeyCredential.id, type: publicKeyCredential.type }, { headers: { 'Content-Type': 'application/json' }, observe: 'response' }).toPromise(); return attestationResponse.body ? true : false; } }6. 認証情報のチェック
クライアントから以下のようなリクエストが送信されてきます。
POST http://localhost:3000/webauthn/response HTTP/1.1
Content-Type: application/json

{
   "rawId":"MLzRnn5P7mRPTK5sATEmKiJfhvV1TJgGXHCbWu3mKrcSZW-oZQ4LwZ3kqeN6KRfESWDbJfv8EXdXHr53XhOQiAvV1Gti4XR9gJaQY45HQK_xw98VxP7e9EnOLjdi6_5a3nLs4lAkQjJ1TqY4IJBnFNSbue7nUAotIQ6kD3ubYR5S",
   "response":{
      "attestationObject":"o2NmbXRoZmlkby11MmZnYXR0U3RtdKJjc2lnWEcwRQIgO3T6_LkyjbSDnIyWX29oe7dUflpm6nt2BB9U1sdVcTwCIQDacpQ3-TAMhaTsFPM039VvjHqSQDUFzC_YaYHkk88v72N4NWOBWQKpMIICpTCCAkqgAwIBAgIJANhaddxx4y8sMAoGCCqGSM49BAMCMIGlMQswCQYDVQQGEwJDTjESMBAGA1UECAwJR3Vhbmdkb25nMREwDwYDVQQHDAhTaGVuemhlbjEzMDEGA1UECgwqU2hlbnpoZW4gRXhjZWxzZWN1IERhdGEgVGVjaG5vbG9neSBDby4gTHRkMR4wHAYDVQQLDBVFeGNlbHNlY3UgRmlkbyBTZXJ2ZXIxGjAYBgNVBAMMEUV4Y2Vsc2VjdSBGaWRvIENBMB4XDTE4MDExOTAzNDY1OVoXDTI4MDExNzAzNDY1OVowgawxCzAJBgNVBAYTAkNOMRIwEAYDVQQIDAlHdWFuZ2RvbmcxETAPBgNVBAcMCFNoZW56aGVuMTMwMQYDVQQKDCpTaGVuemhlbiBFeGNlbHNlY3UgRGF0YSBUZWNobm9sb2d5IENvLiBMdGQxHjAcBgNVBAsMFUV4Y2Vsc2VjdSBGaWRvIFNlcnZlcjEhMB8GA1UEAwwYRXhjZWxzZWN1IEZpZG8gVTJGIDAwMDAyMFkwEwYHKoZIzj0CAQYIKoZIzj0DAQcDQgAEtwOC4SZp2EpDMVxiZS-P_2wp_ZBNMEFKTruWGdg38qM4r_jT5r_a1vxW0UN89LFY1m1BpXuUAeeCn36DriitcaNaMFgwCQYDVR0TBAIwADALBgNVHQ8EBAMCB4AwHQYDVR0OBBYEFERWGpXZomZNMqJn2_6GzguxnlkmMB8GA1UdIwQYMBaAFKyJLw-sy4g7nHYTZwKpZqyJzZ-bMAoGCCqGSM49BAMCA0kAMEYCIQCpPai4VwA59-PiHq8SYjS9qcffQD-3oFnfR9njRpY5UwIhAMlMszhSeaf0xaAPC48ZYSB_ZeZ8vgnkQOFjfctD_EFmaGF1dGhEYXRhWQEFSZYN5YgOjGh0NBcPZHZgW4_krrmihjLHmVzzuoMdl2NBAAAAAAAAAAAAAAAAAAAAAAAAAAAAgTC80Z5-T-5kT0yubAExJioiX4b1dUyYBlxwm1rt5iq3EmVvqGUOC8Gd5KnjeikXxElg2yX7_BF3Vx6-d14TkIgL1dRrYuF0fYCWkGOOR0Cv8cPfFcT-3vRJzi43Yuv-Wt5y7OJQJEIydU6mOCCQZxTUm7nu51AKLSEOpA97m2EeUqUBAgMmIAEhWCBwt4oPucNcbc8PIR7gFdM9tWAr0NCKc9HjzPvB4h0wvSJYIK09jRBM_VY8ms4y5pnsfURZjwTcvmu6noWK7GXpCNxy",
      "clientDataJSON":"eyJ0eXBlIjoid2ViYXV0aG4uY3JlYXRlIiwiY2hhbGxlbmdlIjoiWlRjNE4yUTNZbUV0TUROaU15MDBaVGxtTFdFek1EWXROamhtTTJRek1UQXdPV1JpIiwib3JpZ2luIjoiaHR0cDovL2xvY2FsaG9zdDo0MjAwIiwiY3Jvc3NPcmlnaW4iOmZhbHNlfQ"
   },
   "id":"MLzRnn5P7mRPTK5sATEmKiJfhvV1TJgGXHCbWu3mKrcSZW-oZQ4LwZ3kqeN6KRfESWDbJfv8EXdXHr53XhOQiAvV1Gti4XR9gJaQY45HQK_xw98VxP7e9EnOLjdi6_5a3nLs4lAkQjJ1TqY4IJBnFNSbue7nUAotIQ6kD3ubYR5S",
   "type":"public-key"
}
パラメータ 概要説明 rawId 公開鍵のID。 response 認証器が生成した情報。attestationObject, clientDataJSONというパラメータを持ち、認証器が生成した情報を検証する際に使用する。 id rawIdをbase64urlエンコードしたもの。 type 'public-key'固定 それを受ける認証サーバは以下のように実装しています。
webauthn.controller.ts@Controller('webauthn') export class WebauthnController { constructor(private readonly webauthnSercice: WebauthnService) { } // ... 省略 /** * 認証器で生成した認証情報を受け取るエンドポイントです。 * @param createCredentialDto リクエストボディー */ @Post('/response') async response(@Body() createCredentialDto: CreateCredentialDto): Promise<ResponseData> { const verifyResult = await this.webauthnSercice.isValidCredential(createCredentialDto); const responseData = new ResponseData(); verifyResult ? responseData.status = HttpStatus.OK : responseData.status = HttpStatus.INTERNAL_SERVER_ERROR; return responseData; } // 省略 }webauthn.service.ts@Injectable() export class WebauthnService { private readonly ORIGIN = 'http://localhost:4200'; constructor(@InjectModel('User') private userModel: Model<User>) { } // ... 省略 /** * 認証器が生成した認証情報の検証を行います。 * @param createCredentialDto 認証器が生成した認証情報 */ async isValidCredential(createCredentialDto: CreateCredentialDto): Promise<boolean> { // clientDataJSONをデコードし、JSON形式にパースする const clientData: DecodedClientDataJson = JSON.parse(base64url.decode(createCredentialDto.response.clientDataJSON)); Logger.debug(clientData, 'WebAuthnService', true); // originの検証を行う if (clientData.origin !== this.ORIGIN) { throw new HttpException('Origin is not correct.', HttpStatus.BAD_REQUEST); } // challengeの検証を行う const count = await this.userModel.findOne({ challenge: Buffer.from(clientData.challenge) }).count(); Logger.debug(count, 'webauthnService#isvalidCredential', true); if (count === 0) { throw new HttpException('Challenge is not collect.', HttpStatus.BAD_REQUEST); } // attestationObjectの検証を行う const validateResult = await this.verifyAuthenticatorAttestationResponse(createCredentialDto); // 公開鍵をDBに登録する this.userModel.findOneAndUpdate({ challenge: Buffer.from(clientData.challenge) }, { $set: { id: createCredentialDto.id } }, error => { if (error) { Logger.error(error); throw new Error('Update failed.'); } }); return validateResult.verified; } /** * AttestationObjectの検証を行います。 * @param createCredentialDto 認証器が生成した認証データ */ private async verifyAuthenticatorAttestationResponse(createCredentialDto: CreateCredentialDto): Promise<VerifiedAuthenticatorAttestationResponse> { // 認証器でbase64urlエンコードされているので、認証サーバでデコードする const attestationBuffer = base64url.toBuffer(createCredentialDto.response.attestationObject); // attestationObjectをCBORデコードする const ctapMakeCredentialResponse: CborParseAttestationObject = Decoder.decodeAllSync(attestationBuffer)[0]; Logger.debug(ctapMakeCredentialResponse, 'WebAuthnService', true); const response: VerifiedAuthenticatorAttestationResponse = { verified: false, }; if (ctapMakeCredentialResponse.fmt === 'fido-u2f') { const authDataStruct = this.parseMakeCredAuthData(ctapMakeCredentialResponse.authData); if (!authDataStruct.flags) { throw new Error('User was NOT presented durring authentication!'); } const clientDataHash = crypto.createHash('SHA256').update(base64url.toBuffer(createCredentialDto.response.clientDataJSON)).digest(); const reservedByte = Buffer.from([0x00]); const publicKey = this.convertToRawPkcsKey(authDataStruct.cosePublicKey); const signatureBase = Buffer.concat([reservedByte, authDataStruct.rpIdHash, clientDataHash, authDataStruct.credID, publicKey]); const pemCertificate = this.convertPemTextFormat(ctapMakeCredentialResponse.attStmt.x5c[0]); const signature = ctapMakeCredentialResponse.attStmt.sig; response.verified = this.verifySignature(signature, signatureBase, pemCertificate); const validateResult = this.verifySignature(signature, signatureBase, pemCertificate); // Attestation Signatureの有効性を検証する return validateResult ? { verified: validateResult, authInfo: { fmt: 'fido-u2f', publicKey: base64url.encode(publicKey), counter: authDataStruct.counter, credId: base64url.encode(authDataStruct.credID), }, } : response; } } /** * AuthDataをCBORパースします。 * @param authData 認証器の信頼性、セキュリティ等のバイナリデータ */ private parseMakeCredAuthData(authData: Buffer): CborParseAuthData { const rpIdHash = authData.slice(0, 32); authData = authData.slice(32); const flagsBuf = authData.slice(0, 1); authData = authData.slice(1); const flags = flagsBuf[0]; const counterBuf = authData.slice(0, 4); authData = authData.slice(4); const counter = counterBuf.readUInt32BE(0); const aaguid = authData.slice(0, 16); authData = authData.slice(16); const credIDLenBuf = authData.slice(0, 2); authData = authData.slice(2); const credIDLen = credIDLenBuf.readUInt16BE(0); const credID = authData.slice(0, credIDLen); authData = authData.slice(credIDLen); const cosePublicKey = authData; return { rpIdHash, flagsBuf, flags, counter, counterBuf, aaguid, credID, cosePublicKey, } as CborParseAuthData; } /** * COSEエンコードされた公開鍵をPKCS ECDHA Keyに変換します。 * @param cosePublicKey COSEエンコードされた公開鍵 */ private convertToRawPkcsKey(cosePublicKey: Buffer): Buffer { /* +------+-------+-------+---------+----------------------------------+ | name | key | label | type | description | | | type | | | | +------+-------+-------+---------+----------------------------------+ | crv | 2 | -1 | int / | EC Curve identifier - Taken from | | | | | tstr | the COSE Curves registry | | | | | | | | x | 2 | -2 | bstr | X Coordinate | | | | | | | | y | 2 | -3 | bstr / | Y Coordinate | | | | | bool | | | | | | | | | d | 2 | -4 | bstr | Private key | +------+-------+-------+---------+----------------------------------+ */ const coseStruct = Decoder.decodeAllSync(cosePublicKey)[0]; const tag = Buffer.from([0x00]); const x = coseStruct.get(-2); const y = coseStruct.get(-3); return Buffer.concat([tag, x, y]); } /** * バイナリ形式の公開鍵をOpenSSL PEM text形式に変換します。 * @param publicKeyBuffer バイナリの公開鍵 */ private convertPemTextFormat(publicKeyBuffer: Buffer): string { if (!Buffer.isBuffer(publicKeyBuffer)) { throw new Error('publicKeyBuffer must be Buffer.'); } let type; if (publicKeyBuffer.length === 65 && publicKeyBuffer[0] === 0x04) { publicKeyBuffer = Buffer.concat([ Buffer.from('3059301306072a8648ce3d020106082a8648ce3d030107034200', 'hex'), publicKeyBuffer, ]); type = 'PUBLIC KEY'; } else { type = 'CERTIFICATE'; } const b64cert = publicKeyBuffer.toString('base64'); let pemKey = ''; for (let i = 0; i < Math.ceil(b64cert.length / 64); i++) { const start = 64 * i; pemKey += b64cert.substr(start, 64) + '\n'; } pemKey = `-----BEGIN ${type}-----\n` + pemKey + `-----END ${type}-----\n`; return pemKey; } /** * 署名の妥当性を検証します。 * @param signature 署名 * @param data データ * @param publicKey 公開鍵 */ private verifySignature(signature: Buffer, data: Buffer, publicKey: string): boolean { return crypto.createVerify('SHA256') .update(data) .verify(publicKey, signature); } }いくつかポイントを絞って説明します。認証サーバでは、認証器が生成した情報を以下のように検証します。
- リクエストで受け取ったchallengeがサーバで生成されたchallengeと一致するか?
- リクエストで受け取ったoriginが期待するoriginと一致するか?
- attestationObjectが妥当かどうか?
challenge, originの検証
// clientDataJSONをデコードし、JSON形式にパースする
const clientData: DecodedClientDataJson = JSON.parse(base64url.decode(createCredentialDto.response.clientDataJSON));
リクエストボディに含まれる
clientDataJSONをbase64Urlデコードし、JSONにパースすると以下のようなJSONを取得できます。{ "challenge": "upYb6sib9exL7fvSfQhIEazOkBh8_YJXVPzSx0T16B0", "origin": "http://localhost:4200", "type": "webauthn.create" }従って、origin, challengeは以下のように実施しています。
// originの検証を行う
if (clientData.origin !== this.ORIGIN) {
  // do something
}
// challengeの検証を行う
const count = await this.userModel.findOne({ challenge: Buffer.from(clientData.challenge) }).count();
Logger.debug(count, 'webauthnService#isvalidCredential', true);
if (count === 0) {
  // do something
}
origin:予め期待しているoriginと一致するかどうか検証
challenge:検索条件として、リクエストに含まれるchallengeを指定し、検索結果の数で検証
※challengeがぶつかることは想定していないです。一応、uuidから生成しているので、、
AttestationObjectの検証
AttestationObjectは、base64urlエンコードされているCBORとなっています。実際の構成は以下の通りとなっています。
※W3Cより引用
検証では、AttestationObjectをパースして得られるパラメータを使用して、Attestation Signatureの有効性を検証します。
実際の検証ロジックは、fido-seminar-webauthn-tutorialを参考にしました。
webauthn.service.ts/** * AttestationObjectの検証を行います。 * @param createCredentialDto 認証器が生成した認証データ */ private async verifyAuthenticatorAttestationResponse(createCredentialDto: CreateCredentialDto): Promise<VerifiedAuthenticatorAttestationResponse> { // 認証器でbase64urlエンコードされているので、認証サーバでデコードする const attestationBuffer = base64url.toBuffer(createCredentialDto.response.attestationObject); // attestationObjectをCBORデコードする const ctapMakeCredentialResponse: CborParseAttestationObject = Decoder.decodeAllSync(attestationBuffer)[0]; Logger.debug(ctapMakeCredentialResponse, 'WebAuthnService', true); const response: VerifiedAuthenticatorAttestationResponse = { verified: false, }; if (ctapMakeCredentialResponse.fmt === 'fido-u2f') { const authDataStruct = this.parseMakeCredAuthData(ctapMakeCredentialResponse.authData); if (!authDataStruct.flags) { throw new Error('User was NOT presented durring authentication!'); } const clientDataHash = crypto.createHash('SHA256').update(base64url.toBuffer(createCredentialDto.response.clientDataJSON)).digest(); const reservedByte = Buffer.from([0x00]); const publicKey = this.convertToRawPkcsKey(authDataStruct.cosePublicKey); const signatureBase = Buffer.concat([reservedByte, authDataStruct.rpIdHash, clientDataHash, authDataStruct.credID, publicKey]); const pemCertificate = this.convertPemTextFormat(ctapMakeCredentialResponse.attStmt.x5c[0]); const signature = ctapMakeCredentialResponse.attStmt.sig; response.verified = this.verifySignature(signature, signatureBase, pemCertificate); const validateResult = this.verifySignature(signature, signatureBase, pemCertificate); // Attestation Signatureの有効性を検証する return validateResult ? { verified: validateResult, authInfo: { fmt: 'fido-u2f', publicKey: base64url.encode(publicKey), counter: authDataStruct.counter, credId: base64url.encode(authDataStruct.credID), }, } : response; } }完成イメージ
終わりに
自分で実装してみることで、「完全に理解した!」から「なんも分からん」くらいにはなれたと思います。
次は、認証のフローについて書きます。
参考
- 投稿日:2020-06-03T22:03:46+09:00
PA-API v5で商品情報を取得する
PA-APIの利用
PA-API を使ってアマゾン商品情報をとってみよう。そこからアフィリエイトなどで収益化ができたら良いね。
PA-APIはアマゾンで一ヶ月以内に売上が発生していないと使えません。なので、アマゾンの商品リンク作成ツールや、ブログのアフィリエイトツールなどで売上を得られるように頑張ろう。ここが一番難易度が高い気がする。
アフィリエイトで売上が発生したら次に、ISBNやASINが必要となる。ただ、ASINを具体的にどのように取るかの選択が少ないので、アマゾンのサイトをクロールしている。
Amazonの検索結果からasinをスクレイピング
https://qiita.com/99nyorituryo/items/c5d53a3ca8a4967b5927ASINから商品情報のJSONを取得する
ここでは、ISBNやASINという本の情報から、アマゾンの表紙画像や、タイトル著者名、出版社、価格、本の種類などの情報を取得してサイトとして出力する方法を書く。
PAAPIでは、様々な言語用にツールが配布されているが、私はnode.jsが一番慣れているので、node.jsを用いた方法について書いていきます。node.jsのやり方は公式のページから見てみると良いのだけど。
https://affiliate.amazon.co.jp/help/node/topic/GZH32YX29UH5GACM
ここで得られたISBNをsampleGetItemsApi.jsを使ってアマゾンから書誌情報を取得する。
sampleGetItemsApi.jsは下記アドレスのnode.jsからダウンロードできる。
https://webservices.amazon.com/paapi5/documentation/quick-start/using-sdk.html
- paapi5-nodejs-sdk-and-samplesをダウンロードして展開して
- さっきのファイルを解凍したフォルダーで、npm install paapi5--nodejs-sdk --saveでインストール
- アクセスキーやシークレットキーをsampleGetItemsApi.jsなどのサンプルに追加
- またアフィリエイト用のパートナータグも追加(-22で終わるやつ)
- sampleGetItemsApi.jsを実行してみよう
というようなことが書かれています。
sampleGetItemsApi.jsを自分の目的に合うように書き換える。
初期状態では、amazon.co.jpになっていないので修正する必要がある。アクセスキーやシークレットキーを入力しないと実行できない。それから一度に取得できるasinは10個までになっている。それと待ち時間を設定しないとすぐエラーを吐くようである。
- 100個の情報を取得しようとすると、待ち時間を設定して取得している。
- key.jsonにアクセスキーやシークレットキー、アソシエイトタグにまとめている。
- dateが開始日でtodateが終了日になっていてまとめて取得できる。
- asinの配列は下の方法で作っている。
Amazonの検索結果からasinをスクレイピング
https://qiita.com/99nyorituryo/items/c5d53a3ca8a4967b5927{"accessKey":"アクセスキー","secretKey" :"シークレットキー","PartnerTag":"パートナータグ"}fs = require('fs'); var json = fs.readFileSync(__dirname + '/key.json', 'utf-8'); key = JSON.parse(json); function sleep(second) { return new Promise(resolve => { setTimeout(() => { resolve() }, second * 1000) }) } var ProductAdvertisingAPIv1 = require('./src/index'); var defaultClient = ProductAdvertisingAPIv1.ApiClient.instance; defaultClient.accessKey =key.accessKey// defaultClient.secretKey = key.secretKey// defaultClient.host = 'webservices.amazon.co.jp'; defaultClient.region = 'us-west-2'; var api = new ProductAdvertisingAPIv1.DefaultApi(); var getItemsRequest = new ProductAdvertisingAPIv1.GetItemsRequest(); getItemsRequest['PartnerTag'] =key.PartnerTag// getItemsRequest['PartnerType'] = 'Associates'; getItemsRequest['Resources'] =[ "BrowseNodeInfo.BrowseNodes", "BrowseNodeInfo.BrowseNodes.Ancestor", "BrowseNodeInfo.BrowseNodes.SalesRank", "BrowseNodeInfo.WebsiteSalesRank", "Images.Primary.Small", "Images.Primary.Medium", "Images.Primary.Large", "ItemInfo.ByLineInfo", "ItemInfo.ContentRating", "ItemInfo.Classifications", "ItemInfo.ExternalIds", "ItemInfo.ManufactureInfo", "ItemInfo.ProductInfo", "ItemInfo.Title", "Offers.Listings.Price"]; var callback = function (error, data, response) { if (error) { console.log('Error calling PA-API 5.0!'); console.log('Printing Full Error Object:\n' + JSON.stringify(error, null, 1)); console.log('Status Code: ' + error['status']); if (error['response'] !== undefined && error['response']['text'] !== undefined) { console.log('Error Object: ' + JSON.stringify(error['response']['text'], null, 1)); } } else { // console.log('API called successfully.'); var getItemsResponse = ProductAdvertisingAPIv1.GetItemsResponse.constructFromObject(data); console.log(JSON.stringify(getItemsResponse, null, 1)); jsondata=jsondata.concat(getItemsResponse.ItemsResult.Items); fs.writeFileSync(__dirname + '/json/kindle_paapi/'+filename, JSON.stringify(jsondata, null, 1),'utf-8') //console.log("test"+jsondata) if (getItemsResponse['Errors'] !== undefined) { console.log('\nErrors:'); console.log('Complete Error Response: ' + JSON.stringify(getItemsResponse['Errors'], null, 1)); console.log('Printing 1st Error:'); var error_0 = getItemsResponse['Errors'][0]; console.log('Error Code: ' + error_0['Code']); console.log('Error Message: ' + error_0['Message']); } } }; (async function(){ date=20200602 todate=20200602 for (date; date <= todate; date++) { var json = fs.readFileSync(__dirname + '/json/kindle_asin/'+date+'k.json', 'utf-8'); asinarry = JSON.parse(json); //c=a.ItemsResult.Items.concat(b.ItemsResult.Items); jsondata=[]; filename=date +'.json' for (let i = 0; i < asinarry.length; i += 10) { await sleep(3) asin =asinarry.slice(i, i+10) getItemsRequest['ItemIds'] = asin try { api.getItems(getItemsRequest, callback); } catch (ex) { console.log("Exception: " + ex); } }} })();これらを利用して作ったのが下のサイトである。
- 投稿日:2020-06-03T22:03:46+09:00
PA-API v5でAmazonの商品情報を取得する
PA-APIの利用
PA-API を使ってアマゾン商品情報をとってみよう。そこからアフィリエイトなどで収益化ができたら良いね。
PA-APIはアマゾンで一ヶ月以内に売上が発生していないと使えません。なので、アマゾンの商品リンク作成ツールや、ブログのアフィリエイトツールなどで売上を得られるように頑張ろう。ここが一番難易度が高い気がする。
アフィリエイトで売上が発生したら次に、ISBNやASINが必要となる。ただ、ASINを具体的にどのように取るかの選択が少ないので、アマゾンのサイトをクロールしている。
Amazonの検索結果からasinをスクレイピング
https://qiita.com/99nyorituryo/items/c5d53a3ca8a4967b5927ASINから商品情報のJSONを取得する
ここでは、ISBNやASINという本の情報から、アマゾンの表紙画像や、タイトル著者名、出版社、価格、本の種類などの情報を取得してサイトとして出力する方法を書く。
PAAPIでは、様々な言語用にツールが配布されているが、私はnode.jsが一番慣れているので、node.jsを用いた方法について書いていきます。node.jsのやり方は公式のページから見てみると良いのだけど。
https://affiliate.amazon.co.jp/help/node/topic/GZH32YX29UH5GACM
ここで得られたISBNをsampleGetItemsApi.jsを使ってアマゾンから書誌情報を取得する。
sampleGetItemsApi.jsは下記アドレスのnode.jsからダウンロードできる。
https://webservices.amazon.com/paapi5/documentation/quick-start/using-sdk.html
- paapi5-nodejs-sdk-and-samplesをダウンロードして展開して
- さっきのファイルを解凍したフォルダーで、npm install paapi5--nodejs-sdk --saveでインストール
- アクセスキーやシークレットキーをsampleGetItemsApi.jsなどのサンプルに追加
- またアフィリエイト用のパートナータグも追加(-22で終わるやつ)
- sampleGetItemsApi.jsを実行してみよう
というようなことが書かれています。
アクセスキーやシークレットキーは下から取得する。
https://affiliate.amazon.co.jp/assoc_credentials/homesampleGetItemsApi.jsを自分の目的に合うように書き換える。
初期状態では、amazon.co.jpになっていないので修正する必要がある。アクセスキーやシークレットキーを入力しないと実行できない。それから一度に取得できるasinは10個までになっている。それと待ち時間を設定しないとすぐエラーを吐くようである。
- 100個の情報を取得しようとすると、待ち時間を設定して取得している。
- key.jsonにアクセスキーやシークレットキー、アソシエイトタグにまとめている。
- dateが開始日でtodateが終了日になっていてまとめて取得できる。
- asinの配列は下の方法で作っている。
Amazonの検索結果からasinをスクレイピング
https://qiita.com/99nyorituryo/items/c5d53a3ca8a4967b5927{"accessKey":"アクセスキー","secretKey" :"シークレットキー","PartnerTag":"パートナータグ"}fs = require('fs'); var json = fs.readFileSync(__dirname + '/key.json', 'utf-8'); key = JSON.parse(json); function sleep(second) { return new Promise(resolve => { setTimeout(() => { resolve() }, second * 1000) }) } var ProductAdvertisingAPIv1 = require('./src/index'); var defaultClient = ProductAdvertisingAPIv1.ApiClient.instance; defaultClient.accessKey =key.accessKey// defaultClient.secretKey = key.secretKey// defaultClient.host = 'webservices.amazon.co.jp'; defaultClient.region = 'us-west-2'; var api = new ProductAdvertisingAPIv1.DefaultApi(); var getItemsRequest = new ProductAdvertisingAPIv1.GetItemsRequest(); getItemsRequest['PartnerTag'] =key.PartnerTag// getItemsRequest['PartnerType'] = 'Associates'; getItemsRequest['Resources'] =[ "BrowseNodeInfo.BrowseNodes", "BrowseNodeInfo.BrowseNodes.Ancestor", "BrowseNodeInfo.BrowseNodes.SalesRank", "BrowseNodeInfo.WebsiteSalesRank", "Images.Primary.Small", "Images.Primary.Medium", "Images.Primary.Large", "ItemInfo.ByLineInfo", "ItemInfo.ContentRating", "ItemInfo.Classifications", "ItemInfo.ExternalIds", "ItemInfo.ManufactureInfo", "ItemInfo.ProductInfo", "ItemInfo.Title", "Offers.Listings.Price"]; var callback = function (error, data, response) { if (error) { console.log('Error calling PA-API 5.0!'); console.log('Printing Full Error Object:\n' + JSON.stringify(error, null, 1)); console.log('Status Code: ' + error['status']); if (error['response'] !== undefined && error['response']['text'] !== undefined) { console.log('Error Object: ' + JSON.stringify(error['response']['text'], null, 1)); } } else { // console.log('API called successfully.'); var getItemsResponse = ProductAdvertisingAPIv1.GetItemsResponse.constructFromObject(data); console.log(JSON.stringify(getItemsResponse, null, 1)); jsondata=jsondata.concat(getItemsResponse.ItemsResult.Items); fs.writeFileSync(__dirname + '/json/kindle_paapi/'+filename, JSON.stringify(jsondata, null, 1),'utf-8') //console.log("test"+jsondata) if (getItemsResponse['Errors'] !== undefined) { console.log('\nErrors:'); console.log('Complete Error Response: ' + JSON.stringify(getItemsResponse['Errors'], null, 1)); console.log('Printing 1st Error:'); var error_0 = getItemsResponse['Errors'][0]; console.log('Error Code: ' + error_0['Code']); console.log('Error Message: ' + error_0['Message']); } } }; (async function(){ date=20200602 todate=20200602 for (date; date <= todate; date++) { var json = fs.readFileSync(__dirname + '/json/kindle_asin/'+date+'k.json', 'utf-8'); asinarry = JSON.parse(json); //c=a.ItemsResult.Items.concat(b.ItemsResult.Items); jsondata=[]; filename=date +'.json' for (let i = 0; i < asinarry.length; i += 10) { await sleep(3) asin =asinarry.slice(i, i+10) getItemsRequest['ItemIds'] = asin try { api.getItems(getItemsRequest, callback); } catch (ex) { console.log("Exception: " + ex); } }} })();これらを利用して作ったのが下のサイトである。
- 投稿日:2020-06-03T21:18:21+09:00
DjangoでVue.js(webpack)を扱うための備忘録
前書き
この記事はPythonをバックエンド(Djangoをフレームワークとして使用)、Node.jsでWebpackを用いてVue.jsをフロントエンドとして使用できるようにするための備忘録記事です。
node.jsの知識が浅いので、使い方を間違っていることもあります。ご了承ください。
また、この記事は
pipenvやyarnを使用しています。導入していない場合は導入してからこの記事を読むことをお勧めします。パッケージのインストール
Djangoのstartprojectで自動作成されたフォルダを基にします。
Python
pip install django
django-admin startproject django_vuejs
cd django_vuejs
pipenv --python 3
pipenv install django
pipenv install django-webpack-loader==0.7.0
node.js
yarn init -yp # package.jsonを作る(対話なし)
yarn add --dev @babel/core @babel/preset-env
yarn add --dev babel-loader css-loader sass-loader style-loader vue-loader vue-template-compiler
yarn add --dev webpack webpack-cli
yarn add --dev webpack-bundle-tracker@0.4.3
yarn add vue vuex vue-router
yarn add --dev clean-webpack-plugin # これは任意ですが、これを入れておくとビルドしたjsファイルがかさばらなくなるので導入推奨。
気をつけてほしいのは
webpack-bundle-trackerのバージョン指定です。バージョンが新しすぎてPython側のdjango-webpack-loaderが上手く動作しなかったため、バージョン指定しています1。念の為Python側のdjango-webpack-loaderのバージョンも指定してます。設定
webpack
webpack.config.jsvar path = require("path"); var webpack = require('webpack'); var BundleTracker = require('webpack-bundle-tracker'); var VueLoaderPlugin = require('vue-loader/lib/plugin'); var { CleanWebpackPlugin } = require('clean-webpack-plugin'); // clean-webpack-pluginを導入した場合は追記 module.exports = { context: __dirname, mode: process.env.NODE_ENV, entry: { main: './src-front/main.js' }, output: { filename: "[name]-[hash].js", path: path.resolve('./static/build/') }, plugins: [ new BundleTracker({ path: '.', filename: 'webpack-stats.json' }), // clean-webpack-pluginを導入した場合は追記(ここから) new CleanWebpackPlugin({ verbose: true }), // (ここまで) new VueLoaderPlugin() ], module: { rules: [ { test: /\.js$/, loader: 'babel-loader' }, { test: /\.vue$/, loader: 'vue-loader' }, { test: /\.scss$/, use: [ 'style-loader', 'css-loader', 'sass-loader' ] }, { test: /\.css$/, use: [ 'vue-style-loader', 'style-loader', { loader: 'css-loader', options: { url: false, sourceMap: true } } ] } ] }, resolve: { extensions: ['.js', '.vue'], modules: [ 'node_modules' ], alias: { 'vue': path.resolve('./node_modules/vue/dist/vue.js') } } }Django
django_vuejs/settings.py# (省略) INSTALLED_APPS = [ # ... # 以下の文を追記 'webpack_loader', ] # 追記 WEBPACK_LOADER = { 'DEFAULT': { 'CACHE': not DEBUG, 'BUNDLE_DIR_NAME': 'build/', 'TIMEOUT': None, 'STATS_FILE': os.path.join(BASE_DIR, 'webpack-stats.json'), 'IGNORE': [r'.+\.hot-update.js', r'.+\.map'] } } STATICFILES_DIRS = [ os.path.join(BASE_DIR, 'static') ]package.json
package.json内に以下の内容を追記します。
--progressオプションはwebpackの進捗状況を可視化できるオプションのため、不要であれば付ける必要はありません。package.json"scripts": { "dev": "webpack --mode development --progress", "build": "webpack --mode production --progress", "watch": "webpack --watch -d --progress" },メインページ
これがフロントエンドがベースとなるファイルです。ここにwebpackでビルドしたCSSやjavascriptのリンクが埋め込まれます。
template/index.html{% load render_bundle from webpack_loader %} <!DOCTYPE html> <html> <head> <meta charset="utf-8"> <title>django_vuejs</title> {% render_bundle 'main' 'css' %} </head> <body> <noscript> <p>Your browser is disabled JavaScript. To use this web application, please enable JavaScript.</p> </noscript> <div id="app"></div> {% render_bundle 'main' 'js' %} </body> </head>Django URL
※今回は1ファイルにまとめていますが、適宜場所を移してください。
django_vuejsfrom django.contrib import admin from django.urls import path from django.shortcuts import render def index(request): return render(request, "index.html") urlpatterns = [ path('admin/', admin.site.urls), path('', index, name="index"), ]フロントエンド
src-front/main.jsimport Vue from 'vue' import App from './App' import router from './router.js' import store from './store' Vue.config.productionTip = false const app = new Vue({ el: '#app', router, store, template: "<App/>", components: { App } })src-front/App.vue<template> <div> <p>Hello World!</p> <router-view></router-view> </div> </template> <script> export default { name: 'App' } </script> <style> </style>
./router.jsや./storeはVue.jsのコマンドで自動生成されるものともろ一緒なので、申し訳ないのですが割愛します。gitignore (gitで管理する場合は設定)
.gitignore# 追記 /static/build/ /webpack-stats.jsonビルド
本番用でビルドする場合は
yarn run build、
開発用としてビルドする場合はyarn run devまたはyarn run watch(フロントエンド系のソースを集中的に弄る場合は推奨)
のコマンドを実行します。ビルドが完了したら
python manage.py runserverでDjangoの開発サーバーを起動し、http://localhost:8000/にアクセスすると、表示されるはずです。参考文献
- 投稿日:2020-06-03T21:17:30+09:00
【ドットインストール】Node.js講座の仕様変更点【 #15 ドキュメントを挿入してみよう】
はじめに
ドットインストールのNode.js講座は最終更新日が2014年のままアーカイブされていて、講座内容そのままやってもうまくいかない箇所がある。
「» #15 ドキュメントを挿入してみよう」
の章では、Node.jsのMongoClientの仕様が変わっているため、エラーが出てしまった。新しい仕様に対応した正しいやり方をメモしておく。mongoDBの公式ドキュメントでは、バージョン3以降、MongoClient.connectにリターンする値がDBからClientに変わったと書かれている。
「What’s new in 3.0
・MongoClient.connect now returns a Client instead of a DB.」http://mongodb.github.io/node-mongodb-native/3.0/upgrade-migration/main/
mongoDBに割り当てられているアドレスを知る
MongoClient.connectを記述する時、第一引数に、mongoDBに割り当てられているアドレスを記述する必要がある。
デフォルトでmongoDBに割り当てられているアドレスを知るには、ターミナルで「mongo」コマンドを入力し、mongoDBがどのアドレスにconnectしているか調べる
講座のままだとエラーになる箇所
ドットインストールの講座のコードのまま実行すると、ターミナルに「node mongo.js」を入力した際に以下のエラーが返ってくる。
TypeError: db.collection is not a function
原因は、MongoDB 3.0以降、MongoClient.connectにリターンする値がDBからClientに変わったこと。
<ドットインストールのコードの問題箇所>MongoClient.connect("mongodb://"+settings.host+"/"+settings.db, function(err, db) { //dbはリターンされないので引数に取れない if (err) { return console.dir(err); } console.log("connected to db"); db.collection("users", function(err, collection) { //dbはリターンされてないので存在しない<MongoDB 3.0に対応したコード>
var MongoClient = require('mongodb').MongoClient

//データベースに接続する関数に渡す第一引数である、mongoDBのアドレスは、定数に格納する方がスッキリする
const url = 'mongodb://localhost:127.0.0.1:27017/myDB'

  // callbackに渡されるオブジェクトが(err, db)から(err, client)に変わった
    MongoClient.connect(url, (err, client)=> {
  // db名を指定してdbオブジェクトを取得する必要がある
      const db = client.db('localhost:127.0.0.1:27017')

    if (err) { return console.dir(err); }
    console.log("connected to db");
    db.collection("users", function(err, collection) {
        var docs = [
            {name: "taguchi", score: 40},
            {name: "fkoji", score: 80},
            {name: "dotinstall", score: 60}
        ];
        collection.insert(docs, function(err, result) {
            console.dir(result);
        });
    });
});
データベースの確認方法
①ターミナルから確認
ターミナルに「node mongo.js」を入力すると、insertしたdocsの値が表示される②mongoDBから確認
ターミナルに「mongo」を入力しmongoDBを起動>show dbs;
localhost:27017 0.000GB
このデータベースに挿入したドキュメントが入っている>show collections;
users
作成したusersコレクションが表示されている>db.users.find();
insertしたdocsの値ががmongoDBに挿入されていると確認できる。参考文献
Node.jsのMongoClientの仕様が変わってた
https://qiita.com/mimizq/items/76d3a948acb33881c8dbNode.jsからMongoDBに接続してみる
https://qiita.com/one-kelvin/items/c0c036f774f0b3b98ae5

- 投稿日:2020-06-03T17:56:05+09:00
LoopBack4の概要 & Examples validation-appを動かしてみる
最近LoopBack4を使ってAPIを作っているので、LoopBack4の概要をお伝えしたいです。
LoopBack4の概要
Node.js TypeScript/ES2017で実装された主にAPI向けのWEBフレームワークです。
IBMが買収したStrongLoopの開発しているOSSで、MITライセンスで公開されています。TypeScriptのDecorator(アノテーション)でDependency Injectionの定義を行ったり、Modelのプロパティに付与することでOpenAPIのドキュメントを生成することが可能です。
self-hostedのREST API Explorerがあり、Modelを書いたらすぐに参照できるので、コードとドキュメントが必ず一致します。
また、CLIが用意されており、基本的なコードを生成したり、Exampleをインストールすることが可能です。
https://loopback.io/index.html
https://github.com/strongloop/loopback-next環境の前提条件
- macOS Catalina 10.15.5
- Node.js v14.1.0
- npm v6.14.5
LoopBack4 CLIのインストール
$ npm i -g @loopback/cliExamplesのvalidation-app
Modelに定義した@property Decoratorや、Interceptorを利用したValidationのサンプルプロジェクトです。
https://github.com/strongloop/loopback-next/tree/master/examples/validation-app
インストール
$ lb4 example validation-app起動
$ cd loopback4-example-validation-app
$ npm runn start

> @loopback/example-validation-app@1.5.0 prestart /Users/tomiyan/dev/loopback4-example-validation-app
> npm run build


> @loopback/example-validation-app@1.5.0 build /Users/tomiyan/dev/loopback4-example-validation-app
> lb-tsc


> @loopback/example-validation-app@1.5.0 start /Users/tomiyan/dev/loopback4-example-validation-app
> node -r source-map-support/register .

Server is running at http://[::1]:3000
REST API Explorer
ブラウザで
http://localhost:3000/explorer/
を開いてみてください。
下記のようなREST API Explorerが閲覧可能できるはずです。これは、Controllerの
@get、@post、@patch、@put、@del、@param、@requestBodyやModelの@propertyを元に自動的に生成されます。
Validationの動作確認
POST /coffee-shopsのValidationを試してみましょう
Controllerの
@postでModelのSchemaを参照するように定義されています。また、Controllerの
@interceptでinterceptorが実行されるように定義されています。Modelでは
@propertyで下記のようなjsonSchemaが定義されています。
- city
string
- maxLength
10- minLength
1- phoneNum
string
- pattern
\\d{3}-\\d{3}-\\d{4}- capacity
number
- maximum
100- minimum
1Interceptorでは、
cityが'toronto'の場合、phoneNumのprefixが'416'か'647'でなければならないという実装がされています。正常系
RequestBody{ "city": "tokyo", "phoneNum": "031-234-5678", "capacity": 1 }Status Codeは200が返ってきます。
ResponseBody{ "shopId": "1", "city": "tokyo", "phoneNum": "031-234-5678", "capacity": 1 }※shopIdはインメモリデータベースで連番が振られます
cityのmaxLengthを超えてみる
RequestBody{ "city": "kasumigaura", "phoneNum": "031-234-5678", "capacity": 1 }Status Codeは422が返ってきます。
ResponseBody{ "statusCode": 422, "message": "My customized validation error message", "resolution": "Contact your admin for troubleshooting.", "code": "VALIDATION_FAILED" }cityがtorontoでphoneNumのprefixを'416'か'647'以外にしてみる
RequestBody{ "city": "toronto", "phoneNum": "031-234-5678", "capacity": 1 }Status Codeは400が返ってきます。
ResponseBody{ "error": { "statusCode": 400, "name": "Error", "message": "Area code and city do not match" } }まとめ
LoopBack4でのOpenAPIの定義やValidationの動きなどのさわりについて説明しました。
その他にも、Dependency InjectionやORMが備わっているフレームワークになっています。
興味がある方はそのへんも調べてみてはいかがでしょうか。参考資料


- 投稿日:2020-06-03T16:41:24+09:00
webpack3からwebpack4へバージョンアップ
保守できていなかったwebpackのバージョンをあげた際の記録です。
メモレベルで恐縮ですが、よかったら参考にしてください。モチベーション
- 最新のTypeScriptを導入したい
- ビルドを速くしたい
移行手順
基本的にはこちらのマイグレーションガイド通りです。
https://webpack.js.org/migrate/4/
- package.jsonの修正
- modeの追加
- pluginの設定見直し
- loaderのバージョンアップ
移行手順詳細
package.jsonの修正
https://github.com/webpack/webpack/releases
こちらを参考にwebpackの箇所のバージョンを修正しました。package.json"webpack": "^4.42.0"npm installyarnの方は
yarn installしてください。modeの追加
productionとdevelopmentの二つがありwebpack.config.jsに記載しないと警告がでます。
本番用と開発用ですね。
圧縮されるかどうかなどの違いがあります。webpack.config.jsmodule.exports = { //... mode: 'production', //... }pluginの設定見直し
3rd partyのプラグインのバージョンアップや一部機能がデフォルトになったため(modeの記述でOKになったため)見直しをしました。
before
webpack.config.jsmodule.exports = { //... plugins: [ new webpack.optimize.UglifyJsPlugin({}) ] //... }after
webpack.config.jsmodule.exports = { //... mode: 'production' //... }loaderのバージョンアップ
Cannot read property 'babel' of undefinedビルドすると、上記のログが出たので
babel-loaderをバージョンアップしました。
最新版にしたかったのですが、babelのバージョンアップとは切り分けたかったのでpackage.json"babel-loader": "^7.1.5"で対応しました。
babel-loaderの8系移行を使うには
https://koukitips.net/if-you-raise-the-babel-loader-to-v8-the-solution-is-when-you-get-an-error/
この辺りを参考にする必要がありそうです。参考
https://webpack.js.org/migrate/4/
https://thebrainfiles.wearebrain.com/moving-from-webpack-3-to-webpack-4-f8cdacd290f9
https://auth0.com/blog/webpack-4-release-what-is-new/#L7--Faster-Build-Times
- 投稿日:2020-06-03T16:37:51+09:00
webpack1からwebpack3へバージョンアップ
保守できていなかったwebpackのバージョンをあげた際の記録です。
メモレベルで恐縮ですが、よかったら参考にしてください。モチベーション
- TypeScriptを導入したい(1だとts-loaderが対応していない)
- ブラウザでのjs実行を速くしたい
なぜ2ではなく、3なの?
https://webpack.js.org/migrate/3/
公式でNote that there were far fewer changes between 2 and 3, so that migration shouldn't be too bad. If you are running into issues, please see the changelog for details.
となっていて、移行ガイドも
To v2 or v3 from v1
となっているから。また、
https://medium.com/webpack/webpack-3-official-release-15fd2dd8f07bMigrating from webpack 2 to 3, should involve no effort beyond running the upgrade commands in your terminal. We marked this as a Major change because of internal breaking changes that could affect some plugins.
とも。
使用ライブラリ
- Grunt
- Webpack
- Bower
移行手順
- package.jsonの修正
- bower対応
- DedupePlugin,OccurenceOrderPlugin
- grunt-webpackバージョンアップ
- moduleDirectories
- resolve
- module
- debug
移行手順詳細
package.jsonの修正
webpackの箇所のバージョンを修正
package.json"webpack": "^3.12.0"npm installyarnの方は
yarn installしてくださいbower対応
bowerとは、公式で非推奨になっていますが、フロントエンド周りのパッケージマネージャーです。
将来的使わないようにしたいですが、今回はwebpackのバージョンアップに専念しています。webpack.config.jsnew webpack.ResolverPlugin( new webpack.ResolverPlugin.DirectoryDescriptionFilePlugin("bower.json", ["main"]) )上記はwebpackでbower管理のファイルを読み込む際のお作法のようなものです。
https://github.com/webpack/webpack/issues/2324
It was removed. There is now a option resolve.plugins. But for bower you don't need a plugin anymore, as the resolve options has been expanded.
See: https://gist.github.com/sokra/27b24881210b56bbaff7#resolving-optionsに書かれていますが、
webpack.config.jsdescriptionFiles: ["package.json", "bower.json"]をwebpack.config.jsのresolveに書いて対応しました。
参考
http://js.studio-kingdom.com/webpack/getting_started/using_plugins
DedupePlugin,OccurenceOrderPlugin
https://teratail.com/questions/93933
OccurenceOrderPluginは、Webpack2でOccurrenceOrderPlugin(rが2つ)と改名されています(Issue)。
DedupeはWebpack2ではデフォルトの動作となったので、プラグインとしては不要です。とのこと。
grunt-webpackバージョンアップ
ビルドすると以下のエラーがでました。
configuration has an unknown property 'failOnError'. These properties are valid:こちらはバージョンアップで対応しました。
package.json"grunt-webpack": "^3.1.3"参考
https://github.com/webpack-contrib/grunt-webpack/issues/81
moduleDirectories
ビルドすると以下のエラーがでました。
configuration.resolve has an unknown property 'modulesDirectories'. These properties are validhttps://webpack.js.org/migrate/3/#resolveroot-resolvefallback-resolvemodulesdirectories
公式ガイドのresolve.modulesDirectoriesを参考に修正しました。before
webpack.config.jsresolve: { root: path.resolve(__dirname, "../js/dirname/"), modulesDirectories: [ path.resolve(__dirname, "node_modules"), path.resolve(__dirname, "bower_components") ] },after
webpack.config.jsresolve: { modules: [ path.resolve(__dirname, "../js/dirname/"), path.resolve(__dirname, "node_modules"), path.resolve(__dirname, "bower_components") ], descriptionFiles: ["package.json", "bower.json"] },descriptionFilesは前述したbower対応です。
同様にresolveloaderでもmodulesDirectoriesを使用していたので、modulesにリネームしました。module.loaders
https://webpack.js.org/migrate/3/#moduleloaders-is-now-modulerules
こちらに沿って変更しました。https://webpack.js.org/migrate/3/#automatic--loader-module-name-extension-removed
また、ドキュメントにあるようにwebpack.config.jsloader: "babel"ようにサフィックスを省略してはいけなくなり
webpack.config.jsloader: "babel-loaderのようにしました。
debug
https://webpack.js.org/migrate/3/#debug
こちらに沿って変更しました。before
webpack.config.jsdebug: true,after
webpack.config.jsplugins: [ new webpack.LoaderOptionsPlugin({ debug: true }) ]参考
公式移行ガイド
https://webpack.js.org/migrate/3/#moduleloaders-is-now-modulerules
他にも
https://qiita.com/uggds/items/2ee337c5843aae28a34a
https://blog.hiroppy.me/entry/2017/02/03/212817
- 投稿日:2020-06-03T05:50:07+09:00
【DynamoDB】条件付き書き込み(ConditionExpression)を使ってupdateItemで新規項目を追加しないようにする
DynamoDBのupdate処理で、テーブルに存在しない項目を指定すると、新規項目としてテーブルに追加されてしまいます(UpdateItem)。
条件付き書き込み(ConditionExpression)を使用し、updateで存在しない項目を指定した時に、テーブルに追加されずに何も変化しない状態になるよう実装します。環境
- macOS
- AWS Cloud9
- Node.js 12
AWS.DynamoDB.DocumentClient
JavascriptでDynamoDBを操作するとき、AWS.DynamoDBを使う方法とAWS.DynamoDB.DocumentClientを使う方法の2パターンがあるのですが、AWS.DynamoDB.DocumentClientを使う方が、DBを操作するときにデータの型を指定せずにコードを書くことができて便利なので、今回はこちらを使用しています。
AWS.DynamoDBとの違いは、データ型の指定が不要な点と、メソッド名がやや異なるくらいで、メソッドの具体的な仕様は全く同じと考えて良さそうです。(AWS.DynamoDB.DocumentClient 公式ドキュメント)実行コード
const AWS = require('aws-sdk');
const DB = new AWS.DynamoDB.DocumentClient();

exports.handler = async(event, context) => {
    const dbParams = {
                        TableName: "tableName",
                        Key:{
                            timestamp: XXXXXX
                            message: "message"
                        },
                        ExpressionAttributeNames: {
                            '#s': 'status'
                        },
                        ExpressionAttributeValues: {
                            ':status': true
                        },
                        ReturnValues: 'ALL_NEW',
                        UpdateExpression: 'SET #s = :status',
                        ConditionExpression: 'attribute_exists(#s)' // ここで条件を指定
                    };
    const data = await DB.update(dbParams).promise();
    return data
}
ここで、
ConditionExpression: 'attribute_exists(#s)'によって、「
timestamp属性の値がXXXXXX、message属性の値が"message"である項目のうち、statusという属性を持つ項目が存在している場合」のみ、updateが実行されるようになります。
つまり、そもそも指定したtimestampやmessageを持つ項目が存在しなければ、何も実行されずに済むということです。ConditionExpression
ConditionExpressionに使用できる演算子・関数は、
比較演算子: = | <> | < | > | <= | >= | BETWEEN | IN
論理演算子: AND | OR | NOT
関数: attribute_exists | attribute_not_exists | attribute_type | contains | begins_with | size
となっています。(参考:公式ドキュメント)各関数について簡単に説明しておくと、
- attribute_exists(path):キーで指定した項目にpathという属性が存在する場合に実行
- attribute_not_exists(path):キーで指定した項目にpathという属性が存在しない場合に実行
- attribute_type(path, type):pathという属性の値がtypeで指定したデータ型であれば実行
- begins_with(path, substr):pathという属性の値がsubstrで指定した文字列で始まる場合に実行
- contains(path, operand):pathという属性の値がoperandを含んでいれば実行
- size(path):pathで指定した属性のサイズを返す。例えば、
size(path) < 3のようにして使うとなっております。
各演算子や関数に関する詳細は、こちらのリファレンスをご覧ください。実行に失敗したとき
指定したDBの操作がConditionExpressionの制約に反し、実行されなかった場合には、ConditionExpressionという例外が吐かれます。
例外時に何か処理を施したい場合は、try~catchでConditionExpressionをcatchしてあげると良さそうです。ご参考までに。
- 投稿日:2020-06-03T05:50:07+09:00
【DynamoDB】updateItemで新規項目を追加しないようにする 〜条件付き書き込み(ConditionExpression)を使って〜
DynamoDBのupdate処理で、テーブルに存在しない項目を指定すると、新規項目としてテーブルに追加されてしまいます(UpdateItem)。
条件付き書き込み(ConditionExpression)を使用し、updateで存在しない項目を指定した時に、テーブルに追加されずに何も変化しない状態になるよう実装します。環境
- macOS
- AWS Cloud9
- Node.js 12
AWS.DynamoDB.DocumentClient
JavascriptでDynamoDBを操作するとき、AWS.DynamoDBを使う方法とAWS.DynamoDB.DocumentClientを使う方法の2パターンがあるのですが、AWS.DynamoDB.DocumentClientを使う方が、DBを操作するときにデータの型を指定せずにコードを書くことができて便利なので、今回はこちらを使用しています。
AWS.DynamoDBとの違いは、データ型の指定が不要な点と、メソッド名がやや異なる(〇〇Itemが〇〇になる)くらいで、メソッドの具体的な仕様は全く同じと考えて良さそうです。(AWS.DynamoDB.DocumentClient 公式ドキュメント)実行コード
const AWS = require('aws-sdk');
const DB = new AWS.DynamoDB.DocumentClient();

exports.handler = async(event, context) => {
    const dbParams = {
                        TableName: "tableName",
                        Key:{
                            timestamp: XXXXXX
                            message: "message"
                        },
                        ExpressionAttributeNames: {
                            '#s': 'status'
                        },
                        ExpressionAttributeValues: {
                            ':status': true
                        },
                        ReturnValues: 'ALL_NEW',
                        UpdateExpression: 'SET #s = :status',
                        ConditionExpression: 'attribute_exists(#s)' // ここで条件を指定
                    };
    const data = await DB.update(dbParams).promise();
    return data
}
ここで、
ConditionExpression: 'attribute_exists(#s)'によって、「
timestamp属性の値がXXXXXX、message属性の値が"message"である項目のうち、statusという属性を持つ項目が存在している場合」のみ、updateが実行されるようになります。
つまり、そもそも指定したtimestampやmessageを持つ項目が存在しなければ、何も実行されずに済むということです。ConditionExpression
ConditionExpressionに使用できる演算子・関数は、
比較演算子: = | <> | < | > | <= | >= | BETWEEN | IN
論理演算子: AND | OR | NOT
関数: attribute_exists | attribute_not_exists | attribute_type | contains | begins_with | size
となっています。(参考:公式ドキュメント)各関数について簡単に説明しておくと、
- attribute_exists(path):キーで指定した項目にpathという属性が存在する場合に実行
- attribute_not_exists(path):キーで指定した項目にpathという属性が存在しない場合に実行
- attribute_type(path, type):pathという属性の値がtypeで指定したデータ型であれば実行
- begins_with(path, substr):pathという属性の値がsubstrで指定した文字列で始まる場合に実行
- contains(path, operand):pathという属性の値がoperandを含んでいれば実行
- size(path):pathで指定した属性のサイズを返す。例えば、
size(path) < 3のようにして使うとなっております。
各演算子や関数に関する詳細は、こちらのリファレンスをご覧ください。実行に失敗したとき
指定したDBの操作がConditionExpressionの制約に反し、実行されなかった場合には、ConditionExpressionという例外が吐かれます。
例外時に何か処理を施したい場合は、try~catchでConditionExpressionをcatchしてあげると良さそうです。ご参考までに。
- 投稿日:2020-06-03T00:33:05+09:00
Reactの人気を超えたASP.NET Coreとは?
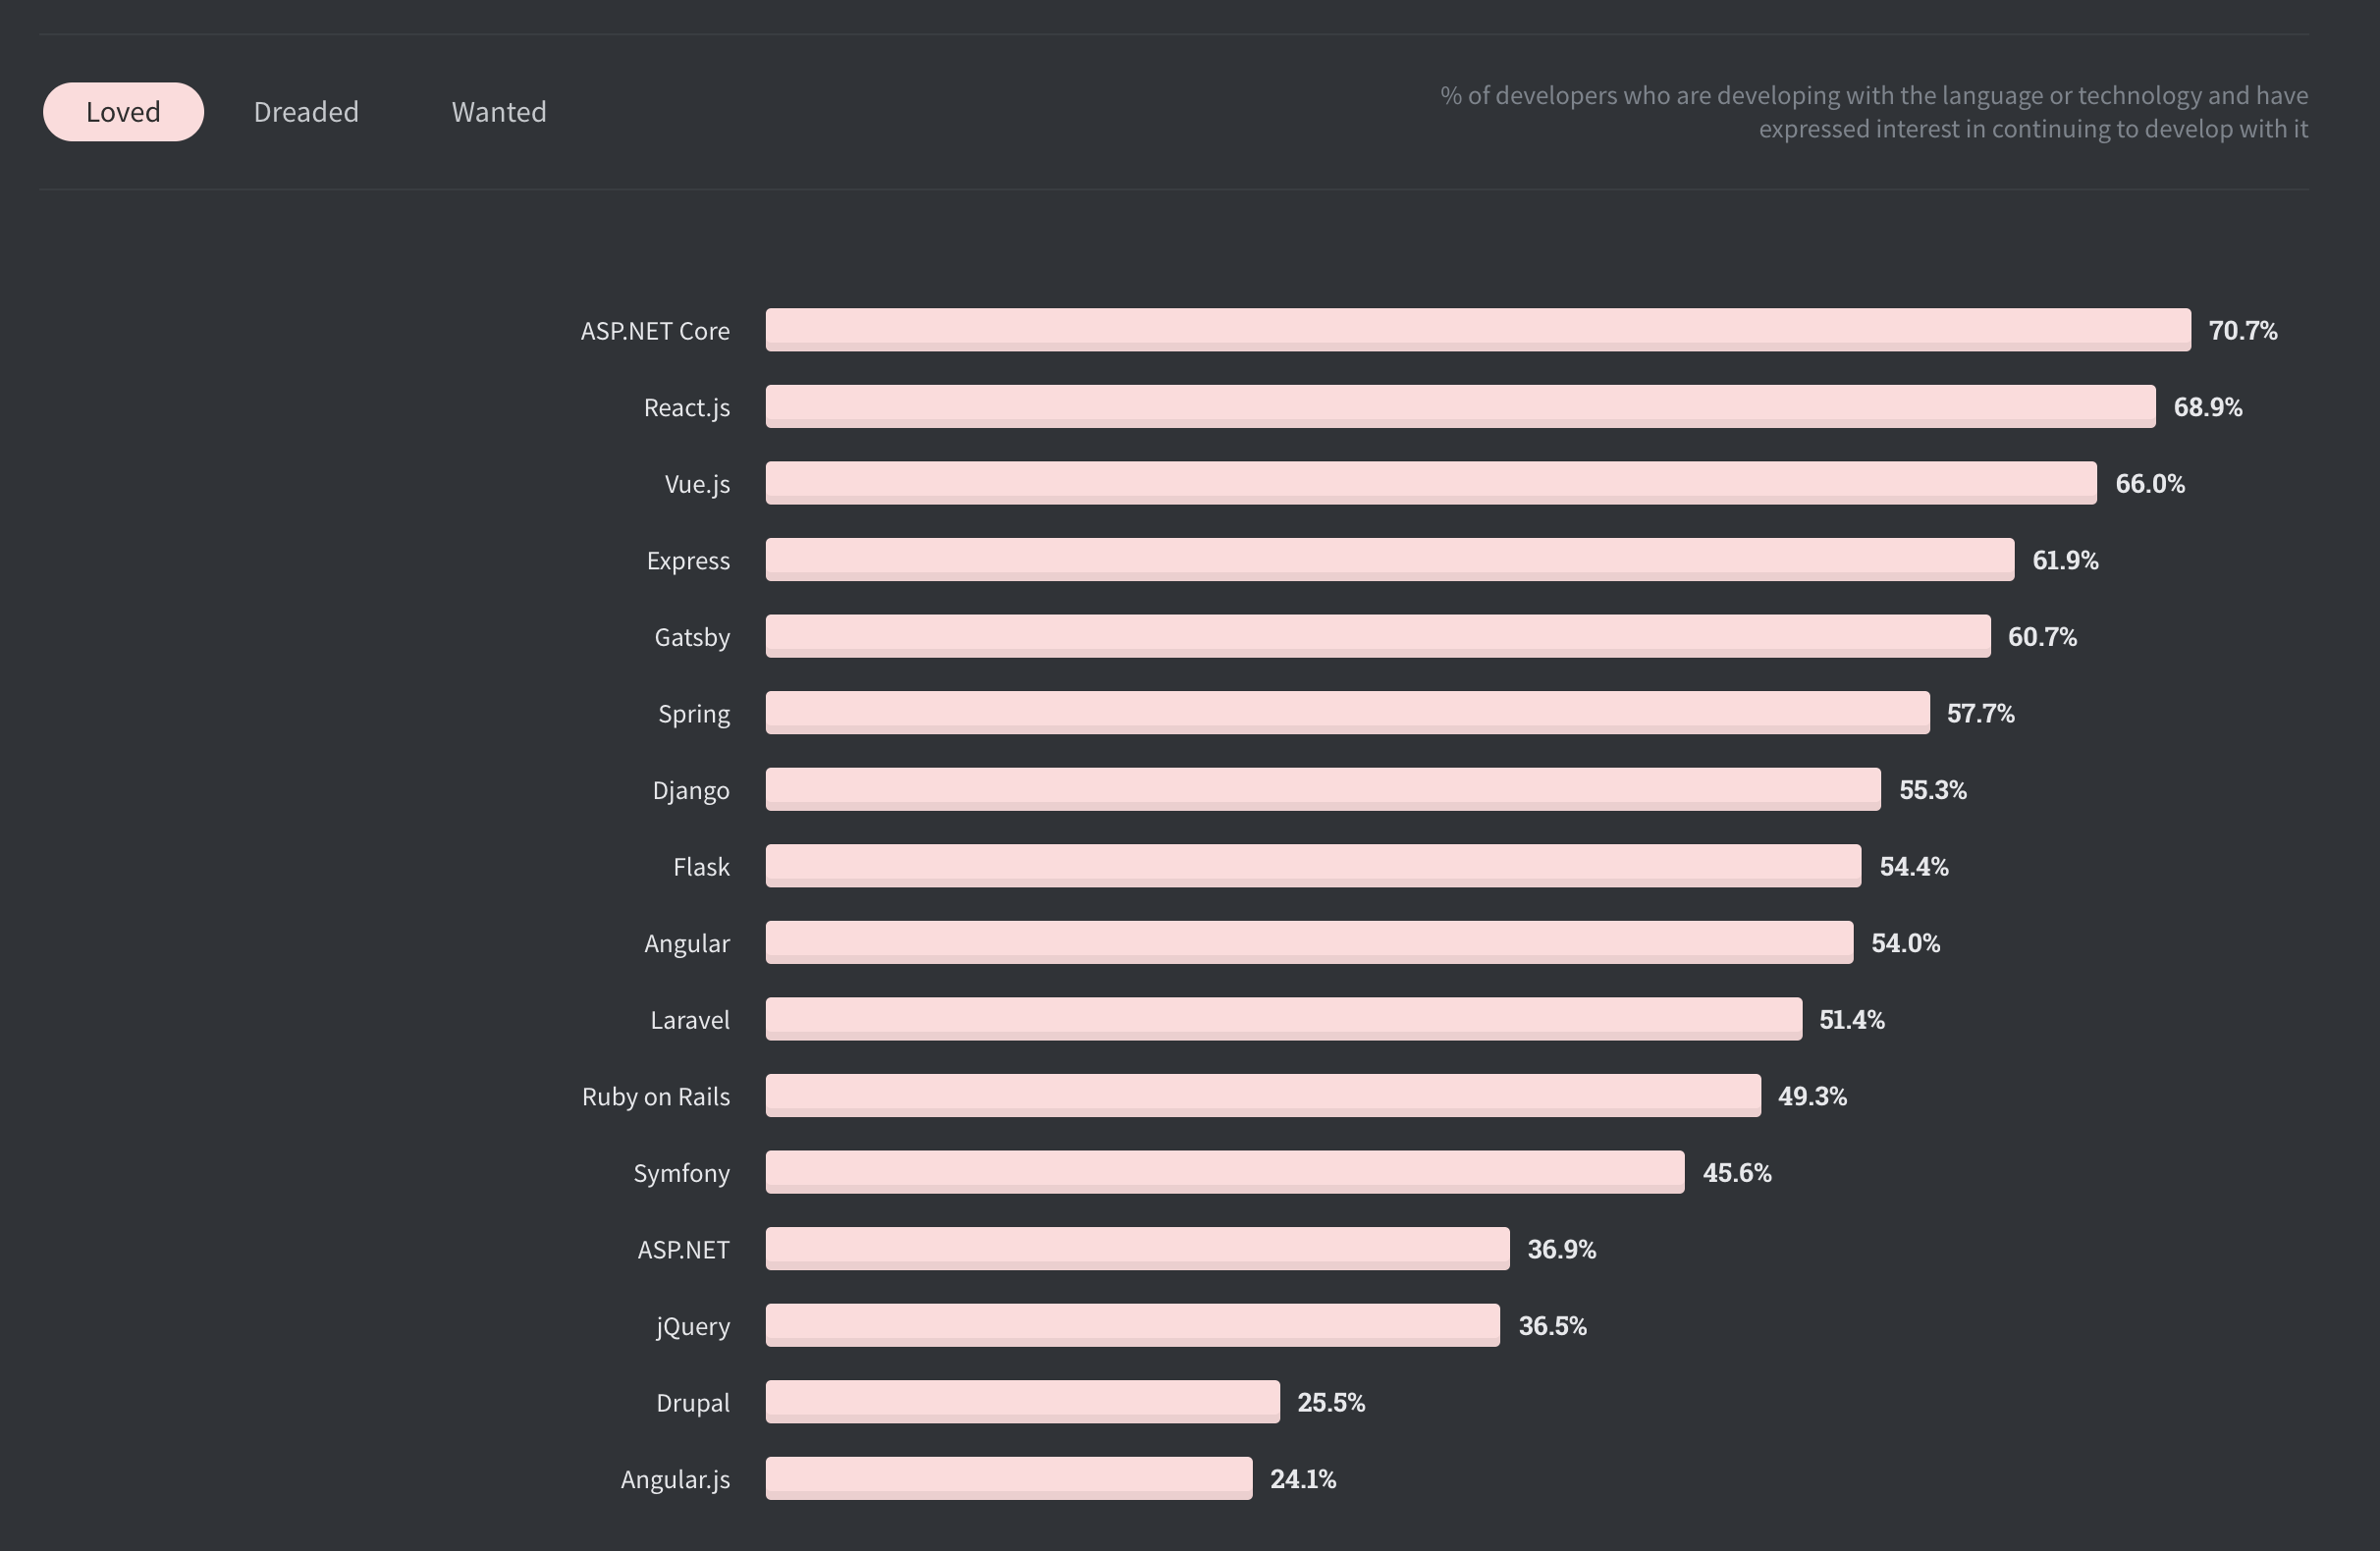
2020 Web Developer Survey
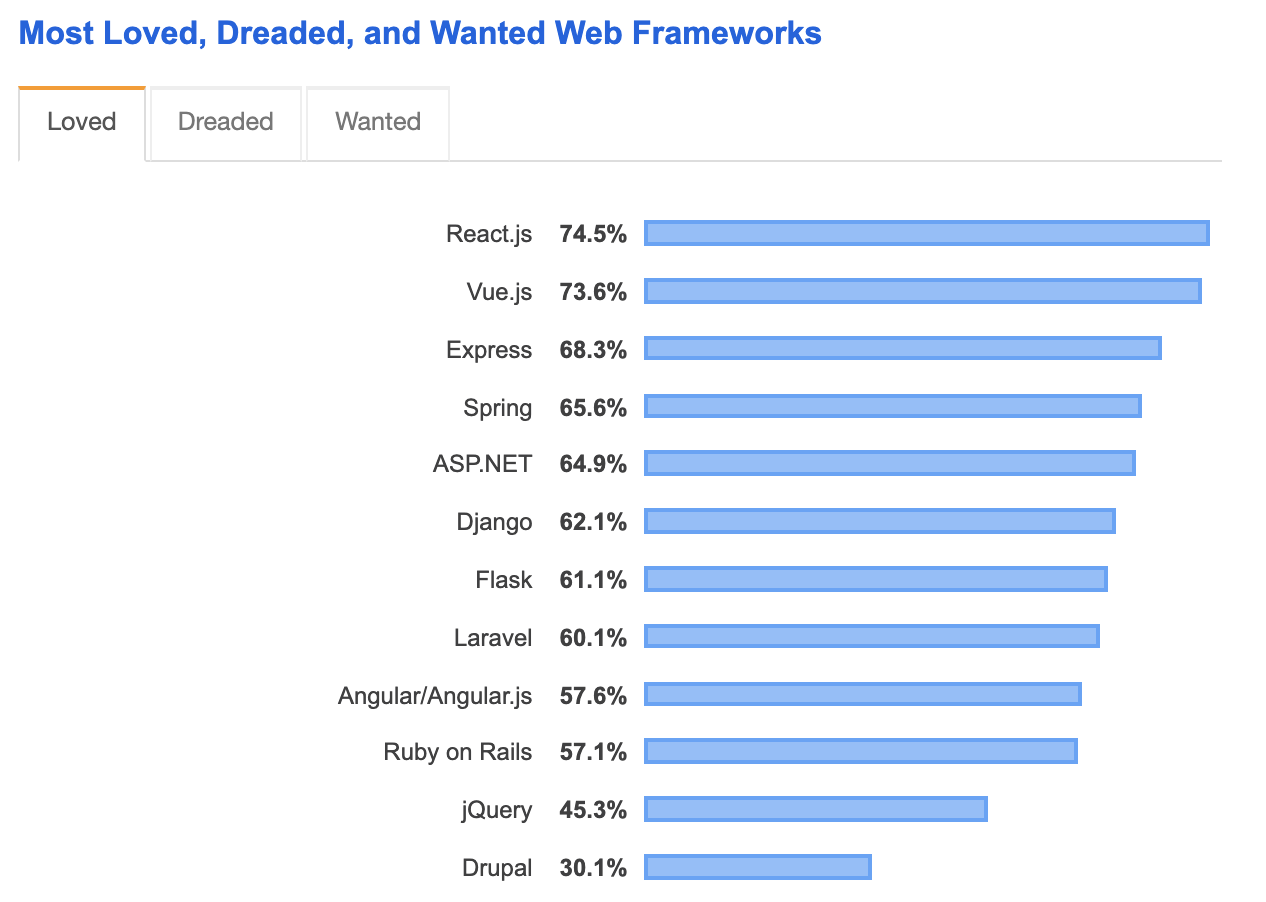
StackOverflowの2020 Web Developer Surveyの「最も愛されるWebフレームワーク」分野で、ASP.NETがReactを超えて1位になりました。なんとなく聞いたことはあるのですが、実際にどのようなものかを調べてみました。
ASP.NETを普段から使ってるわけではないので、間違った内容があればご訂正して頂ければと思います。
Fullstack Web Framework
ASP.NETは、Microsoftが開発した開発者プラットフォームで、C#、F#、Visual Basicを利用して様々なアプリケーションを開発できるようにしたものです。
iOS・AndroidアプリをXamarinで開発でき、IoT・デスクトップ・機械学習なども作れます。
その中でもASP.NET Coreは、Webのフロントエンド・バックエンド開発が可能です。使用している会社
ASP.NET Coreは、テンセントやStackOverflow、GoDaddyなど、巨大なWebサイトで使用されてます。
理由としては、エンタープライズが使いやすい仕様であることと、パフォーマンスがとても早いからです。
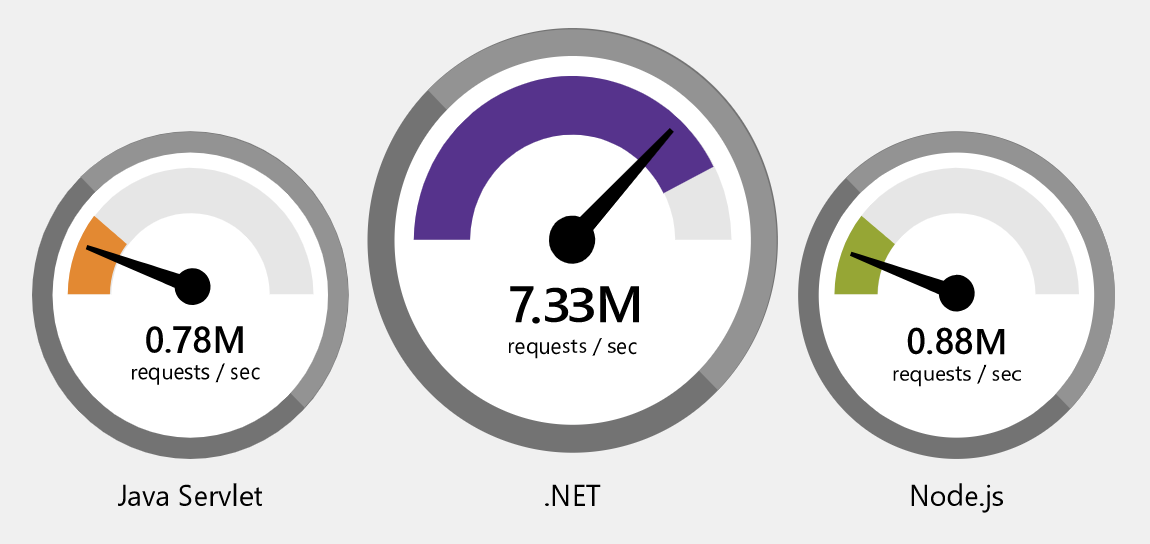
Node.jsやJavaのバックエンドが一秒に80万回程度のリクエストを処理できる反面、.NETでは約700万(7.33 million)リクエストを処理できます。なので、高いパフォーマンスが求められるサービスに適していると思われます。
Blazor
Reactを超えた人気を誇るようになった理由としては、Blazorが挙げられると思われます。
Blazorを使えば、フロントエンドをC#でビルドできます。<h1>counter</h1> <p>Current count: @currentCount</p> <button class="btn btn-primary" @onclick="IncrementCount">Click me</button> @code { private int currentCount = 0; private void IncrementCount() { currentCount++; } }Node.jsが人気になった理由同様、バックエンドもフロントエンドもC#で開発できるのは大きいメリットです。コードはC#で書き、コンパイルはWeb Assemblyを利用、必要なJSのAPIやライブラリーはJavaScript Interopで呼び出せます。
また、Blazorを利用すれば、クライアントロジックをサーバーで処理することもできます。つまり、クライアントサイドとサーバーサイドのインタラクティブさのみならず、SSRレベルのセキュリティも持てるようになります。
JavaScriptのエコシステムとの差
ASP.NET CoreはJS同様、同じ言語でフルスタックな開発ができるのにメリットがありますが、JSのエコシステムとの決定的な差は、JSは開発者の力量に頼りがちという点です。
JSの場合、開発環境の構築のために様々なオープンソースライブラリーをダウンロードし、自分なりの設定をしていかなければなりません。ASP.NET CoreはMSが多くのリソースを投資して誕生した「ビジネスプロダクト」なので、完成度が高く、すべてがフレームワーク内に用意されています。
最後に
いかがだったでしょうか。普段からC#を触ってらっしゃる方々には嬉しい調査結果かもしれません。
ちなみに2019年の同じ調査では、ASP.NETは5位を記録していたので、早いスピードで人気を獲得しているのがわかりますね。
それにしても、最近コードエディターはVS Code、コードベースはGithub、フレームワークはASP.NETと、Microsoftの進撃が止まらないですね…
追記(20/06/04)
@unsignedint さんから補足頂いたので、本文に追記させてもらいました。表題では合っていますが、文中のASP.NETはASP.NET Coreですね。この両者、かなり別物ですので……。グラフにも出ていますが、ASP.NETの方は環境を選ぶこともあるのか、13位にとどまっています。ASP.NET Coreはプラットフォームの自由度が非常に高くなったので一定のブレイクが見られたということかと思います。
この結果は非常に面白いと思います。というのも、Blazorは比較的新しい技術(サーバー版は去年の後半、WebAssemblyは今年の5月にGM)であり、中にはプレビュー版を試用していた回答者もいるかと思いますが、Blazorがどの程度の影響を与えたのかは興味深いところです。(ASP.NET Core自体は、Blazorを使わなくてもウェブアプリが開発できますので……現時点ではまだそちらが主流かと思います。)
また、ASP.NET Coreの人気度が高い一方、Wantedの方ではReactが依然と高くなっているため、使用者からみてASP.NET Coreの満足度が高い一方、他のフレームワークの使用者から引き寄せる力がまだまだ低い、ということなのではないかと解釈しています。
先月、Blazorサーバー・WebAssemblyが出揃い、また、今後のリリースでパフォーマンスの向上等が予定されていることを考えると、今後、更に飛躍する可能性が高そうですし、また、Wantedの方も伸びていくかもしれません。(伸びればいいな、と思っています。Blazor非常に快適なので……。)
@unsignedint
- 投稿日:2020-06-03T00:27:48+09:00
テストもES moduleとして静的に検証させたいって話
テストケース自体も静的に厳密に検証したい
ES moduleのコードでは「関数名や変数名の誤記」をESLintなどで容易に静的に検出できますが、テストをES moduleとして書く時にはこの性質がかえって邪魔になることがあります。
たとえばMochaのテストケースには、何の前触れもなく
describe()やit()などの関数が登場します。これらが「未定義の関数呼び出し」としてエラーにならないようにするには、テストと実装でESLintのルールを切り替えて警告条件を緩和したり、テスティングフレームワークの関数やオブジェクトを警告の例外に明示したりといった対策が必要になります。しかし、警告を甘くすればテストだけ静的な検証が甘くなります1し、警告の例外を指定するのもテストの作成やメンテナンスが煩雑になります。
このように、テストの書きやすさ・維持しやすさと静的な検証の完全性とを両立しにくいのが個人的に気になっていた点でした。
Pure ES modulesなテスティングフレームワークつくった
というわけで、このような難点がないPure ES modulesなテスティングフレームワークを作ってみました。
Node.js v13以上の環境で、
npm install tiny-esm-test-runnerでインストールできます。元々は、特定プロジェクトでのCI用に簡易的なテストランナーを書いて使い捨てにしていたのですが、それを複数プロジェクトで使い回すうちに、さすがメンテナンスが面倒だと感じるようになってきたため、この度一念発起してきちんと整備したという次第です。
基本的な使い方
テストはES moduleのファイルとして記述します。以下に例を示します。
test-example.js// テストしたい実装をインポート。 import { myMethod, myAsyncMethod } from './my-module.js'; // アサーションをインポート。 import { assert } from 'tiny-esm-test-runner'; const { is, isNot, ok, ng } = assert; // 名前が`test`で始まる関数をエクスポートすると、 // テスト関数として自動認識されます。 export function testMyMethod() { const expected = 'AAA'; const actual = myMethod('aaa'); is(expected, actual); } // 非同期処理のテストを書きたい時は、ふつうに // async functionで書いて下さい。 export async function testMyAsyncMethod() { const expected = 'AAA'; const actual = await myAsyncMethod('aaa'); is(expected, actual); }ファイルを保存したら、
run-tiny-esm-test-runnerに引数としてそのファイルを指定して実行します。$ run-tiny-esm-test-runner ./test-*.jsすべてのテストが成功すればステータスコードとして
0を、1つでも失敗したりエラーが発生したら1を返します。自作のnpmモジュールのテストに使うときは、以下の要領で登録しておけば
npm testでテストを実行できます。package.json{ "scripts": { ... "test": "run-tiny-esm-test-runner test/test-*.js" }, "devDependencies": { ... "tiny-esm-test-runner": "^1.1.0" } }アサーション
is()、isNot()、ok()、ng()の4つがあります。
is(期待値, 実測値, メッセージ)
期待値と実測値を===で比較した結果がtrue、またはJSON.stringify()した結果を===で比較した結果がtrueであればアサーションに成功します。第3引数を渡しておくと、アサーション失敗時のメッセージに第3引数の内容が使われるようになります。isNot(期待値, 実測値, メッセージ)
期待値と実測値を!==で比較した結果がtrue、またはJSON.stringify()した結果を!==で比較した結果がtrueであればアサーションに成功します。is()の逆バージョンです。第3引数を渡しておくと、アサーション失敗時のメッセージに第3引数の内容が使われるようになります。ok(実測値, メッセージ)
実測値がJS的にtrueと見なせる値であれば、アサーションに成功します。第2引数を渡しておくと、アサーション失敗時のメッセージに第2引数の内容が使われるようになります。ng(実測値, メッセージ)
実測値がJS的にfalseと見なせる値であれば、アサーションに成功します。ok()の逆バージョンです。第2引数を渡しておくと、アサーション失敗時のメッセージに第2引数の内容が使われるようになります。共通の初期化処理とか終了処理とか
setUp()、tearDown()の名前で関数をエクスポートしておくと、各テスト関数の実行前にsetUp()が、テスト関数の実行後にtearDown()が実行されます。test-example.jsimport { myLoadData } from './my-module.js'; ... let data; export async function setUp() { data = await myLoadData(); } export function tearDown() { data.unload(); }また、
shutDown()の名前で関数をエクスポートしておくと、すべてのテスト関数の実行後にshutDown()が終了処理として実行されます。test-example.jsimport { myCleanupData } from './my-module.js'; ... export async function shutDown() { await myCleanupData(); }引数を色々変えてテストする
データ駆動テストにも対応しています。テスト関数のオブジェクトの
parametersプロパティに配列かオブジェクトを設定すると、その内容を引数としてテスト関数を何度も実行するようになります。test-example.js// 配列で定義する場合、配列の要素が // テスト関数の引数になります。 testSuccess.parameters = [ ['AAA', 'aaa'], ['BBB', 'bbb'] ]; export function testUpperCase([expected, data]) { is(expected, data.toUppwerCase()); } // オブジェクトで定義する場合、キーに対応する値が // テスト関数の引数になります。 testSuccess.parameters = { a: ['AAA', 'aaa'], b: ['BBB', 'bbb'] }; export function testUpperCase([expected, data]) { is(expected, data.toUppwerCase()); }なお、この時の引数は
setUp()とtearDown()にも渡されます。テストがfailしたとき
失敗したテストに対応する実装を手直ししながら何度もテストを実行する、ということをやりたくなる場面はあると思います。こういう時は、他のテストまで実行されると時間がかかりすぎるので、失敗したテストだけ実行したくなるものでしょう。
そのような場合、テスト関数のオブジェクトの
runnableプロパティにtrueを設定しておくと、runnableがtrueのテストだけが実行され、それ以外はスキップされるようになります。test-example.js// このテストはスキップされる export function testSuccess() { const expected = 'AAA'; const actual = 'aaa'.toUpperCase(); is(expected, actual); } // このテストは実行される testFail.runnable = true; export function testFail() { const expected = 'AAA'; const actual = 'aaa'.toLowerCase(); is(expected, actual); }採用事例
実際に以下のプロジェクトで使ってます。
- https://github.com/piroor/tiny-esm-test-runner/tree/master/tests tiny-esm-test-runner自体の自己テスト
- https://github.com/piroor/webextensions-lib-dom-updater/tree/master/test DOM操作のテスト
- https://github.com/piroor/copy-selected-tabs-to-clipboard/tree/master/test 独自記法のパーサーのテスト
- https://github.com/piroor/xulmigemo/tree/master/webextensions/test 文字列操作のテスト
まとめ
自作のPure ES modulesなテスティングフレームワークの
tiny-esm-test-runnerの使い方を簡単に紹介しました。もうES modulesが使えるようになってずいぶん経ってるし、有名どころのテスティングフレームワークもいっぱいあるし、同じような事をやってる人が5000兆人くらいいるんだろうなあ……と思っていたのですが、Node.js界隈に詳しい方によると、今のところメジャーどころの一般向けのリリースではES modulesのテストにネイティブ対応している物はまだないそうで、大変意外に感じました。
Node.jsって、ES modulesとかの仕様がまとまるよりもはるかに昔から存在していて、JSの言語仕様が貧弱なのをみんなで頑張って運用でカバーしてきたからなのか、今Node.jsでスクラッチで何か書こうと思うと、gulpだのgruntだのbabelだのwebpackだのと分厚い技術スタックが一気にガガガって積み上がってく感じで、Node.jsに疎いFirefoxアドオン専門のJS書きの僕には目眩がしてしまいます。
そういうレガシーの極みみたいな分厚いスタックを今から改めて勉強するのツラいっす、もう時代は変わったんですよ、JSだけで
importとかclassとかasync/awaitとか使えるようになってんですよ、それベースでスッキリ書いてサクッと終わらせたいじゃないすか……というのが、tiny-esm-test-runnerを書いた一番大きな動機なのでした。npmのページを見ると分かりますが、テストランナー自体の依存パッケージは0なので、Denoとかでももしかしたら使えるかもしれませんね。
テストを走らせて初めて誤記に気付く、というような手戻りが発生しやすくなります。 ↩
- 投稿日:2020-06-03T00:27:48+09:00
ES moduleとして簡単に静的に検証できるテストを書けるようになって(個人的に)幸せが増した話
テストのtypoにテスト実行後に気付くのってあほくさいじゃないですか?
ES moduleのコードでは「関数名や変数名の誤記」をESLintなどで容易に静的に検出できます。なので、JSで書ける物は片っ端からなんでもES moduleにしたくなるのですが、いわゆる自動テストのコードでは、この性質がかえって邪魔になることがあります。
たとえばMochaのテストケースには、何の前触れもなく
describe()やit()などの関数が登場します。これらが「未定義の関数呼び出し」としてエラーにならないようにするには、テストと実装でESLintのルールを切り替えて警告条件を緩和したり、テスティングフレームワークの関数やオブジェクトを警告の例外に明示したりといった対策が必要になります。しかし、警告を甘くすればテストだけ静的な検証が甘くなりますし、警告の例外を指定するのもテストの作成やメンテナンスが煩雑になります。テストの書きやすさ・維持しやすさと静的な検証の完全性とを両立しにくいのは、JSで物を作る時に個人的にずっと気になっていた点でした。
Pure ES modulesなテスティングフレームワークつくった
というわけで、このような難点がないPure ES modulesなテスティングフレームワークを作ってみました。
Node.js v13以上の環境で、
npm install tiny-esm-test-runnerでインストールできます。元々は、特定プロジェクトでのCI用に簡易的なテストランナーを書いて使い捨てにしていたのですが、それを複数プロジェクトで使い回すうちに、さすがメンテナンスが面倒だと感じるようになってきたため、この度一念発起してきちんと整備したという次第です。
基本的な使い方
テストはES moduleのファイルとして記述します。以下に例を示します。
test-example.js// テストしたい実装をインポート。 import { myMethod, myAsyncMethod } from './my-module.js'; // アサーションをインポート。 import { assert } from 'tiny-esm-test-runner'; const { is, isNot, ok, ng } = assert; // 名前が`test`で始まる関数をエクスポートすると、 // テスト関数として自動認識されます。 export function testMyMethod() { const expected = 'AAA'; const actual = myMethod('aaa'); is(expected, actual); } // 非同期処理のテストを書きたい時は、ふつうに // async functionで書いて下さい。 export async function testMyAsyncMethod() { const expected = 'AAA'; const actual = await myAsyncMethod('aaa'); is(expected, actual); }ファイルを保存したら、
run-tiny-esm-test-runnerに引数としてそのファイルを指定して実行します。$ run-tiny-esm-test-runner ./test-*.jsすべてのテストが成功すればステータスコードとして
0を、1つでも失敗したりエラーが発生したりしたら1を返します。自作のnpmモジュールのテストに使うときは、以下の要領で登録しておけば
npm testでテストを実行できます。package.json{ "scripts": { ... "test": "run-tiny-esm-test-runner test/test-*.js" }, "devDependencies": { ... "tiny-esm-test-runner": "^1.1.0" } }アサーション
is()、isNot()、ok()、ng()の4つがあります。
is(期待値, 実測値, メッセージ)
期待値と実測値を===で比較した結果がtrue、またはJSON.stringify()した結果を===で比較した結果がtrueであればアサーションに成功します。第3引数を渡しておくと、アサーション失敗時のメッセージに第3引数の内容が使われるようになります。isNot(期待値, 実測値, メッセージ)
期待値と実測値を!==で比較した結果がtrue、またはJSON.stringify()した結果を!==で比較した結果がtrueであればアサーションに成功します。is()の逆バージョンです。第3引数を渡しておくと、アサーション失敗時のメッセージに第3引数の内容が使われるようになります。ok(実測値, メッセージ)
実測値がJS的にtrueと見なせる値であれば、アサーションに成功します。第2引数を渡しておくと、アサーション失敗時のメッセージに第2引数の内容が使われるようになります。ng(実測値, メッセージ)
実測値がJS的にfalseと見なせる値であれば、アサーションに成功します。ok()の逆バージョンです。第2引数を渡しておくと、アサーション失敗時のメッセージに第2引数の内容が使われるようになります。共通の初期化処理とか終了処理とか
setUp()、tearDown()の名前で関数をエクスポートしておくと、各テスト関数の実行前にsetUp()が、テスト関数の実行後にtearDown()が実行されます。test-example.jsimport { myLoadData } from './my-module.js'; ... let data; export async function setUp() { data = await myLoadData(); } export function tearDown() { data.unload(); }また、
shutDown()の名前で関数をエクスポートしておくと、すべてのテスト関数の実行後にshutDown()が終了処理として実行されます。test-example.jsimport { myCleanupData } from './my-module.js'; ... export async function shutDown() { await myCleanupData(); }引数を色々変えてテストする
データ駆動テストにも対応しています。テスト関数のオブジェクトの
parametersプロパティに配列かオブジェクトを設定すると、その内容を引数としてテスト関数を何度も実行するようになります。test-example.js// 配列で定義する場合、配列の要素が // テスト関数の引数になります。 testSuccess.parameters = [ ['AAA', 'aaa'], ['BBB', 'bbb'] ]; export function testUpperCase([expected, data]) { is(expected, data.toUppwerCase()); } // オブジェクトで定義する場合、キーに対応する値が // テスト関数の引数になります。 testSuccess.parameters = { a: ['AAA', 'aaa'], b: ['BBB', 'bbb'] }; export function testUpperCase([expected, data]) { is(expected, data.toUppwerCase()); }なお、この時の引数は
setUp()とtearDown()にも渡されます。テストがfailしたとき
失敗したテストに対応する実装を手直ししながら何度もテストを実行する、ということをやりたくなる場面はあると思います。こういう時は、他のテストまで実行されると時間がかかりすぎるので、失敗したテストだけ実行したくなるものでしょう。
そのような場合、テスト関数のオブジェクトの
runnableプロパティにtrueを設定しておくと、runnableがtrueのテストだけが実行され、それ以外はスキップされるようになります。test-example.js// このテストはスキップされる export function testSuccess() { const expected = 'AAA'; const actual = 'aaa'.toUpperCase(); is(expected, actual); } // このテストは実行される testFail.runnable = true; export function testFail() { const expected = 'AAA'; const actual = 'aaa'.toLowerCase(); is(expected, actual); }採用事例
実際に以下のプロジェクトで使ってます。
- https://github.com/piroor/tiny-esm-test-runner/tree/master/tests tiny-esm-test-runner自体の自己テスト
- https://github.com/piroor/webextensions-lib-dom-updater/tree/master/test DOM操作のテスト
- https://github.com/piroor/copy-selected-tabs-to-clipboard/tree/master/test 独自記法のパーサーのテスト
- https://github.com/piroor/xulmigemo/tree/master/webextensions/test 文字列操作のテスト
まとめ
自作のPure ES modulesなテスティングフレームワークの
tiny-esm-test-runnerの使い方を簡単に紹介しました。もうES modulesが使えるようになってずいぶん経ってるし、有名どころのテスティングフレームワークもいっぱいあるし、同じような事をやってる人が5000兆人くらいいるんだろうなあ……と思っていたのですが、Node.js界隈に詳しい方によると、今のところメジャーどころの一般向けのリリースではES modulesのテストにネイティブ対応している物はまだないそうで、大変意外に感じました。
Node.jsって、ES modulesとかの仕様がまとまるよりもはるかに昔から存在していて、JSの言語仕様が貧弱なのをみんなで頑張って運用でカバーしてきたからなのか、今Node.jsでスクラッチで何か書こうと思うと、gulpだのgruntだのbabelだのwebpackだのと分厚い技術スタックが一気にガガガって積み上がってく感じで、Node.jsに疎いFirefoxアドオン専門のJS書きの僕には目眩がしてしまいます。
そういうレガシーの極みみたいな分厚いスタックを今から改めて勉強するのツラいっす、もう時代は変わったんですよ、JSだけで
importとかclassとかasync/awaitとか使えるようになってんですよ、それベースでスッキリ書いてサクッと終わらせたいじゃないすか……というのが、tiny-esm-test-runnerを書いた一番大きな動機なのでした。npmのページを見ると分かりますが、テストランナー自体の依存パッケージは0なので、Denoとかでももしかしたら使えるかもしれませんね。
……と書いていましたが、Denoでも動くようになりました(2020年6月4日追記)。以下のようにして使えます。
$ git clone https://github.com/piroor/tiny-esm-test-runner.git
$ deno install --allow-read --allow-write --allow-net tiny-esm-test-runner/bin/run-tiny-esm-test-runner.deno
$ tiny-esm-test-runner test-*.js
この場合、アサーションは以下のようにして読み込む必要があります。
import { is, ok, ng } from 'https://github.com/piroor/tiny-esm-test-runner/raw/master/lib/assert.js';Deno用にテストを書くならDeno標準のテストモジュールを使うのが正解だと思いますが、テストを簡潔に書き散らかしたい人は、試してみて頂けると幸いです。