- 投稿日:2020-06-03T21:15:45+09:00
Android 電卓のデザインを作成
はじめに
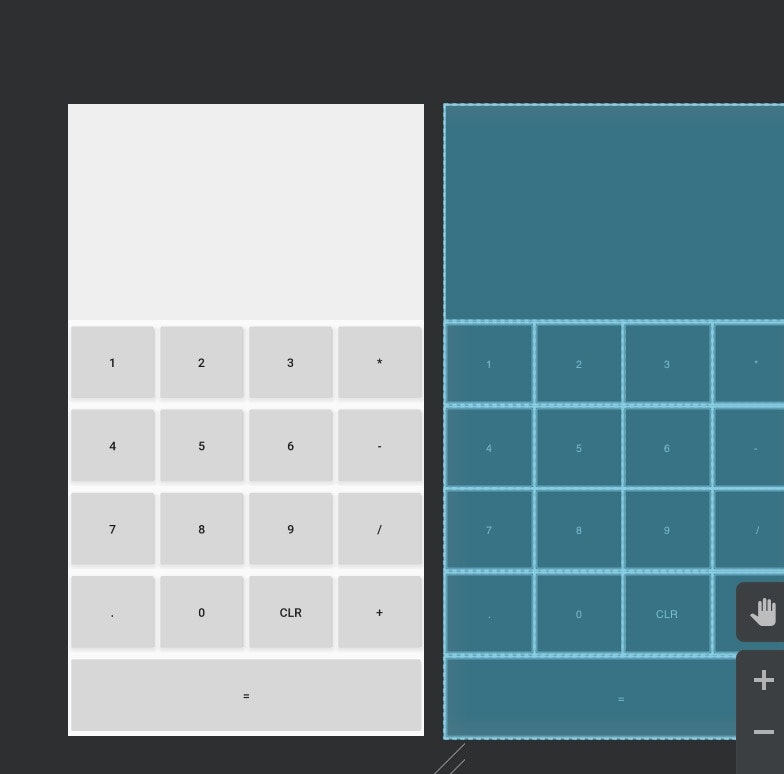
こんな感じの電卓みたいなデザインを作ります。
Android初心者で、XMLがそもそもわからない人向け!
電卓のデザインを作成
Androidのレイアウト?初心者向けざっくり理解
こちらをまずは読むと、より理解が深まるかと。全体的なやり方としては、
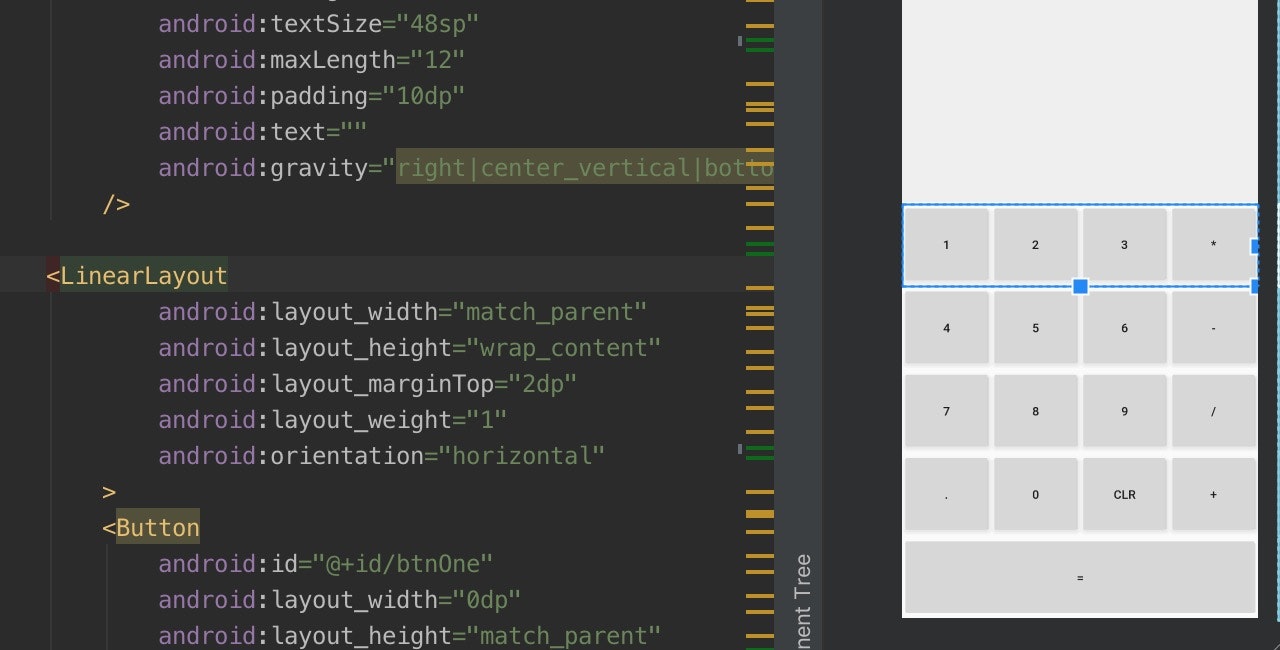
LinearLayoutの中にさらにLinearLayoutを入れ込む感じ。まずは横幅が均等なボタンを4つ
activity_main.xml<?xml version="1.0" encoding="utf-8"?> <LinearLayout xmlns:android="http://schemas.android.com/apk/res/android" xmlns:app="http://schemas.android.com/apk/res-auto" xmlns:tools="http://schemas.android.com/tools" android:layout_width="match_parent" android:layout_height="match_parent" tools:context=".MainActivity" android:orientation="vertical" > <TextView android:id="@+id/tvInput" android:layout_width="match_parent" android:layout_height="250dp" android:background="#efefef" android:textSize="48sp" android:maxLength="12" android:padding="10dp" android:text="" android:gravity="right|center_vertical|bottom" /> <LinearLayout android:layout_width="match_parent" android:layout_height="wrap_content" android:layout_marginTop="2dp" android:layout_weight="1" android:orientation="horizontal" > <Button android:id="@+id/btnOne" android:layout_width="0dp" android:layout_height="match_parent" android:layout_weight="1" android:text="1" android:onClick="onDigit" /> <Button android:id="@+id/btnTwo" android:layout_width="0dp" android:layout_height="match_parent" android:layout_weight="1" android:text="2" android:onClick="onDigit" /> <Button android:id="@+id/btnThree" android:layout_width="0dp" android:layout_height="match_parent" android:layout_weight="1" android:text="3" android:onClick="onDigit" /> <Button android:id="@+id/btnMultiply" android:layout_width="0dp" android:layout_height="match_parent" android:layout_weight="1" android:text="*" android:onClick="onOperator" /> </LinearLayout> </LinearLayout>
android:layout_weight="1"が重要なようです。詳しいことはわかりません内側のLinearLayoutをさらに増やす
内側の
LinearLayout1つで、横1列になります。activity_main.xml<?xml version="1.0" encoding="utf-8"?> <LinearLayout xmlns:android="http://schemas.android.com/apk/res/android" xmlns:app="http://schemas.android.com/apk/res-auto" xmlns:tools="http://schemas.android.com/tools" android:layout_width="match_parent" android:layout_height="match_parent" tools:context=".MainActivity" android:orientation="vertical" > <TextView android:id="@+id/tvInput" android:layout_width="match_parent" android:layout_height="250dp" android:background="#efefef" android:textSize="48sp" android:maxLength="12" android:padding="10dp" android:text="" android:gravity="right|center_vertical|bottom" /> <LinearLayout android:layout_width="match_parent" android:layout_height="wrap_content" android:layout_marginTop="2dp" android:layout_weight="1" android:orientation="horizontal" > <Button android:id="@+id/btnOne" android:layout_width="0dp" android:layout_height="match_parent" android:layout_weight="1" android:text="1" android:onClick="onDigit" /> <Button android:id="@+id/btnTwo" android:layout_width="0dp" android:layout_height="match_parent" android:layout_weight="1" android:text="2" android:onClick="onDigit" /> <Button android:id="@+id/btnThree" android:layout_width="0dp" android:layout_height="match_parent" android:layout_weight="1" android:text="3" android:onClick="onDigit" /> <Button android:id="@+id/btnMultiply" android:layout_width="0dp" android:layout_height="match_parent" android:layout_weight="1" android:text="*" android:onClick="onOperator" /> </LinearLayout> <LinearLayout android:layout_width="match_parent" android:layout_height="wrap_content" android:layout_marginTop="2dp" android:layout_weight="1" android:orientation="horizontal" > <Button android:id="@+id/btnFore" android:layout_width="0dp" android:layout_height="match_parent" android:layout_weight="1" android:text="4" android:onClick="onDigit" /> <Button android:id="@+id/btnFive" android:layout_width="0dp" android:layout_height="match_parent" android:layout_weight="1" android:text="5" android:onClick="onDigit" /> <Button android:id="@+id/btnSix" android:layout_width="0dp" android:layout_height="match_parent" android:layout_weight="1" android:text="6" android:onClick="onDigit" /> <Button android:id="@+id/btnSubtract" android:layout_width="0dp" android:layout_height="match_parent" android:layout_weight="1" android:text="-" android:onClick="onOperator" /> </LinearLayout> <LinearLayout android:layout_width="match_parent" android:layout_height="wrap_content" android:layout_marginTop="2dp" android:layout_weight="1" android:orientation="horizontal" > <Button android:id="@+id/btnSeven" android:layout_width="0dp" android:layout_height="match_parent" android:layout_weight="1" android:text="7" android:onClick="onDigit" /> <Button android:id="@+id/btnEight" android:layout_width="0dp" android:layout_height="match_parent" android:layout_weight="1" android:text="8" android:onClick="onDigit" /> <Button android:id="@+id/btnNine" android:layout_width="0dp" android:layout_height="match_parent" android:layout_weight="1" android:text="9" android:onClick="onDigit" /> <Button android:id="@+id/btnDivide" android:layout_width="0dp" android:layout_height="match_parent" android:layout_weight="1" android:text="/" android:onClick="onOperator" /> </LinearLayout> <LinearLayout android:layout_width="match_parent" android:layout_height="wrap_content" android:layout_marginTop="2dp" android:layout_weight="1" android:orientation="horizontal" > <Button android:id="@+id/btnDecimal" android:layout_width="0dp" android:layout_height="match_parent" android:layout_weight="1" android:text="." android:onClick="onDecimalPoint" /> <Button android:id="@+id/btnZero" android:layout_width="0dp" android:layout_height="match_parent" android:layout_weight="1" android:text="0" android:onClick="onDigit" /> <Button android:id="@+id/btnClear" android:layout_width="0dp" android:layout_height="match_parent" android:layout_weight="1" android:text="CLR" android:onClick="onClear" /> <Button android:id="@+id/btnAdd" android:layout_width="0dp" android:layout_height="match_parent" android:layout_weight="1" android:text="+" android:onClick="onOperator" /> </LinearLayout> <LinearLayout android:layout_width="match_parent" android:layout_height="wrap_content" android:layout_marginTop="2dp" android:layout_weight="1" android:orientation="horizontal" > <Button android:id="@+id/btnEqual" android:layout_width="match_parent" android:layout_height="match_parent" android:text="=" android:onClick="onEqual" /> </LinearLayout> </LinearLayout>これでブロックレイアウトはOK!

- 投稿日:2020-06-03T16:48:06+09:00
Threadを使って一定時間毎にイベントを発生
はじめに
Threadを使って一定時間毎にイベントを発生させるアプリを作ります。
独自イベントは、別途独自イベントを紹介するページを参考にして下さい。アプリの仕様
ボタンを押すとカウンターが自動的にカウントアップするアプリを作ります。
100ms 1/10秒ごとに1カウントアップします。
開始ボタンでカウントアップ開始、停止ボタンがカウントアップを停止します。
※中断は未使用準備
スレッドを使うのですがそのまま使うと画面View(UI)にアクセス出来ないのでcoroutines(コルーチン)を使用します。コルーチンを使うにはGradleスクリプトのbuild.gradle(app)に下記を追加する必要があります。
build.gradle(app)
build.gradle(app)dependencies { 省略 implementation 'org.jetbrains.kotlinx:kotlinx-coroutines-android:1.1.1' }strings.xml
strings.xml<?xml version="1.0" encoding="UTF-8" ?> <resources> <string name="app_name">ThreadTimerSample</string> <string name="btStart">開始</string> <string name="btStop">停止</string> <string name="btPause">中断</string> </resources>activity_main.xml
ボタンを3つとタイマーカウント用のTextViewを1つ配置します。
activity_main.xml<?xml version="1.0" encoding="utf-8"?> <androidx.constraintlayout.widget.ConstraintLayout xmlns:android="http://schemas.android.com/apk/res/android" xmlns:app="http://schemas.android.com/apk/res-auto" xmlns:tools="http://schemas.android.com/tools" android:layout_width="match_parent" android:layout_height="match_parent" tools:context=".MainActivity"> <LinearLayout android:layout_width="0dp" android:layout_height="0dp" android:orientation="vertical" app:layout_constraintBottom_toBottomOf="parent" app:layout_constraintEnd_toEndOf="parent" app:layout_constraintStart_toStartOf="parent" app:layout_constraintTop_toTopOf="parent"> <LinearLayout android:layout_width="match_parent" android:layout_height="wrap_content" android:orientation="horizontal"> <Button android:id="@+id/btStart" android:layout_width="wrap_content" android:layout_height="wrap_content" android:layout_weight="1" android:onClick="onButtonStart" android:text="@string/btStart" /> <Button android:id="@+id/btPause" android:layout_width="wrap_content" android:layout_height="wrap_content" android:layout_weight="1" android:onClick="onButtonPause" android:text="@string/btPause" /> <Button android:id="@+id/btStop" android:layout_width="wrap_content" android:layout_height="wrap_content" android:layout_weight="1" android:onClick="onButtonStop" android:text="@string/btStop" /> </LinearLayout> <TextView android:id="@+id/tvTime" android:layout_width="wrap_content" android:layout_height="wrap_content" android:text="Hello World!" /> </LinearLayout> </androidx.constraintlayout.widget.ConstraintLayout>MainActivity.kt
MainActivity.ktclass MainActivity : AppCompatActivity() { private val timer = ThreadTimer() override fun onCreate(savedInstanceState: Bundle?) { super.onCreate(savedInstanceState) setContentView(R.layout.activity_main) timer.setListener(mainListener) } private val mainListener = object : ThreadTimerInterface{ override fun onSuccess(result: Int) { super.onSuccess(result) val vtTime = findViewById<TextView>(R.id.tvTime) vtTime.setText(result.toString()) } } fun onButtonStart(view : View){ timer.start() } fun onButtonStop(view : View){ timer.stop() } fun onButtonPause(view : View){} } abstract class ScopedAppActivity: AppCompatActivity(), CoroutineScope by MainScope() { override fun onDestroy() { super.onDestroy() //cancel() } } interface ThreadTimerInterface : ThreadTimer.Listener { fun onSuccess(result: Int){} } class ThreadTimer() : ScopedAppActivity(){ private var listener: ThreadTimerInterface? = null interface Listener {} var thread : Thread? = null var counter:Int = 0 var enable : Boolean = false fun setListener(listener: ThreadTimer.Listener?) { if (listener is ThreadTimerInterface) { this.listener = listener as ThreadTimerInterface } } fun start(){ if (enable == true) return enable = true thread = Thread { while (enable) { try { Thread.sleep(100) launch { counter++ listener?.onSuccess(counter); } } catch (ex: InterruptedException) { Thread.currentThread().interrupt() } } } thread?.start() } fun stop(){ if (enable == false) return thread?.interrupt() enable = false } }説明
イベントは別で説明していますのでスレッドに限定します。
start.ktfun start(){ if (enable == true) return enable = true thread = Thread { while (enable) { try { Thread.sleep(100) launch { counter++ listener?.onSuccess(counter); } } catch (ex: InterruptedException) { Thread.currentThread().interrupt() } } } thread?.start() } fun stop(){ if (enable == false) return thread?.interrupt() enable = false }クラスのstartメソッドが呼ばれると thread = Threadとしてスレッドを生成して同時にスレッドで行う処理も書いています。
スレッドの処理はwhile で永久ループとしてその中でThread.sleep(100)として100ms 1/10秒休んだ後、カウントアップを行い、イベントを発生させています。
launch {} で囲んだ部分はスレッドセーフとなっており画面表示 ViewのUIにアクセス出来ます。launch を外すとアプリが落ちます。
永久ループの中でスレッドの停止命令が出ても良いようにtry{}catch{}でスレッドを中断させています。stopメソッドではスレッドを停止させています。
startとstopそれぞれ処理が連続で2回実行されないようにenable値を利用して防止しています。最後に
スレッドセーフ部分と独自イベント部分を除けばごく普通のプログラムとなりました。
これを基本とすれば今後作成するクラスがより一層カプセル化できる様になると思われます。なお
abstract class ScopedAppActivity: AppCompatActivity(), CoroutineScope by MainScope() {で本当はcancel()を呼ぶらしいのですがエラーのためコメントにしてます。
- 投稿日:2020-06-03T15:28:36+09:00
独自のリスナーイベントを作成
はじめに
Androidのソフト開発ではイベントを受け取るためにリスナーを使います。
ボタンをクリックするとonClickイベントが発生するのでそれをリスナーで受け取って処理できるので無駄がありません。
では自分で作ったクラスに独自のイベントを作成するにはどのようにすれば良いのでしょうか?
ネットや書籍を調べても書かれていません。他の人はどのようにして設計しているのか不思議です。説明はしますが、何の資料も無いため手探りで適当に作っていたら偶然出来ただけなので詳細な説明は出来ません。むしろ何故動いているのか知りたいぐらいです。
クラスの設計
独自のイベントを使うクラスを設計してみます。
クラスCalcはメソッドexecuteの引数v1とv2の商を計算するクラスとします。
計算が出来ればonSuccess()イベントが発生し、右式に0を渡されるとonDivZero()イベントを発生させます。レイアウト設計
activity_main.xml<?xml version="1.0" encoding="utf-8"?> <androidx.constraintlayout.widget.ConstraintLayout xmlns:android="http://schemas.android.com/apk/res/android" xmlns:app="http://schemas.android.com/apk/res-auto" xmlns:tools="http://schemas.android.com/tools" android:layout_width="match_parent" android:layout_height="match_parent" tools:context=".MainActivity"> <LinearLayout android:layout_width="match_parent" android:layout_height="match_parent" android:orientation="vertical"> <EditText android:id="@+id/etV1" android:layout_width="match_parent" android:layout_height="wrap_content" android:ems="10" android:inputType="numberDecimal" /> <EditText android:id="@+id/etV2" android:layout_width="match_parent" android:layout_height="wrap_content" android:ems="10" android:inputType="numberDecimal" /> <Button android:id="@+id/button" android:layout_width="match_parent" android:layout_height="wrap_content" android:onClick="onButtonClick" android:text="Button" /> <TextView android:id="@+id/tvExecute" android:layout_width="wrap_content" android:layout_height="wrap_content" /> </LinearLayout> </androidx.constraintlayout.widget.ConstraintLayout>EditText2つ etV1、etV2とonClickにイベント割り当て済みのボタン、TextViewの tvExecuteを配置しています。
MainActivity.kt
MainActivity.ktclass MainActivity : AppCompatActivity() { private val calc = Calc() override fun onCreate(savedInstanceState: Bundle?) { super.onCreate(savedInstanceState) setContentView(R.layout.activity_main) calc.setListener(mainListener) } private val mainListener = object : CalcInterface{ override fun onSuccess(result: Int) { super.onSuccess(result) val vtExe = findViewById<TextView>(R.id.tvExecute) vtExe.setText(result.toString()) } override fun onDivZero() { super.onDivZero() val vtExe = findViewById<TextView>(R.id.tvExecute) vtExe.setText("div zero error!") } } fun onButtonClick(view: View){ val etV1 = findViewById<EditText>(R.id.etV1) val etV2 = findViewById<EditText>(R.id.etV2) calc.execute(etV1.text.toString().toInt(),etV2.text.toString().toInt()) } } interface CalcInterface : Calc.Listener { fun onSuccess(result: Int){} fun onDivZero(){} } class Calc() { private var listener: CalcInterface? = null interface Listener {} fun setListener(listener: Calc.Listener?) { if (listener is CalcInterface) { this.listener = listener as CalcInterface } } fun execute(v1 : Int,v2 : Int){ if (v2 == 0){ listener?.onDivZero(); } else{ listener?.onSuccess(v1 / v2); } } }プログラムの説明
まずはリスナーの説明
CalcInterface.ktinterface CalcInterface : Calc.Listener { fun onSuccess(result: Int){} fun onDivZero(){} }インターフェイスとして CalcInterfaceを定義しています。Calc.Listenerは、この後に定義するCalcに実装されているinterface を参照しています。何故この参照で動くのかは不明です。
ここで作ったメソッドクラス内で呼ぶと、このクラスを生成したMainActivityのリスナーを通じてイベントが発生します。
計算が正常に終わったことを通知するonSuccess(result: Int)と右辺が0で計算できない事を表すonDivZeroを定義しています。
この中では処理が必要では無いので空ですし、この後説明するメイン側で継承したときにsuperで上位クラスを呼ぶ必要もありません。次にクラス本体の説明です。
Calc.ktclass Calc() { private var listener: CalcInterface? = null interface Listener {} fun setListener(listener: Calc.Listener?) { if (listener is CalcInterface) { this.listener = listener as CalcInterface } } fun execute(v1 : Int,v2 : Int){ if (v2 == 0){ listener?.onDivZero(); } else{ listener?.onSuccess(v1 / v2); } } }Listener.ktprivate var listener: CalcInterface? = null interface Listener {}変数名listenerでCalcInterfaceインターフェイスを定義しています。
クラス内のインターフェイスとしてListener も定義しています。setListener.ktfun setListener(listener: Calc.Listener?) { if (listener is CalcInterface) { this.listener = listener as CalcInterface } }メインとリスナーをつなげるためのメソッドsetListenerです。
execute.ktfun execute(v1 : Int,v2 : Int){ if (v2 == 0){ listener?.onDivZero(); } else{ listener?.onSuccess(v1 / v2); } }計算を実行するメソッドexecuteです。
結果によってlistenerが持つメソッドのイベントを発生させます。作ったクラスをMainActivityに実装します。
MainActivity.ktclass MainActivity : AppCompatActivity() { private val calc = Calc() override fun onCreate(savedInstanceState: Bundle?) { super.onCreate(savedInstanceState) setContentView(R.layout.activity_main) calc.setListener(mainListener) } private val mainListener = object : CalcInterface{ override fun onSuccess(result: Int) { super.onSuccess(result) val vtExe = findViewById<TextView>(R.id.tvExecute) vtExe.setText(result.toString()) } override fun onDivZero() { super.onDivZero() val vtExe = findViewById<TextView>(R.id.tvExecute) vtExe.setText("div zero error!") } } fun onButtonClick(view: View){ val etV1 = findViewById<EditText>(R.id.etV1) val etV2 = findViewById<EditText>(R.id.etV2) calc.execute(etV1.text.toString().toInt(),etV2.text.toString().toInt()) } }まずは実装から
onCreate.ktprivate val calc = Calc() override fun onCreate(savedInstanceState: Bundle?) { super.onCreate(savedInstanceState) setContentView(R.layout.activity_main) calc.setListener(mainListener) }作ったクラスを宣言してonCreateイベントでcalc.setListener(mainListener)とメインのリスナーをセットします。
mainListener.ktprivate val mainListener = object : CalcInterface{ override fun onSuccess(result: Int) { super.onSuccess(result) val vtExe = findViewById<TextView>(R.id.tvExecute) vtExe.setText(result.toString()) } override fun onDivZero() { super.onDivZero() val vtExe = findViewById<TextView>(R.id.tvExecute) vtExe.setText("div zero error!") } }MainActivityで受け取るためのリスナーを定義します。
上位のCalcInterfaceで定義したメソッドを継承することでイベントを受け取ることが出来ます。onButtonClick.ktfun onButtonClick(view: View){ val etV1 = findViewById<EditText>(R.id.etV1) val etV2 = findViewById<EditText>(R.id.etV2) calc.execute(etV1.text.toString().toInt(),etV2.text.toString().toInt()) }ボタンクリックの時の処理を書いて終わりです。
最後に
Javaの方は独自のリスナー、独自イベントの説明があるのですがKotlinで説明しているサイトが見つかりませんでした。
今後独自のイベントを使うクラスを設計するときのメモとしてここに残しておきます。
- 投稿日:2020-06-03T12:52:30+09:00
[作業メモ]Firebase Crashlyticsの導入
事前準備
- Android Studio
Firebase SDKの導入
https://firebase.google.com/docs/android/setup
Crashlyticsの導入
https://firebase.google.com/docs/crashlytics/get-started?platform=android#kotlin+ktx
次のステップ
ハマりポイント
公式の導入手順ドキュメントは多言語対応していますけど、日本語の場合にAndroid版の導入手順はまだないらしいです。なので言語を英語に切り替えてから、Android版を確認する方が確実に最新版が表示されます。
- 投稿日:2020-06-03T00:21:36+09:00
Github Actionsを用いてFirebase Test Lab上で実機テストをする方法
概要
本記事ではGithub Actionsを使用して、Firebase Test Labで実機テストを行う方法を紹介します。
具体的には、プルリクエストをトリガーにGithub Actionsのworkflowが起動し、Firebase Test Lab上でRoboテストを、自動で走らせる方法を紹介します。きっかけ
これを試したきっかけは、仕事先でライブラリのアップデートをした際に、クラッシュ等がないかの確認のため、実機をポチポチするという作業がとても面倒に感じられ、Firebase Test Labで自動化できるのではないかと考えたことです。
さらにその調査がプルリクをトリガーに走ってくれたら素敵だと思いGithub Actionsを用いました。はじめに
Androidの実機を用いたテストはとても骨が折れるといわれています。
その理由の一つとして、端末の多さがあげられます。(参考: Android端末一覧(Wikipedia))
端末数が多いと、ハードウェアのスペック、画面サイズ、OSのバージョンなどが多様化し、それぞれに対して実機テストをしなければなりません。すべてのAndroid端末を用意してテストをすることは、とてもコストがかかります。この問題を解決する方法の一つに、下記のようなクラウド型モバイルアプリテストサービスが存在します。
このようなサービスを用いると、端末を手元に持たずにクラウド上で実機テストが可能になります。
つまり「このAPKを、Nexus6とGoogle Pixel 3の端末で、実機テストおねがいー」というようなことができるようになります。しかしながら、いちいちAPKを作成して、それを手動でクラウドサービスに登録するのは面倒くさいですよね?
例えば「検証ブランチであるdevelopブランチに変更が加えられたら、それをいちいちビルドしてAPKを作成して、クラウドサービスに登録してテストをする」というような手間がかかります。この問題を解決してくれるのが、CI/CDと呼ばれるものです。
CIとはContinuous Integration(継続的インテグレーション)の略であり、テストやビルドを自動で行い、開発効率を上げる手法のことを言います。
CDとはContinuous DeliveryあるいはContinuous deployment(継続的デリバリーあるいは継続的デプロイ)の略であり、コードを自動デプロイする手法のことを言います。
より正確な説明はContinuous integration(Wikipedia), Continuous delivery(Wikipedia)を参考にしてください。このCI/CDを使用すると、手作業で行なっていた実機テストまでのフローを自動化することができます。
つまり、先の例でいうと「developブランチの変更のコードを検証→ビルドしてAPKを作成→クラウドサービスに登録して実機テスト」を自動化することができます。したがって、CI/CDツールを利用して、クラウド型モバイルアプリテストサービスを使用すれば、Androidの実機テストを効率的に行えることがわかります。
前置きが長くなりましたが、上述の内容を背景として、
「Github Actionsと呼ばれるCI/CDツールを用いて、自動でFirebase Test Lab上でRoboテストを実施する方法」を紹介します。Github Actionsとは?
GitHub Actionsとは、公式サイトによると下記のように説明されています。
GitHub Actions help you automate your software development workflows in the same place you store code and collaborate on pull requests and issues. You can write individual tasks, called actions, and combine them to create a custom workflow. Workflows are custom automated processes that you can set up in your repository to build, test, package, release, or deploy any code project on GitHub.
つまり、Github Actionsは、Github上で「Action」と呼ばれるタスクを組み合わせて「Workflow」とし、それを実行できるCI/CDサービスです。
例えば、Github上でプルリクエストがあったらcheckoutと呼ばれるActionを用いて、指定したリポジトリからソースコードをチェックアウトし、setup-javaというActionを用いて、Javaの環境を構築して、Ktlintと呼ばれるリントタスク実行するWorkflowを実行するといったことが可能になります。
Actionは、マーケットプレイスで公開されており、用途にあわせて入手することが可能です。
Firebase Test Labとは?
Firebase Test Labとは公式サイトによると、下記のように説明されています。
Firebase Test Lab is a cloud-based app-testing infrastructure. With one operation, you can test your Android or iOS app across a wide variety of devices and device configurations, and see the results—including logs, videos, and screenshots—in the Firebase console.
冒頭でも説明した通り、Firebase Test Labとはクラウド型のアプリテスト基盤のことであり、色々なデバイスをまとめてテストすることができます。それに加えて、Firebase console上で、ログ、テストの様子を写した動画、スクリーンショットなどのテスト結果を確認することができます。
また、公式サイトによると、Androidをテストする際、Firebase Test Labにはテスト手法が、以下のように3つあります。
本記事では、Roboテストを使用してテストをしていますが、その他のテストについても簡単に説明していきます。
Instrumentテスト
Instrumentテストは公式サイトによると下記のように説明されています。
An instrumentation test is a test written by you or your team to specifically to test your app, using the Espresso and UI Automator 2.0 Android test frameworks. Test Lab provides results for all test cases that complete execution during that time.
つまり、Instrumentテストとは、Espresso とUI Automator 2.0 と呼ばれる、Androidテストフレームワークを使ってテストをすることができます。
上記のテストフレームワークは、コードを書くことで、指定したアクションでアプリをテストすることができます。
例えば、ユーザー登録画面で、パスワードの文字数が足りなかった場合、正しくバリデーションされ、エラーメッセージが出ているかといったテストが、コードを書くことによって可能になります。
Roboテスト
Roboテストとは、公式サイトによると、下記のように説明されています。
Robo test analyzes the structure of your app's UI and then explores it methodically, automatically simulating user activities.
Roboテストとは、アプリのUIの構造を分析をしてから、ユーザーのアクティビティを自動的にシミュレーションすることができます。
例えば、アプリがボトムナビゲーションバーを実装しているとき、いわゆるクローラのようなものが、すべてのナビゲーションを探索して、自動でテストをしてくれます。
Game loopテスト
Game loopテストとは公式サイトによると、下記のように説明されています。
With Game Loop tests, you can write tests native to your game engine and then run them in Test Lab on devices you choose. This way, you don't need to worry about writing for different UI or testing frameworks. A Game Loop test simulates the actions of a real player, and when you run it on Test Lab, it provides a fast and scalable way to verify that your game performs well for your users.
つまり、ゲームエンジンを使用したアプリにおいて、ゲームプレーヤーの操作をシミュレーションしたテストを実行できます。
例えば、Unityを使用したアプリにおいて、プレーヤーの操作をまとめたシナリオを作成し、テストをすることができます。
手順
次に、本記事のメインである「プルリクエストをトリガーにGithub Actionsのworkflowが起動し、Firebase Test Lab上でRoboテストを、自動で走らせる方法」について説明していきます。
1. Firebaseプロジェクトを作成
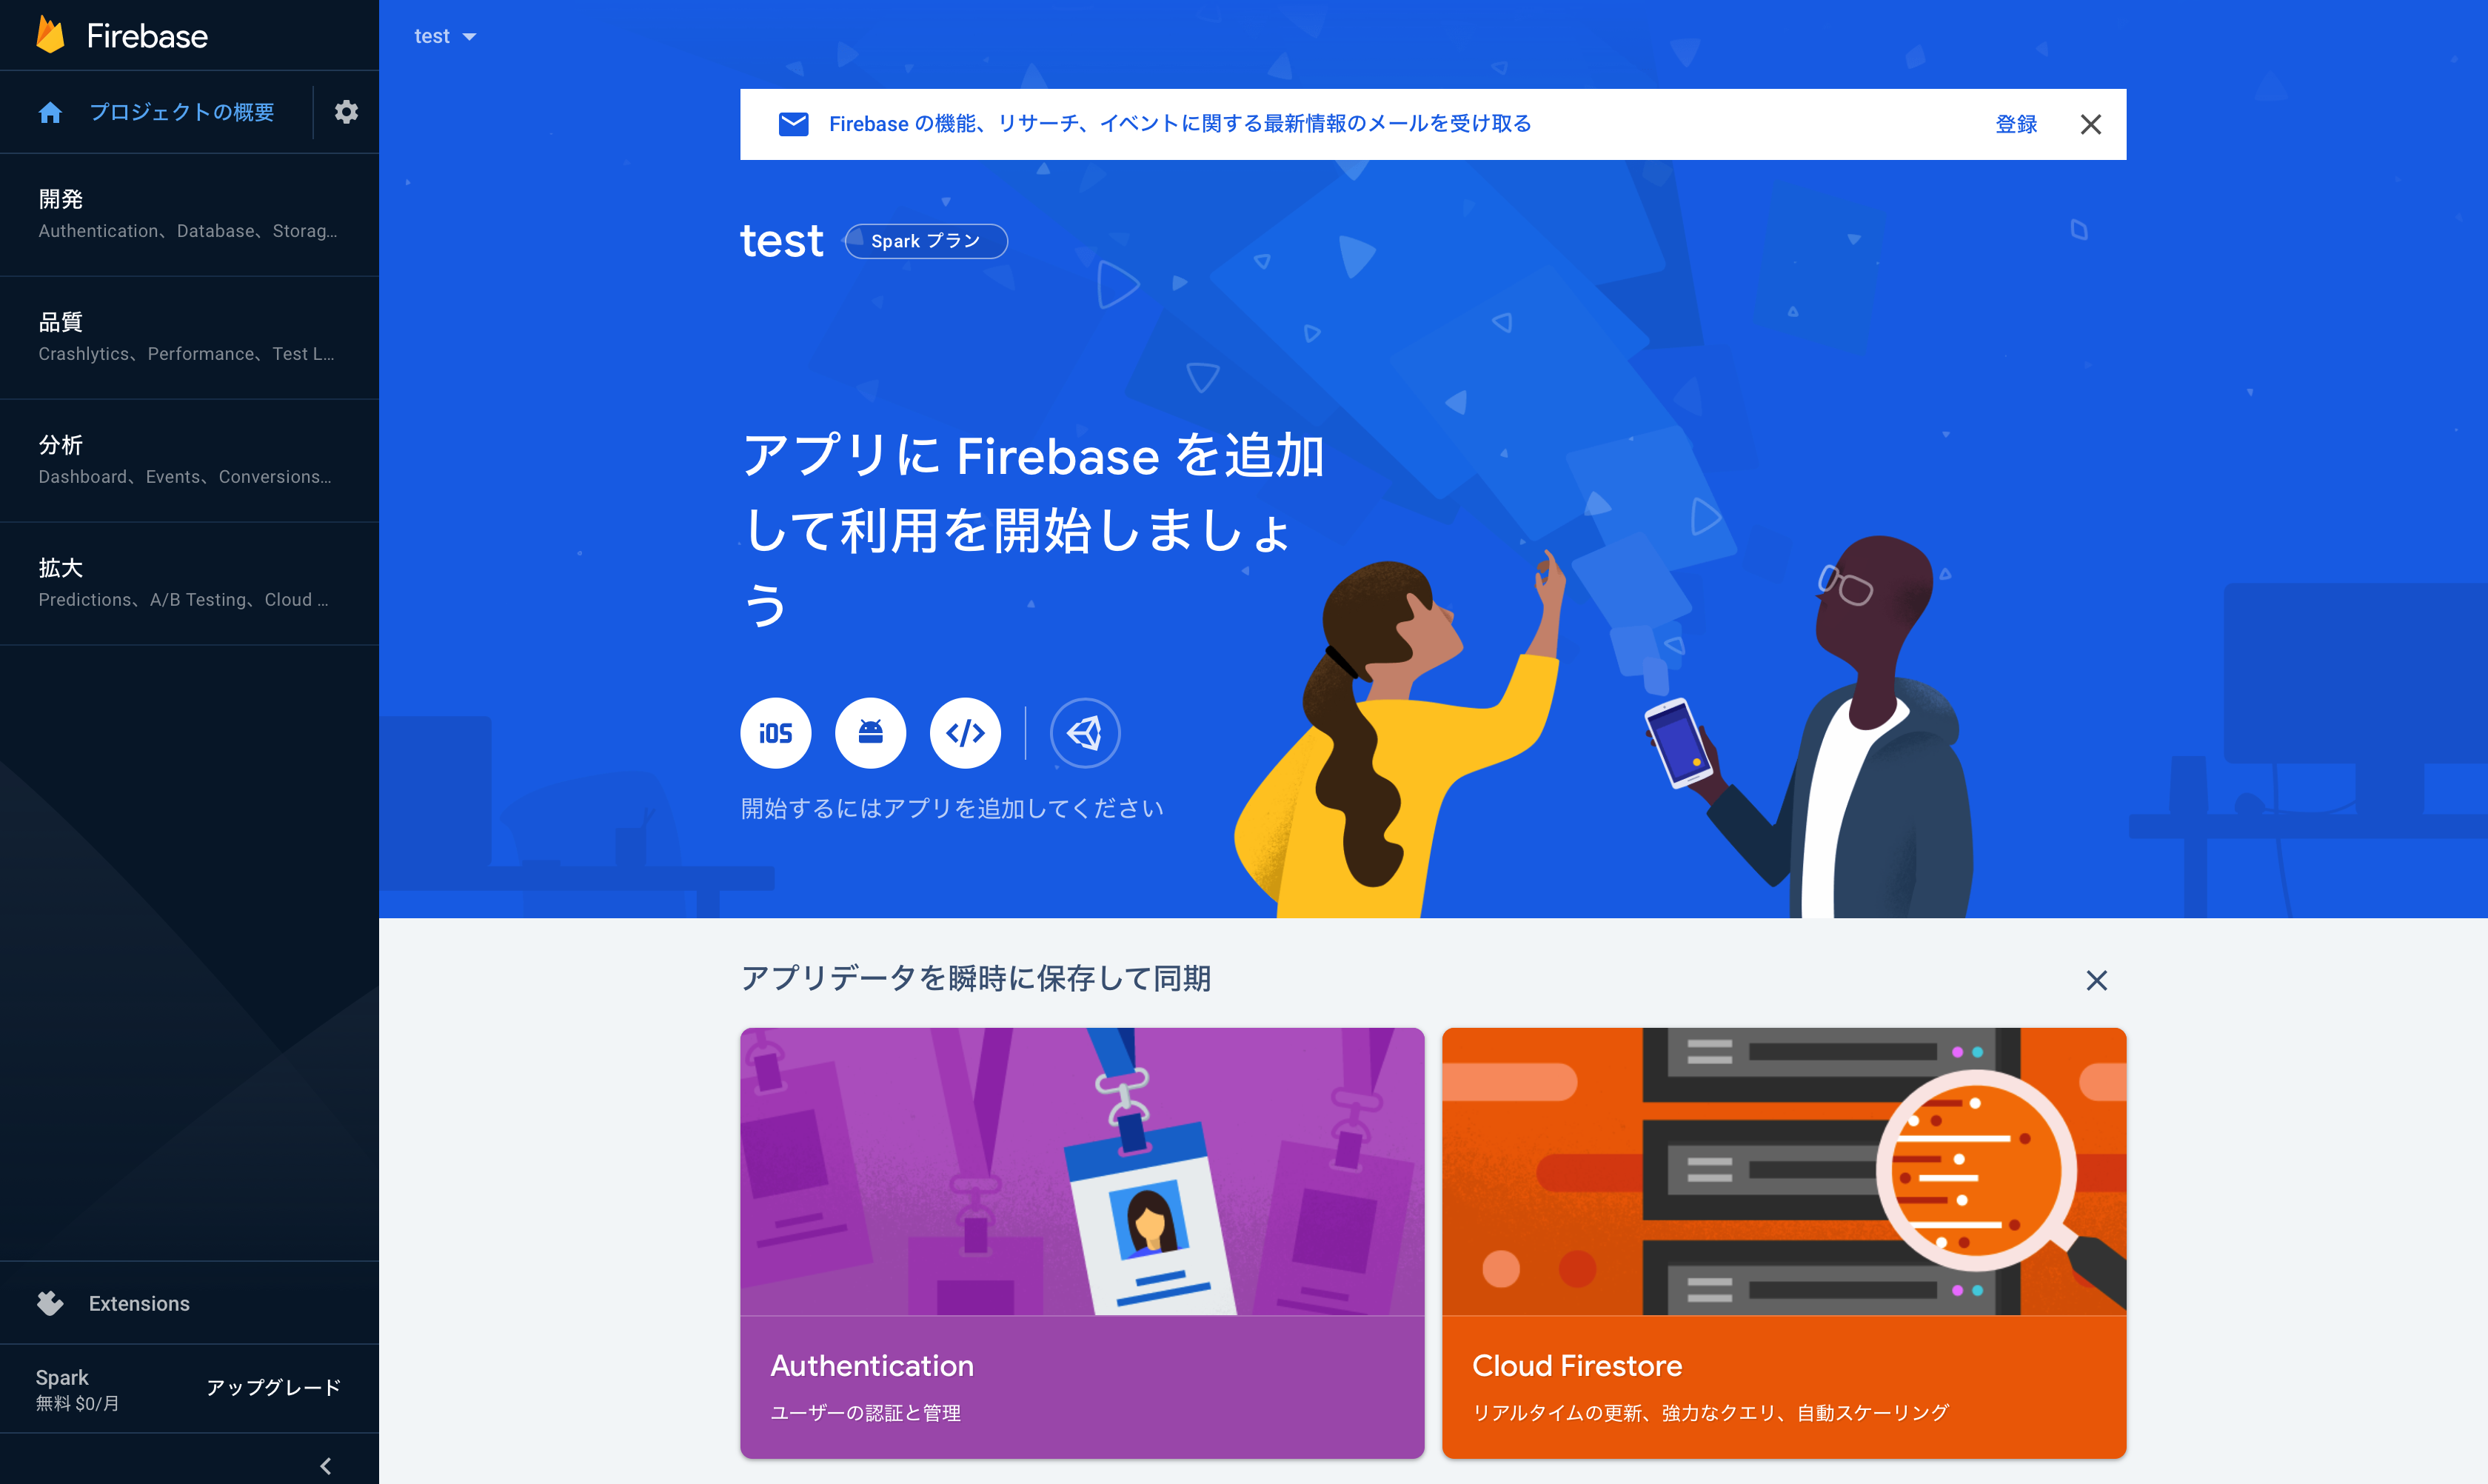
Googleアカウントを作成しFirebase Consoleにアクセスします。
プロジェクトを作成するため、指示に従い情報を入力していきます。
プロジェクトが作成できると、画像のようなページが表示されます。
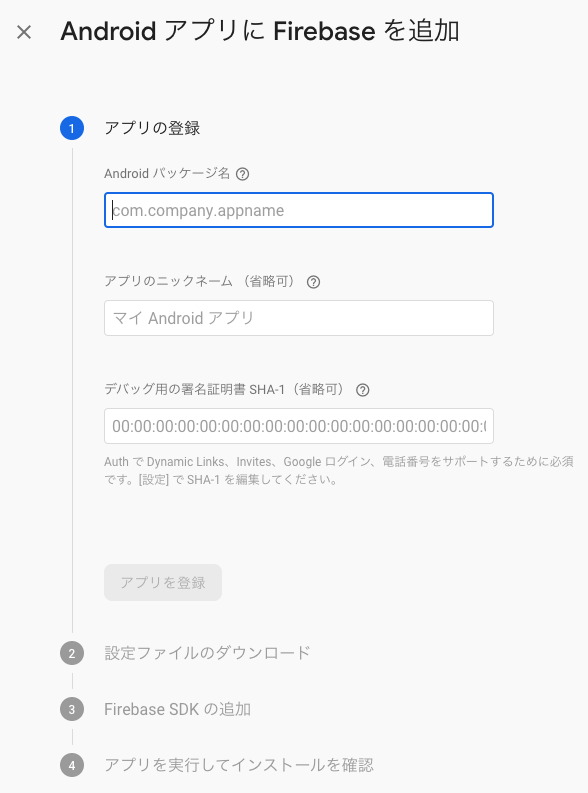
次にAndroidアイコンボタンをクリックし、AndroidアプリにFirebaseを追加します。そうすると画像のようなページが表示されます。設定ファイルのダウンロードやSDKの追加など、手順にしたがって、セットアップをしてください。
2. Github Actionsのworkflowを作成する
次にGithub Actionsのworkflowを作成します。
workflowはGithubのレポジトリ内.github/workflowsディレクトリ内にyaml形式のファイルを作成することで実行することができます。作成したworkflowは以下のようになります。
pull_request_workflow.yamlname: pull request workflow on: pull_request jobs: firebase_test_lab: runs-on: ubuntu-latest steps: - uses: actions/checkout@v2 - name: set up JDK 1.8 uses: actions/setup-java@v1 with: java-version: 1.8 - name: Build with Gradle run: ./gradlew assembleDebug - name: Login to Google Cloud uses: GoogleCloudPlatform/github-actions/setup-gcloud@master with: version: '290.0.1' service_account_key: ${{ secrets.GCP_SA_KEY }} export_default_credentials: true - name: Set current project run: gcloud config set project ${{ secrets.FIREBASE_PROJECT_ID }} - name: Run Tests in Firebase Test Lab run: | gcloud firebase test android run \ --type robo \ --app app/build/outputs/apk/debug/app-debug.apk \ --device model=sailfish,version=25,locale=ja,orientation=portrait \ --device model=zeroflte,version=22,locale=ja,orientation=portrait順番にみていきます。
ワークフローのトリガー設定
onシンタックスはワークフローをトリガーするGitHubイベントの名前を指定します。今回はプルリクエストをトリガーにワークフローを実行したいため、下記のように記述します。(参考: ワークフローをトリガーするイベント)pull_request_workflow.yaml(抜粋)on: pull_requestジョブの定義
jobsシンタックスはワークフローのジョブを定義します。
下記のコードではfirebase_test_labというジョブをubuntuの最新バージョンの環境で実行します。
さらにsteps以下でJobが実行するアクションを定義します。pull_request_workflow.yaml(抜粋)jobs: firebase_test_lab: runs-on: ubuntu-latest steps:レポジトリのチェックアウト
usesシンタックスでジョブで実行されるアクションを指定します。
actions/checkout@v2を使用することで、環境にレポジトリをフェッチします。pull_request_workflow.yaml(抜粋)steps: - uses: actions/checkout@v2Java環境のセットアップ
gradleのタスクを実行するためにJDKをインストールします。
下記のように記述することでJDK8が環境にインストールされます。(参考: https://github.com/actions/setup-java)pull_request_workflow.yaml(抜粋)- name: set up JDK 1.8 uses: actions/setup-java@v1 with: java-version: 1.8Androidアプリのビルド
Androidアプリをビルドします。
runシンタックスを用いることで、シェルを実行することができます。
今回はテスト用のアプリであるため、デバックビルドをします。pull_request_workflow.yaml(抜粋)- name: Build with Gradle run: ./gradlew assembleDebugGoogle Cloud SDKのセットアップ
Firebase Test Labを使用するには環境にGoogle Cloud SDKを環境にインストールする必要があります。(参考: Start testing with the gcloud CLI)
GoogleCloudPlatformが公式で公開しているアクション(github-actions/setup-gcloud)を用いてセットアップを行います。余談ですが、ここらへん、Firebase Test LabとうたってるのにGoogle Cloud SDKをインストールしなきゃならないのはどうかなぁと思います。Firebase CLIに統一してくれればすっきりするのですが。(テストにGCPのリソースを使用しているのでしょうがないのかなぁ)
pull_request_workflow.yaml(抜粋)- name: Login to Google Cloud uses: GoogleCloudPlatform/github-actions/setup-gcloud@master with: version: '290.0.1' service_account_key: ${{ secrets.GCP_SA_KEY }} export_default_credentials: trueここでサービスアカウントキーをGithubのレポジトリに登録する必要があります。
${{ secrets.GCP_SA_KEY }}としているコードにおいて、秘匿すべきサービスアカウントキーを読み込んでいます。
サービスアカウントキーの取得方法と、サービスアカウントキーをGithubのレポジトリに登録する方法は後述します。Firebaseプロジェクトの選択
先ほどセットアップしたGoogle Cloud SDKのgcloud CLIを使用してFirebaseプロジェクトを設定します。
Google Clud SDKのセットアップと同様の方法でプロジェクトIDを取得しています。これも説明は後述します。pull_request_workflow.yaml(抜粋)- name: Set current project run: gcloud config set project ${{ secrets.FIREBASE_PROJECT_ID }}Firebase Test Labの実行
gcloud CLIを使用してテストを実行します。
指定しているオプションは下記の通りです。そのほかのオプションについてはStart testing with the gcloud CLIを参考にしてください。
--type: テストの種類--app: ビルドしたAPKファイルのパス--device: テストの端末pull_request_workflow.yaml(抜粋)- name: Run Tests in Firebase Test Lab run: | gcloud firebase test android run \ --type robo \ --app app/build/outputs/apk/debug/app-debug.apk \ --device model=sailfish,version=25,locale=ja,orientation=portrait \ --device model=zeroflte,version=22,locale=ja,orientation=portrait3. サービスアカウントキーを取得する
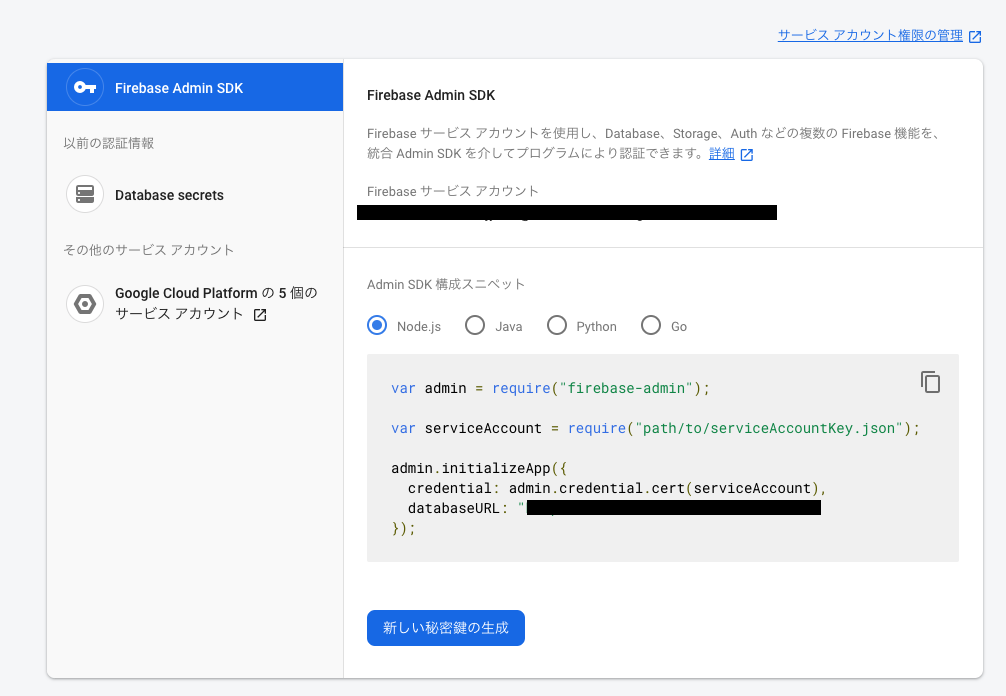
サービスアカウントキーを取得する方法について説明します。
サービスアカウントキーとは、Firebaseのリソースの使用許可をユーザアカウントに与えるものです。今回の例でいうとFirebase Test LabをCLIから使用できるようにするために、サービスアカウントキーを使用します。サービスアカウントキーはFirebaseコンソールから
「歯車アイコン」->「プロジェクトを設定」->「サービスアカウント」と進むと画像のような「新しい秘密鍵の生成」というボタンがあります。これをクリックすることで、サービスアカウントキーを取得することができます。
4. Cloud Testing APIの有効化
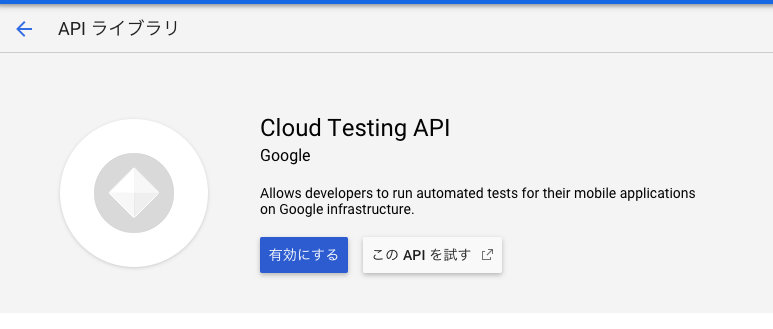
Firebase Test Labを使用するにはGCP上でClud Testing APIを有効にする必要があります。
Cloud Testing APIを有効にすることで、Googleインフラストラクチャでモバイルアプリケーションの自動テストが可能になります。GCPコンソールから
「APIとサービス」->「APIとサービスを有効化」に進み、検索ボックスからCloud Testing APIを検索すると、下記の画像のようなページが表示されます。「有効にする」ボタンをクリックし有効化してください。
5. サービスアカウントのロールの設定
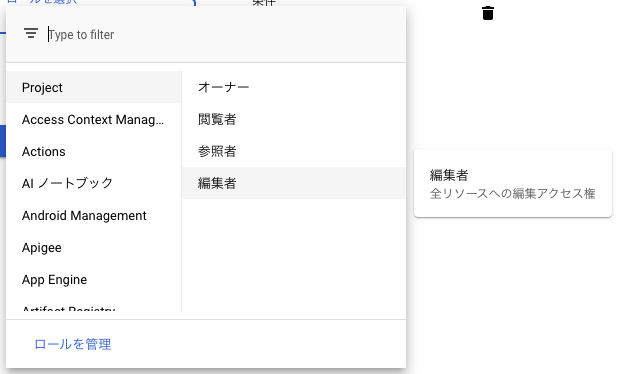
Firebase Test LabはGCPのリソースの上で実行されます。GCPのリソースを使用するには、サービスアカウントに権限がなければいけません。そのため、Firebaseに紐づいたサービスアカウントに権限を付与しなければなりません。
GCPコンソールから
「IAMと管理」に進むと、画像のように名前がfirebase-adminsdkのサービスアカウントが存在します。
右側にあるeditアイコンをクリックして、「別のロールを追加」->「ロールを選択」->「Project」->「編集者」を選択してください。
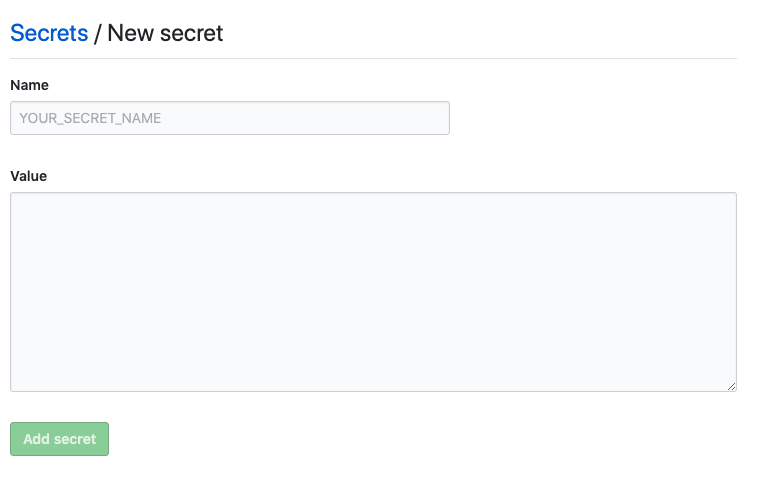
6. サービスアカウントキーをGithubレポジトリに登録する
前述したワークフローの作成において
${{ secrets.GCP_SA_KEY }}を使用していました。これを設定する方法を説明します。まず手順3で取得したサービスアカウントキーファイルをbase64にエンコードする必要があります。
下記のコマンドで出力された文字列をコピーします。$ cat <サービスアカウントキー>.json | base64次にこれをGithubレポジトリに登録します。
Githubレポジトリのレポジトリから「Settings」->「Secrets」->「New secret」に進むと画像のようなページが表示されます。Nameには、「GCP_SA_KEY」、Valueには先ほどbase64にエンコードした文字列を入力します。
このように設定することで、ワークフローのyamlファイルから
${{ secrets.GCP_SA_KEY }}として使用することが可能になります。7. FirebaseプロジェクトIDをGithubレポジトリに登録する
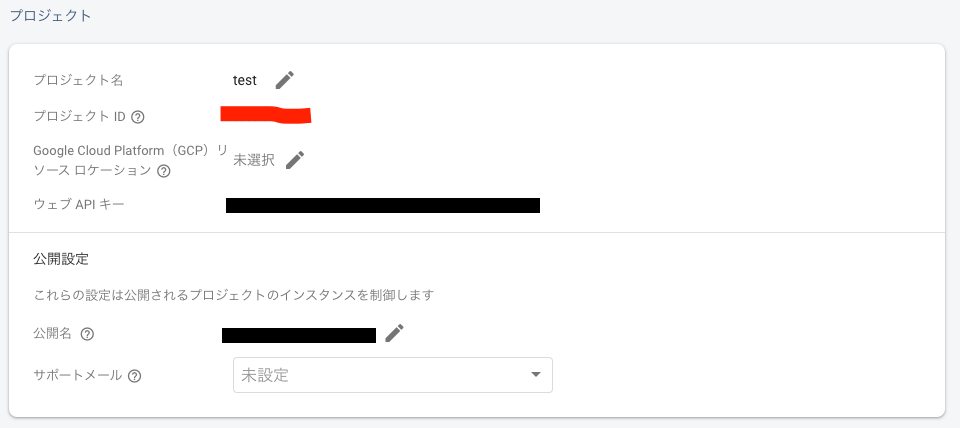
前述したワークフローの作成において${{ secrets.FIREBASE_PROJECT_ID }}を使用しました。これを設定する方法を説明します。
まず、FirebaseプロジェクトIDを取得するために、Firebaseコンソールから「歯車アイコン」->「プロジェクトを設定」->「全般」に進むと下記のようなページが表示されると思います。画像の赤線部分に表示されているプロジェクトIDをコピーします。
手順6と同様に,FIREBASE_PROJECT_IDという名前でGithubレポジトリ上のsecretsに保存します。
8. ワークフローを起動する
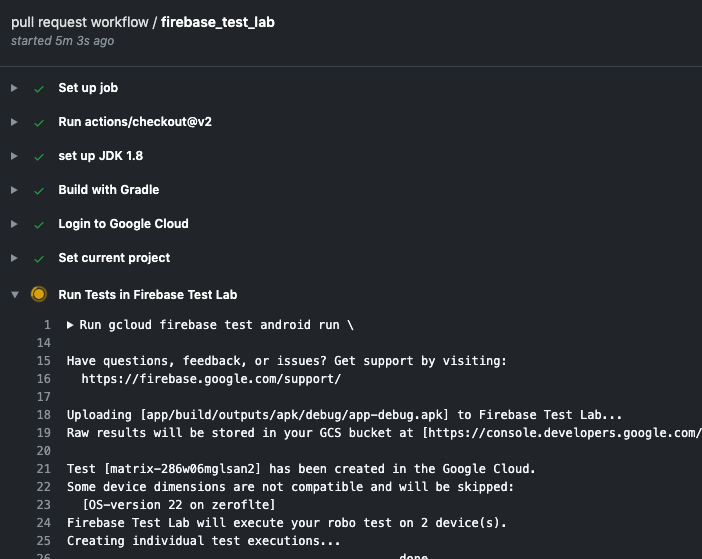
上記までで設定は全て整いました。次は実際にワークフローを起動します。ワークフローでは
on: pull_requestと設定しているため、レポジトリにプルリクエストを出します。そうすると画像のように、ワークフローが実行されます。
結果
最後にFirebase Test Labのテスト結果を簡単に紹介します。
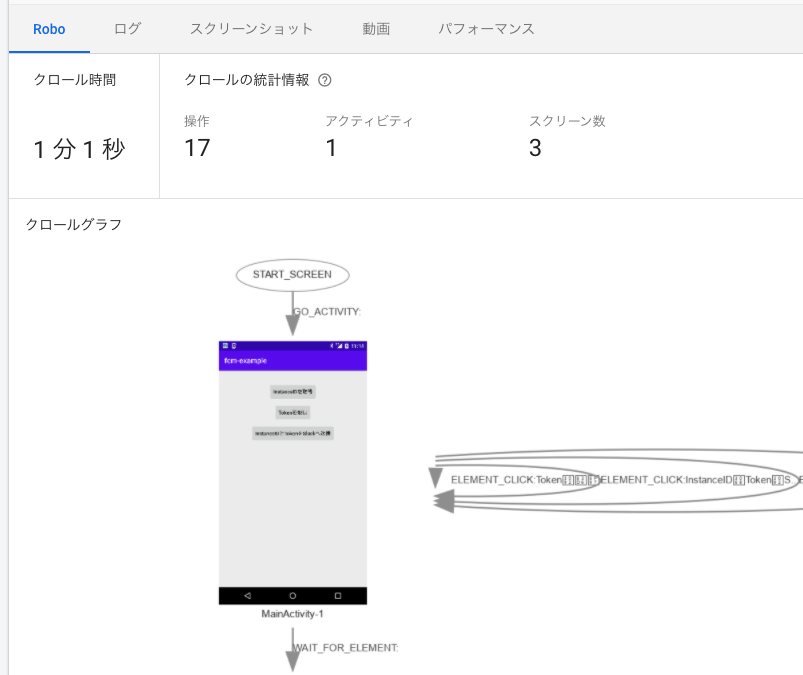
端末のテスト結果の「Robo」タブを開くと画像のようなRoboが実際に行なったクロールの詳細がわかります。
(クロールグラフに表示されている日本語が文字化けしてるの気になる。。。)
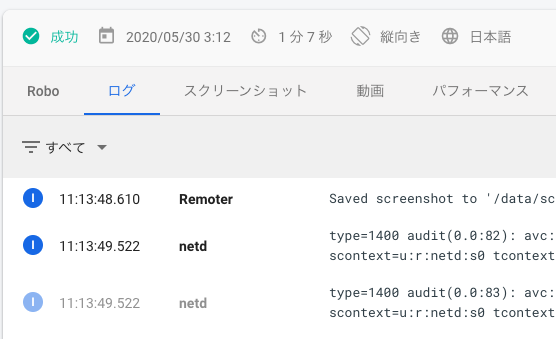
「ログ」タブでは画像のようにクロールのログがわかります。
もしクラッシュ等が発生したら、その詳細をこのログで確認することができます。
「動画」タブでは、クロールの様子を動画で確認することが可能です。
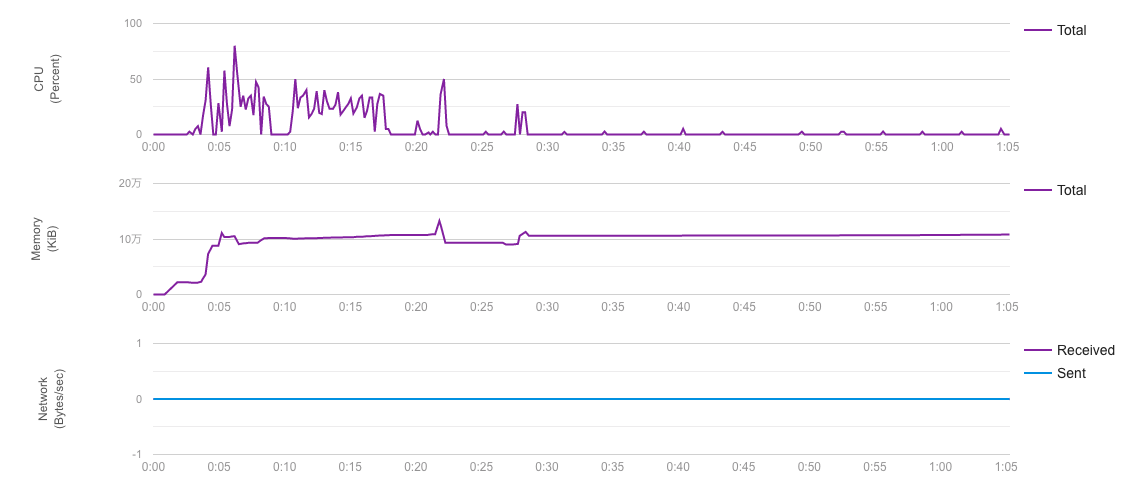
「パフォーマンス」タブでは、パフォーマンスを確認することができます。
例えば、Roboのある操作タイミングに、どれくらいCPU、メモリ、ネットワークを使用したか等がわかります。
まとめ
本記事ではGithub Actionsを使用して、Firebase Test Labで実機テスト(Roboテスト)を行う方法を紹介しました。
参考になれば幸いです!


- 投稿日:2020-06-03T00:19:18+09:00
Recipe: LiveData.observe with NonNull
Problem
  viewModel.order.observe(viewLifecycleOwner, Observe {
      it?.let { applyCurrentOrder(it) }
  })
toooooo many redundant code for just observe NonNull object with
LiveData.Ingredients
lifecycle-livedata-ktxversion 2.1.0 or higher- Kotlin
Metod
First.
Add a dependency
lifecycle-livedata-ktxinapp/build.gradle.dependencies { def lifecycle_version = "2.1.0" // or higher ... implementation "androidx.lifecycle:lifecycle-livedata-ktx:$lifecycle_version" ... }Second.(Optional)
If your project not apply Java8 yet.
add below inapp/build.gradle.android { .. compileOptions { sourceCompatibility JavaVersion.VERSION_1_8 targetCompatibility JavaVersion.VERSION_1_8 } // For Kotlin projects kotlinOptions { jvmTarget = "1.8" } }Third.
Implements your
ViewModel(AAC) class as code below.class MyOrderViewModel: ViewModel() { private val _order: MutableLiveData<Order> = MutableLiveData() val order: LiveData<Order> get() = _order .. // Important: don't update _order directly in other class. just call function. fun updateCurrentOrder(order: Order) { _order.value = order } }Fourth.
Observe data your
Activity/Fragmentclass withktx(important!!!).// You must add LivedData.observe Kotlin extension function. import androidx.lifecycle.observe class MyOrderFragment: Fragment(R.layout.my_fragment) { private val viewModel: MyOrderViewModel by viewModels() override fun onViewCreated(view: View, savedInstanceState: Bundle?) { // No longer need to write just like viewModel.order.observe(viewLifecycleOwner, Obseve{}) viewModel.order.observe(viewLifecycleOwner) { // No need null check applyCurrentOrder(it) } } fun applyCurrentOrder(order: Order) { .. } }Additional Technique (Alternately)
If you already wrote a lot of
MutableLiveDatainstead ofLiveData, you can also do the following.interface MyOrderViewModel { val order: LiveData<Order> } class MyOrderViewModelImpl: ViewModel(), MyOrderViewModel { override val order: MutableLiveData<Order> = MutableLiveData() .. fun updateCurrentOrder(order: Order) { this.order.value = order } }import androidx.lifecycle.observe class MyOrderFragment: Fragment(R.layout.my_fragment) { private val viewModel: MyOrderViewModel by viewModels<MyOrderViewModelImpl>() .. }More Information
about lifecycle: https://developer.android.com/jetpack/androidx/releases/lifecycle
about java8: https://developer.android.com/studio/write/java8-support