- 投稿日:2020-05-30T21:32:07+09:00
Backpropagation (tf.custom_gradient) で self を使用したい (tensorflow)
custom_graident を使用する場合の通常の書き方
@tf.custom_gradient
def gradient_reversal(x):
  y = x
  def grad(dy):
    return - dy
  return y, grad

# model 内で使用する場合
class MyModel(tf.keras.Model):
    def __init__(self):
        super(MyModel, self).__init__()

    def call(self, x):
        return gradient_reversal(x)
custom_gradient 内でスコープ外の変数(self等)を使用したい場合
class MyModel2(tf.keras.Model):
    def __init__(self):
        super(MyModel2, self).__init__()
        self.alpha = self.add_weight(name="alpha", initializer=tf.keras.initializers.Ones())

    @tf.custom_gradient
    def forward(self, x):
        y = self.alpha * x

        def backward(w, variables=None):
            with tf.GradientTape() as tape:
                tape.watch(w)
                z = - self.alpha * w

            grads = tape.gradient(z, [w])
            return z, grads

        return y, backward

    def call(self, x):
        return self.forward(x)
ドキュメント 内での引数が
dyになっているので計算済みのものが渡ってくるかと思いきや、Backpropagation 時の実行関数として指定できる (上記のbackwardメソッド)
bakwardメソッド外のスコープの変数を使用する場合は、variables=Noneを受け取るようにしないと以下のようなエラーが発生する (ドキュメントのArgs内でも説明されている)TypeError: If using @custom_gradient with a function that uses variables, then grad_fn must accept a keyword argument 'variables'.検証用コード
import tensorflow as tf


optimizer = tf.keras.optimizers.Adam(learning_rate=0.1)


class MyModel(tf.keras.Model):
    def __init__(self):
        super(MyModel, self).__init__()
        self.alpha = self.add_weight(name="alpha", initializer=tf.keras.initializers.Ones())

    @tf.custom_gradient
    def forward(self, x):
        y = self.alpha * x
        tf.print("forward")
        tf.print("  y: ", y)

        def backward(w, variables=None):
            z = self.alpha * w
            tf.print("backward")
            tf.print("  z: ", z)
            tf.print("  variables: ", variables)
            return z, variables

        return y, backward

    def call(self, x):
        return self.forward(x)


class MyModel2(tf.keras.Model):
    def __init__(self):
        super(MyModel2, self).__init__()
        self.alpha = self.add_weight(name="alpha", initializer=tf.keras.initializers.Ones())

    @tf.custom_gradient
    def forward(self, x):
        y = self.alpha * x
        tf.print("forward")
        tf.print("  y: ", y)

        def backward(w, variables=None):
            with tf.GradientTape() as tape:
                tape.watch(w)
                z = - self.alpha * w

            grads = tape.gradient(z, [w])

            tf.print("backward")
            tf.print("  z: ", z)
            tf.print("  variables: ", variables)
            tf.print("  alpha: ", self.alpha)
            tf.print("  grads: ", grads)
            return z, grads

        return y, backward

    def call(self, x):
        return self.forward(x)


for model in [MyModel(), MyModel2()]:
    print()
    print()
    print()
    print(model.name)
    for i in range(10):
        with tf.GradientTape() as tape:
            x = tf.Variable(1.0, tf.float32)
            y = model(x)

        grads = tape.gradient(y, model.trainable_variables)
        optimizer.apply_gradients(zip(grads, model.trainable_variables))
        tf.print("step")
        tf.print("  y:", y)
        tf.print("  grads:", grads)
        print()
- 投稿日:2020-05-30T03:41:15+09:00
Anaconda + Keras でGPUを使用する環境を構築する
はじめに
Keras(Tensorflow)でGPUを利用するための手順は、調べればいくらでも情報がでてきます。
逆を言えば、みんな躓いてるんだなぁ...って思いました。私は、
バージョンの対応関係の把握とGPUが使われてるかどうかの確認の仕方に手間取ったので、そこを注視してまとめてみました。環境
Windows10 Pro
NVIDIA GeForce GTX 1070 Ti
MSVC 2017 (Microsoft Visual Studio C++)
CUDA v10.0
cuDNN 7.4Python 3.6
Anaconda
TensorFlow-GPU 2.0.0
Keras 2.3.1一番重要なこと
バージョンの確認です
最初に、インストールするモノのバージョンの対応関係を抑えておきます。
まず、今回使いたい
Kerasが対応しているPythonのバージョンを調べます。
ドキュメントによれば、「KerasはPython 2.7-3.6に対応しています.」となっています。
つまり、対応しているもので最新のPython 3.6を使うことになります。
https://keras.io/ja/次に、
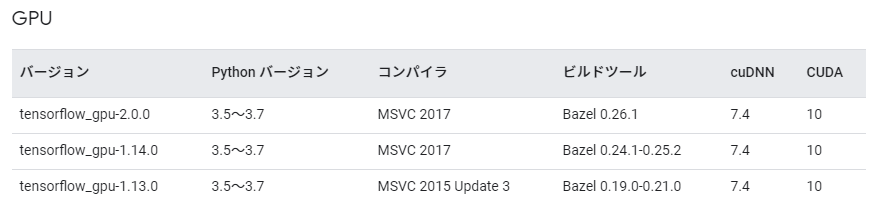
Python 3.6に対応しているtensorflow_gpuのバージョンを調べます。
対応しているもので最新のtensorflow_gpu-2.0.0を選択しました。
また、これに対応するMSVCのバージョン2017、cuDNNは7.4、CUDAは10.0であることがわかりました。
https://www.tensorflow.org/install/source_windows?hl=ja
まとめると、インストールするバージョンは以下のようになります。
- Python(3.6)
- TensorFlow-GPU(2.0.0)
- MSVC(2017)
- cuDNN(7.4)
- CUDA(10.0)
仮想環境の構築
バージョンに配慮が必要なため、仮想環境を構築する必要があります。
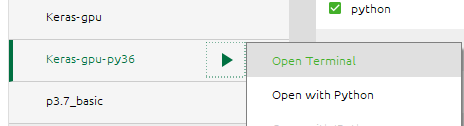
私は、GUIナビゲーターで仮想環境を管理できる「Anaconda」を利用しています。
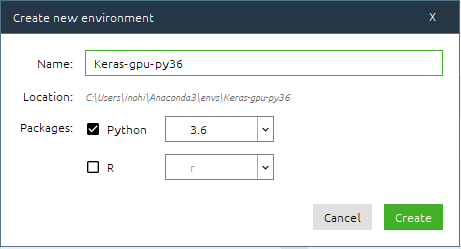
※インストールはこちらを参考に。VSCodeと絡めた開発環境を構築しています。ナビゲーターを起動して、「Enviroments」から「Create」を押して、仮想環境を作成します。
Pythonのバージョンは、先ほど確認した3.6を選択します。
MSVC(Microsoft Visual Studio C++)のインストール
tensorflowのドキュメントによれば、Visual Stadio 2019でテストされているそうなので、
Visual Studio Community 2019をインストールします。(ダウンロード)
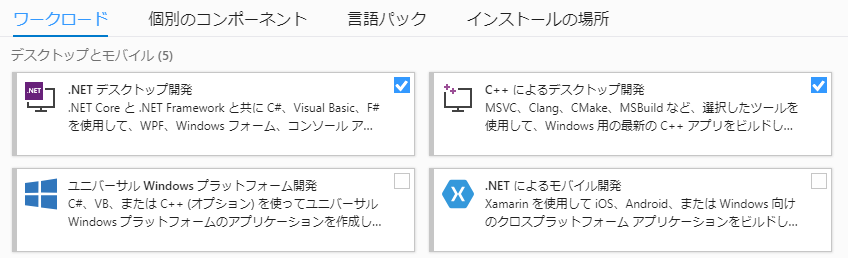
インストール手順はこちらを参照してください。留意点としては、インストールする際に「コンポーネントの選択」しますが、ここで
C++によるデスクトップ開発を選択します。
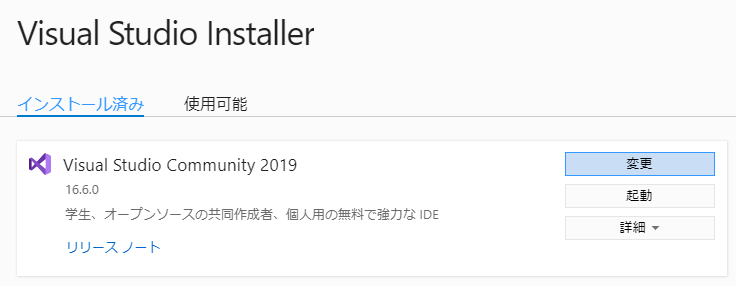
すでにVisual Studio Community 2019をインストールされている方は、Visual Studio Installerから追加することもできます。
[変更]を選択して、上図より選択します。
CUDA、cuDNNのインストール
バージョンに注意して、以下を参考にインストールをします。
https://qiita.com/jonpili/items/e5444c31fbd16f30725a
https://keita-blog.com/data_science/keras-tensorflow-gpuTensorFlow-GPU、Kerasのインストール
作成した仮想環境のcondaプロンプトを起動します。
condaプロンプト.(Keras-gpu-py36) C:\Users\...>TensorFlow-GPUをインストールします。
conda install tensorflow-gpu==2.0.0Kerasをインストールします。
conda install kerasインストールが終わったら、以下を実行してインストールされているパッケージを確認します。
conda list出力で以下のパッケージのバージョンが、インストールしたCUDAとcuDNNのバージョンに合致していればOKです。
(cuDNNのバージョンが違うけど、エラーが出なかったのでスルーしました...)
cudatoolkit               10.0.130                      0
cudnn                     7.6.5                cuda10.0_0
確認
GPUデバイスが認識されていることを確認します。
condaプロンプトで以下を実行します。
> python
>>> from tensorflow.python.client import device_lib
>>> device_lib.list_local_devices()
エラーがなく、以下のように表示されればOKです。
...
name: "/device:GPU:0"
device_type: "GPU"
memory_limit: 2210712780
locality {
  bus_id: 1
  links {
  }
}
...
実モデルで確認してみます。
まず、GPUメモリがオーバーフローしないように制限します。
その後、mnistデータを学習させてみます。
参考:tensorflow2.0 + kerasでGPUメモリの使用量を抑える方法test.py# ------------------------------------------------------- # メモリの制限 tensorflow-gpu (2.0.0) # ------------------------------------------------------- import tensorflow as tf physical_devices = tf.config.experimental.list_physical_devices('GPU') if len(physical_devices) > 0: for k in range(len(physical_devices)): tf.config.experimental.set_memory_growth(physical_devices[k], True) print('memory growth:', tf.config.experimental.get_memory_growth(physical_devices[k])) else: print("Not enough GPU hardware devices available") # ------------------------------------------------------- import keras from keras.datasets import mnist from keras.models import Sequential from keras.layers import Dense, Dropout from keras.optimizers import RMSprop batch_size = 128 num_classes = 10 epochs = 20 # モデルの生成関数 def createModel(): model = Sequential() model.add(Dense(512, activation='relu', input_shape=(784,))) model.add(Dropout(0.2)) model.add(Dense(512, activation='relu')) model.add(Dropout(0.2)) model.add(Dense(10, activation='softmax')) model.compile(loss='categorical_crossentropy', optimizer=RMSprop(), metrics=['accuracy']) return model # Mnistデータのロード (x_train, y_train), (x_test, y_test) = mnist.load_data() x_train = x_train.reshape(60000, 784) # 2次元配列を1次元に変換(訓練データ) x_test = x_test.reshape(10000, 784) # 2次元配列を1次元に変換(テストデータ) x_train = x_train.astype('float32') # int型をfloat32型に変換 x_test = x_test.astype('float32') # int型をfloat32型に変換 x_train /= 255 # [0-255]の値を[0.0-1.0]に変換 x_test /= 255 # 正解ラベルのOne hot vector化 y_train = keras.utils.to_categorical(y_train, num_classes) y_test = keras.utils.to_categorical(y_test, num_classes) # モデルの定義 model = createModel() # 学習の実行 history = model.fit(x_train, y_train, # 画像とラベルデータ batch_size=batch_size, epochs=epochs, # エポック数の指定 validation_data=(x_test, y_test)) # モデル構成の確認 model.summary() score = model.evaluate(x_test, y_test, verbose=0) print('Test loss:', score[0]) print('Test accuracy:', score[1])以下でGPUが使われていることを確認します。
- エラーがでないこと
- 解析に入る前のログでGPUが認識されていること
- タスクマネージャーでGPUの使用率が上がっていること
ログの一部.... device:GPU:0 with 6358 MB memory) -> physical GPU (device: 0, name: GeForce GTX 1070 Ti, pci bus id: 0000:01:00.0, compute capability: 6.1) Train on 60000 samples, validate on 10000 samples Epoch 1/20 2020-05-30 03:06:15.202155: I tensorflow/stream_executor/platform/default/dso_loader.cc:44] Successfully opened dynamic library cublas64_100.dll 60000/60000 [==============================] - 2s 36us/step - loss: 0.2462 - accuracy: 0.9249 - val_loss: 0.1065 - val_accuracy: 0.9655 Epoch 2/20 ...参考
インストール手順
- 【VS Code】Pythonを実行する方法(Anacondaを利用)
- Visual Studio 入門
- Windows10でKeras/tensorflowがGPUを使用できない場合のチェックポイント
- 初心者がGPU搭載Windows10にPython + Anaconda + TensorFlow + Kerasの環境を構築してみた[2018/4/28]
バージョン対応関係
確認方法

- 投稿日:2020-05-30T02:37:51+09:00
Ubuntu18.04にtensorRTをインストールした
Ubuntu18.04にCUDA10.1+cuDNN7.6.5をインストールしてtensorflow-GPU 2.1を入れて使おうとしたところ、import tensorflowした際にlibnvinfer6が読めなかったと警告メッセージが出ました。
これはtensorRTが入ってない為にフルに機能が使えないという警告のようですので、tensorRTをインストールしました。
なお、こちらのStep3の手順そのままです
https://ddkang.github.io/2019/09/19/installing-tensorrt.html手順
TensorRTのインストーラーdebファイルを以下のサイトからダウンロードします
https://developer.nvidia.com/nvidia-tensorrt-6x-download落としてきたdebファイルをdpkgで実行します。
以下ではdebファイルがカレントディレクトリにある状態で、tensorRT6.0.1.5 for cuda10.1をインストールしています。terminalsudo dpkg -i nv-tensorrt-repo-ubuntu1804-cuda10.1-trt6.0.1.5-ga-20190913_1-1_amd64.deb sudo apt update sudo apt install tensorrt libnvinfer6僕の環境ではこれで入ってくれました