- 投稿日:2020-05-24T23:36:46+09:00
GoogleMapを使ってサイクリングに出かけよう
タイトルからは、何の技術の話かわからないですね。
GoogleMapにナビゲーション機能ってありますよね、それをサイクリングでナビゲートしてもらおうというものです。
サイクリング中は、手が使えないので、音声ナビがあると便利です。
ですが、ポケストップを探すたびに、立ち止まってスマホを見るのは手間ですし、軽快ではありません。そこで、(ポケストップに限りませんが)サイクリング前に、途中のチェックポイントを複数覚えておいて、チェックポイントまでの道のりをナビゲートしてもらって、到着したら、ポケストップのアイテムをもらったり、コンビニで休憩したのち、次のチェックポイントを目指す、というものです。
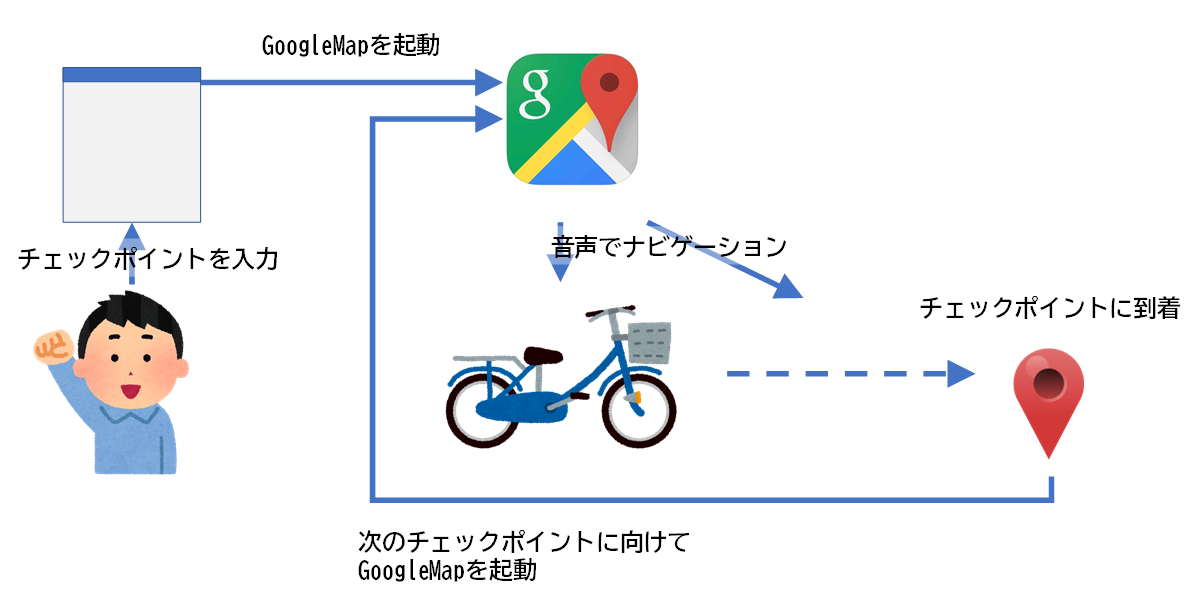
原理の説明:GoogleMapの機能
GoogleMapは、外部のアプリやブラウザから起動させることができます。
その際に、パラメータの指定によって、場所の表示だけでなく、出発地点と目的地を指定して、ナビゲーションを開始させることもできます。ですので、まずはブラウザから、サイクリングで回りたいチェックポイントのリストを作って、GoogleMapを起動して次のチェックポイントまでナビゲーションしてもらいます。
チェックポイントまで到着したら、またブラウザを立ち上げて、今度は次のチェックポイントを指定してGoogleMapを起動させる、これを最後の目的地まで繰り返すわけです。GoogleMapのナビゲーション機能
ナビゲーション中は、以下のことを適宜音声で教えてくれます。
・予定通りの道を進んでいるかどうか
・次の曲がり角まで何メートルか
・今曲がるべき曲がり角か
・予定の道を外れたか
・目的地の近くに来たか
・目的地に着いたか上記は、ナビを開始すると、設定が選べるようになり、「詳しい音声案内」のスイッチをOnにした場合です。Offの場合はもうちょっと少ない気がします。
もろもろGitHubに上げておきました。
poruruba/orientation_navigator
https://github.com/poruruba/orientation_navigator画面説明
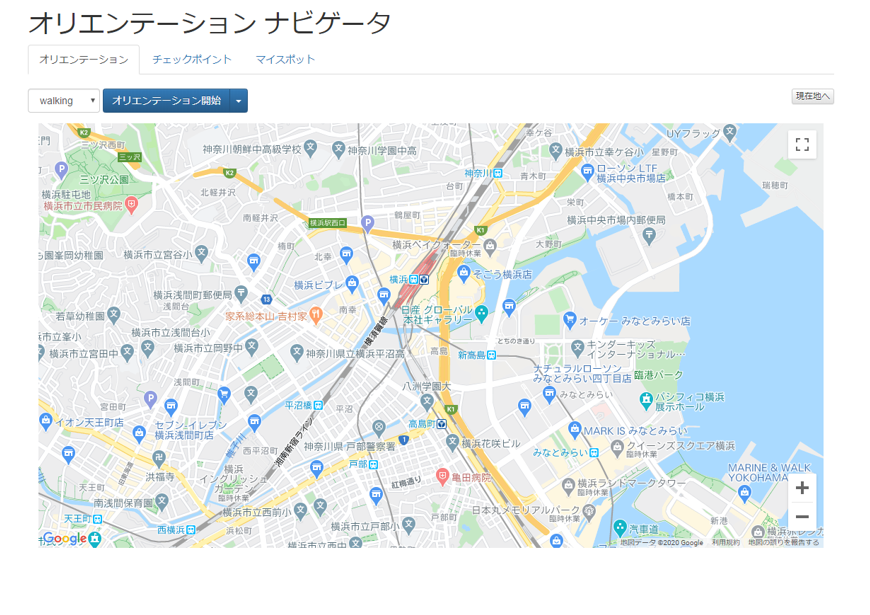
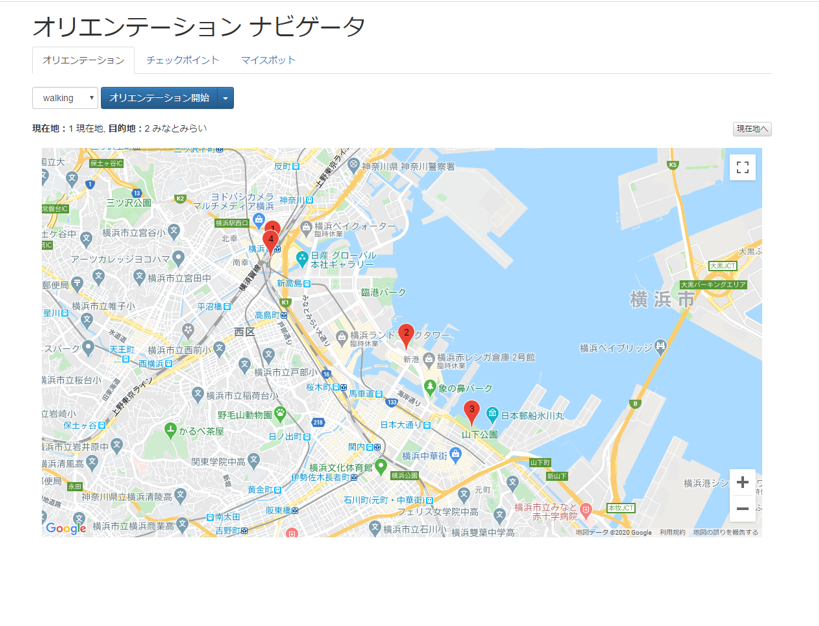
ブラウザを起動するとこんな感じの画面が表示されます。
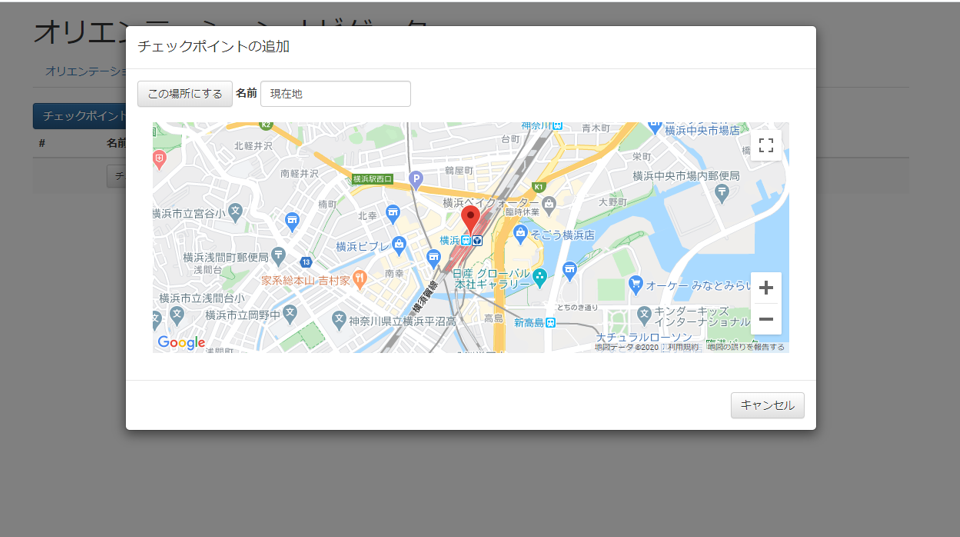
まずは、チェックポイントを追加します。タブ「チェックポイント」を選択し、チェックポイントを追加します。
GoogleMapがはめ込まれて表示されるので、出発地点を選択します。
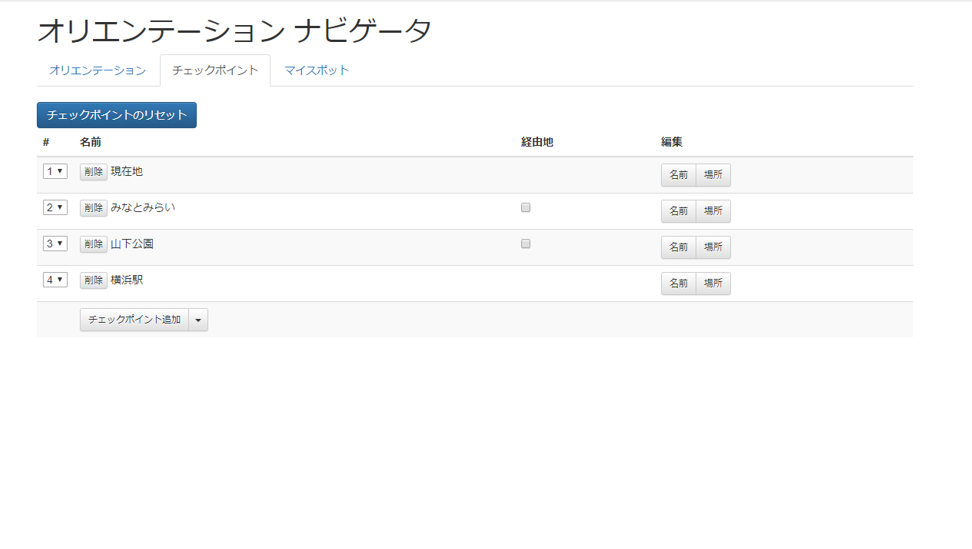
さらに、同じように次のチェックポイントを追加します。
経由地っていうチェックボックスがあります。通常は次のチェックポイントに到着するとGoogleMapのナビゲーションが終わってしまうのですが、経由地は次のチェックポイントまでの途中の経由地であって、経由地を通過しただけでは、GoogleMapのナビゲーションは終わらないようにしています。
ちなみに経由地は、ネイティブのGoogleMapの場合は9箇所、ブラウザの場合は1箇所のみ指定できます。
オリエンテーションタブを選択すると、マーキングされているのがわかります。
これで準備完了です。
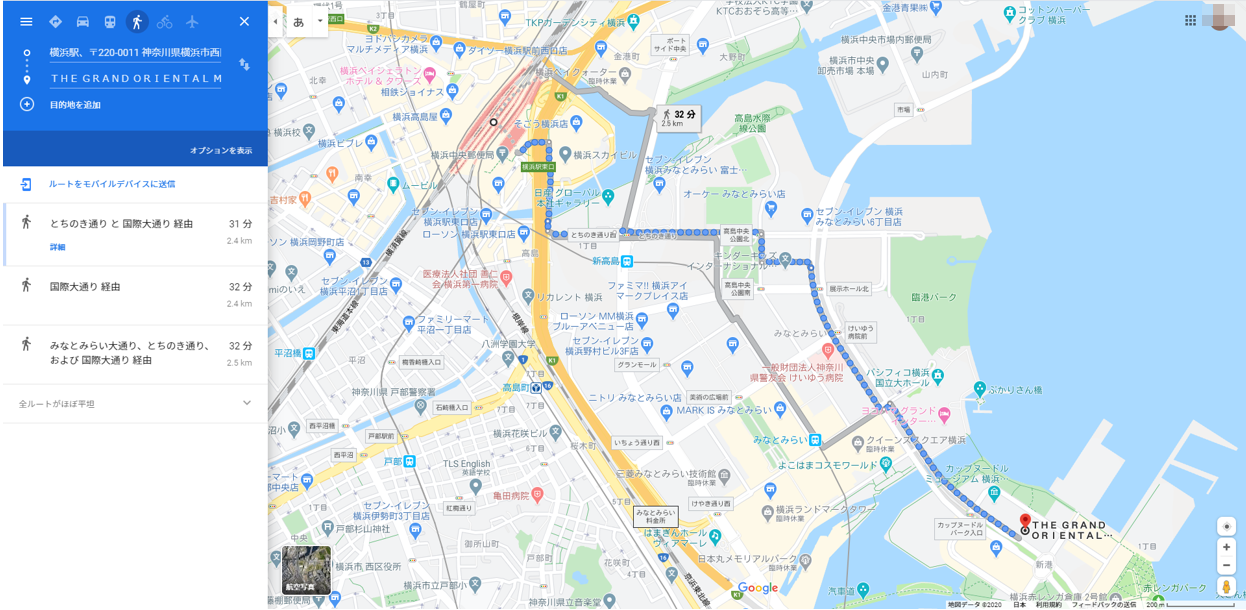
さっそく、「オリエンテーション開始」ボタンを押下してみましょう。
そうすると、こんな感じでGoogleMapが立ち上がり、ナビゲーション開始待ちとなります。
ちなみに、PCのChromeブラウザからの画面ですが、Androidから使うと、ブラウザのGoogleMapか、ネイティブのGoogleMapアプリ、どちらを起動するかの選択肢が出てきます。もちろん、ネイティブのGoogleMapアプリの方がナビゲーションとしては使い勝手が良いです。
あとは、開始してしまえば、いつものナビゲーションが始まります。
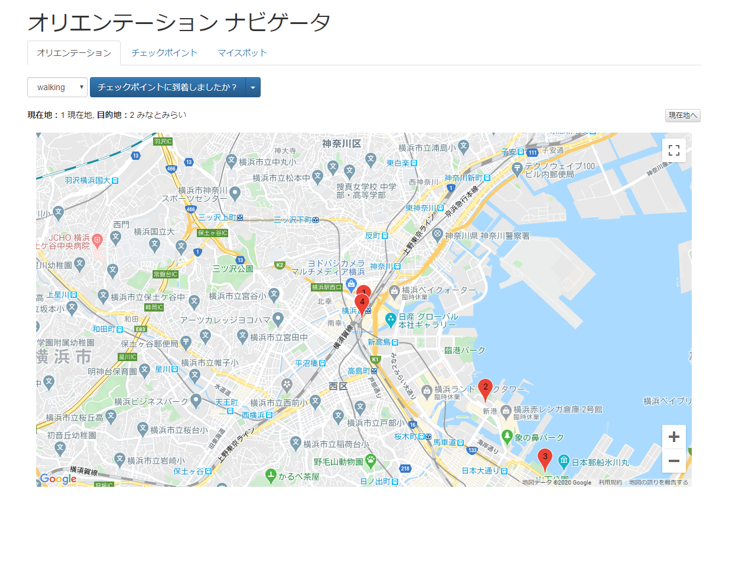
イヤホンで、GoogleMusic(Youtube Music)でも聞きながら、サイクリングしましょう。チェックポイントに到着したら、もう一度ブラウザに戻りましょう。
「チェックポイントに到着しましたか?」ボタンを押下すると、次のチェックポイントに出発のボタンに代わりますので、押下すると、またGoogleMapが立ち上がります。今度は、1つ目のチェックポイントから、2つ目のチェックポイントへのナビゲーションです。
おおよそ、イメージはつかめましたでしょうか?
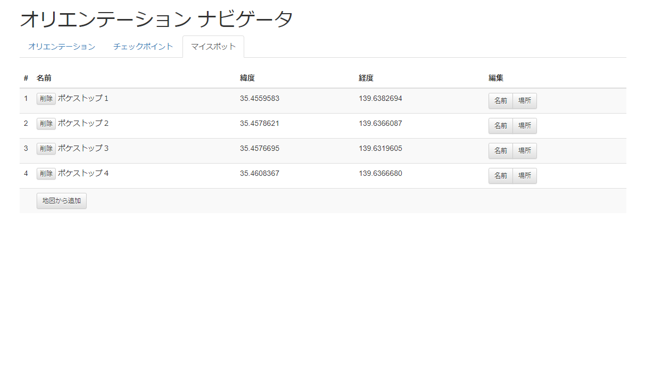
マイスポット機能
毎度毎度、場所を選択するのはめんどうです。特に家の周りはいつものコースを決めていますが、毎度ポケストップを指定するのは面倒です。
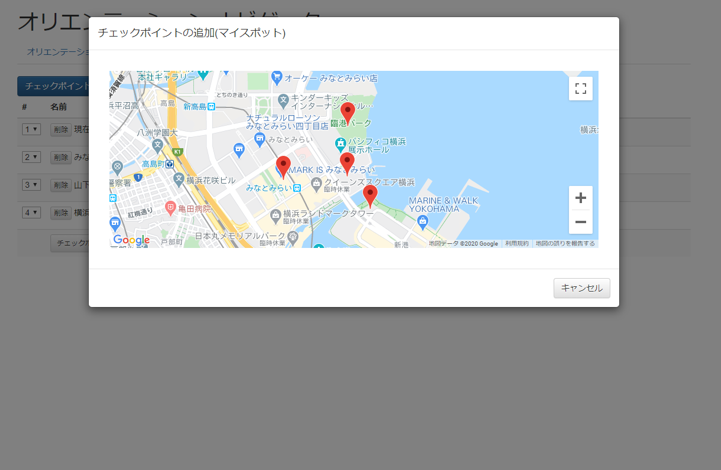
そこで、あらかじめよくいくスポットをマイスポットとして登録しておけば、それを選択するだけで、チェックポイントに追加されるようになります。マイスポットのタブを選択して、登録します。
そうすると、こんな感じで、チェックポイント登録する際に、マイスポットから選択することができます。
サーバ同期
実は、チェックポイントを追加したり、マイスポットを追加したりしたら、サーバ側にデータを保持するようにしています。ですので、ブラウザを立ち上げなおしても、以前の状態が復元されるようにしています。また、ナビゲーション中にチェックポイントに到達したりした時もサーバ側に同期するようにしています。
とはいってもクライアント・サーバいずれもかなり手抜きしています。
クライアント側は、Vueのwatchを使って、対象のデータが変更されたら、サーバに一括アップロードしているだけです。
取得も、ブラウザでの起動時だけです。GoogleMap起動のURL生成
大事なところをピックアップしました。
travelmode、origin、destination、waypointsを指定しているのがわかります。travelmode
歩きの移動か、車の移動か、電車の移動かを指定します。自転車がありますが、日本では使えないようです。origin
出発地点です。ブラウザで設定したチェックポイントに相当します。経由地ではありません。destination
これもブラウザで設定したチェックポイントですが、originのチェックポイントの次のチェックポイントです。waypoints
これが経由地です。start.js// GoogleMap起動のパラメータを生成 var params = ""; var origin = this.checkpoints[this.origin_index]; params += "&travelmode=" + this.travelmode; params += "&origin=" + encodeURIComponent(origin.lat + ',' + origin.lng); if( destination_index <= (this.checkpoints.length - 1)){ var destination = this.checkpoints[destination_index]; params += "&destination=" + encodeURIComponent(destination.lat + ',' + destination.lng); } if( (this.origin_index + 1) < destination_index ){ var waypoints = ""; for( var i = (this.origin_index + 1) ; i < destination_index ; i++ ){ if( i != (this.origin_index + 1) ) waypoints += '|'; waypoints += this.checkpoints[i].lat + ',' + this.checkpoints[i].lng; } params += "&waypoints=" + encodeURIComponent(waypoints); } var href = 'https://www.google.com/maps/dir/?api=1' + params; console.log(href); this.destination_completed = false; // GoogleMapを起動 window.open(href, '_blank');詳しくは以下を参照してください。
GoolgeMap Developers Guide Univarsal cross-platform syntax
https://developers.google.com/maps/documentation/urls/guide?hl=ja#directions-actionソース一式
Javascriptのソースです。
start.js'use strict'; //var vConsole = new VConsole(); const default_lat = 35.465878; const default_lng = 139.622329; const base_url = "http://localhost:10080"; var vue_options = { el: "#top", data: { progress_title: '', // for progress-dialog origin_index: 0, // 出発のインデックス destination_completed : true, // チェックポイントに到着したかどうか checkpoints: [], // チェックポイントのリスト map_markers: [], // Map1に配置のマーカ myspots: [], // マイスポットのリスト dialog_params: {}, // モーダルダイアログの入出力パラメタ map2_markers: [], // Map2に配置のマーカ default_latlng: new google.maps.LatLng(default_lat, default_lng), // デフォルトのロケーション(現在地に上書き) travelmode: 'walking', // GoogleMapに指定するtravelmode }, computed: { // ボタンに表示するテキスト orientation_text: function(){ if( !this.destination_completed ) return 'チェックポイントに到着しましたか?'; if( this.origin_index == 0 ) return 'オリエンテーション開始'; else if( this.origin_index >= (this.checkpoints.length - 1) ) return '最終目的地に到着しました。'; else return '次のチェックポイントに出発'; } }, watch: { checkpoints: function(){ // Mapに配置のマーカを再設定 for( var i = 0 ; i < this.map_markers.length; i++ ) this.map_markers[i].setMap(null); this.map_markers = []; for( var i = 0 ; i < this.checkpoints.length ; i++ ){ var latlng = new google.maps.LatLng(this.checkpoints[i].lat, this.checkpoints[i].lng); var mopts = { position: latlng, map: this.map, label: String(i + 1) }; var marker = new google.maps.Marker(mopts); this.map_markers.push(marker); } try{ // サーバに同期 update_data('checkpoints', this.checkpoints); }catch(error){ this.toast_show("サーバにデータをアップロードできませんでした。"); }; }, myspots: function(){ try{ // サーバに同期 update_data('myspots', this.myspots); }catch(error){ this.toast_show("サーバにデータをアップロードできませんでした。"); }; }, origin_index: function(){ try{ // サーバに同期 update_data('orientation', { origin_index: this.origin_index, destination_completed: this.destination_completed }); }catch(error){ this.toast_show("サーバにデータをアップロードできませんでした。"); }; }, destination_completed: function(){ try{ // サーバに同期 update_data('orientation', { origin_index: this.origin_index, destination_completed: this.destination_completed }); }catch(error){ this.toast_show("サーバにデータをアップロードできませんでした。"); }; }, }, methods: { // デフォルトのロケーションに移動 map_goto_current_location: function(){ var latlng = this.default_latlng; this.map.setCenter(latlng); }, // オリエンテーションタブ選択時にデフォルトのロケーションまたは出発位置に移動 orientation_update_view: function(){ var latlng = this.default_latlng; if( this.checkpoints.length > 0 ) latlng = new google.maps.LatLng(this.checkpoints[this.origin_index].lat, this.checkpoints[this.origin_index].lng); this.map.setCenter(latlng); }, // オリエンテーションを指定位置からリスタート orientation_restart: function(index){ if( index < 0 ) if( !window.confirm('本当に最初から初めてもいいですか?') ) return; this.origin_index = (index < 0) ? 0 : index; this.destination_completed = true; this.orientation_next(); }, // 次の目的地(経由地を除く)を取得 get_next_destination: function(){ var destination_index = this.origin_index + 1; for( ; destination_index < this.checkpoints.length ; destination_index++ ) if( !this.checkpoints[destination_index].waypoint ) break; if( destination_index >= this.checkpoints.length ) destination_index = this.checkpoints.length - 1; return destination_index; }, // 次へのボタンを押下 orientation_next: function(){ if( this.checkpoints.length == 0 ){ alert('チェックポイントを追加してください。'); return; }else if( this.checkpoints.length == 1 ){ alert('次のチェックポイントを追加してください。'); return; } if( this.origin_index >= (this.checkpoints.length - 1) ){ alert('すでに目的地に到達しています。'); return; } var destination_index = this.get_next_destination(); if( (destination_index - (this.origin_index + 1)) > 9){ alert('経由地の数が多すぎます。(9以下)'); return; } if( !this.destination_completed ){ // チェックポイントに到達 this.origin_index = destination_index; this.destination_completed = true; // 目的位置に到達 if( destination_index >= (this.checkpoints.length - 1) ) this.dialog_open('#orientation_complete_dialog'); return; } // GoogleMap起動のパラメータを生成 var params = ""; var origin = this.checkpoints[this.origin_index]; params += "&travelmode=" + this.travelmode; params += "&origin=" + encodeURIComponent(origin.lat + ',' + origin.lng); if( destination_index <= (this.checkpoints.length - 1)){ var destination = this.checkpoints[destination_index]; params += "&destination=" + encodeURIComponent(destination.lat + ',' + destination.lng); } if( (this.origin_index + 1) < destination_index ){ var waypoints = ""; for( var i = (this.origin_index + 1) ; i < destination_index ; i++ ){ if( i != (this.origin_index + 1) ) waypoints += '|'; waypoints += this.checkpoints[i].lat + ',' + this.checkpoints[i].lng; } params += "&waypoints=" + encodeURIComponent(waypoints); } var href = 'https://www.google.com/maps/dir/?api=1' + params; console.log(href); this.destination_completed = false; // GoogleMapを起動 window.open(href, '_blank'); }, // Map2のマーカをクリアし、指定場所に移動 map2_cleanup: function(latlng){ for( var i = 0 ; i < this.map2_markers.length; i++ ) this.map2_markers[i].setMap(null); this.map2_markers = []; if( this.map2_default_marker ){ this.map2_default_marker.setMap(null); this.map2_default_marker = null; } this.map2.setCenter(latlng); }, // モーダルダイアログの結果処理 dialog_submit: function(){ if( this.dialog_params.title == 'マイスポットの追加' ){ var location = this.map2.getCenter(); var name = this.dialog_params.name; this.myspots.push({ name, lat: location.lat(), lng: location.lng() }); }else if( this.dialog_params.title == 'チェックポイントの追加' ){ var location = this.map2.getCenter(); var name = this.dialog_params.name; this.checkpoints.push({ name, lat: location.lat(), lng: location.lng() }); }else if( this.dialog_params.title == 'マイスポットの変更'){ var location = this.map2.getCenter(); this.myspots[this.dialog_params.index].lat = location.lat(); this.myspots[this.dialog_params.index].lng = location.lng(); }else if( this.dialog_params.title == 'チェックポイントの変更' ){ var location = this.map2.getCenter(); this.checkpoints[this.dialog_params.index].lat = location.lat(); this.checkpoints[this.dialog_params.index].lng = location.lng(); } this.dialog_close('#select_location_dialog'); }, // マイスポットの追加(地図から)のためのモーダルダイアログ表示 do_myspot_append: function(){ this.map2_cleanup(this.default_latlng); this.map2_default_marker = new google.maps.Marker({ position: this.default_latlng, map: this.map2, }); this.dialog_params = { title: 'マイスポットの追加', is_input_name: true, is_input_submit: true, }; this.dialog_open('#select_location_dialog'); }, // マイスポットの削除 do_myspot_delete: function(index){ if( !window.confirm('本当に削除していいですか?') ) return; Vue.delete(this.myspots, index); }, // マイスポットの名前変更 do_myspot_change_name: function(index){ var name = window.prompt('新しい名前', this.myspots[index].name); if( !name ) return; this.myspots[index].name = name; }, // マイスポットのロケーション変更 do_myspot_change_location: function(index){ var latlng = new google.maps.LatLng(this.myspots[index].lat, this.myspots[index].lng); this.map2_cleanup(latlng); this.map2_default_marker = new google.maps.Marker({ position: latlng, map: this.map2, }); this.dialog_params = { title: 'マイスポットの変更', index: index, is_input_submit: true, }; this.dialog_open('#select_location_dialog'); }, // チェックポイントリストのリセット do_checkpoints_reset: function(){ if( !window.confirm('本当にリセットしていいですか?') ) return; this.origin_index = 0; this.destination_completed = true; this.checkpoints = []; }, // チェックポイントの追加(マイスポットから)のためのモーダルダイアログ表示 do_checkpoint_append_myspot: function(){ if( this.myspots.length == 0 ){ alert('マイスポットが登録されていません。'); return; } this.map2_cleanup(this.default_latlng); this.dialog_params = { title: 'チェックポイントの追加(マイスポット)', }; var _this = this; for( var i = 0 ; i < this.myspots.length ; i++ ){ var mopts = { position: new google.maps.LatLng(this.myspots[i].lat, this.myspots[i].lng), map: this.map2, }; var marker = new google.maps.Marker(mopts); this.map2_markers.push(marker); marker.addListener('click', function(e){ for( var i = 0 ; i < _this.map2_markers.length ; i++ ){ if( _this.map2_markers[i] == this ){ _this.checkpoints.push(_this.myspots[i]); _this.dialog_close('#select_location_dialog'); return; } } }); } this.dialog_open('#select_location_dialog'); }, // チェックポイント追加(地図から)のためのモーダルダイアログ表示 do_checkpoint_append: function(){ this.map2_cleanup(this.default_latlng); this.map2_default_marker = new google.maps.Marker({ position: this.default_latlng, map: this.map2, }); this.dialog_params = { title: 'チェックポイントの追加', is_input_name: true, is_input_submit: true, name : (this.checkpoints.length == 0) ? '現在地' : '', }; this.dialog_open('#select_location_dialog'); }, // チェックポイントの削除 do_checkpoint_delete: function(index){ if( !window.confirm('本当に削除していいですか?') ) return; Vue.delete(this.checkpoints, index); }, // チェックポイントの名前変更 do_checkpoint_change_name: function(index){ var name = window.prompt('新しい名前', this.checkpoints[index].name); if( !name ) return; this.checkpoints[index].name = name; }, // チェックポイントのロケーション変更 do_checkpoint_change_location: function(index){ var latlng = new google.maps.LatLng(this.checkpoints[index].lat, this.checkpoints[index].lng); this.map2_cleanup(latlng); this.map2_default_marker = new google.maps.Marker({ position: latlng, map: this.map2, }); this.dialog_params = { title: 'チェックポイントの変更', index: index, is_input_submit: true, }; this.dialog_open('#select_location_dialog'); }, // チェックポイントの順番変更 do_checkpoint_change_index: function(index, event){ var newIndex = event.target.selectedIndex; var temp = this.checkpoints[index]; Vue.set(this.checkpoints, index, this.checkpoints[newIndex]); Vue.set(this.checkpoints, newIndex, temp); }, }, created: function(){ }, mounted: function(){ proc_load(); // 現在地情報の取得 navigator.geolocation.getCurrentPosition((pos) =>{ this.default_latlng = new google.maps.LatLng(pos.coords.latitude, pos.coords.longitude); this.map_goto_current_location(); }, (error) =>{ this.toast_show("現在地を取得できませんでした。"); }); // Mapの生成 var myOptions = { zoom: 15, center: this.default_latlng, mapTypeId: google.maps.MapTypeId.ROADMAP, mapTypeControl: false, streetViewControl: false, }; var canvas = $('#map_canvas')[0]; this.map = new google.maps.Map(canvas, myOptions); // Map2(モーダルダイアログ用)の生成 var canvas2 = $('#map_canvas2')[0]; this.map2 = new google.maps.Map(canvas2, myOptions); google.maps.event.addListener(this.map2, 'center_changed', () =>{ if( !this.map2_default_marker ) return; var location = this.map2.getCenter(); this.map2_default_marker.setPosition(location); }); // サーバ保持データの取得 get_data('myspots') .then(data =>{ this.myspots = data; return get_data('checkpoints'); }) .then(data => { this.checkpoints = data; return get_data('orientation'); }) .then(data => { if( data.origin_index != undefined ) this.origin_index = data.origin_index; if( data.destination_completed != undefined ) this.destination_completed = data.destination_completed; }) .catch(error =>{ this.toast_show("サーバからデータを取得できませんでした。"); }); } }; vue_add_methods(vue_options, methods_bootstrap); vue_add_components(vue_options, components_bootstrap); var vue = new Vue( vue_options ); function do_post(url, body) { const headers = new Headers({ "Content-Type": "application/json; charset=utf-8" }); return fetch(new URL(url).toString(), { method: 'POST', body: JSON.stringify(body), headers: headers }) .then((response) => { if (!response.ok) throw 'status is not 200'; return response.json(); }); } async function get_data(type){ return do_post(base_url + '/get-data', { type: type }) .then(json =>{ if( json.status != 'OK' ) throw "post failed"; return json.result.data; }); } async function update_data(type, data){ var body = { type: type, data: data, } return do_post(base_url + '/update-data', body) .then(json =>{ if( json.status != 'OK' ) throw "post failed"; }); }次はHTMLです。
index.html<!DOCTYPE html> <html lang="ja"> <head> <meta http-equiv="Content-Type" content="text/html; charset=utf-8" /> <meta http-equiv="Content-Security-Policy" content="default-src * data: gap: https://ssl.gstatic.com 'unsafe-eval' 'unsafe-inline'; style-src * 'unsafe-inline'; media-src *; img-src * data: content: blob:;"> <meta name="format-detection" content="telephone=no"> <meta name="msapplication-tap-highlight" content="no"> <meta name="apple-mobile-web-app-capable" content="yes" /> <meta name="viewport" content="user-scalable=no, initial-scale=1, maximum-scale=1, minimum-scale=1, width=device-width"> <!-- jQuery (necessary for Bootstrap's JavaScript plugins) --> <script src="https://code.jquery.com/jquery-1.12.4.min.js" integrity="sha384-nvAa0+6Qg9clwYCGGPpDQLVpLNn0fRaROjHqs13t4Ggj3Ez50XnGQqc/r8MhnRDZ" crossorigin="anonymous"></script> <!-- Latest compiled and minified CSS --> <link rel="stylesheet" href="https://stackpath.bootstrapcdn.com/bootstrap/3.4.1/css/bootstrap.min.css" integrity="sha384-HSMxcRTRxnN+Bdg0JdbxYKrThecOKuH5zCYotlSAcp1+c8xmyTe9GYg1l9a69psu" crossorigin="anonymous"> <!-- Optional theme --> <link rel="stylesheet" href="https://stackpath.bootstrapcdn.com/bootstrap/3.4.1/css/bootstrap-theme.min.css" integrity="sha384-6pzBo3FDv/PJ8r2KRkGHifhEocL+1X2rVCTTkUfGk7/0pbek5mMa1upzvWbrUbOZ" crossorigin="anonymous"> <!-- Latest compiled and minified JavaScript --> <script src="https://stackpath.bootstrapcdn.com/bootstrap/3.4.1/js/bootstrap.min.js" integrity="sha384-aJ21OjlMXNL5UyIl/XNwTMqvzeRMZH2w8c5cRVpzpU8Y5bApTppSuUkhZXN0VxHd" crossorigin="anonymous"></script> <title>オリエンテーション ナビゲータ</title> <link rel="stylesheet" href="css/start.css"> <script src="js/methods_bootstrap.js"></script> <script src="js/components_bootstrap.js"></script> <script src="js/vue_utils.js"></script> <script src="dist/js/vconsole.min.js"></script> <script src="https://cdn.jsdelivr.net/npm/vue/dist/vue.js"></script> <script src="https://cdn.jsdelivr.net/npm/js-cookie@2/src/js.cookie.min.js"></script> <link rel="stylesheet" href="https://cdnjs.cloudflare.com/ajax/libs/toastr.js/latest/toastr.min.css"> <script src="https://cdnjs.cloudflare.com/ajax/libs/toastr.js/latest/toastr.min.js"></script> <script type="text/javascript" src="//maps.google.com/maps/api/js?key=【GoogleAPIキー】"></script> </head> <body> <div id="top" class="container"> <h1>オリエンテーション ナビゲータ</h1> <ul class="nav nav-tabs"> <li role="presentation" class="active"><a href="#oriatation" v-on:click="orientation_update_view" data-toggle="tab">オリエンテーション</a></li> <li role="presentation"><a href="#checkpoint" data-toggle="tab">チェックポイント</a></li> <li role="presentation"><a href="#myspot" data-toggle="tab">マイスポット</a></li> </ul> <div class="tab-content"> <div id="oriatation" class="tab-pane fade in active"> <br> <span class="form-inline"> <select class="form-control" v-model="travelmode"> <option value="walking">walking</option> <option value="bicycling">bicycling</option> <option value="driving">driving</option> <option value="transit">transit</option> </select> </span> <div class="btn-group"> <button class="btn btn-primary" v-on:click="orientation_next">{{orientation_text}}</button> <button type="button" class="btn btn-primary dropdown-toggle" data-toggle="dropdown"><span class="caret"></span></button> <ul class="dropdown-menu"> <li><a v-on:click="orientation_restart(-1)">最初から再開</a></li> <li><a v-on:click="orientation_restart(origin_index)">今のチェックポイントを再開</a></li> </ul> </div> <span v-if="checkpoints.length >= 2"> <br><br> <label>現在地:</label>{{origin_index + 1}} {{checkpoints[origin_index].name}}, <label>目的地:</label>{{get_next_destination() + 1}} {{checkpoints[get_next_destination()].name}} </span> <button class="btn btn-default btn-xs pull-right" v-on:click="map_goto_current_location">現在地へ</button> <br> <div class="row" id="map_canvas" style="margin: 15px; height:600px"></div> </div> <div id="checkpoint" class="tab-pane fade in"> <br> <button class="btn btn-primary" v-on:click="do_checkpoints_reset">チェックポイントのリセット</button> <table class="table table-striped"> <thead> <tr><th>#</th><th>名前</th><th>経由地</th><th>編集</th></tr> </thead> <tbody> <tr v-for="(point, index) in checkpoints"> <td width="1px"> <div class="form-inline"> <select v-bind:value="index" v-on:change="do_checkpoint_change_index(index, $event)"> <option v-for="(point2, index2) in checkpoints" v-bind:value="index2" v-bind:selected="index==index2">{{index2 + 1}}</option> </select> </div> </td> <td> <button class="btn btn-default btn-xs" v-on:click="do_checkpoint_delete(index)">削除</button> {{point.name}} </td> <td> <input v-if="index!=0 && index!=(checkpoints.length-1)" type="checkbox" v-model="point.waypoint"> </td> <td> <div class="btn-group"> <button class="btn btn-default btn-sm" v-on:click="do_checkpoint_change_name(index)">名前</button> <button class="btn btn-default btn-sm" v-on:click="do_checkpoint_change_location(index)">場所</button> </div> </td> </tr> <tr> <td></td> <td> <div class="btn-group"> <button class="btn btn-default btn-sm" v-on:click="do_checkpoint_append">チェックポイント追加</button> <button type="button" class="btn btn-default btn-sm dropdown-toggle" data-toggle="dropdown"><span class="caret"></span></button> <ul class="dropdown-menu"> <li><a v-on:click="do_checkpoint_append_myspot">マイスポットから追加</a></li> </ul> </div> </td><td></td><td></td> </tr> </tbody> </table> </div> <div id="myspot" class="tab-pane fade in"> <br> <table class="table table-striped"> <thead> <tr><th>#</th><th>名前</th><th>緯度</th><th>経度</th><th>編集</th></tr> </thead> <tbody> <tr v-for="(spot, index) in myspots"> <td width="1px">{{index + 1}}</td> <td><button class="btn btn-default btn-xs" v-on:click="do_myspot_delete(index)">削除</button> {{spot.name}}</td> <td>{{spot.lat.toFixed(7)}}</td><td>{{spot.lng.toFixed(7)}}</td> <td> <div class="btn-group"> <button class="btn btn-default btn-sm" v-on:click="do_myspot_change_name(index)">名前</button> <button class="btn btn-default btn-sm" v-on:click="do_myspot_change_location(index)">場所</button> </div> </td> </tr> <tr> <td></td> <td> <button class="btn btn-default btn-sm" v-on:click="do_myspot_append">地図から追加</button> </td> <td></td><td></td><td></td> </tr> </tbody> </table> </div> <br> <br> </div> <modal-dialog size="lg" id="orientation_complete_dialog"> <div slot="content"> <div class="modal-header"> <h4 class="modal-title">オリエンテーション達成</h4> </div> <div class="modal-body"> <center> オリエンテーション達成です。おめでとうございます。<br> <img src="img/goal_figure.png"> </center> </div> <div class="modal-footer"> <button class="btn btn-default" v-on:click="dialog_close('#orientation_complete_dialog')">閉じる</button> </div> </div> </modal-dialog> <modal-dialog size="lg" id="select_location_dialog"> <div slot="content"> <div class="modal-header"> <h4 class="modal-title">{{dialog_params.title}}</h4> </div> <div class="modal-body"> <div class="form-inline"> <button class="btn btn-default" v-on:click="dialog_submit" v-if="dialog_params.is_input_submit">この場所にする</button> <span v-if="dialog_params.is_input_name"> <label>名前</label> <input type="text" class="form-control" v-model="dialog_params.name"> </span> </div> <div class="row" id="map_canvas2" style="margin: 20px; height:300px"></div> </div> <div class="modal-footer"> <button class="btn btn-default" v-on:click="dialog_close('#select_location_dialog')">キャンセル</button> </div> </div> </modal-dialog> <!-- for progress-dialog --> <progress-dialog v-bind:title="progress_title"></progress-dialog> </div> <script src="js/start.js"></script> </body>もう長すぎてわけわかんないですよね。。。
その他ユーティリティのファイル等含めて、GitHubに上げています。セットアップ:GoogleMap API利用の準備
GoogleMapを利用するには、GoogleからAPIキーを払い出してもらう必要があります。
以下のサイトの通りに実施すれば、特に問題はなかったです。Get Started with Google Maps Platform
https://developers.google.com/maps/gmp-get-started?hl=ja最後に、API Keyを生成するのですが、Web APIsのMaps Embed APIを採用しました。
セットアップ:サーバの展開
以下のGitHubから一式ダウンロードしておきます。
poruruba/orientation_navigator
https://github.com/poruruba/orientation_navigatorそして、以下の通りに実行します。
unzip orientation_navigator.zip
cd orientation_navigator
npm install
mkdir data
node app.js以下、修正が必要です。
public/start.js
7行目のあたり
const base_url = "http://localhost:10080";上記を立ち上げたサーバのURLを指定します。
public/index.html
34行目あたり
<script type="text/javascript" src="//maps.google.com/maps/api/js?key=【GoogleAPIキー】"></script>また、HTML5の現在地情報取得機能を使っているのですが、それを利用するには、HTTPSである必要があります。
mkdir certs
このディレクトリに、SSL証明書類を配置しましょう。
以下が参考になります。
SSL証明書を取得しよう以上

- 投稿日:2020-05-24T23:34:46+09:00
Nuxtアプリ(SSR)をGAEでデプロイした際に「cannot get /」が発生するバグ
問題
ssr対応したNuxtアプリをGAEでデプロイした際に、
cannot get /が表示される。
再更新するとアプリ画面を開くことができる。解決策
server.jsの記述を一部変更して解決。
const express = require('express') const consola = require('consola') const { Nuxt, Builder } = require('nuxt') const app = express() const host = process.env.HOST || '0.0.0.0' const port = process.env.PORT || 3000 app.set('port', port) // Import and Set Nuxt.js options const config = require('../nuxt.config.js') config.dev = !(process.env.NODE_ENV === 'production') async function start() { // Init Nuxt.js const nuxt = new Nuxt(config) // Build only in dev mode if (config.dev) { const builder = new Builder(nuxt) await builder.build() } // Give nuxt middleware to express app.use(nuxt.render) // Listen the server app.listen(port, host) consola.ready({ message: `Server listening on http://${host}:${port}`, badge: true }) } start()app.use(nuxt.render)の部分を以下に変更した。
  app.use(async (req, res, next) => {
    await nuxt.ready()
    nuxt.render(req, res, next)
  })
- 投稿日:2020-05-24T17:29:40+09:00
Vue.jsで頑張るハンバーガーメニュー
はじめに
「ハンバーガーメニューは古臭い」
最近、僕はその言葉を聞く機会が増えた。
それでも、僕はハンバーガーメニューが好きだ。確かに、ハンバーガーメニューにはメニュー項目を探しにくいという欠点がある。
しかし、コンテンツを表示するエリアを広く使える、つまり表示エリアをほぼ占領しないというメリットがあるので時と場合によってはまだまだ現役で使えると僕は思っている。ということで、Vue.jsを使ってハンバーガーメニューを実装してみる('ω')
とりあえず、完成形はこんな感じになる。
サンプルサイトはこちらから
https://helloworld753315.github.io/vue_hamburger/GitHubのリポジトリはこちらから
https://github.com/helloworld753315/vue_hamburgerでは、実際に手を動かしてみよう!!
参考ページ
公式ドキュメント
https://jp.vuejs.org/v2/guide/基礎から学ぶVue.js
- 書籍 www.amazon.co.jp/dp/4863542453
- サイト(動作デモ) https://cr-vue.mio3io.com/
HTMLクイックリファレンス
https://developer.mozilla.org/ja/docs/Web/CSS/transform-function/translateX
http://www.htmq.com/css3/transform_rotate.shtml必要な知識(使う知識)
- HTML,CSS
- Vue.js
- classの操作
- イベントハンドリング
- トランジション
書く前に
まずは、classをバインドする方法の復習を少し...
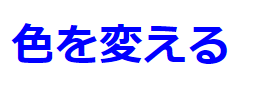
class_bind.html<div id="app"> <h1 v-bind:class="{'color':color_bind}">色を変える</h1> </div> <script src="https://cdn.jsdelivr.net/npm/vue/dist/vue.js"></script> <script> var app = new Vue({ el: '#app', data: { color_bind:true } }) </script>style.css.color{ color: blue; }Vue.jsでclassを操作したい場合、
v-bind:classを使うことでそれが可能になる。例えば、上記のコードでは
colorというclass名をcolor_bindというプロパティと結び付けている。
なので、color_bindがtrueならcolorクラスが付与され、falseなら付与されない。つまり、color_bindがtrueなら文字色が青になりfalseなら黒色のまま!1.trueの場合
2.falseの場合
実際に書いてみる
だらだらと説明しても面白くないので、とりあえず完成形。
index.html<!DOCTYPE html> <html lang="ja"> <head> <meta charset="UTF-8"> <meta name="viewport" content="width=device-width, initial-scale=1.0"> <title>Hamberger</title> <link rel="stylesheet" href="style.css"> </head> <body> <div id="app"> <!--ハンバーガーメニューのボタン--> <div class="hamburger_btn" v-on:click='ActiveBtn=!ActiveBtn'> <span class="line line_01" v-bind:class="{'btn_line01':ActiveBtn}"></span> <span class="line line_02" v-bind:class="{'btn_line02':ActiveBtn}"></span> <span class="line line_03" v-bind:class="{'btn_line03':ActiveBtn}"></span> </div> <!--サイドバー--> <transition name="menu"> <div class="menu" v-show="ActiveBtn"> <ul> <li><a href="#">項目1</a></li> <li><a href="#">項目2</a></li> <li><a href="#">項目3</a></li> <li><a href="#">項目4</a></li> <li><a href="#">項目5</a></li> </ul> </div> </transition> </div> <script src="https://cdn.jsdelivr.net/npm/vue/dist/vue.js"></script> <script> var app = new Vue({ el: '#app', data: { ActiveBtn: false } }) </script> </body> </html>style.css/*ボタン*/ .hamburger_btn { position: fixed; /*常に最上部に表示したいので固定*/ top: 0; right: 0; width: 70px; height: 72px; cursor: pointer; z-index: 50; } .hamburger_btn .line { position: absolute; top: 0; left: 20px; width: 32px; height: 2px; background: #333333; text-align: center; } .hamburger_btn .line_01 { top: 16px; transition: 0.4s ease; } .hamburger_btn .line_02 { top: 26px; transition: 0.4s ease; } .hamburger_btn .line_03 { top: 36px; transition: 0.4s ease; } .btn_line01 { transform: translateY(10px) rotate(-45deg); transition: 0.4s ease; } .btn_line02 { transition: 0.4s ease; opacity: 0; } .btn_line03 { transform: translateY(-10px) rotate(45deg); transition: 0.4s ease; } /*サイドバー*/ .menu-enter-active, .menu-leave-active { transition: opacity 0.4s; } .menu-enter, .menu-leave-to { opacity: 0; } .menu-leave, .menu-enter-to{ opacity: 1; } .menu li { list-style: none; line-height: 1; padding: 1rem; } .menu { background-color: rgba(197, 197, 197, 0.671); z-index: 30; padding: 2rem 1rem; position: fixed; width: 20rem; height: 80rem; top: 0; right: 0; } .menu a { color: rgb(66, 66, 66); text-decoration: none; font-size: 1.2rem; padding: 0 2rem; } .menu ul{ margin: 1rem; padding: 0; }必要な機能
Vueを使ってハンバーガーメニューを作るには、次の2つの機能が必要
- ボタン
- ボタンを押したときにボタンが×に変わる
- もう一度押したときに元に戻る
- サイドバー
- ボタンが押されたらメニューを表示する
- もう一度が押されたらメニューを閉じる
- 表示切替のときのアニメーション
手順
共通部分
v-on:clickを使うと、イベントの制御ができるので「ボタンがクリックされたらActiveBtnの真偽値を逆にする(反転する)」という処理を書く。v-on:click='ActiveBtn=!ActiveBtn'ボタン
最初にやった
v-bind:classを使ってActiveBtnがtrueだったらbtn_line01,
btn_line02,btn_line03のそれぞれのクラス属性を付与するようにする。
ざっくり表にするとこんな感じ。
ActiveBtn class属性 true 付与する false 付与しない あとは、cssで開閉時のアニメーションを書いていくだけ。
cssの方を簡単に説明すると、classが付与されたら
translateとrotateでline_01とline_03の位置と角度を変更して、line_02の透明度を0にしているシンプルなものだ。サイドバー
v-showディレクティブを使ってサイドバーの表示切替の部分を作ろう!
共通部分として作ったActiveBtnのデータをv-show="ActiveBtn"と書いて紐づける。
そうすることで、ボタンを押したときに表示を切り替えることが可能になる。最後に、サイドバーの表示切替時のアニメーションを作ろう!
表示切替のアニメーションにはVue.jsのトランジションという機能を使う。
わからない方のためにざっくり説明すると、cssトランジション・アニメーションを簡単に使えるようにした機能だ。
使う際は、<transion>タグで囲んで使う。名前を付けられるので今回はmenuとしておく。
<transion>タグで囲んだ場所には、トランジションクラスを使ってアニメーションを適用できる。
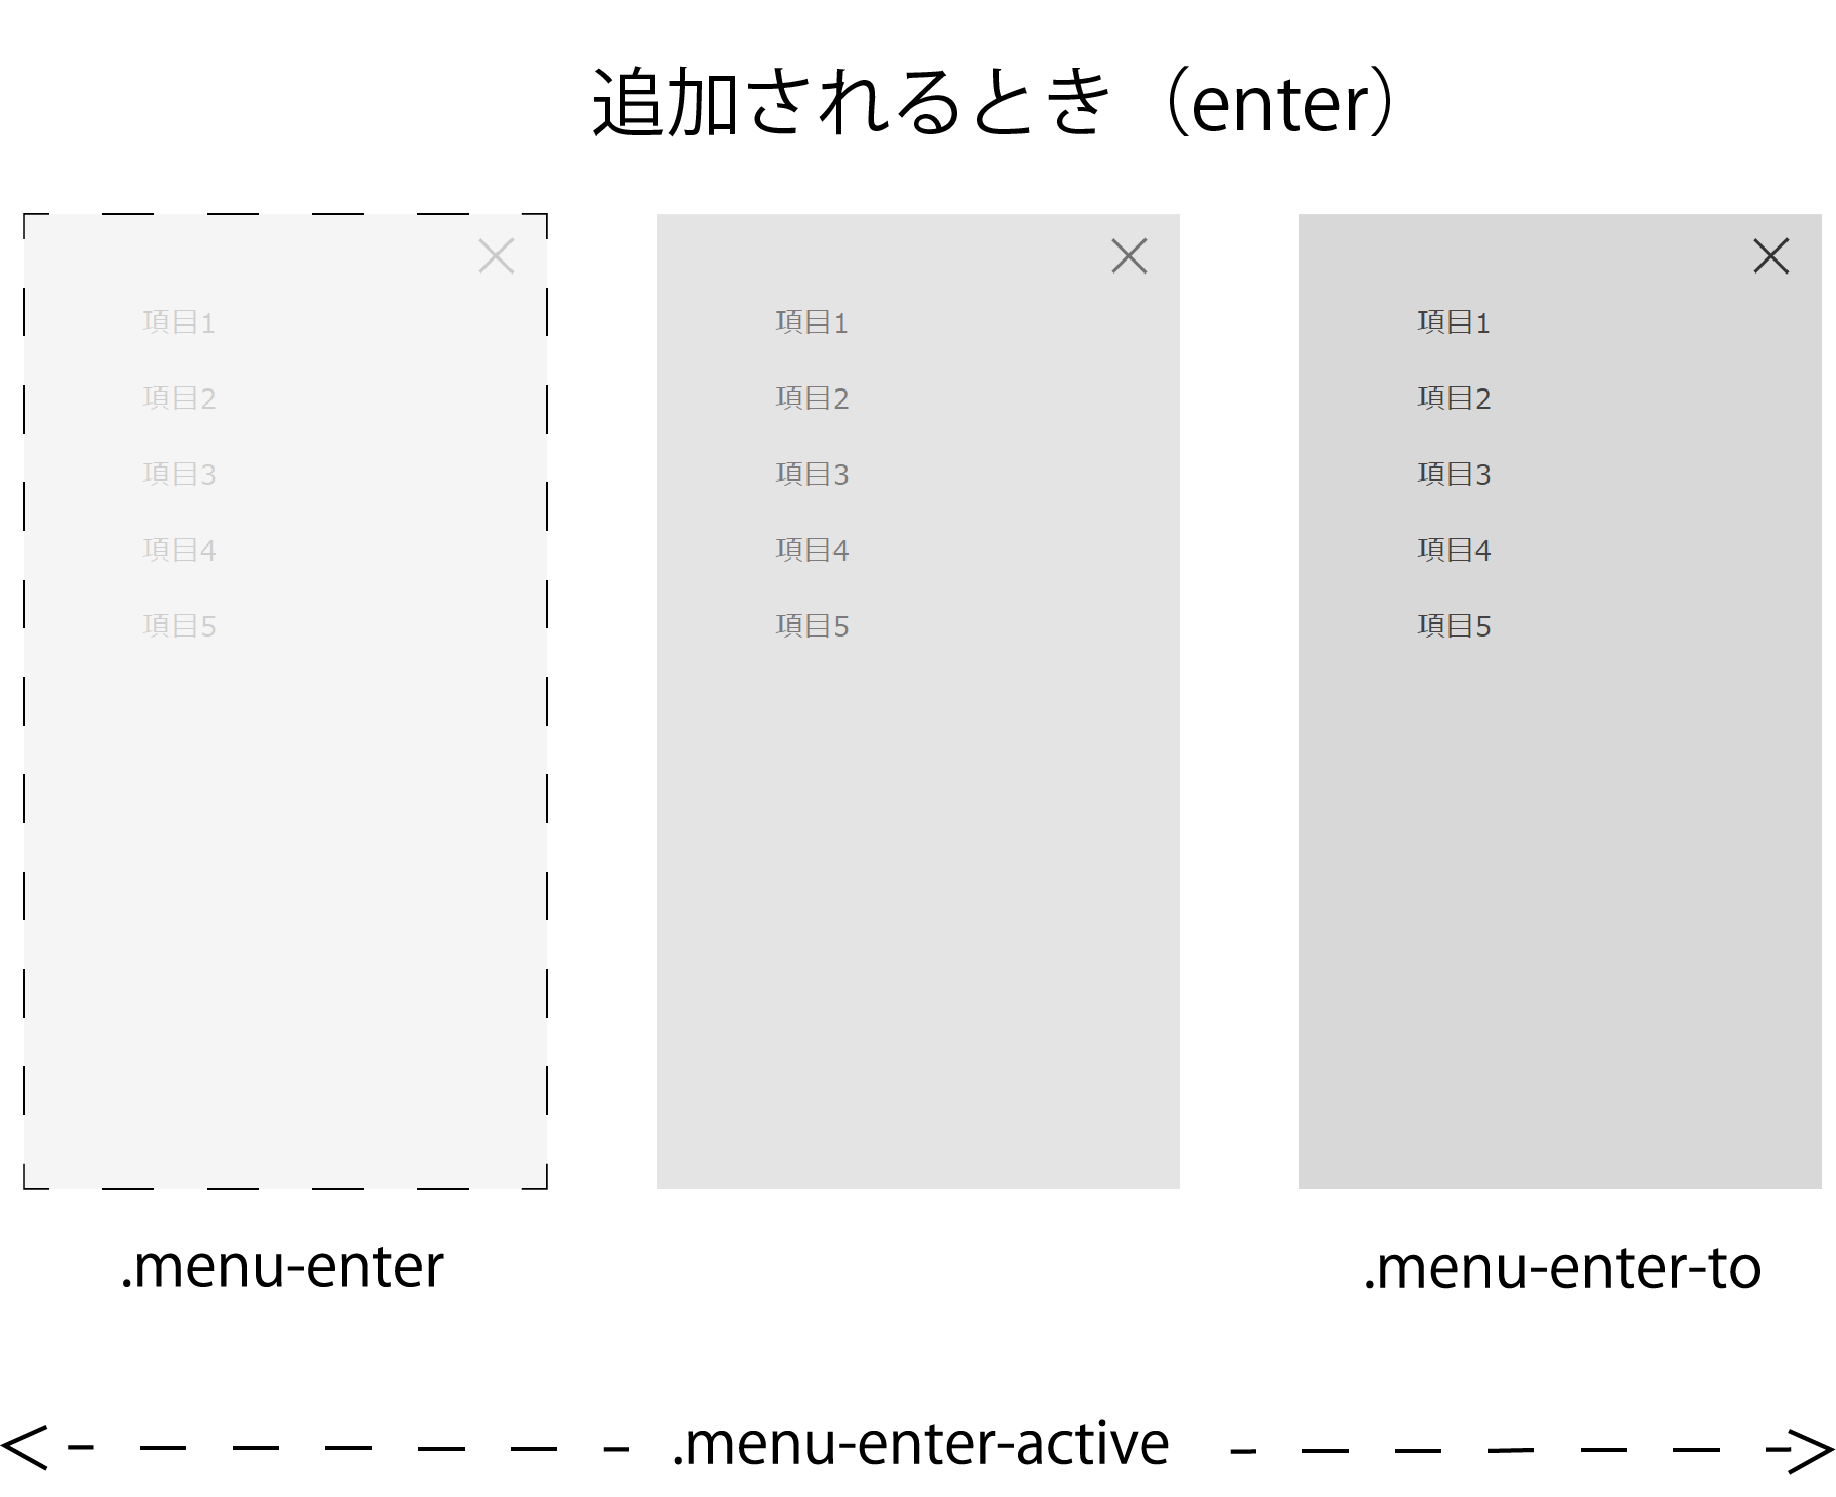
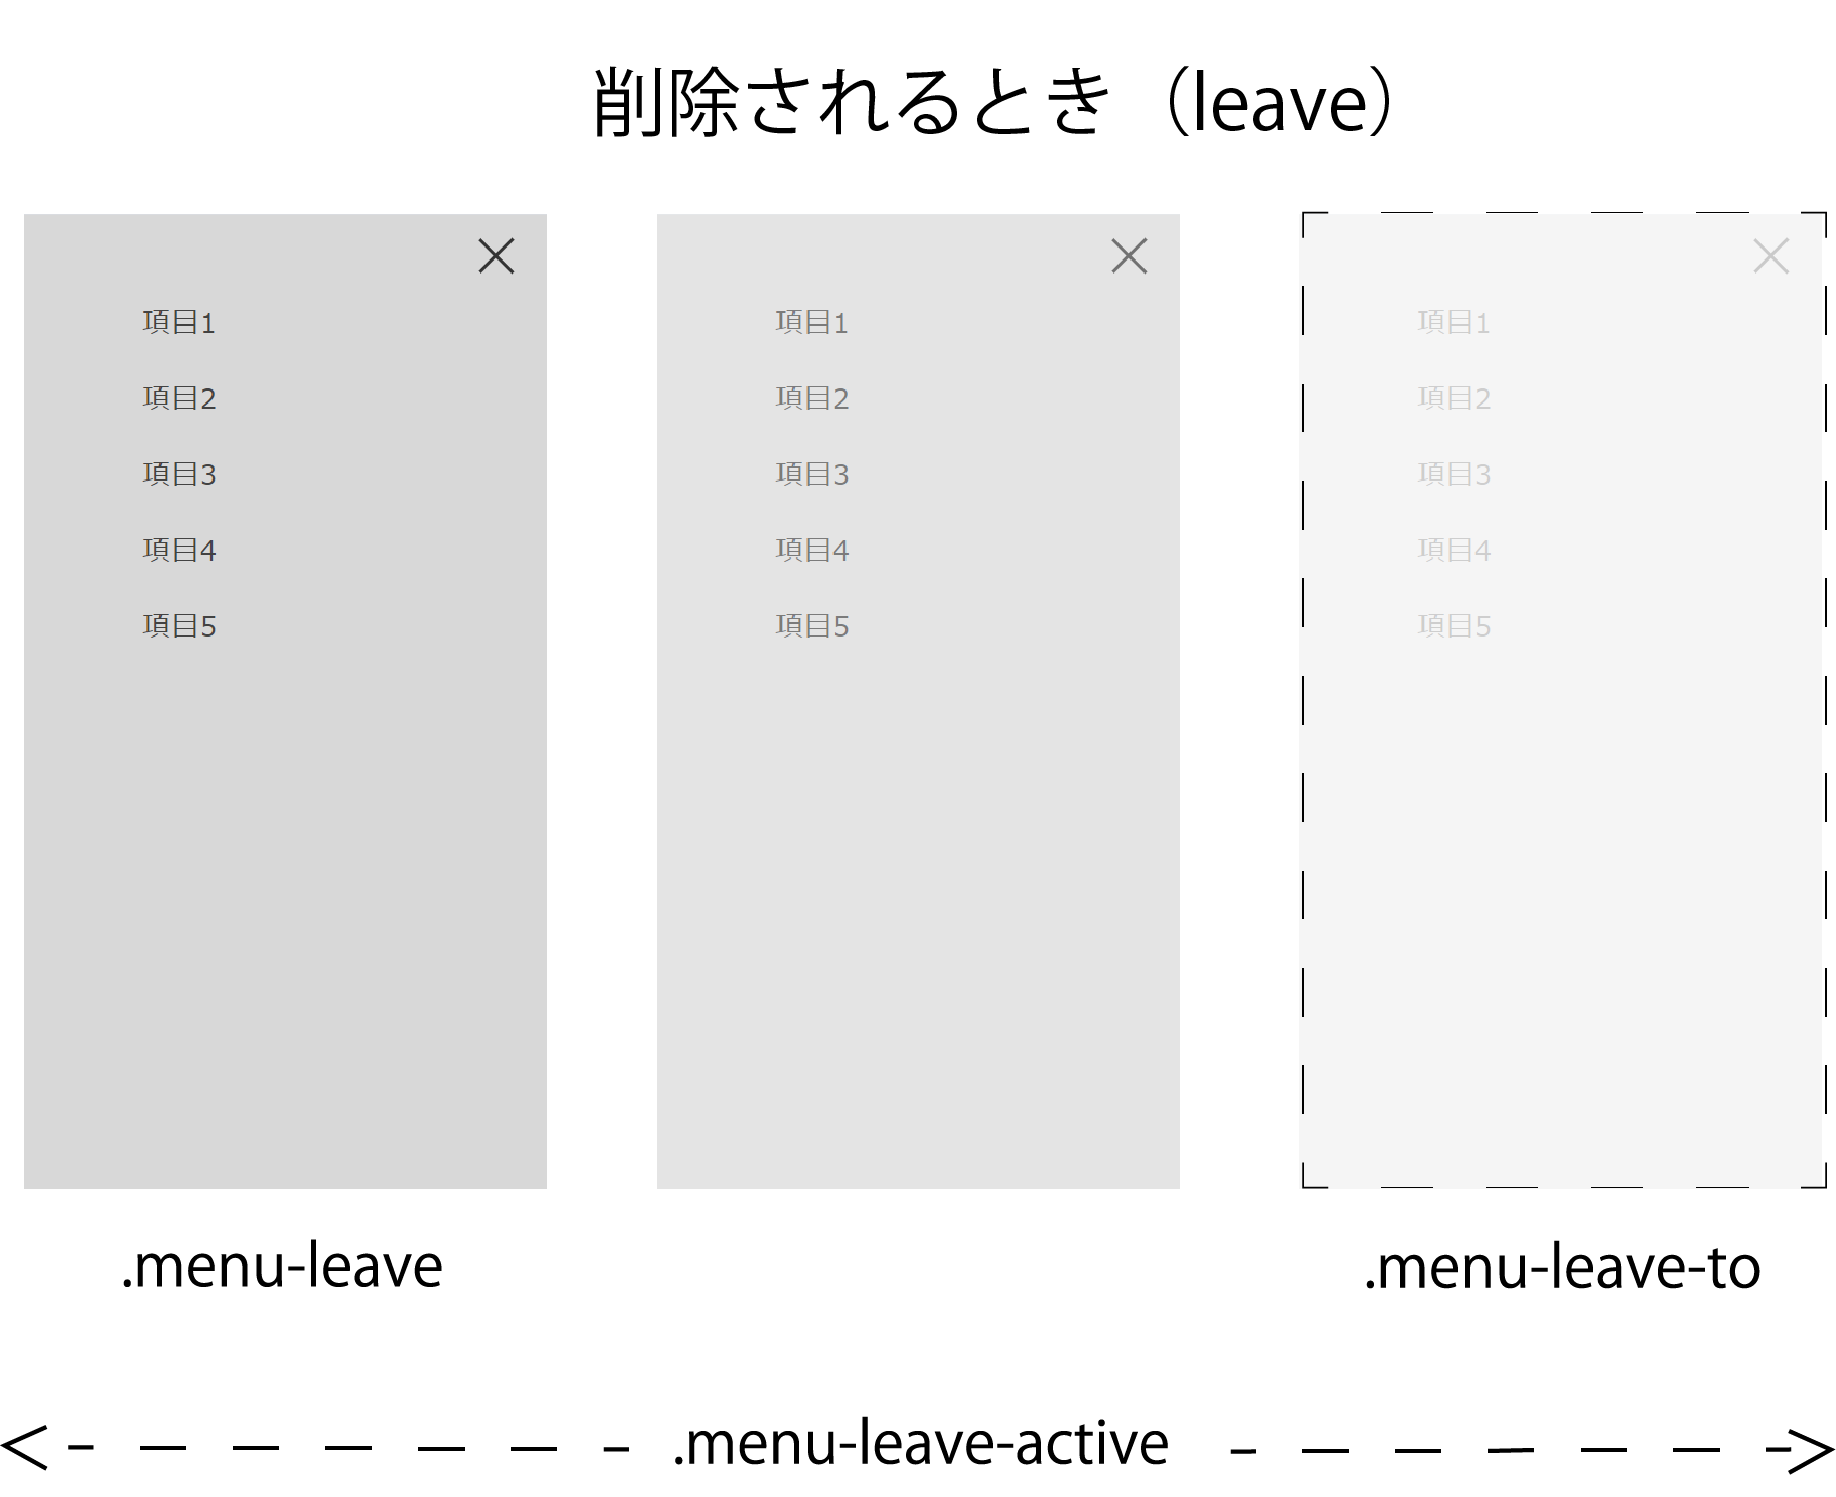
対象をDOMに追加するとき(表示するとき)のアニメーションはenter~、DOMから削除されるとき(非表示にするとき)はleave~を使う。言葉で説明してもわかりにくいので、簡単な図を使って見ていこう(;・∀・)
図を見ると、サイドバーを表示するときは、
.menu-enterで透明度0から始めて.menu-enter-toで透明度が1へと変化しているのが分かる。
また、サイドバーを非表示にするときは、.menu-leaveで透明度1から始めて、.menu-leave-toで透明度1に変化している。書いたコードはこんな感じだ。
.menu-enter-active, .menu-leave-active {
  transition: opacity 0.4s;
}
.menu-enter, .menu-leave-to {
  opacity: 0;
}
.menu-leave, .menu-enter-to{
  opacity: 1;
}
補足しておくと、
enter-activeとleave-activeのところは透明度を0.4秒で変化させるという意味だ。こんな感じの手順でコードを書いていけば、ハンバーガーメニューの完成(*'▽')
最後に
長々と書いてしまいましたが、以上です
普段はTwitterでいろいろ呟いたりしてるので何か聞きたいこと、指摘などあればどんどん送ってほしいです!
https://mobile.twitter.com/helloworld193


- 投稿日:2020-05-24T17:00:54+09:00
Gridsomeを触ってみたメモ
JAMstackでVue.js以上Nuxt.js未満なCMS?のイメージのGridsomeを触ってみたのでメモ。
v14で試そうと思ったらうまくいかなかったのでv12にして試したら上手く行きました。(後述)
チュートリアルをなぞってみる
コマンドラインツールのインストール
$ npm i -g @gridsome/cliここが既に重い印象。(ネガ
ブログプロジェクトを作成
$ gridsome create n0bisuke-appここでsharpのビルドエラー
$ gridsome create n0bisuke-app内部でsharpという画像のリサイズとかをしてくれるモジュールを使ってるみたいで、このモジュールがNode.js v14だとビルドが通らなかったです。
省略

info sharp Using cached /Users/n0bisuke/.npm/_libvips/libvips-8.8.1-darwin-x64.tar.gz
prebuild-install WARN install No prebuilt binaries found (target=14.2.0 runtime=node arch=x64 libc= platform=darwin)
gyp info it worked if it ends with ok
gyp info using node-gyp@5.1.0
gyp info using node@14.2.0 | darwin | x64

省略
取り急ぎNode.js v12を利用したらビルドが通りました。
ローカル起動
プロジェクト内で以下のコマンドで起動します。
$ gridsome developDONE Compiled successfully in 4292ms 2:10:48 Site running at: - Local: http://localhost:8080/ - Network: http://192.168.2.100:8080/ Explore GraphQL data at: http://localhost:8080/___explore
http://localhost:8080で起動しました。
ビルド
以下のコマンドでビルドができます。 distフォルダが出来上がるのでこれをそのままどこかに載せれば良いみたいです。
$ gridsome buildGridsome v0.7.14 Initializing plugins... Load sources - 0s Create GraphQL schema - 0.03s Create pages and templates - 0.05s Generate temporary code - 0.04s Bootstrap finish - 2.22s Compile assets - 8.7s Execute GraphQL (3 queries) - 0s Write out page data (3 files) - 0s Render HTML (3 files) - 0.27s Process files (0 files) - 0s Process images (9 images) - 1s Done in 12.38s
vercelでデプロイ
公式ドキュメントにもありますが、
プロジェクトのルートでvercelコマンドを実行するだけでした。カンタン。
$ vercel対話式で聞かれますが全てエンターで大丈夫でした。↓ログです。
Set up and deploy “~/Documents/ds/3_prototypes/n0bisuke-app”? [Y/n] y
? Which scope do you want to deploy to? n0bisuke
? Link to existing project? [y/N] n
? What’s your project’s name? n0bisuke-app
? In which directory is your code located? ./
> Upload [====================] 99% 0.0sAuto-detected project settings (Gridsome):
- Build Command: `npm run build` or `gridsome build`
- Output Directory: dist
- Development Command: gridsome develop -p $PORT
? Want to override the settings? [y/N] n
?  Linked to n0bisuke/n0bisuke-app (created .vercel and added it to .gitignore)
?  Inspect: https://vercel.com/n0bisuke/n0bisuke-app/fx37uus5b [3s]
✅  Production: https://n0bisuke-app.now.sh [copied to clipboard] [41s]
?  Deployed to production. Run `now --prod` to overwrite later (https://zeit.ink/2F).
?  To change the domain or build command, go to https://zeit.co/n0bisuke/n0bisuke-app/settings
distフォルダに移動してからかなぁとか思ってましたがルートの位置で大丈夫です。vercel側がdistフォルダを見てなのかpackage.jsonを見てなのか判断してくれます。

- 投稿日:2020-05-24T15:48:51+09:00
vue-custom-elementsを利用したVueコンポーネントのカスタム要素化
背景
vue-cliを使ったVueコンポーネントのweb-component化は、以下のようなpackage.jsonの書き換えで簡単に実現できたのですが、
package.json"scripts": { "build": "vue-cli-service build --target wc --name hoge-component", },UIフレームワークとしてVuetifyを使ったコードなどで、スタイルが適用されない問題の壁を越えられず。。
仕方ないので、Vueコンポーネントのラッパーライブラリvue-custom-elementsを試してみました。
vue-custom-element
https://github.com/karol-f/vue-custom-element
Vueコンポーネントをカスタム要素化してくれるライブラリらしいです。
最初、vue-cliで作ったプロジェクトに対して、ライブラリを適用しようとしてみましたが、カスタム要素化された状態の成果物を得ることができず、断念。
初心にかえって(?)、シンプルなVue環境で試した見たところ、それっぽい成果物を得ることが出来ました。
(参考) 最小構成のvue.jsの環境をvue cli使わずに構築する
https://qiita.com/ctoshiki/items/8e5b6e000adec5b332cbvue-custom-elementを使ったサンプル
以下の3つのサンプルを作ってみました。
- シンプルなVueのComponentをカスタム要素化したサンプル
- Element-UIを使っているComponentをカスタム要素化したサンプル
- Vuetifyを使っているComponentをカスタム要素化したサンプル
シンプルなVueのComponentをカスタム要素化したサンプル
作ったサンプル
https://github.com/yusuke-ka/sample-vce-vue
Note
下記のサイト参考にさせていただいて、問題なく作成できました。 (ボタンコンポーネント)
https://qiita.com/doutori/items/09e36b7efa8212ba7044index.tsimport Vue from "vue"; import vueCustomElement from "vue-custom-element"; import Button from "./button.vue"; Vue.config.ignoredElements = ["vce-button"]; Vue.use(vueCustomElement); Vue.customElement("vce-button", Button, { // shadowDOM化すると中のCSSが効かず、ここで指定したCSSが効く shadow: true, shadowCss: ` button { font-size: 8px; cursor: pointer; color: magenta; padding: 1em 1em; background: PaleGreen; `, });button.vue<template> <div> <button>{{ text }} {{ message }}</button> </div> </template> <script> export default { name: "button", props: { message: String, }, data() { return { text: "button", }; }, }; </script>Element-UIを使っているComponentをカスタム要素化したサンプル
作ったサンプル
https://github.com/yusuke-ka/sample-vce-element-ui
Note
本家GitHubのコードにあるサンプルを見ながら作成。 (テーブルコンポーネント)
https://github.com/karol-f/vue-custom-element/tree/master/demo/components注意点としては、カスタム要素化する際に、「shadow: true」を指定すると、CSSが効かなくなりスタイルが崩れることぐらいでしょうか。
index.tsimport Vue from "vue"; import ElementUI from "element-ui"; import "element-ui/lib/theme-chalk/index.css"; import vueCustomElement from "vue-custom-element"; import Table from "./table.vue"; Vue.use(vueCustomElement); Vue.use(ElementUI); Vue.config.ignoredElements = ["vce-table"]; Vue.customElement("vce-table", Table); // shadowDOM化すると中のCSSが効かないtable.vue<template> <div class="card card--primary"> <h4>{{ message }}</h4> <el-table :data="tableData" style="width: 100%"> <el-table-column prop="prop" label="Prop name"> </el-table-column> <el-table-column prop="value" label="Value"> <template slot-scope="scope"> <div slot="reference"> <strong>{{ scope.row.value }}</strong> </div> </template> </el-table-column> <el-table-column prop="type" label="typeof"> <template slot-scope="scope"> <div slot="reference"> <el-tag type="gray">{{ scope.row.type }}</el-tag> </div> </template> </el-table-column> </el-table> </div> </template> <script> export default { props: { prop1: { required: true, }, prop2: {}, prop3: {}, stringProp: { type: String, }, booleanProp: { type: Boolean, }, numberProp: { type: Number, }, longPropName: {}, objectProp: {}, arrayProp: {}, }, data() { return { message: "Custom Element By Vue + Element UI", }; }, computed: { tableData() { const data = [ { prop: "prop1", value: JSON.stringify(this.prop1), type: typeof this.prop1, }, { prop: "prop2", value: JSON.stringify(this.prop2), type: typeof this.prop2, }, { prop: "prop3", value: JSON.stringify(this.prop3), type: typeof this.prop3, }, { prop: "stringProp (type: String)", value: this.stringProp, type: typeof this.stringProp, }, { prop: "booleanProp (type: Boolean)", value: this.booleanProp, type: typeof this.booleanProp, }, { prop: "numberProp (type: Number)", value: this.numberProp, type: typeof this.numberProp, }, { prop: "long-prop-name", value: JSON.stringify(this.longPropName), type: typeof this.longPropName, }, ]; this.objectProp && data.push({ prop: "objectProp", value: this.objectProp, type: typeof this.objectProp, }); this.arrayProp && data.push({ prop: "arrayProp", value: this.arrayProp, type: typeof this.arrayProp, }); return data; }, }, created() { /* eslint-disable no-console */ console.log("demo-basic created()"); }, }; </script>※中身は本家サンプルのコピー
Vuetifyを使っているComponentをカスタム要素化したサンプル
作ったサンプル
https://github.com/yusuke-ka/sample-vce-vuetify
Note
VueコンポーネントはVuetifyのUIコンポーネント(treeview)のサンプルコードを参考に作成 (ツリーコンポーネント)
https://vuetifyjs.com/ja/components/treeview/index.tsimport Vue from "vue"; import Vuetify from "vuetify"; import vueCustomElement from "vue-custom-element"; import Tree from "./tree.vue"; Vue.use(Vuetify); Vue.use(vueCustomElement); Vue.config.ignoredElements = ["vce-tree"]; Vue.customElement("vce-tree", Tree); // shadowDOM化すると中のCSSが効かないtree.vue<template> <div id="app"> <v-app id="inspire"> <v-treeview selectable color="warning" :items="items"></v-treeview> </v-app> </div> </template> <script> // vuetifyやcssは,、index.tsではなく、ここでimportしないと正しく適用されない模様。 // "vuetify"ではなく"vuetify/lib"にしないと、デザインが微妙に異なる import Vuetify from "vuetify/lib"; import "material-design-icons-iconfont/dist/material-design-icons.css"; export default { el: "#app", vuetify: new Vuetify({ icons: { iconfont: "md", }, }), data: () => ({ items: [ { id: 1, name: "Applications :", children: [ { id: 2, name: "Calendar : app" }, { id: 3, name: "Chrome : app" }, { id: 4, name: "Webstorm : app" }, ], }, { id: 5, name: "Documents :", children: [ { id: 6, name: "vuetify :", children: [ { id: 7, name: "src :", children: [ { id: 8, name: "index : ts" }, { id: 9, name: "bootstrap : ts" }, ], }, ], }, { id: 10, name: "material2 :", children: [ { id: 11, name: "src :", children: [ { id: 12, name: "v-btn : ts" }, { id: 13, name: "v-card : ts" }, { id: 14, name: "v-window : ts" }, ], }, ], }, ], }, { id: 15, name: "Downloads :", children: [ { id: 16, name: "October : pdf" }, { id: 17, name: "November : pdf" }, { id: 18, name: "Tutorial : html" }, ], }, { id: 19, name: "Videos :", children: [ { id: 20, name: "Tutorials :", children: [ { id: 21, name: "Basic layouts : mp4" }, { id: 22, name: "Advanced techniques : mp4" }, { id: 23, name: "All about app : dir" }, ], }, { id: 24, name: "Intro : mov" }, { id: 25, name: "Conference introduction : avi" }, ], }, ], }), }; </script>カスタム要素化したコンポーネントの呼び出し
カスタム要素化したコンポーネントを外部のファイルから呼び出す際のやり方。
どのサンプルも下記のように簡単に呼び出せます。ボタンのやつ (simple-vue)
index.html<!DOCTYPE html> <html> <head> <meta charset="utf-8" /> <title>Custom Element By Vue</title> <script src="dist/bundle.js"></script> </head> <body> <vce-button message="test"></vce-button> </body> </html>テーブルのやつ (Element UI)
index.html<!DOCTYPE html> <html> <head> <meta charset="utf-8" /> <title>Custom Element By Vue + Element UI</title> <script src="dist/bundle.js"></script> </head> <body> <vce-table prop1="1" prop2="example text" prop3="true" string-prop="123" boolean-prop="false" number-prop="123" long-prop-name="long name" > </vce-table> </body> </html>ツリーのやつ (Vuetify)
index.html<!DOCTYPE html> <html> <head> <meta charset="utf-8" /> <title>Custom Element By Vue + Vuetify</title> <script src="dist/bundle.js"></script> </head> <body> <vce-tree></vce-tree> </body> </html>vue-cliで生成したやつは、呼び出し元で下記のような記述を足してやる必要がありましたが、これらは必要ありませんでした。
その代わり、カスタム要素化したコンポーネントのサイズが大きくなるので、その点は注意が必要そうです。<script src="https://unpkg.com/vue"></script>
- 投稿日:2020-05-24T14:24:05+09:00
MacでNuxt.jsのプロジェクトを作る(2020)
タイトルの通り、MacでNuxt.jsの初期プロジェクトを作る手順のメモ。
手順
Npmを入れる
まずnuxtのプロジェクト作成コマンドを叩くためのNpmを入れる。
一発でNpmを入れられるわけじゃなくて意外と面倒。
Command Line Toolsを入れる
↓
Homebrewを入れる(Command Line Toolsが必要)
↓
Nodebrewを入れる(Homebrewが必要)
↓
Node.jsとNpmを入れる(Nodebrewが必要)
という手順になる。Command Line Toolsを入れる
$ xcode-select --install
インストールを実行。
結構サイズある、7GBぐらい持ってかれた。Homebrewを入れる
$ /usr/bin/ruby -e "$(curl -fsSL https://raw.githubusercontent.com/Homebrew/install/master/install)"
$ brew -vでバージョンの確認が出来たらOK。Nodebrewを入れる
$ brew install nodebrew
$ nodebrew -vでバージョンの確認が出来たらOK。Node.jsとNpmを入れる
# このディレクトリを作っておかないとエラーになる
$ mkdir -p ~/.nodebrew/src

# latestは最新版という意味
$ nodebrew install-binary latest

# インストールした後で使用を宣言
$ nodebrew use latest

#パスを通す
$ echo 'export PATH=$HOME/.nodebrew/current/bin:$PATH' >> ~/.bash_profile
$ source ~/.bash_profile
$ node -v$ npm -vでそれぞれバージョンの確認が出来たらOK。Nuxtのプロジェクトを作成する
やっと本題。
本題と言いつつここまできたらあとはコマンドを1つ叩くだけ。$ npx create-nuxt-app <project-name>選択肢を聞かれるので選んでいく。
以下は私の設定。(あんまりクセがないと思う。)✨ Generating Nuxt.js project in nuxt ? Project name nuxt # 任意のプロジェクト名。これが作成されるプロジェクトのディレクトリ名にもなる。 ? Project description My flawless Nuxt.js project # 任意のプロジェクトの説明。README.mdに記載される。 ? Author name kuribo2110 # 任意の作者名。 ? Choose programming language JavaScript # 記述方法をJavaScriptかTypeScriptで選択。 ? Choose the package manager Npm # パッケージマネージャーの選択。Npm使います。 ? Choose UI framework Bootstrap Vue # デザインフレームワークの選択。Bootstrap使います。 ? Choose custom server framework None (Recommended) # サーバーフレームワークの選択。別でAPIサーバー立てたいので未選択。 ? Choose Nuxt.js modules Axios # 使いたいモジュールの選択。API叩くためにAxios使います。 ? Choose linting tools ESLint, Prettier # リントツールの選択。ESLintとPrettier使います。 ? Choose test framework Jest # テストフレームワークの選択。Jest使います。 ? Choose rendering mode Universal (SSR) # レンダリング方法をSSRかSPAかで選択。SSRにします。 ? Choose development tools jsconfig.json (Recommended for VS Code) # 開発ツールの選択。VS Code使っているのでjsconfig.json作ります。選択が終わると自動でNuxtプロジェクトを作ってくれます。しゅごい。
$ npm run devでNuxtプロジェクトを起動。
http://localhost:3000/ でTopページが表示されます。

- 投稿日:2020-05-24T10:37:14+09:00
爆速でwh.imのゲームを実装する(じゃんけん編)
はじめに
こんにちは。普段は情報系の学科で大学生をしている者です。
この記事に紹介されている、wh.im(ウィム)というサービスの立ち上げに関わっているのですが、その一環でwh.im上で楽しめるゲームを開発しました。
このサービスの特徴として、誰でもゲームを投稿 できます!そのやり方を知っていただきたく、前回に引き続き記事を書きますので、興味を持った方はぜひゲーム開発を試してみてください!
アプリを公開するまでの一連の流れは、前回の記事にありますので、併せてご覧ください。
Vue.js以外でも実装は可能ですが、今回はVue.jsに限ってご紹介できればと思います!
今回は実際に遊ぶことのできるじゃんけんを例に挙げて、実装方法を説明いたします。
ゲームのテスト環境
まず、ゲームのテスト環境として、wh.imのミラーサイトであるsbx.wh.imというサイトがあります。sbxはサンドボックスの略です。ここで部屋に入室すると、アプリに「開発用アプリ 3001」というのがあります。ここを起動することで
localhost:3001で起動しているゲームをテストすることができます。まずは開発環境で実際に動かしてみる
実際にじゃんけんを開発環境で動かしてみたいと思います。
まず
$ cd ダウンロードしたいディレクトリ
$ git clone https://github.com/whimRTC/whim-janken.git
とします。そして
$ cd whim-janken
$ yarn # or npm install
$ yarn serve # or npm run serve
とします。yarnまたはnpmがインストールされていない場合はインストールしてください。
するとlocalhost:3001にゲームが起動します。そして、sbx.wh.imから入室し、右上のメニューの「アプリを選ぶ」から「開発用アプリ3001」を選ぶことにより、自分の手元でゲームを試すことができます。
このように表示されれば成功です!
実際のコードを見てみる
続いて、実際のコードを使いながら通信方法を説明していきます。
まず表示される画面が書かれている
src/App.vueをご覧ください。src/components/player/App.vue<template> <div id="app"> <Main class="main" /> <Player v-for="user in $whim.users" :key="user.id" class="box" :class="`pos${user.positionNumber}`" :displayUser="user" /> </div> </template> <script> export default { name: "App", components: { Main: () => import("@/components/main/Index"), Player: () => import("@/components/player/Index") } }; </script> <!-- 以下略 -->このゲームではMain画面とPlayer画面に分かれて実装されています。そのため、
App.vue内でMain、Playerの2つのコンポーネントを呼び出しています。
Mainは画面中央部の画面を、Playerはそれぞれのユーザーのいる場所に表示される画面を表します。
Main、Playerの実装はそれぞれ、src/components/main/Index.vue、src/components/player/Index.vueに実装があります。wh.imを経由した通信の方法
App.vueで$whim.usersという呼び出しがあります(this.$whim.usersの省略形です)が、これはwhim-client-vueというパッケージに入っています。このようにすることで、this.$whimから始まる関数だけで、利用者間の非同期通信まわりは全てできるようになっています。ここに扱える関数一覧を示します。scriptタグ内では適宜
thisを先頭に付けてください。状態取得(呼び出すたびに通信する)
コード 型 説明 $whim.users [User] ルームに入っているユーザー一覧 $whim.room Room Room Object $whim.accessUser User 現在アクセスしているUser $whim.state State ゲームの状態(自由に設計可能) 状態変更
コード 引数 説明 $whim.assignState(Object) Object ゲーム情報を追記更新、
存在しないキーの場合:追記
存在するキーの場合:更新$whim.replaceState(Object) Object ゲーム情報を渡されたObjectにすべて変える $whim.deleteState ゲーム情報を空にする これでは分かりにくいと思うので、後ほどのコードで使っている部分を見ながら、理解していただけると助かります。
より詳細な説明は、開発者ドキュメントをご覧ください。このゲームのデータ構造
stateはゲームに合わせて自由に設計することができます。
今回のゲームでは、ユーザーのIDをキーとしてじゃんけんの手`('rock', 'scissors', 'paper')を値に持つObjectとします。Main
次にMain画面のコードについて説明していきます。Main画面は画面中央部に表示されます。じゃんけんゲームでは、じゃんけんが終了した状態のみで「もう一度」やるボタンを出しています。
src/components/main/Index.vue<template> <div class="container" style="background-color:transparent;"> <a v-if="isAllSelected" class="fuwatto_btn_yellow" @click="reset" >もう一度</a > </div> </template> <script> export default { name: "Main", computed: { users() { // Userの配列 return this.$whim.users; }, isAllSelected() { // 全員がじゃんけんの手を選択したかどうか return ( this.users.length > 0 && this.users.every(user => this.$whim.state[user.id]) ); } }, methods: { reset() { this.$whim.deleteState(); } } }; </script> <!-- 以下略 -->ここで
computedプロパティでusersとisAllSelectedの値を定義しています。
じゃんけんでは、state[user.id]にじゃんけんの手の状態が入るようになっていて、isAllSelectedでは全員が選択しているかどうかを判定しています。つまり、state[user.id]が全員undefinedでないかどうかを判定しています。users.length > 0としているのは、データベースからuserが取得できていない状態での判定を防ぐためです。
このようにVue内で先ほど定義した関数を用いることでゲームを実装できます。Player
次にやや複雑なのですが、Player画面を実装していきます。
src/components/player/Index.vue<template> <div class="container"> <Result v-if="isAllSelected" :displayUser="displayUser" /> <h2 v-else-if="isSelected" class="subtitle"> 選択済み </h2> <Me v-else-if="isMe" /> <h2 v-else class="subtitle"> 選択中 </h2> </div> </template> <script> export default { name: "Player", components: { Me: () => import("@/components/player/Me"), Result: () => import("@/components/player/Result") }, props: { displayUser: { type: String, required: true } // 表示されているUserの情報 }, computed: { users() { return this.$whim.users; }, isMe() { // 自分の画面かどうか return this.$whim.accessUser.id === this.displayUser.id; }, isSelected() { // じゃんけんの手を選択したかどうか return !!this.$whim.state[this.displayUser.id]; }, isAllSelected() { // 全員が手を選択したかどうか return ( this.users.length > 0 && this.users.every(user => this.$whim.state[user.id]) ); } } }; </script> <!-- 以下略 -->
computedの内容を中心にご説明します。まず、先ほどと同じ
isAllSelectedがすなわち全員が手を選択した状態を表していて、これがtrueのときResultコンポーネントを表示します。また、
isSelectedでthis.$whim.state[this.displayUser.id]、すなわちデータベース上のstate[画面の人のID]を取得していて、その画面の人がどのじゃんけんの手を選んだ状態かどうかが得られています。this.displayUserがこの画面のプレーヤーを表すことに注意してください(displayUserの情報はApp.vueで渡されています)。isSelectedがtrueである、すなわち選んだ状態のとき、画面に「選択済み」が表示されます。次に、
isMeでこの画面が自分が映っている画面であるかを取得しています。これがtrueのときに表示される、自分のじゃんけんの手を決める画面はMeというコンポーネントで実装されています。そして、上のいずれの状態でもないときに、「選択中」と表示します。
Result
src/components/player/Result.vue<template> <div> <h2 class="subtitle"> 結果 </h2> <div> <img v-if="show === 'rock'" src="@/assets/rock.png" width="150" height="150" /> <img v-if="show === 'scissors'" src="@/assets/scissors.png" width="150" height="150" /> <img v-if="show === 'paper'" src="@/assets/paper.png" width="150" height="150" /> </div> </div> </template> <script> export default { name: "Result", props: { displayUser: { type: Object, required: true } }, computed: { show: function() { return this.$whim.state[this.displayUser.id]; } } }; </script> <style></style>
state[ユーザーのid]には手が保存されているのでshowでプレーヤーの手を返します。displayUserは呼び出し元のPlayerから渡されています。Me
src/components/player/Me.vue<template> <div> <h2 class="subtitle"> 選択してください! </h2> <div> <img src="@/assets/rock.png" width="150" height="150" @click="select('rock')" /> <img src="@/assets/scissors.png" width="150" height="150" @click="select('scissors')" /> <img src="@/assets/paper.png" width="150" height="150" @click="select('paper')" /> </div> </div> </template> <script> export default { name: "Me", methods: { select(show) { this.$whim.assignState({ [this.$whim.accessUser.id]: show }); } } }; </script> <style></style>じゃんけんの手を選択したときに、
select(show)メソッドが呼ばれ、this.$whim.assignState({ [this.$whim.accessUser.id]: show });によってデータベースの
state[accessUser.id]に自分の手が登録されます。以上のコードがあれば、じゃんけんゲームが正常に動きます。
最後に
今回は、ゲームの中では最も単純なじゃんけんゲームについて説明しました。次回はNGワードゲームの実装について説明したいと思っています。乞うご期待!

- 投稿日:2020-05-24T07:40:00+09:00
Vue.jsで作る!自動保存するToDoリスト~その3~localStorage編~
初めに
前回の
Vue.jsで作る!自動保存するToDoリスト~その2~Bootstrap編の続きです。
今回はVue.jsとlocalStorageを使い、リロードや閉じても中のToDoリストが消えないようにします!目次
・Vue.jsでwatchやmounted、localStorageの記述
・コードの解説
・まとめVue.jsでwatchやmounted、localStorageの記述
watch: { items: { handler: function() { localStorage.setItem ('items',JSON.stringify(this.items)); }, deep: true } }, mounted() { this.items = JSON.parse(localStorage.getItem('items')) || []; },Vue.jsで作る!自動保存するToDoリスト~その1~で記述した、
methods{},の下に記述してください。コードの解説
// オブジェクトや配列の追加や削除を検出する
        watch: {
            // itemsを監視する
            items: {
                handler: function() {
                // localStorage.setItem('key', '保存する値'), JSON.stringifyで文字列として保存
                localStorage.setItem('items',JSON.stringify(this.items));
                },
                // deep: trueにすることによって配列の中身の要素まで監視するようになる
                deep: true
            }
        },
        // elementへのマウントがされた後に実行される関数を書く場所
        mounted() {
            // localStorageで保存されていたitemsをgetItemで取得、
            //その後JSON.parseで文字列をthis.itemに格納する
            this.items = JSON.parse(localStorage.getItem('items')) || [];
        },
まとめ
全3回で解説したToDoリストの作成はいかがだったでしょうか?
記事を作成する中でVue.jsやBootstrap、localStorageなどで新しく勉強する事ばかりだったので自分自身とても楽しめました!!
この記事を見てくださったあなたの成長を応援します!!!
- 投稿日:2020-05-24T02:44:48+09:00
Vue Composition API の watch & watchEffect についてまとめてみた
はじめに
composition APIで、リアクティブな値の変更を検知したときにある処理を行いたい時は
watch,watchEffectのどちらかを使う必要があります。composition API での
watchの細かい説明がざっと調べた感じなかったので、いい機会と思い
利用方法、利用用途による違い、computedの利用可否を含めてまとめてみました。watch
Vue 2での書き方と大きく違いはありません。
this.$watchでのアクセス方法が変わっているだけです。
監視したいパターンの要点毎に説明をしていきます。【 監視対象が 1 つのみ 】
watch()の 第一引数にリアクティブな値 を指定します。Watching a Single Source a watcher data source can either be a getter function that returns a value, or directly a ref
ここでのリアクティブな値とは
ref,reactive,computedで記述される値です。第二引数に値の変更検知時の処理を記述します。
直接、記述しても問題ありませんが、テストを考えるとこちらは切り出して記述した方が良いです。監視対象が1つだけconst refA = ref<string>("REF"); // 処理は function として切り出しましょう watch(refA, () => cbFunction());【 監視対象が複数の変数 】
複数の変更を監視して同じ処理を行わせたいときは、第一引数をリアクティブな値を配列で指定します。
監視対象が複数const refA = ref<string>("REF-A"); const refB = ref<string>("REF-B"); // 第一引数を配列で指定する watch([refA, refB], () => cbFunction());【 props, route, store の監視 】
プロダクト規模が大きくなり、親子コンポーネントが増えると
propsの変更検知が必要な場面もあります。
そのようなときは次の 2 通りの書き方 で変更を監視できます。監視対象が全てのリアクティブな値
全体に対しての監視// 監視対象のリアクティブな値を指定しないパターン watch(() => cbFunction());こちらは
simpleEffectでの書き方です。
監視対象を指定せず第一引数に処理を記述します。監視対象となるものは 全てのリアクティブな値 です。
propsをrefなどに代入しても元のpropsの値はシャローコピーされません。
そのため、こちらの書き方をすることで変更検知を可能とします。監視対象をリアクティブな値の一部
1 つ目の方法ですとリアクティブな値がたくさんあるときに無駄な処理を行うことになってしまいます。
(分岐判定とか、returnさせるとか)このようなときは次の書き方で対象を絞ることができます。
監視対象を一部に指定する// props に対してのみ監視が行われる watch(() => props, () => cbFunction());【 値の変更前後を取得 】
watch を使う場合、変更前後の値を用いて判別処理などを行うことが想定されます。
これについては、コールバックの引数としてnew,oldの順番で取得可能です。コールバックの型定義WatcherCallBack<T> = (newVal: T, oldVal: T, onCleanup: CleanupRegistrator) => void;変更前後の値(1つだけ)const refA = ref<string>("REF"); watch(refA, (newVal, oldVal) => cbFunction(newVal, oldVal));複数の変更検知も配列を用いて同じ書き方になります。
監視対象の値(複数)const refA = ref<string>("REF-A"); const refB = ref<string>("REF-B"); watch([refA, refB], ([newA, newB], [oldA, oldB]) => cbFunction([newA, newB], [oldA, oldB]));【 処理前の初期化処理 】
値の変更を監視したときには
onCleanup()で初期化を行うことができます。
letなどで宣言している変数を処理に用いる場合には便利な機能となります。onCleanupconst refA = ref<string>("REF-A"); // WatcherCallBack の第三引数は変更監視対象が複数の有無に関わらず同じ watch(refA, (_, __, onCleanup) => cbFunction(onCleanup));WatcherOption
watchの一番最後の引数にWatcherOptionを指定することができます。
この WatcherOption には 3つのオプションがあります。
property 用途 値 lazy 監視対象の値が変更されたときのみ実行させるかどうか ( デフォルトでは true ? ) boolean deep object の property の監視対象の有無 boolean flush ※ こちらについては調査中です pre, post, sync
deepはvue 2でも使われていたオプションではあるのですぐわかるかと思います。※
lazy,flushに関しては型定義ファイルを見ただけだと分からなかったので引き続き調査していく予定です。watchEffect
watchEffectwatchEffect(effect: SimpleEffect, options?: Omit<Partial<WatcherOption>, 'lazy'>): StopHandle;watchEffect は watch の一部 だと捉えていいかと思います。
全く同じ引数と返り値を取る型定義がwatchにも存在します。おそらく、
「シンプルに記述できるのでこちらもうまく利用していきましょう」
ぐらいのノリだとは思います。個人的には、どの監視対象となる値で処理が行われるのかが分かりづらいと思いました。
機能的にもwatchの方ができることが多いようです。Compared to watchEffect, watch allows us to: Perform the side effect lazily; Be more specific about what state should trigger the watcher to re-run; Access both the previous and current value of the watched state.
ウォッチャーの再実行をトリガーする状態をより具体的にします。
監視状態の以前の値と現在の値の両方にアクセスします。watch と computed の利用
vue 2でもここらへんの話はいろんな記事でされているかとは思います。
個人的には以下の点を基準に使い分けています。watch を使うパターン
- 変数変更を監視して他の処理を行うとき
- DOM で利用しない値
- emit などの
setupContextが持つプロパティーの処理computed を使うパターン
- リアクティブな値から新しい変数を作るとき
終わりに
いかがでしたでしょうか?
watchの乱用は予期せぬバグを生む可能性があります。
しっかりと使いまわしていきたいですね。今回の記事が参考になっていれば幸いです。
繰り返しになりますが、今後も随時 vue Composition API について記事を書いていこうと思います。
是非、引き続き追っていただけると嬉しいです。
- 投稿日:2020-05-24T01:07:05+09:00
SkyWayで後からstreamを送信しようとして詰まった際の対処
複雑な家庭の事情により、どうしてもSkyWayをつかったWebRTC画面共有ツールをつくる必要があったため、詰まったことをメモ。
完全にSkyWay力技ネタなので、SkyWayのAPIリファレンスと見比べながら見てもらえると。
やろうとしたこと
- SkyWayで
- カメラを使用しない
- けれども画面だけ共有できるツール
をつくろうとしました。
自分の顔、相手の顔は見えなくていいのでただただ画面を共有したいというノリです。
これを実現するには
1.peer生成
↓
2.joinRoom(この時はstreamなし)
↓
3.後からgetDisplayMediaして画面をlocalStreamに追加
↓
4.replaceStreamでlocalStreamをルームのmediaStreamへ送信
↓
5.streamイベントを検知してmediaStreamを受信
という流れにすればいいんじゃないかと思い、↓のような雰囲気のコードを書きました。
結論として、これだとダメでした。
    // Peer生成
    const peer = new Peer({
        key: this.skyway_apiKey,
        debug: 3,
    });

    peer.on('open', (id) => {
      this.localPeerId = id;
    });

    // sfuルームに参加
    const room = peer.joinRoom(this.roomId, {
      mode: 'sfu',
      stream: this.localStream,
    });


    // 画面を取得してlocalStreamにセット
    const myStream = navigator
            .mediaDevices
            .getDisplayMedia(
              { video: true }
            )
    this.localStream = await myStream

    // mediaStreamを更新
    room.replaceStream(this.localStream)

    // streamイベントを検知した際の処理
    room.on('stream', async stream => {
      if ( typeof(stream) === 'object') {
        const remoteVideo = document.createElement('video');
        remoteVideo.srcObject = stream;
        remoteVideo.playsInline = true;
        remoteVideo.setAttribute('data-peer-id', stream.peerId);
        videosContainer.append(remoteVideo);

        await remoteVideo.play().catch(console.error);
      } else {
        console.log("streamなし");
      }
    });
※トリガーとか省略してるので本当に雰囲気だけのコードになってます
うまくいかなかったこと
【事象】streamを送信しても、mediaStreamを更新ができない
上記のように実装して動かしてみたところ、4〜5を達成できず、画面共有ができませんでした。
で、4のreplaceStreamか、5のstreamイベント検知側に問題があるのかと思い試行錯誤したのですが、最終的にpeerJoinの段階で詰んでいたことが発覚。
【原因】ルームへの接続時にstreamが空だと"受信のみモード"で接続されてしまう説
リファレンスのPeer.callのparameters:streamの記載によると、
接続先のPeerへ送るメディアストリームです。 設定されていない場合は、受信のみモードで発信します。とのこと。
sfuRoomの欄に記載があるわけではないのであくまで仮説でしかないんですが、
stream = ""の状態でjoinRoomしてしまっていることがそもそもの失敗で、受信のみモードで参加しているからreplaceStreamがうまくいかなかった模様です。
解決するためにやったこと
事前にlocalStreamを準備してからjoinRoomをするようにすればいいのですが、カメラは使用したくないし、接続前にかならず画面を取得しないといけないのは使い勝手が悪い。
ならば"mediaStream形式の空データを作成して、それをstreamにセットしてしまえばいいんじゃないか"と思ったので、mediaStreamのモックデータを用意することにしました。
    getMock() {
      const mock = document.createElement('canvas');
      this.localStream = mock.captureStream(10);
    }
canvas要素を生成して、そのリアルタイムキャプチャをストリーミングとして取得する感じです。
で、localStreamが空だったり死んでたりする場合は、このモックデータを生成してからjoinRoomするように変更したところ、無事に成功。
    if ((!this.localStream.active) || (this.localStream === "")){
        this.getMock()
      }
      const room = peer.joinRoom(this.roomId, {
        mode: 'sfu',
        stream: this.localStream,
      });
接続時は黒いブランク画面が共有されて、後で画面を取得したらちゃんと画面を共有できるようになりました。
カメラなしで画面だけ共有するアプリをつくっている人の記事が見当たらず困ったので、同じようなことをやろうとしている特異な人がいたら参考にしてもらえればと。