- 投稿日:2020-05-24T20:37:24+09:00
Docker for Mac の Mutagen-based caching で Volume のパフォーマンスが劇的に改善した
Docker for Mac の Edge channel で、 Mutagen ベースのキャッシュが使えるようになっています。(手元のバージョンは 2.3.1.0)
従来、 EC-CUBE をはじめとする Symfony をベースとしたアプリケーションや、Composer や npm などのパッケージ管理システムのファイルをマウントすると、強烈に遅くなる問題がありました。
今回利用できるようになった Mutagen ベースのキャッシュを利用するには、
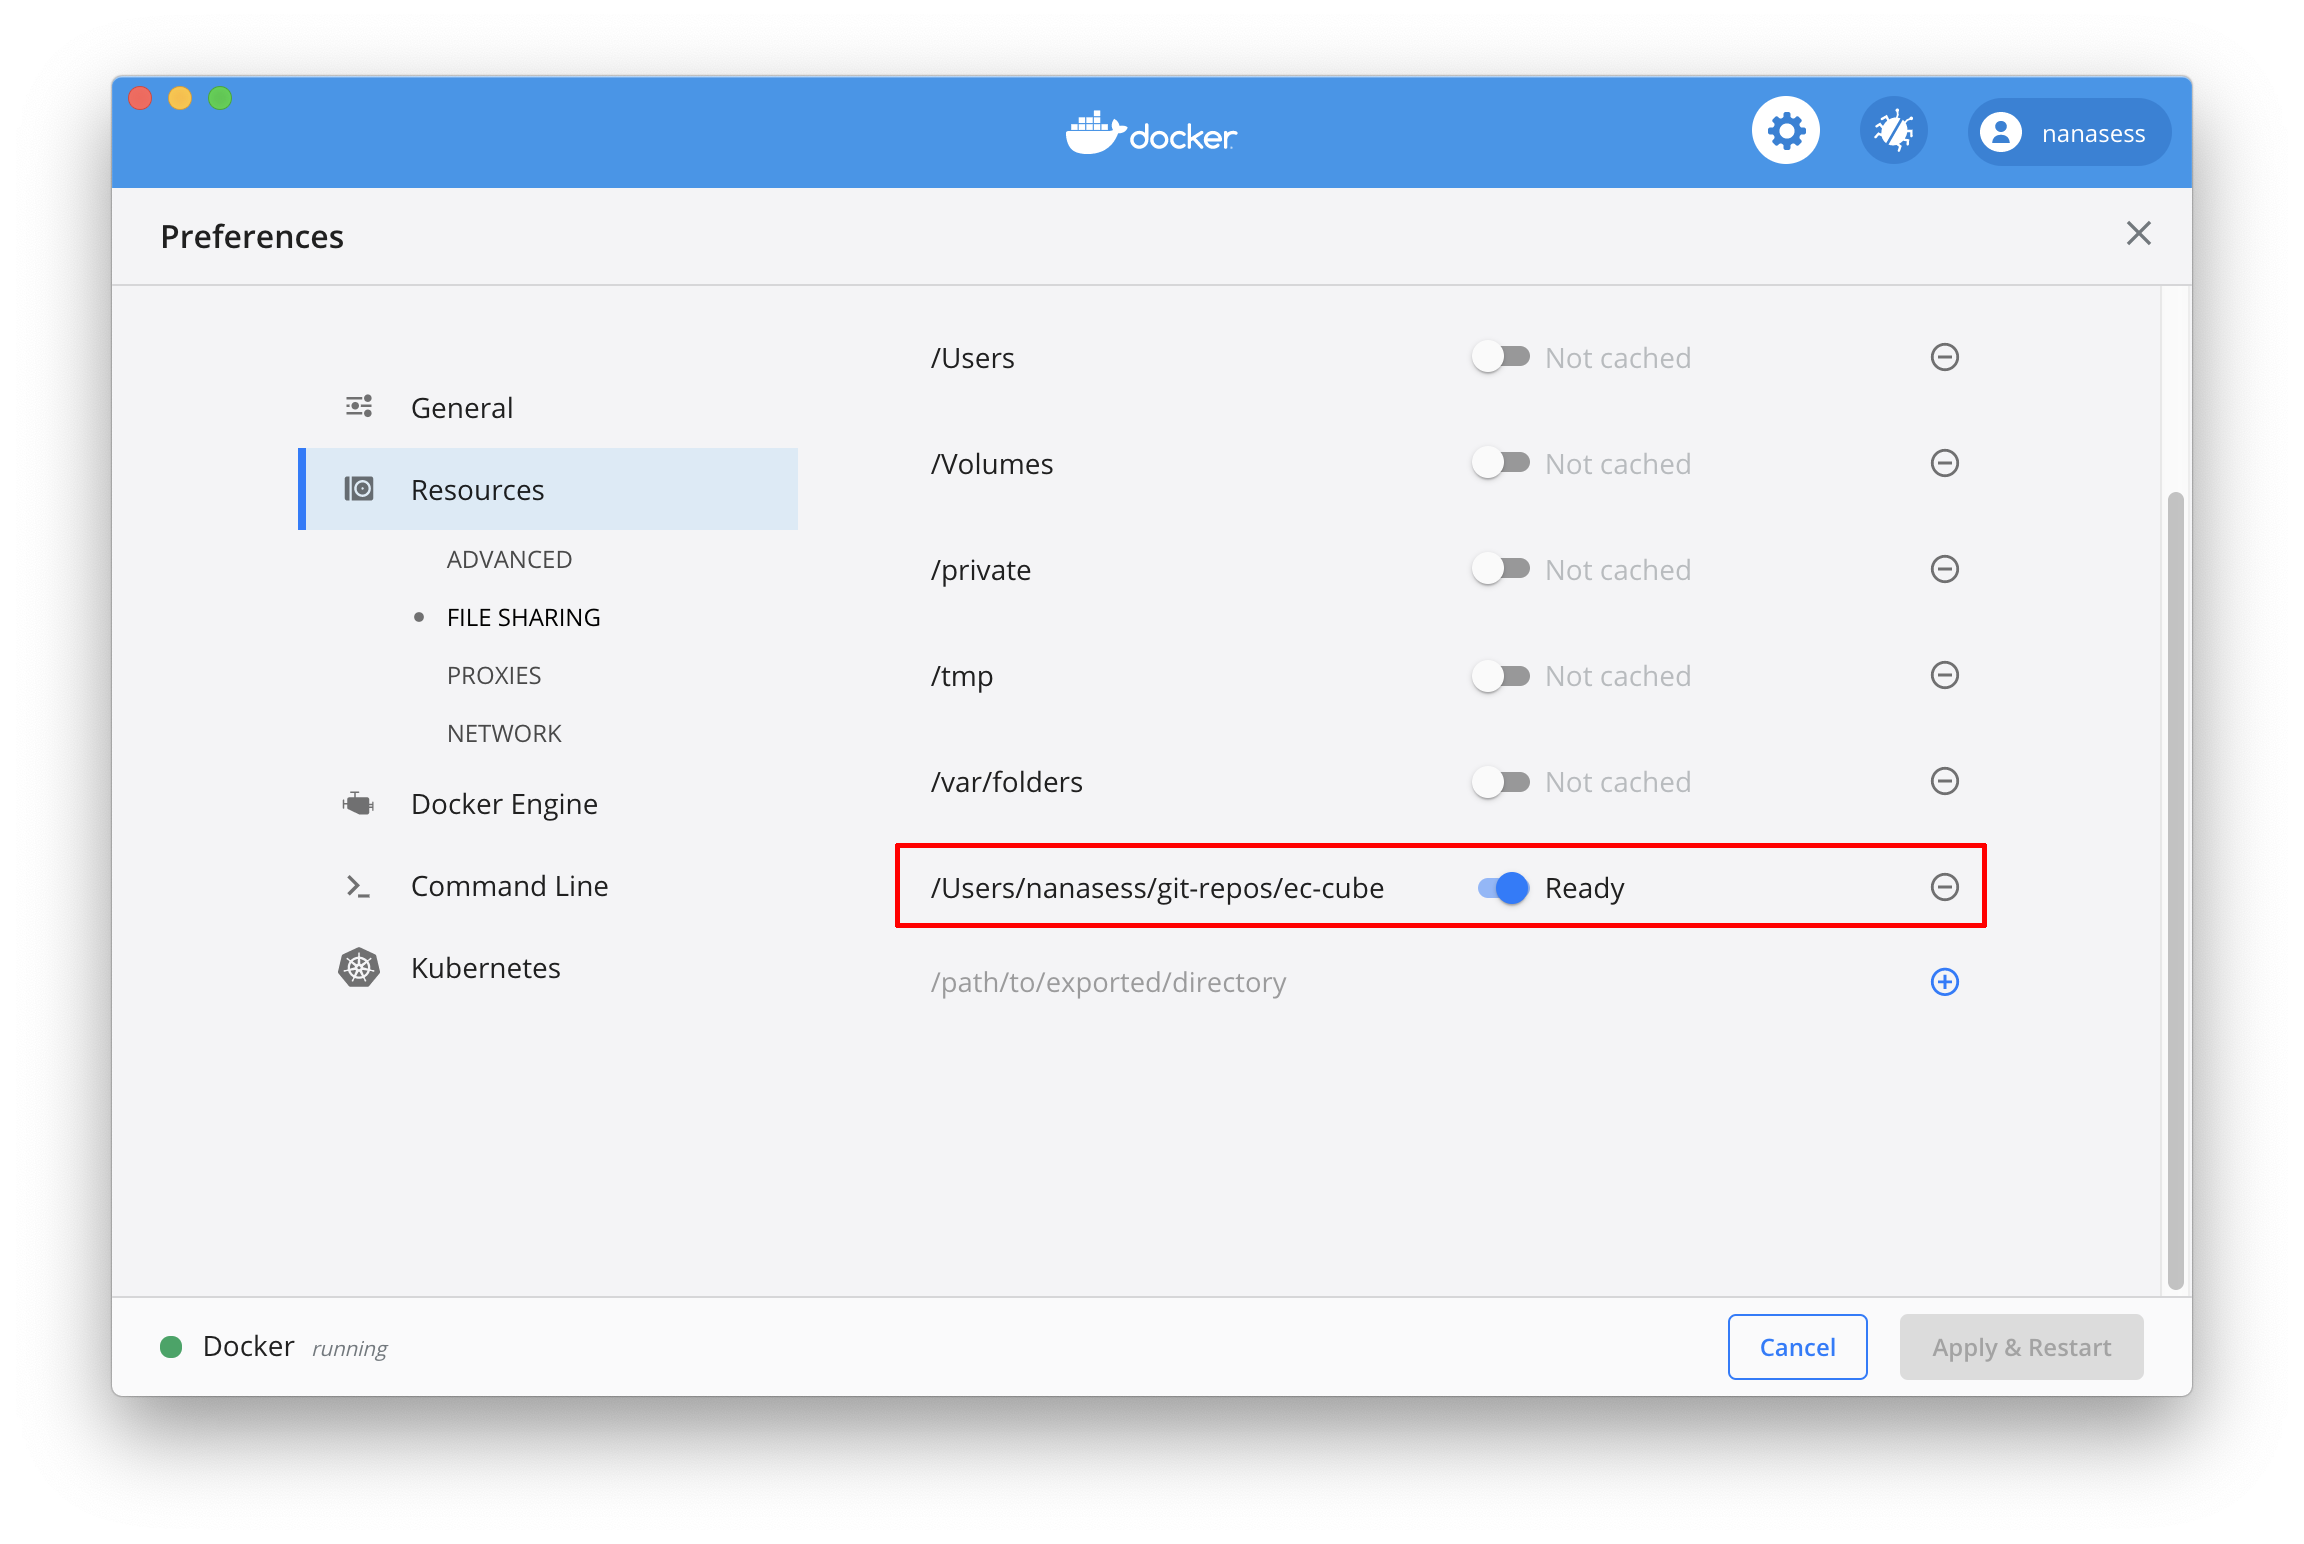
- Preferences -> Resources -> FILE SHAREING でマウントするディレクトリを指定
- キャッシュを ON にするだけ。
です。
あとは通常通り、アプリケーション全体をボリュームにマウントして大丈夫です。
## 例
docker run --name ec-cube -p "8080:80" -v "$PWD:/var/www/html:cached" --link container_mysql:db eccube-php-apache
以下、手元の環境での比較です。
約7倍にパフォーマンス向上しています。
(性能のよいディスク使っているので、体感的な差は少ないですが、古めの環境では大きく差が出ると思います)Mutagen-based caching OFF の場合
Mutagen-based caching ON の場合
GitHub の issues にもパフォーマンス検証結果がコメントされていますので、併わせてご覧ください。
Ruby や Node.js など、 PHP 以外のアプリケーションでもパフォーマンス向上が期待できます。
Docker for Mac の遅さに手を焼いていた方はぜひお試しください!2020年5月26日追記
マウントしたファイルのパーミッションが変わってしまう問題 があります。
近いうちに改善されるかもしれませんが、 コンテナ上でchmod -R o+w <mounted volume>するなりして凌ぎましょう...こちらのツイートも参考に
試した
— Koji Tanaka (@tenkoma) May 23, 2020
1. キャッシュ処理が終わるまでコンテナ内で使えない
2. 使わないときよりCPU消費してる気がする
3. owner/group/permissionが変わる。問題は報告されていて改善するかも? https://t.co/TGiY5wqkaUSome nice performance work on @Docker Desktop for Mac, please help test it if you can. Shockingly good performance on some things (like #ddev composer install). Testing instructions and comparisons at https://t.co/TlJC0JsoCN pic.twitter.com/gifRftpk6d
— Randy Fay (@randyfay) May 27, 2020


- 投稿日:2020-05-24T20:28:37+09:00
macOSのError,FaultログをCSVファイルに出力する
概要
本書ではlogコマンドを利用してmacOSのError,Faultログを抽出し、CSVファイルにログを出力するコマンドを作成します。また当日に発生したError,FaultログのみをCSVに出力するシェルスクリプトを作成します。
動作環境
macOS Catalina (MacBookAir2019)
1.error,Faultログの出力
- ログを出力するにはターミナルを開き、
log showと入力しEnterを押下します。コマンドを実行すると全てのログが出力されます。% log show | more Timestamp Thread Type Activity PID TTL 2020-05-05 19:16:40.063938-0700 0x0 Timesync 0x0 0 0 === system boot: 571DA786-615F-4413-944B-1D34B63BA616 2020-05-05 19:16:40.063938-0700 0x0 Timesync 0x0 0 0 === log class: TTL more than 14 days begins 2020-05-05 19:16:40.063938-0700 0x0 Timesync 0x0 0 0 === log class: persist begins 2020-05-05 19:16:40.063980-0700 0x0 Default 0x0 0 0 kernel: mem_actual: 0x400000000 (非常に長いため省略)
- Errorログのみを出力するには
log show --predicate 'messageType == "error"'と入力しEnterを押下します。% log show --predicate 'messageType == "error"' | more Timestamp Thread Type Activity PID TTL 2020-05-05 19:16:42.931110-0700 0x26a Error 0x0 72 0 opendirectoryd: [com.apple.opendirectoryd:default] Failed to open file <private> [2: No such file or directory] 2020-05-05 19:16:42.949256-0700 0x2bc Error 0x0 72 0 opendirectoryd: [com.apple.opendirectoryd:default] Failed to open file <private> [2: No such file or directory] 2020-05-05 19:16:42.976184-0700 0x2c1 Error 0x0 72 0 opendirectoryd: [com.apple.opendirectoryd:default] Failed to open file <private> [2: No such file or directory] 2020-05-05 19:16:42.977242-0700 0x2bf Error 0x20 102 0 tccd: (libsqlite3.dylib) [com.apple.libsqlite3:logging-persist] cannot open file at line 43353 of [378230ae7f] (非常に長いため省略)
- Faultログのみを出力するには
log show --predicate 'messageType == "fault"'と入力しEnterを押下します。% log show --predicate 'messageType == "fault"' | more Timestamp Thread Type Activity PID TTL 2020-05-05 19:17:29.320269-0700 0x394 Fault 0x0 0 0 kernel: (IOAcceleratorFamily2) bool IOAccelDisplayPipe::init_framebuffer_resource(IOAccelResource2 *): getPixelInformation for framebuffer 0 failed 2020-05-05 19:17:29.559630-0700 0x394 Fault 0x0 0 0 kernel: (IOAcceleratorFamily2) virtual IOReturn IOAccelLegacySurface::set_id_mode(uint32_t, uint32_t): Surface mode contains bad bits 2020-05-05 19:17:29.559788-0700 0x394 Fault 0x0 0 0 kernel: (IOAcceleratorFamily2) virtual IOReturn IOAccelLegacySurface::set_id_mode(uint32_t, uint32_t): Surface mode contains bad bits 2020-05-05 19:17:29.559875-0700 0x394 Fault 0x0 0 0 kernel: (IOAcceleratorFamily2) virtual IOReturn IOAccelLegacySurface::set_id_mode(uint32_t, uint32_t): Surface mode contains bad bits (非常に長いため省略)2.Error,FaultログをCSVに出力する
- リダイレクトを使用してError,FaultログをCSVに出力します。
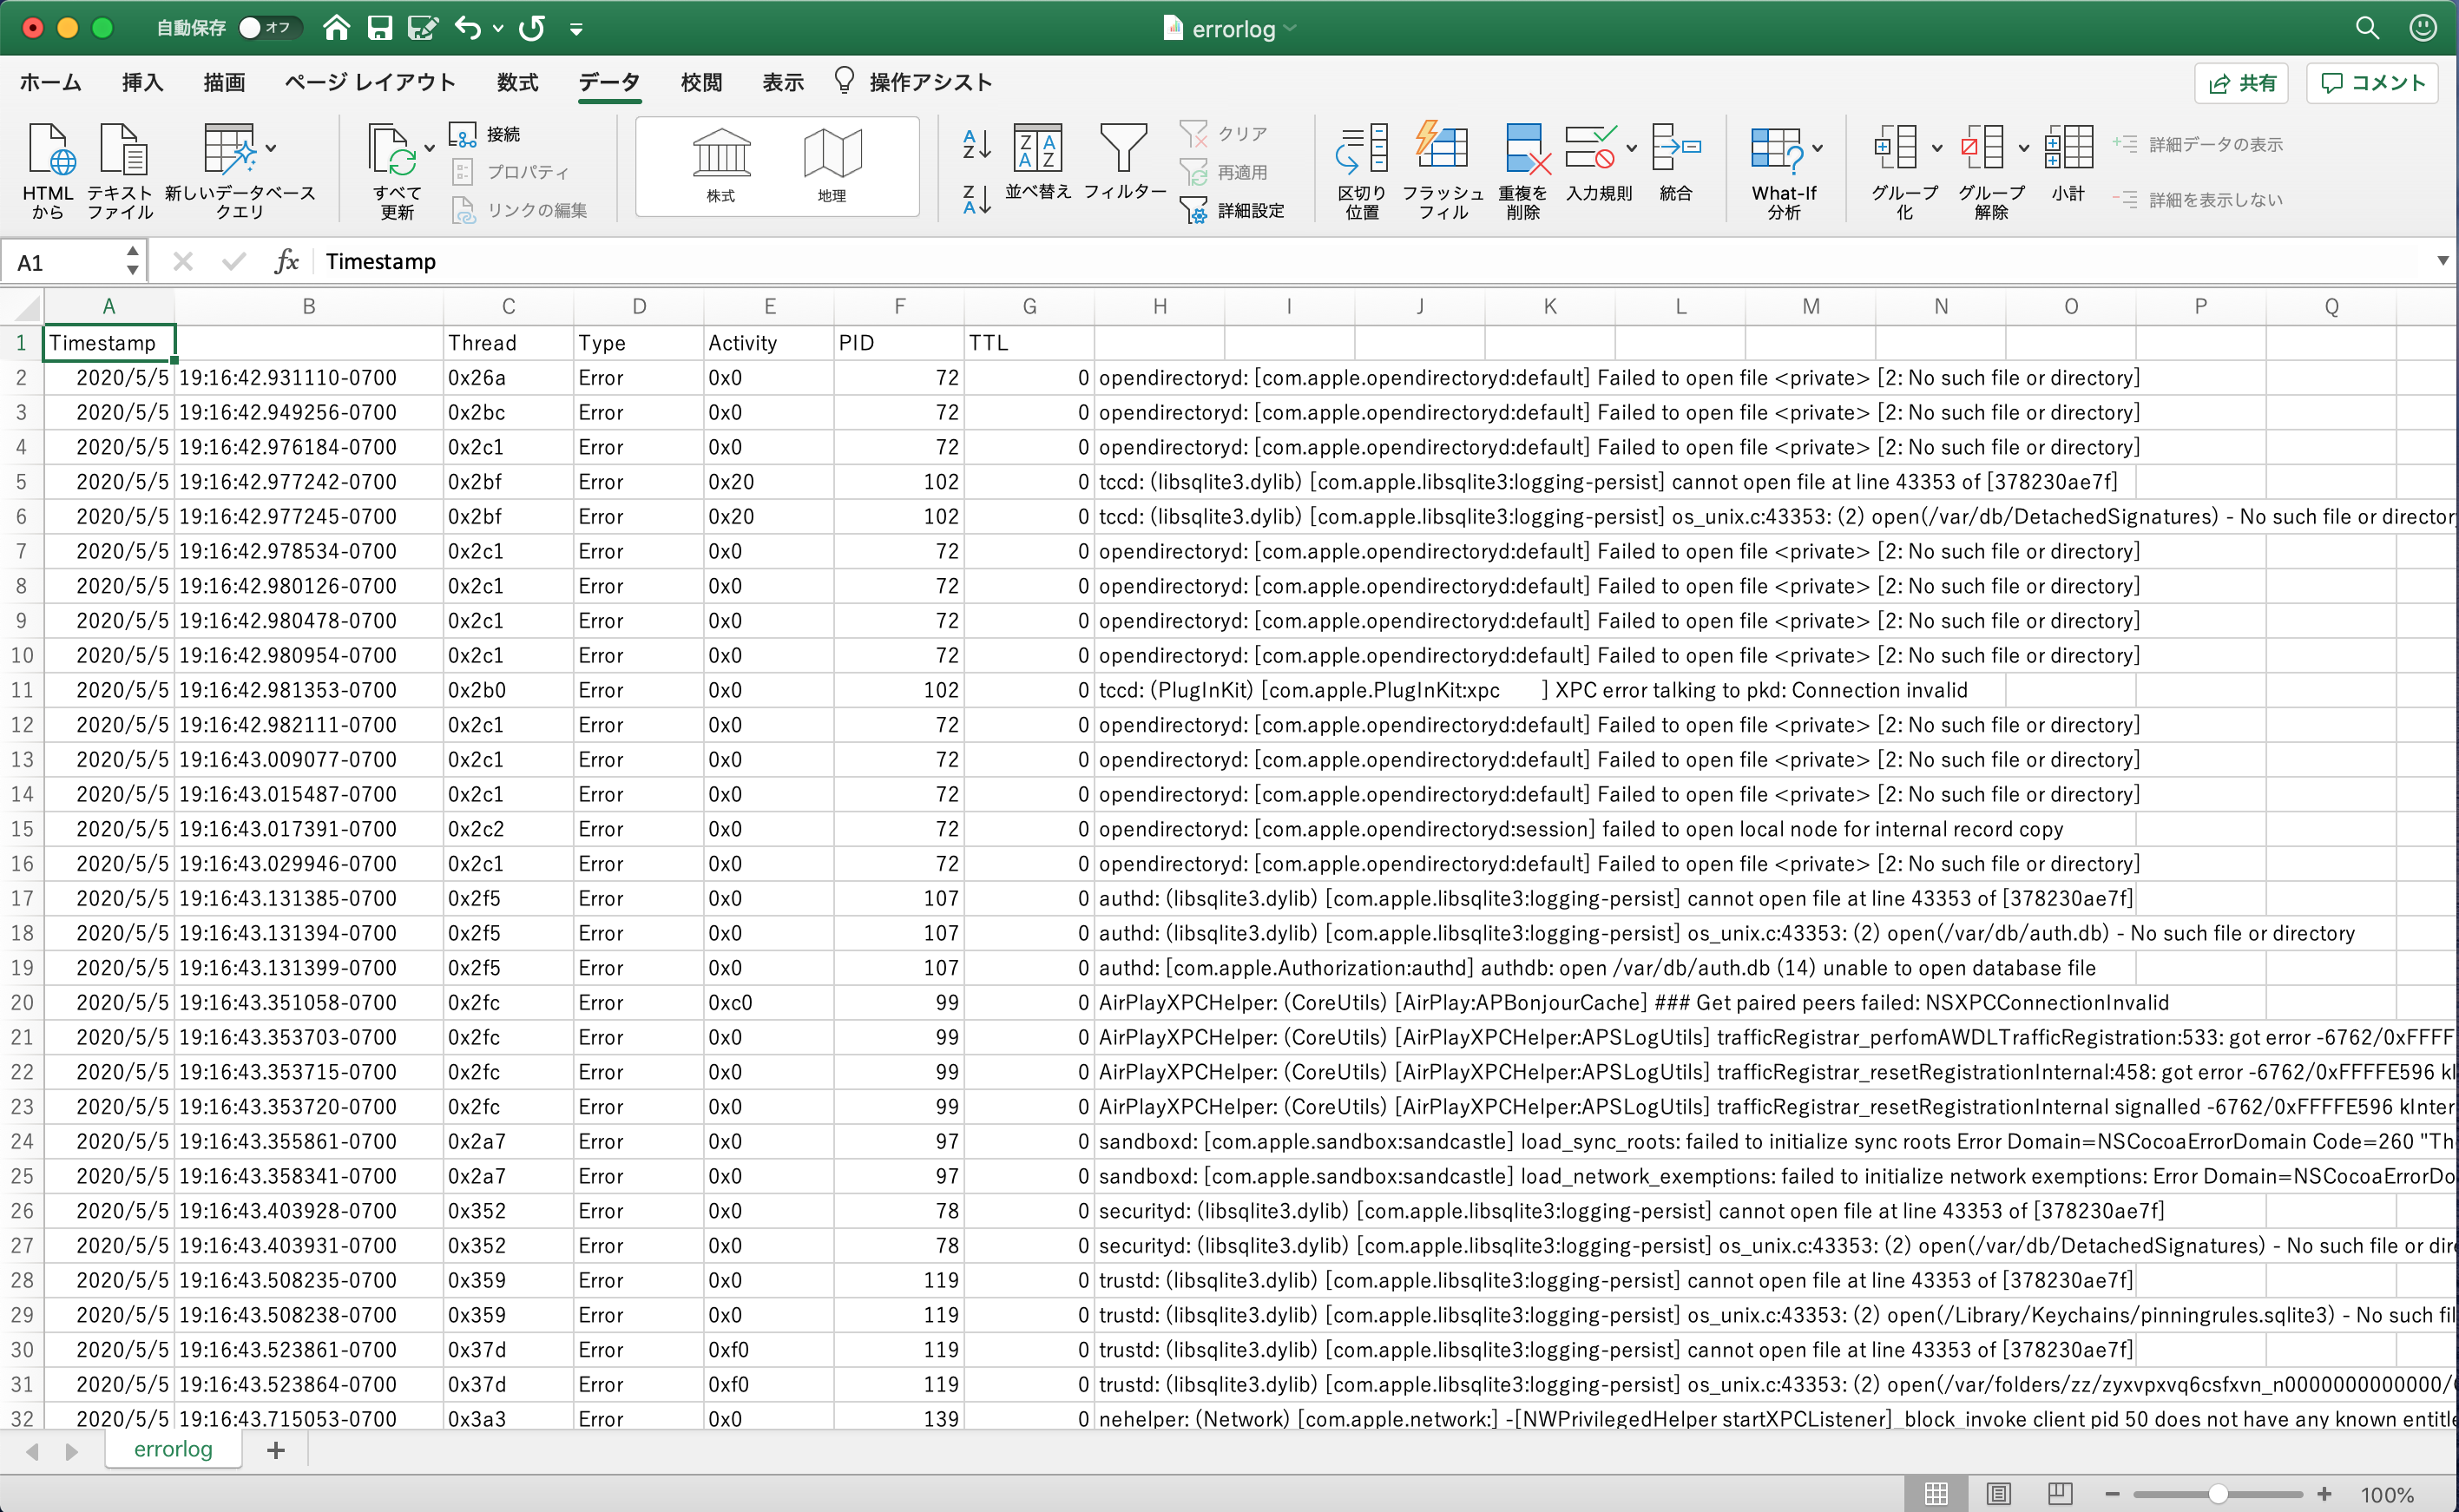
% log show --predicate 'messageType == "error"'>/tmp/test2/errorlog.csv
% log show --predicate 'messageType == "fault"'>/tmp/test2/faultlog.csv
% ls -la /tmp/test2
total 57360
drwxr-xr-x   4 yuichiwest  wheel       128  5 24 19:46 .
drwxrwxrwt  15 root        wheel       480  5 24 19:47 ..
-rw-r--r--   1 yuichiwest  wheel  26946597  5 24 19:45 errorlog.csv
-rw-r--r--   1 yuichiwest  wheel   1497197  5 24 19:46 faultlog.csv
% cat /tmp/test2/errorlog.csv | more
Timestamp                       Thread     Type        Activity             PID    TTL
2020-05-05 19:16:42.931110-0700 0x26a      Error       0x0                  72     0    opendirectoryd: [com.apple.opendirectoryd:default] Failed to open file <private> [2: No such file or directory]
2020-05-05 19:16:42.949256-0700 0x2bc      Error       0x0                  72     0    opendirectoryd: [com.apple.opendirectoryd:default] Failed to open file <private> [2: No such file or directory]
2020-05-05 19:16:42.976184-0700 0x2c1      Error       0x0                  72     0    opendirectoryd: [com.apple.opendirectoryd:default] Failed to open file <private> [2: No such file or directory]
2020-05-05 19:16:42.977242-0700 0x2bf      Error       0x20                 102    0    tccd: (libsqlite3.dylib) [com.apple.libsqlite3:logging-persist] cannot open file at line 43353 of [378230ae7f]
(省略)
% cat /tmp/test2/faultlog.csv | more
Timestamp                       Thread     Type        Activity             PID    TTL
2020-05-05 19:17:29.320269-0700 0x394      Fault       0x0                  0      0    kernel: (IOAcceleratorFamily2) bool IOAccelDisplayPipe::init_framebuffer_resource(IOAccelResource2 *): getPixelInformation for framebuffer 0 failed
2020-05-05 19:17:29.559630-0700 0x394      Fault       0x0                  0      0    kernel: (IOAcceleratorFamily2) virtual IOReturn IOAccelLegacySurface::set_id_mode(uint32_t, uint32_t): Surface mode contains bad bits
2020-05-05 19:17:29.559788-0700 0x394      Fault       0x0                  0      0    kernel: (IOAcceleratorFamily2) virtual IOReturn IOAccelLegacySurface::set_id_mode(uint32_t, uint32_t): Surface mode contains bad bits
2020-05-05 19:17:29.559875-0700 0x394      Fault       0x0                  0      0    kernel: (IOAcceleratorFamily2) virtual IOReturn IOAccelLegacySurface::set_id_mode(uint32_t, uint32_t): Surface mode contains bad bits
(省略)
- Excelの区切り位置を設定することでログを見やすく表示することができます。
3.当日に発生したError,Faultログのみを出力するシェルスクリプトを作成する
- シェルスクリプトの動作内容
当日の日付を変数に出力する
保存先を変数に出力する
Error,Faultログを指定した日付、保存先にCSVとして出力する
- シェルスクリプトの内容
#!/bin/sh

<< COMMENTOUT
logsearch(macOS)
Copyright (c) 2020 yuichi1992_west
This software is released under the MIT License.
http://opensource.org/licenses/mit-license.php
COMMENTOUT

# Get today's date
log_date=`date +"%Y-%m-%d"`

# Specify the log storage location
log_space='/tmp/test3'

# Output error log
log show --predicate 'messageType == "error"' | grep "${log_date}" > "${log_space}"/error_log_"${log_date}".csv

# Output fault log
log show --predicate 'messageType == "fault"' | grep "${log_date}" > "${log_space}"/fault_log_"${log_date}".csv

exit 0
- 動作結果
% bash logsearch.sh
% ls -la /tmp/test3
total 6656
drwxr-xr-x   4 yuichiwest  wheel      128  5 24 20:09 .
drwxrwxrwt  18 root        wheel      576  5 24 20:15 ..
-rw-r--r--   1 yuichiwest  wheel  2928838  5 24 20:09 error_log_2020-05-24.csv
-rw-r--r--   1 yuichiwest  wheel   137697  5 24 20:10 fault_log_2020-05-24.csv
% cat /tmp/test3/error_log_2020-05-24.csv | more
2020-05-24 10:08:52.588855+0900 0x31a      Error       0x0                  139    0    opendirectoryd: [com.apple.opendirectoryd:default] Failed to open file <private> [2: No such file or directory]
2020-05-24 10:08:52.742746+0900 0x32f      Error       0x0                  139    0    opendirectoryd: [com.apple.opendirectoryd:default] Failed to open file <private> [2: No such file or directory]
2020-05-24 10:08:52.744104+0900 0x2c4      Error       0x0                  151    0    displaypolicyd: (CoreFoundation) [com.apple.defaults:User Defaults] All kCFPreferencesCurrentUser domains in this process will be volatile, because homeDirPath starts with /var/empty
2020-05-24 10:08:52.745015+0900 0x32f      Error       0x0                  139    0    opendirectoryd: [com.apple.opendirectoryd:default] Failed to open file <private> [2: No such file or directory]
(省略)
% cat /tmp/test3/fault_log_2020-05-24.csv | more
2020-05-24 10:08:53.089823+0900 0x3a3      Fault       0x190                183    14   contextstored: (CoreFoundation) [com.apple.defaults:User Defaults] Couldn't read values in CFPrefsPlistSource<0x7fe9b7707ce0> (Domain: kCFPreferencesAnyApplication, User: kCFPreferencesCurrentUser, ByHost: No, Container: (null), Contents Need Refresh: No): accessing preferences outside an application's container requires user-preference-read or file-read-data sandbox access
2020-05-24 10:08:53.090168+0900 0x3a3      Fault       0x191                183    14   contextstored: (CoreFoundation) [com.apple.defaults:User Defaults] Couldn't read values in CFPrefsPlistSource<0x7fe9b7707fb0> (Domain: kCFPreferencesAnyApplication, User: kCFPreferencesAnyUser, ByHost: Yes, Container: (null), Contents Need Refresh: No): accessing preferences outside an application's container requires user-preference-read or file-read-data sandbox access
2020-05-24 10:08:53.277770+0900 0x43c      Fault       0x1f2                183    14   contextstored: (KnowledgeMonitor) [com.apple.coreduet.knowledge:] Requested the previousEvent from instantState in setCurrentEvent, but received nil in stream: Backlight.
2020-05-24 10:08:53.278484+0900 0x43b      Fault       0x1f5                183    14   contextstored: (KnowledgeMonitor) [com.apple.coreduet.knowledge:] Requested the previousEvent from instantState in setCurrentEvent, but received nil in stream: ChargerPluggedInState.
(省略)
最後に
macOSのError,Faultログを出力することで、ハードウェアやアプリケーションの不具合を調査するのに役立つと思います。またCSVに出力することでExcelを利用してログデータを加工でき、ログデータによる不具合の調査がやりやすくなると思います。
- 投稿日:2020-05-24T14:24:05+09:00
MacでNuxt.jsのプロジェクトを作る(2020)
タイトルの通り、MacでNuxt.jsの初期プロジェクトを作る手順のメモ。
手順
Npmを入れる
まずnuxtのプロジェクト作成コマンドを叩くためのNpmを入れる。
一発でNpmを入れられるわけじゃなくて意外と面倒。
Command Line Toolsを入れる
↓
Homebrewを入れる(Command Line Toolsが必要)
↓
Nodebrewを入れる(Homebrewが必要)
↓
Node.jsとNpmを入れる(Nodebrewが必要)
という手順になる。Command Line Toolsを入れる
$ xcode-select --install
インストールを実行。
結構サイズある、7GBぐらい持ってかれた。Homebrewを入れる
$ /usr/bin/ruby -e "$(curl -fsSL https://raw.githubusercontent.com/Homebrew/install/master/install)"
$ brew -vでバージョンの確認が出来たらOK。Nodebrewを入れる
$ brew install nodebrew
$ nodebrew -vでバージョンの確認が出来たらOK。Node.jsとNpmを入れる
# このディレクトリを作っておかないとエラーになる
$ mkdir -p ~/.nodebrew/src

# latestは最新版という意味
$ nodebrew install-binary latest

# インストールした後で使用を宣言
$ nodebrew use latest

#パスを通す
$ echo 'export PATH=$HOME/.nodebrew/current/bin:$PATH' >> ~/.bash_profile
$ source ~/.bash_profile
$ node -v$ npm -vでそれぞれバージョンの確認が出来たらOK。Nuxtのプロジェクトを作成する
やっと本題。
本題と言いつつここまできたらあとはコマンドを1つ叩くだけ。$ npx create-nuxt-app <project-name>選択肢を聞かれるので選んでいく。
以下は私の設定。(あんまりクセがないと思う。)✨ Generating Nuxt.js project in nuxt ? Project name nuxt # 任意のプロジェクト名。これが作成されるプロジェクトのディレクトリ名にもなる。 ? Project description My flawless Nuxt.js project # 任意のプロジェクトの説明。README.mdに記載される。 ? Author name kuribo2110 # 任意の作者名。 ? Choose programming language JavaScript # 記述方法をJavaScriptかTypeScriptで選択。 ? Choose the package manager Npm # パッケージマネージャーの選択。Npm使います。 ? Choose UI framework Bootstrap Vue # デザインフレームワークの選択。Bootstrap使います。 ? Choose custom server framework None (Recommended) # サーバーフレームワークの選択。別でAPIサーバー立てたいので未選択。 ? Choose Nuxt.js modules Axios # 使いたいモジュールの選択。API叩くためにAxios使います。 ? Choose linting tools ESLint, Prettier # リントツールの選択。ESLintとPrettier使います。 ? Choose test framework Jest # テストフレームワークの選択。Jest使います。 ? Choose rendering mode Universal (SSR) # レンダリング方法をSSRかSPAかで選択。SSRにします。 ? Choose development tools jsconfig.json (Recommended for VS Code) # 開発ツールの選択。VS Code使っているのでjsconfig.json作ります。選択が終わると自動でNuxtプロジェクトを作ってくれます。しゅごい。
$ npm run devでNuxtプロジェクトを起動。
http://localhost:3000/ でTopページが表示されます。

- 投稿日:2020-05-24T14:14:37+09:00
ターミナル入門1
ターミナルの見た目を変更する
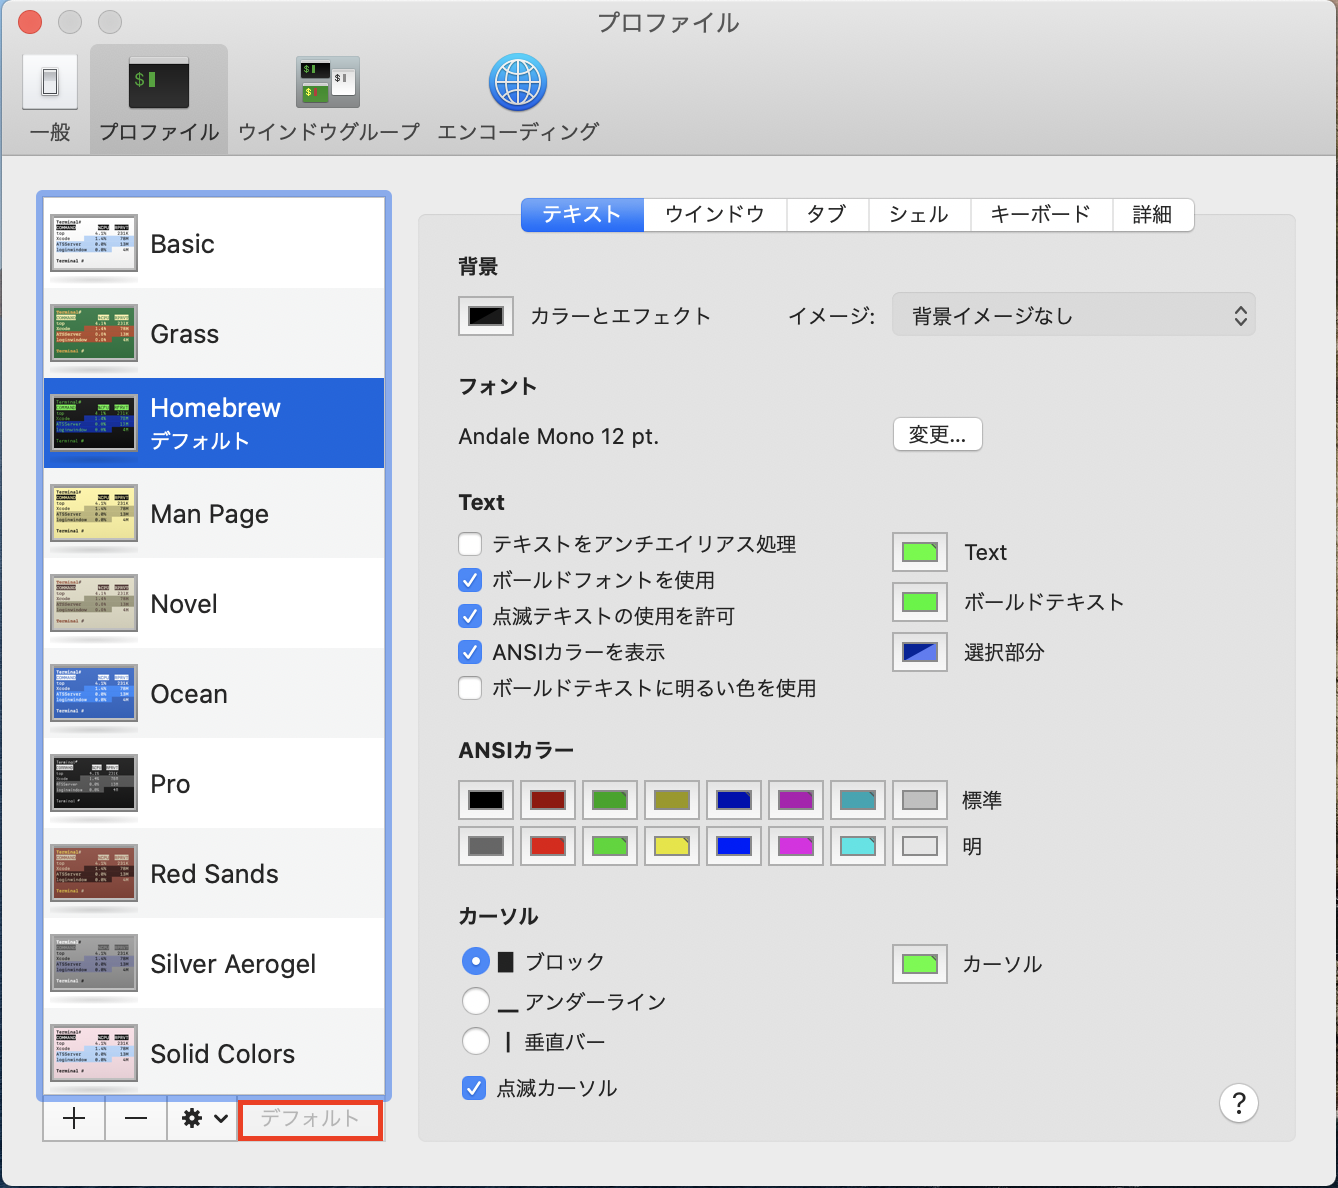
ターミナル→環境設定→プロフィル→プロファイルを選択(Homebrewがおすすめ)→デフォルトを押す
ターミナルの文字の大きさを変える
文字を大きくする時
⌘キー&シフト&セミコロン(⌘キー&+)文字を小さくする時
⌘キー&−キーコマンド集
lsコマンド→自分のいる階層にあるファイルやフォルダを表示する
cd パス→指定のパスに移動する
cd ..→一つ上の階層に移動する
pwd→自分のいる場所を確認する
mkdir フォルダ名→指定した名前のフォルダを作成
rm -r フォルダ名→指定のフォルダを削除する
touch ファイル名→指定した名前のファイルを作成
vim ファイル名→ファイルの中身を開く
i→入力を受け付ける
escキー:wq→ファイルを保存してvimを閉じる
cat ファイル名→ファイルの中身を確認
rm ファイル名→指定した名前のファイルを削除終わりに
最近になってターミナルの勉強を始めました。これからも面白いコマンドを見つけたら更新して行くのでこれからもよろしくお願いします。
- 投稿日:2020-05-24T12:10:33+09:00
初めてのPython ~課題編~
対象者
前回の記事の続きです。
実は条件分岐とループ処理が書ければもう大体のことは実現できます。
本記事はいくつか課題を出題しますので、色々調べながら考えてみてくださいね!
初心者以外でも、Pythonまだあまり知らないこと多いな〜もっと知りたいな〜という方はぜひ!
何かいい課題思いついたら追加します。
(こんなのどう?ってアイデアあればぜひ教えてください)目次
初級編
まずは簡単なものから。
numpyについて調べながらやってみてください。課題1
$1 \sim 100$までの整数の和を求めるプログラムをできるだけ少ない行数、文字数で書いてください。
(いわゆるコードゴルフというやつです)課題2
乱数を100個生成して全ての要素を出力してください。
課題3
課題2で生成した乱数の最大・最小・平均・分散・標準偏差を求めてください。
課題4
課題3について、
matplotlibを使って箱ひげ図とヒストグラムを描いてください。初級編解答例
あくまで例です。
もっとスマートなやり方があればぜひ教えてください?
解答1
ans1.pyimport numpy as np print(np.sum(np.arange(101)))
解答2
ans2_4.pyimport numpy as np import matplotlib.pyplot as plt np.set_printoptions(threshold=np.inf) x = np.random.rand(100) print(x)
解答3
ans2_4.pyprint("max = {}".format(np.max(x))) print("min = {}".format(np.min(x))) print("mean = {}".format(np.mean(x))) print("std = {}".format(np.std(x))) print("var = {}".format(np.var(x)))
解答4
ans2_4.pyplt.boxplot(x) plt.show() plt.hist(x) plt.show()中級編
中級編です。ちょっと難し目です。
課題5
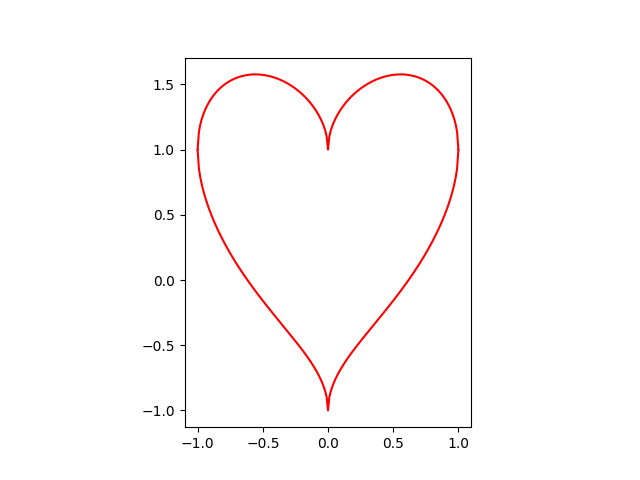
ハート型グラフを描いてください。
(ヒント:ハート グラフ でググる)課題6
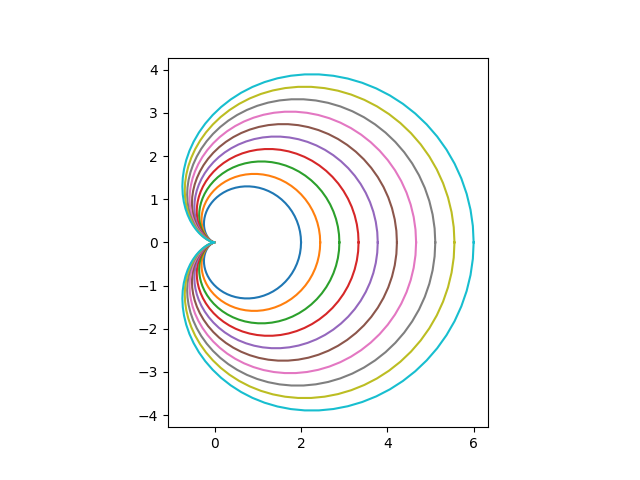
カージオイドのグラフを描いてください。
ただしカージオイドは以下の数式で表されており、この式中の$a$の値について、$1 \sim 3$までを10等分した値で生成したグラフを全て重ねて表示してください。
($a=1$のグラフを生成、$a=1.222\ldots$のグラフを生成、...)x = a (1 + \cos\theta) \cos\theta \\ y = a (1 + \cos\theta) \sin\theta \\ 0 \le \theta \le 2 \pi \quad 1 \le a \le 3中級編解答例
解答例です。
だんだん複雑になってきましたね。
解答5
これはググればいろんな方程式が出てきますが、今回はこれを使います。
x^2 + (y - \sqrt{|x|})^2 = 1 \\
-1 \le x \le 1
このままでは描けないので工夫します。
\begin{align}
  (y - \sqrt{|x|})^2 &= 1 - x^2 \\
  y - \sqrt{|x|} &= \pm \sqrt{1 - x^2} \\
  y &= \sqrt{|x|} \pm \sqrt{1 - x^2}
\end{align}
または極形式で
\begin{align}
  x &= \cos \theta \\
  y &= \sin \theta + \sqrt{|x|} \\
    &= \sin \theta + \sqrt{|\cos \theta|}
\end{align} \\
0 \le \theta \le 2 \pi
ans5.pyimport numpy as np import matplotlib.pyplot as plt def f(x, sign): if sign == "plus": return np.sqrt(np.fabs(x)) + np.sqrt(1 - x ** 2) elif sign == "minus": return np.sqrt(np.fabs(x)) - np.sqrt(1 - x ** 2) else: raise ValueError("不明な符号: {}".format(sign)) def g(theta): return np.cos(theta), np.sin(theta) + np.sqrt(np.fabs(np.cos(theta))) #x = np.linspace(-1, 1, 201) theta = np.linspace(0, 2 * np.pi, 302) fig, ax = plt.subplots(1) #plt.plot(x, f(x, "plus"), color="r") #plt.plot(x, f(x, "minus"), color="r") x, y = g(theta) plt.plot(x, y, color="r") ax.set_aspect("equal") plt.show() plt.savefig("heart.png")
解答6
ans6.pyimport numpy as np import matplotlib.pyplot as plt def r(a, theta): coef = a * (1 + np.cos(theta)) return coef * np.cos(theta), coef * np.sin(theta) theta = np.linspace(0, 2 * np.pi, 100) a = np.linspace(1, 3, 10) fig, ax = plt.subplots(1) for i in a: x, y = r(i, theta) plt.plot(x, y) ax.set_aspect("equal") plt.show() plt.savefig("cardioid.png")
上級編
さらに複雑になります。
色々ググりながらやってみよう。課題7
サイクロイドのwikiにあるアニメーションを描いてください。
サイクロイド曲線だけでOKですが、可能なら動円と動径も描きましょう。課題8
ある自然数$n \gt 2$を入力すると、その数までの素数のリスト(またはnumpy配列)を返す関数を作成してください。
この時、$n = 1e6 = 100000$を入力した時の実行時間が0.1秒を下回るようにしてください。上級編解答例
解答7
サイクロイドは以下の設定で描きます。
x = r(\theta - \sin \theta) \\
y = r(1 - \cos \theta) \\
r = 1 \quad 0 \le \theta \le 2 \pi
オプションとして、動円は
(x - \theta)^2 + (y - r)^2 = r^2 \\
\Leftrightarrow \left\{
  \begin{align}
    x &= r \cos \psi + \theta \\
    y &= r \sin \psi + r
  \end{align}
\right. \\
0 \le \psi \le 2 \pi
動径はサイクロイド点を$(a, b)$、動円の中心を$(c, d)$とすると
\left\{
  \begin{array}{cc}
    y - d = \cfrac{d - b}{c - a} (x - c) & (x \lt |c - a|, a \ne c) \\
    x = c & (a = c, b \le y \le d \quad or \quad d \le y \le b)
  \end{array}
\right.
のように描けます。
ans7.py%matplotlib nbagg import numpy as np import matplotlib.pyplot as plt import matplotlib.animation as animation def f(r, theta): return r * (theta - np.sin(theta)), r * (1 - np.cos(theta)) def circle(r, theta, n_point): psi = np.linspace(0, 2 * np.pi, n_point) return r * np.cos(psi) + theta, r * np.sin(psi) + r def line(r, theta, n_point): a, b = f(r, theta) if theta - a == 0: x = np.full(n_point, theta) y = np.linspace(min(b, r), max(b, r), n_point) return x, y else: x = np.linspace(min(a, theta), max(a, theta), n_point) y = (r - b) / (theta - a) * (x - theta) + r return x, y # パラメータ設定 n_point = 200 r = 1 theta = np.linspace(0, 2 * np.pi, n_point) # グラフ設定など fig = plt.figure() ax = plt.axes() plt.xlim(theta[0] - 0.5, theta[-1] + 0.5) plt.ylim(0, 2.5 * r) plt.grid() interval = 5 # シーン作成 images = [] for i in range(len(theta)): # 動円 x, y = circle(r, theta[i], n_point) im1, = plt.plot(x, y, color="g") # 動径 x, y = line(r, theta[i], n_point) im2, = plt.plot(x, y, color="r") # サイクロイド曲線 x, y = f(r, theta[:i]) im3, = plt.plot(x, y, color="b") # サイクロイド点 if i != 0: im4, = plt.plot(x[-1], y[-1], color="b", marker="o") else: im4, = plt.plot(x, y, color="b", marker="o") ax.set_aspect("equal") images.append([im1, im2, im3, im4]) # グラフを描く ani = animation.ArtistAnimation(fig, images, interval=interval) plt.show() #ani.save("cycloid.gif", writer="imagemagick")
jupyter notebook上でgifを表示するには
ans7.py%matplotlib nbagg
を最初に記述する必要があります。
同じ要領で外サイクロイドや内サイクロイドなんかにチャレンジしてもいいですね!
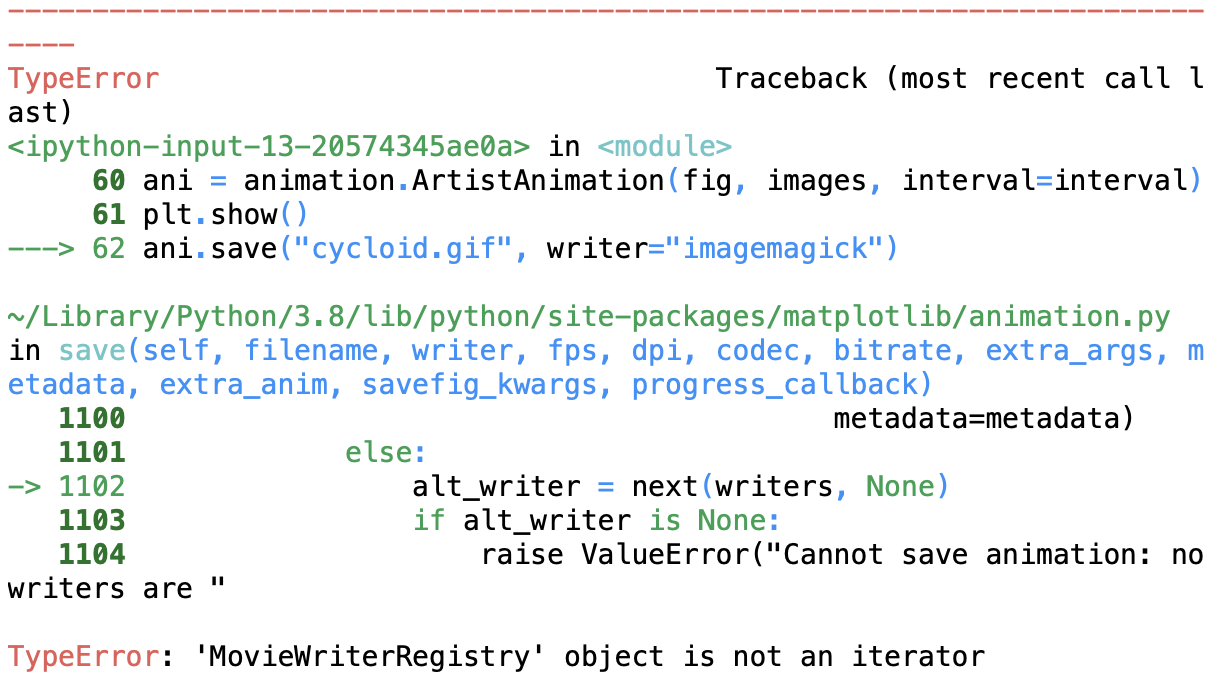
<<注意>>
matplotlibのバグでgif保存できません。
上記のgifはスクリーンショット→動画をgifにするアプリを用いて生成したgifです...
解答8
ここではエラトステネスのふるいというアルゴリズムを用います。
アルゴリズムの内容自体は至極単純で、
- フラグを$n + 1$個用意する(インデックス番号と自然数を対応させるため)
- $0$番目と$1$番目のフラグは折る($=$自然数$0$と$1$は素数ではない)
- $i = 2 \sim \sqrt{n} + 1$までループ
- $i$番目のフラグが立っていれば素数なので、それ以外の$i$で割り切れる数のフラグを折る
- フラグが立っているインデックスを返す
という感じです。
ans8.pyimport numpy as np import time as time np.set_printoptions(threshold=10, edgeitems=10) # エラトステネスのふるい def prime(n): numbers = np.ones(n + 1, dtype=np.bool) numbers[0 : 2] = False border = int(np.sqrt(len(numbers))) + 1 for i in range(2, border): if numbers[i]: numbers[::i] = False numbers[i] = True return np.where(numbers)[0] start = time.time() primes = prime(int(1e6)) end = time.time() print(primes) print("time: {}".format(end - start))
参考
初めてのPythonシリーズ記事