- 投稿日:2020-05-24T23:36:46+09:00
GoogleMapを使ってサイクリングに出かけよう
タイトルからは、何の技術の話かわからないですね。
GoogleMapにナビゲーション機能ってありますよね、それをサイクリングでナビゲートしてもらおうというものです。
サイクリング中は、手が使えないので、音声ナビがあると便利です。
ですが、ポケストップを探すたびに、立ち止まってスマホを見るのは手間ですし、軽快ではありません。そこで、(ポケストップに限りませんが)サイクリング前に、途中のチェックポイントを複数覚えておいて、チェックポイントまでの道のりをナビゲートしてもらって、到着したら、ポケストップのアイテムをもらったり、コンビニで休憩したのち、次のチェックポイントを目指す、というものです。
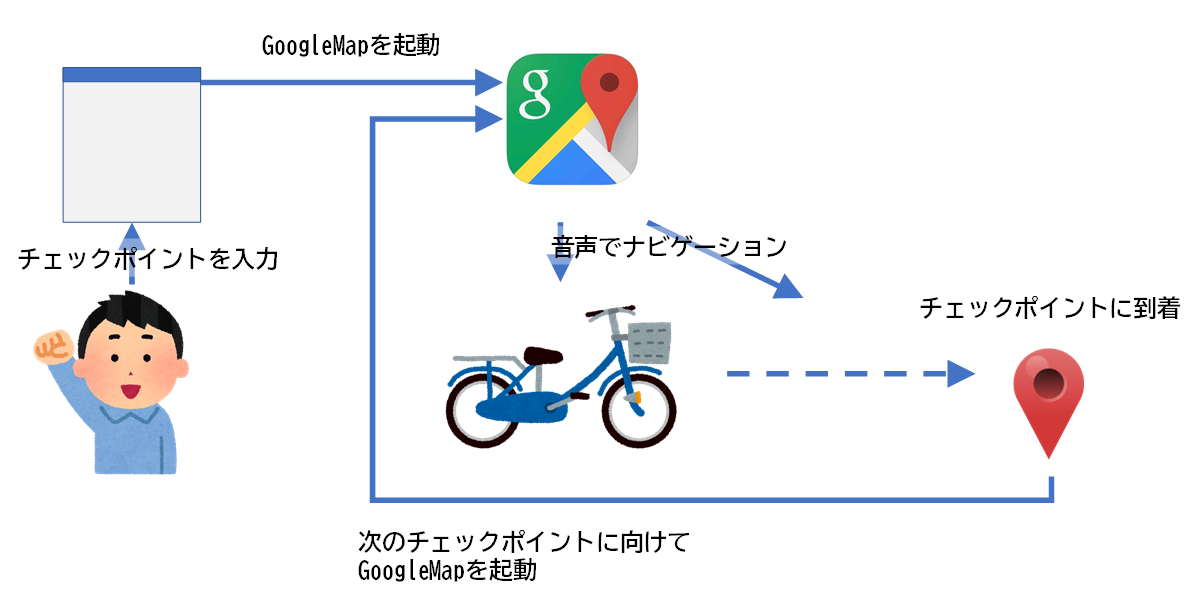
原理の説明:GoogleMapの機能
GoogleMapは、外部のアプリやブラウザから起動させることができます。
その際に、パラメータの指定によって、場所の表示だけでなく、出発地点と目的地を指定して、ナビゲーションを開始させることもできます。ですので、まずはブラウザから、サイクリングで回りたいチェックポイントのリストを作って、GoogleMapを起動して次のチェックポイントまでナビゲーションしてもらいます。
チェックポイントまで到着したら、またブラウザを立ち上げて、今度は次のチェックポイントを指定してGoogleMapを起動させる、これを最後の目的地まで繰り返すわけです。GoogleMapのナビゲーション機能
ナビゲーション中は、以下のことを適宜音声で教えてくれます。
・予定通りの道を進んでいるかどうか
・次の曲がり角まで何メートルか
・今曲がるべき曲がり角か
・予定の道を外れたか
・目的地の近くに来たか
・目的地に着いたか上記は、ナビを開始すると、設定が選べるようになり、「詳しい音声案内」のスイッチをOnにした場合です。Offの場合はもうちょっと少ない気がします。
もろもろGitHubに上げておきました。
poruruba/orientation_navigator
https://github.com/poruruba/orientation_navigator画面説明
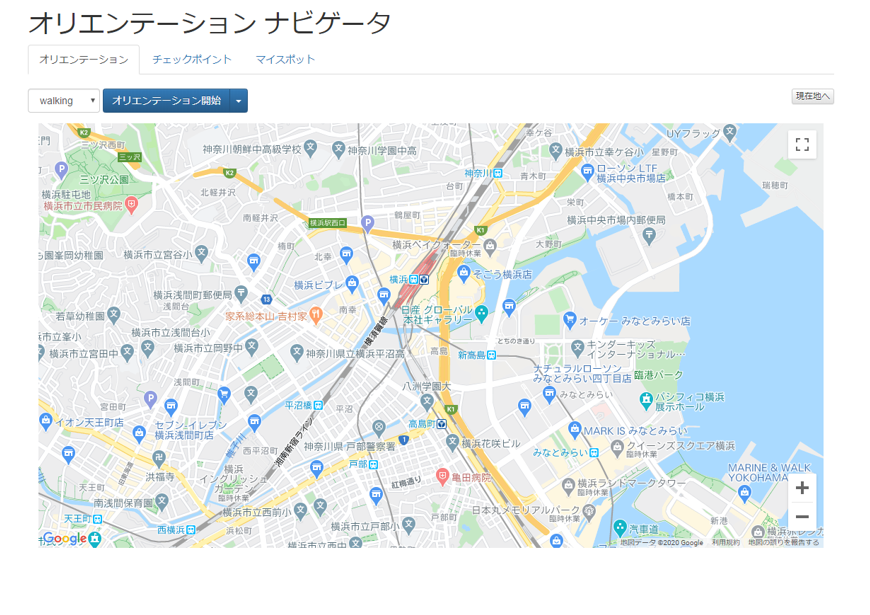
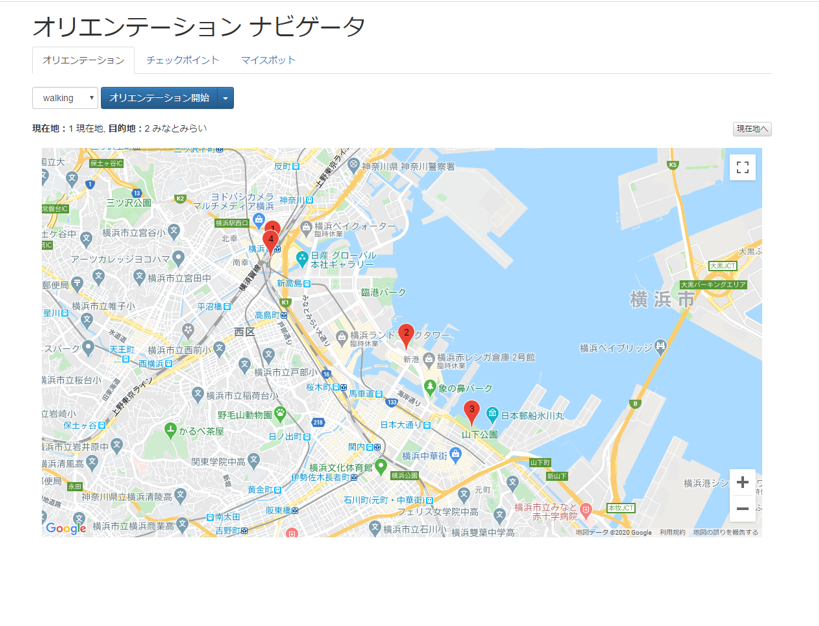
ブラウザを起動するとこんな感じの画面が表示されます。
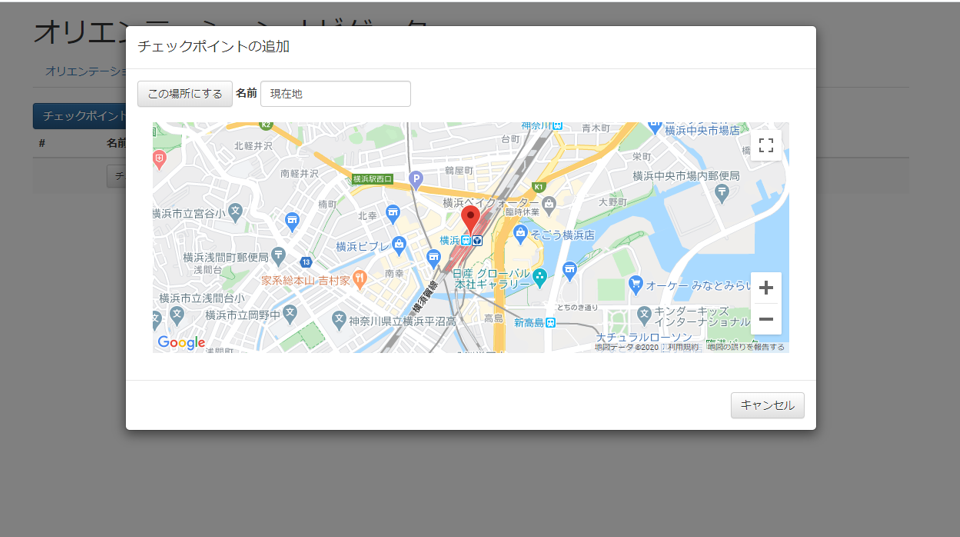
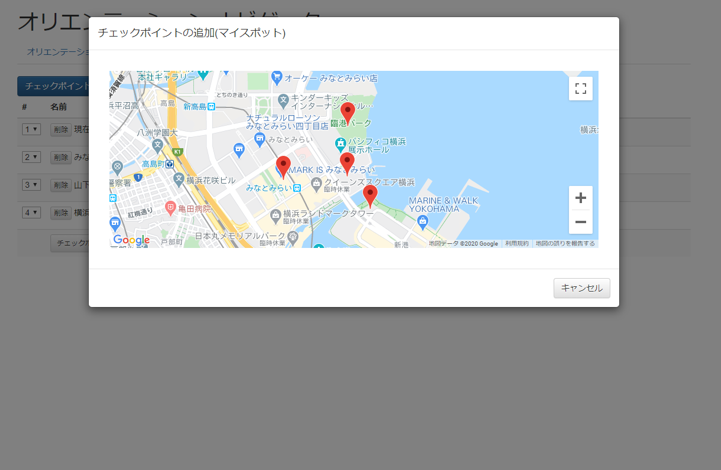
まずは、チェックポイントを追加します。タブ「チェックポイント」を選択し、チェックポイントを追加します。
GoogleMapがはめ込まれて表示されるので、出発地点を選択します。
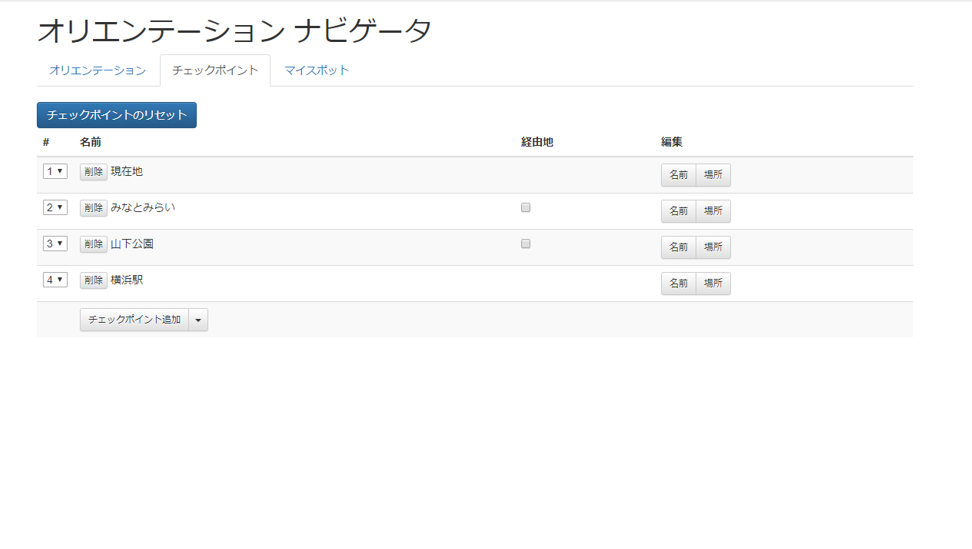
さらに、同じように次のチェックポイントを追加します。
経由地っていうチェックボックスがあります。通常は次のチェックポイントに到着するとGoogleMapのナビゲーションが終わってしまうのですが、経由地は次のチェックポイントまでの途中の経由地であって、経由地を通過しただけでは、GoogleMapのナビゲーションは終わらないようにしています。
ちなみに経由地は、ネイティブのGoogleMapの場合は9箇所、ブラウザの場合は1箇所のみ指定できます。
オリエンテーションタブを選択すると、マーキングされているのがわかります。
これで準備完了です。
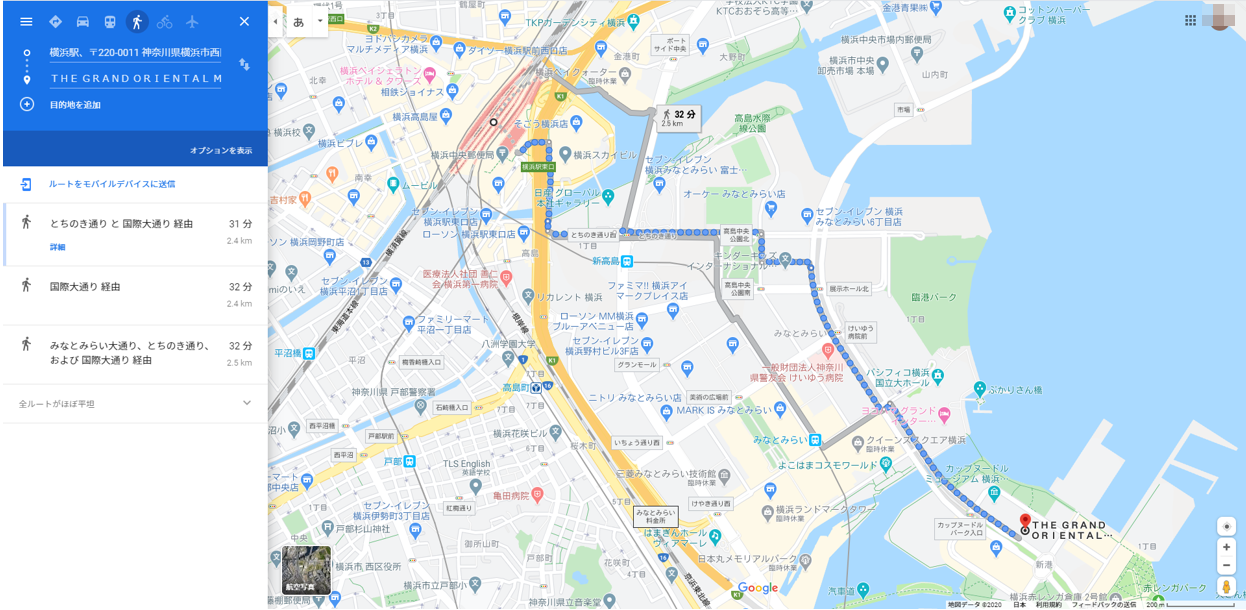
さっそく、「オリエンテーション開始」ボタンを押下してみましょう。
そうすると、こんな感じでGoogleMapが立ち上がり、ナビゲーション開始待ちとなります。
ちなみに、PCのChromeブラウザからの画面ですが、Androidから使うと、ブラウザのGoogleMapか、ネイティブのGoogleMapアプリ、どちらを起動するかの選択肢が出てきます。もちろん、ネイティブのGoogleMapアプリの方がナビゲーションとしては使い勝手が良いです。
あとは、開始してしまえば、いつものナビゲーションが始まります。
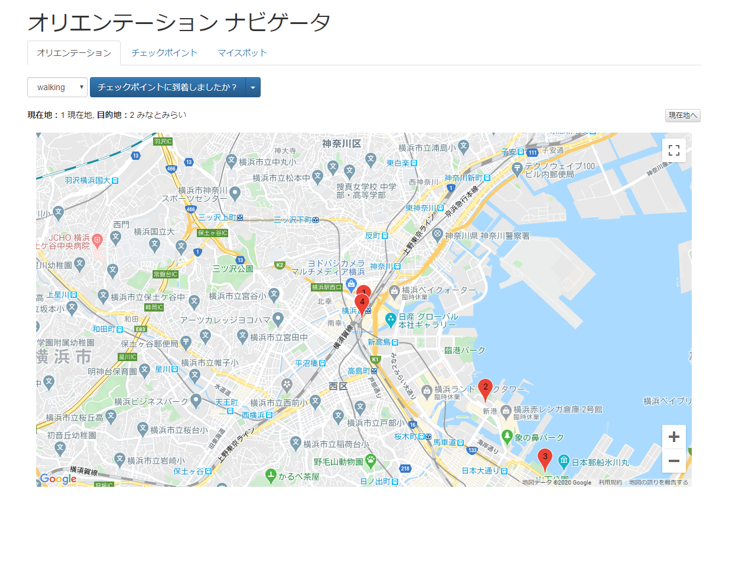
イヤホンで、GoogleMusic(Youtube Music)でも聞きながら、サイクリングしましょう。チェックポイントに到着したら、もう一度ブラウザに戻りましょう。
「チェックポイントに到着しましたか?」ボタンを押下すると、次のチェックポイントに出発のボタンに代わりますので、押下すると、またGoogleMapが立ち上がります。今度は、1つ目のチェックポイントから、2つ目のチェックポイントへのナビゲーションです。
おおよそ、イメージはつかめましたでしょうか?
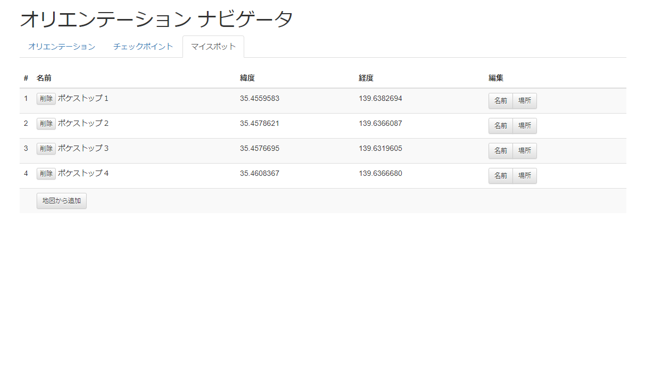
マイスポット機能
毎度毎度、場所を選択するのはめんどうです。特に家の周りはいつものコースを決めていますが、毎度ポケストップを指定するのは面倒です。
そこで、あらかじめよくいくスポットをマイスポットとして登録しておけば、それを選択するだけで、チェックポイントに追加されるようになります。マイスポットのタブを選択して、登録します。
そうすると、こんな感じで、チェックポイント登録する際に、マイスポットから選択することができます。
サーバ同期
実は、チェックポイントを追加したり、マイスポットを追加したりしたら、サーバ側にデータを保持するようにしています。ですので、ブラウザを立ち上げなおしても、以前の状態が復元されるようにしています。また、ナビゲーション中にチェックポイントに到達したりした時もサーバ側に同期するようにしています。
とはいってもクライアント・サーバいずれもかなり手抜きしています。
クライアント側は、Vueのwatchを使って、対象のデータが変更されたら、サーバに一括アップロードしているだけです。
取得も、ブラウザでの起動時だけです。GoogleMap起動のURL生成
大事なところをピックアップしました。
travelmode、origin、destination、waypointsを指定しているのがわかります。travelmode
歩きの移動か、車の移動か、電車の移動かを指定します。自転車がありますが、日本では使えないようです。origin
出発地点です。ブラウザで設定したチェックポイントに相当します。経由地ではありません。destination
これもブラウザで設定したチェックポイントですが、originのチェックポイントの次のチェックポイントです。waypoints
これが経由地です。start.js// GoogleMap起動のパラメータを生成 var params = ""; var origin = this.checkpoints[this.origin_index]; params += "&travelmode=" + this.travelmode; params += "&origin=" + encodeURIComponent(origin.lat + ',' + origin.lng); if( destination_index <= (this.checkpoints.length - 1)){ var destination = this.checkpoints[destination_index]; params += "&destination=" + encodeURIComponent(destination.lat + ',' + destination.lng); } if( (this.origin_index + 1) < destination_index ){ var waypoints = ""; for( var i = (this.origin_index + 1) ; i < destination_index ; i++ ){ if( i != (this.origin_index + 1) ) waypoints += '|'; waypoints += this.checkpoints[i].lat + ',' + this.checkpoints[i].lng; } params += "&waypoints=" + encodeURIComponent(waypoints); } var href = 'https://www.google.com/maps/dir/?api=1' + params; console.log(href); this.destination_completed = false; // GoogleMapを起動 window.open(href, '_blank');詳しくは以下を参照してください。
GoolgeMap Developers Guide Univarsal cross-platform syntax
https://developers.google.com/maps/documentation/urls/guide?hl=ja#directions-actionソース一式
Javascriptのソースです。
start.js'use strict'; //var vConsole = new VConsole(); const default_lat = 35.465878; const default_lng = 139.622329; const base_url = "http://localhost:10080"; var vue_options = { el: "#top", data: { progress_title: '', // for progress-dialog origin_index: 0, // 出発のインデックス destination_completed : true, // チェックポイントに到着したかどうか checkpoints: [], // チェックポイントのリスト map_markers: [], // Map1に配置のマーカ myspots: [], // マイスポットのリスト dialog_params: {}, // モーダルダイアログの入出力パラメタ map2_markers: [], // Map2に配置のマーカ default_latlng: new google.maps.LatLng(default_lat, default_lng), // デフォルトのロケーション(現在地に上書き) travelmode: 'walking', // GoogleMapに指定するtravelmode }, computed: { // ボタンに表示するテキスト orientation_text: function(){ if( !this.destination_completed ) return 'チェックポイントに到着しましたか?'; if( this.origin_index == 0 ) return 'オリエンテーション開始'; else if( this.origin_index >= (this.checkpoints.length - 1) ) return '最終目的地に到着しました。'; else return '次のチェックポイントに出発'; } }, watch: { checkpoints: function(){ // Mapに配置のマーカを再設定 for( var i = 0 ; i < this.map_markers.length; i++ ) this.map_markers[i].setMap(null); this.map_markers = []; for( var i = 0 ; i < this.checkpoints.length ; i++ ){ var latlng = new google.maps.LatLng(this.checkpoints[i].lat, this.checkpoints[i].lng); var mopts = { position: latlng, map: this.map, label: String(i + 1) }; var marker = new google.maps.Marker(mopts); this.map_markers.push(marker); } try{ // サーバに同期 update_data('checkpoints', this.checkpoints); }catch(error){ this.toast_show("サーバにデータをアップロードできませんでした。"); }; }, myspots: function(){ try{ // サーバに同期 update_data('myspots', this.myspots); }catch(error){ this.toast_show("サーバにデータをアップロードできませんでした。"); }; }, origin_index: function(){ try{ // サーバに同期 update_data('orientation', { origin_index: this.origin_index, destination_completed: this.destination_completed }); }catch(error){ this.toast_show("サーバにデータをアップロードできませんでした。"); }; }, destination_completed: function(){ try{ // サーバに同期 update_data('orientation', { origin_index: this.origin_index, destination_completed: this.destination_completed }); }catch(error){ this.toast_show("サーバにデータをアップロードできませんでした。"); }; }, }, methods: { // デフォルトのロケーションに移動 map_goto_current_location: function(){ var latlng = this.default_latlng; this.map.setCenter(latlng); }, // オリエンテーションタブ選択時にデフォルトのロケーションまたは出発位置に移動 orientation_update_view: function(){ var latlng = this.default_latlng; if( this.checkpoints.length > 0 ) latlng = new google.maps.LatLng(this.checkpoints[this.origin_index].lat, this.checkpoints[this.origin_index].lng); this.map.setCenter(latlng); }, // オリエンテーションを指定位置からリスタート orientation_restart: function(index){ if( index < 0 ) if( !window.confirm('本当に最初から初めてもいいですか?') ) return; this.origin_index = (index < 0) ? 0 : index; this.destination_completed = true; this.orientation_next(); }, // 次の目的地(経由地を除く)を取得 get_next_destination: function(){ var destination_index = this.origin_index + 1; for( ; destination_index < this.checkpoints.length ; destination_index++ ) if( !this.checkpoints[destination_index].waypoint ) break; if( destination_index >= this.checkpoints.length ) destination_index = this.checkpoints.length - 1; return destination_index; }, // 次へのボタンを押下 orientation_next: function(){ if( this.checkpoints.length == 0 ){ alert('チェックポイントを追加してください。'); return; }else if( this.checkpoints.length == 1 ){ alert('次のチェックポイントを追加してください。'); return; } if( this.origin_index >= (this.checkpoints.length - 1) ){ alert('すでに目的地に到達しています。'); return; } var destination_index = this.get_next_destination(); if( (destination_index - (this.origin_index + 1)) > 9){ alert('経由地の数が多すぎます。(9以下)'); return; } if( !this.destination_completed ){ // チェックポイントに到達 this.origin_index = destination_index; this.destination_completed = true; // 目的位置に到達 if( destination_index >= (this.checkpoints.length - 1) ) this.dialog_open('#orientation_complete_dialog'); return; } // GoogleMap起動のパラメータを生成 var params = ""; var origin = this.checkpoints[this.origin_index]; params += "&travelmode=" + this.travelmode; params += "&origin=" + encodeURIComponent(origin.lat + ',' + origin.lng); if( destination_index <= (this.checkpoints.length - 1)){ var destination = this.checkpoints[destination_index]; params += "&destination=" + encodeURIComponent(destination.lat + ',' + destination.lng); } if( (this.origin_index + 1) < destination_index ){ var waypoints = ""; for( var i = (this.origin_index + 1) ; i < destination_index ; i++ ){ if( i != (this.origin_index + 1) ) waypoints += '|'; waypoints += this.checkpoints[i].lat + ',' + this.checkpoints[i].lng; } params += "&waypoints=" + encodeURIComponent(waypoints); } var href = 'https://www.google.com/maps/dir/?api=1' + params; console.log(href); this.destination_completed = false; // GoogleMapを起動 window.open(href, '_blank'); }, // Map2のマーカをクリアし、指定場所に移動 map2_cleanup: function(latlng){ for( var i = 0 ; i < this.map2_markers.length; i++ ) this.map2_markers[i].setMap(null); this.map2_markers = []; if( this.map2_default_marker ){ this.map2_default_marker.setMap(null); this.map2_default_marker = null; } this.map2.setCenter(latlng); }, // モーダルダイアログの結果処理 dialog_submit: function(){ if( this.dialog_params.title == 'マイスポットの追加' ){ var location = this.map2.getCenter(); var name = this.dialog_params.name; this.myspots.push({ name, lat: location.lat(), lng: location.lng() }); }else if( this.dialog_params.title == 'チェックポイントの追加' ){ var location = this.map2.getCenter(); var name = this.dialog_params.name; this.checkpoints.push({ name, lat: location.lat(), lng: location.lng() }); }else if( this.dialog_params.title == 'マイスポットの変更'){ var location = this.map2.getCenter(); this.myspots[this.dialog_params.index].lat = location.lat(); this.myspots[this.dialog_params.index].lng = location.lng(); }else if( this.dialog_params.title == 'チェックポイントの変更' ){ var location = this.map2.getCenter(); this.checkpoints[this.dialog_params.index].lat = location.lat(); this.checkpoints[this.dialog_params.index].lng = location.lng(); } this.dialog_close('#select_location_dialog'); }, // マイスポットの追加(地図から)のためのモーダルダイアログ表示 do_myspot_append: function(){ this.map2_cleanup(this.default_latlng); this.map2_default_marker = new google.maps.Marker({ position: this.default_latlng, map: this.map2, }); this.dialog_params = { title: 'マイスポットの追加', is_input_name: true, is_input_submit: true, }; this.dialog_open('#select_location_dialog'); }, // マイスポットの削除 do_myspot_delete: function(index){ if( !window.confirm('本当に削除していいですか?') ) return; Vue.delete(this.myspots, index); }, // マイスポットの名前変更 do_myspot_change_name: function(index){ var name = window.prompt('新しい名前', this.myspots[index].name); if( !name ) return; this.myspots[index].name = name; }, // マイスポットのロケーション変更 do_myspot_change_location: function(index){ var latlng = new google.maps.LatLng(this.myspots[index].lat, this.myspots[index].lng); this.map2_cleanup(latlng); this.map2_default_marker = new google.maps.Marker({ position: latlng, map: this.map2, }); this.dialog_params = { title: 'マイスポットの変更', index: index, is_input_submit: true, }; this.dialog_open('#select_location_dialog'); }, // チェックポイントリストのリセット do_checkpoints_reset: function(){ if( !window.confirm('本当にリセットしていいですか?') ) return; this.origin_index = 0; this.destination_completed = true; this.checkpoints = []; }, // チェックポイントの追加(マイスポットから)のためのモーダルダイアログ表示 do_checkpoint_append_myspot: function(){ if( this.myspots.length == 0 ){ alert('マイスポットが登録されていません。'); return; } this.map2_cleanup(this.default_latlng); this.dialog_params = { title: 'チェックポイントの追加(マイスポット)', }; var _this = this; for( var i = 0 ; i < this.myspots.length ; i++ ){ var mopts = { position: new google.maps.LatLng(this.myspots[i].lat, this.myspots[i].lng), map: this.map2, }; var marker = new google.maps.Marker(mopts); this.map2_markers.push(marker); marker.addListener('click', function(e){ for( var i = 0 ; i < _this.map2_markers.length ; i++ ){ if( _this.map2_markers[i] == this ){ _this.checkpoints.push(_this.myspots[i]); _this.dialog_close('#select_location_dialog'); return; } } }); } this.dialog_open('#select_location_dialog'); }, // チェックポイント追加(地図から)のためのモーダルダイアログ表示 do_checkpoint_append: function(){ this.map2_cleanup(this.default_latlng); this.map2_default_marker = new google.maps.Marker({ position: this.default_latlng, map: this.map2, }); this.dialog_params = { title: 'チェックポイントの追加', is_input_name: true, is_input_submit: true, name : (this.checkpoints.length == 0) ? '現在地' : '', }; this.dialog_open('#select_location_dialog'); }, // チェックポイントの削除 do_checkpoint_delete: function(index){ if( !window.confirm('本当に削除していいですか?') ) return; Vue.delete(this.checkpoints, index); }, // チェックポイントの名前変更 do_checkpoint_change_name: function(index){ var name = window.prompt('新しい名前', this.checkpoints[index].name); if( !name ) return; this.checkpoints[index].name = name; }, // チェックポイントのロケーション変更 do_checkpoint_change_location: function(index){ var latlng = new google.maps.LatLng(this.checkpoints[index].lat, this.checkpoints[index].lng); this.map2_cleanup(latlng); this.map2_default_marker = new google.maps.Marker({ position: latlng, map: this.map2, }); this.dialog_params = { title: 'チェックポイントの変更', index: index, is_input_submit: true, }; this.dialog_open('#select_location_dialog'); }, // チェックポイントの順番変更 do_checkpoint_change_index: function(index, event){ var newIndex = event.target.selectedIndex; var temp = this.checkpoints[index]; Vue.set(this.checkpoints, index, this.checkpoints[newIndex]); Vue.set(this.checkpoints, newIndex, temp); }, }, created: function(){ }, mounted: function(){ proc_load(); // 現在地情報の取得 navigator.geolocation.getCurrentPosition((pos) =>{ this.default_latlng = new google.maps.LatLng(pos.coords.latitude, pos.coords.longitude); this.map_goto_current_location(); }, (error) =>{ this.toast_show("現在地を取得できませんでした。"); }); // Mapの生成 var myOptions = { zoom: 15, center: this.default_latlng, mapTypeId: google.maps.MapTypeId.ROADMAP, mapTypeControl: false, streetViewControl: false, }; var canvas = $('#map_canvas')[0]; this.map = new google.maps.Map(canvas, myOptions); // Map2(モーダルダイアログ用)の生成 var canvas2 = $('#map_canvas2')[0]; this.map2 = new google.maps.Map(canvas2, myOptions); google.maps.event.addListener(this.map2, 'center_changed', () =>{ if( !this.map2_default_marker ) return; var location = this.map2.getCenter(); this.map2_default_marker.setPosition(location); }); // サーバ保持データの取得 get_data('myspots') .then(data =>{ this.myspots = data; return get_data('checkpoints'); }) .then(data => { this.checkpoints = data; return get_data('orientation'); }) .then(data => { if( data.origin_index != undefined ) this.origin_index = data.origin_index; if( data.destination_completed != undefined ) this.destination_completed = data.destination_completed; }) .catch(error =>{ this.toast_show("サーバからデータを取得できませんでした。"); }); } }; vue_add_methods(vue_options, methods_bootstrap); vue_add_components(vue_options, components_bootstrap); var vue = new Vue( vue_options ); function do_post(url, body) { const headers = new Headers({ "Content-Type": "application/json; charset=utf-8" }); return fetch(new URL(url).toString(), { method: 'POST', body: JSON.stringify(body), headers: headers }) .then((response) => { if (!response.ok) throw 'status is not 200'; return response.json(); }); } async function get_data(type){ return do_post(base_url + '/get-data', { type: type }) .then(json =>{ if( json.status != 'OK' ) throw "post failed"; return json.result.data; }); } async function update_data(type, data){ var body = { type: type, data: data, } return do_post(base_url + '/update-data', body) .then(json =>{ if( json.status != 'OK' ) throw "post failed"; }); }次はHTMLです。
index.html<!DOCTYPE html> <html lang="ja"> <head> <meta http-equiv="Content-Type" content="text/html; charset=utf-8" /> <meta http-equiv="Content-Security-Policy" content="default-src * data: gap: https://ssl.gstatic.com 'unsafe-eval' 'unsafe-inline'; style-src * 'unsafe-inline'; media-src *; img-src * data: content: blob:;"> <meta name="format-detection" content="telephone=no"> <meta name="msapplication-tap-highlight" content="no"> <meta name="apple-mobile-web-app-capable" content="yes" /> <meta name="viewport" content="user-scalable=no, initial-scale=1, maximum-scale=1, minimum-scale=1, width=device-width"> <!-- jQuery (necessary for Bootstrap's JavaScript plugins) --> <script src="https://code.jquery.com/jquery-1.12.4.min.js" integrity="sha384-nvAa0+6Qg9clwYCGGPpDQLVpLNn0fRaROjHqs13t4Ggj3Ez50XnGQqc/r8MhnRDZ" crossorigin="anonymous"></script> <!-- Latest compiled and minified CSS --> <link rel="stylesheet" href="https://stackpath.bootstrapcdn.com/bootstrap/3.4.1/css/bootstrap.min.css" integrity="sha384-HSMxcRTRxnN+Bdg0JdbxYKrThecOKuH5zCYotlSAcp1+c8xmyTe9GYg1l9a69psu" crossorigin="anonymous"> <!-- Optional theme --> <link rel="stylesheet" href="https://stackpath.bootstrapcdn.com/bootstrap/3.4.1/css/bootstrap-theme.min.css" integrity="sha384-6pzBo3FDv/PJ8r2KRkGHifhEocL+1X2rVCTTkUfGk7/0pbek5mMa1upzvWbrUbOZ" crossorigin="anonymous"> <!-- Latest compiled and minified JavaScript --> <script src="https://stackpath.bootstrapcdn.com/bootstrap/3.4.1/js/bootstrap.min.js" integrity="sha384-aJ21OjlMXNL5UyIl/XNwTMqvzeRMZH2w8c5cRVpzpU8Y5bApTppSuUkhZXN0VxHd" crossorigin="anonymous"></script> <title>オリエンテーション ナビゲータ</title> <link rel="stylesheet" href="css/start.css"> <script src="js/methods_bootstrap.js"></script> <script src="js/components_bootstrap.js"></script> <script src="js/vue_utils.js"></script> <script src="dist/js/vconsole.min.js"></script> <script src="https://cdn.jsdelivr.net/npm/vue/dist/vue.js"></script> <script src="https://cdn.jsdelivr.net/npm/js-cookie@2/src/js.cookie.min.js"></script> <link rel="stylesheet" href="https://cdnjs.cloudflare.com/ajax/libs/toastr.js/latest/toastr.min.css"> <script src="https://cdnjs.cloudflare.com/ajax/libs/toastr.js/latest/toastr.min.js"></script> <script type="text/javascript" src="//maps.google.com/maps/api/js?key=【GoogleAPIキー】"></script> </head> <body> <div id="top" class="container"> <h1>オリエンテーション ナビゲータ</h1> <ul class="nav nav-tabs"> <li role="presentation" class="active"><a href="#oriatation" v-on:click="orientation_update_view" data-toggle="tab">オリエンテーション</a></li> <li role="presentation"><a href="#checkpoint" data-toggle="tab">チェックポイント</a></li> <li role="presentation"><a href="#myspot" data-toggle="tab">マイスポット</a></li> </ul> <div class="tab-content"> <div id="oriatation" class="tab-pane fade in active"> <br> <span class="form-inline"> <select class="form-control" v-model="travelmode"> <option value="walking">walking</option> <option value="bicycling">bicycling</option> <option value="driving">driving</option> <option value="transit">transit</option> </select> </span> <div class="btn-group"> <button class="btn btn-primary" v-on:click="orientation_next">{{orientation_text}}</button> <button type="button" class="btn btn-primary dropdown-toggle" data-toggle="dropdown"><span class="caret"></span></button> <ul class="dropdown-menu"> <li><a v-on:click="orientation_restart(-1)">最初から再開</a></li> <li><a v-on:click="orientation_restart(origin_index)">今のチェックポイントを再開</a></li> </ul> </div> <span v-if="checkpoints.length >= 2"> <br><br> <label>現在地:</label>{{origin_index + 1}} {{checkpoints[origin_index].name}}, <label>目的地:</label>{{get_next_destination() + 1}} {{checkpoints[get_next_destination()].name}} </span> <button class="btn btn-default btn-xs pull-right" v-on:click="map_goto_current_location">現在地へ</button> <br> <div class="row" id="map_canvas" style="margin: 15px; height:600px"></div> </div> <div id="checkpoint" class="tab-pane fade in"> <br> <button class="btn btn-primary" v-on:click="do_checkpoints_reset">チェックポイントのリセット</button> <table class="table table-striped"> <thead> <tr><th>#</th><th>名前</th><th>経由地</th><th>編集</th></tr> </thead> <tbody> <tr v-for="(point, index) in checkpoints"> <td width="1px"> <div class="form-inline"> <select v-bind:value="index" v-on:change="do_checkpoint_change_index(index, $event)"> <option v-for="(point2, index2) in checkpoints" v-bind:value="index2" v-bind:selected="index==index2">{{index2 + 1}}</option> </select> </div> </td> <td> <button class="btn btn-default btn-xs" v-on:click="do_checkpoint_delete(index)">削除</button> {{point.name}} </td> <td> <input v-if="index!=0 && index!=(checkpoints.length-1)" type="checkbox" v-model="point.waypoint"> </td> <td> <div class="btn-group"> <button class="btn btn-default btn-sm" v-on:click="do_checkpoint_change_name(index)">名前</button> <button class="btn btn-default btn-sm" v-on:click="do_checkpoint_change_location(index)">場所</button> </div> </td> </tr> <tr> <td></td> <td> <div class="btn-group"> <button class="btn btn-default btn-sm" v-on:click="do_checkpoint_append">チェックポイント追加</button> <button type="button" class="btn btn-default btn-sm dropdown-toggle" data-toggle="dropdown"><span class="caret"></span></button> <ul class="dropdown-menu"> <li><a v-on:click="do_checkpoint_append_myspot">マイスポットから追加</a></li> </ul> </div> </td><td></td><td></td> </tr> </tbody> </table> </div> <div id="myspot" class="tab-pane fade in"> <br> <table class="table table-striped"> <thead> <tr><th>#</th><th>名前</th><th>緯度</th><th>経度</th><th>編集</th></tr> </thead> <tbody> <tr v-for="(spot, index) in myspots"> <td width="1px">{{index + 1}}</td> <td><button class="btn btn-default btn-xs" v-on:click="do_myspot_delete(index)">削除</button> {{spot.name}}</td> <td>{{spot.lat.toFixed(7)}}</td><td>{{spot.lng.toFixed(7)}}</td> <td> <div class="btn-group"> <button class="btn btn-default btn-sm" v-on:click="do_myspot_change_name(index)">名前</button> <button class="btn btn-default btn-sm" v-on:click="do_myspot_change_location(index)">場所</button> </div> </td> </tr> <tr> <td></td> <td> <button class="btn btn-default btn-sm" v-on:click="do_myspot_append">地図から追加</button> </td> <td></td><td></td><td></td> </tr> </tbody> </table> </div> <br> <br> </div> <modal-dialog size="lg" id="orientation_complete_dialog"> <div slot="content"> <div class="modal-header"> <h4 class="modal-title">オリエンテーション達成</h4> </div> <div class="modal-body"> <center> オリエンテーション達成です。おめでとうございます。<br> <img src="img/goal_figure.png"> </center> </div> <div class="modal-footer"> <button class="btn btn-default" v-on:click="dialog_close('#orientation_complete_dialog')">閉じる</button> </div> </div> </modal-dialog> <modal-dialog size="lg" id="select_location_dialog"> <div slot="content"> <div class="modal-header"> <h4 class="modal-title">{{dialog_params.title}}</h4> </div> <div class="modal-body"> <div class="form-inline"> <button class="btn btn-default" v-on:click="dialog_submit" v-if="dialog_params.is_input_submit">この場所にする</button> <span v-if="dialog_params.is_input_name"> <label>名前</label> <input type="text" class="form-control" v-model="dialog_params.name"> </span> </div> <div class="row" id="map_canvas2" style="margin: 20px; height:300px"></div> </div> <div class="modal-footer"> <button class="btn btn-default" v-on:click="dialog_close('#select_location_dialog')">キャンセル</button> </div> </div> </modal-dialog> <!-- for progress-dialog --> <progress-dialog v-bind:title="progress_title"></progress-dialog> </div> <script src="js/start.js"></script> </body>もう長すぎてわけわかんないですよね。。。
その他ユーティリティのファイル等含めて、GitHubに上げています。セットアップ:GoogleMap API利用の準備
GoogleMapを利用するには、GoogleからAPIキーを払い出してもらう必要があります。
以下のサイトの通りに実施すれば、特に問題はなかったです。Get Started with Google Maps Platform
https://developers.google.com/maps/gmp-get-started?hl=ja最後に、API Keyを生成するのですが、Web APIsのMaps Embed APIを採用しました。
セットアップ:サーバの展開
以下のGitHubから一式ダウンロードしておきます。
poruruba/orientation_navigator
https://github.com/poruruba/orientation_navigatorそして、以下の通りに実行します。
unzip orientation_navigator.zip
cd orientation_navigator
npm install
mkdir data
node app.js以下、修正が必要です。
public/start.js
7行目のあたり
const base_url = "http://localhost:10080";上記を立ち上げたサーバのURLを指定します。
public/index.html
34行目あたり
<script type="text/javascript" src="//maps.google.com/maps/api/js?key=【GoogleAPIキー】"></script>また、HTML5の現在地情報取得機能を使っているのですが、それを利用するには、HTTPSである必要があります。
mkdir certs
このディレクトリに、SSL証明書類を配置しましょう。
以下が参考になります。
SSL証明書を取得しよう以上

- 投稿日:2020-05-24T23:01:32+09:00
Lambda@EdgeのテストをJestで書く
概要
Lambda@Edge の単体テストを Jest で書いたときのメモ。今回書いたのは Lambda@Edge だけど、Lambda でも基本的には同じはず。Jest はシンプルで良いですね。
導入方法
導入したいディレクトリを作成して、そこで以下のコマンドを入力していく。Jest の導入はすごく簡単。
npm init
- npm を初期化する
- インタラクティブに設定項目を聞かれるので、お好みで設定
test commandだけjestと入力するnpm install -D jest
- jest をインストールする
テスト対象ファイル
今回テストするファイルはこちら。Lambda@Edge のリクエストオリジンで動作させるような処理。
main.js"use strict"; exports.handler = (event, context, callback) => { const request = event.Records[0].cf.request; // /hoge にアクセスしたら /index.html へ向き先を変える if (request.uri.indexOf("/hoge") === 0) { request.uri = "/index.html"; callback(null, request); return; } callback(null, request); };テストファイル作成
テストファイルは
XXX.spec.jsまたはXXX.test.jsで作成する。この Lambda では callback が最終的にどのように実行されたかをチェックしたいので、 jest.fn() でモック化して呼び出す。main.spec.jsconst { handler } = require("./main"); // Mockオブジェクトを作成 const getMockEvent = (request) => { return { Records: [ { cf: { request }, }, ], }; }; describe("handlerのテスト", () => { it("/hoge は /index.html に変更される", () => { const event = getMockEvent({ uri: "/hoge" }); const callback = jest.fn(); handler(event, null, callback); expect(callback).toHaveBeenCalledWith(null, { uri: "/index.html" }); expect(callback).toHaveBeenCalledTimes(1); }); it("/foo は何もされない", () => { const event = getMockEvent({ uri: "/foo" }); const callback = jest.fn(); handler(event, null, callback); expect(callback).toHaveBeenCalledWith(null, { uri: "/foo" }); expect(callback).toHaveBeenCalledTimes(1); }); });実行結果
$ npm test

> jest

 PASS  ./main.spec.js
  handlerのテスト
    ✓ /hoge は /index.html に変更される (3 ms)
    ✓ /foo は何もされない (1 ms)

Test Suites: 1 passed, 1 total
Tests:       2 passed, 2 total
Snapshots:   0 total
Time:        1.459 s
Ran all test suites.
aws-lambda-mock-context
ちなみに Lambda の context をモック化したい場合は、下記のライブラリを使うのがシンプルで良い。今回の例では context が必要なかったので null にしているが、これを使えば
const ctx = context()だけでモックが作成できる。
- 投稿日:2020-05-24T21:35:40+09:00
Amazonの検索結果からasinをスクレイピング
node.jsのsync-requestとjsdomを使って、アマゾンから商品のasinを取得してみる。
まず、5月24日発売のkindleの本を例にとって取得する。browsenodeを変えると違う内容も同じように取得できるだろう。ページ数は4あり、それぞれを自動で切り替えて最終ページになるとbreakして止まるようにしている。sync-requestを利用しているので同期処理で書いています。
sync-requestとjsdomはそれぞれ、インストールする。npm install sync-request npm install jsdom5月24日発売のkindleの本のURL
https://www.amazon.co.jp/s?i=digital-text&bbn=2275256051&rh=n%3A2250738051%2Cn%3A2275256051%2Cp_n_date%3A20200524&dc&qid=1588732789&ref=sr_ex_n_1日付やページの部分を書き換えて自動で取得している。
ページからjsdomでasinを配列として出力している。1ページあたり16冊まで表示する。var request = require('sync-request'); const jsdom = require("jsdom"); const { JSDOM } = jsdom; fs = require('fs'); day=20200524 flag=1 asinarray=[] loop1:for (let i =1; i <=100; i ++) { var url = 'https://www.amazon.co.jp/s?i=digital-text&rh=n%3A2250738051%2Cn%3A2250739051%2Cn%3A2275256051%2Cp_n_date%3A'+day+'&s=date-desc-rank&page='+i+'&qid=1588652675&ref=sr_pg_2' //console.log(url) if(flag==0){break;} html = httpGet(url); asin=asinGet(html) asinarray=asinarray.concat(asin) } console.log(asinarray) function httpGet(url){ var res = request( 'GET', url ); response= res.getBody('utf-8') //console.log(response); return response; } function asinGet(html){ const dom = new JSDOM(html); table=dom.window.document.querySelectorAll("h2.a-size-mini > a") asin=[]//配列宣言 for (let i = 0; i < table.length; i++) { asin[i]=table[i].href asin[i]=asin[i].replace( /^.+dp\/(\w+)\/.+$/g , '$1' ) } if(dom.window.document.querySelectorAll("ul.a-pagination > li").length !== 0){ li=dom.window.document.querySelectorAll("ul.a-pagination > li") flag=li[li.length-1].getElementsByTagName('a').length } else{flag=0} console.log(asin) console.log(flag) return asin }
- 投稿日:2020-05-24T20:35:08+09:00
Node.jsでターミナルで動くテキスト編集可能なアプリケーションを作る
こんなの作ってます
何ができるのか?
- BoostNote(v1)のデータの読み書き
どうやって作ったか?
使うもの
- TypeScript
- blessed
- Node.jsからターミナルの表示を色々いじれるライブラリ
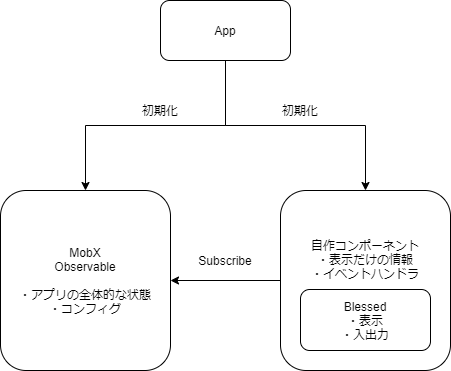
- MobX
- アプリケーションのベース部分
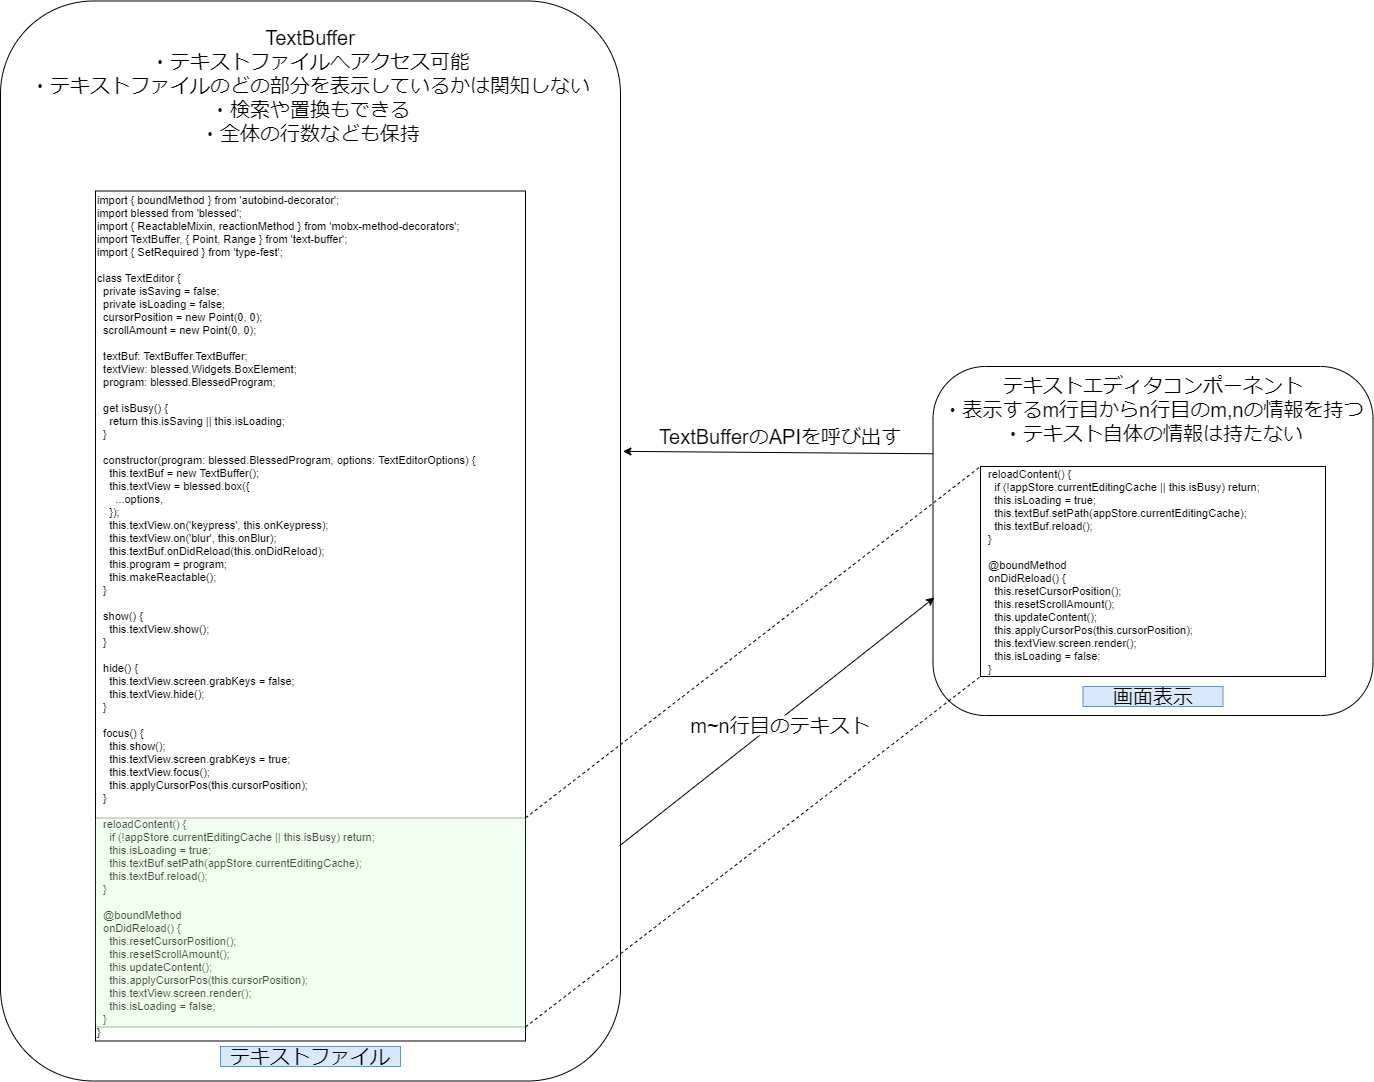
- TextBuffer
- テキストファイルへのアクセス補助
構成図
blessedの使い方
blessedは今風の宣言的UIライブラリではないので、結構泥臭い感じになります。(一応Reactでラップしたライブラリもありますが、今回は素のblessedを使いました。)
このアプリの場合は、画面内の各要素ごとに自前のコンポーネントを作成し、その中でblessedのパーツを描画する感じにしました。
import ...

type NoteListOptions = SetRequired<blessed.Widgets.ListOptions<any>, 'parent'>;

const kDefaultNoteListOption: Readonly<Partial<NoteListOptions>> = Object.freeze({
  keys: true,
  mouse: false,
  scrollbar: {
    ch: ' ',
    track: {
      bg: 'cyan',
    },
    style: {
      inverse: true,
    },
  },
  style: {
    item: {
      hover: {
        bg: 'blue',
      },
    },
    selected: {
      bg: 'blue',
      bold: true,
    },
  },
});

interface NoteList extends LoggableMixin, ReactableMixin {}

class NoteList {
  private noteList: blessed.Widgets.ListElement;

  constructor(options: NoteListOptions) {
    // blessedのパーツはコンポーネントで保持する
    this.noteList = blessed.list({
      ...kDefaultNoteListOption,
      ...options,
    });
    // コンポーネントのインスタンスメソッドを、パーツにイベントリスナーとして設定する
    this.noteList.key(['up'], this.onUpKeyPressed);
    this.noteList.key(['down'], this.onDownKeyPressed);
    this.noteList.key(['f'], this.onFolderKeyPressed);
    this.noteList.key(['c'], this.onCKeyPressed);
    this.noteList.on('select', this.onSelect);
    this.makeReactable();
  }

  focus() {
    this.noteList.focus();
  }

  @boundMethod
  onUpKeyPressed() {
    if (0 < appStore.currentShowDocumentIndex) {
      appStore.setCurrentShowDocumentIndex(appStore.currentShowDocumentIndex - 1);
    }
  }

  @boundMethod
  onDownKeyPressed() {
    if (appStore.currentShowDocumentIndex < appStore.currentFolderDocuments.length - 1) {
      appStore.setCurrentShowDocumentIndex(appStore.currentShowDocumentIndex + 1);
    }
  }

  ...
}

...
MobXの使い方
MobXは基本的にはReactと組み合わせて使うのが王道ですが、単体でも使えるということを自分なりにやってみたかったので使いました。
実装としてはシンプルに、MobXのobservableをクラスとして作り、そこにいろんな情報を入れて、先程の自前コンポーネントからsubscribeする、という感じです。
MobXのobservableの定義
https://github.com/mk2/yabai/blob/master/packages/yabai/src/models/AppStore.ts
class AppStore {

  ...

  /**
   * Folders
   */

  @observable
  private _folders: Folder[] = [];

  @computed
  get folders() {
    return this._folders;
  }

  @actionAsync
  async loadFolders() {
    this._folders = JSON.parse(await task(fs.readFile(config.folderFilePath, { encoding: 'utf8' }))).folders;
  }

  ...

}
observableを使うコンポーネント
https://github.com/mk2/yabai/blob/master/packages/yabai/src/components/FolderList.ts
class FolderList {
  private folderList: blessed.Widgets.ListElement;

  constructor(options: FolderListOptions) {
    this.folderList = blessed.list({
        ...
      },
      parent: options.parent,
    });
    this.folderList.on('select', this.onSelect);
    this.makeReactable();
  }

  ...

  // reactionMethodは、自分で作ったデコレータ
  // this.makeReactableを呼び出すと、MobXのreactionとして動くようになります
  @reactionMethod(() => appStore.isInitialized)
  reloadItems() {
    this.folderList.setItems(appStore.folders.map((folder) => folder.name));
    this.folderList.select(appStore.currentFolderIndex);
    this.folderList.screen.render();
  }
}
正直Reactみたいなわかりやすいデータフローでもなく、subscribeがいろんなところに散らばって見づらい感じはあるんですが、一応実装は出来ます。
TextBufferの使い方
TextBufferとはAtomで使われている、テキストファイルへのアクセスを簡単にするためのライブラリです。
https://github.com/atom/text-buffer
yabaiでは、下記のような使い方をしています。
テキストファイルへのアクセスは全てTextBufferに任せ、テキストエディタコンポーネントはあくまで表示の処理に集中する、という使い方です。ちなみにこの実装のやり方は、blessedベースのテキストエディタである、slapを参考にして作りました。
テキストファイルの読み込み、書き込みなどの操作を全てTextBufferに任せられるので非常に楽です。
Tips
blessedが更新されていない
blessedは既に更新が止まっているようで(でも動く)、いろんな人がforkしてオレオレblessedを作っているようです。このアプリケーションでは、その中でももっとも更新の頻度が高そうなneo-blessedを選びました。
https://github.com/embarklabs/neo-blessed
※さらに一部修正したい部分があったので、モノレポのパッケージの一つとしてリポジトリに入れてしまってます。
CoffeeScriptがWebpackでバンドルできない
BoostNoteのデータファイルは、csonベースなのでcsonを依存に含める必要があります。これが非常に悩みポイントでした。csonを依存に入れるということはcoffeescriptを依存に入れる、ということなのですが、coffeescriptはrequireが独自のものを使ってたりと色々癖があり非常に大変でした。
https://github.com/mk2/cson-parser
https://github.com/mk2/coffeescriptここにWebpackでバンドル可能なcson-parser/coffesscriptを置いておきます。ちょっと手が滑ってコミット履歴など全て消し飛んでしまったのですが、修正点としては設定部分だけです。
- 投稿日:2020-05-24T20:26:38+09:00
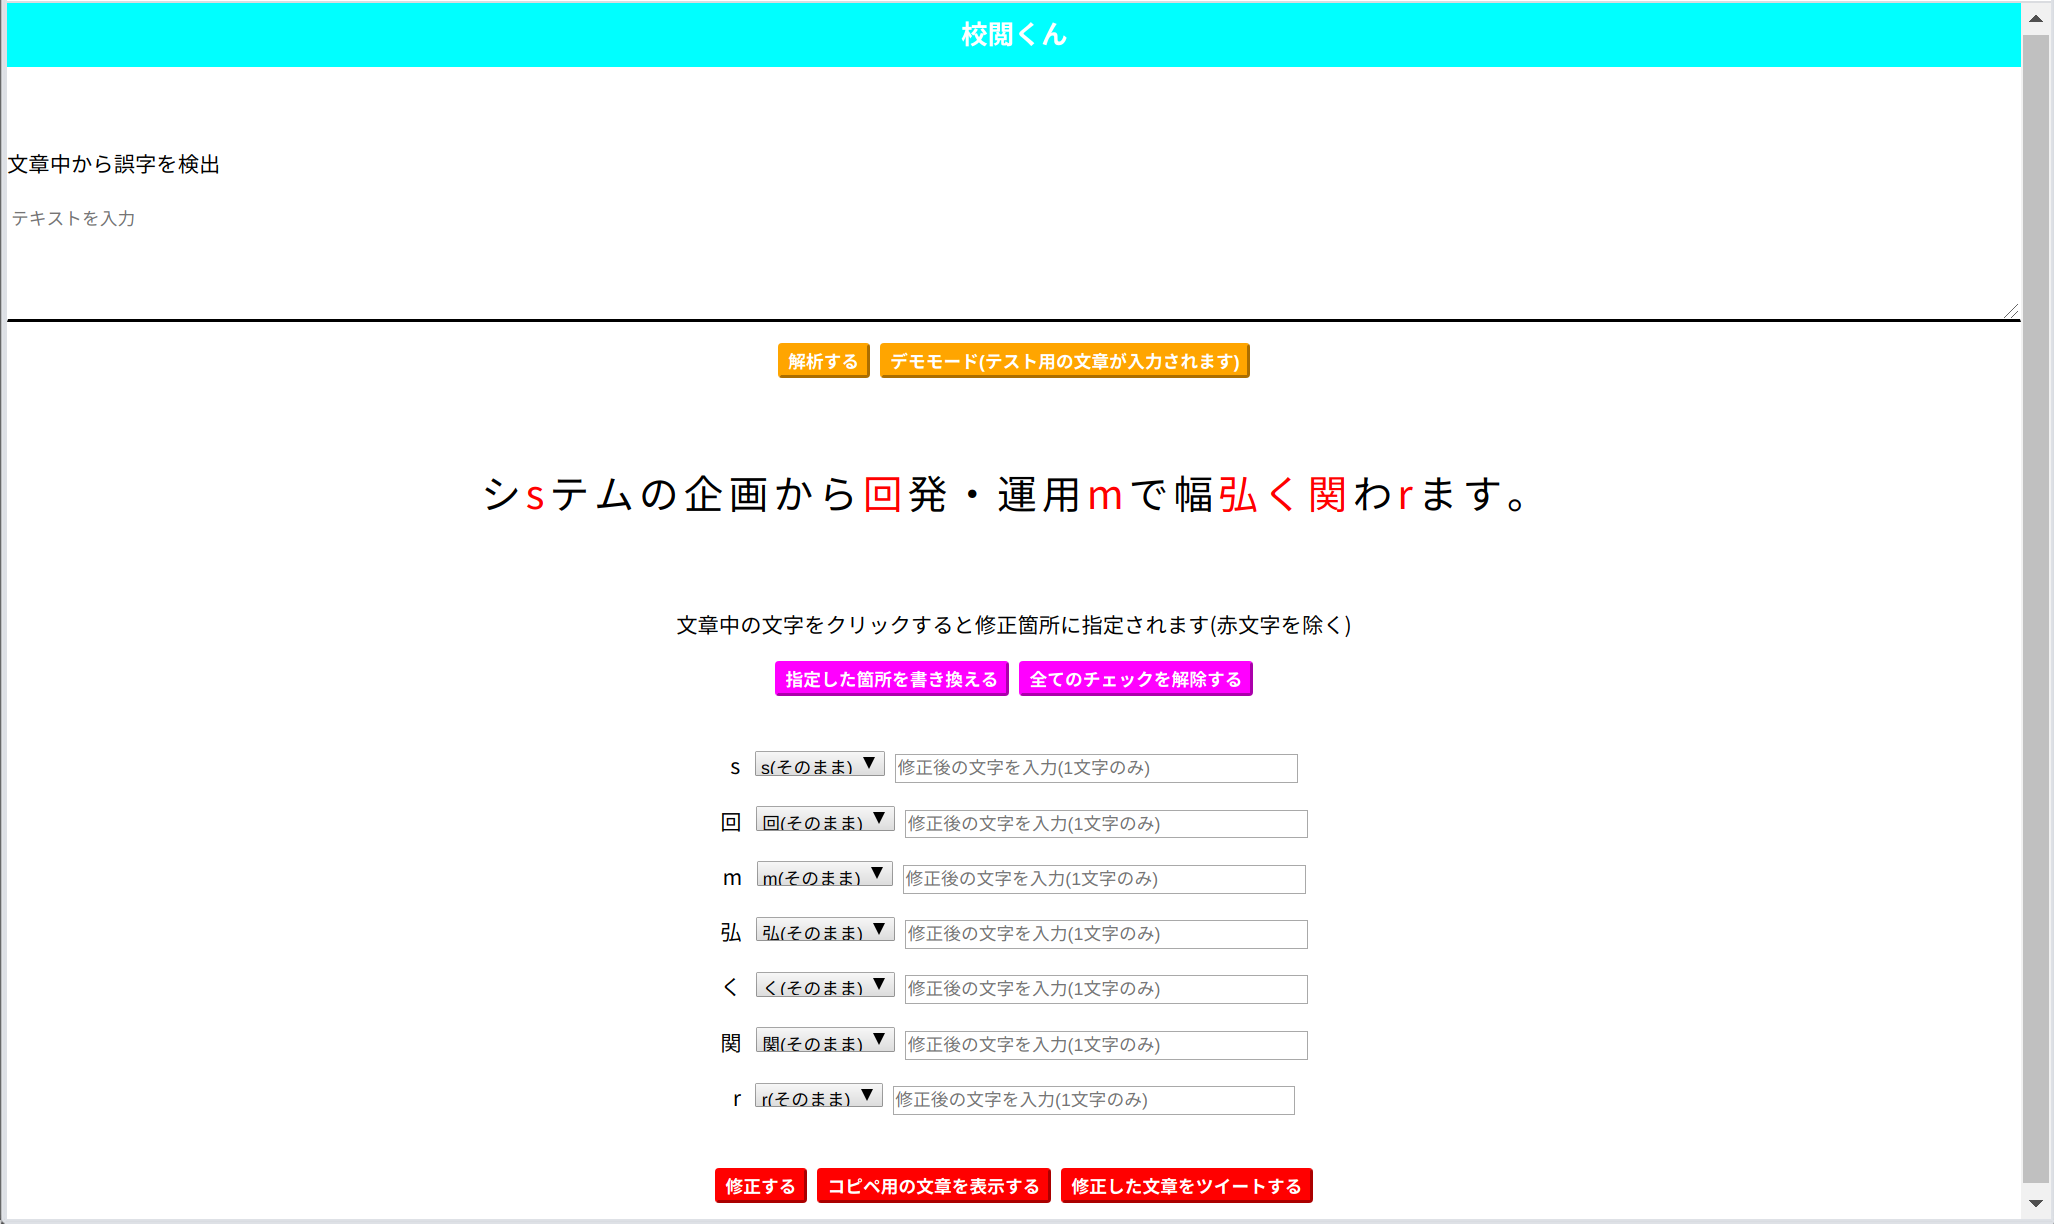
文章中の誤字を発見するwebアプリを作った
文章中の誤字を見つけ出して修正するためのwebアプリを作った。
できたもの
https://intriguing-soda.glitch.me/
使ったもの
- Node.js + express + ejs
- A3RT Proofreading API
- glitch
気になるところ
- 正しい箇所が修正候補として指摘されてしまう場合がある(特に間違っている箇所の隣の文字)
- ejsの使用について
server.js//これがあれば app.set("view engine", "ejs"); //こっちはいらない? var ejs = require("ejs");
- 投稿日:2020-05-24T18:42:22+09:00
console.logからの脱却 - node.jsでデバッグするには(Chrome DevTools編)
あらすじ
若き開発者ヒロロはJavascriptのデバッグで
console.logをコード内に埋め込んで、一つのバグの調査で何十回もコードを実行するという不毛な行為をしていた。しかしChromeの開発者用ツールの存在を知りBreakpointを使いこなせるようになった彼はコードを追いながら値を確認できるようになり効率的に開発するようになった。
ある日、彼はNode.jsでの開発に携わることに。持ち前のJavascriptのスキルを生かしてサーバーサイドでも活躍するはずだったが、Node.jsでデバッグする方法を知らず苦戦を強いられることに。
フロントエンドと同じ方法でデバッグすることができず、このままではヒロロはまたあの日のconsole.logによるデバッグ地獄をNode.jsでも味わうことになる。果たして
console.logを使わずに効率的にデバッグすることはできるのか⁇Node.jsではGoogle Developer Toolが使えない?
...とまぁ少し昔の話をはじめにさせてもらいました。
通常、Node.jsでプログラムを動かす場合、ターミナル上で
node index.jsと入力してプログラムを実行します。フロントエンドの開発ではChromeの開発者用ツールからSourceを開き、ブレークポイントを打つことができましたが、Node.jsはサーバーサイド言語のため、同様の手順でデバッグすることはできません。
知らない人はconsole.logをコードに埋め込んでちまちまデバッグするハメになります。Node.jsでデバッグする方法
あれから長い月日(3回くらいの現場での開発経験)を経てようやく脱却しました。
最初のほうはコード量が少なくできなくてもそんなに困らなかったのでスルーしてましたが、
コードの量が増えてくるとさすがに苦しくなり、開発効率が下がってきたので本腰入れて対応することにしました。調べてみると、Node.jsでもブレークポイントをうちながらデバッグすることは可能です。ただ手順が異なります。
とりあえずChrome DevToolを使ってデバッグする方法を試してみました。公式ドキュメントにも記載されています(みんなちゃんと読もうね)。1. inspectスイッチを使う
まずターミナルでnodeプログラムを実行する際に
inspectスイッチを入力します。node --inspect index.jsデフォルトは
9229ポートが開かれますが、node --inspect=【port】 index.jsとすれば他のポートを使うことも可能です。
2. ブラウザを開く
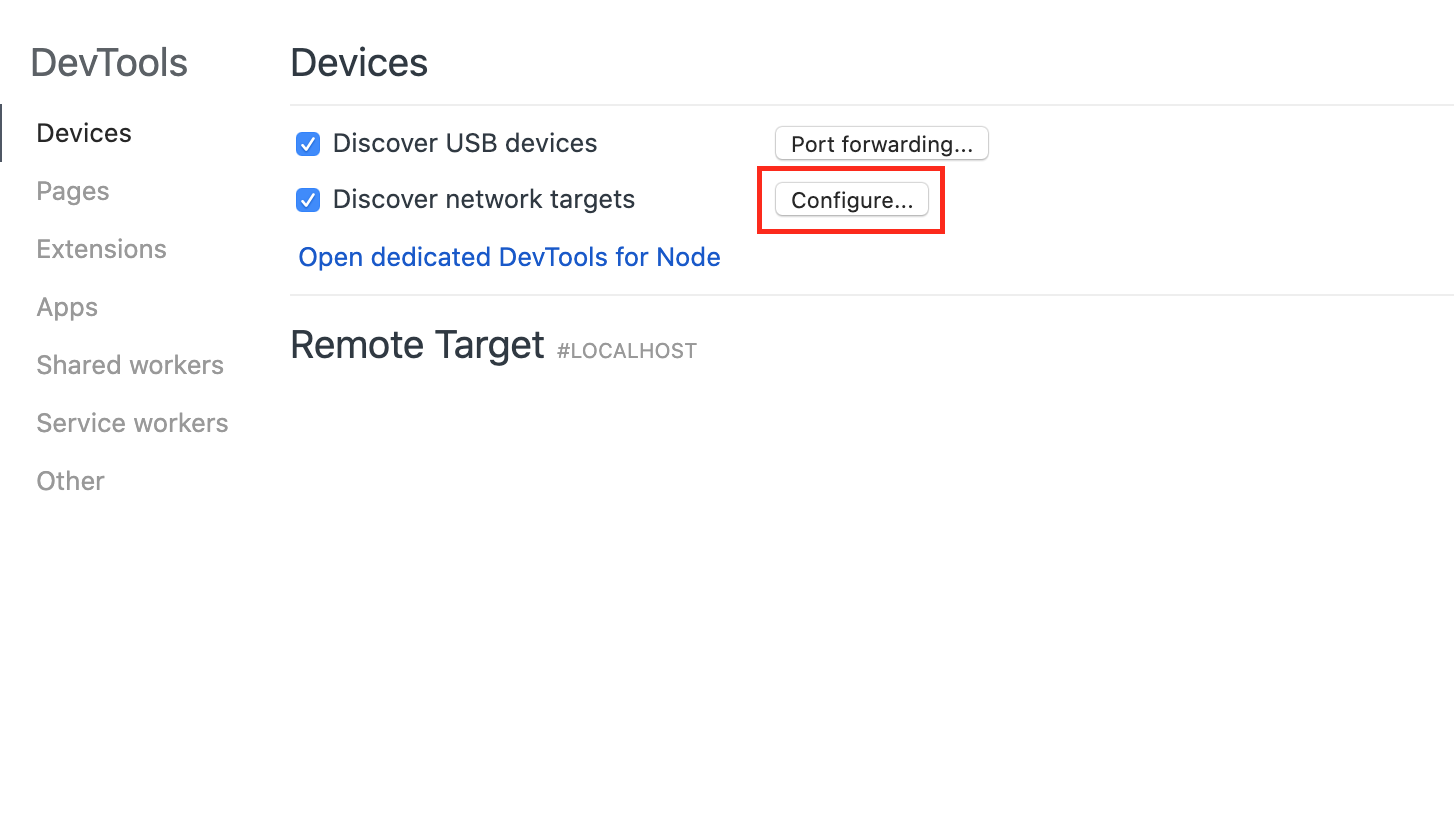
次にChromeを開いて
Chrome://inspectと入力します。
すると以下のような画面が出てくるので、configure...ボタンを押します。
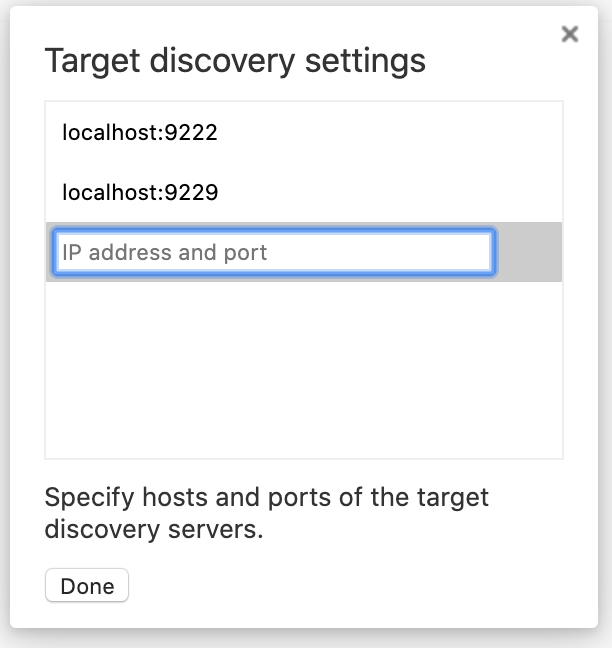
ここに
localhost:【port】を入力し、Doneを押します。
その後前画面内に記載の
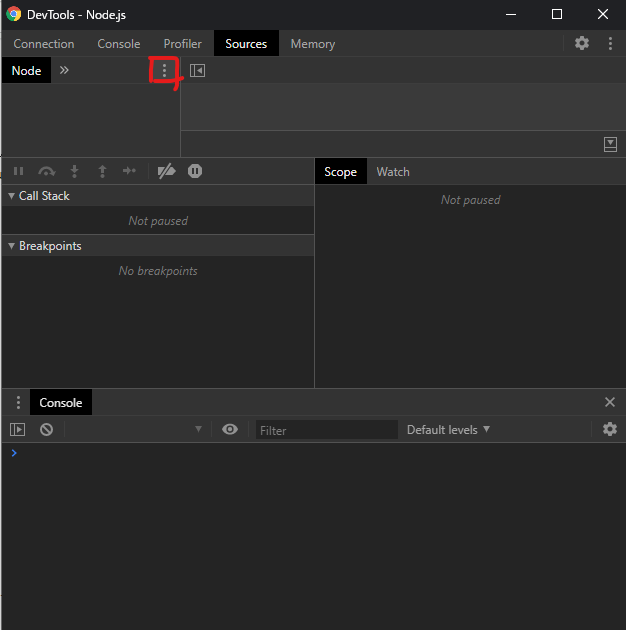
Open dedicated DevTools for NodeをクリックするとNode.jsの開発者ツール画面が現れます。
あとはSourceを開き、ファイルが存在していなかったら赤枠部分からOpen fileをクリックしてデバッグ対象のファイルを開きます。
これでファイルが開かれ、Breakpointを打つとそこで処理が止まるようになります。
小休止
ひとまずこれでコードを追いながらデバッグできるようになり、
Console.log地獄から逃れることができました。
しかし毎度DevToolsにアクセスするのが手間に感じてしまうようになりました。
・愛用のvsCodeを使ってデバッグできないか?
・electronやLambda関数のデバッグをもう少し効率よくできないか?
まだまだ改善点はありそうです。続く
- 投稿日:2020-05-24T18:11:23+09:00
Teams に ProActive メッセージ(Push 通知)を送る
はじめに
今回、Teams へ Azure Bot Service を使用して ProActive メッセージを送る手順をまとめてみました。
一応、公式の GitHub の sample にもあります。
ちょっと違うのが、Http Request を postにしていることです。今回は(も)Node.js を使用していきます。
また、コードは Github にあげるほどはないので、記事内にペタペタしときます。また、Azure Bot Service の sample の試し方やDeploy方法は過去の以下の記事を参考にしていただけると嬉しいです!
- local test 方法まで
- Azure へのDeployなどProActive メッセージを post で送信する際に必要な情報
基本的には body にconversation reference という情報が必要になります。
conversation reference には多くの情報があるのですが、以下の4つを最低限含めてあげたら大丈夫です。なので、ここから内容では基本的に以下の4つのみに注目して書きます。body.json{ "ref":{ "conversation": { "id": "" }, "bot": { "id": "", "name": "" }, "serviceUrl": "" } }基本的に、この形式を入れてあげたら、他にどんな情報でも自由に足してあげたら大丈夫です!
この辺の情報は chat ごとに作られます。ので、Teamsのこれらの情報がは特に大事にしてください。もとにした
今回は硬式sample の EchoBot の一部を編集します。
こちらから手元に落としてください編集したのは
- index.js
- bot.js
の2つです。まずは、サーバを起動する index.js の方を編集します。
下の折り畳みにコードが書いてるので、コピペでおkです。
index.js の全体
index.js// Copyright (c) Microsoft Corporation. All rights reserved. // Licensed under the MIT License. const dotenv = require('dotenv'); const path = require('path'); const restify = require('restify'); // Import required bot services. // See https://aka.ms/bot-services to learn more about the different parts of a bot. const { BotFrameworkAdapter } = require('botbuilder'); // This bot's main dialog. const { EchoBot } = require('./bot'); // Import required bot configuration. const ENV_FILE = path.join(__dirname, '.env'); dotenv.config({ path: ENV_FILE }); // Create HTTP server const server = restify.createServer(); server.listen(process.env.port || process.env.PORT || 3978, () => { // Important server.use(restify.plugins.bodyParser({ mapParams: true })); console.log(`\n${ server.name } listening to ${ server.url }`); console.log('\nGet Bot Framework Emulator: https://aka.ms/botframework-emulator'); console.log('\nTo talk to your bot, open the emulator select "Open Bot"'); }); // Create adapter. // See https://aka.ms/about-bot-adapter to learn more about how bots work. const adapter = new BotFrameworkAdapter({ appId: process.env.MicrosoftAppId, appPassword: process.env.MicrosoftAppPassword }); // Catch-all for errors. const onTurnErrorHandler = async (context, error) => { // This check writes out errors to console log .vs. app insights. // NOTE: In production environment, you should consider logging this to Azure // application insights. console.error(`\n [onTurnError] unhandled error: ${ error }`); // Send a trace activity, which will be displayed in Bot Framework Emulator await context.sendTraceActivity( 'OnTurnError Trace', `${ error }`, 'https://www.botframework.com/schemas/error', 'TurnError' ); // Send a message to the user await context.sendActivity('The bot encountered an error or bug.'); await context.sendActivity('To continue to run this bot, please fix the bot source code.'); }; // Set the onTurnError for the singleton BotFrameworkAdapter. adapter.onTurnError = onTurnErrorHandler; // Create the main dialog. const myBot = new EchoBot(); // Listen for incoming requests. server.post('/api/messages', (req, res) => { adapter.processActivity(req, res, async (context) => { // Route to main dialog. await myBot.run(context); }); }); // Listen for Upgrade requests for Streaming. server.on('upgrade', (req, socket, head) => { // Create an adapter scoped to this WebSocket connection to allow storing session data. const streamingAdapter = new BotFrameworkAdapter({ appId: process.env.MicrosoftAppId, appPassword: process.env.MicrosoftAppPassword }); // Set onTurnError for the BotFrameworkAdapter created for each connection. streamingAdapter.onTurnError = onTurnErrorHandler; streamingAdapter.useWebSocket(req, socket, head, async (context) => { // After connecting via WebSocket, run this logic for every request sent over // the WebSocket connection. await myBot.run(context); }); }); // add to echo sample // Listen for incoming notifications and send proactive messages to users. server.post('/api/notify',async (req, res) => { await MicrosoftAppCredentials.trustServiceUrl(req.body.ref.serviceUrl); await adapter.continueConversation(req.body.ref, async turnContext => { // console.dir(req.body.ref.serviceUrl); await turnContext.sendActivity('ProActive Hello!'); }); res.setHeader('Content-Type', 'text/html'); res.writeHead(200); res.write('<html><body><h1>Proactive messages have been sent.</h1></body></html>'); // res = JSON.stringify(req); res.end(); });
注意すべきは server.listen の部分で restify のプラグインを追加しているところ、server.post のエンドポイントを実装しているところです。 また、Loacalでテストする際には
await MicrosoftAppCredentials.trustServiceUrl(req.body.ref.serviceUrl);の部分をコメントアウトしてないとエラーが出るかもです(確かここはTeams上で実行するのに必要な部分)index.js---- 抜粋 ---- // Create HTTP server const server = restify.createServer(); server.listen(process.env.port || process.env.PORT || 3978, () => { // Important server.use(restify.plugins.bodyParser({ mapParams: true })); console.log(`\n${ server.name } listening to ${ server.url }`); console.log('\nGet Bot Framework Emulator: https://aka.ms/botframework-emulator'); console.log('\nTo talk to your bot, open the emulator select "Open Bot"'); }); ---- post 処理部分 ---- // Listen for incoming notifications and send proactive messages to users. server.post('/api/notify',async (req, res) => { await MicrosoftAppCredentials.trustServiceUrl(req.body.ref.serviceUrl); await adapter.continueConversation(req.body.ref, async turnContext => { // console.dir(req.body.ref.serviceUrl); await turnContext.sendActivity('ProActive Hello!'); }); res.setHeader('Content-Type', 'text/html'); res.writeHead(200); res.write('<html><body><h1>Proactive messages have been sent.</h1></body></html>'); // res = JSON.stringify(req); res.end(); });次に、Bot.js を編集します。
こちらは、Bot との会話のやり取りをするときに使用しています。
今回は、ProActive メッセージを送ることのフォーカスしているので、
あんまり実装はしてませんが、ConverstaionReference を取得するのに少し編集してます。
bot.js の全体
bot.js// Copyright (c) Microsoft Corporation. All rights reserved. // Licensed under the MIT License. const { ActivityHandler, MessageFactory } = require('botbuilder'); // add to echo sample const { TurnContext } = require('botbuilder'); class EchoBot extends ActivityHandler { constructor() { super(); // See https://aka.ms/about-bot-activity-message to learn more about the message and other activity types. this.onMessage(async (context, next) => { // add echo sample from const cvid = this.getConversationReference(context.activity); console.dir(cvid) var msg = `Your Info`; await context.sendActivity(msg); msg="- conversation reference:"+cvid.conversation.id+"\n\n"; msg+="- Bot id:"+cvid.bot.id+"\n\n"; msg+="- Bot name:"+cvid.bot.name+"\n\n"; msg+="- Service URL:"+cvid.serviceUrl+"\n\n"; console.log(msg); await context.sendActivity(msg); // to here await next(); }); this.onMembersAdded(async (context, next) => { const membersAdded = context.activity.membersAdded; const welcomeText = 'Hello and welcome!'; for (let cnt = 0; cnt < membersAdded.length; ++cnt) { if (membersAdded[cnt].id !== context.activity.recipient.id) { await context.sendActivity(MessageFactory.text(welcomeText, welcomeText)); } } // By calling next() you ensure that the next BotHandler is run. await next(); }); } // add echo sample from getConversationReference(activity) { // ConversationReference の取得 const conversationReference = TurnContext.getConversationReference(activity); return conversationReference; } // to here } module.exports.EchoBot = EchoBot;
大した長さがないですが、
bot.js// add to echo sample const { TurnContext } = require('botbuilder');というのを忘れがちなので一応抜粋しておきます。
(もしかしたら、このmoduleを足さなくても別の方法でも実装できるかもです。)
(もしあれば教えてください(笑))とりあえず、一度 Local でテストしてみましょう。
やり方は最初にも言いましたが、これを参考にしてください。
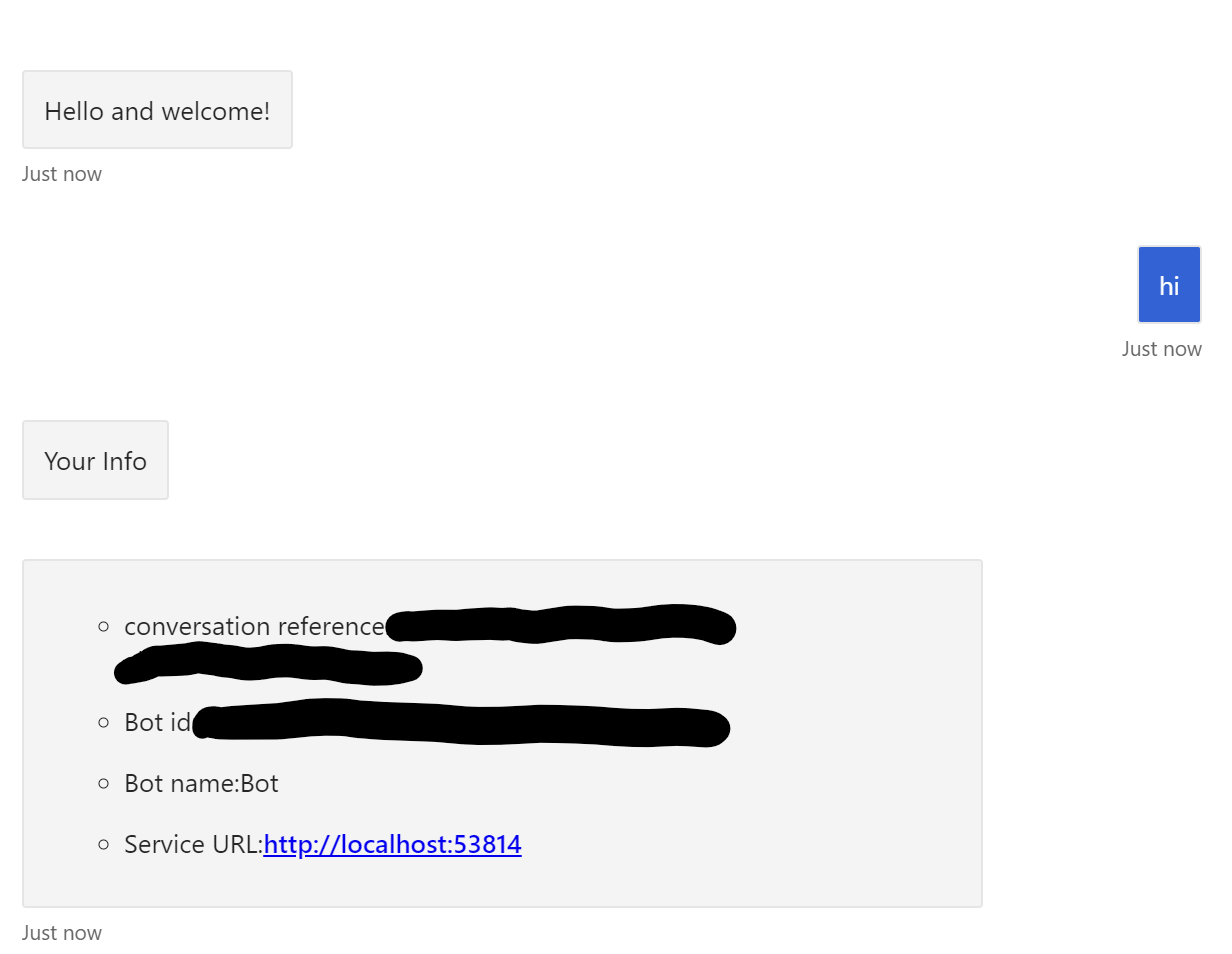
Emulator で実行して何かしら話しかけたらこんな感じで返してくれます。
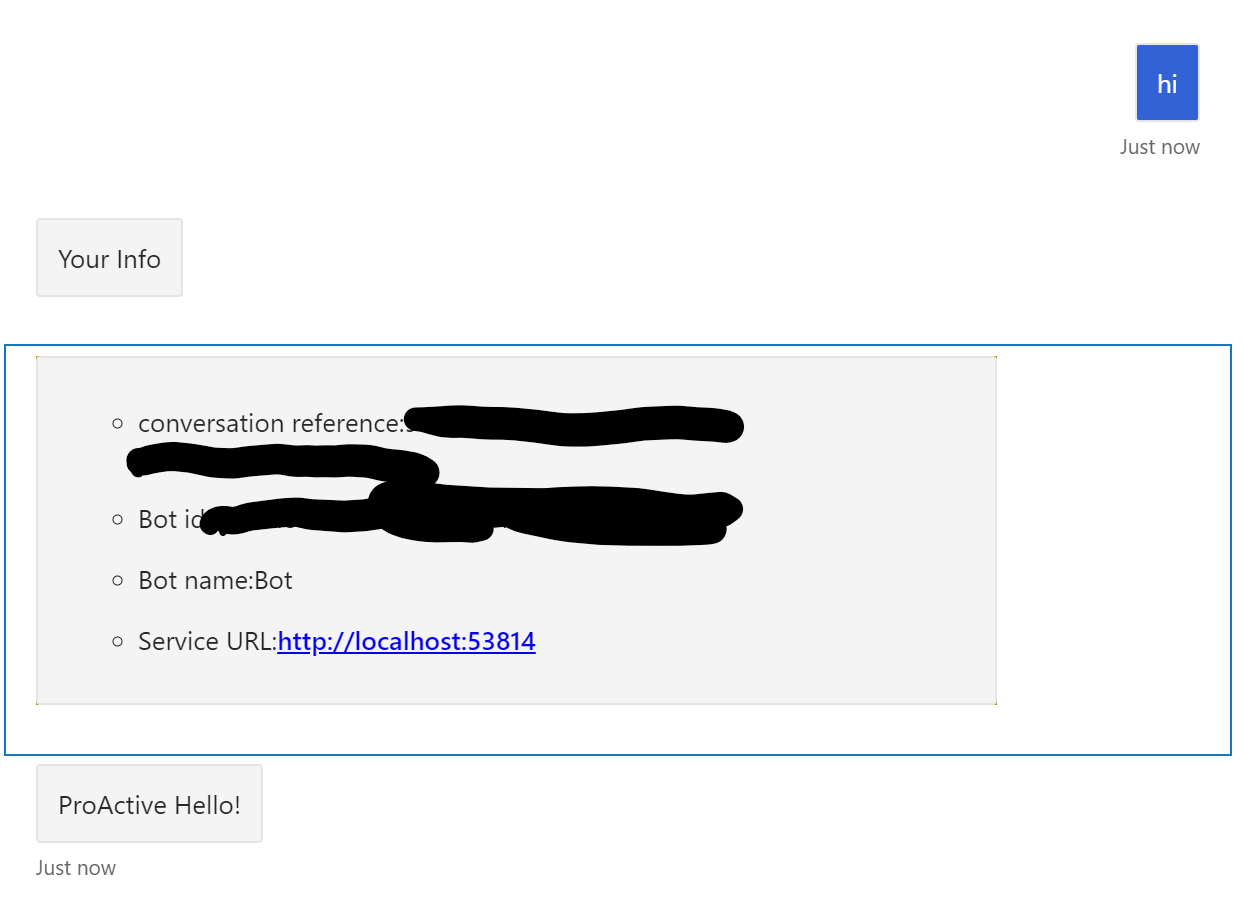
ちなみに、Emulator だと ServiceURL や id がEmulatorを更新するたびに変更されるので注意してくださいね。そして、上記の body.json にBotから変えてきた情報を入れて post してあげると
こうなります!ちゃんと PoroActive にメッセージが送られてきてますね!
後は、AzureにBotをDeployして、Teamsとの接続を確認しましょう。
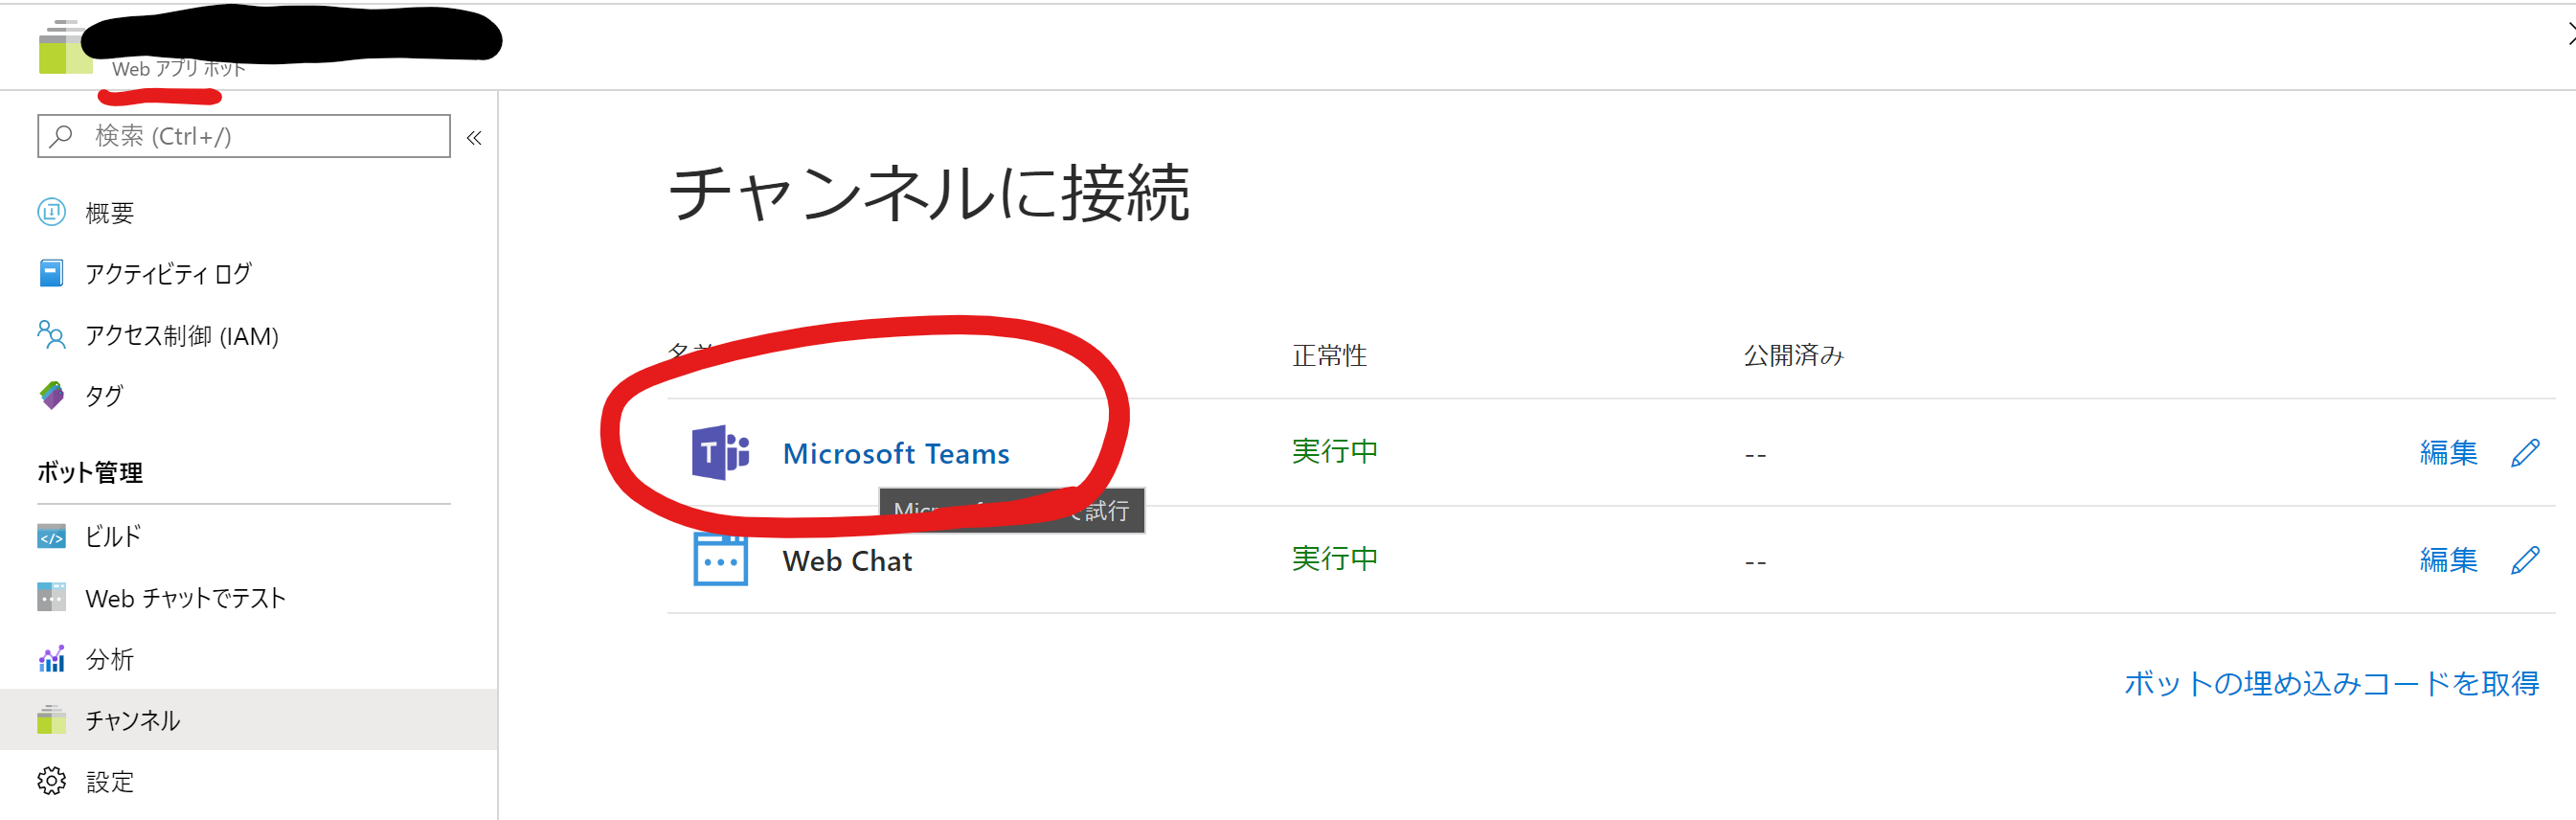
例によって、Azure へのDeployなどはこちらから確認してください(笑)さて、Deploy が済んだら、BotServiceのリソースに移動して、チャンネルから、Teamsを選んでください。(私のはすでにchannelが出来ているので、少し表示されている場所は違うかと思いますが)
ここをクリックして、画面の指示通りに何回かクリックしたら、Teams を Web かデスクトップアプリで開くように指示されますので、開いてください。そしたら、先ほどまで作成していた Bot とのChat が出来ているはずです。
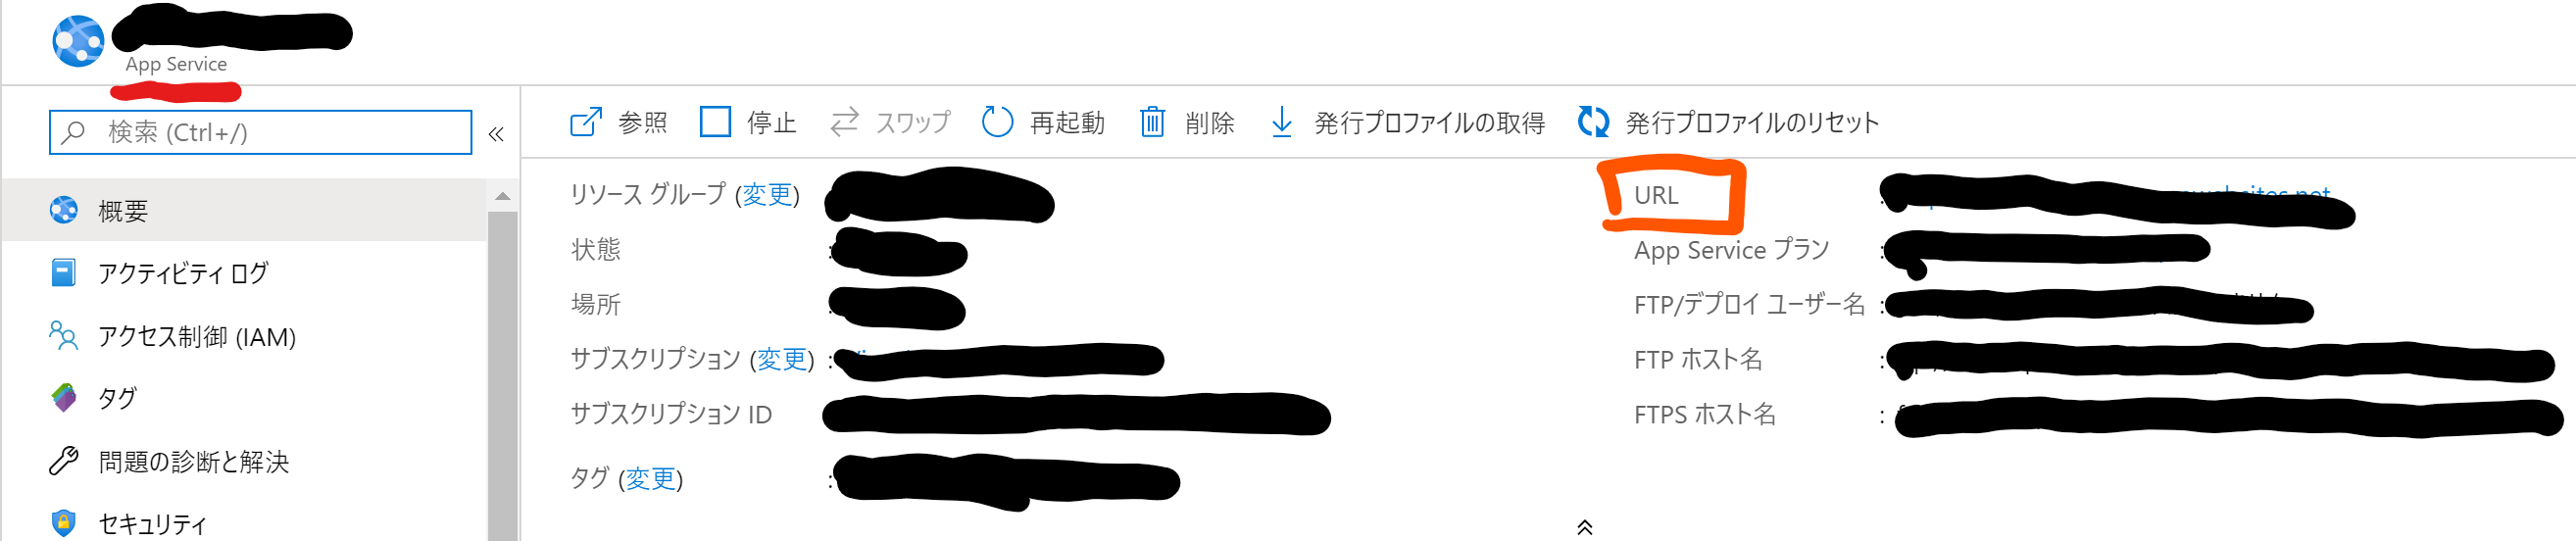
ここまで来たらもう少しです。Teams に Proactive メッセージを送る際のpost Request の URL は
App Service のEndpointを指定してあげてください。
この画像の右上にある URL ですね。
以上です!いろいろとつたない文章でしたが、ご興味があります方はぜひお試しくださいな!
- 投稿日:2020-05-24T17:00:54+09:00
Gridsomeを触ってみたメモ
JAMstackでVue.js以上Nuxt.js未満なCMS?のイメージのGridsomeを触ってみたのでメモ。
v14で試そうと思ったらうまくいかなかったのでv12にして試したら上手く行きました。(後述)
チュートリアルをなぞってみる
コマンドラインツールのインストール
$ npm i -g @gridsome/cliここが既に重い印象。(ネガ
ブログプロジェクトを作成
$ gridsome create n0bisuke-appここでsharpのビルドエラー
$ gridsome create n0bisuke-app内部でsharpという画像のリサイズとかをしてくれるモジュールを使ってるみたいで、このモジュールがNode.js v14だとビルドが通らなかったです。
省略

info sharp Using cached /Users/n0bisuke/.npm/_libvips/libvips-8.8.1-darwin-x64.tar.gz
prebuild-install WARN install No prebuilt binaries found (target=14.2.0 runtime=node arch=x64 libc= platform=darwin)
gyp info it worked if it ends with ok
gyp info using node-gyp@5.1.0
gyp info using node@14.2.0 | darwin | x64

省略
取り急ぎNode.js v12を利用したらビルドが通りました。
ローカル起動
プロジェクト内で以下のコマンドで起動します。
$ gridsome developDONE Compiled successfully in 4292ms 2:10:48 Site running at: - Local: http://localhost:8080/ - Network: http://192.168.2.100:8080/ Explore GraphQL data at: http://localhost:8080/___explore
http://localhost:8080で起動しました。
ビルド
以下のコマンドでビルドができます。 distフォルダが出来上がるのでこれをそのままどこかに載せれば良いみたいです。
$ gridsome buildGridsome v0.7.14 Initializing plugins... Load sources - 0s Create GraphQL schema - 0.03s Create pages and templates - 0.05s Generate temporary code - 0.04s Bootstrap finish - 2.22s Compile assets - 8.7s Execute GraphQL (3 queries) - 0s Write out page data (3 files) - 0s Render HTML (3 files) - 0.27s Process files (0 files) - 0s Process images (9 images) - 1s Done in 12.38s
vercelでデプロイ
公式ドキュメントにもありますが、
プロジェクトのルートでvercelコマンドを実行するだけでした。カンタン。
$ vercel対話式で聞かれますが全てエンターで大丈夫でした。↓ログです。
Set up and deploy “~/Documents/ds/3_prototypes/n0bisuke-app”? [Y/n] y
? Which scope do you want to deploy to? n0bisuke
? Link to existing project? [y/N] n
? What’s your project’s name? n0bisuke-app
? In which directory is your code located? ./
> Upload [====================] 99% 0.0sAuto-detected project settings (Gridsome):
- Build Command: `npm run build` or `gridsome build`
- Output Directory: dist
- Development Command: gridsome develop -p $PORT
? Want to override the settings? [y/N] n
?  Linked to n0bisuke/n0bisuke-app (created .vercel and added it to .gitignore)
?  Inspect: https://vercel.com/n0bisuke/n0bisuke-app/fx37uus5b [3s]
✅  Production: https://n0bisuke-app.now.sh [copied to clipboard] [41s]
?  Deployed to production. Run `now --prod` to overwrite later (https://zeit.ink/2F).
?  To change the domain or build command, go to https://zeit.co/n0bisuke/n0bisuke-app/settings
distフォルダに移動してからかなぁとか思ってましたがルートの位置で大丈夫です。vercel側がdistフォルダを見てなのかpackage.jsonを見てなのか判断してくれます。

- 投稿日:2020-05-24T14:49:32+09:00
Playwrightで簡単なクロスブラウザテストを書いてみた
2020 年 5 月の頭頃、Playwright が 1.0 に到達した際に、作成チームによって書かれた記事がホットエントリーになっていました。
https://medium.com/@arjunattam/fast-and-reliable-cross-browser-testing-with-playwright-155c0e8a821fタイミング良くクロスブラウザテストを書く機会があったので、簡単なテストを書いてみました。
※ ブラウザ毎に挙動の異なる API のテストだと良かったのですが、こちらで実施するのはボタンをクリックして innerText の変更をテストするのみです。ソースはこちらにあります。
https://github.com/nnashiki/playwright_samplePlaywrigh とは
Chromium、Firefox、Safari を簡単にクロスブラウザテストするための、Node library とのことです。
Playwright is a Node library to automate Chromium, Firefox and WebKit with a single API. Playwright is built to enable cross-browser web automation that is ever-green, capable, reliable and fast.
https://playwright.dev/
https://github.com/microsoft/playwright冒頭に挙げた medium の記事では、Chromium、WebKit、FireFox、WebDriver などに協力を得た(巨人の肩に乗ってるんだぜ!)とあります。
アーリアダプターはこんな感じに充実しています。テスト対象
"ボタン押下前"と書かれているボタンを押すと"ボタン押下前"に変わる簡単なものです。
以下コマンドでサービスを立ち上げます。
docker run --rm --name sample -p 8090:80 -v $PWD/src/app:/usr/share/nginx/html -d nginxindex.html<!DOCTYPE html> <html lang="ja"> <head> <meta charset="utf-8" /> <meta name="viewport" content="width=device-width, initial-scale=1, shrink-to-fit=no" /> <title>ボタンテスト</title> <link rel="icon" href="favicon.ico" /> <!- bootstrap4 -> <link rel="stylesheet" href="https://stackpath.bootstrapcdn.com/bootstrap/4.3.1/css/bootstrap.min.css" integrity="sha384-ggOyR0iXCbMQv3Xipma34MD+dH/1fQ784/j6cY/iJTQUOhcWr7x9JvoRxT2MZw1T" crossorigin="anonymous" /> <!- bootstrap4 -> </head> <body> <div class="container"> <button id="test_button1" type="button" class="btn btn-primary"> ボタン押下前 </button> </div> <script type="text/javascript" src="./index.js?0.0"></script> <!- bootstrap4 -> <script src="https://code.jquery.com/jquery-3.3.1.slim.min.js" integrity="sha384-q8i/X+965DzO0rT7abK41JStQIAqVgRVzpbzo5smXKp4YfRvH+8abtTE1Pi6jizo" crossorigin="anonymous" ></script> <script src="https://cdnjs.cloudflare.com/ajax/libs/popper.js/1.14.7/umd/popper.min.js" integrity="sha384-UO2eT0CpHqdSJQ6hJty5KVphtPhzWj9WO1clHTMGa3JDZwrnQq4sF86dIHNDz0W1" crossorigin="anonymous" ></script> <script src="https://stackpath.bootstrapcdn.com/bootstrap/4.3.1/js/bootstrap.min.js" integrity="sha384-JjSmVgyd0p3pXB1rRibZUAYoIIy6OrQ6VrjIEaFf/nJGzIxFDsf4x0xIM+B07jRM" crossorigin="anonymous" ></script> <!- bootstrap4 -> </body> </html>index.jsconst button1 = document.getElementById("test_button1"); button1.addEventListener("click", (e) => { document.getElementById(e.target.id).innerText = "ボタン押下後"; });テストコード
利用コード
test runner は Jest を使用しています。
各ブラウザで自動操縦でボタンをクリックして、表記の変化を確認するテストです。
ブラウザ単位でテスト結果を確認したいので分割しました。src/test/button_action.test.jsconst playwright = require("playwright"); // #test_button1 のボタンを押下して、ボタンの表記を取得する const croll_click = async (browserType) => { const browser = await playwright[browserType].launch(); const context = await browser.newContext(); const page = await context.newPage(); await page.goto("http://localhost:8090"); await page.click("#test_button1"); const click_after_text = await page.evaluate(() => { return document.getElementById("test_button1").innerText; }); await browser.close(); return click_after_text; }; test("click chromium", async () => { let result = await croll_click("chromium"); expect(result).toMatch(/ボタン押下後/); }); test("click firefox", async () => { let result = await croll_click("firefox"); expect(result).toMatch(/ボタン押下後/); }); test("click webkit", async () => { let result = await croll_click("webkit"); expect(result).toMatch(/ボタン押下後/); });page の中での javascript(webAPI)の実行は以下を参考にしました。
https://playwright.dev/#version=v1.0.2&path=docs%2Fverification.md&q=evaluating-javascriptJest の set up、tear down でブラウザの呼び出しと終了をするには以下が参考になります。
https://playwright.dev/#version=v1.0.2&path=docs%2Ftest-runners.md&q=jest--jasmine環境構築
Playwright、 Jest を install します。
npm install --save-dev playwright
npm install --save-dev jest
実行してみる
jest src/testを実行します。
ブラウザ毎のテストを実行することができました。> jest src/test PASS src/test/button_action.test.js (7.1 s) ✓ click chromium (1327 ms) ✓ click firefox (4186 ms) ✓ click webkit (1073 ms) Test Suites: 1 passed, 1 total Tests: 3 passed, 3 total Snapshots: 0 total Time: 7.594 s Ran all test suites matching /src\/test/i.tips
そのまま実行すると、Jest の default time out が引っかかることがありました。
 FAIL  src/test/button_action.test.js (8.725 s)
  ✓ click chromium (2076 ms)
  ✕ click firefox (5002 ms)
  ✓ click webkit (1018 ms)

  ● click firefox

    : Timeout - Async callback was not invoked within the 5000 ms timeout specified by jest.setTimeout.Timeout - Async callback was not invoked within the 5000 ms timeout specified by jest.setTimeout.Error:

      22 | });
      23 |
    > 24 | test("click firefox", async () => {
         | ^
      25 |   let result = await croll_click("firefox");
      26 |   expect(result).toMatch(/ボタン押下後/);
      27 | });

      at new Spec (node_modules/jest-jasmine2/build/jasmine/Spec.js:116:22)
      at Object.<anonymous> (src/test/button_action.test.js:24:1)

Test Suites: 1 failed, 1 total
Tests:       1 failed, 2 passed, 3 total
Snapshots:   0 total
Time:        9.605 s, estimated 12 s
Ran all test suites.
そこで、timeout を伸ばして実行しました。
jest src/test --testTimeout=10000
5000mm を超えても実行できています。$ jest src/test --testTimeout=10000 PASS src/test/button_action.test.js (11.592 s) ✓ click chromium (3831 ms) ✓ click firefox (5042 ms) ✓ click webkit (1948 ms) Test Suites: 1 passed, 1 total Tests: 3 passed, 3 total Snapshots: 0 total Time: 12.957 s Ran all test suites matching /src\/test/i.まとめ
puppeteer は使った事が無いので、比較はできませんが利用の開始はとても簡単でした。
Playwright は普及しそうなので、今後も追ってみたいと思います。
- 投稿日:2020-05-24T10:56:23+09:00
[JS1日クッキング]SequelizeとExpressでAPIサーバー
何かを簡単に作って、ちょっとした勉強になる。そんなシリーズになる予定です。
今回は、Node.jsで簡単なTodoアプリに使うAPIサーバーを作っていきます。データベースはMySQLで、データベース操作にはSequelizeを利用します。
完成品はこちら -> sequelize-todo-api-server
材料
- mysql2
- sequelize
- sequelize-cli
- express
作り方
1. ライブラリのインストール
適当にディテクトリ作って、
npm initで初期化してから、今回使うライブラリをインストールします。npm i sequelize mysql2 npm i -D sequelize-cli予めMySQLサーバーをインストールして、設定をしておきます。以下は今回使うユーザー名とパスワードです。
use mysql;
create user sequelize@localhost identified by 'password';
mysql> grant all on *.* to sequelize@localhost;
exit;
2. データベースを作る
データベースがMySQLかPostgreSQLの場合は、sequelize-cliでコマンドを打っていくことで簡単にデータベースのマイグレーションや初期値のセットなどができます。
sequelize-cli initを利用して、Sequelizeの初期化をします。npx sequelize-cli init Sequelize CLI [Node: 14.2.0, CLI: 5.5.1, ORM: 5.21.10] Created "config/config.json" Successfully created models folder at "/home/kei/Programming/Project/temp/sequelize-test/models". Successfully created migrations folder at "/home/kei/Programming/Project/temp/sequelize-test/migrations". Successfully created seeders folder at "/home/kei/Programming/Project/temp/sequelize-test/seeders".初期化をすると、3つのディレクトリが作成されます。config/config.jsonの設定をしていきます。自動生成されたconfig.jsonのusernameとpasswordの部分を実際のデータベースで設定したユーザー名とパスワードにします。operatorsAliasesの項目があるとエラーになるので、ある場合は削除します。
config/config.json{ "development": { "username": "sequelize", "password": "password", "database": "database_development", "host": "127.0.0.1", "dialect": "mysql" }, "test": { "username": "sequelize", "password": "password", "database": "database_test", "host": "127.0.0.1", "dialect": "mysql" }, "production": { "username": "sequelize", "password": "password", "database": "database_production", "host": "127.0.0.1", "dialect": "mysql" } }下のコマンドでデータベースを作ります。
$ npx sequelize-cli db:create

Sequelize CLI [Node: 14.2.0, CLI: 5.5.1, ORM: 5.21.10]

Loaded configuration file "config/config.json".
Using environment "development".
Database database_development created.
config.jsonのdevelopmantの設定に従って、データベースが作成されました。
3. モデルとテーブルの作成
npx sequelize-cli model:generateでモデルを作成し、npx sequelize-cli db:migrateでデータベースのテーブルを作成します。$ npx sequelize-cli model:generate --name Todo --attributes title:string,completed:boolean Sequelize CLI [Node: 14.2.0, CLI: 5.5.1, ORM: 5.21.10] New model was created at /home/kei/Programming/Project/temp/sequelize-test/models/todo.js . New migration was created at /home/kei/Programming/Project/temp/sequelize-test/migrations/20200521050853-Todo.js . $ npx sequelize-cli db:migrate Sequelize CLI [Node: 14.2.0, CLI: 5.5.1, ORM: 5.21.10] Loaded configuration file "config/config.json". Using environment "development". == 20200521050853-create-todo: migrating ======= == 20200521050853-create-todo: migrated (0.087s)mysql> use database_development; Database changed mysql> show tables; +--------------------------------+ | Tables_in_database_development | +--------------------------------+ | SequelizeMeta | | Todos | +--------------------------------+ 2 rows in set (0.00 sec) mysql> select * from Todos; Empty set (0.00 sec)4. テスト用の初期値の準備
テスト用の初期値を作成します。Seederを利用すると、コマンドで初期値をセットしたり、破棄したりできるようになります。
npx sequelize-cli seed:generateでSeederを用意します。$ npx sequelize-cli seed:generate --name test-data Sequelize CLI [Node: 14.2.0, CLI: 5.5.1, ORM: 5.21.10] seeders folder at "/home/kei/Programming/Project/temp/sequelize-test/seeders" already exists. New seed was created at /home/kei/Programming/Project/temp/sequelize-test/seeders/20200521060543-test-data.js .このコマンドで作成されたファイルに、初期値を書いていきます。
seeders/20200521060543-test-data.js"use strict"; module.exports = { up: (queryInterface, Sequelize) => { const todos = [ { title: "草むしり", completed: false, updatedAt: new Date(2020, 4, 22, 9, 47, 19), createdAt: new Date(2020, 4, 22, 9, 47, 19), }, { title: "買い物", completed: true, updatedAt: new Date(2020, 4, 20, 18, 2, 33), createdAt: new Date(2020, 4, 20, 15, 41, 58), }, { title: "トイレ掃除", completed: false, updatedAt: new Date(2020, 4, 20, 18, 4, 21), createdAt: new Date(2020, 4, 20, 18, 4, 21), }, ]; return queryInterface.bulkInsert("Todos", todos); }, down: (queryInterface, Sequelize) => { return queryInterface.bulkDelete("Todos", null, {}); }, };
npx sequelize db:seed:allでテーブルに初期値を書き込みます。$ npx sequelize db:seed:all Sequelize CLI [Node: 14.2.0, CLI: 5.5.1, ORM: 5.21.10] Loaded configuration file "config/config.json". Using environment "test". == 20200521060543-test-data: migrating ======= == 20200521060543-test-data: migrated (0.049s)mysql> use database_development; Database changed mysql> select * from Todos; +----+-----------------+-----------+---------------------+---------------------+ | id | title | completed | createdAt | updatedAt | +----+-----------------+-----------+---------------------+---------------------+ | 1 | 草むしり | 0 | 2020-05-22 00:47:19 | 2020-05-22 00:47:19 | | 2 | 買い物 | 1 | 2020-05-20 06:41:58 | 2020-05-20 09:02:33 | | 3 | トイレ掃除 | 0 | 2020-05-20 09:04:21 | 2020-05-20 09:04:21 | +----+-----------------+-----------+---------------------+---------------------+ 3 rows in set (0.00 sec)5. データ処理する関数を書く
とりあえず、CRUD処理をするため、
- create: 1つのアイテムを書き込む
- read: すべてのアイテムを取得
- update: 1つのアイテムを更新する
- deleteItem: 1つのアイテムを削除する
という4つの関数を書きます。updateとdeleteItemはidで対象アイテムを指定します。
lib/db-simple.jsconst { Todo } = require("../models"); const create = async (title, completed) => { const todo = await Todo.create({ title, completed }); return todo.dataValues; }; const read = async () => { const todos = await Todo.findAll(); return todos.map((todo) => todo.dataValues); }; const updated = async (id, title, completed) => { const isUpdate = await Todo.update( { title, completed }, { where: { id, }, } ); return isUpdated[0] ? { message: "updated" } : { error: "item not found" }; }; const deleteItem = async (id) => { const isDeleted = await Todo.destroy({ where: { id, }, }); return isDeleted ? { message: "deleted" } : { error: "item not found" }; }; module.exports = { create, read, update, deleteItem };update関数のisUpdatedはアップデートした件数が配列の1番目に入っています。なので、それでアップデートしたかを判定しています。deleteItem関数のisDeletedも同様です。
6. サーバーを作る
Expressでサーバーを作ります。先ほど作った関数とURLを結びつけるだけです。
index-simple.jsconst express = require("express"); const db = require("./lib/db-simple"); const app = express(); app.use(express.json()); app.use(express.urlencoded({ extended: true })); app.get("/", async (req, res) => { const todos = await db.read(); res.json(todos); }); app.post("/create", async (req, res) => { const result = await db.create(req.body.title, req.body.completed); res.json(result); }); app.put("/update", async (req, res) => { const result = await db.update( req.body.id, req.body.title, req.body.completed ); res.json(result); }); app.delete("/delete", async (req, res) => { const result = await db.deleteItem(req.body.id); res.json(result); }); app.listen(3000, () => console.log("listening on port 3000"));下はPostmanで"/"にget、"/create"にpostしたときの結果です。
おわりに
Sequelizeは、慣れればDjangoのORMとほぼ同じように使えるような気がします。とても便利です。
これ書いた人は色々調べながら+実は少しテストも書きながら+記事書きながら作っていたので、作成日数が1日を超えました\(^o^)/
コード -> sequelize-todo-api-server


- 投稿日:2020-05-24T10:36:50+09:00
yarn v2 は開発時における効率を損ねるのではないか
背景
npm, yarn による zero install 戦略を読んで Zero Install を知り、yarn v2 の有用性が気になった。パッケージ追加の速度やパッケージのサイズは従来よりも改善されるそうだが、パッケージをランタイム時に読み込むということはアプリ起動速度は従来よりも劣るように思えたため、検証を行った。
検証方法
yarn v2 と v1 を用いる別環境にて、CRAを用いたプロジェクトを作成して以下の3点から優位性を比較する。
* パッケージ追加の所要時間
* プロジェクトディレクトリのサイズ
* アプリ起動の所要時間検証
1. パッケージ追加の所要時間
ReactアプリのプロジェクトをCRA経由で作成する。途中でパッケージ追加が行われるため、以下のコマンドを実行してdateコマンドの差から所要時間を算出する。
$ create-react-app --version
3.4.1
$ date && create-react-app test-react-app && date
2. プロジェクトディレクトリのサイズ
以下のコマンドを実行し、出力結果からプロジェクトディレクトリのサイズを取得する。
$ du -sh test-react-app3. アプリ起動の所要時間
以下のコマンドを実行し、アプリ起動のメッセージが出力されるまでの時間をストップウオッチで計測する。
$ cd test-react-app
$ yarn start
結果と考察
検証結果は以下の通りである。当初の想定通り、パッケージ追加の速度とプロジェクトディレクトリのサイズは v2 が優位であるが、アプリ起動の所要時間は v1 の方が短く優位である。
yarn v2 yarn v1 パッケージ追加の所要時間 67s 88s プロジェクトディレクトリのサイズ 70.9M 247.1M アプリ起動の所要時間 19.70s 13.73s アプリ起動を頻繁に繰り返す開発時における6秒の差は大きく、体感的にも待たされているストレスを強く感じる。パッケージ追加は高速であるとはいえ、頻繁に発生するアプリ起動時の遅延を補えるものではなく、プロジェクトディレクトリのサイズは記憶媒体が大容量化している今日ではさほど問題ではないように思える。現時点の個人的な感想としては v2 は開発の効率を損なうもののように思え、好意的な印象を持つには至らなかった。
- 投稿日:2020-05-24T04:07:30+09:00
【Yarn】パッケージをオフラインでインストールする
背景
Yarn v2についての動画で出てきた「v1のオフラインインストール」について、よく知らなかったので調べてみた。
概要
Yarnのオフラインインストールとは、パッケージを追加する際に実態のtarballをローカルにダウンロードしておき、後からそれを用いてパッケージをインストール出来るようにしたものである。パッケージをインストールする際に
yarn.lockファイルにダウンロード元のURLが記録されているため、URLが有効な限りは何度実行しても同一のファイルがダウンロードされることが保証されるが、ダウンロード元のダウンや閉鎖等によってURLが無効になった場合はダウンロードに失敗する。このような場合に備えて予めtarballをダウンロードしておき、オフライン時に利用するのがオフラインインストールである。詳解
事前準備
まずはじめに、適当なディレクトリを作成して以下のファイルを配置する。
package.json{ "name": "yarn-offline", "version": "1.0.0", "main": "index.js", "license": "MIT", "dependencies": { "is-array": "^1.0.1", "left-pad": "^1.3.0", "mime-types": "^2.1.27" } }パッケージを追加し、ディレクトリの構成が以下の通りになっていることを確認する。
$ yarn
(略)
$ ls
node_modules    package.json    yarn.lock
オフラインミラーの設定
オフラインミラー(ダウンロードされるtarballが配置されるパス)を設定する。ここで指定するパスはホームディレクトリからの相対パスであることに留意する。
$ yarn config set yarn-offline-mirror ./npm-packages-offline-cache
yarn config v1.22.0
success Set "yarn-offline-mirror" to "./npm-packages-offline-cache".
✨  Done in 0.04s.
$ yarn config set yarn-offline-mirror-pruning true
yarn config v0.23.2
success Set "yarn-offline-mirror-pruning" to "true".
✨  Done in 0.06s.
yarn config setで追加した設定は~/.yarnrcに記録されている。これを特定のプロジェクトでのみ利用可能にするため、ファイルをプロジェクトディレクトリ内に移動する。$ mv ~/.yarnrc ./パッケージのダウンロード
オフラインインストールを用いる場合でも、
yarn.lockは変更されないためパッケージ管理に影響を及ぼさない。これを検証するためにファイルをコピーしておく。$ cp yarn.lock yarn.lock.before
node_modules/とyarn.lockを削除して再度パッケージの追加を行う。その後、~/npm-packages-offline-cacheにtarballがダウンロードされていることを確認する。$ rm -rf node_modules/ yarn.lock $ yarn yarn install v1.22.4 info No lockfile found. [1/4] ? Resolving packages... [2/4] ? Fetching packages... [3/4] ? Linking dependencies... [4/4] ? Building fresh packages... success Saved lockfile. ✨ Done in 0.52s. $ ls ~/npm-packages-offline-cache is-array-1.0.1.tgz left-pad-1.3.0.tgz mime-db-1.44.0.tgz mime-types-2.1.27.tgz
yarn.lockが変更されていないことを確認する。$ diff yarn.lock yarn.lock.before $ rm yarn.lock.beforeオフラインインストールの実行
オフラインインストールの検証を行うため、
node_modules/とキャッシュを削除する。$ rm -rf node_modules/ $ yarn cache clean yarn cache v1.22.4 success Cleared cache. ✨ Done in 0.10s.ネットワークを切断してオフラインにする。続けて
yarn --offlineを実行し、オフライン時でもパッケージが追加できることを確認する。thara@ht-mbp-2:yarn-offline $ ls package.json yarn.lock thara@ht-mbp-2:yarn-offline $ yarn --offline yarn install v1.22.4 [1/4] ? Resolving packages... [2/4] ? Fetching packages... [3/4] ? Linking dependencies... [4/4] ? Building fresh packages... ✨ Done in 0.55s. thara@ht-mbp-2:yarn-offline $ ls node_modules package.json yarn.lock検証
上記に続けて、ダウンロード済みtarball、キャッシュ、
yarn.lockの関係について検証する。オフラインインストールはキャッシュが無い場合に行われる
オフラインインストール時のパッケージとしてダウンロード済みtarballが用いられたように思えるがこれは正確ではない。キャッシュにもtarballが存在しており、こちらが優先して用いられるため「キャッシュが無ければダウンロード済みtarballが用いられる」という説明が正しい。以下を実行し、
~/npm-packages-offline-cacheが存在しなくともオフラインインストールに成功することを確認する。$ rm -rf node_modules/ $ mv ~/npm-packages-offline-cache ~/npm-packages-offline-cache-renamed $ yarn --offline yarn install v1.22.4 info No lockfile found. [1/4] ? Resolving packages... [2/4] ? Fetching packages... [3/4] ? Linking dependencies... [4/4] ? Building fresh packages... success Saved lockfile. ✨ Done in 0.28s.キャッシュとダウンロード済みtarballの両方が存在しなければ、当然オフラインインストールは失敗する。
$ rm -rf node_modules/
$ yarn cache clean
yarn cache v1.22.4
success Cleared cache.
✨  Done in 0.05s.
$ yarn --offline
yarn install v1.22.4
[1/4] ?  Resolving packages...
[2/4] ?  Fetching packages...
error Can't make a request in offline mode ("https://registry.yarnpkg.com/is-array/-/is-array-1.0.1.tgz")
info Visit https://yarnpkg.com/en/docs/cli/install for documentation about this command.
ダウンロード済みパッケージの検証には
yarn.lockが用いられる
~/npm-packages-offline-cacheを元に戻し、yarn.lockを削除してオフラインインストールに失敗することを確認する。yarn.lockが存在しない場合は、インストールするべきパッケージの検証が出来ないためである。$ mv ~/npm-packages-offline-cache-renamed/ ~/npm-packages-offline-cache $ rm yarn.lock $ yarn --offline yarn install v1.22.4 info No lockfile found. [1/4] ? Resolving packages... error An unexpected error occurred: "There should only be one folder in a package cache (got in /Users/thara/.cache/yarn/v6/npm-is-array-1.0.1-e9850cc2cc860c3bc0977e84ccf0dd464584279a-integrity/node_modules)". info If you think this is a bug, please open a bug report with the information provided in "/Users/thara/Desktop/yarn-offline/yarn-error.log". info Visit https://yarnpkg.com/en/docs/cli/install for documentation about this command.キャッシュが存在する場合は
yarn.lockは不要である端末をオンライン状態にし、パッケージを追加してキャッシュを作成する。
$ yarn yarn install v1.22.4 [1/4] ? Resolving packages... [2/4] ? Fetching packages... [3/4] ? Linking dependencies... [4/4] ? Building fresh packages... ✨ Done in 0.57s. $ yarn cache list yarn cache v1.22.4 Name Version Registry Resolved is-array 1.0.1 npm https://registry.yarnpkg.com/is-array/-/is-array-1.0.1.tgz#e9850cc2cc860c3bc0977e84ccf0dd464584279a left-pad 1.3.0 npm https://registry.yarnpkg.com/left-pad/-/left-pad-1.3.0.tgz#5b8a3a7765dfe001261dde915589e782f8c94d1e mime-db 1.44.0 npm https://registry.yarnpkg.com/mime-db/-/mime-db-1.44.0.tgz#fa11c5eb0aca1334b4233cb4d52f10c5a6272f92 mime-types 2.1.27 npm https://registry.yarnpkg.com/mime-types/-/mime-types-2.1.27.tgz#47949f98e279ea53119f5722e0f34e529bec009f ✨ Done in 0.04s.端末をオフライン状態にして
node_modules/とyarn.lockを削除し、オフラインインストールに成功することを確認する。$ rm -rf node_modules/ yarn.lock $ yarn --offline yarn install v1.22.4 info No lockfile found. [1/4] ? Resolving packages... [2/4] ? Fetching packages... [3/4] ? Linking dependencies... [4/4] ? Building fresh packages... success Saved lockfile. ✨ Done in 0.40s.