- 投稿日:2020-04-04T21:25:59+09:00
[Flutter] Dribbbleデザイン、そのまま作ろう その15
こんにちは 皆さん!Dreamwalkerです。
皆さんはFlutterを使って楽しんで開発進んでいますか?今回は15回目の私がDribbbleのサイトの中で、
気に入れたデザインをFlutterで作ってみた。。ということになります。Dribbbleというサイトは色んなデザイナーさん達が色んなデザインを載せていて
デザインをの知識というか、デザイナーじゃない人でも、開発に参考になったり、役に立ったりするサイトです。まあ、デザインに対して、色んなサイトありますけれど私はDribbbleを愛用してます。
今回のデザイン
今回は15番目の「DribbbleのデザインをFlutterでやってみた」になります。
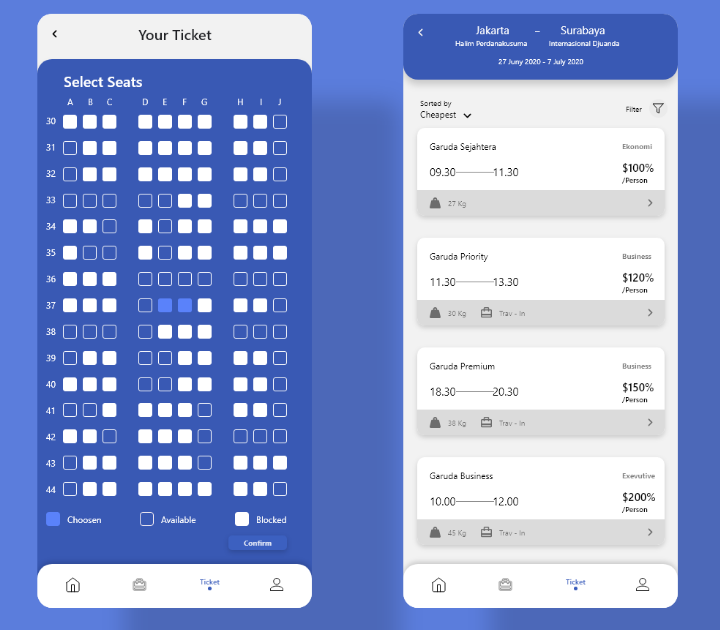
Flight Ticket
右側の席を選ぶ画面を作ってみたいと思います。
https://dribbble.com/shots/10862680-Flight-Ticket/attachments/2517650?mode=media
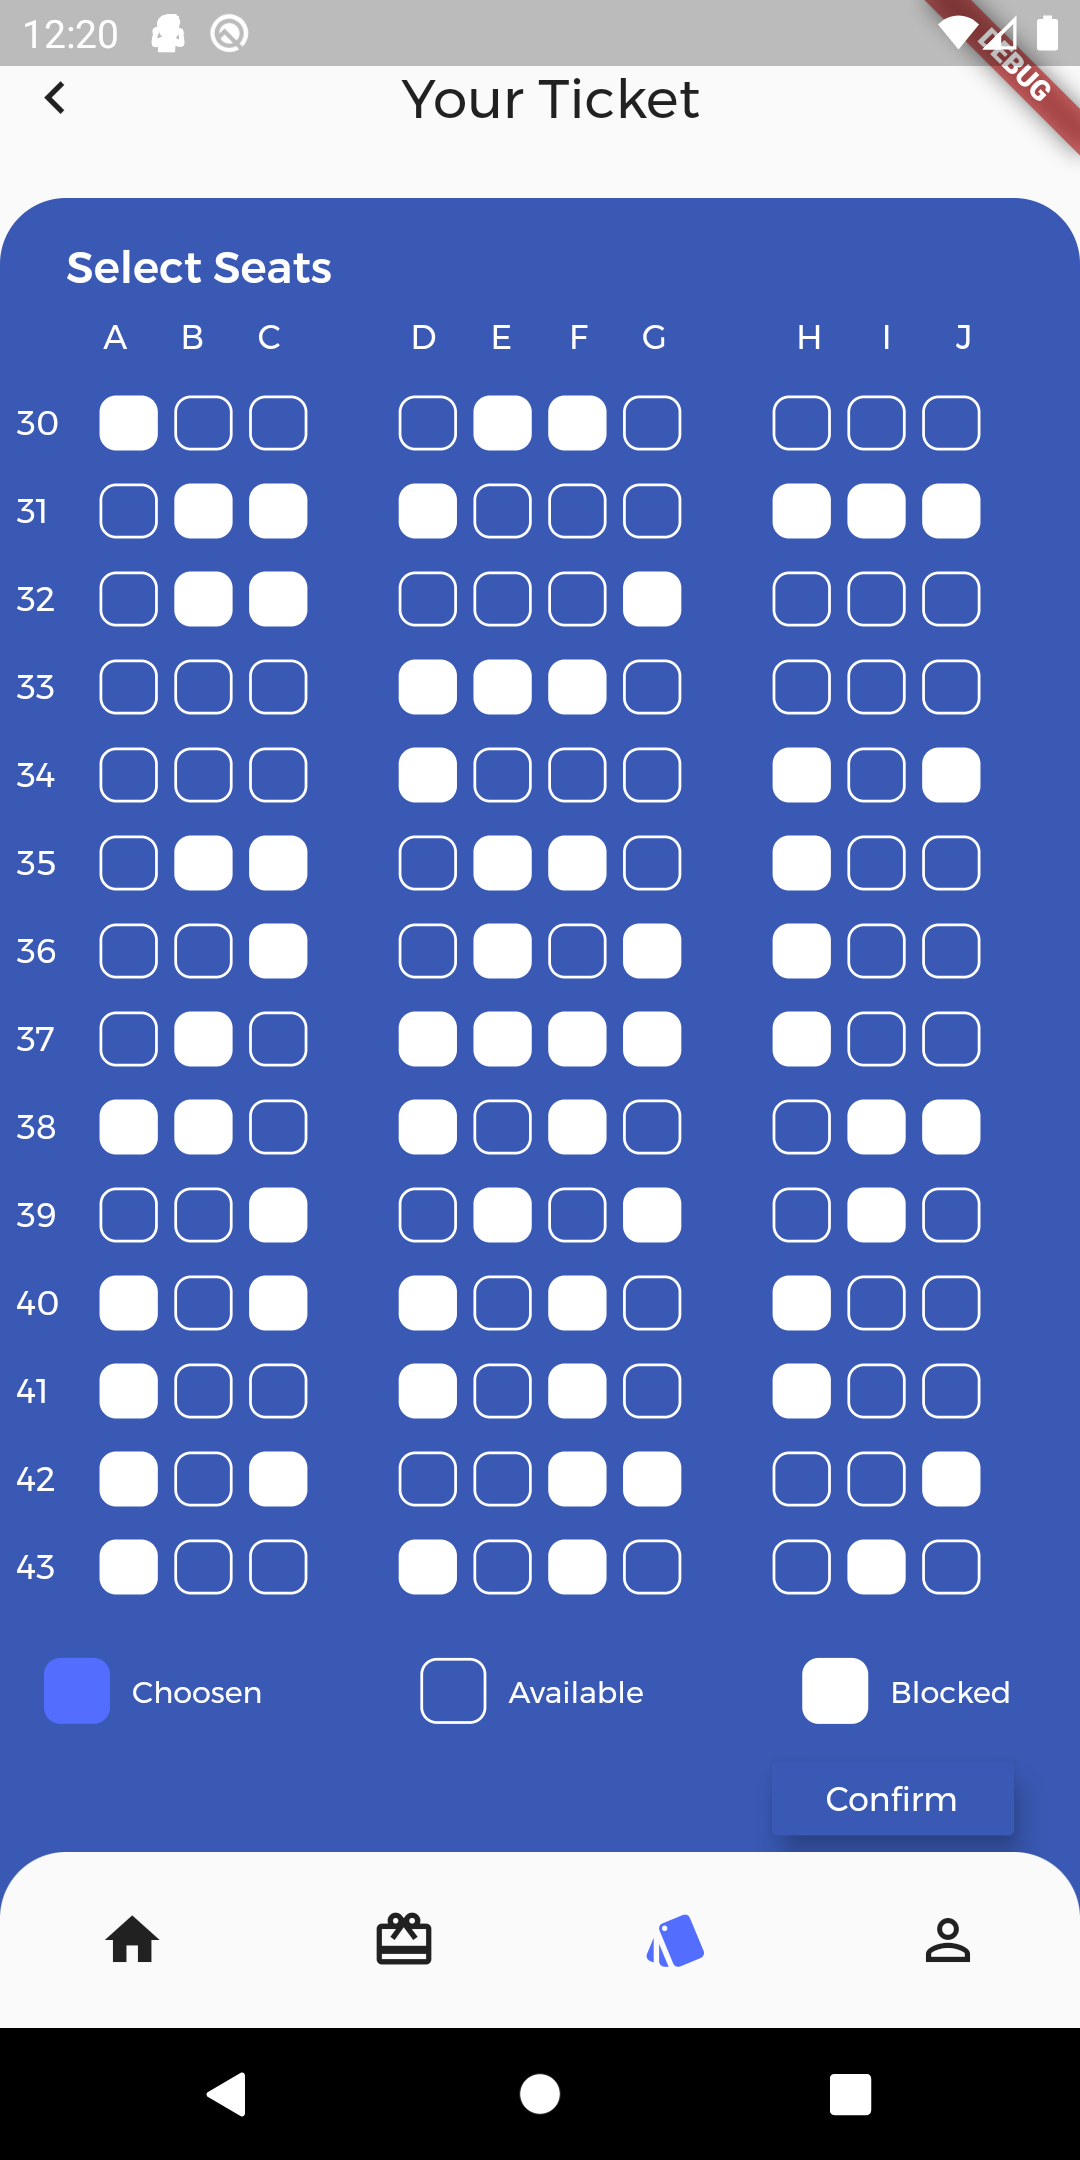
結果
1.
google_fonts: ^0.3.10データモデル
seat.dartclass Seat { final bool isAvailable; Seat({this.isAvailable}); }2次元配列
main.dart_tmp = List.generate(_column, (index) => List<Seat>.generate(_row, (index) => Seat(isAvailable: random.nextBool()))); _tmp.forEach((element) { element.forEach((e) { print(e.isAvailable); }); });
main。
main.dartimport 'dart:math'; import 'package:flutter/cupertino.dart'; import 'package:flutter/material.dart'; import 'package:flutternotebook5th/generated/i18n.dart'; import 'package:google_fonts/google_fonts.dart'; class Seat { final bool isAvailable; Seat({this.isAvailable}); } class FlightTicketApp extends StatelessWidget { @override Widget build(BuildContext context) { return MaterialApp( home: TicketPage(), ); } } class TicketPage extends StatefulWidget { @override _TicketPageState createState() => _TicketPageState(); } class _TicketPageState extends State<TicketPage> { Color appColor = Color(0xff3959b4); // 57 89 180 dec to hex 39 59 b4 List<Seat> _item; int _row = 10; int _column = 14; List<List<Seat>> _tmp; @override void initState() { // TODO: implement initState Random random = Random(); //TODO: One Dimension Array _item = List<Seat>.generate(10, (index) => Seat(isAvailable: random.nextBool())); _item.forEach((element) { print(element.isAvailable); }); //TODO : 2 Dimension Array _tmp = List.generate(_column, (index) => List<Seat>.generate(_row, (index) => Seat(isAvailable: random.nextBool()))); _tmp.forEach((element) { element.forEach((e) { print(e.isAvailable); }); }); super.initState(); } List<Widget> _buildSeatTitle() { return <Widget>[ Expanded( child: Container(), ), Expanded( child: Container( child: Center( child: Text( "A", style: GoogleFonts.montserrat(fontSize: 12, color: Colors.white), ), ), ), ), Expanded( child: Container( child: Center( child: Text( "B", style: GoogleFonts.montserrat(fontSize: 12, color: Colors.white), ), ), ), ), Expanded( child: Container( child: Center( child: Text( "C", style: GoogleFonts.montserrat(fontSize: 12, color: Colors.white), ), ), ), ), Expanded( child: Container(), ), Expanded( child: Container( child: Center( child: Text( "D", style: GoogleFonts.montserrat(fontSize: 12, color: Colors.white), ), ), ), ), Expanded( child: Container( child: Center( child: Text( "E", style: GoogleFonts.montserrat(fontSize: 12, color: Colors.white), ), ), ), ), Expanded( child: Container( child: Center( child: Text( "F", style: GoogleFonts.montserrat(fontSize: 12, color: Colors.white), ), ), ), ), Expanded( child: Container( child: Center( child: Text( "G", style: GoogleFonts.montserrat(fontSize: 12, color: Colors.white), ), ), ), ), Expanded( child: Container(), ), Expanded( child: Container( child: Center( child: Text( "H", style: GoogleFonts.montserrat(fontSize: 12, color: Colors.white), ), ), ), ), Expanded( child: Container( child: Center( child: Text( "I", style: GoogleFonts.montserrat(fontSize: 12, color: Colors.white), ), ), ), ), Expanded( child: Container( child: Center( child: Text( "J", style: GoogleFonts.montserrat(fontSize: 12, color: Colors.white), ), ), ), ), Expanded( child: Container(), ), ]; } @override Widget build(BuildContext context) { return Scaffold( body: SafeArea( child: Stack( children: <Widget>[ Positioned( left: 8, right: 24, top: 0, child: Row( mainAxisSize: MainAxisSize.min, children: <Widget>[ Icon(Icons.keyboard_arrow_left), Spacer(), Text( "Your Ticket", style: GoogleFonts.montserrat(fontSize: 20), ), Spacer(), ], ), ), Positioned( left: 0, right: 0, top: 48, bottom: 0, child: Container( decoration: BoxDecoration( color: appColor, borderRadius: BorderRadius.circular(24), ), child: Column( crossAxisAlignment: CrossAxisAlignment.start, children: <Widget>[ Expanded( flex: 2, child: Padding( padding: const EdgeInsets.only(left: 24, top: 16), child: Text( "Select Seats", style: GoogleFonts.montserrat(color: Colors.white, fontWeight: FontWeight.w500, fontSize: 16), ), ), ), Expanded( flex: 28, child: Column( children: <Widget>[ Expanded( flex: 1, child: Row( children: _buildSeatTitle(), ), ), Expanded( flex: 15, child: ListView.builder( itemCount: _tmp.length, itemBuilder: (context, index) { List<Seat> _seatItems = _tmp[index]; int idx = 30 + index; return Padding( padding: const EdgeInsets.all(6.0), child: Row( children: <Widget>[ Expanded( child: Text( idx.toString(), style: GoogleFonts.montserrat(fontSize: 12, color: Colors.white), )), Expanded( child: _seatItems[0].isAvailable ? Container( margin: EdgeInsets.symmetric(horizontal: 3), height: 20, decoration: BoxDecoration( color: Colors.white, borderRadius: BorderRadius.circular(6), ), ) : Container( margin: EdgeInsets.symmetric(horizontal: 3), height: 20, decoration: BoxDecoration( border: Border.all(color: Colors.white), borderRadius: BorderRadius.circular(6)), ), ), Expanded( child: _seatItems[1].isAvailable ? Container( margin: EdgeInsets.symmetric(horizontal: 3), height: 20, width: 24, decoration: BoxDecoration( color: Colors.white, borderRadius: BorderRadius.circular(6), ), ) : Container( margin: EdgeInsets.symmetric(horizontal: 3), height: 20, width: 24, decoration: BoxDecoration( border: Border.all(color: Colors.white), borderRadius: BorderRadius.circular(6)), ), ), Expanded( child: _seatItems[2].isAvailable ? Container( margin: EdgeInsets.symmetric(horizontal: 3), height: 20, width: 24, decoration: BoxDecoration( color: Colors.white, borderRadius: BorderRadius.circular(6), ), ) : Container( margin: EdgeInsets.symmetric(horizontal: 3), height: 20, width: 24, decoration: BoxDecoration( border: Border.all(color: Colors.white), borderRadius: BorderRadius.circular(6)), ), ), Expanded( child: Container(), ), Expanded( child: _seatItems[3].isAvailable ? Container( margin: EdgeInsets.symmetric(horizontal: 3), height: 20, width: 24, decoration: BoxDecoration( color: Colors.white, borderRadius: BorderRadius.circular(6), ), ) : Container( margin: EdgeInsets.symmetric(horizontal: 3), height: 20, width: 24, decoration: BoxDecoration( border: Border.all(color: Colors.white), borderRadius: BorderRadius.circular(6)), ), ), Expanded( child: _seatItems[4].isAvailable ? Container( margin: EdgeInsets.symmetric(horizontal: 3), height: 20, width: 24, decoration: BoxDecoration( color: Colors.white, borderRadius: BorderRadius.circular(6), ), ) : Container( margin: EdgeInsets.symmetric(horizontal: 3), height: 20, width: 24, decoration: BoxDecoration( border: Border.all(color: Colors.white), borderRadius: BorderRadius.circular(6)), ), ), Expanded( child: _seatItems[5].isAvailable ? Container( margin: EdgeInsets.symmetric(horizontal: 3), height: 20, width: 24, decoration: BoxDecoration( color: Colors.white, borderRadius: BorderRadius.circular(6), ), ) : Container( margin: EdgeInsets.symmetric(horizontal: 3), height: 20, width: 24, decoration: BoxDecoration( border: Border.all(color: Colors.white), borderRadius: BorderRadius.circular(6)), ), ), Expanded( child: _seatItems[6].isAvailable ? Container( margin: EdgeInsets.symmetric(horizontal: 3), height: 20, width: 24, decoration: BoxDecoration( color: Colors.white, borderRadius: BorderRadius.circular(6), ), ) : Container( margin: EdgeInsets.symmetric(horizontal: 3), height: 20, width: 24, decoration: BoxDecoration( border: Border.all(color: Colors.white), borderRadius: BorderRadius.circular(6)), ), ), Expanded(child: Container()), Expanded( child: _seatItems[7].isAvailable ? Container( margin: EdgeInsets.symmetric(horizontal: 3), height: 20, width: 24, decoration: BoxDecoration( color: Colors.white, borderRadius: BorderRadius.circular(6), ), ) : Container( margin: EdgeInsets.symmetric(horizontal: 3), height: 20, width: 24, decoration: BoxDecoration( border: Border.all(color: Colors.white), borderRadius: BorderRadius.circular(6)), ), ), Expanded( child: _seatItems[8].isAvailable ? Container( margin: EdgeInsets.symmetric(horizontal: 3), height: 20, width: 24, decoration: BoxDecoration( color: Colors.white, borderRadius: BorderRadius.circular(6), ), ) : Container( margin: EdgeInsets.symmetric(horizontal: 3), height: 20, width: 24, decoration: BoxDecoration( border: Border.all(color: Colors.white), borderRadius: BorderRadius.circular(6)), ), ), Expanded( child: _seatItems[9].isAvailable ? Container( margin: EdgeInsets.symmetric(horizontal: 3), height: 20, width: 24, decoration: BoxDecoration( color: Colors.white, borderRadius: BorderRadius.circular(6), ), ) : Container( margin: EdgeInsets.symmetric(horizontal: 3), height: 20, width: 24, decoration: BoxDecoration( border: Border.all(color: Colors.white), borderRadius: BorderRadius.circular(6)), ), ), Expanded( child: Container(), ), ], ), ); }), ) ], ), ), Expanded( flex: 4, child: Column( children: <Widget>[ Expanded( child: Padding( padding: const EdgeInsets.symmetric(horizontal: 16), child: Row( children: <Widget>[ Container( height: 24, width: 24, decoration: BoxDecoration( color: Colors.indigoAccent, borderRadius: BorderRadius.circular(6)), ), Padding( padding: const EdgeInsets.all(8.0), child: Text( "Choosen", style: GoogleFonts.montserrat(color: Colors.white, fontSize: 11), ), ), Spacer(), Container( height: 24, width: 24, decoration: BoxDecoration( border: Border.all(color: Colors.white), borderRadius: BorderRadius.circular(6)), ), Padding( padding: const EdgeInsets.all(8.0), child: Text( "Available", style: GoogleFonts.montserrat(color: Colors.white, fontSize: 11), ), ), Spacer(), Container( height: 24, width: 24, decoration: BoxDecoration(color: Colors.white, borderRadius: BorderRadius.circular(6)), ), Padding( padding: const EdgeInsets.all(8.0), child: Text( "Blocked", style: GoogleFonts.montserrat(color: Colors.white, fontSize: 11), ), ), ], ), ), ), Expanded( child: Padding( padding: const EdgeInsets.only(right: 24, top: 8), child: Align( alignment: Alignment.centerRight, child: MaterialButton( elevation: 8, color: appColor, onPressed: () {}, child: Text( "Confirm", style: GoogleFonts.montserrat( fontSize: 12, color: Colors.white, ), ), ), ), ), ), ], ), ), Expanded(flex: 4, child: Container()), ], ), ), ), Positioned( bottom: 0, right: 0, left: 0, child: Container( height: 64, padding: EdgeInsets.symmetric(horizontal: 24), decoration: BoxDecoration( color: Colors.grey[50], borderRadius: BorderRadius.only( topLeft: Radius.circular(24), topRight: Radius.circular(24), )), child: Row( mainAxisAlignment: MainAxisAlignment.spaceBetween, children: <Widget>[ IconButton( icon: Icon(Icons.home), onPressed: () {}, ), IconButton( icon: Icon(Icons.card_giftcard), onPressed: () {}, ), IconButton( icon: Icon(Icons.style), color: Colors.indigoAccent, onPressed: () {}, ), IconButton( icon: Icon(Icons.person_outline), onPressed: () {}, ) ], ), ), ) ], ), ), ); } }
今回も読んでくださってありがとうございます。
- 投稿日:2020-04-04T18:00:17+09:00
DataBinding で ListViewを表示
はじめに
DataBindingとListViewを使って簡単なリスト表示をやってみたときのメモ。
やったこと
1. DataBindingの有効化
Gradle(app)に設定を追記。
app/build.gradleandroid { dataBinding { enabled true } }2. Modelの作成
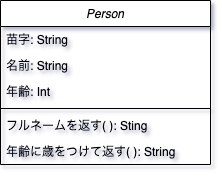
ListViewに表示するデータを保持、整形するためのModelを作成。
model/Person.ktclass Person( private val firstName: String, private val lastName: String, private val age: Int ) { fun getFullName() = "$firstName $lastName" fun getDisplayAge() = "$age 歳" }
3. ViewModelの作成
ModelとViewをつなぎ合わせるためのViewModelを作成。
ほとんどの属性値、メソッドはビューとのバインド用。viewmodel/MainViewModel.ktclass MainViewModel : ViewModel() { private val dataList by lazy { ArrayList<Person>() } private val _items = MutableLiveData<List<Person>>() val items: LiveData<List<Person>> = _items var firstName = MutableLiveData("") var lastName = MutableLiveData("") var age = MutableLiveData("") var isEnabled = MediatorLiveData<Boolean>() private fun isAllEntered() = firstName.value!!.isNotBlank() && lastName.value!!.isNotBlank() && age.value!!.isNotBlank() init { isEnabled.addSource(firstName) { isEnabled.postValue(isAllEntered()) } isEnabled.addSource(lastName) { isEnabled.postValue(isAllEntered()) } isEnabled.addSource(age) { isEnabled.postValue(isAllEntered()) } } fun onAddClick() { val fnVal = firstName.value ?: "" val lnVal = lastName.value ?: "" val ageVal = if (age.value!!.isEmpty()) 0 else Integer.parseInt(age.value!!) dataList.add(Person(fnVal, lnVal, ageVal)) _items.value = dataList } fun getOnItemClickListener(): AdapterView.OnItemClickListener { return AdapterView.OnItemClickListener { adapterView, view, i, l -> dataList.removeAt(i) _items.value = dataList } } }4. カスタムバインディングアダプタの作成
カスタムバインディングアダプタを作成することで、
レイアウトファイルに対してカスタム属性とメソッドをバインドさせることができる。util/DataBindAdapter.kt@BindingAdapter("onItemClickListener") fun setOnItemClickListener(listView: ListView, listener: AdapterView.OnItemClickListener) { listView.onItemClickListener = listener }メソッドに対して
@BindingAdapter(属性)を付与することによって
レイアウトファイルに任意の属性が設定でき、バインドができる。<ListView app:onItemClickListener="@{viewModel.getOnItemClickListener()}"> </ListView>属性値である
viewModel.getOnItemClickListener()が
setOnItemClickListenerの第2引数に渡される。
ここでは、ListViewに対してクリック時のリスナーを登録。5. レイアウトファイルの作成
例によってデータバインディング用のレイアウトに変換したのち、
バインドさせたい属性とViewModelの属性値を
@{~}(単方向)、@={~}(双方向)でバインドさせていく。・メインアクティビティ
layout/activity_main.xml<?xml version="1.0" encoding="utf-8"?> <layout xmlns:android="http://schemas.android.com/apk/res/android" xmlns:app="http://schemas.android.com/apk/res-auto"> <data> <variable name="viewModel" type="com.example.mymvvmlistview.viewmodel.MainViewModel" /> </data> <LinearLayout android:layout_width="match_parent" android:layout_height="match_parent" android:orientation="vertical"> <LinearLayout android:layout_width="match_parent" android:layout_height="50dp" android:orientation="horizontal"> <EditText android:id="@+id/etLastName" android:layout_width="0dp" android:layout_height="match_parent" android:layout_weight="3.0" android:text="@={viewModel.lastName}" android:ems="10" android:hint="苗字" android:inputType="textPersonName" android:autofillHints="" /> <EditText android:id="@+id/etFirstName" android:layout_width="0dp" android:layout_height="match_parent" android:layout_weight="3.0" android:text="@={viewModel.firstName}" android:ems="10" android:hint="名前" android:inputType="textPersonName" android:autofillHints="" /> <EditText android:id="@+id/editText3" android:layout_width="0dp" android:layout_height="match_parent" android:layout_weight="2" android:text="@={viewModel.age}" android:ems="10" android:hint="年齢" android:inputType="number" android:autofillHints="" /> <Button android:id="@+id/btAdd" android:layout_width="0dp" android:layout_height="match_parent" android:layout_weight="2" android:onClick="@{() -> viewModel.onAddClick()}" android:text="追加" android:enabled="@{viewModel.isEnabled()}"/> </LinearLayout> <ListView android:id="@+id/lvItem" android:layout_width="match_parent" android:layout_height="0dp" android:layout_weight="1" app:onItemClickListener="@{viewModel.getOnItemClickListener()}"> </ListView> </LinearLayout> </layout>・ListView用のカスタムセル
layout/list_item_cell.xml<?xml version="1.0" encoding="utf-8"?> <layout xmlns:android="http://schemas.android.com/apk/res/android" xmlns:tools="http://schemas.android.com/tools"> <data> <variable name="person" type="com.example.mymvvmlistview.model.Person" /> <variable name="viewModel" type="com.example.mymvvmlistview.viewmodel.MainViewModel" /> </data> <LinearLayout android:layout_width="match_parent" android:layout_height="50dp"> <TextView android:id="@+id/tvName" android:layout_width="0dp" android:layout_height="match_parent" android:layout_marginStart="30dp" android:layout_weight="0.7" android:gravity="center" android:textAlignment="center" android:textSize="18sp" tools:text="@{person.fullName}" /> <TextView android:id="@+id/tvAge" android:layout_width="0dp" android:layout_height="match_parent" android:layout_marginEnd="30dp" android:layout_weight="0.3" android:gravity="center" android:textAlignment="center" android:textSize="18sp" tools:text="@{person.displayAge}" /> </LinearLayout> </layout>6. ListViewのアダプタを作成
ListViewで使用するカスタムアダプタを作成する。
MyCustomAdapter.ktclass MyCustomAdapter( private val context: Context, private var dataList: List<Person> ) : BaseAdapter() { override fun getView(position: Int, convertView: View?, parent: ViewGroup?): View { val binding = if (convertView == null) { val inflater = LayoutInflater.from(context) // https://developer.android.com/topic/libraries/data-binding/expressions?hl=ja val tBinding: ListItemCellBinding = ListItemCellBinding.inflate(inflater, parent, false) // tagにインスタンスをセット(convertViewが存在する場合に使い回すため) tBinding.root.tag = tBinding tBinding } else { convertView.tag as ListItemCellBinding } binding.person = getItem(position) as Person // 即時バインド binding.executePendingBindings() return binding.root } fun updateItems(newItems: List<Person>) { dataList = newItems // 変更の通知 notifyDataSetChanged() } override fun getItem(position: Int): Any { return dataList[position] } override fun getItemId(position: Int): Long { return position.toLong() } override fun getCount(): Int { return dataList.size } }7. Activityの修正
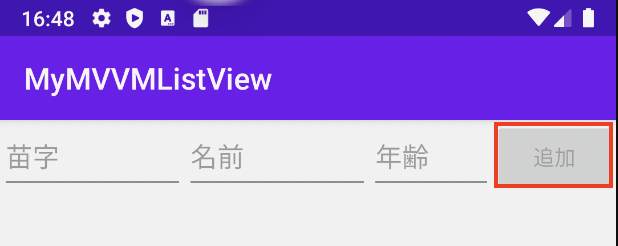
ui/MainActivity.ktclass MainActivity : AppCompatActivity() { private val mViewModel: MainViewModel by lazy { ViewModelProvider(this).get(MainViewModel::class.java) } override fun onCreate(savedInstanceState: Bundle?) { super.onCreate(savedInstanceState) val binding = DataBindingUtil.setContentView<ActivityMainBinding>( this, R.layout.activity_main ) with(binding) { viewModel = mViewModel lvItem.adapter = MyCustomAdapter(applicationContext, ArrayList(0)) lifecycleOwner = this@MainActivity (viewModel as MainViewModel).items.observe(this@MainActivity, Observer { item -> val adapter = lvItem.adapter as MyCustomAdapter adapter.updateItems(item) }) } } }8. 動作確認
双方向バインディングにより、画面上の「苗字」「名前」「年齢」の値を監視し、
なにかしらの入力値が入るまで追加ボタンを押すことができないようにした。
参考
先人の知恵をお借りしました。
ありがとうございます。
Android DataBinding 〜ListViewで使う〜
【Android】LiveData+DataBinding+ViewModelでListView作成
How can I use Android DataBinding in a listview and still use a ViewHolder pattern?

- 投稿日:2020-04-04T17:42:59+09:00
AndroidのCIとテストアプリ配信をサービスアカウントを使ったGithubActions+AppDistributionに載せ替える
載せ替えた理由
CI
・BitriseにiOSとAndroidの両方を載せて回していたが、プロジェクト数も多くなり始め契約していたMAX2レーンのプランだとタイミングによって待つ必要が出てきていた。
・それぞれのプロジェクトで使っているBitriseのStepにばらつきが出ていたので、統一するタイミングが欲しかった。
・サーバーサイドがすでに一部載せ替えており、使いやすいし無料枠が余っていると言われていた。
・とりあえず新しい技術には触っておきたかった。テストアプリ配信
・FabricのFirebase統合に伴い、Betaが利用できなくなる。
https://docs.fabric.io/apple/beta/overview.html完成形
とりあえずGithubActions用のYAMLファイルを載せておきます
name: CI

on:
  push:
    branches:
      - develop

jobs:
  build:
    runs-on: ubuntu-latest
    steps:
      - uses: actions/checkout@v2
      - name: Set up Ruby 2.6
        uses: actions/setup-ruby@v1
        with:
          ruby-version: 2.6.5
      - name: install bundler
        run: gem install bundler:2.0.2
      - uses: actions/setup-node@v1
        with:
          node-version: '10.x'
      - name: install firebase tools
        run: npm install -g firebase-tools
      - name: Set Google GOOGLE_APPLICATION_CREDENTIALS
        run: |
          cat << "EOF" > google_service_account_key.json
          ${{ secrets.GOOGLE_APPLICATION_CREDENTIALS }}
          EOF
      - name: exec fastlane
        run: |
          bundle install --path vendor/bundle
          bundle exec fastlane beta
        env:
          GOOGLE_APPLICATION_CREDENTIALS: ./google_service_account_key.json
解説
当初はFirebaseTokenを使って実装していたのですが、各プロジェクトの担当者がそれぞれtokenの認証通すのか?退社した場合どうするのか?みたいな問題があったため、サービスアカウントを使って実装する運びとなりました。
結構詰まりポイントがあったので、解説していきます。
(ほぼ社内のエンジニアの方に助けてもらってできたので、私はまとめているだけです。皆さんありがとうございました…)AppDistributionサービスアカウント情報の格納
まず、サービスアカウントの情報はYAMLから秘匿された状態でGithubActionsから参照できるようにしなければなりません。
これを実現するためにはGithubのSecretsを利用すれば可能ですが、Secretsは以下の通りjson形式のファイル保存をさけるように言及しています。
https://help.github.com/ja/actions/configuring-and-managing-workflows/creating-and-storing-encrypted-secrets
シークレットの名前には、空白を含めることはできません。 GitHubがログのシークレットを確実に削除するよう、構造化データをシークレットの値として使用することは避けてください。 たとえば、JSONやエンコードされたGit blobを含むシークレットは作成しないでください。何度か検証した結果、Secretに改行が含まれているものをYAMLで読み込むと、シェルスクリプトに改行を書いたと解釈されてしまうようです。
なので、Secretに格納する前に、サービスアカウントのjsonから改行を全て取り除きました。
また、サービスアカウントjson内の""などもシェルスクリプトの記法として解釈されるため、YAML上でヒアドキュメントを使って文字リテラルとして解釈させます。加工したjsonをSecret内に格納した上で、以下のスクリプトでgoogle_service_account_key.jsonとして出力します。
- name: Set Google GOOGLE_APPLICATION_CREDENTIALS
  run: |
    cat << "EOF" > google_service_account_key.json
    ${{ secrets.GOOGLE_APPLICATION_CREDENTIALS }}
    EOF
AppDistributionの実行
実際にAppDistributionに配信させる部分は、fastlaneから実行します。
fastlaneから実行できるように、PluginFileに以下を記述します。
参考
https://github.com/fastlane/fastlane-plugin-firebase_app_distributiongem 'fastlane-plugin-firebase_app_distribution'fastlaneに先ほど生成したjsonのPathを渡します。
環境変数名GOOGLE_APPLICATION_CREDENTIALSにパスを入れて渡してやると、あとは勝手に解釈してくれるようです。
参考
https://firebase.google.com/docs/app-distribution/android/distribute-gradle- name: exec fastlane run: | bundle install --path vendor/bundle bundle exec fastlane beta env: GOOGLE_APPLICATION_CREDENTIALS: ./google_service_account_key.json既存のlaneのBeta配信だった部分を以下に置き換えます。
hogehogeの部分はFirebaseに登録しているアプリIDに差し替えてください。firebase_app_distribution( app: "****************hogehoge****************", apk_path: apk_path, release_notes: "", groups: "GROUP" )これで準備は完了です。
あとはCIに設定したトリガに引っ掛けて動作させるだけです。まとめ
結構Secret周りにクセがあって、Androidエンジニアとしての知識だけだと辛かったです。
いつもGit周りはSourceTreeを利用しているので、CUI周りの知識が乏しく、ヒアドキュメントとか聞いたこともない単語でした
どこかで困っているAndroidエンジニアの助けになればと思います…
- 投稿日:2020-04-04T16:37:47+09:00
ターミナルからAndroidエミュレーターを起動
エミュレーターのリストを表示します。
$ emulator -list-avdsPixel_2_API_26
Pixel_3_API_26などと端末名が表示されます。
エミュレーターを起動します。
emulator @Pixel_2_API_26
エミュレーターが起動されました。
参考
https://developer.android.com/studio/run/emulator-commandline
- 投稿日:2020-04-04T15:57:54+09:00
lifecycle-livedata-ktx を使ってみた
lifecycle-livedata-ktxとは名前のとおりLiveDataのKTX拡張機能のことである。
具体的には、LiveData + Coroutine で組み合わせて非同期で値を取得して返す仕組みである。導入方法
app/build.gradleに以下を追加するだけ。
dependencies {
    implementation "androidx.lifecycle:lifecycle-livedata-ktx:2.2.0"
}
公式にも載っている
https://developer.android.com/kotlin/ktx使い方
ViewModelクラスで、このように書くことができる。
class MainViewModel : ViewModel() {

    // 変数宣言と共に、liveData関数内に非同期処理を実装できる
    val data: LiveData<String> = liveData {
        // 結果を出力
        emit("Hello")
    }
そしてFragmentから先ほどのdata変数を購読する。
// observeした時に処理が開始される
viewModel.data.observe(viewLifecycleOwner, Observer { data ->
    // Helloが表示される
    binding.message.text = data
})
observeした時にliveData関数が呼び出されるので、使用タイミングには気をつけること。実用的に使うとこんな感じ
ViewModel側
class MainViewModel : ViewModel() {

    // lifeData変数にAPI取得を実装できる
    val ktxLiveData: LiveData<ScreenState> = liveData {
        emit(ScreenState.Loading)
        val data = doSomeThing()
        emit(ScreenState.Data(data))
    }

    // API通信やDB取得などの処理
    private suspend fun doSomeThing(): SomeData {
        delay(3000L)
        return SomeData(123)
    }
Fragment側でlivedataをobserveするとAPIなどの処理が実行される
class MainFragment : Fragment() {
    private fun loadKtxLiveData() {
        viewModel.ktxLiveData.observe(viewLifecycleOwner, Observer { state ->
            when (state) {
                is ScreenState.Loading -> {
                    Log.d("MainFragment", "Loading表示")
                }
                is ScreenState.Data -> {
                    Log.d("MainFragment", "取得成功 Data: ${state.someData}")
                    binding.message.text = state.someData.id.toString()
                    Log.d("MainFragment", "Finish")
                }
                is ScreenState.Error -> {
                    // Errorハンドリング
                    Log.d("MainFragment", "Errorダイアログ表示")
                }
            }
        })
    }
もしくは、DataBindingにちょくせつViewModelを渡してしまえば、もっとコードを省ける。
使用コード
- 投稿日:2020-04-04T11:22:00+09:00
Androidをペンタブレットにする(1/3)
WindowsやMacは通常マウスとキーボードで操作しますが、Androidでは通常タッチパネルで操作します。
そこで、Androidのタッチパネル操作をWindowsから検知するようにして、Androidをペンタブレット化してみます。
実際には、AndroidをBLEペリフェラルにして、Windowsかはブラウザ経由でAndroidにつなぎます。これをやる目的は、毎度の通り勉強のためでして、以下のノウハウを得ることを目的にしています。
- Androidをペリフェラル化できるようになる。
- Androidのタッチイベントを操れるようになる。
- ブラウザからペリフェラルにアクセスできるようになる。
この環境が整うと、ちょっとした機能をちょこちょこつけるモチベーションが上がってきます。ということで、ついでに以下のような機能をAndroidペンタブレットにつけます。
- Androidの地磁気センサー、ジャイロスコープ、加速度センサーを検出して、Windowsに通知する。
- AndroidのGPS情報を取得し、Windowsに通知する。
- AndroidでQRコードをスキャンし、Windowsに通知する。
- Androidで音声認識して、Windowsに通知する。
- AndroidのクリップボードにWindowsからコピーやペーストする。
- Androidのペンタブレットのパネルを1つではなく2つにする。
- AndroidにWindowsからToastを表示する。
- Androidで複数のボタンの押下を検出して、Windowsに通知する。
作っていくうちに、だんだん盛りだくさんになってしまいました。。。
今回はまずはAndroid側のタッチイベントを作成し、次にAndroidのその他機能を実装し、最後の投稿でWindows側のブラウザからAndroidを操ってみます。ソース一式は以下のGitHubに置いておきました。
poruruba/sensor_pen_tablet
https://github.com/poruruba/sensor_pen_tabletAndroidネイティブアプリなので、以降Android Studioを使います。
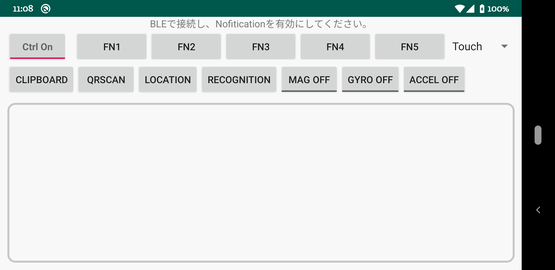
こんな感じの画面です。
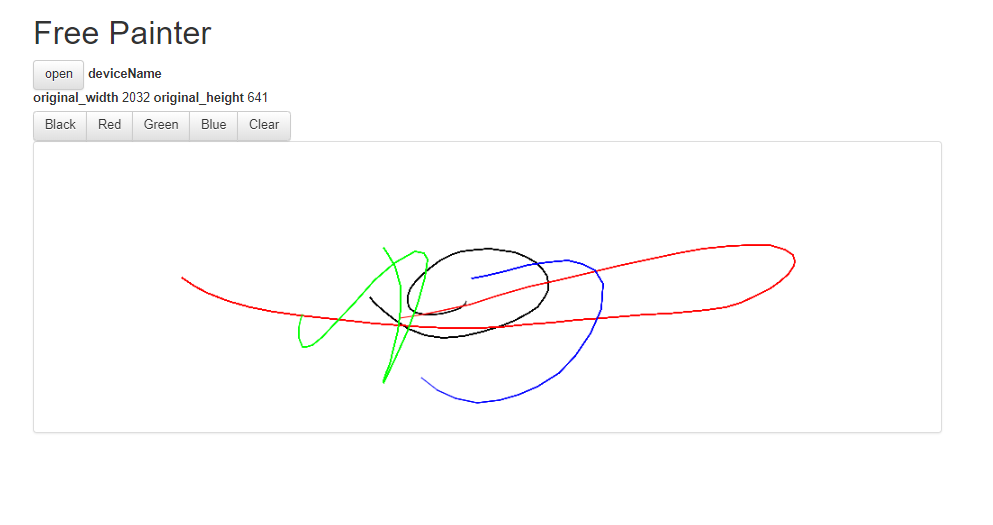
BLEセントラル側は、Chromeブラウザを使いました。こんな画面です。2つ作成します。
ブラウザですので、Macでも動作します。ただし、Web Bluetooth APIに対応している必要があります。
まずはBLEペリフェラル化する
BLEを使うので、AndroidManifest.xmlに許可の宣言を追記します。
AndroidManifest.xml<uses-feature android:name="android.hardware.bluetooth_le" android:required="true"/> <uses-permission android:name="android.permission.BLUETOOTH" /> <uses-permission android:name="android.permission.BLUETOOTH_ADMIN" />キャラクタリスティックの構成は以下の3つにしました。
① Write用:Writeのみ
② Read用:Readのみ
③ Notification用:WriteおよびNotificationのみこれで一通りの使い方がマスターできます。
ちなみに、NotificationにWrite権限が必要なのは、Notification通知を有効にしたり無効にしたりするときに書き込みを行うためです。それが決まれば、以下のように実装します。
onCreateのところ
MainActivity.javamBleManager = (BluetoothManager) getSystemService(Context.BLUETOOTH_SERVICE); if( mBleManager != null ) { mBleAdapter = mBleManager.getAdapter(); if (mBleAdapter != null) prepareBle(); }その実装
MainActivity.javaprivate void prepareBle(){ mBtGattServer = mBleManager.openGattServer(this, mGattServerCallback); btGattService = new BluetoothGattService(Const.UUID_SERVICE, BluetoothGattService.SERVICE_TYPE_PRIMARY); mWriteCharacteristic = new BluetoothGattCharacteristic(Const.UUID_WRITE, BluetoothGattCharacteristic.PROPERTY_WRITE, BluetoothGattCharacteristic.PERMISSION_WRITE); btGattService.addCharacteristic(mWriteCharacteristic); mReadCharacteristic = new BluetoothGattCharacteristic(Const.UUID_READ, BluetoothGattCharacteristic.PROPERTY_READ, BluetoothGattCharacteristic.PERMISSION_READ); btGattService.addCharacteristic(mReadCharacteristic); mNotifyCharacteristic = new BluetoothGattCharacteristic(Const.UUID_NOTIFY, BluetoothGattCharacteristic.PROPERTY_NOTIFY, BluetoothGattCharacteristic.PERMISSION_READ); btGattService.addCharacteristic(mNotifyCharacteristic); BluetoothGattDescriptor dataDescriptor = new BluetoothGattDescriptor(Const.UUID_DESC, BluetoothGattDescriptor.PERMISSION_WRITE | BluetoothGattDescriptor.PERMISSION_READ); mNotifyCharacteristic.addDescriptor(dataDescriptor); mBtGattServer.addService(btGattService); startBleAdvertising(); } private void startBleAdvertising(){ mBtAdvertiser = mBleAdapter.getBluetoothLeAdvertiser(); if( mBtAdvertiser == null ){ Toast.makeText(this, "BLE Peripheralモードが使用できません。", Toast.LENGTH_SHORT).show(); return; } AdvertiseData.Builder dataBuilder = new AdvertiseData.Builder(); dataBuilder.setIncludeTxPowerLevel(true); dataBuilder.addServiceUuid(new ParcelUuid(Const.UUID_SERVICE)); AdvertiseSettings.Builder settingsBuilder = new AdvertiseSettings.Builder(); settingsBuilder.setAdvertiseMode(AdvertiseSettings.ADVERTISE_MODE_BALANCED); settingsBuilder.setTxPowerLevel(AdvertiseSettings.ADVERTISE_TX_POWER_MEDIUM); settingsBuilder.setTimeout(0); settingsBuilder.setConnectable(true); AdvertiseData.Builder respBuilder = new AdvertiseData.Builder(); respBuilder.setIncludeDeviceName(true); mBtAdvertiser.startAdvertising(settingsBuilder.build(), dataBuilder.build(), respBuilder.build(), new AdvertiseCallback(){ @Override public void onStartSuccess(AdvertiseSettings settingsInEffect) { Log.d(TAG, "onStartSuccess"); } @Override public void onStartFailure(int errorCode) { Log.d(TAG, "onStartFailure"); } }); }より詳しく知りたい方は、以下をご参照ください。
AndroidをBLEペリフェラルにしようBLEペリフェラルとして起動した後、BLEセントラル側からの書き込みや読み出し要求が来た時の処理は、以下の部分で設定した自作のクラスで実装します。
mBtGattServer = mBleManager.openGattServer(this, mGattServerCallback);Read要求は単純です。private byte[] readValue のところに、読み出しに応えたい任意の値を格納しておきます。そして、onCharacteristicReadRequest のところで、以下を呼び出しているだけです。
MainActivity.javamBtGattServer.sendResponse(device, requestId, BluetoothGatt.GATT_SUCCESS, offset, readValue);何を返しているかというと、WriteやNotificationで送受信するパケットの最大長と、どのような機能を実装したかをビットで表現しています。(これらの値は、今回のアプリの機能実装で使うもので、通常は任意の値で良いです)
以下その実装です。Write要求であるonCharacteristicWriteRequestはあとで説明します。
MainActivity.javaprivate BluetoothGattServerCallback mGattServerCallback = new BluetoothGattServerCallback() { private byte[] readValue = new byte[]{ (byte)((Const.UUID_VALUE_SIZE >> 8) & 0xff), (byte)(Const.UUID_VALUE_SIZE & 0xff), (byte)((cap >> 24) & 0xff), (byte)((cap >> 16) & 0xff), (byte)((cap >> 8) & 0xff), (byte)((cap >> 0) & 0xff) }; @Override public void onMtuChanged (BluetoothDevice device, int mtu){ Log.d(TAG, "onMtuChanged(" + mtu + ")"); } @Override public void onConnectionStateChange(android.bluetooth.BluetoothDevice device, int status, int newState) { Log.d(TAG, "onConnectionStateChange"); if(newState == BluetoothProfile.STATE_CONNECTED){ mConnectedDevice = device; mIsConnected = true; Log.d(TAG, "STATE_CONNECTED:" + device.toString()); } else{ mIsConnected = false; Log.d(TAG, "Unknown STATE:" + newState); } } public void onCharacteristicReadRequest(android.bluetooth.BluetoothDevice device, int requestId, int offset, BluetoothGattCharacteristic characteristic) { Log.d(TAG, "onCharacteristicReadRequest"); if( characteristic.getUuid().compareTo(Const.UUID_READ) == 0) { mBtGattServer.sendResponse(device, requestId, BluetoothGatt.GATT_SUCCESS, offset, readValue); }else{ mBtGattServer.sendResponse(device, requestId, BluetoothGatt.GATT_FAILURE, offset, null ); } } public void onCharacteristicWriteRequest(android.bluetooth.BluetoothDevice device, int requestId, BluetoothGattCharacteristic characteristic, boolean preparedWrite, boolean responseNeeded, int offset, byte[] value) { Log.d(TAG, "onCharacteristicWriteRequest"); if( characteristic.getUuid().compareTo(Const.UUID_WRITE) == 0 ){ // ***** // 後述します。 // ***** }else{ mBtGattServer.sendResponse(device, requestId, BluetoothGatt.GATT_FAILURE, offset, null); } } public void onDescriptorReadRequest(BluetoothDevice device, int requestId, int offset, BluetoothGattDescriptor descriptor) { Log.d(TAG, "onDescriptorReadRequest"); if( descriptor.getUuid().compareTo(Const.UUID_DESC) == 0 ) { mBtGattServer.sendResponse(device, requestId, BluetoothGatt.GATT_SUCCESS, offset, notifyDescValue); } } public void onDescriptorWriteRequest(BluetoothDevice device, int requestId, BluetoothGattDescriptor descriptor, boolean preparedWrite, boolean responseNeeded, int offset, byte[] value) { Log.d(TAG, "onDescriptorWriteRequest"); if( descriptor.getUuid().compareTo(Const.UUID_DESC) == 0 ) { notifyDescValue[0] = value[0]; notifyDescValue[1] = value[1]; mBtGattServer.sendResponse(device, requestId, BluetoothGatt.GATT_SUCCESS, offset, null); } } };タッチパネルのイベントをフックする
それでは、今回の主題であるタッチパネルのイベントを扱っていきます。
タッチパネルのイベントをフックするために、新たにViewクラスを作成します。TouchViewというクラス名にしました。Viewクラスを親クラスとして派生させます。
そこに、以下のメソッドをオーバライドすれば、タッチのたびに呼び出されるようになります。TouchView.java@Override public boolean onTouchEvent(MotionEvent event) {その中で、受信したイベントの内容を簡単に整理したうえで、上位に通知します。
通知先は、あらかじめsetOnTouchEventLister でリスナーを設定してもらう前提です。複雑な実装ではないので、以下に示しておきます。
TouchView.javapublic class TouchView extends View{ private OnTouchEventListener listener = null; private int id; public class PointerXY{ public int pointerid = -1; public float x = 0.0f; public float y = 0.0f; public PointerXY(){ } } public class TouchViewEvent{ public int id; public int action; public int targetId; public PointerXY[] pointers; public TouchViewEvent(int id, int count){ this.id = id; this.pointers = new PointerXY[count]; for( int i = 0 ; i < count; i++ ) this.pointers[i] = new PointerXY(); } } public interface OnTouchEventListener { void onTouchEvent(TouchViewEvent event); } public TouchView(Context context) { this(context, null); } public TouchView(Context context, AttributeSet attrs) { super(context, attrs); } public void setOnTouchEventLister(int id, OnTouchEventListener listener){ this.id = id; this.listener = listener; } public void removeOnTouchEventLister(){ this.listener = null; } @Override public boolean onTouchEvent(MotionEvent event) { if( this.listener == null ) return true; TouchViewEvent ev = new TouchViewEvent(id, event.getPointerCount()); ev.action = event.getActionMasked(); int pointerIndex = event.getActionIndex(); ev.targetId = event.getPointerId(pointerIndex); for (int i = 0; i < ev.pointers.length; i++) { ev.pointers[i].pointerid = event.getPointerId(i); ev.pointers[i].x = event.getX(i); ev.pointers[i].y = event.getY(i); } if( this.listener != null ) this.listener.onTouchEvent(ev); return true; } }メインのActivityでリスナを登録します。
MainActivity.javaTouchView touchview; touchview = findViewById(R.id.view_touch); touchview.setOnTouchEventLister(0, this); touchview = findViewById(R.id.view_touch1); touchview.setOnTouchEventLister(1, this); touchview = findViewById(R.id.view_touch2); touchview.setOnTouchEventLister(2, this);複数登録するため、0、1、2という識別子を設定し、区別しています。
実際のTouchViewは、静的にLayout XMLに指定します。activity_main.xml<LinearLayout android:id="@+id/layout_touch" android:layout_width="match_parent" android:layout_height="match_parent" android:layout_weight="1" android:visibility="gone" android:orientation="horizontal"> <com.example.sensorpentablet.TouchView android:id="@+id/view_touch" android:layout_margin="10dp" android:background="@drawable/border_style" android:layout_width="match_parent" android:layout_height="match_parent" /> </LinearLayout> <LinearLayout android:id="@+id/layout_2touch" android:layout_width="match_parent" android:layout_height="match_parent" android:layout_weight="1" android:visibility="gone" android:orientation="horizontal"> <com.example.sensorpentablet.TouchView android:id="@+id/view_touch1" android:layout_weight="1" android:layout_marginRight="60dp" android:layout_marginLeft="10dp" android:layout_marginBottom="10dp" android:layout_marginTop="10dp" android:background="@drawable/border_style" android:layout_width="match_parent" android:layout_height="match_parent" /> <com.example.sensorpentablet.TouchView android:id="@+id/view_touch2" android:layout_weight="1" android:layout_marginRight="10dp" android:layout_marginLeft="60dp" android:layout_marginBottom="10dp" android:layout_marginTop="10dp" android:background="@drawable/border_style" android:layout_width="match_parent" android:layout_height="match_parent" /> </LinearLayout>@drawable/border_style はViewに四角の囲いを描画して、どこがタッチ範囲なのかがわかるようにしています。
border_style.xml<?xml version="1.0" encoding="utf-8"?> <shape xmlns:android="http://schemas.android.com/apk/res/android" android:shape="rectangle"> <stroke android:width="3dp" android:color="#c9c9c9"/> <corners android:radius="10dp" /> <solid android:color="#00000000" /> </shape>Android画面いっぱいの1つのTouchViewとして使う場合と、2つのTouchViewを左右に配置し使う、2つの方式を用意しています。
visibilityをgoneにしているのはそのためで、使う方をvisibleにして、使わない用をgoneにします。
private void selectPanel(String item)が実装の部分です。割愛しまが。visibilityを設定したのち、変わったことをNotificationで上位に伝えています。
また、どっちの方式にするかを選択するためのSpinnerも配置しています。BLEパケットの通信仕様
ここで、BLEパケットの通信仕様を明示しておきます。
今回は、1回で送信できるパケット長を最大20バイトとしています。MTU交換によって伸張したサイズで、やってもいいのですが、処理が複雑になるので、固定サイズにしています。実は、これはFIDOのCTAPを参考にさせていただいています。
必ず先頭が0x83で、続いて2バイトでビッグエンディアンがあり、送信したいデータ(20バイトに収まる分)が続きます。
そのあとに、20バイトきっかりずつ分割受信されてきます。ただし、2つ目以降の受信パケットの先頭が0x00、次が0x01、その次が0x02でインクリメントされます。20バイトぴったりで受信している時点ではまだ次があると考え、20バイトより小さかったらそれが最後のパケットとみなします。受信の場合のことを書きましたが、Notificationの場合も同じルールで通知します。
実装としてはこんな感じです。
受信処理は、BluetoothGattServerCallbackのonCharacteristicWriteRequest の部分です。MainActivity.javaif( expected_len > 0 && value[0] != expected_slot ) expected_len = 0; if( expected_len == 0 ) { if (value[0] != (byte)0x83) { mBtGattServer.sendResponse(device, requestId, BluetoothGatt.GATT_FAILURE, offset, null); return; } recv_len = 0; expected_len = (((value[1] << 8) & 0x00ff) | (value[2] & 0x00ff)); System.arraycopy(value, 3, recv_buffer, recv_len, value.length - 3); recv_len += value.length - 3; expected_slot = 0x00; }else{ System.arraycopy(value, 1, recv_buffer, recv_len, value.length - 1); recv_len += value.length - 1; expected_slot++; } mBtGattServer.sendResponse(device, requestId, BluetoothGatt.GATT_SUCCESS, offset, null); if( recv_len >= expected_len ) { processCommand(); expected_len = 0; }通知処理は以下の部分です。
MainActivity.javapublic void sendBuffer(byte[] send_buffer, int send_len){ if( !isNotification() ) return; int offset = 0; int slot = 0x00; int packet_size = 0; byte[] value = charValue; do{ if(offset == 0){ packet_size = send_len - offset; if( packet_size >= (Const.UUID_VALUE_SIZE - 3) ) { packet_size = Const.UUID_VALUE_SIZE - 3; }else{ value = new byte[packet_size + 3]; } value[0] = (byte)0x83; value[1] = (byte)((send_len >> 8) & 0xff); value[2] = (byte)(send_len & 0xff); System.arraycopy(send_buffer, offset, value, 3, packet_size); offset += packet_size; packet_size += 3; }else{ packet_size = send_len - offset; if( packet_size >= (Const.UUID_VALUE_SIZE - 1) ){ packet_size = Const.UUID_VALUE_SIZE - 1; }else{ value = new byte[packet_size + 1]; } value[0] = (byte)slot++; System.arraycopy(send_buffer, offset, value, 1, packet_size); offset += packet_size; packet_size += 1; } mNotifyCharacteristic.setValue(value); mBtGattServer.notifyCharacteristicChanged(mConnectedDevice, mNotifyCharacteristic, false); }while(packet_size >= Const.UUID_VALUE_SIZE); }最後に、TouchViewからコールバックされたタッチイベントをBLEセントラルに通知する部分の処理です。
MainActivity.java@Override public void onTouchEvent(TouchView.TouchViewEvent event) { Log.d(TAG,"onTouchEvent : " + event.action + ", " + event.targetId); for( int i = 0 ; i < event.pointers.length ; i++ ) Log.d(TAG,"\t[" + i + "] " + event.pointers[i].pointerid + " (" + event.pointers[i].x + "," + event.pointers[i].y + ")"); int float_unit = Float.SIZE / Byte.SIZE; int int_unit = Integer.SIZE / Byte.SIZE; byte[] send_buffer = new byte[2 + 2 * int_unit + 1 + event.pointers.length * (int_unit + float_unit * 2)]; send_buffer[0] = Const.RSP_TOUCH_EVENT; send_buffer[1] = (byte)event.id; setIntBytes(send_buffer, 2, event.action); setIntBytes(send_buffer, 2 + int_unit, event.targetId); send_buffer[2 + 2 * int_unit] = (byte)event.pointers.length; for( int i = 0 ; i < event.pointers.length ; i++ ){ setIntBytes(send_buffer, 2 + 2 * int_unit + 1 + i * (int_unit + 2 * float_unit), event.pointers[i].pointerid); setFloatBytes(send_buffer, 2 + 2 * int_unit + 1 + i * (int_unit + 2 * float_unit) + int_unit, event.pointers[i].x); setFloatBytes(send_buffer, 2 + 2 * int_unit + 1 + i * (int_unit + 2 * float_unit) + int_unit + float_unit, event.pointers[i].y); } sendBuffer(send_buffer, send_buffer.length); }ここでちょっと補足します。以下のような関数を作っています。intやfloatといった既定の型は、CPUのエンディアンに依存してメモリに配置されています。したがってそのままBLEセントラルに送信すると、エンディアンが違った場合正しく受け取れないことになります。そこで、BLEセントラルに送るデータとしてはビッグエンディアン固定にしています。
MainActivity.javapublic static int setIntBytes(byte[] buffer, int offset, int value){ int arraySize = Integer.SIZE / Byte.SIZE; ByteBuffer bytebuffer = ByteBuffer.allocate(arraySize); bytebuffer.order(ByteOrder.BIG_ENDIAN); byte[] array = bytebuffer.putInt(value).array(); System.arraycopy(array, 0, buffer, offset, arraySize); return arraySize; } public static int setFloatBytes(byte[] buffer, int offset, float value){ int arraySize = Float.SIZE / Byte.SIZE; ByteBuffer bytebuffer = ByteBuffer.allocate(arraySize); bytebuffer.order(ByteOrder.BIG_ENDIAN); byte[] array = bytebuffer.putFloat(value).array(); System.arraycopy(array, 0, buffer, offset, arraySize); return arraySize; }最後に
とりあえず、Androidのタッチイベント処理を実装してみました。
それだけでも結構説明が長くなってしまいました。次回は、BLEセントラルであるブラウザ側の処理に入る前に、寄り道して、Androidの各種センサやGPSなど、ついでの機能の実装を説明予定です。
以上

- 投稿日:2020-04-04T10:49:25+09:00
GitLab Runner で Unity の Android SDK が見つからない場合の対処法
GitLab Runner で Unity の Android SDK が見つからない場合の対処法
症状
GitLab Runner で Unity の Androidアプリのビルド時に、下記のエラーが発生。
DisplayProgressbar: Detecting Android SDK
UnityException: Android SDK not found
Unable to locate Android SDK.
解決法
- システム環境変数に「ANDROID_SDK_ROOT」を追加。
- サービス「gitlab-runner」を再起動。
説明
Unity 2018.4.20f1 の Preferences -> External Tools で Android SDK の設定はしているが、GitLab Runner でコマンドラインビルドを実行すると、上記のエラーが発生。
サービス「gitlab-runner」は別のアカウントで Windows 10 にログインしているため、レジストリに保存されている Android SDK の設定は参照されていない模様。