- 投稿日:2020-03-17T20:00:19+09:00
SendKeys.Send()でチェックボックスをチェックするワザップ
地味に調べてもなかなか見つからなかったので
?※記事の対象者と背景を追記しました。?♀️
そのままタイトルのとおりにSendKeys.Send()メソッドを使用してチェックボックスをチェックする方法になります。
業務で使用している Windows Form のアプリケーションの操作を自動化したいという話があり、いろいろ要件はあったのですが最終的には人間が行っているキーボード操作をそのままエミュレートして再現する形をとりました。タイトルに対する結論としてはチェックボックスにフォーカスされている状態で☟でおkです。
SendKeys.Send(" ")つまるところ、普通にキーボード操作でチェックボックスをチェックするように
SPACEキーの入力をエミュレートしたいのですが リファレンス の特殊なキーの一覧(Enterなど)にはSPACEがありませんしSendKeys.Send("{SPACE}")とするとSystem.ArgumentException: 'キーワード "SPACE" は有効ではありません。'という例外が発生します。半角空白文字で
SPACEキーの入力をエミュレートできるということに関してはリファレンス本文中の下記の記述から推察できるのかなと思います。こちらについては自分なりにそういう風に解釈したということなので解釈違いがあればご指摘ください?♂️各キーは、1つまたは複数の文字で表されます。 1つのキーボード文字を指定するには、文字自体を使用します。 たとえば、文字 A を表すには、文字列 "A" をメソッドに渡します。
こちらも
ENTER や TAB、文字ではなくアクションを表すキーなど、キーを押したときに表示されない文字を指定するには、次の表のコードを使用します。
これらから、A のキーと文字列 "A" の対応のように
SPACEキーが対応する文字列は " " になりますし、対応する文字列が存在するのであればEnterなどと同じように特殊なコード{Enter}の一覧には存在しないのは当然である、というように解釈しました。一応下記の環境下で
SendKeys.Send(" ")でチェックボックスにチェックできることを確認しました。
- Visual Studio 2019 (16.5.0)
- Windows Forms App (.NET Core) C#
- .NET Core 3.1
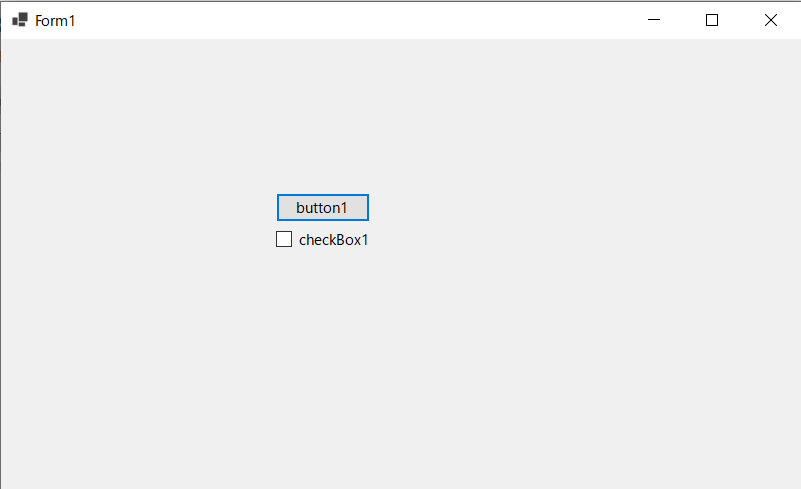
下図のような適当なフォームを作成し
button1のClickイベントのイベントハンドラでSendKey.Sendします。button1をクリックするたびに checkBox1 のチェックのオンオフが切り替わります。
button1_Clickprivate void button1_Click(object sender, EventArgs e) { SendKeys.Send("{TAB}"); SendKeys.Send(" "); }
- 投稿日:2020-03-17T16:51:43+09:00
【ffmpeg】C#で動画の解像度変換【C#】
C#でffmpegを使う
ffmpegの場所を教えて、コマンドラインで扱ってやるだけ。
ラップしたサンプル
    static void Main(string[] args)
        {
            EncodeClass profile = new EncodeClass(@"C:\Users\ffmpeg.exe");
            profile.inputVideoPath = @"C:\Users\in.mp4";
            profile.outputVideoPath = @"C:\Users\out.mp4";
            profile.EncodeVideo();
        }

        public class EncodeClass
        {
            public EncodeClass(string processPath)
            {
                this.processPath = processPath;
                this.outputType = "mpeg4";
                this.resolution = 720;
                this.quality = 1;
                this.framerate = 30;
            }

            public string processPath { get; set; }
            public string inputVideoPath { get; set; }
            public string outputVideoPath { get; set; }
            public string outputType { get; set; }
            public int framerate { get; set; }
            public int resolution { get; set; }
            public int quality { get; set; }

            public void EncodeVideo()
            {
                var reso = GetResolution().Split(',');  //元動画の解像度取得
                var height = int.Parse(reso[0].ToString());
                var width = int.Parse(reso[1].ToString());

                System.Diagnostics.Process pro = new System.Diagnostics.Process();

                pro.StartInfo.FileName = this.processPath;    //ffmpegの場所

                string command = "";
                command += @" -i " + this.inputVideoPath;

                //アス比調整
                if (width < height)
                {
                    command += @" -y -vf scale=-1:" + this.resolution;
                }
                else
                {
                    command += @" -y -vf scale=" + this.resolution + ":-1";
                }

                command += @" -r " + this.framerate;
                command += @" -c:v " + this.outputType;
                command += @" -q:v " + this.quality;
                command += @" " + this.outputVideoPath;

                pro.StartInfo.Arguments = command;
                pro.StartInfo.CreateNoWindow = true;
                pro.StartInfo.UseShellExecute = false;
                pro.StartInfo.RedirectStandardOutput = true;

                pro.Start();
                pro.WaitForExit();
            }

            //解像度取得
            private string GetResolution()
            {
                System.Diagnostics.Process pro = new System.Diagnostics.Process();

                string command = "";
                command += @" -i " + this.inputVideoPath;

                pro.StartInfo.FileName = this.processPath;    //ffmpegの場所
                pro.StartInfo.Arguments = command;
                pro.StartInfo.CreateNoWindow = true;
                pro.StartInfo.UseShellExecute = false;
                pro.StartInfo.RedirectStandardError = true;
                pro.Start();

                string output = pro.StandardError.ReadToEnd().Replace("\r\r\n", "\n");

                List<string> vlist = new List<string>(output.Split("\n"));

                /*出力から解像度だけ抽出する*/
                var findIndex = vlist.FindIndex(s => s.Contains("Stream"));
                var splitSpace = new List<string>(vlist[findIndex].Split(' '));
                var findResoNext = splitSpace.IndexOf("[SAR");
                var findReso = splitSpace[findResoNext - 1];
                var width = int.Parse(findReso.Split('x')[0]);
                var height = int.Parse(findReso.Split('x')[1]);

                pro.WaitForExit();

                //解像度を返す
                return width + "," + height;

            }
        }
補足
https://www.home-movie.biz/free_movie.html
こちらの動画でエンコードできるのを確認しましたが、自前のものはできませんでした。
解像度を取得する際に解析するテキストの構造が違うみたいで、解像度を取得できませんでした。
- 投稿日:2020-03-17T16:23:41+09:00
【C#】カッコ(とか)で始まってカッコ(とか)で終わる文字列を取得
c# カッコで始まってカッコで終わる文字列を取得を参考に、自分の都合のいいように作り直した。
囲み文字を()だけじゃなくて、開始と終了でそれぞれ選べるようにした。
あと囲み文字自体も欲しい時はincludeBracket=trueにする。実行前
(aaa(bbb(ccc)ddd)eee)includeBracket=falseで段階的に3回実行した時
aaa(bbb(ccc)ddd)eee
bbb(ccc)ddd
ccc/// <summary> /// <para>囲み文字内の文字列を取得します。</para> /// <para>囲み文字の開始、終了がひもづかない場合は取得できません。</para> /// </summary> /// <param name="value">文字列。</param> /// <param name="startBracket">囲み文字の開始文字。</param> /// <param name="endBracket">囲み文字の終了文字。</param> /// <param name="includeBracket">結果に囲み文字を含めるかどうか。</param> /// <returns>囲み文字内の文字列。取得できない場合は空。</returns> public string GetEnclosedText(string value, string startBracket, string endBracket, bool includeBracket = false) { var started = false; var openCount = 0; var startIndex = -1; // 指定ブラケットに一致するかどうか var sb = new StringBuilder(); Func<int, string, bool> IsMatchBracket = delegate (int index, string targetBracket) { sb.Clear(); for (var i = 0; i < targetBracket.Length; i++) { sb.Append(value[index + i]); } var bracket = sb.ToString(); if (bracket == targetBracket) { return true; } return false; }; // 開始ブラケット処理 Action<int> startBracketAction = delegate (int index) { // 文字長を超えるならブラケット処理なし if (value.Length - 1 < index + startBracket.Length - 1) { return; } // ブラケットに合致しなければ処理なし if (!IsMatchBracket(index, startBracket)) { return; } openCount++; if (!started) { startIndex = index; } started = true; }; // 終了ブラケット処理 Action<int> endBracketAction = delegate (int index) { // 文字長を超えるならブラケット処理なし if (value.Length - 1 < index + endBracket.Length - 1) { return; } // ブラケットに合致しなければ処理なし if (!IsMatchBracket(index, endBracket)) { return; } openCount--; }; for (var index = 0; index < value.Length; index++) { startBracketAction(index); endBracketAction(index); if (!started || openCount > 0) { continue; } index += endBracket.Length - 1; if (!includeBracket) { startIndex += startBracket.Length; index -= endBracket.Length; } return value.Substring(startIndex, index + 1 - startIndex); } return value; } /// <summary> /// <para>囲み文字内の文字列を取得します。</para> /// <para>囲み文字の開始、終了がひもづかない場合は取得できません。</para> /// </summary> /// <param name="value">文字列。</param> /// <param name="includeBracket">結果に囲み文字を含めるかどうか。</param> /// <param name="startBracket">囲み文字の開始文字。</param> /// <param name="endBracket">囲み文字の終了文字。</param> /// <returns>囲み文字内の文字列。取得できない場合は空。</returns> public string GetEnclosedText(string value, bool includeBracket = false, char startBracket = '(', char endBracket = ')') { return GetEnclosedText(value, startBracket.ToString(), endBracket.ToString(), includeBracket); }
- 投稿日:2020-03-17T10:57:42+09:00
サイズ変更可能な簡易MonthCalendarを作ってみた
.NETのMonthCalendarコンポーネントがパワフルで使いやすいですが、サイズがなかなか調整できないのが欠点です。特にタッチパネル上で操作する時、サイズがやや小さい気がします。
機能限定ですが、サイズ変更可能なMonthCalendarを自作してみた。using System; using System.ComponentModel; using System.ComponentModel.Design; using System.Drawing; using System.Drawing.Drawing2D; using System.Runtime.InteropServices; using System.Windows.Forms; namespace utils.calendar { [ClassInterface(ClassInterfaceType.AutoDispatch)] [ComVisible(true)] [DefaultEvent("Load")] [DesignerCategory("UserControl")] public class MonthCalendar : UserControl { private DateTime currentDate; [Browsable(true)] [DefaultValue(12)] public int FontSize { get { return (int)this.Font.Size; } set { this.Font = new Font("Meiryo UI", value, FontStyle.Regular, GraphicsUnit.Point, ((byte)(128))); } } private DayLabel[,,] days = new DayLabel[2,7,7]; private DayLabel rightButton; private DayLabel leftButton; private Label title; private DayLabel todayLabel; private Panel[] bodyPanel = new Panel[2]; public const string MONTH_FORMAT = "yyyy年M月"; public const string DATE_FORMAT = "yyyy年M月d日"; private DayLabel selectDayLabel; [Browsable(false)] [DefaultValue(typeof(DateTime))] public DateTime SelectDate { get { return selectDayLabel == null ? new DateTime() : selectDayLabel.Date; } set { if (value.Ticks > 0L) { currentDate = value.Date; setDayLabelPreferredDate(curIndex, currentDate, false); if (selectDayLabel != null && selectDayLabel.Selected) { selectDayLabel.Selected = false; } selectDayLabel = getCurrentDayLabel(value.Day); if (selectDayLabel != null) { selectDayLabel.Selected = true; } title.Text = currentDate.Date.ToString(MONTH_FORMAT); } } } [Browsable(true)] [DefaultValue(26)] public int TilteHeight { get { return title.Height; } set { title.Height = value; Invalidate(); } } private int curIndex = 0; private volatile bool moving = false; public MonthCalendar() : base() { this.MinimumSize = new Size(240,200); currentDate = DateTime.Now.Date; title = new Label(); todayLabel = new DayLabel(); rightButton = new DayLabel(); leftButton = new DayLabel(); bodyPanel[0] = new Panel(); bodyPanel[1] = new Panel(); string[] WEEKS = { "日", "月", "火", "水", "木", "金", "土", }; this.SuspendLayout(); for (int n = 0; n < 2; n++) { Panel p = new Panel();//曜日、各日の分割ライン p.Location = new Point(0,0); p.Size = new Size(1, 1); p.BackColor = Color.DeepSkyBlue; p.Anchor = AnchorStyles.Left | AnchorStyles.Right; bodyPanel[n].Controls.Add(p); for (int i = 0; i < 7; i++) { for (int ii = 0; ii < 7; ii++) { DayLabel d = new DayLabel(); d.Size = new Size(40, 30); if (i == 0) { d.Text = WEEKS[ii]; d.staticLabel = true; } else { d.Date = currentDate; d.Click += DayLabel_Click; } d.Location = new Point(ii*40+5, 30*i+5); days[n, i, ii] = d; bodyPanel[n].Controls.Add(d); } } } this.Font = new Font("Meiryo UI", 12, FontStyle.Regular, GraphicsUnit.Point, ((byte)(128))); this.AutoScaleMode = AutoScaleMode.Dpi; int w = 320; int h = 240; int th = 26; int tw = 240; this.Size = new Size(w, h); this.Anchor = AnchorStyles.Bottom | AnchorStyles.Left | AnchorStyles.Right | AnchorStyles.Top; title.AutoSize = false; title.Size = new Size(tw, th); title.Location = new Point((w-tw)>>1, 0); title.TextAlign = ContentAlignment.MiddleCenter; title.Text = currentDate.ToString(MONTH_FORMAT); title.Anchor = AnchorStyles.Top | AnchorStyles.Left | AnchorStyles.Right; todayLabel.AutoSize = true; todayLabel.Date = currentDate; todayLabel.Text = "□ 今日:" + currentDate.ToString(DATE_FORMAT); int todaywidth = TextRenderer.MeasureText(todayLabel.Text, this.Font).Width; todayLabel.Location = new Point((w - Padding.Left - Padding.Right - todaywidth) / 2, h - th - Padding.Bottom); todayLabel.Anchor = AnchorStyles.Bottom | AnchorStyles.Left | AnchorStyles.Right; todayLabel.CurrentMonth = true; todayLabel.Click += Today_Click; rightButton.Font = new Font("Meiryo UI", FontSize + 2, FontStyle.Regular, GraphicsUnit.Point, ((byte)(128))); rightButton.Text = "▶"; rightButton.ForeColor = Color.Black; rightButton.Size = new Size(th, th); rightButton.Location = new Point(w - th - 5, 0); rightButton.Anchor = AnchorStyles.Top | AnchorStyles.Right; rightButton.CurrentMonth = true; rightButton.Click += RightButton_Click; leftButton.Font = new Font("Meiryo UI", FontSize + 2, FontStyle.Regular, GraphicsUnit.Point, ((byte)(128))); leftButton.Text = "◀"; leftButton.ForeColor = Color.Black; leftButton.Size = new Size(th, th); leftButton.Location = new Point(5, 0); leftButton.Anchor = AnchorStyles.Top | AnchorStyles.Left; leftButton.CurrentMonth = true; leftButton.Click += LeftButton_Click; bodyPanel[0].Size = new Size(w, h - th - th - 1); bodyPanel[0].Location = new Point(0, th); bodyPanel[0].Anchor = AnchorStyles.Bottom | AnchorStyles.Left | AnchorStyles.Right | AnchorStyles.Top; bodyPanel[0].SizeChanged += (s, e) => { setDayLabelPreferredSize((Control)s); }; bodyPanel[1].Size = new Size(w - tw, h - th - 1); bodyPanel[1].Location = new Point(0, th); bodyPanel[1].Anchor = AnchorStyles.Bottom | AnchorStyles.Left | AnchorStyles.Right | AnchorStyles.Top; bodyPanel[1].Visible = false; bodyPanel[1].SizeChanged += (s, e) => { setDayLabelPreferredSize((Control)s); }; this.Controls.Add(title); this.Controls.Add(todayLabel); this.Controls.Add(rightButton); this.Controls.Add(leftButton); this.Controls.Add(bodyPanel[0]); this.Controls.Add(bodyPanel[1]); setDayLabelPreferredSize(bodyPanel[0]); this.ResumeLayout(false); this.PerformLayout(); } private void changeToNextMonth(DateTime nextDate, Action callback=null) { if(currentDate.Year==nextDate.Year && currentDate.Month == nextDate.Month) { moving = false; return; } int nextIndex = (curIndex + 1) & 0x00000001; Panel np = bodyPanel[nextIndex]; Panel cp = bodyPanel[curIndex]; DayLabel firstday = setDayLabelPreferredDate(nextIndex, nextDate, (selectDayLabel!=null)); Point pt = np.Location; int dx = cp.Width + 2; int n = 5; int xStep = (dx + n - 1) / n; if (nextDate>currentDate) //[cur][next]<=左に移動 { dx = -dx; xStep = -xStep; } pt.X = cp.Location.X - dx; pt.Y = cp.Location.Y; np.Location = pt; np.Visible = true; int orgCX = cp.Location.X; int orgNX = np.Location.X; Timer t = new Timer(); t.Interval = (200 + n - 1) / n; int cnt = 0; t.Tick += (s, e)=> { Point npt = np.Location; Point cpt = cp.Location; cnt++; if(cnt>=n) { npt.X = orgCX; cpt.X = orgNX; t.Stop(); moving = false; cp.Visible = false; curIndex = nextIndex; currentDate = nextDate; if (selectDayLabel != null) { selectDayLabel = firstday; } title.Text = currentDate.ToString(MONTH_FORMAT); if (callback != null) { try { callback(); } catch (Exception) { } } } else { npt.Offset(xStep, 0); cpt.Offset(xStep, 0); } cp.Location = cpt; np.Location = npt; }; t.Start(); } private void LeftButton_Click(object sender, EventArgs e) { if (!moving) { moving = true; DateTime t = currentDate.AddMonths(-1); changeToNextMonth(t); title.Text = t.ToString(MONTH_FORMAT); } } private void RightButton_Click(object sender, EventArgs e) { if (!moving) { moving = true; DateTime t = currentDate.AddMonths(1); changeToNextMonth(t); title.Text = t.ToString(MONTH_FORMAT); } } private void Today_Click(object sender, EventArgs e) { if (!moving) { moving = true; changeToNextMonth(todayLabel.Date, () => { DayLabel next = getCurrentDayLabel(currentDate.Day); if (next != null) { if (selectDayLabel != null) { selectDayLabel.Selected = false; } selectDayLabel = next; selectDayLabel.Selected = true; } }); title.Text = todayLabel.Date.ToString(MONTH_FORMAT); } } private void DayLabel_Click(object sender, EventArgs e) { DayLabel d = (DayLabel)sender; if (d.CurrentMonth) { if (selectDayLabel == null) { selectDayLabel = d; selectDayLabel.Selected = true; } else if (selectDayLabel != d) { selectDayLabel.Selected = false; selectDayLabel = d; selectDayLabel.Selected = true; } } else { if (!moving) { moving = true; changeToNextMonth(d.Date, () => { DayLabel next = getCurrentDayLabel(d.Date.Day); if (next != null) { if (selectDayLabel != null) { selectDayLabel.Selected = false; } selectDayLabel = next; selectDayLabel.Selected = true; } }); title.Text = d.Date.ToString(MONTH_FORMAT); } } } private DayLabel getCurrentDayLabel(int day) { int m = currentDate.Month; for(int i=1;i<7;i++) { for(int ii=0;ii<7;ii++) { DayLabel d = days[curIndex,i,ii]; if (d.Date.Month == m && d.Date.Day == day) { return d; } } } return null; } private void setDayLabelPreferredSize(Control parent) { int pw = parent.Width; int ph = parent.Height; int left = parent.Padding.Left; int right = parent.Padding.Right; int top = parent.Padding.Top; int bottom = parent.Padding.Bottom; int dy = 3; //間隔 int dx = 3; //間隔 int n = 7; //行数 int separater = 10; //分割ライン高さ int w = (pw - left - right - dx * (n - 1)) / n; int h = (ph - top - bottom - dy * (n - 1) - separater) / n; parent.SuspendLayout(); for(int i=0; i<2;i++) { int y = top; for(int row=0;row<n;row++) { int x = left; for (int col = 0; col < n; col++) { days[i, row, col].Size = new Size(w, h); days[i, row, col].Location = new Point(x, y); x += dx; x += w; } y += dy; y += h; if (row==0) { bodyPanel[i].Controls[0].Size = new Size(pw-dx-dx, 2); bodyPanel[i].Controls[0].Location = new Point(dx, y + 3); y += separater; } } } setDayLabelPreferredDate(curIndex, currentDate, false); setDayLabelPreferredDate(0x00000001&(curIndex+1), currentDate.AddMonths(1), false); parent.ResumeLayout(true); } private DayLabel setDayLabelPreferredDate(int curIndex, DateTime date, bool selectFirstday) { DateTime d = new DateTime(date.Year, date.Month, 1); int m = d.Month; int w = (int)d.DayOfWeek; if(w==0) { w = 7; } d = d.AddDays(-w); DayLabel firstday = null; int curMonth = todayLabel.Date.Month; int curDay = todayLabel.Date.Day; for (int i = 1; i < 7; i++) { for(int ii = 0; ii < 7; ii++) { DayLabel dd = days[curIndex, i, ii]; dd.Date = d; dd.CurrentMonth = (d.Month == m); dd.Today = (d.Month == curMonth && d.Day == curDay); bool selected = false; if (firstday==null && d.Day==1) { firstday = dd; if (selectFirstday) { selected = true; } } dd.Selected = selected; FontStyle s; if (d.DayOfWeek==DayOfWeek.Sunday|| d.DayOfWeek == DayOfWeek.Saturday) { s = FontStyle.Bold; } else { s = FontStyle.Regular; } if (dd.Font.Style != s) { dd.Font = new Font(dd.Font, s); } d = d.AddDays(1); } } return firstday; } protected override void OnLoad(EventArgs e) { base.OnLoad(e); int w = Width; int h = Height; int th = title.Height; bodyPanel[0].Size = new Size(w, h - th - th - 1); bodyPanel[1].Size = new Size(w, h - th - th - 1); setDayLabelPreferredSize(bodyPanel[0]); if (selectDayLabel != null) { selectDayLabel.Selected = true; } } protected override void OnSizeChanged(EventArgs e) { base.OnSizeChanged(e); if(selectDayLabel!=null) { selectDayLabel.Selected = true; } } class DayLabel : Label { private Color[] foreColeos = { Color.Black, Color.Orange, Color.Black, Color.Black }; private Color[] backColeos = { Color.Transparent, Color.LightCyan, Color.Transparent, Color.Orange }; private Color BODY_LINE_COLOR = Color.DeepSkyBlue; private Color SELECTED_COLOR = Color.Red; private const int MOUSE_NONE = 0; private const int MOUSE_ENTER = 1; private const int MOUSE_LEAVE = 2; private const int MOUSE_DOWN = 3; private const int MOUSE_UP = MOUSE_NONE; private const int MOUSE_SELECT = 4; public bool CurrentMonth { get { return curMonth; } set { curMonth = value; ForeColor = value ? Color.Black : Color.LightGray; } } private bool curMonth = true; public bool Today { get { return toDay; } set { toDay = value; } } private bool toDay = false; private DateTime date; public bool Selected { get { return selectd; } set { selectd = value; BackColor = value ? SELECTED_COLOR : BackColor = backColeos[state]; } } private bool selectd; private int radius = 3; private int state = MOUSE_NONE; public bool staticLabel { get; set; } public DateTime Date { get { return date; } set { date = value; int day = date.Day; if(day==0) { Text = ""; } else if(day<10) { Text = " " + day; } else { Text = day.ToString(); } } } public DayLabel() : base() { this.AutoSize = false; this.BackColor = Color.Transparent; this.TabIndex = 0; this.TabStop = false; this.TextAlign = ContentAlignment.MiddleCenter; } protected override void OnMouseLeave(EventArgs e) { base.OnMouseLeave(e); if (staticLabel) { return; } state = MOUSE_LEAVE; setCurrentColor(); } private void setCurrentColor() { if (!curMonth &&( state == MOUSE_NONE||state==MOUSE_LEAVE)) { ForeColor = Color.LightGray; } else { ForeColor = foreColeos[state]; } if(state!=MOUSE_DOWN && selectd) { BackColor = SELECTED_COLOR; } else { BackColor = backColeos[state]; } } protected override void OnMouseEnter(EventArgs e) { base.OnMouseEnter(e); if (staticLabel) { return; } state = MOUSE_ENTER; setCurrentColor(); } protected override void OnKeyDown(KeyEventArgs e) { base.OnKeyDown(e); if (staticLabel) { return; } state = MOUSE_DOWN; setCurrentColor(); } protected override void OnMouseDown(MouseEventArgs e) { base.OnMouseDown(e); if (staticLabel) { return; } state = MOUSE_DOWN; setCurrentColor(); } protected override void OnKeyUp(KeyEventArgs e) { base.OnKeyUp(e); if (staticLabel) { return; } state = MOUSE_UP; setCurrentColor(); } protected override void OnMouseUp(MouseEventArgs e) { base.OnMouseUp(e); if (staticLabel) { return; } state = MOUSE_UP; setCurrentColor(); } protected override void OnPaint(PaintEventArgs e) { base.OnPaint(e); if (!toDay) { return; } int x = 0; int y = 0; int w = Width - 1; int h = Height - 1; using (Pen pen = new Pen(BODY_LINE_COLOR)) { if (selectd) { pen.DashStyle = DashStyle.Dash; } using (GraphicsPath Path = generateGraphicsPath(x, y, w, h, radius)) { e.Graphics.DrawPath(pen, Path); } } } private GraphicsPath generateGraphicsPath(int x, int y, int w, int h, int radius) { radius <<= 1; GraphicsPath path = new GraphicsPath(); path.AddArc(x + w - radius, y, radius, radius, 270, 90); path.AddArc(x + w - radius, y + h - radius, radius, radius, 0, 90); path.AddArc(x, y + h - radius, radius, radius, 90, 90); path.AddArc(x, y, radius, radius, 180, 90); path.CloseFigure(); return path; } } } }
- 投稿日:2020-03-17T10:20:09+09:00
緊急地震速報の生電文を受信しよう
日本は地震が多いですね。その割には情報を入手する手段が少ない気がします。
テレビでは震度5弱以上予想時のみ提供されますが、震度4以下の場合には事後の提供のみです。
提供してもらえないなら自分で入手しましょう。
(毎回 Qiita 記事の頭の文章が適当になってしまう)なお、記事の最後に
わざわざ自分で電文を受信して解析する必要がない方法も紹介します。免責事項
筆者は現在この記事で紹介する方法は
使用していません。今後使えなくなっても責任は負いかねます。
参考にする場合は自己責任でお願いします。環境
- 安定したネットワーク環境 (1Mbps 以下でも接続を維持できればOK)
- C# 開発環境
- Windows 10
- WeatherNews.jp 有料会員
流れをざっくりと説明
気象庁 -> WeatherNews.jp -> 利用者WeatherNews.jp -> 利用者 の間は TCPSocket を使用します。
プログラム
簡単にサンプルで作成したプログラムを載せます。自由に改変や修正を加えてください。
途中の正規表現は即席なのでもっと良いパターンがあればコメントでお願いします。
また、 WNI が緊急地震速報を送信するサーバーの IP アドレスは http://lst10s-sp.wni.co.jp/server_list.txt に記述されていますが、どれでもOKです。
選択するサーバーによっては遅延がかなり酷く、平気で1分以上遅れたりする場合があります。
なのでサーバーガチャで勝利してください。
「ここ速かったよ!」とかありましたらコメントでお願いします。(使っていないけど)あ、死活管理は適宜実装してください。
WniClient.cspublic class WniClient : IDisposable { private Socket _socket; private const int BufferSize = 1024; private readonly byte[] _buffer = new byte[BufferSize]; public async Task ConnectAsync(string mailAddress, string passWord) { // パスワードを MD5 に変換 var passWordByte = MD5.Create().ComputeHash(Encoding.UTF8.GetBytes(passWord)); // MD5 に変換すると byte[] になるため string に変換 var passWordStr = BitConverter.ToString(passWordByte).ToLower().Replace("-", ""); _socket = new Socket(AddressFamily.InterNetwork, SocketType.Stream, ProtocolType.Tcp); _socket.Connect(new IPEndPoint(IPAddress.Parse(await GetServerIpAsync()), 80)); // 認証情報を送信 _socket.Send(new UTF8Encoding().GetBytes($"GET /login HTTP/1.1\r\nX-WNI-Account: {mailAddress}\r\nX-WNI-Password: {passWordStr}\r\n\r\n")); // データ受信時にイベント発火 _socket.BeginReceive(_buffer, 0, BufferSize, SocketFlags.None, ReceiveCallback, _socket); } private static async Task<string> GetServerIpAsync() { using var c = new HttpClient(); var servers = (await c.GetStringAsync("http://lst10s-sp.wni.co.jp/server_list.txt").ConfigureAwait(false)).Split('\n'); var rdm = new Random(); var server = servers[rdm.Next(0, servers.Length - 1)]; return server.Split(':')[0]; } public void Disconnect() => _socket.Disconnect(false); public void Dispose() => _socket.Close(); private void ReceiveCallback(IAsyncResult asyncResult) { var socket = (Socket)asyncResult.AsyncState; if (socket == null) return; int byteSize; try { byteSize = socket.EndReceive(asyncResult); } catch (Exception ex) { OnException?.Invoke(ex); return; } if (byteSize < 1) return; var res = Encoding.UTF8.GetString(_buffer, 0, byteSize); if (res.Contains("X-WNI-ID: Data")) { res = new string(res.Replace("\n", " ").Replace("\r", " ").Replace(" ", " ").Where(x => !char.IsControl(x)).ToArray()); var mc = new Regex("3([0-9/]{1}) ([0-9/]{2}) ([0-9/]{2}) ([0-9/]{12}) C([0-9/]{2}) ([0-9/]{12}) ND([0-9/]{14}) NCN([0-9A-Z/]{3}) JD([0-9/]{14}) JN([0-9/]{3}) ([0-9/]{3}) ([N0-9/]{4}) ([E0-9/]{5}) ([0-9/]{3}) ([0-9/]{2}) ([0-9/+-]{2}) RK([0-9/]{5}) RT([0-9/]{5}) RC([0-9/]{5}) (.*?)9999=", RegexOptions.None).Matches(res); foreach (Match m in mc) OnReceiveData?.Invoke(m.Value.Trim()); } socket.BeginReceive(_buffer, 0, _buffer.Length, SocketFlags.None, ReceiveCallback, socket); } public delegate void ReceiveEventHandler(string receiveData); public event ReceiveEventHandler OnReceiveData; public delegate void OnExceptionEventHandler(Exception exception); public event OnExceptionEventHandler OnException; }Main.csprivate static async Task Main() { using var client = new WniClient(); // 受信したら OnReceiveData が発火し、電文が渡される client.OnReceiveData += Console.WriteLine; await client.ConnectAsync("[メールアドレス]", "[パスワード]"); Console.ReadLine(); client.Disconnect(); }まとめ
The Last 10-Secondで使用されている緊急地震速報配信サーバーを利用する方法を紹介しました。
とにかく遅延が酷いです。調子がいい時は3秒遅れ程度や遅延無しで配信されます。
速いサーバーを見つけた方は共有しましょう。楽な方法
手前味噌ですが https://api.iedred7584.com/eew/ を使ってください。(宣伝)
- 投稿日:2020-03-17T00:54:35+09:00
UiPath Activity Creatorを使ってみる。(その2:簡単なアクティビティ作成とプロパティの設計・設定について)
このドキュメントの概要
前回 はUiPath Activity Creatorの導入を中心に説明を行いました。
今回は実際にUiPath Activity Creatorを使って簡単なカスタムアクティビティを作成してみます。またアクティビティの入出力を担うプロパティの設定について、代表的な記述の仕方を説明します。
サンプルアクティビティの仕様とその作り方
UiPathのサイト上でのサンプルでもつかわれている、足し算カスタムアクティビティを作ってみます。仕様としてはInt32型の入力値a,bを加算し、Int32型の値cを出力します。
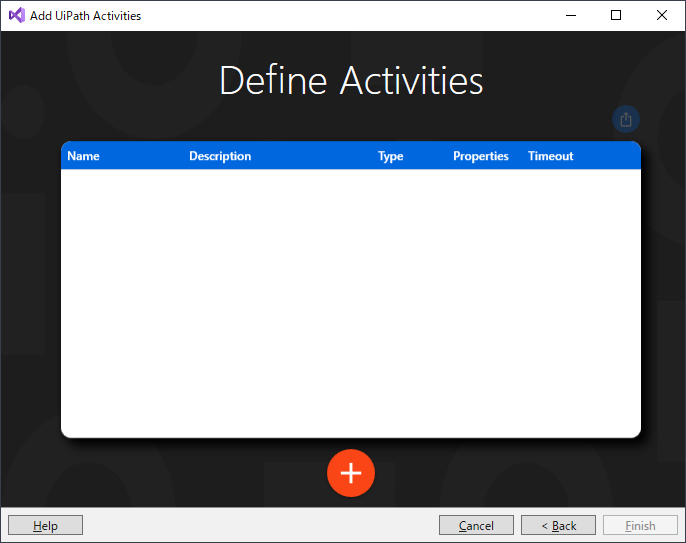
まずWizardを起動して、Add Activityします。
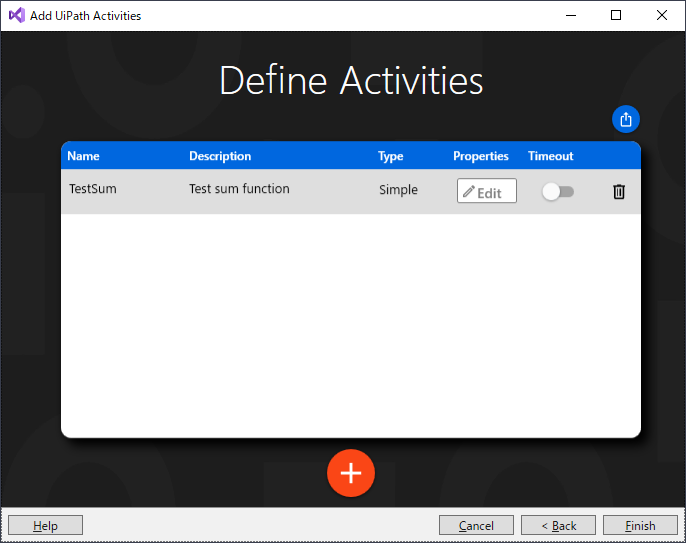
次に追加するアクティビティの設定を行います。今回はTestSumという名前のアクティビティにしました。
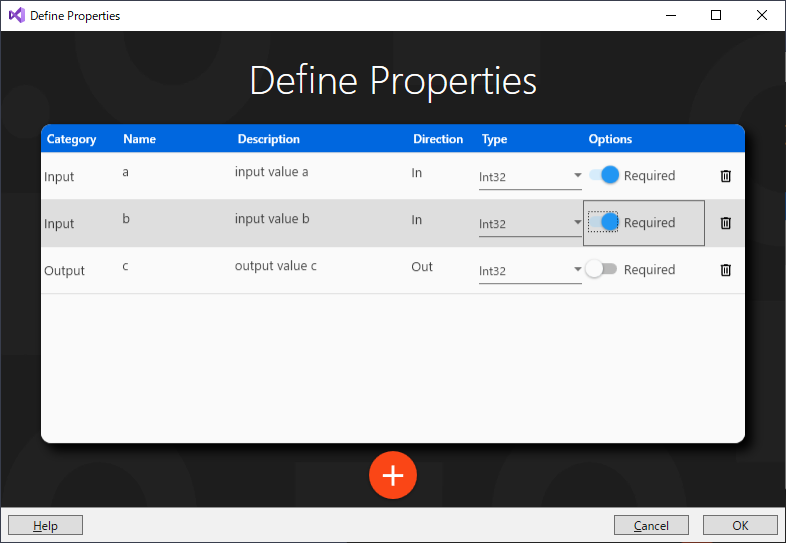
次にプロパティを追加します。a,bがInt32型の入力、cがInt32型の出力です。
これで準備完了です。Activityの定義画面からFinishをクリックします。コードが自動的に生成されたます。そのコードを見てみましょう。
TestSum.csusing System; using System.Activities; using System.Threading; using System.Threading.Tasks; using Company.Product2.Activities.Properties; using UiPath.Shared.Activities; using UiPath.Shared.Activities.Localization; namespace Company.Product2.Activities { [LocalizedDisplayName(nameof(Resources.TestSum_DisplayName))] [LocalizedDescription(nameof(Resources.TestSum_Description))] public class TestSum : BaseAsyncCodeActivity { #region Properties [LocalizedDisplayName(nameof(Resources.TestSum_A_DisplayName))] [LocalizedDescription(nameof(Resources.TestSum_A_Description))] [LocalizedCategory(nameof(Resources.Input_Category))] public InArgument<int> A { get; set; } [LocalizedDisplayName(nameof(Resources.TestSum_B_DisplayName))] [LocalizedDescription(nameof(Resources.TestSum_B_Description))] [LocalizedCategory(nameof(Resources.Input_Category))] public InArgument<int> B { get; set; } [LocalizedDisplayName(nameof(Resources.TestSum_C_DisplayName))] [LocalizedDescription(nameof(Resources.TestSum_C_Description))] [LocalizedCategory(nameof(Resources.Output_Category))] public OutArgument<int> C { get; set; } #endregion #region Constructors public TestSum() { } #endregion #region Protected Methods protected override void CacheMetadata(CodeActivityMetadata metadata) { if (A == null) metadata.AddValidationError(string.Format(Resources.ValidationValue_Error, nameof(A))); if (B == null) metadata.AddValidationError(string.Format(Resources.ValidationValue_Error, nameof(B))); base.CacheMetadata(metadata); } protected override async Task<Action<AsyncCodeActivityContext>> ExecuteAsync(AsyncCodeActivityContext context, CancellationToken cancellationToken) { // Inputs var a = A.Get(context); var b = B.Get(context); /////////////////////////// // Add execution logic HERE /////////////////////////// // Outputs return (ctx) => { C.Set(ctx, null); }; } #endregion } }このままではロジックがないので、加算のロジックを追加します。ExecuteAsyncメソッドについて以下のように加算のロジックと、戻り値の設定を行います。
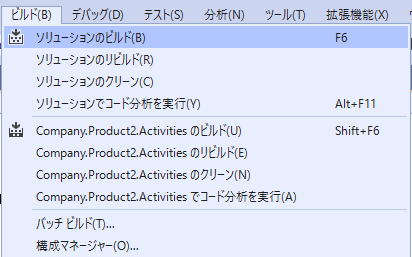
            // Inputs
            var a = A.Get(context);
            var b = B.Get(context);

            ///////////////////////////
            // Add execution logic HERE
            ///////////////////////////
            ///
            var c = a + b;

            // Outputs
            return (ctx) => {
                C.Set(ctx, c);
            };
これで実装は完了です。それではBuildしてみましょう。
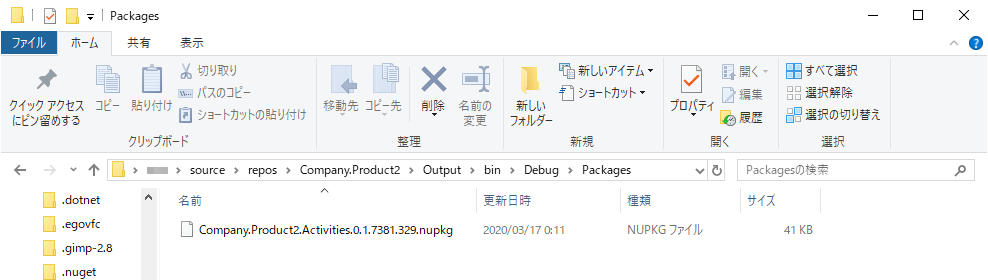
すでにActivity Creatorに設定がありますので、Build指示するだけで、プロジェクトフォルダ\Output\bin\ReleaseまたはDebug\Package以下にnupkgファイルが出力されます。
このnupkgファイルをUipathのパッケージ管理から参照できる場所に置きます。
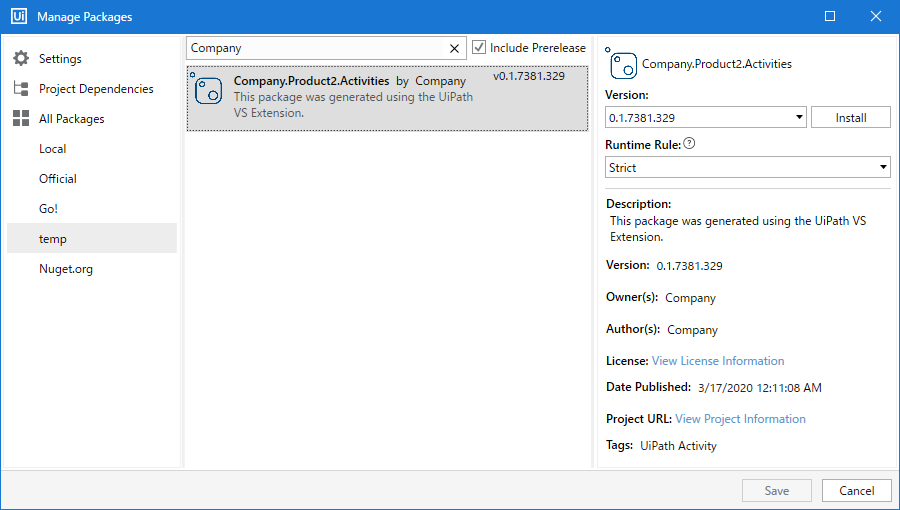
パッケージ管理からは下記のように見えますので、これをインストールします。
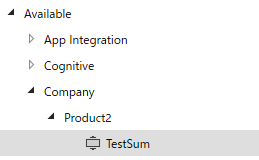
インストールが完了すると、アクティビティパネル上で以下のように表示されます。
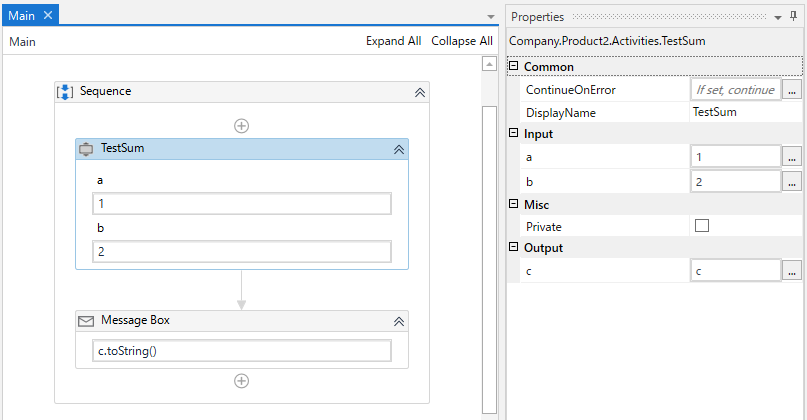
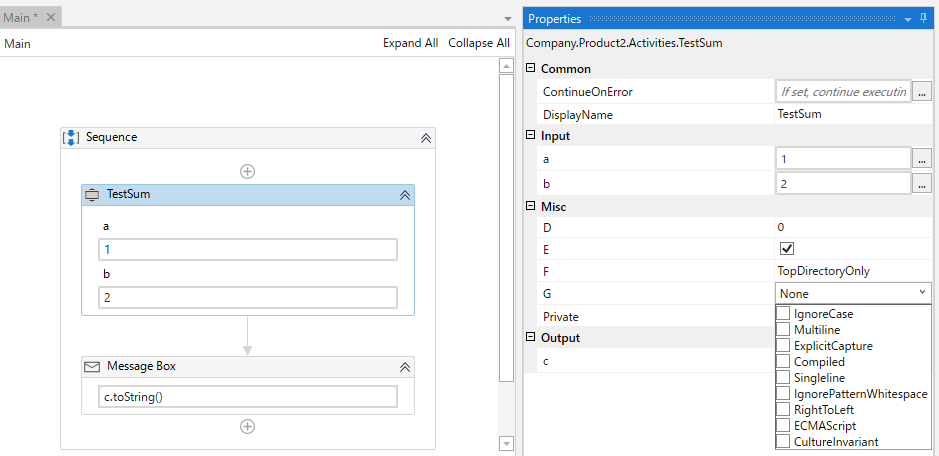
これをデザインパネルに配置すると以下のようになります。(下図は値が入力された状態です)
実際に値を入力して、期待する値が表示されるか確認してみましょう。
期待通りの動作が確認できれば完成です。プロパティの設計・設定について
今回実際に自動生成されたプロパティに関する箇所を見てみます。
        [LocalizedDisplayName(nameof(Resources.TestSum_A_DisplayName))]
        [LocalizedDescription(nameof(Resources.TestSum_A_Description))]
        [LocalizedCategory(nameof(Resources.Input_Category))]
        public InArgument<int> A { get; set; }

        [LocalizedDisplayName(nameof(Resources.TestSum_B_DisplayName))]
        [LocalizedDescription(nameof(Resources.TestSum_B_Description))]
        [LocalizedCategory(nameof(Resources.Input_Category))]
        public InArgument<int> B { get; set; }

        [LocalizedDisplayName(nameof(Resources.TestSum_C_DisplayName))]
        [LocalizedDescription(nameof(Resources.TestSum_C_Description))]
        [LocalizedCategory(nameof(Resources.Output_Category))]
        public OutArgument<int> C { get; set; }
今回のプロパティは
InArgument<int>型またはOutArgument<int>型として定義されています。
このように定義することにより、UiPathの呼び出し側からワークフロー上の変数等の値を渡すことができるようになります。多くの場合、UiPathの呼び出し側からは変数を渡す必要があるかと思いますので、基本的にはこの型を使用しましょう。ただし値の取得については
var a = A.Get(context);
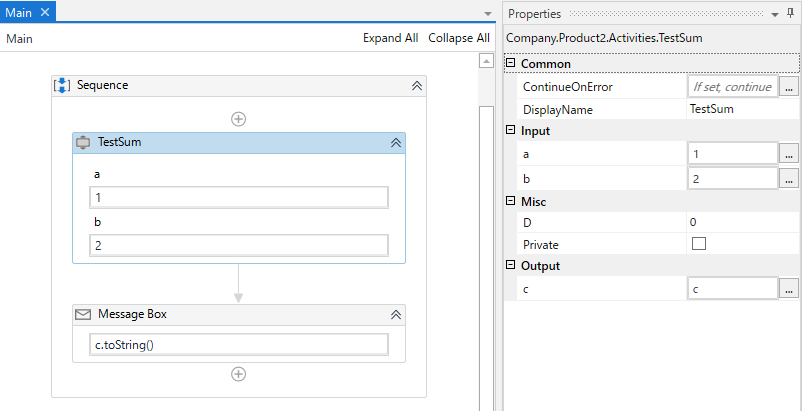
のように記述する必要がありますので、その点は注意が必要です。一方で単純にプロパティの型をInt型として定義することもできます。実際に以下のように記述してBuildしてみます。
public int D {get; set;}このように記述した場合もプロパティは生成されます。以下Dというプロパティが追加されました。
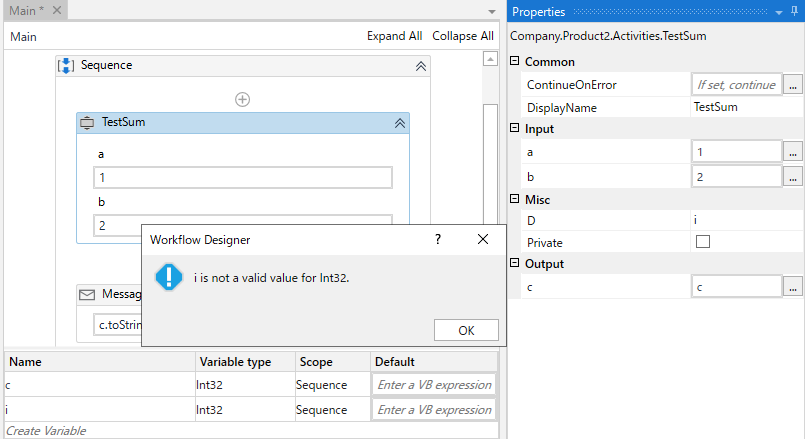
しかしそこには定義した型のリテラル値しか入力することができません。int32で定義された変数iを入力しても下記のようにエラーとなります。
このようなケースは使い道がないようにも思えますが、その項目によっては、よりユーザビリティが高いUIが用意されています。
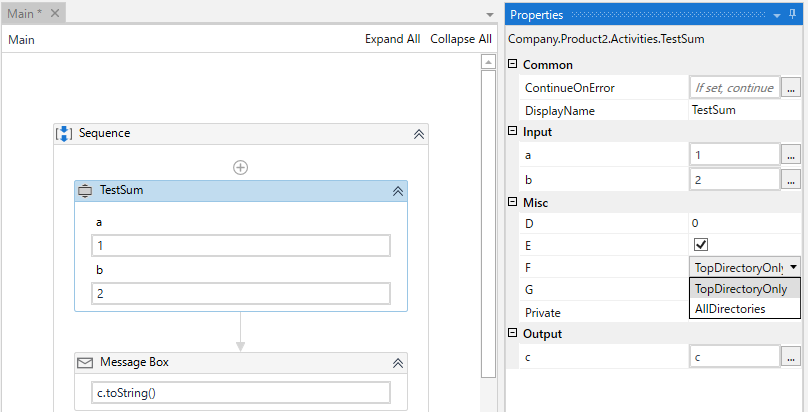
具体的には、例えばbool型を指定するとその項目はチェックボックスとして表示されます。enum型にするとドロップダウンリストとして表示されます。FlagsAttribute付きのenum型の場合は複数選択可能なチェックボックス付きドロップダウンリストとして表示されます。
なおこのような設定は、現時点ではActivity CreatorのWizardではできませんので、手動で記述する必要があります。例えば以下を追加してビルドしてみましょう。
        public bool E { get; set; }

        public System.IO.SearchOption F { get; set; }

        public System.Text.RegularExpressions.RegexOptions G { get; set; }
UiPathの画面上は以下のようにboolはチェックボックスに、enumはドロップダウンリストになります。
FlagsAttribute付きのenumは以下のようにチェックボックス付きドロップダウンになります。
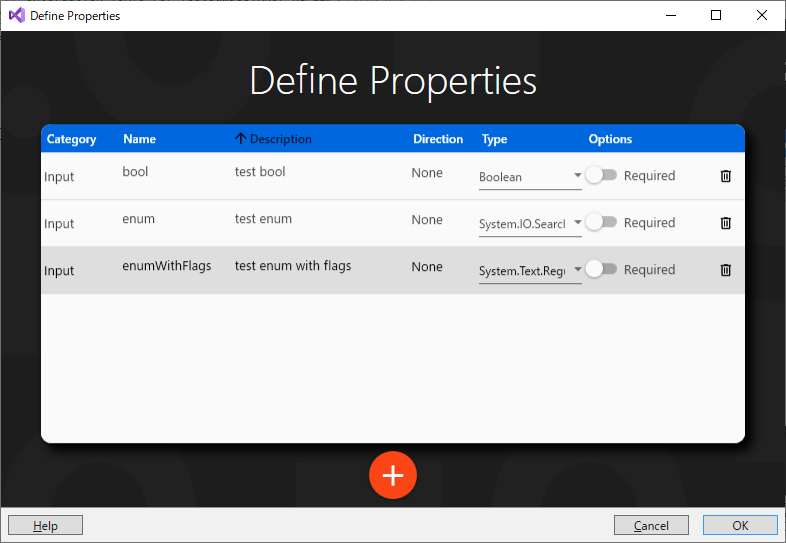
(2020/3/18追記)下図のようにWizardのプロパティ定義画面でDirectionをNoneにすることにより、Wizardからでも上記のようなチェックボックスやドロップダウンリストを作成できます。
デザイナー部分のプロパティ設定は、また別の機会に記述します。
(その2:終わり)
- 投稿日:2020-03-17T00:38:31+09:00
【C#, NUnit】Assert.That で自前のクラスを比較するにはどうすればいいのかいろいろ調べたことのまとめ
?♂️解釈違いなどがあればご指摘ください。
?♂️いずれも参考資料が詳しくそちらを参照していただくのみで充分な内容であるかもしれません。
?♂️同じような疑問からスタートされた方に対してどのような手順で調査して理解が得られたのかということを共有したいと思います。調べたこと
下記のようなクラス
TestClass1に対しての値の検証Test1の結果が失敗❌するのは何故なのかを調べました。
最終的にはTest1を成功✅させるにはどうしたらよいのかということまでまとめます。TestClass1public class TestClass1 { public string Id { get; set; } public string Name { get; set; } public TestClass1(string id, string name) { Id = id; Name = name; } }Test1[Test] public void Test1() { TestClass1 actual = new TestClass1("1", "takashi"); TestClass1 expect = new TestClass1("1", "takashi"); Assert.That(actual, Is.EqualTo(expect)); //失敗する }環境など
- Visual Studio 2019
- Microsoft.NET.Test.Sdk 16.5.0
- NUnit 3.12.0
- NUnit3TestAdapter 3.16.1
等価性について
なんとなくの知識として、オブジェクト同士で比較する場合にはそれらが同一のインスタンスであるかどうかでイコールかそうでないかが決まるというような理解でした。つまり下記のようになるということは知っていました。
TestClass1 actual = new TestClass1("1", "takashi");
TestClass1 expect = new TestClass1("1", "takashi");
var isEqual = actual == expect // False
ですので、
Assert.Thatによる比較においてもこれと同じ要領で比較が行われた結果、テストは失敗したのだと考え、まずは等値演算子(==)と「等価性」について調べてみました。まず、等価性を考えるにあたって、その対象には「値型」と「参照型」とがあり(リファレンスには他に「文字列」と「デリゲート」がありました)今回作成した
TestClass1のようなクラスは参照型となります。等価性を求めるためには等値演算子とEqualsメソッドが用いられ、参照型は既定ではそれらにおいて「参照の等価性」の比較を行っています。また、ここでの既定のEqualsメソッドとは Object.Equals メソッド であると理解しました。ここまでで、私が求めている二つのオブジェクトの比較は「値の等価性」を求めるものであり
Assert.Thatは「参照の等価性」の比較を行っているのではないかということがわかりました。Assert.That について
では、
Assert.Thatによる比較は参照の等価性の比較なのかということを調べてみました。
https://github.com/nunit/docs/wiki/EqualConstraint#notes にそのようなことが書いてありました。When checking the equality of user-defined classes, NUnit first examines each class to determine whether it implements IEquatable (unless the AsCollection modifier is used). If either object implements the interface for the type of the other object, then that implementation is used in making the comparison. If neither class implements the appropriate interface, NUnit makes use of the Equals override on the expected object. If you neglect to either implement IEquatable or to override Equals, you can expect failures comparing non-identical objects. In particular, overriding operator == without overriding Equals or implementing the interface has no effect.
クラスに
IEquatable <T>の実装がなければオーバーライドされたEqualsメソッドを、Equalsメソッドのオーバーライドがなければ既定のObject.Equalsを用いて等価性の検証をするということでしょうか?
であれば、TestClass1にはいずれもありませんから参照の等価性で比較を行った結果テストが失敗❌したのだと考えられます。IEquatable の実装
上記にて
IEquatableというものについて言及されていたのでこちらについて調べました。
とはいえ IEquatableを完全に理解する という記事でまとめられており自分が改めてまとめる必要はないかと思います。
ただ、ここまで調べてきて「可変型(ミュータブル)」についてまだうまく理解しきれていません。「値」であるかという点に注目して等価性判定についてどのように実装するのかということはなんとなくわかったので、参照型である自前のクラスが値としての性質を持っている場合には不変型(イミュータブル)とするべきであると考えると良いのでしょうか?今回の実際のケース(※後述)においては「値」で「イミュータブル」なクラスと判断したのでIEquatableを実装しました(自動生成)。参考記事でも紹介されていましたが Visual Studio の
クイック アクションとリファクタリングの機能でクラスに対してIEquatableの実装の自動生成ができます(Visual Studio 2019版)。また、同記事 配列等に注意 は実際に嵌っていたところを解決してくれました。IEquatableを完全に理解する
Visual Studio で Equals および GetHashCode メソッドのオーバーライドを生成する
値型と参照型とミュータブルとイミュータブルとまとめ
今回の疑問のスタート地点はテストがなぜ失敗するのかというところであり
Assert.Thatの挙動からIEquatableに辿り着きました。しかし、本来は等価性という考え方に基づいてIEquatableや等値演算子の実装のガイドラインやベストプラクティスが存在しAssert.Thatにおいてもそちらに基づいているのだと理解しました。自前のクラスにおいてもそうしたガイドラインに従い等価性判定のメソッドを実装する必要があります。今回のケースではその一つのパターンとして
IEquatableの実装及びEqualsメソッド、GetHashCodeメソッドのオーバーライド、等値演算子のオーバーロードを行いました。まだ完全に理解できていない部分、調査できていない部分あると思います。そうした部分については今後実際のケースを通して今回のように調査しながら深めていけたらと思っています。
TestClass1(IEquatableを実装)public class TestClass1 : IEquatable<TestClass1> { public string Id { get; } public string Name { get; } public TestClass1(string id, string name) { Id = id; Name = name; } public override bool Equals(object obj) { return Equals(obj as TestClass1); } public bool Equals([AllowNull] TestClass1 other) { return other != null && Id == other.Id && Name == other.Name; } public override int GetHashCode() { return HashCode.Combine(Id, Name); } public static bool operator ==(TestClass1 left, TestClass1 right) { return EqualityComparer<TestClass1>.Default.Equals(left, right); } public static bool operator !=(TestClass1 left, TestClass1 right) { return !(left == right); } }
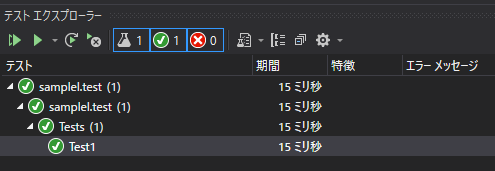
Test1 成功の図補足など
実際のケースは、API層(Controller)、ドメイン層、データ層のような構成の Web API におけるドメイン層での EntityModel Class のデータを ViewModel Class のデータに変換するロジック部分のメソッドの検証です。
また、https://stackoverflow.com/questions/318210/compare-equality-between-two-objects-in-nunit でテストのためだけに
Equalsメソッドのオーバーライドなどはするべきではないという回答がありました。これについては、ドメインロジックに影響するから~というよりかは、等価性に関する検討を行い適切なパターンで等価性判定を実装してそれに従ってテストしなくてはいけないから(あるいはテストのほうが先にできている)と考える方が、今回調査してみた結果、自分なりにしっくりきます。参考

- 投稿日:2020-03-17T00:38:31+09:00
【C#, NUnit】Assert.That で自前のクラスを比較するにはどうすればいいのかいろいろ調べたことのまとめ【IEquatable】
?♂️解釈違いなどがあればご指摘ください。
?♂️いずれも参考資料が詳しくそちらを参照していただくのみで充分な内容であるかもしれません。
?♂️同じような疑問からスタートされた方に対してどのような手順で調査して理解が得られたのかということを共有したいと思います。※コメントでのご指摘を受けて本文中の
Assert.Thatによる比較という表現をEqualConstraintによる比較に修正しました。調べたこと
下記のようなクラス
TestClass1に対しての値の検証Test1の結果が失敗❌するのは何故なのかを調べました。
最終的にはTest1を成功✅させるにはどうしたらよいのかということまでまとめます。TestClass1public class TestClass1 { public string Id { get; set; } public string Name { get; set; } public TestClass1(string id, string name) { Id = id; Name = name; } }Test1[Test] public void Test1() { TestClass1 actual = new TestClass1("1", "takashi"); TestClass1 expect = new TestClass1("1", "takashi"); Assert.That(actual, Is.EqualTo(expect)); //失敗する }環境など
- Visual Studio 2019
- Microsoft.NET.Test.Sdk 16.5.0
- NUnit 3.12.0
- NUnit3TestAdapter 3.16.1
等価性について
なんとなくの知識として、オブジェクト同士で比較する場合にはそれらが同一のインスタンスであるかどうかでイコールかそうでないかが決まるというような理解でした。つまり下記のようになるということは知っていました。
TestClass1 actual = new TestClass1("1", "takashi");
TestClass1 expect = new TestClass1("1", "takashi");
var isEqual = actual == expect // False
ですので、
Assert.ThatEqualConstraint (Is.EqualTo)による比較においてもこれと同じ要領で比較が行われた結果、テストは失敗したのだと考え、まずは等値演算子(==)と「等価性」について調べてみました。まず、等価性を考えるにあたって、その対象には「値型」と「参照型」とがあり(リファレンスには他に「文字列」と「デリゲート」がありました)今回作成した
TestClass1のようなクラスは参照型となります。等価性を求めるためには等値演算子とEqualsメソッドが用いられ、参照型は既定ではそれらにおいて「参照の等価性」の比較を行っています。また、ここでの既定のEqualsメソッドとは Object.Equals メソッド であると理解しました。ここまでで、私が求めている二つのオブジェクトの比較は「値の等価性」を求めるものであり
Assert.ThatEqualConstraintは「参照の等価性」の比較を行っているのではないかということがわかりました。EqualConstraint について
※章題変更しました。
では、
Assert.ThatEqualConstraintによる比較は参照の等価性の比較なのかということを調べてみました。
https://github.com/nunit/docs/wiki/EqualConstraint#notes にそのようなことが書いてありました。When checking the equality of user-defined classes, NUnit first examines each class to determine whether it implements IEquatable (unless the AsCollection modifier is used). If either object implements the interface for the type of the other object, then that implementation is used in making the comparison. If neither class implements the appropriate interface, NUnit makes use of the Equals override on the expected object. If you neglect to either implement IEquatable or to override Equals, you can expect failures comparing non-identical objects. In particular, overriding operator == without overriding Equals or implementing the interface has no effect.
クラスに
IEquatable <T>の実装がなければオーバーライドされたEqualsメソッドを、Equalsメソッドのオーバーライドがなければ既定のObject.Equalsを用いて等価性の検証をするということでしょうか?
であれば、TestClass1にはいずれもありませんから参照の等価性で比較を行った結果テストが失敗❌したのだと考えられます。IEquatable の実装
上記にて
IEquatableというものについて言及されていたのでこちらについて調べました。
とはいえ IEquatableを完全に理解する という記事でまとめられており自分が改めてまとめる必要はないかと思います。
ただ、ここまで調べてきて「可変型(ミュータブル)」についてまだうまく理解しきれていません。「値」であるかという点に注目して等価性判定についてどのように実装するのかということはなんとなくわかったので、参照型である自前のクラスが値としての性質を持っている場合には不変型(イミュータブル)とするべきであると考えると良いのでしょうか?今回の実際のケース(※後述)においては「値」で「イミュータブル」なクラスと判断したのでIEquatableを実装しました(自動生成)。参考記事でも紹介されていましたが Visual Studio の
クイック アクションとリファクタリングの機能でクラスに対してIEquatableの実装の自動生成ができます(Visual Studio 2019版)。また、同記事 配列等に注意 は実際に嵌っていたところを解決してくれました。IEquatableを完全に理解する
Visual Studio で Equals および GetHashCode メソッドのオーバーライドを生成する
値型と参照型とミュータブルとイミュータブルとまとめ
今回の疑問のスタート地点はテストがなぜ失敗するのかというところであり
Assert.ThatEqualConstraintの挙動からIEquatableに辿り着きました。しかし、本来は等価性という考え方に基づいてIEquatableや等値演算子の実装のガイドラインやベストプラクティスが存在しAssert.ThatEqualConstraintにおいてもそちらに基づいているのだと理解しました。自前のクラスにおいてもそうしたガイドラインに従い等価性判定のメソッドを実装する必要があります。今回のケースではその一つのパターンとして
IEquatableの実装及びEqualsメソッド、GetHashCodeメソッドのオーバーライド、等値演算子のオーバーロードを行いました。まだ完全に理解できていない部分、調査できていない部分あると思います。そうした部分については今後実際のケースを通して今回のように調査しながら深めていけたらと思っています。
TestClass1(IEquatableを実装)public class TestClass1 : IEquatable<TestClass1> { public string Id { get; } public string Name { get; } public TestClass1(string id, string name) { Id = id; Name = name; } public override bool Equals(object obj) { return Equals(obj as TestClass1); } public bool Equals([AllowNull] TestClass1 other) { return other != null && Id == other.Id && Name == other.Name; } public override int GetHashCode() { return HashCode.Combine(Id, Name); } public static bool operator ==(TestClass1 left, TestClass1 right) { return EqualityComparer<TestClass1>.Default.Equals(left, right); } public static bool operator !=(TestClass1 left, TestClass1 right) { return !(left == right); } }
Test1 成功の図補足など
実際のケースは、API層(Controller)、ドメイン層、データ層のような構成の Web API におけるドメイン層での EntityModel Class のデータを ViewModel Class のデータに変換するロジック部分のメソッドの検証です。
また、https://stackoverflow.com/questions/318210/compare-equality-between-two-objects-in-nunit でテストのためだけに
Equalsメソッドのオーバーライドなどはするべきではないという回答がありました。これについては、ドメインロジックに影響するから~というよりかは、等価性に関する検討を行い適切なパターンで等価性判定を実装してそれに従ってテストしなくてはいけないから(あるいはテストのほうが先にできている)と考える方が、今回調査してみた結果、自分なりにしっくりきます。参考
- 投稿日:2020-03-17T00:38:31+09:00
【C#, NUnit】NUnit で自前のクラスを比較するにはどうすればいいのかいろいろ調べたことのまとめ【IEquatable】
?♂️解釈違いなどがあればご指摘ください。
?♂️いずれも参考資料が詳しくそちらを参照していただくのみで充分な内容であるかもしれません。
?♂️同じような疑問からスタートされた方に対してどのような手順で調査して理解が得られたのかということを共有したいと思います。※コメントでのご指摘を受けて本文中の
Assert.Thatによる比較という表現をEqualConstraintによる比較に修正しました。
※さらに追記でタイトルの修正もしました調べたこと
下記のようなクラス
TestClass1に対しての値の検証Test1の結果が失敗❌するのは何故なのかを調べました。
最終的にはTest1を成功✅させるにはどうしたらよいのかということまでまとめます。TestClass1public class TestClass1 { public string Id { get; set; } public string Name { get; set; } public TestClass1(string id, string name) { Id = id; Name = name; } }Test1[Test] public void Test1() { TestClass1 actual = new TestClass1("1", "takashi"); TestClass1 expect = new TestClass1("1", "takashi"); Assert.That(actual, Is.EqualTo(expect)); //失敗する }環境など
- Visual Studio 2019
- Microsoft.NET.Test.Sdk 16.5.0
- NUnit 3.12.0
- NUnit3TestAdapter 3.16.1
等価性について
なんとなくの知識として、オブジェクト同士で比較する場合にはそれらが同一のインスタンスであるかどうかでイコールかそうでないかが決まるというような理解でした。つまり下記のようになるということは知っていました。
TestClass1 actual = new TestClass1("1", "takashi");
TestClass1 expect = new TestClass1("1", "takashi");
var isEqual = actual == expect // False
ですので、
Assert.ThatEqualConstraint (Is.EqualTo)による比較においてもこれと同じ要領で比較が行われた結果、テストは失敗したのだと考え、まずは等値演算子(==)と「等価性」について調べてみました。まず、等価性を考えるにあたって、その対象には「値型」と「参照型」とがあり(リファレンスには他に「文字列」と「デリゲート」がありました)今回作成した
TestClass1のようなクラスは参照型となります。等価性を求めるためには等値演算子とEqualsメソッドが用いられ、参照型は既定ではそれらにおいて「参照の等価性」の比較を行っています。また、ここでの既定のEqualsメソッドとは Object.Equals メソッド であると理解しました。ここまでで、私が求めている二つのオブジェクトの比較は「値の等価性」を求めるものであり
Assert.ThatEqualConstraintは「参照の等価性」の比較を行っているのではないかということがわかりました。EqualConstraint について
※章題変更しました。
では、
Assert.ThatEqualConstraintによる比較は参照の等価性の比較なのかということを調べてみました。
https://github.com/nunit/docs/wiki/EqualConstraint#notes にそのようなことが書いてありました。When checking the equality of user-defined classes, NUnit first examines each class to determine whether it implements IEquatable (unless the AsCollection modifier is used). If either object implements the interface for the type of the other object, then that implementation is used in making the comparison. If neither class implements the appropriate interface, NUnit makes use of the Equals override on the expected object. If you neglect to either implement IEquatable or to override Equals, you can expect failures comparing non-identical objects. In particular, overriding operator == without overriding Equals or implementing the interface has no effect.
クラスに
IEquatable <T>の実装がなければオーバーライドされたEqualsメソッドを、Equalsメソッドのオーバーライドがなければ既定のObject.Equalsを用いて等価性の検証をするということでしょうか?
であれば、TestClass1にはいずれもありませんから参照の等価性で比較を行った結果テストが失敗❌したのだと考えられます。IEquatable の実装
上記にて
IEquatableというものについて言及されていたのでこちらについて調べました。
とはいえ IEquatableを完全に理解する という記事でまとめられており自分が改めてまとめる必要はないかと思います。
ただ、ここまで調べてきて「可変型(ミュータブル)」についてまだうまく理解しきれていません。「値」であるかという点に注目して等価性判定についてどのように実装するのかということはなんとなくわかったので、参照型である自前のクラスが値としての性質を持っている場合には不変型(イミュータブル)とするべきであると考えると良いのでしょうか?今回の実際のケース(※後述)においては「値」で「イミュータブル」なクラスと判断したのでIEquatableを実装しました(自動生成)。参考記事でも紹介されていましたが Visual Studio の
クイック アクションとリファクタリングの機能でクラスに対してIEquatableの実装の自動生成ができます(Visual Studio 2019版)。また、同記事 配列等に注意 は実際に嵌っていたところを解決してくれました。IEquatableを完全に理解する
Visual Studio で Equals および GetHashCode メソッドのオーバーライドを生成する
値型と参照型とミュータブルとイミュータブルとまとめ
今回の疑問のスタート地点はテストがなぜ失敗するのかというところであり
Assert.ThatEqualConstraintの挙動からIEquatableに辿り着きました。しかし、本来は等価性という考え方に基づいてIEquatableや等値演算子の実装のガイドラインやベストプラクティスが存在しAssert.ThatEqualConstraintにおいてもそちらに基づいているのだと理解しました。自前のクラスにおいてもそうしたガイドラインに従い等価性判定のメソッドを実装する必要があります。今回のケースではその一つのパターンとして
IEquatableの実装及びEqualsメソッド、GetHashCodeメソッドのオーバーライド、等値演算子のオーバーロードを行いました。まだ完全に理解できていない部分、調査できていない部分あると思います。そうした部分については今後実際のケースを通して今回のように調査しながら深めていけたらと思っています。
TestClass1(IEquatableを実装)public class TestClass1 : IEquatable<TestClass1> { public string Id { get; } public string Name { get; } public TestClass1(string id, string name) { Id = id; Name = name; } public override bool Equals(object obj) { return Equals(obj as TestClass1); } public bool Equals([AllowNull] TestClass1 other) { return other != null && Id == other.Id && Name == other.Name; } public override int GetHashCode() { return HashCode.Combine(Id, Name); } public static bool operator ==(TestClass1 left, TestClass1 right) { return EqualityComparer<TestClass1>.Default.Equals(left, right); } public static bool operator !=(TestClass1 left, TestClass1 right) { return !(left == right); } }
Test1 成功の図補足など
実際のケースは、API層(Controller)、ドメイン層、データ層のような構成の Web API におけるドメイン層での EntityModel Class のデータを ViewModel Class のデータに変換するロジック部分のメソッドの検証です。
また、https://stackoverflow.com/questions/318210/compare-equality-between-two-objects-in-nunit でテストのためだけに
Equalsメソッドのオーバーライドなどはするべきではないという回答がありました。これについては、ドメインロジックに影響するから~というよりかは、等価性に関する検討を行い適切なパターンで等価性判定を実装してそれに従ってテストしなくてはいけないから(あるいはテストのほうが先にできている)と考える方が、今回調査してみた結果、自分なりにしっくりきます。参考
- 投稿日:2020-03-17T00:36:40+09:00
【WPF】キーボードフォーカスが当たらない
ウィンドウ初期表示時に、ある要素にキーボードフォーカスを当てたいのに当たりません。
以下やってみたこと。
FocusManager.FocusedElement="{Binding ElementName=ButtonOk}"- Focusableをtrueにする
- Keyboard.Focus()をActivatedイベントに登録
しかし思うように動作せずハマってましたが、こちらにどんぴしゃの解決法が載ってました。
https://stackoverflow.com/questions/20294658/focusedelement-is-not-being-honoured備忘録として載せておきます。
classnamespace Invoices.Client.Wpf.Behaviors { using System.Windows; using System.Windows.Input; public static class KeyboardFocus { public static readonly DependencyProperty OnProperty; public static void SetOn(UIElement element, FrameworkElement value) { element.SetValue(OnProperty, value); } public static FrameworkElement GetOn(UIElement element) { return (FrameworkElement)element.GetValue(OnProperty); } static KeyboardFocus() { OnProperty = DependencyProperty.RegisterAttached("On", typeof(FrameworkElement), typeof(KeyboardFocus), new PropertyMetadata(OnSetCallback)); } private static void OnSetCallback(DependencyObject dependencyObject, DependencyPropertyChangedEventArgs dependencyPropertyChangedEventArgs) { var frameworkElement = (FrameworkElement)dependencyObject; var target = GetOn(frameworkElement); if (target == null) return; frameworkElement.Loaded += (s, e) => Keyboard.Focus(target); } } }xaml<UserControl xmlns:behaviors="clr-namespace:Invoices.Client.Wpf.Behaviors"> <Grid behaviors:KeyboardFocus.On="{Binding ElementName=TextBoxToFocus}"> <TextBox x:Name="TextBoxToFocus" /> </Grid> </UserControl>私の場合はこれで無事解決しました。