- 投稿日:2020-02-27T22:17:07+09:00
React のチュートリアルを Typescript でやってみた【環境構築編 2】
注意
前回の記事の続きです。
※前回紹介した
awesome-typescript-loaderに関して調べた結果、
現在はすでに更新されていないプラグインとのことでts-loaderかbabel-loaderを使用したほうがいいです。はじめに
前回でほとんどの設定をしたのですが、
以下のプラグインを導入することで、開発をもっと便利にします。
(やらなくてもコード変更後、ソースをビルドすればコーディングは確認は可能)webpack-dev-server の導入と設定
以下のコマンドで
webpack-dev-serverをインストールします。npm install webpack-dev-server --save-devwebpack-dev-server については以下の記事にわかりやすく書いてあります。
https://qiita.com/riversun/items/d27f6d3ab7aaa119deabpackage.json に以下のコードを追加します。
各設定の説明は割愛します。自分で調べてみると面白いかもしれませんね。package.json"scripts": { "test": "echo \"Error: no test specified\" && exit 1", "build": "webpack", "start": "webpack-dev-server --hot --inline " },React での HMR 機能
HMRとは、Hot Module Replacementの頭文字を取ったもので、ページの再読み込み無しで、モジュールの交換・追加・削除をアプリケーションの動作中に行います。
React で HMR 機能を使う場合は、以下のプラグインをインストールする必要があります。
- react-hot-loader
また、
react-hot-loaderで typescript を使用するために以下のプラグインをインストールします。
この箇所についてはreact-hot-loaderの公式の typescript の箇所を参考にしています。
react-hot-loader TypeScript
- @babel/core
- @babel/plugin-proposal-class-properties
- @babel/plugin-proposal-decorators
- @babel/preset-env
- @babel/preset-react
- @babel/preset-typescript
- babel-cli
- babel-loader
- fork-ts-checker-webpack-plugin
- @hot-loader/react-dom
コマンド
npm install --save-dev @babel/core
npm install --save-dev @babel/plugin-proposal-class-properties
npm install --save-dev @babel/plugin-proposal-decorators
npm install --save-dev @babel/preset-env
npm install --save-dev @babel/preset-react
npm install --save-dev @babel/preset-typescript
npm install --save-dev babel-cli
npm install --save-dev babel-loader
npm install --save-dev fork-ts-checker-webpack-plugin
npm install @hot-loader/react-dom
html-webpack-plugin の導入
html-webpack-pluginを使用することで html を修正した際に検知し反映してくれるようになるのでインストールします。npm install --save-dev html-webpack-pluginconfig で設定しますが src のフォルダ内に、index.html を作成します。
index.html<!DOCTYPE html> <html> <head> <meta charset="UTF-8" /> <title>TypeScript HelloWorld</title> </head> <body> <div id="app"></div> </body> </html>webpack.config.js
最終的にコンフィグの内容は以下の様になりました。
webpack.config.jsconst path = require("path"); const webpack = require("webpack"); const HtmlWebpackPlugin = require("html-webpack-plugin"); const ForkTsCheckerWebpackPlugin = require("fork-ts-checker-webpack-plugin"); module.exports = { mode: "development", entry: ["react-hot-loader/patch", path.resolve(__dirname, "./src/index.tsx")], output: { path: path.resolve(__dirname, "dist/"), filename: "bundle.js" }, devtool: "source-map", resolve: { modules: ["node_modules"], alias: { "react-dom": "@hot-loader/react-dom" }, extensions: [".ts", ".tsx", ".js", ".jsx", ".json"] }, module: { rules: [ { test: /\.(j|t)s(x)?$/, exclude: /node_modules/, use: { loader: "babel-loader", options: { cacheDirectory: true, babelrc: false, presets: [ ["@babel/preset-env"], "@babel/preset-typescript", "@babel/preset-react" ], plugins: [ ["@babel/plugin-proposal-decorators", { legacy: true }], ["@babel/plugin-proposal-class-properties", { loose: true }], "react-hot-loader/babel" ] } } }, { enforce: "pre", test: /\.ts(x?)$/, loader: "source-map-loader" } ] }, devServer: { host: "0.0.0.0", contentBase: path.resolve(__dirname, "dist/") }, plugins: [ new ForkTsCheckerWebpackPlugin(), new webpack.NamedModulesPlugin(), new HtmlWebpackPlugin({ template: "./src/index.html" }) ] };tsx を HMR が反映されるように修正する。
以下のように修正します。
index.tsximport * as React from "react"; import * as ReactDOM from "react-dom"; import { hot } from "react-hot-loader/root"; const App = () => <div>Hello World!!!!!!</div>; export default hot(App); ReactDOM.render(<App />, document.getElementById("app"));hot 機能を使用するためには、component を hot でラップする必要があります。以下の部分
const App = () => <div>Hello World!!!!!!</div>;
export default hot(App);
上記の内容で hot が反映されるようになりました。
実際に試してみる
webpack-dev-sarver を以下のコマンドで起動させます。
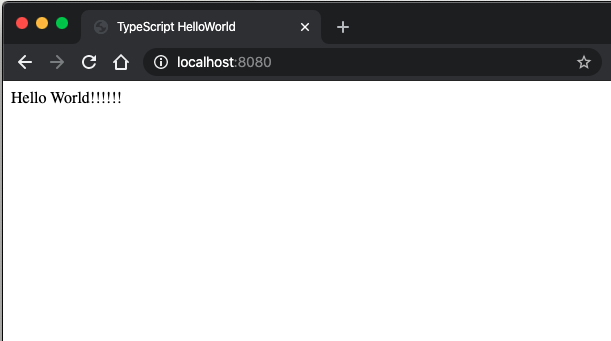
npm start起動を確認し、
http://localhost:8080/にアクセスします。
すると以下のような画面が表示されます。
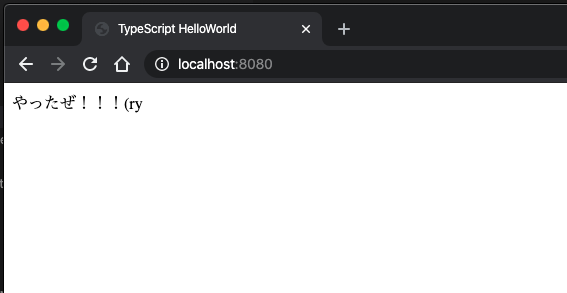
そのまま webpack-dev-sarver を起動させた状態で、index.tsx の内容を変更します。
以下、変更内容index.tsximport * as React from "react"; import * as ReactDOM from "react-dom"; import { hot } from "react-hot-loader/root"; const App = () => <div>やったぜ!!!(ry</div>; export default hot(App); ReactDOM.render(<App />, document.getElementById("app"));変更を保存したあと画面を確認すると変更した内容が反映されていることが確認できます。
まとめ
これで、開発がしやすくなったかと思います。
本来であれば、もっと早く次の記事を出す予定だったのですが、思ったよりreact-hot-loaderの設定に手間取りました。
最終的には、コンフィグの以下の内容が原因でした。
みなさんも気をつけてください。エラー時の内容
extensions: [".ts", ".tsx", ".js", ".json"]正しい内容
extensions: [".ts", ".tsx", ".js", ".jsx", ".json"]
- 投稿日:2020-02-27T15:48:54+09:00
[React+Storybook]KnobsでdangerouslySetInnerHTMLがうまく表示されないとき
現象
Reactで(Vueもだと思うけど)Storybook + Knobsのスタックで、Knobsの
text()にHTMLタグを直接渡して、コンポーネントでdangerouslySetInnerHTMLを使ってレンダリングしようとするとうまく行かない。
原因
Knobsの
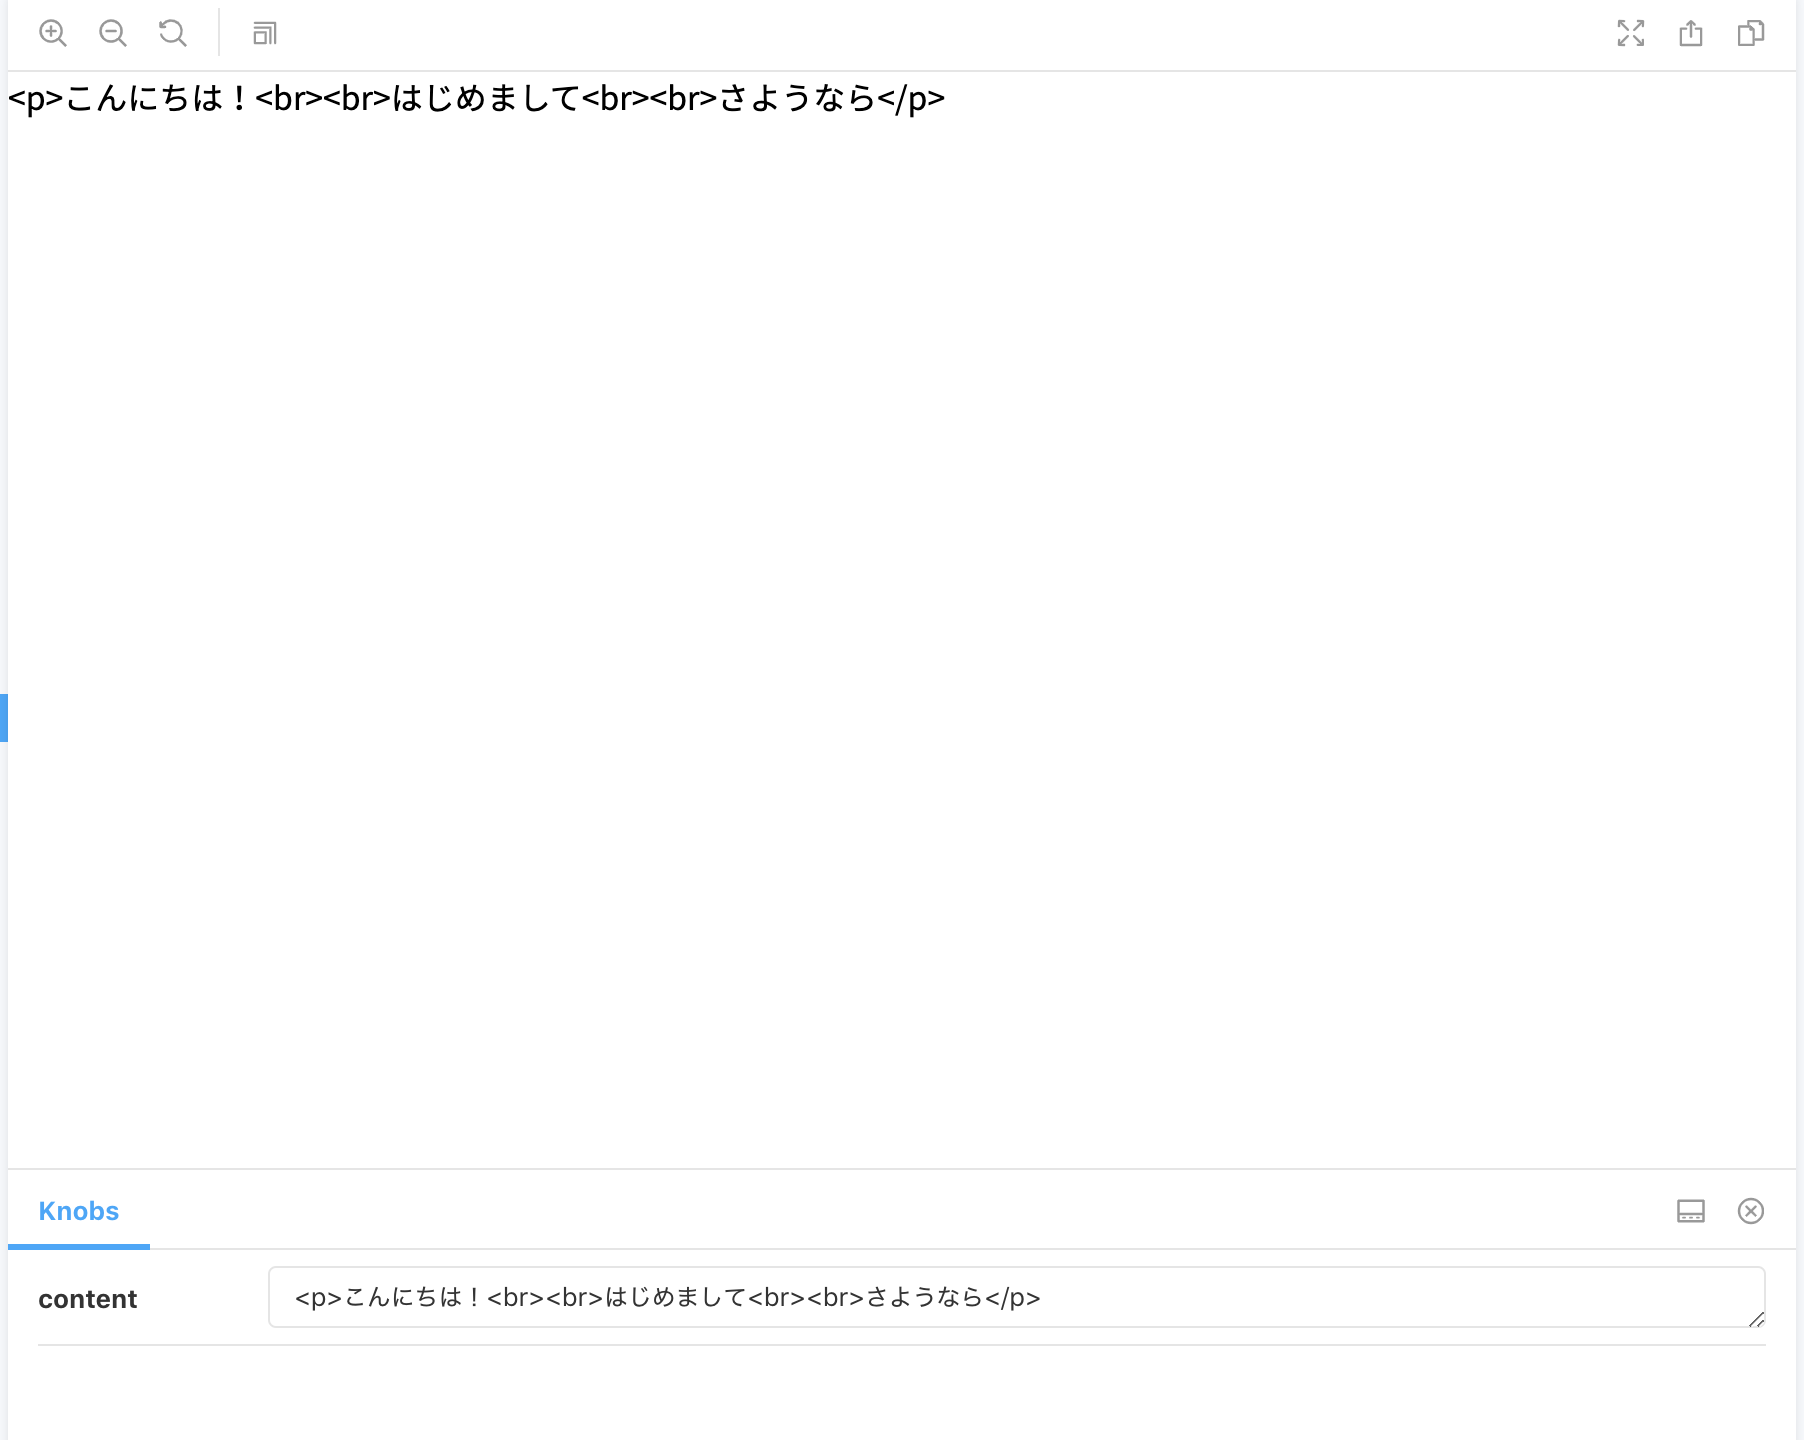
text()にHTMLタグを渡すと、親切にタグをエスケープしてくれるらしい。<p>こんにちは!<br><br>はじめまして<br><br>さようなら</p>対応
ただアンエスケープするだけでよし。
export const onlyParagraph = () => { const beforeContent = text( "content", "<p>こんにちは!<br><br>はじめまして<br><br>さようなら</p>" ); // Knobsのtext()でHTMLタグがエスケープされてしまうので、アンエスケープしています const unescapeHtml = string => { const patterns = { "<": "<", ">": ">", "&": "&", """: '"', "'": "'", "`": "`" }; const escapedString = string.replace( /&(lt|gt|amp|quot|#x27|#x60);/g, match => patterns[match] ); return escapedString; } return ( <> <HTMLContentWrapper content={unescapeHtml(beforeContent)} /> </> ); };
- 投稿日:2020-02-27T10:21:50+09:00
Next.js のプロジェクトにGTMを組み込む方法
意外と情報がなかったので後世のために記す。
react-gtm-module というライブラリにお世話になった。
使わない場合は_document.jsに dangerouslySetInnerHTML したりでもいける。はず。Next.js での設定
まず
npm install react-gtm-module --saveかyarn add react-gtm-moduleする。そして
_app.tsxに次のコードを埋め込むimport TagManager from 'react-gtm-module'; class MyApp extends App { componentDidMount() { // gtmId に自分のGTMアカウントのID入れてください TagManager.initialize({ gtmId: 'GTM-XXXXXX' }); } render() { 。。。 } }これでタグは配信されるようになる。
が、これだけだとクライアントサイドルーティングのPVが計測できない(History APIで更新しているだけなのでタグが発火されないから)。Next.jsを使っていると基本的にユーザの元に届いた時点でSPAとして振舞うようになると思うのでそれに対策する必要がある。
GTM上でページ遷移時のPVを取るためのトリガーを作る
「履歴の変更」というトリガーを仕込んであげるといい。
https://support.google.com/tagmanager/answer/7679322?hl=ja
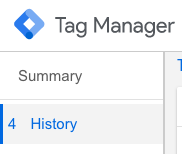
これで公開して GTM のプレビューで見ると
Historyというイベントが計測されていることを確認できる。

- 投稿日:2020-02-27T06:17:58+09:00
responsive-loaderを使ってProgressive Imagesを実装しよう!( React + TypeScript )
この記事は何ですか?
React.js + TypeScriptで、Progressive Imagesを実装しようとしたけど、あんまり(日本語の)良い記事が無かったので、備忘録ついでに解説した記事です。
あと、responsive-loaderが結構良かったので、その紹介もしたくて書きました。
そもそもProgressive Imagesって何ですか?
以下のgif画像のような感じの画像の遅延ロード方法。これによってUXを上げれて、レイアウト崩れも防げて、一石二鳥。
あと、オシャレでハイカラな感じしない? するよね? うん、するね。
Progressive Imagesの仕組み
これは結構単純な話で、
- ロードしてくる画像を縮小した画像をあらかじめ作っておく
- 画像をロード
- ロードしている間は縮小した画像の方をCSSでブラー(ボケさせる効果)をかけて表示
- ロードが完了したらアニメーションをしながらロードした画像を表示する
縮小した画像は、webpackでビルドする時にbase64URLにするので、ロードする事なく表示が可能になる。
url-loaderについて
url-loaderは、webpackを使っているならおなじみのloaderですね。
機能としては、以下のように画像ファイルをimportして使うことができます。url-loaderを使った時import sampleImage from "./SampleImage.png" const SampleComponent = () => <img src={sampleImage} alt="sample" />そして、url-loader最大の特徴が、画像ファイルのサイズが小さければ、base64URLに変換してくれます!
これによって、ロードする処理が発生しないので、無駄な通信を省くことが出来ます!また、大きなサイズのファイルに対しては、別のloaderを指定することが出来ます。デフォルトでは、file-loaderが設定されており、通常はそれで事足りると思いますが、今回はresponsive-loaderを使いたいと思います。
responsive-loaderについて
responsive-loaderは、基本的な挙動はfile-loaderとたぶん一緒です。
file-loaderを使った時import sampleImage from "./SampleImage.png" const SampleComponent = () => <img src={sampleImage} alt="sample" />上記のような記述があった時、ビルドフォルダーにimportした画像を名前として複製して、
src={sampleImage}のsampleImageのところに、複製した画像のPATHを挿入してくれます。responsive-loaderは、それにプラスして、サイズの違う画像を出力して、画像をレスポンシブに対応させることが出来ます!
以下の例では、画面の幅が600px以下の画像では600pxの画像を取得し、それよりも大きい幅の画面であれば、1920pxの画像を取得します。
responsive-loaderを使った時import sampleImage from "./SampleImage.png" const SampleComponent = () => ( <img src={sampleImage.src /* /images/SampleImage-600.png */} srcSet={sample.srcSet /* /images/SampleImage-600.png 600w, SampleImage-1920.png 1920w */} alt="sample" /> )また、responsive-loaderには
placeholderと言うオプションがあり、それを有効にしておくと、importした画像を縮小したbase64URLの画像を生成することができるます。
なので、responsive-loaderを使えばProgressive Imageに必要な縮小画像を生成しつつ、レスポンシブ画像にも対応できます!webpackの設定
それでは、responsive-loaderを使うために
webpack.config.jsを定義していきましょう。
今回の解説とは関係の薄い設定は、省略しています。詳しい設定は、各自で設定してください。
また、インストールの工程も省略させてもらいます。ご了承ください。webpack.config.jsmodule.exports = { /* -- 省略 -- */ module: { rules: [ /* -- 省略 -- */ { test: /\.(png|jpe?g|jpeg|gif)$/, use: [ { loader: 'url-loader', options: { limit: 8192, // base64URLにする画像の大きさを指定 fallback: require.resolve('responsive-loader'), // limitより大きい画像に適用するloaderを設定 adapter: require('responsive-loader/sharp'), // responsive-loaderが画像を整形する時に使う sizes: [300, 600, 1080, 1920], // 生成する画像のサイズを指定 placeholder: true, // Progressive Imageで使う縮小画像を生成するかどうかのフラグ placeholderSize: 50, // 縮小画像のサイズ outputPath: "images/", // 出力する画像の出力先。先頭に"/"を付けちゃダメ。 name: "[name]-[width].[ext]" // 出力する画像の名前 }, } ] } ] }, /* -- 省略 -- */ };ここでの注意点としては、responsive-loaderのオプションは、url-loaderのオプションと一緒に書いてください。そうすると、url-loaderが勝手にresponsive-loaderにオプションを渡してくれます。
Reactコンポーネントの作成
webpackの設定が出来たら、次はProgressive Imageを表示するためのReactComponentを作っていきましょう!
ちなみに、ソースコードはTypeScriptで書かれています。Pimg.tsximport * as React from "react" import "./Pimg.scss"; // styleを適用する interface PimgProps { img: React.ImgHTMLAttributes<HTMLImageElement>; delay?: number; } /** * @description Progressive Imageを表示するコンポーネント **/ export const Pimg: React.FC<PimgProps> = ({ img: { src, placeholder, srcSet }, delay }) => { // 画像のロードが完了したかのフラグ const [loaded, setLoaded] = React.useState(false); // 縮小画像の非表示フラグ( true: 非表示, false: 表示 ) const [hiddenPreview, setHiddenPreview] = React.useState(false); // 画像をロードする関数 const onLoad = () => { if (src && !loaded) { // Imageを作成1 const img = new Image(); // srcset属性を設定 if (srcSet) img.srcset = srcSet; // 画像のロードが完了した時、setLoaded関数にtrueを渡して実行する img.onload = () => setTimeout(setLoaded, delay, true); // 画像のロードを開始 img.src = src; } }; // コンポーネントがマウントされた時、onLoad関数を実行 React.useEffect(onLoad, []); return ( <div className="progressive"> {hiddenPreview ? null : ( <img className="image-element preview" src={placeholder} /> )} {load ? ( <img className={`image-element ${hiddenPreview ? "" : "reveal"}`} src={src} srcSet={srcSet} onAnimationEnd={() => setHiddenPreview(true)} /> ) : null} </div> ); };次にSCSSを定義してきます。
こちらのSCSSのコードは、こちらのサイトを参考にさせてもらいました。Pimg.scss// 画像の親要素のStyle .progressive { position: relative; display: block; overflow: hidden; outline: none; } // 画像要素のStyle .image-element { display: block; width: 100%; max-width: none; height: auto; border: 0 none; } // 縮小サイズの画像のStyle .preview { filter: blur(2vw); transform: scale(1.05); } // ロードしてきた画像のStyle // CSSアニメーション(reveal)が完了した時に、このclass名は外す .reveal { position: absolute; left: 0; top: 0; will-change: transform, opacity; animation: reveal 1s ease-out; } // 透明度を変化させながらアニメーション @keyframes reveal { 0% {transform: scale(1.05); opacity: 0;} 100% {transform: scale(1); opacity: 1;} }ここまで出来たら、あとは使うだけですが、TypeScriptで画像ファイルをimportする時は、自分で型定義ファイルを書く必要があります。なので、以下のような型定義ファイルを作成してください。
declaration.d.tsdeclare module "*.jpg" { const responsive_image: React.ImgHTMLAttributes<HTMLImageElement>; export default responsive_image; }そして、先ほど作った
Pimgコンポーネントの使用例です。ProgressiveImagesの表示imoprt * as React from "react" import { render } from "react-dom" import { Pimg } from "./Pimg" import SmapleImage from "./SampleImage.jpg" const App = () => ( <div className="app"> {/* Progressive Imageを表示 */} <Pimg img={SampleImage} delay={500 /* 500ms後に画像を表示 */} > </div> ) render(<App />, document.getElementById("root"))webpack-dev-serverなどで、サーバーを立てて見てみてください。以下のgif画像のように画像が表示されていれば成功です!
お疲れ様でした!
あとがき
今回はReact.jsでやってみましたが、Vue.jsとかでも出来ると思うので、参考になるかと思います。
Progressive Imagesは、結構簡単に実装できますし、見た目もオシャレなのでおすすめですね。
動的なコンテンツとかだと、縮小した画像はサーバーの方で作ってやれば良いだけですね。ハイ。ここまで読んでくれてありがとうございます。
それでは、また?
