- 投稿日:2020-02-27T22:53:36+09:00
Java言語で学ぶデザインパターン入門の2章のまとめ
お久しぶりです。白々です。
前回は、「Iteratorパターン」に関しての記事を作成しました。
前回の記事は、後述のappendixに記載しています。
今回は、「Adapterパターン」に関して記載したいと思います。
また、「Java言語で学ぶデザインパターン入門」には、サンプルプログラムも有りますが、著作権の都合上省かせて頂きます。御了承ください。第2章 Adapter -皮かぶせて再利用
日本で使っている電化製品があると思います。
この電気製品を海外でコンセントを利用する時に、電圧が違うので、コンセントの変換器を持っていくと思います。
このように、すでに供給されている物をそのまま利用できない場合に、使うことができる形に変換することで利用できるようになります。
このような、変換を行うパターンをAdapterパターンと言うそうです。
「Java言語で学ぶデザインパターン入門」には、「すでに提供されているもの」と「必要なもの」との「ずれ」を埋めるためのデザインパターン
と言う記載がありました。
このAdapterパターンは、Wrapperパターンとも呼ぶそうです。なんでこんなパターンが必要なの?
「Java言語で学ぶデザインパターン入門」にも、記載がありましたが、必要なメソッドがあるなら追加で作ればいいという意見もあると思います。
ただ、全てのメソッドを一から作ると、テストの手間がものすごく増えてしまいます。例えば、unixtimeを取得しint型で返すメソッドがあるとし、新しくunixtimeを文字列型で返すメソッドを欲しいとします。
こんな簡単な例なら、メソッドの返り値を文字列型でキャストすれば問題ないですが、ここでは新しく時間を文字列型で返すメソッドを作成したとします。
この新しく作成したメソッドでエラーが発生した場合、時間を取得している部分で失敗しているのか、文字列型でキャストしている部分で失敗したかエラーが起きたという部分だけではわからないですよね?
ですが、既存のunixtimeを取得しint型で返すメソッドを使用し、新しく時間を文字列型で返すメソッドを作ってエラーが出た場合は、時間を取得する部分のエラーに関しては、既存のメソッドでないことを確認済みなので、int型から文字列型でキャストする時に失敗しているということがすぐに分かります。
また、メソッドを作成する時に、既存のメソッドを呼ぶだけで済むので簡単に実装することができます。
このように、Adapterパターンを使用することで、実装工数の短縮及び実装時に発生したエラー原因を減らすことができます。既存のunixtimeを取得しint型で返すメソッドの返り値を文字列型でキャストするように修正する場合も考えてみましょう。
「Java言語で学ぶデザインパターン入門」にも、記載がありましたが、この場合でもAdapterパターンを使用した方が良いです。
理由としては、既存の実装を変更してしまうので、再度このメソッドを使用している部分をテストしなけばならないため、少しの改変でもテストの工数がかかってしまい無駄になります。「Java言語で学ぶデザインパターン入門」にも、記載がありましたが、機能がかなり離れていたら新規でクラスを作るしかないです。
イメージとしては以下のような場合です。交流100ボルトの電源を元にして水道の水を出すわけにはいかないですからね
Adapterパターンの種類
このAdapterパターンは、以下の2種類あるそうです。
・クラスによるAdapterパターン(継承を使用)
・インスタンスによるAdapterパターン(移譲を使用)
例に対してそれぞれのパターンで記載していきたいと思います。例
インスタンスを作成した時間のunixtimeを取得しint型で返すメソッドを持つクラスを使用して、string型で返すwrapperを作成することにします。
クラスによるAdapterパターン
クラス図
このクラス図は、PlantUMLというもので記載しています。
私が、書いたPlantUMLのコードは以下のGitHubに記載がありますのでReadMeを読んでお使いください。
該当ファイル名は、class.txtです。
https://github.com/sirajirasajiki/design_pattern_uml/blob/master/adapter/class.txtPlantUMLのインストール方法と使い方に関しては、後述のappendixに記載しています。
クラス図を元にpythonで実装
以下に実装したコードを公開しています。python 3.7で実装しました。
https://github.com/sirajirasajiki/design_pattern_python/tree/master/Adapter/class_caseインスタンスによるAdapterパターン
クラス図
クラスによるAdapterパターンと異なるのは、GetTimeStrにてGetTimeの使い方が違います。
このクラス図は、PlantUMLというもので記載しています。
私が、書いたPlantUMLのコードは以下のGitHubに記載がありますのでReadMeを読んでお使いください。
https://github.com/sirajirasajiki/design_pattern_uml/blob/master/adapter/instance.txtクラス図を元にpythonで実装
以下に実装したコードを公開しています。python 3.7で実装しました。
https://github.com/sirajirasajiki/design_pattern_python/tree/master/Adapter/instance_caseまとめ
既存クラスと使用したい形式が違った場合のズレを吸収する物がAdapterパターンということが分かりました。
第2章感想
既存実装を使い新しいクラスを作ることによって、新規作成するよりも工数を減らすことができ、新規実装分でエラーが発生した場合、エラーの原因の範囲が少なくて済むので簡単に実装できると思いました。
また、返り値の型を変えるような簡単な修正でも既存実装に修正を加えてしまうとテストをやり直しになってしまうので、そのような場合にこのAdapterパターンは使うんだなということがわかりました。追記
adapterを作るよりwrapperを作るの方が良く聞くとのことなので、これからは、wrapperを作ると言おうと思います。最後に
何か間違っているところがあれば、ご指摘していただけると嬉しいです!
appendix
前回の記事
https://qiita.com/sirajirasajiki/items/55269e5d6c6e158de16e
PlantUMLに関するサイト
PlantUMLのインストールの時にお世話になったサイトは以下です。
https://qiita.com/kohashi/items/1d2c6e859eeac72ed926
PlantUMLを書くときにお世話になっているサイトは以下です。
https://qiita.com/ogomr/items/0b5c4de7f38fd1482a48更新履歴
2020/2/28 感想と例を部分的に更新しました。

- 投稿日:2020-02-27T22:29:03+09:00
Minecraft1.12.2で1.14のSweet berryのような植物ブロックを追加したメモ(サンプルコード)
Minecraft1.12.2で1.14のSweet berryのような植物ブロックを追加したメモ(サンプルコード)
右クリックで収穫できる茂みを作るよ
環境
- Forge MDK: forge-1.12.2-14.23.5.2768
前提
- 追加したブロックやアイテムの登録用クラスやプロキシクラスを用意してある
- (僕はあゆたきさんのチュートリアルの通りにやりました)
- テクスチャのドット絵を用意してある
参考にしたバニラのコード
備考: 新しい処理は何も書いていなくてバニラの変数に代入したりしただけです
- 1.12.2の
- ItemFood.class
- ItemSeed.class
- BlockCrops.class
- BlockCarrots.class
- apple.json
- acacia_sapling.json
- carrots.json
- 1.14.4の
- SweetBerryBushBlock.class
最低限必要なコード
あんずの木(このMODのあんずを収穫)のを追加したいと思います
備考: 登録用クラスを用意しておいてねファイルの配置
パッケージ名とかはバニラのマネっ子してます
src/main/java
- FFFMItems.java(アイテムの登録用クラス)
- oguro.fffm.init
- FFFMBlocks.java(ブロックの登録用クラス)
- oguro.fffm.init
- BlockFruitTree.java(果物の木の特性を決めるクラス)
- oguro.fffm.block
- BlockApricotTree.java(あんずの木独自の性質を決めるクラス)
- oguro.fffm.block
- ItemFruit.java(果物の特性を決めるクラス)
- oguro.fffm.item
- ItemApricot.java(あんず独自の性質を決めるクラス)
- oguro.fffm.item
- ItemSapling.java(果物の木の苗の性質を決めるクラス)
- oguro.fffm.item
- ItemApricotSapling.java(あんずの苗独自の性質を決めるクラス)
- oguro.fffm.item
src/main/resources(モデル)
備考: コマンドを使わないとインベントリに表示されることはないのでBlockApricotTreeのインベントリでの見た目のjsonを用意していないがlogにエラー出まくって鬱陶しいので適当でいいから用意したほうがいいかも(見た目が読み込めないだけなので大丈夫)
- apricot.json(あんずの見た目)
- assets.fffm.models.item
- apricot_tree_sapling.json(あんずの苗の見た目)
- assets.fffm.models.item
- apricot_tree(あんずの木のブロックはメタデータが違う複数のブロックだから、それぞれの見た目を記述したjsonはどれか指定するファイル)
- assets.fffm.blockstates
- apricot_tree_stage0.json
- apricot_tree_stage1.json
- apricot_tree_stage2.json
- apricot_tree_stage3.json (あんずの木のそれぞれ成長段階ごとの見た目)
- assets.fffm.models.block
src/main/resources(テクスチャ)
- apricot.png(あんずのテクスチャ)
- assets.fffm.textures.items
- apricot_tree_sapling.png(あんずの苗のテクスチャ)
- assets.fffm.textures.items
- apricot_tree_stage0.png
- apricot_tree_stage1.png
- apricot_tree_stage2.png
- apricot_tree_stage3.png(あんずの木のテクスチャ)
- assets.fffm.textures.blocks
クラスのソースコード
FFFMItems.java
package oguro.fffm.init;

import java.util.LinkedList;
import java.util.List;

import net.minecraft.client.renderer.block.model.ModelResourceLocation;
import net.minecraft.item.Item;
import net.minecraft.item.ItemFood;
import net.minecraftforge.client.model.ModelLoader;
import net.minecraftforge.event.RegistryEvent;
import net.minecraftforge.fml.common.Mod;
import net.minecraftforge.fml.common.eventhandler.SubscribeEvent;
import oguro.fffm.FFFMRef;
import oguro.fffm.item.ItemApricot;
import oguro.fffm.item.ItemApricotTreeSapling;
import oguro.fffm.item.ItemSapling;

public class FFFMItems
{
    //アイテムを宣言する
    public static ItemSapling APRICOT_TREE_SAPLING;

    public static ItemFood APRICOT;

    //アイテムのインスタンスを生成する
    public static void init()
    {
        APRICOT_TREE_SAPLING = (ItemSapling) new ItemApricotTreeSapling(FFFMBlocks.APRICOT_TREE).setRegistryName("apricot_tree_sapling")
                .setUnlocalizedName("apricot_tree_sapling");

        APRICOT = (ItemFood) new ItemApricot().setRegistryName("apricot")
                .setUnlocalizedName("apricot");

    }


    //アイテムを登録する
    public static void register()
    {
        registerItem(APRICOT_TREE_SAPLING);

        registerItem(APRICOT);
    }

    public static void registerItem(Item item)
    {
        RegistrationHandler.ITEMS.add(item);
    }

    //アイテムの描画を登録する
    public static void registerRenders()
    {
        registerRender(APRICOT_TREE_SAPLING);

        registerRender(APRICOT);

    }

    private static void registerRender(Item item)
    {
        ModelLoader.setCustomModelResourceLocation(item, 0,
                new ModelResourceLocation(item.getRegistryName(),"inventory"));
    }

    //内部クラスでアイテムを登録する
    @Mod.EventBusSubscriber(modid = FFFMRef.MODID)
    public static class RegistrationHandler
    {

        public static final List<Item> ITEMS = new LinkedList<>();

        @SubscribeEvent
        public static void registerItems(final RegistryEvent.Register<Item> event)
        {
            FFFMItems.init();
            FFFMItems.register();
            ITEMS.stream().forEach(item -> event.getRegistry().register(item));

        }
    }
}
FFFMBlocks.java
package oguro.fffm.init;

import java.util.LinkedList;
import java.util.List;

import net.minecraft.block.Block;
import net.minecraft.client.renderer.block.model.ModelResourceLocation;
import net.minecraft.item.Item;
import net.minecraft.item.ItemBlock;
import net.minecraftforge.client.model.ModelLoader;
import net.minecraftforge.event.RegistryEvent;
import net.minecraftforge.fml.common.Mod;
import net.minecraftforge.fml.common.eventhandler.SubscribeEvent;
import net.minecraftforge.fml.relauncher.Side;
import net.minecraftforge.fml.relauncher.SideOnly;
import oguro.fffm.FFFMRef;
import oguro.fffm.block.BlockApricotTree;
import oguro.fffm.block.BlockFruitTree;

public class FFFMBlocks
{
    //登録するブロックを宣言
    public static BlockFruitTree APRICOT_TREE;

    //ブロックのインスタンスを生成
    public static void init()
    {
        APRICOT_TREE = (BlockFruitTree) new BlockApricotTree().setRegistryName("apricot_tree")
                .setUnlocalizedName("apricot_tree");
    }


    //ブロックを登録する
    public static void register()
    {
        registerBlock(APRICOT_TREE);
    }


    //ブロックの登録
    public static void registerBlock(Block block)
    {
        registerBlock(block, new ItemBlock(block));
    }

    //アイテムブロックの登録
    public static void registerBlock(Block block, ItemBlock item)
    {
        RegistrationHandler.BLOCKS.add(block);
        item.setRegistryName(block.getRegistryName());
        FFFMItems.RegistrationHandler.ITEMS.add(item);
    }

    //アイテムブロックの描画を登録する
    public static void registerRenders()
    {
        registerRender(APRICOT_TREE);
    }

    @SideOnly(Side.CLIENT)
    private static void registerRender(Block block)
    {
        ModelLoader.setCustomModelResourceLocation(Item.getItemFromBlock(block), 0,
                new ModelResourceLocation(block.getRegistryName(),"inventory"));
    }

    //内部クラスでブロックを登録する
    @Mod.EventBusSubscriber(modid = FFFMRef.MODID)
    public static class RegistrationHandler {

        public static final List<Block> BLOCKS = new LinkedList<>();

        @SubscribeEvent
        public static void registerItems(final RegistryEvent.Register<Block> event) {

            FFFMBlocks.init();
            FFFMBlocks.register();
            BLOCKS.stream().forEach(block -> event.getRegistry().register(block));
        }
    }
}
BlockFruitTree.java
package oguro.fffm.block;

import java.util.Random;

import net.minecraft.block.Block;
import net.minecraft.block.BlockBush;
import net.minecraft.block.IGrowable;
import net.minecraft.block.SoundType;
import net.minecraft.block.properties.IProperty;
import net.minecraft.block.properties.PropertyInteger;
import net.minecraft.block.state.BlockStateContainer;
import net.minecraft.block.state.IBlockState;
import net.minecraft.creativetab.CreativeTabs;
import net.minecraft.entity.player.EntityPlayer;
import net.minecraft.init.Blocks;
import net.minecraft.init.Items;
import net.minecraft.init.SoundEvents;
import net.minecraft.item.Item;
import net.minecraft.item.ItemStack;
import net.minecraft.util.EnumFacing;
import net.minecraft.util.EnumHand;
import net.minecraft.util.SoundCategory;
import net.minecraft.util.math.AxisAlignedBB;
import net.minecraft.util.math.BlockPos;
import net.minecraft.util.math.MathHelper;
import net.minecraft.world.IBlockAccess;
import net.minecraft.world.World;
import oguro.fffm.init.FFFMItems;

//BlockCropsを改造しつつ1.14.4のSweetBerryBushBlockから果物入手あたりの処理をパクってきた。
//新しいフルーツを追加するときは、このクラスを継承してドロップするアイテムなどの変数を書き換えることにする。
public class BlockFruitTree
extends BlockBush
implements IGrowable
{
    //作物の成長段階を作る。ここでは0から3の4段階。
    public static final PropertyInteger AGE = PropertyInteger.create("age", 0, 3);

    protected BlockFruitTree()
    {
        this.setDefaultState(this.blockState.getBaseState().withProperty(this.getAgeProperty(), Integer.valueOf(0)));
        this.setTickRandomly(true);
        this.setCreativeTab((CreativeTabs)null);
        this.setHardness(0.0F);
        this.setSoundType(SoundType.PLANT);
        this.disableStats();
    }


    public AxisAlignedBB getBoundingBox(IBlockState state, IBlockAccess source, BlockPos pos)
    {
        return FULL_BLOCK_AABB;
    }
    //成長に関する記述
    protected boolean canSustainBush(IBlockState state)
    {
        //設置可能(作付け可能)なブロック
        //BlockFruitTreeでは「耕地(FARMLAND)」、「草ブロック(GRASS)」、「土(DIRT)」の上に植えられるようにした。
        return state.getBlock() == Blocks.FARMLAND ||
                state.getBlock() == Blocks.GRASS ||
                state.getBlock() == Blocks.DIRT;
    }

    protected PropertyInteger getAgeProperty()
    {
        return AGE;
    }

    public int getMaxAge()
    {
        //最大成長段階は今回は3
        return 3;
    }

    protected int getAge(IBlockState state)
    {
        return ((Integer)state.getValue(this.getAgeProperty())).intValue();
    }

    public IBlockState withAge(int age)
    {
        return this.getDefaultState().withProperty(this.getAgeProperty(), Integer.valueOf(age));
    }

    public boolean isMaxAge(IBlockState state)
    {
        return ((Integer)state.getValue(this.getAgeProperty())).intValue() >= this.getMaxAge();
    }

    public void updateTick(World worldIn, BlockPos pos, IBlockState state, Random rand)
    {
        super.updateTick(worldIn, pos, state, rand);

        if (!worldIn.isAreaLoaded(pos, 1)) return; // Forge: prevent loading unloaded chunks when checking neighbor's light
        if (worldIn.getLightFromNeighbors(pos.up()) >= 9)
        {
            int i = this.getAge(state);

            if (i < this.getMaxAge())
            {
                float f = getGrowthChance(this, worldIn, pos);

                if(net.minecraftforge.common.ForgeHooks.onCropsGrowPre(worldIn, pos, state, rand.nextInt((int)(25.0F / f) + 1) == 0))
                {
                    worldIn.setBlockState(pos, this.withAge(i + 1), 2);
                    net.minecraftforge.common.ForgeHooks.onCropsGrowPost(worldIn, pos, state, worldIn.getBlockState(pos));
                }
            }
        }
    }

    public void grow(World worldIn, BlockPos pos, IBlockState state)
    {
        int i = this.getAge(state) + this.getBonemealAgeIncrease(worldIn);
        int j = this.getMaxAge();

        if (i > j)
        {
            i = j;
        }

        worldIn.setBlockState(pos, this.withAge(i), 2);
    }

    protected int getBonemealAgeIncrease(World worldIn)
    {
        return MathHelper.getInt(worldIn.rand, 2, 5);
    }

    protected static float getGrowthChance(Block blockIn, World worldIn, BlockPos pos)
    {
        float f = 4.0F;
        BlockPos blockpos = pos.down();

        for (int i = -1; i <= 1; ++i)
        {
            for (int j = -1; j <= 1; ++j)
            {
                float f1 = 0.0F;
                IBlockState iblockstate = worldIn.getBlockState(blockpos.add(i, 0, j));

                if (iblockstate.getBlock().canSustainPlant(iblockstate, worldIn, blockpos.add(i, 0, j), net.minecraft.util.EnumFacing.UP, (net.minecraftforge.common.IPlantable)blockIn))
                {
                    f1 = 4.0F;

                    if (iblockstate.getBlock().isFertile(worldIn, blockpos.add(i, 0, j)))
                    {
                        f1 = 5.2F;
                    }
                }

                if (i != 0 || j != 0)
                {
                    f1 /= 6.0F;
                }

                f += f1;
            }
        }

        BlockPos blockpos1 = pos.north();
        BlockPos blockpos2 = pos.south();
        BlockPos blockpos3 = pos.west();
        BlockPos blockpos4 = pos.east();
        boolean flag = blockIn == worldIn.getBlockState(blockpos3).getBlock() || blockIn == worldIn.getBlockState(blockpos4).getBlock();
        boolean flag1 = blockIn == worldIn.getBlockState(blockpos1).getBlock() || blockIn == worldIn.getBlockState(blockpos2).getBlock();

        if (flag && flag1)
        {
            f /= 2.0F;
        }
        else
        {
            boolean flag2 = blockIn == worldIn.getBlockState(blockpos3.north()).getBlock() || blockIn == worldIn.getBlockState(blockpos4.north()).getBlock() || blockIn == worldIn.getBlockState(blockpos4.south()).getBlock() || blockIn == worldIn.getBlockState(blockpos3.south()).getBlock();

            if (flag2)
            {
                f /= 4.8F;
            }
        }

        return f;
    }

    //破壊したときに落とす「苗アイテム」の設定
    //このクラスはどの果樹からも直接呼び出されない予定なのでとりあえずあんずの苗にしておく。
    protected Item getSapling()
    {
        return FFFMItems.APRICOT_TREE_SAPLING;
    }

  //破壊したときに落とす「果物」とその個数の設定
    //このクラスはどの果樹からも直接呼び出されない予定なのでとりあえずあんずを2個にしておく。
    protected Item getFruit()
    {
        return Items.APRICOT;
    }

    protected int getHowManyPickUp()
    {
        return 2;
    }

    //ドロップするようにする
    public Item getItemDropped(IBlockState state, Random rand, int fortune)
    {
        return this.getSapling();
    }

    public ItemStack getItem(World worldIn, BlockPos pos, IBlockState state)
    {
        return new ItemStack(this.getSapling());
    }

    public boolean onBlockActivated(World worldIn, BlockPos pos, IBlockState state, EntityPlayer playerIn, EnumHand hand, EnumFacing facing, float hitX, float hitY, float hitZ)
    {
        int i = this.getAge(state);
        boolean flag = i == 3;
        if (!flag && playerIn.getHeldItem(hand).getItem() == Items.DYE) {
           return false;
        }
      //age=2(準最大成長)のときに収穫する処理
        else if (i == 2)
        {
           //収穫できる個数
           //getHowManyPickUpで設定した収穫個数だけ収穫できる設定にしてある。
           int j = getHowManyPickUp();
           spawnAsEntity(worldIn, pos, new ItemStack(getFruit(), j + (flag ? 1 : 0)));
           //収穫時に鳴らす音
           //新しい音を追加せずに「額縁からアイテムを剥ぎ取る音」にした。
           worldIn.playSound((EntityPlayer)null, pos, SoundEvents.ENTITY_ITEMFRAME_REMOVE_ITEM, SoundCategory.BLOCKS, 1.0F, 0.8F + worldIn.rand.nextFloat() * 0.4F);
           worldIn.setBlockState(pos, this.withAge(Integer.valueOf(0)), 2);
           return true;
        }
        //age=3(最大成長)のときに収穫する処理
        else if (i == 3)
        {
           //収穫できる個数
           //getHowManyPickUpで設定した収穫個数の2倍を収穫できる設定にしてある。
           int j = getHowManyPickUp() * 2;
           spawnAsEntity(worldIn, pos, new ItemStack(getFruit(), j + (flag ? 1 : 0)));
           //収穫時に鳴らす音
           //新しい音を追加せずに「額縁からアイテムを剥ぎ取る音」にした。
           worldIn.playSound((EntityPlayer)null, pos, SoundEvents.ENTITY_ITEMFRAME_REMOVE_ITEM, SoundCategory.BLOCKS, 1.0F, 0.8F + worldIn.rand.nextFloat() * 0.4F);
           worldIn.setBlockState(pos, this.withAge(Integer.valueOf(0)), 2);
           return true;
        }
        //age=2に満たないときは「収穫しない処理
        else
        {
           return super.onBlockActivated(worldIn, pos, state, playerIn, hand, facing, hitX, hitY, hitZ);
        }
     }

    //IGrowableに関する記述
    @Override
    public boolean canGrow(World worldIn, BlockPos pos, IBlockState state, boolean isClient)
    {
        return !this.isMaxAge(state);
    }

    @Override
    public boolean canUseBonemeal(World worldIn, Random rand, BlockPos pos, IBlockState state)
    {
        return true;
    }

    @Override
    public void grow(World worldIn, Random rand, BlockPos pos, IBlockState state)
    {
        this.grow(worldIn, pos, state);
    }

    //成長段階ごとのブロックをメタデータの異なるブロックとして管理
    public IBlockState getStateFromMeta(int meta)
    {
        return this.withAge(meta);
    }
    public int getMetaFromState(IBlockState state)
    {
        return this.getAge(state);
    }

    protected BlockStateContainer createBlockState()
    {
        return new BlockStateContainer(this, new IProperty[] {AGE});
    }
}
BlockApricotTree.java
package oguro.fffm.block;

import net.minecraft.item.Item;
import oguro.fffm.init.FFFMItems;

public class BlockApricotTree
extends BlockFruitTree
{
    //苗アイテムを設定

    protected Item getSapling()
    {
        return FFFMItems.APRICOT_TREE_SAPLING;
    }

    //果物アイテムを設定

    protected Item getFruit()
    {
        return FFFMItems.APRICOT;
    }

    //収穫できる個数を設定

    protected int getHowManyPickUp()
    {
        return 2;
    }
}
ItemFruit.java
package oguro.fffm.item;

import net.minecraft.entity.player.EntityPlayer;
import net.minecraft.item.EnumAction;
import net.minecraft.item.ItemFood;
import net.minecraft.item.ItemStack;
import net.minecraft.util.ActionResult;
import net.minecraft.util.EnumActionResult;
import net.minecraft.util.EnumHand;
import net.minecraft.world.World;
import oguro.fffm.creativetab.FFFMCreativeTabs;

public class ItemFruit
extends ItemFood
{

    //満腹度回復量
    protected static int getHealAmount()
    {
        return 5;
    }

    //オオカミが食べるかどうか
    protected static boolean canWolfEat()
    {
        return false;
    }

    //食べるのにかかる時間
    protected int getEatTime()
    {
        return 32;
    }

    //食べるときのアニメーション
    //デフォルトでEAT
    public EnumAction getItemUseAction(ItemStack stack)
    {
        return EnumAction.EAT;
    }

    //満腹でも食べられるか
    //デフォルトでいいえ
    protected boolean canEatAlways()
    {
        return false;
    }


    public ItemFruit()
    {
        super(getHealAmount(), canWolfEat());
        this.setCreativeTab(FFFMCreativeTabs.FFFM_FRUIT);
    }

    public int getMaxItemUseDuration(ItemStack stack)
    {
        return getEatTime();
    }


    public ActionResult<ItemStack> onItemRightClick(World worldIn, EntityPlayer playerIn, EnumHand handIn)
    {
        ItemStack itemstack = playerIn.getHeldItem(handIn);

        if (playerIn.canEat(canEatAlways()))
        {
            playerIn.setActiveHand(handIn);
            return new ActionResult<ItemStack>(EnumActionResult.SUCCESS, itemstack);
        }
        else
        {
            return new ActionResult<ItemStack>(EnumActionResult.FAIL, itemstack);
        }
    }
}
ItemApricot.java
package oguro.fffm.item;

import net.minecraft.entity.player.EntityPlayer;
import net.minecraft.item.EnumAction;
import net.minecraft.item.ItemFood;
import net.minecraft.item.ItemStack;
import net.minecraft.util.ActionResult;
import net.minecraft.util.EnumActionResult;
import net.minecraft.util.EnumHand;
import net.minecraft.world.World;
import oguro.fffm.creativetab.FFFMCreativeTabs;

public class ItemFruit
extends ItemFood
{

    //満腹度回復量
    protected static int getHealAmount()
    {
        return 5;
    }

    //オオカミが食べるかどうか
    protected static boolean canWolfEat()
    {
        return false;
    }

    //食べるのにかかる時間
    protected int getEatTime()
    {
        return 32;
    }

    //食べるときのアニメーション
    //デフォルトでEAT
    public EnumAction getItemUseAction(ItemStack stack)
    {
        return EnumAction.EAT;
    }

    //満腹でも食べられるか
    //デフォルトでいいえ
    protected boolean canEatAlways()
    {
        return false;
    }


    public ItemFruit()
    {
        super(getHealAmount(), canWolfEat());
        this.setCreativeTab(FFFMCreativeTabs.FFFM_FRUIT);
    }

    public int getMaxItemUseDuration(ItemStack stack)
    {
        return getEatTime();
    }


    public ActionResult<ItemStack> onItemRightClick(World worldIn, EntityPlayer playerIn, EnumHand handIn)
    {
        ItemStack itemstack = playerIn.getHeldItem(handIn);

        if (playerIn.canEat(canEatAlways()))
        {
            playerIn.setActiveHand(handIn);
            return new ActionResult<ItemStack>(EnumActionResult.SUCCESS, itemstack);
        }
        else
        {
            return new ActionResult<ItemStack>(EnumActionResult.FAIL, itemstack);
        }
    }
}
ItemSapling.java
package oguro.fffm.item;

import net.minecraft.advancements.CriteriaTriggers;
import net.minecraft.block.Block;
import net.minecraft.entity.player.EntityPlayer;
import net.minecraft.entity.player.EntityPlayerMP;
import net.minecraft.item.Item;
import net.minecraft.item.ItemStack;
import net.minecraft.util.EnumActionResult;
import net.minecraft.util.EnumFacing;
import net.minecraft.util.EnumHand;
import net.minecraft.util.math.BlockPos;
import net.minecraft.world.World;
import net.minecraftforge.common.IPlantable;
import oguro.fffm.block.BlockFruitTree;
import oguro.fffm.creativetab.FFFMCreativeTabs;
import oguro.fffm.init.FFFMBlocks;

//バニラのItemSeedを引っ張ってきたっぽい(覚えてない)。
//新しいフルーツを追加するときは、このクラスを継承して植える果樹などの変数を書き換えることにする。
public class ItemSapling
extends Item
implements IPlantable
{
    private final BlockFruitTree crops;
    protected Block getTree()
    {
        //植える果樹
        //このクラスはどの果樹からも直接呼び出されない予定なのでとりあえずあんずの木にしておく。
        return FFFMBlocks.APRICOT_TREE;
    }


    public ItemSapling(BlockFruitTree fruit_tree)
    {
        this.crops = (BlockFruitTree) this.getTree();
        //クリエイティブタブ
        //私は新しく「FFFM_SAPLING」というクリエイティブタブを作ってそこに入れた。
        //バニラのクリエイティブタブをそのまま使うならthis.setCreativeTab(CreativeTabs.FOOD);とか
        this.setCreativeTab(FFFMCreativeTabs.FFFM_SAPLINGS);
    }

    public EnumActionResult onItemUse(EntityPlayer player, World worldIn, BlockPos pos, EnumHand hand, EnumFacing facing, float hitX, float hitY, float hitZ)
    {
        ItemStack itemstack = player.getHeldItem(hand);
        net.minecraft.block.state.IBlockState state = worldIn.getBlockState(pos);
        if (facing == EnumFacing.UP && player.canPlayerEdit(pos.offset(facing), facing, itemstack) && state.getBlock().canSustainPlant(state, worldIn, pos, EnumFacing.UP, (IPlantable) this) && worldIn.isAirBlock(pos.up()))
        {
            worldIn.setBlockState(pos.up(), this.crops.getDefaultState());

            if (player instanceof EntityPlayerMP)
            {
                CriteriaTriggers.PLACED_BLOCK.trigger((EntityPlayerMP)player, pos.up(), itemstack);
            }

            itemstack.shrink(1);
            return EnumActionResult.SUCCESS;
        }
        else
        {
            return EnumActionResult.FAIL;
        }
    }

    @Override
    public net.minecraftforge.common.EnumPlantType getPlantType(net.minecraft.world.IBlockAccess world, BlockPos pos)
    {
        return net.minecraftforge.common.EnumPlantType.Plains;
    }

    @Override
    public net.minecraft.block.state.IBlockState getPlant(net.minecraft.world.IBlockAccess world, BlockPos pos)
    {
        return this.crops.getDefaultState();
    }

}
ItemApricotTreeSapling.java
package oguro.fffm.item;

import net.minecraft.block.Block;
import oguro.fffm.block.BlockFruitTree;
import oguro.fffm.init.FFFMBlocks;

public class ItemApricotTreeSapling extends ItemSapling {

    public ItemApricotTreeSapling(BlockFruitTree fruit_tree) {
        super(fruit_tree);
    }

        //植える果樹
    @Override
    protected Block getTree()
    {
        return FFFMBlocks.APRICOT_TREE;
    }

}
jsonのソースコード
jsonとクラスの当たり判定いじってやれば高さ2マスにしたりできるかも
apricot.json
{
    "parent": "item/generated",
    "textures": {
        "layer0": "fffm:items/apricot"
    }
}
apricot_tree_sapling.json
{
    "parent": "item/generated",
    "textures": {
        "layer0": "fffm:blocks/apricot_tree_sapling"
    }
}
apricot_tree.json
{
    "variants": {
        "age=0": { "model": "fffm:apricot_tree_stage0" },
        "age=1": { "model": "fffm:apricot_tree_stage1" },
        "age=2": { "model": "fffm:apricot_tree_stage2" },
        "age=3": { "model": "fffm:apricot_tree_stage3" }
    }
}
apricot_tree_stage◯.json
◯の中の数字いじってくれ
{
    "parent": "block/cross",
    "textures": {
        "cross": "fffm:blocks/apricot_tree_stage◯"
    }
}
- 投稿日:2020-02-27T21:17:38+09:00
【Java】あるディレクトリの下のファイル全てに対して処理を行う
別に目新しくもなんともないのですが、なんとなく投稿してみます。
掲題のような処理を行うには、Java7で追加されてたFiles#walkFileTree()がよさそうです。
WalkFileTreeSample.javaimport java.nio.file.*; import java.nio.file.attribute.BasicFileAttributes; import java.io.*; public class WalkFileTreeSample { public static void main(String[] args) throws IOException { Path start = Paths.get("/Users/daiki/go"); Files.walkFileTree(start, new SimpleFileVisitor<Path>() { @Override public FileVisitResult visitFile(Path file, BasicFileAttributes attrs) { System.out.println(file); return FileVisitResult.CONTINUE; } }); } }SimpleFileVisitorは普通のクラスであり、関数型インタフェースじゃないのでラムダ式は使えません。
上記ではファイルごとに呼び出されるメソッドのみをオーバーライドしてますが、他にもディレクトリを訪問する前に呼び出されるメソッド、後に呼び出されるメソッドなどがあり、オーバーライドすることで処理を挟むことができます。別の例として、Java8で追加されてたFiles#walk()を使うこともできます。こちらはStream APIを使います。上のと結果を合わせるため、ディレクトリは除外しています。ちょっと気持ち悪い?
WalkSample.javaimport java.io.IOException; import java.nio.file.*; import java.util.stream.Stream; public class WalkSample { public static void main(String[] args) throws IOException { Path start = Paths.get("/path/to/target"); try(Stream<Path> paths = Files.walk(start)) { paths.filter(path -> !Files.isDirectory(path)) .forEach(System.out::println); } } }Java6以前であれば、再帰を使って自分で書くことになりますかね。ただファイル名を出力するだけなら、特に難しいことはありませんが。
WalkWithoutLibrarySample.javaimport java.io.File; public class WalkWithoutLibrarySample { public static void main(String[] args) { File start = new File("/path/to/target"); walk(start); } private static void walk(File dir) { for(File file : dir.listFiles()) { if(file.isFile()) { System.out.println(file); } else { walk(file); } } } }参考
- 投稿日:2020-02-27T19:59:28+09:00
Spring bootでapplication.propertiesの設定値を起動時に変更する方法
新型コロナの影響が徐々に職場にも出始めていていつ出社停止になるかドキドキしています。
そんな中、久しぶりに丸一日ハマったので記録しておくことにしました。
しかも理解できればとても単純な話でかなり凹んでます。
おそらくJavaやってる人からすれば初歩的すぎてWebに公開するまでもないようなことなのかもしれません。。やりたいこと
- アプリケーション起動時に設定ファイルを読み込んで値を設定したい。
こんな簡単なことに8h。
ハマったポイント
- classes/application.propertiesを書き換えても値が反映されない。
事象再現
https://github.com/t-o-z/configuration-demo
Readmeの通りにセットアップして、
docker run config-demoするとapplication.propertiesに含まれている
  .   ____          _            __ _ _
 /\\ / ___'_ __ _ _(_)_ __  __ _ \ \ \ \
( ( )\___ | '_ | '_| | '_ \/ _` | \ \ \ \
 \\/  ___)| |_)| | | | | || (_| |  ) ) ) )
  '  |____| .__|_| |_|_| |_\__, | / / / /
 =========|_|==============|___/=/_/_/_/
 :: Spring Boot ::        (v2.2.4.RELEASE)

2020-02-27 09:51:15.557  INFO 7 --- [           main] c.z.c.ConfigurationDemoApplication       : Starting ConfigurationDemoApplication v0.0.1-SNAPSHOT on 6c889b4a8ada with PID 7 (/usr/src/myapp/configuration-demo-0.0.1-SNAPSHOT.jar started by root in /usr/src/myapp)
2020-02-27 09:51:15.566  INFO 7 --- [           main] c.z.c.ConfigurationDemoApplication       : No active profile set, falling back to default profiles: default
2020-02-27 09:51:16.918  INFO 7 --- [           main] c.z.c.ConfigurationDemoApplication       : Started ConfigurationDemoApplication in 2.482 seconds (JVM running for 3.809)
key1-value
が表示されます。
classes配下のapplication.propertiesを
sample.key1=key1-value1と書き換えて、再度実行しても、
user:configuration-demo user$ docker run config-demo

  .   ____          _            __ _ _
 /\\ / ___'_ __ _ _(_)_ __  __ _ \ \ \ \
( ( )\___ | '_ | '_| | '_ \/ _` | \ \ \ \
 \\/  ___)| |_)| | | | | || (_| |  ) ) ) )
  '  |____| .__|_| |_|_| |_\__, | / / / /
 =========|_|==============|___/=/_/_/_/
 :: Spring Boot ::        (v2.2.4.RELEASE)

2020-02-27 09:58:45.004  INFO 6 --- [           main] c.z.c.ConfigurationDemoApplication       : Starting ConfigurationDemoApplication v0.0.1-SNAPSHOT on 9999dad12dac with PID 6 (/usr/src/myapp/configuration-demo-0.0.1-SNAPSHOT.jar started by root in /usr/src/myapp)
2020-02-27 09:58:45.014  INFO 6 --- [           main] c.z.c.ConfigurationDemoApplication       : No active profile set, falling back to default profiles: default
2020-02-27 09:58:46.425  INFO 6 --- [           main] c.z.c.ConfigurationDemoApplication       : Started ConfigurationDemoApplication in 2.564 seconds (JVM running for 3.881)
key1-value
となり反映されません。。
いろいろ試しました。
- classes/configにapplication.properties置いてみたり
- 設定読み込みの方法を変えてみたり
- 起動時にプロパティを直接InputStreamから取得して上書きしてみたり
- (すみません。参考にしていたURL見失いました。)
対策を調べても、
- 環境ごとの設定ファイルを用意する
- コマンドライン引数で書き換える
- Hot(Live) Reloadを使用する
とかいろいろあるのですが、純粋に1ファイルだけってもしかしてできないの?ってくらい情報がありませんでした。最後のHot Reloadなんかはこれやるためだけにサーバ立ち上げるとか。
結論
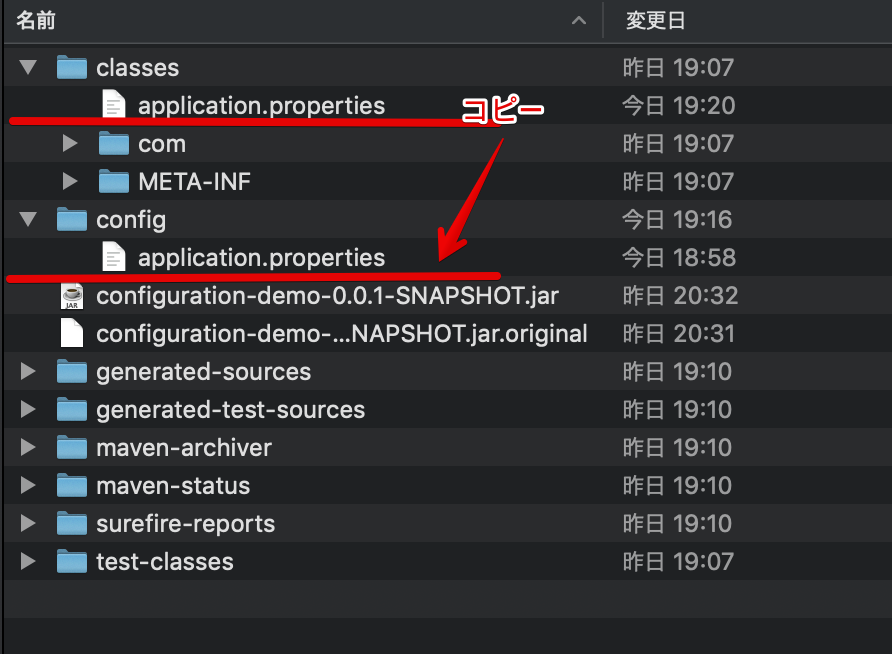
/configにコピーする!
もう試行錯誤のところで太字にしちゃってますが、
classes/configじゃダメなんです。
/configを新しく作成してその中にclasses/application.propertiesを配置します。
sample.key1=modifyと変更してDockerを起動(COPYなので再build必要)すると。
Otsuka:configuration-demo otsukatakuya$ docker run config-demo

  .   ____          _            __ _ _
 /\\ / ___'_ __ _ _(_)_ __  __ _ \ \ \ \
( ( )\___ | '_ | '_| | '_ \/ _` | \ \ \ \
 \\/  ___)| |_)| | | | | || (_| |  ) ) ) )
  '  |____| .__|_| |_|_| |_\__, | / / / /
 =========|_|==============|___/=/_/_/_/
 :: Spring Boot ::        (v2.2.4.RELEASE)

2020-02-27 10:54:32.393  INFO 6 --- [           main] c.z.c.ConfigurationDemoApplication       : Starting ConfigurationDemoApplication v0.0.1-SNAPSHOT on c43d6b28259a with PID 6 (/usr/src/myapp/configuration-demo-0.0.1-SNAPSHOT.jar started by root in /usr/src/myapp)
2020-02-27 10:54:32.403  INFO 6 --- [           main] c.z.c.ConfigurationDemoApplication       : No active profile set, falling back to default profiles: default
2020-02-27 10:54:33.804  INFO 6 --- [           main] c.z.c.ConfigurationDemoApplication       : Started ConfigurationDemoApplication in 2.474 seconds (JVM running for 3.59)
modify
どこに書いてある?
Spring bootの公式リファレンスに記載がありました。
SpringApplication loads properties from application.properties files in the following locations and adds them to the Spring Environment:
A /config subdirectory of the current directory
The current directory
A classpath /config package
The classpath root
The list is ordered by precedence (properties defined in locations higher in the list override those defined in lower locations).
1を試しているつもりが最初に3を試してできないとなっていたのです。。
おそらくクラスパスはjarに含まれているからそちらと競合してしまう?pom.xmlに除外設定を書いて、buildに含めない方法を提案している方もいたのですが、追加するだけで良いよ!って簡潔に書いている記事が少なくて勉強になりました。
- 投稿日:2020-02-27T16:06:49+09:00
Android StudioでUsageStatsManagerを使う方法(他のアプリの起動時間を調べる方法)
前提
Windows 10
Android Studio最新版
Javaこの方法は、2020/02/27時点では私のスマートフォンのおいては正常に動作しました。
仕様変更があるかもしれないので、コピペしてうまく行かない場合は公式ドキュメントを参考にしましょう。やりたいこと
他のアプリがその日どれくらい起動していたかを取得する必要がありました。
例えば、下の画像はActionDashというアプリで、他のアプリの起動時間を表示しています。
結論から言うと、UsageStatsManagerを使えば良いです。
UsageStatsManager
権限関係
まず、下のように
AndroidManifest.xmlに記載してください。AndroidManifest.xml<?xml version="1.0" encoding="utf-8"?> <manifest xmlns:android="http://schemas.android.com/apk/res/android" xmlns:tools="http://schemas.android.com/tools" package="****"> <!-- 下の二行を追加 --> <uses-permission android:name="android.permission.PACKAGE_USAGE_STATS" tools:ignore="ProtectedPermissions" /> <application> <!-- 省略 --> </application> </manifest>次に、permission checkを行います。
普通のpermissionの方法ではなく、特別な方法を使用します。private boolean checkReadStatsPermission() { // AppOpsManagerを取得 AppOpsManager aom = (AppOpsManager) getSystemService(Context.APP_OPS_SERVICE); // GET_USAGE_STATSのステータスを取得 int mode = aom.checkOp(AppOpsManager.OPSTR_GET_USAGE_STATS, android.os.Process.myUid(), getPackageName()); if (mode == AppOpsManager.MODE_DEFAULT) { // AppOpsの状態がデフォルトなら通常のpermissionチェックを行う。 // 普通のアプリならfalse return checkPermission("android.permission.PACKAGE_USAGE_STATS", android.os.Process.myPid(), android.os.Process.myUid()) == PackageManager.PERMISSION_GRANTED; } // AppOpsの状態がデフォルトでないならallowedのみtrue return mode == AppOpsManager.MODE_ALLOWED; }最後に、permissionのリクエストです。
これも、通常の方法と違うので注意が必要です。if (!checkReadStatsPermission()) { startActivity(new Intent(Settings.ACTION_USAGE_ACCESS_SETTINGS)); }UsageStatsManagerを使う
ソースコードの中で解説を入れています。
このソースコードは、その日のアプリの使用時間を取得します。public class UsageStatsClass { // Log.d()で、このクラスが出力したものだと識別するための名前 private static final String TAG = UsageStatsClass.class.getSimpleName(); // MainActivityのContextを代入 private Context context; public UsageStatsClass(Context mContext) { // contextを代入 context = mContext; } // UsageStatsというObjectは、一つのアプリの情報(アプリの使用時間など)が入っている // つまり、1つアプリにつき1つのUsageStatsが割り当てられる private List<UsageStats> getUsageStatsObject() { // getSystemService()で、UsageStatsManagerを取得する // UsageStatsManagerは、アプリの使用情報を取得するためのもの UsageStatsManager usageStatsManager = (UsageStatsManager) context.getSystemService(Context.USAGE_STATS_SERVICE); // 現在時刻をCalendarオブジェクトとして取得する Calendar calendar = Calendar.getInstance(); // calendarの時刻を午前0時に設定する // これにより、calendarが内包している時刻情報は、現在時刻から本日の午前0時となる calendar.set(Calendar.HOUR_OF_DAY, 0); // queryUsageStats(取得する時間の単位, 取得する時間の始まり、取得する時間の終わり) // 取得する時間の単位 : 日単位(INTERVAL_DAILY)、週単位(INTERVAL_WEEKLY)、月単位(INTERVAL_MONTHLY)、 // 年単位(INTERVAL_YEARLY)、自動選択(INTERVAL_BEST)がある // // 取得する時間の始まり : 取得したいデータの時間帯のスタート地点。今回は、その日の午前0時。 // 取得する時間の終わり : 取得したいデータの時間帯の終わり。今回は、現在時刻。 return usageStatsManager.queryUsageStats( UsageStatsManager.INTERVAL_DAILY, calendar.getTimeInMillis(), System.currentTimeMillis()); } // 外部から実行するための関数 public void readOneDayUsageStats() { // アプリごとの使用情報をListとして取得 List<UsageStats> usageStats = getUsageStatsObject(); // for文を使用することで、usageStatに一つのアプリの使用情報を取得する for (UsageStats usageStat : usageStats) { // もし、そのアプリを一度も使用していない場合は、スキップする if (usageStat.getTotalTimeInForeground() == 0) { continue; } // Logcatで、取得した情報を出力する // package name : getPackageName() : そのアプリ固有のID // total time displayed : getTotalTimeInForeground() : そのアプリが画面上に表示された合計時間 // first time : getFirstTimeStamp() : 取得したデータの始まりの時間をミリ秒で返す // getStringDate()を使ってミリ秒を人間にわかりやすい形に変換している // end time : getLastTimeUsed() : 取得したデータの終わりの時間をミリ秒で返す // getStringDate()を使ってミリ秒を、人間にわかりやすい形に変換している Log.d(TAG, "packageName: " + usageStat.getPackageName() + "\ttotalTimeDisplayed: " + usageStat.getTotalTimeInForeground() + "\tfirstTime: " + getStringDate(usageStat.getFirstTimeStamp()) + "\tlastTime: " + getStringDate(usageStat.getLastTimeUsed())); } } // long型のミリ秒をString型の人間がわかりやすい形に変換する private String getStringDate(long milliseconds) { final DateFormat df = new SimpleDateFormat("yyyy/MM/dd HH:mm:ss", Locale.JAPANESE); final Date date = new Date(milliseconds); return df.format(date); } }実行結果
アプリごとの、時間が表示されています。
やったね!D/UsageStatsClass: packageName: com.huawei.android.launcher totalTimeDisplayed: 3769989 firstTime: 2020/02/27 00:00:02 lastTime: 2020/02/27 15:59:00 D/UsageStatsClass: packageName: jp.naver.line.android totalTimeDisplayed: 805413 firstTime: 2020/02/27 00:00:02 lastTime: 2020/02/27 15:34:36 D/UsageStatsClass: packageName: com.discord totalTimeDisplayed: 4247 firstTime: 2020/02/27 00:00:02 lastTime: 2020/02/27 15:43:05 D/UsageStatsClass: packageName: com.microsoft.office.outlook totalTimeDisplayed: 43011 firstTime: 2020/02/27 00:00:02 lastTime: 2020/02/27 14:19:16 D/UsageStatsClass: packageName: com.google.android.packageinstaller totalTimeDisplayed: 2444 firstTime: 2020/02/27 00:00:02 lastTime: 2020/02/27 15:59:02 D/UsageStatsClass: packageName: com.google.android.apps.photos totalTimeDisplayed: 283917 firstTime: 2020/02/27 00:00:02 lastTime: 2020/02/27 13:38:33 D/UsageStatsClass: packageName: com.spotify.music totalTimeDisplayed: 6267989 firstTime: 2020/02/27 00:00:02 lastTime: 2020/02/27 13:56:21 D/UsageStatsClass: packageName: jp.mineo.app.phone totalTimeDisplayed: 70175 firstTime: 2020/02/27 00:00:02 lastTime: 2020/02/27 13:59:50 D/UsageStatsClass: packageName: com.google.android.apps.translate totalTimeDisplayed: 8170 firstTime: 2020/02/27 00:00:02 lastTime: 2020/02/27 15:04:14 D/UsageStatsClass: packageName: ch.bitspin.timely totalTimeDisplayed: 798142 firstTime: 2020/02/27 00:00:02 lastTime: 2020/02/27 11:17:25 D/UsageStatsClass: packageName: com.android.settings totalTimeDisplayed: 21715 firstTime: 2020/02/27 00:00:02 lastTime: 2020/02/27 14:32:32参考文献
- 投稿日:2020-02-27T15:46:37+09:00
51歳からの(現52)プログラミング 備忘 3行 android ボタンにフォーカスを移動する
Button btn = findViewById(R.id.btn);

btn.setFocusable(true);
btn.setFocusableInTouchMode(true);
btn.requestFocusFromTouch();
- 投稿日:2020-02-27T14:11:58+09:00
OWASP dependency check と認証プロキシと私
OWASP dependency checkとは
ここが一番わかり易いサイトかと思います。
同サイトでも記載されているように、あるモジュールに対して、既知の脆弱性を持ったライブラリを
使っていないかをチェックするツールとなっています。元はJavaアプリや.NETアプリ向けのツールで、今はプロトとして以下のものも対応しつつある状態。
* Python アプリケーション
* Ruby アプリケーション
* PHP (Composer) アプリケーション
* Node.js アプリケーション実行環境
OS:CentOS 7.7
OWASP dependency check:5.3.0現象
CLI版を使ったのですが、マニュアルに従って、
Proxyサーバ、Proxyポート、Proxy認証の情報を引数に指定し実行したところ、バラバラとExceptionが。。。
その中に以下のような見覚えのあるエラーメッセージを発見。
Caused by: java.io.IOException: Unable to tunnel through proxy. Proxy returns "HTTP/1.1 407 Proxy Authentication Required"
はて。。。Proxy情報を指定しているのにProxy Authenticatio Requiredが出るとなると。。。原因
Java 8 Update 111からjava.netパッケージのHTTPS接続の際のトンネリングにBasic認証を使用できない設定がデフォルトとなっていることが原因でした。
参考URL: https://www.oracle.com/technetwork/java/javase/8u111-relnotes-3124969.htmlただ解決方法はあって、以下のオプションをJavaの実行時につければいいとのこと。
-Djdk.http.auth.tunneling.disabledSchemes=""解決方法
解決方法はわかったものの、これをOWASPのツールとしてどう適用するかって話がわからない。
OWASP dependency check のCLI版は、シェルスクリプトだったので、そっと中を覗いてみると、
実行時のパラメタにJAVA_OPTSという環境変数を与えていることが判明。結論
以下のようにして実行すればよい。
export JAVA_OPTS="${JAVA_OPTS} -Djdk.http.auth.tunneling.disabledSchemes=\"\""

dependency-check.sh --project 【プロジェクト名】 --scan 【スキャン対象ディレクトリパス】 --proxyserver 【プロキシサーバ名】 --proxyport 【プロキシポート】 --proxypass 【プロキシ認証パスワード】 --proxyuser 【プロキシ認証ID】
- 投稿日:2020-02-27T00:01:47+09:00
Minecraftのテクスチャなどを指定するJsonを自動生成するクラスを作った【1.12.2】
はじめに
今更ですが、Minecraftのリソースは1.8以降からブロックステートなるものが実装され、それに伴いテクスチャを割り当てるためにJsonを書かないといけなくなりました。それもあって簡単に3Dモデルを実装したりすることが可能になりました。しかし、Modding時、全ての追加コンテンツに最低でも1つのJsonを書かなくてはならず、非常にめんどくさいと感じていました。
実はコード自体は数ヶ月前に作っていたのですが、久しぶりにカキカキして使いやすいように書き直しました。
せっかくなので公開します!
開発環境
- Windows 10
- Minecraft 1.12.2
- Minecraft Forge 14.23.5.2847
- IntelliJ IDEA 2019.1.4
- Gradle 3.0
- Forge Gradle 2.3-SNAPSHOT
ソースコード
GitHubにてソースコードを公開しています。
また、開発にあたって GitHub defeatedcrow/HeatAndClimateLib より一部のソースコードを参考にさせていただきました。
参考元の規約に基づいた上で、ご自由に流用、改変していただいて構いません。GitHub NaturalStyle2(リポジトリ)
GitHub NaturalStyle2 - JsonHelper(クラスへ直接飛ぶリンク)元々趣味でゆっくり作っているModの一部だったので名前などはそれ用になっています。
ご自身の環境で使われる場合は最低限下記の部分を修正して使ってください。
isDebug は動作が重くならないように、デバッグモード時にのみ処理を走らせたいので、その判定に使用しています。
自分はconfigで変更できるようにしていますが、こだわらないならfalse/trueで直接書き換えてしまってもいいかも?modID はご自身の開発環境のModIDを書いてください。
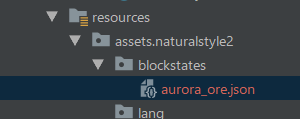
引数に開発環境のresourcesフォルダのパスをいれてください。エクスプローラーなどで見れるパスをコピペで行けます。できること
ブロックステートの自動生成
- 基本のブロック (土、石...)
- 東西南北の方角を持つブロック (かまど、ディスペンサー...)
方角は北側に固定しているので、それに合わせて回転させるコードを書いていただく必要があります。
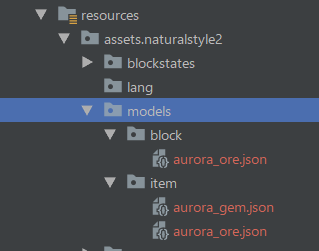
ブロックモデルの自動生成
- 基本のブロック (1枚)
- 東西南北の方角を持つブロック (3枚: top, front, side)
- 上下と横のテクスチャを持つブロック (2枚: top, side)
- 上と下と横のテクスチャを持つブロック (3枚: top, side, bottom)
()内の数字は必要なテクスチャ枚数です。top などはベースのテクスチャ名の後に _ と一緒に追記する必要がある名前です。
アイテムモデルの自動生成
- ブロック用アイテム
- 基本のアイテム
- ツール用アイテム
ブロック用のモデルはインベントリ内での表示に使います。
使い方
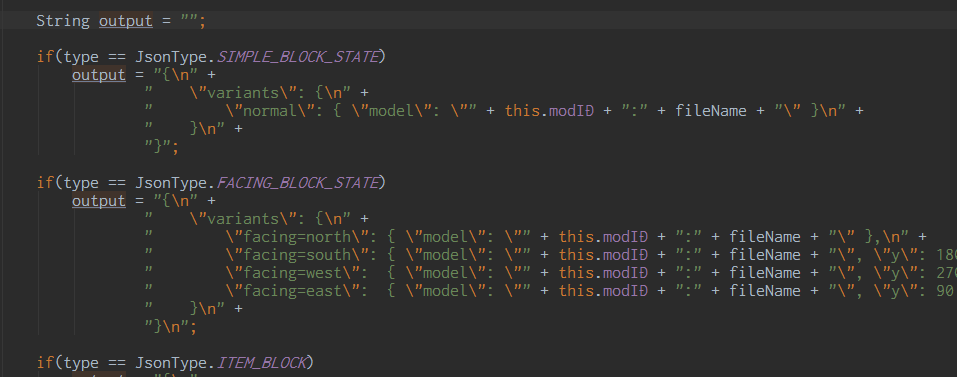
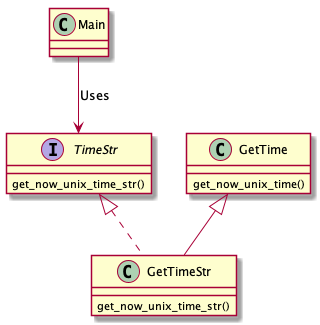
JsonHelperというクラスが実際に処理を行うクラスになります。
例えば画像の場合は、追加するブロックのクラスのコンストラクタ内で処理を行ってくれるメソッドを呼び出しています。public void registerJson(Object target, JsonType type, String name)
target Block又はItemのインスタンス
type JsonType内から実装したいタイプを選択
name 出力する際に使われる名前nameの部分は getUnlocalizedName() を使うことを前提で書いているので、そちらを使ってください。
他のバージョンでも使いたい!
このクラスは1.12.2での動作を想定しているので、その他のバージョンでは高確率で動作しない可能性があります。
その場合は、generateJson(...)の処理で、中間あたりにあるoutputをJsonType毎に代入する中身を変えてあげればいいと思います。
終わりに
このクラスのおかげで飛躍的に開発スピードが上がると思います。
結構自信作です。笑是非ご利用ください。それでは!