- 投稿日:2020-02-11T23:23:24+09:00
Laravel でModelの配列を created_at , updated_at で並べ替えたいとき
TL;DR
usort を使って行います
$posts = $user->posts->toArray();
usort($posts, function ($a, $b) {
    if ($a['updated_at'] != $b['updated_at']) {
        return ($a['updated_at'] < $b['updated_at']) ? +1 : -1;
    }

    if ($a['created_at'] != $b['created_at']) {
        return ($a['created_at'] < $b['created_at']) ? +1 : -1;
    }

    return ($a['id'] < $b['id']) ? +1 : -1;
});
デモンストレーション
Postモデルのデータをupdated_at > created_at > id の評価順で降順に並べ替えます
データの準備
php artisan make:seederでSeederを生成$ php artisan make:seeder PostsTableSeeder
- 生成したSeederを編集
<?php

use Faker\Factory as Faker;
use App\Post;
use Illuminate\Database\Seeder;
use Illuminate\Support\Facades\DB;

class PostsTableSeeder extends Seeder
{
    /**
     * Run the database seeds.
     *
     * @return void
     */
    public function run()
    {
        DB::table('posts')->truncate();
        $faker = Faker::create('en_US');

        for ($i = 0; $i < 5; $i++) {
            $created_at = $faker->dateTime;
            $updated_at = $faker->dateTime;
            while ($created_at > $updated_at) {
                // created_at > updated_atのデータは気持ち悪いため
                $updated_at = $faker->dateTime;
            }

            Post::create([
                "title" => $faker->text(20),
                "content" => $faker->text(100),
                "writer_id" => 1,
                "created_at" => $created_at,
                "updated_at" => $updated_at,
            ]);
        }
    }
}
php artisan db:seedでデータ登録$ php artisan db:seed Seeding: PostsTableSeeder Seeded: PostsTableSeeder (0.12 seconds) Database seeding completed successfullyusort で並べ替え
PHPには、配列を並べ替える関数が多く用意されています
https://www.php.net/manual/ja/array.sorting.php今回は複雑な並べ替えをしたいため、
usortを使用します
usortは第1引数にソートしたい配列を、第2引数にユーザ定義の比較関数を渡して使用します
この比較関数は比較対象の2つの値を引数に持ち、正の数が返されたときに第1引数が大きい、
負の数が返されたとき第1引数が小さいと判定されます// Post(オブジェクト)の配列を、Post(配列)の配列に変換する $posts = $user->posts->toArray(); // 第1引数にPostの配列を、第2引数に$a、$b(を // 引数に持つコールバックを渡す usort($posts, function ($a, $b) { if ($a['updated_at'] != $b['updated_at']) { // 両者のupdated_atが異なる、つまり比較が可能 return ($a['updated_at'] < $b['updated_at']) ? +1 : -1; } if ($a['created_at'] != $b['created_at']) { return ($a['created_at'] < $b['created_at']) ? +1 : -1; } // 両者のupdated_at、created_atが同じ場合、idで比較 return ($a['id'] < $b['id']) ? +1 : -1; });
- ソート前のデータ
array:5 [
  0 => array:6 [
    "id" => 1
    "title" => "Quo corrupti autem."
    "content" => "Esse rerum facere excepturi. Possimus eum inventore voluptas necessitatibus."
    "writer_id" => 1
    "created_at" => "1977-07-07 11:20:57"
    "updated_at" => "1994-10-21 08:47:34"
  ]
  1 => array:6 [
    "id" => 2
    "title" => "Id similique magni."
    "content" => "Beatae sed in qui tempora iste omnis. Ab sed alias unde dolorum quae. Enim laborum quos ut."
    "writer_id" => 1
    "created_at" => "1993-07-08 01:36:37"
    "updated_at" => "2010-04-29 20:39:01"
  ]
  2 => array:6 [
    "id" => 3
    "title" => "Maxime rem."
    "content" => "Ut alias nisi sit sunt nulla. Sit illo et necessitatibus dolore eaque placeat nesciunt iste."
    "writer_id" => 1
    "created_at" => "2013-06-27 15:33:04"
    "updated_at" => "2018-04-30 20:57:11"
  ]
  3 => array:6 [
    "id" => 4
    "title" => "A neque quo sit."
    "content" => "Unde explicabo iure est dolor maiores sit. Occaecati assumenda atque exercitationem quos nam omnis."
    "writer_id" => 1
    "created_at" => "2006-04-26 06:04:26"
    "updated_at" => "2009-12-17 18:17:15"
  ]
  4 => array:6 [
    "id" => 5
    "title" => "Ullam quia beatae."
    "content" => "Commodi numquam fugiat eveniet quas. Dolore repellat enim veniam libero."
    "writer_id" => 1
    "created_at" => "2015-04-06 09:17:58"
    "updated_at" => "2020-01-16 19:21:05"
  ]
]
- ソート後のデータ
array:5 [
  0 => array:6 [
    "id" => 5
    "title" => "Ullam quia beatae."
    "content" => "Commodi numquam fugiat eveniet quas. Dolore repellat enim veniam libero."
    "writer_id" => 1
    "created_at" => "2015-04-06 09:17:58"
    "updated_at" => "2020-01-16 19:21:05"
  ]
  1 => array:6 [
    "id" => 3
    "title" => "Maxime rem."
    "content" => "Ut alias nisi sit sunt nulla. Sit illo et necessitatibus dolore eaque placeat nesciunt iste."
    "writer_id" => 1
    "created_at" => "2013-06-27 15:33:04"
    "updated_at" => "2018-04-30 20:57:11"
  ]
  2 => array:6 [
    "id" => 2
    "title" => "Id similique magni."
    "content" => "Beatae sed in qui tempora iste omnis. Ab sed alias unde dolorum quae. Enim laborum quos ut."
    "writer_id" => 1
    "created_at" => "1993-07-08 01:36:37"
    "updated_at" => "2010-04-29 20:39:01"
  ]
  3 => array:6 [
    "id" => 4
    "title" => "A neque quo sit."
    "content" => "Unde explicabo iure est dolor maiores sit. Occaecati assumenda atque exercitationem quos nam omnis."
    "writer_id" => 1
    "created_at" => "2006-04-26 06:04:26"
    "updated_at" => "2009-12-17 18:17:15"
  ]
  4 => array:6 [
    "id" => 1
    "title" => "Quo corrupti autem."
    "content" => "Esse rerum facere excepturi. Possimus eum inventore voluptas necessitatibus."
    "writer_id" => 1
    "created_at" => "1977-07-07 11:20:57"
    "updated_at" => "1994-10-21 08:47:34"
  ]
]
- 投稿日:2020-02-11T23:03:14+09:00
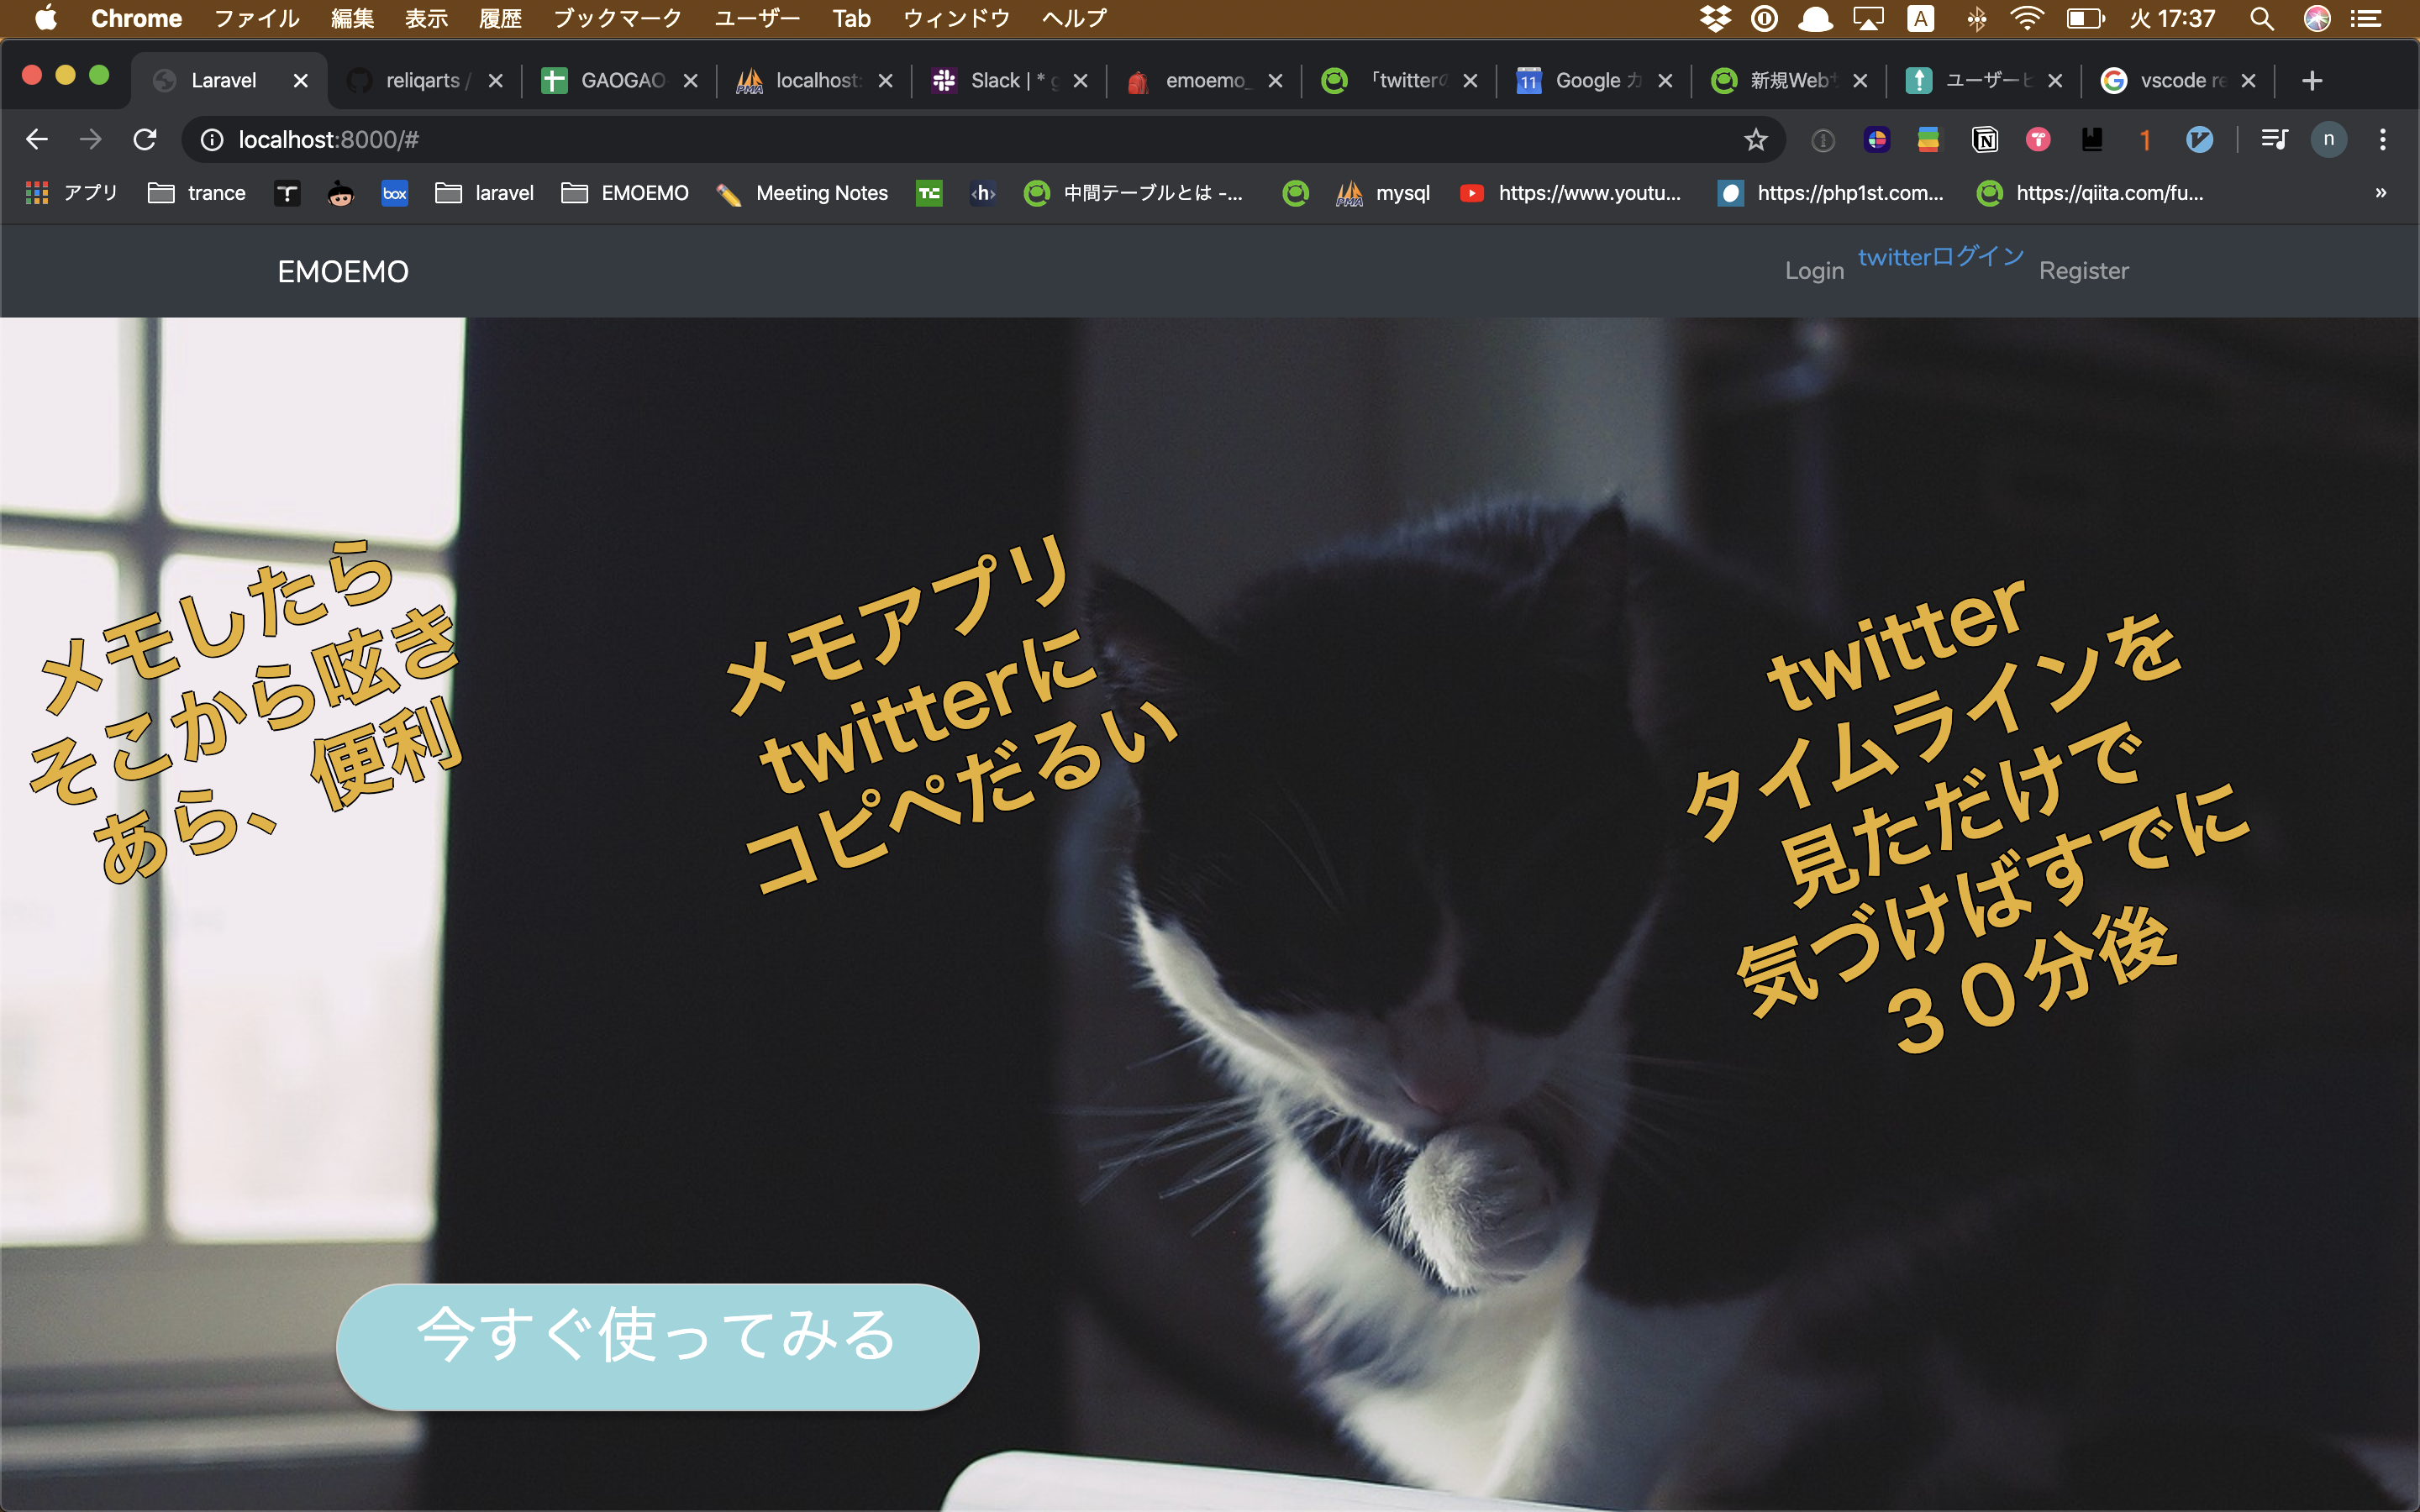
twitterの情報発信を助けるWebサービス「EMOEMO」を2月の14日に公開します!
はじめに
初めまして!てらって呼んでください
簡単に自己紹介をするとごみくずプログラミング初学者です。(3ヶ月目)
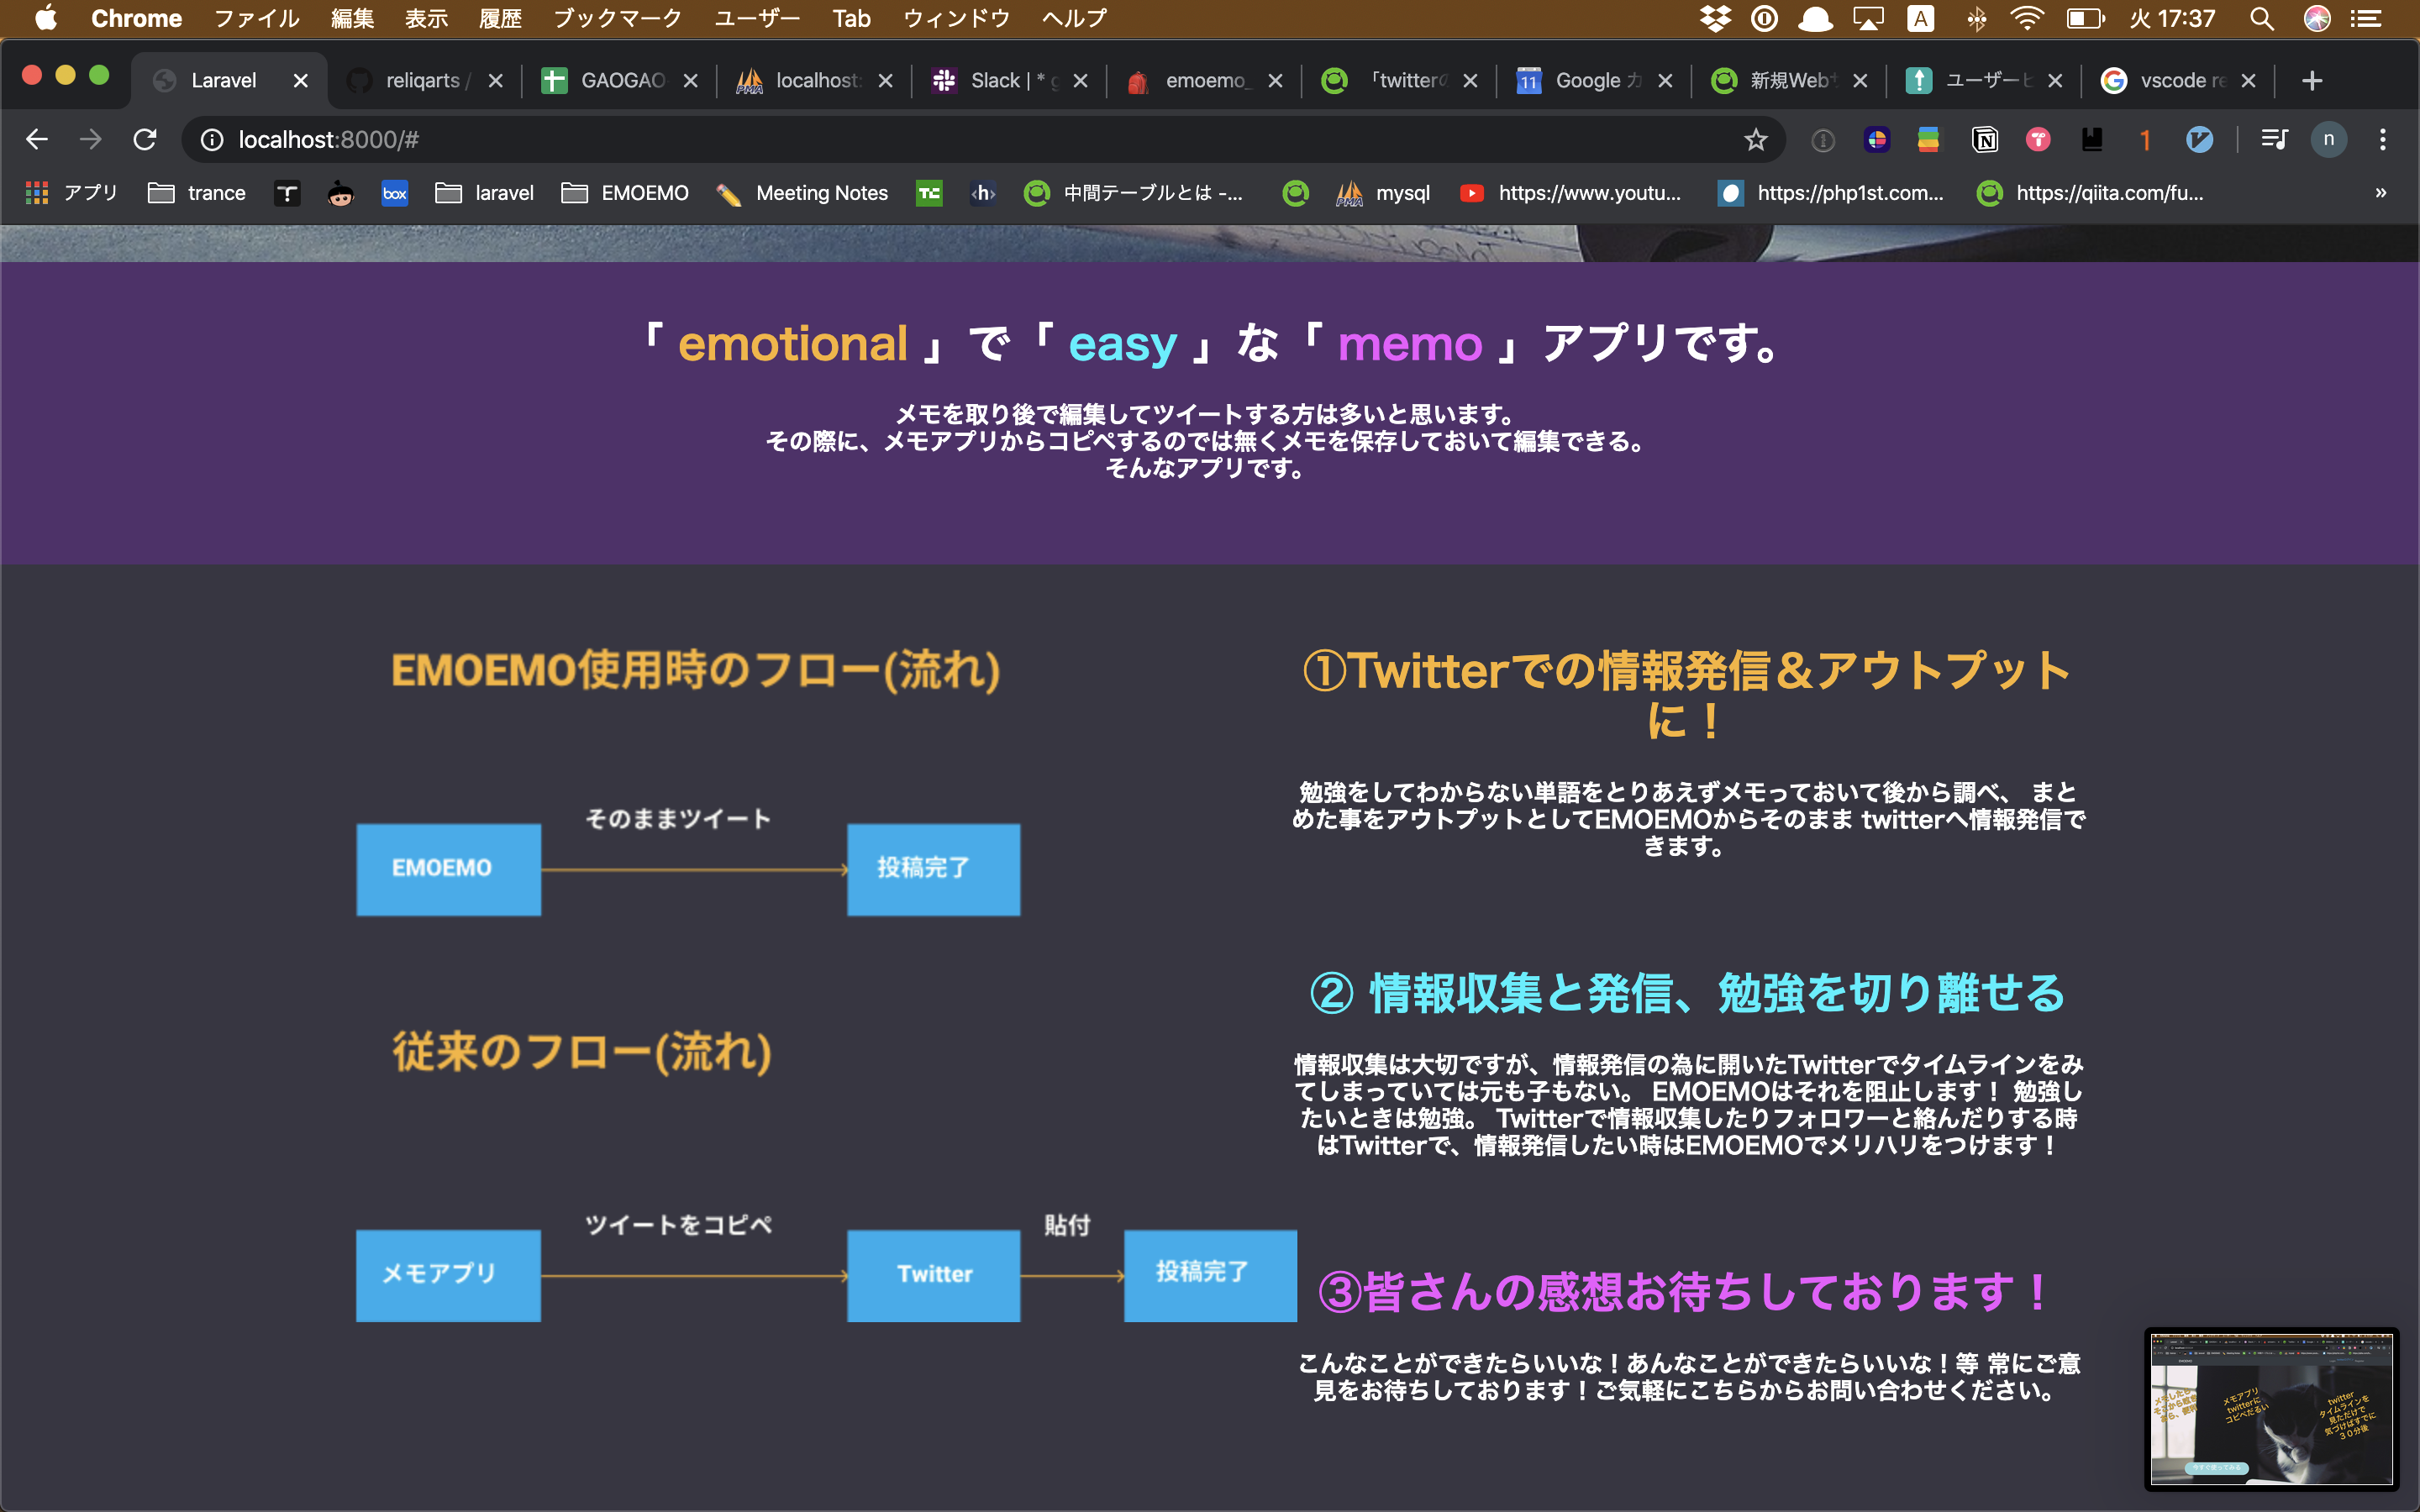
現在個人開発中のWEBサービス(EMOEMO)を紹介してみようと思い記事を書いています。EMOEMOはどんなサービス?
メモアプリからそのままツイート出来ます!
EMOEMOの提供するサービスの基本はこの1点です。
メモを管理できたりする機能も随時実装予定ですが、これはおまけみたいなもんです。EMOEMOは何を解決するの?
プログラミング勉強をしていてわからない単語を調べる機会はあるかとおもいます。
私の場合はかなり多く単語をgooglekeepにメモっておいて、後からまとめて調べてそれをコピペしアウトプットとしてtwitterに呟いていました。
ある時、このコピペがだる過ぎてこれを解決したくてEMOEMOを製作し始めました。使ってみて欲しい人は?
- 情報発信を始めた人
- まさに1ヶ月前の自分とこれからの自分です。
- twitterjのタイムラインを見過ぎてしまって、時間を無駄にしてしまっているなと感じている人
今、進捗は感じなの?
LP部
CRUD機能部(作って読めて編集できて削除出来るアプリケーションの基本機能の事です)
ここでメモを追加したり編集できたりできます。
メモをTwitterに送信できます。
ここまで作ってみての感想など。
やはり実現したい事は高度な技術を使っている場合が多く大変です。時間の制約がある以上そぎ落とすべき肉は必ずあるし、やりたい実装の取捨選択が大変でした。これこんな難しいの!?みたいな事はザラだし、逆にめっちゃむずいと思っていたけど簡単やんこれみたいな感じな事もよくあります。
最低限必要な機能を実装し、使ってもらう事が一番だと思っているので必要な機能のみを実装しとりあえず、使ってみてもらう事を1番の目標設定にしています。
2月の14日にデプロイします!
スケジュールはこんな感じにしています。
最後に!!!!!!
もし最後まで読んでくださっていたら方がいたらいいねをお願いします!
またね!
- 投稿日:2020-02-11T21:06:59+09:00
星5段階評価プルダウンメニューの作成手順
星5段階評価プルダウンメニューを導入したのでその手順をメモします
configディレクトリ下にデータをつくる
score.php<?php return array( '1' => '☆', '2' => '☆☆', '3' => '☆☆☆', '4' => '☆☆☆☆', '5' => '☆☆☆☆☆', ); ?>ビューでプルダウンを表示する
create.blade.php<select type="text" name="review"> @foreach(config('score') as $key => $score) <option value="{{ $key }}">{{ $score }}</option> @endforeach </select>プルダウンで選択して送信したデータを取得する
viewの記述(if文を使用する場合)
detail.blade.php@if (取得したいデータ == 1) <p>{{ '☆' }}</p> @elseif (取得したいデータ == 2) <p>{{ '☆☆' }}</p> @elseif (取得したいデータ == 3) <p>{{ '☆☆☆' }}</p> @elseif (取得したいデータ == 4) <p>{{ '☆☆☆☆' }}</p> @elseif (取得したいデータ == 5) <p>{{ '☆☆☆☆☆' }}</p> @endifviewの記述(switch文を使用する場合)
detail.blade.php@switch (取得したいデータ) @case (1) <p>{{ '☆' }}</p> @break @case (2) <p>{{ '☆☆' }}</p> @break @case (3) <p>{{ '☆☆☆' }}</p> @break @case (4) <p>{{ '☆☆☆☆' }}</p> @break @case (5) <p>{{ '☆☆☆☆☆' }}</p> @break @endswitchviewの記述(1行で済ませたい場合)
detail.blade.php{{ config('score')[取得したいデータ] }}参考
- 投稿日:2020-02-11T19:42:25+09:00
Dynamic select-box with php using Vue.js
Introduction
There might be a demand that people would like to develop dynamic select box using Vue.js.
And I was the one of them.Then, I coded like below, and It can be also available to use old value after post from form or back.
Code
index.php<?php $selected_parent_category_id = ''; $selected_child_category_list = ''; if($_POST['parent_category_id']){ $selected_parent_category_id = $_POST['parent_category_id']; } if($_POST['child_category_id']){ $selected_child_category_id = $_POST['child_category_id']; } ?> <!DOCTYPE html> <html lang="ja"> <head> <title>Select box with Vue.js</title> <meta charset="utf-8"> <script src="https://cdn.jsdelivr.net/npm/vue@2.6.11"></script> <script src="https://code.jquery.com/jquery-3.4.1.min.js"></script> </head> <body> <div id="select-category"> <form method="POST" action="./"> <select v-on:change="selectParent" v-model="value['parent']" name="parent_category_id"> <option v-for="(value, key) in parent_list" v-text="value" v-bind:value="key"></option> </select> <select v-model="value['child']" name="child_category_id"> <option v-for="(value, key) in child_list" v-text="value" v-bind:value="key"></option> </select> <input type="submit" value="SUBMIT"> </form> </div> <div style="display:none"> <?php if($selected_parent_category_id): ?> <span id="selected_parent_category_id"><?php echo $selected_parent_category_id; ?></span> <?php endif; ?> <?php if($selected_child_category_id): ?> <span id="selected_child_category_id"><?php echo $selected_child_category_id; ?></span> <?php endif; ?> </div> </body> <script> var select_prefecture = new Vue ({ el : '#select-category', data: { value:{ 'parent': $('#selected_parent_category_id').text(), 'child': $('#selected_child_category_id').text(), }, parent_list:{ 0: "選択してください", 1: "日本料理", 2: "中華料理", 3: "イタリアン" }, child_list:{}, child_candidate_list:{ 1: { 0: "選択してください", 1: "天ぷら", 2: "寿司", 3: "うどん", }, 2: { 0: "選択してください", 1: "回鍋肉", 2: "麻婆豆腐", 3: "焼売", }, 3: { 0: "選択してください", 1: "パスタ", 2: "ピザ", 3: "リゾット", }, }, }, methods: { selectParent() { this.child_list = this.child_candidate_list[this.value['parent']]; }, }, mounted() { if(this.value['parent']){ this.selectParent(); } } }); </script> </html>
- 投稿日:2020-02-11T19:21:10+09:00
【メモ】Windows10 + Apache + PHP
Windows10 + Apache + PHP 設定
これまで縁の無かったPHPに初挑戦。忘れないように環境構築・設定のメモを作成。
PC環境:
・Windows 10 Pro 1903 x64
・PHP 7.4.2(VC15 x64 Thread Safe)
・Microsoft Visual C++再頒布パッケージ(Visual Studio 2019)
・Apache 2.4.41 Win64PHPのセットアップ
@uriuri7610 さんの「WindowsでPHP/Apache環境構築(ダウンロード~画面を起動するまで)」を参考に設定。記事の最終更新から1年以上経過していたが、PHP / Apache とも最新版で手順通りに設定できた。
セットアップの手順は
・PHP公式サイトよりPHPをダウンロード、セットアップ
・マイクロソフトサポートサイトよりMicrosoft Visual C++ 再頒布可能パッケージをダウンロード、セットアップ
・Apache公式サイトよりApacheをダウンロード、セットアップ参考URL:
https://qiita.com/uriuri7610/items/df6a05ed27b65fde499c
- 投稿日:2020-02-11T19:20:04+09:00
PHP 上級試験範囲 オブジェクト 個人的な備忘録
インターフェース基礎
インターフェースは、抽象メソッドの集まりに名前を付けたもの。インターフェースを使用すると、そのインターフェースを持つクラスが備えるべき機能を明示することができる。インターフェースのインスタンスを作成することはできない。
インターフェースは
interfaceキーワードで定義する。インターフェース内のメソッドはabstractキーワードを付けないが、抽象メソッドとして扱われる。抽象メソッドを持つインターフェースの定義
phpinterface X { function a() // 抽象メソッド }クラスにインターフェースを持たせることを実装という。
※抽象メソッドとをサブクラスで具体的に定義することも実装と呼ぶ。インターフェースを実装するには、クラス名の後ろに
implementsキーワードを置き、実装するインターフェース名を記述する。インターフェースを実装するクラスでは、インターフェースのすべての抽象メソッドを実装するか、またはそのクラスを抽象クラスにする。インターフェースのすべての抽象メソッドの実装
phpinterface X { function a() // 抽象メソッド } class Y implements X { function a() { // 処理 } }エラーになる例
phpinterface X { function a() // 抽象メソッド function b() // 抽象メソッド } class Y implements X { function a() { // 処理 } }インターフェースにプロパティを定義することはできない。
クラスの継承と、インターフェースの実装
クラスの定義の際に、一度に複数のスーパークラスを継承することはできない。これは抽象クラスにおいても同様である。但し、クラスを継承するクラスを作り、さらにそのクラスを継承するクラスを定義する(サブクラスのサブクラスを作る)ことはできる。
クラスが一度に複数のインターフェースを実装することは可能である。その場合は、
implementsキーワードの後ろに、実装するインターフェースの名前をカンマ区切りで複数指定する。phpinterface X { function a() // 抽象メソッド } interface Y { function b() // 抽象メソッド } class Z implements X, Y { function a() { // 処理 } function b() { // 処理 } }タイプヒンティング
タイプヒンディングとは、メソッドのパラメータに対し、特定のクラスやインターフェースを指定することができる機能である。タイプヒンディングにより、パラメータに渡された引数が、特定のクラスやインターフェースのインスタンスを強制することができる。つまり、誤ったパラメータを渡すのを防ぐことができる。
phpclass X { // 処理 } class Y { // 処理 } class Z { // パラメータの$objがクラスXのインスタンスでなければいけないことを宣言している。 function a (X $obj) { echo 'OK'; } } $z = new Z(); $z->a(new X);タイプヒンディングで、パラメータに渡された引数が、配列であることも強制できる。この場合はパラメータ名の前に
arrayを記述する。intやstringは指定できない。パラメータに渡された引数が、タイプヒンディングで指定された型のインスタンスでない場合は、「キャッチ可能な致命的なエラー」が発生する。エラーハンドラ関数を用いて、例外に変換することができる。try-cache構文でその例外をキャッチすることで、例外に対処するコードを実行することができる。
クラスの調査
内部検査の機能を使うと、クラスやオブジェクトのプロパティ、メソッドなどの性質を調べることができる。
class_exists()
class_exists()は、指定した名前のクラスが定義済みかどうかを確認する。get_declared_classes()
get_declared_classes()は、定義されたすべてのクラス名を配列で返す。get_class_methods()
get_class_methods()は、指定されたクラスのメソッド名(静的メソッド名を含む)の一覧を取得することができる。継承したメソッドも取得する事ができる。get_class_vars()
get_class_vars()は、指定されたクラスのプロパティと、それらのデフォルト値を取得する。get_parent_class()
get_parent_class()は、オブジェクト(またはクラス)の親クラスの名前を取得する。対応する親クラスがない場合は、falseを返す。オブジェクトの調査
is_object()
is_object()を用いると、指定された値がオブジェクトかどうかを調べることができる。get_class()
get_class()を用いると、指定されたオブジェクトのクラス名を取得できる。method_exists()
method_exists()を用いると、オブジェクト(またはクラス)が、指定した名前のメソッドを持つかどうかを調べる事ができる。get_object_vars()
get_object_vars()は、指定されたオブジェクトについて、現在のスコープからアクセス可能なプロパティと、それらの現在の値を取得する。静的プロパティの情報は含まれない。引数にオブジェクトでないものを渡した場合はNULLを返す。シリアライズ
オブジェクトのシリアライズとは、オブジェクトをバイトストリームに変換する事である。シリアライズする事で、オブジェクトをファイルに保存できるようになる。また、シリアライズされたオブジェクトは、元の形に復元する事ができる。PHPのセッションの機能では、シリアライズと復元が使用されている。
シリアライズには
serialize()を使用する。シリアライズによって得られたバイトストリームを元のオブジェクトに復元するにはunserialize()を使用する。なお、シリアライズではオブジェクト以外にもリソース型以外のすべての変数で利用可能である。phpclass X { public $a; public $b; } $x = new X; $x->a = 'hello'; $x->b = 5; $s = serialize($x); echo $s; // 結果:O:1:"X":2:{s:1:"a";s:5:"hello";s:1:"b";i:5;} $y = unserialize($s); var_dump($y); /* 結果: object(X)#2 (2) { ["a"]=> string(5) "hello" ["b"]=> int(5) } */クラスに
__sleep()が含まれている場合、シリアライズの直前にそのメソッドが呼び出される。クラスに__wakeup()が含まれている場合、復元の直後にそのメソッドが呼び出される。参照
徹底攻略 PHP5 技術者認定 [上級] 試験問題集 [PJ0-200]対応
- 投稿日:2020-02-11T18:14:38+09:00
php 三項演算子
三項演算子
if文をすっきり書けるので便利ですよね。
実装してて気になったので、備忘録をかねて①基本
条件式 ? 式1 : 式2$lang = 'En'; $lang == 'Jp' ? $msg = 'こんにちは' : $msg = 'Hello'; print $msg; 'Hello'②代入+基本
代入式 + 条件式 ? 式1 式2;$lang = 'Jp'; $msg = $lang == 'Jp' ? 'こんにちは' : 'Hello'; print $msg; 'こんにちは'これなら式1、式2にそれぞれに式を書く手間が省ける
今まで①パターンで書いてたけど、次からは②のパターンを使用してみようっと
なにかの参考になれば、幸いです。
- 投稿日:2020-02-11T17:44:33+09:00
そろそろaws初めてみよか#5~Cloud9環境での実行~
はじめに
awsと戯れる会も第5回目(^^♪
Cloud9環境でちゃんと開発できるようCloud9のインスタンスにもlaravel環境をセットアップしましたが
肝心のlaravel実行まではできませんでした。
今回はこの肝心の部分の記事になります♪以前の記事はこちらから
- そろそろaws初めてみよか~まずは触れてみた~
- そろそろaws初めてみよか#2~CodeStarによるコード修正からDeployまで~
- そろそろaws初めてみよか#3~RDSとの接続~
- そろそろaws初めてみよか#4~Cloud9環境の整備~Cloud9のビルトインサーバでの起動
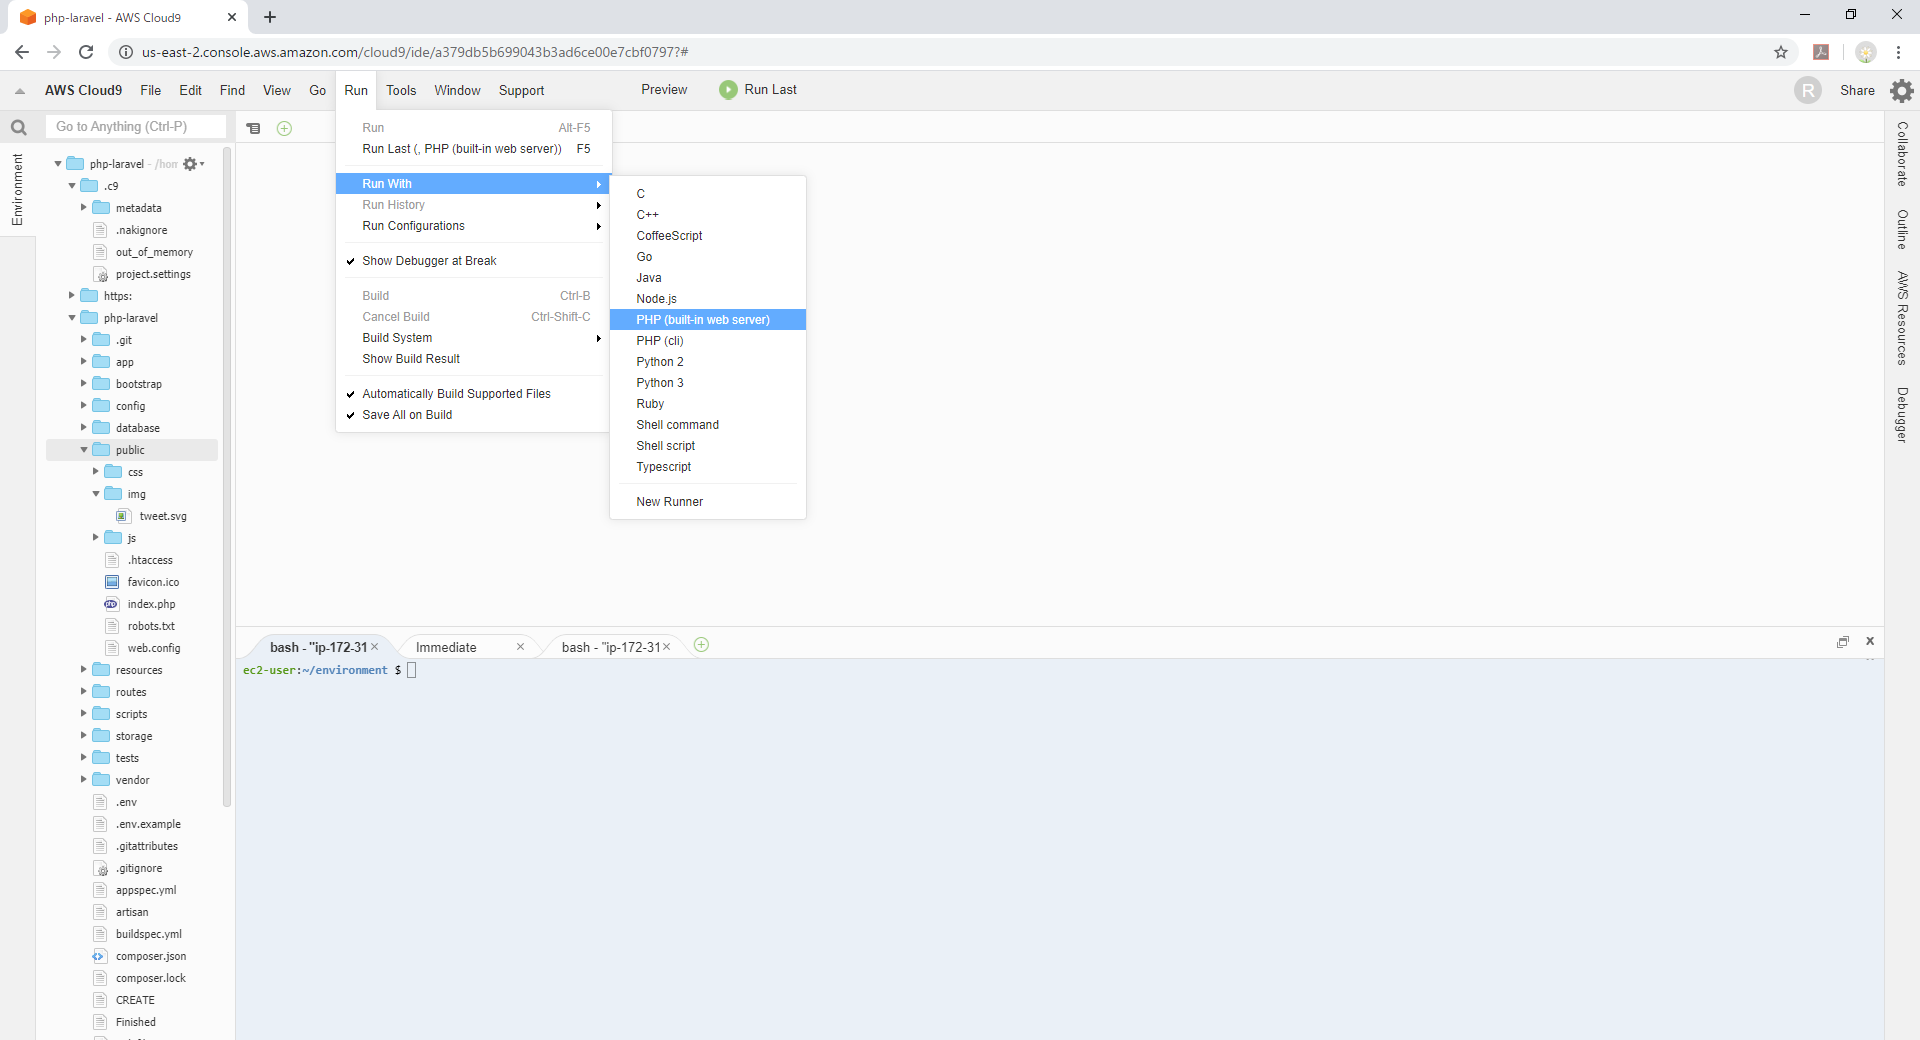
Run>Run with>PHP (build-in web server)を選択します。
下ペインに現れる[New]タブの[CWD]をクリックし、ドキュメントルート
php-laravel/publicを選択します。
上のメニューからPreviewをクリックしブラウザを表示させます。
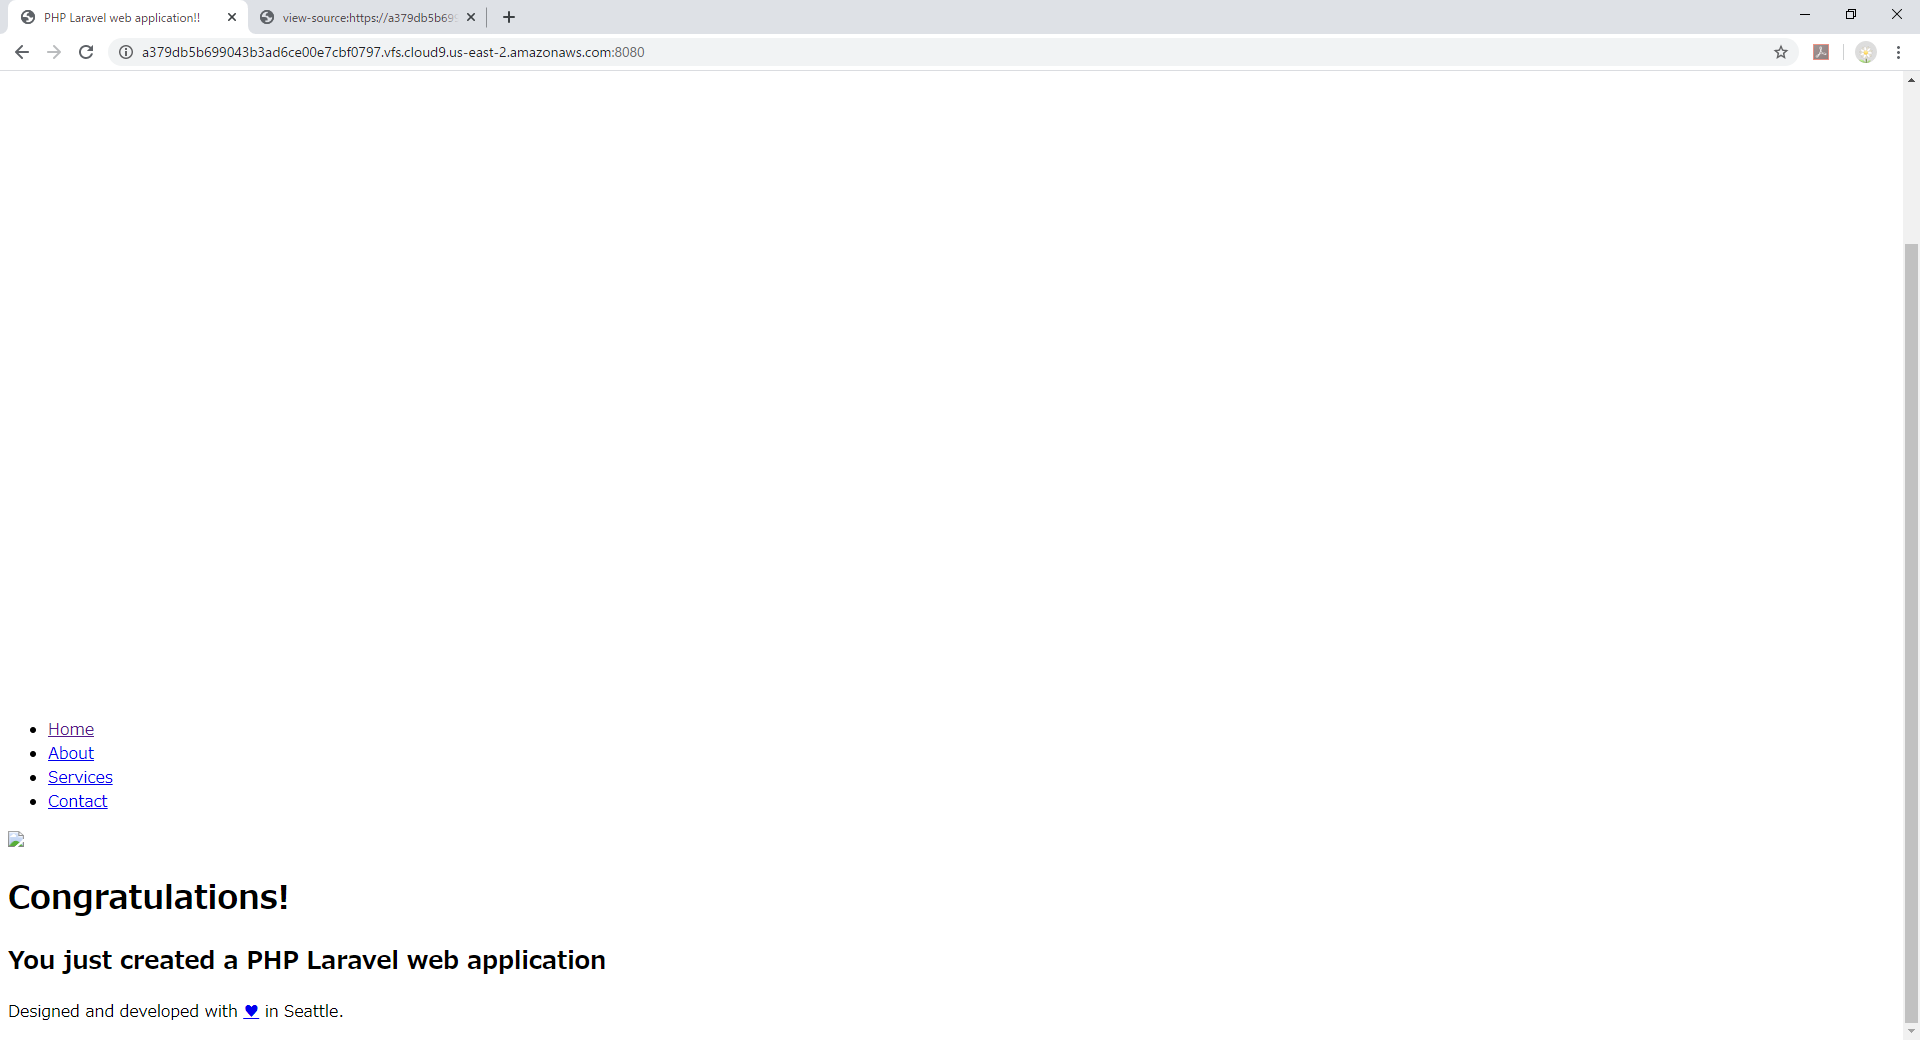
Oopsとか表示されますが、ポート番号があっていないためなので気にしない気にしない。
PHP (build-in web server)は下ペインのメッセージにある通り
Listening on http://0.0.0.0:8080
となっていますので、プレビューのURL欄をクリックし「:8080」を追加します。
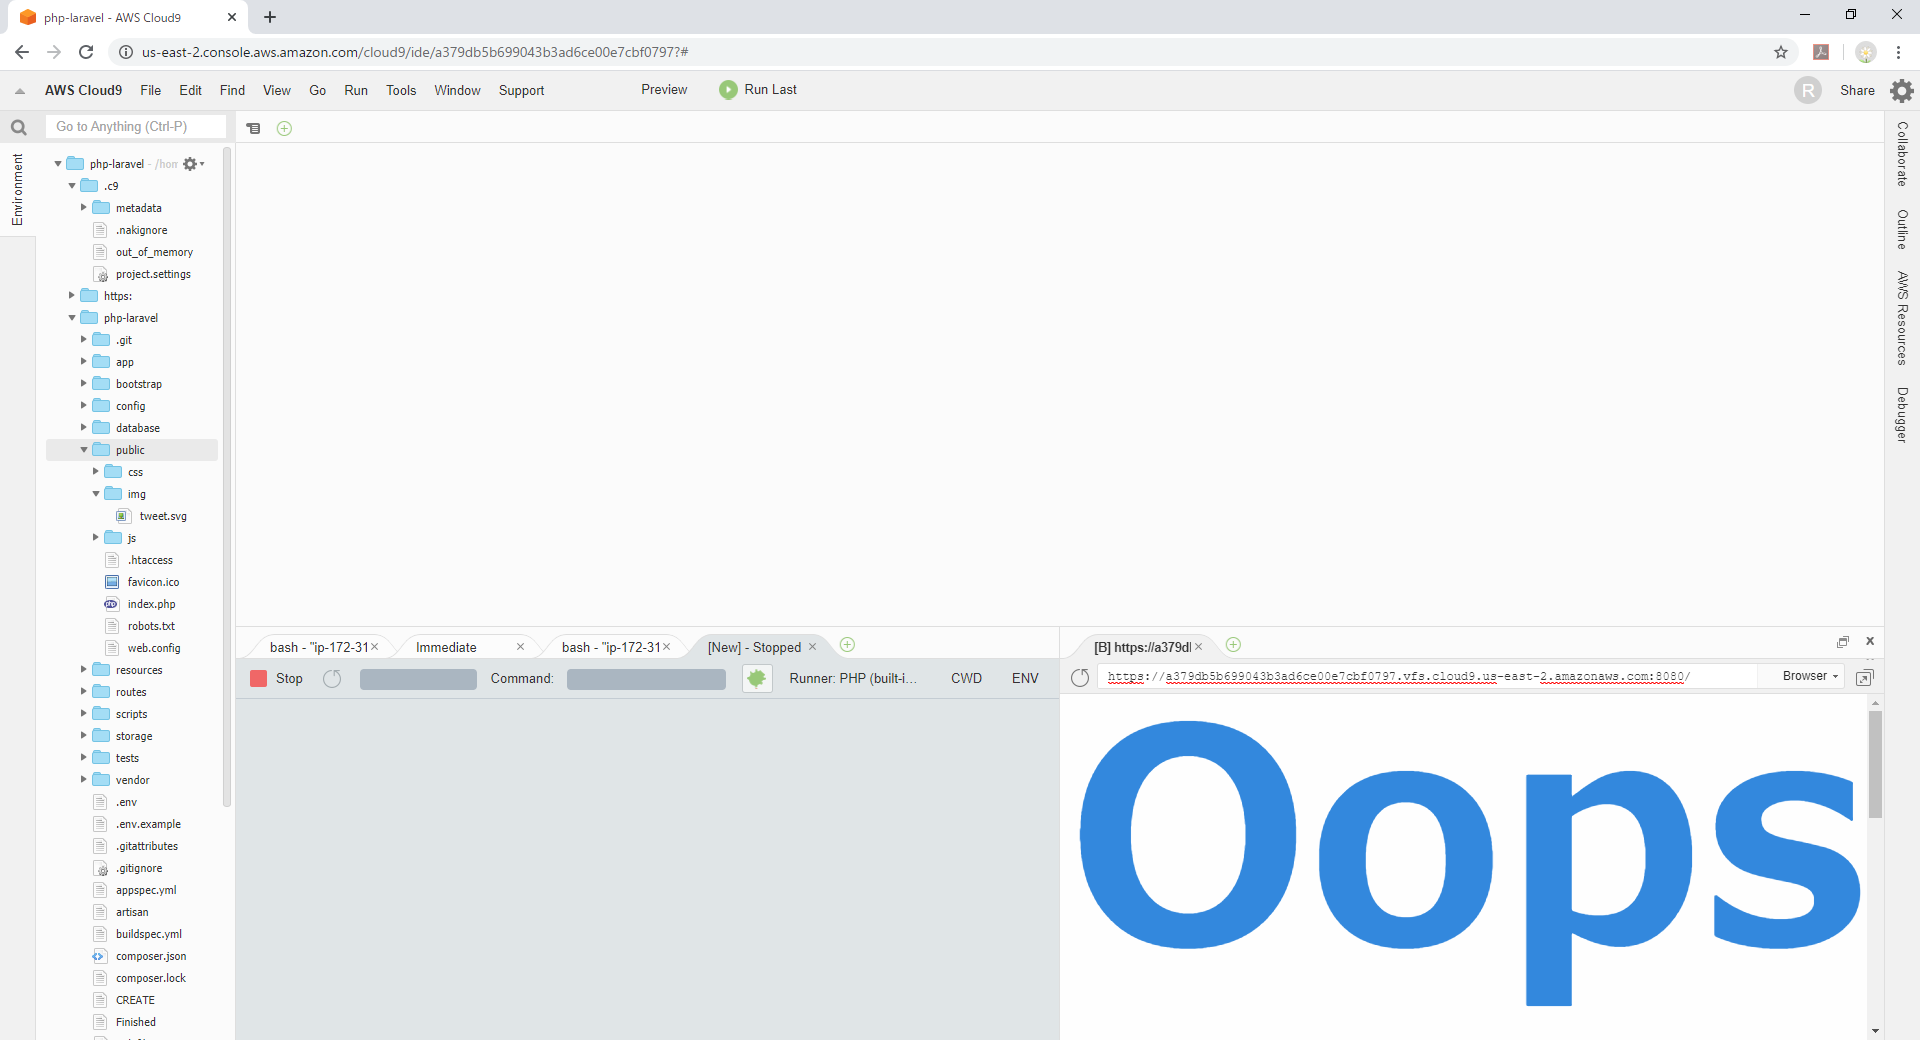
それっぽい画面が出てきましたが…スクリプトも画像も読み込まれていません。
Chromeの別タブで同URLを表示させ、ソース表示すると判りますが
ページのURLはhttpsなのに対し、リソースのパスがすべてhttpとなっていることが原因でした。
laravelでassetとかのパスをhttpsで出力する
assetとかで指定したアドレスがことごとくhttpになっているのでhttpsになるようlaravel側で対応します。
具体的には此方の記事を参考にさせて頂きました。
Laravel5.3でSSL通信を強制する修正したのはAppServiceProviderのboot()の定義となります。
なお本番環境にデプロイした際はhttpだったのでここではapp.envがlocal,stagingの場合のみhttpsにするとしています。
本来の商用環境ではELBも入りhttpsになると思うのでその際は修正が必要となります。app/Providers/AppServiceProvider.php<?php namespace App\Providers; use Illuminate\Support\ServiceProvider; class AppServiceProvider extends ServiceProvider { /** * Bootstrap any application services. * * @return void */ public function boot() { // } /** * Register any application services. * * @return void */ public function register() { // } }修正後
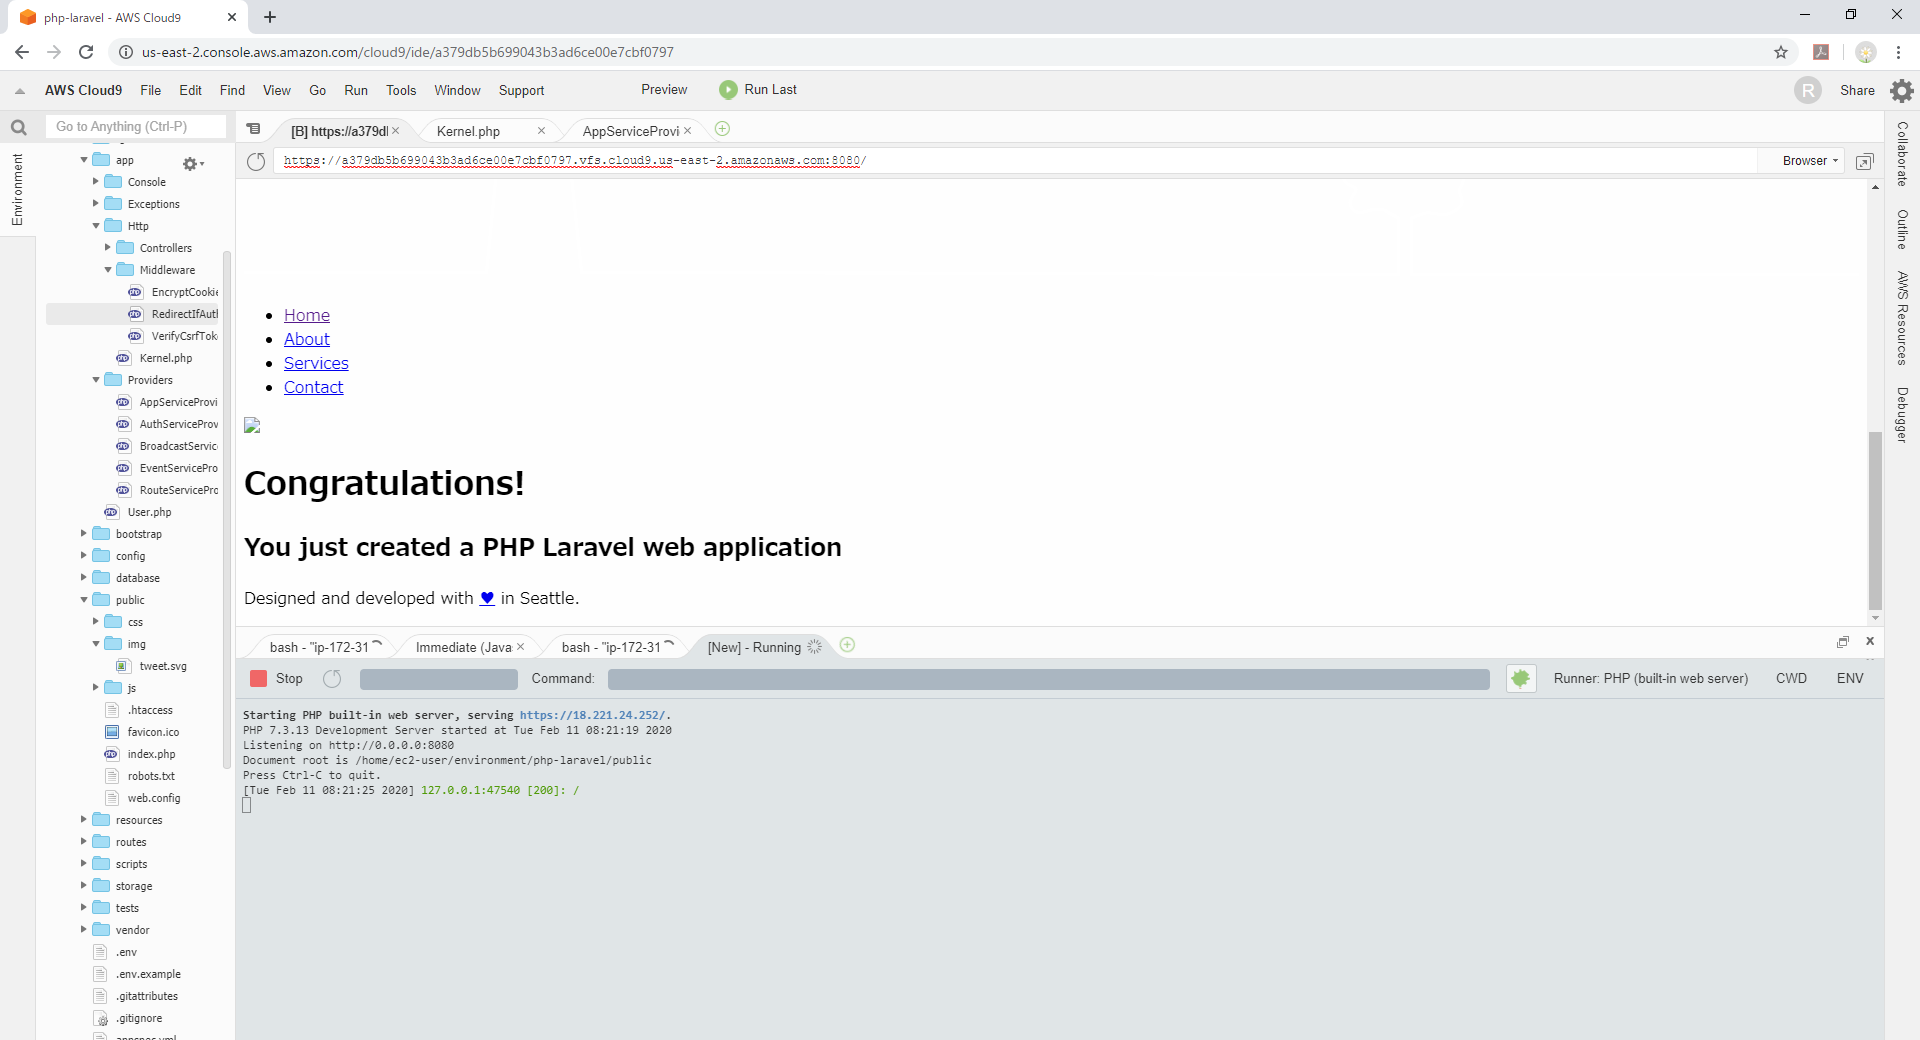
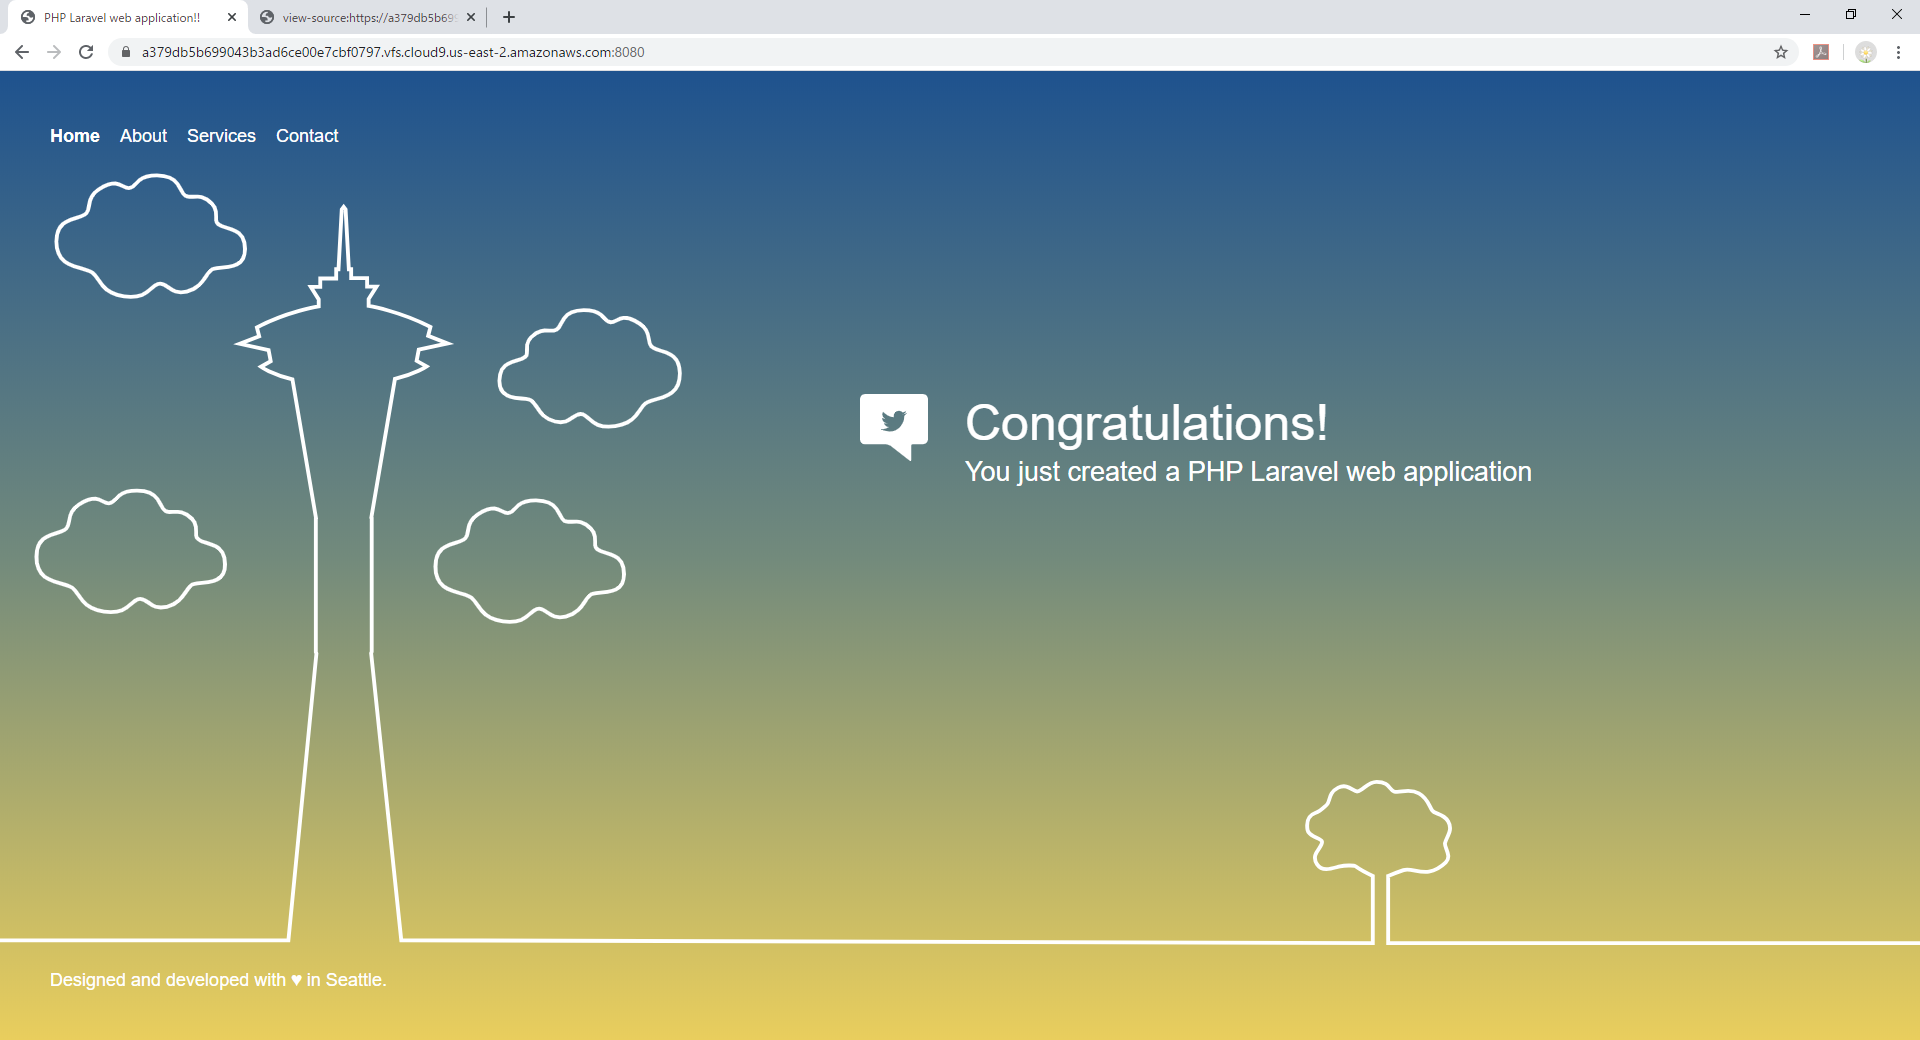
app/Providers/AppServiceProvider.php<?php namespace App\Providers; use Illuminate\Support\ServiceProvider; class AppServiceProvider extends ServiceProvider { /** * Bootstrap any application services. * * @return void */ public function boot() { // if (config('app.env') === 'local' || config('app.env') === 'staging') { \URL::forceSchema('https'); } } /** * Register any application services. * * @return void */ public function register() { // } }これで確認するとこんな感じで正常に表示されます。
どうやらIDE内のブラウザではsvgが動かないっぽいので、動確するなら別タブで開いた方がよさそうですね!
これで本当の意味で開発環境を作ることができました!


- 投稿日:2020-02-11T17:02:40+09:00
Word Pressテーマ:STORKを使用したWebサイトに発生したエラーを解決するために行った処理
*プログラミング超初心者です。閲覧していただいた方にわかりやすい表現を意識していますが
①分かりにくい点
②間違っている点
ありましたら、ご指摘ください?それでは早速
STORKを使用したWebサイトに発生したエラーを解決する
【症状】
Webサイトの上部にエラーメッセージが表示される
メッセージ本文
"Notice:Undefined variable:icon in /~ファイルパス省略~/wp-content/themes/jstork/library/shortcode.php on line 226"【状況】
・テーマをアップデートしたら発生した
・吹き出しを使用しているページに表示されるっぽい(←サイト運営者推察)【やったこと】
エラーメッセージを読んでみる
(ファイルパス省略)/library/shortcode.php の226行目にある"$icon"ってなんですの?の意味(ファイルパス省略)/library/shortcode.php 226行目を確認する
- 方法1:サーバーからローカル環境に本番環境を構築して確認する
- FTPソフトにて"jstork"をローカルのwordpress環境>wp-content>themeの中にダウンロード
- > JSTORK > library > shortcode.php を選択し226行目の記述内容を確認する...①
- 方法2:管理画面から確認してみる方法
- WordPress管理画面 > 外観 > テーマエディターに進んで”stork(親テーマ本体)”を選択 > ①を実行
記述の内容を確認(以下コードのコピペ)
    // コンテンツボックス
function contentboxFunc($atts , $content = null) { ...A
    if($atts && $content) {
        $class = (isset($atts['class'])) ? esc_attr($atts['class']) : null;                     |
        $title = (isset($atts['title'])) ? esc_attr($atts['title']) : null;                     |
        $type = (isset($atts['type'])) ? ' type_'.esc_attr($atts['type']) : ' type_normal';     |....B

        if(!$title && $class) {                                                                 |....C
            return '<div class="c_box ' . $class . $type .'">' . $icon . do_shortcode($content) . '</div>';|...D*

        } elseif($title && $class) {
            return '<div class="c_box intitle ' . $class . $type .'"><div class="box_title"><span class="span__box_title">' . $icon . $title . '</span></div>'. do_shortcode($content) .'</div>';                                                   |...D*
        }
    }
}
add_shortcode('box','contentboxFunc');

↑この中でエラーが発生していた。
-記述の内容の概要-
A:ファンクションcontentboxFuncをこう定義しまっせー
B:このファンクションで使う変数はこれらでっせー
C:さあ実行しましょう!
D*:$iconて何?! <-ここがエラー4.上記を受けてBのなかに$iconを定義する一文を追記しました(221行目)
218行目   $class = (isset($atts['class'])) ? esc_attr($atts['class']) : null;
219      $title = (isset($atts['title'])) ? esc_attr($atts['title']) : null;
220      $type = (isset($atts['type'])) ? ' type_'.esc_attr($atts['type']) : ' type_normal';
221      $icon = (isset($atts['icon'])) ? esc_attr($atts['icon']) : null;*
意味:もし、$attsの中のiconが入力されていたらiconのURLを$iconに入れる、そうでなければ$iconにnullを入れる..(この解釈ちょっと怪しい。)
以上の処理でエラーは表示されなくなりました。
【やってみて思ったこと】
・管理画面からファイルを編集することもできるけど、本番環境での調整になるので
ローカル環境にダウンロードして作業した方が、心理的にもエラーが発生するリスク回避の面でも
メリットがある。
・予想していたショートコードに関するエラーではなかったので、実際に発生している事象は自分の目で
確認する。忘備録と自分log
- 投稿日:2020-02-11T16:24:30+09:00
バラバラな例外をまとめてキャッチする PHP7.1〜
前書き
まとめてキャッチできたら楽だよなって思い調べたら、PHP7.1以降なら使えるみたいなので書き方を載せておきます。
PHP7.1以前の書き方
try
{
 //例外ごとにキャッチを書かなけばならない
}
catch (Exception1 $t)
{
   echo $t->getMessage();
}
catch (Exception2 $e)
{
   echo $e->getMessage();
}
PHP7.1以降の書き方
try
{
//キャッチ一つで複数の例外をまとめてキャッチできる
} catch (Exception1 | Exception2 $e) {
   echo $e->getMessage();
}
まとめて書くとコードもスッキリして、かなりいいと思いました。
- 投稿日:2020-02-11T15:54:58+09:00
PHP 上級試験範囲 配列 個人的な備忘録
配列の展開と抽出
list()
list()を使うと、配列の値を取り出して、複数の変数に順番に格納することができる。なお、スクリプト内のすべての配列をリスト形式で出力する関数ではない。php$array = array(2020, 1, 2); list($y, $m, $d) = $array; echo $y, '年'; echo $m, '月'; echo $d, '日'; // 結果:2020年1月2日配列の要素数に対してlist()に指定した変数が少ない場合は、余った要素は無視される。逆に、配列の要素数に対して変数が多い場合は、余った変数には
NULLがセットされる。配列の要素を取り出す必要がない箇所では、変数の指定を省略することもできる。
php$array = array(2020, 1, 2); list(, $m, $d) = $array; echo $m, '月'; echo $d, '日'; // 結果:1月2日array_slice()
array_slice()を使用すると配列から要素を抽出することができる。第一引数に抽出開始位置の要素、第二引数に抽出数を指定すると、それを抽出して新しい配列として返す。php$array = array('a', 'b', 'c', 'd'); $array = array_slice($array, 1, 2); var_dump($array); /* 結果: array(2) { [0]=> string(1) "b" [1]=> string(1) "c" } */array_chunk()
array_chunk()を使用すると、配列を、指定した要素のかたまり(チャンク)に分割することができる。配列の要素を、指定した要素ずつの配列に分割し、その配列を返す。
php$array = array('a', 'b', 'c', 'd', 'e'); $array = array_chunk($array, 2); var_dump($array); /* 結果: array(3) { [0]=> array(2) { [0]=> string(1) "a" [1]=> string(1) "b" } [1]=> array(2) { [0]=> string(1) "c" [1]=> string(1) "d" } [2]=> array(1) { [0]=> string(1) "e" } } */array_splice()
配列1の左端から数えた「開始位置」から、指定された「削除数」だけの要素を削除する。「削除数」は省略可能であり、省略した場合は、「開始位置」から配列の終わりまでの要素が削除される。配列2が指定された場合は、削除した位置に配列2の要素を挿入する。配列2が省略された場合は、挿入操作は行われない。
削除数未指定の場合
php$color = array('赤', '緑', '青', '白', '黒'); // 削除する要素を出力 var_dump(array_splice($color, 2)); // array_spliceで上記の要素を削除された残りの要素を出力 var_dump($color); /* 結果:削除する要素を出力 array(3) { [0]=> string(3) "青" [1]=> string(3) "白" [2]=> string(3) "黒" } 結果:array_spliceで上記の要素を削除された残りの要素を出力 array(2) { [0]=> string(3) "赤" [1]=> string(3) "緑" } */削除数を指定した場合
php$color = array('赤', '緑', '青', '白', '黒'); // 削除する要素を出力 var_dump(array_splice($color, 1, 4)); // array_spliceで上記の要素を削除された残りの要素を出力 var_dump($color); /* 結果:削除する要素を出力 array(4) { [0]=> string(3) "緑" [1]=> string(3) "青" [2]=> string(3) "白" [3]=> string(3) "黒" } 結果:array_spliceで上記の要素を削除された残りの要素を出力 array(1) { [0]=> string(3) "赤" } */別配列を指定した場合
php$color = array('赤', '緑', '青', '白', '黒'); // 削除する要素を出力 var_dump(array_splice($color, 1, 4, array('紫', '橙', '黄'))); // array_spliceで上記の要素を削除された残りの要素を出力 var_dump($color); /* 結果:削除する要素を出力 array(4) { [0]=> string(3) "緑" [1]=> string(3) "青" [2]=> string(3) "白" [3]=> string(3) "黒" } 結果:array_spliceで上記の要素を削除された残りの要素を出力 array(4) { [0]=> string(3) "赤" [1]=> string(3) "紫" [2]=> string(3) "橙" [3]=> string(3) "黄" } */配列のキーや値の操作
array_key_exists()
isset(配列[キー])は、配列のキーが存在してもキーに対応する値がNULLの時は、falseを返す。値がNULLであるかどうかにかかわらずキーが配列に存在するかどうかを確認するには、
array_key_exists()を使用する。array_search()
値を指定して、その値に対応するキーを検索するには、
array_search()を使用する。配列から値を検索し、見つかった場合は値に対応するキーを返し、見つからなかった場合はfalseを返す。指定した値が配列内に複数含まれる場合は、最初に見つかった要素のキーが返される。配列の集合演算
array_unique()
array_unique()は、配列から重複する値を取り除くために使用する。array_filter()と同様、元の配列のキーが維持されている。php$color = array('赤', '緑', '青', '白', '黒', '青', '灰', '青'); $color = array_unique($color); var_dump($color); /* 結果: array(6) { [0]=> string(3) "赤" [1]=> string(3) "緑" [2]=> string(3) "青" [3]=> string(3) "白" [4]=> string(3) "黒" [6]=> string(3) "灰" } */array_intersect
array_intsersect()は、複数の配列に共通して含まれる値を集める。2つの配列に共通して含まれる値を集めた配列を返す。php$color1 = array('赤', '緑', '青'); $color2 = array('白', '黒', '赤'); $color = array_intersect($color1, $color2); var_dump($color); /* 結果: array(1) { [0]=> string(3) "赤" } */配列への値の追加と削除
配列の先頭に作用する
array_unshift()
配列の先頭に値を追加するには、
array_unshift()を使用する。array_shift()
配列の先頭の値を削除するには、
array_shift()を使用する。配列の末尾に作用する
array_push()
配列の末尾に値を追加するには、
array_push()を使用する。array_pop()
配列の末尾の値を削除するには、
array_pop()を使用する。参照
徹底攻略 PHP5 技術者認定 [上級] 試験問題集 [PJ0-200]対応
- 投稿日:2020-02-11T15:25:04+09:00
CakePHP3で自作コンポーネントを作成、利用
コード
コンポーネントの作成
App/Controller/component/HogeComponent.php<?php namespace App\Controller\Component; use Cake\Controller\Component; use Cake\Controller\ComponentRegistry; class HogeComponent extends Component{ function init() { return $this; } public function hoge($itemName){ //処理内容 } }呼び出したいcontrollerで以下のようにする
class YobidashitaiController extends AppController
{
    public $components = [
        "Hoge" => [],
    ];
    public $hoge;
}
実際に使うactionで以下のようにする
public function jissainiTukauAction()
{
    $hoge = $this->hoge->init();
    $hoge->hoge(処理を加える文字列など);
}
最後に
実行せず思い出しながらなので、
間違ってるかもしれません・・・
備忘録としてメモ。
- 投稿日:2020-02-11T15:02:07+09:00
xamppが立ち上がらない・・
XAMPPが立ち上がらない…どうしよう
概要
ということで
自分のPC内で開発をしようと思ったときに、Xamppが立ち上がらなくて非常に困ったことがありました。
ぐぐっても記事がなかったので備忘録として、まとめます。エラー内容
以下現象の画像
え?なになに?
□□□□□□□□□□□□エラーメッセージ□□□□□□□□□□□□□□□□□□□□
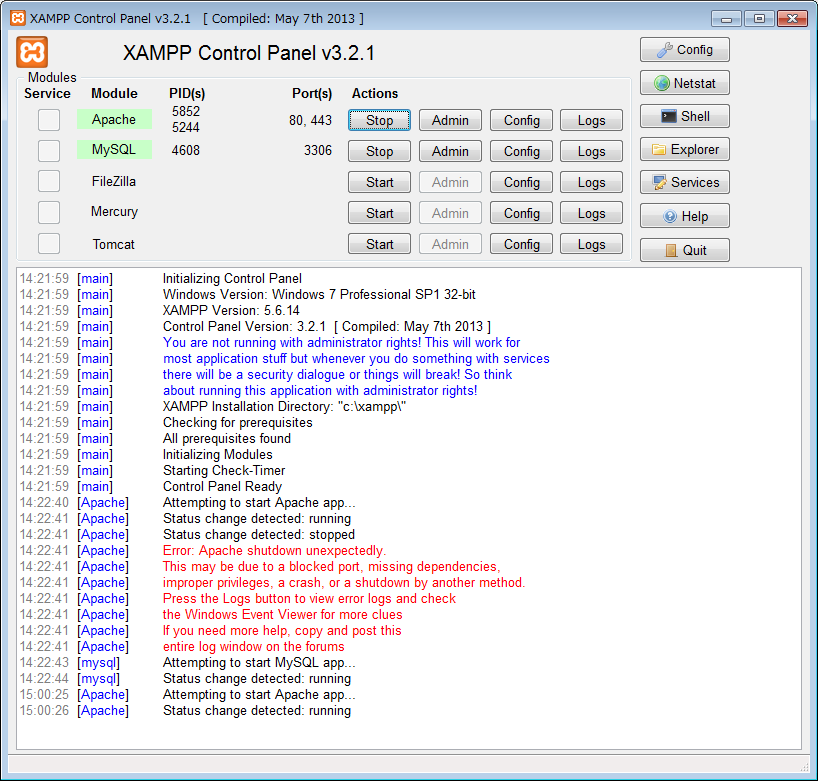
Error: Apache shutdown unexpectedly.
This may be due to a blocked port, missing dependencies,
improper privileges, a crash, or a shutdown by another method.
Press the Logs button to view error logs and check
the Windows Event Viewer for more clues
If you need more help, copy and post this
entire log window on the forums
□□□□□□□□□□□□エラーメッセージ□□□□□□□□□□□□□□□□□□□□・・・?
日本語でおけ!□□□□□□□□□□□□エラーメッセージ□□□□□□□□□□□□□□□□□□□□
エラー:Apacheが予期せずシャットダウンしました。
これは、ポートのブロック、依存関係の欠落、
不適切な特権、クラッシュ、または別の方法によるシャットダウン。
[ログ]ボタンを押してエラーログを表示し、確認します
より多くの手がかりのためのWindowsイベントビューア
さらにサポートが必要な場合は、これをコピーして投稿してください
フォーラムのログウィンドウ全体
□□□□□□□□□□□□エラーメッセージ□□□□□□□□□□□□□□□□□□□□ポートの確認
え??ポートの問題!?
早速、コマンドプロンプトでコマンドをたたいてみるが
80番ポート使っているアプリケーションはいない
ちなみ調べるコマンドはnetstat
上記をたたいて調べてください。
うーん・・
どうしよう・・・なになにWindowsイベントビューアを見ろと・・・
Windowsイベントビューア
見てみました・・
関係ないエラーを見て、
心が折れそうになったが今はXamppちゃん救出しなきゃ!ということで次はどうしようと持ったのですが…。
ログ的な物はないか?
と思ってたのですが
あ!Apacheのエラーログ確認
なんかのヒントがないかと思ってアパッチのエラーログを見てみました。
□□□□□□□□□□□□エラーメッセージ□□□□□□□□□□□□□□□□□□□□
[Tue Feb 11 13:24:30.934170 2020] [mpm_winnt:notice] [pid 3036:tid 228] AH00428: Parent: child process 4044 exited with status 3221225477 -- Restarting.
AH00526: Syntax error on line 244 of C:/xampp/apache/conf/httpd.conf:
DocumentRoot must be a directory
□□□□□□□□□□□□エラーメッセージ□□□□□□□□□□□□□□□□□□□□・・・?
日本語でおけ!□□□□□□□□□□□□エラーメッセージ□□□□□□□□□□□□□□□□□□□□
[2月11日火曜日13:24:30.934170 2020] [mpm_winnt:通知] [pid 3036:tid 228] AH00428:親:子プロセス4044がステータス3221225477-Restartingで終了しました。
AH00526:Cの244行目の構文エラー:/xampp/apache/conf/httpd.conf:
DocumentRootはディレクトリでなければなりません
□□□□□□□□□□□□エラーメッセージ□□□□□□□□□□□□□□□□□□□□DocumentRoot系のエラー?
あれ触ってないけどなぁ・・httpd.conf
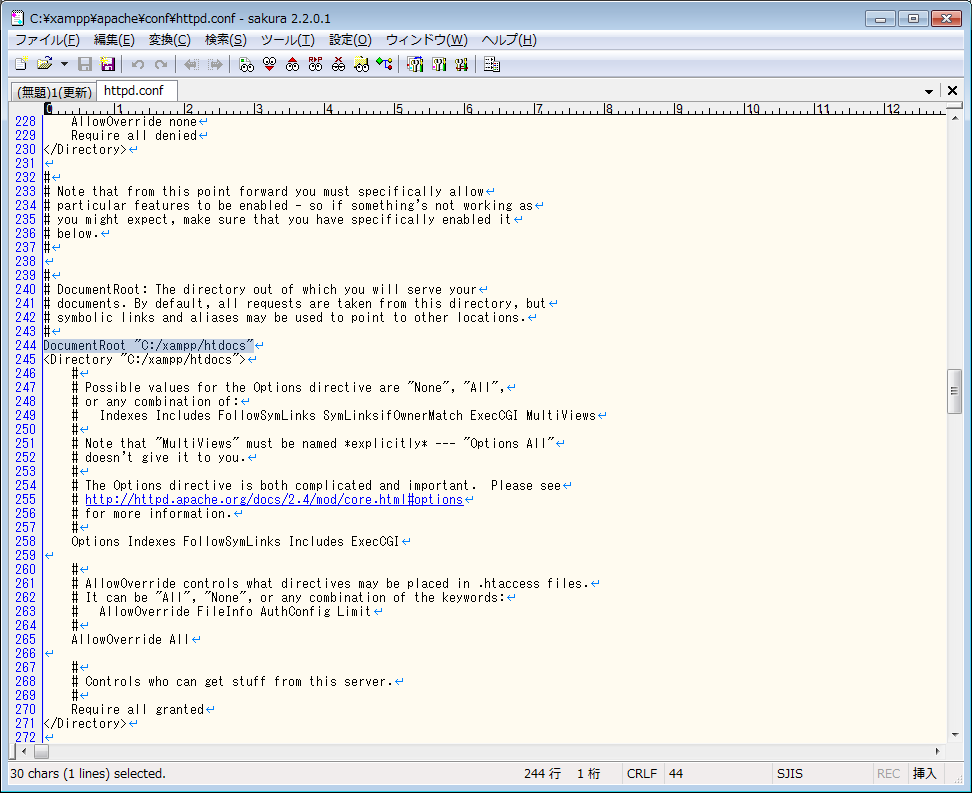
の244行目でこけてるのかー
見てみよう・・・!対象行の表示
DocumentRoot "C:/xampp/htdocs"
あ゛あ゛あ゛あ゛あ゛!!!
ボンミスです…。
htdocsのファイルを名前変更して
ドキュメントルートが無いからApache起動でけへんねん
というエラーでした・・・htdocsを作成して
再度「Start」を押す!
無事起動しました~

- 投稿日:2020-02-11T15:01:58+09:00
PHPの自作関数で元の値を書き換えるには&で参照渡しする
参照渡し(元の値が書き換わる)
hoge.phpfunction hoge (&$argument) { for ($i = 0; $i <= count($argument); $i++) { if ($argument[$i] == 0){ $argument = $argument + 1; }; }; };こういう配列の中身の数値が、
0のものには1を足すっていう関数があって、hoge($array);実行すれば、実際に配列の中身が変わります。
値渡し
hoge.phpfunction hoge ($argument) { for ($i = 0; $i <= count($argument); $i++) { if ($argument[$i] == 0){ $argument = $argument + 1; }; }; };仮引数の&がないと値渡しになるので、
hoge($array);実行しても元の値は書き換わりません。
最後に
メインで書いているのがRubyで、
破壊的な操作〜とかで検索しても出なかったのでメモ。
まあ普通に考えればわかることではありますが。
- 投稿日:2020-02-11T13:30:45+09:00
PSR-4: Autoloader 読了
PSRとは
- PSR(PHP Standards Recommendations)とは、PHP-FIG(PHP Framework Interop Group)が策定しているPHPコーディング規約を指す
PSR-4: Autoloader
The key words “MUST”, “MUST NOT”, “REQUIRED”, “SHALL”, “SHALL NOT”, “SHOULD”, “SHOULD NOT”, “RECOMMENDED”, “MAY”, and “OPTIONAL” in this document are to be interpreted as described in RFC 2119.
- いくつか登場するキーワード(MUST, MUST NOT etc...)は、RFC 2119で説明されてるような解釈とする
内容の構成は章立てされており、いくつかの章では節に当たる項目が用意されてる
引用に関しては全てPSR-1のものである
箇条書きされてる箇所は 和訳+個人の解釈 の入った内容となってる※以下、学習の一環として自分の解釈とコードを交えた内容を記載しますが、間違いあればコメント頂けますと幸いです。早急に対応しますのでご遠慮なく。
1. 概要
https://www.php-fig.org/psr/psr-4/#1-overview
This PSR describes a specification for autoloading classes from file paths. It is fully interoperable, and can be used in addition to any other autoloading specification, including PSR-0. This PSR also describes where to place files that will be autoloaded according to the specification.
- ここではファイルパスからクラスを自動ロードするための仕様について記述する
- PSR-0を含む他の自動ロード仕様に加えて使用する事ができる
- 自動ロードされるファイルの配置場所についても説明する
2. 仕様
https://www.php-fig.org/psr/psr-4/#2-specification
1. The term “class” refers to classes, interfaces, traits, and other similar structures.
2. A fully qualified class name has the following form:
\<NamespaceName>(\<SubNamespaceNames>)*\<ClassName>
1. The fully qualified class name MUST have a top-level namespace name, also known as a “vendor namespace”.
2. The fully qualified class name MAY have one or more sub-namespace names.
3. The fully qualified class name MUST have a terminating class name.
4. Underscores have no special meaning in any portion of the fully qualified class name.
5. Alphabetic characters in the fully qualified class name MAY be any combination of lower case and upper case.
6. All class names MUST be referenced in a case-sensitive fashion.3. When loading a file that corresponds to a fully qualified class name …
1. A contiguous series of one or more leading namespace and sub-namespace names, not including the leading namespace separator, in the fully qualified class name (a “namespace prefix”) corresponds to at least one “base directory”.
2. The contiguous sub-namespace names after the “namespace prefix” correspond to a subdirectory within a “base directory”, in which the namespace separators represent directory separators. The subdirectory name MUST match the case of the sub-namespace names.
3. The terminating class name corresponds to a file name ending in .php. The file name MUST match the case of the terminating class name.4. Autoloader implementations MUST NOT throw exceptions, MUST NOT raise errors of any level, and SHOULD NOT return a value.
- 1. 「クラス」という用語は、クラス、インターフェース、特性、およびその他の類似の構造を指す
- 2. 完全修飾クラス名の形式は次のとおりです。
\<NamespaceName>(\<SubNamespaceNames>)*\<ClassName>- 1. 「ベンダー名前空間」と呼ばれる最上位の名前空間が必要(NamespaceNameがそれに当たる)
- 2. 1つ以上のサブ名前空間名が含まれてる場合がある(SubNamespaceNamesがそれに当たる)
- 3. 終了クラス名が必要(ClassNameがそれに当たる)
- 4. アンダースコアに特別な意味は持たない
- 5. 命名は大文字と小文字の組み合わせによって構成する
- 6. 全てのクラス名は大文字と小文字を区別して参照しなければならない
- 3. 完全修飾クラス名に対応するファイルをロードするとき
- 1. 完全修飾クラス名(名前空間接頭辞)の先頭の名前空間区切り文字を含まない1つ以上の先頭の名前空間とサブ名前空間名の連続したシリーズは、少なくとも1つの「ベースディレクトリ」に対応する
- 2. 「ネームスペースプレフィックス」の後の連続するサブネームスペース名は、「ベースディレクトリ」内のサブディレクトリに対応し、(ネームスペースセパレータはディレクトリセパレータを示す) サブディレクトリ名は、サブ名前空間名の大文字小文字と一致しなければならない
- 3. 終了クラス名は、.phpで終わるファイル名に対応する、ファイル名は、終了するクラス名の大文字小文字と一致しなければならない
3. 例
https://www.php-fig.org/psr/psr-4/#3-examples
The table below shows the corresponding file path for a given fully qualified class name, namespace prefix, and base directory.
FULLY QUALIFIED CLASS NAME NAMESPACE PREFIX BASE DIRECTORY RESULTING FILE PATH \Acme\Log\Writer\File_Writer Acme\Log\Writer ./acme-log-writer/lib/ ./acme-log-writer/lib/File_Writer.php \Aura\Web\Response\Status Aura\Web /path/to/aura-web/src/ /path/to/aura-web/src/Response/Status.php \Symfony\Core\Request Symfony\Core ./vendor/Symfony/Core/ ./vendor/Symfony/Core/Request.php \Zend\Acl Zend /usr/includes/Zend/ /usr/includes/Zend/Acl.php For example implementations of autoloaders conforming to the specification, please see the examples file. Example implementations MUST NOT be regarded as part of the specification and MAY change at any time.
- 表は、特定の完全修飾クラス名、名前空間プレフィックス、およびベースディレクトリに対応するファイルパスを示してる
- 仕様に準拠したオートローダーの実装例については、サンプルファイルを参照してください
注意
- 冒頭でも述べたように、主に箇条書きされてる箇所については、 和訳+個人の解釈 の入った内容になっているため、参考程度の理解としていただきたい
- また、表現に誤りがある場合、遠慮なくコメントいただけると幸いです(この内容に関しては表現の誤りは致命的なため)
- 学習の一環としてアウトプットしたいため投稿したので、その点暖かい目で読んで頂けると嬉しい
- 投稿日:2020-02-11T04:07:56+09:00
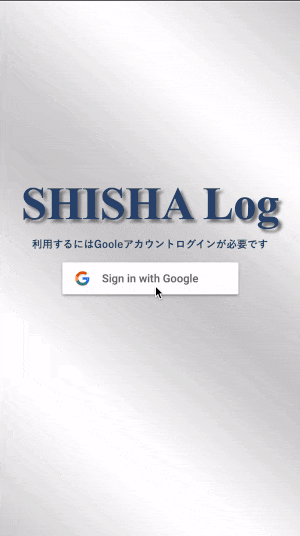
【初Qiita】プログラミング2ヶ月目でリリース、現在も使われているWebアプリ『SHISHA Log』
1. プログラミングを初めて4ヶ月が経過しました。
はじめまして、赤岸叶恵です(Twitter@KKKEAS)
初めてQiitaに投稿します。当記事への訪問ありがとうございます!私は現在G's Academy TOKYOで未経験からプログラミングを学習しています。
ありがたいことに開発した『SHISHA Log』にユーザー投稿が50件集まり、形になってきたので備忘録としてこの記事を書いています。2. 『SHISHA Log』 = シーシャの美味しいミックスをメモするだけのアプリ
動作環境:モバイルGoogle Chrome
SHISHA Log リンク:https://chan-kanae.sakura.ne.jp/shisha_/login.html
① なぜ開発したのか
私は一時期週8でシーシャ屋に行っていたほどシーシャ(水煙草)が好きです。
シーシャは複数のフレーバーをミックスして吸うことができるのですが、3種類以上になると
「この前のミックス美味しかったな。またやりたいけど何のフレーバーが入ってたか忘れちゃった。再現できない」
という問題が発生します。そのため
- 美味しいミックスを思い出すため
- 他ユーザーの投稿をみて「このミックス美味しそう」→シーシャ屋訪店→シーシャ界が活性化するといいなと考え
シーシャの美味しいミックスをメモするだけのアプリ『SHISHA Log』を開発しました!
② 仕様した技術
- HTML5
- CSS3
- JavaScript
- PHP
- Firebase
③ 実装した機能/工夫した点
- ホーム画面=タイムライン。自分の投稿のみ<編集/削除>アイコンを表示
- マイページ。「自分の投稿一覧はよ」というユーザーの要望に応える形で実装
3. 今後実装したい機能/使いたい技術
現時点ではフロントJavaScript、サーバー_PHPで動いていますが
今後はフロントVue.js or Nuxt.js、サーバー_Laravelに移行し、以下の機能を 実装していきます。
目指せ週1アップデート!
- ユーザー情報(名前・アイコン等)登録
- 投稿のブックマーク機能
- あいまい検索
- 投稿をTwitter連携でシェア機能
4. 自戒を込めて。1番ハマった、データベース接続の構文
どハマりしました。3時間溶かしました。
動かない構文
PDO('mysql:dbname= mydb;charset=utf8;host=localhost','root','root');動く構文
PDO('mysql:dbname=mydb;charset=utf8;host=localhost','root','root');mysql:dbname= mydb ←問題はこの半角スペースでした。
正しいデータベース名は「mydb」ですが「 mydb」というデータベース名で接続しにいってたので
「そんなデータベースないよ〜」とPHPは思っていたようです。5. 今後どんなエンジニアを目指すのか
事業会社のWebエンジニアとしてサービスのグロースハックに取り組みたいと考えています!
フロントサイドかサーバーサイドかでいうと、まだ決められません。
つい最近まではずっとフロント志望だったのですが、「どのサービスも情報を送受信して、表示するだけ。データベースに強くなりたいな」などと考えはじめています。ひとまずVue.js or Nuxt.js/Laravelで開発を進めながら、何エンジニアになるのか決めようと思います!
そしてインターン先を探しています。インターンさせてください!
______________________
最後まで読んでくださりありがとうございます!
- 投稿日:2020-02-11T00:55:08+09:00
そろそろaws初めてみよか#4~Cloud9環境の整備~
はじめに
awsと戯れる会も第4回目(^^♪
Cloud9環境でちゃんと開発できるようCloud9のインスタンスにもlaravel環境をセットアップします。以前の記事はこちらから
- そろそろaws初めてみよか~まずは触れてみた~
- そろそろaws初めてみよか#2~CodeStarによるコード修正からDeployまで~
- そろそろaws初めてみよか#3~RDSとの接続~phpのバージョンアップ(5.6->7.3)
Cloud9上のphpは
5.6.40
ところが実行環境であるインスタンスのphpは7.3.13
って事でphpのインストールと切り替えを行います。php73のインストール
ec2-user:~ $ sudo yum install php73 php73-gd php73-json php73-mbstring php73-mysqlnd php73-pdo php73-soap php73-xml
 :
phpの切り替え(5.6->7.3)
ec2-user:~ $ php -v
PHP 5.6.40 (cli) (built: Oct 31 2019 20:35:16)
Copyright (c) 1997-2016 The PHP Group
Zend Engine v2.6.0, Copyright (c) 1998-2016 Zend Technologies
    with Xdebug v2.5.5, Copyright (c) 2002-2017, by Derick Rethans
ec2-user:~ $ sudo alternatives --config php

There are 2 programs which provide 'php'.

  Selection    Command
-----------------------------------------------
*+ 1           /usr/bin/php-5.6
   2           /usr/bin/php-7.3

Enter to keep the current selection[+], or type selection number: 2
ec2-user:~ $ php -v
PHP 7.3.13 (cli) (built: Jan 21 2020 19:15:52) ( NTS )
Copyright (c) 1997-2018 The PHP Group
Zend Engine v3.3.13, Copyright (c) 1998-2018 Zend Technologies
ec2-user:~ $
composerのインストール
次に必要となってくるcomposerのインストールを行います。
公式の手順(https://getcomposer.org/download/)に則ってec2-user:~ $ php -r "copy('https://getcomposer.org/installer', 'composer-setup.php');" ec2-user:~ $ php -r "if (hash_file('sha384', 'composer-setup.php') === 'c5b9b6d368201a9db6f74e2611495f369991b72d9c8cbd3ffbc63edff210eb73d46ffbfce88669ad33695ef77dc76976') { echo 'Installer verified'; } else { echo 'Installer corrupt'; unlink('composer-setup.php'); } echo PHP_EOL;" Installer verified ec2-user:~ $ php composer-setup.php All settings correct for using Composer Downloading... Composer (version 1.9.3) successfully installed to: /home/ec2-user/composer.phar Use it: php composer.phar ec2-user:~ $ php -r "unlink('composer-setup.php');" ec2-user:~ $ ls composer.phar environment node_modules package-lock.jsonlaravelなどのインストール
プロジェクトフォルダには
composer.jsonがありますので、以下のコマンドで必要なモジュールをインストールします。
ちなみにGitからCloneされたソースは~\environmentにあります。ec2-user:~ $ ec2-user:~ $ cd environment/ ec2-user:~/environment $ cd php-laravel ec2-user:~/environment/php-laravel (master) $ ls app artisan buildspec.yml composer.lock database index.php phpunit.xml README.md routes server.php template-configuration.json tests appspec.yml bootstrap composer.json config gulpfile.js package.json public resources scripts storage template.yml ec2-user:~/environment/php-laravel (master) $ ~/composer.phar install Loading composer repositories with package information Installing dependencies (including require-dev) from lock file Package operations: 63 installs, 0 updates, 0 removals - Installing kylekatarnls/update-helper (1.2.0): Downloading (100%) - Installing jakub-onderka/php-console-color (v0.2): Downloading (100%) - Installing symfony/polyfill-ctype (v1.12.0): Downloading (100%) - Installing vlucas/phpdotenv (v2.6.1): Downloading (100%) - Installing symfony/polyfill-mbstring (v1.12.0): Downloading (100%) - Installing symfony/var-dumper (v3.1.10): Downloading (100%) - Installing symfony/translation (v3.1.10): Downloading (100%) - Installing symfony/routing (v3.1.10): Downloading (100%) - Installing symfony/process (v3.1.10): Downloading (100%) - Installing symfony/http-foundation (v3.1.10): Downloading (100%) - Installing symfony/event-dispatcher (v3.4.30): Downloading (100%) - Installing psr/log (1.1.0): Downloading (100%) - Installing symfony/debug (v3.1.10): Downloading (100%) - Installing symfony/http-kernel (v3.1.10): Downloading (100%) - Installing symfony/finder (v3.1.10): Downloading (100%) - Installing symfony/console (v3.1.10): Downloading (100%) - Installing swiftmailer/swiftmailer (v5.4.12): Downloading (100%) - Installing paragonie/random_compat (v2.0.18): Downloading (100%) - Installing ramsey/uuid (3.8.0): Downloading (100%) - Installing nikic/php-parser (v3.1.5): Downloading (100%) - Installing jakub-onderka/php-console-highlighter (v0.3.2): Downloading (100%) - Installing dnoegel/php-xdg-base-dir (0.1): Downloading (100%) - Installing psy/psysh (v0.8.18): Downloading (100%) - Installing nesbot/carbon (1.39.0): Downloading (100%) - Installing mtdowling/cron-expression (v1.2.1): Downloading (100%) - Installing monolog/monolog (1.24.0): Downloading (100%) - Installing league/flysystem (1.0.53): Downloading (100%) - Installing symfony/polyfill-util (v1.12.0): Downloading (100%) - Installing symfony/polyfill-php56 (v1.12.0): Downloading (100%) - Installing jeremeamia/superclosure (2.4.0): Downloading (100%) - Installing doctrine/inflector (v1.3.0): Downloading (100%) - Installing classpreloader/classpreloader (3.2.0): Downloading (100%) - Installing laravel/framework (v5.3.31): Downloading (100%) - Installing fzaninotto/faker (v1.8.0): Downloading (100%) - Installing hamcrest/hamcrest-php (v1.2.2): Downloading (100%) - Installing mockery/mockery (0.9.11): Downloading (100%) - Installing webmozart/assert (1.4.0): Downloading (100%) - Installing phpdocumentor/reflection-common (1.0.1): Downloading (100%) - Installing phpdocumentor/type-resolver (0.4.0): Downloading (100%) - Installing phpdocumentor/reflection-docblock (4.3.1): Downloading (100%) - Installing phpunit/php-token-stream (2.0.2): Downloading (100%) - Installing symfony/yaml (v3.3.18): Downloading (100%) - Installing sebastian/version (2.0.1): Downloading (100%) - Installing sebastian/resource-operations (1.0.0): Downloading (100%) - Installing sebastian/recursion-context (2.0.0): Downloading (100%) - Installing sebastian/object-enumerator (2.0.1): Downloading (100%) - Installing sebastian/global-state (1.1.1): Downloading (100%) - Installing sebastian/exporter (2.0.0): Downloading (100%) - Installing sebastian/environment (2.0.0): Downloading (100%) - Installing sebastian/diff (1.4.3): Downloading (100%) - Installing sebastian/comparator (1.2.4): Downloading (100%) - Installing phpunit/php-text-template (1.2.1): Downloading (100%) - Installing doctrine/instantiator (1.2.0): Downloading (100%) - Installing phpunit/phpunit-mock-objects (3.4.4): Downloading (100%) - Installing phpunit/php-timer (1.0.9): Downloading (100%) - Installing phpunit/php-file-iterator (1.4.5): Downloading (100%) - Installing sebastian/code-unit-reverse-lookup (1.0.1): Downloading (100%) - Installing phpunit/php-code-coverage (4.0.8): Downloading (100%) - Installing phpspec/prophecy (1.8.1): Downloading (100%) - Installing myclabs/deep-copy (1.9.3): Downloading (100%) - Installing phpunit/phpunit (5.7.27): Downloading (100%) - Installing symfony/css-selector (v3.1.10): Downloading (100%) - Installing symfony/dom-crawler (v3.1.10): Downloading (100%) symfony/var-dumper suggests installing ext-symfony_debug symfony/translation suggests installing symfony/config symfony/routing suggests installing doctrine/annotations (For using the annotation loader) symfony/routing suggests installing symfony/config (For using the all-in-one router or any loader) symfony/routing suggests installing symfony/dependency-injection (For loading routes from a service) symfony/routing suggests installing symfony/expression-language (For using expression matching) symfony/event-dispatcher suggests installing symfony/dependency-injection symfony/http-kernel suggests installing symfony/browser-kit symfony/http-kernel suggests installing symfony/class-loader symfony/http-kernel suggests installing symfony/config symfony/http-kernel suggests installing symfony/dependency-injection paragonie/random_compat suggests installing ext-libsodium (Provides a modern crypto API that can be used to generate random bytes.) ramsey/uuid suggests installing ext-libsodium (Provides the PECL libsodium extension for use with the SodiumRandomGenerator) ramsey/uuid suggests installing ext-uuid (Provides the PECL UUID extension for use with the PeclUuidTimeGenerator and PeclUuidRandomGenerator) ramsey/uuid suggests installing ircmaxell/random-lib (Provides RandomLib for use with the RandomLibAdapter) ramsey/uuid suggests installing moontoast/math (Provides support for converting UUID to 128-bit integer (in string form).) ramsey/uuid suggests installing ramsey/uuid-console (A console application for generating UUIDs with ramsey/uuid) ramsey/uuid suggests installing ramsey/uuid-doctrine (Allows the use of Ramsey\Uuid\Uuid as Doctrine field type.) psy/psysh suggests installing ext-pdo-sqlite (The doc command requires SQLite to work.) psy/psysh suggests installing hoa/console (A pure PHP readline implementation. You'll want this if your PHP install doesn't already support readline or libedit.) monolog/monolog suggests installing aws/aws-sdk-php (Allow sending log messages to AWS services like DynamoDB) monolog/monolog suggests installing doctrine/couchdb (Allow sending log messages to a CouchDB server) monolog/monolog suggests installing ext-amqp (Allow sending log messages to an AMQP server (1.0+ required)) monolog/monolog suggests installing ext-mongo (Allow sending log messages to a MongoDB server) monolog/monolog suggests installing graylog2/gelf-php (Allow sending log messages to a GrayLog2 server) monolog/monolog suggests installing mongodb/mongodb (Allow sending log messages to a MongoDB server via PHP Driver) monolog/monolog suggests installing php-amqplib/php-amqplib (Allow sending log messages to an AMQP server using php-amqplib) monolog/monolog suggests installing php-console/php-console (Allow sending log messages to Google Chrome) monolog/monolog suggests installing rollbar/rollbar (Allow sending log messages to Rollbar) monolog/monolog suggests installing ruflin/elastica (Allow sending log messages to an Elastic Search server) monolog/monolog suggests installing sentry/sentry (Allow sending log messages to a Sentry server) league/flysystem suggests installing league/flysystem-aws-s3-v2 (Allows you to use S3 storage with AWS SDK v2) league/flysystem suggests installing league/flysystem-aws-s3-v3 (Allows you to use S3 storage with AWS SDK v3) league/flysystem suggests installing league/flysystem-azure (Allows you to use Windows Azure Blob storage) league/flysystem suggests installing league/flysystem-cached-adapter (Flysystem adapter decorator for metadata caching) league/flysystem suggests installing league/flysystem-eventable-filesystem (Allows you to use EventableFilesystem) league/flysystem suggests installing league/flysystem-rackspace (Allows you to use Rackspace Cloud Files) league/flysystem suggests installing league/flysystem-sftp (Allows you to use SFTP server storage via phpseclib) league/flysystem suggests installing league/flysystem-webdav (Allows you to use WebDAV storage) league/flysystem suggests installing league/flysystem-ziparchive (Allows you to use ZipArchive adapter) league/flysystem suggests installing spatie/flysystem-dropbox (Allows you to use Dropbox storage) league/flysystem suggests installing srmklive/flysystem-dropbox-v2 (Allows you to use Dropbox storage for PHP 5 applications) laravel/framework suggests installing aws/aws-sdk-php (Required to use the SQS queue driver and SES mail driver (~3.0).) laravel/framework suggests installing doctrine/dbal (Required to rename columns and drop SQLite columns (~2.4).) laravel/framework suggests installing guzzlehttp/guzzle (Required to use the Mailgun and Mandrill mail drivers and the ping methods on schedules (~5.3|~6.0).) laravel/framework suggests installing league/flysystem-aws-s3-v3 (Required to use the Flysystem S3 driver (~1.0).) laravel/framework suggests installing league/flysystem-rackspace (Required to use the Flysystem Rackspace driver (~1.0).) laravel/framework suggests installing pda/pheanstalk (Required to use the beanstalk queue driver (~3.0).) laravel/framework suggests installing predis/predis (Required to use the redis cache and queue drivers (~1.0).) laravel/framework suggests installing pusher/pusher-php-server (Required to use the Pusher broadcast driver (~2.0).) laravel/framework suggests installing symfony/psr-http-message-bridge (Required to use psr7 bridging features (0.2.*).) sebastian/global-state suggests installing ext-uopz (*) phpunit/php-code-coverage suggests installing ext-xdebug (^2.5.1) phpunit/phpunit suggests installing ext-xdebug (*) phpunit/phpunit suggests installing phpunit/php-invoker (~1.1) Package phpunit/phpunit-mock-objects is abandoned, you should avoid using it. No replacement was suggested. Generating autoload files Carbon 1 is deprecated, see how to migrate to Carbon 2. https://carbon.nesbot.com/docs/#api-carbon-2 You can run './vendor/bin/upgrade-carbon' to get help in updating carbon and other frameworks and libraries that depend on it. > Illuminate\Foundation\ComposerScripts::postInstall > php artisan optimize Generating optimized class loader Compiling common classes ec2-user:~/environment/php-laravel (master) $.envの準備
開発用に.envを作成します。
コマンドでも良いのですがせっかくのIDEですので.env.exampleをコピー&ペーストして.envを作成
以下の部分を書き換えました。DB_CONNECTION=mysql DB_HOST=laravel-db.culgyynq9ap1.us-east-2.rds.amazonaws.com DB_PORT=3306 DB_DATABASE=laravel_dev DB_USERNAME=admin DB_PASSWORD=***********DBはインスタンスは本番と同様でデータベースを分ける想定です。
インスタンスから分けたい場合は、RDSで新たにDBを作成しセキュリティグループの設定を行ってください。
参考)そろそろaws初めてみよか#3~RDSとの接続~開発用データベースの作成
例によってインスタンスにはmysqlがインストールされていませんのでまずはインストールします。
ec2-user:~/environment/php-laravel (master) $ sudo yum install -y mysql
Loaded plugins: priorities, update-motd, upgrade-helper
amzn-main                                                                                                                                                                                                                     | 2.1 kB  00:00:00
amzn-updates                                                                                                                                                                                                                  | 2.5 kB  00:00:00
1073 packages excluded due to repository priority protections
Resolving Dependencies
--> Running transaction check
---> Package mysql.noarch 0:5.5-1.6.amzn1 will be installed
--> Finished Dependency Resolution

Dependencies Resolved

=====================================================================================================================================================================================================================================================
 Package                                                 Arch                                                     Version                                                          Repository                                                   Size
=====================================================================================================================================================================================================================================================
Installing:
 mysql                                                   noarch                                                   5.5-1.6.amzn1                                                    amzn-main                                                   2.7 k

Transaction Summary
=====================================================================================================================================================================================================================================================
Install  1 Package

Total download size: 2.7 k
Installed size: 0
Downloading packages:
mysql-5.5-1.6.amzn1.noarch.rpm                                                                                                                                                                                                | 2.7 kB  00:00:00
Running transaction check
Running transaction test
Transaction test succeeded
Running transaction
  Installing : mysql-5.5-1.6.amzn1.noarch                                                                                                                                                                                                        1/1
  Verifying  : mysql-5.5-1.6.amzn1.noarch                                                                                                                                                                                                        1/1

Installed:
  mysql.noarch 0:5.5-1.6.amzn1

Complete!
次にデータベースに接続し、データベースを作成します。
※セキュリティグループにCloud9インスタンスからMariaDBへの接続を許可する設定を入れておいてください。
参考)そろそろaws初めてみよか#3~RDSとの接続~ec2-user:~/environment/php-laravel (master) $ mysql -u admin -p -h laravel-db.culgyynq9ap1.us-east-2.rds.amazonaws.com Enter password: Welcome to the MySQL monitor. Commands end with ; or \g. Your MySQL connection id is 19 Server version: 5.5.5-10.2.21-MariaDB-log Source distribution Copyright (c) 2000, 2018, Oracle and/or its affiliates. All rights reserved. Oracle is a registered trademark of Oracle Corporation and/or its affiliates. Other names may be trademarks of their respective owners. Type 'help;' or '\h' for help. Type '\c' to clear the current input statement. mysql> CREATE DATABASE laravel_dev DEFAULT CHARACTER SET utf8 COLLATE utf8_general_ci; Query OK, 1 row affected (0.01 sec) mysql> SHOW DATABASES; +--------------------+ | Database | +--------------------+ | information_schema | | innodb | | laravel | | laravel_dev | | mysql | | performance_schema | +--------------------+ 6 rows in set (0.00 sec) mysql> \q Byephp artisan migrateをしてみる
ec2-user:~/environment/php-laravel (master) $ php artisan migrate
Migration table created successfully.
Migrated: 2014_10_12_000000_create_users_table
Migrated: 2014_10_12_100000_create_password_resets_table
これで開発できますね^^
と思ったのですが…
php artisan serveができない...。
一難去ってまた一難。一体どうやってaws上でlaravelプロジェクトを開発していくんでしょうか…。