- 投稿日:2020-02-11T22:05:04+09:00
Androidタブレット(HWT31)を子供用Kindle専用端末にする
背景
以前よりKindleで購入した本は家族内で読みまわしたいと思っていた。紙は好きだが、狭い日本の家でスペース取る。読書権の永続性が担保されてるわけではないが、ITジャイアントのモラルを信じて数年前からKindleに集約している。何なら紙で買って、処分したのち、電子で買い直すことすらした。コンテンツ産業よ光あれ。
話を戻そう。
子供らYouTubeめっちゃ見るのよね。ほっとくと1日中。ほんま良くない。全てが悪とは言わないが低俗なものにハマっている印象だ。最初に渡したのが良くなかった。せめてYoutube Kidsにしておくんだったが、後からの移行は不可能であった。見れなくなるチャンネルばかりでブーイングの嵐であったためだ。仕方なく時間制限を設ける運用に至っている。Kindleで買った漫画を読ませるためにタブレットを渡そうと思うも、YouTube、インターネット等、出来ることが多すぎるのだ。そこで、Kindle以外の機能を全て殺すことで希望を満たそうと思った次第である。
うっかり殺し過ぎてファクトリーリセットを3回もしてしまった。(+書いてる最中にもう1回やった)
備忘録としてまとめるとともに誰かの有益になればこれ幸いである。1. 初期化
タイトルの通り、au Huawei製タブレット Qua tab 02(HWT31)での話。2016年発売、Android5と2020年にしては古く処理能力は低いが、10.1インチUXGA液晶なので、漫画を見開きでみるという用途で言えば記事執筆現在も有用である。中途半端に使っていたので一旦まっさらにする。
電源オフの状態から、電源ボタンと音量(-)を長押しで起動するとブートメニューになるので、工場出荷状態に戻す。ちなみにこのタブレットいわゆる一般的な配置と音量(+)(-)が逆である。縦配置で、上にある方が(-)。全く慣れない。
この後ログインするのだが、いろいろと制約が掛かるファミリーリンクの被管理アカウント(要は制限付き子供のアカウント)ではログインしてはいけない。この後の開発者向けオプションが有効に出来ないので。
2. ホームアプリ追加
まずGoogle Play開発者サービスのアップデートが裏で入るので少し待つ。
アイコンが変わったらOK。auのホームアプリが好きではないのでこの後消すのだが、Windowsで言うExplorerを消すようなものなので、代替アプリを入れておく。無料の範囲でそこそこの設定が出来るApexランチャーがオススメ。
3. 設定変更
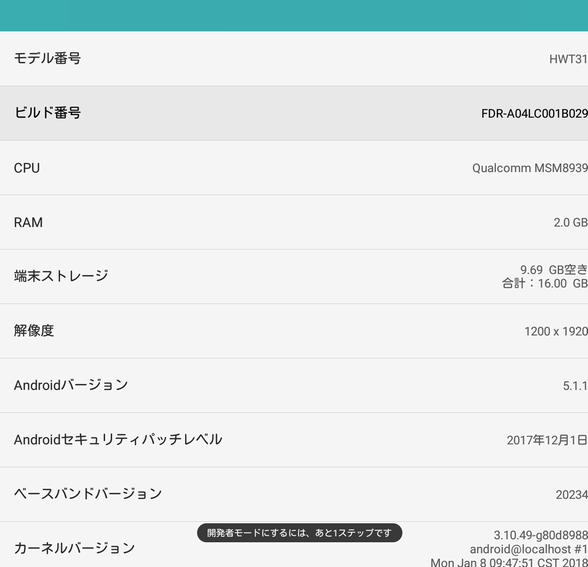
ビルド番号を連打、開発者向けオプションを有効にして、USBデバッグを有効にする。
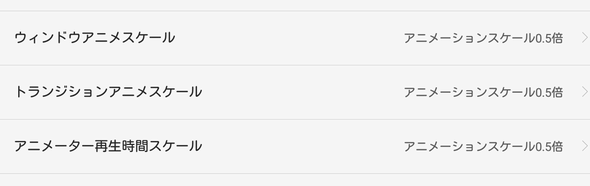
キビキビ感が欲しいのでエフェクトは短くするのが私のジャスティス。
4. アプリ一覧取得
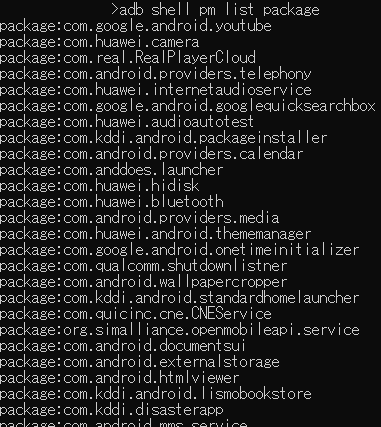
adb shell pm list packageでこんな感じに得られる。
5.アプリ削除
さてここから慎重に。コアなコンポーネントを消し過ぎるとアプリのダウンロードが出来ない、ダウンロードとインストールが出来てもコンテンツのダウンロードが出来ない、となって結局再リセットとなる。(なった)。
数回の試行錯誤を経て、こうした。
adb shell pm uninstall -k --user 0 cn.wps.moffice_eng
adb shell pm uninstall -k --user 0 com.android.chrome
adb shell pm uninstall -k --user 0 com.example.android.notepad
adb shell pm uninstall -k --user 0 com.facebook.katana
adb shell pm uninstall -k --user 0 com.google.android.apps.books
adb shell pm uninstall -k --user 0 com.google.android.apps.magazines
adb shell pm uninstall -k --user 0 com.google.android.apps.plus
adb shell pm uninstall -k --user 0 com.google.android.gm
adb shell pm uninstall -k --user 0 com.google.android.talk
adb shell pm uninstall -k --user 0 com.google.android.videos
adb shell pm uninstall -k --user 0 com.google.android.youtube
adb shell pm uninstall -k --user 0 com.huawei.manual.qua02
adb shell pm uninstall -k --user 0 com.kddi.android.au_setting_menu
adb shell pm uninstall -k --user 0 com.kddi.android.au_wifi_connect2
adb shell pm uninstall -k --user 0 com.kddi.android.aumanagementsystem
adb shell pm uninstall -k --user 0 com.kddi.android.auoneidsetting
adb shell pm uninstall -k --user 0 com.kddi.android.ausharelink
adb shell pm uninstall -k --user 0 com.kddi.android.checker_android
adb shell pm uninstall -k --user 0 com.kddi.android.cmail
adb shell pm uninstall -k --user 0 com.kddi.android.easysettingwizard
adb shell pm uninstall -k --user 0 com.kddi.android.email
adb shell pm uninstall -k --user 0 com.kddi.android.emailprov
adb shell pm uninstall -k --user 0 com.kddi.android.extract
adb shell pm uninstall -k --user 0 com.kddi.android.imp
adb shell pm uninstall -k --user 0 com.kddi.android.klop
adb shell pm uninstall -k --user 0 com.kddi.android.lismobookstore
adb shell pm uninstall -k --user 0 com.kddi.android.mamoru
adb shell pm uninstall -k --user 0 com.kddi.android.packageinstaller
adb shell pm uninstall -k --user 0 com.kddi.android.pdg
adb shell pm uninstall -k --user 0 com.kddi.android.screenshotshare
adb shell pm uninstall -k --user 0 com.kddi.android.standardhomelauncher
adb shell pm uninstall -k --user 0 com.kddi.android.UtaPass
adb shell pm uninstall -k --user 0 com.kddi.android.videopass
adb shell pm uninstall -k --user 0 com.kddi.ar.satch.satchviewer
adb shell pm uninstall -k --user 0 com.kddi.auoneshopping
adb shell pm uninstall -k --user 0 com.kddi.cs.app001
adb shell pm uninstall -k --user 0 com.kddi.datacharge
adb shell pm uninstall -k --user 0 com.kddi.disasterapp
adb shell pm uninstall -k --user 0 com.kddi.extcontroldevice
adb shell pm uninstall -k --user 0 com.kddi.market
adb shell pm uninstall -k --user 0 com.kddi.pass.launcher
adb shell pm uninstall -k --user 0 com.kddi.ux.station
adb shell pm uninstall -k --user 0 com.lookout
adb shell pm uninstall -k --user 0 com.navitime.local.naviwalk
adb shell pm uninstall -k --user 0 com.real.RealPlayerCloud
adb shell pm uninstall -k --user 0 jp.auone.wallet
adb shell pm uninstall -k --user 0 jp.co.optim.oru
adb shell pm uninstall -k --user 0 jp.gamegift
adb shell pm uninstall -k --user 0 jp.kddilabs.smartnetwork.troubleshooting
adb shell pm uninstall -k --user 0 jp.netstar.familysmile
adb shell pm uninstall -k --user 0 org.simalliance.openmobileapi.service
adb shell pm uninstall -k --user 0 web.wm.auone.jp
1個ずつ消せとかいう人が多いのだが、batファイルにまとめると順次処理してくれる。
6. 仕上げ
- Kindleインストール
- コンテンツがダウンロード出来ることの確認
- インストール済みアプリの更新
- アカウント設定
- 暫定的に入っていた親アカウントの削除
- 子供アカウント(リビングアカウント)でのログイン
- ファミリーリンク設定
- Apexホームの設定
- 不要なアプリの非表示化
- ホームスクリーンやアプリ一覧の見栄え整え
- 横画面固定が特にウザいので自動回転に
- あらゆる通知をオフ
- etc 経て、完成。
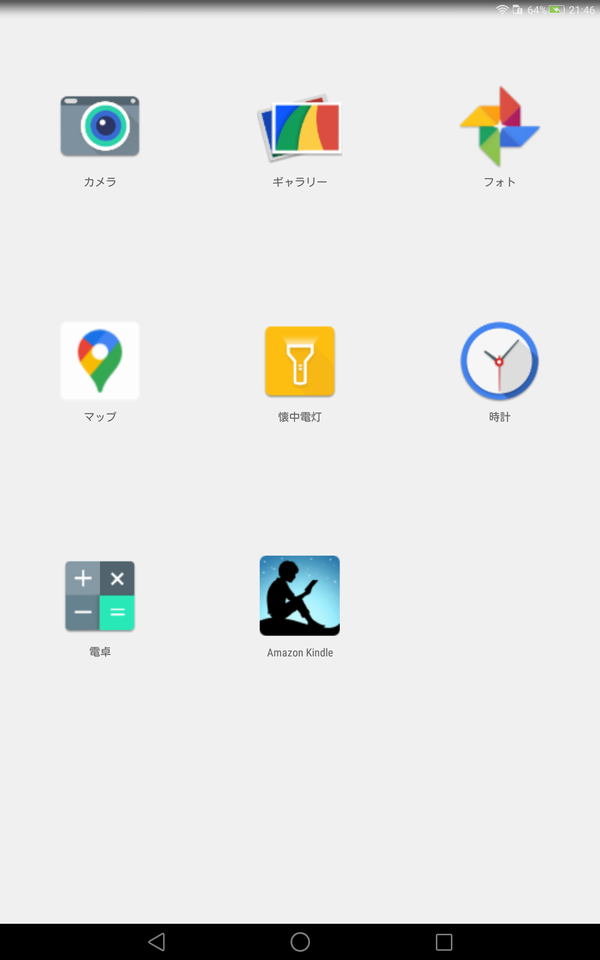
どスッキリしたホーム
どスッキリしたアプリ一覧
オチ
1-Clickでいつでも買える状態を制御出来なさそうなので、クレジットカードの登録を外さざるを得なかった。自分の買い物のときに面倒になるのかな・・・散財を抑えられて良いかな・・・
参考資料
https://developer.android.com/studio/command-line/adb?hl=ja#pm
https://qiita.com/reinsF82/items/39caba2f45c7d751de6a
https://qiita.com/kamorits/items/2a3d29d8b4bf0a31e94c
https://qiita.com/tkc_tsuchiya/items/1fd9953bc1337150dff1


- 投稿日:2020-02-11T19:23:18+09:00
AndroidでFirebaseを使ったログインの際にINVALID_CERT_HASHが起きる場合の対処法
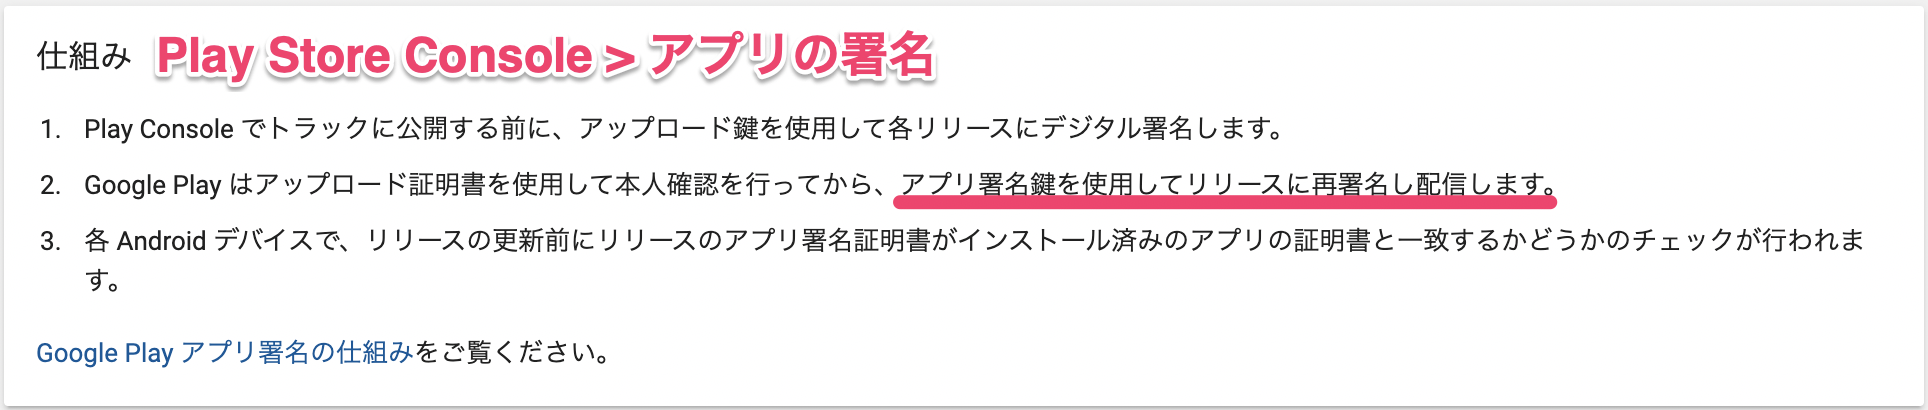
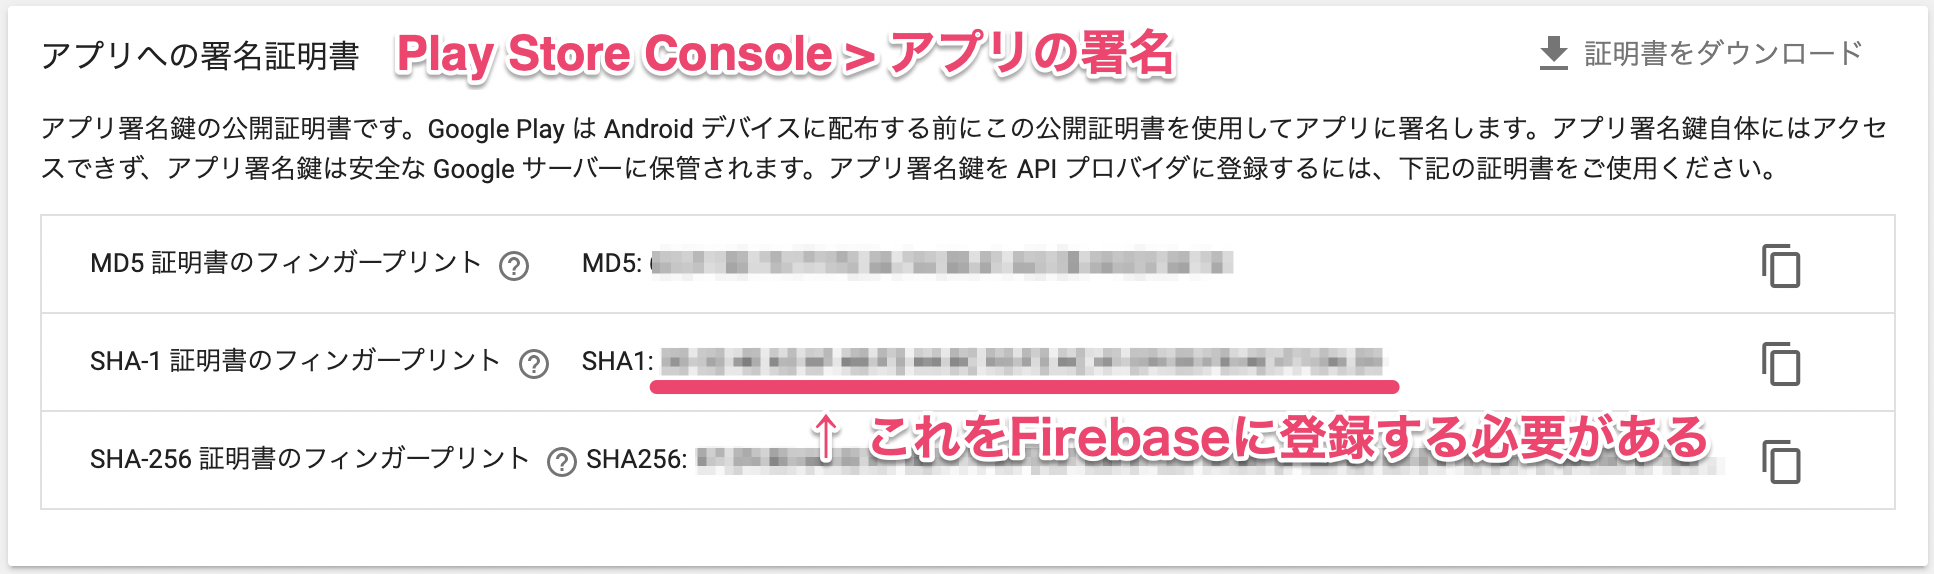
Google Playアプリ署名が有効になっていると、自分のアプリ署名が削除され、アプリリリース後にGoogle Playが付与したアプリ署名が使われる。
そのため、Firebaseログインを利用する場合、自分が署名した際のSHA-1フィンガープリントではなく、Google Playが署名した際のSHA-1フィンガープリントをFirebaseの設定で登録する必要がある。
上記の手順を行っていない場合、Firebaseを使ったログインの際、下記のコードで例外が起きる。
firebaseAuth
        .startActivityForSignInWithProvider(MainActivity.this, provider.build())
        .addOnSuccessListener(
                new OnSuccessListener<AuthResult>() {
                    @Override
                    public void onSuccess(AuthResult authResult) {
                    }
                })
        .addOnFailureListener(
                new OnFailureListener() {
                    @Override
                    public void onFailure(@NonNull Exception e) {
                        // ここで例外が起きる
                        e.printStackTrace();
                    }
                });
エラーメッセージに書かれている
INVALID_CERT_HASHは、Play Storeが施したアプリ署名のSHA-1フィンガープリントとFirebaseに登録されたSHA-1フィンガープリントが一致しない場合に起きる。E/FirebaseAuth: [GetAuthDomainTask] Error getting project config. Failed with INVALID_CERT_HASH 400E/IdpSignInActivity: Web sign-in failed, finishingスタックトレースの直前に書かれている
There was an error while trying to get your package certificate hashは「パッケージの証明書の署名が間違っているとき」に起きるエラーで、INVALID_CERT_HASHと同じ意味になる。com.google.firebase.auth.FirebaseAuthException: There was an error while trying to get your package certificate hash. at com.google.firebase.auth.api.internal.zzdv.zza(com.google.firebase:firebase-auth@@19.2.0:37) at com.google.firebase.auth.internal.zzal.onReceive(com.google.firebase:firebase-auth@@19.2.0:32) at androidx.localbroadcastmanager.content.LocalBroadcastManager.executePendingBroadcasts(LocalBroadcastManager.java:313) at androidx.localbroadcastmanager.content.LocalBroadcastManager$1.handleMessage(LocalBroadcastManager.java:121) at android.os.Handler.dispatchMessage(Handler.java:107) at android.os.Looper.loop(Looper.java:214) at android.app.ActivityThread.main(ActivityThread.java:7356) at java.lang.reflect.Method.invoke(Native Method) at com.android.internal.os.RuntimeInit$MethodAndArgsCaller.run(RuntimeInit.java:492) at com.android.internal.os.ZygoteInit.main(ZygoteInit.java:930)参考リンク
下記のリンクにはもう少し詳しい説明が書いてある。
Authorization issue with Firebase when publish app to Play Store
- 投稿日:2020-02-11T17:00:44+09:00
Snackbar使用時に ScrollView can host only one direct child とエラーが起きる場合の対処
問題概要
この記事にたどり着いた人はScrollViewにaddViewした覚えがないのに
ScrollView can host only one direct childのエラーに悩まされている人かと思います。その場合、
Snackbarのmakeの第一引数に渡しているviewが、ScrollViewになっていないか確認してください。ScrollViewになっていれば、原因はそれの可能性が高いです。
原因
MateralComponentの1.1.0-alpha-06までのSnackbarの実装を見てみると、
 @NonNull
  public static Snackbar make(
      @NonNull View view, @NonNull CharSequence text, @Duration int duration) {
    final ViewGroup parent = findSuitableParent(view);
    if (parent == null) {
      throw new IllegalArgumentException(
          "No suitable parent found from the given view. Please provide a valid view.");
    }

    final LayoutInflater inflater = LayoutInflater.from(parent.getContext());
    final SnackbarContentLayout content =
        (SnackbarContentLayout)
            inflater.inflate(
                hasSnackbarButtonStyleAttr(parent.getContext())
                    ? R.layout.mtrl_layout_snackbar_include
                    : R.layout.design_layout_snackbar_include,
                parent,
                false);
    final Snackbar snackbar = new Snackbar(parent, content, content);
    snackbar.setText(text);
    snackbar.setDuration(duration);
    return snackbar;
  }
makeの中で、ViewGroupを取得する際に、findSuitableParentを使用していることがわかります。
final ViewGroup parent = findSuitableParent(view);では、さらに見ていくと、
private static ViewGroup findSuitableParent(View view) {
    ViewGroup fallback = null;
    do {
      if (view instanceof CoordinatorLayout) {
        // We've found a CoordinatorLayout, use it
        return (ViewGroup) view;
      } else if (view instanceof FrameLayout) {
        if (view.getId() == android.R.id.content) {
          // If we've hit the decor content view, then we didn't find a CoL in the
          // hierarchy, so use it.
          return (ViewGroup) view;
        } else {
          // It's not the content view but we'll use it as our fallback
          fallback = (ViewGroup) view;
        }
      }

      if (view != null) {
        // Else, we will loop and crawl up the view hierarchy and try to find a parent
        final ViewParent parent = view.getParent();
        view = parent instanceof View ? (View) parent : null;
      }
    } while (view != null);

    // If we reach here then we didn't find a CoL or a suitable content view so we'll fallback
    return fallback;
  }
まずCoordinatorLayoutであるか見て、その次にFrameLayoutであるかどうかを見ています。
その場合の細かい話は今回置いておいて、違った場合を見てみると、parent viewが見つかるまでview.getParent()しています。
最終的に、parent viewがScrollViewだった場合、ScrollViewがparent viewとして返ります。
そして、final Snackbar snackbar = new Snackbar(parent, content, content);そのparentを自身のコンストラクタに渡しています。
  private Snackbar(
      ViewGroup parent,
      View content,
      com.google.android.material.snackbar.ContentViewCallback contentViewCallback) {
    super(parent, content, contentViewCallback);
    accessibilityManager =
        (AccessibilityManager) parent.getContext().getSystemService(Context.ACCESSIBILITY_SERVICE);
  }
次に、Snackbarの親であるBaseTransientBottomBarを見てみます。
最終的に実行されるshowView()を見てみると、
  final void showView() {
    if (this.view.getParent() == null) {
      final ViewGroup.LayoutParams lp = this.view.getLayoutParams();

      if (lp instanceof CoordinatorLayout.LayoutParams) {
        // If our LayoutParams are from a CoordinatorLayout, we'll setup our Behavior
        final CoordinatorLayout.LayoutParams clp = (CoordinatorLayout.LayoutParams) lp;

        final SwipeDismissBehavior<? extends View> behavior =
            this.behavior == null ? getNewBehavior() : this.behavior;

        if (behavior instanceof BaseTransientBottomBar.Behavior) {
          ((BaseTransientBottomBar.Behavior) behavior).setBaseTransientBottomBar(this);
        }
        behavior.setListener(
            new SwipeDismissBehavior.OnDismissListener() {
              @Override
              public void onDismiss(View view) {
                view.setVisibility(View.GONE);
                dispatchDismiss(BaseCallback.DISMISS_EVENT_SWIPE);
              }

              @Override
              public void onDragStateChanged(int state) {
                switch (state) {
                  case SwipeDismissBehavior.STATE_DRAGGING:
                  case SwipeDismissBehavior.STATE_SETTLING:
                    // If the view is being dragged or settling, pause the timeout
                    SnackbarManager.getInstance().pauseTimeout(managerCallback);
                    break;
                  case SwipeDismissBehavior.STATE_IDLE:
                    // If the view has been released and is idle, restore the timeout
                    SnackbarManager.getInstance().restoreTimeoutIfPaused(managerCallback);
                    break;
                  default:
                    // Any other state is ignored
                }
              }
            });
        clp.setBehavior(behavior);
        // Also set the inset edge so that views can dodge the bar correctly, but only if there is
        // no anchor view.
        if (anchorView == null) {
          clp.insetEdge = Gravity.BOTTOM;
        }
      }

      extraBottomMarginAnchorView = calculateBottomMarginForAnchorView();
      updateBottomMargin();

      targetParent.addView(this.view);
    }
最後の行の
targetParent.addView(this.view);でaddViewしており、このtargetParentがSnakbarのコンストラクタで親に渡していたparentです。
ここがScrollViewだった場合、エラーが発生してランタイムで落ちてしまいます。DataBindingを使っている場合の落とし穴
ちなみに、rootがScrollViewになってしまう原因として、
findViewByIdで
android.R.id.contentを指定するとxml上で見えるrootのさらに上の階層のviewを取得できますが、(viewの階層構造に関しては割愛。DecorViewとかContentFrameLayoutとかだいぶ深い階層になっています)
DataBindingを使っている場合、binding.rootで取得したrootはxml上のrootです。/** * Returns the outermost View in the layout file associated with the Binding. If this * binding is for a merge layout file, this will return the first root in the merge tag. * * @return the outermost View in the layout file associated with the Binding. */ @NonNull public View getRoot() { return mRoot; }the outermost View in the layout file associated with the Binding.
ということなので。
bindingしているViewのみを扱うことを考えたら、当然といえば当然かもしれません。
なので、 rootがScrollViewなLayoutにて、binding.rootを渡すとクラッシュします。対処法
対処法としては、
https://stackoverflow.com/questions/4486034/get-root-view-from-current-activity
にあるように、android.R.id.contentを指定して、ScrollViewではないrootが渡るように保証してあげるなどが考えられます。
例えば、fun View.showError( @StringRes errorMessageResId: Int = R.string.error ) { Snackbar.make(findViewById(android.R.id.content), errorMessageResId, Snackbar.LENGTH_LONG) .show() }のように、Viewのextensionにして共通で使うなど。
ただし、rootをCoordinatorLayoutにしたい場合は別途対応が必要です。
- 投稿日:2020-02-11T16:37:08+09:00
Introduction of Data Binding in Android
本稿ではData bindingの実装手順を備忘録として残しておきます。
SeekBarとViewModel、TextViewを結びつけて、SeekBarの変化を画面表示に反映する機能を実装します。
使用する主な道具としては、
SeekBar・Data Binding・LiveDataになります。Githubに実装がおいてあります。説明上コードを適宜省略していますので、詳しくはこちらのレポジトリを参照してください。また、説明と対応するコミットへのリンクを掲載していますので、実装を追記する位置はこちらを参照してください。
環境
macOS 10.15.3
Android Studio 3.5.1
Kotlin plugin 1.3.61-release-Studio3.5-1
実装手順
以降、package名を example.android.android_data_binding_sampleとして進めます。
ビルド設定
新規プロジェクトをEmpty Activityを選んで作ったら、まず、app/build.gradleでData Binding用のビルド設定を行います。
build.gradle(app)android { ... dataBinding { enabled = true } }ViewModel
続いて、ViewModelを実装します。
MainViewModel.ktclass MainViewModel : ViewModel() { /** * シークバーの値を格納する * */ private val _seekBarValue = MutableLiveData(50) /** * シークバーの値を表示用に整形した文字列 * */ val seekBarValueString: LiveData<String> = Transformations.map(_seekBarValue) { "value: $it" } /** * シークバーの値が変化した時に呼び出される * */ fun onSeekBarValueChanged(value: Int) { _seekBarValue.postValue(value) } }MutableLiveDataのイニシャライザなどでビルドエラーになる場合は、app/build.gradleにライブラリの依存関係を追加します。
build.gradle(app)dependencies { ... implementation 'androidx.lifecycle:lifecycle-extensions:2.2.0' ... }レイアウトファイル
次に、activity_main.xmlを編集します。
<layout>タグで既存の記述を囲みます。activity_main.xml<?xml version="1.0" encoding="utf-8"?> <layout> <androidx.constraintlayout.widget.ConstraintLayout ... </androidx.constraintlayout.widget.ConstraintLayout> </layout>先程実装したViewModelの宣言を行います。
activity_main.xml<layout> <data> <variable name="viewModel" type="example.android.android_data_binding_sample.MainViewModel" /> </data> ... </layout>最後に、SeekBarと、SeekBarの値を表示するTextViewを宣言します。ついでにConstraintLayoutからLinearLayoutに変更します。
activity_main.xml<layout xmlns:android="http://schemas.android.com/apk/res/android"> ... </data> <LinearLayout android:layout_width="match_parent" android:layout_height="match_parent" android:gravity="center" android:orientation="vertical"> <SeekBar android:id="@+id/seekBar" android:layout_width="match_parent" android:layout_height="wrap_content" android:layout_marginBottom="20dp" android:progress="50" /> <TextView android:layout_width="match_parent" android:layout_height="wrap_content" android:text="@{viewModel.seekBarValueString}" android:textAlignment="center" /> </LinearLayout> </layout>ここでのポイントは、TextViewの
text属性をviewModelのseeekBarValueStringプロパティに紐づけている箇所です。activity_main.xml<TextView android:text="@{viewModel.seekBarValueString}" />TextViewの
textを直接ViewModelのLiveData<String>型のプロパティに紐付けています。MainActivity
MainActivityの編集に移ります。
まず、ViewModelのプロパティを追加します。
MainActivitity.ktclass MainActivity : AppCompatActivity() { private val viewModel by lazy { ViewModelProvider(this).get(MainViewModel::class.java) } ...この際、ViewModelProviderのインポートを追加します。
次に、バインディングオブジェクトのプロパティをMainActivityに追加します。自動生成されるこの型の名称は、対応するレイアウトファイルのファイル名をパスカルケースにし、 Bindingを末尾につけたものになります。
例:レイアウトファイル名が
activity_foo.xmlならActivityFooBindingになるMainActivitity.ktimport example.android.android_data_binding_sample.databinding.ActivityMainBinding class MainActivity : AppCompatActivity() { ... private lateinit var binding: ActivityMainBinding ...続いて、
onCreate()内に、data bindingの設定を追記していきます。プロジェクト生成時にデフォルトで書かれる
setContentView()をDataBindingUtilのそれに差し替え、バインディングクラスをインスタンス化します。MainActivitity.kt... override fun onCreate(savedInstanceState: Bundle?) { super.onCreate(savedInstanceState) binding = DataBindingUtil.setContentView(this, R.layout.activity_main) ...この際に、
DataBindingUtilのインポート文も追加します。LiveDataオブジェクトをバインディングクラスとともに使用するため、MainActivityをライフサイクル所有者に指定します。
MainActivitity.kt... override fun onCreate(savedInstanceState: Bundle?) { super.onCreate(savedInstanceState) binding = DataBindingUtil.setContentView(this, R.layout.activity_main) binding.lifecycleOwner = this//追記 ...続いて、先程定義したMainViewModelをバインディングクラスと共に使用するため、バインディングクラスのプロパティに指定します。
MainActivitity.kt... override fun onCreate(savedInstanceState: Bundle?) { super.onCreate(savedInstanceState) binding = DataBindingUtil.setContentView(this, R.layout.activity_main) binding.lifecycleOwner = this binding.viewModel = viewModel//追記 ...最後に、SeekBarの変化への対応を設定します。
MainActivitity.kt... override fun onCreate(savedInstanceState: Bundle?) { ... binding.seekBar.setOnSeekBarChangeListener(object : SeekBar.OnSeekBarChangeListener { override fun onProgressChanged(seekBar: SeekBar?, progress: Int, fromUser: Boolean) { this@MainActivity.viewModel.onSeekBarValueChanged(progress) } override fun onStartTrackingTouch(seekBar: SeekBar?) { } override fun onStopTrackingTouch(seekBar: SeekBar?) { } }) }これで実行してみます。
シークバーを動かすと、TextViewの値が変わるのが確認できたでしょうか。
まとめ
ViewModelの(LiveDataの)プロパティをレイアウトファイル上のTextViewと紐付け、さらにSeekBarの変化をViewModelに伝える設定を行いました。
その結果、SeekBarの変化に応じてTextViewが変化するようになりました。
ユーザーがSeekBarを操作すると、次のようにメソッド呼び出し・プロパティの変化が生じます:
(MainActivity)
SeekBar.OnSeekBarChangeListener.onProgressChanged()の呼び出し

(MainViewModel)
viewModel.onSeekBarValueChanged()の呼び出し

_seekBarValue.postValue()の呼び出し

seekBarValueStringのvalueプロパティが更新される

(activity_main.xml)
seekBarValueStringに紐付けられたTextViewのtextプロパティが更新される
以上になります。
ここまでお読みいただきありがとうございます。お疲れ様でした。
参考

- 投稿日:2020-02-11T14:06:56+09:00
Flutter プラットフォーム固有機能を利用するためのSystemChannels APIについて
はじめに
Flutterからプラットフォーム固有の機能を利用するためのAPIのSystemChannelsについて解説します。
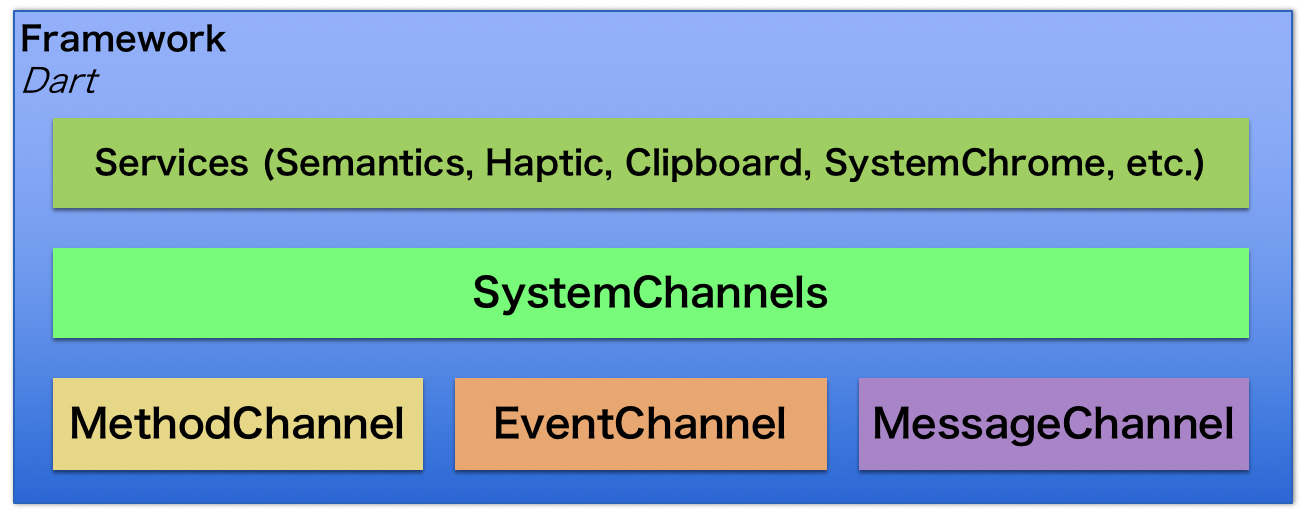
SystemChannelsとは
まず最初に、基本的にこのAPIを使うことは推奨しません。Flutter Framework内部ではこのAPIを多用していますが、以下のように中間レイヤのAPIであるため今後のバージョンアップで変わる可能性が高いです。
SystemChannelsのソースコードを見ると、中身はMethodChannel, EventChannel等を利用していることが分かると思います。MethodChannelやEventChannel等についてはこちらにまとめていますので参考にしてください。
SystemChannelsの種類
用途毎にいくつかの種類が用意されています。一覧を以下に示します。
種類 機能 上位のFlutter Service lifecycle ライフサイクル widget navigation ナビゲーション widget, system_chrome system 不明…。ここで利用されているが、実質何もしていない widget accessibility アクセシビリティ (テキスト読み上げなど) PlatformViews, Semantics platform システム設定 (画面回転, 終了など) SemanticsService,RouteNotificationMessages etc. platform_views プラットフォーム固有のビュー操作 AndroidView, UiKitView skia グラフィックス - keyEvent キー入力 RawKeyEvent textInput テキスト入力 TextInput, AndroidView, UiKitView サンプルコード
lifecycle
ライフサイクルリスナーSystemChannels.lifecycle.setMessageHandler((message){ print('<SystemChannels.lifecycle> $message'); /* AppLifecycleState.paused AppLifecycleState.inactive AppLifecycleState.resumed AppLifecycleState.suspending AppLifecycleState.detached */ return Future<String>.value(); });navigation
ナビゲーション操作リスナーSystemChannels.navigation.setMethodCallHandler((call) { print('<SystemChannels.navigation> ${call.method} (${call.arguments})'); /* popRoute pushRoute */ return Future<dynamic>.value(); });system
実質何にも使えず、使われておらず、無視して良さそうです。
とりあえずコールバックだけ設定SystemChannels.system.setMessageHandler((message) { print('<SystemChannels.system> $message'); return Future<dynamic>.value(); });accessibility
テキスト読み上げサンプルSemanticsService.announce('Hello world', TextDirection.ltr)のFlutter Framework内部実装が以下です。
Dartfinal AnnounceSemanticsEvent event = AnnounceSemanticsEvent('Hello world', TextDirection.ltr); SystemChannels.accessibility.send(event.toMap());platform
アプリ終了SystemNavigator.pop()のFlutter Framework内部実装が以下です。
アプリ終了SystemChannels.platform.invokeMethod('SystemNavigator.pop');platform_views
flutter_webで利用しているので参考にしてください。
こんな感じでビューを作成していくfinal Map<String, dynamic> args = <String, dynamic>{ 'id': 1, 'viewType': 'Create WebView', }; SystemChannels.platform_views.invokeMethod('create', args);skia
Skiaキャッシュサイズ設定。他に機能がなく、今はこれしか出来ない…const maxBytes = 4 * 1024 * 1024; SystemChannels.skia.invokeMethod('setResourceCacheMaxBytes', maxBytes);keyEvent
キー入力リスナーSystemChannels.keyEvent.setMessageHandler((message) { print('<SystemChannels.keyEvent> $message'); return Future<dynamic>.value(); });textInput
キーボードの表示ON/OFFSystemChannels.textInput.invokeMethod('TextInput.show'); SystemChannels.textInput.invokeMethod('TextInput.hide');
- 投稿日:2020-02-11T13:23:14+09:00
Kotlin, LiveData, coroutine なんかを使って初めてのAndroidアプリを作る(8)
前回の続きです。
今回の目標
リストの表示を1ヶ月1ページにします。
そしていわゆるViewPagerを使い、左右にスワイプすることで月を移動できるようにします。※カレンダー風の表示は、また次回に回します。
ViewPagerは、Androidでは使えないとお話にならない機能だと思うので、是非覚えて下さい。
1ヶ月1ページにする
(1) レイアウトの変更
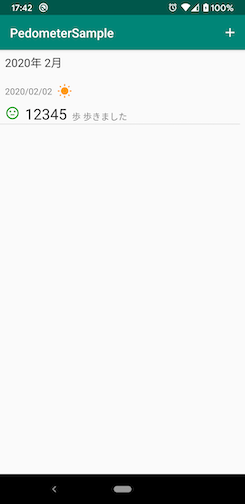
今表示してる「年月」を表示する部分を追加します。
完成イメージはこんな感じです。
レイアウトxmlのサンプルはこちら
activity_main.xml<?xml version="1.0" encoding="utf-8"?> <layout xmlns:android="http://schemas.android.com/apk/res/android" xmlns:app="http://schemas.android.com/apk/res-auto" xmlns:tools="http://schemas.android.com/tools"> <data> <variable name="viewmodel" type="jp.les.kasa.sample.mykotlinapp.MainViewModel"/> </data> <androidx.constraintlayout.widget.ConstraintLayout android:layout_width="match_parent" android:layout_height="match_parent" tools:context=".MainActivity"> <TextView android:id="@+id/textViewYM" android:layout_width="match_parent" android:layout_height="wrap_content" android:elevation="2dp" android:padding="8dp" android:textColor="@android:color/black" android:textSize="18sp" app:layout_constraintEnd_toEndOf="parent" app:layout_constraintStart_toStartOf="parent" app:layout_constraintTop_toTopOf="parent" tools:text="2020年 2月" /> <androidx.recyclerview.widget.RecyclerView android:id="@+id/log_list" android:layout_width="match_parent" android:layout_height="0dp" android:layout_marginTop="8dp" android:layout_marginEnd="8dp" android:layout_marginBottom="8dp" app:items="@{viewmodel.stepCountList}" app:layout_constraintBottom_toBottomOf="parent" app:layout_constraintEnd_toEndOf="parent" app:layout_constraintLeft_toLeftOf="parent" app:layout_constraintTop_toBottomOf="@id/textViewYM" /> </androidx.constraintlayout.widget.ConstraintLayout> </layout>ここはさほど難しくないですかね。
RecyclerViewのlayout_heightをmatch_parentにしているとダメなので、そこだけ要注意です。(2) MonthlyPageFragmentの作成
今
MainActivityはFragmentを持たずベタにリスト表示をしていますが、のちのちFragmentで表示していくようになるので、今のうちに一度Fragmentを使うように変えます。
これは勿論後でViewPagerを入れるときに同時にやっても良いのですが、前もって月表示Fragmentの動作、表示を確認しておく、という意味で先にやっておきます。1. MonthlyPageFragmentのレイアウトの作成
fragment_monthly_page.xmlにactivity_main.xmlの内容をそのままコピーします。
そして、activity_main.xmlを次のように書き変えます。activity_main.xml<?xml version="1.0" encoding="utf-8"?> <androidx.constraintlayout.widget.ConstraintLayout xmlns:android="http://schemas.android.com/apk/res/android" xmlns:app="http://schemas.android.com/apk/res-auto" xmlns:tools="http://schemas.android.com/tools" android:layout_width="match_parent" android:layout_height="match_parent" tools:context=".activity.main.MainActivity"> <FrameLayout android:id="@+id/main_container" app:layout_constraintBottom_toBottomOf="parent" app:layout_constraintEnd_toEndOf="parent" app:layout_constraintStart_toStartOf="parent" app:layout_constraintTop_toTopOf="parent" android:layout_width="match_parent" android:layout_height="match_parent" android:layout_marginStart="8dp" android:layout_marginTop="8dp" android:layout_marginEnd="8dp" android:layout_marginBottom="8dp"> </FrameLayout> </androidx.constraintlayout.widget.ConstraintLayout>Databindingが不要になったので外してあります。
2. MonthlyPageFragmentクラスの作成
その前に、
activityパッケージ下にmainを作って、以下を移動させておきます。
- MainActivity
- MainViewModel
ファイルが増えてくるのでパッケージ直下に増えていくのが嫌だったので
activityにまとめました。
ただ、好みやチームの方針があると思うので、その辺は臨機応変に。さて、
MonthlyPageFragmentをmainパッケージ下に [New]-[Kotlin-File/Class] で作成したら、次のものを移植してきます。
DIALOG_TAG_DELETE_CONFIRM,DIALOG_BUNDLE_KEY_DATA変数(companion object)viewModel,adapter変数onItemClick関数onLongItemClick関数onConfirmResult関数LogRecyclerAdapterクラスまた、以下の変更が必要です。
MainViewModelのインジェクトは、by sharedViewModelで
MainActivityと共有のViewModelインスタンスにしたいためonCreateはonCreateViewに移植DataBindingUtilによるレイアウトの初期化は、DataBindingUtil.inflate()を使うstartActivityForResultを自前で呼ばず、activity?.startActivityForResultとしてActivityから起動させる
onActivityResultの処理をMainAcitivity側に残しておくためFragmentからもstartActivity/startActivityForResult可能だが、そうするとFragment側のonActivityResultをオーバーライドして処理する必要が出るConfirmDialog.BuilderにsetTarget(this)をする
- コールバックリスナーをFragmentで受け取るために必要
ほとんど
MainActivityにあった処理を持ってくるだけなので、難しいところは無いと思います。
上記の点に注意して、作ってみて下さい。
全体コードのサンプルはこちら
MonthlyPageFragment.ktclass MonthlyPageFragment : Fragment(), LogRecyclerAdapter.OnItemClickListener , ConfirmDialog.ConfirmEventListener { companion object { const val DIALOG_TAG_DELETE_CONFIRM = "delete_confirm" const val DIALOG_BUNDLE_KEY_DATA = "data" } val viewModel by sharedViewModel<MainViewModel>() lateinit var adapter: LogRecyclerAdapter override fun onCreateView( inflater: LayoutInflater, container: ViewGroup?, savedInstanceState: Bundle? ): View? { val binding: FragmentMonthlyPageBinding = DataBindingUtil.inflate( layoutInflater, R.layout.fragment_monthly_page, container, false ) binding.lifecycleOwner = this binding.viewmodel = viewModel // RecyclerViewの初期化 binding.logList.layoutManager = LinearLayoutManager(context) adapter = LogRecyclerAdapter(this) binding.logList.adapter = adapter // 区切り線を追加 val decor = DividerItemDecoration(context, DividerItemDecoration.VERTICAL) binding.logList.addItemDecoration(decor) return binding.root } override fun onItemClick(data: StepCountLog) { val intent = Intent(context, LogItemActivity::class.java) intent.putExtra(LogItemActivity.EXTRA_KEY_DATA, data) activity?.startActivityForResult( intent, MainActivity.REQUEST_CODE_LOGITEM ) } override fun onLongItemClick(data: StepCountLog) { // ダイアログを表示 val dialog = ConfirmDialog.Builder() .message(R.string.message_delete_confirm) .data(Bundle().apply { putSerializable(MainActivity.DIALOG_BUNDLE_KEY_DATA, data) }) .target(this) .create() dialog.show( requireFragmentManager(), MainActivity.DIALOG_TAG_DELETE_CONFIRM ) } override fun onConfirmResult(which: Int, bundle: Bundle?, requestCode: Int) { when (which) { DialogInterface.BUTTON_POSITIVE -> { // 削除を実行 val stepCountLog = bundle?.getSerializable(MainActivity.DIALOG_BUNDLE_KEY_DATA) as StepCountLog? viewModel.deleteStepCount(stepCountLog!!) } } } } class LogRecyclerAdapter(private val listener: OnItemClickListener) : RecyclerView.Adapter<LogRecyclerAdapter.LogViewHolder>() { interface OnItemClickListener { fun onItemClick(data: StepCountLog) fun onLongItemClick(data: StepCountLog) } private var list: List<StepCountLog> = emptyList() override fun onCreateViewHolder(parent: ViewGroup, viewType: Int): LogViewHolder { val binding: ItemStepLogBinding = DataBindingUtil.inflate( LayoutInflater.from(parent.context), R.layout.item_step_log, parent, false ) return LogViewHolder( binding ) } fun setList(newList: List<StepCountLog>) { list = newList notifyDataSetChanged() } override fun getItemCount() = list.size override fun onBindViewHolder(holder: LogViewHolder, position: Int) { if (position >= list.size) return val data = list[position] holder.binding.stepLog = data holder.binding.logItemLayout.setOnClickListener { listener.onItemClick(data) } holder.binding.logItemLayout.setOnLongClickListener { listener.onLongItemClick(data) return@setOnLongClickListener true } } class LogViewHolder(val binding: ItemStepLogBinding) : RecyclerView.ViewHolder(binding.root) }3. MainActivityの変更
MainActivityがMonthlyPageFragmentを使うようにします。
MonthlyPageFragmentに移したメソッドを削除して、Databinding用のコードも削除します。
onCreateは次のようになります。それと、使わなくなった定数も削除して良いかと思います。MainActivity.ktclass MainActivity : AppCompatActivity() { companion object { const val REQUEST_CODE_LOGITEM = 100 const val REQUEST_CODE_SHARE_TWITTER = 101 const val RESULT_CODE_DELETE = 10 } val viewModel by viewModel<MainViewModel>() override fun onCreate(savedInstanceState: Bundle?) { super.onCreate(savedInstanceState) setContentView(R.layout.activity_main) supportFragmentManager.beginTransaction().replace( R.id.main_container, MonthlyPageFragment() ).commit() } }
onCreateがスッキリしましたね。
オプションメニュー関係と、onActivityResult関係の処理だけが残っているはずです。実行してみて下さい。
追加や、データの編集、削除など、問題なく行えるでしょうか?
自分で動かしてみる手動テストより、せっかくテストを作ってきたのですから、テストを実行して確認しましょう。4. 年月表示の受け渡し
MainViewModelに表示する年月情報を渡して、表示に反映させましょう。まず、
MainViewModelに対応するLiveDataと、それを外からセットする関数を用意します。MainViewModel.kt// 表示する年月 private val _dataYearMonth = MutableLiveData<String>() val dataYearMonth :LiveData<String> = _dataYearMonth fun setYearMonth(yearMonth: String){ _dataYearMonth.postValue(yearMonth) }
setYearMonthは、今はUIスレッドからしか呼ばれませんが、のちのちワーカースレッドから呼ばれる可能性もあるので、postValueを使っておくようにしています。次はDatabindingの設定です。
fragment_monthly_page.xml<TextView android:id="@+id/textViewYM" ...(略) app:yearMonth="@{viewmodel.dataYearMonth}"
app:yearMonthは例によってBindingAdapters.ktに次のように用意しました。BindingAdapters.kt@BindingAdapter("yearMonth") fun setDataYearMonth(view: TextView, yearMonth: String?) { if(yearMonth==null) return val date = yearMonth.split('/') val str = view.context.getString(R.string.year_month_label, date[0], Integer.valueOf(date[1])) view.text = str }
MainViewModelにセットする年月は、データベースの検索に使うことも考慮して、yyyy/MMの形とする仕様にしました。そのままでも良いのですが、好みで日本語表記の「yyyy年 M月」に変換して表示するようにしています。
R.string.year_month_labelは次の通り。values.xml<string name="year_month_label">%1$s年 %2$d月</string>この二つでやっていることは、
"yyyy/MM"で渡ってきた文字列を/で"yyyy"と"MM"に分けて、"yyyy"はそのまま文字列としてリソース文字列の引数1に入れ、"MM"は一度Integerにしてリソース文字列の引数2に入れています。一度Integerにしているのは、"02"などの場合の0を削除したいからです。
Formatterを使っても良いのかも知れませんが、単純なのでこのようにしました。最後に、
MonthlyPageFragmentの初期化時に年月をセットしてやります。MonthlyPageFragment.ktoverride fun onCreateView(...){ ... viewModel.setYearMonth("2020/02") return binding.root }実行してみましょう。
年月をコード上で変えてみると、表示もちゃんと変わるはずです。(3) データを1ヶ月分取得して表示する
さて、今は全データ表示していますので、これを「指定月」のものだけ表示するようにしていきます。
1. LogDaoの修正
まずは指定の範囲でデータを抽出できるよう、
LogDaoに関数を追加する必要があります。アプローチはいくつかあるとは思いますが、ここでは、from年月とto年月を渡すことで、from以上to未満の日付であるデータを抽出するクエリーにしてみましょう。
例えば、
2020/01のデータは、from="2020/01/01"、to="2020/02/01"とすることで、1ヶ月分が抽出できますね。LogDao.kt@Query("SELECT * from log_table WHERE date>= :from AND date < :to ORDER BY date DESC") fun getRangeLog(from: String, to: String): LiveData<List<StepCountLog>>返す値は、リストに変更があれば反映されて欲しいので、
LiveDataにしておきます。2. LogRepositoryの修正
LogRepositoryは上記のgetRangeLogのラッパーを作るだけです。LogRepository.kt@WorkerThread fun searchRange(from: String, to: String): LiveData<List<StepCountLog>>{ return logDao.getRangeLog(from, to) }
suspend関数にしていないのは理由があるのですが、いったん置いておきます。
LogRepositoryのテストに追加しましょう。LogRepositoryTest.kt@Test fun searchRange(){ runBlocking { repository.insert(StepCountLog("2019/07/31", 12345)) repository.insert(StepCountLog("2019/08/01", 12345)) repository.insert(StepCountLog("2019/08/30", 12345)) repository.insert(StepCountLog("2019/08/31", 12345, LEVEL.GOOD, WEATHER.CLOUD)) repository.insert(StepCountLog("2019/09/01", 123, LEVEL.BAD, WEATHER.RAIN)) repository.insert(StepCountLog("2019/12/31", 1111, LEVEL.BAD, WEATHER.RAIN)) repository.insert(StepCountLog("2019/01/01", 1111)) // 古いデータ repository.insert(StepCountLog("2020/01/01", 11115)) repository.insert(StepCountLog("2020/02/29", 29)) repository.insert(StepCountLog("2020/02/28", 28)) repository.insert(StepCountLog("2020/03/01", 31)) } val data6 = repository.searchRange("2019/06/01", "2019/07/01") data6.observeForever { assertThat(it).isEmpty() } val data8 = repository.searchRange("2019/08/01", "2019/09/01") data8.observeForever { assertThat(it).isNotEmpty() assertThat(it!!.size).isEqualTo(3) assertThat(it[2]).isEqualToComparingFieldByField( StepCountLog("2019/08/01", 12345) ) assertThat(it[1]).isEqualToComparingFieldByField( StepCountLog("2019/08/30", 12345) ) assertThat(it[0]).isEqualToComparingFieldByField( StepCountLog("2019/08/31", 12345, LEVEL.GOOD, WEATHER.CLOUD) ) } // 月またぎ、年またぎ val data12 = repository.searchRange("2019/12/01", "2020/02/01") data12.observeForever { assertThat(it).isNotEmpty() assertThat(it!!.size).isEqualTo(2) assertThat(it[1]).isEqualToComparingFieldByField( StepCountLog("2019/12/31", 1111, LEVEL.BAD, WEATHER.RAIN) ) assertThat(it[0]).isEqualToComparingFieldByField( StepCountLog("2020/01/01", 11115) ) } // 閏月 val data2 = repository.searchRange("2020/02/01", "2020/03/01") data2.observeForever { assertThat(it).isNotEmpty() assertThat(it!!.size).isEqualTo(2) assertThat(it[1]).isEqualToComparingFieldByField( StepCountLog("2020/02/28", 28) ) assertThat(it[0]).isEqualToComparingFieldByField( StepCountLog("2020/02/29", 29) ) } }月初と月末の日付をデータに入れて、閾値(しきいち)テストをちゃんとします。
関数の仕様としては何ヶ月分でもOKなので、2ヶ月分、年またぎで取れるかのテストもしています。
なんだったら今年はちょうど閏年だし、閏月のテストもしておきます。テストを実行し、通過するのを確認しましょう。
続いて、変数
allLogsの定義は不要になったので削除します。ただ、テストでは全件検索がまだ欲しいので、関数化します。LogRepository.kt// メンバー変数は削除 // val allLogs: LiveData<List<StepCountLog>> = logDao.getAllLogs() @WorkerThread fun allLogs():List<StepCountLog>{ return logDao.getAllLogs() }今のところテストで使うだけなので、
LiveDataを返すのもやめました。
これに伴い、allLogsを使っていた箇所を修正します。
allLogsはメンバー変数では無く、関数としたので、それに合わせて書き変えます。LogRepositoryTest.ktval items = repository.allLogs()また、戻り値は
LiveDataでもなくなったので、observeする必要も無くなっています。
これらを踏まえて、書き直しましょう。
単純な変更なので、答え(?)は、ブランチにアップしてあるソースコードで確認して下さい。これで
LogRepositoryTestが通過するようになれば準備は終わりです。3. MainViewModelに機能を追加
まず、
MainViewModelもallLogsを参照しているので書き変えないとビルドが通りませんね。
stepCountListの定義を次のように変更したいところです。MainViewModel.ktval stepCountList = repository.searchRange(from, to)んー、でも、
fromとtoって、直ぐには決まらないですよね。外から貰わないと・・・
ただ、_dataYearMonthが決まれば、自動的に決まりますね?ということは、
_dataYearMonthがセットされるときに同時に呼んでやれば良いでしょうかね?MainViewModel.ktfun setYearMonth(yearMonth: String) { _dataYearMonth.postValue(yearMonth) stepCountList = repository.searchRange(from, to) }あれ、でも、
stepCountListはvalだから再代入できないと怒られてしまいます。
じゃあ、varにしなくちゃダメか?実は、あるLiveDataに変更があったときに、その値を元に別のLiveDataを更新するということが出来ます。
MediatorLiveDataと言われるものです。
詳細は公式サイトに譲るとして、ここでは更に便利な、Transformationsというのを使います。
これは、1個のSourceだけを参照するMediatorLiveDataと考えれば良いかと思います。(実際にTransformationsのソースコードを見るとまさしくそのような実装になっているのが分かります)
stepCountListの定義はこうなります。MainViewModel.kt// データリスト val stepCountList: LiveData<List<StepCountLog>> = Transformations.switchMap(_dataYearMonth) { val ymd = getFromToYMD(it) repository.searchRange(ymd.first, ymd.second) }
Transformations.switchMapは、LiveDataを返すときに使います。Transformations.mapという関数もあり、こちらは値を返す場合に使います。上のコードは、
_dataYearMonthに変更があったら、from日付とto日付を求めて、repository.searchRangeを呼び出し、その戻りのLiveDataをstepCountListが参照している、ということになります。先ほど、
searchRangeをsuspend関数にしなかった理由を後回しにしましたが、実は、ここでこのように使いたかったからです。suspend関数にしていると、Transformationsの中で呼べないんですね。厳密には、拡張ライブラリ(ktx)を使えば出来るようなんですが今回はバージョンの問題で使わないので。なお、愚直に
MediatorLiveDataでやるとすると、サンプルのようなコードになるかと思います。
サンプルコードはこちら
    val stepCountList: LiveData<List<StepCountLog>> by lazy {
        val liveData = MediatorLiveData<List<StepCountLog>>()
        liveData.addSource(_dataYearMonth){
            val ymd = getFromToYMD(it)
            repository.searchRange(ymd.first, ymd.second)
        }
        return@lazy liveData
    }
getFromToYMDは次のように定義しました。MainViewModel.ktfun getFromToYMD(yyyyMM: String): Pair<String, String> { val formatter = SimpleDateFormat("yyyy/MM", Locale.JAPAN) val from = Calendar.getInstance() from.time = formatter.parse(yyyyMM) from.set(Calendar.DATE, 1) from.clearTime() val to = from.clone() as Calendar to.add(Calendar.MONTH, 1) return Pair(from.getDateStringYMD(), to.getDateStringYMD()) }クエリー用のfromとto日付を取得する関数です。
yyyy/MMでフォーマットされている日付文字列を受け取ると、その月の1日と、その翌月1日の日付文字列を、yyyy/MM/ddのフォーマットで返す、というものです。
Pairというのが出てきました。以前ちらっと触れたのを覚えているでしょうか?
第6回の記事でした。これこそ、型を定義するまでもないので、使ってみました。要素が2個しかないので配列やリストにするまでもないし。
まずはこの
getFromToYMD関数のテストを作って確認しましょう。MainViewModelTest.kt@Test fun getFromToYMD(){ val pair = viewModel.getFromToYMD("2020/01") assertThat(pair.first).isEqualTo("2020/01/01") assertThat(pair.second).isEqualTo("2020/02/01") val pair2 = viewModel.getFromToYMD("2020/12") assertThat(pair2.first).isEqualTo("2020/12/01") assertThat(pair2.second).isEqualTo("2021/01/01") }こちらも閾値確認として、年またぎデータも確認しています。
なお、
MainViewModelTestのaddStepCountとdeleteStepCountのテストも、次の行の追加が必要です。MainViewModelTest.ktviewModel.stepCountList.observeForever(listObserver) viewModel.setYearMonth("2019/06") // <- 追加(どうでもいいけどこのテストを最初に書いたのがもう半年以上前だと知って愕然としています)
理由は分かりますか?
MainViewModel#stepCountListは、Transformations.switchMap()で値が代入されるので、_dataYearMonthがセットされるまでは値が入らないんです。だから単にaddStepCountをしただけではstepCountListが更新されず、LiveData#onChangedが飛んでこないため、listObserver.await()で必ずタイムアウトしてしまうんですね。うっかり私も嵌まっていましたが、原因が分かれば至極当然な理由でした(汗)
androidTestの方にある、ViewModelTestI.ktも同様に修正して、通るようになればOKなんですが、initテストだけは、下記のコードを修正する必要があります。ViewModelTestI.ktviewModel.stepCountList.observeForTesting { assertThat(viewModel.stepCountList.value) .isNull() // isEmpty()から変更 }理由は先ほどと同じで、初期化段階では
stepCountList.valueはnullだからですね・・・ちなみに、このチェック、Robolectric版の
ViewModelTestでは書いてなかったですが(以前はスレッド問題でコルーチンのテストが出来なかったから)、同じように書くことが出来るようになっているので、今後のメンテの負担も考えて、androidTest版の方はもう削除しても良いかも知れませんね。とりあえずアプリの動作確認をしてみましょう。
先月分、今月分と、任意の日付でデータを登録してみてください。
リストには「今月分」だけ表示されているでしょうか?過去のデータを見る手段が無くなってしまいましたが、ViewPagerに対応するまでの辛抱です(笑)
(4) 年月表示のUIテスト
忘れていたわけではありませんよ(汗)
まずは、単純に日付表示ラベルが正しいかのテストです。
MainActivityTestI.kt@Test fun showDateLabel(){ val mainActivity = activityRule.activity mainActivity.runOnUiThread { mainActivity.viewModel.setYearMonth("2020/02") } getInstrumentation().waitForIdleSync() onView(withId(R.id.textViewYM)).check(matches(isDisplayed())) .check(matches(withText("2020年 2月"))) } }特に難しいところは無いですね。
Robolectric版も同じように行けます。(5)その他のUIテストの修正
あとは、他のテストで
setYearMonthで日付をセットしておく必要があります。
単純な修正なのでコードは載せませんが、答え(?)はブランチにアップしてあるソースコードで確認して下さい。それと、せっかくなので指定月以外は表示されていないテストも追加しましょう。
MainActivityTestI.kt@Test fun showList() { // ViewModelのリストに直接追加 val mainActivity = activityRule.activity mainActivity.runOnUiThread { mainActivity.viewModel.addStepCount(StepCountLog("2019/06/13", 12345, LEVEL.GOOD)) mainActivity.viewModel.addStepCount(StepCountLog("2019/06/19", 666, LEVEL.BAD, WEATHER.RAIN)) mainActivity.viewModel.addStepCount(StepCountLog("2019/05/31", 333, LEVEL.NORMAL, WEATHER.HOT)) // 追加 mainActivity.viewModel.setYearMonth("2019/06") } getInstrumentation().waitForIdleSync() onView(withId(R.id.log_list)).check(matches(hasItemCount(2))) .... }
showListのテストで、2019/6以外のデータを追加して、リストには2件の2019/6データしか無いことを確認しています。
hasItemCountは、EspressoUtil.ktに次のように定義しました。EspressoUtil.ktobject RecyclerViewMatchers { fun hasItemCount(itemCount: Int): Matcher<View> { return object : BoundedMatcher<View, RecyclerView>( RecyclerView::class.java) { override fun describeTo(description: Description) { description.appendText("has $itemCount items") } override fun matchesSafely(view: RecyclerView): Boolean { return view.adapter!!.itemCount == itemCount } } } }これで、月単位の表示をするFragmentの準備が出来ました。
ViewPager
さて、このままでは、いわゆる過去ログが見られません。
過去に遡って見られるように、左(から右)にスワイプしたらどんどん月を遡っていけるようにしましょう。
これは、実は一般的なViewPagerの使い方とは逆の進行方向になります。
通常は左端がデフォルトで、右(から左)にスワイプして進めていくのが基本的な仕様なのですが、カレンダーという性質上、逆にするしかありませんね。(1) レイアウトの変更
1. 依存関係の追加
最初に、ViewPagerのライブラリを追加します。
ViewPager2というのがJetpackになって追加されたので、こちらを使ってみようと思います。
旧来のViewPagerをご存じで、何が変わったか知りたい人は公式ページなどを参考にして下さい。app/build.gradledependencies{ ... // ViewPager2 implementation 'androidx.viewpager2:viewpager2:1.0.0' }2. MainActivityのレイアウトの変更
FrameLayoutを削除し、代わりにViewPager2を入れます。activity_main.xml<?xml version="1.0" encoding="utf-8"?> <androidx.constraintlayout.widget.ConstraintLayout xmlns:android="http://schemas.android.com/apk/res/android" xmlns:app="http://schemas.android.com/apk/res-auto" xmlns:tools="http://schemas.android.com/tools" android:layout_width="match_parent" android:layout_height="match_parent" tools:context=".activity.main.MainActivity"> <androidx.viewpager2.widget.ViewPager2 android:id="@+id/viewPager" android:layout_width="match_parent" android:layout_height="match_parent" android:layout_marginStart="8dp" android:layout_marginTop="8dp" android:layout_marginEnd="8dp" android:layout_marginBottom="8dp" android:orientation="horizontal" app:layout_constraintBottom_toBottomOf="parent" app:layout_constraintEnd_toEndOf="parent" app:layout_constraintStart_toStartOf="parent" app:layout_constraintTop_toTopOf="parent" /> </androidx.constraintlayout.widget.ConstraintLayout>3. MainActivityの初期化の変更
onCreateでFragmentをセットしているコードはいったん削除します。MainActivity.kt// supportFragmentManager.beginTransaction().replace( // R.id.main_container, MonthlyPageFragment() // ).commit()(2) Adapterクラス
続いて、ViewPagerにAdapterをセットしていきます。
ViewPager2では、RecyclerAdapterを使うこともできるんですが、Fragmentを使いたいので、FragmentStateAdapterを使います。MainActivity.ktclass MonthlyPagerAdapter( fragmentActivity: FragmentActivity, private val items: List<String> ) : FragmentStateAdapter(fragmentActivity) { override fun getItemCount(): Int = items.size override fun createFragment(position: Int) = MonthlyPageFragment.newInstance(items[position]) }
MonthlyPagerAdapterはリストを受け取り、その数だけページを表示します。
基底クラスのFragmentStateAdapterはFragmentActivityを必要とするのでコンストラクタで渡します。ページ数はいったん固定にしておきます。
MainActivity.ktoverride fun onCreate(savedInstanceState: Bundle?) { super.onCreate(savedInstanceState) setContentView(R.layout.activity_main) val list = listOf("2019/10", "2019/11", "2019/12", "2020/01", "2020/02") viewPager.adapter = MonthlyPagerAdapter(this, list) viewPager.setCurrentItem(list.size - 1, false) }listは今は仮です。後でDBから取るようにします。取り敢えずViewPagerの動作確認をしましょう。
viewPager.setCurrentItem(list.size - 1, false)は、
- ViewPagerの
list.size - 1=最終ページをカレントに指定する- アニメーションをしない
という設定です。
ViewPagerは通常は左端がデフォルトで、(右から)左にスワイプして進めていくのが基本的な仕様だと書きましたが、アプリの特性上、「一番新しい月」が表示されて欲しいし、過去に遡る操作は(左から)右にスワイプしていくのが自然です。
なので、最初に表示するページを最終ページにする設定をしているのです。この時、アニメーションするのが見えてしまうと変なので、二つ目の引数にfalseを渡してアニメーションしないように指定しています。アニメーションしても良いようにカレントアイテムを変更するときは、Kotlinではプロパティアクセスで
viewPager.currentItem = list.size - 1とすることが出来ます。※
ViewPager2はRight-to-Left(RTL)レイアウトをサポートしたそうなので、レイアウトxmlにandroid:layoutDirection="rtl"とすれば、setCurrentItemで最後のページをカレントにする設定をしなくても良さそうに思ったのですが、試しに使ってみたところ、中のレイアウトまで全部RTLになってしまうようで、今回の用途には使えませんでした。(3) ViewModelの修正
これで起動して動作してみましょう。
スワイプしてページが切り替わるでしょうか?
2019/10から5ヶ月分のデータを登録してみましょう。・・・なんか動作が変ではないでしょうか?
同じ表示が何ヶ月も続いてしまったりしませんか?これは
MainViewModelが共有されてしまっているからですね。MonthlyPageFragment.ktval viewModel by sharedViewModel<MainViewModel>()ここを
val viewModel by viewModel<MainViewModel>()とすれば、FragmentごとにViewModelのインスタンスが作成されるはずなので、共有されなくなるはず。しかし、それだと、
MainViewModelに、MainActivityで使うものと、MonthlyPageFragmentで使うものとがマージされたような状態になってしまっています。これを改善するため、
MonthlyPageViewModelを作って、お互いに不要なものは削除してしまいましょう。1. MainViewModelの変更
MainViewModel.ktclass MainViewModel( app: Application, val repository: LogRepository ) : AndroidViewModel(app) { fun addStepCount(stepLog: StepCountLog) = viewModelScope.launch(Dispatchers.IO) { repository.insert(stepLog) } fun deleteStepCount(stepLog: StepCountLog) = viewModelScope.launch(Dispatchers.IO) { repository.delete(stepLog) } }
MainViewModelは、ログの追加と削除関数だけになりました。2. MonthlyPageViewModelの追加
一方、
MonthlyPageViewModelは、こうなりますMonthlyPageViewModel.ktclass MonthlyPageViewModel( app: Application, val repository: LogRepository ) : AndroidViewModel(app) { // 表示する年月 private val _dataYearMonth = MutableLiveData<String>() val dataYearMonth: LiveData<String> = _dataYearMonth // データリスト val stepCountList: LiveData<List<StepCountLog>> = Transformations.switchMap(_dataYearMonth) { val ymd = getFromToYMD(it) repository.searchRange(ymd.first, ymd.second) } fun setYearMonth(yearMonth: String) { _dataYearMonth.postValue(yearMonth) } fun deleteStepCount(stepLog: StepCountLog) = viewModelScope.launch(Dispatchers.IO) { repository.delete(stepLog) } /** * クエリー用のfromとto日付を取得する * @param yyyyMM `yyyy/MM`の形の日付 * @return <yyyy/MM/01, yyyy/(MM+1)/01>のPair */ fun getFromToYMD(yyyyMM: String): Pair<String, String> { val formatter = SimpleDateFormat("yyyy/MM", Locale.JAPAN) val from = Calendar.getInstance() from.time = formatter.parse(yyyyMM) from.set(Calendar.DATE, 1) from.clearTime() val to = from.clone() as Calendar to.add(Calendar.MONTH, 1) val formatter2 = SimpleDateFormat("yyyy/MM/dd", Locale.JAPAN) val fromStr = formatter2.format(from.time) val toStr = formatter2.format(to.time) return Pair(fromStr, toStr) } }ほとんどが
MainViewModelからの移動です。削除関数だけは、こちらも持つことになります。3. Koinモジュールの修正
さて、ViewModelを追加したので、Koinのモジュール群も修正する必要があります。
modules.ktval viewModelModule = module { viewModel { MainViewModel(androidApplication(), get()) } viewModel { MonthlyPageViewModel(androidApplication(), get()) } ... }4. MonthlyPageFragmentの修正
MonthlyPageFragmentでViewModelをインジェクトするコードも変更します。MonthlyPageFragment.ktval viewModel by viewModel<MonthlyPageViewModel>()4. レイアウトファイルの修正
忘れてはならないのが、Databindingをしているレイアウトファイルの修正です。バインドするデータの型を、
MainViewModelからMonthlyPageViewModelに変更するのを忘れてはなりません。fragment_monthly_page.xml<data> <variable name="viewmodel" type="jp.les.kasa.sample.mykotlinapp.activity.main.MonthlyPageViewModel" /> </data>これで実行してみて下さい。
ちゃんと月ごとにページの表示が変わるはずです!追加や削除も試してみましょう。
なお、「
MainActivityとMonthlyPageFragmentの両方で削除が出来るのが気持ち悪い」「LogItemActivityの起動はMonthlyPageFragmentから行い、起動後の戻り処理もMonthlyPageFragmentでやるべき」など、いろいろ設計思想はあると思います。その場合、
MonthlyPageFragmentでactivity?.startActivityForResult()とActivityを経由して起動しているのをやめて、Fragment自身のstartActivityForResult()を呼び出すようにして、MainActivity内にあるonActivityResultをごっそりMonthlyPageFragmentに移動すれば良いかと思います。そうすると、MainActivityはかなりスッキリしますね。(4) ページ数を取得する
さて、最後のステップです。
今はページリストを固定で渡してしまっているので、ちゃんとデータから引っ張ってくるようにしましょう。ところで、
ViewPagerのページは何ページ用意すれば良いでしょうか?
無限に遡れる、無限に未来が見られる、としても良いのですが、ここでは、面倒なので有限ページ数とするため、以下の仕様としようと思います。
- 最も古いデータの年月まで遡れる
- 来月以降は表示出来ない(未来のデータは登録できないからそもそも不要)
この辺りは、「ログも取るけど、予定も書き込めるようにしたいんだ!」などという要望、仕様によって決めていく必要があるでしょう。
今回は「ログアプリ」という点に特化し、未来のデータは登録が出来ない仕様なのだからそもそもページを作らないこととします。ということで、「最も古いデータ」から「当月」までページを作れば良さそうです。
どうアプローチするのが良いのか悩ましいですが、以下のような手順でどうでしょう。
- 一番古い日付のデータを取得する
- 現在日付を取得する
- その間の年月を展開してリストにする
1. 一番古い日付のデータを取得する
ここはDao, Repositoryクラスの範疇ですね。
LogDatabase.kt@Dao interface LogDao { .... @Query("SELECT date from log_table ORDER BY date limit 1") fun getOldestDate(): LiveData<String> }こんなクエリーでどうでしょうか。
取得するのは
dateカラムのみ。その際、dateカラムを昇順でソートした上で(ORDER BYにDESCを指定すると降順、昇順はASCですが、デフォルトでASCなので省略しています)、limit=1すなわち1件だけ取得することで、一番古い日付を取得しています。返すのは
LiveDataです。古いデータが登録されたら、ページを追加してやらないといけないので。
LogRepositoryは上記をラップした関数を追加します。LogRepository.kt@WorkerThread fun getOldestDate(): LiveData<String>{ return logDao.getOldestDate() }こういうときは単体テストでサクッと確認しましょう。
LogRepositoryTest.kt@Test fun getOldestDate(){ runBlocking { repository.insert(StepCountLog("2019/08/30", 12345)) repository.insert(StepCountLog("2019/09/01", 12345)) repository.insert(StepCountLog("2019/09/22", 12345)) repository.insert(StepCountLog("2019/10/10", 12345)) repository.insert(StepCountLog("2019/10/13", 12345)) repository.insert(StepCountLog("2019/01/13", 12345)) repository.insert(StepCountLog("2020/02/03", 12345)) repository.insert(StepCountLog("2019/02/03", 12345)) repository.insert(StepCountLog("2020/02/04", 12345)) } val date = repository.getOldestDate() date.observeForever{ assertThat(it).isNotEmpty() assertThat(it).isEqualTo("2019/01/13") } }わざとデータの登録順をめちゃくちゃにしたうえで、一番古い日付が取れているかのテストになっています。
2. テストサイズの指定
さて、先ほど作ったテストを実行しようとすると・・・
MainViewModelの仕様が変わったので、MainViewModelTestやMainAcvitiyTestのコンパイルエラーのためビルドが通りません。
一時的にコメントアウトするなどしておくのが良いでしょう。これらのテストについては、後段でやります。3. ページリストを作成する
ページリストとは、このアプリの場合、表示する年月の範囲を展開した
yyyy/MMの文字列のリストです。
これはMainViewModelで持ちます。まずは、Databaseから取ってこられる
一番古い日付を監視します。MainViewModel.kt// 一番古いデータの年月 private val oldestDate = repository.getOldestDate()で、この日付と、「当月」(アプリを実行している今日の日付)の間の年月をリスト化しようと思います。
先ほども使った、Transforamtions.swicthMapの出番ですね!MainViewModel.kt// ページ val pages = Transformations.switchMap(oldestDate) { val liveData = MutableLiveData<List<String>>() val today = Calendar.getInstance().clearTime() liveData.value = makePageList(it, today) return@switchMap liveData } fun makePageList(from: String?, to: Calendar): List<String> { val formatter = SimpleDateFormat("yyy/MM/dd", Locale.JAPAN) to.set(Calendar.DATE, 1) to.clearTime() if (from == null) { return listOf(to.getDateStringYM()) } val date = Calendar.getInstance() date.time = formatter.parse(from) date.clearTime() date.set(Calendar.DATE, 1) val list = mutableListOf<String>() // 今の年月を超えるまで月を足し続ける while (!date.after(to)) { list.add(date.getDateStringYM()) date.add(Calendar.MONTH, 1) } return list }
makePageListは、こんなステップです。
toのカレンダーの時間をクリアして、さらに日を1日セットfromからCalendarインスタンスを作って、時間をクリア、日を1日にセット- 今日を超えるまで、月を1ヶ月ずつ足しながら、
yyyy/MMのフォーマットで日付を取得してリストに追加
getDateStringYMは例によって拡張関数です。Util.ktfun Calendar.getDateStringYM(): String { val fmt = SimpleDateFormat("yyyy/MM", Locale.JAPAN) return fmt.format(time) }UtilTest.kt@Test fun calendar_getDateStringYM() { val cal = Calendar.getInstance() cal.set(2020, 9 - 1, 11) // 月だけはindex扱いなので、実際の月-1のセットとしなければならない assertThat(cal.getDateStringYM()).isEqualTo("2020/09") }これで、一番古い日付から、当月までの年月文字列のリストが出来ました。
これを、ViewPager2のAdapterにセットしてやれば良いですね。
当然、セットするタイミングは、pagesを監視しておいて、変更があったときです。MainActivity.ktoverride fun onCreate(savedInstanceState: Bundle?) { super.onCreate(savedInstanceState) setContentView(R.layout.activity_main) viewModel.pages.observe(this, Observer { list -> list?.let { viewPager.adapter = MonthlyPagerAdapter(this, it) viewPager.setCurrentItem(it.size - 1, false) } }) }これで、一番古いデータがある月から、今月までのページが見られるようになりました!
なお、
activity_main.xmlをDatabinding化して出来ないかも試したのですが、Fragmentの再作成がおかしなことになったので、使わない方を採用しています。※恐らく、Adapter内でのFragmentのキャッシュ利用が影響していると思います。ViewPagerは、
offscreenPageLimitでキャッシュするページを変更できますが、どうしても0にはセットできないのです。ViewPager2になってもこの仕様は変わらないようです。※
DiffUtilを上手く使えばDatabinding版でも上手くいくのかも知れません。テスト
最後に、テストを修正します。
ViewModel周りが大きく変わりましたね。
Activityもテストが大きく変わります。(1) リファクタリング
まず、
MainActivityとMainViewModelをパッケージ移動したので、テストの方も移動しましょう。
Robolectric版のtest下と、InstrumentationTest版のandroidTest下を両方やるのをお忘れなく。なお、私は今回から、ViewModelのテストは
Robolectricオンリーで実装していくことにします。
なので、androidTest下にあったMainViewModelTestI.ktは削除です。(2) MainViewModelのテスト
このクラスのテストは、
init、add/deleteStepCoountとmakePageListの関数のテストだけになるかと思います。
詳細は割愛します。
参考ソースはブランチにアップしてあるソースコードでご確認ください。(3) MonthlyPageViewModelのテスト
MonthlyPageViewModelTestクラスを作成します。
このクラスのテストは、以前MainViewModelTestにあったものをそのまま持ってこられますね。
そして、setYearMonth関数のテストを追加するだけかと思います。MonthlyPageViewModel.kt@Test fun setYearMonth() { val dateObserver = TestObserver<String>() viewModel.dataYearMonth.observeForever(dateObserver) viewModel.setYearMonth("2019/06") dateObserver.await() assertThat(viewModel.dataYearMonth.value).isEqualTo("2019/06") }LiveDataにpostされた値が一致するかの単純なテストです。
他はほとんどコピペというか移動するだけなので、参考ソースはブランチにアップしてあるソースコードでご確認ください。(4) MainAcvitiyのテスト
ここからがめちゃくちゃ時間かかった部分です。結論を出すまでに延べ24時間くらい試行錯誤しました(泣)
1. Robolectric版(断念)
とりあえず
addRecordMenuとaddRecordMenuIcon以外はコメントアウトした状態でいったん流そうとしたら、エラーが(泣)java.lang.Exception: Main looper has queued unexecuted runnables. This might be the cause of the test failure. You might need a shadowOf(getMainLooper()).idle() call. at org.robolectric.android.internal.AndroidTestEnvironment.checkStateAfterTestFailure(AndroidTestEnvironment.java:470) at org.robolectric.RobolectricTestRunner$HelperTestRunner$1.evaluate(RobolectricTestRunner.java:548) at org.robolectric.internal.SandboxTestRunner$2.lambda$evaluate$0(SandboxTestRunner.java:252) at org.robolectric.internal.bytecode.Sandbox.lambda$runOnMainThread$0(Sandbox.java:89) at java.util.concurrent.FutureTask.run(FutureTask.java:266) at java.util.concurrent.ThreadPoolExecutor.runWorker(ThreadPoolExecutor.java:1149) at java.util.concurrent.ThreadPoolExecutor$Worker.run(ThreadPoolExecutor.java:624) at java.lang.Thread.run(Thread.java:748) Caused by: java.lang.IllegalStateException: Layout state should be one of 100 but it is 10 at androidx.recyclerview.widget.RecyclerView$State.assertLayoutStep(RecyclerView.java:12371) ....(略).... at org.robolectric.android.fakes.RoboMonitoringInstrumentation.startActivitySync(RoboMonitoringInstrumentation.java:42) at androidx.test.rule.ActivityTestRule.launchActivity(ActivityTestRule.java:358) at jp.les.kasa.sample.mykotlinapp.activity.main.MainActivityTest.setUp(MainActivityTest.kt:63) at org.junit.runners.model.FrameworkMethod$1.runReflectiveCall(FrameworkMethod.java:50) at org.junit.internal.runners.model.ReflectiveCallable.run(ReflectiveCallable.java:12) at org.junit.runners.model.FrameworkMethod.invokeExplosively(FrameworkMethod.java:47) at org.junit.internal.runners.statements.RunBefores.evaluate(RunBefores.java:24) at org.junit.internal.runners.statements.RunAfters.evaluate(RunAfters.java:27) at androidx.test.rule.ActivityTestRule$ActivityStatement.evaluate(ActivityTestRule.java:531) at org.junit.rules.TestWatcher$1.evaluate(TestWatcher.java:55) at org.junit.rules.RunRules.evaluate(RunRules.java:20) at org.robolectric.RobolectricTestRunner$HelperTestRunner$1.evaluate(RobolectricTestRunner.java:546)
ViewPager2を入れる前までは動いていたはずなので、どうやら相性が悪いのか・・・
でもViewPager2の中身はRecyclerViewで、RecyclerViewはログデータのリスト表示でもうずっと使ってきていたし・・・
Fragmentに移ったからおかしくなったのでしょうか?
いやいや、その他のUIテストの修正ではFragment化したRecyclerViewでテスト通ってました。ひとまず
IllegalStateException: Layout state should be one of 100 but it is 10でググると、
@LooperMode(LooperMode.Mode.PAUSED)を使う とか、ShadowLooper.pauseMainLooper()を使う とか、といったアドバイスが見られますが、そうするとLiveDataの監視をしている実際の
Activityのコードの中でスレッドが間違っていると怒られてしまいます。他のActivityのテストは変わらず通るので、
ViewPager2+Fragment化で何か起こってしまったようです。
もしかしたら、旧来版のViewPagerだと大丈夫だったりするかも知れませんが、テストのためにアプリ側の本実装を変えるというのもおかしなものです。Instrumentation版は動くのだし。
ということで、今後、MainActivityのRobolectric版テストはいったん諦めることにします。ファイルも削除しておきますね・・・
無念・・・
もし、「この方法で出来たよ」という報告がありましたら、是非コメントで教えて下さい!
3. Instrumentation版テストの修正
androidTestフォルダ下にあるテストのことです。
こちらはこれまで通り、大丈夫なようなので、コンパイルが通らなくなっているテストを直していきます。ちょっと前に
setYearMonthするコードを追加していますすが、
- 関数自体は
MonthlyPageViewModelのものになっていること- アプリは起動すると今月を表示しようとする
というあたりで、作成するデータの日付に注意する必要が出てきています。
テストを起動すると、テストを実行している「年月」のデータを表示しようとしてしまうので、作成するデータが固定だと問題が出てくるわけです。でも、テストデータの日付を、テストを実行している当月にするようなコードは分かりづらくなりそうなのでやりたくないですね。
せっかくKoinでモジュールをモックする方法を学んだので、Calendarを提供するモジュールを作ってモック化するというのはどうでしょうか?
例えば、こんなクラスをモジュールに追加します。
modules.kt// カレンダークラスで現在日付を持つInstance取得を提供するプロバイダ interface CalendarProviderI{ val now: Calendar } class CalendarProvider : CalendarProviderI{ override val now: Calendar get() = Calendar.getInstance().clearTime() } val providerModule = module { factory { CalendarProvider() as CalendarProviderI } } // モジュール群 val appModules = listOf(viewModelModule, daoModule, repositoryModule, providerModule)interface
CalendarProviderIを定義して、実際にアプリで使うのはそれを派生したCalendarProviderとします。
Kotlinでは、このように変数をオーバーライドすることが出来るんですね。
get() = Calendar.getInstance().clearTime()は、変数nowのgetterを定義しているコードになります。テスト用にはこうします。
ひとまずこのクラスのテストデータは"2019/06"のものになっているので、常にこの月が返るようにします。
"日にち"は何日でもいいのですが、テストを実行する日にちが"31"だと、6月は31日が存在しないのでちょっとまずいかも知れません。
ということで、任意の日にちにしておきます。androidTest/.../MockModules.kt// カレンダークラスで現在日付を持つInstance取得を提供するプロバイダのテスト用 class TestCalendarProvider : CalendarProviderI { override val now: Calendar get() { val cal = Calendar.getInstance().clearTime() cal.set(Calendar.YEAR, 2019) cal.set(Calendar.MONTH, 6-1) // 月は0 based index cal.set(Calendar.DATE, 28) return cal } } // テスト用にモックするモジュール val testMockModule = module { ... single(override = true){ TestCalendarProvider() as CalendarProviderI } }
MainViewModelにこのCalendarProviderIがインジェクトされるようにします。
interfaceの方を型に指定するのを間違えないように。MainViewModel.ktclass MainViewModel( app: Application, val repository: LogRepository, val calendarProvider: CalendarProviderI ) : AndroidViewModel(app) {今日の日付を取っているところをこのprovider経由に変えます。
MainViewModel.ktliveData.value = makePageList(it, calendarProvider.now)
MainViewModelのコンストラクタ引数が増えたので、Koinモジュールの方も修正します。modules.ktviewModel { MainViewModel(androidApplication(), get(), get()) }これでどうでしょうか?
今後、テストを作るときには"2019/06"のデータを作らなきゃいけない、という制約には気をつけないとダメですが、テストデータがテストを実行する日付によって変わるよりは、ずっといいかと思います。
願わくば、モックモジュールの方に、使用する日付を指定できると良いのだけど、ちょっとやり方が分かりませんでした。
どこかにstatic変数用意しちゃうとかなら思いつくんだけど、それでいいのだろうか??と・・・さて、過去に作ったテストは、これでパスするようになったかと思います。
続いて、ViewPager周りのテストですが、
- ページ数が合っていること
- 最初に表示されているのが最終ページであること
の確認をしていきましょう。
なお、
ViewPagerを左右にスワイプするテストはEspressoにもアクションが用意されているけど、これ、ViewPager2でも使えるのかな???
中身がRecyclerViewに変わったからもしかしたら同じでいけるかも?ということで、先ほど作ったRecyclerViewのアイテム数をチェックするMatcherを改造して、ViewPager2用にしてみます。EspressoUtils.ktobject ViewPagerMatchers { fun hasItemCount(itemCount: Int): Matcher<View> { return object : BoundedMatcher<View, ViewPager2>( ViewPager2::class.java ) { override fun describeTo(description: Description) { description.appendText("has $itemCount items") } override fun matchesSafely(view: ViewPager2): Boolean { return view.adapter!!.itemCount == itemCount } } } fun isCurrent(index: Int): Matcher<View> { return object : BoundedMatcher<View, ViewPager2>( ViewPager2::class.java ) { override fun describeTo(description: Description) { description.appendText("is $index index is current") } override fun matchesSafely(view: ViewPager2): Boolean { return view.currentItem == index } } } }ついでにカレントページインデックスをチェックするMatcherも作っておきました。
テストはこう実装しました。
MainActivityTestI.kt@Test fun pages(){ // 最初にデータ投入 val mainActivity = activityRule.activity mainActivity.runOnUiThread { // @formatter:off mainActivity.viewModel.addStepCount(StepCountLog("2019/06/13", 12345, LEVEL.GOOD)) mainActivity.viewModel.addStepCount(StepCountLog("2018/12/19", 666, LEVEL.BAD, WEATHER.RAIN)) // @formatter:on } getInstrumentation().waitForIdleSync() // ページ数が正しいかのテスト(2018/12〜2019/06までの7ページあるはず onView(withId(R.id.viewPager)).check(matches(ViewPagerMatchers.hasItemCount(7))) // 今表示されているのが2019/06かどうかのテスト onView(withText("2019年 6月")).check(matches(isCompletelyDisplayed())) // currentPageのチェック onView(withId(R.id.viewPager)).check(matches(ViewPagerMatchers.isCurrent(6))) }実行してみます。おお、動きました。パスしました!
単純だけどスワイプもテストしておきましょうか。Espressoの
ViewActions.swipe系がViewPager2でも使えるかどうかの実験も兼ねて。MainActivityTestI.kt@Test fun swipe(){ // 最初にデータ投入 val mainActivity = activityRule.activity mainActivity.runOnUiThread { // @formatter:off mainActivity.viewModel.addStepCount(StepCountLog("2019/06/13", 12345, LEVEL.GOOD)) mainActivity.viewModel.addStepCount(StepCountLog("2018/12/19", 666, LEVEL.BAD, WEATHER.RAIN)) // @formatter:on } getInstrumentation().waitForIdleSync() // currentPageのチェック onView(withId(R.id.viewPager)).check(matches(ViewPagerMatchers.isCurrent(6))) // 左にスワイプしてカレントページインデックスのチェック onView(withId(R.id.viewPager)).perform(swipeLeft()) getInstrumentation().waitForIdleSync() onView(withId(R.id.viewPager)).check(matches(ViewPagerMatchers.isCurrent(5))) // 右にスワイプしてカレントページインデックスのチェック onView(withId(R.id.viewPager)).perform(swipeRight()) .check(matches(ViewPagerMatchers.isCurrent(6))) }うーん、スワイプしませんね・・・
仕方ないのでググってみます。まだ新しいせいか、そんなに情報が無いのですが・・・
こんなページが引っかかりました。https://github.com/android/views-widgets-samples/tree/master/ViewPager2
ViewPager2のサンプルの中に、テストも作っておられて、なんとカスタムマッチャーまで作成されています。
これは使えそうかな?と、その中のViewPagerActions.ktを読んでいくと、でも使っているのはやっぱりswipeLeft/Rightです。さらに追っていくと、どうやら、
ViewPagerIdleWatcher.ktのコメントをざっと流し読むと、EspressoでのViewPager2のアイドリングステータスの監視が合致しないようです。
それを解消するためのクラスと言うことなので、ライセンスはApache-2.0のようですから、こちらを遠慮無く利用させていただきましょう。
ソースコードをGithub上でコピーしてペタッと貼ってもよいですし(ライセンス表記を消さないこと)、ソースコードをzipでDLしてきて、以下のファイルを任意のandroidTest/下のフォルダに置けば良いですね。
- ViewPagerActions.kt
- ViewPagerIdleWatcher.kt
ただし、パッケージ名を自分のアプリのフォルダ構成に合わせるのには注意してくださいね。
スワイプしてインデックスをチェックする部分のコードはこうなります。
MainActivityTestI.kt// 左からスワイプしてカレントページインデックスのチェック onView(withId(R.id.viewPager)).perform(swipePrevious()) val idleWatcher = ViewPagerIdleWatcher(mainActivity.viewPager) idleWatcher.waitForIdle() onIdle() onView(withId(R.id.viewPager)).check(matches(ViewPagerMatchers.isCurrent(5)))パスしました!右からスワイプも同じように直して、このテストは完成です。
ところで、
pressBack()を使っているところで、importエラーみたいなのが出るかも知れません。
その場合は、androidx.test.espresso.Espressoの方にする必要があります。あるいは、
addRecordMenuテストで失敗するかも知れません。特にoptimize importをどこかで有効にしていると、import文が下記のようになってしまっている場合があります。
import androidx.test.espresso.action.ViewActions.pressBackこうなっているとちゃんと動かないので、
import androidx.test.espresso.Espresso.pressBackとし、
ViewActions.pressBackの方は削除しましょう。
あるいは、安全に、Espresso.pressBack()を使うよう、コードの方を修正するかですね。(5) MonthlyPageFratmentのテスト作成
さて、ここからがかなり試行錯誤でハマってしまった部分です。
このシリーズみたいに、ちょこちょこ作っては機能変えてというアジャイル的な作り方だと、テストを作り込んでおくと、テストの修正に時間が取られて、かえってプロジェクトスピードは落ちます。なのでそのプロジェクトの性質に合わせてテストをどのタイミングで作っていくかは考えた方が良いですね。
(・・・別にテストも一緒に作り始めて後悔しているわけじゃないんだからねっっ)1. FragmentTest導入(半分失敗)
せっかくだから
FragmentScenarioに移行したいので試したのですが、なんだか変でした。かいつまんで言うと、一応同じコードでテストは動いたのですが、InstrumentationTestの方で、ちゃんとUIが表示されない。
公式にはグラフィカル フラグメントをテストする場合、そのフラグメントはユーザーにも表示される
とあるので、表示されるものと思っているのですが、いざ実行して、画面が表示されているべきタイミングにブレークポイントを貼ってみると、こんな画面しか表示されていませんでした。
空のActivityにアタッチされるのは分かるけど、Fragmentのレイアウトは表示されないの?
謎です。
もしかしたら、
グラフィカル フラグメントと言っているのは、レイアウトを持っていて表示に使うFragmentのことで、非グラフィカルフラグメントとは、UIを持たないで便宜的に差し込んでいるFragmentのことを言っているのかなあ?という気がしてきました。
Androidのライブラリにも、いわゆるUIを持たないでステータス管理のようなことだけをするFragmentがあったはずで、そういう役割のFragmentを指して非グラフィカルフラグメントと言っているのかな?と。
だとすれば、そのフラグメントはユーザーにも表示される
の部分は、実は、
そのフラグメントはユーザーにも表示される(ただし人間の目に見えるとは言ってない)
ってことなのかー!?
こういうときは、英語の原文を読むのが大切です。
If you're testing a graphical fragment, it's also visible to users, so you can evaluate information about its UI elements using Espresso UI tests.
うーん、そんなにおかしな日本語訳ではないですね。
it's also visible to usersの係り方の問題かな?
「グラフィカルフラグメントは、(ユーザーに見える)UIを持っているんだから、Espresso UI testsが使えるよ」
と言っているだけで、「Fragment Scenarioで起動したFragmentがテスト実行中に本当に表示されるとは言ってない」ってことなんでしょうね。
私の読解力の問題だったのか・・・?!
InstrumentationTestでは、ちゃんと画面を自分でも確認した上で、テストの実装がOKだと判定したいので、ちょっとこれは個人的には使えません。
また、それ以外にも、FragmentTestにすると以下のような不具合もありました。
Activityを起動したIntentが取れないRecyclerViewに対して、perform(click())は動くのに、perform(longClick())でエラーを吐くなので、
- Robolectic版はFragmentTestで書けるものだけ
- InstrumentationTestは通常通りAcrivityRuleでやる(=
MainActivityTestIに残す)とすることにします。
(まあ、本来は、AcrivityRuleよりもAcrivityScenarioを使って行くべきなのでしょうが)まだまだ新しい
ViewPager2を使ってしまったことの弊害でしょうか。
新しいものを採用すると、こういうリスクもあると言うことですね。2. 依存関係の追加
dependenciesに下記のように追加します。app/build.gradle// FragmentTest testImplementation 'androidx.test:core:1.2.0' androidTestImplementation 'androidx.test:core:1.2.0' // Robolectric用,test向けではなくdebug向けに必要 debugImplementation "androidx.fragment:fragment-testing:1.2.1" debugImplementation 'androidx.test:core:1.2.0' // 無くてもアプリの実行は問題ないがテストがビルド出来ない debugImplementation "androidx.legacy:legacy-support-core-ui:1.0.0" debugImplementation "androidx.legacy:legacy-support-core-utils:1.0.0"
androidx.legacy:legacy-support-core-ui:1.0.0とandroidx.legacy:legacy-support-core-utils:1.0.0は以前からも書いていたのですが、implementation "androidx.legacy:legacy-support-core-ui:1.0.0" implementation "androidx.legacy:legacy-support-core-utils:1.0.0"と実アプリのビルドにも含まれるようにしていました。が、無くてもアプリの実行は問題なかったので、削除してみたら、コメントにあるとおり、InstrumentationTestがビルドできなくなってしまいました。これはアプリ側のapkに含まれていないとダメなんだろうなってことで、debugビルドだけ(testで実行される対象がdebugビルドだから)含まれるようにしました。
なんだか気持ち悪い構成ですが。
3. FragmentTestの実装
FragmentTestで書けたのは、次の二つだけでした。
- showDateLabel
- showList
よって、
MainActivityTestIからは上記二つのテストは除外しています。FragmentTestの基本形は、
- 必要なら
fragmentArgsを作ってlaunchFragmentInContainer<Fragmentクラス>(fragmentArgs)でFragmentを起動するというものになります。
MonthlyPageFragmentTestならこうなりますね。val fragmentArgs = Bundle().apply { putString(MonthlyPageFragment.KEY_DATE_YEAR_MONTH, "2020/02") } val scenario = launchFragmentInContainer<MonthlyPageFragment>( fragmentArgs )
launchFragmentInContainerはFragmentScenario<Fragmentクラス>を返します。このFragmentScenarioは、Fragmentクラスの実体を使いたいときにこんな風に出来ます。scenario.onFragment { fragment -> fragment.xxxx() }Fragmentの関数だったり(当然publicなものだけ)を直接触れるんで、まあ少しは便利でしょうか。
これを使って修正を加えれば、このクラスのRobolectric版テストは完成です。
activityTestRuleとかは不要なので削除します。
MonthlyPageFragmentTestクラスの全コードは、こちらからご確認下さい。
全テストコードサンプル
MonthlyPageFragmentTest.ktimport android.os.Bundle import androidx.arch.core.executor.testing.InstantTaskExecutorRule import androidx.fragment.app.testing.launchFragmentInContainer import androidx.recyclerview.widget.RecyclerView import androidx.test.espresso.Espresso.onView import androidx.test.espresso.assertion.ViewAssertions.matches import androidx.test.espresso.contrib.RecyclerViewActions import androidx.test.espresso.matcher.ViewMatchers.* import androidx.test.ext.junit.runners.AndroidJUnit4 import jp.les.kasa.sample.mykotlinapp.* import jp.les.kasa.sample.mykotlinapp.data.* import jp.les.kasa.sample.mykotlinapp.di.mockModule import kotlinx.coroutines.runBlocking import org.assertj.core.api.Assertions.assertThat import org.junit.After import org.junit.Before import org.junit.Rule import org.junit.Test import org.junit.rules.TestRule import org.junit.runner.RunWith import org.koin.core.context.loadKoinModules import org.koin.test.AutoCloseKoinTest import org.koin.test.get import org.koin.test.inject import org.robolectric.annotation.Config @RunWith(AndroidJUnit4::class) @Config( qualifiers = "xlarge-port", shadows = [ShadowAlertDialog::class, ShadowAlertController::class] ) class MonthlyPageFragmentTest : AutoCloseKoinTest() { @get:Rule val rule: TestRule = InstantTaskExecutorRule() private val repository: LogRepository by inject() @Before fun setUp() { loadKoinModules(mockModule) get<LogRoomDatabase>().clearAllTables() } @After fun tearDown() { get<LogRoomDatabase>().clearAllTables() } @Test fun showDateLabel() { val fragmentArgs = Bundle().apply { putString(MonthlyPageFragment.KEY_DATE_YEAR_MONTH, "2020/02") } launchFragmentInContainer<MonthlyPageFragment>(fragmentArgs) onView(withId(R.id.textViewYM)).check(matches(isDisplayed())) .check(matches(withText("2020年 2月"))) } @Test fun showList() { // repositoryに直接追加 runBlocking { // @formatter:off repository.insert(StepCountLog("2019/06/13", 12345, LEVEL.GOOD)) repository.insert(StepCountLog("2019/06/19", 666, LEVEL.BAD, WEATHER.RAIN)) repository.insert(StepCountLog("2019/05/30", 612, LEVEL.NORMAL, WEATHER.CLOUD)) // @formatter:on } val allLogs = repository.allLogs() assertThat(allLogs.size).isEqualTo(3) val fragmentArgs = Bundle().apply { putString(MonthlyPageFragment.KEY_DATE_YEAR_MONTH, "2019/06") } launchFragmentInContainer<MonthlyPageFragment>(fragmentArgs) // リストの表示確認 onView(withId(R.id.log_list)).check(matches(RecyclerViewMatchers.hasItemCount(2))) // リスト項目の確認 var index = 1 onView(withId(R.id.log_list)) // @formatter:off .perform(RecyclerViewActions.scrollToPosition<RecyclerView.ViewHolder>(index)) .check(matches(atPositionOnView(index, withText("12345"), R.id.stepTextView))) .check(matches(atPositionOnView(index, withText("2019/06/13"), R.id.dateTextView))) .check(matches(atPositionOnView(index, withDrawable(R.drawable.ic_sentiment_very_satisfied_pink_24dp), R.id.levelImageView))) .check(matches(atPositionOnView(index, withDrawable(R.drawable.ic_wb_sunny_yellow_24dp),R.id.weatherImageView))) // @formatter:on index = 0 onView(withId(R.id.log_list)) // @formatter:off .perform(RecyclerViewActions.scrollToPosition<RecyclerView.ViewHolder>(index)) .check(matches(atPositionOnView(index, withText("666"), R.id.stepTextView))) .check(matches(atPositionOnView(index, withText("2019/06/19"), R.id.dateTextView))) .check(matches(atPositionOnView(index, withDrawable(R.drawable.ic_sentiment_dissatisfied_black_24dp),R.id.levelImageView))) .check(matches(atPositionOnView(index, withDrawable(R.drawable.ic_iconmonstr_umbrella_1),R.id.weatherImageView))) // @formatter:on } }最後に、すべてのテストが通過するのを確認しておきましょう。
だいたいOKなんですが・・・
クラス全体、あるいはパッケージ全体を実行すると、私の環境では(最近AndroidStudioを3.5.3にアップデートしました。あと使っている実機はPixel3a OS10です)、特定のテスト(
MainActivityTestI#onActivityResult_AddやonActivityResult_Edit)が失敗しやすくなっています。タイミングの問題だと思いますが、全部パスすることもあるのと、個別に実行すれば必ず成功するので、今は目をつぶります。あと、デバッグ実行もなぜか一括実行が出来ずに、1件だけテストした後応答しなくなってしまいます。これもViewPager2のせいなんでしょうか?時間があったら、旧来のViewPagerに置き換えて実験してみます。まとめ
データベースから、範囲を絞ってデータを抽出出来るようにしました。
ViewPager2を使用して、月ごとの表示をページングすることが出来るようになりました。
LiveDataを監視して変更するMediatorLiveData、それを簡単に実装できるTransformations.switchMap()の使い方を学びました。
テストでは、(Robolectric版を挑戦した場合)FragmentScenarioの使い方も覚えました。ここまでの状態のプロジェクトをGithubにpushしてあります。
https://github.com/le-kamba/qiita_pedometer/tree/feature/qiita_08
予告
いよいよ、カレンダー風のグリッド表示に挑戦します。
参考ページなど
MediatorLiveDataとTransformationsでViewModelを効果的に使う
https://www.koheiando.com/tech/android/298How to count RecyclerView items with Espresso
https://stackoverflow.com/questions/36399787/how-to-count-recyclerview-items-with-espressoViewPager2を簡単に使ってみる
https://qiita.com/chohas/items/7efe9828c3308145b13eおまけ(ViewPager実験結果)
ということで、ViewPager2を旧来の
ViewPagerに置き換えて実験しましたが、テストが失敗しやすくなっているのは変わらずでした。また、Robolectric版で
RecyclerViewのアイテムへのlongClickがエラーになってしまうのも同じでした。
ViewPagerはRobolectricとは相性が悪そうですね・・・DialogFragmentが取れない点など、Activityのレイアウト直下にないFragmentとは、相性が悪いのかも知れません。一応以下のブランチにアップしてありますので、興味があれば覗いてみて下さい。
なお、旧来のVeiwPagerはandroidx.appcompat:appcompatモジュールに含まれているので、特に依存関係に追加する必要はありません。https://github.com/le-kamba/qiita_pedometer/tree/feature/qiita_08_sub/viewpager_1
それと、こちらはDatabinding + ViewModelが出来たので、それも入っています。
見て頂くと分かりますが、
ViewPager向けのFragmentStatePagerAdapterでは、notifyDataSetChangedされたときに、作成済みのFragmentをキャッシュから作らせない方法があり、それがgetItemPositionでPagerAdapter.POSITION_NONEを返すこと、です。
ViewPager2ではキャッシュ済のFragmentを使わないように指定する方法が見つからないので、しばらくはDatabinding + ViewModelは諦めないとだめそうです。
ViewPagerは、ページ数が変わること、順番が変わることをあまり想定していないようですね(そりゃそうだ)。
- 投稿日:2020-02-11T01:55:20+09:00
Unity 2019.3 でJDK、NDK、SDKが無いエラーが出る
Unity でAndroid開発、あるいはOculus開発しようとしたら、
UnityException: JDK not foundが出ましたか?
自分は同じミスを二度ほどして学びました。エラー内容
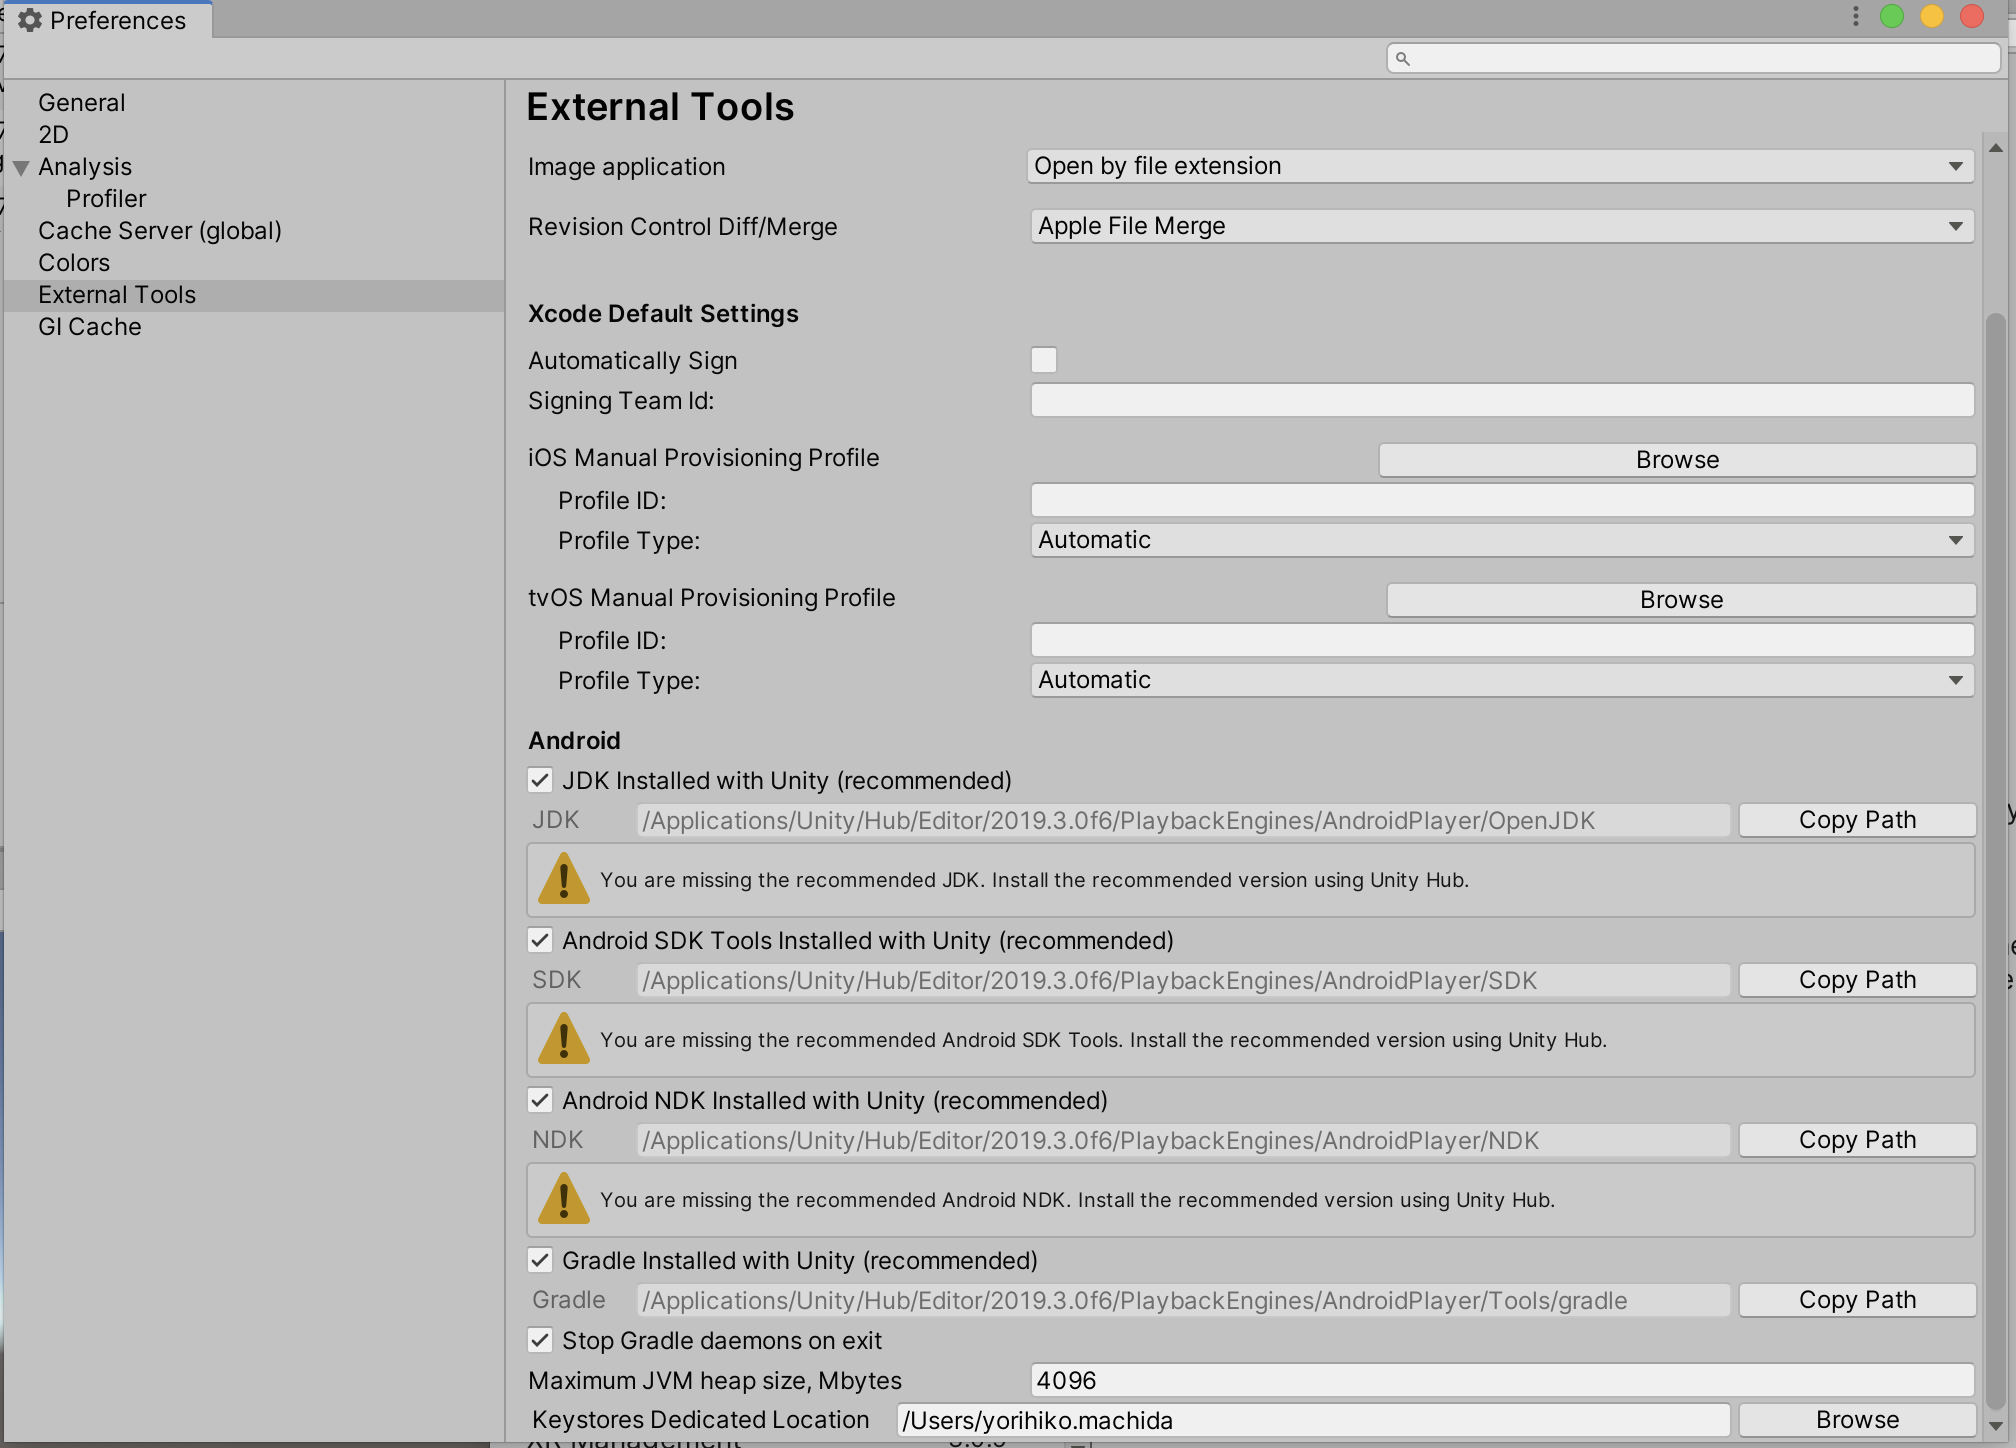
UnityException: JDK not found
Java Development Kit (JDK) directory is not set or invalid. Please, fix it in Preferences -> External Tools
UnityEngine.GUIUtility:ProcessEvent(Int32, IntPtr) (at /Users/builduser/buildslave/unity/build/Modules/IMGUI/GUIUtility.cs:187)
Preferences を見ると、JDK周りに警告が出ている。
対応方法
Unity の Andorid ビルドをインストールした時に、JDK周りのツールがオプションのため、インストールされていないことが原因なので、UnityHubから追加します。
- Unity Hub を起動して、該当のUnityのバージョンの・をクリックします。
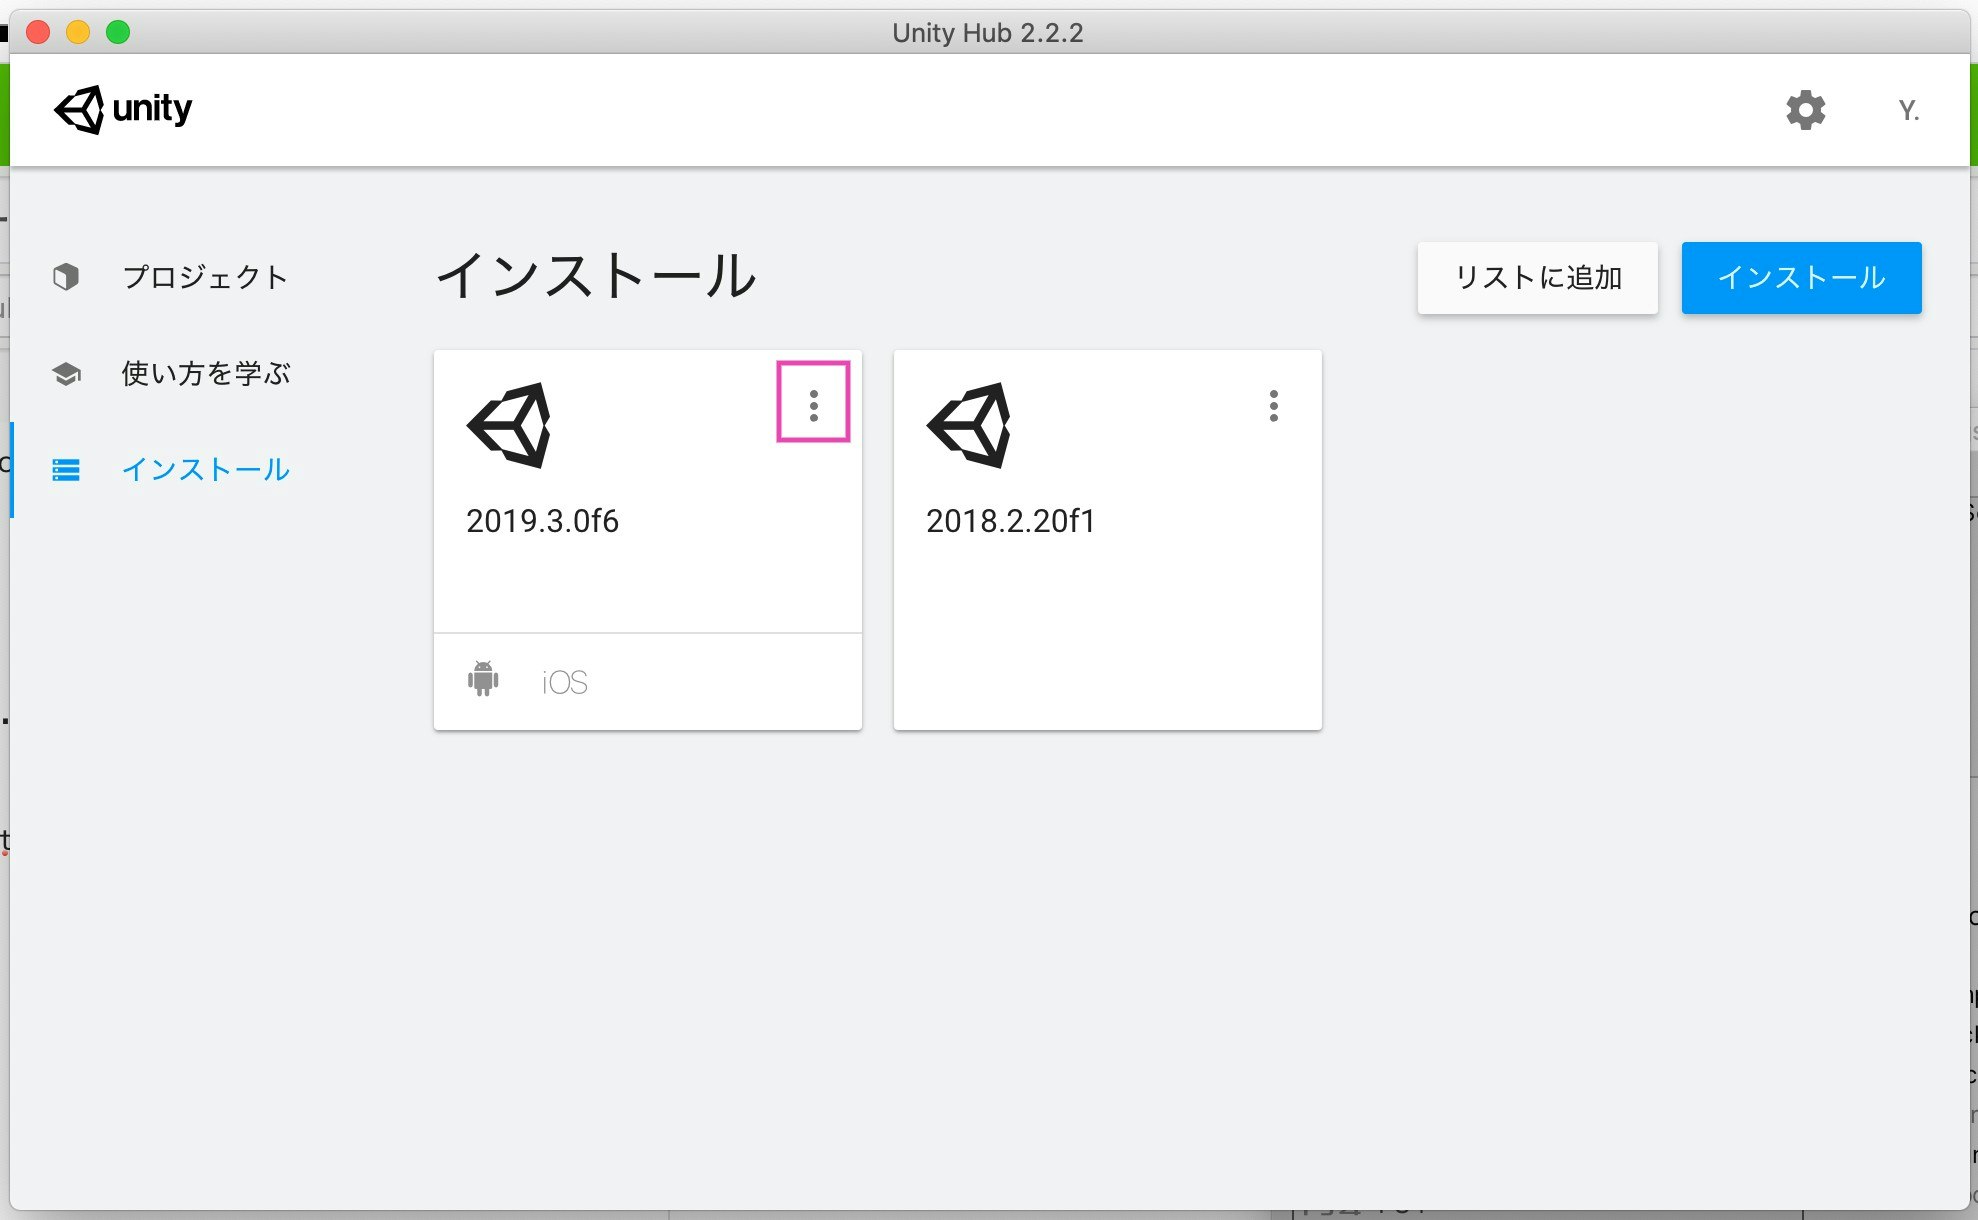
- モジュールを加えるを選択します。
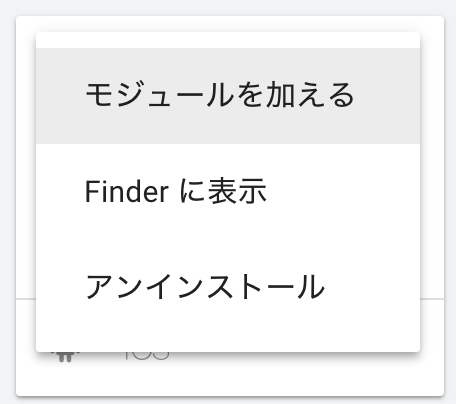
Android SDK & NDK ToolsとOpenJDKの両方にチェックを入れて、実行。
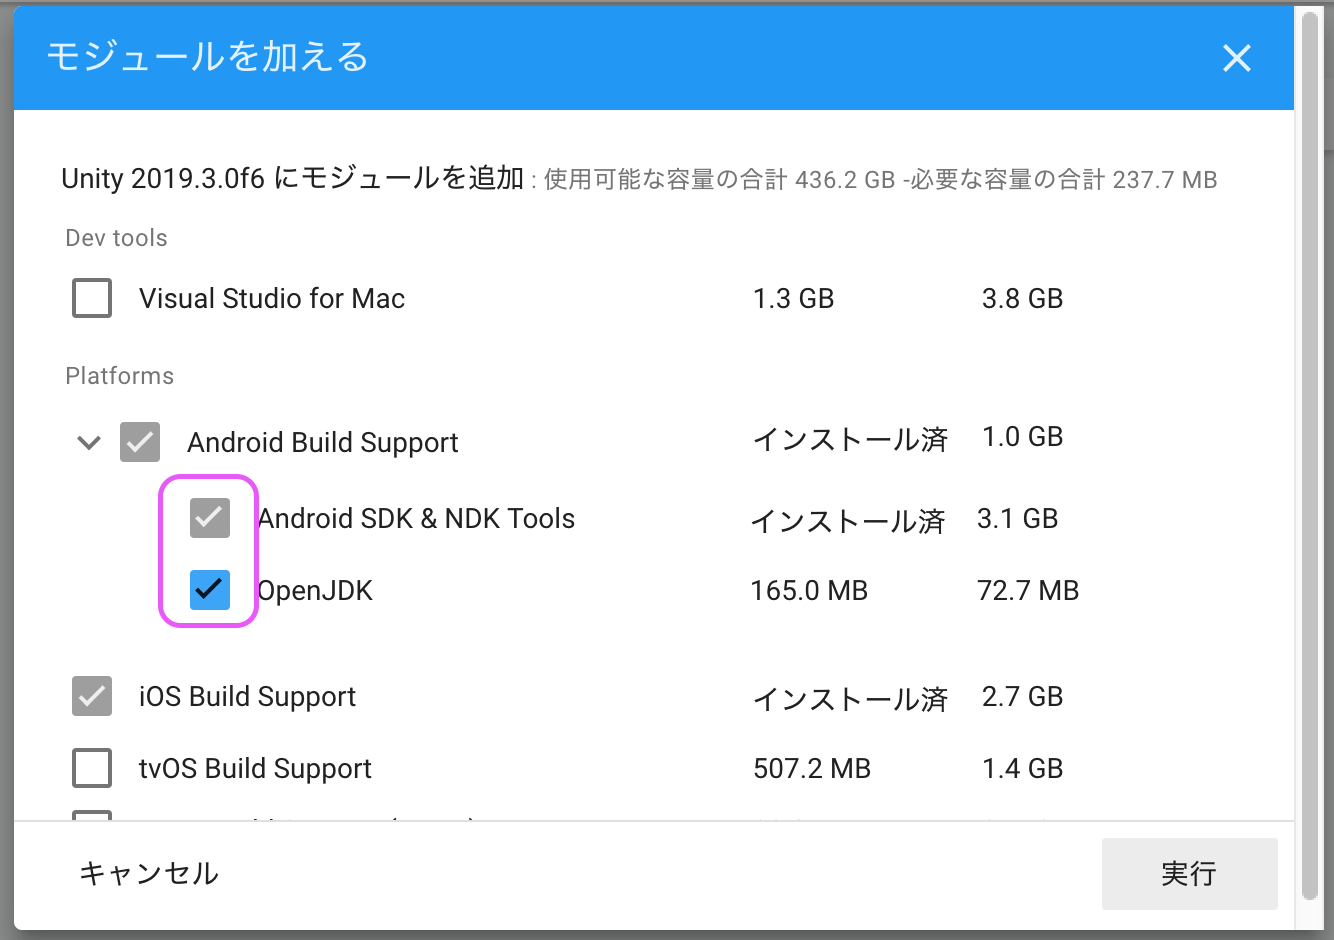
概ねこれで対応完了です。Preferences をみてまだ警告が出ているようであれば、手動で設定すれば解消できるはずです。
参考
- 投稿日:2020-02-11T01:55:20+09:00
Unity 2019.3 でJDK、NDK、SDKが無いエラーが出る場合の対応方法
Unity でAndroid開発、あるいはOculus開発しようとしたら、
UnityException: JDK not foundが出ましたか?
自分は同じミスを二度ほどして学びました。エラー内容
UnityException: JDK not found
Java Development Kit (JDK) directory is not set or invalid. Please, fix it in Preferences -> External Tools
UnityEngine.GUIUtility:ProcessEvent(Int32, IntPtr) (at /Users/builduser/buildslave/unity/build/Modules/IMGUI/GUIUtility.cs:187)
Preferences を見ると、JDK周りに警告が出ている。
対応方法
Unity の Andorid ビルドをインストールした時に、JDK周りのツールがオプションのため、インストールされていないことが原因なので、UnityHubから追加します。
- Unity Hub を起動して、該当のUnityのバージョンの・をクリックします。
- モジュールを加えるを選択します。
Android SDK & NDK ToolsとOpenJDKの両方にチェックを入れて、実行。
概ねこれで対応完了です。Preferences をみてまだ警告が出ているようであれば、手動で設定すれば解消できるはずです。
参考