- 投稿日:2020-01-21T22:00:42+09:00
Node.js用QualityForward SDKを使ってテストフェーズを作成する
QualityForwardはクラウドベースのテスト管理サービスです。APIを公開しており、テスト管理に関するデータのCRUD操作ができるようになっています。SDKとしてはNode.js、Python、そしてGoogle Apps Scriptを作成中です。
Node.js SDKについてはデータの取得系は一通り実装されています。今回はデータの追加、テストフェーズの作成について紹介します。
QualityForward用Node.js SDKを使う
Node.js SDKはgoofmint/qualityforward-nodeにて公開しています。npmで公開していますので、インストールは簡単です。
npm i qualityforward -S初期化
初期化はAPIキーを適用して行います。
client = new QualityForward('YOUR_API_KEY');テストフェーズの作成
まずテストフェーズオブジェクトを作成します。
const testPhase: TestPhase = client.TestPhase();値を設定する
次に値を設定します。プロジェクトID、名前、開始日、終了日は必須です。
testPhase.project_id = 748;
testPhase.name = 'test';
testPhase.start_on = new Date();
testPhase.end_on = new Date();
さらに例えばBTS連携としてRedmineを用いる場合には次のように登録します。
testPhase.bug_tracking_system = 'redmine';                   // redmineまたはjiraを指定
testPhase.redmine_base_url = 'https://example.com';          // ベースURL
testPhase.redmine_issues_url = 'https://example.com';        // バグ曲線、グラフデータ取得用URL
testPhase.redmine_latest_issues_url = 'https://example.com'; // 最近のインシデント取得用URL
テストスイートバージョンを登録する
テストフェーズと連携するテストスイートバージョンを指定します。これは複数登録可能です。
const tsv = client.TestSuiteVersion();
tsv.id = 13290;
testPhase.test_suite_versions.push(tsv);
保存する
最後に保存します。問題があればエラーが発生するので、try〜catchで捕捉できます。
await testPhase.save();
console.log(testPhase.id);
まとめ
既存のシステムからテストケースを移行する際にAPIを利用できます。入力が面倒な場合、APIを使えば一気に処理できますので、Node.jsを社内システムで使っている場合には試してみてください。
- 投稿日:2020-01-21T15:30:57+09:00
Redis の WebAPI (Express)
こちらで定めた仕様を満たすサーバーサイドのプログラムです。
Redis の WebAPI を作成フォルダー構成
$ tree . ├── app.js └── routes └── index.jsapp.js//------------------------------------------------------------------------- // app.js // // Jan/21/2020 //------------------------------------------------------------------------- var express = require('express') var routes = require('./routes') var bodyParser = require("body-parser") var cfenv = require('cfenv') var app = express() app.use(bodyParser.urlencoded({ extended: true })) app.use(bodyParser.json()) app.use(express.static(__dirname + '/public')) var appEnv = cfenv.getAppEnv() app.post('/read',routes.read) app.post('/list',routes.list) app.post('/insert',routes.insert) app.listen(appEnv.port, '0.0.0.0', function() { console.log("server starting on " + appEnv.url) }) //-------------------------------------------------------------------------routes/index.js// ----------------------------------------------------------------------- /* routes/index.js Jan/21/2020 */ // ----------------------------------------------------------------------- const redis = require("redis") const client = redis.createClient(6379,'localhost') exports.read = function(req,res) { console.error ("*** read *** start ***") if (req.body.key) { key = req.body.key } var dict_aa = {} client.get (key, function (err, reply) { dict_aa["key"] = reply var str_out = JSON.stringify(dict_aa) res.send(str_out) console.error ("*** read *** end ***") }) } // ----------------------------------------------------------------------- exports.list = function(req,res) { console.error ("*** list *** start ***") client.keys ('*',function (err, reply) { const keys = reply var str_out = JSON.stringify(keys) res.send(str_out) console.error ("*** list *** end ***") }) } // ----------------------------------------------------------------------- exports.insert = function(req,res) { console.error ("*** insert *** start ***") var key = "" var value = "" if (req.body.key) { key = req.body.key } if (req.body.value) { value = req.body.value } client.set(key, value, redis.print) res.send(value) console.error ("*** insert *** end ***") } // -----------------------------------------------------------------------サーバーの起動
$ node app.js
server starting on http://localhost:3000
- 投稿日:2020-01-21T12:08:59+09:00
花粉症LINE BotからのデータをWEBカレンダーに表示する(花粉カレンダー作成④)
概要
耳鼻咽喉科の開業医をしています。
花粉症の患者さんに使ってもらえるような花粉飛散情報が分かるカレンダーアプリを作りたいと思っています。
これまでカレンダーを表示して予定を入れることと、ユーザー認証の実装、LINEのデータをFirebaseに貯めるところまで行ってきました。
Vue.js×FullCallendarでWEBカレンダー作成(花粉カレンダー作成①)
Auth0で簡単にユーザー認証を実装(花粉カレンダー作成②)
花粉症LINE Botのデータをnode.jsを使ってFirebaseに出し入れする(花粉カレンダー作成③)今回はLINEBotのデータが記録されているFirebaseのdatabaseのデータをカレンダーに表示することに挑戦しました。
LINEBotの記事はこちら
花粉症の重症度を判定し自分に合う市販薬を教えてくれるLINE Botの作成完成動画
作成
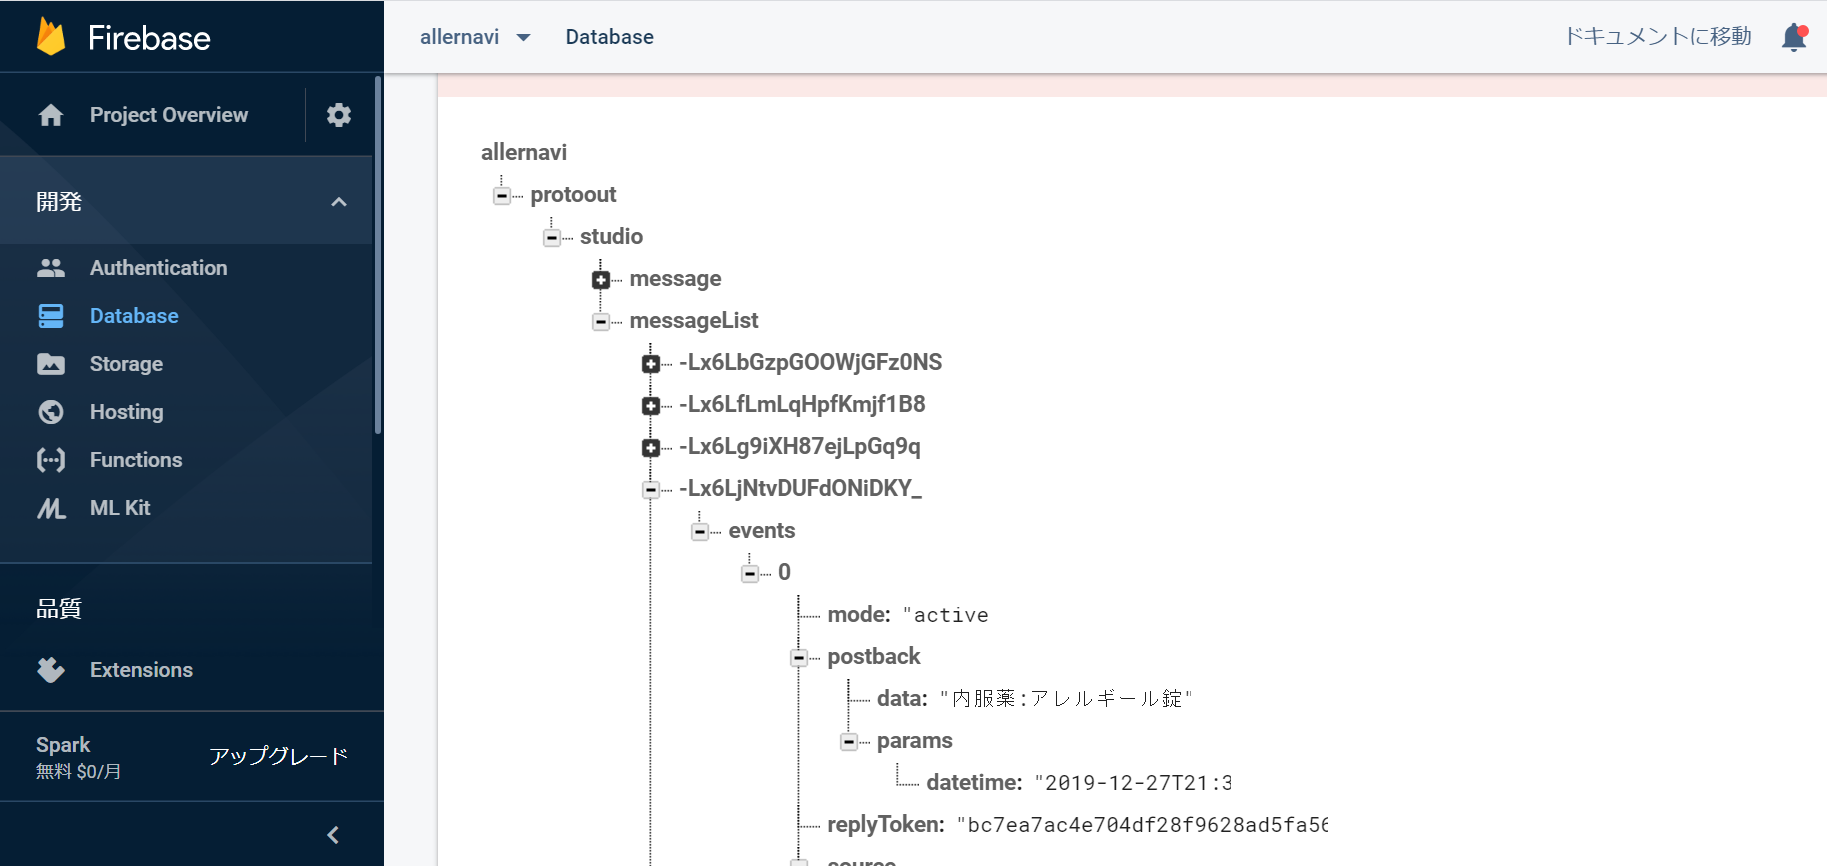
1.FirebaseのRealtime Databaseの確認
LINEのデータはFirebaseのRealtime Databaseに記録されています。
データは以下のように収納されています。
今回は以下の情報を取得して重症度や薬剤名、緯度経度をリアルタイムでカレンダーに記入していきたいと思います。
・postback.data(花粉症の重症度や使用している薬剤の情報)
・postback.params.datatime(重症度判定を行った日や薬剤使用開始した日の情報)
・sorce.userID(LINEのユーザーID)
個別の花粉飛散情報を表示するため
・message.latitude(ユーザー位置情報 緯度)
・message.latitude(ユーザー位置情報 経度)データは.(ドット)で深堀していくことができるようです。
2.実装
以前作成したCalendar.vueに追記していきます。
Vue.js×FullCallendarでWEBカレンダー作成(花粉カレンダー作成①)methods: { }の中に以下を追記します。
緯度や経度は本当はデータが取得できるだけでいいのですが、今回は本日の日付で表示してみました。childAdded(snap) { const message = snap.val(); const mes = message.events[0]; if (mes.type == "postback") { console.log(mes.postback.data); console.log(mes.postback.params.datetime); console.log(mes.source.userId); this.calendarEvents.push({ title: mes.postback.data,//重症度や薬剤 start: mes.postback.params.datetime, end: mes.postback.params.datetime }); } if (mes.type == "message") { if(mes.message.type=="location"){ console.log(mes.message.latitude); console.log(mes.message.longitude); userlat = mes.message.latitude;// 緯度 userlong = mes.message.longitude;//経度 }; this.calendarEvents.push({ // title: mes.message.text, title: `緯度${userlat}`, start: "2020-01-19T09:00:00", end: "2020-01-19T10:30:00" }, { title:`緯度${userlong}`, start: "2020-01-19T09:00:00", end: "2020-01-19T10:30:00" } ); } },async created() { }の中に以下を追記して完成です。
 const ref_message = firebase.database().ref("protoout/studio/messageList");
 //新しいメッセージ2件だけ表示する
 ref_message.limitToLast(2).on("child_added", this.childAdded);
LINEから位置情報を送ると緯度と経度が表示されます。
考察
Firebaseのデータをカレンダーに表示することが出来ました。
次は気象APIから花粉情報を表示できるようにしたいと思います。


- 投稿日:2020-01-21T12:05:57+09:00
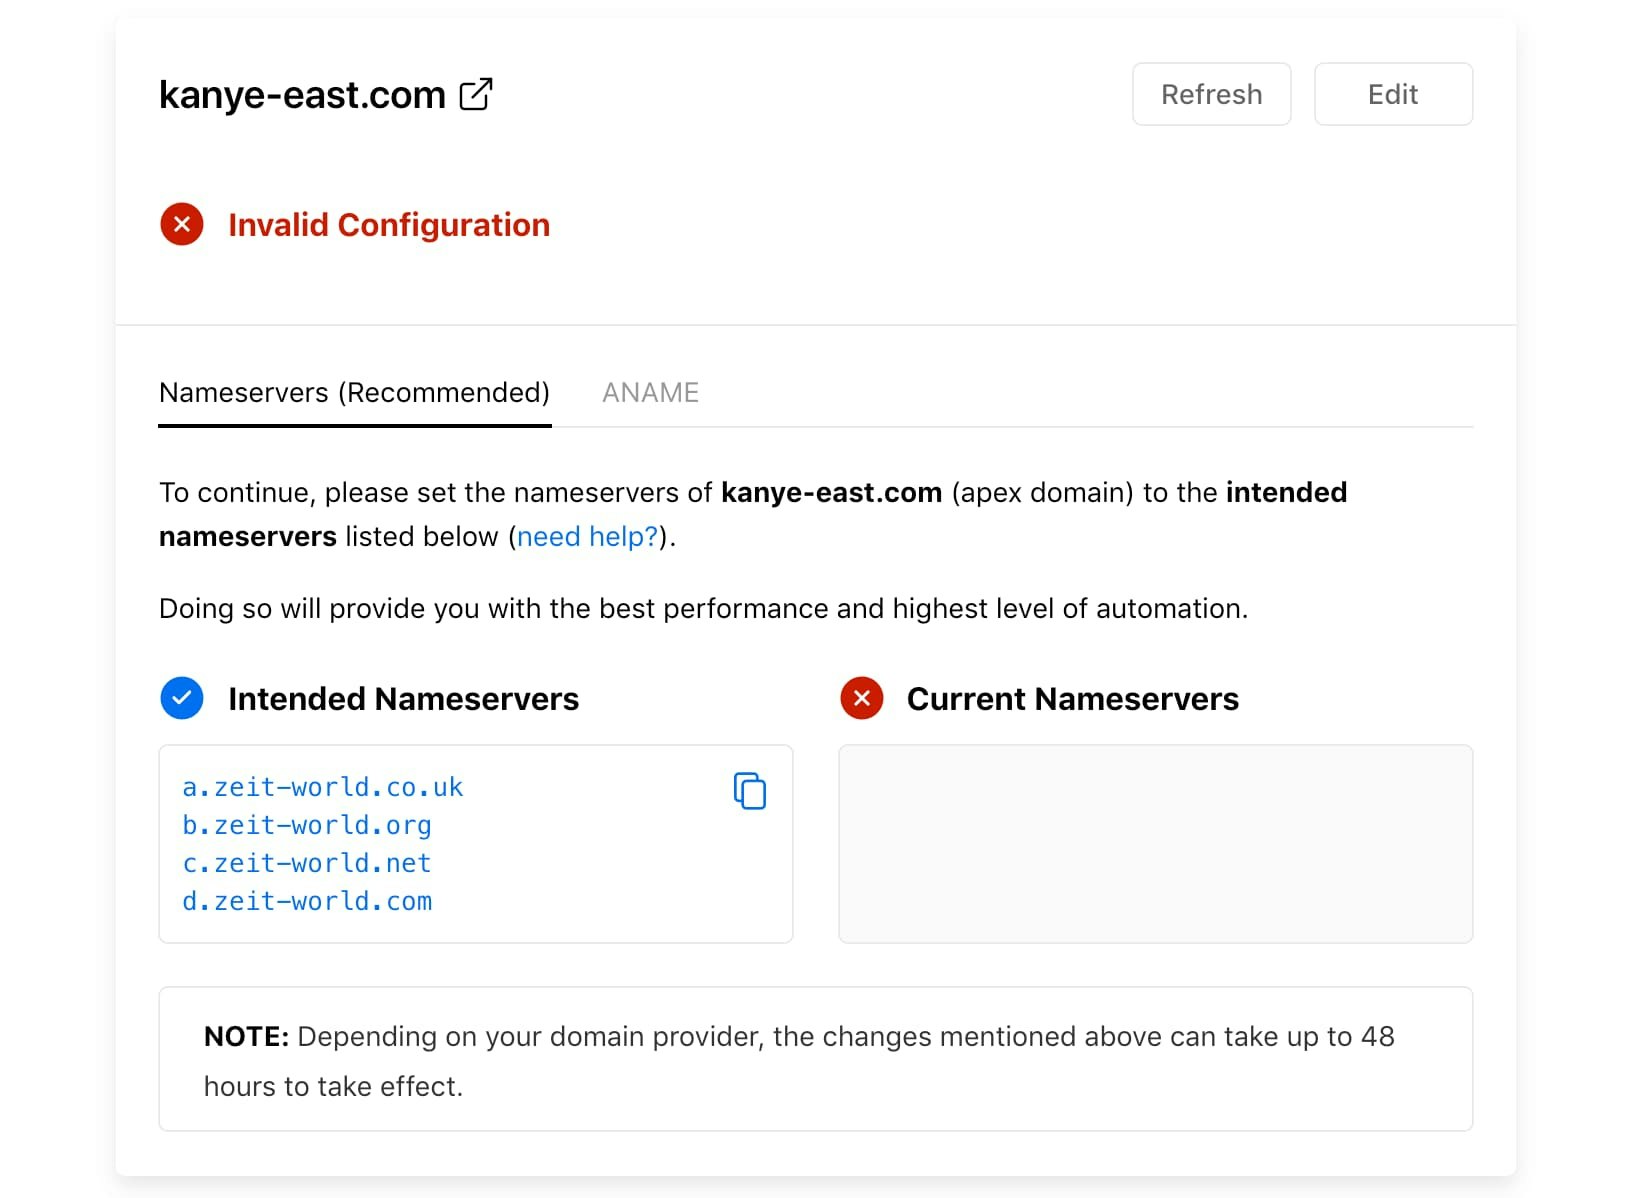
Zeitの最強ホスティングサービスnowのDNS設定にレコードを追加する方法
今回始めてNext.jsアプリをnowにデプロイしました。
nowでは簡単に独自ドメイン設定ができるので、お名前どっとこむで取得したものを設定しました。
また、SEO対策で欠かせない?Google Search Consoleでのドメイン所有権確認のためにTXTレコードの追加が必要になり、ここで少しつまずいたのでメモ的にDNSレコード追加方法を書いておきます。ドメイン設定はName Server転送を選択
そもそものドメイン設定は、Zeitがおすすめしているネームサーバー転送で行いました。
つまり、これから自分のドメインにTXT等レコードを追加したい場合は、お名前ドットコムの設定ではなく、nowのものをイジる必要があるわけです。nowで設定した独自ドメインにTXTレコードを追加してみる
nowは非常にミニマルで美しい管理画面を提供してくれているのですが、今回やりたい、レコードの追加はブラウザではできないようです。ではどうやるのか、コマンドラインツールnowコマンドです。
nowコマンドでTXTレコード追加
npmやyarnでnowコマンドをグローバルインストールした後、
$ npm i -g now # Or yarn global add nownowにログインします
$ now loginそして以下コマンドで一発完了
$ now dns add sample.com @ TXT "TXTレコードの値"宣伝
こんにちは。
自分は新卒でヤフー→4年で退職→2019/05よりバンクーバー在住のソフトウェアデベロッパーです。
Node.js/Vue/Nuxt/React/Next 周りならフロントバックエンド共に開発できます。
バンクーバーからのリモートでもOK!という案件お待ちしております!
@taishikat0_Ja
taishikato.com/resume
- 投稿日:2020-01-21T11:57:40+09:00
鼓膜の画像を送り質問に返答すれば、自動で中耳炎の診断や治療方針が返されるLINE Botを作成(ヒーローズ・リーグ2019 LINEテーマ賞)
概要
耳鼻咽喉科の開業医をしています。
以前、質問に答えていくと急性中耳炎の重症度が分かるLINE Botと
鼓膜画像を送ると正常か中耳炎かを答えてくれるLINE Botを作成しました。急性中耳炎の重症度が分かるLINE Botの作成
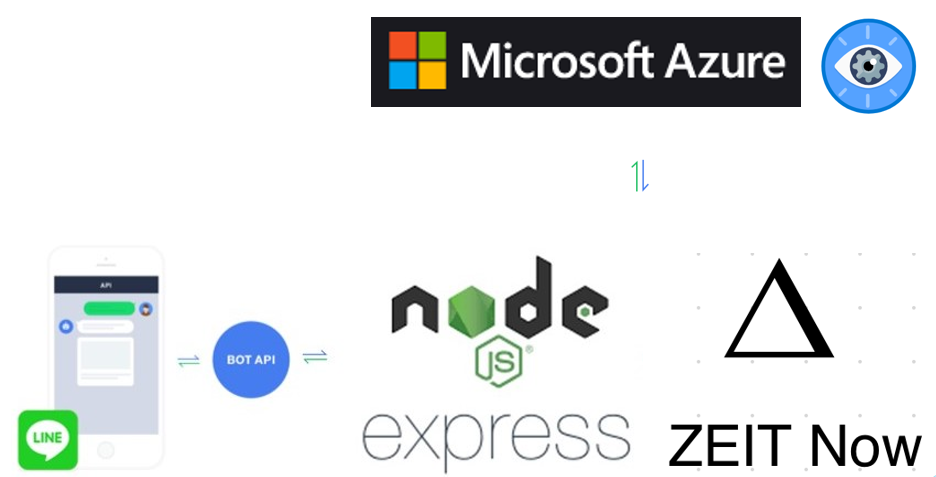
Microsoft Custom Vision Serviceによる中耳炎画像認識LINE Botの作成今回、二つのBotを組み合わせて、鼓膜の画像を送り質問に返答すれば、自動で中耳炎の診断や治療方針が返されるLINE Botを作成しました。
概念図
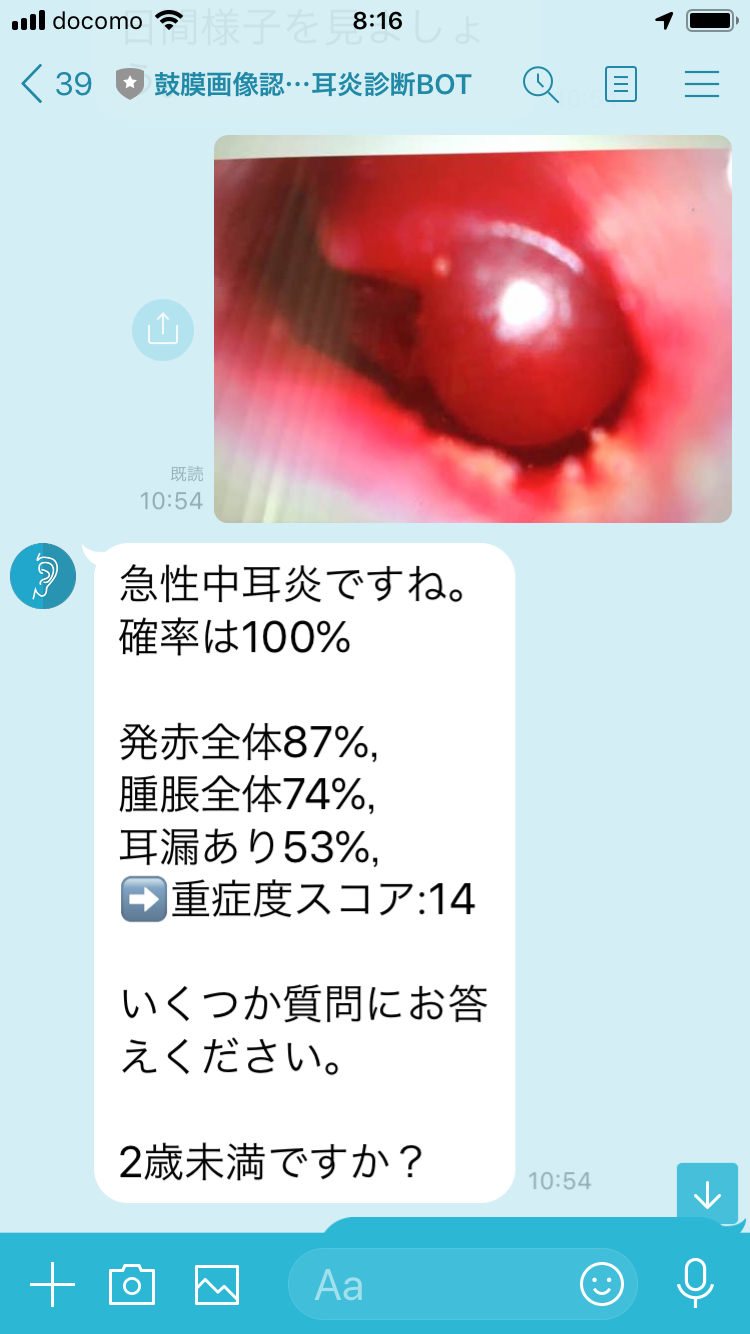
完成動画/画像
— 病気のセルフチェック (@Selfcheckhealt1) January 21, 2020
作成
以前の作成したBotのコードを変えていきます。
Azure Custom Vision ServicesのPrediction APIの発行の仕方もこちらの記事を参考にして下さい。Microsoft Custom Vision Serviceによる中耳炎画像認識LINE Botの作成
まず、ユーザーから送られてくるのがメッセージか画像かで処理を分けます。
function handleEvent(req, res) {
    if (req.body.events[0].type === 'message' && req.body.events[0].message.type === 'text') {
      return handleTextEvent(req.body.events[0]);
    }else if(req.body.events[0].message.type === 'image'){
      return handleImageEvent(req.body.events[0]);
    }
    console.log("サポートされていないメッセージです");
}
鼓膜画像が送られてきたときの処理です。
最も確率が高い診断名とその確率が表示されます。
診断が急性中耳炎の場合は重症度判定に必要な「鼓膜の発赤」「鼓膜の腫脹」「耳漏」の程度を確率で表示し重症度スコアを計算します。
その後年齢に関する質問が開始され、クイックリプライで表示されます。function handleImageEvent(event) { console.log("画像が来たよ"); // ユーザーがLINE Bot宛てに送った写真のURLを取得する const options = { url: `https://api.line.me/v2/bot/message/${event.message.id}/content`, method: 'get', headers: { 'Authorization': 'Bearer 自分のchannelAccessToken' , }, encoding: null }; Request(options, function(error, response, body) { if (!error && response.statusCode == 200) { //保存 console.log(options.url + '/image.jpg'); let strURL = options.url + '/image.jpg'; //Nowでデプロイする場合は、/tmp/のパスが重要 fs.writeFileSync(`/tmp/` + event.message.id + `.png`, new Buffer(body), 'binary'); const filePath = `/tmp/` + event.message.id + `.png`; //Azure Custom Vision APIの設定 const config = { "predictionEndpoint": "ひかえておいたURL", "predictionKey": 'ひかえておいたKey' }; let result1; cv.sendImage( filePath, config, (data) => { console.log(data); let result0=""; // let result1; let result2 = ""; let result3 = ""; let result4 = ""; let result5 = ""; let strName = ""; let Probability ; let strProbability; for (var i = 0; i <4; i++) { strName = data.predictions[i].tagName; Probability = data.predictions[i].probability * 100; strProbability = Probability.toFixed(); if (strName == "急性中耳炎") { result1 = "急性中耳炎"; result0 = "ですね。\n確率は"+strProbability + '%\n\n'; }else if (strName == "滲出性中耳炎") { result1 = "滲出性中耳炎"; result0 = strProbability + '%'; }else if(strName == "正常鼓膜") { result1 = "正常鼓膜"; result0 = strProbability + '%'; } } let symptoms = {}; let score = 0; if (result1 == "急性中耳炎") { for (var i = 0; i < 10; i++) { strName = data.predictions[i].tagName; Probability = data.predictions[i].probability * 100; strProbability = Probability.toFixed(); if (symptoms["発赤"] === undefined) { if (strName == "発赤:なし") { symptoms["発赤"] = "発赤なし" + strProbability + '%,\n'; //score0 } else if (strName == "発赤:一部") { symptoms["発赤"] = "発赤一部" + strProbability + '%,\n'; score += 2; } else if (strName == "発赤:全体") { symptoms["発赤"] = "発赤全体" + strProbability + '%,\n'; score += 4; } result2 = symptoms["発赤"]; } if (symptoms["腫脹"] === undefined) { if (strName == "腫脹:なし") { symptoms["腫脹"] = "腫脹なし" + strProbability + '%,\n'; } else if (strName == "腫脹:一部") { symptoms["腫脹"] = "腫脹一部" + strProbability + '%,\n'; score += 4; } else if (strName == "腫脹:全体") { symptoms["腫脹"] = "腫脹全体" + strProbability + '%,\n'; score += 8; } result3 = symptoms["腫脹"]; } if (symptoms["耳漏"] === undefined) { if (strName == "耳漏:なし") { symptoms["耳漏"] = "耳漏なし" + strProbability + '%,\n'; } else if (strName == "耳漏:あり") { symptoms["耳漏"] = "耳漏あり" + strProbability + '%,\n'; score += 2; } result4 = symptoms["耳漏"]; } } // } client.replyMessage(event.replyToken, { "type": "text", // ① "text": result1 + result0 + result2 + result3 + result4 + "➡重症度スコア:" + String(score)+"\n\nいくつか質問にお答えください。\n\n2歳未満ですか?", "quickReply": { "items": [ { "type": "action", "action": { "type": "message", "label": "いいえ", "text": "2歳以上 トータルスコア:" + String(score) } }, { "type": "action", "action": { "type": "message", "label": "はい", "text": "2歳未満 トータルスコア:" + String(score + 3) } } ] } }); } else if (result1 == "滲出性中耳炎") { client.replyMessage(event.replyToken, { type: 'text', text: result1 + "ですね。\n確率は" + result0 , }); } else if (result1 == "正常鼓膜") { client.replyMessage(event.replyToken, { type: 'text', text: result1 + "ですね。\n確率は" + result0 , }); } try { fs.unlinkSync(filePath); return true; } catch(err) { return false; } return; }, (error) => { console.log(error) } ); } else { console.log('imageget-err'); } }); }メッセージに対する処理は、function handleTextEvent(event) { }の中に
急性中耳炎の重症度が分かるLINE Botの作成のLINE botのプログラムを入れて追記すると完成です。質問に対するクイックリプライの回答から重症度スコアを加算していき、すべての質問が終わるとトータルスコアから急性中耳炎の重症度を判定し、ガイドラインで推奨されている治療を返します。
考察
鼓膜の画像さえきれいに撮影できれば、高い精度で急性中耳炎のガイドラインに沿った診断と推奨治療を返すBotを作成できました。
こちらのBotで昨年末に開催された開発コンテストのヒーローズ・リーグ2019で賞(LINEテーマ賞 by LINE株式会社様)をいただきとても嬉しかったです。
また、先日耳鼻咽喉科の学術講演会でこのBotについても発表させていただき耳鼻咽喉科の先生方からもかなり反響がありました。
鼓膜の撮影をするカメラ(デジタル耳鏡)は通販で3~4000円で購入できるため、一般の方が自宅で撮影することもできるのですが、Botが病気の診断することは現在の法律で禁じられているため、こちら公開して使って頂くことは出来ません。データを増やし精度を上げながら自院で医師の指導のもと中耳炎の再来患者さんを中心に使用していただいて、有効性や安全性を検証していきたいと思っています。

- 投稿日:2020-01-21T09:38:35+09:00
npmコマンドが使えなくなった。
npm command not found
ターミナルを起動すると下記のエラーが
bash: /Users/gouda/.bash_profile: line 20: syntax error: unexpected end of file.bash_profile見てみる
大体、コピペで作っていたので、おかしい箇所が分からなかったが、
最後の方のif文が、fiで終わっていなかったことが原因みたい。# Setting PATH for Python 3.7 # The original version is saved in .bash_profile.pysave PATH="/Library/Frameworks/Python.framework/Versions/3.7/bin:${PATH}" export PATH="$HOME/.pyenv/shims:$PATH" export DYLD_FALLBACK_LIBRARY_PATH=$HOME/anaconda/lib/:$DYLD_FALLBACK_LIBRARY_PATH # Setting PATH for pyenv eval "$(pyenv init -)" PATH="/usr/local/opt/openssl@1.1/bin:$PATH" if [ -f ~/.bashrc ] ; then . ~/.bashrc正しい書き方
これ書いてないと、.bashrcが反映されませんでした。
if [ -f ~/.bashrc ] ; then
. ~/.bashrc
fi
参考
- 投稿日:2020-01-21T09:01:01+09:00
Cloud Functions for Firebaseを使ってExcelファイル←→ Cloud Firestore を読み書きするサンプルコード
WEBアプリからExcelファイルを操作(アップロード・ダウンロードなど)する必要があったため、そのときに調べた内容の備忘メモ。
イントロ
Cloud Functions for Firebase を使って、Excelファイル内のデータをCloud Firestoreへ投入したり、FirestoreのデータをExcelファイルとしてダウンロードしたりするサンプルコードです。
以下のことができるようになります。
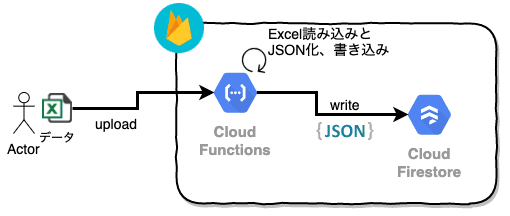
- Excelデータを読み込んで、Firestoreへ保存
- Firestoreデータを読み出して、Excelへ流し込んでダウンロード
- Excelファイルを、Storageへアップロード(上記で用いるExcelテンプレートをアップロード)
それぞれ、図的には下記のようになります。
Excelデータを読み込んで、Firestoreへ保存
ローカルのExcelファイルを、Cloud Functionsへアップロード。FunctionsはExcelファイルを読み込んでJSONデータを生成し、Firestoreにデータを書き込みます。
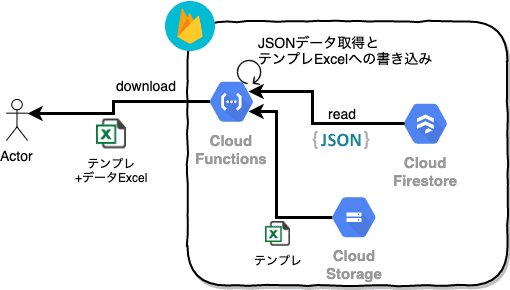
Firestoreデータを読み出して、Excelへ流し込んでダウンロード
Cloud Functionsを呼び出すとFunctionsがFirestoreからデータを取得。またCloud Storageに置いたテンプレートExcelファイルを取り出してそこにデータを書き込み、Excelファイルをダウンロードします。
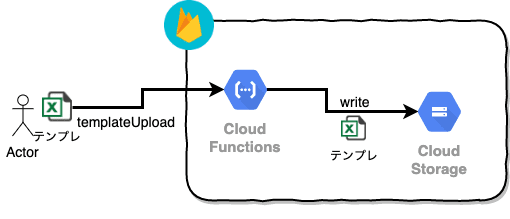
Excelファイルを、Storageへアップロード(上記で用いるExcelテンプレートをアップロード)
ついでに、テンプレートのExcelをCloud Functions経由で、Cloud Storageへアップロードします。
前提、事前準備(メモ)
Node.js はインストールされてる前提で、firebase-toolsのインストールから。
$ node --version
v10.18.1

$ npm i -g firebase-tools

+ firebase-tools@7.12.1
added 516 packages from 325 contributors in 20.769s

$ firebase --version
7.12.1
続いてFirebaseへのログイン。下記のコマンドを実行するとブラウザが起動するので、そちらでFirebaseにログインしておきます。
$ firebase login

✔  Success! Logged in as xxxx@example.com
今回のサンプルのコードをGitHubからダウンロードして、使用するFirebaseのプロジェクトを設定しておきます。
$ git clone https://github.com/masatomix/excel2firestore.git
$ cd excel2firestore/

$ firebase use --add
? Which project do you want to add? slackapp-sample
? What alias do you want to use for this project? (e.g. staging) default

Created alias default for slackapp-sample.
Now using alias default (slackapp-sample)
$
その他Firebase上で
- Cloud Functions for Firebase が利用可能な状態
- Cloud Storage が利用可能な状態
- Cloud Firestore が利用可能な状態
にしておきましょう1。
環境設定
サービスアカウント設定
FunctionsからFirestoreへ読み書きを行うために「サービスアカウントJSONファイル」が必要です。
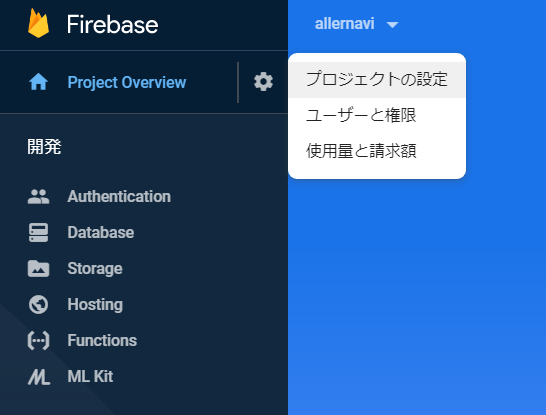
Firebaseのプロジェクトの左メニューの歯車アイコンから「プロジェクトの設定」を選択 >> サービスアカウント 画面でJSONファイルを生成・取得しておいてください。
その後、ソースコード上の
./functions/src/firebase-adminsdk.jsonという名前で配置しておいてください。Storageの設定
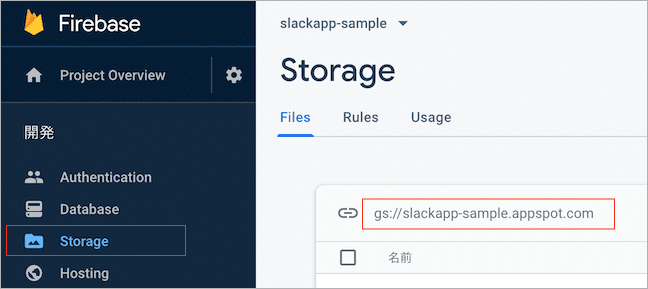
StorageのURLを指定します。Firebaseのプロジェクトの左メニュー >> Storage を選択。
gs://slackapp-sample.appspot.comがStorageのURLなのでそれを設定します。$ cd functions/ $ cat ./src/firebaseConfig.ts export default { apiKey: '', authDomain: '', databaseURL: 'https://slackapp-sample.firebaseio.com', ←今回使いません projectId: 'slackapp-sample', ←今回使いません storageBucket: 'slackapp-sample.appspot.com', ← 正しいStorage名に。 messagingSenderId: '', appId: '' }以上で準備は完了です。
Functionsを起動し、実行する
$ npm i
...
found 0 vulnerabilities

$ npm run serve

> functions@0.0.6-SNAPSHOT serve /Users/xxx/excel2firestore/functions
> npm run build && firebase serve --only functions

> functions@0.0.6-SNAPSHOT build /Users/xxx/excel2firestore/functions
> tsc

⚠  Your requested "node" version "8" doesn't match your global version "10"
✔  functions: Emulator started at http://localhost:5000
i  functions: Watching "/Users/xxx/excel2firestore/functions" for Cloud Functions...
✔  functions[api]: http function initialized (http://localhost:5000/slackapp-sample/us-central1/api).
起動したので、別のターミナルから。。
$ pwd
/Users/xxx/excel2firestore/functions
$
- Excelデータを、Firestoreへ
$ curl http://localhost:5000/slackapp-sample/us-central1/api/samples/upload -F file=@samples.xlsx -X POST- Firestoreデータを、整形されたExcelへ
$ curl http://localhost:5000/slackapp-sample/us-central1/api/samples/download -o result.xlsx- Excelファイルを、Storageへ
$ curl http://localhost:5000/slackapp-sample/us-central1/api/samples/templateUpload -F file=@samples.xlsx -X POSTコード説明
基本的なFunctionsのコード(Expressを使った部分とか)は省略します。興味があればCloneしたコードをご確認ください:-)
「Excelデータを読み込んで、Firestoreへ保存」のサンプルコード
HTTPでFormからアップロードされてくるデータを取り扱うための「busboy」を用いてファイルのデータを取得し、一旦ファイルとして書き出します。次のそのファイルから「xlsx-populate-wrapper」を使ってExcelファイルを読み込み、Firestore へデータを書き込んでいます。内容的には Google Cloud内のドキュメント#マルチパートデータ の内容ほぼそのままですね。
また xlsx-populate-wrapper は「xlsx-populate」のWrapperですが、ファイルの読み書きで変更したい箇所があったので、forkしてすこしだけ改変させてもらいました。
オリジナル: https://github.com/juniorCitizen/xlsx-populate-wrapper
upload.tsimport { Request, Response } from 'express' import * as admin from 'firebase-admin' import { excel2Sample4 } from './sample4' import * as path from 'path' import * as os from 'os' import * as Busboy from 'busboy' import * as fs from 'fs' const SAMPLE4: string = 'sample4' export const upload = async (request: Request, response: Response) => { // https://cloud.google.com/functions/docs/writing/http?hl=ja // https://qiita.com/rubytomato@github/items/11c7f3fcaf60f5ce3365 console.log('start.') // Node.js doesn't have a built-in multipart/form-data parsing library. // Instead, we can use the 'busboy' library from NPM to parse these requests. const busboy = new Busboy({ headers: request.headers }) const tmpdir = os.tmpdir() // This object will accumulate all the uploaded files, keyed by their name. const uploads: { [key: string]: string } = {} const fileWrites: Array<Promise<any>> = [] busboy.on('file', (fieldname, file, filename, encoding, mimetype) => { // file: NodeJS.ReadableStream console.log('busboy.on.file start.') console.log(`File [${fieldname}]: filename: ${filename}, encoding: ${encoding} , mimetype: ${mimetype}`) // Note: os.tmpdir() points to an in-memory file system on GCF // Thus, any files in it must fit in the instance's memory. const filepath = path.join(tmpdir, filename) uploads[fieldname] = filepath const writeStream = fs.createWriteStream(filepath) file.pipe(writeStream) // File was processed by Busboy; wait for it to be written to disk. const promise = new Promise((resolve, reject) => { file.on('end', () => { writeStream.end() excel2Sample4(filepath) .then((datas: any[]) => { for (const instance of datas) { admin .firestore() .doc(`${SAMPLE4}/${instance.operationId}`) .set(instance) } resolve(datas) }) .catch(err => reject(err)) }) // writeStream.on('finish', resolve) // writeStream.on('error', reject) }) fileWrites.push(promise) }) // Triggered once all uploaded files are processed by Busboy. // We still need to wait for the disk writes (saves) to complete. busboy.on('finish', async () => { console.log('busboy.on.finish start.') const results: any[] = await Promise.all(fileWrites) for (const file of Object.values(uploads)) { fs.unlinkSync(file) } const length = results .map(result => result.length) .reduce((acc, value) => acc + value) // response.status(200).send(`${Object.keys(uploads).length} file executed.`) response.status(200).send(`${length} 件処理しました。`) }) const reqex: any = request busboy.end(reqex.rawBody) }下記では、Excelから取得した行データを、Firestoreに書き込む前にJSONデータにしています。JSON生成をゴニョゴニョやってますが、開発してるWEBアプリ向けのデータ構造に変換しているだけで、記事観点での本質的な意味はありません。
Excel上日付のデータについては、Excelのシリアル値(number)が取得されるので、Date型への変換などを行っています。
sample4.ts(抜粋)#excel2Sample4import * as admin from 'firebase-admin' import { xlsx2json, dateFromSn, toBoolean } from './commonUtils' const SAMPLE1: string = 'sample1' const SAMPLE4: string = 'sample4' export const excel2Sample4 = (path: string): Promise<Array<any>> => { const format_func = (instance: any): any => { const now = admin.firestore.Timestamp.now() const data: any = { operationId: instance.operationId, driver: { ref: admin.firestore().doc(`${SAMPLE1}/${instance.driverId}`) }, opeType: String(instance.opeType), opeDateFrom: dateFromSn(instance.opeDateFrom), opeDateTo: dateFromSn(instance.opeDateTo), opeStatus: String(instance.opeStatus), destinationDate: dateFromSn(instance.destinationDate), isUnplanned: toBoolean(instance.isUnplanned), createdAt: now, updatedAt: now, } return data } return xlsx2json(path, SAMPLE4, format_func) }下記は、実際にExcelファイルから行データを生成する処理です。
commonUtils.ts(抜粋)#xlsx2jsonimport xPopWrapper = require('xlsx-populate-wrapper') /** * Excelファイルを読み込み、各行をデータとして配列で返すメソッド。 * @param path Excelファイルパス * @param sheet シート名 * @param format_func フォーマット関数。instanceは各行データが入ってくるので、任意に整形して返せばよい */ export const xlsx2json = async function (path: string, sheet: string, format_func?: (instance: any) => any): Promise<Array<any>> { const workbook = new xPopWrapper(path) await workbook.init() const instances: Array<any> = workbook.getData(sheet) if (format_func) { return instances.map(instance => format_func(instance)) } return instances } /** * Excelのシリアル値を、Dateへ変換します。 * @param serialNumber シリアル値 */ export const dateFromSn = (serialNumber: number): Date => { return XlsxPopulate.numberToDate(serialNumber) } export const toBoolean = function (boolStr: string | boolean): boolean { if (typeof boolStr === 'boolean') { return boolStr } return boolStr.toLowerCase() === 'true' }「Firestoreデータを読み出して、Excelへ流し込んでダウンロード」のサンプルコード
Cloud StorageからテンプレートとなるExcelファイルを取得します。またFirestoreからはExcelに書き込むデータを取得し、再び「xlsx-populate-wrapper」を使ってExcelファイルへデータを書き込んで、ユーザへのResponseへExcelデータとして返却します。データをExcelへ書き込みつつ、ある程度の書式設定・罫線の描画も行っています。
download.tsimport { Request, Response } from 'express' import * as admin from 'firebase-admin' import { getSample4Promise } from './sample4' import * as path from 'path' import * as os from 'os' const SAMPLE4: string = 'sample4' import xPopWrapper = require('xlsx-populate-wrapper') export const download = async (request: Request, response: Response) => { const bucket = admin.storage().bucket() const fileName = 'output.xlsx' const fullPath = path.join(os.tmpdir(), fileName) try { await bucket.file(fileName).download({ destination: fullPath, }) // ファイル読み込み console.log(fullPath) const workbook = new xPopWrapper(fullPath) await workbook.init() const rowCount = await addRow(workbook) applyStyles(workbook, rowCount) const newFileName = 'download.xlsx' const newFilePath = path.join(os.tmpdir(), newFileName) // 書き込んだファイルを保存 await workbook.commit(newFilePath) console.log(newFilePath) response.download(newFilePath, newFileName) } catch (error) { console.log(error) response.status(500).send(error) } } const addRow = async (workbook: any): Promise<number> => { const datas = await getSample4Promise() const convertedDatas = datas.map(data => Object.assign(data, { isUnplanned: String(data.isUnplanned) // Booleanだけは、Excelでfalseが表示出来ず。文字列化することにした。 }) ) workbook.update(SAMPLE4, convertedDatas) // 更新 return datas.length } // https://www.npmjs.com/package/xlsx-populate#style-reference // https://support.office.com/en-us/article/Number-format-codes-5026bbd6-04bc-48cd-bf33-80f18b4eae68?ui=en-US&rs=en-US&ad=US // https://www.tipsfound.com/vba/07015 const applyStyles = (workbook: any, rowCount: number) => { const sheet = workbook.getWorkbook().sheet(SAMPLE4) sheet.range(`D2:D${rowCount + 1}`).style('numberFormat', '@') // 書式: 文字(コレをやらないと、見かけ上文字だが、F2で抜けると数字になっちゃう) sheet.range(`G2:G${rowCount + 1}`).style('numberFormat', '@') // 書式: 文字(コレをやらないと、見かけ上文字だが、F2で抜けると数字になっちゃう) sheet.range(`E2:F${rowCount + 1}`).style('numberFormat', 'yyyy/mm/dd') // 書式: 日付 sheet.range(`H2:H${rowCount + 1}`).style('numberFormat', 'yyyy/mm/dd hh:mm') // 書式: 日付+時刻 // データのある行に、罫線を引く sheet.range(`A2:I${rowCount + 1}`).style('border', { top: { style: 'thin' }, left: { style: 'thin' }, bottom: { style: 'thin' }, right: { style: 'thin' } }) }sample4.ts(抜粋)#getSample4Promiseimport * as admin from 'firebase-admin' const SAMPLE4: string = 'sample4' type QuerySnapshot = admin.firestore.QuerySnapshot type DocumentSnapshot = admin.firestore.DocumentSnapshot export const getSample4Promise = async (): Promise<Array<any>> => { const returnArray: any = [] const snapshot: QuerySnapshot = await admin.firestore().collection(SAMPLE4).get() snapshot.forEach((docref: DocumentSnapshot) => { const orgData = docref.data()! // nullはない、と仮定 // プロパティを再定義。 const data = Object.assign(orgData, { opeDateFrom: orgData.opeDateFrom.toDate(), opeDateTo: orgData.opeDateTo.toDate(), destinationDate: orgData.destinationDate.toDate(), createdAt: orgData.createdAt.toDate(), updatedAt: orgData.updatedAt.toDate(), driverId: orgData.driver.ref.id, driver: orgData.driver.ref, }) }) return returnArray }「Excelファイルを、Storageへアップロード(上記で用いるExcelテンプレートをアップロード)」のサンプルコード
登り電文のExcelファイルを受けとるのは、先ほどもでてきた「busboy」で。先ほどはファイルとして一時的に書き出しましたが、今回は受けとったデータをそのまま、Cloud Storage へ保存しています。
templateUploader.tsimport { Request, Response } from 'express' import * as admin from 'firebase-admin' import * as Busboy from 'busboy' export const templateUpload = async (request: Request, response: Response) => { // https://qiita.com/rubytomato@github/items/11c7f3fcaf60f5ce3365 console.log('start.') const busboy = new Busboy({ headers: request.headers }) const bucket = admin.storage().bucket() // This object will accumulate all the uploaded files, keyed by their name. const uploads: { [key: string]: string } = {} busboy.on('file', (fieldname, file, filename, encoding, mimetype) => { console.log('busboy.on.file start.') console.log(`File [${fieldname}]: filename: ${filename}, encoding: ${encoding} , mimetype: ${mimetype}`) uploads[fieldname] = filename file.on('data', async (data) => { console.log(`File [${fieldname}] got ${data.length} bytes`) try { await bucket.file(filename).save(data, { contentType: 'application/vnd.openxmlformats-officedocument.spreadsheetml.sheet' }) } catch (error) { console.log(error) response.status(500).send(error) } }) file.on('end', () => { console.log('file.on.end start.') console.log(`File [${fieldname}]: filename: ${filename} Finished.`) }) }) // Triggered once all uploaded files are processed by Busboy. // We still need to wait for the disk writes (saves) to complete. busboy.on('finish', () => { console.log('busboy.on.finish start.') response .status(200) .send(`${Object.keys(uploads).length} file(s) uploaded.`) }) const reqex: any = request busboy.end(reqex.rawBody) }細かい説明は省略してしまいましたが、だいたいこんな感じです。。
以上、おつかれさまでしたー。
関連リンク
- busboy HTTPでアップロードされたファイルを処理するライブラリ
- xlsx-populate Excelのパーサ
- xlsx-populate-wrapper そのWrapper
- Google Cloud内のドキュメント#マルチパートデータ busboyのサンプル
- FirebaseのHostingとCloud Functionsを利用してStorageへファイルをアップロードするデモアプリケーション busboyとStorageの連係処理の参考にさせてもらいました!感謝です。また、Firebaseの環境設定から丁寧に書いてあります。
- CloudFunctionsからCloudStorageへ画像をアップロードする 上記は一度ファイルに書き出してましたが、こちらは直接Storageへ。感謝です
- xlsx-populateのStyle Reference xlsx-populate で指定出来る書式設定の一覧
- Number format codes Excelの数値フォーマット指定方法
- VBA セルに表示形式を設定する
Functionsからの処理なので、Security Rules の設定は影響がない、はず。もちろん本運用時は適切な設定で。 ↩

- 投稿日:2020-01-21T07:11:06+09:00
花粉症LINE Botのデータをnode.jsを使ってFirebaseに出し入れする(花粉カレンダー作成③)
概要
耳鼻咽喉科の開業医をしています。
今回、以前作成したLINE Botのデータをnode.jsを使ってFirebaseに出し入れできるようにしました。
以前作ったLINE Botの記事はこちら
花粉症の重症度を判定し自分に合う市販薬を教えてくれるLINE Botの作成作成
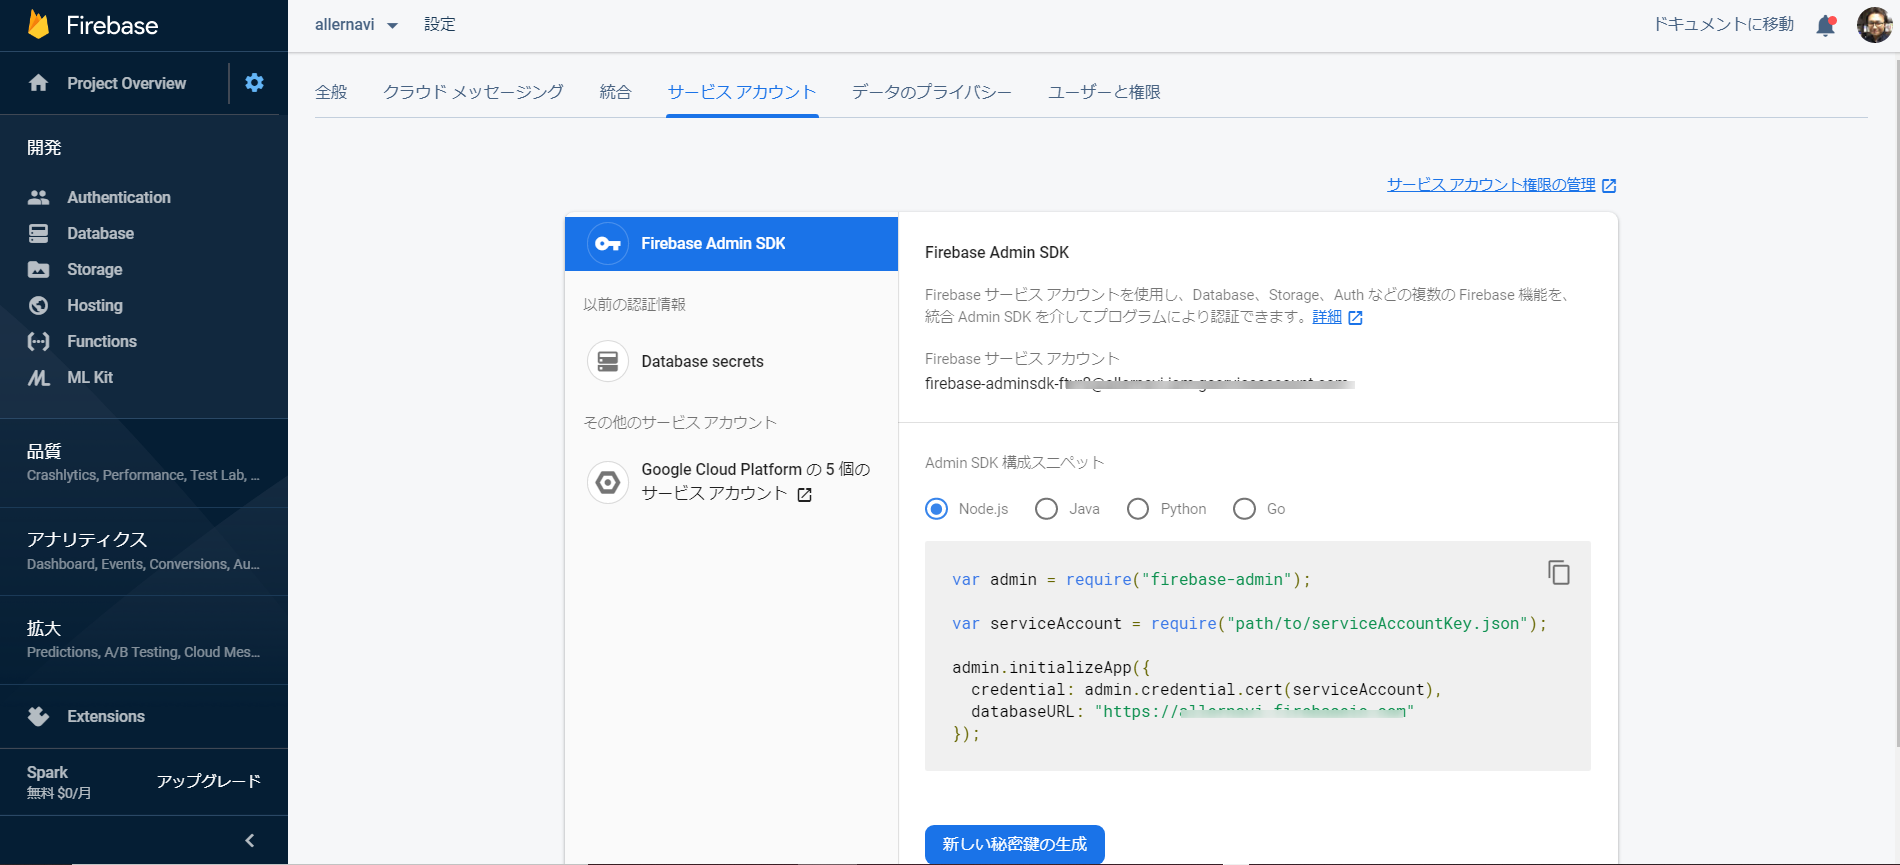
1.Firebaseno秘密鍵を生成し準備
こちらを参考にします。
サーバーに Firebase Admin SDK を追加する歯車マークからプロジェクトの設定を選択します
サービスアカウントに移動し下部にある「新しい秘密鍵の生成」ボタンを押します。
次に表示される「キーを生成」ボタンを押します。
すると、すぐに生成されてJSONファイルがダウンロードされます。この段階では、長めの文字数のファイル名.jsonになっています。
ダウンロードしたJSONファイルをserviceAccountKey.jsonに名前を変えて配置します。Realtime DatabaseのページでdatabaseURLを確認します。
Firebaseコンソールにある、Realtime Databaseの中にあるデータが確認できるページでdatabaseURLを確認します。赤枠のところをメモしておきます。
2.Firebaseにデータを記録できるようにする
Firebase関連のインストール
npm i firebase-admin花粉症の重症度を判定し自分に合う市販薬を教えてくれるLINE Botの作成で作成したプログラムに追記していきます。
// Firebase /////////////////////////////////

var admin = require("firebase-admin");

// 1. サービスアカウント鍵を生成しserviceAccountKey.jsonにリネーム
var serviceAccount = require("./serviceAccountKey.json");

admin.initializeApp({
  credential: admin.credential.cert(serviceAccount),
  // 2. Realtime DatabaseのページでdatabaseURLを確認して反映
  databaseURL: "https://*************.com"
});

var db = admin.database();
var ref = db.ref("protoout/studio");
var usersRef = ref.child("messageList");

// LINE /////////////////////////////////////

const express = require('express');
const line = require('@line/bot-sdk');
const axios = require('axios');
const PORT = process.env.PORT || 3000;

const config = {
    channelSecret: '********************',
    channelAccessToken: '***********************'
};

const app = express();

// app.get('/', (req, res) => res.send('Hello LINE BOT!(GET)')); //ブラウザ確認用(無くても問題ない)
app.post('/webhook', line.middleware(config), (req, res) => {
    console.log(req.body.events);

    //ここのif分はdeveloper consoleの"接続確認"用なので削除して問題ないです。
    if(req.body.events[0].replyToken === '00000000000000000000000000000000' && req.body.events[1].replyToken === 'ffffffffffffffffffffffffffffffff'){
        res.send('Hello LINE BOT!(POST)');
        console.log('疎通確認用');
        return;
    }

  // Firebaseにも応答を記録 push
  usersRef.push({
    events:req.body.events
  });

    Promise
      .all(req.body.events.map(handleEvent))
      .then((result) => res.json(result));

});
3.Firebaseからデータを受信できるようにする
以下のコードを追記します。
// Firebase Listからデータを受信 child added on
var refMessageList = db.ref("protoout/studio/messageList");
refMessageList.on('child_added', function (snapshot) {
    //postbackの場合
    if (snapshot.val().events[0].type == 'postback') {
      console.log('child_added', snapshot.val().events[0].postback.data)
      userpostback = snapshot.val().events[0].postback.data;
    }
    //messageの場合
    if (snapshot.val().events[0].type == 'message') {
      //message-位置情報の場合
      if (snapshot.val().events[0].message.type == 'location') {
        userlat = snapshot.val().events[0].message.latitude;
        userlong = snapshot.val().events[0].message.longitude;
        getweather();//気象情報をreturnする関数
      }
    }
   })
4.データベースを確認する
LINEのデータが記録されています。
考察
LINE BotのデータをFirebaseに出し入れすることができました。
今度はFirebaseのデータをWEBカレンダーに表示できるようにしたいと思います。

- 投稿日:2020-01-21T03:20:36+09:00
lighthouseを自動で指定回数動かしてWebパフォーマンスを確認する環境を構築する
pupeteerでlighthouseを自動で指定回数動かしてWebパフォーマンスを確認する環境を構築する
- 改めて整理し、今回はpupeteerは使わなくなりました。
Tree-map[Homebrew] ├─[formula] │ ├─npm │ └─... [npm] ├─express ├─lighthouse └─...プロジェクトを作成する
Terminal$ mkdir node_js_api_sample_1 $ cd node_js_api_sample_1/プロジェクト名やバージョンなどを管理する(NPM init)
npm initを実行したカレントディレクトリにpackage.jsonが作成される- npmをインストールした後最初に使用する初期化処理を意味するコマンドではなく、プロジェクトの初期化処理
0. npmをインストールしていない場合
brew searchTerminal$ brew search npm ==> Formulae npm pnpm
brew installTerminal$ brew install npm Updating Homebrew... ==> Auto-updated Homebrew! Updated 3 taps (homebrew/core, homebrew/cask and homebrew/services). ==> New Formulae mmctl wasmer ==> Updated Formulae ruby-build ✔ calicoctl exploitdb gradle kapacitor mill opam serverless typescript alp cgrep faas-cli grakn kawa minetest openjdk sile vtk angular-cli cimg fastlane groovy kepubify minio pandoc-crossref skaffold vulkan-headers ansible clojure flann gssdp libbi mlpack pcl sn0int wabt armadillo composer flow gupnp libde265 mongo-c-driver pdal snapcraft whistle aws-cdk contentful-cli flyway haproxy libmatio mono plantuml snappy xmrig aws-sdk-cpp csound frugal hdf5 libphonenumber mpd pspg solr youtube-dl bandwhich csvq gcab hey libsecret msitools purescript sourcekitten bibtexconv deno gdal hledger libsigc++ nco pyinvoke spdlog bison dependency-check ghq jenkins libtensorflow ncview q starship blis devspace gitleaks jfrog-cli-go libtorch nebula qmmp sxiv broot dnscontrol gmic jpeg libxml++3 netcdf rke terraform-docs byobu ensmallen gmt just lxc netlify-cli sbt terrahub byteman ethereum gmt@5 kakoune micronaut okteto scc topgrade ==> Deleted Formulae lastfmfpclient ==> Installing dependencies for node: icu4c ==> Installing node dependency: icu4c ==> Downloading https://homebrew.bintray.com/bottles/icu4c-64.2.mojave.bottle.tar.gz ==> Downloading from https://akamai.bintray.com/e8/e858556120acc0c2d52b8fb572b677856724cc28d24a7e1b2762d458a2977c8e?__gda__=exp=1579541904~hmac=12a35835f00b20d6ff6164725a306 ######################################################################## 100.0% ==> Pouring icu4c-64.2.mojave.bottle.tar.gz ==> Caveats icu4c is keg-only, which means it was not symlinked into /usr/local, because macOS provides libicucore.dylib (but nothing else). If you need to have icu4c first in your PATH run: echo 'export PATH="/usr/local/opt/icu4c/bin:$PATH"' >> ~/.bash_profile echo 'export PATH="/usr/local/opt/icu4c/sbin:$PATH"' >> ~/.bash_profile For compilers to find icu4c you may need to set: export LDFLAGS="-L/usr/local/opt/icu4c/lib" export CPPFLAGS="-I/usr/local/opt/icu4c/include" For pkg-config to find icu4c you may need to set: export PKG_CONFIG_PATH="/usr/local/opt/icu4c/lib/pkgconfig" ==> Summary ? /usr/local/Cellar/icu4c/64.2: 257 files, 69.2MB ==> Installing node ==> Downloading https://homebrew.bintray.com/bottles/node-13.6.0.mojave.bottle.tar.gz ==> Downloading from https://akamai.bintray.com/bc/bc3727f6f1b1f079b53a19c26c985a066a1525feffa2d2594a5626618f3bac6e?__gda__=exp=1579541924~hmac=f8b1ea89a976b43f537b93024aad8 ######################################################################## 100.0% ==> Pouring node-13.6.0.mojave.bottle.tar.gz ==> Caveats Bash completion has been installed to: /usr/local/etc/bash_completion.d ==> Summary ? /usr/local/Cellar/node/13.6.0: 4,663 files, 60MB ==> Caveats ==> icu4c icu4c is keg-only, which means it was not symlinked into /usr/local, because macOS provides libicucore.dylib (but nothing else). If you need to have icu4c first in your PATH run: echo 'export PATH="/usr/local/opt/icu4c/bin:$PATH"' >> ~/.bash_profile echo 'export PATH="/usr/local/opt/icu4c/sbin:$PATH"' >> ~/.bash_profile For compilers to find icu4c you may need to set: export LDFLAGS="-L/usr/local/opt/icu4c/lib" export CPPFLAGS="-I/usr/local/opt/icu4c/include" For pkg-config to find icu4c you may need to set: export PKG_CONFIG_PATH="/usr/local/opt/icu4c/lib/pkgconfig" ==> node Bash completion has been installed to: /usr/local/etc/bash_completion.d1. npm init
Terminal$ npm init This utility will walk you through creating a package.json file. It only covers the most common items, and tries to guess sensible defaults. See `npm help json` for definitive documentation on these fields and exactly what they do. Use `npm install <pkg>` afterwards to install a package and save it as a dependency in the package.json file. Press ^C at any time to quit. package name: (node_js_api_sample_1) version: (1.0.0) description: lighthouse on NodeJS on express by WebAPI entry point: (index.js) test command: git repository: https://github.com/webmaster-patche/node_js_api_sample_1.git keywords: lighthouse NodeJS express API author: webmaster-patche license: (ISC) About to write to /Users/webmaster-patche/node_js_api_sample_1/package.json: { "name": "node_js_api_sample_1", "version": "1.0.0", "description": "lighthouse on NodeJS on express by WebAPI", "main": "index.js", "scripts": { "test": "echo \"Error: no test specified\" && exit 1" }, "repository": { "type": "git", "url": "git+https://github.com/webmaster-patche/node_js_api_sample_1.git" }, "keywords": [ "lighthouse", "NodeJS", "express", "API" ], "author": "webmaster-patche", "license": "ISC", "bugs": { "url": "https://github.com/webmaster-patche/node_js_api_sample_1/issues" }, "homepage": "https://github.com/webmaster-patche/node_js_api_sample_1#readme" } Is this OK? (yes) yesTerminal$ ls package.jsonexpressをインストールする
1. npmでインストールする(package.json追記タイプ)
--saveオプションを指定するので、カレントディレクトリに指定のパッケージをインストールするときに package.json の dependencies欄 にパッケージ名が記録されるTerminal$ npm install --save express npm notice created a lockfile as package-lock.json. You should commit this file. + express@4.17.1 added 50 packages from 37 contributors and audited 126 packages in 10.244s found 0 vulnerabilities2. package.jsonの依存関係を確認する
Terminal$ cat package.json { "name": "node_js_api_sample_1", "version": "1.0.0", "description": "lighthouse on NodeJS on express by WebAPI", "main": "index.js", "scripts": { "test": "echo \"Error: no test specified\" && exit 1" }, "repository": { "type": "git", "url": "git+https://github.com/webmaster-patche/node_js_api_sample_1.git" }, "keywords": [ "lighthouse", "NodeJS", "express", "API" ], "author": "webmaster-patche", "license": "ISC", "bugs": { "url": "https://github.com/webmaster-patche/node_js_api_sample_1/issues" }, "homepage": "https://github.com/webmaster-patche/node_js_api_sample_1#readme", "dependencies": { "express": "^4.17.1" } }先ずはHello worldを用意
- expressを使用してlocalhost:8081アクセスで
Hello worldを返すアプリを用意するindex.js// expressモジュールを読み込む const express = require('express'); // expressアプリを生成する const app = express(); // ルート(http://localhost/)にアクセスしてきたときに「Hello world」を返す app.get('/', (req, res) => res.send('Hello world')); // ポート8081でサーバを立てる app.listen(8081, () => console.log('Listening on port 8081'));Web-apサーバ起動
Terminal$ node index.js Listening on port 8081
http://127.0.0.1:8081/にアクセスする
Hello worldが表示されました停止する場合は
Ctrl + Cでシグナルを送信しますpupeteerをインストールする
1. npmでインストールする(package.json追記タイプ)
Terminal$ npm install --save puppeteer > puppeteer@2.0.0 install /Users/webmaster-patche/node_js_api_sample_1/node_modules/puppeteer > node install.js Downloading Chromium r706915 - 111.8 Mb [====================] 100% 0.0s Chromium downloaded to /Users/webmaster-patche/node_js_api_sample_1/node_modules/puppeteer/.local-chromium/mac-706915 + puppeteer@2.0.0 added 40 packages from 21 contributors and audited 176 packages in 32.736s 1 package is looking for funding run `npm fund` for details found 0 vulnerabilities2. package.jsonの依存関係を確認する
Terminal$ cat package.json { "name": "node_js_api_sample_1", "version": "1.0.0", "description": "lighthouse on NodeJS on express by WebAPI", "main": "index.js", "scripts": { "test": "echo \"Error: no test specified\" && exit 1" }, "repository": { "type": "git", "url": "git+https://github.com/webmaster-patche/node_js_api_sample_1.git" }, "keywords": [ "lighthouse", "NodeJS", "express", "API" ], "author": "webmaster-patche", "license": "ISC", "bugs": { "url": "https://github.com/webmaster-patche/node_js_api_sample_1/issues" }, "homepage": "https://github.com/webmaster-patche/node_js_api_sample_1#readme", "dependencies": { "express": "^4.17.1", "puppeteer": "^2.0.0" } }lighthouseをインストールする
1. npmでインストールする(package.json追記タイプ)
Terminal$ npm install -g lighthouse /usr/local/bin/lighthouse -> /usr/local/lib/node_modules/lighthouse/lighthouse-cli/index.js /usr/local/bin/chrome-debug -> /usr/local/lib/node_modules/lighthouse/lighthouse-core/scripts/manual-chrome-launcher.js + lighthouse@5.6.0 added 234 packages from 203 contributors in 23.901s後の手順
http://127.0.0.1:8081/lighthouse/%url%にアクセスした時に /bin/sh: lighthouse: command not found となる場合
npm install --save lighthouseではコマンドがインストールされない
アンインストールする
Terminal$ npm uninstall lighthouse removed 210 packages and audited 176 packages in 2.434s found 0 vulnerabilities
- インストールし直す
Terminal$ npm install -g lighthouse /usr/local/bin/lighthouse -> /usr/local/lib/node_modules/lighthouse/lighthouse-cli/index.js /usr/local/bin/chrome-debug -> /usr/local/lib/node_modules/lighthouse/lighthouse-core/scripts/manual-chrome-launcher.js + lighthouse@5.6.0 added 234 packages from 203 contributors in 23.901s2. package.jsonの依存関係を編集する
Terminal$ vi package.json { "name": "node_js_api_sample_1", "version": "1.0.0", "description": "lighthouse on NodeJS on express by WebAPI", "main": "index.js", "scripts": { "test": "echo \"Error: no test specified\" && exit 1" }, "repository": { "type": "git", "url": "git+https://github.com/webmaster-patche/node_js_api_sample_1.git" }, "keywords": [ "lighthouse", "NodeJS", "express", "API" ], "author": "webmaster-patche", "license": "ISC", "bugs": { "url": "https://github.com/webmaster-patche/node_js_api_sample_1/issues" }, "homepage": "https://github.com/webmaster-patche/node_js_api_sample_1#readme", "dependencies": { "express": "^4.17.1", "lighthouse": "^5.6.0", "puppeteer": "^2.0.0" } }index.jsを編集する
1. light_houseを外部ファイルとしてインクルードする
index.js// expressモジュールを読み込む const express = require('express'); // expressアプリを生成する const app = express(); // ポート3000でサーバを立てる var server = app.listen(8081, () => console.log(`Node.js Linsten Port: ${server.address().port}`) ); /* start Including export js */ // include lighthouse.js var lighthouse = require('./lighthouse'); /* end Including export js */ // ルート(http://localhost/)にアクセスしてきたときに「Hello」を返す app.get('/', (req, res) => res.send('Hello world')); // light_house_scoreにアクセスしてきたときに、jsonでスコアを返す app.get('/lighthouse/:url', function(req, res) { lighthouse.getLighthouseScore(decodeURI(req.params.url)) .then(function(result) { console.log(`result: ${result}`); res.send(result); }); });2. lighthouse.jsを編集する
lighthouse.jsconst execSync = require('child_process').execSync; exports.getLighthouseScore = (url) => { return new Promise((resolve, reject) => { try { console.log(`light house URL: ${url}`); // Lighthouse CLIを実行 const result = execSync(`lighthouse "${url}" --output json --quiet`, {timeout: 60000}).toString(); const stats = JSON.parse(result); const scoreMap = Object.entries(stats.categories).reduce((acc, [key, val]) => { return Object.assign({}, acc, {[val.title]: val.score ? parseInt(val.score * 100) : 0 }); }, {}); resolve(scoreMap); } catch(e) { reject({}); execSync } }); }3. Web-apサーバ起動
Terminal$ node index.js
http://127.0.0.1:8081/lighthouse/https%3A%2F%2Fqiita.com%2Fにアクセスする
Response{"Performance":64,"Accessibility":44,"Best Practices":86,"SEO":90,"Progressive Web App":74} {"Performance":28,"Accessibility":44,"Best Practices":86,"SEO":90,"Progressive Web App":74}
- 停止する場合は
Ctrl + Cでシグナルを送信しますリクエストパラメータで複数回指定を制御する
1. index.jsを編集する
index.js// expressモジュールを読み込む const express = require('express'); // expressアプリを生成する const app = express(); // ポート3000でサーバを立てる var server = app.listen(8081, () => console.log(`Node.js Linsten Port: ${server.address().port}`) ); /* start Including export js */ // include lighthouse.js var lighthouse = require('./lighthouse'); const consts = require('./const'); /* end Including export js */ // ルート(http://localhost/)にアクセスしてきたときに「Hello」を返す app.get('/', (req, res) => res.send('Hello world')); // light_house_scoreにアクセスしてきたときに、jsonでスコアを返す /* Request Parameter * /lighthouse/%encoded url%?%query string(?param=value[¶m=value]...% * encoded url: light houseで計測するurl(Base64 encondeされたURL) * query string: term 回数 */ app.get('/lighthouse/:url', function(req, res) { console.log(`request paraemter: ${req.query.term} / ${req.params.url}`); var resultsMap = new Map(); var limit = req.query.term || 1; for(loop = 0; loop < limit; loop++) { lighthouse.getLighthouseScore(decodeURI(req.params.url)) .then(function(result) { // console.log(consts.lighthouseScoreFile()); var resultMap = lighthouse.getLighthouseScoreMap(consts.lighthouseScoreFile()); // map set resultMap.forEach( function(v, k) { if (resultsMap.has(k)) { var arr = resultMap.get(k); arr.push(v); resultsMap.set(k, arr); } else { resultsMap.set(k, [v]); } }); }); } // res.send( JSON.stringify( Array.from(resultsMap).reduce( (sum, [v,k]) => (sum[v]=k, sum), {}) ) ); res.send( JSON.stringify( Array.from(resultsMap).reduce( (sum, [k,v]) => (sum[k]=v, sum), {} ) ) ); });2. lighthouse.js を編集する
lighthouse.jsconst execSync = require('child_process').execSync; const fs = require('fs'); const consts = require('./const'); exports.getLighthouseScore = (url) => { return new Promise((resolve, reject) => { try { // console.log(`light house URL: ${url}`); console.log(`lighthouse "${url}" --save-assets --output json --output-path ${consts.lighthouseScoreFile()} --quiet`); // Lighthouse CLIを実行 const result = execSync(`lighthouse "${url}" --save-assets --output json --output-path ${consts.lighthouseScoreFile()} --quiet`, {timeout: 60000}); // const stats = JSON.parse(result); // const scoreMap = Object.entries(stats.categories).reduce((acc, [key, val]) => { // return Object.assign({}, acc, {[val.title]: val.score ? parseInt(val.score * 100) : 0 }); //}, {}); //resolve(scoreMap); resolve(); } catch(e) { reject({}); //execSync } }); } exports.getLighthouseScoreMap = (file) => { var json = JSON.parse(fs.readFileSync(file, 'utf8')); var importMap = new Map(Object.entries(json)); // console.log(importMap.get("audits")['first-contentful-paint']["displayValue"]); // console.log(importMap.get("audits")['first-meaningful-paint']["displayValue"]); // console.log(importMap.get("audits")['speed-index']["displayValue"]); // console.log(importMap.get("audits")['first-cpu-idle']["displayValue"]); // console.log(importMap.get("audits")['interactive']["displayValue"]); // console.log(importMap.get("audits")['max-potential-fid']["displayValue"]); return resultMap = new Map([ ["first-contentful-paint", importMap.get("audits")['first-contentful-paint']["displayValue"]], ["first-meaningful-paint", importMap.get("audits")['first-meaningful-paint']["displayValue"]], ["speed-index", importMap.get("audits")['speed-index']["displayValue"]], ["first-cpu-idle", importMap.get("audits")['first-cpu-idle']["displayValue"]], ["interactive", importMap.get("audits")['interactive']["displayValue"]], ["max-potential-fid", importMap.get("audits")['max-potential-fid']["displayValue"]] ]); }3. const.js を作成する
const.jsexports.lighthouseScoreFile = () => { return "/Users/webmaster-patche/node_js_api_sample_1/result.json" }これで動くと思いきや?!
Response{}5. ログを仕込んでみる
index.js// expressモジュールを読み込む const express = require('express'); // expressアプリを生成する const app = express(); // ポート3000でサーバを立てる var server = app.listen(8081, () => console.log(`Node.js Linsten Port: ${server.address().port}`) ); /* start Including export js */ // include lighthouse.js var lighthouse = require('./lighthouse'); const consts = require('./const'); /* end Including export js */ // ルート(http://localhost/)にアクセスしてきたときに「Hello」を返す app.get('/', (req, res) => res.send('Hello world')); // light_house_scoreにアクセスしてきたときに、jsonでスコアを返す /* Request Parameter * /lighthouse/%encoded url%?%query string(?param=value[¶m=value]...% * encoded url: light houseで計測するurl(Base64 encondeされたURL) * query string: term 回数 */ app.get('/lighthouse/:url', function(req, res) { console.log(`request paraemter: ${req.query.term} / ${req.params.url}`); var resultsMap = new Map(); var limit = req.query.term || 1; for(loop = 0; loop < limit; loop++) { lighthouse.getLighthouseScore(decodeURI(req.params.url)) .then(function(result) { // console.log(consts.lighthouseScoreFile()); var resultMap = lighthouse.getLighthouseScoreMap(consts.lighthouseScoreFile()); // map set resultMap.forEach( function(v, k) { if (resultsMap.has(k)) { var arr = resultMap.get(k); arr.push(v); resultsMap.set(k, arr); } else { resultsMap.set(k, [v]); } /* このログ */ console.log(`${k} > ${v}`); }); /* このログ */ console.log(resultsMap); }); } // res.send( JSON.stringify( Array.from(resultsMap).reduce( (sum, [v,k]) => (sum[v]=k, sum), {}) ) ); res.send( JSON.stringify( Array.from(resultsMap).reduce( (sum, [k,v]) => (sum[k]=v, sum), {} ) ) ); });デバッグログrequest paraemter: 2 / https://qiita.com/ lighthouse "https://qiita.com/" --save-assets --output json --output-path /Users/webmaster-patche/node_js_api_sample_1/result.json --quiet Map {} lighthouse "https://qiita.com/" --save-assets --output json --output-path /Users/webmaster-patche/node_js_api_sample_1/result.json --quiet Map {} Map {} first-contentful-paint > 2.3 s has: false first-meaningful-paint > 2.3 s has: false speed-index > 3.2 s has: false first-cpu-idle > 7.9 s has: false interactive > 9.1 s has: false max-potential-fid > 200 ms has: false first-contentful-paint > 2.3 s has: true first-meaningful-paint > 2.3 s has: true speed-index > 3.2 s has: true first-cpu-idle > 7.9 s has: true interactive > 9.1 s has: true max-potential-fid > 200 ms has: true明らかにレポート結果の二重読み込みをした上、Mapに一向に結果が反映されない
非同期処理を廃止(Promise)
1. index.js を編集する
index.js// expressモジュールを読み込む const express = require('express'); // expressアプリを生成する const app = express(); // ポート3000でサーバを立てる var server = app.listen(8081, () => console.log(`Node.js Linsten Port: ${server.address().port}`) ); /* start Including export js */ // include lighthouse.js var lighthouse = require('./lighthouse'); const consts = require('./const'); /* end Including export js */ // ルート(http://localhost/)にアクセスしてきたときに「Hello」を返す app.get('/', (req, res) => res.send('Hello world')); // light_house_scoreにアクセスしてきたときに、jsonでスコアを返す /* Request Parameter * /lighthouse/%encoded url%?%query string(?param=value[¶m=value]...% * encoded url: light houseで計測するurl(Base64 encondeされたURL) * query string: term 回数 */ app.get('/lighthouse/:url', function(req, res) { console.log(`request paraemter: ${req.query.term} / ${req.params.url}`); var resultsMap = new Map(); var limit = req.query.term || 1; for(loop = 0; loop < limit; loop++) { lighthouse.getLighthouseScore(decodeURI(req.params.url)); // console.log(consts.lighthouseScoreFile()); var resultMap = lighthouse.getLighthouseScoreMap(consts.lighthouseScoreFile()); // map set resultMap.forEach( function(v, k) { if (resultsMap.has(k)) { var arr = resultsMap.get(k); arr.push(v); resultsMap.set(k, arr); } else { resultsMap.set(k, [v]); } }); } res.send( JSON.stringify( Array.from(resultsMap).reduce( (sum, [k,v]) => (sum[k]=v, sum), {} ) ) ); });2. lighthouse.js を編集する
lighthouse.jsconst execSync = require('child_process').execSync; const fs = require('fs'); const consts = require('./const'); exports.getLighthouseScore = async (url) => { try { console.log(`lighthouse "${url}" --save-assets --output json --output-path ${consts.lighthouseScoreFile()} --quiet`); // Lighthouse CLIを実行 const result = execSync(`lighthouse "${url}" --save-assets --output json --output-path ${consts.lighthouseScoreFile()} --quiet`, {timeout: 60000}); } catch(e) { } } exports.getLighthouseScoreMap = (file) => { var json = JSON.parse(fs.readFileSync(file, 'utf8')); var importMap = new Map(Object.entries(json)); var resultMap = new Map([ ["first-contentful-paint", importMap.get("audits")['first-contentful-paint']["displayValue"]], ["first-meaningful-paint", importMap.get("audits")['first-meaningful-paint']["displayValue"]], ["speed-index", importMap.get("audits")['speed-index']["displayValue"]], ["first-cpu-idle", importMap.get("audits")['first-cpu-idle']["displayValue"]], ["interactive", importMap.get("audits")['interactive']["displayValue"]], ["max-potential-fid", importMap.get("audits")['max-potential-fid']["displayValue"]] ]); return resultMap; }4. 起動する
Terminal$ node index.js
http://127.0.0.1:8081/lighthouse/https%3A%2F%2Fqiita.com%2F?term=15にアクセスする[スクリーンショット 2020-01-21 3.20.09.png]()
Response{"first-contentful-paint":["2.4 s","2.0 s","2.1 s","2.1 s","1.8 s","2.1 s","2.1 s","1.9 s","2.1 s","1.9 s","2.3 s","2.7 s","1.9 s","2.1 s","1.9 s"],"first-meaningful-paint":["2.4 s","2.0 s","2.1 s","2.5 s","2.3 s","2.1 s","2.6 s","1.9 s","3.1 s","2.3 s","2.3 s","2.9 s","1.9 s","2.6 s","1.9 s"],"speed-index":["3.9 s","4.3 s","5.3 s","4.5 s","4.7 s","3.8 s","5.6 s","4.7 s","5.1 s","4.2 s","5.1 s","6.0 s","3.7 s","5.4 s","4.6 s"],"first-cpu-idle":["9.9 s","9.6 s","9.1 s","9.6 s","9.5 s","8.2 s","7.7 s","9.2 s","9.2 s","9.4 s","10.1 s","10.2 s","8.5 s","7.8 s","9.5 s"],"interactive":["11.2 s","10.8 s","10.0 s","10.8 s","10.6 s","12.2 s","10.4 s","10.1 s","10.5 s","10.6 s","11.3 s","11.5 s","9.7 s","9.9 s","10.6 s"],"max-potential-fid":["1,500 ms","480 ms","180 ms","510 ms","240 ms","460 ms","420 ms","430 ms","440 ms","630 ms","430 ms","1,200 ms","440 ms","480 ms","500 ms"]}Beautify{ "first-contentful-paint": [ "2.4 s", "2.0 s", "2.1 s", "2.1 s", "1.8 s", "2.1 s", "2.1 s", "1.9 s", "2.1 s", "1.9 s", "2.3 s", "2.7 s", "1.9 s", "2.1 s", "1.9 s" ], "first-meaningful-paint": [ "2.4 s", "2.0 s", "2.1 s", "2.5 s", "2.3 s", "2.1 s", "2.6 s", "1.9 s", "3.1 s", "2.3 s", "2.3 s", "2.9 s", "1.9 s", "2.6 s", "1.9 s" ], "speed-index": [ "3.9 s", "4.3 s", "5.3 s", "4.5 s", "4.7 s", "3.8 s", "5.6 s", "4.7 s", "5.1 s", "4.2 s", "5.1 s", "6.0 s", "3.7 s", "5.4 s", "4.6 s" ], "first-cpu-idle": [ "9.9 s", "9.6 s", "9.1 s", "9.6 s", "9.5 s", "8.2 s", "7.7 s", "9.2 s", "9.2 s", "9.4 s", "10.1 s", "10.2 s", "8.5 s", "7.8 s", "9.5 s" ], "interactive": [ "11.2 s", "10.8 s", "10.0 s", "10.8 s", "10.6 s", "12.2 s", "10.4 s", "10.1 s", "10.5 s", "10.6 s", "11.3 s", "11.5 s", "9.7 s", "9.9 s", "10.6 s" ], "max-potential-fid": [ "1,500 ms", "480 ms", "180 ms", "510 ms", "240 ms", "460 ms", "420 ms", "430 ms", "440 ms", "630 ms", "430 ms", "1,200 ms", "440 ms", "480 ms", "500 ms" ] }
- 停止する場合は
Ctrl + Cでシグナルを送信します


- 投稿日:2020-01-21T00:04:43+09:00
ElectronでcontextBridgeによる安全なIPC通信
はじめに
Electronの情報って、検索すると沢山出てくるのに、ところどころみな違っていて見極めが難しいですよね。まだまだ私自身よくわかっていないですが、調べた情報を共有します。
現時点での結論として、セキュアなIPC通信にはcontextBridgeを使おう、ということらしいです。
とはいえ、Electronの状況はversionによってかなり変わるようなので、以下の際内容には注意してください。こちらで検証した時点でのElectronのversionは7.1.9です。
Electronにおけるセキュアな設計とは
前提として、Electronでは、メインプロセスと、webページ画面として動くレンダラープロセスが立ち上がります。最初にelectronコマンドの引数として指定したjsファイル(今回はmain.jsとします)がmainプロセス上で実行され、
$ electron ./main.jsその中で
BrowserWindow.loadURL()関数などで読み込まれたhtmlがレンダラープロセス上で起動します(今回はindex.htmlとします)。また、index.html上で読み込まれたjsファイルもレンダラープロセス上で実行されます。たたき台として、以下のようなコードが最小コードとしましょう。
/* main.js, case 0 (initial) **************************/
const {electron,BrowserWindow,app} = require('electron');
let mainWindow = null;
const CreateWindow = () => {
    mainWindow = new BrowserWindow({width: 800, height: 600});
    mainWindow.loadURL('file://' + __dirname + '/index.html');
    mainWindow.webContents.openDevTools();
    mainWindow.on('closed', function() {
        mainWindow = null;
    });
}
app.on('ready', CreateWindow);
<!--index.html, case 0 (initial) --> <!DOCTYPE html> <html> <head> <meta charset="UTF-8"> <title>Test</title> </head> <body> <button id="button1">test1</button> </body> <script type = "text/javascript"> //適当なプログラム const electron = require('electron');//これがエラーになる const {ipcRenderer} = require('electron');//これもエラー </script> </html>ここで、昔のversionのElectronではレンダラープロセス上でもファイル読み書きなどのnodeの便利なメソッドが使えたわけですが、最近はdefaultでは使えなくなっているそうです。ですので、上記の様にレンダラープロセス上の「適当なプログラム」の部分で
require('electron')と書いて実行しようとすると、"Uncaught ReferenceError: require is not defined at index.html"のようなエラーメッセージが出ます。じゃあ、ファイル読み書きなどのnodeの機能はメインプロセス上だけでやろう、という方針を取るにしても、レンダラープロセスからの信号や情報をメインプロセスへ伝える手段がいるわけです。プロセス間の通信は
IPC通信としてElectronのAPIが用意されているものの、最低限レンダラープロセス上での通信処理を司るipcRendererが欲しくなります(公式docs)。しかし、requireが使えないのでそれすら取得できません。どうしましょう。
巷の情報
検索して出てくる情報は以下のようなものが多いです。
nodeIntegration: trueにすればよい。セキュアにするには
nodeIntegration: falseのままにすべし。その代わりpreloadを使おう。
preload内で準備したオブジェクトや関数をレンダラープロセスのjsで使うためには、(
globalや)windowの変数に追加することでインスタンスを渡そう。あるversion以降、プロセス間で
windowが同一のオブジェクトではなくなった。よって受け渡しできない。同一オブジェクトにするにはcontextIsolation: falseとしよう。いやいや、セキュアにするには
contextIsolation: trueのままにしよう。
contextBridgeを使えば、nodeIntegration: false,contextIsolation: trueでもIPC通信できる[^1][^2]。巡り巡って、どうやら、7番の方法で解決みたいですが、それ以前の手立ても含めて以下にまとめていきます。
方法1(情報1): nodeIntegration: true
nodeIntegrationというのは、メインプロセスでウィンドウを生成するとき位のオプションで指定します。先のmain.jsにおいて、
BrowserWindowの生成部分のコードを以下の様に書き替えます。/* main.js, case 1 */ // ~略~ // const CreateWindow = () => { mainWindow = new BrowserWindow({width: 800, height: 600, webPreferences: { nodeIntegration: true, } }); // ~略~ //これだけで、レンダラープロセスで
require関数が使えるようになります。しかし、デバッグコンソールには"Electron Security Warning (Insecure Content-Security-Policy)"というwarningメッセージがでてきて、なにやら危ないようです。XSSの危険が大きいということで、あまりお勧めできないようです。方法2(情報2-6):preloadを使う
では、
nodeintegration: falseとしながら、レンダラープロセスでせめてIPC通信だけでもするにはどうするのか。そこで出てくるのがpreloadで追加jsを先行して読ませる方法です。読ませるjsをpreload.jsとします。このpreload.jsにおいてはnode.jsの機能、つまりrequire関数が使えるので、これをグローバルなオブジェクト変数として記録します。それをレンダラープロセスから使うということになります。コードで書くと、次のようになります。/* main.js, case 2 */ //ipcMainの追加 const {electron,BrowserWindow,app,ipcMain} = require('electron'); let mainWindow = null; const CreateWindow = () => { mainWindow = new BrowserWindow({width: 800, height: 600, webPreferences: { nodeIntegration: false, //ここはfalseのまま contextIsolation: false, //これをfalseに preload: __dirname + '/preload.js' //preloadするjs指定 } }); mainWindow.loadURL('file://' + __dirname + '/index.html'); mainWindow.webContents.openDevTools(); mainWindow.on('closed', function() { mainWindow = null; }); } app.on('ready', CreateWindow); //IPCメッセージの受信部(レンダラープロセスから送られる)// ipcMain.on("msg_render_to_main", (event, arg) => { console.log(arg); //printing "good job" });/* preload.js, case 2*/ const {ipcRenderer} = require('electron'); window.MyIPCSend = (msg)=>{ ipcRenderer.send("msg_render_to_main", msg); }<!-- index.html, case 2 --> <!DOCTYPE html> <html> ~~略~~ <script type = "text/javascript"> //適当なプログラム const button1 = document.getElementById("button1"); button1.addEventListener("click", (e)=>{ window.MyIPCSend("good job");}); </script> </html>まず、main.jsでは、
BrowserWindowの生成のoptionにpreloadとcontextIsolationの項目を追加しています。またIPCメッセージの受信部としてipcMain.onを設定しています。preload.jsでは
requireが利用できるので、グローバル変数としてwindow.MyIPCSend(msg)関数を追加し、その中でipcRendererを使ったメッセージ送信の機能を持たせます。ここからメインプロセスのipcMain.onへメッセージを送ります。index.htmlではボタンを押したときに
window.MyIPCSend(msg)関数を呼び出します。これはpreload.jsで定義したものですが、グローバルなwindowオブジェクトに保持されているので使えるようです。このような形でIPCメッセージだけでもやり取りできれば、それで必要な情報を送り、node関連の機能を使った処理は全てメインプロセスへ押し付けてしまうこともできるでしょう。
ところがこの方法でも、
contextIsolation: falseが必要です。あるversionからデフォルトではcontextIsolation: trueとなったようです。そしてセキュアにするには、ここもtrueがよいと。しかし、trueとすると、preload.jsから呼び出したwindowと、index.htmlで呼び出すwindowのインスタンスが別物になってしまいます。よって、window.MyIPCSend(msg)関数をindex.htmlから呼び出しても、定義されていない旨のエラーメッセージが出ます。方法3(情報7):contextBridgeを利用する
さて、
nodeIntegration: falseかつcontextIsolation: trueのままでIPC通信する手段として、contextBridgeというElectron APIがあるそうです[^1]。これはElectronで公式に提案されたセキュアなプロセス間通信の実現のためのAPIだそうです(これを見つけた時は、嬉しくて叫んじゃいました)。コードは次のようになります。
/* main.js, case 3 (final) */
// ~~略~~ ここまでcase2と同じ//
    mainWindow = new BrowserWindow({width: 800, height: 600,
        webPreferences: {
            nodeIntegration: false, //ここはfalseのまま
            contextIsolation: true,  //trueのまま(case2と違う)
            preload: __dirname + '/preload.js' //preloadするjs指定
        } });
// ~~略~~ 以後もcase2と同じ//
/* preload.js, case 3 (final)*/ const { contextBridge, ipcRenderer} = require("electron"); contextBridge.exposeInMainWorld( "api", { send: (data) => { ipcRenderer.send("msg_render_to_main", data); } } );<!-- index.html, case 3 (final) --> <!DOCTYPE html> <html> ~~略~~ <script type = "text/javascript"> //適当なプログラム const button1 = document.getElementById("button1"); button1.addEventListener("click", (e)=>{ window.api.send("god job");}); </script> </html>さて、main.jsは方法2と比べて
contextIsolation: trueに変えただけです。大きく変わったのはpreload.jsです。electronからオブジェクト
contextBridgeを取り出し、exposeInMainWorld()によってグローバルな関数send()を登録しています。ここで登録した関数は、レンダラープロセスのindex.htmlの中からもwindow.api.send()として呼び出すことができます。めでたし、めでたし。
注意点
contextBridgeはとっても良さそうなAPIですが、Electronのドキュメント[^3]には次のように書かれています。
"The
contextBridgeAPI has been published to Electron's master branch, but has not yet been included in an Electron release."一応、私の環境のversion7.1.9では使えていますが、いつから使えるようになったのかはちょっと不明なので、気を付けてください。
感想
HTML+Javascriptでブラウザ上だけでほぼ動くものを作ってしまえば、パッケージングはElectronですぐにできると思っていた時期が僕にもありました。。。
この記事がだれかの参考になれば幸いです。とはいえ、なにぶんJavascriptはライト勢なので、間違いもたくさんありそう。ご指摘いただければ大変嬉しいです。
References