- 投稿日:2019-12-01T23:05:52+09:00
TypeScript での DI について
本記事は、ぷりぷりあぷりけーしょんずアプリ開発担当による、ぷりぷりあぷりけーしょんず Advent Calendar 2019 の10日目の記事となります。
背景
マイクロサービスの簡単な勉強として、 RESTful API を Node.js で作成しようと開発を始めました。
また、静的型付にしたかったため、流行りの TypeScript を採用。あと、フレームワークでは王道の Express を使用します。
せっかくなので、クリーンアーキテクチャにも挑戦したいなというのもあり、そのアーキテクチャで設計や実装を始めました。
実装を進めていく上で、いちいちconstructorでnewするのが嫌だったのと、 interface の実態がなんなのかを1つのファイルで完結させたかった(まさに DI Container)というのがあり、なんかいいのがないのか調べたところ、InversifyJSとなるものを発見。
これはなかなかいいなと感じたため、記事にしてみようかと思った次第どす。InversifyJS とは
TypeScript での強力で軽量の DI コンテナです。
セットアップ
Node.js でのプロジェクトが作成されている前提で話を進めていきます。
TypeScript の開発環境構築に関しては、以下のコマンドを実行するだけで出来上がるかと思われます。
ただ、Node や npm などのインストール方法に関しては省略します。あと、npx も使える前提で進めます。$ mkdir <project name> $ cd <project name> $ npm init -y $ npm i -D typescript ts-node $ npx tsc --initここまでで、TypeScript の環境はできました。(他にもやることは色々ありますが、、)
注意点としては、InversifyJS は TypeScript のバージョン 2.0 以上 をサポートしているため、インストールの際はバージョンに気をつけてください。
それでは、InversifyJS の環境構築していきます。
っとは言っても、やり方は README に記載している通りにすれば完了です。笑
まずはプロジェクトのルートで以下コマンドを実行$ npm i -S inversify reflect-metadata次に tsconfig.json のコンパイルに関する設定を編集します。
{
    "compilerOptions": {
        "target": "es5",
        "lib": ["es6"],
        "types": ["reflect-metadata"],
        "module": "commonjs",
        "moduleResolution": "node",
        "experimentalDecorators": true,
        "emitDecoratorMetadata": true
    }
}
個人的には、
targetとlibに関しては、esnextでいい気もしますが、そこはお好みで。
あと、相対パスの設定とビルドした際に吐き出されるフォルダ指定の設定も含めたいので、以下の設定を追加します。(ここもお好みで){ "compilerOptions": { ... "emitDecoratorMetadata": true, "paths": { "@/*": [ "src/*" ] }, "outDir": "./dist" } }以上で、セットアップ完了です。
実装
それでは実際に実装に入ってみます。
実装に関してはクリーンアーキテクチャを自分なりに組んでおり、そのソースを記載してく感じになりますが、InversifyJS 雰囲気だけ感じてもらえればなと思います。
今回は1リソースをサンプルに記述していこうかと思います。
内容はポケモン情報一覧取得です。(ポケモンに関する薄っぺらい情報一覧を返すエンドポイントを作成します)各パーツの作成
まず、データベースからデータ取得する repository を定義してきます。
こちらは、マルチ DB 対応・モックデータ取得といったように、汎用性を効かせるため、interface で定義してきます。
今回使用している ORM では TypeORM ってのを用いています。(そちらの説明は主旨とは異なるため省きます)src/domain/repositories/IPokemonRepository.tsimport Pokemons from '@/domain/entities/Pokemons'; export default interface IPokemonRepository { findAll(): Promise<Pokemons[]>; }こちらの interface に対して、どの実態のインスタンスを格納するかを InversifyJS で設定していきます。
その設定の話は後にするとして、まずは実態を実装していきましょう。src/infrastructure/repositories/PokemonRepository.tsimport { injectable } from 'inversify'; import IPokemonRepository from '@/domain/repositories/IPokemonRepository'; import Pokemons from '@/domain/entities/Pokemons'; @injectable() export default class PokemonRepository implements IPokemonRepository { public async findAll(): Promise<Pokemons[]> { return Pokemons.find().catch(err => { throw err; }); } }DI に関わるクラスなどには
@injectable()を付与します。次にポケモン一覧取得の Usecase を定義します。
src/usecases/pokemons/ISearchPokemonUsecase.tsimport PokemonSearchResponse from '@/usecases/dto/models/PokemonSearchResponse'; export default interface ISearchPokemonUsecase { search(): Promise<PokemonSearchResponse[]>; }こちらも、実態を実装していきます。
src/interactores/pokemons/SearchPokemonInteractor.tsimport { injectable, inject } from 'inversify'; import 'reflect-metadata'; import ISearchPokemonUsecase from '@/usecases/pokemons/ISearchPokemonUsecase'; import TYPES from '@/registories/inversify.types'; import IPokemonRepository from '@/domain/repositories/IPokemonRepository'; import Pokemons from '@/domain/entities/Pokemons'; import PokemonSearchResponse from '@/usecases/dto/models/PokemonSearchResponse'; @injectable() export default class SearchPokemonInteractor implements ISearchPokemonUsecase { @inject(TYPES.IPokemonRepository) private repository: IPokemonRepository; public async search(): Promise<PokemonSearchResponse[]> { const pokemons: Readonly<Pokemons>[] = await this.repository.findAll(); return pokemons.map( (p): PokemonSearchResponse => new PokemonSearchResponse(p.id, p.code, p.name, p.generationNo) ); } }こちらも同様に
@injectable()を先頭に付与します。また、先ほどの repository の interface をメンバ変数として定義しています。
こちらには@injectを付与します。その引数に関しては後に定義していきます。
最後に Controller を定義します。import { Request, Response } from 'express'; import { injectable, inject } from 'inversify'; import 'reflect-metadata'; import TYPES from '@/registories/inversify.types'; import ISearchPokemonUsecase from '@/usecases/pokemons/ISearchPokemonUsecase'; import PokemonSearchResponse from '@/usecases/dto/models/PokemonSearchResponse'; import PokemonSearchResponseViewModel from '@/usecases/dto/viewModels/PokemonSearchResponseViewModel'; @injectable() export default class PokemonController { @inject(TYPES.ISearchPokemonUsecase) private usecase: ISearchPokemonUsecase; async search(_: Request, res: Response): Promise<void> { const response: PokemonSearchResponse[] = await this.usecase.search(); const result: PokemonSearchResponseViewModel[] = response.map( (r): PokemonSearchResponseViewModel => new PokemonSearchResponseViewModel( r.id, r.code, r.name, r.generationNo ) ); res.status(201).json(result); } }DTO の中身に関しては、Entity とほぼほぼ変わらないクラスとなっています。
まだまだ、ハードコードを直すこと(HTTP statusとか)やトランザクション周りの設定など、やることは多いですがざっとこんな感じで完成です。DI Container の定義
ソース中に出てきた
TYPESや実態をどのように設定しているかについて、記載していきます。
まずはTYPESの定義をしてきます。
ここでは、どのクラスが実態となるのかの識別子を定義しています。定義方法は自由で、クラスでも文字列リテラルでもいいそう。
今回は README にあるようなSymbolで定義しています。src/registories/inversify.types.tsconst TYPES = { PokemonController: Symbol.for('PokemonController'), IPokemonRepository: Symbol.for('IPokemonRepository'), ISearchPokemonUsecase: Symbol.for('ISearchPokemonUsecase') } as const; export default TYPES;最後に DI Container の定義です。
import { Container } from 'inversify';

import IPokemonRepository from '@/domain/repositories/IPokemonRepository';
import PokemonRepository from '@/infrastructure/repositories/PokemonRepository';
import ISearchPokemonUsecase from '@/usecases/pokemons/ISearchPokemonUsecase';
import SearchPokemonInteractor from '@/interactores/pokemons/SearchPokemonInteractor';
import PokemonController from '@/controllers/pokemons/PokemonController';

import TYPES from '@/registories/inversify.types';

const container = new Container();
container
    .bind<IPokemonRepository>(TYPES.IPokemonRepository)
    .to(PokemonRepository);
container
    .bind<ISearchPokemonUsecase>(TYPES.ISearchPokemonUsecase)
    .to(SearchPokemonInteractor)
    .inSingletonScope();
container
    .bind<PokemonController>(TYPES.PokemonController)
    .to(PokemonController);

export default container;
まず、今まで定義した interface とその実態クラス、クラス中に
@injectしているクラスをインポートします。
その後に、先ほど定義したTYPESの識別子を用いて、どの interface にはどの実態クラスが格納されるといった設定をしていきます。
今回は普通に設定しましたが、環境変数を参照してこの実態クラスを格納する、といったような設定を記述していくと思われます。src/registories/inversify.config.tsconst { NODE_ENV } = process.env; if (NODE_ENV === 'development') { container .bind<IPokemonRepository>(TYPES.IPokemonRepository) .to(PokemonRepository) .inSingletonScope(); container .bind<ISearchPokemonUsecase>(TYPES.ISearchPokemonUsecase) .to(SearchPokemonInteractor) .inSingletonScope(); container .bind<PokemonController>(TYPES.PokemonController) .to(PokemonController) .inSingletonScope(); } else if (NODE_ENV === 'test') { container .bind<IPokemonRepository>(TYPES.IPokemonRepository) .to(PokemonMock) .inSingletonScope(); container .bind<ISearchPokemonUsecase>(TYPES.ISearchPokemonUsecase) .to(SearchPokemonTestInteractor) .inSingletonScope(); container .bind<PokemonController>(TYPES.PokemonController) .to(PokemonController) .inSingletonScope(); }すいません。すっごい適当に書いてます。笑
あくまでも一例だと思ってください。
理想は、環境ごとに config ファイルを用意して(inversify.dev.tsやinversify.test.tsなど) どれを読み込むかをinversify.config.tsでいい感じにするがいいのかもしれません。定義した Controller を Express でコールしてみる
ここまで定義したのを Express Router に読み込ませます。
src/app.tsimport * as express from 'express'; import { Request, Response } from 'express'; import 'reflect-metadata'; import container from '@/registories/inversify.config'; import PokemonController from '@/controllers/pokemons/PokemonController'; import TYPES from '@/registories/inversify.types'; const pokemonControllerContainer = container.get<PokemonController>( TYPES.PokemonController ); const app = express(); app.get('/', (req: Request, res: Response) => pokemonControllerContainer.search(req, res) ); const port = 3000; app.listen(port, () => console.log(`Example app listening on port ${port}!`));これで config に基づいて DI された実態クラスのメソッドがコールされ、処理が実行されます。
また、エンドポイントでの処理を以下のように記述するとなぜかうまくいきませんでした。。。(ここ、ちょっとハマりました)app.get('/', pokemonControllerContainer.search);まとめ
とりあえず、記事まとめるのはとても疲れますね。(後半、結構雑になってるかもしれません。。。)
結構シンプルな実装になるので、キャッチアップも早くできるかと思われます。
個人的に、DI される実態クラスを設定できるのはとてもありがたいので、サーバサイド開発では今後とも使っていこうと思っています。
結構スター数も多いので安心して使えるパッケージです。気になる方は是非使用してみてください!明日は @MSHR-Dec さんの記事となります!
- 投稿日:2019-12-01T20:38:35+09:00
【TypeScript】マークダウン文字列をHTMLにパースする(GitHub Flavored Markdown)
サンプル
今回紹介するコードを使用しているのがこちら。
デモページ: github-markdown-editor
github: kou-pg-0131/github-markdown-editor使用するモジュール
marked,@types/marked
markdownをHTMLにパース
highlight.js,@types/highlight.js
コードのシンタックスハイライト部分をパース
highlightjsモジュールも存在しますが、別物なので間違えないように注意npm i marked @types/marked highlight.js @types/highlight.jsサンプルコード
import marked from 'marked'; import highlightjs from 'highlight.js'; marked.setOptions({ highlight: function(code, lang) { return highlightjs.highlightAuto(code, [lang]).value; }, // シンタックスハイライトに使用する関数の設定 pedantic: false, // trueの場合はmarkdown.plに準拠する gfmを使用する場合はfalseで大丈夫 gfm: true, // GitHub Flavored Markdownを使用 breaks: true, // falseにすると改行入力は末尾の半角スペース2つになる sanitize: true, // trueにすると特殊文字をエスケープする silent: false // trueにするとパースに失敗してもExceptionを投げなくなる }); const markdown: string = ` # Hello World \`\`\`ruby puts 'Hello World' \`\`\` <h1>Hello World</h1> ` const html: string = marked(markdown) console.log(html); /* => * <h1 id="hello-world">Hello World</h1> * <pre><code class="language-ruby">puts <span class="hljs-string">'Hello World'</span></code></pre> * <p><h1>Hello World</h1> * </p> */参考
- 投稿日:2019-12-01T18:20:13+09:00
毎日npm auditを実行して脆弱性対応する
はじめに
Node.jsで開発している方は多くのnpmパッケージを利用していますよね。これらの脆弱性をいち早く見つけて対応するために、私が実践していることを紹介します。
CIと言えるかやや不安ですが、細かく考えずCI/CD Advent Calendarに投稿してしまいます。
背景
ある程度の規模の企業では、依存パッケージの脆弱性スキャンとしてOSSや商用ツールを利用しているところもあるでしょう。ただし、小規模な企業や個人開発ではそこまでなかなか手が回らない、お金が出せないというケースもあるかもしれません。そこで、安価に(できれば無料で)手っ取り早く脆弱性を発見する仕組みを検討してみました。
対象
package-lock.jsonに列挙されている依存パッケージの脆弱性検知を対象とします。自前のソースコードの脆弱性スキャンなどは本記事の対象外です。脆弱性検知の方法
私は個人開発のリポジトリで2つの方法を併用しています。
- Snyk
- npm audit on CircleCI
本記事では後者を紹介します。
npm audit on CircleCI
npm auditはnpmに標準で含まれるサブコマンドで https://www.npmjs.com/advisories (など?)を情報源として脆弱性を見つけるものです。npm v6ぐらいから利用できます。私が採用している方法は何も難しいものではなく、この
npm auditコマンドをCircleCIで毎日実行して、脆弱性が見つかったらSlackに通知するというものです。では、設定ファイルを紹介します。.circleci/config.ymlversion: 2 jobs: build: docker: - image: circleci/node steps: - checkout - run: name: update npm command: 'sudo npm install -g npm@latest' - run: npm ci - run: name: npm test command: $(npm bin)/nyc npm test && $(npm bin)/nyc report --reporter=text-lcov | $(npm bin)/coveralls - run: npm run lint - run: name: install serverless command: 'sudo npm install -g serverless' - deploy: name: sls deploy command: | if [ "${CIRCLE_BRANCH}" == "master" ]; then sls deploy --stage prod else sls deploy --stage dev fi vul-check: docker: - image: circleci/node steps: - checkout - run: name: update npm command: 'sudo npm install -g npm@latest' - run: npm ci - run: npm audit workflows: version: 2 commit-workflow: jobs: - build nightly: triggers: - schedule: cron: "0 16 * * *" filters: branches: only: master jobs: - vul-checkhttps://github.com/oke-py/container-linux-release-feed/blob/master/.circleci/config.yml
npm auditに関係ない部分もそのまま掲載していますが、
vul-checkあたりをご参照ください。nightly buildでmasterブランチに対してnpm ci、npm auditを実行しています。こちらがエラー時の例です。
https://circleci.com/gh/oke-py/container-linux-release-feed/193脆弱性対応
こうして毎晩脆弱性をチェックし、見つかったときはどうするかを示します。
npm audit fix; npm update基本的にはこれだけです。極稀に
npm audit fixでは解決できず、手動で対応する必要があります(昔すぎてどんな対応をしたか忘れました)。所感
前述のように2種類の方法を併用していますが、半年ほど使ってみてSnykからの通知を起点に対応したことはありません。
npm auditで脆弱性を見つけています。おわりに
安価で手っ取り早く脆弱性スキャンする方法を紹介しました。ざっと確認したところ他の言語では3rd partyのツールに頼らざるを得ない感じです。標準サポートされないかな・・・
- 投稿日:2019-12-01T18:09:04+09:00
Node.js & Express & MySQL & React でTODOリスト API編
目的
ReactでTODOアプリを作成したことはありますが、自分でAPIを書いたことがなかったので書いてみました。
Web企業未経験なので、間違いなどありましたらご指摘いただけると助かります!APIを書くまえに
まずは簡単にNode.jsとReactの勉強をUdemyで行いました。
Linkは下記になります。【フロントエンドエンジニアのための React ・ Redux アプリケーション開発入門】
https://www.udemy.com/course/react-application-development/【Node.js速習講座 Part1 <導入&基礎編>】
https://www.udemy.com/course/nodejs-part1/【Node.js速習講座 Part1 】
https://www.udemy.com/course/nodejs-part2-express/データベースとテーブルの準備
まずはじめにMySQLで必要なテーブルを準備します。
$ sudo service mysqld status

$ mysql -u root

mysql> create database todo_api;

mysql> use todo_api;

mysql> create table todo_list(id int auto_increment, name varchar(255), isDone boolean, index(id));

mysql> insert into todo_list(name, isDone) values('todo sample', true);

mysql> exit
name : やることを保存
isDone : todoが完了しているか(true / false)これでテーブルの準備は完了です。
AUTO_INCREMENTを使用する際はindexを作成する必要がある点にご注意ください。Node.jsで実際に処理を書いていく
ここからがいよいよAPIを書いていきます。
まずは、必要なnpmパッケージをインストールしましょう。
# 作成したディレクトリ内で
$ npm init

$ npm install express --save
$ npm install body-parser --save
$ npm install mysql --save
body-parserを使用することで、データの取得が容易になります。
後ほど使用します。まずは、定型文的な処理を書いていきます。
index.jsconst express = require("express") const app = express() const bodyParser = require("body-parser"); const mysql = require("mysql") app.use(bodyParser.urlencoded({ extended: true })); # *******は、ご自身のパスワード const connection = mysql.createConnection({ host: 'localhost', user: 'root', password: '*******', database: 'todo_api' }) connection.connect(); const port = process.removeListener.PORT || 3000; app.listen(port)ここからMethotごとの処理を記述していきます。
まずはgetからindex.jsapp.get('/api/v1', (req, res) => { connection.query('select * from todo_list', (error, results, fields) => { if (error) { console.log(error) } res.send(results) }) }) app.get('/api/v1/:id', (req, res) => { connection.query("select * from todo_list where id = ?", req.params.id, (error, result, fields) => { if (error) { console.log(error) } res.send(result) }) })select * from todo_list where id = ?", req.params.id はSQLインジェクション対策です。
select * from todo_list where id = ${req.params.id}" は危険です。
他は簡単ですね。続いてPOST
index.jsapp.post('/api/v1', (req, res) => { let todo = { name: req.body.name, isDone : req.body.isDone } connection.query("insert into todo_list(name, isDone) values(?, ?)", [todo.name, todo.isDone], (error, results, fields) => { if (error) { console.log(error) } res.send(todo) }) })body-parserを使用することによって、req.body.nameのように書くことでデータを取得することができます。
ただ、APIとして使用する際にtodoというオブジェクトが必要なのかどうかは自分はまだよくわかっていないので、
もしかしたら消すかもしれません(笑)続いてPUT
index.jsapp.put('/api/v1/:id', (req, res) => { connection.query(`select * from todo_list`, (error, results, fields) => { connection.query("update todo_list set name = ?, isDone = ? where id = ?", [req.body.name, req.body.isDone, req.params.id], (error, result, fields) => { if (error) { console.log(error) } res.send(result) }) }) })update todo_list set name = ?, isDone = ? where id = ?,[req.body.name, req.body.isDone, req.params.id]は、
? は複数個になった場合は引数に配列で値を配置します。
配置する値がフィールドの場合は ?? とします。書き方はとんでもなく汚いような気がします。。。。。
何か他の方法があれば教えていただきたいです(切実)
やっていることは、POSTの処理のSQL文をUPDATEにしただけです。
簡単ですね。最後にDELETE
index.jsapp.delete('/api/v1/:id', (req, res) => { connection.query(`select * from todo_list`, (error, results, fields) => { connection.query("delete from todo_list where id = ?", req.params.id, (error, result, fields) => { if (error) { console.log(error) } res.send(result) }) }) })特に解説する部分はありません。
Postmanでテスト
APIを作成する際はPostmanが便利です。
Link https://www.getpostman.com/試しにGETを送信すると、こんな感じでJSON形式でデータが返ってきます。
いい感じですね。
終わり
これでとりあえずAPIは終了です。
昨日Nodeの勉強を始めたばかりなので、書き方が間違えている部分はお許しください(笑)今後はAPIをHerokuにデプロイして、それを使用してReactでTODOリストの作成をします。
強強エンジニアの方、ぜひ間違えている部分を個人的にでもコメントにでも良いので教えていただきたいです。
- 投稿日:2019-12-01T17:25:47+09:00
WebpackerなしでNode.jsベースの最小のJavaScriptビルド環境を設定する「minimum_javascript_on_rails」
はじめに
事の始まりはかれこれ1年程運用している個人プロダクトにWebpackerを導入しようとしたことです。
Webpackerを使うという選択は正直「なんとなく」でした。しかしWebpackerに関する様々な記事を読んでいたところ、pixivさんの今日から簡単!Webpacker 完全脱出ガイドやMisocaさんのWebpackerを導入してから外すまでをふりかえるをはじめとした脱Webpacker系記事がいくつか見受けられたことや、「なんとなく」Webpackerを使うよりは自分で設定した方がはるかに勉強になると思い、結果的にWebpackerの使用はやめました。本記事では、
minimum_javascript_on_railsを参考に最小のビルド環境を設定する手順を説明していきたいと思います!minimum_javascript_on_railsとは
WebpackerなしでNode.jsベースの最小のJavaScriptビルド環境を設定した、Ruby on Railsアプリケーションのサンプルである
公式リポジトリ
こんなアプリケーションにおすすめ
- あまり多くのJavaScriptのコードを含まない
- スタイルシートのビルド環境は
sprockets-railsで十分- 使わない
npmパッケージはインストールしない- 必要なパッケージを即座に更新できるようにするために、
npmパッケージは可能な限り個別のものとして管理する既存アプリケーションへの設定
minimum_javascript_on_railsではプルリクエスト形式で設定のカスタマイズ例を示してくれているので、細かい実装の仕方を知りたい方や、順を追って設定していきたい方はリポジトリからPRを追うのが一番早いです
環境
- Ruby ->
2.6.3- Ruby on Rails ->
6.0.1- Node.js ->
12.6.0流れ
npm run buildが動くようにするnpm run watchが動くようにする- クロスブラウザで新しいECMAScript機能を有効にする
- JSファイルの移行
- その他設定
1.
npm run buildが動くようにするまずはGitの管理対象から外したいファイルを
.gitignoreに追加します.gitignore/client/tmp/ /node_modules/ /public/client/ npm-debug.log次に、以下コマンドでjsファイルをビルドするためのnpmパッケージを準備します
npm install -D webpack webpack-cli @babel/core @babel/preset-env babel-loader assets-webpack-plugin次に、
npm run buildを実行するとpublic/client/webpacked-{hash}.jsにjsファイルが生成され、client/src/index.js(エントリーポイント)に関連するすべてのソースを再帰的にバンドル&コンパイルされるように設定していきます。
また、assets-webpack-plugin(アセットパスを含むJSONファイルを生成するプラグイン)と、毎ビルド前に古いファイルを消去する設定(webpacked-{hash}.jsは互いに異なるハッシュを持っているため、古いファイルを削除しないと残り続けてしまいます)もしておきます。client/webpack/production-build.config.jsconst AssetsPlugin = require('assets-webpack-plugin'); const path = require('path'); const javaScriptRoot = path.join(__dirname, '../src'); // -> "{project-root}/client/src" const publicationRoot = path.join(__dirname, '../../public/client'); // -> "{project-root}/public/client" const temporaryFilesRoot = path.join(__dirname, '../tmp'); // -> "{project-root}/client/tmp" module.exports = { mode: 'production', entry: { 'webpacked': path.join(javaScriptRoot, 'index.js'), }, output: { filename: '[name]-[chunkhash].js', path: publicationRoot, }, module: { rules: [ { test: /\.m?js$/, exclude: /node_modules/, use: [ { loader: 'babel-loader', }, ], }, ], }, plugins: [ new AssetsPlugin({ filename: 'webpack-manifest.json', path: temporaryFilesRoot, }), ], };package.json"scripts": { "build": "npm run clean && npm run webpack", "clean": "if [ -e client/tmp ]; then rm -r client/tmp; fi && if [ -e public/client ]; then rm -r public/client; fi", "test": "echo \"Error: no test specified\" && exit 1", "webpack": "$(npm bin)/webpack --config client/webpack/production-build.config.js" },最後に、
client_side_javascript_tag(Webpackerでいうとjavascript_pack_tag)を定義すれば完成です!app/helpers/application_helper.rbmodule ApplicationHelper def client_side_javascript_tag path = ClientSideSupporter.webpacked_javascript_path javascript_include_tag(path).html_safe end endapp/helpers/application_helper/client_side_supporter.rbmodule ApplicationHelper # A module for cooperation with the client side module ClientSideSupporter class << self # Returns a value that is used for the "src" attribute on script tag. def webpacked_javascript_path "#{base_publication_path}/#{webpack_manifest['webpacked']['js']}" end private def base_publication_path # If you have specified an external host in `config.action_controller.asset_host`, # you need to consider it here. '/client' end def webpack_manifest Rails.application.config.x.client_side_supporter.webpack_manifest end end end endconfig/initializers/client_side_supporter.rbwebpack_manifest_json_path = Rails.root.join('client', 'tmp', 'webpack-manifest.json') unless File.exist?(webpack_manifest_json_path) raise 'Please execute `npm run build` command before operating the Rails.' end Rails.application.config.x.client_side_supporter.webpack_manifest = JSON.parse(File.read(webpack_manifest_json_path))app/views/layouts/application.html.erb<%= client_side_javascript_tag %> # add <%= javascript_pack_tag 'application', 'data-turbolinks-track': 'reload' %> # delete
npm run buildの後にrails serverを実行して確認してみてください!2.
npm run watchが動くようにするまずは以下コマンドでclean-webpack-pluginというビルド時に出力先フォルダの中身を空にするプラグインを入れます
npm install -D clean-webpack-plugin次に、
npm run watchが動くようにしていきます。
(先ほど作成したproduction-build.config.jsとwatch-for-development.config.jsは共通部分が多いので、こちらのPRを参考にまとめてみてください)client/webpack/watch-for-development.config.jsconst AssetsPlugin = require('assets-webpack-plugin'); const {CleanWebpackPlugin} = require('clean-webpack-plugin'); const path = require('path'); const webpack = require('webpack'); const javaScriptRoot = path.join(__dirname, '../src'); // -> "{project-root}/client/src" const publicationRoot = path.join(__dirname, '../../public/client'); // -> "{project-root}/public/client" const temporaryFilesRoot = path.join(__dirname, '../tmp'); // -> "{project-root}/client/tmp" module.exports = { mode: 'none', watch: true, entry: { 'webpacked': path.join(javaScriptRoot, 'index.js'), }, output: { filename: '[name]-[chunkhash].js', path: publicationRoot, }, module: { rules: [ { test: /\.m?js$/, exclude: /node_modules/, use: [ { loader: 'babel-loader', }, ], }, ], }, plugins: [ // This is similar to `npm run clean`. // If `npm run clean` does not needed to be independent, it can be included in `npm run build`. new CleanWebpackPlugin(), // This sets an environment variable that is enabled in build process on webpack. // Many npm packages refer to the `NODE_ENV` value to change the build behavior. new webpack.DefinePlugin({ 'process.env.NODE_ENV': JSON.stringify('development'), }), new AssetsPlugin({ filename: 'webpack-manifest.json', path: temporaryFilesRoot, }), ], };package.json"watch": "$(npm bin)/webpack --config client/webpack/watch-for-development.config.js", # Add under `scripts`次に、監視対象のファイルが更新された場合にreloaderを実行する処理を書きます
config/environments/development.rbconfig.x.client_side_supporter.update_webpack_manifest_on_reloading = trueconfig/initializers/client_side_supporter.rbif Rails.application.config.x.client_side_supporter.update_webpack_manifest_on_reloading == true reloader = Rails.application.config.file_watcher.new([webpack_manifest_json_path]) do if File.exist?(webpack_manifest_json_path) Rails.application.config.x.client_side_supporter.webpack_manifest = JSON.parse(File.read(webpack_manifest_json_path)) end end Rails.application.reloaders << reloader ActiveSupport::Reloader.to_prepare do reloader.execute_if_updated end endこれでブラウザをリロードするとソースの変更が反映されるようになったと思います!
3. クロスブラウザで新しいECMAScript機能を有効にする
できるだけ多くのブラウザで動作するように
forceAllTransformsを追加し、production-build.config.js,watch-for-development.config.jsのmodule > rules > use配下に以下を追加しますoptions: { presets: [ [ '@babel/preset-env', { // This "forceAllTransforms" transforms sources for working on many browsers as possible. // // Normally, "@babel/preset-env" performs only the minimum necessary conversions // for the supported browsers specified by the "targets" option or the ".browserslistrc" file. // So this option slows down the transpiling and increases the file size of the built ".js". // But if you don't have to write a lot of JavaScript, you don't have to worry about it. forceAllTransforms: true, }, ], ], },最後に以下コマンドで
core-js@3とregenerator-runtimeをインストールし、index.js(エントリーポイント)でインポートします。npm install core-js@3 regenerator-runtimeclient/src/index.js// This polyfill way is the easiest way, but it has the largest file size and has some global side effects. // If you want to know different ways, you may want to read from the following article. // https://babeljs.io/blog/2019/03/19/7.4.0#core-js-3-7646-https-githubcom-babel-babel-pull-7646 import 'core-js/stable'; import 'regenerator-runtime/runtime';4. JSファイルの移行
あとはひたすら
app/assets/javascripts配下にあるjsファイルをclient/src配下に移行し、index.js(エントリーポイント)から各ファイルをimportすれば完成です!お疲れ様でした〜〜

5. その他設定
上記の1〜4では最小限の設定を紹介してきましたが、他にもPRが出されているので紹介しておきます
BabelからTypeScriptへ変更する
ユニットテストをNode.js/Jestで動かす
bin/setupに設定を適用
production-build.config.jsとwatch-for-development.config.jsの共通処理をまとめる
Please execute npm run build command before operating the Rails.エラーを抑止するおわりに
いかがでしたでしょうか!
実際に個人プロダクトで設定してみて、「なんとなく」Webpackerのレールに乗るよりはるかに勉強になったなと感じています。
個人的には初心者の方にこそおすすめだなと感じているので、ぜひ気になった方はリポジトリ覗いてみてください〜!
- 投稿日:2019-12-01T15:52:57+09:00
Node.js & Express & Socket.ioで非同期通信しようとしたら"/socket.io.js 404"で上手くいかない
はじめに
今までRailsしかやってこなかったのでNode.jsを入門しようと思い, とりあえずexpress-generatorでWebアプリの雛形を作り, Socket.ioを使った簡単な非同期通信チャットアプリを作ろうと思いました.
しかし, npm startしてページを開けてもGET /socket.io/socket.io.js 404と出てしまい上手くいきませんでした.
色々ググったら解決したので, 備忘録として記事を書きます.
間違ってる部分があればコメントでご指摘頂けると助かります.環境
macOS Mojava 10.14.6
Node.js 12.13.1
npm 6.12.1
Express 4.17.1
Socket.io 2.3.0何がダメだったか(私の場合)
このエラーの原因は色々と考えられますが, 私の場合はapp.jsに
var io = require('socket.io')(server);
io.on('connection', function(socket){
  console.log('connected');
});
を入れていたからっぽかったです.
socket関連の処理は, app.jsではなくbin/wwwファイルに書くとのことでした.解決策
bin/wwwに処理を書きます.
var server = http.createServer(app);の後に,
//Socket.io
var io = require('socket.io')(server);
io.on('connection', function(socket){
  console.log('connected');
});
を記述すると, 無事ターミナルで
connected
と出力されていました.
- 投稿日:2019-12-01T14:33:45+09:00
Discord.jsのフレームワーク「Ecstar」を作ったよって話
Ecstar
Discord.js のコマンド等を楽に追加するフレームワークです。
何で作ったの?
Discord、LINE、Slack の Bot などメッセージに対して反応する Bot は以下のように if 文がたくさん必要になってきます。
if (message === "aaa") {
    send("aaa");
}
if (message === "bbb") {
    send("bbb");
}
if (message === "ccc") {
    send("ccc");
...
めんどくさいので Bot の規模が大きくなってくるとできるだけ簡潔にコマンドを増やせるように、自分で何らかの処理を書くと思います。
これでもいいのですが、複数 Bot を作成するときに同じ処理を書き直す事を考えると管理面などから大変です。
なら module 化すればよくね?それ npm に上げればよくねって事でできたのが
Ecstarです。
もっといい Klasa ってのがあるよって意見は受け付けません。特徴
- ムダなコードが減って楽に Bot が作れる
- Discord.js の関数など全部利用できる
TypesScript 対応(そろそろします)使い方
現在作成中で大きな変更があると思います。
なのでこちらの最新版を確認してください。詰まったところ
実行フォルダーの取得
実行フォルダー(Ecstar を使うフォルダー)を取得するには
process.argv[1]で実行したファイルまで取得できます。
そこから〇〇.jsを消すことで実行フォルダーを取得しました。メッセージコマンドの引数
コマンドの引数の処理にかなりの時間を費やしました。
!help allのようなメッセージがあるとき
allを取得してそれに対して処理したいです。それを Ecstar 側で出力する処理をしました。まだ結構ガバガバで納得してないので上手くできたら別で記事にしたいと思います。
EventEmitter のイベントを一括で取得したい
EventEmitter2でやった方法
通常の EventEmitter では全部を一括で取得できません。
ちょっと調べたところEventEmitter2というものがあり、これは以下のように*で全部取得できます。emitter.on("*", function event(callback) { console.log(`イベント名: ${this.event} 返り値: ${callback}`); });
ですがEventEmitter2でイベントを受けるときアロー関数だとthis.eventでイベント名を取得できないのでなんかもっといい方法ないかなとか考えてます。
↓
記事公開したあと考えてたらこんな感じで実装できました(別記事)
EventEmitterですべてのイベントを取得する(ワイルドカード)npm に公開
はじめて作ったのでつまりました。
公式のドキュメントがわかりやすかったのでそれ読みつつ公開しました。これから
- TypeScript
- Discordの権限別に実行できるコマンド
- 複数のコマンド引数
終わりに
これ仮完成させたのが数ヶ月前なので思い出しつつ書きました。
今はこれを TypeScript を使ってきれいで安全なコードに書き直しています。何か意見、質問があれば
GitHub,
Twitter,Discord コミュニティーまたはコメントまで
- 投稿日:2019-12-01T12:14:47+09:00
nodebrew から nodenv に移行しました
nodebrew はディレクトリごとに利用するバージョンが切り替えられないので nodenv へ移行しました。
そのときの手順メモ。 mac OS で brew で nodebrew をいれてありました。利用しているバージョンを控えておく
$ nodebrew listnodebrew をアンインストール
$ brew update
$ brew uninstall nodebrew
利用しているシェルの設定ファイルから以下を削除する。
export PATH=$HOME/.nodebrew/current/bin:$PATHnodenv をインストール
まずは README を読む
https://github.com/nodenv/nodenv$ brew install nodenvシェルの設定に以下を追加しておく
eval "$(nodenv init -)"nodenv の基本的な使い方
利用できるバージョンの確認
$ nodenv install --list指定したバージョンのインストール
$ nodenv install <version>インストール後はrehashを
$ nodenv rehashインストールされているバージョンの確認
$ nodenv versionsglobal バージョンの指定
$ nodenv global <version>local バージョンの指定
プロジェクトのディレクトリに移動して
$ nodenv local <version>node のバージョンが切り替わることを確認
$ node -v
- 投稿日:2019-12-01T10:55:19+09:00
Apache経由でExpressに接続する方法
環境
- CentOS 7.7
- Apache 2.4.6
- node v12.13.1
- express-generator 4.16.1
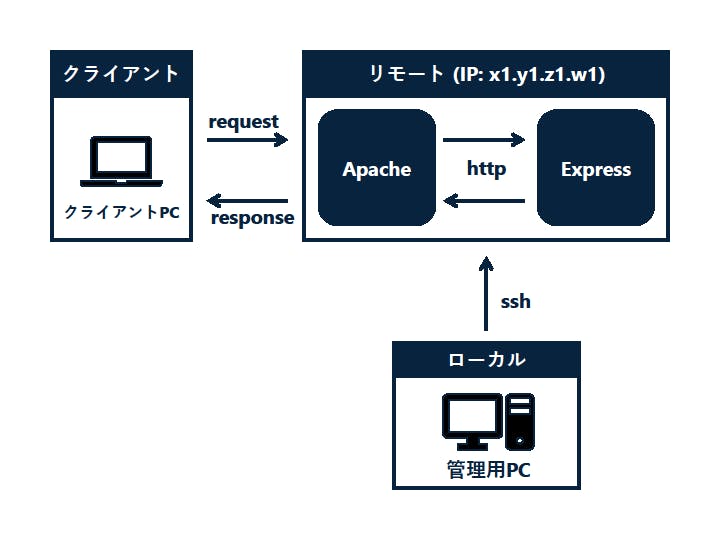
イメージ
設定手順
1. httpdの設定ファイルを編集する
サーバにhttpdがインストールされていない場合は、以下のコマンドでインストールし、有効化します。
$ sudo yum update
$ sudo yum install httpd

$ sudo systemctl enable httpd
$ sudo systemctl start httpd
/etc/httpd/conf.d/の直下に、hoge.confというファイルを作ります。(hogeは変更可能)今回はApacheをプロキシのような中継サーバとして使うので、
proxy.confとつけました。/etc/httpd/conf.d/proxy.confProxyPass / http://localhost:3000/ ProxyPassReverse / http://localhost:3000/
3000はExpressが使用するデフォルトのポート番号です。httpdを再起動し、設定を反映します。
$ sudo systemctl restart httpd2. Expressサーバを起動する
nodeがインストールされていない場合は、以下の手順でインストールします。(2019年12月現在LTSのv12系を使います。)
$ curl -sL https://rpm.nodesource.com/setup_12.x | bash -
$ sudo yum install nodejs
処理が終了したら、バージョンを確認して正常にインストールされたか確認します。
$ node --version
v12.13.1
express-generatorがインストールされていない場合は、以下の手順でインストールします。$ npm install express-generator -g
expressの新しいプロジェクトを作成します。$ express exp-app $ cd exp-app $ npm install $ npm start &以降もターミナルで操作を続けるために、
npm startは&を付けてバックグラウンドで実行します。
http://localhost:3000とブラウザに入力すると、以下のようなページが表示されます。
コマンドラインなら、curlで確認しても良いです。$ curl http://localhost:3000 <!DOCTYPE html><html><head><title>Express</title><link rel="stylesheet" href="/stylesheets/style.css"></head><body><h1>Express</h1><p>Welcome to Express</p></body></html>Expressが正常に起動していることを確認できました。
3. httpでアクセスする
HTTPでローカルからリモートにアクセスするにあたり、以下の2つの設定を変更します。
- FWの設定
  $ sudo firewall-cmd --add-service=http --zone=public --permanent
  $ sudo firewall-cmd --reload
HTTPリクエストを受け付けます。
- SElinuxの設定
$ sudo setsebool -P httpd_can_network_connect onhttpdがネットワーク通信できるように設定します。
4.アクセス確認
ローカルのブラウザで
http://x1.y1.z1.w1(リモートのIPアドレス)と入力し、Expressのウェルカムページが表示されることを確認します。以上で、ApacheとExpressの連携が完了しました!
注意
- 上記の方法では、
npm start &を実行したターミナルからログアウトすると、Expressサーバも止まってしまいます。Expressサーバを常駐させておくためには、サーバ側にforeverをインストールすると良いです。 (参考:Node.jsアプリをLinux環境で常駐化させる forever編)- ローカルとリモートが同じプライベートネットワーク上にあると、Edge では正常にアクセスできないことがあるようです。以下のサイトの設定を行うと解決します。 (参考:Windows10 バージョン1809 Edge でローカルIPアドレスにアクセスできません!)
参考

- 投稿日:2019-12-01T01:25:42+09:00
【自分用】webpackの使い方
webpackとは
webpackとは、HTMLやCSS、JavaScriptなどWEBサイトやWEBアプリを構成するファイルを1つにまとめてくれるツールです。
ファイルを1つにまとめることで、たくさんのメリットがあります。
① HTTP通信の高速化
HTTP通信では、ブラウザとサーバーの同時接続数が限られるため、接続回数が増えれば、ファイルの転送にそれだけ時間がかかります。
そこで、ファイルを1つにまとめることで、サーバーとの接続回数を少なし、ファイルの転送時間を減らすことができます。②保守性が上がる
これまでのJavaScriptファイルは全てのファイルをHTMLに
<script>を使い書かなければいけませんでした。そのため、読み込みが遅く、かつ可読性に優れない状況でした。
webpackでは、ECMAScript標準の公式機能であるES Modules(import文)が使え、さらにnode.jsのモジュール機能(require文)が使えるために、ファイル同士を結合できます。
モジュールを使えることで、コードの可読性が上がり、開発作業の分担やテストがしやすくなり、再利用性や保守性が上がります。その他にもたくさんのメリットがありますが、ここでは割愛します。
参考:webpackを使う理由
webpackの使い方
Node.jsのインストールが済んでいることが前提で進みます。
webpack公式のデモンストレーションに沿って始めます。
以下のコマンドを入力し、ディレクトリを作ります。
console$ mkdir webpack-demo $ cd webpack-demo $ npm init -y $ npm install webpack webpack-cli --save-dev・1行目でプロジェクトを行う
webpack-demoディレクトリを作成しています。このディレクトリの名前はなんでも大丈夫です。
・2行目は、1行目で作成したwebpack-demoディレクトリに移動しています。
・3行目は、初期化処理を行い、package.jsonを生成しています。
npm initを行うと普通はどういうパッケージにするか質問がされるのですが、-yオプションを作ることで、すべてyesの回答となり、その質問を省略することができます。
・4行目で、webpackとwebpack-cliのインストールを行っています。
--save-devオプションをつけることで、package.jsonのdevDependenciesにwebpackとwebpack-cliのバージョン情報を書き込んでいます。以上で準備が完了しました。
続いて、バンドルをするために、ディレクトリ構造とファイル、それらの中身を作成します。webpack-demo |- package.json |- webpack.config.js |- /src |- index.js |- sub.js |- /node_modules以上のようなディレクトリ構造を作るため、下記のコマンドを入力してください。
console$ touch webpack.config.js $ mkdir src $ touch ./src/index.js $ touch ./src/sub.js・1行目は、
webpackの設定をするファイルを作成しています。
・2行目は、srcディレクトリを作成します。このディレクトリの中にあるファイルがバンドルされます。
・3、4行目は、バンドルするファイルを作成しています。これでディレクトリ構成が完成しました。
続いて、ファイルの中身を編集していきます。
まずは、webpackの設定をするためにwebpack.config.jsに以下のように書き込んでいきます。webpack.config.jsmodule.exports = { //エントリーポイントの設定 entry: `./src/index.js`, // 出力するファイルの設定 output: { // 出力するファイルのディレクトリ名 path: __dirname + `/dist`, // 出力するファイルの名前 filename: "main.js" }, //modeの設定 mode: "development" };・
entry:は、アプリケーションのバンドル処理を開始するポイントの設定です。index.jsはsub.jsのモジュールに依存しますが、最終的なエントリーポイント(HTML等が読み込むポイント)はindex.jsであるので、そのindex.jsを設定しています。
・output:は、出力するファイルの設定をします。path:が出力するファイルのディレクトリ名で、filename:が出力するファイルの名前です。
今回は出力ファイルをmain.jsと設定します。
・mode:はモード設定で、development(開発モード)とすることで、出力されるmain.jsが見やすい形で出力されます。
modeをproductionにすると、圧縮され見づらくなりますがその分、高速に読み取りができるようになります。参考:webpackの構成設定
続いて、そのバンドルしたい
index.jsとsub.jsの中身を書いていきます。
今回は単純に、関数モジュールファイルとそのモジュールを実行するファイルに分けます。sub.js// greet関数をexportする。 module.exports = function greet() { document.write("Hello webpack"); }index.js// require文を使ってsub.jsファイルを読み込む。 const greet = require('./sub'); // sub.jsに定義されたgreet関数を実行する。 greet();それでは、いよいよwebpackの出番です。
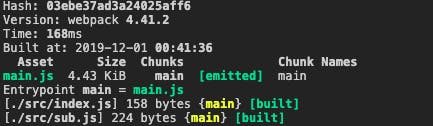
以下のコマンドを入力してください。console$ npx webpackすると、以下のように表示され、バンドルが完了します。
出来上がったmain.jsファイルを見てみるとよくわからない文字が出ていますが、これでバンドルされたファイルの完成です。続いて、このバンドルされたファイルをhtmlで表示してみましょう。
以下のように./distディレクトリ内にhtmlファイルを作成します。console$ touch ./dist/index.html続いて、
index.htmlファイルの中身を記述していきます。index.html<!DOCTYPE html> <html> <head> <meta charset="UTF-8"> </head> <body> <div></div> <script text="text/javascript" src="main.js" charset="utf-8"></script> </body> </html>できあがったら、ブラウザでindex.htmlファイルを見てみましょう。
Hello webpack と表示されていたら成功です。続きの画像やcssをバンドルする方法は、以下のURLをご覧ください。
https://webpack.js.org/guides/asset-management/webpackの使い方の振り返り
① webpackのインストール
② webpackの設定ファイルを書き込む
③ webpackを実行する。
④ バンドル成功【参考】
webpack で始めるイマドキのフロントエンド開発
最新版で学ぶwebpack 4入門 JavaScriptのモジュールバンドラ