- 投稿日:2019-11-25T19:42:13+09:00
Eloquent、Queryあたりでよく詰まったところ
モデル名::query()とは?
モデルを生成している。Event::query()なら、Eventモデルに書かれた内容を元に、モデルをコピーしているようなイメージ。
    $query = Event::query(); //←モデルEventのコピーを作ってる状態

    return $query->displayed()->notEnd()->orderByForEvent()->get(); //このgetでDBから中身取得
EloquentとQueryって?
DBとモデルを対応づける機能が定義されている。
このサイトがわかりやすい!
https://nextat.co.jp/staff/archives/131$requestとは?
Railsでいうところのparams。ユーザーから受け取った情報が入ってる。
変数等に何の値が入ってるか見たい時
    var_dump(中身を見たい変数名等);
    exit;
binding.pryの代わりに活用。
よく苦しめられるエラー
Call to undefined method Illuminate\Database\Eloquent\Builder::all();もしくは
Method Illuminate\Database\Eloquent\Collection::(なんらかの変数名) does not exist.$query = Event::query();はモデルを作成しているが、
$query = Event::query();->all();や
$query = Event::query();->get();とすることで、
モデルの中身の配列を取得してしまうため、モデルに使うメソッドを使用するとエラーとなる。リレーション先のテーブルにデータが入っているものだけ取得したい
https://www.yukiiworks.com/archives/256
上記を参考に。$query = モデル名::with('リレーション先のテーブル名'); $query->whereHas( 'リレーション先のテーブル名', function ($content) { //引数は任意の単語で $contents->whereExists( function ($contents) { } ); } );これで取得できました。
- 投稿日:2019-11-25T19:16:37+09:00
Laravelでマイグレ。$table->integer()の罠
「わ〜!なんでやねんなんでやね〜ん」と私グレてます。
laravel6でmigrationカスタマイズ$table->integer('gender', 1); // 性別:-1 ♂, 0, 1 ♀ってやってました。そうしたらこう怒られるんです!
Illuminate\Database\QueryException : SQLSTATE[42000]: Syntax error or access violation: 1075 Incorrect table definition; there can be only one auto column and it must be defined as a key (SQL: create table `pre_registers` (`id` bigint unsigned not null auto_increment primary key, `first_name` varchar(100) not null, ...って。わけわからん。
もうどうしようもなくなって事務所を飛び出して、夜の街をぶらついたんです。でもやっぱり「戻ってググろう」って思い直して…
要するに結論は第2引数指定したら
autoincrimentされるんだって。参考記事
- 投稿日:2019-11-25T14:31:27+09:00
Laravelのモデル名を変更した際のエラーを解決する
- 投稿日:2019-11-25T14:01:42+09:00
51歳からのプログラミング 備忘 Laravel 自作 認証 モドキ
セキュリティーとかあまり関係ないような、個人運用のWEBサイトに、簡単な認証システム(モドキ)を実装したい!なんてニーズはないのだろうけれど、認証モドキを作ってみた。いつか使ってみようかな。フレームワークのを使えよ!って言われますね、たぶん。
OverView
モドキなので、ほんとに簡単。バリデーションとか入れてません。
概要は下記localhost:8000/でアクセスすると、認証済状態であればTOPページに、認証未済であればLoginページに遷移。ログインは、フォームで"123"を入力すればログイン完了!ログイン完了時にsessionとクッキーを設定して認証済状態にします。
sessionは
config.sessionで、ブラウザを閉じるまでsessionを維持する状態としてます。認証済後は、topページ、secondページ、logoutページを移動できる。認証未済状態で直接top,second,logoutページにはアクセスできません。という感じでゴー!ファイル構成
Laravel 6.5.2
ファイル名 説明 web.php ルートファイル SampleController.php コントローラ MyAuth.php ミドルウェア:ルート保護 login.blade.php ログインファイル top.blade.php second.blade.php logout.blade.php web.php
web.php<?php Route::get ('/','SampleController@confirmAuth'); Route::view('/login','login'); Route::get ('/sessStart','SampleController@sessStart'); Route::middleware(['MyAuth'])->group(function(){ Route::view('/top','top'); Route::view('/second','second'); Route::view('/logout','logout'); Route::get ('/deleteSess','SampleController@deleteSess'); });SampleController.php
SampleController.php<?php namespace App\Http\Controllers; use App\Http\Controllers\Controller; use Illuminate\Support\Facades\Cookie; class SampleController extends Controller { // session は mySession 、cookie は myCookieで設定 // mySession == myCookie なら true を返す関数 public static function checkCookie(){ if( session()->has('mySession') && Cookie::has('myCookie') ){ if( session('mySession') == Cookie::get('myCookie') ){ return true; } } return false; } // checkCookie関数が true なら topページへ // false なら loginページに遷移 public function confirmAuth(){ if( self::checkCookie() ){ return view('top'); } return view('login'); } // mySession と myCookie を設定して topページへ遷移 public function sessStart(){ $value = (string) rand(); session()->put('mySession',$value); Cookie::queue('myCookie',$value); return view('top'); } // logout 後 に、mySession と myCookie を削除 public function deleteSess(){ session()->forget('mySession'); setcookie('myCookie','',time()-1); return redirect('/'); } }MyAuth.php
MyAuth.php// ミドルウェア <?php namespace App\Http\Middleware; use Closure; use App\Http\Controllers\Controller; use App\Http\Controllers\SampleController; use Illuminate\Http\Request; class MyAuth { /** * Handle an incoming request. * * @param \Illuminate\Http\Request $request * @param \Closure $next * @return mixed */ public function handle($request, Closure $next) { // SampleController の checkCookie関数を使ってチェック if(SampleController::checkCookie()){ return $next($request); } return redirect('/login'); } }Middleware では return view ではなく redirectにした。いろいろ調べてたらMidlewareはget送信するみたいな話が、どっかにあったな。
get送信ならRoute::viewで受けられると思うのだけれど、
Call to a member function setCookie() on null
とエラーを賜ります。なぜ?
return redirect でちゃんと動いたので、とりあえず。login.blade.php
login.blade.php{{-- jqueryを使えるようにする呪文です! --}} <script src="https://ajax.googleapis.com/ajax/libs/jquery/3.3.1/jquery.min.js"></script> <script src="https://code.jquery.com/ui/1.12.1/jquery-ui.js"></script> <script> $(function(){ $('form').submit(function(e){ e.preventDefault(); // ログイン処理 // 123が入力されていればログイン完了 // ログイン完了なら、ログイン状態を維持する処理へ(SampleController@sessStart) if($('input').val() == "123"){ location.href = "/sessStart"; } return; }); }); </script> <form> <input type="text" value="123"> <button>LOGIN</button> </form>top.blade.php~logout.blade.php
top.blade.php<a href="/second">second</a> | <a href="/logout">logout</a> <p> topsecond.blade.php<a href="/second">top</a> | <a href="/logout">logout</a> <p> secondlogout.blade.php<a href="/second">top</a> | <a href="/second">second</a> <p> <a href="deleteSess">LOGOUT</a>メモ
Undefined variable: _SESSION
session_start()が正しく実行されていないときに出た!
- 投稿日:2019-11-25T14:01:42+09:00
51歳からのプログラミング 備忘 Laravel 自作認証モドキ
セキュリティーとかあまり関係ないような、個人運用のWEBサイトに、簡単な認証モドキを実装したい!なんてニーズはないのだろうけれど、認証モドキを作ってみた。いつか使ってみようかな。
OverView
モドキなので、ほんとに簡単。バリデーションとか入れてません。
概要は下記localhost:8000/でアクセスすると、認証済状態であればTOPページに、認証未済であればLoginページに遷移。ログインは、フォームで"123"を入力すればログイン完了!ログイン完了時にsessionとクッキーを設定して認証済状態にします。
sessionは
config.sessionで、ブラウザを閉じるまでsessionを維持する状態としてます。認証済後は、topページ、secondページ、logoutページを移動できる。認証未済状態で直接top,second,logoutページにはアクセスできません。という感じでゴー!ファイル構成
Laravel 6.5.2
ファイル名 説明 web.php ルートファイル SampleController.php コントローラ MyAuth.php ミドルウェア:ルート保護 login.blade.php ログインファイル top.blade.php second.blade.php logout.blade.php web.php
web.php<?php Route::get ('/','SampleController@confirmAuth'); Route::view('/login','login'); Route::get ('/sessStart','SampleController@sessStart'); Route::middleware(['MyAuth'])->group(function(){ Route::view('/top','top'); Route::view('/second','second'); Route::view('/logout','logout'); Route::get ('/deleteSess','SampleController@deleteSess'); });SampleController.php
SampleController.php<?php namespace App\Http\Controllers; use App\Http\Controllers\Controller; use Illuminate\Support\Facades\Cookie; class SampleController extends Controller { // session は mySession 、cookie は myCookieで設定 // mySession == myCookie なら true を返す関数 public static function checkCookie(){ if( session()->has('mySession') && Cookie::has('myCookie') ){ if( session('mySession') == Cookie::get('myCookie') ){ return true; } } return false; } // checkCookie関数が true なら topページへ // false なら loginページに遷移 public function confirmAuth(){ if( self::checkCookie() ){ return view('top'); } return view('login'); } // mySession と myCookie を設定して topページへ遷移 public function sessStart(){ $value = (string) rand(); session()->put('mySession',$value); Cookie::queue('myCookie',$value); return view('top'); } // logout 後 に、mySession と myCookie を削除 public function deleteSess(){ session()->forget('mySession'); setcookie('myCookie','',time()-1); return redirect('/'); } }MyAuth.php
MyAuth.php// ミドルウェア <?php namespace App\Http\Middleware; use Closure; use App\Http\Controllers\Controller; use App\Http\Controllers\SampleController; use Illuminate\Http\Request; class MyAuth { /** * Handle an incoming request. * * @param \Illuminate\Http\Request $request * @param \Closure $next * @return mixed */ public function handle($request, Closure $next) { // SampleController の checkCookie関数を使ってチェック if(SampleController::checkCookie()){ return $next($request); } return redirect('/login'); } }Middleware では return view ではなく redirectにした。いろいろ調べてたらMidlewareはget送信するみたいな話が、どっかにあったな。
get送信ならRoute::viewで受けられると思うのだけれど、
Call to a member function setCookie() on null
とエラーを賜ります。なぜ?
return redirect でちゃんと動いたので、とりあえず。login.blade.php
login.blade.php{{-- jqueryを使えるようにする呪文です! --}} <script src="https://ajax.googleapis.com/ajax/libs/jquery/3.3.1/jquery.min.js"></script> <script src="https://code.jquery.com/ui/1.12.1/jquery-ui.js"></script> <script> $(function(){ $('form').submit(function(e){ e.preventDefault(); // ログイン処理 // 123が入力されていればログイン完了 // ログイン完了なら、ログイン状態を維持する処理へ(SampleController@sessStart) if($('input').val() == "123"){ location.href = "/sessStart"; } return; }); }); </script> <form> <input type="text" value="123"> <button>LOGIN</button> </form>top.blade.php~logout.blade.php
top.blade.php<a href="/second">second</a> | <a href="/logout">logout</a> <p> topsecond.blade.php<a href="/second">top</a> | <a href="/logout">logout</a> <p> secondlogout.blade.php<a href="/second">top</a> | <a href="/second">second</a> <p> <a href="deleteSess">LOGOUT</a>メモ
Undefined variable: _SESSION
session_start()が正しく実行されていないときに出た!
- 投稿日:2019-11-25T13:45:14+09:00
Mockeryで正規表現を使う
環境
- Laravel Framework 6.0.3
- Mockery 1.0
- Docker 19.03.4 (Laravelの実行環境)
背景
Laravelではファサードをモックしたテストを手軽に書く事ができます。公式ドキュメントにもある通り、モックされたファサードは
Mockeryインスタンスを返します。そのため、Mockery::withでファサードの引数を検証する事ができます。課題
ファサードの引数にランダムな値が含まれる場合などに
withで正規表現を使いたい場合、直感的に正規表現を書いても認識されません。例
以下のようなファイルをアップロードするコマンドがあるとします。同名のファイルが存在する場合は、上書きしないように元の名前にユニークな値を追記したファイル名でアップロードします。
コマンド
<?php

namespace App\Console\Commands;

use Illuminate\Console\Command;
use Illuminate\Support\Facades\Log;
use Illuminate\Support\Facades\Storage;
use Illuminate\Support\Str;

class FileUploadCommand extends Command
{
    protected $signature = 'uploadfile';

    public function handle()
    {
        $filename = 'uploadfile.txt';
        $content = 'これからアップロードされるファイルです';
        if (! Storage::disk('backups')->exists($filename)) {
           Storage::disk('backups')->put($filename, $content);
           Log::info('新規ファイルがアップロードされました。ファイル名:' . $filename);
        } else {
           $rename = sprintf('%s.%s', $filename, Str::uuid());
           Log::info('既に同名のファイルが存在したためリネームしました。ファイル名:' . $rename);
        }
    }
}
テスト
withに正規表現っぽい値を入れて、リネーム処理のテストを書いてみます。<?php namespace Tests\Feature; use Illuminate\Support\Facades\Log; use Illuminate\Support\Facades\Storage; use Illuminate\Support\Str; use Mockery; use Tests\TestCase; class FileUploadCommandTest extends TestCase { public function testリネーム処理() { Storage::disk('backups')->put( 'uploadfile.txt', 'これはアップロード済みファイルです' ); Log::shouldReceive('info')->once()->with("/既に同名のファイルが存在したためリネームしました。ファイル名:/"); $this->artisan('uploadfile'); } }テスト実行
[root@1b8af3a695ec www]# vendor/bin/phpunit tests/Feature/FileUploadCommandTest.php
PHPUnit 8.3.5 by Sebastian Bergmann and contributors.

E                                                                   1 / 1 (100%)

Time: 1.11 seconds, Memory: 24.00 MB

There was 1 error:

1) Tests\Feature\FileUploadCommandTest::testリネーム処理()
Mockery\Exception\NoMatchingExpectationException: No matching handler found for Mockery_0_Illuminate_Log_LogManager::info('既に同名のファイルが存在したためリネームしました。ファイル名:uploadfile.txt.c91c2c81-f26a-4c02-8dda-5e9c260af597'). Either the method was unexpected or its arguments matched no expected argument list for this method
実行しても正規表現としては、見なされないようでテストは失敗します^^;
解決方法
Mockery::patternを使います。
テストコードを修正
正規表現っぽく書いた場所を
Mockery::patternを使って書き直してみます。- Log::shouldReceive('info')->once()->with("/既に同名のファイルが存在したためリネームしました。ファイル名:/"); + Log::shouldReceive('info')->once()->with(Mockery::pattern("/既に同名のファイルが存在したためリネームしました。ファイル名:/"));テスト再実行
[root@1b8af3a695ec www]# vendor/bin/phpunit tests/Feature/FileUploadCommandTest.php
PHPUnit 8.3.5 by Sebastian Bergmann and contributors.

.                                                                   1 / 1 (100%)

Time: 1.76 seconds, Memory: 24.00 MB

OK (1 test, 2 assertions)
?
- 投稿日:2019-11-25T12:40:33+09:00
Laravel/uiを用いた場合のapp.scssの使い方
Laravel中のsassとコンパイル
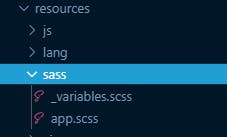
laravel/uiでvue.jsを導入するとresources以下にsassというフォルダが追加されます。
sassフォルダ以下にはapp.scssと_variables.scssがあります。
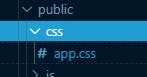
Laravelのasset関数で読み込まれるcssファイルのurlはpublic/css/app.cssなのですが、
そこで書かれているcssはこのsassがコンパイルされた内容になります。
もしpublic/css/app.cssを直接変更していた場合はコンパイルの際に内容ごと上書きされてしまいます。
コンパイルはwebpack(npm run dev等で動作しているソフト)で行われます。
webpackは他にもrequireしたファイルやapp.js等もpublic以下のフォルダに展開してくれます。コンパイルの設定を行うLaravel Mix
Laravelでは、webpackでコンパイルするファイルやコンパイル先の設定を、Laravel Mixで行います。
LaravelMixの設定をするwebpack.mix.jsではscssが指定されています。Laravel Mixの詳細な設定は、作成したプロジェクトのルートフォルダ直下にある、laravel.mix.jsというファイルを通して行います。
laravel.mix.jsconst mix = require('laravel-mix'); /* |-------------------------------------------------------------------------- | Mix Asset Management |-------------------------------------------------------------------------- | | Mix provides a clean, fluent API for defining some Webpack build steps | for your Laravel application. By default, we are compiling the Sass | file for the application as well as bundling up all the JS files. | */ //"php artisan ui react" を実行するとreactとsassの設定をし、reactとsassのコンパイル設定を行う。 //"php artisan ui vue"ならば、mix.reactの部分がmix.vueになる。 mix.react('resources/js/app.js', 'public/js') .sass('resources/sass/app.scss', 'public/css');LaravelMixを用いて、様々な形式のファイルをwebpackでコンパイルできます。
詳細な設定はドキュメントを参照してください。
https://readouble.com/laravel/5.5/ja/mix.htmlapp.scssの構造
app.scssのファイル中では
bootstrapやfont、変数のファイルを読み込んでいます。app.scss// Fonts @import url('https://fonts.googleapis.com/css?family=Nunito'); // Variables @import 'variables'; // Bootstrap @import '~bootstrap/scss/bootstrap';もしコンパイルされたcssをasset等で読み込んでいた場合、
scssではコメントアウトができるので、
bootstrapを読み込んでいる部分(3つ目のimport)をコメントアウトしコンパイルすれば
bootstrapの設定が無効にすることができます。上から2番目のimport variablesでは
変数を読み込んでいます。
_variables.scssでは予め、
色や文字の設定用の変数を規定してくれています。_variables.scss// Body $body-bg: #f8fafc; // Typography $font-family-sans-serif: 'Nunito', sans-serif; $font-size-base: 0.9rem; $line-height-base: 1.6; // Colors $blue: #3490dc; $indigo: #6574cd; $purple: #9561e2; $pink: #f66d9b; $red: #e3342f; $orange: #f6993f; $yellow: #ffed4a; $green: #38c172; $teal: #4dc0b5; $cyan: #6cb2eb;使用例:
app.scss// Fonts @import url('https://fonts.googleapis.com/css?family=Nunito'); // Variables @import 'variables'; // Bootstrap @import '~bootstrap/scss/bootstrap'; .write-points { background-color: $red; }
- 投稿日:2019-11-25T09:24:34+09:00
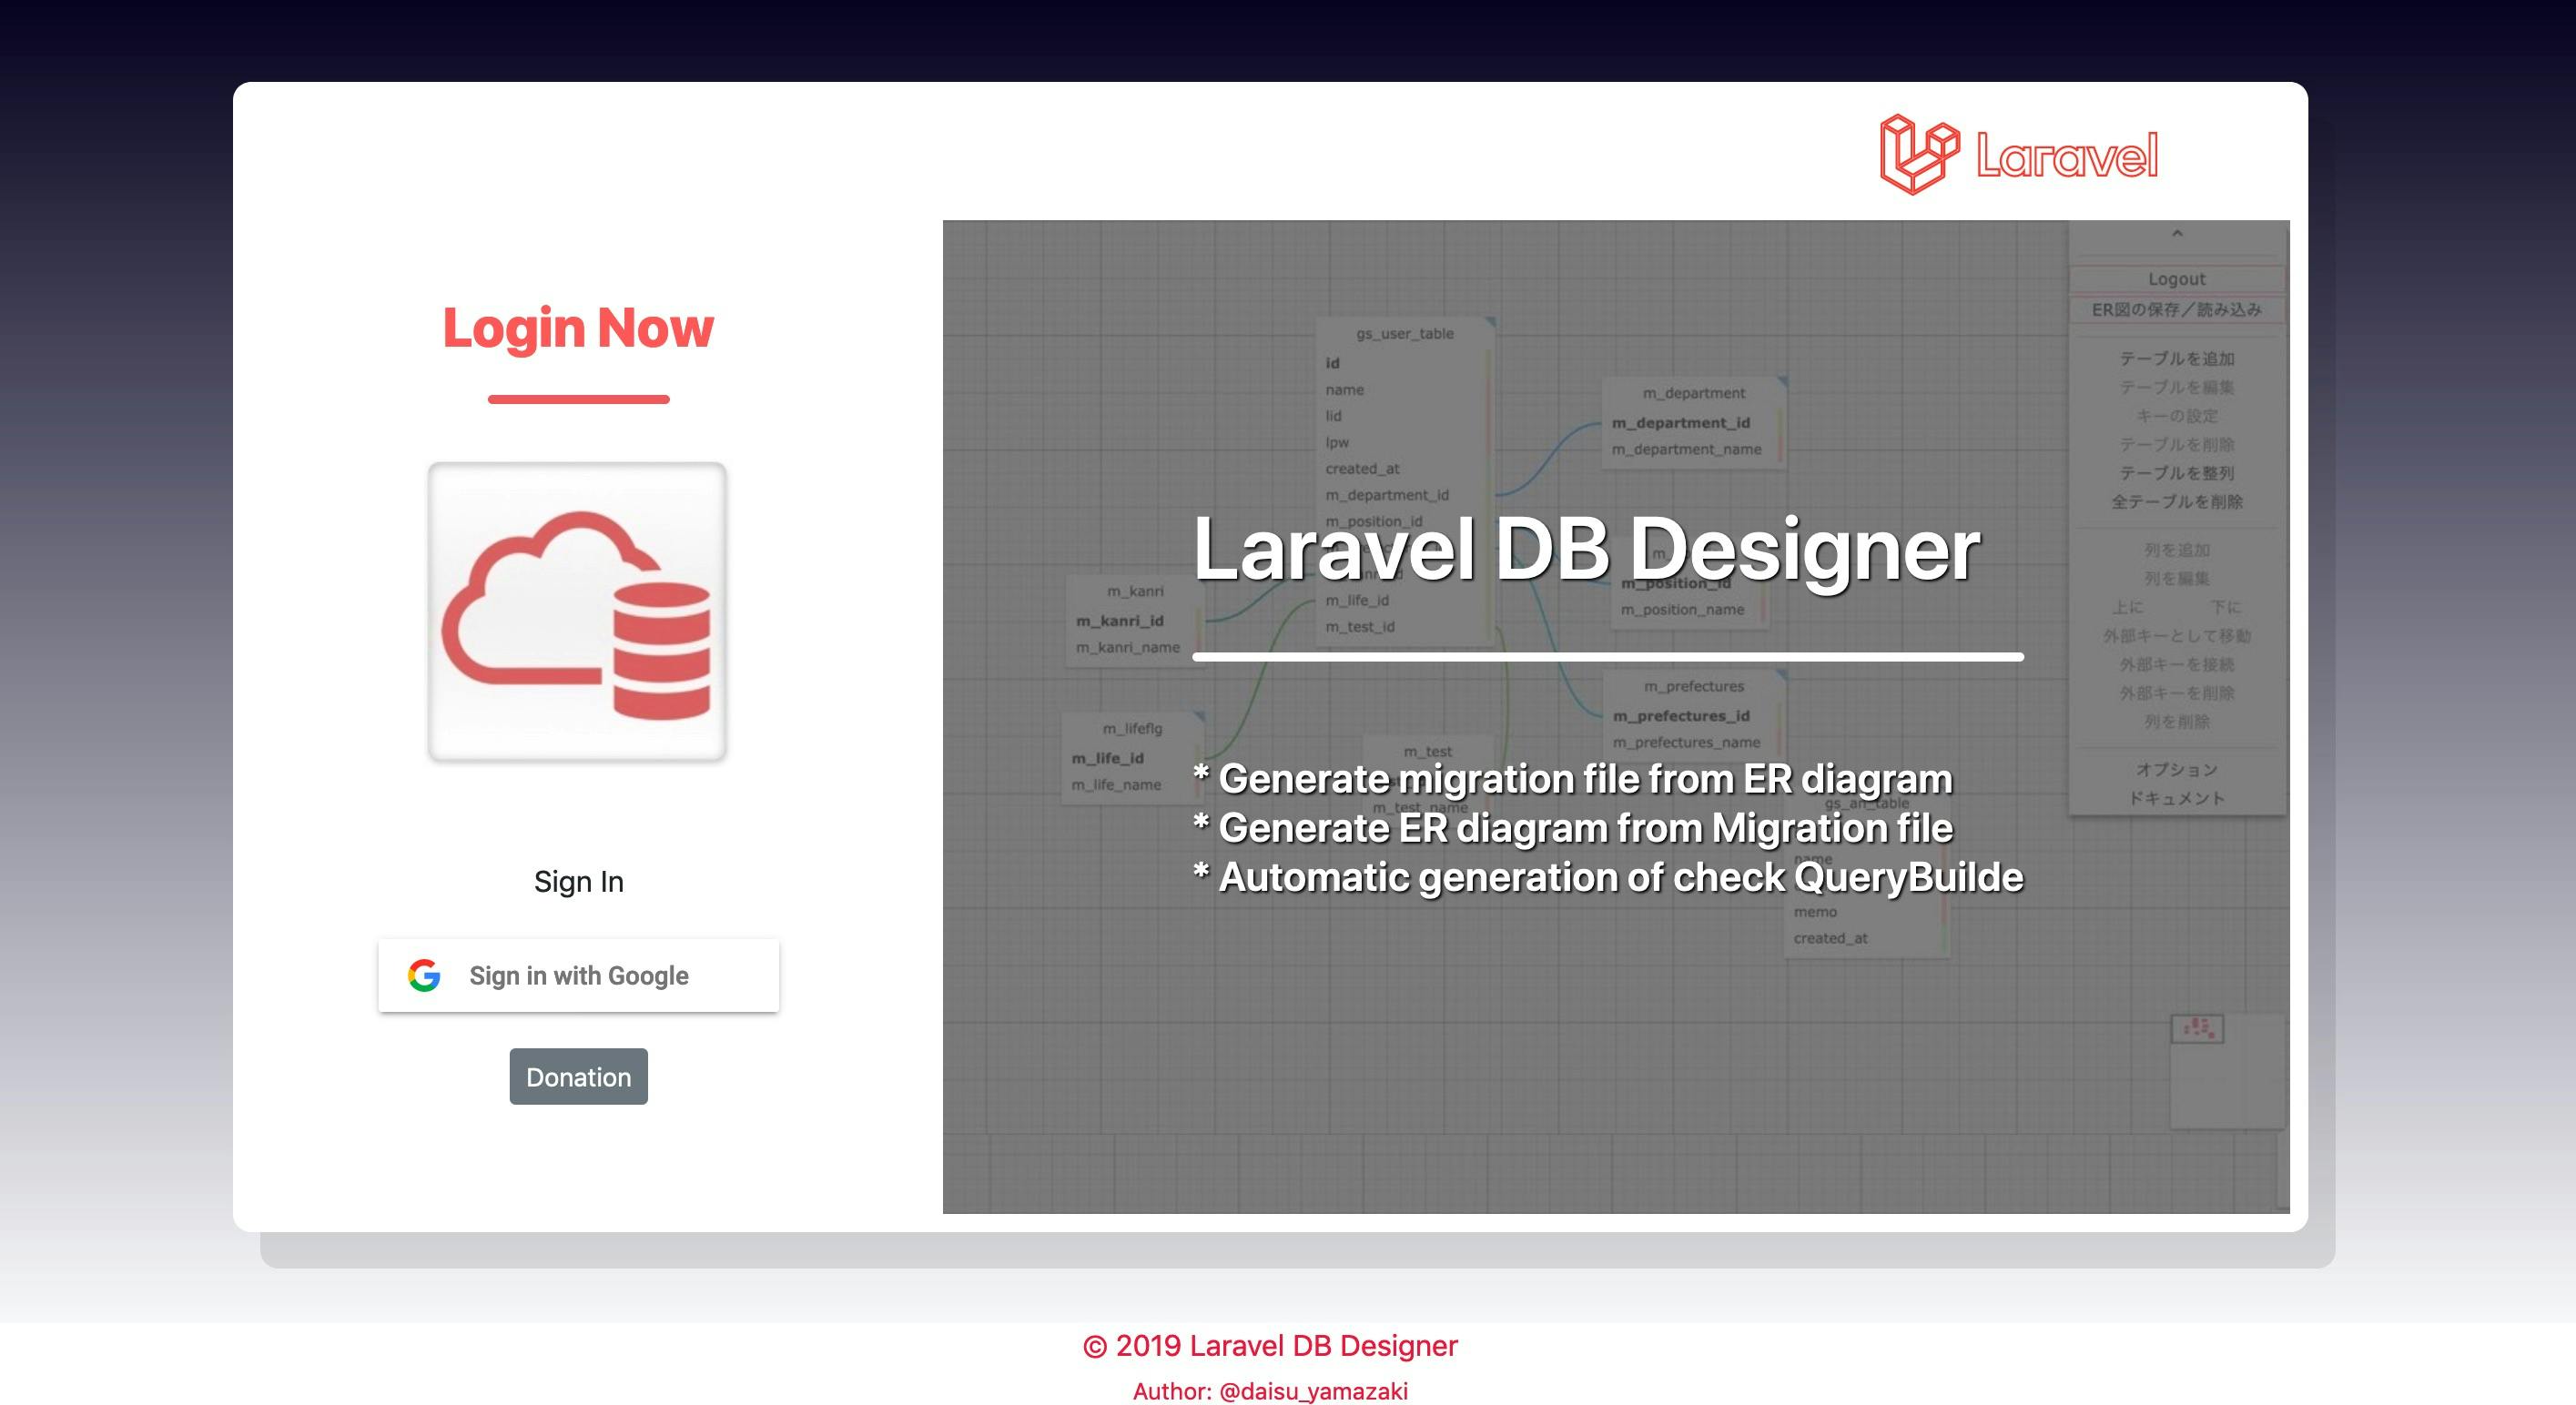
「Laravel DB Designer 」vol.3 使い方・仕様 について解説
今回は" Laravel DB Designer "の使い方・仕様について書きました(vol3)
『Laravelを使う人を幸せにしたいという思いから作った』
(vol2の続きです)[https://qiita.com/daisu_yamazaki/items/92dc3cc599a264c3fb0f]
https://laraveldb.com
※英語圏対応済み主機能
- ER図作成 (対応している”型”はページ下部に表記)
- ER図作成 → Migrationファイルを生成
- ER図作成 → チェック用クエリービルダーを自動生成
- Migrationファイル → ER図を生成(リバース)
テーブル名
テーブル名の頭に"m_"を付けた場合(Master:都道府県のように最初から用意するテーブル)
「 m_テーブル名 」とすると" $table->softDeletes(); "は追加されません。
「 m_テーブル名 」とすると" $table->timestamps(); "は追加されません。
テーブル名の頭に"t_"を付けた場合(Transaction:ユーザーの入力でデータが追加されていくテーブル)
「 t_テーブル名 」とすると" $table->softDeletes(); "が自動で追加されます。
「 t_テーブル名 」とすると" $table->timestamps(); "が自動で追加されます。
テーブル名の頭に"t_"も"m_"も付けない場合(接頭辞を付けない場合)
"m_" や "t_"を付けなければ " $table->softDeletes(); "が自動で追加されます。
"m_" や "t_"を付けなければ "$table->timestamps(); "が自動で追加されます。
【使用時の気をつけるPOINT】
1)
フォルダにMigrationファイル(Schema::createのみ)一式集めZip圧縮したファイルをアップロードすることで、ER図へ変換(リバース)することが可能です。2)
以下Migrationファイル 「 Schema::create 」のみ現在は可能
※ Schema::create以外は対応検討中Schema::create("テーブル名", function (Blueprint $table) {...}3)
外部キー(使った場合)親子の順番でMigrationファイルを選び、Migrateしなくてはいけない
※ 親子順でファイル名(時間等)を少しずらし対応検討中4)
ダウンロードしたMigrationファイル(ZIP)をそのまま再アップロードは出来ません
一度解凍してから自身のPCでZIPしてアップロードしてください。(PHPでの圧縮アルゴリズムの問題かも)
※ 今後の調査対象の一つ5)
MySQLのみ対応
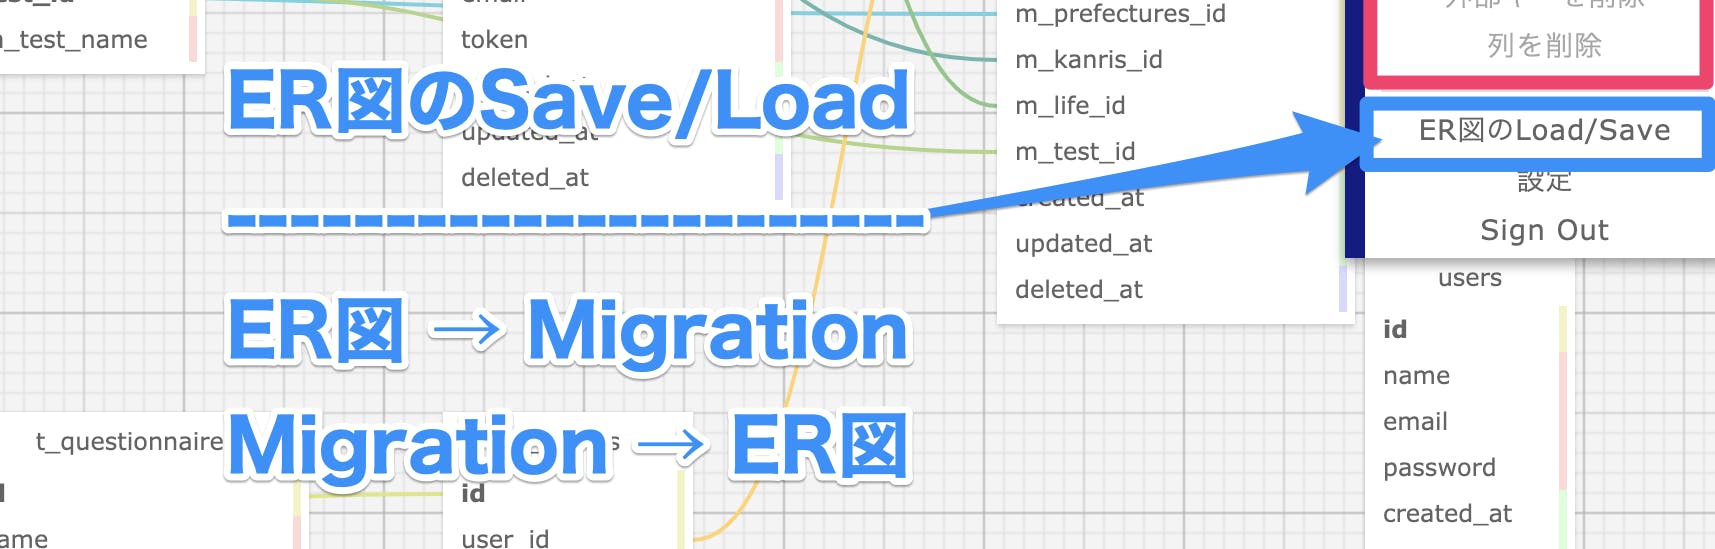
※ 要望が多ければPostgres,SQLite等の対応も検討「ER図のSave/Load」機能
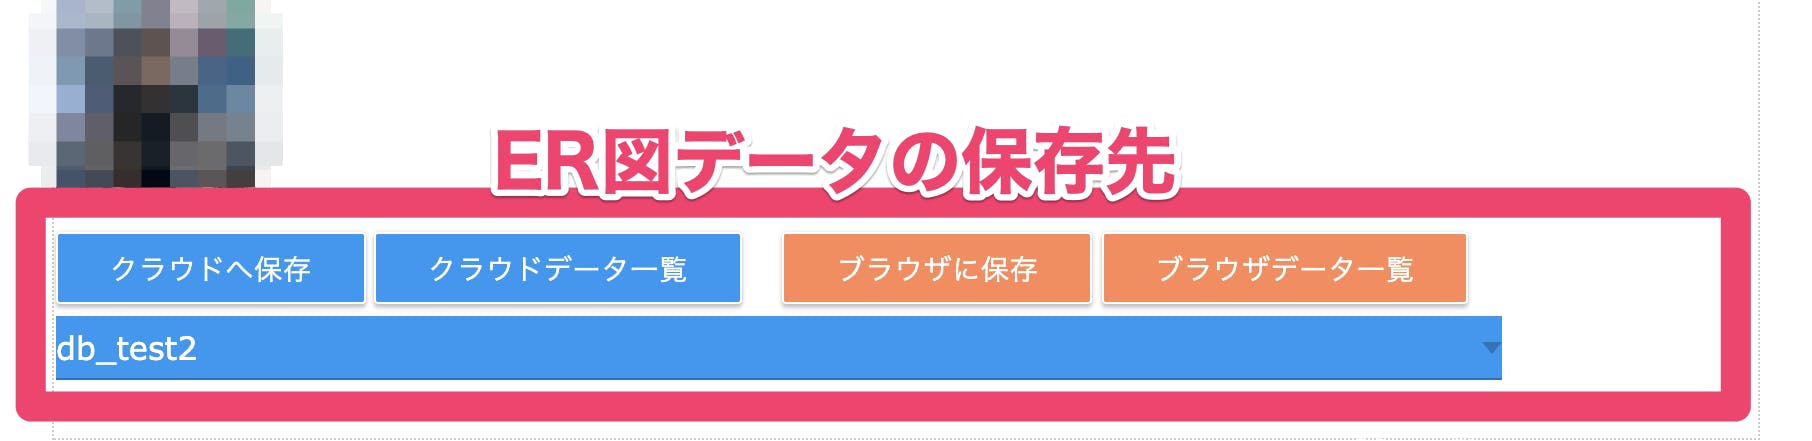
ER図データのLoad/Save
Save/Load機能 機能詳細 クラウドへ保存 Web上のDB(Firebase)に保存します。 クラウドデータ一覧 自身がWebに保存したデータ一覧 ブラウザに保存 LocalStorageに一時保存 ブラウザデータ一覧 自身がlocalに保存したデータ一覧 上記の「データ一覧」選択後、「 -- Data List -- 」の選択肢が表示されます。
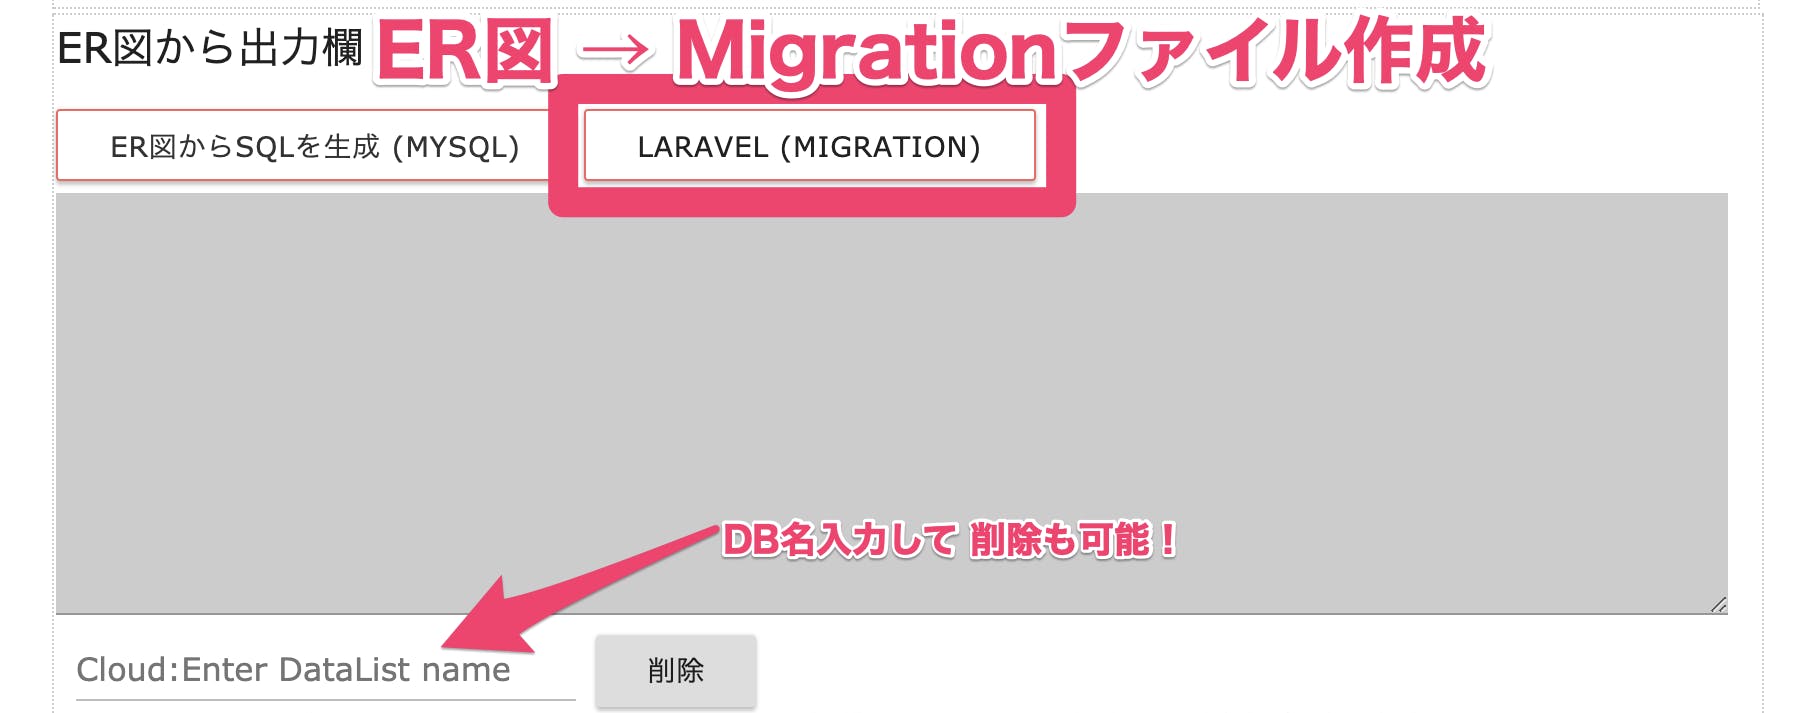
そこに表示されるデータ項目を選択するとER図が復元します。ER図から出力(外部出力)
Save/Load機能 機能詳細 ER図からSQLを作成 現在表示しているEQ図からMySQLテーブルを作成するSQL文を作成 Laravel(Migration) 現在表示しているEQ図からLaravel専用のMigrationファイルをZIP圧縮して一式ダウンロード 子テーブルへの外部キー制約が記載されてるMigrationファイルは、
「 5分遅らせた 」ファイル名が生成しています(現時点)。
理由)親テーブルをMigrateしてから子テーブルをMigrateしないとエラーになるため最低限の対応を追加しました。
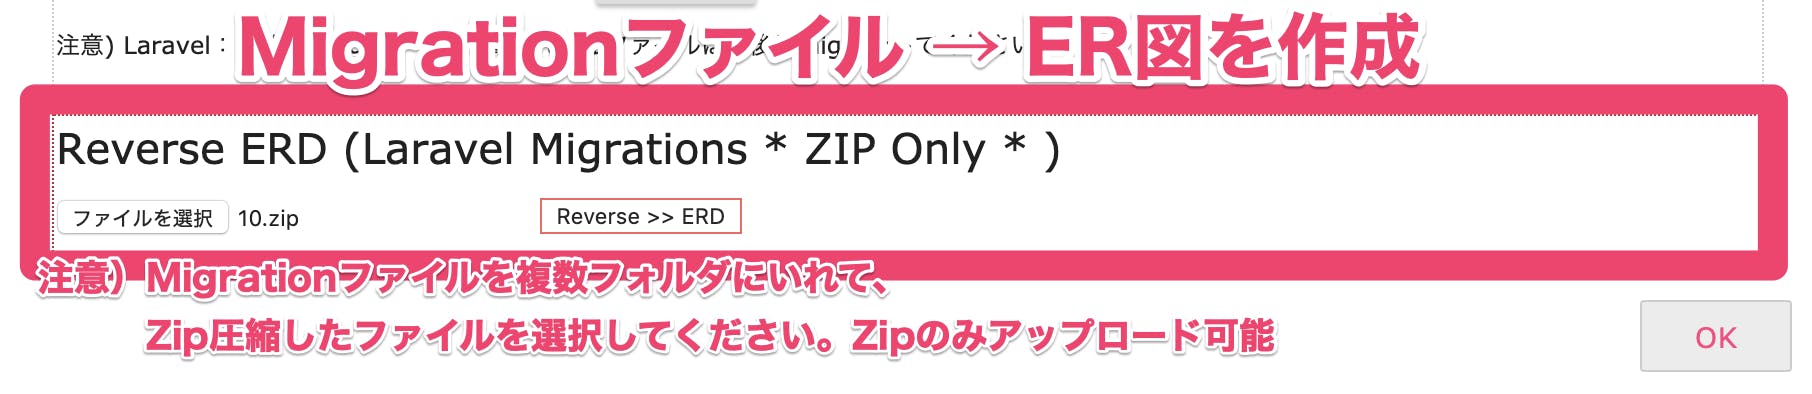
今後は、外部キーの親・子を全て判断して順番を「時間でずらすことで対応」していこうと考えています(未実装)。Reverse ERD
Migrationファイル一式をZIP圧縮 → [ Reverse >>> ERD ]ボタンでアップロード
アップロード完了するとER図が表示されます。
Migration(ZIPファイルに一式纏めて) 機能詳細 [ Reverse >>> ERD ] Migrationファイル一式をフォルダに入れて、ZIP圧縮したファイルをアップロード << 要注意 >>
「Laravel DB Designer」からZIPファイルをダウンロードしたファイルをそのままアップロードは出来ません。必ず、一度解凍したものをZIP圧縮しなおしてuploadしてください。今回vol3のまとめ
今回は「 Laravel DB Designer 」の操作方法とメイン機能である「 Save/Load 」と「 出力 」の解説をさせていただきました。まだまだUXの部分には力をいれられてないので、こういった使用説明が必要だと思い書きました。
少しでもご理解いただき使用していただければと存じます。
また、説明が抜けてるところがあるかもしれません、随時更新、内容によっては新しく解説記事を投稿して行こうと思います。『Laravelを使う人を幸せにしたいという思いから作った』
https://laraveldb.com以上
今後とも宜しくお願い致します。

- 投稿日:2019-11-25T09:24:34+09:00
【 Laravel 】「Laravel DB Designer」で設計から実装まで「ER図←→Migration」相互変換!” 「使い方・仕様 」について解説” vol3
今回は" Laravel DB Designer "の「 使い方・仕様 」について書きました(vol3)
『Laravelを使う人を幸せにしたいという思いから作った』
https://laraveldb.com
※英語圏対応済み
主機能
- ER図作成 (対応している”型”はページ下部に表記)
- ER図作成 → Migrationファイルを生成
- ER図作成 → チェック用クエリービルダーを自動生成
- Migrationファイル → ER図を生成(リバース)
テーブル名
テーブル名の頭に"m_"を付けた場合(Master:都道府県のように最初から用意するテーブル)
「 m_テーブル名 」とすると" $table->softDeletes(); "は追加されません。
「 m_テーブル名 」とすると" $table->timestamps(); "は追加されません。
テーブル名の頭に"t_"を付けた場合(Transaction:ユーザーの入力でデータが追加されていくテーブル)
「 t_テーブル名 」とすると" $table->softDeletes(); "が自動で追加されます。
「 t_テーブル名 」とすると" $table->timestamps(); "が自動で追加されます。
テーブル名の頭に"t_"も"m_"も付けない場合(接頭辞を付けない場合)
"m_" や "t_"を付けなければ " $table->softDeletes(); "が自動で追加されます。
"m_" や "t_"を付けなければ "$table->timestamps(); "が自動で追加されます。
【使用時の気をつけるPOINT】
1)
フォルダにMigrationファイル(Schema::createのみ)一式集めZip圧縮したファイルをアップロードすることで、ER図へ変換(リバース)することが可能です。2)
以下Migrationファイル 「 Schema::create 」のみ現在は可能
※ Schema::create以外は対応検討中Schema::create("テーブル名", function (Blueprint $table) {...}3)
外部キー(使った場合)親子の順番でMigrationファイルを選び、Migrateしなくてはいけない
※ 親子順でファイル名(時間等)を少しずらし対応検討中4)
ダウンロードしたMigrationファイル(ZIP)をそのまま再アップロードは出来ません
一度解凍してから自身のPCでZIPしてアップロードしてください。(PHPでの圧縮アルゴリズムの問題かも)
※ 今後の調査対象の一つ5)
MySQLのみ対応
※ 要望が多ければPostgres,SQLite等の対応も検討「ER図のSave/Load」機能
ER図データのLoad/Save
Save/Load機能 機能詳細 クラウドへ保存 Web上のDB(Firebase)に保存します。 クラウドデータ一覧 自身がWebに保存したデータ一覧 ブラウザに保存 LocalStorageに一時保存 ブラウザデータ一覧 自身がlocalに保存したデータ一覧 上記の「データ一覧」選択後、「 -- Data List -- 」の選択肢が表示されます。
そこに表示されるデータ項目を選択するとER図が復元します。ER図から出力(外部出力)
Save/Load機能 機能詳細 ER図からSQLを作成 現在表示しているEQ図からMySQLテーブルを作成するSQL文を作成 Laravel(Migration) 現在表示しているEQ図からLaravel専用のMigrationファイルをZIP圧縮して一式ダウンロード 子テーブルへの外部キー制約が記載されてるMigrationファイルは、
「 5分遅らせた 」ファイル名が生成しています(現時点)。
理由)親テーブルをMigrateしてから子テーブルをMigrateしないとエラーになるため最低限の対応を追加しました。
今後は、外部キーの親・子を全て判断して順番を「時間でずらすことで対応」していこうと考えています(未実装)。Reverse ERD
Migrationファイル一式をZIP圧縮 → [ Reverse >>> ERD ]ボタンでアップロード
アップロード完了するとER図が表示されます。
Migration(ZIPファイルに一式纏めて) 機能詳細 [ Reverse >>> ERD ] Migrationファイル一式をフォルダに入れて、ZIP圧縮したファイルをアップロード << 要注意 >>
「Laravel DB Designer」からZIPファイルをダウンロードしたファイルをそのままアップロードは出来ません。必ず、一度解凍したものをZIP圧縮しなおしてuploadしてください。今回vol3のまとめ
今回は「 Laravel DB Designer 」の操作方法とメイン機能である「 Save/Load 」と「 出力 」の解説をさせていただきました。まだまだUXの部分には力をいれられてないので、こういった使用説明が必要だと思い書きました。
少しでもご理解いただき使用していただければと存じます。
また、説明が抜けてるところがあるかもしれません、随時更新、内容によっては新しく解説記事を投稿して行こうと思います。『Laravelを使う人を幸せにしたいという思いから作った』
https://laraveldb.com以上
今後とも宜しくお願い致します。
- 投稿日:2019-11-25T09:24:34+09:00
【 Laravel 】「Laravel DB Designer 」を便利に使うための知識 ”使い方・仕様 ”について解説 Vol.3
今回は" Laravel DB Designer "の使い方・仕様について書きました(vol3)
『Laravelを使う人を幸せにしたい』という思いから作った「Laravel DB Designer」
(vol2の続きです)[https://qiita.com/daisu_yamazaki/items/92dc3cc599a264c3fb0f]
https://laraveldb.com
※英語圏対応済み主機能
- ER図作成 → 対応している”型”はvol2記事の下へ
- ER図作成 → Migrationファイルを生成
- ER図作成 → チェック用クエリービルダーを自動生成
- Migrationファイル → ER図を生成(リバース)再設計可能
テーブル名
テーブル名の頭に"m_"を付けた場合(Master:都道府県のように最初から用意するテーブル)
「 m_テーブル名 」とすると" $table->softDeletes(); "は追加されません。
「 m_テーブル名 」とすると" $table->timestamps(); "は追加されません。
テーブル名の頭に"t_"を付けた場合(Transaction:ユーザーの入力でデータが追加されていくテーブル)
「 t_テーブル名 」とすると" $table->softDeletes(); "が自動で追加されます。
「 t_テーブル名 」とすると" $table->timestamps(); "が自動で追加されます。
テーブル名の頭に"t_"も"m_"も付けない場合(接頭辞を付けない場合)
"m_" や "t_"を付けなければ " $table->softDeletes(); "が自動で追加されます。
"m_" や "t_"を付けなければ "$table->timestamps(); "が自動で追加されます。
「ER図のSave/Load」機能
ER図データのLoad/Save
Save/Load機能 機能詳細 クラウドへ保存 Web上のDB(Firebase)に保存します。 クラウドデータ一覧 自身がWebに保存したデータ一覧 ブラウザに保存 LocalStorageに一時保存 ブラウザデータ一覧 自身がlocalに保存したデータ一覧 上記の「データ一覧」選択後、「 -- Data List -- 」の選択肢が表示されます。
そこに表示されるデータ項目を選択するとER図が復元します。ER図から出力(外部出力)
Save/Load機能 機能詳細 ER図からSQLを作成 現在表示しているEQ図からMySQLテーブルを作成するSQL文を作成 Laravel(Migration) 現在表示しているEQ図からLaravel専用のMigrationファイルをZIP圧縮して一式ダウンロード 子テーブルへの外部キー制約が記載されてるMigrationファイルは、
「 5分遅らせた 」ファイル名が生成しています(現時点)。
理由)親テーブルをMigrateしてから子テーブルをMigrateしないとエラーになるため最低限の対応を追加しました。
※子の子テーブル等の外部キー制約は自身で順番にMigrateの必要があります!Reverse ERD
フォルダにMigrationファイル(Schema::createのみ)一式集めZip圧縮したファイルをアップロードすることで、ER図へ変換(リバース)することが可能です。
Migrationファイル一式をZIP圧縮 → [ Reverse >>> ERD ]ボタンでアップロード
アップロード完了するとER図が表示されます。
Migration(ZIPファイルに一式纏めて) 機能詳細 [ Reverse >>> ERD ] Migrationファイル一式をフォルダに入れて、ZIP圧縮したファイルをアップロード 1.注意
以下Migrationファイル 「 Schema::create 」のみ現在は可能
※ Schema::create以外は対応検討中Schema::create("テーブル名", function (Blueprint $table) {...}2.注意
「Laravel DB Designer」からZIPファイルをダウンロードしたファイルをそのままアップロードは出来ません。必ず、一度解凍したものをZIP圧縮しなおしてuploadしてください。今回vol3のまとめ
今回は「 Laravel DB Designer 」の操作方法とメイン機能である「 Save/Load 」と「 出力 」の解説をさせていただきました。まだまだUXの部分には力をいれられてないので、こういった使用説明が必要だと思い書きました。
また、シンプルな記法(ベーシックな?)をベースに仕様/処理を考えたため、複雑な、又はイレギュラーな記述が入ってるケースでは思った通りの出力にならないこともあるかも知れません。しかし、1から全て書いて行くよりは、楽になると思っています。また、設計後に再度ER図からのやり返しができるので、そこも利点だと思います。
少しでもご理解いただき使用していただければと存じます。また、説明が抜けてるところがあるかもしれません、随時更新、内容によっては新しく解説記事を投稿して行こうと思います。(現在はMySQLのみ対応:要望が多ければPostgres,SQLite等の対応も検討する予定です)
『Laravelを使う人を幸せにしたい』という思いから作った
Laravel DB Designer https://laraveldb.com
今後とも宜しくお願い致します。以上、今回はここまで。
- 投稿日:2019-11-25T09:24:34+09:00
「Laravel DB Designer 」vol.3 「使い方・仕様 」について解説”
今回は" Laravel DB Designer "の「 使い方・仕様 」について書きました(vol3)
『Laravelを使う人を幸せにしたいという思いから作った』
https://laraveldb.com
※英語圏対応済み
主機能
- ER図作成 (対応している”型”はページ下部に表記)
- ER図作成 → Migrationファイルを生成
- ER図作成 → チェック用クエリービルダーを自動生成
- Migrationファイル → ER図を生成(リバース)
テーブル名
テーブル名の頭に"m_"を付けた場合(Master:都道府県のように最初から用意するテーブル)
「 m_テーブル名 」とすると" $table->softDeletes(); "は追加されません。
「 m_テーブル名 」とすると" $table->timestamps(); "は追加されません。
テーブル名の頭に"t_"を付けた場合(Transaction:ユーザーの入力でデータが追加されていくテーブル)
「 t_テーブル名 」とすると" $table->softDeletes(); "が自動で追加されます。
「 t_テーブル名 」とすると" $table->timestamps(); "が自動で追加されます。
テーブル名の頭に"t_"も"m_"も付けない場合(接頭辞を付けない場合)
"m_" や "t_"を付けなければ " $table->softDeletes(); "が自動で追加されます。
"m_" や "t_"を付けなければ "$table->timestamps(); "が自動で追加されます。
【使用時の気をつけるPOINT】
1)
フォルダにMigrationファイル(Schema::createのみ)一式集めZip圧縮したファイルをアップロードすることで、ER図へ変換(リバース)することが可能です。2)
以下Migrationファイル 「 Schema::create 」のみ現在は可能
※ Schema::create以外は対応検討中Schema::create("テーブル名", function (Blueprint $table) {...}3)
外部キー(使った場合)親子の順番でMigrationファイルを選び、Migrateしなくてはいけない
※ 親子順でファイル名(時間等)を少しずらし対応検討中4)
ダウンロードしたMigrationファイル(ZIP)をそのまま再アップロードは出来ません
一度解凍してから自身のPCでZIPしてアップロードしてください。(PHPでの圧縮アルゴリズムの問題かも)
※ 今後の調査対象の一つ5)
MySQLのみ対応
※ 要望が多ければPostgres,SQLite等の対応も検討「ER図のSave/Load」機能
ER図データのLoad/Save
Save/Load機能 機能詳細 クラウドへ保存 Web上のDB(Firebase)に保存します。 クラウドデータ一覧 自身がWebに保存したデータ一覧 ブラウザに保存 LocalStorageに一時保存 ブラウザデータ一覧 自身がlocalに保存したデータ一覧 上記の「データ一覧」選択後、「 -- Data List -- 」の選択肢が表示されます。
そこに表示されるデータ項目を選択するとER図が復元します。ER図から出力(外部出力)
Save/Load機能 機能詳細 ER図からSQLを作成 現在表示しているEQ図からMySQLテーブルを作成するSQL文を作成 Laravel(Migration) 現在表示しているEQ図からLaravel専用のMigrationファイルをZIP圧縮して一式ダウンロード 子テーブルへの外部キー制約が記載されてるMigrationファイルは、
「 5分遅らせた 」ファイル名が生成しています(現時点)。
理由)親テーブルをMigrateしてから子テーブルをMigrateしないとエラーになるため最低限の対応を追加しました。
今後は、外部キーの親・子を全て判断して順番を「時間でずらすことで対応」していこうと考えています(未実装)。Reverse ERD
Migrationファイル一式をZIP圧縮 → [ Reverse >>> ERD ]ボタンでアップロード
アップロード完了するとER図が表示されます。
Migration(ZIPファイルに一式纏めて) 機能詳細 [ Reverse >>> ERD ] Migrationファイル一式をフォルダに入れて、ZIP圧縮したファイルをアップロード << 要注意 >>
「Laravel DB Designer」からZIPファイルをダウンロードしたファイルをそのままアップロードは出来ません。必ず、一度解凍したものをZIP圧縮しなおしてuploadしてください。今回vol3のまとめ
今回は「 Laravel DB Designer 」の操作方法とメイン機能である「 Save/Load 」と「 出力 」の解説をさせていただきました。まだまだUXの部分には力をいれられてないので、こういった使用説明が必要だと思い書きました。
少しでもご理解いただき使用していただければと存じます。
また、説明が抜けてるところがあるかもしれません、随時更新、内容によっては新しく解説記事を投稿して行こうと思います。『Laravelを使う人を幸せにしたいという思いから作った』
https://laraveldb.com以上
今後とも宜しくお願い致します。
- 投稿日:2019-11-25T09:21:21+09:00
【laravel】 migrationでindexの削除
削除出来ない
usersテーブルのtextカラムにindexを以下のように貼った時、
$table->index('text');削除を以下のようにして
php artisan migrate:rollbackを実行すると。$table->dropIndex('text');PDOException::("SQLSTATE[42000]: Syntax error or access violation: 1091 Can't DROP 'text'; check that column/key exists")怒られる。
なぜ
laravelはindex名は命名規則に基づいて定められる。
例'users_id_primary' // 主キー 'users_email_unique' // ユニークキー 'users_name_index' // 基本インデックス 'users_location_spatialindex' // 空間インデックスなので、今回の場合はindex名は
users_text_indexとなっている。そういうindexは無いので怒られる。
解決
消したいindexが貼ってあるカラム名を配列にして入れることで、命名規則に従ったindexが削除される。
$table->dropIndex(['text']);
- 投稿日:2019-11-25T08:38:38+09:00
Laravel6で作る顧客管理システム(超長文) 1.0版
今人気のフレームワーク Laraveで顧客管理システムを作ってみよう。
超高速開発で!注意:記事検証中です。記事通りやってもどこかでエラーになるかも。GitHubにソースコードが公開されているのでこのソースコードと比較しながら読んでいくのが良いかな。
この記事で説明するLaravelの機能
- Migrate
- Factory
- Seeder
- Eloquent -- hasMany(), belongsTo(), hasOne()
- Policy
- Controller
- Middleware
- @csrf
- Validation
- FormRequest
- Blade -- layout include
- Event & Listener
- Provider
この記事で説明されていないLaravelの機能や概念
- TDD
- Test
- SOLID
- Method DELETE の処理
- Controller での EDITの処理
- Eloquent JOIN
- Cache
対象となる方
- PHPの基本を分かっている
- オブジェクト指向の基本を分かっている
- データベースの基本を分かっている
- MySQLの基本操作が出来る
- PHP7.xの実行環境が有る
- composerコマンドが使える環境を持っている
ごめんなさい。あまり基本的な説明はしません。分からないところが出てきたらググって他の記事を見てください。
構築済みLaravelプロジェクトをGitHubに置きました
こんなシステムを作ります
簡単な顧客管理システム
- 社員がログインをする
- 社員は役職を持ち、役職にはスーパーバイザーと店員の2つがある
- 社員は顧客を登録・検索して顧客詳細情報を見ることが出来る
- 顧客の履歴を入力・一覧表示できる
- クレーマー顧客が登録されたらスーパーバイザーに通知メールを送る
- 社員は店舗に所属する
- 店舗は東京本社、名古屋支店、大阪支店の3つがある
今回作成しない機能
- 社員の登録編集画面
- 店舗の登録編集画面
画面ワイヤーフレーム
ER図
基本設定
composerでプロジェクトを作る
それでは1から 顧客管理システムを作っていきましょう
作業ディレクトリを決めて、以下のcomposerコマンドを実行します。
Laravelのバージョンは6.4の最新
プロジェクト名はchibi_crmとしました。composer create-project laravel/laravel=6.4.* chibi_crmcomposerでプロジェクトが作成されたら、作成されたディレクトリでcomposer installとnpm installを行いましょう。
cd chibi_crm
composer install
・・・ composerガンバル ・・・
npm install
・・・ npmガンバル ・・・
ロケールをJPにする
config/app.phpファイルを変更します。
70行目近辺
'timezone' => 'Asia/Tokyo',83行目近辺
'locale' => 'ja',109行目近辺
'faker_locale' => 'ja_JP',
.env を設定
.envでデータベースの接続情報やメールサーバーの設定をします。
.envファイルとは: プロジェクトで使用する設定定義ファイルです。gitに登録されません。秘匿にすべきパスワード情報なども入っています。以下の設定は例です。ご自分のMySQLとSMTPサーバーの設定を行ってください。
変更箇所のみ抜粋
APP_NAME=ちびCRM

DB_CONNECTION=mysql
DB_HOST=localhost
DB_PORT=3306
DB_DATABASE=chibi_crm
DB_USERNAME=chibi_crm
DB_PASSWORD=mypassword

MAIL_DRIVER=smtp
MAIL_HOST=mysmtpserver.example.com
MAIL_PORT=587
MAIL_USERNAME=myaccount
MAIL_PASSWORD=mypassword
MAIL_ENCRYPTION=tls
MAIL_FROM_ADDRESS=your_email_address
MAIL_FROM_NAME=your_name
MySQLデータベースの用意
今回データベースはMySQLを使用します。
MySQLにコマンドラインでログインしてユーザーとデータベースを作成します。
私の例では MySQLにchibi_crm ユーザーを作成し、chibi_crmユーザーがアクセス出来る chibi_crm データベースを作成します。
使用するデータベースの作成方法はご自分の好みの方法で構いません。SELECT PASSWORD('mypassword') +-------------------------------------------+ | PASSWORD('') | +-------------------------------------------+ | *5159E0755745831648EAB93EB77AD75F312B7D61 | +-------------------------------------------+ 1 row in set Time: 0.017s CREATE USER 'chibi_crm'@'localhost' IDENTIFIED WITH mysql_native_password AS '*5159E0755745831648EAB93EB77AD75F312B7D61' GRANT USAGE ON *.* TO 'chibi_crm'@'localhost' REQUIRE NONE WITH MAX_QUERIES_PER_HOUR 0 MAX_CONNECTIONS_PER_HOUR 0 MAX_UPDATES_PER_HOUR 0 MAX_USER_CONNECTIONS CREATE DATABASE IF NOT EXISTS `chibi_crm` GRANT ALL PRIVILEGES ON `chibi_crm`.* TO 'chibi_crm'@'localhost' quit
key generate と laravel/uiのインストール
Laravel6の認証機能を使うために以下のコマンドを実行します。
メモ:Laravel6からmake:authが無くなりました。以前のLaravelではmake:authで認証機能を作成しました。
php artisan key:generate
composer require laravel/ui
composer install
php artisan ui vue --auth
npm install && npm run dev
ためしに migration してみる
基本的なデータベース設定が済んだところでちゃんと接続できるか試してみましょう。
以下のコマンドを実行します。
php artisan migrateエラーにならずにusersテーブルなどが作成されるはずです。
データベースアクセスクラスの用意
artisan make:modelコマンドを使って データベースにアクセスするモデルクラスを作成します。
php artisan help make:modelを実行してみてください。make:modelで指定出来るオプション一覧が表示されます。
今回は--migration, --factoryオプションを使用します。
--migrationオプションを指定するとモデルと一緒にmigration fileと呼ばれるテーブル定義作成ファイルがモデルと一緒に作成されます。
--factoryオプションを指定するとテスト用のダミーデータを作成するファクトリークラスがモデルと一緒に作成されます。$php artisan help make:model Description: Create a new Eloquent model class Usage: make:model [options] [--] <name> Arguments: name The name of the class Options: -a, --all Generate a migration, factory, and resource controller for the model -c, --controller Create a new controller for the model -f, --factory Create a new factory for the model --force Create the class even if the model already exists -m, --migration Create a new migration file for the model -p, --pivot Indicates if the generated model should be a custom intermediate table model -r, --resource Indicates if the generated controller should be a resource controller -h, --help Display this help message -q, --quiet Do not output any message -V, --version Display this application version --ansi Force ANSI output --no-ansi Disable ANSI output -n, --no-interaction Do not ask any interactive question --env[=ENV] The environment the command should run under -v|vv|vvv, --verbose Increase the verbosity of messages: 1 for normal output, 2 for more verbose output and 3 for debug $以下のコマンドを実行してモデルとマイグレーションとファクトリークラスを作成します。
php artisan make:model Role --migration
php artisan make:model Shop --migration
php artisan make:model Customer --migration --factory
php artisan make:model CustomerLog --migration --factory
Rolesテーブルとクラス
php artisan make:model Role --migrationを実行したときに以下のファイルが作られます。
- database/migrations/2019_11_18_180233_create_roles_table.php
- app/Role.php
2019_11_18_180233_create_roles_table.phpは役職テーブル rolesの定義ファイルです。
Role.phpはrolesテーブルにアクセスするためのEloquentモデルクラスファイルです。
EloquentとはLaravelのデータベースアクセスクラスになります。
rolesテーブルの定義
マイグレーションファイルはartisanコマンドで作った直後にはidとタイムスタンプカラムしかありません。
rolesテーブルにnameとmemoカラムを追加します。class CreateRolesTable extends Migration { public function up() { Schema::create('roles', function (Blueprint $table) { $table->bigIncrements('id'); $table->string('name', 8)->comment('ロール名'); // ← 追記 ********* $table->string('memo')->comment('備考'); // ← 追記 ********* $table->timestamps(); }); } }
rolesテーブルと同様に他のテーブルにもカラムを追加します。
2014_10_12_000000_create_users_table.php
class CreateUsersTable extends Migration
{
    public function up()
    {
        Schema::create('users', function (Blueprint $table) {
            $table->bigIncrements('id');
            $table->string('name');
            $table->string('email')->unique();
            $table->timestamp('email_verified_at')->nullable();
            $table->string('password');
            $table->unsignedInteger('role_id');  // ← 追記 *********
            $table->unsignedInteger('shop_id');  // ← 追記 *********
            $table->string('memo');  // ← 追記 *********
            $table->rememberToken();
            $table->timestamps();
        });
    }
}
2019_11_18_184433_create_shops_table.php
class CreateShopsTable extends Migration
{
    public function up()
    {
        Schema::create('shops', function (Blueprint $table) {
            $table->bigIncrements('id');
            $table->string('name')->comment('店名');  // ← 追記 *********
            $table->timestamps();
        });
    }
}
2019_11_18_184441_create_customers_table.php
class CreateCustomersTable extends Migration
{
    public function up()
    {
        Schema::create('customers', function (Blueprint $table) {
            $table->bigIncrements('id');
            $table->unsignedInteger('shop_id');  // ← 追記 *********
            $table->string('name');  // ← 追記 *********
            $table->string('postal');  // ← 追記 *********
            $table->string('address');  // ← 追記 *********
            $table->string('email');  // ← 追記 *********
            $table->date('birthdate');  // ← 追記 *********
            $table->string('phone');  // ← 追記 *********
            $table->boolean('kramer_flag')->default(false)->comment('クレーマーフラグ');  // ← 追記 *********
            $table->timestamps();
        });
    }
}
2019_11_18_184446_create_customer_logs_table.php
class CreateCustomerLogsTable extends Migration
{
    public function up()
    {
        Schema::create('customer_logs', function (Blueprint $table) {
            $table->bigIncrements('id');
            $table->unsignedInteger('customer_id');  // ← 追記 *********
            $table->unsignedInteger('user_id')->comment('ログを入力した店員のID');  // ← 追記 *********
            $table->text('log')->comment('顧客記録');  // ← 追記 *********
            $table->timestamps();
        });
    }
}
テーブル定義が出来たところで migrateしてみる
以下のコマンドを実行してみてください。
php artisanartisanコマンドが実行できるコマンド一覧が表示されます。
$php artisan
・・・・抜粋・・・・
 migrate
  migrate:fresh        Drop all tables and re-run all migrations
  migrate:install      Create the migration repository
  migrate:refresh      Reset and re-run all migrations
  migrate:reset        Rollback all database migrations
  migrate:rollback     Rollback the last database migration
  migrate:status       Show the status of each migration
・・・・抜粋・・・・
migrateの箇所をみてください。
migrate:refresh Reset and re-run all migrations
テーブル定義を変更後の2回め以降のmigrationなので migrate:refresh を実行します。
php artisan migrate:refreshmigrate:refreshを実行すると、マイグレーションファイルに間違えがなければマイグレーションが実行されます。
ファクトリの作成
モデルを作成したときに--factoryオプションを指定していたのでdatabase/factories ディレクトリ以下のファイルが作成されています。
CustomerFactory.php
CustomerLogFactory.php
CustomerFactory.php
CustomerFactory.phpを変更します。fakerを使ってダミーデータを作成します。fakerはLaraveの機能で氏名やアドレス、電話番号をそれっぽいフェイクデーターを作成する機能です。
app/config.phpのfaker_localeをja_JPにしたので日本用のデータが作成されます。たとえば氏名なら山口 さゆりの様な。<?php /** @var \Illuminate\Database\Eloquent\Factory $factory */ use App\Customer; use Faker\Generator as Faker; $factory->define(Customer::class, function (Faker $faker) { return [ 'shop_id' => mt_rand(1, 3), // ショップIDは1が本店、2が名古屋、3が大阪 。マジックナンバーでごめんなさい 'name' => $faker->name, 'email' => $faker->unique()->safeEmail, 'postal' => $faker->postcode, 'address' => $faker->address, 'birthdate' => $faker->dateTimeBetween('-90 years', '-18 years'), // 18歳から90歳までの誕生日を生成 'phone'=> $faker->phoneNumber, 'kramer_flag' => 0, // クレーマーフラグ とりあえず全員 0 にしておく ]; });
CustomerLogFactory.php
顧客履歴テーブルに適当なデータを作成します。
<?php

/** @var \Illuminate\Database\Eloquent\Factory $factory */

use App\CustomerLog;
use Faker\Generator as Faker;

$factory->define(CustomerLog::class, function (Faker $faker) {
    return [
        'customer_id' => mt_rand(1, 30),
        'user_id' => mt_rand(1, 4),
        'log' => $faker->sentence(40),
    ];
});
シーダーの作成
seederというテスト用データ作成クラスを作ります。今回はシーダーを使って社員や顧客テーブルの中身を作っていきます。
以下のコマンドを実行してシーダークラスを作成します。php artisan make:seeder RolesTableSeeder php artisan make:seeder ShopsTableSeeder php artisan make:seeder CustomersTableSeeder php artisan make:seeder CustomerLogsTableSeeder php artisan make:seeder UsersTableSeederdatabase/seedsに 以下のファイルが作成されます。
CustomerLogsTableSeeder.php
CustomersTableSeeder.php
DatabaseSeeder.php
RolesTableSeeder.php
ShopsTableSeeder.php
UsersTableSeeder.php
CustomerLogsTableSeeder.php
<?php

use Illuminate\Database\Seeder;

class CustomerLogsTableSeeder extends Seeder
{
    /**
     * Run the database seeds.
     *
     * @return void
     */
    public function run()
    {
        factory('App\CustomerLog',120)->create();
    }
}
CustomersTableSeeder.php
<?php

use Illuminate\Database\Seeder;

class CustomersTableSeeder extends Seeder
{
    /**
     * Run the database seeds.
     *
     * @return void
     */
    public function run()
    {
        factory('App\Customer',200)->create();
    }
}
RolesTableSeeder.php
シーダーはテスト用データの作成という位置づけで考えると テスト用ではないマスターレコードの定義はmigrationに書くべき。でも今回はシーダーに書いてしまった。後で直すかも。
<?php

use Illuminate\Database\Seeder;
use Illuminate\Support\Facades\DB;

class RolesTableSeeder extends Seeder
{
    /**
     * Run the database seeds.
     *
     * @return void
     */
    public function run()
    {
        DB::table('roles')->insert(['id'=>1,'name'=>'sv','memo'=>'スーパーバイザー']);
        DB::table('roles')->insert(['id'=>2,'name'=>'clerk','memo'=>'店員']);
    }
}
ShopsTableSeeder.php
<?php

use Illuminate\Database\Seeder;
use Illuminate\Support\Facades\DB;

class ShopsTableSeeder extends Seeder
{
    /**
     * Run the database seeds.
     *
     * @return void
     */
    public function run()
    {
        DB::table('shops')->insert(['id'=>1,'name'=>'東京本店']);
        DB::table('shops')->insert(['id'=>2,'name'=>'名古屋支店']);
        DB::table('shops')->insert(['id'=>3,'name'=>'大阪支店']);
    }
}
UsersTableSeeder.php
<?php

use Illuminate\Database\Seeder;
use Illuminate\Support\Facades\DB;

class UsersTableSeeder extends Seeder
{
    /**
     * Run the database seeds.
     *
     * @return void
     */
    public function run()
    {
        // ↓ メールアドレスを受信可能なものに設定すると通知メール試験でメールを受け取れます
        DB::table('users')->insert(['id' => 1, 'name' => '山田太郎', 'email' => 'sute1@example.com', 'password' => bcrypt('password'), 'role_id' => 1, 'shop_id' => 1, 'memo' => '総括主任']);
        DB::table('users')->insert(['id' => 2, 'name' => '畠山俊二', 'email' => 'sute2@example.com', 'password' => bcrypt('password'), 'role_id' => 2, 'shop_id' => 2, 'memo' => '東京本店店員']);
        DB::table('users')->insert(['id' => 3, 'name' => '伊藤あきら', 'email' => 'sute3@example.com', 'password' => bcrypt('password'), 'role_id' => 2, 'shop_id' => 2, 'memo' => '名古屋支店店員']);
        DB::table('users')->insert(['id' => 4, 'name' => '財条浩二', 'email' => 'sute4@example.com', 'password' => bcrypt('password'), 'role_id' => 2, 'shop_id' => 3, 'memo' => '大阪支店店員']);
    }
}
DatabaseSeeder.phpに実行するシーダーを登録
DatabaseSeederクラスのrun関数にある $this->callの引数に実行するシーダークラスを追記します。
<?php

use Illuminate\Database\Seeder;

class DatabaseSeeder extends Seeder
{
    /**
     * Seed the application's database.
     *
     * @return void
     */
    public function run()
    {
        // $this->call(UsersTableSeeder::class);
        $this->call([
            RolesTableSeeder::class,
            UsersTableSeeder::class,
            ShopsTableSeeder::class,
            CustomersTableSeeder::class,
            CustomerLogsTableSeeder::class,
        ]);
    }
}
ためしに マイグレーション
php artisan migrate:refresh を実行してみる。
シーダーを実行
php artisan db:seed を実行してシーダーを実行します。
php artisan db:seedこんな感じのデータが作成されているはずです。
kokyaku>SELECT * FROM customers LIMIT 5
+----+---------+-------------+---------+--------------------------------------------------------------+----------------------------+------------+---------------+-------------+---------------------+---------------------+
| id | shop_id | name | postal | address | email | birthdate | phone | kramer_flag | created_at | updated_at |
+----+---------+-------------+---------+--------------------------------------------------------------+----------------------------+------------+---------------+-------------+---------------------+---------------------+
| 1 | 1 | 山口 さゆり | 3519079 | 2805820 岐阜県中村市南区田中町高橋7-1-7 コーポ中村101号 | osamu.nagisa@example.com | 1934-07-10 | 080-4996-6411 | 0 | 2019-11-22 11:16:17 | 2019-11-22 11:16:17 |
| 2 | 1 | 村山 和也 | 6265934 | 5742765 愛媛県西之園市北区山口町井高4-1-3 | mikako87@example.com | 1930-01-12 | 0374-37-4158 | 0 | 2019-11-22 11:16:17 | 2019-11-22 11:16:17 |
| 3 | 1 | 津田 聡太郎 | 9311596 | 9997357 三重県田中市中央区中村町三宅6-4-3 ハイツ津田102号 | shuhei77@example.com | 1989-10-06 | 090-9212-4853 | 0 | 2019-11-22 11:16:17 | 2019-11-22 11:16:17 |
| 4 | 3 | 渡辺 陽子 | 1581161 | 5312267 神奈川県笹田市北区山口町近藤9-6-9 | ematsumoto@example.net | 1974-02-24 | 021-043-9247 | 0 | 2019-11-22 11:16:17 | 2019-11-22 11:16:17 |
| 5 | 1 | 青田 充 | 3359132 | 4697243 大分県斉藤市中央区加納町中津川1-7-6 コーポ斉藤104号 | asuka.yamamoto@example.com | 1931-08-13 | 0078-09-2986 | 0 | 2019-11-22 11:16:17 | 2019-11-22 11:16:17 |
+----+---------+-------------+---------+--------------------------------------------------------------+----------------------------+------------+---------------+-------------+---------------------+---------------------+
5 rows in set
Time: 0.020s
kokyaku>Laravelリレーション定義*****
belongsTo, hasMany設定
ER図を見てみましょう。
https://qiita-image-store.s3.ap-northeast-1.amazonaws.com/0/6384/12cfb20e-1738-a952-7ffe-6ed1666cf7d5.png
Laravelでは1対多の関係はhasMany、多対1の関係はbelongsTo、1対1の関係はhasOneで設定します。
例えば 店舗と顧客はは1対多の関係になり。(今回顧客は1つの店舗にしか所属しない)
Customerクラスには belongsToを指定しpublic function shop() { return $this->belongsTo(Shop::class); }Shopクラスには hasManyを指定します
public function customers()
{
    return $this->hasMany(Customer::class);
}
Customer.php, CustomerLog.php, Role.php, Shop.php, User.phpテーブルにリレーションの設定をします。
Customer.php
リレーションの設定と一緒に guardedの設定もします。guardedはModelのプロパティで外から設定出来ないようにしたいものを指定するものです。今回すべてのプロパティを設定可能にするため guaredは[]の空の配列を設定します。
<?php

namespace App;

use App\Events\KramerInComming;
use Illuminate\Database\Eloquent\Model;

class Customer extends Model
{

    protected $guarded = [];

    public function shop()
    {
        return $this->belongsTo(Shop::class);
    }

    public function customerLogs()
    {
        return $this->hasMany(CustomerLog::class);
    }

}
CustomerLog.php
<?php

namespace App;

use Illuminate\Database\Eloquent\Model;

class CustomerLog extends Model
{
    protected $guarded = [];

    public function customer()
    {
        return $this->belongsTo(Customer::class);
    }

    public function user()
    {
        return $this->belongsTo(User::class);
    }

}
Role.php
<?php

namespace App;

use Illuminate\Database\Eloquent\Model;

class Role extends Model
{
    public const SUPER_VISOR_ID = 1;
    public const CLERK_ID = 2;

    protected $guarded = [];

    public function users()
    {
        return $this->hasMany(User::class);
    }
}
Shop.php
<?php

namespace App;

use Illuminate\Database\Eloquent\Model;

class Shop extends Model
{
    protected $guarded = [];

    public function users()
    {
        return $this->hasMany(User::class);
    }

    public function customers()
    {
        return $this->hasMany(Customer::class);
    }
}
User.php
<?php

namespace App;

use Illuminate\Contracts\Auth\MustVerifyEmail;
use Illuminate\Foundation\Auth\User as Authenticatable;
use Illuminate\Notifications\Notifiable;

class User extends Authenticatable
{
    use Notifiable;

    /**
     * The attributes that are mass assignable.
     *
     * @var array
     */
    protected $fillable = [
        'name', 'email', 'password',
    ];

    /**
     * The attributes that should be hidden for arrays.
     *
     * @var array
     */
    protected $hidden = [
        'password', 'remember_token',
    ];

    /**
     * The attributes that should be cast to native types.
     *
     * @var array
     */
    protected $casts = [
        'email_verified_at' => 'datetime',
    ];

    public function role()
    {
        return $this->belongsTo(Role::class);
    }

    public function shop()
    {
        return $this->belongsTo(Shop::class);
    }

    public function customers()
    {
        return $this->hasMany(CustomerLog::class);
    }

}
TinkerでDBからデータを取得してみる
リレーションの設定が出来たところで Tinker コマンドを使ってデータ取得確認をします。
$ php artisan tinker

\App\User::find(1)->name
=> "山田太郎"

\App\User::find(1)->shop->name
=> "東京本店"


\App\User::find(1)->role->memo
=> "スーパーバイザー"

\App\Shop::find(1)->users
=> Illuminate\Database\Eloquent\Collection {#3086
     all: [
       App\User {#3116
         id: 1,
         name: "山田太郎",
         email: "sute1@example.com",
         email_verified_at: null,
         role_id: 1,
         shop_id: 1,
         memo: "総括主任",
         created_at: null,
         updated_at: null,
       },
     ],
   }


\App\Customer::find(3)->customerLogs[1]->log
=> "Fugiat ad ea iusto quia sed dolores id tempore architecto placeat provident distinctio quo eos enim mollitia ut assumenda nostrum quis impedit perspiciatis a mollitia."
ポリシーの作成
以下の権限をLaravelのポリシー機能を使って実装していきます。
スーパーバイザー
- 全店員を閲覧できる
- 全顧客を閲覧できる店員
- 店員情報は自分のものだけ閲覧出来る
- 自店舗の顧客のみ閲覧出来る
artisan make:policy コマンドでポリシーファイルを作成する
helpオプションをつけてどんなオプションが指定できるか確認します。
php artisan help make:policy
$php artisan help make:policy
Description:
  Create a new policy class

Usage:
  make:policy [options] [--] <name>

Arguments:
  name                  The name of the class

Options:
  -m, --model[=MODEL]   The model that the policy applies to
  -h, --help            Display this help message
  -q, --quiet           Do not output any message
  -V, --version         Display this application version
      --ansi            Force ANSI output
      --no-ansi         Disable ANSI output
  -n, --no-interaction  Do not ask any interactive question
      --env[=ENV]       The environment the command should run under
  -v|vv|vvv, --verbose  Increase the verbosity of messages: 1 for normal output, 2 for more verbose output and 3 for debug
$
--modelオプションを使用して 対象となるモデルを指定してポリシーファイルを作成します。
php artisan make:policy UserPolicy --model=User
php artisan make:policy CustomerPolicy  --model=Customer
User.phpに isSuserVisor関数とenumSupserVisor関数を追加
app\User.phpを編集します。
    public function isSuserVisor(): bool
    {
        return $this['role_id'] === Role::SUPER_VISOR_ID;
    }

    public static function enumSupserVisor()
    {
        return User::where('role_id', '=', Role::SUPER_VISOR_ID)->get();
    }
ポリシーファイルを変種します
UserPolicy.php
<?php

namespace App\Policies;

use App\User;
use Illuminate\Auth\Access\HandlesAuthorization;

class UserPolicy
{
    use HandlesAuthorization;

    /**
     * Determine whether the user can view any models.
     *
     * @param \App\User $user
     * @return mixed
     */
    public function viewAny(User $user)
    {
        return $user->isSuserVisor();
    }

    /**
     * Determine whether the user can view the model.
     *
     * @param \App\User $user
     * @param \App\User $model
     * @return mixed
     */
    public function view(User $user, User $model)
    {
        return $user->id === $model->id || $user->isSuserVisor();
    }

}
CustomerPolicy.php
<?php

namespace App\Policies;

use App\Customer;
use App\User;
use Illuminate\Auth\Access\HandlesAuthorization;

class CustomerPolicy
{
    use HandlesAuthorization;

    /**
     * スーパーバイザーは全店舗の顧客を閲覧出来る
     * 以外は 自分が所属する店舗の顧客だけ閲覧出来る
     * @param  \App\User  $user
     * @param  \App\Customer  $customer
     * @return mixed
     */
    public function view(User $user, Customer $customer)
    {
        return $user->shop_id === $customer->shop_id || $user->isSuserVisor();
    }

}
ブラウザで表示してみる
php artisan serveコマンドはhttpサーバー立ち上げてLaravelのプロジェクトをブラウザで確認できる用意する仕組みです。
php artisan help serve でserveコマンドのオプションを確認。
$php artisan help serve
Description:
  Serve the application on the PHP development server

Usage:
  serve [options]

Options:
      --host[=HOST]     The host address to serve the application on [default: "127.0.0.1"]
      --port[=PORT]     The port to serve the application on
      --tries[=TRIES]   The max number of ports to attempt to serve from [default: 10]
  -h, --help            Display this help message
  -q, --quiet           Do not output any message
  -V, --version         Display this application version
      --ansi            Force ANSI output
      --no-ansi         Disable ANSI output
  -n, --no-interaction  Do not ask any interactive question
      --env[=ENV]       The environment the command should run under
  -v|vv|vvv, --verbose  Increase the verbosity of messages: 1 for normal output, 2 for more verbose output and 3 for debug
$
ポート番号を指定できるので指定する。省略すると8000ポートが使われる。
$php artisan serve --port=9999
Laravel development server started: http://127.0.0.1:9999
Welcome画面が表示されるので、これから顧客情報システムの画面が表示されるように設定します。
routes/web.php
どのURLでどの画面を表示するかの設定をweb.phpで行います。
routes/web.php
<?php

Route::get('/', function () {
    return view('welcome');
});

Auth::routes();

Route::get('/home', 'HomeController@index')->name('home');

Route::get('/users', 'UserController')->name('社員一覧
')->middleware('auth');
Route::get('/roles', 'RoleController')->name('ロール一覧')->middleware('auth');

Route::resource('/customers', 'CustomerController')->middleware('auth');
Route::post('/customers/{customer}/logs', 'CustomerLogController')->middleware('auth');
Route::get('customer_search', 'CustomerSearchController@index')->middleware('auth');
Route::post('customer_search', 'CustomerSearchController@search')->middleware('auth');
説明
社員一覧画面表示
Route::get('/users', 'UserController')->name('社員一覧')->middleware('auth');
http://127.0.0.1:8000/users へのGET リクエストを UserControllerに渡す。ミドルウェアにauthを指定する。authミドルウェアを指定することでログインされたユーザーのみアクセス出来るようになっている。ミドルウェアの指定を省略することも出来る。
役職一覧表示
Route::get('/roles', 'RoleController')->name('ロール一覧')->middleware('auth');
http://127.0.0.1:8000/roles へのGET リクエストを RoleControllerに渡す。
顧客画面 表示・登録画面
Route::resource('/customers', 'CustomerController')->middleware('auth');
resourceを指定しているので customersテーブルのCRUD 処理をコントローラー該当するメソッドに割り当てている。
顧客履歴登録
Route::post('/customers/{customer}/logs', 'CustomerLogController')->middleware('auth');
顧客履歴登録処理を行う。POSTリクエストをCustomerLogControllerに渡す。
顧客検索画面を表示する
Route::get('customer_search', 'CustomerSearchController@index')->middleware('auth');
/customer_searchへの GETリクエストをCustomerSearchControllerの index関数に渡す。
顧客検索結果画面を表示する
Route::post('customer_search', 'CustomerSearchController@search')->middleware('auth');
/customer_searchへの POSTリクエストをCustomerSearchControllerの search関数に渡す。
ミドルウェアの説明
Laravelの重要な機能。
ミドルウェアはアプリケーションの手前でRequestを処理し、アプリケーションんから出るResponseに処理を行うことが出来る仕組みです。
今回authミドルウェアを使うことによって ログイン認証を実装しています。
ミドルウェアは php artisan make:middleware コマンドで独自のミドルウェアを作成することもできますが、本記事では独自ミドルウェアは扱いません。
bladeとは
bladeはLaravelが使っているテンプレートエンジンです。
ファイル名のプリフィックスが.blade.phpを使います。
resources/views以下に 各画面のbladeファイルを配置します。
layout
WEBアプリケーション画面の共通部分を取り出して共通部品として使用する仕組みです。
今回はLaravelにはじめから入っているapp.blade.php layout をそのまま使います。
app.blade.php
プロジェクトディレクトリ内の resources/views/layouts/app.blade.php に入っています。変更せずに使いますが ちょっとデザインを変えたい場合は変更しても良いと思います。
include
includeはbladeでヘッダーやフッターなどの共通部分を一箇所で定義して各画面で読み込んで使う場合などに使用します。
今回エラーメッセージ表示を errors.blade.php に共通化して必要な画面でincludeして使います。
画面の作成
WELCOME画面
Laravelに最初から入っている
resources/views/welcome.blade.php
を、変更して使います。<div class"content">の中を <div class="title m-b-md"> 顧客管理システム </div> だけにしました。<!DOCTYPE html> <html lang="{{ str_replace('_', '-', app()->getLocale()) }}"> <head> ・・・略しました!・・・ </head> <body> <div class="flex-center position-ref full-height"> @if (Route::has('login')) <div class="top-right links"> @auth <a href="{{ url('/home') }}">Home</a> @else <a href="{{ route('login') }}">Login</a> @if (Route::has('register')) <a href="{{ route('register') }}">Register</a> @endif @endauth </div> @endif <div class="content"> <div class="title m-b-md"> 顧客管理システム </div> </div> </div> </body> </html>
ログイン画面
ログインの画面とコントローラはLaravelの初期状態をそのまま使うので変更はしません。
ログインアカウントはUsersTableSeeder.phpで登録したアカウントか Register のリンクからユーザー登録を行うと 役職権限が設定されないはずなので動かないと思う。
ダッシュボード画面
Laravelにサンプルとして入っている home.bladeを変更して使います。
resources/views/home.blade.phpダッシュボードには各画面へのリンクを一覧表示します
home.blade.php
@extends('layouts.app')

@section('content')
    <div class="container">
        <div class="row justify-content-center">
            <div class="col-md-8">
                <div class="card">
                    <div class="card-header">Dashboard</div>

                    <div class="card-body">
                        @if (session('status'))
                            <div class="alert alert-success" role="alert">
                                {{ session('status') }}
                            </div>
                        @endif

                        <ul>
                            @canany('viewAny', auth()->user())
                                <li><a href="/users">社員一覧
</a></li>
                            @endcanany
                            <li><a href="/roles">役職一覧</a></li>
                            <li><a href="/customers">顧客一覧</a></li>
                            <li><a href="/customers/create">顧客新規登録</a></li>
                            <li><a href="/customer_search">顧客検索</a></li>
                        </ul>
                    </div>
                </div>
            </div>
        </div>
    </div>
@endsection
@canany
@cananyは ポリシーを確認して true であれば内容を表示します。
今回のケースでは UserPolicy.phpのviewAny関数を呼んで true になれば社員一覧
のリンクを表示します。スーパーバイザーの社員一覧
を表示します。
社員一覧画面
社員一覧画面のweb.phpを確認
routes/web.php の以下の部分が
社員一覧コントローラを呼ぶ定義になります。Route::get('/users', 'UserController')->name('社員一覧')->middleware('auth');Route::get('/users', 'UserController')->name('社員一覧')->middleware('auth');
社員一覧画面コントローラの作成
invokableオプションを指定して invokable コントローラを作成します。invokableコントローラは呼び出される関数が一つのみのコントローラです。
少ない処理の画面であれば invokable で十分でしょう。
またweb.phpでコントローラ内の関数を指定しないで済みます。例:
Route::get('foo', 'FooController@show'); 左の showが呼び出される関数の指定する部分。invokableの場合自動的に__invoke関数が呼び出される。php artisan make:controller UserController --invokable
app/Http/Controllers/UserController.phpが作成される。
<?php

namespace App\Http\Controllers;

use App\User;
use Illuminate\Http\Request;

class UserController extends Controller
{
    /**
     * Handle the incoming request.
     *
     * @param \Illuminate\Http\Request $request
     * @return \Illuminate\Http\Response
     */
    public function __invoke(Request $request)
    {
        $user = auth()->user();
        $this->authorize('viewAny', $user);  // Policy をチェック
        $users = User::get(); // 社員一覧
を取得
        return view('users.index', compact('users')); // users.index.bldae を呼出し、 usersを渡す
    }
}
社員一覧画面のusers.blade.php
resources/views/users ディレクトリを作成して
この中に index.blade.php ファイルを作ります。@extends('layouts.app') @section('content') <div class="container"> <div class="row justify-content-center"> <div class="col-md-8"> <div class="card"> <div class="card-header">社員一覧 </div> <table width="100%" border="1"> <thead> <tr style="background-color: lightgray"> <td>氏名</td> <td>所属店舗</td> <td>ロール</td> <td>メール</td> </tr> </thead> @foreach($users as $user) {{-- Controllerから渡された users を foreach で回す --}} <tr> <td>{{ $user->name }}</td> {{-- 各要素を表示 --}} <td>{{ $user->shop->name }}</td> <td>{{ $user->role->name }}</td> <td>{{ $user->email }}</td> </tr> @endforeach </table> </div> </div> </div> </div> @endsection
役職一覧画面
役職一覧画面は社員一覧画面とほぼ同じです。
同じ様にweb.phpを確認して、コントローラーとbladeファイルを作っていきます。役職一覧画面のweb.phpを確認
routes/web.php の以下の部分がroutes/web.php の以下の部分がroutes/web.php の以下の部分が
役職一覧コントローラを呼ぶ定義になります。Route::get('/roles', 'RoleController')->name('ロール一覧')->middleware('auth');
役職一覧画面コントローラの作成
php artisan make:controller RoleController --invokableapp/Http/Controllers/RoleController.php ファイルが作られます。
以下の様に変更します。<?php namespace App\Http\Controllers; use App\Role; use Illuminate\Http\Request; class RoleController extends Controller { /** * Handle the incoming request. * * @param \Illuminate\Http\Request $request * @return \Illuminate\Http\Response */ public function __invoke(Request $request) { $roles = Role::get(); // 役職一覧を取得 return view('roles.index', compact('roles')); // $roles一覧情報を渡して roles./index.blade.phpを呼びます } }
役職一覧画面のusers.blade.php
resources/views/roles/index.blade.php ファイルを作成します。
@extends('layouts.app')
@section('content')
    <div class="container">
        <div class="row justify-content-center">
            <div class="col-md-8">
                <div class="card">
                    <div class="card-header">役職一覧</div>
                    <table width="100%" border="1">
                        <thead>
                        <tr style="background-color: lightgray">
                            <td>ID</td>
                            <td>役職コード</td>
                            <td>役職</td>
                        </tr>
                        </thead>
                        @foreach($roles as $role)
                            <tr>
                                <td>{{ $role->id }}</td>
                                <td>{{ $role->name }}</td>
                                <td>{{ $role->memo }}</td>
                            </tr>
                        @endforeach
                    </table>
                </div>
            </div>
        </div>
    </div>
@endsection
顧客一覧画面画面
顧客一覧画面のweb.phpを確認
routes/web.php の以下の部分が
顧客一覧コントローラを呼ぶ定義になります。Route::resource('/customers', 'CustomerController')->middleware('auth');Route::resourceは 予め決められたメソッドに振り分ける記述方法です。
振り分けは以下のようになっています。
Verb URI アクション ルート名
GET /customers index customers.index
GET /customers/create create customers.create
POST /customers store customers.store
GET /customers/{customer} show customers.show
GET /customers/{customer}/edit edit customers.edit
PUT/PATCH /customers/{customer} update customers.update
DELETE /customers/{customer} destroy customers.destroy顧客一覧では
GET /customers index customers.index
に該当する処理を作っていきます。
顧客一覧画面コントローラの作成
php artisan make:controller CustomerController --resource --model=Customer
--resource オプションを入れることで CustomerControllerに予め表示、編集、削除などの処理を行う関数が作成されます。
--modelはこのコントローラーで操作するModelを指定します。顧客(Customer)を扱うため Customerモデルを指定します。app/Http/Controllers/CustomerController.php
が作られていますので変更を加えていきます。
顧客一覧処理の処理を加えるのでindex関数内に処理を書いていきます。class CustomerController extends Controller { /** * 顧客一覧表示 * スーパーバイザーは全店舗の顧客を見られる * 以外は自分が所属する顧客のみ表示 * * @return \Illuminate\Http\Response */ public function index() { // 顧客情報はスーパーバイザーであれば 全店舗の顧客情報を閲覧できますが、店員の場合は自分が所属する店舗の顧客情報しか閲覧できません。 if (auth()->user()->isSuserVisor()) { $customers = Customer::paginate(); } else { $customers = Customer::where('shop_id', auth()->user()['shop_id'])->paginate(); } return view('customers.index', compact('customers')); } ・・・・略・・・・ }
Customer::paginate();この処理はページネーションを行い顧客一覧譲歩を取得します。デフォルトでは1ページに15件表示されます。
1ページ目は最初の15人分、2ページでは次の15人分の顧客一覧情報を取得します。
たった一行でページネーションの処理をやってくれるとはLaravelすごすぎ!
$customers = Customer::where('shop_id', auth()->user()['shop_id'])->paginate();whereの部分はSQLのWHERE区の処理を行います。
店員が所属するショップの顧客だけを抽出する検索条件を設定しています。
顧客一覧画面のusers.blade.php
resources/views/customers/index.blade.phpファイルを作成します。
@extends('layouts.app')
@section('content')
    <div class="container">
        <div class="row justify-content-center">
            <div class="col-md-8">
                <div class="card">
                    <div class="card-header">顧客</div>
                    <table width="100%" border="1">
                        <thead>
                        <tr style="background-color: lightgray">
                            <td>氏名</td>
                            <td>店舗</td>
                            <td>郵便番号</td>
                            <td>住所</td>
                        </tr>
                        </thead>
                        @foreach($customers as $customer)
                            <tr>
                                <td>
                                    <a href="/customers/{{ $customer->id }}">
                                        {{ $customer->name }}
                                    </a>
                                </td>
                                <td>{{ $customer->shop->name }}</td>
                                <td>{{ $customer->postal }}</td>
                                <td>{{ $customer->address }}</td>
                            </tr>
                        @endforeach
                    </table>
                    {{--  pagenation link -------------------------------------------------------------------------------       --}}
                    <table width="100%">
                        <tr>
                            @if($customers->lastPage() > 1)
                                <td width="120px"><a href="{{ $customers->url(0) }}">最初のページへ</a></td>
                                <td width="120px">
                                    @if($customers->previousPageUrl())
                                        <a href="{{ $customers->previousPageUrl() }}">前のページへ</a>
                                    @endif
                                </td>
                                <td width="120px" style="text-align: center">{{ $customers->currentPage() }}
                                    / {{ $customers->lastPage() }}</td>
                                <td width="120px">
                                    @if($customers->nextPageUrl())
                                        <a href="{{ $customers->nextPageUrl() }}">次のページへ</a>
                                    @endif
                                </td>
                                <td width="120px"><a href="{{ $customers->url($customers->lastPage()) }}">最後のページへ</a>
                                </td>

                            @endif
                        </tr>
                    </table>
                    {{--  End of pagenation link -------------------------------------------------------------------------       --}}

                    @include('errors')
                </div>
            </div>
        </div>
    </div>
@endsection
ページネーション
$customers は コントローラーでCustomer::paginate();で取得したのでページネーション関連の機能を使えます。
- $customers->previousPageUrl() 前ページのリンクを取得
- $customers->nextPageUrl() 次ページのリンクを取得
- $customers->url(0) 最初ページのリンクを取得
- $customers->url($customers->lastPage()) 最終ページのリンクを取得
- {{ \$customer->shop->name }}
customersテーブルにはshop_idが入っていますが店舗名が入っていません。ですのでそのまま表示すると店舗欄には店舗IDが表示されますが Customer.php モデルで定義したshop関数でbelongsToを指定してあるので $customer->shop->name と書くことでLaravelが店舗名をデータベースから読んでくれます。楽ですね。
顧客詳細
顧客詳細画面のweb.phpを確認
routes/web.php の以下の部分が
Route::resource('/customers', 'CustomerController')->middleware('auth');CustomerController コントローラを呼ぶ定義になります。
これは顧客一覧、顧客登録と同じです。
/customers/{customer} のパスで GET リクエストが来ると。
CustomerControllerのshow()メソッドが呼ばれます。
顧客詳細画面コントローラの作成
顧客一覧画面で作った CustomerController を使います。
CustomerController.phpのshow()関数に処理を書きます。
    /**
     * Display the specified resource.
     *
     * @param \App\Customer $customer
     * @return \Illuminate\Http\Response
     */
    public function show(Customer $customer)
    {
        $this->authorize('view', $customer);
        return view('customers.show', compact('customer'));
    }
- public function show(Customer \$customer) Laravelが該当するカスタマー情報をデータベースから取得し $customer変数に入れます。引数にモデルを指定するだけなんて楽で良いですね。
- \$this->authorize('view', $customer); CustomerPolicy.phpのview関数を呼んで スーパーバイザーでなければ ユーザーの所属する顧客しか見られないように制御します。
- return view('customers.show', compact('customer')); customer変を渡して customers/show.blade.php で Viewを作成します。
顧客詳細画面のusers.blade.php
@extends('layouts.app')
@section('content')
    <div class="container">
        <div class="row justify-content-center">
            <div class="col-md-12">
                <div class="card">
                    <div class="card-header">{{ $customer->name }}({{ $customer->id }})</div>
                    <p>店舗:{{ $customer->shop['name'] }}</p>
                    <p>郵便番号:{{ $customer->postal }}</p>
                    <p>住所:{{ $customer->address }}</p>
                    <p>メール:{{ $customer->email }}</p>
                    <p>生年月日:{{ $customer->birthdate }}</p>
                    <p>電話番号:{{ $customer->phone }}</p>
                    <p>クレーマーフラグ:{{ $customer->kramer_flag }}</p>
                    <p>更新日:{{ $customer->created_at }}</p>
                    <p>登録日日:{{ $customer->updated_at }}</p>

                    @include('errors')
                </div>
                <br/>
                <div class="card">
                    <form action="/customers/{{$customer->id}}/logs" method="POST">
                        @csrf
                        Log: <input type="text" name="log" value="{{old('log')}}">
                        <button type="submit" class="btn btn-sm btn-outline-primary">投稿</button>
                    </form>

                </div>
                <br/>
                <div class="card">
                    <ul>
                        @foreach($customer->customerLogs as $log)
                            <li>
                                {{ $log->log }}<br/>
                                記入時刻:{{ $log->created_at }} 記入者:{{ $log->user->name }}<br/>
                                <br/>
                            </li>
                        @endforeach
                    </ul>
                </div>
            </div>
        </div>
    </div>
@endsection
- @foreach(\$customer->customerLogs as \$log) 顧客履歴を表示します。CustomerController show関数内で 顧客履歴取得は行っていませんが、Customer モデルの customerLogs関数でhasManyを指定しているので Laravelが \$customer->customerLogs で 顧客履歴をデータベースから取得します。
顧客新規登録
顧客新規登録画面のweb.phpを確認
routes/web.php の以下の部分が
Route::resource('/customers', 'CustomerController')->middleware('auth');CustomerController コントローラを呼ぶ定義になります。
これは顧客一覧、顧客登録と同じです。
- /customers/create のパスで get リクエストが呼ぶと CustomerControllerのcreate()メソッドが呼ばれます。
- /customers のパスを POST リクエストで呼ぶと CustomerControllerのstore()メソッドが呼ばれます。
顧客新規登録画面コントローラの作成
すでに作られている CustomerController を追加います。
顧客情報入力画面の表示
    /**
     * Show the form for creating a new resource.
     *
     * @return \Illuminate\Http\Response
     */
    public function create()
    {
        return view('customers.create');
    }
customers/create.blade.phpでViewを作るだけ。
顧客情報データベース登録の処理
CustomerControllerにバリデーション関数を用意ます。ユーザーが入力した内容に不足な部分やおかしな情報が無いかチェックします。
    /**

     * 顧客登録処理のバリデーションを行います

     * @return mixed

     */

    protected function validateCustomer()

    {

        return request()->validate([

            'name' => ['required', 'min:3', 'max:32'],

            'shop_id' => ['required', 'Numeric', 'Between:1,3'],

            'postal' => ['required',],

            'address' => ['required',],

            'email' => ['required', 'E-Mail'],

            'birthdate' => ['required', 'Date'],

            'phone' => ['required',],

            'kramer_flag' => ['required', 'Numeric', 'Between:0,1'],

        ]);

    }
* request() ヘルパー関数
* validate() バリデーション関数
バリデーション関数にバリデーションルールを連想配列として渡します。バリデーションに失敗すると新規顧客画面に戻ります。/** * Store a newly created resource in storage. * * @param \Illuminate\Http\Request $request * @return \Illuminate\Http\Response */ public function store(Request $request) { $attribute = $this->validateCustomer(); $customer = Customer::create($attribute); return redirect('/customers'); }
- store(Request \$request) ストア関数 ユーザーが入力した情報の入っている Requestを受けます。
- \$attribute = \$this->validateCustomer(); バリデーション関数を呼びます。
- \$customer = Customer::create(\$attribute); 顧客情報をデータベースに新規登録します。
- return redirect('/customers'); 顧客一覧画面に遷移します。
顧客新規登録画面のusers.blade.php
resources/views/customers/create.blade.php
@extends('layouts.app')
@section('content')
    <div class="container">
        <div class="row justify-content-center">
            <div class="col-md-12">
                <div class="card">
                    <div class="card-header">顧客新規登録</div>
                    <form action="/customers" method="POST">
                        @csrf
                        <p>氏名:<input type="text" name="name" value="{{ old('name') }}"></p>
                        <p>店舗番号:<input type="text" name="shop_id" value="{{ old('shop') }}"></p>
                        <p style="font-size: 0.75em">1 東京本店, 2 名古屋支店, 3 大阪支店</p>
                        <p>郵便番号:<input type="text" name="postal" value="{{ old('postal') }}"></p>
                        <p>住所:<input type="text" name="address" value="{{ old('address') }}"></p>
                        <p>メール:<input type="text" name="email" value="{{ old('email') }}"></p>
                        <p>生年月日:<input type="text" name="birthdate" value="{{ old('birthdate') }}"></p>
                        <p>電話番号:<input type="text" name="phone" value="{{ old('phone') }}"></p>
                        <p>クレーマーフラグ:<input type="text" name="kramer_flag" value="{{ old('kramer_flag') }}"></p>
                        <p style="font-size: 0.75em">0 問題ない顧客, 1 クレーマー顧客</p>
                        <p style="text-align: center"><button class="btn btn-primary" type="submit">  登 録  </button></p>
                    </form>

                    @include('errors')
                </div>
            </div>
        </div>
    </div>
@endsection
- Submitしたら /customers にPOSTします。
- @csrf クロス・サイト・リクエスト・フォージェリ攻撃から守るために csrfトークンを配置します。
- 氏名の入力欄です。 value="{{ old('name') }}"の部分は 顧客登録を行うときに必須項目が足りないなどのバリデーションエラーで戻った場合に ユーザーが入力した値を表示するためのものです。
- @include('errors') バリデーションエラーで戻ってきたときに エラーを表示するものです。 errorsの場所 resources/views/errors.blade.php errorsの中身
  @if( $errors->any() )
    <ul>
        @foreach($errors->all() as $error)
            <li>{{$error}}</li>
        @endforeach
    </ul>
  @endif
クレーマーが登録されたらスーパーバイザーにメールを送る
クレーマーが登録されたらスーパーバイザーにメールを送るようにします。
Laravelの Mail, Evnet, Listener の機能を使います。メール KramerInComming
php artisan make:mail KramerInComming --markdown="kramer-in-comming"
KramerInComming Mailableクラスを作成します。app/Mail/KramerInComming.php が作られます。
コンストラクタを変更して kramer オブジェクトを保存するようにします。<?php namespace App\Mail; use App\Customer; use Illuminate\Bus\Queueable; use Illuminate\Contracts\Queue\ShouldQueue; use Illuminate\Mail\Mailable; use Illuminate\Queue\SerializesModels; class KramerInComming extends Mailable { use Queueable, SerializesModels; /** * @var Customer */ public $kramer; /** * Create a new message instance. * * @return void */ public function __construct(Customer $kramer) { $this->kramer = $kramer; } /** * Build the message. * * @return $this */ public function build() { return $this->markdown('kramer-in-comming'); } }artisan コマンドで markdown オプションを指定したので メール本文のテンプレートファイル kramer-in-comming.blade.phpが ./resources/views/kramer-in-comming.blade.phpに作られます。
以下の様に変更します。@component('mail::message') # Introduction クレーマーが来ました。 {{ $kramer->name }}様 @component('mail::button', ['url' => '']) 顧客管理システムを開く @endcomponent Thanks,<br> {{ config('app.name') }} @endcomponentイベント KramerInComming
php artisan make:event KramerInComming
KramerInComming イベントを作成します。app/Events/KramerInComming.php ファイルが作られます。
コンストラクタを変更して kramer オブジェクトを保存するようにします。<?php namespace App\Events; use App\Customer; use Illuminate\Broadcasting\Channel; use Illuminate\Broadcasting\InteractsWithSockets; use Illuminate\Broadcasting\PresenceChannel; use Illuminate\Broadcasting\PrivateChannel; use Illuminate\Contracts\Broadcasting\ShouldBroadcast; use Illuminate\Foundation\Events\Dispatchable; use Illuminate\Queue\SerializesModels; class KramerInComming { use Dispatchable, InteractsWithSockets, SerializesModels; /** * @var Customer */ public $kramer; /** * Create a new event instance. * * @return void */ public function __construct(Customer $kramer) { $this->kramer = $kramer; } /** * Get the channels the event should broadcast on. * * @return \Illuminate\Broadcasting\Channel|array */ public function broadcastOn() { return new PrivateChannel('channel-name'); } }
- Customer.php dispatchesEvents に KramerInCommingイベントを追加します。 ./app/Customer.php
    protected $dispatchesEvents = [
        'created' => KramerInComming::class,
    ];
リスナー SendKramerInCommingNotification
php artisan make:listener SendKramerInCommingNotification --event=KramerInComming
./app/Listeners/SendKramerInCommingNotification.php が作られます。
handle()関数内に処理を書きます<?php namespace App\Listeners; use App\Events\KramerInComming; use App\User; use Illuminate\Contracts\Queue\ShouldQueue; use Illuminate\Queue\InteractsWithQueue; use Illuminate\Support\Facades\Mail; class SendKramerInCommingNotification { /** * Create the event listener. * * @return void */ public function __construct() { } /** * Handle the event. * * @param KramerInComming $event * @return void */ public function handle(KramerInComming $event) { // クレーマーなら通知を発送 。クレーマー確定前に クレーマー変数にカスタマーを入れているのはなんか変だなぁ。 if ($event->kramer->isKramer()) { foreach (User::enumSupserVisor() as $superVisor) { Mail::to($superVisor->email)->send(new \App\Mail\KramerInComming($event->kramer)); //Mail::to($superVisor->email)->send(\App\Mail\KramerInComming($event->kramer)); } } } }
- EventServiceProvider.php に listen に追加します。 ./app/Providers/EventServiceProvider.phpをエディタで開いて $listen に SendKramerInCommingNotification を追記します。
  protected $listen = [
    Registered::class => [
        SendEmailVerificationNotification::class,
    ],
    KramerInComming::class => [
        SendKramerInCommingNotification::class
    ],
];
これで新規顧客登録時に クレーマーフラグ 1 が登録されたら、クレーマーが来たとして スーパーバイザーに 通知メールが送られます。
顧客検索
MyApplicationService
顧客検索のController, Viewに入る前に、今回はアプリケーション全体で使う MyApplicationService を作成します。
このクラスはMVCのモデルに相当します。
ビジネスロジックを記述します。先にユニットテストを作る(ここだけTDDっぽいな)
tests/Unit/MyApplicationServiceTest.php
<?php

namespace App\MyServices;


use Illuminate\Foundation\Testing\DatabaseTransactions;
use Illuminate\Support\Facades\App;
use Tests\TestCase;

class MyApplicationServiceTest extends TestCase
{
    use DatabaseTransactions;

    /** @test */
    public function get_birth_day_range()
    {
        $apService = App::make('myapplicationservice');

        try {
            $num = $apService->getBirthdayRange(1, strtotime('1940-1-1'));
            $this->assertTrue(false);
        } catch (\Exception $e) {
            $this->assertSame($e->getCode(), MyApplicationService::ERROR_CODE_WRONG_START_TIMESTAMP);
        }

        // 1970年境界値チェック
        try {
            $num = $apService->getBirthdayRange(1, strtotime('1969-12-31'));
            $this->assertTrue(false);
        } catch (\Exception $e) {
            $this->assertSame($e->getCode(), MyApplicationService::ERROR_CODE_WRONG_START_TIMESTAMP);
        }

        // 1970年境界値チェック
        try {
            $num = $apService->getBirthdayRange(1, strtotime('1970-1-1 8:59:59'));// Timezone JP
            $this->assertTrue(false);
        } catch (\Exception $e) {
            $this->assertSame($e->getCode(), MyApplicationService::ERROR_CODE_WRONG_START_TIMESTAMP);
        }

        // 1970年境界値チェック
        $num = $apService->getBirthdayRange(1, strtotime('1970-1-1 09:00'));
        $this->assertNotEmpty($num);

        // 1歳
        $num = $apService->getBirthdayRange(1);
        $this->assertNotEmpty($num);
        $num = $apService->getBirthdayRange(1, time());
        $this->assertNotEmpty($num);


        // 40歳
        $num = $apService->getBirthdayRange(10);
        $this->assertNotEmpty($num);
        $num = $apService->getBirthdayRange(10, strtotime('1980-1-1'));
        $this->assertSame(['start' => '1969-01-02', 'end' => '1970-01-01'], $num);

    }
}
MyApplicationServiceを作る
./app/MyServices ディレクトリを作成し
このディレクトリの中に MyApplicationService.php ファイルを作成します。./app/MyServices/MyApplicationService.php
<?php


namespace App\MyServices;


class MyApplicationService
{
    const ERROR_CODE_WRONG_START_TIMESTAMP = 1992;

    /**
     * 年齢を指定して 誕生日の始まりの日と終わりの日を返す
     * @param int $age 年齢を指定
     * @param int $targetTimestamp 対象タイムスタンプ。指定するとこの時刻を基準にして年齢を計算する。デフォルトはNULL
     * @return array 0に開始日、1に終了日が入る
     */
    function getBirthdayRange(int $age, int $targetTimestamp = null)
    {
        if ($targetTimestamp < 0) {
            throw new \Exception('基準日は1970年以降', self::ERROR_CODE_WRONG_START_TIMESTAMP);
        }
        $ts = $targetTimestamp;
        if (is_null(($targetTimestamp))) {
            $targetTimestamp = time();
        }
        $_ts_b = $targetTimestamp + 86400;

        $start = mktime(0, 0, 0, date('m', $_ts_b), date('d', $_ts_b), date('Y', $_ts_b) - $age - 1);
        $end = mktime(0, 0, 0, date('m', $targetTimestamp), date('d', $targetTimestamp), date('Y', $targetTimestamp) - $age);
        return ['start' => date('Y-m-d', $start), 'end' => date('Y-m-d', $end)];
    }

}
顧客検索画面のweb.phpを確認
routes/web.php の以下の部分が
Route::get('customer_search', 'CustomerSearchController@index')->middleware('auth');CustomerSearchControllerコントローラを呼ぶ定義になります。
顧客検索画面コントローラの作成
php artisan make:controller CustomerSearchController
を実行。app/Http/Controllers/CustomerSearchController.php が作られます。<?php namespace App\Http\Controllers; use App\Customer; use App\Http\Requests\CustomerSearchPost; use App\MyServices\MyApplicationService; use Illuminate\Http\Request; class CustomerSearchController extends Controller { protected $myApplicationService; public function __construct() { $this->myApplicationService = app()->make('myapplicationservice'); } /** * 顧客を検索して表示する * @return \Illuminate\Http\Response */ public function index(Request $request) { return view('customer_search'); } public function search(CustomerSearchPost $request, MyApplicationService $myApplicationService) { $validated = $request->validated(); $wheres = []; $search_criterias = []; // 氏名の指定は有るか if (!empty($validated['name'])) { array_push($wheres, ['name', '=', $validated['name']]); array_push($search_criterias, '氏名が' . $validated['name'] . 'に一致する'); } // 年齢 from の指定は有るか if (!empty($validated['age_from'])) { $ages = $myApplicationService->getBirthdayRange(($validated['age_from'])); array_push($wheres, ['birthdate', '<=', $ages['end']]); } // 年齢 to の指定は有るか if (!empty($validated['age_to'])) { $ages = $myApplicationService->getBirthdayRange(($validated['age_to'])); array_push($wheres, ['birthdate', '>=', $ages['end']]); } $customers = Customer::where($wheres)->paginate(); return view('customer_search', compact('customers', 'search_criterias', 'validated')); } }CustomerSearchPost の作成
今回は ユーザー入力のバリデーションを FormRequest クラスを使って行います。以下のartisan コマンドを実行して FormRequest クラスを生成します。
php artisan make:request CustomerSearchPost
./app/Http/Requests/CustomerSearchPost.php が作られます。
<?php

namespace App\Http\Requests;

use Illuminate\Foundation\Http\FormRequest;

class CustomerSearchPost extends FormRequest
{
    /**
     * Determine if the user is authorized to make this request.
     *
     * @return bool
     */
    public function authorize()
    {
        return true;
    }

    /**
     * Get the validation rules that apply to the request.
     *
     * @return array
     */
    public function rules()
    {
        return [
            'searchItems' => 'required_without_all:name,age_from,age_to',
            'name' => '',
            'age_from' => '',
            'age_to' => '',
        ];
    }

    public $attributes;

    public function attributes()
    {
        return [
            'name' => '氏名',
            'age_from' => '年齢から',
            'age_to' => '年齢まで',
        ];
    }
}
- rules にバリデーションのルールを書きます
- attributes関数で 項目名を日本語にします。エラーメッセージで使われます。
エラーメッセージをカスタマイズします
resources/lang/ja ディレクトリを作成し ここに resources/lang/en/validation.php ファイルをコピーします。
resources/lang/ja/validation.phpをエディタで開いてエラーメッセージをカスタマイズします。'required_without_all' => ' :values のどれか一つは入力してください。',
顧客検索画面のusers.blade.php
resources/views/customer_search.blade.php
@extends('layouts.app')

@section('content')
    <div class="container">
        <div class="row justify-content-center">
            <div class="col-md-12">
                <div class="card">
                    <div class="card-header">検索条件</div>
                    <div class="card-body">
                        <form action="/customer_search" method="POST">
                            @csrf
                            <table>
                                <tr>
                                    <td>氏名</td>
                                    <td>
                                        <input type="text" name="name"
                                               value="{{isset($validated['name'])?$validated['name']:''}}"
                                        />
                                    </td>
                                </tr>
                                <tr>
                                    <td>年齢</td>
                                    <td>
                                        <input type="number" min="0" max="999" name="age_from"
                                               value="{{isset($validated['age_from'])?$validated['age_from']:''}}"
                                        />
                                        〜
                                        <input type="text" min="0" max="999" name="age_to"
                                               value="{{isset($validated['age_to'])?$validated['age_to']:''}}"
                                        />
                                    </td>
                                </tr>
                                <tr>
                                    <td colspan="2" align="center">
                                        <button type="submit" class="btn btn-primary">  検 索  </button>
                                    </td>
                                </tr>
                            </table>
                        </form>
                        @include('errors')
                    </div>
                </div>
                <br/>
                @if(!empty($customers))
                    <div class="card">
                        <div class="card-header">
                            <p>検索結果</p>
                            <ul>
                                @foreach($search_criterias as $criteria)
                                    <li>{{$criteria}}</li>
                                @endforeach
                            </ul>
                        </div>
                        <div class="card-body">
                            <ul>
                                @foreach($customers as $customer)
                                    <li>
                                        <a href="/customers/{{$customer['id']}}">{{ $customer['name'] }}</a>
                                    </li>
                                @endforeach
                            </ul>
                        </div>
                    </div>
                @endif
            </div>
        </div>
    </div>
@endsection
顧客検索結果
顧客検索結果画面のweb.phpを確認
routes/web.php の以下の部分が
Route::post('customer_search', 'CustomerSearchController@search')->middleware('auth');CustomerSearchControllerのsearch関数を呼ぶ定義になります。
顧客検索結果画面コントローラの作成
すでに作られている CustomerSearchController.php を使います。
search関数に検索処理を書いていきます。public function search(CustomerSearchPost $request, MyApplicationService $myApplicationService) { $validated = $request->validated(); $wheres = []; $search_criterias = []; // 氏名の指定は有るか if (!empty($validated['name'])) { array_push($wheres, ['name', '=', $validated['name']]); array_push($search_criterias, '氏名が' . $validated['name'] . 'に一致する'); } // 年齢 from の指定は有るか if (!empty($validated['age_from'])) { $ages = $myApplicationService->getBirthdayRange(($validated['age_from'])); array_push($wheres, ['birthdate', '<=', $ages['end']]); } // 年齢 to の指定は有るか if (!empty($validated['age_to'])) { $ages = $myApplicationService->getBirthdayRange(($validated['age_to'])); array_push($wheres, ['birthdate', '>=', $ages['end']]); } $customers = Customer::where($wheres)->paginate(); return view('customer_search', compact('customers', 'search_criterias', 'validated')); }
- public function search(CustomerSearchPost $request, MyApplicationService $myApplicationService) CustomerSearchPost $request で バリデーション済みの 検索条件が渡されます。バリデーションが成功しなければsearch関数は実行されません。 MyApplicationService $myApplicationService アプリケーションサービスインスタンスが渡されます クラス型を指定することによって Laravelが自動的に対応するインスタンスを設定してくれます。便利です。
- \$wheres 配列に 検索条件を追加していき Customer::where(\$wheres)->paginate(); で検索結果を得ます。paginate()を呼ぶことで1ページ分のレコードが設定されます。
顧客検索結果画面のcustomer_search.blade.php
resources/views/customer_search.blade.php
@extends('layouts.app')

@section('content')
    <div class="container">
        <div class="row justify-content-center">
            <div class="col-md-12">
                <div class="card">
                    <div class="card-header">検索条件</div>
                    <div class="card-body">
                        <form action="/customer_search" method="POST">
                            @csrf
                            <table>
                                <tr>
                                    <td>氏名</td>
                                    <td>
                                        <input type="text" name="name"
                                               value="{{isset($validated['name'])?$validated['name']:''}}"
                                        />
                                    </td>
                                </tr>
                                <tr>
                                    <td>年齢</td>
                                    <td>
                                        <input type="number" min="0" max="999" name="age_from"
                                               value="{{isset($validated['age_from'])?$validated['age_from']:''}}"
                                        />
                                        〜
                                        <input type="text" min="0" max="999" name="age_to"
                                               value="{{isset($validated['age_to'])?$validated['age_to']:''}}"
                                        />
                                    </td>
                                </tr>
                                <tr>
                                    <td colspan="2" align="center">
                                        <button type="submit" class="btn btn-primary">  検 索  </button>
                                    </td>
                                </tr>
                            </table>
                        </form>
                        @include('errors')
                    </div>
                </div>
                <br/>
                @if(!empty($customers))
                    <div class="card">
                        <div class="card-header">
                            <p>検索結果</p>
                            <ul>
                                @foreach($search_criterias as $criteria)
                                    <li>{{$criteria}}</li>
                                @endforeach
                            </ul>
                        </div>
                        <div class="card-body">
                            <ul>
                                @foreach($customers as $customer)
                                    <li>
                                        <a href="/customers/{{$customer['id']}}">{{ $customer['name'] }}</a>
                                    </li>
                                @endforeach
                            </ul>
                        </div>
                    </div>
                @endif
            </div>
        </div>
    </div>
@endsection
Customer log
顧客詳細画面で顧客履歴を表示・登録が行えますweb.php に登録処理の定義をします。
Route::post('/customers/{customer}/logs', 'CustomerLogController')->middleware('auth');php artisan make:controller CustomerLogController --invokable
を実行して ivokableなCustomerLogControllerクラスを作成します。
app/Http/Controllers/CustomerLogController.php
が作られます。app/Http/Controllers/CustomerLogController.php
<?php

namespace App\Http\Controllers;

use App\Customer;
use App\CustomerLog;
use Illuminate\Http\Request;

class CustomerLogController extends Controller
{
    /**
     * Handle the incoming request.
     *
     * @param \Illuminate\Http\Request $request
     * @return \Illuminate\Http\Response
     */
    public function __invoke(Customer $customer)
    {
        $attribute = $this->validateLog();
        $attribute['customer_id'] = $customer['id']; // カスタマーIDを記録
        $attribute['user_id'] = auth()->user()['id']; // ログを記録した人を保存
        $customerLog = CustomerLog::create($attribute);
        return back();
    }

    protected function validateLog()
    {
        return request()->validate([
            'log' => ['required', 'min:1', 'max:100'],
        ]);
    }

}
おしまい
以上でLaravel6で作る顧客管理システムの記事はおしまいです。
読んでくれて ありがとう。

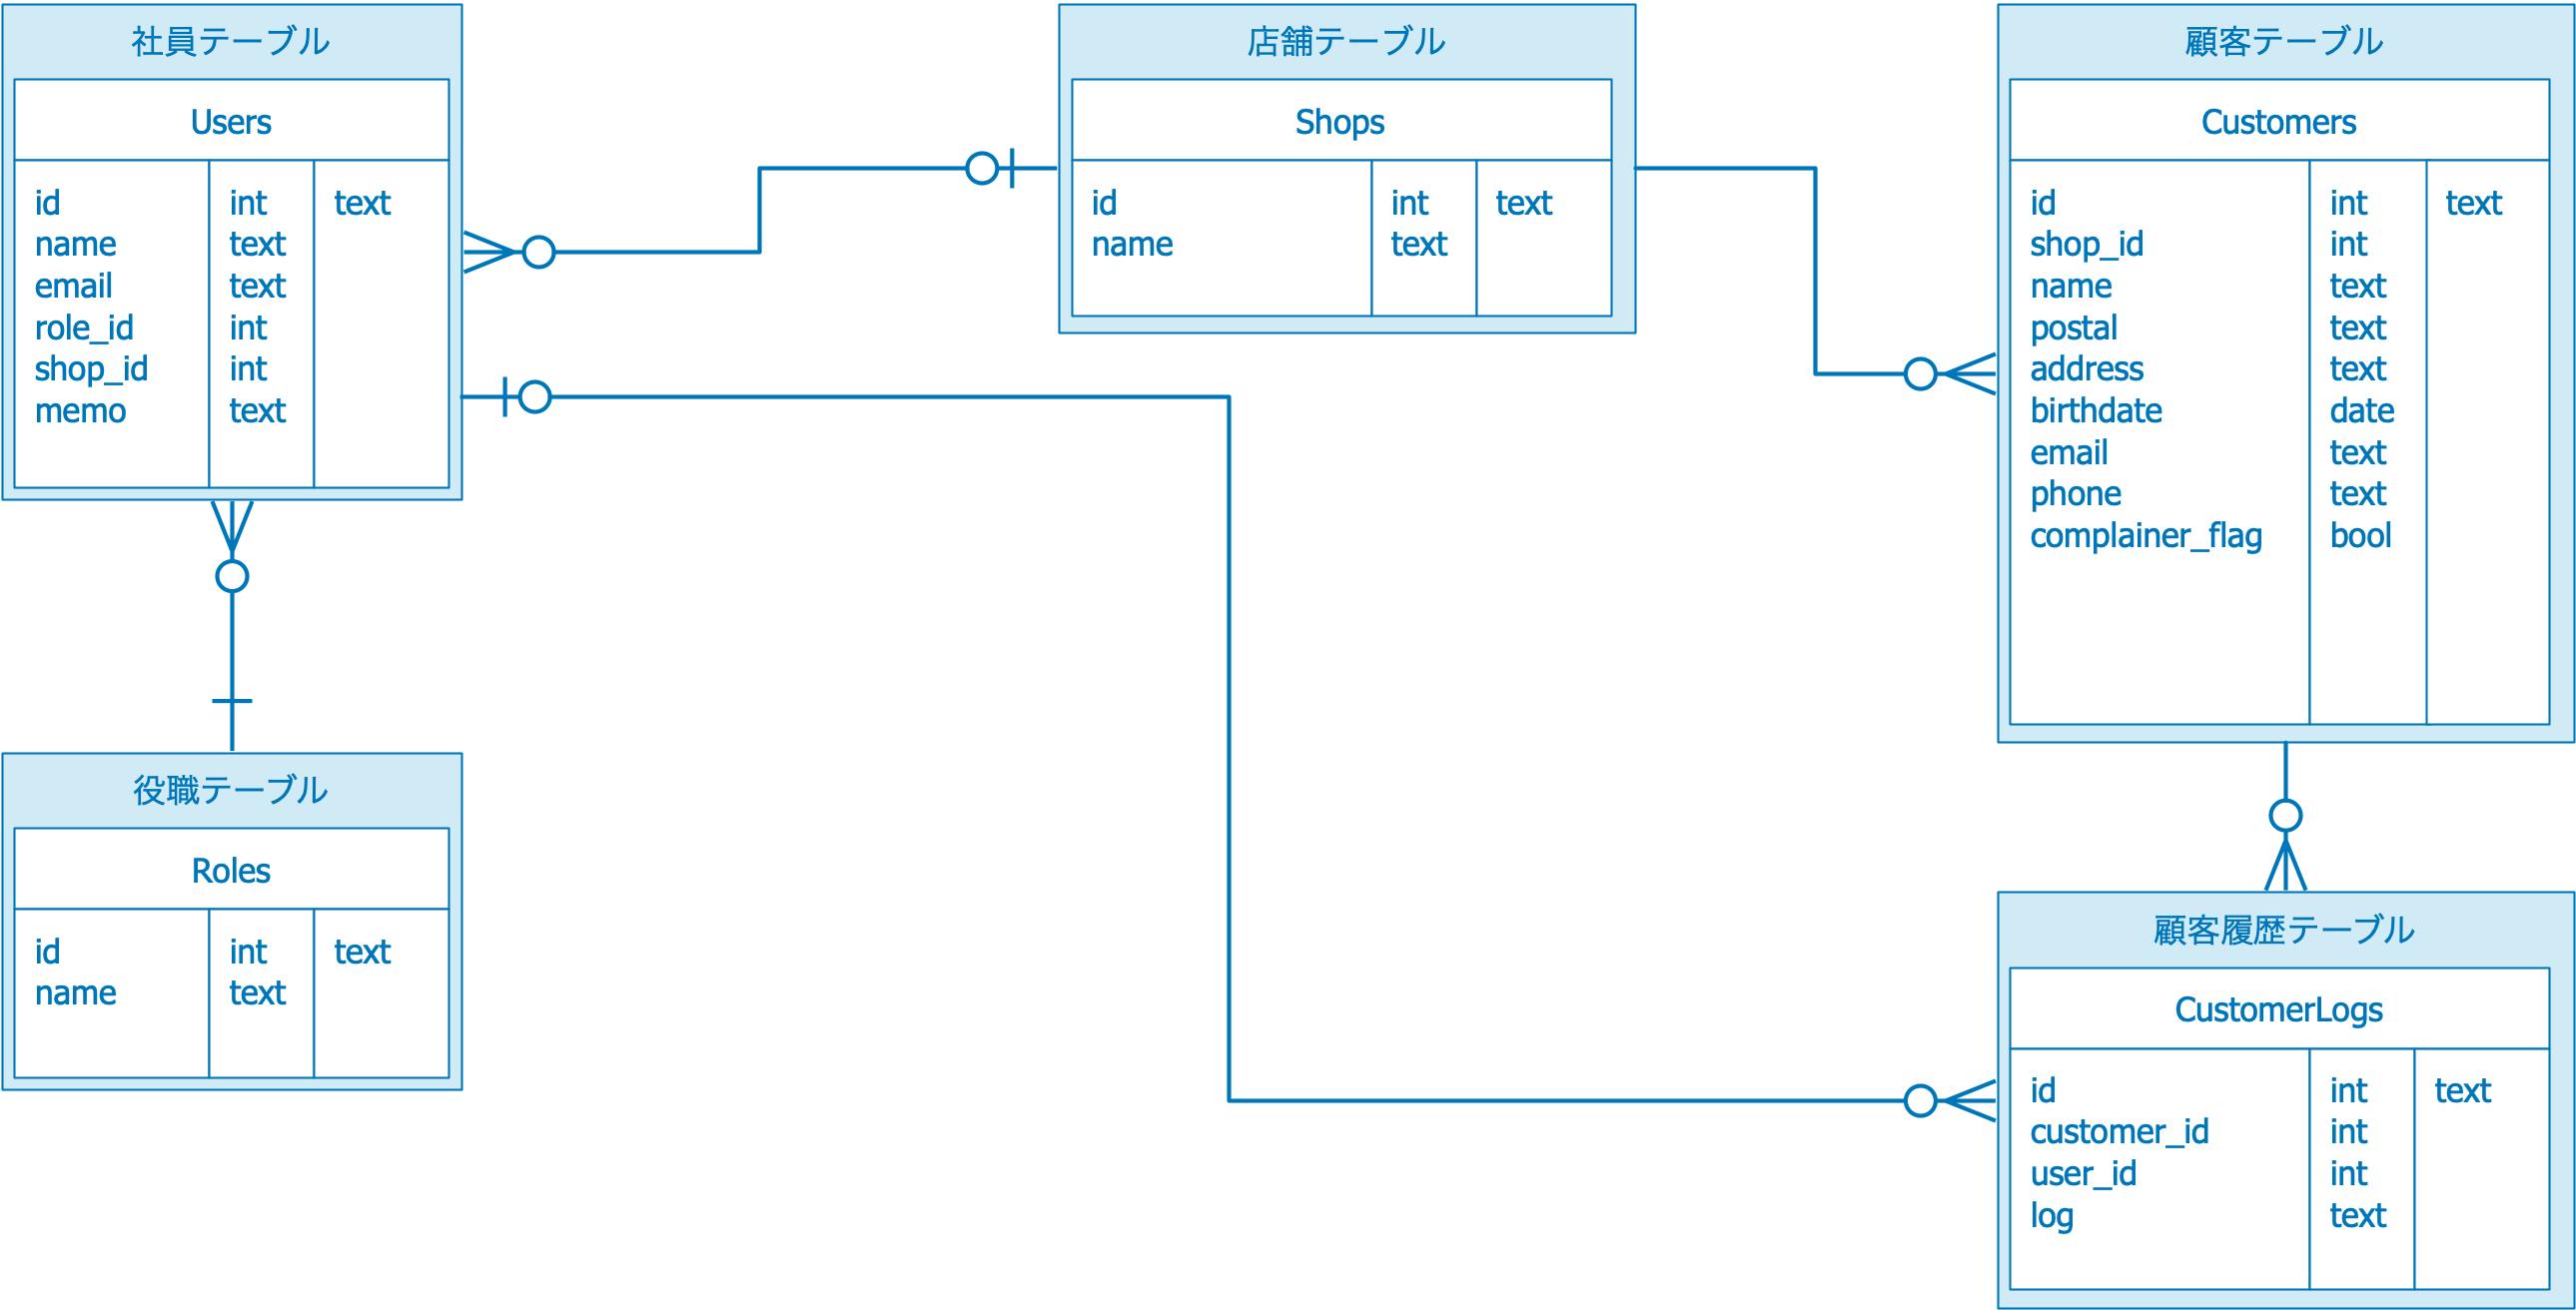

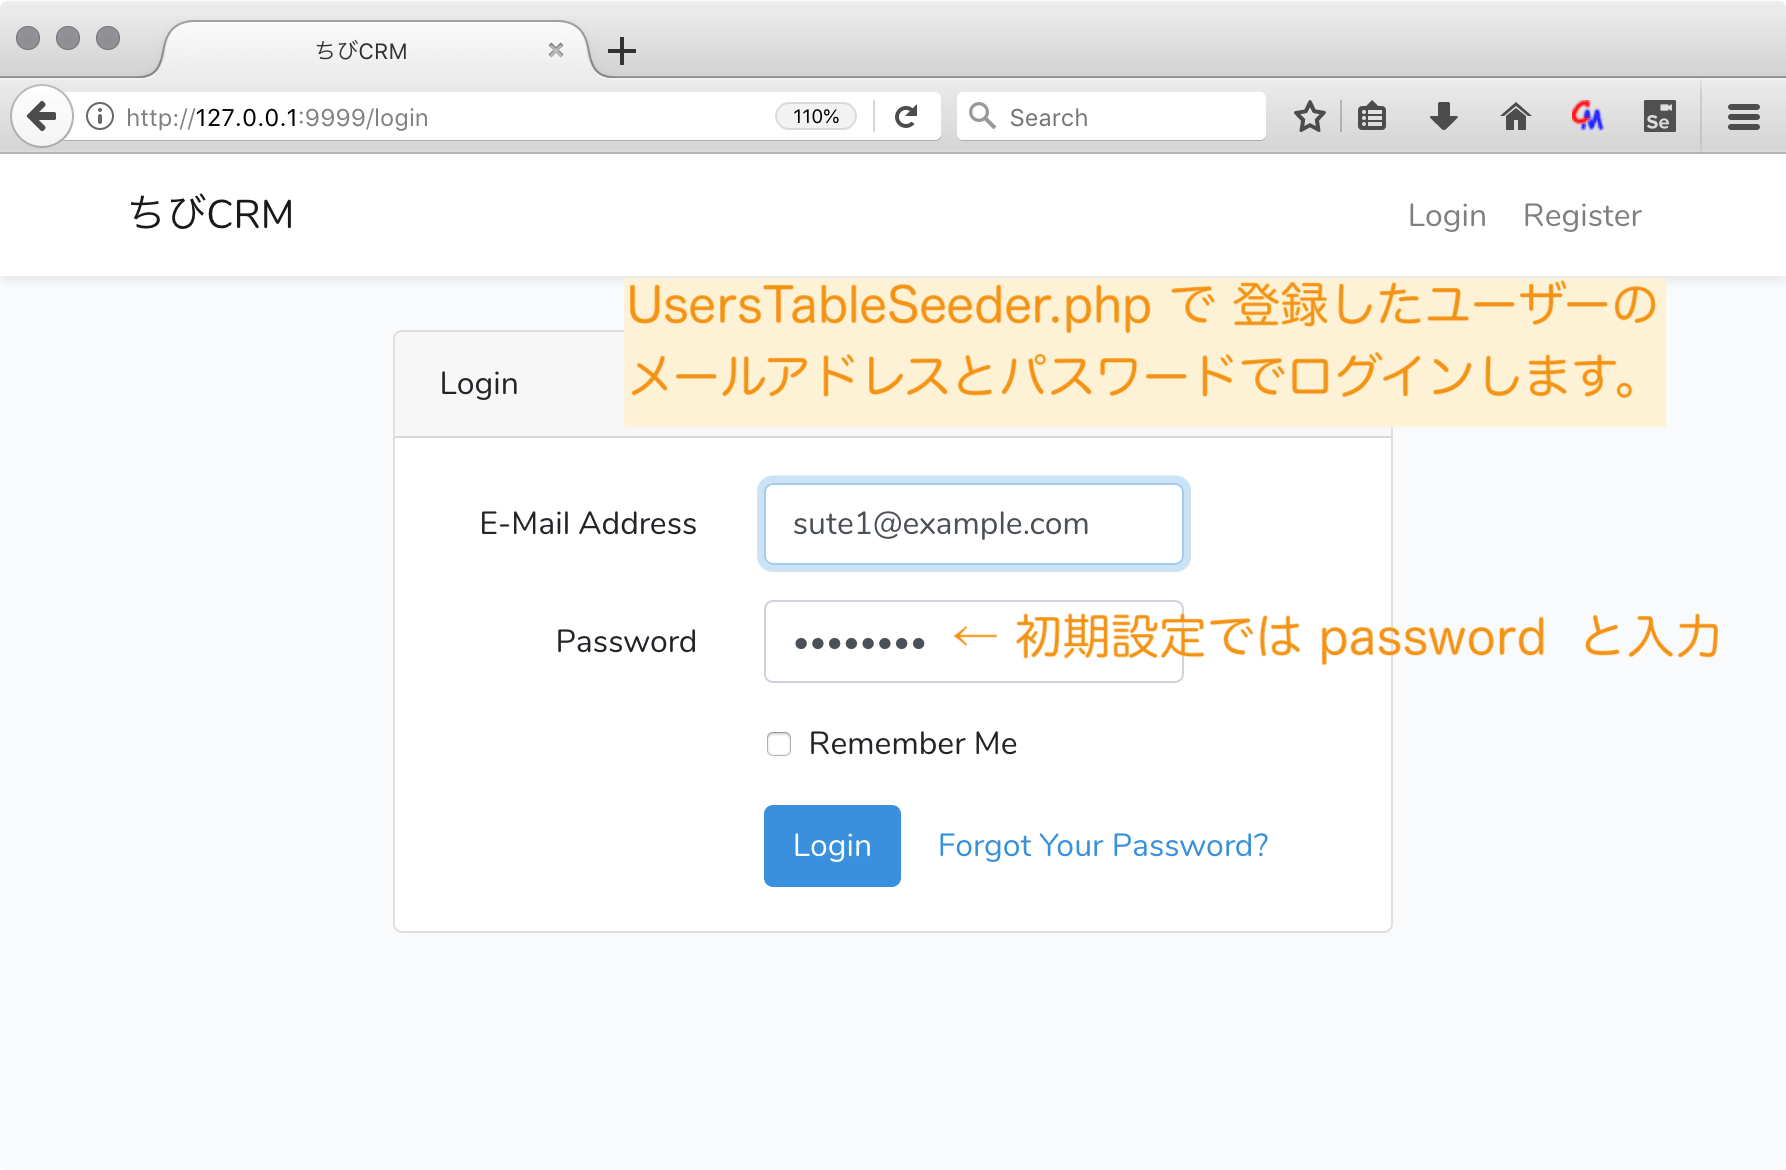
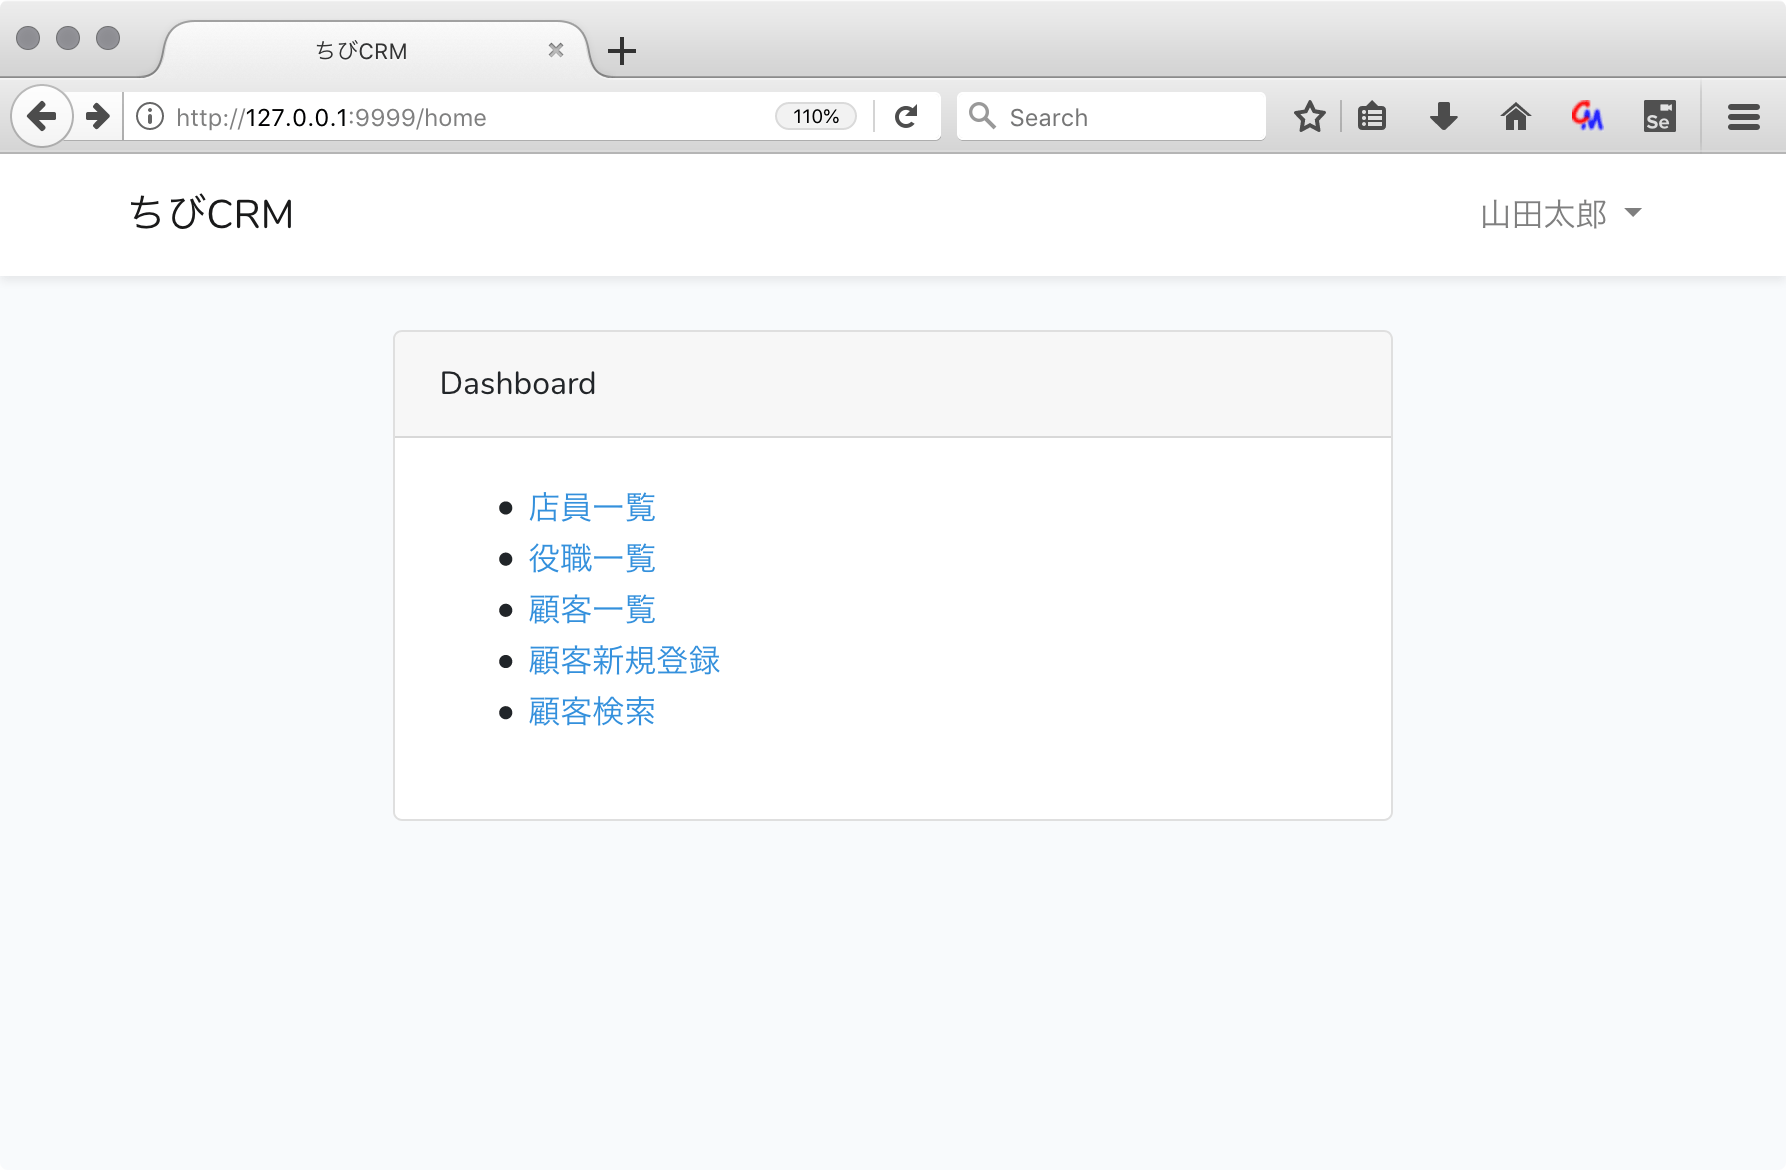
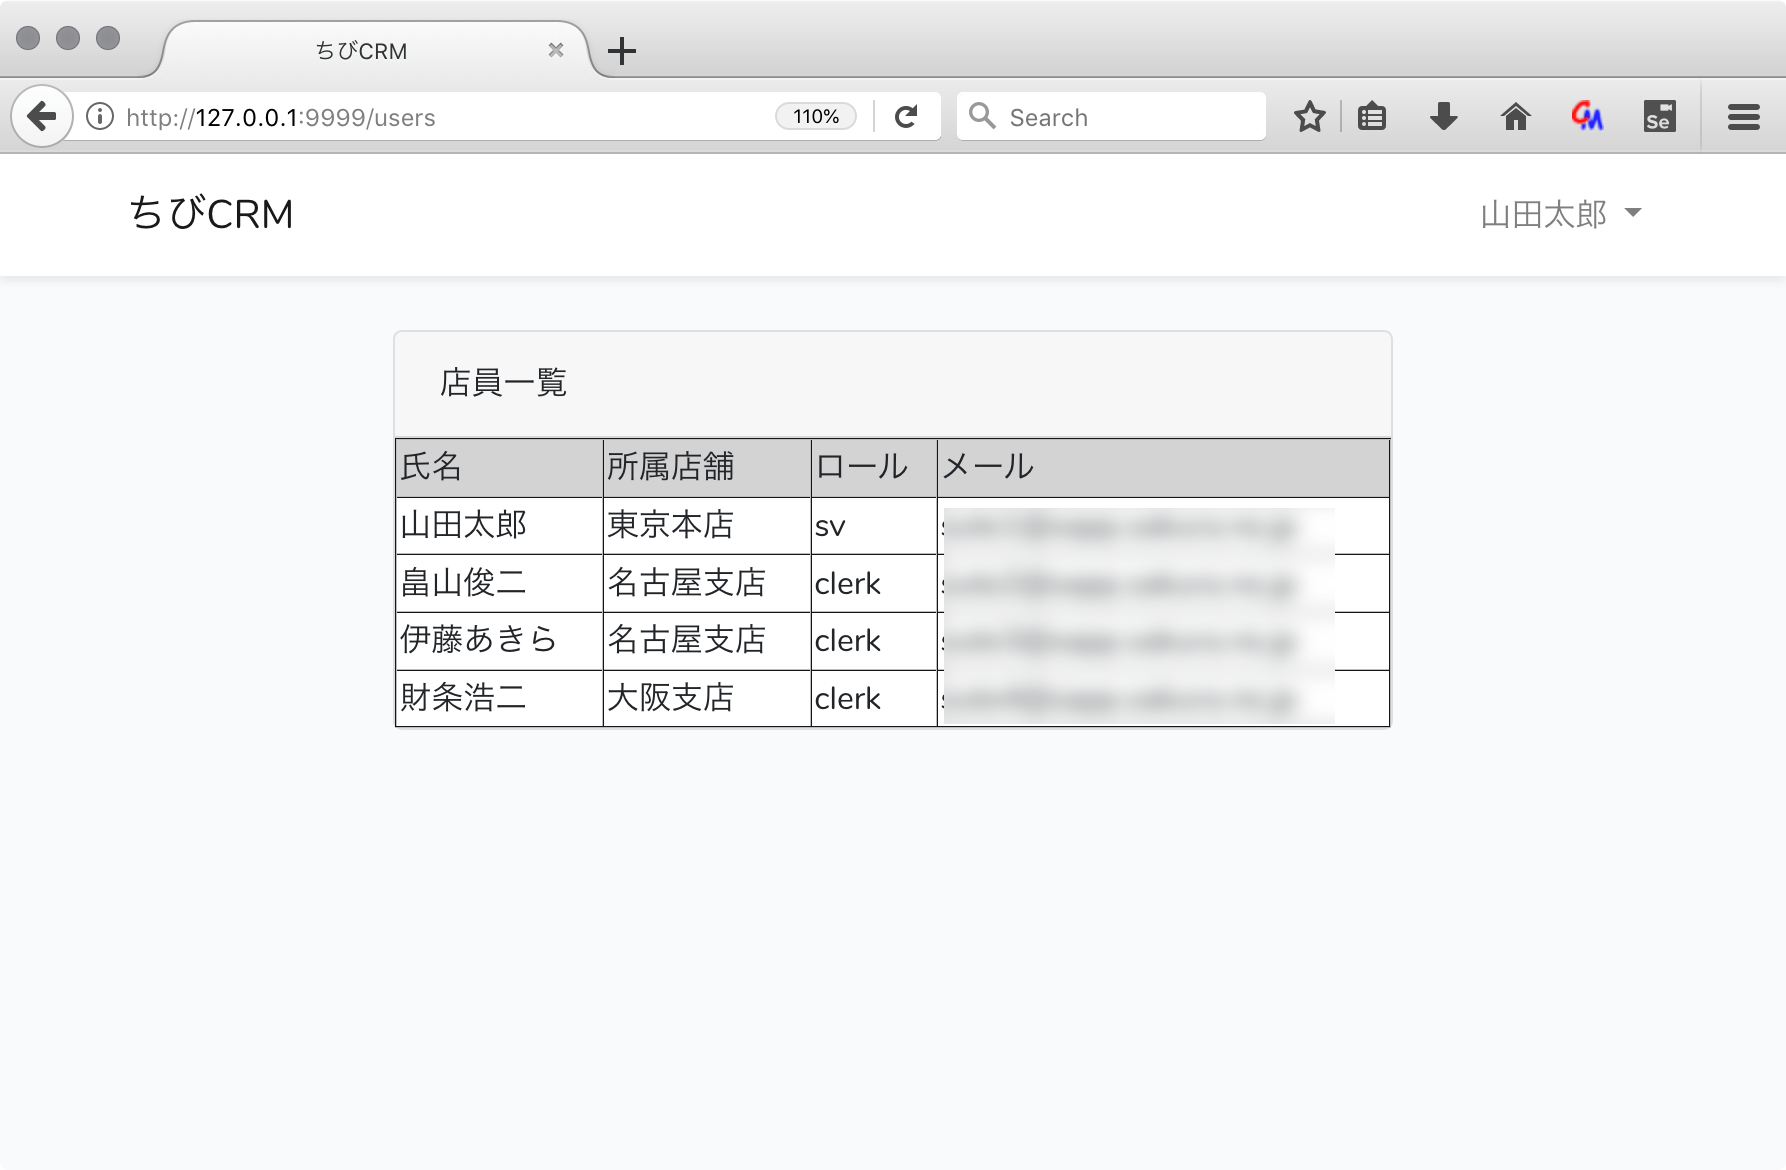
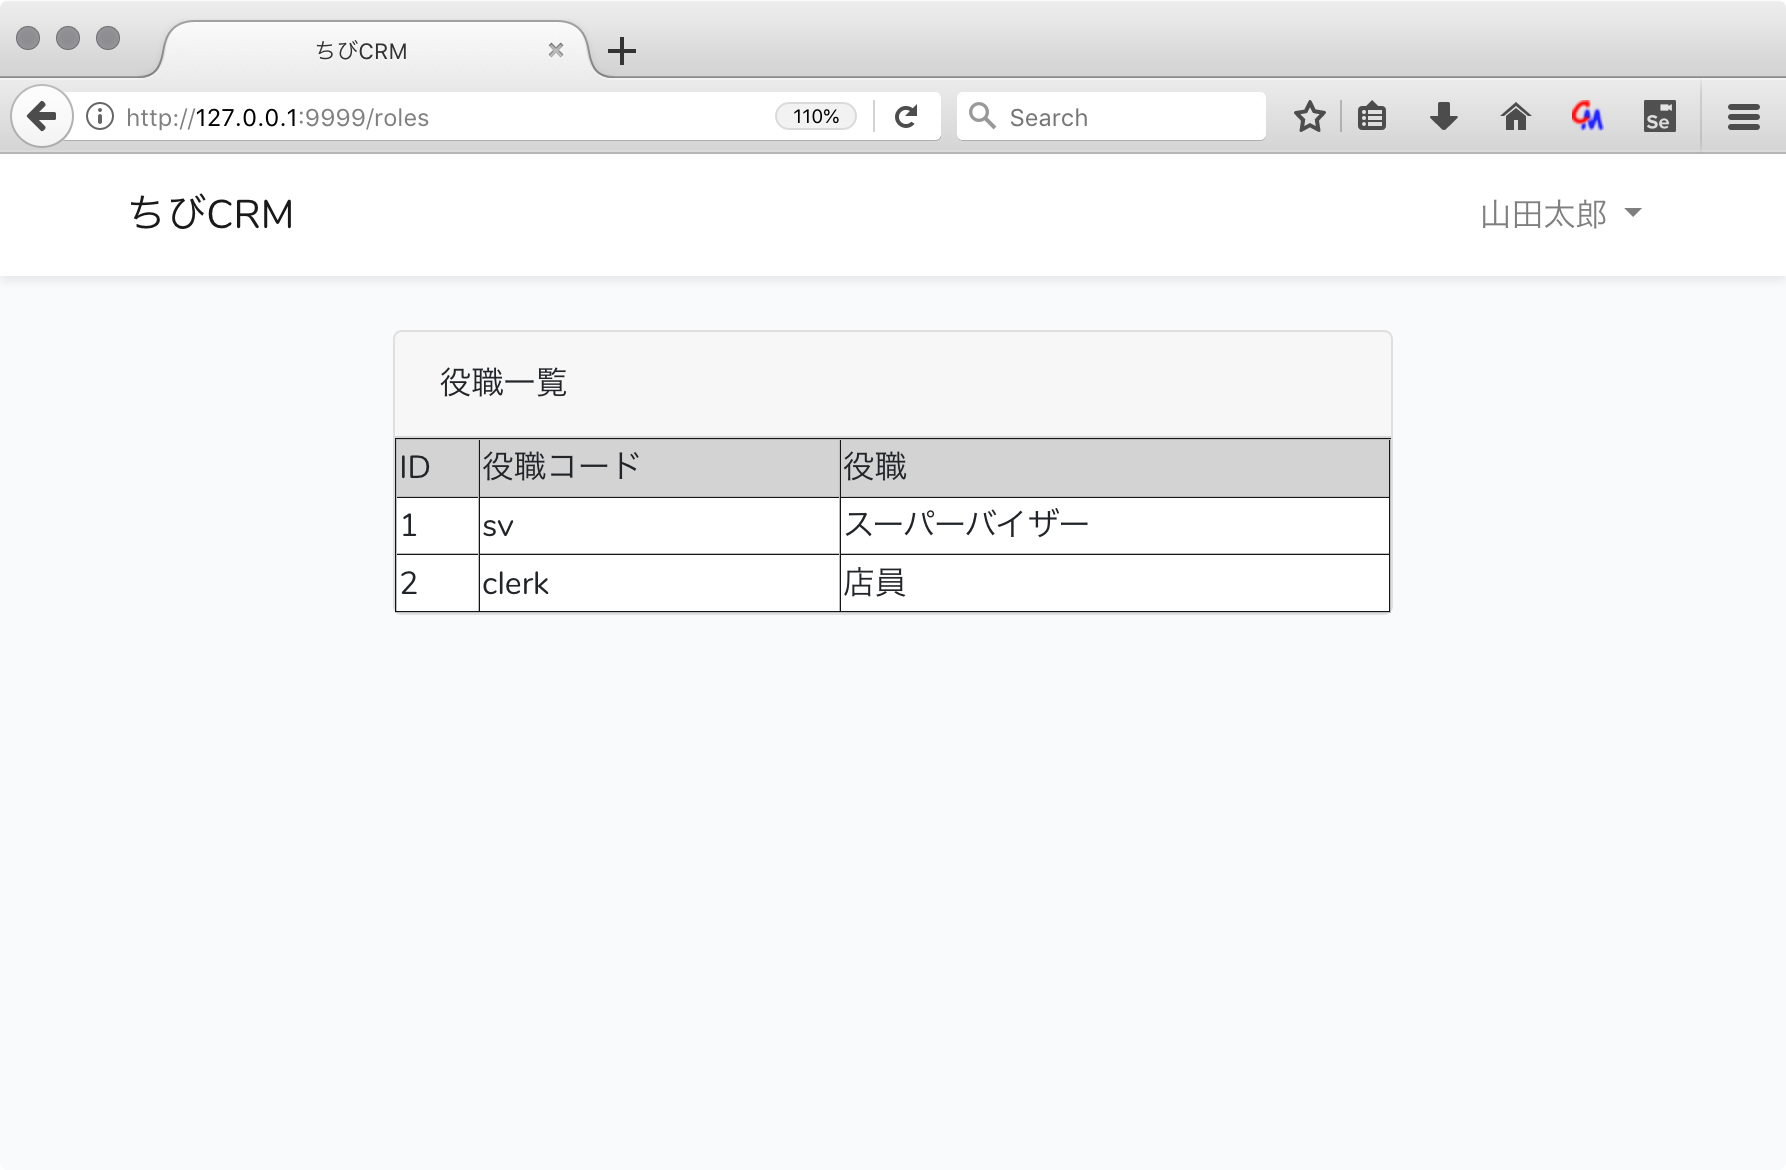
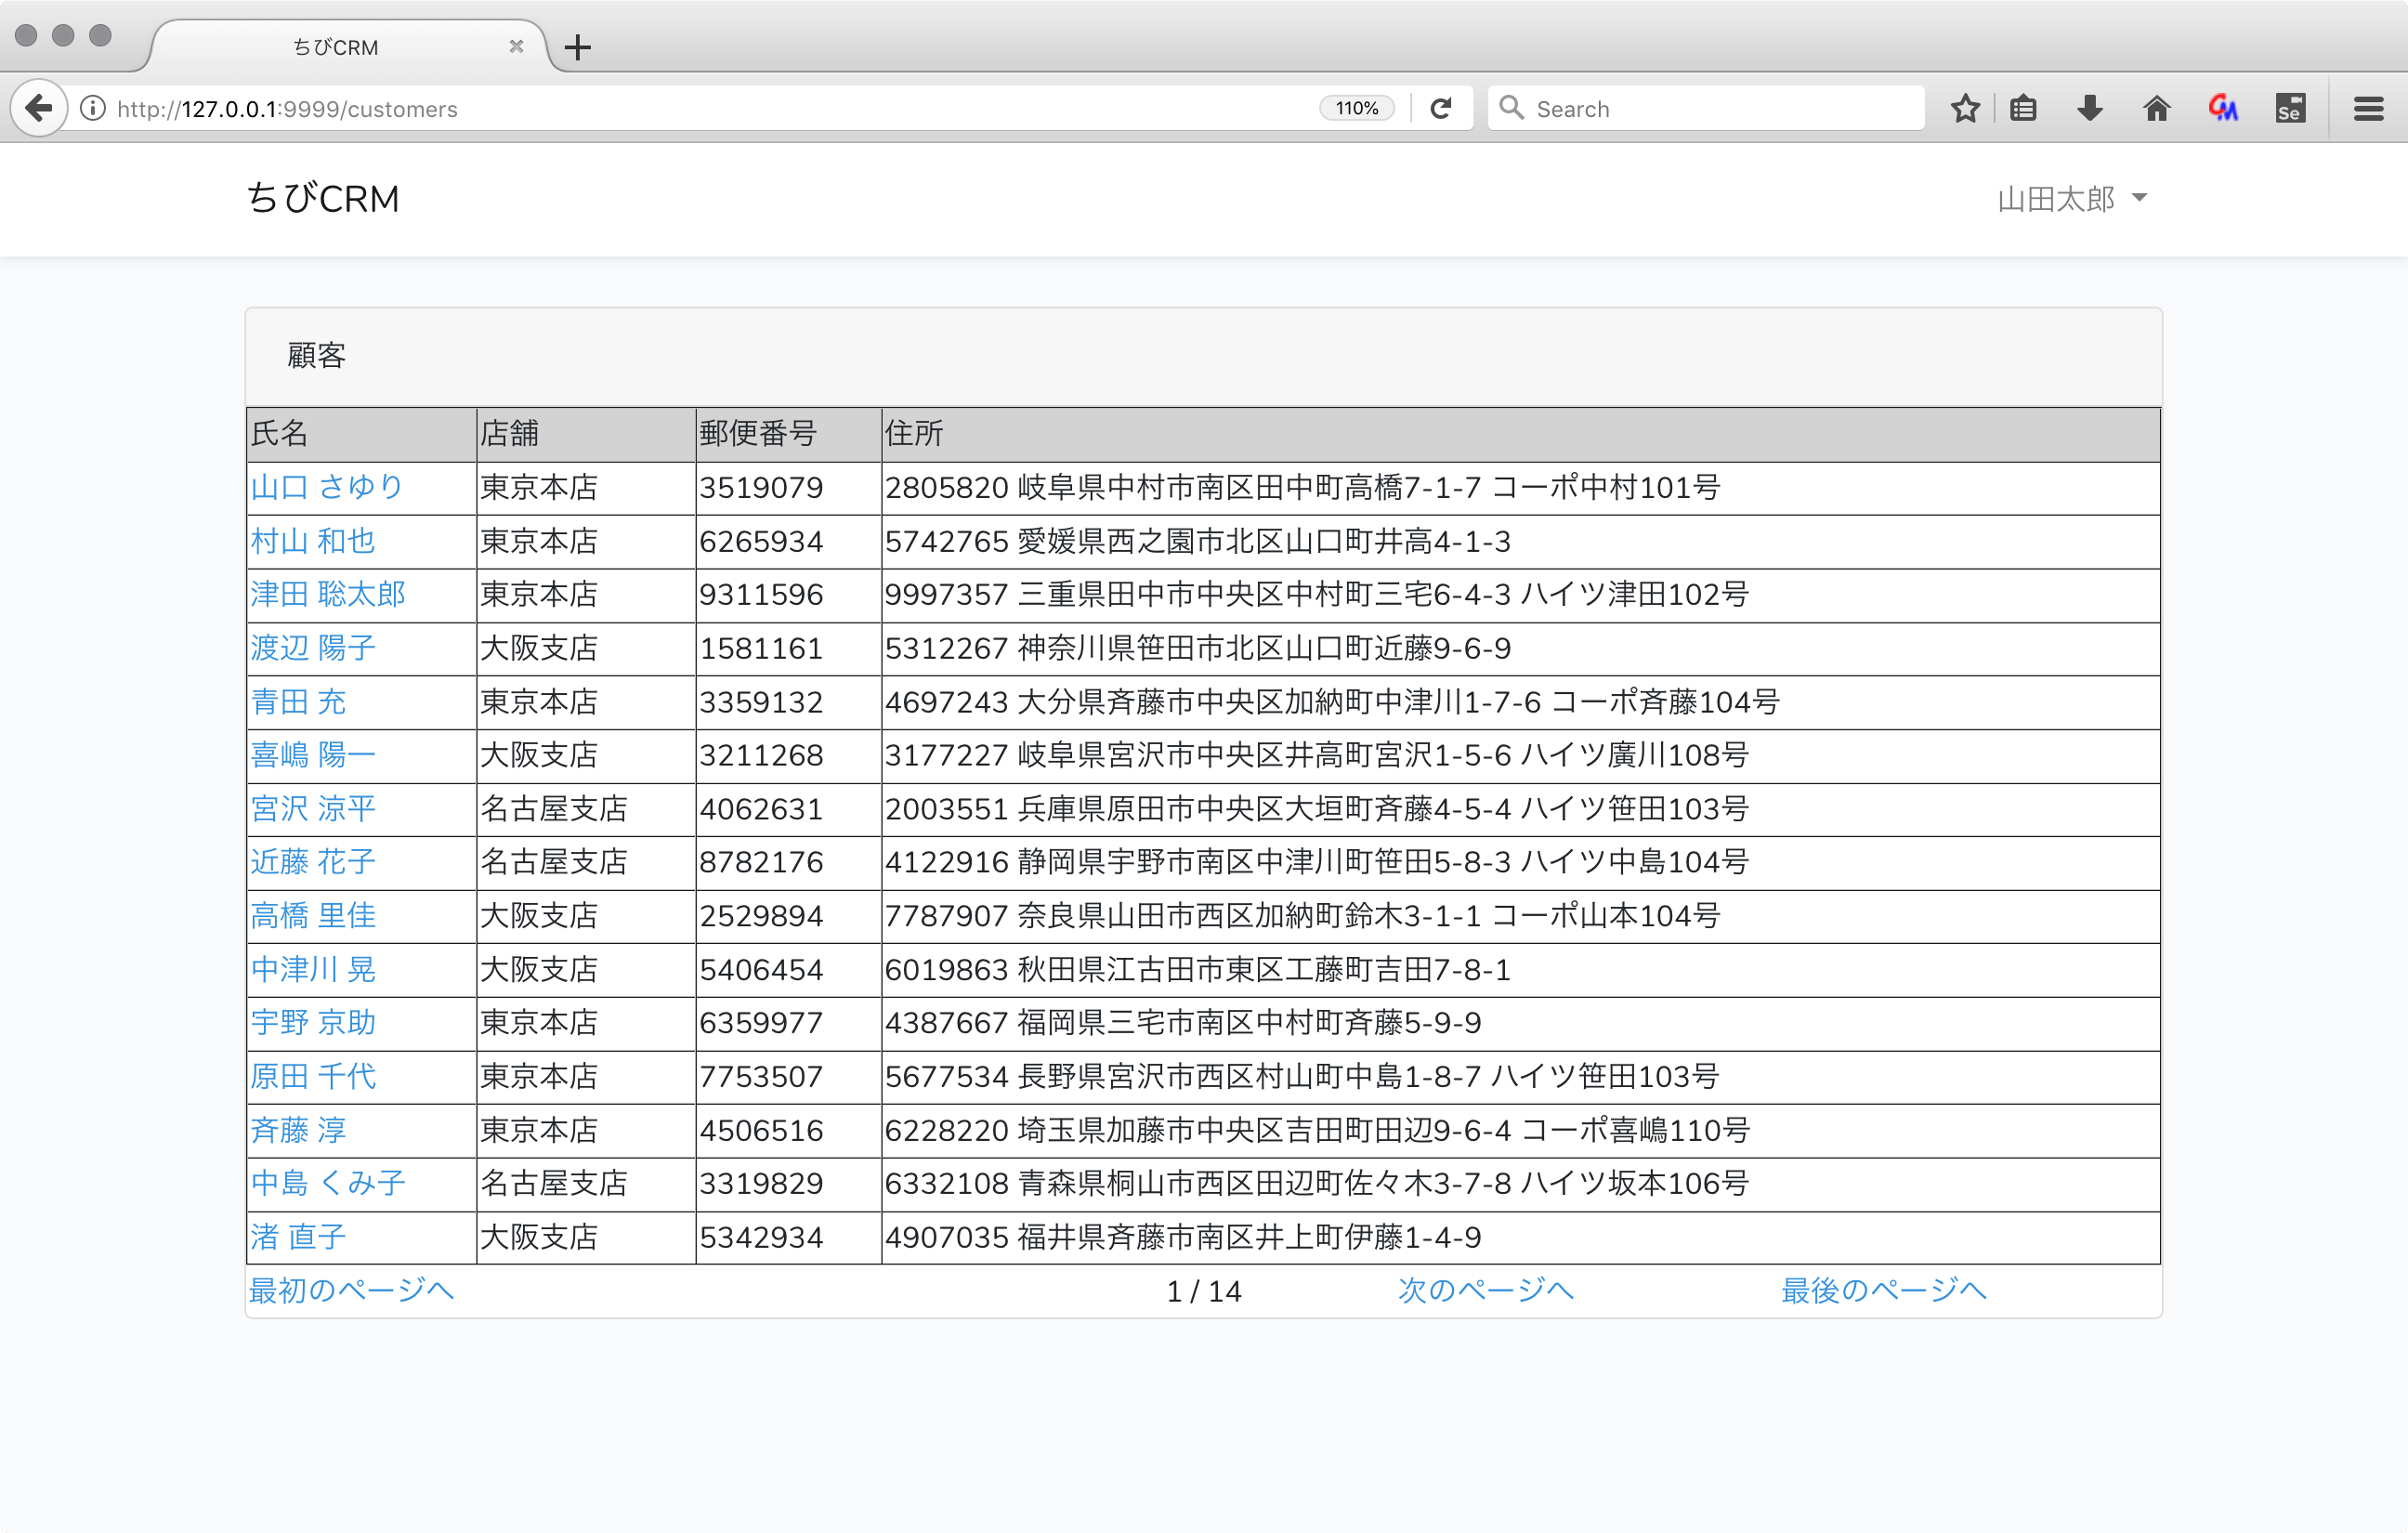
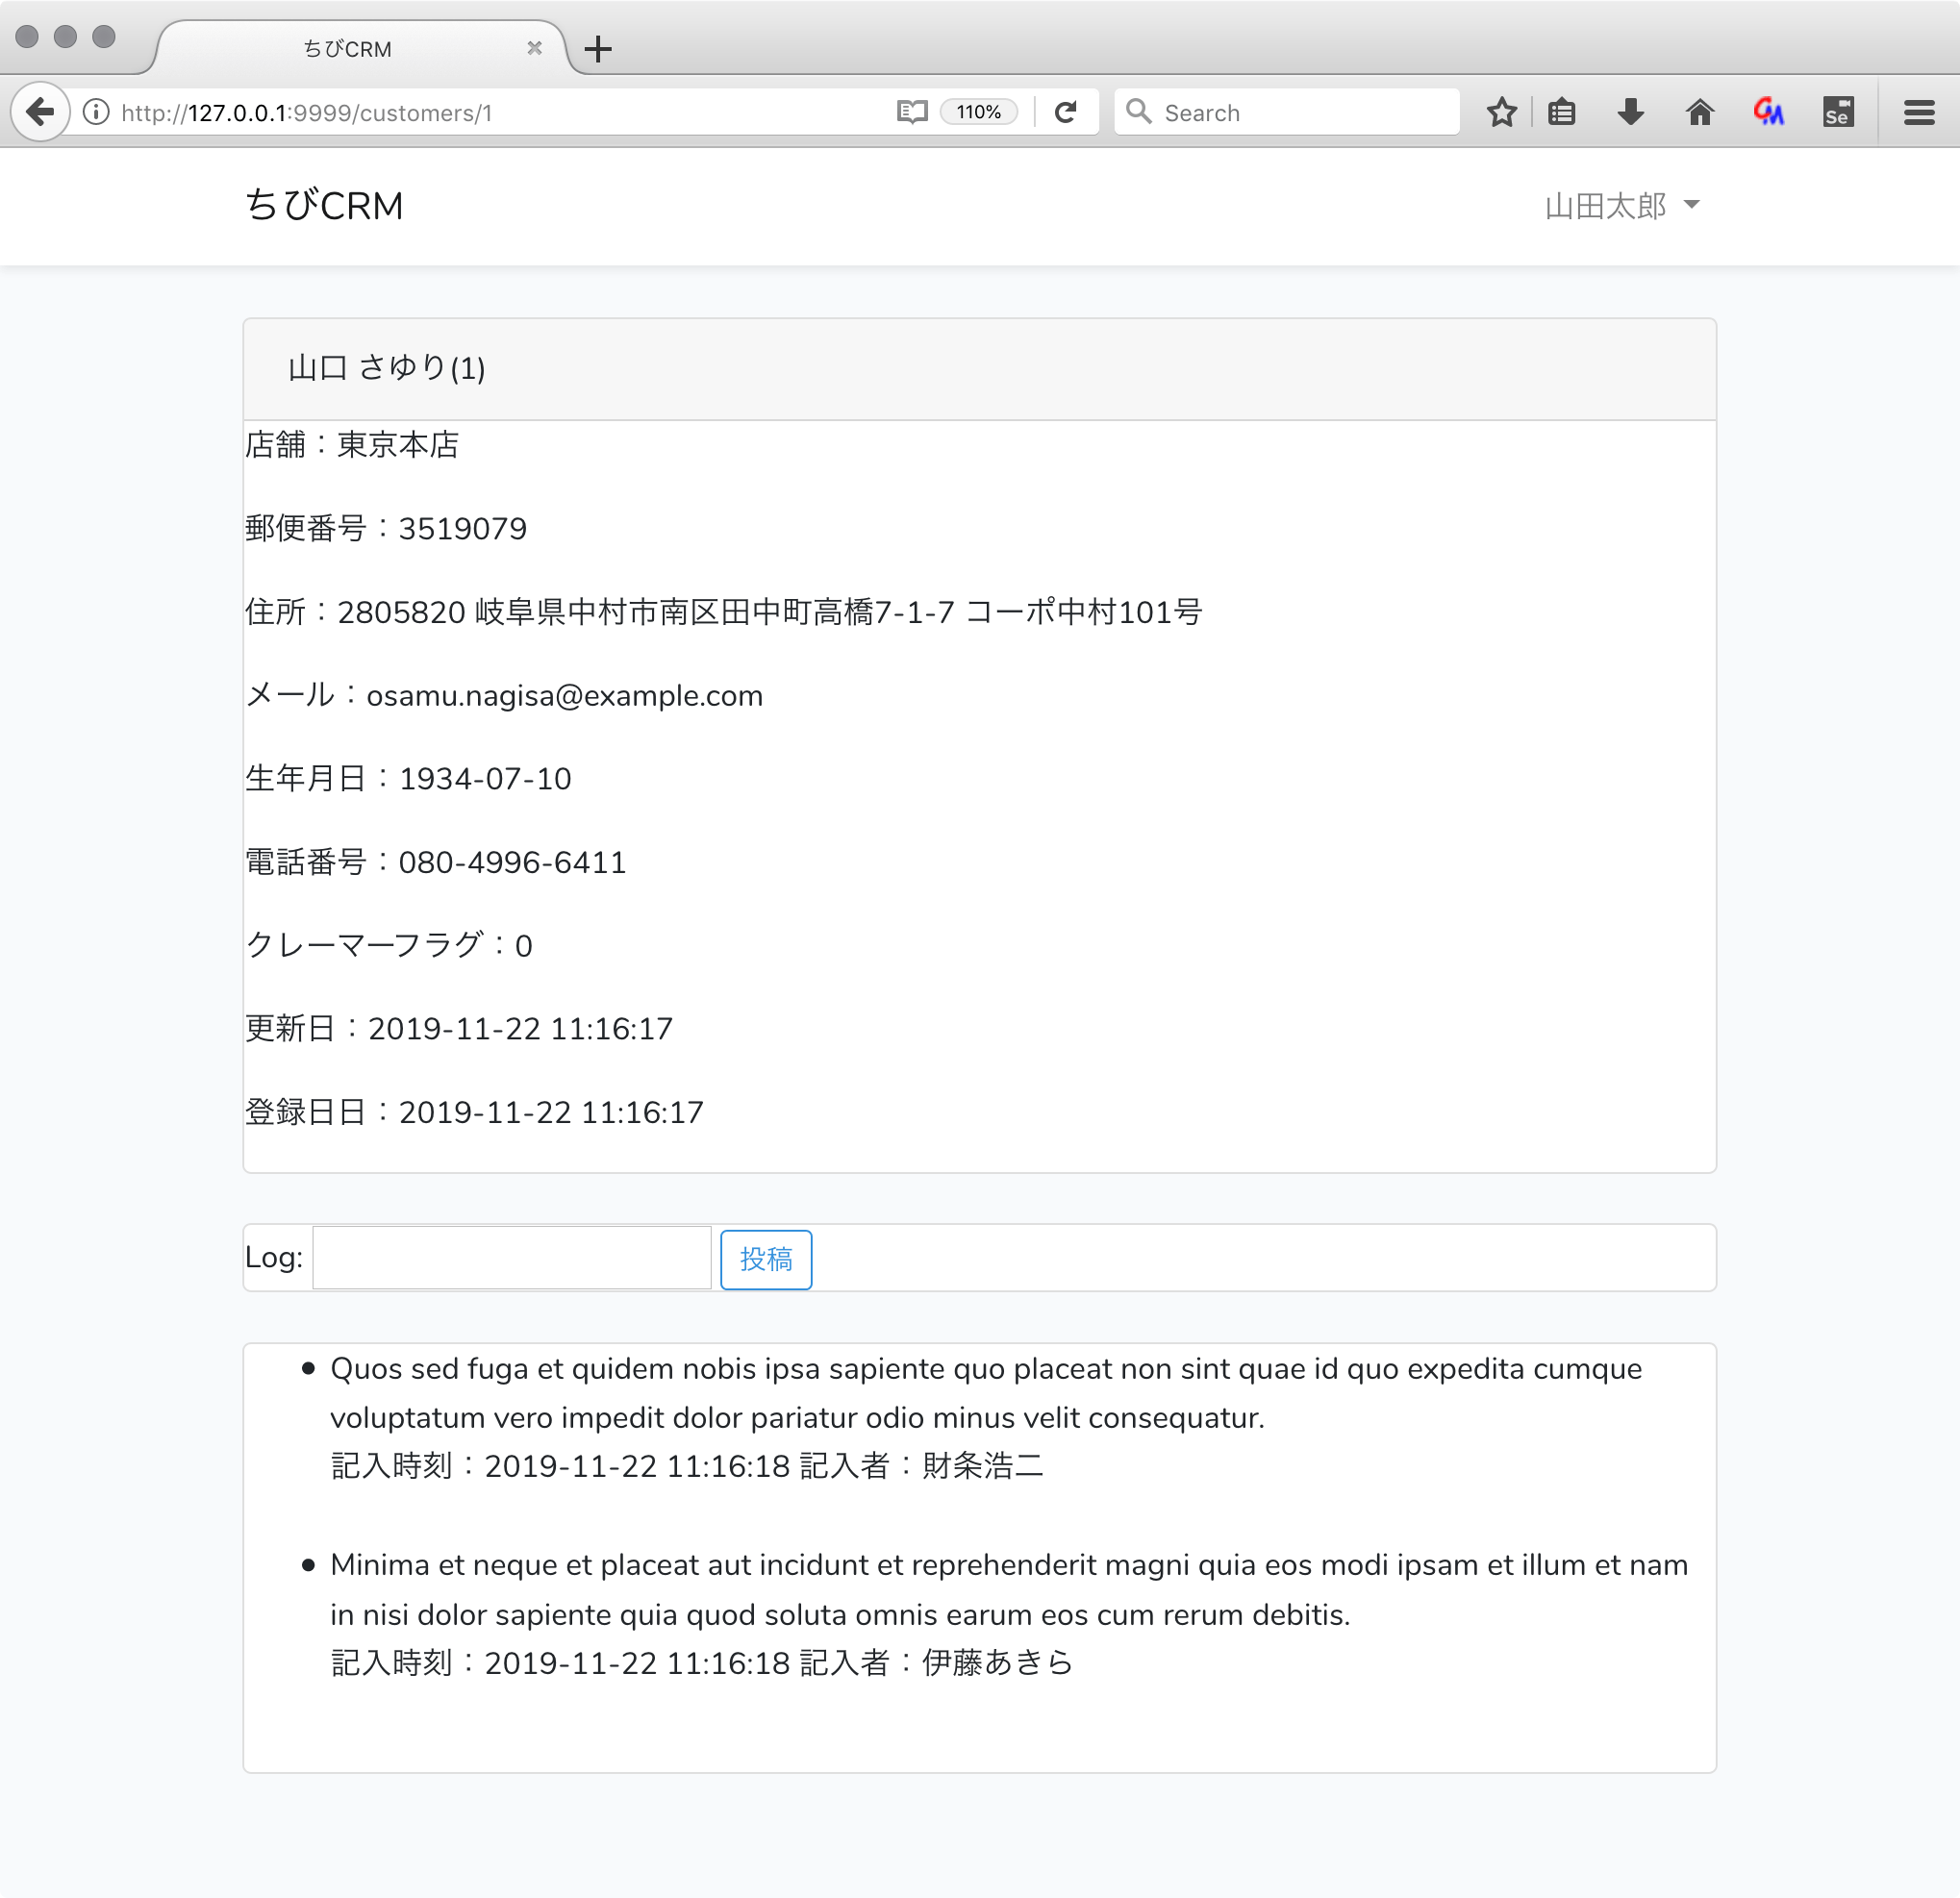

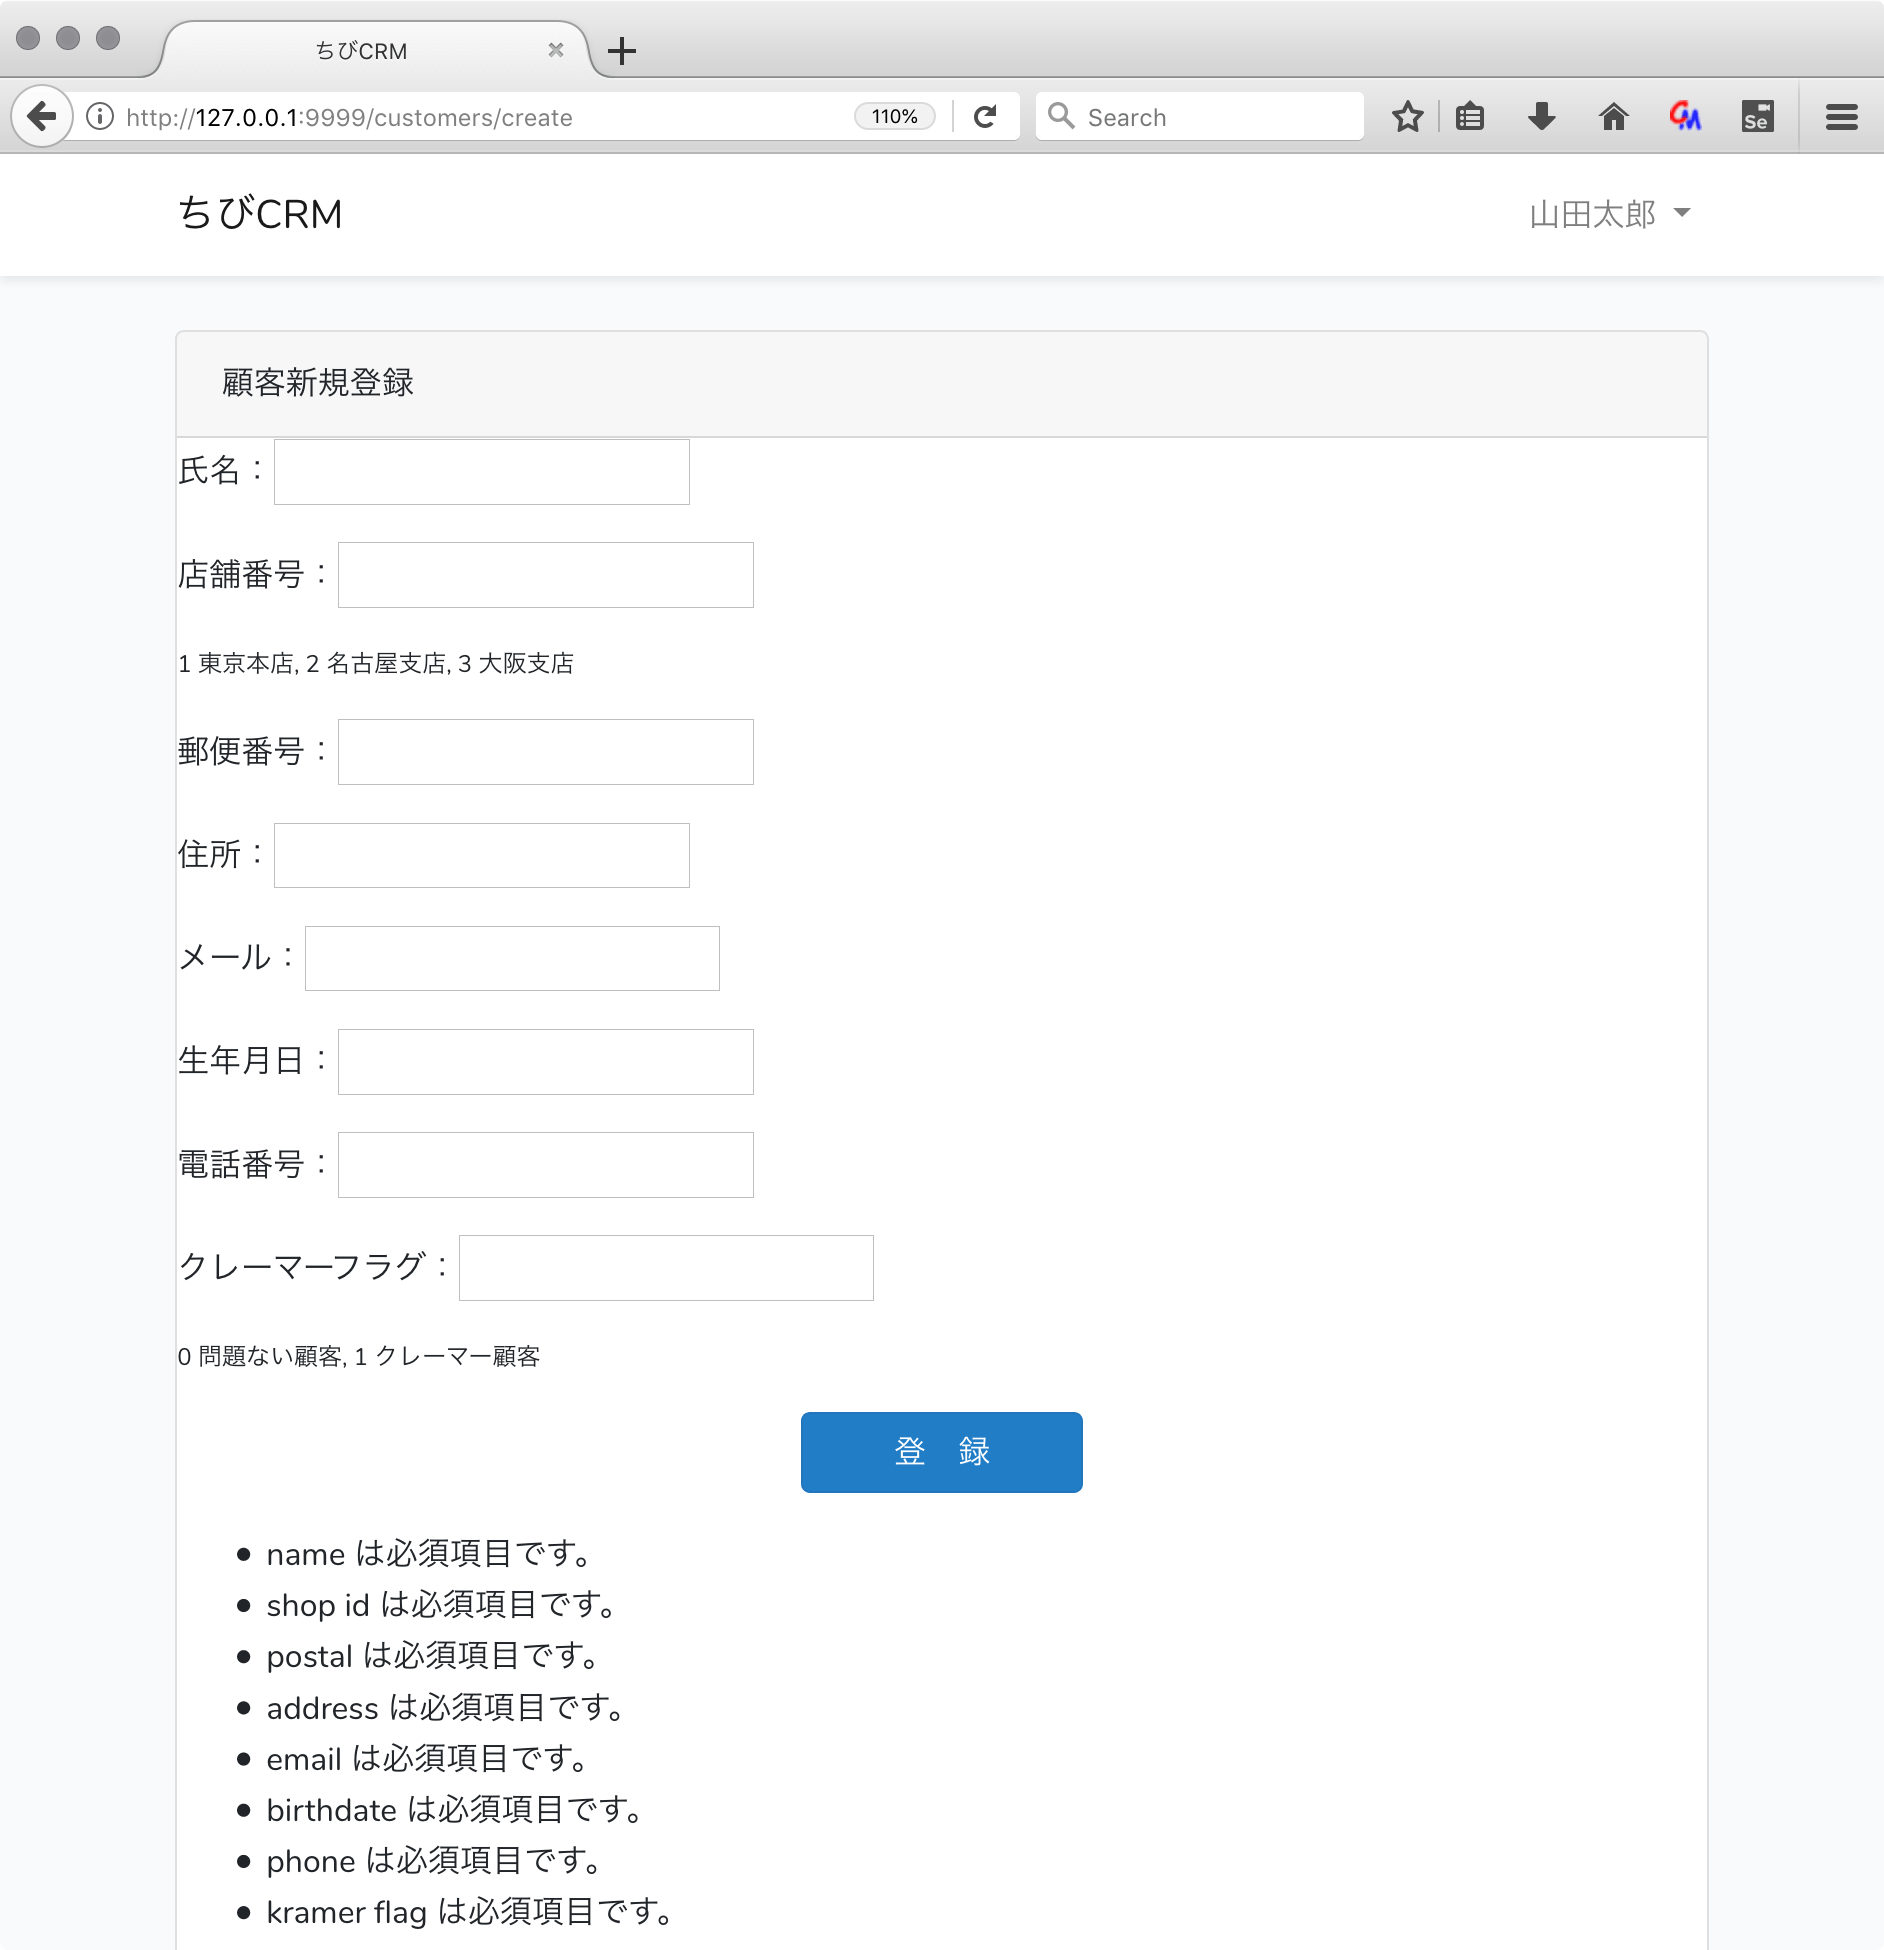


- 投稿日:2019-11-25T05:41:57+09:00
LaravelのPipeline::thenでmiddlewareを処理している流れをまとめてみた
概要
laravelではリクエストをコントローラーにディスパッチするまでや、コントローラーのメソッドを呼び出す前にミドルウェアを適用しています。
その処理をしているのが
Pipeline::thenになります。今回はその処理を追っていきます。
start
Illuminate/Foundation/Http/Kernelprotected function sendRequestThroughRouter($request) { //... return (new Pipeline($this->app)) ->send($request) ->through($this->app->shouldSkipMiddleware() ? [] : $this->middleware) ->then($this->dispatchToRouter()); }public function send($passable) { $this->passable = $passable; return $this; } public function through($pipes) { $this->pipes = is_array($pipes) ? $pipes : func_get_args(); return $this; }send()はrequestをプロパティにセットして、through()はmiddlewareをプロパティにセットしています。
then()に渡しているのはdispatchToRouter()の返り値です。引数に
$requestを受け取ってdispatch($request)するClosureです。Illuminate/Foundation/Http/Kernelprotected function dispatchToRouter() { return function ($request) { $this->app->instance('request', $request); return $this->router->dispatch($request); }; }
then()を見ていきます。Illuminate/Pipeline/Pipelinepublic function then(Closure $destination) { $pipeline = array_reduce( array_reverse($this->pipes), $this->carry(), $this->prepareDestination($destination) ); return $pipeline($this->passable); }
array_reduce()は第一引数に渡された配列に、第二引数に渡されたClosureを適用して、1つの値を返す関数です。ここでは1つのClosureを返しています。
array_reduceは第三引数が渡されているときはそれを最初に解決していきます。Illuminate/Pipeline/Pipelineprotected function prepareDestination(Closure $destination) { return function ($passable) use ($destination) { try { return $destination($passable); } catch (Exception $e) { return $this->handleException($passable, $e); } catch (Throwable $e) { return $this->handleException($passable, new FatalThrowableError($e)); } }; }このメソッドもClosureを返します。
$destinationはthen()に渡されたClosureなので、書き換えるとこうなります。return function ($passable) use ($destination) { try { return function ($passable) { $this->app->instance('request', $passable); return $this->router->dispatch($passable); }; } catch (Exception $e) { return $this->handleException($passable, $e); } catch (Throwable $e) { return $this->handleException($passable, new FatalThrowableError($e)); } };try-catchで囲んだだけですね。
prepareDestination()の返り値を利用して、$this->carry()のClosureをarray_reverse($this->pipes)に順に適用していきます。
$this->pipesにはKernelで定義したMiddlewareの配列が入っています。
carry()を重要なところだけ抜き出してみました。protected function carry() { return function ($stack, $pipe) { return function ($passable) use ($stack, $pipe) { $parameters = [$passable, $stack]; $carry = method_exists($pipe, $this->method) ? $pipe->{$this->method}(...$parameters) : $pipe(...$parameters); return $this->handleCarry($carry); }; }; }最初に
carry()が呼ばれたときは、$stackにprepareDestination()の返り値のClosureが入って、$pipeにarray_reverse($this->pipes)の1つ目の値(middleware)が入ってきます。
$this->methodには"handle"が代入されているので、middlewareにhandleメソッドが定義されていれば、それが呼ばれることになります。middlewareを作成するときにhandle()を定義するのはこのためだったんですね。順番に
$this->carry()を適用していくと以下のようなClosureにまとめられます。function ($passable) { return $pipe1->handle($passable, function ($passable) { return $pipe2->handle($passable, function ($passable){ return $pipe3->handle($passable, $this->prepareDestination()); }) }) }middlewareの
handle()にリクエストと次のClosureを渡す層になっています。middleware
handle()内に書いてある$next()とは次のmiddlewareのhandle()を呼び出すClosureを指定していたわけなんですね!public function handle($request, Closure $next) { return $next($request); }最終的にmiddlewareを全て通ったリクエストは、最初に
$this->prepareDestination()で作成されたClosureに渡され、routerにdispatchされていきます。Illuminate/Foundation/Http/Kernelreturn function ($passable) use ($destination) { try { return function ($passable) { $this->app->instance('request', $passable); return $this->router->dispatch($passable); }; } catch (Exception $e) { return $this->handleException($passable, $e); } catch (Throwable $e) { return $this->handleException($passable, new FatalThrowableError($e)); } };
- 投稿日:2019-11-25T04:23:43+09:00
php.iniの場所・パスを調べる方法
- 投稿日:2019-11-25T03:21:20+09:00
Laravelでのエラー処理の流れを把握したいのでソースコードリーディング
Laravelでのエラー処理の流れ
laravelではキャッチされなかった例外は
vendor/laravel/framework/src/Illuminate/Routing/Pipeline::handleExceptionで処理をされます。
なぜこのクラスに処理がくるのかはこちらを参考に→Laravelの処理の流れコードリーディング(投げたエラーはどこで処理されている???)このメソッドを見ることでlaravelでのエラー処理の流れを理解することができます。
protected function handleException($passable, Exception $e)
{
    if (! $this->container->bound(ExceptionHandler::class) ||
        ! $passable instanceof Request) {
        throw $e;
    }

    $handler = $this->container->make(ExceptionHandler::class);

    $handler->report($e);

    $response = $handler->render($passable, $e);

    if (method_exists($response, 'withException')) {
        $response->withException($e);
    }

    return $response;
}
エラー処理の流れとしては、
report()してrender()からのレスポンスを返却しているだけです。簡単ですね。
$this->container->make()で実際に処理を任せるハンドラを生成しています。コンテナのバインドはbootstrapで行われています。
bootstrap/app.php$app->singleton( Illuminate\Contracts\Debug\ExceptionHandler::class, App\Exceptions\Handler::class );上のコードから具体的な処理内容に関しては
App\Exceptions\Handlerに実装されているようです。App\Exceptions\Handlerpublic function report(Exception $exception) { parent::report($exception); } public function render($request, Exception $exception) { return parent::render($request, $exception); }継承している
Illuminate\Foundation\Exceptions\Handlerの処理を呼び出しているだけみたいです。report
まずは
report()を見ていきます。このメソッドでログなどを残す処理をしています。\Illuminate\Foundation\Exceptions\Handlerpublic function report(Exception $e) { if ($this->shouldntReport($e)) { return; } if (is_callable($reportCallable = [$e, 'report'])) { return $this->container->call($reportCallable); } try { $logger = $this->container->make(LoggerInterface::class); } catch (Exception $ex) { throw $e; } $logger->error( $e->getMessage(), array_merge($this->context(), ['exception' => $e] )); }
$this->shouldntReport()でプロパティの$dontReport、$internalDontReportの中に書かれた例外に関してはreport処理を行わないようにしています。
is_callable()で例外クラスにreport()が定義されていればそのメソッドを呼ぶようにしています。例外クラスによってreport処理を変えたいときは使えそうです。2つのifに当てはまらなかった場合はログインスタンスを取得してログを残す処理を行っています。
render
次に
render()を見ていきます。エラーメッセージなどを利用してレスポンスを生成する処理を行います。\Illuminate\Foundation\Exceptions\Handlerpublic function render($request, Exception $e) { if (method_exists($e, 'render') && $response = $e->render($request)) { return Router::toResponse($request, $response); } elseif ($e instanceof Responsable) { return $e->toResponse($request); } $e = $this->prepareException($e); if ($e instanceof HttpResponseException) { return $e->getResponse(); } elseif ($e instanceof AuthenticationException) { return $this->unauthenticated($request, $e); } elseif ($e instanceof ValidationException) { return $this->convertValidationExceptionToResponse($e, $request); } return $request->expectsJson() ? $this->prepareJsonResponse($request, $e) : $this->prepareResponse($request, $e); }最初のif文では、例外クラスに
render()が実装されている、かつそのメソッドがレスポンスを返す場合にレスポンスを生成しています。また、
$e instanceof Responsableならば、こちらもすぐにレスポンスを返却するようにしています。
$this->prepareException()では特定の例外クラスを別の例外クラスに詰め替えなおしています。次のif文では特定の例外クラスならば、しかるべき処理をしてその場でレスポンスを返却しています。
ValidationExceptionはまさにバリデーションエラーのときの例外です。少し見てみましょう。\Illuminate\Foundation\Exceptions\Handlerprotected function invalid($request, ValidationException $exception) { return redirect($exception->redirectTo ?? url()->previous()) ->withInput(Arr::except($request->input(), $this->dontFlash)) ->withErrors($exception->errors(), $exception->errorBag); }返却するレスポンスがJsonでないときは、
invalid()が呼ばれます。ただ単にinputの値などをセッションにいれて前ページにリダイレクトさせているだけです。もとの処理に戻って最後のreturn文を見てみましょう。
\Illuminate\Foundation\Exceptions\Handlerpublic function render($request, Exception $e) { //... return $request->expectsJson() ? $this->prepareJsonResponse($request, $e) : $this->prepareResponse($request, $e); }返却する形式がJsonかそうでないかで分岐していますね。今回は
$this->prepareResponse()を見ていきましょう。\Illuminate\Foundation\Exceptions\Handlerprotected function prepareResponse($request, Exception $e) { if (! $this->isHttpException($e) && config('app.debug')) { return $this->toIlluminateResponse($this->convertExceptionToResponse($e), $e); } if (! $this->isHttpException($e)) { $e = new HttpException(500, $e->getMessage()); } return $this->toIlluminateResponse( $this->renderHttpException($e), $e ); }
HttpExceptionでない、かつapp.debugがtrueに設定している場合は、$this->toIlluminateResponse()でレスポンスを生成します。Laravelの標準では、真っ白い画面にステータスコードとメッセージを出す本番用の画面と、エラーの内容を詳細に表示してくれる画面の2種類があります。
エラー画面は
$this->convertExceptionToResponse()でよしなにしてくれているのです。(実際の処理の分岐はrenderExceptionContent()で行っています。)しかしエラーが
HttpException(40x系エラーなど)だとapp.debugをtrueにしても詳細エラー画面は出してくれません。アカウント登録のメール認証でのmiddlewareが吐くInvalidSignatureExceptionがHttpExceptionを継承していてエラー画面が出ずに原因がわからず泣いたことがあります。最後のreturn文を見てみます。
return $this->toIlluminateResponse(
    $this->renderHttpException($e), $e
);

protected function renderHttpException(HttpExceptionInterface $e)
{
    $this->registerErrorViewPaths();

    if (view()->exists($view = "errors::{$e->getStatusCode()}")) {
        return response()->view($view, [
            'errors' => new ViewErrorBag,
            'exception' => $e,
        ], $e->getStatusCode(), $e->getHeaders());
    }

    return $this->convertExceptionToResponse($e);
}
viewsディレクトリの中にerrorsディレクトリを作成し、その中に
400.blade.phpのようにbladeファイルを用意しておけばステータスコード毎にエラー画面をカスタマイズできるようになります。要ししてなければ
$this->convertExceptionToResponse()で真っ白い画面を出すようにレスポンスを返してくれます。本番環境でステータスコードでなく、柔軟にエラー画面を出したいならば、このメソッドを
App\Exceptions\Handlerでオーバーライドしてごにょごにょするのがよさそうです。まとめ
laravelでは実際のエラー処理は、
Illuminate\Foundation\Exceptions\Handlerに実装されている。カスタムがしたければ、
app/Exceptions/Handlerに記述していけばよさそうです。自分で作成した例外クラスに
report()やrender()を定義することによって柔軟にエラー処理を変更できそう。