- 投稿日:2019-11-25T22:37:23+09:00
アノテーションってなぁに?
はじめに
勝手に始めた「なぁに?」シリーズ(というか、ただのメモ)。
今回はJavaのアノテーションについて。知っているようで知らない(?)アノテーションの意味やメリットを簡単に整理する。
アノテーションってなに?
- Annotation = 注釈 の意。
- コード中に "@" を使って記述する。
- たとえば、以下のようなコードになる。
package hoge.nwobhm;

public class Metallica {
    @Override
    public String playMetal() {
        return "riff";
    }
    public static void main(String[] args) {
        Metallica metal= new Metallica ();
        System.out.println(metal.playMetal());
    }
}
例えばどんなものがあるの?
具体的には以下のようなものがある。
- Override : オーバーライドメソッドであることを宣言する。
- Deprecated : クラスやメソッドを非推奨にする。
- SuppressWarnings : コンパイル時の警告抑制。
また、アノテーションは3つの種類に分けられる。
1.マーカー : 名前だけでデータのないもの
2.単一アノテーション : データをひとつ持つもの
3.フルアノテーション : 複数のデータを持つもの決められたものしか使えないの?
- アノテーションは独自実装することができる。
- "@interface"を指定して実装する。
- たとえばこんな感じ。
package hoge.nwobhm;

public @interface Megadeth {
    String value();
}
使うメリットは?
- アノテーションはコンパイル対象のため、コードが統一できる。(コードが見やすくなる)
- アノテーションは独自実装できるため、活用の幅は広い。
参考
- 投稿日:2019-11-25T22:06:08+09:00
Javaプログラミング (static句と「クラス変数」)
static句とクラス
メインメソッドのメソッド名の前についているstaticという文言についてです。
標準出力やクラスの書き方、呼び出し方を理解していれば読めると思います。クラス変数
普通、クラスはインスタンス化して使います。試しに次のメソッドを考えてみましょう。
public class Calculate {
 private int s = 3;
 public int multipleIntegerNumber(int num){
  s = num + s;
  s = num + s;
  return s;
 }
}
これをメインメソッドの中で呼び出してみます。
public class Mainmethod{
  public static void main(String[] args){

  int result;

   Calculate calculate = new Calculate();
   result = calculate.multipleIntegerNumber(3);
  }
}
すると、変数resultは9です。
では、次のように変えてみましょう。public class Calculate { private static int s = 3; private int ns = 3; int[] r = new int[2]; public int[] multipleIntegerNumber1(int num){ s = 2*num + s; // -----> A ns = 2*num + ns; r[0] = s; r[1] = ns; return r; } }このクラスをつぎのメインメソッドから呼び出してみましょう。
public class Mainmethod{
  public static void main(String[] args){

   int[] result1;
   int[] result2;

   ClassValue calculate1 = new ClassValue();
   ClassValue calculate2 = new ClassValue();

   result1 = calculate1.multipleIntegerNumber1(3);// -------> ➀
   result2 = calculate2.multipleIntegerNumber1(3);// -------> ➁

  }
}
ここで、result1 と result2 はどうなるでしょうか。
結論から言えば
となります。なんとresul2[0]は値が変わります。
それはstaticと付けたのことが原因です。staticがないときにはインスタンス毎に変数の値はリセットされます。しかし。staticを付けるインスタンスが変わっても変数の値が引き継がれます。今回の例の場合、変数nsは宣言時にstaticとつけていないので、インスタンスcalculate1,calculate2で値がリセットされました。しかし、変数sは宣言時にstaticとつけているのでインスタンスcalculate1,calculate2で値が引き継がれました。➀のときに$s(=3)$に$2{\times}num(=6)$が加算されて$9$になります。さらに、➁のときに$s(=9)$に$2{\times}num(=6)$が加算されて$15$になります。ちなみに、static句を付けるか付けないかでインスタンス変数とかクラス変数という呼び方をします。
インスタンス変数 クラス変数 宣言時にstatic句は つけない つける 変数の値 インスタンス毎に違う すべてのインスタンスで共有 クラス変数の2つのメソッド
最後にもう一つのクラス変数の使い方を例をあげます。
次のClassValue2クラスではインスタンス変数static_countとクラス変数instans_countの2つが定義されています。そして、クラスの中で定義されている4つのメソッドが呼ばれるたびに2つの変数に1が足されていきます。そして、confirmationメソッドで値を出しています。package classvalue; public class ClassValue2 { private int s = 3; private static int static_count = 0; private int instans_count = 0; public void add(int num){ s = num + s; static_count = static_count + 1; instans_count = instans_count + 1; } public void substract(int num){ s = -num + s; static_count = static_count + 1; instans_count = instans_count + 1; } public void multiple(int num){ s = num*s; static_count = static_count + 1; instans_count = instans_count + 1; } public void division(int num){ s = 1/num*s; static_count = static_count + 1; instans_count = instans_count + 1; } public void confirmation(){ System.out.println("static_count:" + static_count); System.out.println("instans_count:" + instans_count); System.out.println("s:" + s); } }それを次のように呼び出してみます。
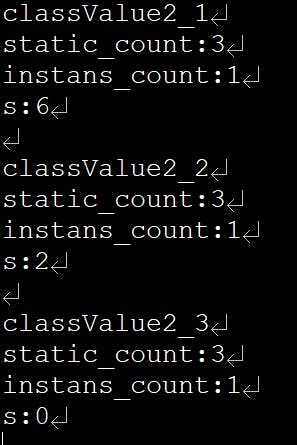
3つのインスタンスから呼び出しています。ClassValue2 classValue2_1 = new ClassValue2(); classValue2_1.add(3); ClassValue2 classValue2_2 = new ClassValue2(); classValue2_2.substract(1); ClassValue2 classValue2_3 = new ClassValue2(); classValue2_3.division(2); classValue2_1.confirmation(); classValue2_2.confirmation(); classValue2_3.confirmation();結果は次のようになります。
このようにして。変数instans_countでそのインスタンスから呼び出された回数をカウントでき、変数static_countからすべてのインスタンスから呼び出された総数をカウントすることが出来ます。

- 投稿日:2019-11-25T20:50:12+09:00
ストロングゼロをほろよいで割った時のアルコール度数を計算できるアプリでJavaFXに入門する
この記事は Mikatus Advent Calendar 2019 5日目の記事です。
はじめに
皆さんはお酒が好きですか?
私はお酒が大好きですし、多分お酒も私のことが好き1です。
最近では様々な缶チューハイが発売され、私も日々帰宅するなり晩酌をし、飲むだけ飲んだら眠りにつく日々を送っております。しかし、昨今の缶チューハイは某ストロングを始めとした9%以上のものが増えてきました。
私もついついアルコール度数が高いものを買ってしまいがちですが、健康被害を考えると震え上がってしまいお酒を飲まなければ眠れない毎日です。そんななか、職場の仲間から「ほろよいで割ればOK」2と言われその発想に感動すると共に、お酒をお酒で割った時のアルコール度数とは・・・?となったので計算するデスクトップアプリをJavaFXで作ってみました。
JavaFXとは
以下Wikipediaから引用
JavaFX(ジャバエフエックス)とはJava仮想マシン上で動作するリッチインターネットアプリケーション (RIA) のGUIライブラリである。Java SE 7 Update 2以降に標準搭載されている。Swingとは異なり、FXMLと呼ばれるXMLとCSSを併用してデザインを記述する。
ざっくり言うとSwingの後継みたいな感じですかね。
SwingはUIも全部Javaで書かなければいけなくて結構地獄のような感じでしたが、JavaFXではFXMLというファイルにデザインを抽出したのでJavaでUIを書くことはないみたいです。環境構築&プロジェクト作成
こちらの記事を参考にさせていただきました。
【超初心者向け】JavaFX超入門
プロジェクト構成、Mainクラスの記述は完全にコピペさせていただきました。Scene Builderがかなり便利でパーツのドラッグ・アンド・ドロップでUIの構築は終わってしまいました。
こんな感じです。一つ注意点として上げるならば、JavaSE11からOracleJDKの無償版がなくなりOpenJDKを使用している人が大多数だと思いますが、OpenJDKにはなんとJavaFXが含まれていません。
今回は対応するのも面倒だったのでEclipseでプロジェクトを作成する際Java8を選択しました。ちなみに対応方法もあるようです。
OpenJFX + OpenJDK で JavaFX を動かす
OpenJDK 11にJavaFXを導入するFXMLをControllerに紐付ける
Scene BuilderでUIを作成して保存するとFXMLファイルで保存されます。
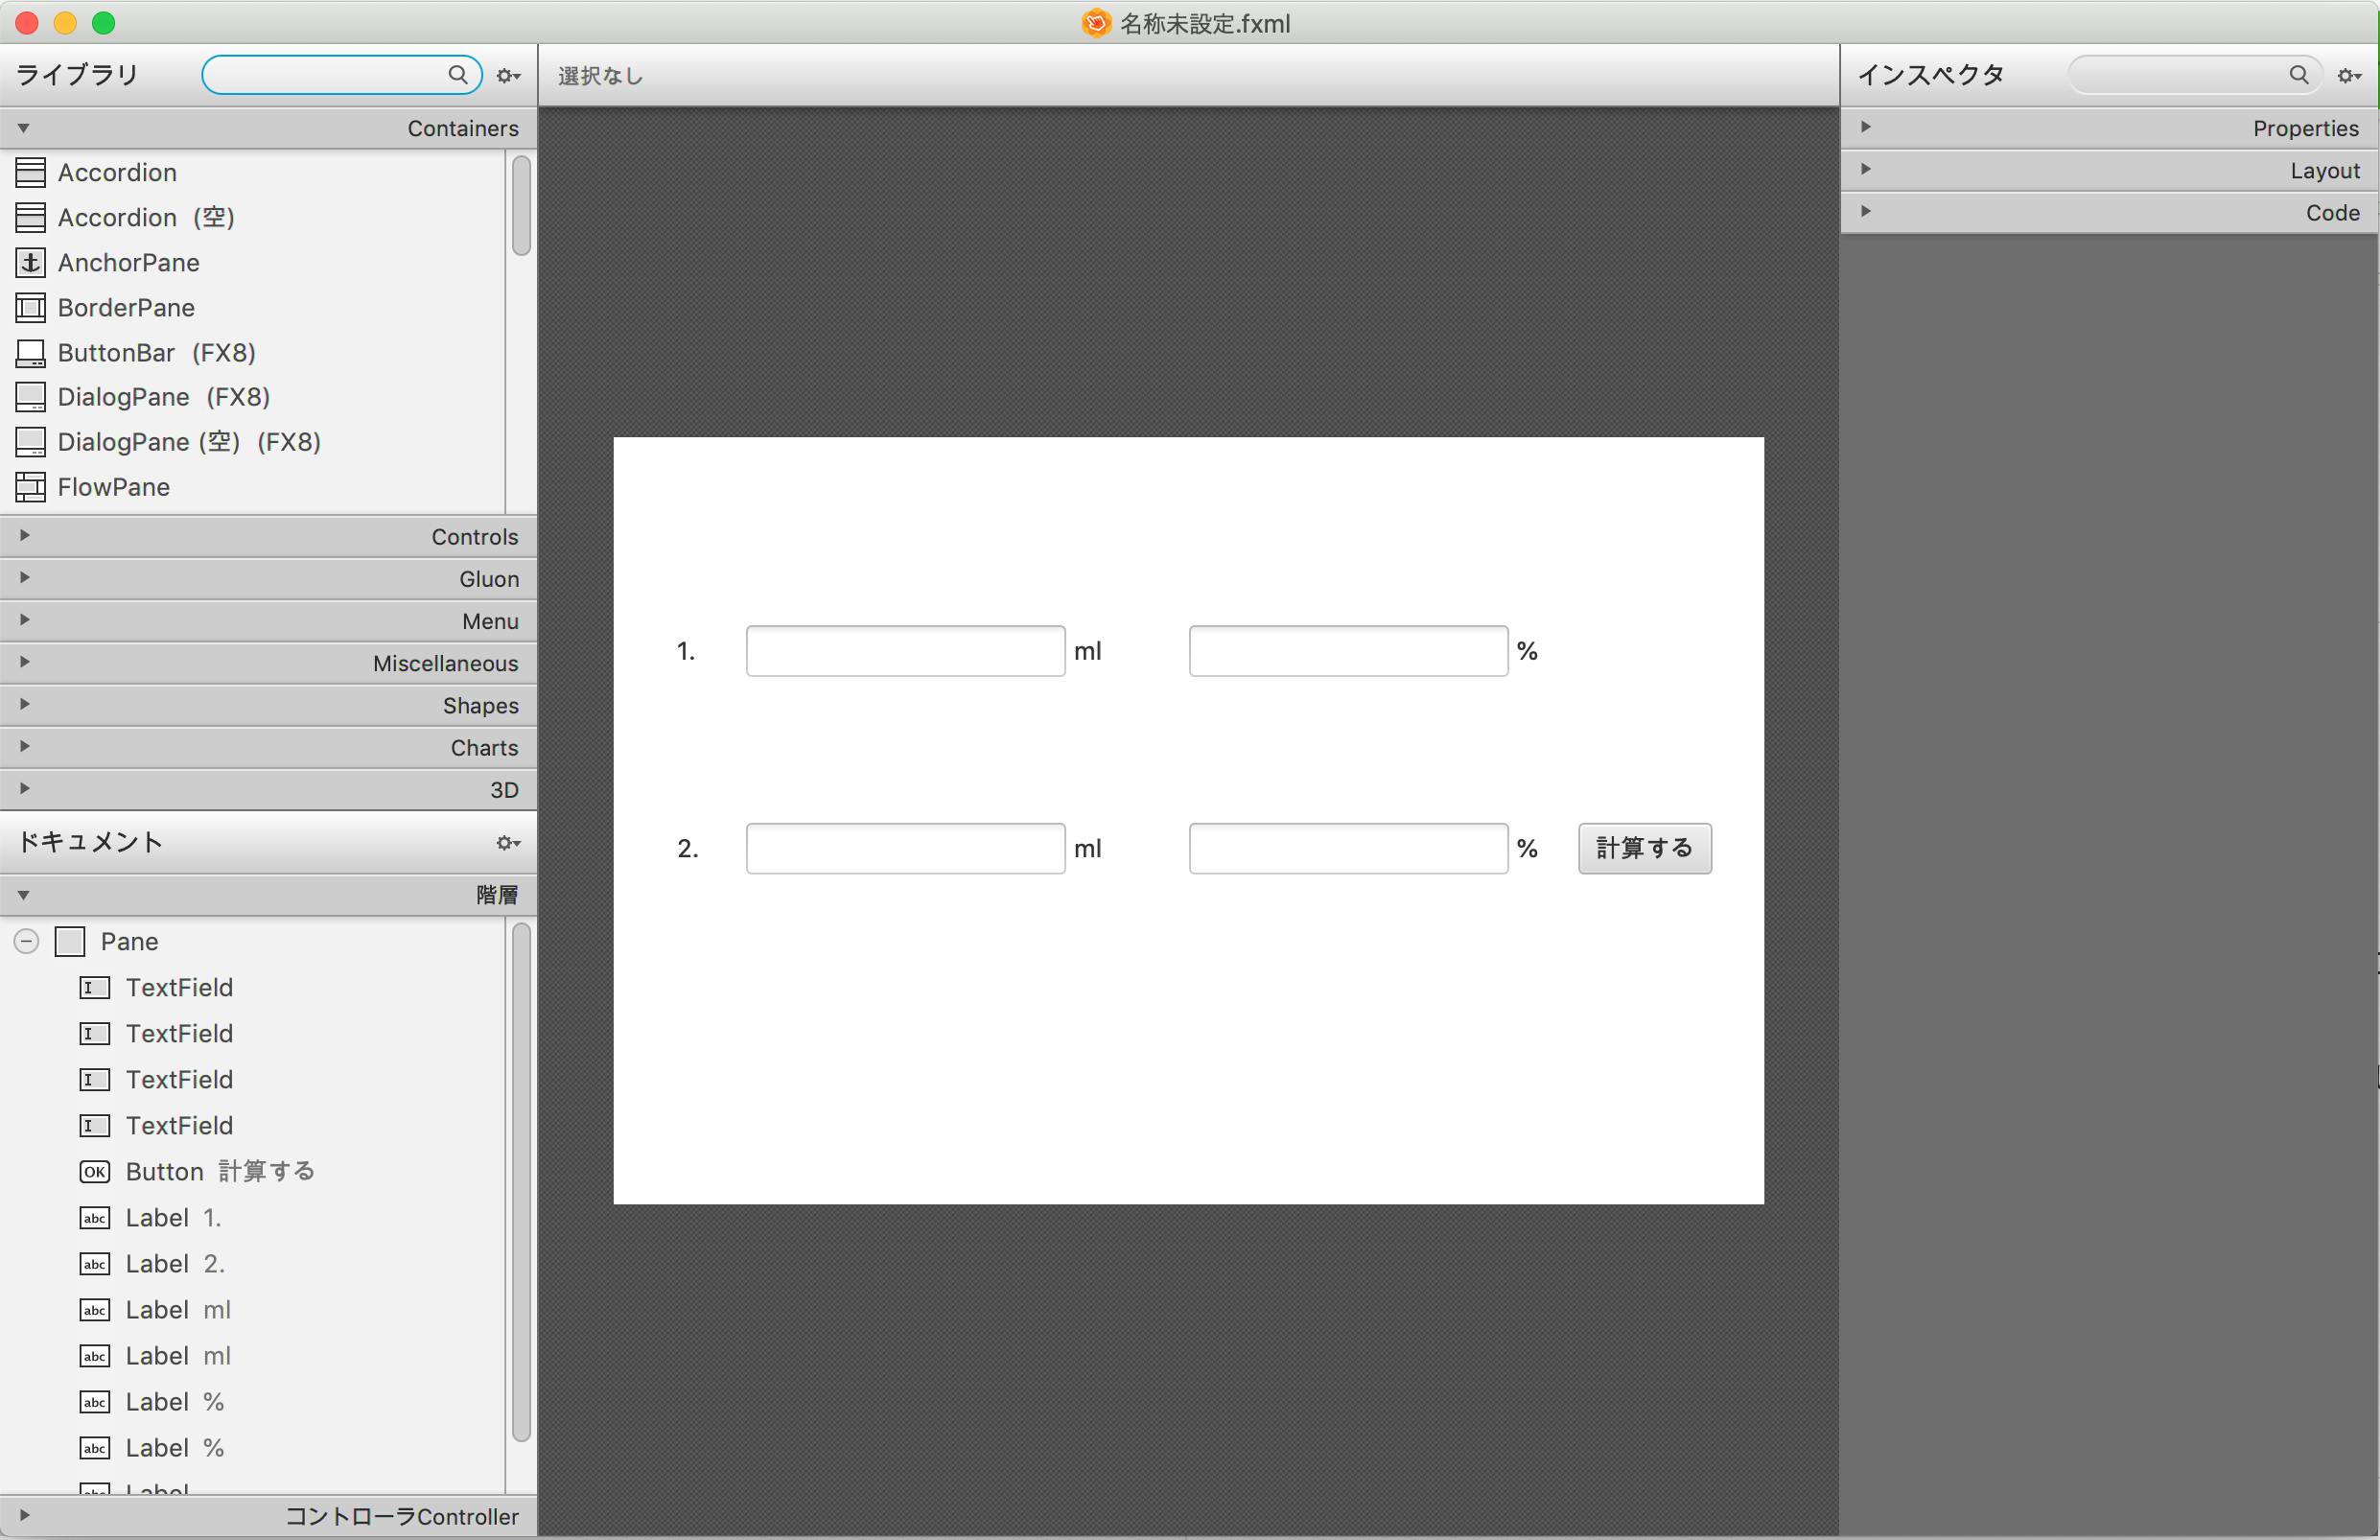
今回作ったFXMLファイルがこちら名称未設定.fxml<?xml version="1.0" encoding="UTF-8"?> <?import javafx.scene.control.Button?> <?import javafx.scene.control.Label?> <?import javafx.scene.control.TextField?> <?import javafx.scene.layout.Pane?> <Pane maxHeight="-Infinity" maxWidth="-Infinity" minHeight="-Infinity" minWidth="-Infinity" prefHeight="400.0" prefWidth="600.0" xmlns="http://javafx.com/javafx/11.0.1" xmlns:fx="http://javafx.com/fxml/1"> <children> <TextField layoutX="69.0" layoutY="98.0" /> <TextField layoutX="300.0" layoutY="98.0" /> <TextField layoutX="69.0" layoutY="201.0" /> <TextField layoutX="300.0" layoutY="201.0" /> <Button layoutX="503.0" layoutY="201.0" mnemonicParsing="false" text="計算する" /> <Label layoutX="33.0" layoutY="103.0" text="1." /> <Label layoutX="33.0" layoutY="206.0" text="2." /> <Label layoutX="240.0" layoutY="103.0" text="ml" /> <Label layoutX="240.0" layoutY="206.0" text="ml" /> <Label layoutX="471.0" layoutY="103.0" text="\%" /> <Label layoutX="471.0" layoutY="206.0" text="\%" /> <Label layoutX="100.0" layoutY="285.0" prefHeight="48.0" prefWidth="401.0" /> </children> </Pane>実際にやりたいこととしては、計算すると言うボタンが押下された際、4つのフォームに入力された値を取得して計算、と言う流れなのでボタン押下や4つのフォームに入力された値をJavaのControllerクラスで受け止められるようfxmlファイルを修正していきます。
そして出来上がったのがこちら
Main.fxml<?xml version="1.0" encoding="UTF-8"?> <?import javafx.scene.control.Button?> <?import javafx.scene.control.Label?> <?import javafx.scene.control.TextField?> <?import javafx.scene.layout.Pane?> <Pane maxHeight="-Infinity" maxWidth="-Infinity" minHeight="-Infinity" minWidth="-Infinity" prefHeight="400.0" prefWidth="600.0" xmlns="http://javafx.com/javafx/11.0.1" xmlns:fx="http://javafx.com/fxml/1" fx:controller="controller.AlcoholController"> <children> <TextField layoutX="69.0" layoutY="98.0" fx:id="amountFst" /> <TextField layoutX="300.0" layoutY="98.0" fx:id="alcoholFst" /> <TextField layoutX="69.0" layoutY="201.0" fx:id="amountSec" /> <TextField layoutX="300.0" layoutY="201.0" fx:id="alcoholSec" /> <Button layoutX="503.0" layoutY="201.0" mnemonicParsing="false" text="計算する" fx:id="button" onAction="#onClick" /> <Label layoutX="33.0" layoutY="103.0" text="1." /> <Label layoutX="33.0" layoutY="206.0" text="2." /> <Label layoutX="240.0" layoutY="103.0" text="ml" /> <Label layoutX="240.0" layoutY="206.0" text="ml" /> <Label layoutX="471.0" layoutY="103.0" text="\%" /> <Label layoutX="471.0" layoutY="206.0" text="\%" /> <Label layoutX="100.0" layoutY="285.0" prefHeight="48.0" prefWidth="401.0" fx:id="result" /> </children> </Pane>
fx:で始まるタグが追加されているのがわかると思います。
まず一番大きなパネルの記述部分にfx:controllerでFXMLファイルと紐付けるControllerを記述します。
TextFieldはfx:idをつけてあげます。これが後にControllerの変数と紐付きます。
ButtonにはonActionでonClickを定義してあげます。
これでボタンが押下された際onClickというメソッドが動き出すはずです。上記FXMLに合わせてControllerを作成します。
AlcoholController.javapackage controller; import java.net.URL; import java.util.ResourceBundle; import javafx.event.ActionEvent; import javafx.fxml.FXML; import javafx.fxml.Initializable; import javafx.scene.control.Button; import javafx.scene.control.Label; import javafx.scene.control.TextField; public class AlcoholController implements Initializable { @FXML private TextField amountFst; @FXML private TextField alcoholFst; @FXML private TextField amountSec; @FXML private TextField alcoholSec; @FXML private Button button; @FXML private Label result; @Override public void initialize(URL location, ResourceBundle resources) { } @FXML public void onClick(ActionEvent event) { } }こんな感じです。
@FXMLをつけることで先程定義したFXMLファイルと紐づくみたいです。あとはonClickに簡単な計算を書いて完成です。
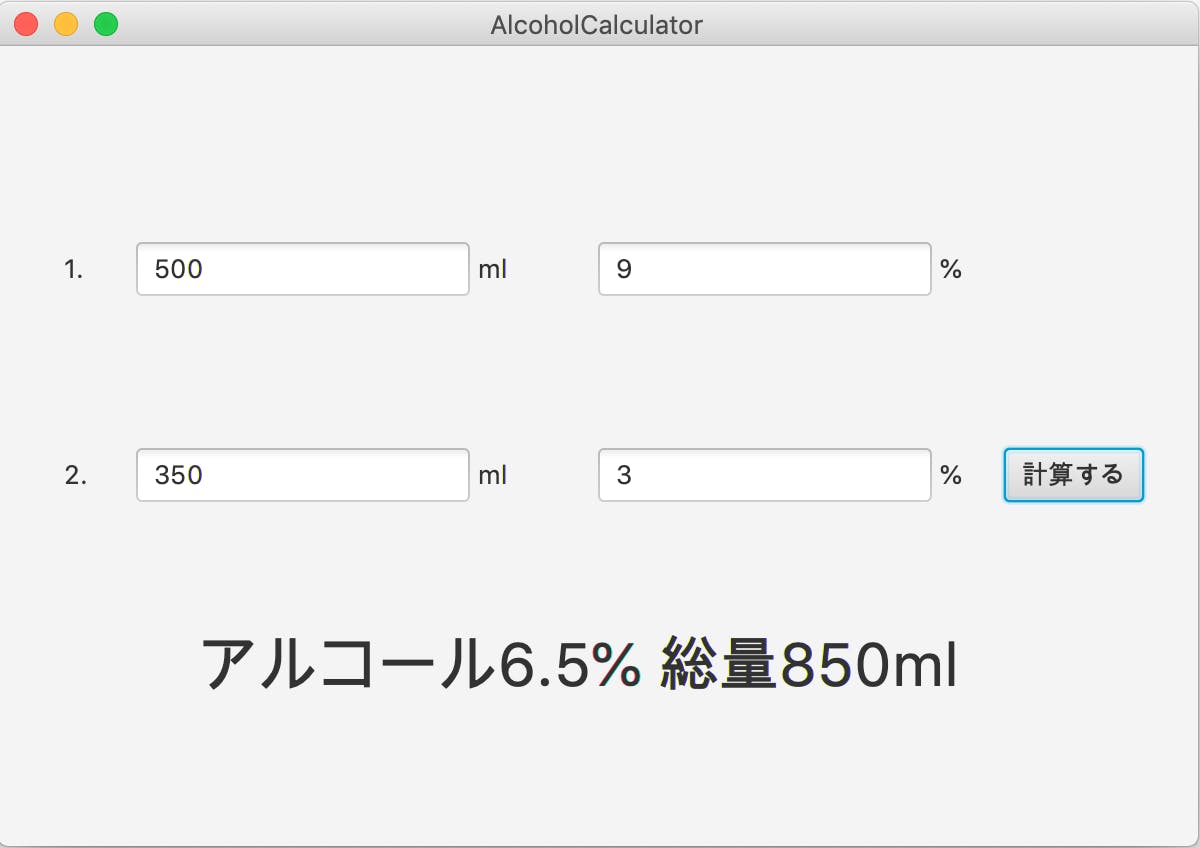
これはアルコール9%のロング缶をほろよいで割った時のアルコール度数です。
極めて健康的な数値になっているのがわかります。あとはEclipseから実行可能jarで書き出せば立派なアプリになりますね。
最後に
Swingを書いた経験もありますが、やはりScene Builderがかなり便利だったのもあってSwingより断然楽でした。
Javaのコード自体もスッキリするので読みやすいですし、数日間サボって日にちが空いても全然読めましたね。今回書いたソースはGithubにあげておくので良かったらご参考までに。
https://github.com/SomeyaHotaka/AlcoholCalcこのアプリで私は健康生活を送っていこうと思います。
それではまた。
- 投稿日:2019-11-25T19:23:25+09:00
Javaのラムダ式の成り立ち
Javaラムダ式
はじめに
サーバサイドエンジニアのliitFeetです。最近はもっぱらkotlinとSpringBootでWebFluxをCoroutineって感じです。
Coroutine難しい・・・この記事はチームラボエンジニアリングアドベントカレンダー7日目の記事です。
この記事ではJavaのラムダ式の成り立ちについて説明していきます。
え、今更?っていう感じはありますが、goやkotlinなど関数を第一級オブジェクトとして扱えるようになって、実はラムダ式の中身が何かよくわからずに使っていることありそうだなーと思い書きました。結論から言うと、javaのラムダ式はメソッドが一つしかないインターフェースを実装してインスタンスを作成(new)します。
多分この説明ではなんのこっちゃわからないと思いますので、ある式を計算した結果を表示するプログラムを例に、ラムダ式までの成り立ちを順をおって説明していきます。
1. 通常のクラスを引数で受け渡し
2. インナークラスを引数で受け渡し
3. 無名クラスを引数で受け渡し
4. ラムダ式を引数で受け渡しラムダ式は記述量を減らしつつ、人間にもコンパイラーにも読みやすい記述法なんだなーというのを意識するとわかりやすいかなと思います。
また、この記事はJavaのラムダ式の成り立ちについて説明しますが、
ラムダ式自体の詳しい説明(引数が一つだけならカッコは記述不要や関数型インターフェースなど)はしませんのでご了承ください〜。ソースコードはGitHubにあります。
通常のクラスを引数で受け渡し
まずはノーマルなクラスを受け渡すことで、計算した結果を表示するプログラムを実現したいと思います。
ソースコードはnormalClassパッケージです。
ソースは下記の4つです。Main.java メインのクラス Display.java 計算結果を表示するクラス CalcuratorInterface.java 計算について定義したインターフェース Display.java CalcuratorInterfaceまずDisplayクラスでは、計算を担当するcalculatorと計算する値(a, b)を受け取り、
calculatorで(a, b)の値を計算して表示します。public class Display { public void showCalc(CalculatorInterface calculator, int a, int b) { System.out.println(calculator.calc(a, b)); } }CalculatorInterfaceでは計算を行うメソッド、calcを定義します。
public interface CalculatorInterface {
    int calc(int a, int b);
}
AddCalculatorではCalculatorInterfaceを実装して、引数(a, b)を足した値を返します。
public class AddCalculator implements CalculatorInterface {

    @Override
    public int calc(int a, int b) {
        return a + b;
    }
}
MainクラスではDisplayクラスに計算を行う
calculatorと計算する値を渡して計算結果を表示させています。public class Main { public static void main(String[] args) { Display display = new Display(); CalculatorInterface calculator = new AddCalculator(); display.showCalc(calculator, 3, 5); } }特に問題ないかと思います。
インナークラスで受け渡し
次に、インナークラスを使ってみたいと思います。
ソースコードはinnerClassパッケージです。
CalcuratorInterface.javaと、Display.javaは変更ありません。前述の通常のクラスを使う場合、ただMainクラスだけで使う足し算をするだけのために、わざわざクラスファイルを作成するのは面倒だと思いませんか。
そこで、以下のようにMainの中でAddCalculatorを定義してしまい、AddCalculator.javaを無くすことができます。public class Main { public static void main(String[] args) { Display display = new Display(); // インナークラスを定義 class AddCalculator implements CalculatorInterface { @Override public int calc(int a, int b) { return a + b; } } CalculatorInterface calculator = new AddCalculator(); display.showCalc(calculator, 3, 5); } }無名クラスを関数で受け渡し
次に無名クラスを使っていきます。
ソースコードはanonymousInnerClassパッケージです。
インナークラスを使って、クラスファイルを一つ作らずにすみましたが、ここで一回しか使わないであれば、このクラスに名前つける必要はありません。
そこでcalculatorに代入するタイミングで、その場でクラスを実装してしまいましょう。public class Main { public static void main(String[] args) { Display display = new Display(); // 一回なら使い捨てで CalculatorInterface calculator = new CalculatorInterface() { @Override public int calc(int a, int b) { return a + b; } }; display.showCalc(calculator, 3, 5); } }これが無名クラスです。使い回しはできませんが、記述量がだんだん減ってきましたね。
ラムダ式
最後に、ラムダ式を使った引数の受け渡しです。
ソースコードはlambdaExpressionパッケージです。
無名クラスを使うことでクラスの名前を省略し、記述量を抑えることができました。
ですが、CalculatorInterfaceを実装するならnew CalculatorInterface()と書かなくともコンパイラでよしなにしてくれそうです。
それに、メソッドが一つしかないなら、どのメソッドを実装するかも一意に決まっています。
メソッドの引数もインターフェースで型の定義がされているし、宣言しなくともコンパイラは型を推測することが可能です。ラムダ式では、実装に必要なメソッドのみ記述することでインスタンスを生成することができます。
public class Main {
    public static void main(String[] args) {
        Display display = new Display();

        // 実装するメソッドの処理のみかく
        CalculatorInterface calculator = (a, b) -> {
            return a + b;
        };

        display.showCalc(calculator, 3, 5);
    }
}
ラムダ式は以下の部分ですね。この部分で、CalculatorInterfaceのcalcメソッドの実装を表現しています。
(a, b) -> {
    return a + b;
};
(a, b)は引数です。メソッドの引数はインターフェースで型の定義がされているのでわざわざ書きません。
->以降がメソッドの実装です。a+bをリターンしてますね。まとめ
いかがでしたでしょうか。
最初に「javaのラムダ式はメソッドが一つしかないインターフェースを実装してインスタンスを作成(new)します。」と書いた意味が伝わったら幸いです!完全に余談ですが、kotlinとかみたいに第一級オブジェクトとして関数扱えると楽でいいですよね・・・引数もわかりやすい・・・
val calculator = {a: Int, b: Int -> a + b}
showCalc(calculator, 3, 5)
fun showCalc(calc: (Int, Int) -> Int, a: Int, b: Int) { println(calc.invoke(a, b)) }
- 投稿日:2019-11-25T17:09:35+09:00
【個人メモ】Java における乱数生成器とのつき合い方
- 投稿日:2019-11-25T13:03:03+09:00
Google Cloud Firestore で Channel ManagedChannelImpl was not shutdown properly!!! が発生する
概要
- Google Cloud Firestore API Client Library for Java で「Channel ManagedChannelImpl was not shutdown properly!!!」というエラーメッセージが出力される
- 今回の環境: Java 11 + Google Cloud Firestore API Client Library for Java 1.31.0
エラーメッセージ例
2019-11-25 05:57:46.557 ERROR 41081 --- [nio-8080-exec-5] i.g.i.ManagedChannelOrphanWrapper        : *~*~*~ Channel ManagedChannelImpl{logId=5, target=firestore.googleapis.com:443} was not shutdown properly!!! ~*~*~*
  Make sure to call shutdown()/shutdownNow() and wait until awaitTermination() returns true.
java.lang.RuntimeException: ManagedChannel allocation site at io.grpc.internal.ManagedChannelOrphanWrapper$ManagedChannelReference.<init>(ManagedChannelOrphanWrapper.java:94) at io.grpc.internal.ManagedChannelOrphanWrapper.<init>(ManagedChannelOrphanWrapper.java:52) at io.grpc.internal.ManagedChannelOrphanWrapper.<init>(ManagedChannelOrphanWrapper.java:43) at io.grpc.internal.AbstractManagedChannelImplBuilder.build(AbstractManagedChannelImplBuilder.java:512) at com.google.api.gax.grpc.InstantiatingGrpcChannelProvider.createSingleChannel(InstantiatingGrpcChannelProvider.java:296) at com.google.api.gax.grpc.InstantiatingGrpcChannelProvider.createChannel(InstantiatingGrpcChannelProvider.java:194) at com.google.api.gax.grpc.InstantiatingGrpcChannelProvider.getTransportChannel(InstantiatingGrpcChannelProvider.java:186) at com.google.api.gax.rpc.ClientContext.create(ClientContext.java:155) at com.google.api.gax.rpc.ClientContext.create(ClientContext.java:122) at com.google.cloud.firestore.spi.v1.GrpcFirestoreRpc.<init>(GrpcFirestoreRpc.java:122) at com.google.cloud.firestore.FirestoreOptions$DefaultFirestoreRpcFactory.create(FirestoreOptions.java:90) at com.google.cloud.firestore.FirestoreOptions$DefaultFirestoreRpcFactory.create(FirestoreOptions.java:82) at com.google.cloud.ServiceOptions.getRpc(ServiceOptions.java:538) at com.google.cloud.firestore.FirestoreOptions.getFirestoreRpc(FirestoreOptions.java:385) at com.google.cloud.firestore.FirestoreImpl.<init>(FirestoreImpl.java:77) at com.google.cloud.firestore.FirestoreOptions$DefaultFirestoreFactory.create(FirestoreOptions.java:73) at com.google.cloud.firestore.FirestoreOptions$DefaultFirestoreFactory.create(FirestoreOptions.java:66) at com.google.cloud.ServiceOptions.getService(ServiceOptions.java:518)エラーメッセージ部分の抜粋
エラーメッセージを読むと、「チャネルが適切にシャットダウンされていない。shutdown や shutdownNow をコールして awaitTermination が true を返すまで待つ必要がある」とのこと。
Channel ManagedChannelImpl was not shutdown properly!!!
Make sure to call shutdown()/shutdownNow() and wait until awaitTermination() returns true.
リソースを解放せずにガベージコレクションの対象となった場合にエラーメッセージを出力している
shutdown や shutdownNow メソッドを呼び出さずに放置したオブジェクトがガベージコレクトの対象となったときに出力されるという情報がある。
It means you didn't call shutdown() or shutdownNow() on your channel, and it was garbage collected.
gRPC のリソースを解放していないままガベージコレクションされたということらしい。
I don't think this is actually related to creating new Publisher, though gRPC uses that as an opportunity to tell us that we're leaking channels.
ライブラリのソースコード該当箇所
Google Cloud Firestore API Client Library for Java は gRPC-Java ライブラリを使用している。
今回のエラーメッセージは gRPC-Java ライブラリが出力している。
該当箇所のソースコードを以下に示す。grpc-java/ManagedChannelOrphanWrapper.java at v1.24.1 · grpc/grpc-java · GitHub
@Override public ManagedChannel shutdown() { phantom.shutdown = true; phantom.clear(); return super.shutdown(); } @Override public ManagedChannel shutdownNow() { phantom.shutdown = true; phantom.clear(); return super.shutdownNow(); }ManagedChannelReference( ManagedChannelOrphanWrapper orphanable, ManagedChannel channel, ReferenceQueue<ManagedChannelOrphanWrapper> refqueue, ConcurrentMap<ManagedChannelReference, ManagedChannelReference> refs) { super(orphanable, refqueue); allocationSite = new SoftReference<>( ENABLE_ALLOCATION_TRACKING ? new RuntimeException("ManagedChannel allocation site") : missingCallSite); this.channelStr = channel.toString(); this.refqueue = refqueue; this.refs = refs; this.refs.put(this, this); cleanQueue(refqueue); }@VisibleForTesting static int cleanQueue(ReferenceQueue<ManagedChannelOrphanWrapper> refqueue) { ManagedChannelReference ref; int orphanedChannels = 0; while ((ref = (ManagedChannelReference) refqueue.poll()) != null) { RuntimeException maybeAllocationSite = ref.allocationSite.get(); ref.clearInternal(); // technically the reference is gone already. if (!ref.shutdown) { orphanedChannels++; Level level = Level.SEVERE; if (logger.isLoggable(level)) { String fmt = "*~*~*~ Channel {0} was not shutdown properly!!! ~*~*~*" + System.getProperty("line.separator") + " Make sure to call shutdown()/shutdownNow() and wait " + "until awaitTermination() returns true."; LogRecord lr = new LogRecord(level, fmt); lr.setLoggerName(logger.getName()); lr.setParameters(new Object[] {ref.channelStr}); lr.setThrown(maybeAllocationSite); logger.log(lr); } } } return orphanedChannels; }解決策
都度 Firestore オブジェクトを close する
Firestore インターフェースの close メソッドをコールすると、関連付けられた gRPC チャネルがクローズされる。
Firestore (Google Cloud 0.119.0-alpha API)
Closes the gRPC channels associated with this instance and frees up their resources. This method blocks until all channels are closed. Once this method is called, this Firestore client is no longer usable.
Firestore インターフェースは AutoCloseable を継承しているため、try-with-resources で自動的に close メソッドを呼び出すことも可能。
Firestore を close した場合は、再度生成する際には FirestoreOptions も新しく生成する必要がある。
Firestore を使い回す
もうひとつの解決策として、Firestore を close せずにシングルトンパターンなどでオブジェクトを使い回しても良い。
参考資料
- 投稿日:2019-11-25T13:03:03+09:00
Google Cloud Firestore で Channel ManagedChannelImpl was not shutdown properly!!!
概要
- Google Cloud Firestore API Client Library for Java で「Channel ManagedChannelImpl was not shutdown properly!!!」というエラーメッセージが出力される
- 今回の環境: Java 11 + Google Cloud Firestore API Client Library for Java 1.31.0
エラーメッセージ例
2019-11-25 05:57:46.557 ERROR 41081 --- [nio-8080-exec-5] i.g.i.ManagedChannelOrphanWrapper        : *~*~*~ Channel ManagedChannelImpl{logId=5, target=firestore.googleapis.com:443} was not shutdown properly!!! ~*~*~*
  Make sure to call shutdown()/shutdownNow() and wait until awaitTermination() returns true.
java.lang.RuntimeException: ManagedChannel allocation site at io.grpc.internal.ManagedChannelOrphanWrapper$ManagedChannelReference.<init>(ManagedChannelOrphanWrapper.java:94) at io.grpc.internal.ManagedChannelOrphanWrapper.<init>(ManagedChannelOrphanWrapper.java:52) at io.grpc.internal.ManagedChannelOrphanWrapper.<init>(ManagedChannelOrphanWrapper.java:43) at io.grpc.internal.AbstractManagedChannelImplBuilder.build(AbstractManagedChannelImplBuilder.java:512) at com.google.api.gax.grpc.InstantiatingGrpcChannelProvider.createSingleChannel(InstantiatingGrpcChannelProvider.java:296) at com.google.api.gax.grpc.InstantiatingGrpcChannelProvider.createChannel(InstantiatingGrpcChannelProvider.java:194) at com.google.api.gax.grpc.InstantiatingGrpcChannelProvider.getTransportChannel(InstantiatingGrpcChannelProvider.java:186) at com.google.api.gax.rpc.ClientContext.create(ClientContext.java:155) at com.google.api.gax.rpc.ClientContext.create(ClientContext.java:122) at com.google.cloud.firestore.spi.v1.GrpcFirestoreRpc.<init>(GrpcFirestoreRpc.java:122) at com.google.cloud.firestore.FirestoreOptions$DefaultFirestoreRpcFactory.create(FirestoreOptions.java:90) at com.google.cloud.firestore.FirestoreOptions$DefaultFirestoreRpcFactory.create(FirestoreOptions.java:82) at com.google.cloud.ServiceOptions.getRpc(ServiceOptions.java:538) at com.google.cloud.firestore.FirestoreOptions.getFirestoreRpc(FirestoreOptions.java:385) at com.google.cloud.firestore.FirestoreImpl.<init>(FirestoreImpl.java:77) at com.google.cloud.firestore.FirestoreOptions$DefaultFirestoreFactory.create(FirestoreOptions.java:73) at com.google.cloud.firestore.FirestoreOptions$DefaultFirestoreFactory.create(FirestoreOptions.java:66) at com.google.cloud.ServiceOptions.getService(ServiceOptions.java:518)エラーメッセージ部分の抜粋
エラーメッセージを読むと、「チャネルが適切にシャットダウンされていない。shutdown や shutdownNow をコールして awaitTermination が true を返すまで待つ必要がある」とのこと。
Channel ManagedChannelImpl was not shutdown properly!!!
Make sure to call shutdown()/shutdownNow() and wait until awaitTermination() returns true.
リソースを解放せずにガベージコレクションの対象となった場合にエラーメッセージを出力している
shutdown や shutdownNow メソッドを呼び出さずに放置したオブジェクトがガベージコレクトの対象となったときに出力されるという情報がある。
It means you didn't call shutdown() or shutdownNow() on your channel, and it was garbage collected.
gRPC のリソースを解放していないままガベージコレクションされたということらしい。
I don't think this is actually related to creating new Publisher, though gRPC uses that as an opportunity to tell us that we're leaking channels.
ライブラリのソースコード該当箇所
Google Cloud Firestore API Client Library for Java は gRPC-Java ライブラリを使用している。
今回のエラーメッセージは gRPC-Java ライブラリが出力している。
該当箇所のソースコードを以下に示す。grpc-java/ManagedChannelOrphanWrapper.java at v1.24.1 · grpc/grpc-java · GitHub
@Override public ManagedChannel shutdown() { phantom.shutdown = true; phantom.clear(); return super.shutdown(); } @Override public ManagedChannel shutdownNow() { phantom.shutdown = true; phantom.clear(); return super.shutdownNow(); }ManagedChannelReference( ManagedChannelOrphanWrapper orphanable, ManagedChannel channel, ReferenceQueue<ManagedChannelOrphanWrapper> refqueue, ConcurrentMap<ManagedChannelReference, ManagedChannelReference> refs) { super(orphanable, refqueue); allocationSite = new SoftReference<>( ENABLE_ALLOCATION_TRACKING ? new RuntimeException("ManagedChannel allocation site") : missingCallSite); this.channelStr = channel.toString(); this.refqueue = refqueue; this.refs = refs; this.refs.put(this, this); cleanQueue(refqueue); }@VisibleForTesting static int cleanQueue(ReferenceQueue<ManagedChannelOrphanWrapper> refqueue) { ManagedChannelReference ref; int orphanedChannels = 0; while ((ref = (ManagedChannelReference) refqueue.poll()) != null) { RuntimeException maybeAllocationSite = ref.allocationSite.get(); ref.clearInternal(); // technically the reference is gone already. if (!ref.shutdown) { orphanedChannels++; Level level = Level.SEVERE; if (logger.isLoggable(level)) { String fmt = "*~*~*~ Channel {0} was not shutdown properly!!! ~*~*~*" + System.getProperty("line.separator") + " Make sure to call shutdown()/shutdownNow() and wait " + "until awaitTermination() returns true."; LogRecord lr = new LogRecord(level, fmt); lr.setLoggerName(logger.getName()); lr.setParameters(new Object[] {ref.channelStr}); lr.setThrown(maybeAllocationSite); logger.log(lr); } } } return orphanedChannels; }解決策
都度 Firestore オブジェクトを close する
Firestore インターフェースの close メソッドをコールすると、関連付けられた gRPC チャネルがクローズされる。
Firestore (Google Cloud 0.119.0-alpha API)
Closes the gRPC channels associated with this instance and frees up their resources. This method blocks until all channels are closed. Once this method is called, this Firestore client is no longer usable.
Firestore インターフェースは AutoCloseable を継承しているため、try-with-resources で自動的に close メソッドを呼び出すことも可能。
Firestore を close した場合は、再度生成する際には FirestoreOptions も新しく生成する必要がある。
Firestore を使い回す
もうひとつの解決策として、Firestore を close せずにシングルトンパターンなどでオブジェクトを使い回しても良い。
参考資料
- 投稿日:2019-11-25T12:42:12+09:00
最近噂のDart言語でjsアプリ作ってみた
最近噂の3倍生産性が良いFlutterにつられて色々調べていたら、dart言語なるものがあり、JSアプリ作ろうかなーって思っていたので、使ってみた。
https://dart.devfacebookインスタントゲームとして、公開済み。
https://fb.gg/play/solitaireproworldjavaで開発したandroidアプリを移植した。
https://play.google.com/store/apps/details?id=jp.co.projapan.solitaireゲームアプリなので、StageXLフレームワークを使用。これはFlash風APIになってる。
http://www.stagexl.org良かった点
- ビルドが速い。5秒程度でリロードされる。慣れるとサクサク開発できて、超気持ちいい。
- Javaに似てるので、javaから移植しやすい。javaプログラマーは入りやすい。
- javaと比べると、文句なしでDartがいい。全然違う。Objective-Cはクソ
- 新しめの言語なので、変な制約が少ない。C++とかクソ
- IDEはVSCode使ったが、軽くて良い。最近のXCodeはクソ。androidStudioでも開発可能。
- 慣れるとサクサク開発できて、超気持ちいい。
- Dart関係ないけどVSCodeでのソース自動整形はいい。生産性が上がる。(今まで興味なかった)
- webGLも使える。StageXLはでふぉでON。まあ古めのデバイスのためにOFFったけど。新しめのデバイスならONの方が性能上がりそう。
- JSは結構デカくなるけど、gzip圧縮できるので、問題無し。このアプリは748KB->212KBだった。
- ChromeのみでDartソースレベルDEBUGができる!さすが純正。
悪かった点
- VSCodeだと日本語コメントが文字化けしやがる。(最新版では修正済みらしい)
- 日本語情報が少ない。特にStageXL情報がない。全くない。
- 画面をコードで構築するので、めんどい。まあこれはこれでいい。変なツールを覚える必要がない。
- たまにソース辿れない例外が出て、修正に苦労する。
- double->intの暗黙の変換で整数じゃないと例外が出てしまう。
- VSCodeからDEBUG起動とかもできるが、そのうち劇重になるので、使わなかった。Chromeのみでデバッグ可能なので、そっちを使う。現在は改善されてるかも。
- 言語別リソースの機能とかは無い。仕方ないので、自分で構築した。まあ言語ごとにjsonに追い出したりするだけ。
- if (xx)でxxがnullだと例外吐きやがる。クソが。
- ビルド待ち時間が少ないので、疲れる
超疲れる。news読む暇なくなる。
最後に
概ねサクサク作れました。
生産性、いいわあ。ビルド速いのは正義だねえ。
StageXL使ってる日本人、私だけかもー。貴重な老人プログラマーになれたかも。
そのうちFlutterもやろう。
AngularDartは現在使用中。
- 投稿日:2019-11-25T10:42:50+09:00
try-with-resourseが便利
リソースを自動で閉じる
ファイル開いて、try-catchして、閉じるみたいな
よくやると思うんですけれど
finallyとか使おうとすると長い.java// try // ファイルを開く // catch // 例外処理 // finally // ファイルを閉じる public static void main(String[] args) { String filePath = "C:\\Windows\\System32"; BufferedReader bufferedReader = null; try { // ファイルを開く File file = new File(filePath); // 読み込み FileReader fileReader = new FileReader(file); bufferedReader = new BufferedReader(fileReader); // 出力 String data; while ((data = bufferedReader.readLine()) != null) { System.out.println(data); } } catch (IOException e) { System.out.println("ひらけん"); } finally { if (bufferedReader != null) { try { bufferedReader.close(); } catch (IOException e) { System.out.println("とじれん"); } } } }これを、try-with-resource文を使うと...
すまーと.java// try // ファイルを開く、勝手に閉じる // catch // 例外処理 public static void main(String[] args) { String filePath = "C:\\Windows\\System32"; try (FileReader fileReader = new FileReader(new File(filePath)); BufferedReader bufferedReader = new BufferedReader(fileReader);) { // 出力 String data; while ((data = bufferedReader.readLine()) != null) { System.out.println(data); } } catch (IOException e) { System.out.println("ひらけん"); } }tryの次の括弧()内部で宣言した変数は
勝手に閉じられる対象となります(java.lang.AutoCloseable)try句の中までのスコープで、まぁtry句の中で宣言するのと使い勝手は変わりません
勝手に閉じてくれるとか気が利きすぎてて便利すぎでは
- 投稿日:2019-11-25T08:16:25+09:00
@valueを用いているクラスに対するモックを用いたテストのコツ
東京理科大学 Advent Calendar 2019の9日目です。
今回はJavaのフレームワークSpringにおいて
@Valueアノテーションを用いたクラスに対してテストをする際の方法/コツについて書いていきます。
@Valueとは
@Valueアノテーションは別のファイルから値をインジェクションしたいときに用いるアノテーションです。
Spring Bootの場合デフォルトの設定のままですと、application.ymlまたはapplication.propertiesに記載してある値から読み取りインジェクションします。具体的に書くとこのような形式です。
まず、application.ymlに値を書きます。application.ymlsample.threshold : 1そして、アノテーションの引数に
@Value("${先程のkey}")としたうえで、クラス内のフィールドや引数などに
@Valueアノテーションを付与します。具体的には
HogeCoordinator.java@Service public class HogeCoordinator { @value("${sample.threshold}") private Integer threshold; @Autowired private HogeService hogeService; public void hoge() { hogeService.fuga(threshold); } }このようなイメージです。
HogeCoordinatorクラスのフィールドthresholdに@value("${sample.threshold}")と記載するとapplication.ymlに記載したのkeyから1を読み取り、アプリケーションを実行するとインジェクションしてくれます。これにより、アプリケーション固有の値などを1ファイルに集めて管理できるのがメリットです。
@Valueを用いているクラスに対するテストそれでは本題の
@Valueを用いているクラスに対するテスト方法です。テスト対象は先程のHogeCoordinator.javaとします。
@Valueを用いている場合、下記のような一般的なテストの書き方をしてしまうと、@Valueを付与している対象に値をインジェクションしてくれません。FailedHogeCoordinatorTest.javapublic class FailedHogeCoordinatorTest { @InjectMocks private HogeCoordinator hogeCoordinator; @Mock private HogeService hogeService; @Before public void setup() { MockitoAnnotations.initMocks(this); } // 以下省略 }そこで、ReflectionTestUnitsクラスのsetFieldメソッドを用います。メソッドの引数には対象のインスタンス、インジェクションを行うフィールド名、インジェクションする値を指定します。
このメソッドを用いるために、HogeCoordinatorのインスタンスを 生成しておく必要があるため、newしておきます。
これを踏まえてテストを書くとこのようになります。
SuccessHogeCoordinatorTest.javapublic class SuccessHogeCoordinatorTest { @InjectMocks private HogeCoordinator hogeCoordinator = new HogeCoordinator(); @Mock private HogeService hogeService; @Before public void setup() { ReflectionTestUnits.setField(hogeCoordinator, "threshold", 1); MockitoAnnotations.initMocks(this); } // 以下省略 }こうすることで、
@Valueを付与しているフィールドに値がインジェクションされます。コツとしてはモックをインジェクションするクラスのインスタンスをテスト時に生成する必要があるため、DIを行う際にはコンストラクタインジェクションをしない方がよいということです。
今回のテスト対象であるHogeCoordinatorクラスは
@Autowiredを用いてDIしていますが、例えば下記のようにLombokの@RequiredArgsConstructorを用いてコンストラクタインジェクションをしてしまうと、コンストラクタの引数が増えてしまうため、インスタンスの生成が面倒になります。HogeCoordinator.java@Service @RequiredArgsConstructor public class HogeCoordinator { @value("${sample.threshold}") private Integer threshold; private final HogeService hogeService; public void hoge() { hogeService.fuga(threshold); } }そのため、ReflectionTestUnitsクラスのsetFieldメソッドを用いてテストをするクラスにインジェクションする場合は、コンストラクタインジェクションは避けた方が楽になると考えます。
まとめ
@Valueを付与しているクラスに対してテストする際はReflectionTestUnitsクラスのsetFieldメソッドを用いると値をインジェクションしてくれます。
その際にテスト対象のクラスのDIはコンストラクタインジェクション以外の方法にしておいた方が、テストの際にインスタンスの生成が容易になり、楽にテストすることができます。さいごに
今回OBという縁がありまして、アドベントカレンダーに参加させていただくことにしました。
私自身初のアドベントカレンダーへの参加ということもあり、貴重な場を設けてくださった@piffettさんには感謝しております。
ありがとうございました。参考文献
- 投稿日:2019-11-25T07:10:26+09:00
Google Cloud Firestore で IllegalStateException: Firestore client has already been closed が発生する
概要
- Google Cloud Firestore API Client Library for Java で IllegalStateException: Firestore client has already been closed が発生する
- Firestore オブジェクトの close メソッドを呼び出した後で、 FirestoreOptions の getService メソッドで取得した Firestore オブジェクトを使用すると発生する
- 今回の環境: Java 11 + Google Cloud Firestore API Client Library for Java 1.31.0
エラーメッセージ例
java.lang.IllegalStateException: Firestore client has already been closed
  at com.google.common.base.Preconditions.checkState(Preconditions.java:511)
  at com.google.cloud.firestore.FirestoreImpl.streamRequest(FirestoreImpl.java:473)
  at com.google.cloud.firestore.Query.stream(Query.java:1141)
  at com.google.cloud.firestore.Query.get(Query.java:1181)
  at com.google.cloud.firestore.Query.get(Query.java:1151)
Firestore インターフェースの close メソッド
close メソッドをコールすると、関連付けられた gRPC チャネルがクローズされ、この Firestore オブジェクトが使用できなくなる。
Firestore (Google Cloud 0.119.0-alpha API)
Closes the gRPC channels associated with this instance and frees up their resources. This method blocks until all channels are closed. Once this method is called, this Firestore client is no longer usable.
Firestore インターフェースは AutoCloseable を継承しているため、try-with-resources で自動的に close メソッドを呼び出すことができる。
try-with-resources 文は、1 つ以上のリソースを宣言する try 文です。リソースは、プログラムでの使用が終わったら閉じられなければいけないオブジェクトです。try-with-resources 文は、文の終わりで各リソースが確実に閉じられるようにします。java.io.Closeable を実装しているすべてのオブジェクトも含め、java.lang.AutoCloseable インタフェースを実装しているオブジェクトはリソースとして使用できます。
エラー発生コードの例
以下のようなコードでエラーが発生していた。
import com.google.api.core.ApiFuture;
import com.google.auth.oauth2.GoogleCredentials;
import com.google.cloud.firestore.CollectionReference;
import com.google.cloud.firestore.DocumentSnapshot;
import com.google.cloud.firestore.Firestore;
import com.google.cloud.firestore.FirestoreOptions;
import com.google.cloud.firestore.Query;
import com.google.cloud.firestore.QuerySnapshot;

public class MyFirestore {

  private final String projectId;
  private final GoogleCredentials credentials;
  private Firestore firestore;
  private final String collectionPath;
  private final FirestoreOptions firestoreOptions;

  public MyFirestore(String projectId, GoogleCredentials credentials, String collectionPath) {
    this.projectId = projectId;
    this.credentials = credentials;
    this.collectionPath = collectionPath;
    this.firestoreOptions =
      FirestoreOptions.newBuilder()
        .setCredentials(credentials)
        .setProjectId(projectId)
        .build();
  }

  public <T> T get(String id, Class<T> type) throws Exception {
    // try-with-resources: 使用後に自動で Firestore#close を呼び出す
    try (Firestore firestore = firestoreOptions.getService()) {
      // コレクションを取得
      CollectionReference c = firestore.collection(collectionPath);
      // コレクションからドキュメントを取得
      Query query = c.whereEqualTo("mykey", id);
      ApiFuture<QuerySnapshot> querySnapshot = query.get();
      for (DocumentSnapshot doc : querySnapshot.get().getDocuments()) {
        return doc.toObject(type);
      }
      return null;
    }
  }
}
解決策
都度 FirestoreOptions を生成する
Firestore オブジェクトを close した場合は、再度 FirestoreOptions を生成する必要がある。
毎回 Firestore#close をコールするのであれば、以下のように FirestoreOptions も都度生成して Firestore を取得するようにする。
private static Firestore getFirestore(String projectId, GoogleCredentials credentials) {
  FirestoreOptions firestoreOptions =
    FirestoreOptions.newBuilder()
      .setCredentials(credentials)
      .setProjectId(projectId)
      .build();
  return firestoreOptions.getService();
}
Firestore を使い回す
もうひとつの解決策として、Firestore を close せずにシングルトンパターンなどでオブジェクトを使い回しても良い。
FirestoreOptions クラスの getService メソッド
FirestoreOptions のドキュメントには何も載っていない。
FirestoreOptions (Google Cloud 0.119.0-alpha API)
FirestoreOptions の親クラスである ServiceOptions には発生する例外についての説明は載っていない。
ServiceOptions (Google Cloud 0.107.0-alpha API)
Returns a Service object for the current service. For instance, when using Google Cloud Storage, it returns a Storage object.
ソースコードを見ると getService メソッドが他のクラスに委譲してオブジェクトを生成して返しているのがわかる。
java-core/ServiceOptions.java at v1.91.2 · googleapis/java-core · GitHub
private transient ServiceT service;public ServiceT getService() { if (shouldRefreshService(service)) { service = serviceFactory.create((OptionsT) this); } return service; }生成した Service オブジェクトは ServiceOptions オブジェクトが所有している。
再度 getService メソッドが呼び出されたときにはすでに生成済みの同じ Service オブジェクトを返す仕組みになっている。参考資料
- 投稿日:2019-11-25T00:59:25+09:00
JavaでRocksDBを使用してみる
RockDBとは
Key-Valueのデータ形式(バイト配列)を保持するデータベース。
C++で作られており、JavaからもJNIで使用できる。
ただし、JavaのAPIはC++のAPIに追いついていないとのこと。Wiki
https://ja.wikipedia.org/wiki/RocksDB使い方
以下に簡単な使用方法を記載します。
詳細は公式のドキュメントを参照してください。https://github.com/facebook/rocksdb/wiki/RocksJava-Basics
Maven
以下のライブラリを使用します。
RocksDbのみを使用する場合、rocksdbjniのみでOK。
シリアライズ、デシリアライズのためにkryoを追加しています。<dependency> <groupId>org.rocksdb</groupId> <artifactId>rocksdbjni</artifactId> <version>6.0.1</version> </dependency> <dependency> <groupId>com.esotericsoftware</groupId> <artifactId>kryo</artifactId> <version>3.0.1</version> </dependency>オープン・クローズ
クローズ用のメソッドもあるが、try-with-resourcesの使用を推奨しているので、従いましょう。
openにはDB保存先のパスを指定する必要があります。以下のように指定するとプロジェクト直下にDB用のフォルダが作成されます。try (RocksDB rocksDb = RocksDB.open("sample")) { // ここに処理を書く }読み込み、書き込み、削除
基本的なAPIの使用例です。
読み込みはget、書き込みはput、削除はdeleteです。
その他、全件取得(newIterator)、範囲削除(deleteRange)、複数取得(multiGetAsList)の使用例を記載しています。public void execute() { // RocksDBをOpenする。openにはDB保存先を指定する(下記の指定を行うとプロジェクト直下に作成される) try (RocksDB rocksDb = RocksDB.open("sample")) { // Kryoを使用してシリアライズ byte[] binaryKey = serialize("key"); byte[] binaryValue = serialize("Value"); // Key、Valueを指定してRocksDBにput(API#put) // 重複したKeyを登録してもエラーとならず、上書きするだけ rocksDb.put(binaryKey, binaryValue); rocksDb.put(binaryKey, binaryValue); // シリアライズしたKeyを使用して、RocksDBから取得(API#get) try (Input input = new Input(rocksDb.get(binaryKey))) { System.out.println(kryo.readObject(input, String.class)); } // Keyを指定してRockDBから削除(API#delete) rocksDb.delete(binaryKey); if (null == rocksDb.get(binaryKey)) { System.out.println("取得できません"); } for (int i = 0; i < 10; i++) { // Kryoを使用してシリアライズ byte[] tempBinaryKey = serialize("key" + String.valueOf(i)); byte[] tempBinaryValue = serialize("Value"+ String.valueOf(i)); // Key、Valueを指定してRocksDBにput rocksDb.put(tempBinaryKey, tempBinaryValue); } // RocksDB内のすべてのデータ取得(API#newIterator) System.out.println("全Entry取得"); RocksIterator iterator = rocksDb.newIterator(); iterator.seekToFirst(); while (iterator.isValid()) { try (Input input = new Input(iterator.key())) { System.out.println(kryo.readObject(input, String.class)); } iterator.next(); } // RocksDB内をキーの範囲を指定して削除(API#deleteRange) // beginKeyに指定〜EndKeyの直前までが削除される rocksDb.deleteRange(serialize("key0"), serialize("key8")); System.out.println("範囲削除key0-key7"); RocksIterator iterator2 = rocksDb.newIterator(); iterator2.seekToFirst(); while (iterator2.isValid()) { try (Input input = new Input(iterator2.value())) { System.out.println(kryo.readObject(input, String.class)); } iterator2.next(); } // RocksDB内複数取得(#multiGetAsList) System.out.println("複数取得"); List<byte[]> binaryKeyList = new ArrayList<>(); binaryKeyList.add(serialize("key8")); binaryKeyList.add(serialize("key9")); List<byte[]> binaryValueList = rocksDb.multiGetAsList(binaryKeyList); for (byte[] binary:binaryValueList) { try (Input input = new Input(binary)) { System.out.println(kryo.readObject(input, String.class)); } } } catch (RocksDBException e) { throw new RuntimeException(e); } } private byte[] serialize(String str) { ByteArrayOutputStream baos = new ByteArrayOutputStream(); try (Output output = new Output(baos)) { kryo.writeObject(output, str); } return baos.toByteArray(); }どんなときに使う?
ライブラリを導入するだけで使用できるため、RDBを使用するまでも行かないけど、
データの永続化が必要な場面で活躍すると思います。参考
https://github.com/EsotericSoftware/kryo
https://github.com/facebook/rocksdb/wiki/RocksJava-Basics