- 投稿日:2019-02-09T20:43:10+09:00
Angular7 で俺式 MEAN スタック Webアプリを構築する、ほぼ全手順(3)
概要
Angular7 で俺式 MEAN スタックを作るための備忘録。
今回は「サーバ側の作成」を行う。前提
2019年1月1日時点の情報です。また、以下の環境になっている前提です。
- Angular CLI: 7.0.6
- Node.js: 10.15.0
- npm: 6.4.1
また、「Angular7 で俺式 MEAN スタック Webアプリを構築する、ほぼ全手順(2)」が完了していること。
サーバサイド導入準備
型定義ファイルと関連モジュールをインストール
Universal 対応で既に導入されたモジュールの型定義ファイルと関連モジュールを入れておく
npm i @nguniversal/express-engine @nguniversal/module-map-ngfactory-loader

npm i -D @types/express
ディレクトリを作成
以下の通りに、server ディレクトリ配下を作成しておく
[ルートディレクトリ]
  :
  └─ server # 新規作成
     ├─ constants # 定数用
     │   ├─ api-routes.constant.ts
     │   └─ http-method.constant.ts
     ├─ controllers # コントローラ処理用
     │   └─ sample.controller.ts
     ├─ managers # 管理系クラス用
     │   └─ api.manager.ts
     │
     ├─ tsconfig.json # TS 設定ファイル
     └─ web-server.ts # Web サーバ
tsconfig ファイル作成
server/tsconfig.json の中身を以下の通りにする。
ついでに、各ファイルの import 時に../の多用を防ぐため、ルートディレクトリ直下の tsconfig.json にエイリアスを設定しておく。(common ディレクトリの部分)
↑なんかうまくいかないので、サーバサイドは一旦普通に相対パスで書くことにする。server/tsconfig.json{ "extends": "../tsconfig.json", "compilerOptions": { "outDir": "./dist/out-tsc", "module": "commonjs", "target": "es6", }, "exclude": [ "test.ts", "**/*.spec.ts" ] }サーバサイド作成
コントローラクラス作成
以下の通りにコントローラ作成
server/controllers/sample.controller.tsimport { ISamplePathParams, ISampleRequest, ISampleResponse } from '../../common/apis/sample/sample.api'; /** サンプル コントローラ */ export class SampleController { public async getUsers(request: ISampleRequest, params?: ISamplePathParams): Promise<ISampleResponse> { console.log('=== SampleContoroller #getUsers ==='); console.log('params: ', params); console.log('request: ', request); const response: ISampleResponse = { users: [{ id: 1, name: 'GET で API が呼ばれました', age: 11 }] }; return response; } public async createUser(request: ISampleRequest): Promise<ISampleResponse> { console.log('=== SampleContoroller #createUser ==='); console.log('request: ', request); const response: ISampleResponse = { users: [{ id: 2, name: 'POST で API が呼ばれました', age: 22 }] }; return response; } public async updateUser(request: ISampleRequest, params?: ISamplePathParams): Promise<ISampleResponse> { console.log('=== SampleContoroller #updateUser ==='); console.log('params: ', params); console.log('request: ', request); const response: ISampleResponse = { users: [{ id: 3, name: 'PUT で API が呼ばれました', age: 33 }] }; return response; } public async deleteUser(request: ISampleRequest, params?: ISamplePathParams): Promise<ISampleResponse> { console.log('=== SampleContoroller #deleteUser ==='); console.log('params: ', params); console.log('request: ', request); const response: ISampleResponse = { users: [{ id: 3, name: 'PUT で API が呼ばれました', age: 33 }] }; return response; } }定数クラス作成(HTTP メソッド定数)
以下の通りに HTTP メソッド定数作成
server/constants/http-method.constant.ts/** HTTP メソッド定数 */ export enum HttpMethod { GET = 'GET', POST = 'POST', PUT = 'PUT', PATCH = 'PATCH', DELETE = 'DELETE' }定数クラス作成(API ルート定数)
以下の通りに API ルート定数作成
server/constants/api-routes.constant.tsimport { HttpMethod } from './http-method.constant'; import { SampleController } from '../controllers/sample.controller'; import { SAMPLE_API_PATH } from '../../common/apis/sample/sample.api'; /** API ルータ一覧 */ export const apiRoutes = [ { path: SAMPLE_API_PATH, method: HttpMethod.GET, proccess: new SampleController().getUsers }, { path: `${SAMPLE_API_PATH}/:id`, method: HttpMethod.GET, proccess: new SampleController().getUsers }, { path: SAMPLE_API_PATH, method: HttpMethod.POST, proccess: new SampleController().createUser }, { path: `${SAMPLE_API_PATH}/:id`, method: HttpMethod.PUT, proccess: new SampleController().updateUser }, { path: `${SAMPLE_API_PATH}/:id`, method: HttpMethod.DELETE, proccess: new SampleController().deleteUser }, ];API ルーティング管理クラスを作成
以下の通りに Express のルーティングを管理するクラスを作成
server/managers/api.manager.tsimport { Express, Request, Response, NextFunction } from 'express'; import { apiRoutes } from '../constants/api-routes.constant'; import { HttpMethod } from '../constants/http-method.constant'; /** API 管理クラス */ export class ApiManager { /** 各 API ルータを束ねたミドルウェアを生成 */ public serve(api: Express) { for (const route of apiRoutes) { if (route.method === HttpMethod.GET) { api.get(route.path, this.proccess(route.proccess)); } else if (route.method === HttpMethod.POST) { api.post(route.path, this.proccess(route.proccess)); } else if (route.method === HttpMethod.PUT) { api.put(route.path, this.proccess(route.proccess)); } else if (route.method === HttpMethod.DELETE) { api.delete(route.path, this.proccess(route.proccess)); } } } /** API コントローラ呼出 */ private proccess(controller: (requestData: any, requestParams: any) => Promise<any>) { return async (apiReq: Request, apiRes: Response, next: NextFunction) => { const httpMethod = apiReq.method; const params = apiReq.params; const request = (httpMethod === HttpMethod.GET || httpMethod === HttpMethod.DELETE) ? apiReq.query : apiReq.body; try { const response = await controller(request, params); apiRes.status(200).send(response); } catch (error) { apiRes.status(500).send(error); } }; } }Web サーバ作成
server/web-server.ts// 以下の2インポートは最初に呼ばれる必要がある import 'zone.js/dist/zone-node'; import 'reflect-metadata'; import * as express from 'express'; import * as bodyParser from 'body-parser'; import { join } from 'path'; import { ngExpressEngine } from '@nguniversal/express-engine'; import { provideModuleMap } from '@nguniversal/module-map-ngfactory-loader'; import { ApiManager } from './managers/api.manager'; const webServer = express(); const PORT = process.env.PORT || 3000; const CLIENT_DIST_PATH = join(process.cwd(), 'dist/demo-app'); // TODO: パスをアプリ名に合わせる // 動的に生成される dist ファイルため、require() のままにしておく const { AppServerModuleNgFactory, LAZY_MODULE_MAP } = require(join(process.cwd(), 'dist/demo-app-server/main')); // TODO: パスをアプリ名に合わせる // テンプレートファイル名で拡張子が省略された場合のデフォルト拡張子を設定 webServer.set('view engine', 'html'); // テンプレートファイルを置くパスを設定 webServer.set('views', CLIENT_DIST_PATH); // レンダリングに利用するテンプレートエンジンに Angular Express エンジン を登録 webServer.engine('html', ngExpressEngine({ bootstrap: AppServerModuleNgFactory, providers: [ provideModuleMap(LAZY_MODULE_MAP) ] })); // サーバサイドレンダリングされる静的ファイル webServer.get('*.*', express.static(CLIENT_DIST_PATH)); // HTTP ボディ JSON 送信対応 webServer.use(bodyParser.urlencoded({ extended: true })); webServer.use(bodyParser.json({ limit: '100kb' })); // Limit オプションでリクエストボディサイズ設定 (デフォルト: 100KB) // API ルーティング提供 new ApiManager().serve(webServer); // テンプレート SSR: 全ての通常ルートは Universal エンジンを使用 webServer.get('*', (req, res) => res.render('index', { req, res })); // Node サーバ開始 webServer.listen(PORT, () => { console.log(`Node server is listening - http://localhost:${PORT}`); });
demo-appの部分は、必要に応じて各自のアプリ名に書き換えてください。起動
起動スクリプト修正
以下のとおりに、package.json のスクリプトを修正
package.json: "scripts": { "dev": "ng serve", "start": "node ./dist/server/web-server.js", "start:npx": "npx node-static ./dist/demo-app --spa --port=3000", // 基本使わないけど入れておく "build": "npm run build:client && npm run build:server", "build:client": "ng run demo-app:app-shell:production", "build:clientsub": "ng build && ng run demo-app:server", // 基本使わないけど入れておく "build:server": "tsc --project server --outDir dist --allowjs true", "test": "ng test", "lint": "ng lint", "e2e": "ng e2e" }, :確認
以下のコマンドでビルド、アプリ起動
# ビルド
npm run build

# 起動
npm run start
- ブラウザで
http://localhost:3000にアクセスし、画面位表示されたボタンをクリック- ブラウザコンソール、ターミナルコンソールに、それぞれ、クライアントとサーバの標準出力がなされればOK.
- ビルド完了後、以下のディレクトリと中身がルートディレクトリ配下に生成されていればOK.
- dist/common(クラサバ共用ファイル群)
- dist/demo-app(クライアントのソースコード)
- dist/demo-app-server(Universal 対応で作ったやつ)
- dist/server(Express および API ロジック用ファイル群)
この後の手順
サーバサイド作らないと動作確認できないので、サーバサイドを作る。
- 投稿日:2019-02-09T20:41:40+09:00
Angular7 で俺式 MEAN スタック Webアプリを構築する、ほぼ全手順(2)
概要
Angular7 で俺式 MEAN スタックを作るための備忘録。
今回は「クライアント側のクラサバ通信対応」を行う。前提
2019年1月1日時点の情報です。また、以下の環境になっている前提です。
- Angular CLI: 7.0.6
- Node.js: 10.15.0
- npm: 6.4.1
また、「Angular7 で俺式 MEAN スタック Webアプリを構築する、ほぼ全手順(1)」が完了していること。
クラサバ共用部の作成
クライアントとサーバでデータ形式を一致させるために、インターフェース統一用の定義ファイルを格納する領域を作る。ついでに共用する定数などがあれば、それもこちらに用意することにする。
ディレクトリを作成
以下の通りに、新規ディレクトリを src/app 配下に作成しておく
[ルートディレクトリ]
  :
  ├─ common # 新規作成
  │   ├─ apis
  │   │  └─ sample
  │   │      └─ sample.api.ts
  │   ├─ entities
  │   │  └─ sample
  :   │      └─ sample.entity.ts
  :   └─ tsconfig.json
tsconfig ファイル作成
以下のとおりに中身を作成する
common/tsconfig.json{ "extends": "../tsconfig" }インターフェースを作成
独自クラスを以下の通りに作成
common/entities/sample/sample.entity.ts/** サンプル クラス */ export class Sample { /** ID */ id: number; /** 氏名 */ name: string; /** 年齢 */ age: number; }API インターフェースを以下の通りに作成
common/apis/sample/sample.api.tsimport { Sample } from '../../entities/sample/sample.entity'; export const SAMPLE_API_PATH = '/api/sample'; /** サンプル パスパラメータ */ export interface ISamplePathParams { /** ID */ id: number; } /** サンプル リクエスト */ export interface ISampleRequest { /** 氏名(サンプル) */ name: string; /** 年齢(サンプル) */ age: number; } /** サンプル レスポンス */ export interface ISampleResponse { users: Sample[]; }クライアント側を作成
サーバ API を呼び出すサービスを作っていく。
ディレクトリを作成
以下の通りに、新規ディレクトリを src/app 配下に作成しておく
[ルートディレクトリ]
  ├─ browser
  │   └─ app # 既存
  :      :
  :      └─ services # 新規作成: サービス用
             └─ sample # 新規作成: サンプル個別サービス用
既存の tsconfig ファイル修正
browser/tsconfig.app.json の中身を以下の通りにする。
common ディレクトリの各ファイルを import 時に、
../の多用を防ぐためにエイリアスを設定しておく。browser/tsconfig.app.json{ "extends": "../tsconfig.json", "compilerOptions": { "baseUrl": "./", // 追加 "outDir": "../out-tsc/app", "types": [], // 追加 "paths": { "common/*": ["../common/*"] }, }, "exclude": [ "test.ts", "**/*.spec.ts" ] }サービスクラスのファイルを生成
# 移動
cd browser/app/services

# HTTP 基底サービス生成
ng generate s http

# さらに移動
cd sample

# 画面用の専用サービス生成
ng generate s sample
終わったら、
cd ../../../..で元のディレクトリ位置に戻っておく。HTTP 基底サービス作成
HTTP 通信を実際に担う部分を、以下のとおりに作成。
browser/app/services/http.service.tsimport { Injectable } from '@angular/core'; import { HttpClient, HttpHeaders, HttpParams, HttpResponse, HttpErrorResponse } from '@angular/common/http'; @Injectable({ providedIn: 'root' }) export class HttpService { constructor(protected http: HttpClient) { } public async get<Req, Res>(apiPath: string, request?: Req): Promise<HttpResponse<Res>> { return await this.send<Req, Res>('GET', apiPath, request); } public async post<Req, Res>(apiPath: string, request?: Req): Promise<HttpResponse<Res>> { return await this.send<Req, Res>('POST', apiPath, request); } public async put<Req, Res>(apiPath: string, request?: Req): Promise<HttpResponse<Res>> { return await this.send<Req, Res>('PUT', apiPath, request); } public async delete<Req, Res>(apiPath: string, request?: Req): Promise<HttpResponse<Res>> { return await this.send<Req, Res>('DELETE', apiPath, request); } /** HTTP通信 実行 */ private async send<Req, Res>(method: 'GET'|'POST'|'PUT'|'DELETE', path: string, request?: Req): Promise<HttpResponse<Res>> { try { const url = window.location.origin + path; console.log('[HttpService - url] ', url); // GET, PUT の場合 クエリパラメータ生成 (exppress の query にセットされる) let httpParams: HttpParams = new HttpParams(); if ((method === 'GET' || method === 'DELETE') && request) { for (const requestKey of Object.keys(request)) { if (request[requestKey]) { httpParams = httpParams.append(requestKey, request[requestKey]); } } } const response = await this.http.request<Res>(method, url, { headers: new HttpHeaders({ 'Content-Type': 'application/json' }), responseType: 'json', params: httpParams, body: request }).toPromise(); console.log('[HttpService - response] ', response); return { ok: true, status: 200, body: response } as HttpResponse<Res>; } catch (error) { console.log('[HttpService - error] ', error); if (error instanceof HttpErrorResponse) { return { ok: false, status: error.status, body: undefined } as HttpResponse<Res>; } else { return { ok: false, body: undefined } as HttpResponse<Res>; } } } }サンプルサービス作成
browser/app/services/sample/sample.service.tsimport { Injectable } from '@angular/core'; import { HttpClient } from '@angular/common/http'; import { SAMPLE_API_PATH, ISampleRequest, ISampleResponse } from 'common/apis/sample/sample.api'; import { Sample } from 'common/entities/sample/sample.entity'; import { HttpService } from '../http.service'; @Injectable({ providedIn: 'root' }) export class SampleService extends HttpService { constructor(protected http: HttpClient) { super(http); } public async testGet(request: ISampleRequest, id?: number): Promise<{result: boolean, users: Sample[]}> { let apiPath = SAMPLE_API_PATH; if (id) { apiPath += `/${id}`; } const response = await this.get<ISampleRequest, ISampleResponse>(apiPath, request); return { result: response.ok, users: response.body.users }; } public async testPost(request: ISampleRequest): Promise<{result: boolean}> { const apiPath = SAMPLE_API_PATH; const response = await this.post<ISampleRequest, ISampleResponse>(apiPath, request); return { result: response.ok }; } public async testPut(request: ISampleRequest, id: number): Promise<{result: boolean}> { const apiPath = SAMPLE_API_PATH + `/${id}`; const response = await this.put<ISampleRequest, ISampleResponse>(apiPath, request); return { result: response.ok }; } public async testDelete(id: number): Promise<{result: boolean}> { const apiPath = SAMPLE_API_PATH + `/${id}`; const response = await this.delete<any, ISampleResponse>(apiPath, undefined); return { result: response.ok }; } }モジュールに HTTP 通信用モジュールを追加
HTTP 通信を行うために必要なモジュールをインポート。
これをしないとロジック作ってもエラーで動かない。src/app/app.module.ts: import { HttpClientModule } from '@angular/common/http'; // 追加 : @NgModule({ : imports: [ : HttpClientModule, // 追加 ], : }) export class AppModule { }コンポーネント修正
TS ファイルを以下のとおりに追加。
(サービス呼び出し処理追加、およびsampleListの型を修正)browser/app/components/home/home.component.tsimport { Component, OnInit } from '@angular/core'; import { Sample } from 'common/entities/sample/sample.entity'; import { SampleService } from '../../services/sample/sample.service'; @Component({ selector: 'app-home', templateUrl: './home.component.html', styleUrls: ['./home.component.scss'] }) export class HomeComponent implements OnInit { id: number; name: string; age: number; // エラーメッセージ message: string; sampleList: Sample[] = []; constructor(private service: SampleService) { } ngOnInit() { } test() { // エラーメッセージ初期化 this.message = ''; // 入力判定 および 表示処理 if (this.id && this.name && this.age) { this.sampleList.push({ id: this.id, name: this.name, age: this.age }); } else { this.message = '未入力の項目があります。必ず全て入力してください'; } } // 表示リストをリセット resetList() { this.sampleList = []; } async searchUsers() { // エラーメッセージ初期化 this.message = ''; // 通信実施 const response = await this.service.testGet({ name: this.name, age: this.age }, this.id); if (response.result) { // 通信が成功した場合 this.sampleList = response.users; } else { // 処理が失敗した場合 this.message = 'エラーが発生しました'; } } async createUser() { // エラーメッセージ初期化 this.message = ''; // 入力判定 および 作成処理 if (this.name && this.age) { // 通信実施 const response = await this.service.testPost({ name: this.name, age: this.age }); if (response.result) { // 通信が成功した場合、一覧再取得 await this.searchUsers(); } else { // 処理が失敗した場合 this.message = 'エラーが発生しました'; } } else { this.message = '「ID」以外の項目は、全て入力してください'; } } async updateUser() { // エラーメッセージ初期化 this.message = ''; // 入力判定 および 更新処理 if (this.id) { // 通信実施 const response = await this.service.testPut({ name: this.name, age: this.age }, this.id); if (response.result) { // 通信が成功した場合、一覧再取得 await this.searchUsers(); } else { // 処理が失敗した場合 this.message = 'エラーが発生しました'; } } else { this.message = '「ID」の項目は、必ず入力してください'; } } async deleteUser() { // エラーメッセージ初期化 this.message = ''; // 入力判定 および 更新処理 if (this.id) { // 通信実施 const response = await this.service.testDelete(this.id); if (response.result) { // 通信が成功した場合、一覧再取得 await this.searchUsers(); } else { // 処理が失敗した場合 this.message = 'エラーが発生しました'; } } else { this.message = '削除する「ID」を入力してください'; } } }HTML を以下のとおりに修正(検索ボタン追加)
browser/app/components/home/home.component.html<div class="home"> <h2>ホーム画面</h2> <!-- <a [routerLink]="'/home2'">go to home2</a> --> <!-- エラーメッセージ --> <p *ngIf="message" class="error-message">{{ message }}</p> <!-- 入力エリア --> <div class="condition"> <label>ユーザID</label> <input type="number" [(ngModel)]="id"> <label>名前</label> <input type="text" [(ngModel)]="name"> <label>年齢</label> <input type="number" [(ngModel)]="age"> <button (click)="test()">表示追加</button> <button (click)="searchUsers()">検索</button> <button (click)="createUser()">登録</button> <button (click)="updateUser()">更新</button> <button (click)="deleteUser()">削除</button> <button (click)="resetList()">リセット</button> </div> <!-- 一覧表示エリア --> <table> <thead> <tr> <th>ID</th><th>名前</th><th>年齢</th> </tr> </thead> <tbody> <tr *ngFor="let element of sampleList"> <td>{{ element.id }}</td><td>{{ element.name }}</td><td>{{ element.age }}歳</td> </tr> </tbody> </table> </div>この後の手順
サーバサイド作らないと動作確認できないので、サーバサイドを作る。
- 投稿日:2019-02-09T20:39:23+09:00
Angular7 で俺式 MEAN スタック Webアプリを構築する、ほぼ全手順(1)
概要
Angular7 で俺式 MEAN スタックを作るための備忘録。
今回は「クライアント側のベース生成」を行う。前提
2019年1月1日時点の情報です。また、以下の環境になっている前提です。
- Angular CLI: 7.0.6
- Node.js: 10.15.0
- npm: 6.4.1
また、 「ルート(root)」「ルート(route)」「ディレクトリ」「コンポーネント」「ビルド」「スクリプト」などの言葉の概念が何となくわかることが前提です。
知らない場合は、事前に軽く言葉の意味を検索しておいてください。
(わからなくても、記載の通りやっていけばアプリはできます)事前準備
「npm コマンドで Angular CLI のインストール、バージョンアップする方法(まとめ)」などを参考に環境は整えておいてください。
ngコマンドやnpmコマンドができる前提で書いていきます。Angular アプリ初期生成
フロント側のベースを構築する。
Angular CLI でアプリ自動生成
まず、以下のコマンドを実行。
スタイルは SCSS で生成する(嫌だったらオプション抜けば選択できる)# ng new 任意のアプリ名 ng new demo-app --routing=true --style=scss※ 以降、各コマンドで「アプリ名」を使用するので必ず、コマンド実行時に統一して読み替えていくこと。
※ 生成されたルートディレクトリの名前は変更しても大丈夫
※ もし、Git クローンした空のプロジェクト内で、今回の生成コマンドを行う場合は、Angular CLI で生成されたプロジェクト名のディレクトリ配下のファイルを、Git クローンディレクトリ直下に、node_modulesとREADME.md以外は全て移動/コピーする。その後に、要らなくなったディレクトリを消し、もう一度npm installを実行すること。脆弱性が指摘された場合は都度直す
package.jsonがあるディレクトリ階層# 脆弱性に対する対応コマンド npm audit fixこのコマンドは、npm インストールする度に、ほぼ毎回やる事になるので、都度求められると思っておいてください。
PWA対応にする
以下の PWA 対応コマンドで、ServiceWorker が入る。
# ng add @angular/pwa --project=アプリ名
ng add @angular/pwa --project=demo-app
ngsw-config.json, manifest.json 等が増える。
PWA 対応にすると ServiceWorker の機能でブラウザに色々とキャッシュしちゃうので、それが、煩わしい場合はアプリ起動する前に PWA 機能の関連箇所(src/app/app.module.tsなど)をコメントアウトしても良い。
(※ なんでキャッシュしちゃうのかは ServiceWorker について調べてください)Universal にする
# ng g universal --client-project=アプリ名
ng g universal --client-project=demo-app
angular.json に
serverというプロパティが増える。AppShell 追加
# ng g app-shell --client-project=アプリ名 --universal-project=アプリ名
ng g app-shell --client-project=demo-app --universal-project=demo-app
アプリシェルのソースコードが生成される。
(※ アプリシェルって何なのかは調べてください)Angular Material 導入 (省略可)
Angular 用のマテリアルデザイン を導入。
Web アプリをマテリアルデザインにしない場合は、この手順はスキップして良い。実際の導入手順は「こちらのQiita記事」を参照して実施してください。
クライアントサイドのベース作成
ディレクトリを作成
以下の通りに、新規ディレクトリを src/app 配下に作成しておく
[ルートディレクトリ]
  ├─ src
  │  └─ app
  │      ├─ app-shell # 既存
  :      ├─ components # 新規作成: コンポーネント用
  :      :
適当なコンポーネントを新規作成
適当な画面レベルのコンポーネントを作っておく。
今回は Home というホーム画面用コンポーネントを用意。# src/app/components ディレクトリに移動 cd src/app/components # コンポーネント生成 (モジュールが2つあるのでスキップオプションを付けないとエラーになるかも) ng generate c home --skip-import終わったら、
cd ../../..で元のディレクトリ位置に戻っておく。ホーム画面コンポーネント修正
出来上がったコンポーネントを以下のとおりに修正。
画面にテスト用ボタンと押下処理を追加する。まず TypeScript を修正
src/app/components/home/home.component.tsimport { Component, OnInit } from '@angular/core'; @Component({ selector: 'app-home', templateUrl: './home.component.html', styleUrls: ['./home.component.scss'] }) export class HomeComponent implements OnInit { id: number; name: string; age: number; // エラーメッセージ message: string; sampleList: { id: number, name: string, age: number }[] = []; constructor() { } ngOnInit() { } test() { // エラーメッセージ初期化 this.message = ''; // 入力判定 および 表示処理 if (this.id && this.name && this.age) { this.sampleList.push({ id: this.id, name: this.name, age: this.age }); } else { this.message = '未入力の項目があります。必ず全て入力してください'; } } // 表示リストをリセット resetList() { this.sampleList = []; } }次にHTMLを修正
src/app/components/home/home.component.html<div class="home"> <h2>ホーム画面</h2> <!--他のコンポーネントに遷移するときに使用 --> <!-- <a [routerLink]="'/home2'">go to home2</a> --> <!-- エラーメッセージ --> <p *ngIf="message" class="error-message">{{ message }}</p> <!-- 入力エリア --> <div class="condition"> <label>ユーザID</label> <input type="number" [(ngModel)]="id"> <label>名前</label> <input type="text" [(ngModel)]="name"> <label>年齢</label> <input type="number" [(ngModel)]="age"> <button (click)="test()">表示追加</button> <button (click)="resetList()">リセット</button> </div> <!-- 一覧表示エリア --> <table> <thead> <tr> <th>ID</th><th>名前</th><th>年齢</th> </tr> </thead> <tbody> <tr *ngFor="let element of sampleList"> <td>{{ element.id }}</td><td>{{ element.name }}</td><td>{{ element.age }}歳</td> </tr> </tbody> </table> </div>そして CSS に追記
src/app/components/home/home.component.scss.home { padding: 1rem } .error-message { color: red } .condition { margin: 2rem } .condition input { margin-right: 1rem } .condition button { margin-left: 1rem } table { width: 100%; margin: 3rem 0; } thead { color: white; background-color: #3f51b5; }モジュールに追加
ホーム画面のコンポーネントを有効化するためモジュールに登録する。
Angular でフォームを扱うために必要なモジュールも同時にインポートする。src/app/app.module.ts: import { FormsModule } from '@angular/forms'; // 追加 import { HomeComponent } from './components/home/home.component'; // 追加 @NgModule({ declarations: [ AppComponent, HomeComponent, // 追加 ], imports: [ : FormsModule, // 追加 ], : }) export class AppModule { }画面ルーティング追加
src/app/app-routing.module.tsimport { NgModule } from '@angular/core'; import { Routes, RouterModule } from '@angular/router'; import { HomeComponent } from './components/home/home.component'; const routes: Routes = [ { path: '', redirectTo: 'home', pathMatch: 'full' }, // 追加 { path: 'home', component: HomeComponent }, // 追加 ]; @NgModule({ imports: [RouterModule.forRoot(routes)], exports: [RouterModule] }) export class AppRoutingModule { }Universal 用のモジュールをインポートしておく
module-map-ngfactory-loader の型定義ファイルを念の為入れておく。
npm i -D @nguniversal/module-map-ngfactory-loaderモジュールに module-map-ngfactory-loader を追加
src/app/app.server.module.tsimport { NgModule } from '@angular/core'; import { ServerModule } from '@angular/platform-server'; import { ModuleMapLoaderModule } from '@nguniversal/module-map-ngfactory-loader'; // 追加 import { MatProgressSpinnerModule } from '@angular/material/progress-spinner'; import { AppModule } from './app.module'; import { AppComponent } from './app.component'; import { Routes, RouterModule } from '@angular/router'; import { AppShellComponent } from './app-shell/app-shell.component'; const routes: Routes = [ { path: 'shell', component: AppShellComponent }]; @NgModule({ imports: [ AppModule, ServerModule, ModuleMapLoaderModule, // 追加 RouterModule.forRoot(routes), MatProgressSpinnerModule ], bootstrap: [AppComponent], declarations: [AppShellComponent], }) export class AppServerModule {}アプリのビルド/起動コマンドを修正
package.json のスクリプト部分を以下の通りにする
package.json... "scripts": { "ng": "ng", "dev": "ng serve", "start": "npx node-static ./dist/demo-app --spa --port=3000", "build": "npm run build:client", "build:client": "ng run demo-app:app-shell:production", // ng run アプリ名:app-shell:production "build:clientsub": "ng build && ng run demo-app:server", "test": "ng test", "lint": "ng lint", "e2e": "ng e2e" }, ...受付ポート変更
ng serve実行時に受け付けるポートを念のため指定して合わせておく。angular.json
ポート設定を追記する。データ構造的には、
projects.プロジェクト名.architect.serveにのオプションにポート設定を追加するangular.json{ "$schema": "./node_modules/@angular/cli/lib/config/schema.json", "version": 1, "newProjectRoot": "projects", "projects": { "demo-app": { : "architect": { : "serve": { "builder": "@angular-devkit/build-angular:dev-server", "options": { "browserTarget": "demo-app:build", // カンマだけ追加 "port": 3000 // 1行追加 }, "configurations": { "production": { "browserTarget": "demo-app:build:production" } } }, : } }, :protractor.js
テスト時のURLのポート番号を変更する
e2e/protractor.js... baseUrl: 'http://localhost:3000', // 4200 から修正 ...いったん確認
# ビルド
npm run build

# ビルド終わったら、アプリ起動
npm run start
起動したら Web ブラウザから
http://localhost:3000にアクセス。表示確認できれば成功(停止はCtrl+C)アプリシェルが効いていれば、初期画面表示が遅い場合のみ、画面表示時に一瞬だけ AppShellComponent の内容が表示される。
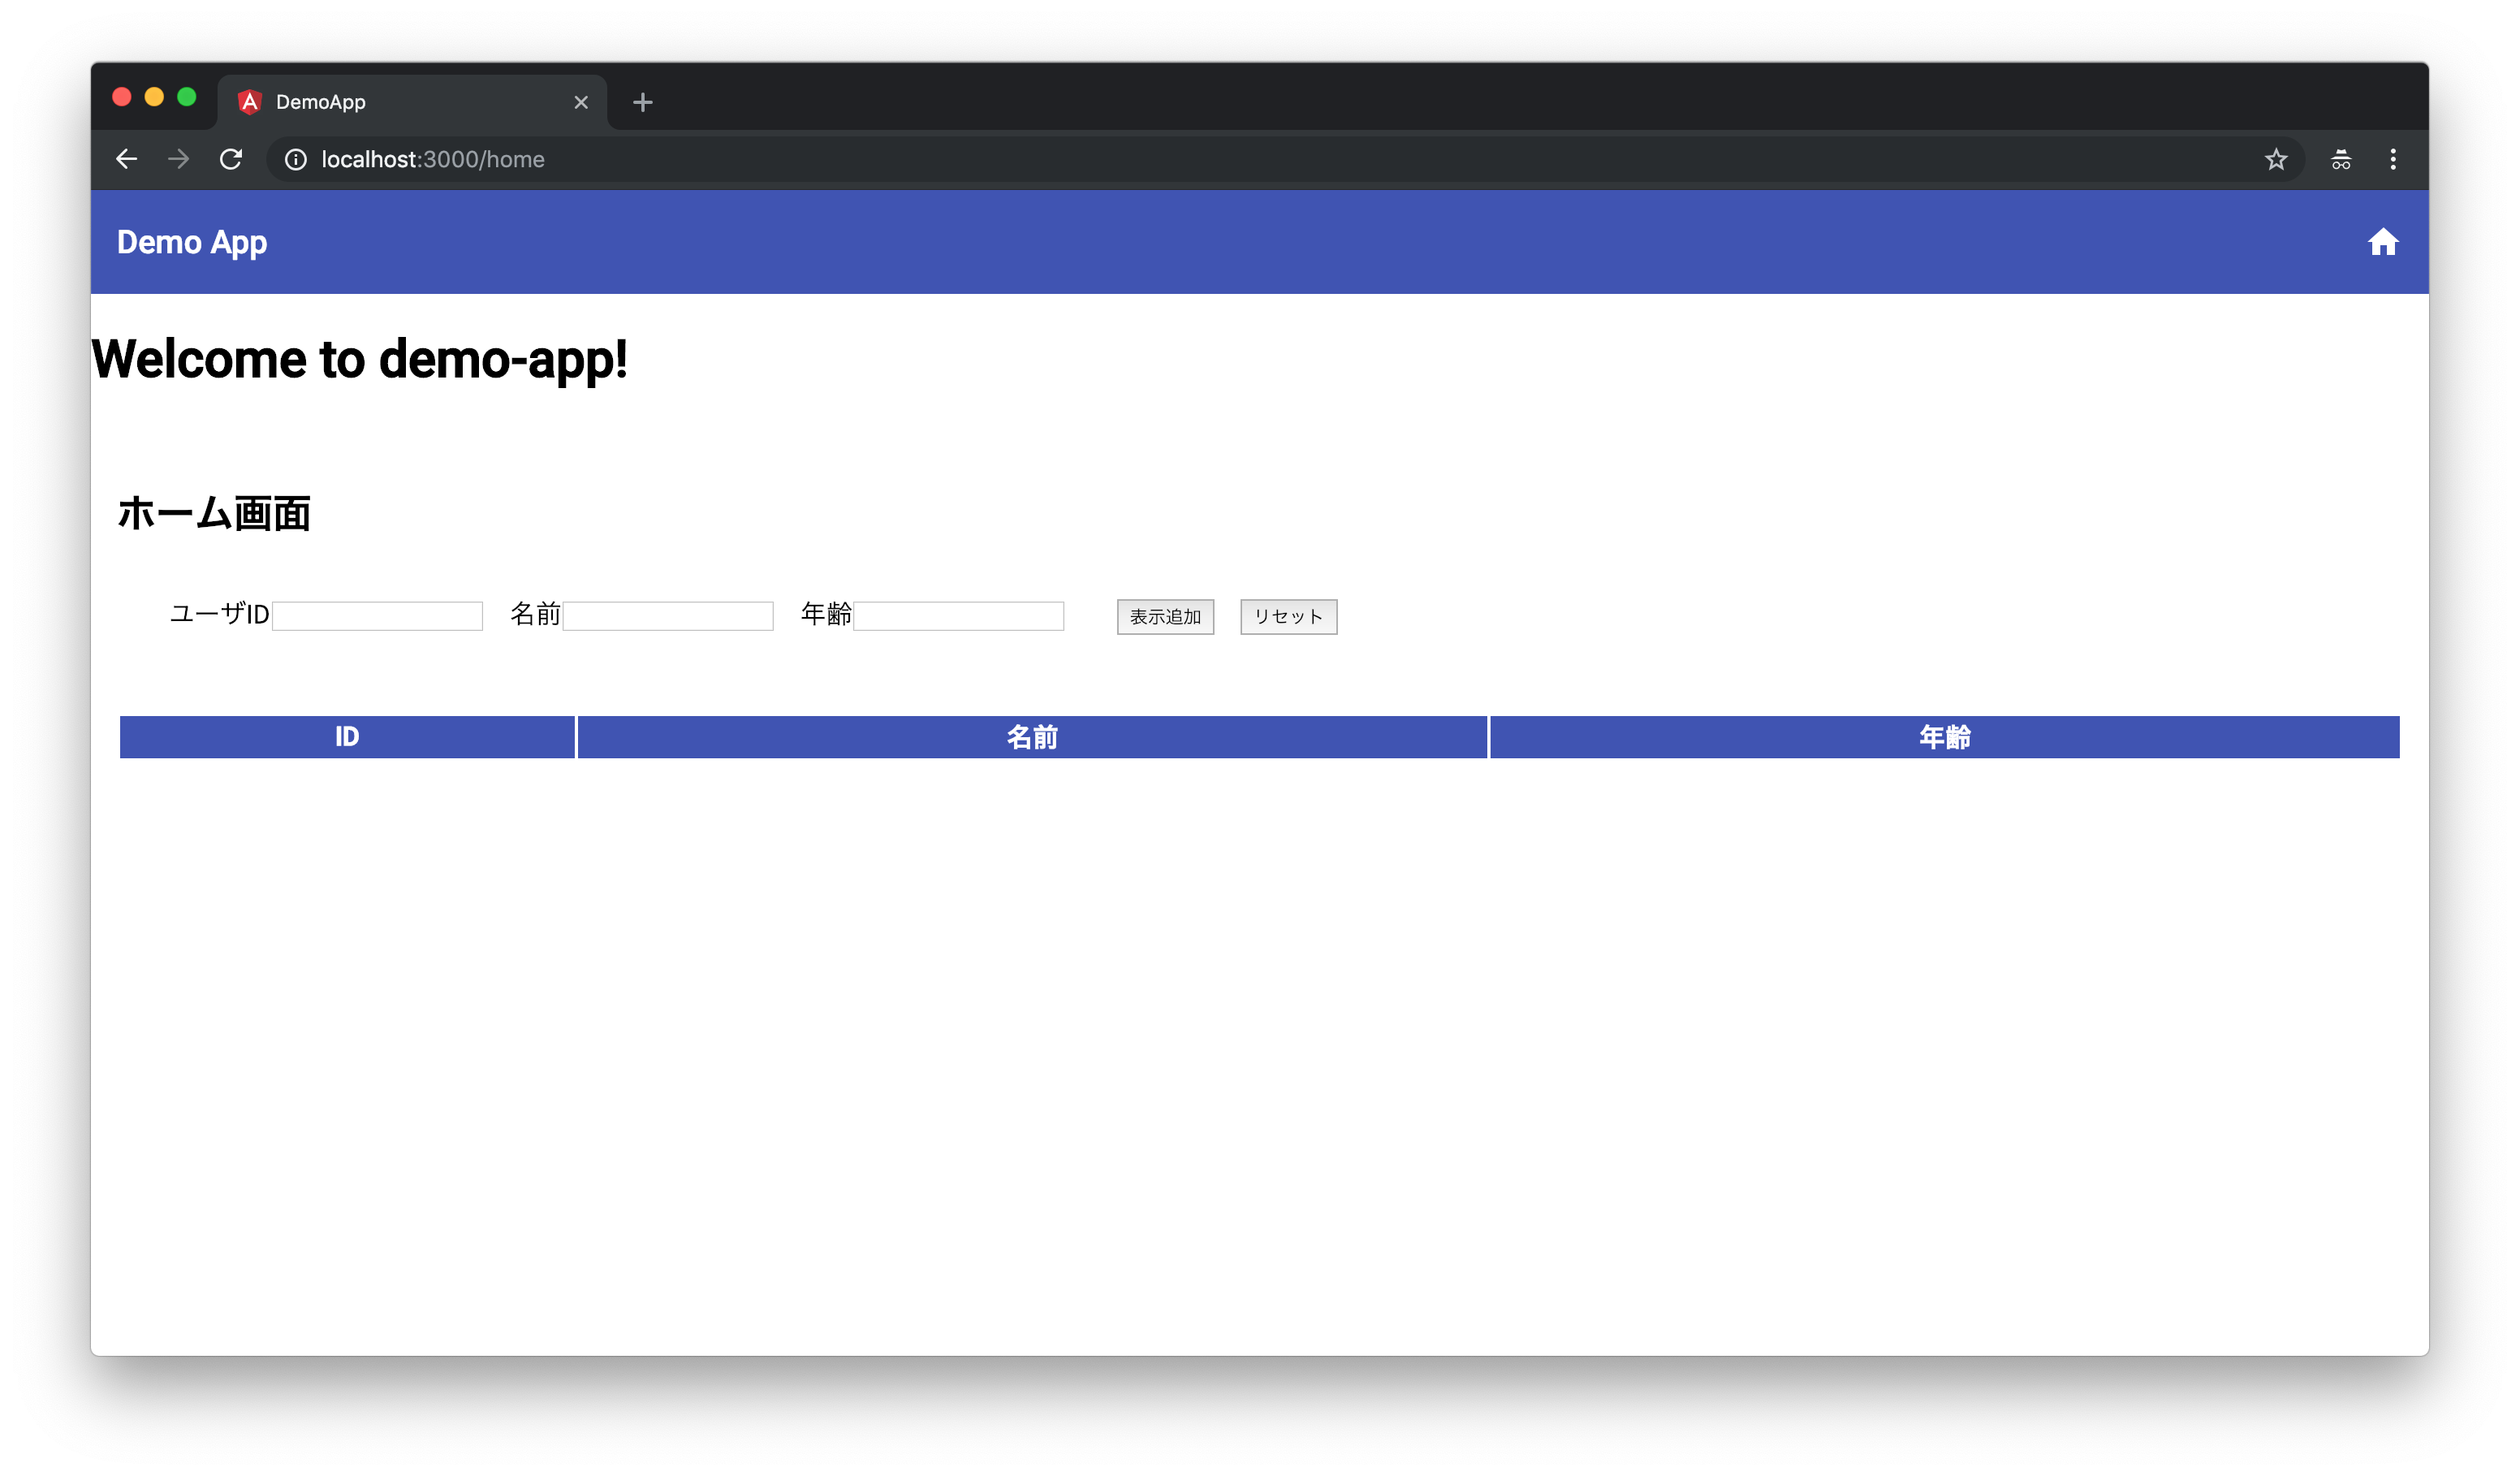
実際に表示される画面例
ブラウザでは初期表示でこんな画面になるはず。
※ 画像では Angular Material でマテリアルデザインをヘッダ部分に導入している
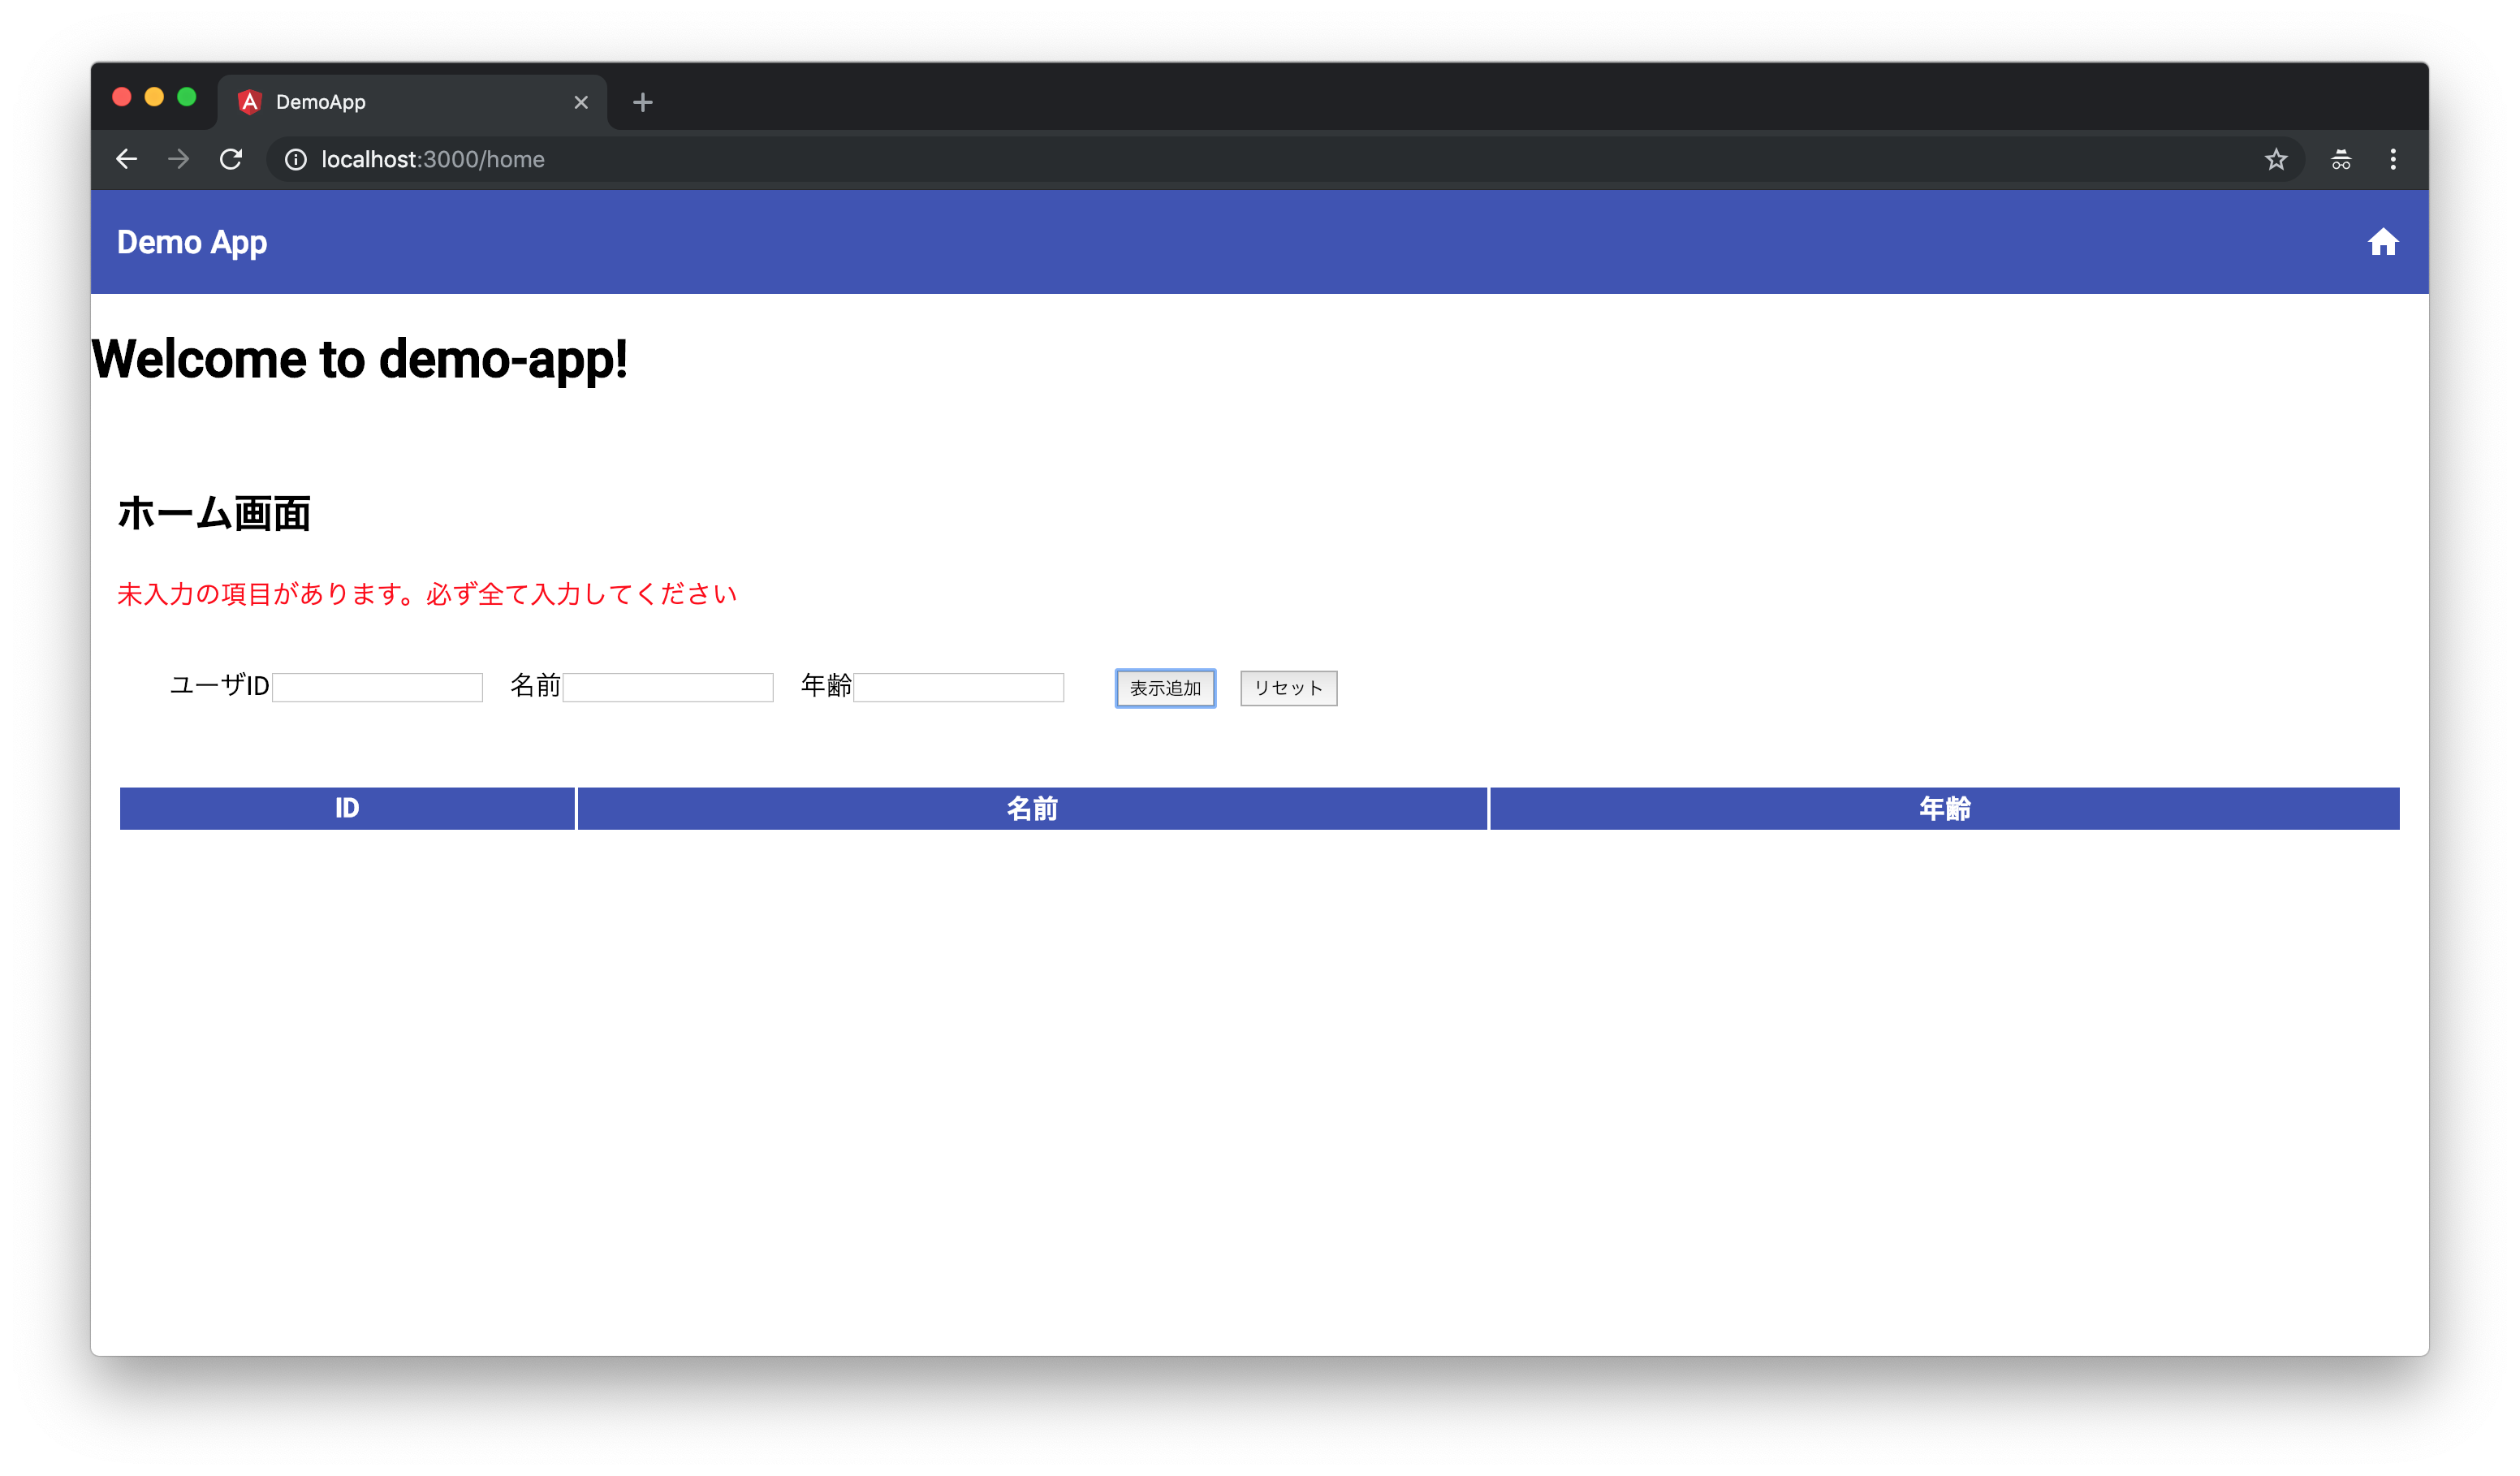
何も入力せずに「表示追加」ボタンを押したらこんな感じになるはず
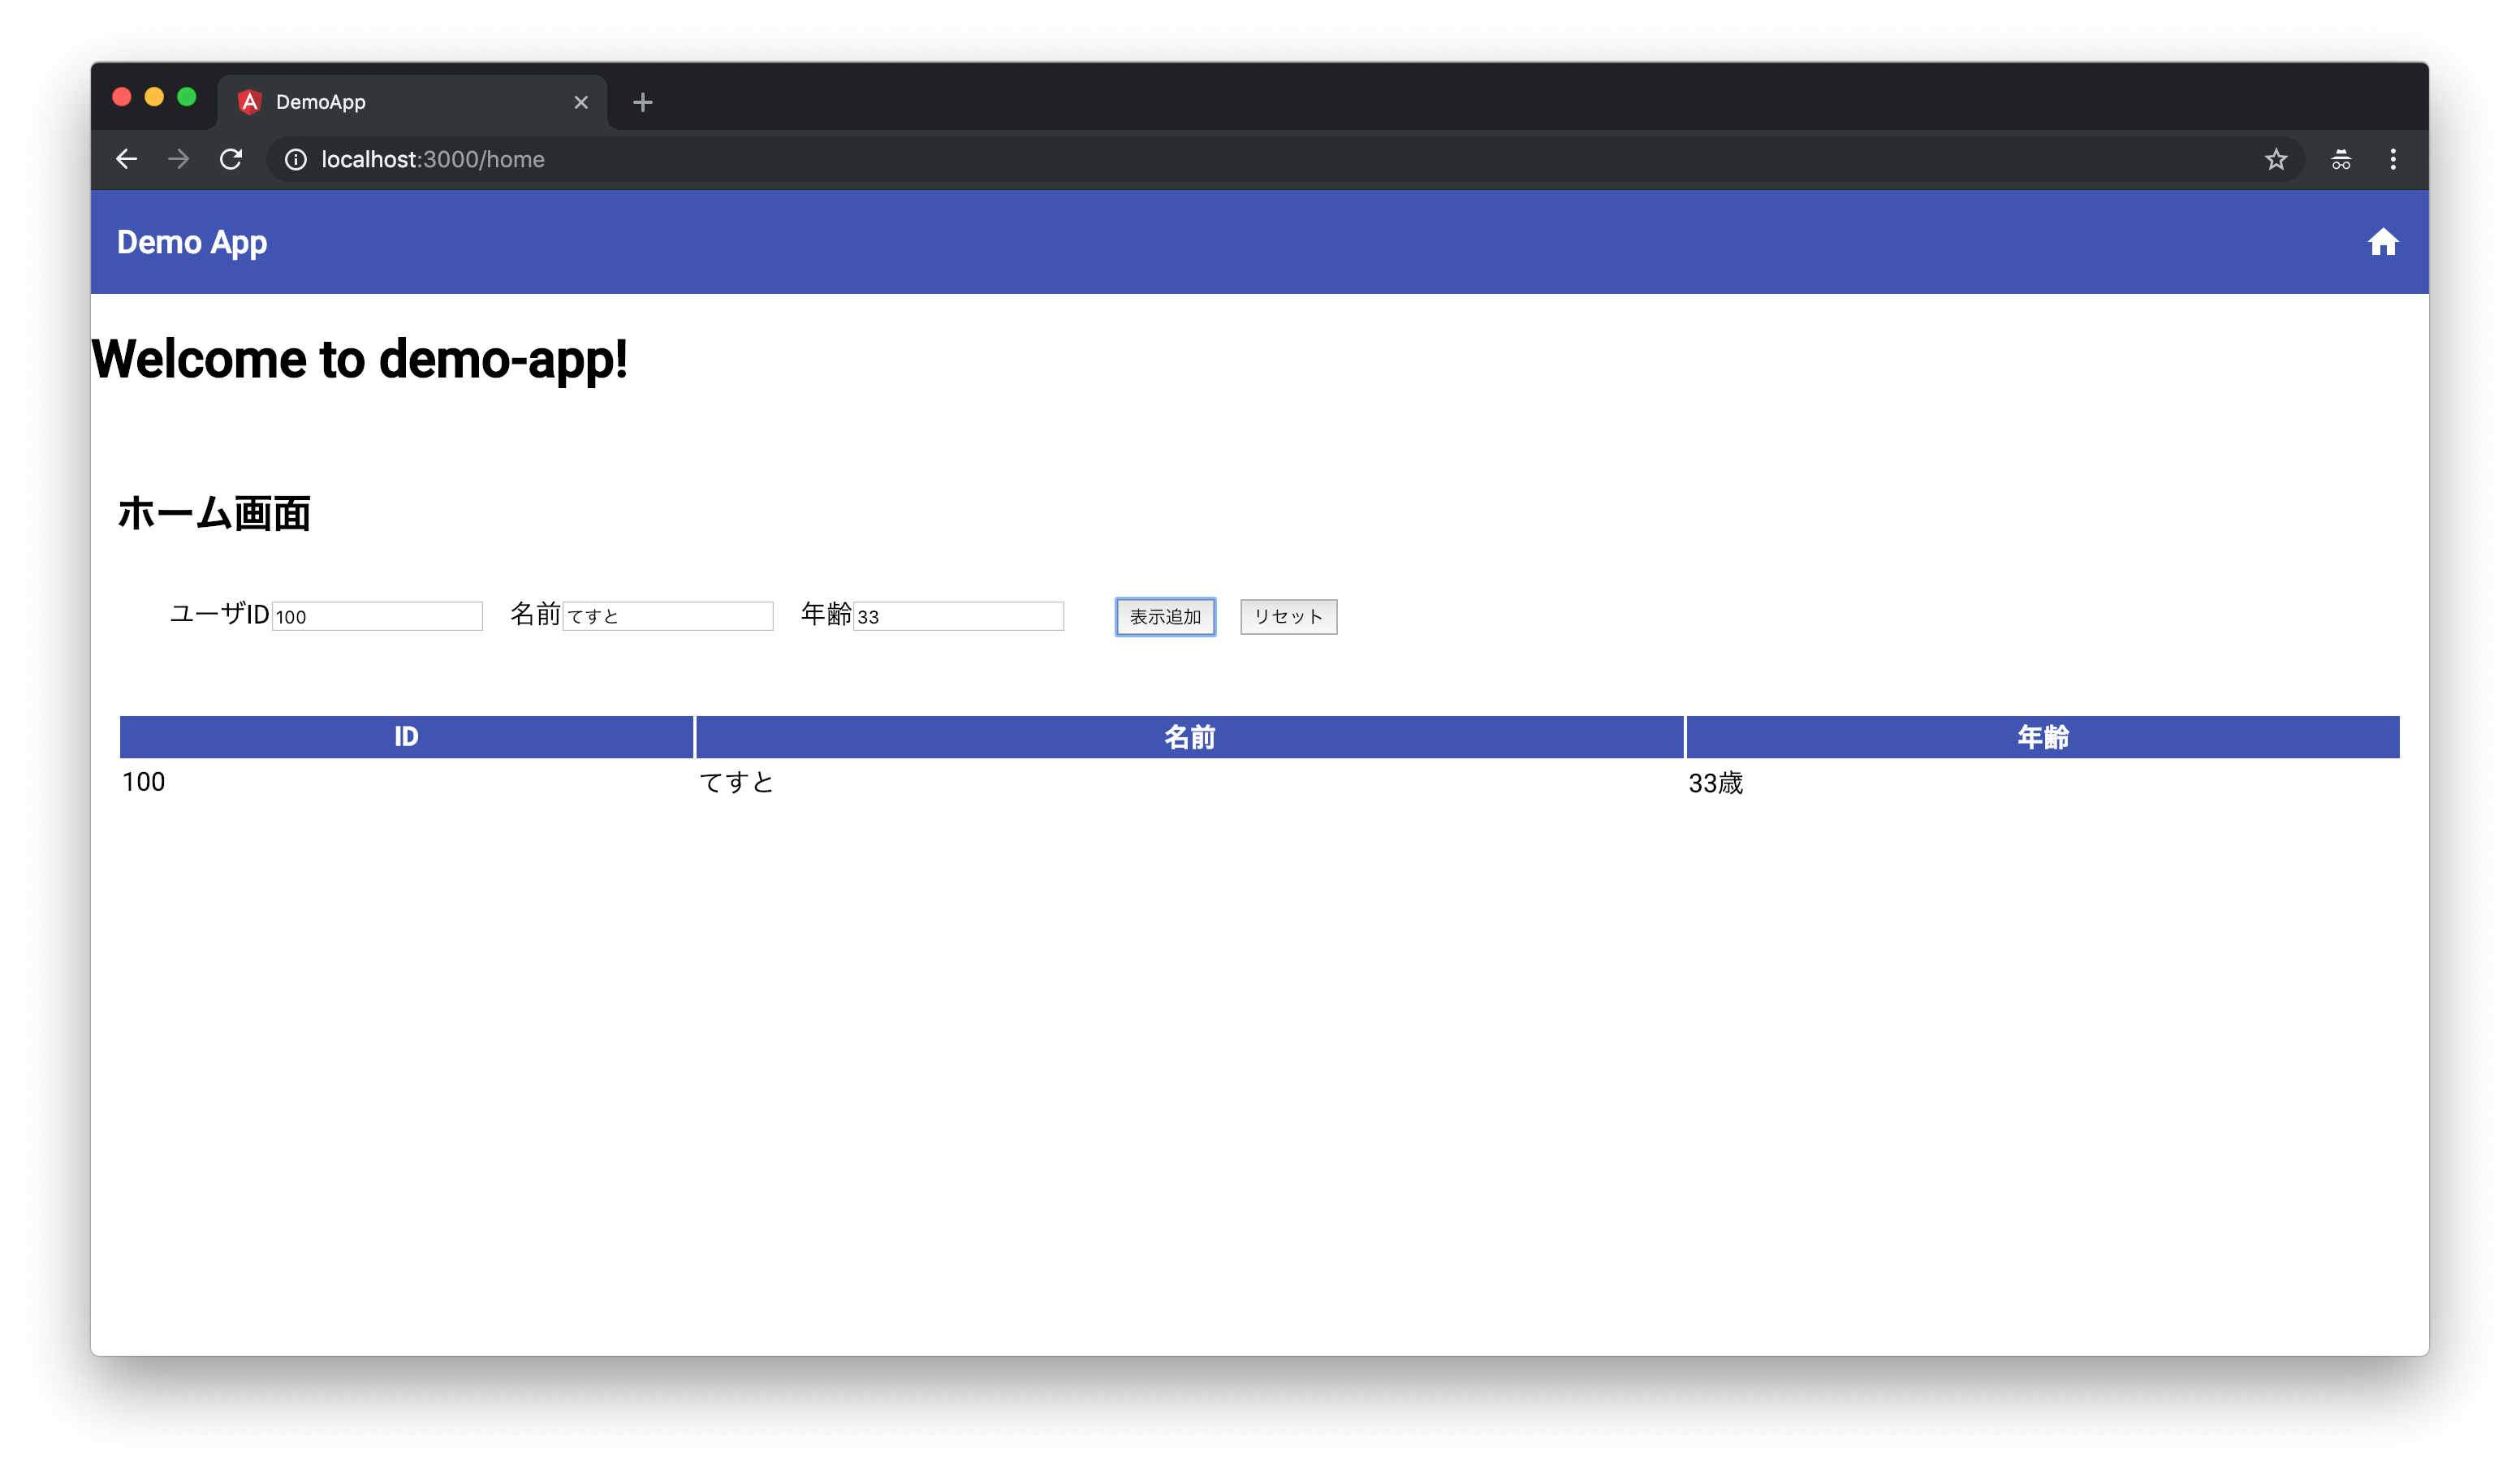
試しに入力欄を埋めて「表示追加」ボタンを押してみると、一覧に追加されるはず。(連打すればたくさん入る)
あとは、「リセット」ボタンを押したら全部消えるはず。
バックエンド導入準備
サーバサイドを作る前提で、クライアント側の関連ディレクトリ名をわかりやすい表記に変更しておく。
今回は「browser」というディレクトリに変更する。src ディレクトリ名修正
クライアントのディレクトリ名を
src→browserに変更するangular.json 修正
angular.json ファイル内で
src→browserに全置換する動作確認
# ビルド
npm run build

# ビルド終わったら、アプリ起動
npm run start
問題なく動いていればOK。