- 投稿日:2019-02-09T23:42:14+09:00
ViewPager2をGroupieと組み合わせて使ってみる
ViewPagerとViewPager2の違い
ViewPager ViewPager2 FragmentStatePagerAdapter FragmentStateAdapter PagerAdapter RecyclerView.Adapter addPageChangeListener registerOnPageChangeCallback 実装
ViewPager2は他の記事でもかなり取り上げられてるので今回は必要最低限の部分をDataBindingとGroupieと組み合わせて実装してみます。
build.gradleに以下を追記します。
build.gradleandroid { ... buildTypes { ... dataBinding.enabled = true } } ... dependencies { ... implementation 'androidx.viewpager2:viewpager2:1.0.0-alpha01' implementation 'com.xwray:groupie:2.3.0' implementation 'com.xwray:groupie-kotlin-android-extensions:2.3.0' implementation 'com.xwray:groupie-databinding:2.3.0' }レイアウトにViewPager2を追加します。
activity_main.xml<?xml version="1.0" encoding="utf-8"?> <layout xmlns:android="http://schemas.android.com/apk/res/android" xmlns:tools="http://schemas.android.com/tools" xmlns:app="http://schemas.android.com/apk/res-auto"> <androidx.constraintlayout.widget.ConstraintLayout android:layout_width="match_parent" android:layout_height="match_parent" tools:context=".MainActivity"> <androidx.viewpager2.widget.ViewPager2 android:layout_width="0dp" android:layout_height="0dp" android:id="@+id/view_pager2" android:orientation="horizontal" app:layout_constraintTop_toTopOf="parent" app:layout_constraintLeft_toLeftOf="parent" app:layout_constraintRight_toRightOf="parent" app:layout_constraintBottom_toBottomOf="parent"/> </androidx.constraintlayout.widget.ConstraintLayout> </layout>次にViewPagerで表示させたいLayoutを作成します。
item_view_pager2.xml<?xml version="1.0" encoding="utf-8"?> <layout xmlns:android="http://schemas.android.com/apk/res/android" xmlns:tools="http://schemas.android.com/tools" xmlns:app="http://schemas.android.com/apk/res-auto"> <androidx.constraintlayout.widget.ConstraintLayout android:layout_width="match_parent" android:layout_height="match_parent"> <TextView android:layout_width="match_parent" android:layout_height="wrap_content" android:id="@+id/text" tools:text="viewpager" app:layout_constraintTop_toTopOf="parent" app:layout_constraintLeft_toLeftOf="parent" app:layout_constraintRight_toRightOf="parent" app:layout_constraintBottom_toBottomOf="parent" android:textAlignment="center"/> </androidx.constraintlayout.widget.ConstraintLayout> </layout>レイアウトができたらコードを書いていきます。
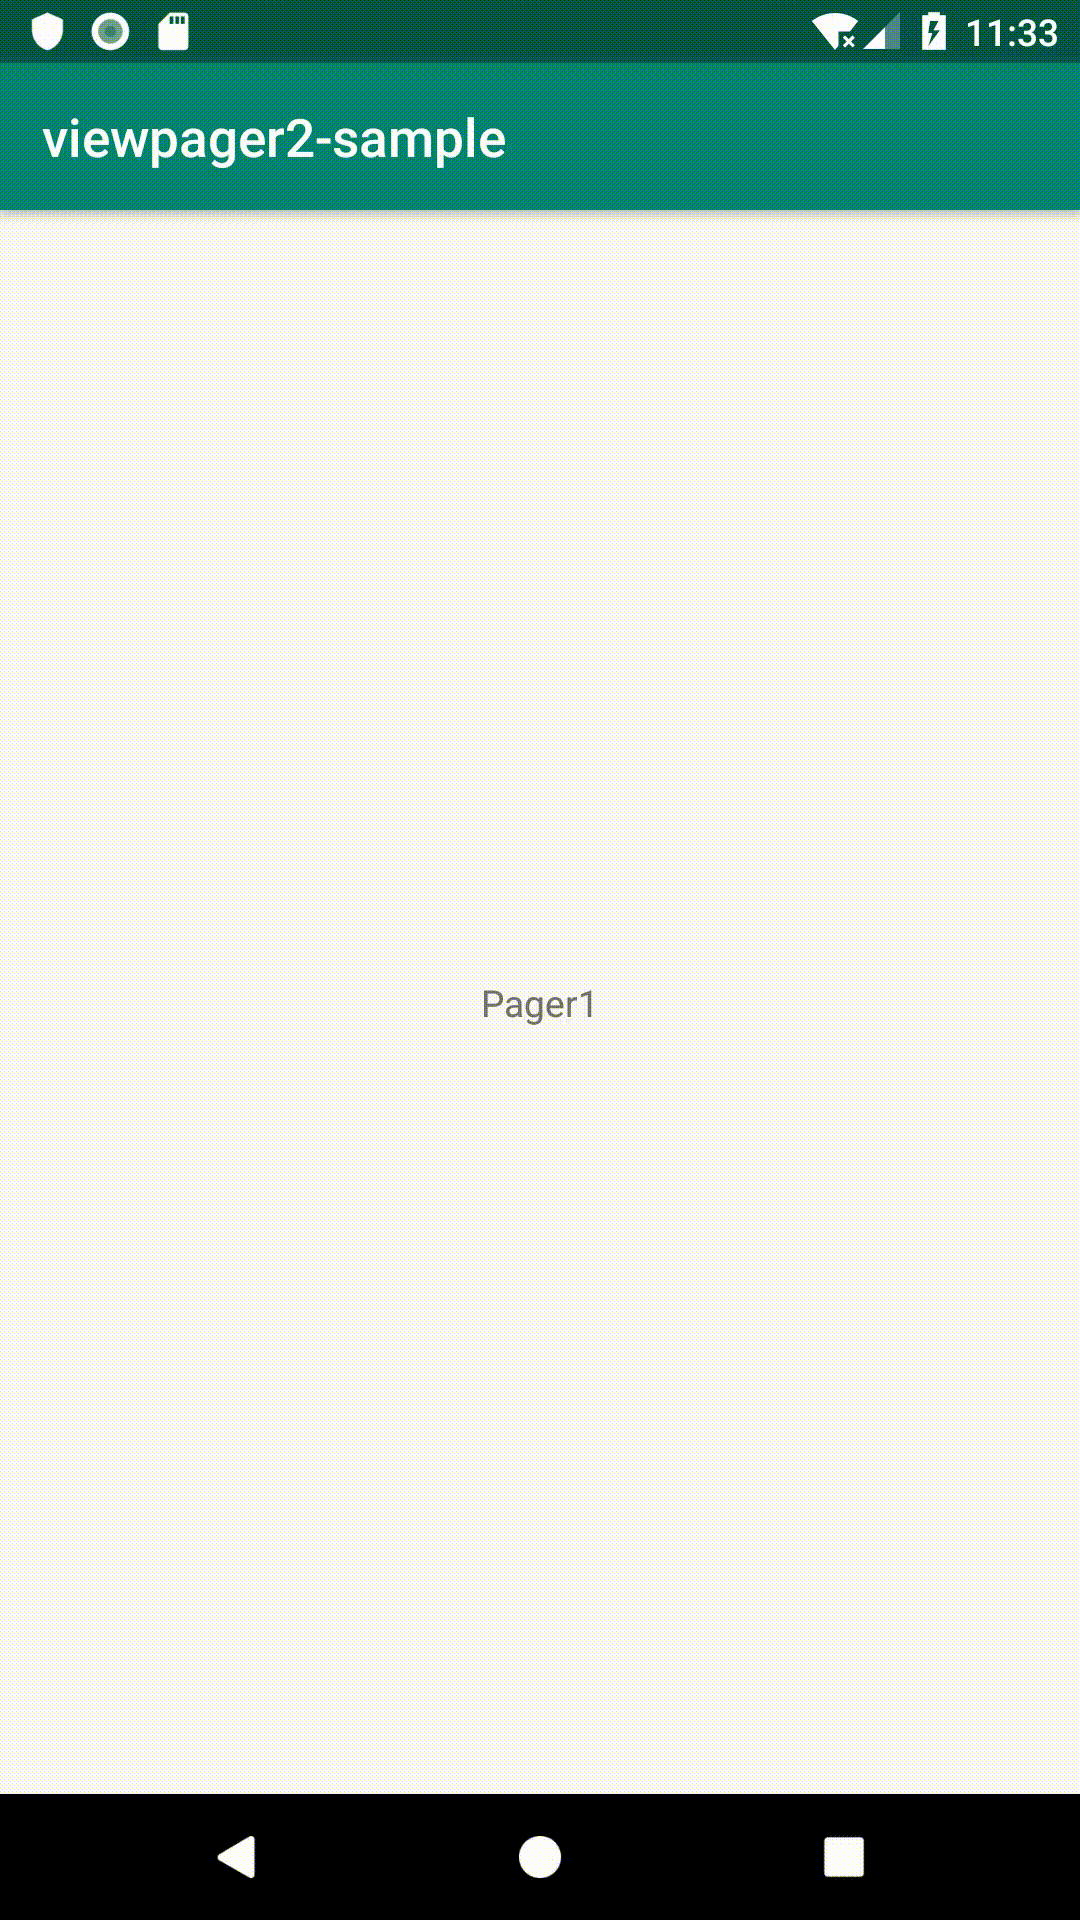
ViewPager2Item.ktclass ViewPager2Item(val text: String) : BindableItem<ItemViewPager2Binding>() { override fun getLayout(): Int = R.layout.item_view_pager2 override fun bind(viewBinding: ItemViewPager2Binding, position: Int) { viewBinding.text.text = text } }MainActivity.ktclass MainActivity : AppCompatActivity() { private lateinit var binding: ActivityMainBinding override fun onCreate(savedInstanceState: Bundle?) { super.onCreate(savedInstanceState) binding = DataBindingUtil.setContentView(this, R.layout.activity_main) val groupAdapter = GroupAdapter<ViewHolder>() val list = arrayListOf( ViewPager2Item("Pager1"), ViewPager2Item("pager2"), ViewPager2Item("Pager3") ) groupAdapter.update(list) binding.viewPager2.apply { adapter = groupAdapter } } }できたら実行してみましょう!
コードはgithubにあげています。
まとめ
RecyclerView的なノリでやってみましたが、正直こんな感じで良いのかわかりません。
もっとこうした方が良いなどの意見があればいただけるとありがたいです!
- 投稿日:2019-02-09T22:46:49+09:00
FlutterでPixelとかのアイコン(Adaptive Icon)に対応する
Flutterでアプリを作成中にアプリアイコンどうやって設定するのだろうと思いググると以下の記事を見つけた.
ありがたや...と思いながら実行してみると
よく見かける残念なアイコンになってしまった...そこで改めてライブラリの仕様を見てみると,普通にAdaptive Iconの項目がありました...
The next two attributes are only used when generating Android launcher icon
adaptive_icon_background: The color (E.g. "#ffffff") or image asset (E.g. "assets/images/christmas-background.png") which will be used to fill out the background of the adaptive icon.
adaptive_icon_foreground: The image asset which will be used for the icon foreground of the adaptive icon
なのでAdaptive Icon用の画像を追加し,pubspec.yamlを以下のように書き換え.
(※今回は面倒だったので背景色付きの画像を使ったけど,本来は分ける)pubspec.yamlflutter_icons: android: true ios: true image_path: "assets/icon/icon.png" adaptive_icon_foreground: "assets/icon/adaptive_icon.png" adaptive_icon_background: "#0EB39A"
無事対応できました.


- 投稿日:2019-02-09T18:43:00+09:00
僕たちはいつまでこんな楽しいAndroid Studio設定をし続けるのか? Android Studio 3.x時代の設定不足解消メモ
概要
本稿はAndroid Studio 2.x世代に開発したアプリをAndroid Studio 3.x世代でビルドするときに遭遇した事象と対策のメモです。
- Androidアプリを開発していると、頻繁に開発環境のアップデートがあります
- 開発環境をアップデートすると頻繁に古いプロジェクトがビルドできなくなります
(昔は通用したのに、今は通用しなくなる)ビルドの成否に影響を及ぼす要素
- Android Studioのバージョン
- Gradleのバージョン
- Android Pluginのバージョン
- SDK Build Toolsのバージョン
- Android Plugin Repositoryの場所
- Default Library Repositoryの場所
- Android SDK Toolsのバージョン
- Android Support Libraryのバージョン
- JDKバージョン
これらが絶妙に調合されていないとビルドは成功しません。これは(Androidかいわいに限った話でなく)宿命なのでその時代に応じて何とか乗り越えていく必要があります。
Android Studioのバージョン
Android Studioは 3系を対象にします
https://developer.android.com/studio/?hl=ja
【問題】Gradle versionとAndroid Plugin VersionとSDK Build Tools versionの組み合わせ問題
起こりがちなエラー
以下のメソッドがサポートされていませんエラー
Error:Unsupported method: BaseConfig.getApplicationIdSuffix().Error:Unsupported method: GradleProject.getProjectDirectory().古いGradleにしてくださいエラー
Gradle sync failed: Gradle version 2.2 is required. Current version is 4.10.1. If using the gradle wrapper, try editing the distributionUrl in ...Gradle sync failed: No signature of method: java.util.ArrayList.all() is applicable for argument types: ... Possible solutions: any(), tail(), last(), last(), add(java.lang.Object), add(java.lang.Object) (10 s 345 ms)原因
古いプロジェクトを開いた等で、Gradle versionとAndroid Plugin VersionとSDK Build Tools versionの組み合わせがあっていない。
解決策
以下に正しい組み合わせが出ているので、それを確認する
https://developer.android.com/studio/releases/gradle-plugin#updating-gradle
2019年1月現在だと以下が最新の組み合わせ
設定 バージョン Gradle version 4.10.1 Android Plugin 3.3.0 Build Tools 28.0.3 Android StudioのProject StructureでGradle versionとAndroid Plugin Versionを設定する
File>Project Structure>Project と選択してGradle versionを4.10.1、Android Plugin Versionを3.3.0と入力する。
build.gradle (Module:app) で buildToolsVersionを設定する
bulid.gradle(appレベル)で buildToolsVersionを28.0.3とする。
build.gradle(app)apply plugin: 'com.android.application' android { compileSdkVersion 19 buildToolsVersion "28.0.3" ...これで、Gradle versionとAndroid Plugin VersionとSDK Build Tools versionが正しい組み合わせとなった。
Tips
たとえ、以下のように Gradle versionを古くするように提案されてもbuild.gradleのbuildToolsVersionを最新にあわせればたいてい問題は消える。Gradle sync failed: Gradle version 2.2 is required. Current version is 4.10.1.解説・参考サイト
https://developer.android.com/studio/releases/gradle-plugin#updating-gradle
https://developer.android.com/studio/releases/build-tools#notes
【問題】Android Plugin Versionをあげようとしたらプラグインがリポジトリからみつからない
起こりがちなエラー
gradle依存ライブラリがみつかりませんエラー
Gradle sync failed: Could not find com.android.tools.build:gradle:3.0.
Searched in the following locations:
- https://jcenter.bintray.com/com/android/tools/build/gradle/3.0/gradle-3.0.pom
- https://jcenter.bintray.com/com/android/tools/build/gradle/3.0/gradle-3.0.jar
原因
Android Pluginは 3.0.0以降、jcenterではなく、google独自のmavenリポジトリから配信されているため
解決策その1
File>Project Structure>Project と選択してAndroid Plugin Repositoryに
'https://maven.google.com'を設定する以下のようにAndroid Plugin Repositoryに
jcenter,'https://maven.google.com'のように両方設定しておいてOK
設定 バージョン Gradle version 4.10.1 Android Plugin 3.3.0 Build Tools 28.0.3 Android Plugin Repository jcenter,'https://maven.google.com' Default Library Repository jcenter 解決案その2
Android Studioでなく、コード側に設定してもOK。ルート(プロジェクトレベル)のbuild.gradleに
https://maven.google.comを追加するが、https://maven.google.comと書かなくてもgoogle()と書けば同じ意味になるので、そのようにする。build.gradle(プロジェクトレベル)buildscript { repositories { jcenter() google() } dependencies { classpath 'com.android.tools.build:gradle:3.3.0' } } allprojects { repositories { jcenter() google() } }解説・参考サイト
https://developer.android.com/studio/build/dependencies#google-maven
【問題】Gradle versionを上げたら、今までは問題なかった記述がエラー扱いされる
起こりがちなエラーや警告
minSdkは AndroidManifest.xml じゃなくて build.gradleに書いてねエラー
ERROR: The minSdk version should not be declared in the android manifest file. You can move the version from the manifest to the defaultConfig in the build.gradle file.
Remove minSdkVersion and sync project
targetSdkは AndroidManifest.xml じゃなくて build.gradleに書いてね警告
WARNING: The targetSdk version should not be declared in the android manifest file. You can move the version from the manifest to the defaultConfig in the build.gradle file.
Move targetSdkVersion to build file and sync project
原因
Gradle 3.0.0以降、記述ルールが大きめの変更がはいっているため
(https://developer.android.com/studio/build/gradle-plugin-3-0-0-migration)解決策
以下の記述が AndroidManifest.xmlにあったら、それを消してbuild.gradleに以降する。
AndroidManifest.xml<uses-sdk android:minSdkVersion="19" android:targetSdkVersion="19" /> ...↓↓↓
build.gradle(app)apply plugin: 'com.android.application' android { compileSdkVersion 26 buildToolsVersion "28.0.3" defaultConfig { applicationId "com.example.sony.smarteyeglass.extension.helloworld" minSdkVersion 19 targetSdkVersion 26 }(Android向けのIDEの主流がEclipseからAndroid Studioに変わったとき、AndroidManifest.xmlに記述していた内容の一部がbuild.gradleに以降したが、minSdkVersionは、ついにエラー扱いになってしまったということ。)
解説・参考サイト
https://developer.android.com/studio/build/gradle-plugin-3-0-0-migration
【問題】APKがビルドできない
起こりがちなエラーや警告
Gradle sync failed: Cannot set the value of read-only property 'outputFile' for ApkVariantOutputImpl_Decorated{apkData=Main{type=MAIN, fullName=release, filters=[], versionCode=1, versionName=1.0.0}} of type com.android.build.gradle.internal.api.ApkVariantOutputImpl.原因
Androidプラグインが3.0.0以降になった影響のため
https://developer.android.com/studio/build/gradle-plugin-3-0-0-migration
(新しいプラグインでは、Variant API を使用してバリアント出力を操作することができません)解決策
- 修正前bulid.gradle
build.gradle(before)applicationVariants.all { variant -> if (variant.buildType.name.equals("release")) { variant.outputs.each{ output -> if (output.outputFile != null && output.outputFile.name.endsWith('.apk')) { output.outputFile = new File(output.outputFile.parent, "HelloWorld.apk") } } } }
- 修正後bulid.gradle
build.gradle(after)android.applicationVariants.all { variant -> variant.outputs.all { outputFileName = "${variant.name}-${variant.versionName}.apk" } }解説・参考サイト
https://developer.android.com/studio/build/gradle-plugin-3-0-0-migration
【問題】無効なJDKを参照している
起こりがちなエラー
Gradle sync failed: Could not determine java version from '9.0.1'. (1 s 411 ms)The supplied javaHome seems to be invalid. I cannot find the java executable.原因
無効(Android Studioおよびツールにとって)なJDKが指定されている
解決策
Android Studioのメニューから File>Project Structure>SDK Locationを選択して、Use embedded JDK(recommended)をチェックして有効にする。
【問題】Android SDK Tools が古い
起こりがちなエラー・警告
Android SDK Tools
Version 24.0.2 or later is required.
原因
Android SDK Toolsには、Android Emulator や ProGuard など、基本的なツールが含まれているが、これが現在の開発環境に対して古い。
解決案
最新の Android SDK Toolsをインストールする。
- SDK Manager経由でインストールする
- Android Studio上からインストールする解説・参考サイト
https://developer.android.com/studio/releases/sdk-tools
https://developer.android.com/studio/intro/update#sdk-managerまとめ
- 古い開発環境で作ったAndroidアプリプロジェクトを最新の開発環境に取り込もうとするときに発生しがちな事象と対策をまとめました。
- こういった作業はいつの時代にも必ず発生するコストなのであらかじめ見積もっておく(+つきあう覚悟)のが良いようにおもいます。
- 1つずつ地道に対応してビルドが通ったときはとてもスッキリします。


- 投稿日:2019-02-09T18:31:36+09:00
Essential Phone(PH-1)にMagiskを導入した話。TWRP/ROM...etc
はじめに
初心者向けの記事。というか毎回調べるのが面倒なので自分向けにメモ。色々調べまわると、色々書いてあるもんだから困るので丁寧に書いていく。なんだけど、間違ってたり、よりよい方法があればアドバイス求む。色々調べただけで本質理解していないです。
Markdownの使い方よくわからんから読みにくかったらごめん。注意事項
- 端末が文鎮化しても各自自己責任で。
- ADB、FASTBOOTは導入済み前提。
- 事前に大事なデータはバックアップしておこう。
必要なもの
- Essential Phone(PH-1)
- パソコン(僕の環境はWindows)
- ROMの入った.zipファイル。OTAとFastbootどちらも。( https://essential-live.herokuapp.com/developer/current-builds )
- TWRP( https://twrp.me/Devices/Essential/ )
- Magisk( https://forum.xda-developers.com/apps/magisk/official-magisk-v7-universal-systemless-t3473445 )のページのDownloads>Latest StableでOK。
- Magisk Manager(上のMagiskと同じ場所)のページのDownloads>Latest Magisk ManagerでOK。
1) bootloaderのアンロック
- https://storage.googleapis.com/essential-static/Essential-PH1-WindowsDrivers.exe から端末用のドライバーをPCに入れる。
- 端末の「開発オプション」を有効化。
- 端末の「開発者オプション」内のOEMロック解除を有効化、ADBが使えるようにしておく。
adb reboot bootloaderまたは電源を落としたあと、電源ボタン+音量-ボタンを同時押しでbootloaderを起動。fastboot flashing unlockでbootloaderのアンロック完了。このときに端末のユーザーデータは初期化される。これ以降、手こずった場合はfactory reset(脳死的判断)。
factory reset
- (標準リカバリ)
adb reboot recoveryのあと、「電源ボタンを押しながら、音量+ボタンを押す」でリカバリを起動。"Apply update from ADB"を選択。- (TWRP)TWRPのときは上記の方法はできないので、TWRP起動時に
adb shell twrp sideloadとしとく。adb sideload [ROM(OTA)].zip。その後再起動で初期化できる。その場合はADBつかえなくなったはずだから再度「開発者オプション」から有効化しておこう。2)TWRPの起動
- bootloaderを起動し
fastboot getvar current-slotで現在aとbのスロットか確認する。fastboot --set-active=aというようにスロットを変更できる。bにしたいならfastboot --set-active=bにする。fastboot flash boot_a [twrp].imgでOK。スロット云々言ったけど正直良くわからんからbにも焼こうということで、fastboot flash boot_b [twrp].img。fastboot rebootでTWRPが起動すると思う。なんか知らんけど、TWRP(twrp-3.2.3-0-mata.img)のタッチが効かない。そのままでやった。3)Magisk.zip
- TWRP起動時に
adb shell twrp sideload。adb sideload [Magisk].zipのあとadb rebootで再起動。- Androidが起動するので初期設定を済ませる。あとからでも出来るので全部スキップした。Magisk Manegerはインストールできてたけど、Root化されてない?

4)patched_boot.img
- ROM(FASTBOOT).zipを解凍してboot.imgを端末に置いとく。Magisk Managerで「インストール→Patch Boot Image File」でboot.imgを指定して、できたpatched_boot.imgをPCの方に戻す。
- bootloaderを起動し。
fastboot flash boot_a patched_boot/imgで書き込む。5)終わり
おそらくこれより簡単な方法あるだろうけど、とりあえずこれで出来た。
Magiskを入れた理由はこれ。
・QuickSwitch is a Magisk Module that enables Android Pie recent apps on supported third-party launchers・Get the OnePlus Launcher with its recent apps interface on any Android Pie device [Root]
そこまで思ったより満足度が低かったし、勿論Root取ってるからKyashなどの金融系が使えないから戻した。遊び用の端末が欲しい。
Recents Appsのときに下にアプリを並べられるようにできるのは、デフォルトランチャーのみって問題じゃないですかね。Qでココらへんが改善されてくれればとても助かるんだけどなぁ。
- 投稿日:2019-02-09T16:08:40+09:00
[Android] FragmentからActivityへ画面遷移+Toolbarに戻るボタン表示の実装メモ
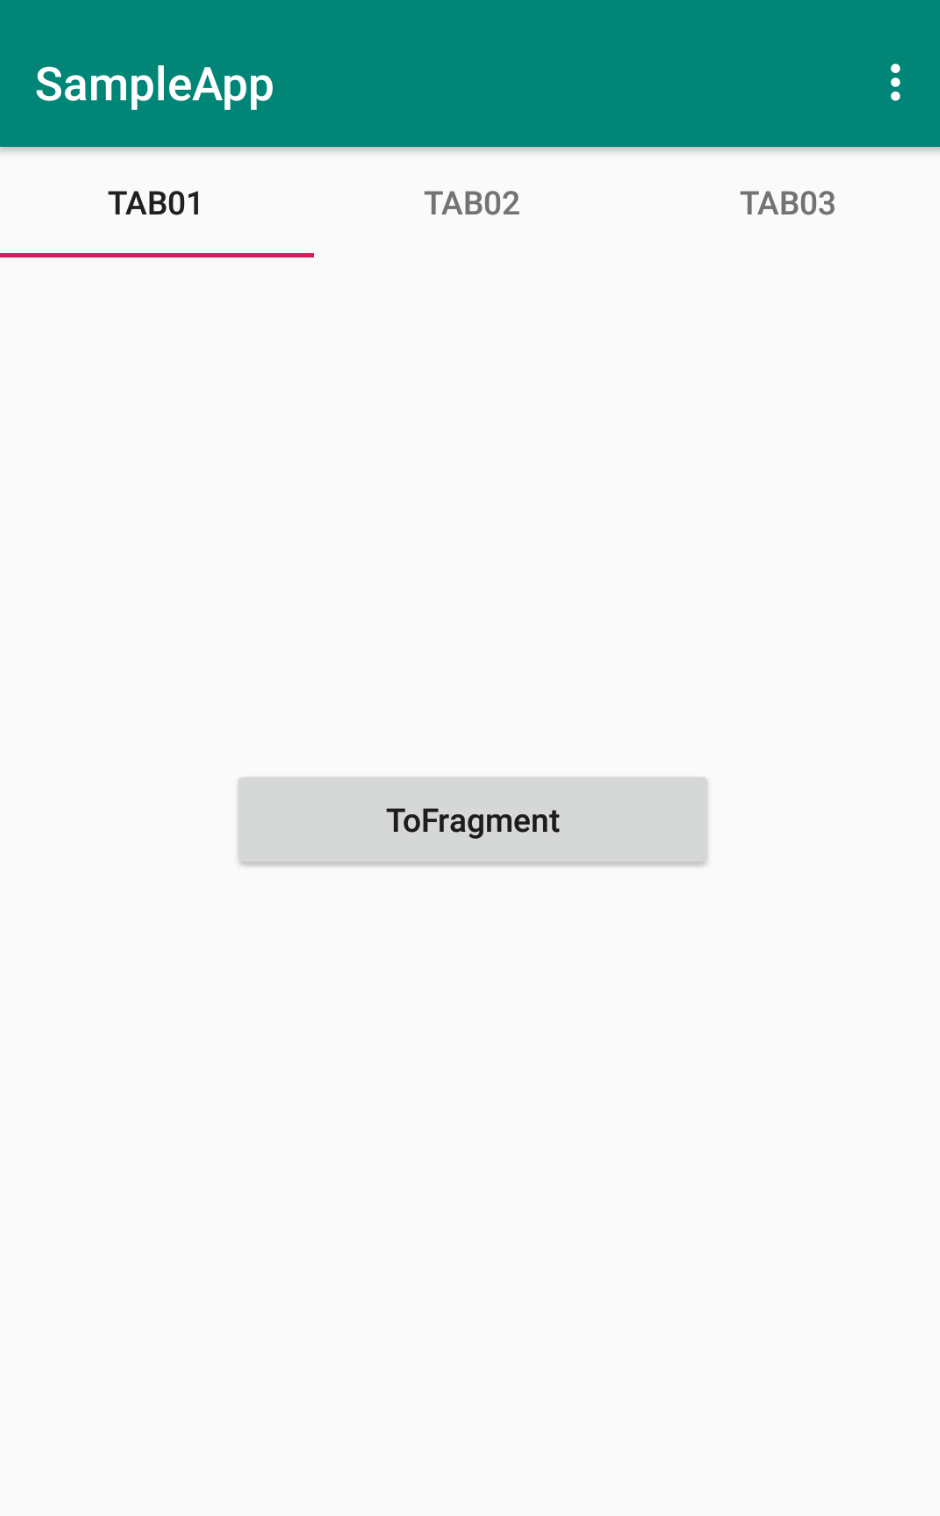
Tab上のFragmentでボタンを押す、Activityを表示する簡単な画面を実装しました。
また、遷移後の画面ではToolbarに戻るボタンが表示されます。TAB02とTAB03の画面は載せていませんが、TAB01と同じようなFragmentとlayoutを増やしているだけです。
まだ勉強中なので、おかしい部分があるかもしれません。。作ったもの
※注意:ボタンテキストは「ToFragment」ではなく「ToActivity」でした…。
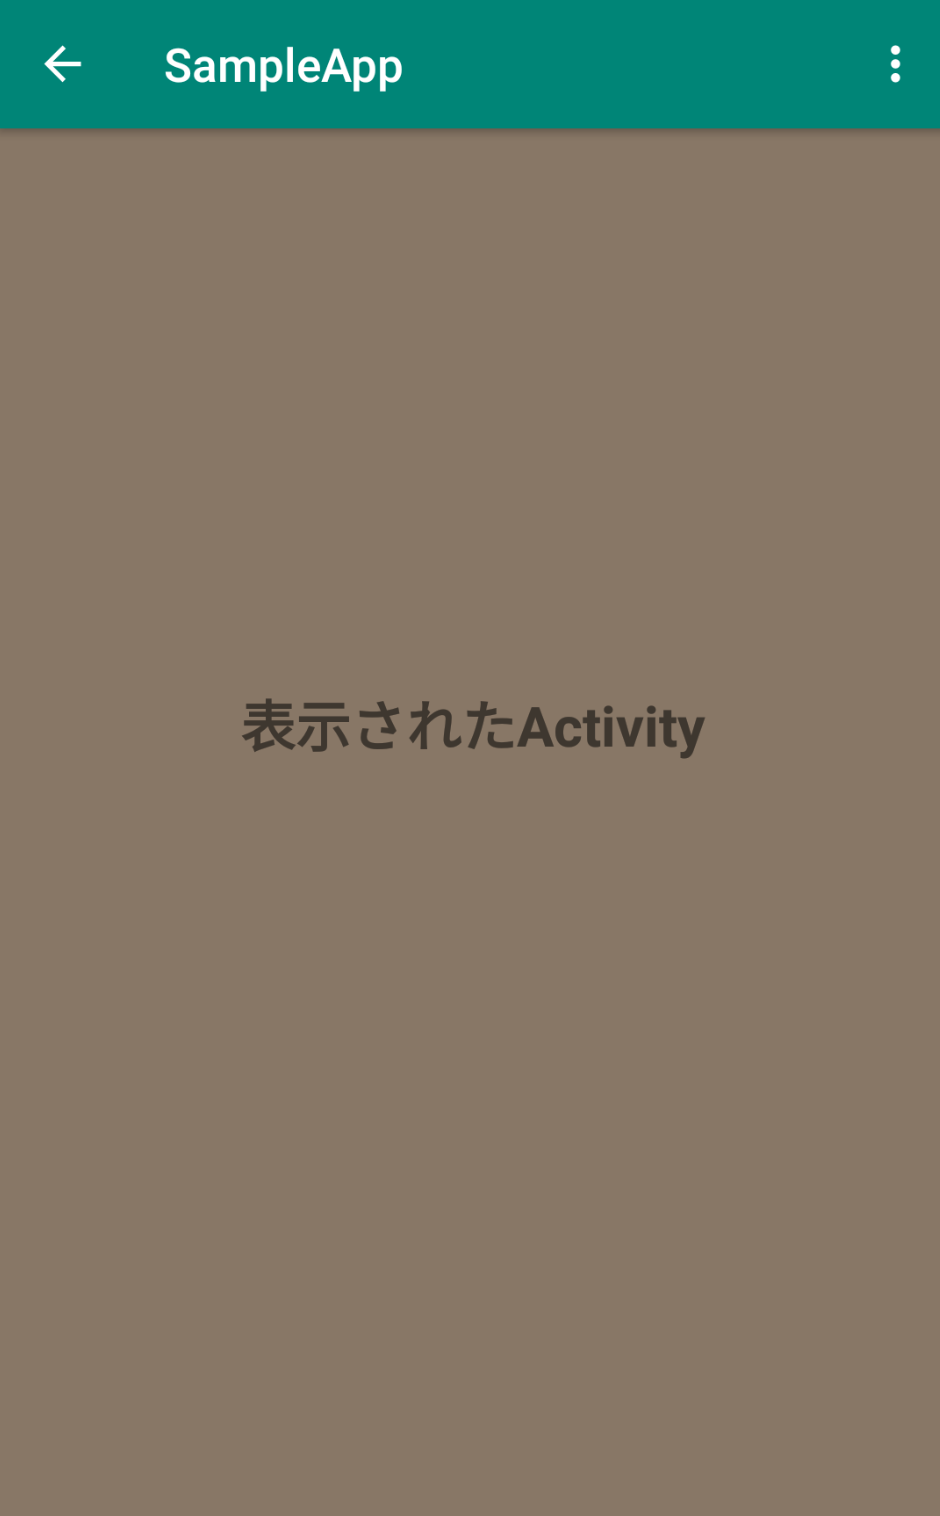
Button押下後の画面
MainActivity.java
MainActivity.javapublic class MainActivity extends AppCompatActivity { @Override protected void onCreate(Bundle savedInstanceState) { super.onCreate(savedInstanceState); setContentView(R.layout.activity_main); Toolbar toolbar = (Toolbar) findViewById(R.id.toolbar); setSupportActionBar(toolbar); OriginalFragmentPagerAdapter adapter = new OriginalFragmentPagerAdapter(getSupportFragmentManager()); ViewPager viewPager = findViewById(R.id.viewPager); viewPager.setOffscreenPageLimit(3); viewPager.setAdapter(adapter); TabLayout tabLayout = findViewById(R.id.tabLayout); tabLayout.setupWithViewPager(viewPager); } @Override public boolean onCreateOptionsMenu(Menu menu) { // Inflate the menu; this adds items to the action bar if it is present. getMenuInflater().inflate(R.menu.menu_main, menu); return true; } @Override public boolean onOptionsItemSelected(MenuItem item) { int id = item.getItemId(); //noinspection SimplifiableIfStatement if (id == R.id.action_settings) { return true; } return super.onOptionsItemSelected(item); } }Tab01Fragment.java
Tab01Fragment.javapublic class Tab01Fragment extends Fragment { public Tab01Fragment() { // Required empty public constructor } private int cnt = 0; public static Tab01Fragment newInstance(int count){ //Fragment インスタンス化 Tab01Fragment tab01Fragment = new Tab01Fragment(); //Bundleにパラメータを設定 Bundle args = new Bundle(); args.putInt("Counter", count); tab01Fragment.setArguments(args); return tab01Fragment; } @Override public View onCreateView(LayoutInflater inflater, ViewGroup container, Bundle savedInstanceState) { // Inflate the layout for this fragment return inflater.inflate(R.layout.fragment_tab01, container, false); } @Override public void onViewCreated(View view, @Nullable Bundle savedInstanceState) { super.onViewCreated(view, savedInstanceState); Bundle args = getArguments(); if(args != null){ int count = args.getInt("Counter"); cnt = count + 1; } Button appButton = view.findViewById(R.id.Button); appButton.setOnClickListener(new View.OnClickListener() { @Override public void onClick(View v) { Intent intent = new Intent(getActivity(), AppComDetailsActivity.class); startActivity(intent); } }); } }Tab01NextActivity.java
Tab01NextActivity.javapublic class Tab01NextActivity extends AppCompatActivity { @Override protected void onCreate(Bundle savedInstanceState) { super.onCreate(savedInstanceState); setContentView(R.layout.activity_tab01_next); // Backボタンを有効にする getSupportActionBar().setDisplayHomeAsUpEnabled(true); getSupportActionBar().setHomeButtonEnabled(true); } @Override public boolean onCreateOptionsMenu(Menu menu) { // Inflate the menu; this adds items to the action bar if it is present. getMenuInflater().inflate(R.menu.menu_main, menu); return true; } @Override public boolean onOptionsItemSelected(MenuItem item) { int id = item.getItemId(); //noinspection SimplifiableIfStatement if (id == R.id.action_settings) { return true; } switch (item.getItemId()) { case android.R.id.home: finish(); default: break; } return super.onOptionsItemSelected(item); } }Layout / activity_main.xml
activity_main.xml<?xml version="1.0" encoding="utf-8"?> <android.support.design.widget.CoordinatorLayout xmlns:android="http://schemas.android.com/apk/res/android" xmlns:app="http://schemas.android.com/apk/res-auto" xmlns:tools="http://schemas.android.com/tools" android:id="@+id/main_content" android:layout_width="match_parent" android:layout_height="match_parent" android:fitsSystemWindows="true" tools:context=".MainActivity"> <android.support.design.widget.AppBarLayout android:id="@+id/appbar" android:layout_width="match_parent" android:layout_height="wrap_content" android:paddingTop="@dimen/appbar_padding_top" android:theme="@style/AppTheme.AppBarOverlay"> <android.support.v7.widget.Toolbar android:id="@+id/toolbar" android:layout_width="match_parent" android:layout_height="?attr/actionBarSize" android:layout_weight="1" android:background="?attr/colorPrimary" app:layout_scrollFlags="scroll|enterAlways" app:popupTheme="@style/AppTheme.PopupOverlay" app:title="@string/app_name"> </android.support.v7.widget.Toolbar> </android.support.design.widget.AppBarLayout> <LinearLayout android:layout_width="match_parent" android:layout_height="match_parent" android:orientation="vertical" app:layout_behavior="@string/appbar_scrolling_view_behavior"> <android.support.design.widget.TabLayout android:id="@+id/tabLayout" android:layout_width="match_parent" android:layout_height="wrap_content"> <android.support.design.widget.TabItem android:layout_width="wrap_content" android:layout_height="wrap_content" android:text="Left" /> <android.support.design.widget.TabItem android:layout_width="wrap_content" android:layout_height="wrap_content" android:text="Center" /> <android.support.design.widget.TabItem android:layout_width="wrap_content" android:layout_height="wrap_content" android:text="Right" /> </android.support.design.widget.TabLayout> <android.support.v4.view.ViewPager android:id="@+id/viewPager" android:layout_width="match_parent" android:layout_height="match_parent"> </android.support.v4.view.ViewPager> </LinearLayout> </android.support.design.widget.CoordinatorLayout>Layout / fragment_tab01.xml
fragment_tab01.xml<?xml version="1.0" encoding="utf-8"?> <FrameLayout xmlns:android="http://schemas.android.com/apk/res/android" xmlns:app="http://schemas.android.com/apk/res-auto" xmlns:tools="http://schemas.android.com/tools" android:id="@+id/container" android:layout_width="match_parent" android:layout_height="match_parent" tools:context=".Tab01Fragment"> <android.support.constraint.ConstraintLayout android:layout_width="match_parent" android:layout_height="match_parent"> <Button android:id="@+id/Button" android:layout_width="211dp" android:layout_height="wrap_content" android:layout_marginStart="8dp" android:layout_marginTop="8dp" android:layout_marginEnd="8dp" android:layout_marginBottom="8dp" android:text="ToFragment" android:textAllCaps="false" app:layout_constraintBottom_toBottomOf="parent" app:layout_constraintEnd_toEndOf="parent" app:layout_constraintHorizontal_bias="0.503" app:layout_constraintStart_toStartOf="parent" app:layout_constraintTop_toTopOf="parent" app:layout_constraintVertical_bias="0.393" /> </android.support.constraint.ConstraintLayout> <!--</LinearLayout>--> </FrameLayout>Layout / activity_tab01_next.xml
activity_tab01_next.xml<?xml version="1.0" encoding="utf-8"?> <android.support.constraint.ConstraintLayout xmlns:android="http://schemas.android.com/apk/res/android" xmlns:app="http://schemas.android.com/apk/res-auto" xmlns:tools="http://schemas.android.com/tools" android:layout_width="match_parent" android:layout_height="match_parent" android:background="#876" tools:context=".Tab01NextActivity"> <TextView android:id="@+id/textView2" android:layout_width="wrap_content" android:layout_height="wrap_content" android:text="表示されたActivity" android:textSize="24sp" android:textStyle="bold" app:layout_constraintBottom_toBottomOf="parent" app:layout_constraintEnd_toEndOf="parent" app:layout_constraintHorizontal_bias="0.502" app:layout_constraintStart_toStartOf="parent" app:layout_constraintTop_toTopOf="parent" app:layout_constraintVertical_bias="0.425" /> </android.support.constraint.ConstraintLayout>Menu / menu_main.xml
menu_main.xml<menu xmlns:android="http://schemas.android.com/apk/res/android" xmlns:app="http://schemas.android.com/apk/res-auto" xmlns:tools="http://schemas.android.com/tools" tools:context=".MainActivity"> <item android:id="@+id/action_settings" android:orderInCategory="100" android:title="@string/action_settings" app:showAsAction="never" /> </menu>おわり!
- 投稿日:2019-02-09T14:13:53+09:00
React Nativeでのリスト機能とイイネ機能について
本エントリでは作成したアプリで使用したいくつかのテクニックの一つのリストについて記載します。
カメラで撮影しコメントを付けて投稿したものを一覧で表示する機能を提供する部分です。またイイネボタンもどうしても付けたかったので実装しました。
以下ソースです。import React, {Component} from 'react'; import {Platform, StyleSheet, TouchableOpacity, View, ListView,Image} from 'react-native'; import { Text, List, ListItem, } from "native-base"; import { NavigationActions } from "react-navigation"; import axios from 'axios'; export default class HomeScreen extends Component<Props> { //コンストラクタ constructor(props){ super(props); //必ず呼ぶ this.state = { rec:[] } } getData() { const prm ={params:{TEST:"ダミー"}}; axios .get('https://XXXXXXX.execute-api.XXXXXXXX.amazonaws.com/dev/test', prm,{ headers: { 'Content-Type': 'application/json' ,'Accept': 'application/json'}}) .then((results) => { this.setState({rec:results.data.body}); console.log(JSON.stringify(results.data.body)); // <-- (5) [ }).catch(() => { console.log('通信に失敗しました。'); }); } async componentDidMount() { try { this.getData(); } catch(e) { alert(e.message) } } render() { const rec = this.state.rec return ( <View style={styles.container}> <Text>リストのページです</Text> <List dataArray={rec} renderRow={(item) => <ListItem style={{flex:1,flexDirection: 'column',alignItems: 'center'}}> <Image style={{width: 250, height: 250}} source={{uri:item.PictureFile}}/> <Text style={{color:'#b0c4de'}}>{item.datetimestr}</Text> <Text style={{color:'#b0c4de'}}>{item.Comment}</Text> <TouchableOpacity onPress={() => this.handleLikeClick(item)} style={styles.capture}> <Text style={{color:'#b0c4de'}}>{item.LikeNum}</Text> </TouchableOpacity> </ListItem> } style={{backgroundColor: '#e6e6fa',bordercolor:'#4A90E2'}}> > </List> <TouchableOpacity onPress={() => this.props.navigation.navigate("Home")} style={styles.capture}> <Text style={{ fontSize: 14 }}> Home</Text> </TouchableOpacity> </View> ) } handleLikeClick = (item) => { axios .post('https://XXXXXX.execute-api.XXXXXXX.amazonaws.com/dev/increment_like',{datetimestr:item.datetimestr},{ headers: {Accept: 'application/json','Content-Type': 'application/json'}}) .then((results) => { console.log(JSON.stringify(results.data.body)); // <-- (5) [ }).catch(() => { console.log('通信に失敗しました。'); }); } } const styles = StyleSheet.create({ container: { flex: 1, flexDirection: 'column', backgroundColor: 'aliceblue', }, capture: { flex: 0, backgroundColor: '#fff', borderRadius: 5, padding: 15, paddingHorizontal: 20, alignSelf: 'center', margin: 20, }, });ここでハマったのはAWSから取得したデータはJSON形式なのですがそれをreact-Native標準のListViewで表示させようとするとうまくいかず。なので、react-baseのList,ListItemを使用しました。標準のほうは連想配列は使えず純粋な配列でないとダメなのかとか、少しこの辺は曖昧です。
あと以前の投稿にも書きましたが、リストをstateにもつ時には必ずconstructor(props){ super(props); //必ず呼ぶ this.state = { rec:[] //絶対いる!! } }と初期化が必要です。(ホントこれには大変な思いをさせられましたw)
イイネボタンはデータの主キーに当たるdatetimestrをAWSで公開しているAPIに渡すだけのシンプルなものです。
ところで直接この話とは関係ないですがこの部分を実装している時に少し時間を喰ってしまったのはaxiosはGETの時にはパラメーターに
{params:{TEST:"ダミー"}}
とparamsを要求しますが、POSTだと
{datetimestr:item.datetimestr}
と要らないのですよね。コピペして使って少し無駄足を踏んでしまいました。
あと画像の表示はAWSのS3から直接取得しています。
そしてご覧の通りの実装なのでイイネした後数字がインクリメントされません。いろいろ方法はあるみたいですが、またエネルギーが回復したら(え゛っw)トライしてみたいと思います。以上でリスト表示機能とイイネ機能についての篇を閉じます。
- 投稿日:2019-02-09T14:03:42+09:00
SharedPreferencesの反映はapplyを使おう
SharedPreferencesへの書き込みの反映には下記2点のメソッドが用意されています。
業務で以下のようなコードでcommitの方が使われており、PlayConsoleにANRのレポートが上がってきました。
commitはドキュメントにもあるように同期的にファイルへ書き出しを行っているため、書き出しに時間がかかりレポートされたと考えられます。fun save(context: Context, value: Int) { val pref = context.getSharedPreferences("PREF", Context.MODE_PRIVATE) val editor = pref.edit() editor.putInt("KEY", value) editor.commit() }そこで、非同期で書き込みを行うapplyに置き換え対応しました。
fun save(context: Context, value: Int) {
    val pref = context.getSharedPreferences("PREF", Context.MODE_PRIVATE)
    val editor = pref.edit()
    editor.putInt("KEY", value)
    editor.apply()
}
- 投稿日:2019-02-09T13:42:26+09:00
React Navigationでのナビゲージョンの実現について
本エントリでは作成したアプリで使用したいくつかのテクニックの一つのナビゲーションについて記載します。
React Nativeでナビゲーションを実現するには幾つか方法があるようですが筆者はReact Navigationを使用しました。
React Navigationは3.x系になって前バージョンと随分趣が変わったようですが幸か不幸か筆者は3.xからのスタートだったのでネットの情報が少ない以外はそれほどに大きな困難を抱えることはありませんでした。
以下ナビゲートのを定義したApp.jsとメイン画面のソースです。App.js
import React, {Component} from 'react';
import {Platform, StyleSheet, Text,View} from 'react-native';
import { createStackNavigator, createAppContainer } from "react-navigation";
import HomeCamera from "./src/HomeCamera.js";
import HomeConf from "./src/HomeConf.js";
import HomeScreen from "./src/HomeScreen.js";
import HomeList from "./src/HomeList.js";

const AppNavigator = createStackNavigator(
  {
    Home: HomeScreen,
    Camera:HomeCamera,
    Conf: HomeConf,
    List: HomeList
  },
  {
    initialRouteName: "Home"
  }
);

const AppContainer = createAppContainer(AppNavigator);

type Props = {};
export default class App extends Component<Props> {
  render() {
   return (
    <AppContainer />
   );
 }
}
HomeScreen.js
import React, {Component} from 'react';
import {Platform, StyleSheet, Text, TouchableOpacity, View,Image} from 'react-native';
import { NavigationActions } from "react-navigation";

export default class HomeScreen extends Component<Props> {
  //コンストラクタ
  constructor(props){
    super(props); //必ず呼ぶ
  }

  render() {
   return (
     <View style={styles.container}>
     <Image style={{ width: 400, height: 200}} source={{uri:'https://yuap.jp/blog/wp-content/uploads/2018/09/reactnative.png'}}/>
     <TouchableOpacity onPress={() => this.props.navigation.navigate("List")} style={styles.capture}>
       <Text style={{ fontSize: 14 }}> List</Text>
     </TouchableOpacity>
     <TouchableOpacity onPress={() => this.props.navigation.navigate("Camera")} style={styles.capture}>
       <Text style={{ fontSize: 14 }}> Camera</Text>
     </TouchableOpacity>
     </View>
   )
 }
}


const styles = StyleSheet.create({
  container: {
    flex: 1,
    flexDirection: 'column',
    justifyContent:'center',
    backgroundColor: 'white',
  },
  capture: {
    flex: 0,
    backgroundColor: 'aliceblue',
    borderRadius: 5,
    padding: 15,
    paddingHorizontal: 20,
    alignSelf: 'center',
    margin: 50,
  },
});
App.jsで定義している createStackNavigator 辺りが2.x系と大きく変わったようですね。
HomeScreen.jsのポイントは他のコンポーネントに遷移する時にはthis.props.navigation.navigate("List")というようにnavigateを使用することで、本関数は
import { NavigationActions } from "react-navigation";とインポートすると使えるようになります。
以上でナビゲーションについての篇を閉じます。
- 投稿日:2019-02-09T12:44:59+09:00
初めてのReact Native(開発環境篇)
初期スキルセット
一応職業SEを15年ほどやっている身ではありますがキャリア的にWebには殆ど縁がなく
Web関連
ホームページ作成、Perlでcgi,ASP.NET,楽々フレームワーク、など。
つまりは最早レガシーといわれる部類に入る技術のみで、Bootstrapすらも触ったことないレベル。スマホアプリ開発関連
Visual Studio2017でIonicを使って簡単なおもちゃ作ったのと、Android Studioで言語としてkotlinを選んで入門書のコードを打ち込んだりはしてました。
スマホアプリ開発におけるベースの知識は理解出来てないまでも触れていた程度です。React Nativeでの開発の、その前に
スマホアプリ開発は数多あるフレームワークから選択するところから始まります。選択する際にクロスプラットフォームということはは大前提でした。そうすると Xamarin 若しくは JavaScript系 となります。ここでXamarinを選択すると日頃慣れ親しんだ環境の延長に成ってしまいそうと思い却下。昔からWeb関連余りやってこなかったし、それに何故か、またはそれ故かJavaScriptにかなり苦手意識があり。でも折角の機会だし敢えて苦手なJavaScriptの方へ行こうかと思いました。JavaScript界隈が今ホットだからというのも大いに選択の理由としてはありました。
JavaScript系列となると今はReact Native(以下 RN と表記),Angular,Vue.jpの三巨頭から選ぶことになります。この中で何故RNにしたかというと、その動機は実はあまりはっきり覚えていないのですが、ネイティブなものを作ることが出来る、というところだったかなぁと思います。Angularは前に少しだけIonicという形で触れているので、違うものをという考えがあったのかなぁと、自分のことながら推測したりも。
つまりこれといった大した決め手はありませんでした。あと個人的にExpoは何となく使いたくなかったので使ってません。でもFacebookが推しているようで、後々使わざるを得なくなるかもですね。オススメ
これから色々な技術について記載していきます。ネットにはあらゆる記事があってとても参考になりますがまとまった形の情報というものは意外と無いものです。
そこでお勧めなのがKindle Unlimitedです。紙媒体の成書として成り立つプロのテクニカルライターの本からブログ記事をまとめたような一冊数百円のものまで。Kindle Unlimitedの本の良いところは細かい所は置いといて知りたいことをさくっと知ることができる本が多いのが僕的に大いに助かりました。ブログ以上 成書未満とでも言えそうな。月1000円などすぐに元とれると思います。用が済んだら解約すればいいですし。当方の開発マシンは
Think paddad X230
CPU i5
Mem 16G
SSD480
OS:Fedora 29 Workstationこれに外部モニタ、USBキーボードというスタイルで開発してました。
React Native 開発環境構築
使ったものは
・Android Studio まずこれが無くては始まらない。
・npm
・react-native-cli (どうも今の流れはexpo-cliの様ですが)です。
因みにエディタはatomです。まるで機能使いこなしていませんが。開発環境の関連でポイントとなることを列記します。
・JAVA_HOMEを忘れずに設定しましょう
Android Studioで開発する場合はAndroid Studioが気を利かせてくれますが、RNの場合はそうはいかないので。・Emulatorの起動
デバッグの時、まずエミュレーターを立ち上げてから、デバッグのコマンドであるreact-native run-androidを叩きます。
まず最初にAndroid Studioで使いたいエミュレーターを作成します。その後に作成したエミュレーターを直接起動します。エミュレーターの起動はAndroid Studioからでも出来るようですが毎回立ち上げるのも面倒なのでエミュレーターを直接起動します。毎回長いコマンド叩くのも面倒ですので起動用シェルを用意しておくと便利です。
エミュレーターはSDK配下、つまりANDROID_HOME配下にあります。ANDROID_HOME=/home/XXXXXX/Android/Sdkという感じで設定します。またエミュレーター起動用のシェルは
#!/bin/bash
$ANDROID_HOME/tools/emulator @Nexus_5X_API_27
という感じになります。ご覧の通り @マークの 後ろに起動したいエミュレーターを指定します。
・npm
ググったものをそのまま打ち込んでも問題ないと思いますが、npm install XXX -g,npm install XXX --save 等のオプションの意味を理解しておくと何かと安心できます。。あとnpm updateとかnpm outdatedなどよく使うコマンドも一覧にしてくれている記事があるので一回目を通しておくことをお勧めします。・gradle
react-native init XXX でプロジェクトを作成した後にまず最初にやることはgradleのアップデートです。gradleのバージョンが古いとOpen Jdk 1x以降(かと思われます)の位置を認識してくれません。基本新しいに越したこと無さそうです。gradleのアップデートの仕方は
(プロジェクト名)/android/gradle/wrapper/gradle-wrapper.properties
の5行目
distributionUrl=https://services.gradle.org/distributions/gradle-5.2-all.zip
のZIPファイル名を本家サイトで確認したアップデートしたいバージョン(基本最新でしょう)に書き換える。次に
(プロジェクト名)/android/build.gradle
の末尾にあるtask wrapper(type: Wrapper) { gradleVersion = '4.4' distributionUrl = distributionUrl.replace("bin", "all") }という感じに記載されているtask wrapperなるものの4行を削除します。
最後にプロジェクトのディレクトリで
./android/gradlew buildを実行します。
・webpack,Babel
縁の下の力持ちのツールについてざっくり調べておきましょう。筆者もざっくりの認識しか持っておらず、BabelはRNに限って言うとJSXなる独自言語を一般的な言語翻訳してくれるのだろう、webpackは複数のJSを一つにまとめてくれるのだろう、ぐらいの認識です。外れてはないかもだけれどざっくり過ぎてわかっているとは到底いえません。でも裏で何が動いているかぐらいは把握して置いた方が安心感が持てます。
webpackについては前述のKindle Unlimitedに詳しい書籍があります。斜め読みぐらいはしました。(こういう小さいツールについての書籍は紙媒体では出版しにくいでしょうが電子書籍だから出来るのでしょう)以上で開発環境構築篇を閉じます。
- 投稿日:2019-02-09T00:42:29+09:00
DateFormatはスレッドセーフじゃない
下記のようにDateFormatのインスタンスをメンバ変数として保持して使いまわしていたところ、Fabricにクラッシュレポートが上がってきました。
class Util { companion object { private val sDateFormat = SimpleDateFormat("yyyy/MM/dd") fun convert(date: Date): String { return sDateFormat.format(date) } } }調査したところ複数スレッドから呼ばれる実装になっており、ドキュメントにもあるように毎度インスタンスを生成するように変更して対応しました。
class Util {

   companion object {
       fun convert(date: Date): String {
           return SimpleDateFormat("yyyy/MM/dd").format(date)
       }
   }

}