- 投稿日:2019-02-03T23:04:40+09:00
Google colab で RubyからGPU を使って行列計算する
Google Colab に Cumo/NArray をインストールすることで、Google Colab上でRubyでGPUを用いた高速計算ができることがわかったのでメモを残します。
Google Colaboratory とは
Google Colaboratory はクラウドで実行できる無料のJupyter環境です。カスタムでインストールすることでJupyterカーネルがあるさまざまな言語を動かすことができると思われる。少なくともRubyは動く。
Cumo とは
PythonだとCupyに相当するものです。RubyにはNumo/NArrayという、Numpyとほぼ同等の機能をもつ数値計算ライブラリがあります。CumoはこのNArray互換のインターフェースをCUDAで動かせるライブラリです。
Google Colab のランタイムのGPUを有効にする
一番最初にGPUを有効にします。あとからGPUを有効にするとランタイムの環境がリセットされてしまうので、注意してください。GPUが有効でないランタイムにいくらRubyやライブラリを正常にインストールしても、GPU有効のランタイムでは動きませんし、その逆もしかりです。google colabはランタイム再起動や、時間切れで再起動した際に知らずに設定が切り替わってることがあり、ハマりやすいです。動かなくなったらまずこれを疑ってもいいかも知れません。
Google ColabでRubyを動かす
Google Colab で Rubyを動かしてみた を参考にGoogle ColabでRubyを動かせるようにします。
Cumo/NArray のインストール
Google Colab は2019年1月の時点で、CUDA9.2を使用しており、Cumo/NArray の公式READMEの指示通りでインストールされます。ただし、環境変数は1行ごとにクリアされているっぽいので、マジックコマンドは長々と続けて書く必要があるようです。もっといいやり方があったら教えてください。また、IRuby上ではマジックコマンドは動きませんのでRubyとは別にPythonノートブックを立ち上げて下記のコマンドは実行しています。コマンドが実行されたら、IRubyのランタイムを起動し直すとcumoがrequrieできるようになっているはずです。
(cumoのインストールには合計10分ぐらい時間がかかります)
!export CUDA_PATH="/usr/local/cuda" && export CPATH="$CUDA_PATH/include:$CPATH" && export LD_LIBRARY_PATH="$CUDA_PATH/lib64:$CUDA_PATH/lib:$LD_LIBRARY_PATH" && export PATH="$CUDA_PATH/bin:$PATH" && export LIBRARY_PATH="$CUDA_PATH/lib64:$CUDA_PATH/lib:$LIBRARY_PATH" && gem install cumo上記でインストールされますが、ちゃんとCumoの機能が動くか確認したい場合、コンパイルに失敗してエラーが見たい場合は、下記のような感じにしてメッセージを表示させながらのコンパイルや、テストを実行することもできるようです。
!gem install bundler
!git clone https://github.com/sonots/cumo
!export CUDA_PATH="/usr/local/cuda" && export CPATH="$CUDA_PATH/include:$CPATH" && export LD_LIBRARY_PATH="$CUDA_PATH/lib64:$CUDA_PATH/lib:$LD_LIBRARY_PATH" && export PATH="$CUDA_PATH/bin:$PATH" && export LIBRARY_PATH="$CUDA_PATH/lib64:$CUDA_PATH/lib:$LIBRARY_PATH" && cd cumo && rake compile && rake test
補足
これでどこからでも無料でRubyからGPUで使うことができて個人的には満足です。ただし手元のコンピュータでは実行できたスクリプトもGoogle Colab上ではエラーが出る場合もあり、もう少し使ってみないと色々わからない面もあります。
- 投稿日:2019-02-03T21:43:06+09:00
面白いセルの合計
1行ごとに、前の行の面白いセル一覧を取得してから、自分の上にあるセルの中で面白いものを合計。
セルの右端が欠けるので余裕を見ないといけない。この意味で負けな可能性がある。
ちなみに、Rubyで11分、Crystalで2分、Crystal build --releaseで13秒でした。実行時間的にはyhpgですから許容範囲でしょう。tyama_henae30.rb#!/usr/bin/ruby #http://nabetani.sakura.ne.jp/hena/orde30sumt/ #https://qiita.com/Nabetani/items/725e09cc5913a8569c04 while s=gets a_,b_=s.chomp.split("/") a=a_.split(",").map(&:to_i) b=b_.to_i width=a[-1]*b*4 ### fixme magic number 4 #cell id, number storage=width.times.map{|i|[i/a[0],i/a[0]+1]} (1...a.size).each{|wi| interesting={} storage.uniq.tap{|z| interesting[z[0]]=1 (1..z.size-2).each{|i| interesting[z[i]]=1 if z[i][1]!=z[i-1][1] || z[i][1]!=z[i+1][1] } interesting[z[-1]]=1 } z0=[] w0=a[wi] 0.step(width-1,w0).with_index{|k,ki| su=(k...[k+w0,width].min).select{|i| interesting.has_key?(storage[i]) }.map{|i| storage[i] }.uniq.map(&:last).reduce(0,:+)%1000 (k...[k+w0,width].min).each{z0<<[ki,su]} } storage=z0 } p storage[(b-1)*a[-1]][1] STDOUT.flush endtyama_henae30.cr#!/usr/bin/env crystal #http://nabetani.sakura.ne.jp/hena/orde30sumt/ #https://qiita.com/Nabetani/items/725e09cc5913a8569c04 while s=gets a_,b_=s.chomp.split("/") a=a_.split(",").map(&.to_i) b=b_.to_i width=a[-1]*b*4 ### fixme magic number 4 #cell id, number storage=width.times.map{|i|{i/a[0],i/a[0]+1}}.to_a (1...a.size).each{|wi| interesting=Hash(Tuple(Int32,Int32),Int32).new storage.uniq.tap{|z| interesting[z[0]]=1 (1..z.size-2).each{|i| interesting[z[i]]=1 if z[i][1]!=z[i-1][1] || z[i][1]!=z[i+1][1] } interesting[z[-1]]=1 } z0=Array(Tuple(Int32,Int32)).new w0=a[wi] 0.step(to: width-1,by: w0).with_index{|k,ki| su=(k...[k+w0,width].min).select{|i| interesting.has_key?(storage[i]) }.map{|i| storage[i] }.uniq.map(&.last).sum%1000 (k...[k+w0,width].min).each{z0<<{ki,su}} } storage=z0 } p storage[(b-1)*a[-1]][1] STDOUT.flush end
- 投稿日:2019-02-03T18:56:06+09:00
Windowsでrubyをつかう。WEBrickが立ち上がるまで
WindosでRubyの開発を行いたいと思ったことがきっかけ
Ruby導入からRailsプロジェクトの作成、WEBrickが起動するまでのまとめ
Qiitaとか投稿したこがないけど、やってみようかな
アウトプットすることを覚える
見苦しいところが多々ありますが、ご指摘していただけるとありがだいです。m@@m開発環境
- Windows7(x64)
- Ruby2.5.3p105 (2018-10-18 revision 65156)
- Rails5.2.2
rubyインストール
Windows用のRubyがここで公開されてる。development kit がついている以下のものをダウンロードする
- Ruby+Devkit 2.5.3-1 (x64)
インストーラを実行すればrubyが導入される
今回はC直下にインストールv@@vRailsのインストール
コマンドプロンプトで以下を実行する
gem install railsSQLite3の実行ファイルをダウンロード
ここから以下のものをダウンロードする
Source Code
- sqlite-amalgamation-3260000.zip・・・C直下に展開
recompiled Binaries for Windows
- sqlite-dll-win32-x86-3260000.zip・・・C:\Ruby25-x64\binにsqlite3.dllを投入
- sqlite-tools-win32-x86-3260000.zip・・・C:\Ruby25-x64\binにsqlite3.exeを投入
SQLite3のライブラリをインストール
SQLite3のソースコードと実行ファイルのディレクトリを指定しコマンドプロンプトで以下を実行
gem install sqlite3 --platform=ruby -- --with-sqlite3-include=C:\sqlite-amalgamation-3260000 --with-sqlite3-lib=C:\Ruby25-x64\bin※SQLite3のインストールでハマりました、以下のページを参照して脱出
WindowsでRailsTutorialするときに気をつけることRailsプロジェクトを作成
コマンドプロンプトでRailsのプロジェクトを作成したいフォルダを指定(今回はd:\app\rails)し以下を実行
rails new プロジェクト名d:\app\railsにプロジェクト名のフォルダが作成されている
これだけでrailsのプロジェクトができちゃうのねWEBrickを起動する
d:\app\rails\プロジェクト名 を指定しコマンドプロンプトで以下を実行
rails server WEBrickhttp://localhost:3000/にアクセス
WEBrickが正常に起動していれば、地球の上に立っている人々が表示されるコマンドでWEBrickを指定せず、サーバを起動させるとPumaが起動した
バージョンによってデフォルトで起動するサーバが違うのか...?参考
Ruby on Rails入門
ここで紹介されている内容を実行しました
- 投稿日:2019-02-03T16:54:30+09:00
オフラインリアルタイムどう書く E29 の実装例( ruby )
問題の名前 : 面白いセルの合計
問題 : http://nabetani.sakura.ne.jp/hena/orde30sumt/
実装リンク集 : https://qiita.com/Nabetani/items/725e09cc5913a8569c04次回のイベントは 3/9
で。
ruby2.6require "json" class Cells def initialize(ws) @ws = ws.dup @cache={} end def at(y,x) key = (x<<32)+y @cache[key] ||= _at(y,x) end def interesting?(y,x) !( 0<y && at(y,x)==at(y,x-1) && at(y,x)==at(y,x+1) ) end def _at(y,x) return x+1 if y<=0 left0 = x*@ws[y] right0 = left0 + @ws[y] left = left0 / @ws[y-1] right = (right0-1) / @ws[y-1] (left..right).select{ |xx| interesting?(y-1,xx) }.sum{ |xx| at(y-1,xx) } % 1000 end end def solve( src ) wss, ms = src.split("/") ws = wss.split(",").map(&:to_i) Cells.new(ws).at(ws.size-1, ms.to_i-1).to_s end if $0==__FILE__ data = JSON.parse(DATA.read, symbolize_names: true) data[:test_data].map{ | number:, src:, expected: | actual = solve( src ) okay = actual == expected puts [ number, (okay ? "ok" : "**NG**"), actual, expected ].join(" ") okay }.all?.yield_self{ |x| puts( x ? "okay" : "SOMETHING WRONG" ) } end __END__ {"event_id":"E30","event_url":"https://yhpg.doorkeeper.jp/events/84247","test_data":[ {"number":0,"src":"4,6,1,5/3","expected":"14"}, {"number":1,"src":"1/1","expected":"1"}, {"number":2,"src":"6/1","expected":"1"}, {"number":51,"src":"408,412,30,930,372,822,632,948,855,503,8,618,138,695,897,852/377","expected":"212"} ]}毎度のことながらテストデータの大半は省略。
普通にメモ化つき再帰なんだけど、それ以外にいい作戦は思いついていない。
つい
yield_selfのままにしたけど、 ruby 2.6 なのでitselfにすべきだったね。過去問に 上と左の合計 という類題がある。過去問のほうが難しそうな感じ。
- 投稿日:2019-02-03T16:54:30+09:00
オフラインリアルタイムどう書く E30 の実装例( ruby )
問題の名前 : 面白いセルの合計
問題 : http://nabetani.sakura.ne.jp/hena/orde30sumt/
実装リンク集 : https://qiita.com/Nabetani/items/725e09cc5913a8569c04次回のイベントは 3/9
see https://yhpg.doorkeeper.jp/events/86766で。
ruby2.6require "json" class Cells def initialize(ws) @ws = ws.dup @cache={} end def at(y,x) key = (x<<32)+y @cache[key] ||= _at(y,x) end def interesting?(y,x) !( 0<y && at(y,x)==at(y,x-1) && at(y,x)==at(y,x+1) ) end def _at(y,x) return x+1 if y<=0 left0 = x*@ws[y] right0 = left0 + @ws[y] left = left0 / @ws[y-1] right = (right0-1) / @ws[y-1] (left..right).select{ |xx| interesting?(y-1,xx) }.sum{ |xx| at(y-1,xx) } % 1000 end end def solve( src ) wss, ms = src.split("/") ws = wss.split(",").map(&:to_i) Cells.new(ws).at(ws.size-1, ms.to_i-1).to_s end if $0==__FILE__ data = JSON.parse(DATA.read, symbolize_names: true) data[:test_data].map{ | number:, src:, expected: | actual = solve( src ) okay = actual == expected puts [ number, (okay ? "ok" : "**NG**"), actual, expected ].join(" ") okay }.all?.yield_self{ |x| puts( x ? "okay" : "SOMETHING WRONG" ) } end __END__ {"event_id":"E30","event_url":"https://yhpg.doorkeeper.jp/events/84247","test_data":[ {"number":0,"src":"4,6,1,5/3","expected":"14"}, {"number":1,"src":"1/1","expected":"1"}, {"number":2,"src":"6/1","expected":"1"}, {"number":51,"src":"408,412,30,930,372,822,632,948,855,503,8,618,138,695,897,852/377","expected":"212"} ]}毎度のことながらテストデータの大半は省略。
普通にメモ化つき再帰なんだけど、それ以外にいい作戦は思いついていない。
つい
yield_selfのままにしたけど、 ruby 2.6 なのでitselfthenにすべきだったね。過去問に 上と左の合計 という類題がある。過去問のほうが難しそうな感じ。
- 投稿日:2019-02-03T15:37:20+09:00
brew doctorでWarningが出たので解決方法まとめました。(for Mac)
環境
Macbook pro(2017年モデル)
macOS Mojave状況
Homebrewを使って、rbenvをインストールしようと試みたところエラーが発生し、
terminal$ brew doctorで確認したところ、以下のようなWarningが出現したので、その解決方法を備忘録として残しておきます。
Please note that these warnings are just used to help the Homebrew maintainers
with debugging if you file an issue. If everything you use Homebrew for is
working fine: please don't worry or file an issue; just ignore this. Thanks!

Warning: Unbrewed dylibs were found in /usr/local/lib.
If you didn't put them there on purpose they could cause problems when
building Homebrew formulae, and may need to be deleted.

Unexpected dylibs:
  /usr/local/lib/libgvplugin_core.6.dylib
  /usr/local/lib/libgvplugin_dot_layout.6.dylib
  /usr/local/lib/libgvplugin_gd.6.dylib
  /usr/local/lib/libgvplugin_neato_layout.6.dylib
  /usr/local/lib/libgvplugin_quartz.6.dylib

Warning: Unbrewed header files were found in /usr/local/include.
If you didn't put them there on purpose they could cause problems when
building Homebrew formulae, and may need to be deleted.

Unexpected header files:
  /usr/local/include/arith.h
  /usr/local/include/binary_log_types.h
  /usr/local/include/cdt.h
  /usr/local/include/cgraph.h
  /usr/local/include/color.h
  /usr/local/include/decode.h
  /usr/local/include/demux.h
  /usr/local/include/encode.h
  /usr/local/include/errmsg.h
  /usr/local/include/fcfreetype.h
  /usr/local/include/fcprivate.h
  /usr/local/include/fontconfig.h
  /usr/local/include/freetype/config/ftconfig.h
  /usr/local/include/freetype/config/ftheader.h
  /usr/local/include/freetype/config/ftmodule.h
  /usr/local/include/freetype/config/ftoption.h
  /usr/local/include/freetype/config/ftstdlib.h
  /usr/local/include/freetype/freetype.h
  /usr/local/include/freetype/ftadvanc.h
  /usr/local/include/freetype/ftbbox.h
  /usr/local/include/freetype/ftbdf.h
  /usr/local/include/freetype/ftbitmap.h
  /usr/local/include/freetype/ftbzip2.h
  /usr/local/include/freetype/ftcache.h
  /usr/local/include/freetype/ftchapters.h
  /usr/local/include/freetype/ftcid.h
  /usr/local/include/freetype/ftdriver.h
  /usr/local/include/freetype/fterrdef.h
  /usr/local/include/freetype/fterrors.h
  /usr/local/include/freetype/ftfntfmt.h
  /usr/local/include/freetype/ftgasp.h
  /usr/local/include/freetype/ftglyph.h
  /usr/local/include/freetype/ftgxval.h
  /usr/local/include/freetype/ftgzip.h
  /usr/local/include/freetype/ftimage.h
  /usr/local/include/freetype/ftincrem.h
  /usr/local/include/freetype/ftlcdfil.h
  /usr/local/include/freetype/ftlist.h
  /usr/local/include/freetype/ftlzw.h
  /usr/local/include/freetype/ftmac.h
  /usr/local/include/freetype/ftmm.h
  /usr/local/include/freetype/ftmodapi.h
  /usr/local/include/freetype/ftmoderr.h
  /usr/local/include/freetype/ftotval.h
  /usr/local/include/freetype/ftoutln.h
  /usr/local/include/freetype/ftparams.h
  /usr/local/include/freetype/ftpfr.h
  /usr/local/include/freetype/ftrender.h
  /usr/local/include/freetype/ftsizes.h
  /usr/local/include/freetype/ftsnames.h
  /usr/local/include/freetype/ftstroke.h
  /usr/local/include/freetype/ftsynth.h
  /usr/local/include/freetype/ftsystem.h
  /usr/local/include/freetype/fttrigon.h
  /usr/local/include/freetype/fttypes.h
  /usr/local/include/freetype/ftwinfnt.h
  /usr/local/include/freetype/t1tables.h
  /usr/local/include/freetype/ttnameid.h
  /usr/local/include/freetype/tttables.h
  /usr/local/include/freetype/tttags.h
  /usr/local/include/ft2build.h
  /usr/local/include/geom.h
  /usr/local/include/graphviz_version.h
  /usr/local/include/gvc.h
  /usr/local/include/gvcext.h
  /usr/local/include/gvcjob.h
  /usr/local/include/gvcommon.h
  /usr/local/include/gvconfig.h
  /usr/local/include/gvplugin.h
  /usr/local/include/gvplugin_device.h
  /usr/local/include/gvplugin_layout.h
  /usr/local/include/gvplugin_loadimage.h
  /usr/local/include/gvplugin_render.h
  /usr/local/include/gvplugin_textlayout.h
  /usr/local/include/gvpr.h
  /usr/local/include/lt_dlloader.h
  /usr/local/include/lt_error.h
  /usr/local/include/lt_system.h
  /usr/local/include/mux.h
  /usr/local/include/mux_types.h
  /usr/local/include/my_command.h
  /usr/local/include/my_list.h
  /usr/local/include/mysql.h
  /usr/local/include/mysql/client_plugin.h
  /usr/local/include/mysql/plugin_auth_common.h
  /usr/local/include/mysql/udf_registration_types.h
  /usr/local/include/mysql_com.h
  /usr/local/include/mysql_time.h
  /usr/local/include/mysql_version.h
  /usr/local/include/mysqld_error.h
  /usr/local/include/mysqlx_ername.h
  /usr/local/include/mysqlx_error.h
  /usr/local/include/mysqlx_version.h
  /usr/local/include/pack.h
  /usr/local/include/pathgeom.h
  /usr/local/include/pathplan.h
  /usr/local/include/png.h
  /usr/local/include/pngconf.h
  /usr/local/include/textspan.h
  /usr/local/include/types.h
  /usr/local/include/usershape.h
  /usr/local/include/xdot.h
解決法
まずは上のWarningから。(下のWarningも解決方法同じでした!!)
Warning: Unbrewed dylibs were found in /usr/local/lib.
If you didn't put them there on purpose they could cause problems when
building Homebrew formulae, and may need to be deleted.

Unexpected dylibs:
  /usr/local/lib/libgvplugin_core.6.dylib
  /usr/local/lib/libgvplugin_dot_layout.6.dylib
  /usr/local/lib/libgvplugin_gd.6.dylib
  /usr/local/lib/libgvplugin_neato_layout.6.dylib
  /usr/local/lib/libgvplugin_quartz.6.dylib
①ターミナルに以下を入力します。(ファイルの作成)
terminal$ vim ~/.del_files.sh②
〜が並んだページが出現するので、1行目に#!/bin/bashを貼り付け、2行目以降にUnexpected dylibs:に記載されているファイルをコピペします。(以下、参考)terminal#!/bin/bash /usr/local/lib/libgvplugin_core.6.dylib /usr/local/lib/libgvplugin_dot_layout.6.dylib /usr/local/lib/libgvplugin_gd.6.dylib /usr/local/lib/libgvplugin_neato_layout.6.dylib /usr/local/lib/libgvplugin_quartz.6.dylib③カーソルを一番上のファイル(2行目)の頭におき、
ctrl + vで矩形選択のビジュアルモード(VISUAL BLOCK)に移行。↓カーソルで一番下のファイルの頭まで選択し、:を押します。すると、下のラインに既に
:'<,'>が入力された状態でコマンドラインが表示されるので、続けてs/^/rm -f /と入力します。(rmは、ファイルやディレクトリを削除してあげるコマンドで、-fは、「削除しますか?」的なメッセージを都度出さないようにするオプションです。)④
Enterを押して、全ての行(一番上以外)の先頭にs/^/rm -f /が追加されているのを確認したら、もう一度:を押します。一番下の行に入力欄が出てくるので、wq!と入力し、Enterを押します。⑤通常の入力モードに戻るので、そこで
terminal$ bash ~/.del_files.shを実行。これでファイルが削除されます。
⑥以上が完了したら、
terminal$ brew doctorを実行し、エラー文が消えていたら、成功です。
追記
⑦もし、以下のようなWarningが出現した場合
Warning: Broken symlinks were found. Remove them with `brew cleanup`:
  /usr/local/lib/libgvplugin_core.dylib
  /usr/local/lib/libgvplugin_dot_layout.dylib
  /usr/local/lib/libgvplugin_gd.dylib
  /usr/local/lib/libgvplugin_neato_layout.dylib
  /usr/local/lib/libgvplugin_quartz.dylib
エラー文に従って、
terminal$ brew cleanupしてあげましょう。
こちらのWarningも上記と同じ方法で解決できます!!
Warning: Unbrewed header files were found in /usr/local/include.
If you didn't put them there on purpose they could cause problems when
building Homebrew formulae, and may need to be deleted.

Unexpected header files:
  /usr/local/include/arith.h
  /usr/local/include/binary_log_types.h
  /usr/local/include/cdt.h
  /usr/local/include/cgraph.h
  /usr/local/include/color.h
  /usr/local/include/decode.h
  /usr/local/include/demux.h
  /usr/local/include/encode.h
  /usr/local/include/errmsg.h
  /usr/local/include/fcfreetype.h
  /usr/local/include/fcprivate.h
  /usr/local/include/fontconfig.h
  /usr/local/include/freetype/config/ftconfig.h
  /usr/local/include/freetype/config/ftheader.h
  /usr/local/include/freetype/config/ftmodule.h
  /usr/local/include/freetype/config/ftoption.h
  /usr/local/include/freetype/config/ftstdlib.h
  /usr/local/include/freetype/freetype.h
  /usr/local/include/freetype/ftadvanc.h
  /usr/local/include/freetype/ftbbox.h
  /usr/local/include/freetype/ftbdf.h
  /usr/local/include/freetype/ftbitmap.h
  /usr/local/include/freetype/ftbzip2.h
  /usr/local/include/freetype/ftcache.h
  /usr/local/include/freetype/ftchapters.h
  /usr/local/include/freetype/ftcid.h
  /usr/local/include/freetype/ftdriver.h
  /usr/local/include/freetype/fterrdef.h
  /usr/local/include/freetype/fterrors.h
  /usr/local/include/freetype/ftfntfmt.h
  /usr/local/include/freetype/ftgasp.h
  /usr/local/include/freetype/ftglyph.h
  /usr/local/include/freetype/ftgxval.h
  /usr/local/include/freetype/ftgzip.h
  /usr/local/include/freetype/ftimage.h
  /usr/local/include/freetype/ftincrem.h
  /usr/local/include/freetype/ftlcdfil.h
  /usr/local/include/freetype/ftlist.h
  /usr/local/include/freetype/ftlzw.h
  /usr/local/include/freetype/ftmac.h
  /usr/local/include/freetype/ftmm.h
  /usr/local/include/freetype/ftmodapi.h
  /usr/local/include/freetype/ftmoderr.h
  /usr/local/include/freetype/ftotval.h
  /usr/local/include/freetype/ftoutln.h
  /usr/local/include/freetype/ftparams.h
  /usr/local/include/freetype/ftpfr.h
  /usr/local/include/freetype/ftrender.h
  /usr/local/include/freetype/ftsizes.h
  /usr/local/include/freetype/ftsnames.h
  /usr/local/include/freetype/ftstroke.h
  /usr/local/include/freetype/ftsynth.h
  /usr/local/include/freetype/ftsystem.h
  /usr/local/include/freetype/fttrigon.h
  /usr/local/include/freetype/fttypes.h
  /usr/local/include/freetype/ftwinfnt.h
  /usr/local/include/freetype/t1tables.h
  /usr/local/include/freetype/ttnameid.h
  /usr/local/include/freetype/tttables.h
  /usr/local/include/freetype/tttags.h
  /usr/local/include/ft2build.h
  /usr/local/include/geom.h
  /usr/local/include/graphviz_version.h
  /usr/local/include/gvc.h
  /usr/local/include/gvcext.h
  /usr/local/include/gvcjob.h
  /usr/local/include/gvcommon.h
  /usr/local/include/gvconfig.h
  /usr/local/include/gvplugin.h
  /usr/local/include/gvplugin_device.h
  /usr/local/include/gvplugin_layout.h
  /usr/local/include/gvplugin_loadimage.h
  /usr/local/include/gvplugin_render.h
  /usr/local/include/gvplugin_textlayout.h
  /usr/local/include/gvpr.h
  /usr/local/include/lt_dlloader.h
  /usr/local/include/lt_error.h
  /usr/local/include/lt_system.h
  /usr/local/include/mux.h
  /usr/local/include/mux_types.h
  /usr/local/include/my_command.h
  /usr/local/include/my_list.h
  /usr/local/include/mysql.h
  /usr/local/include/mysql/client_plugin.h
  /usr/local/include/mysql/plugin_auth_common.h
  /usr/local/include/mysql/udf_registration_types.h
  /usr/local/include/mysql_com.h
  /usr/local/include/mysql_time.h
  /usr/local/include/mysql_version.h
  /usr/local/include/mysqld_error.h
  /usr/local/include/mysqlx_ername.h
  /usr/local/include/mysqlx_error.h
  /usr/local/include/mysqlx_version.h
  /usr/local/include/pack.h
  /usr/local/include/pathgeom.h
  /usr/local/include/pathplan.h
  /usr/local/include/png.h
  /usr/local/include/pngconf.h
  /usr/local/include/textspan.h
  /usr/local/include/types.h
  /usr/local/include/usershape.h
  /usr/local/include/xdot.h
参考URL
brew doctorでのWarningを解決してみた(for Mac)
HowTo: Save File in Vi / Vim Text Editor
server - E45 readonly option is set (add ! to override) - Ask Ubuntu
- 投稿日:2019-02-03T13:13:29+09:00
Google検索結果をスクレイピングするときは、User-Agentの設定に気をつけよう
自分のブログの転載記事です。
TL;DR
User-Agentの設定に気をつけないと、Google検索結果のスクレイピングがうまくいかないかもしれません、というお話です。
ついでに、Google検索結果のスクレイピングはグレーっぽいというお話です。やってみて失敗したこと
Googleの検索結果をスクレイピングするなら、あなたはどのようなコードを書くでしょうか。
私はこんな感じで書きます。search_url = "https://www.google.co.jp/search?hl=jp&gl=JP&" query = URI.encode_www_form(q: "日本M&Aセンター") search_url += query charset = nil html = open(search_url) do |f| charset = f.charset f.read end doc = Nokogiri::HTML.parse(html, nil, charset)人によって細かい違いはあるかもしれませんが、上記はごく普通のNokogiriでのスクレイピングだと思います。
ここから、最初の検索結果に現れたサイトのURLを取得したいとします。
xpathでの指定が簡単そうでしたので、要素のxpathを指定し、そこからリンクテキストをスクレイピングするとします。link = doc.xpath('//div[@class="r"]/a') link[0].attribute('href').textそうすると、変数linkには何が入っているでしょうか。
puts link
=> nil
何も入っていません。何故でしょう。
結論から言うと、xpathの指定が間違っているからです。
そしてなぜxpathが間違っているのかというと、User-Agentを指定していないからなのです。User-Agentの検証
実際に検証してみましょう。
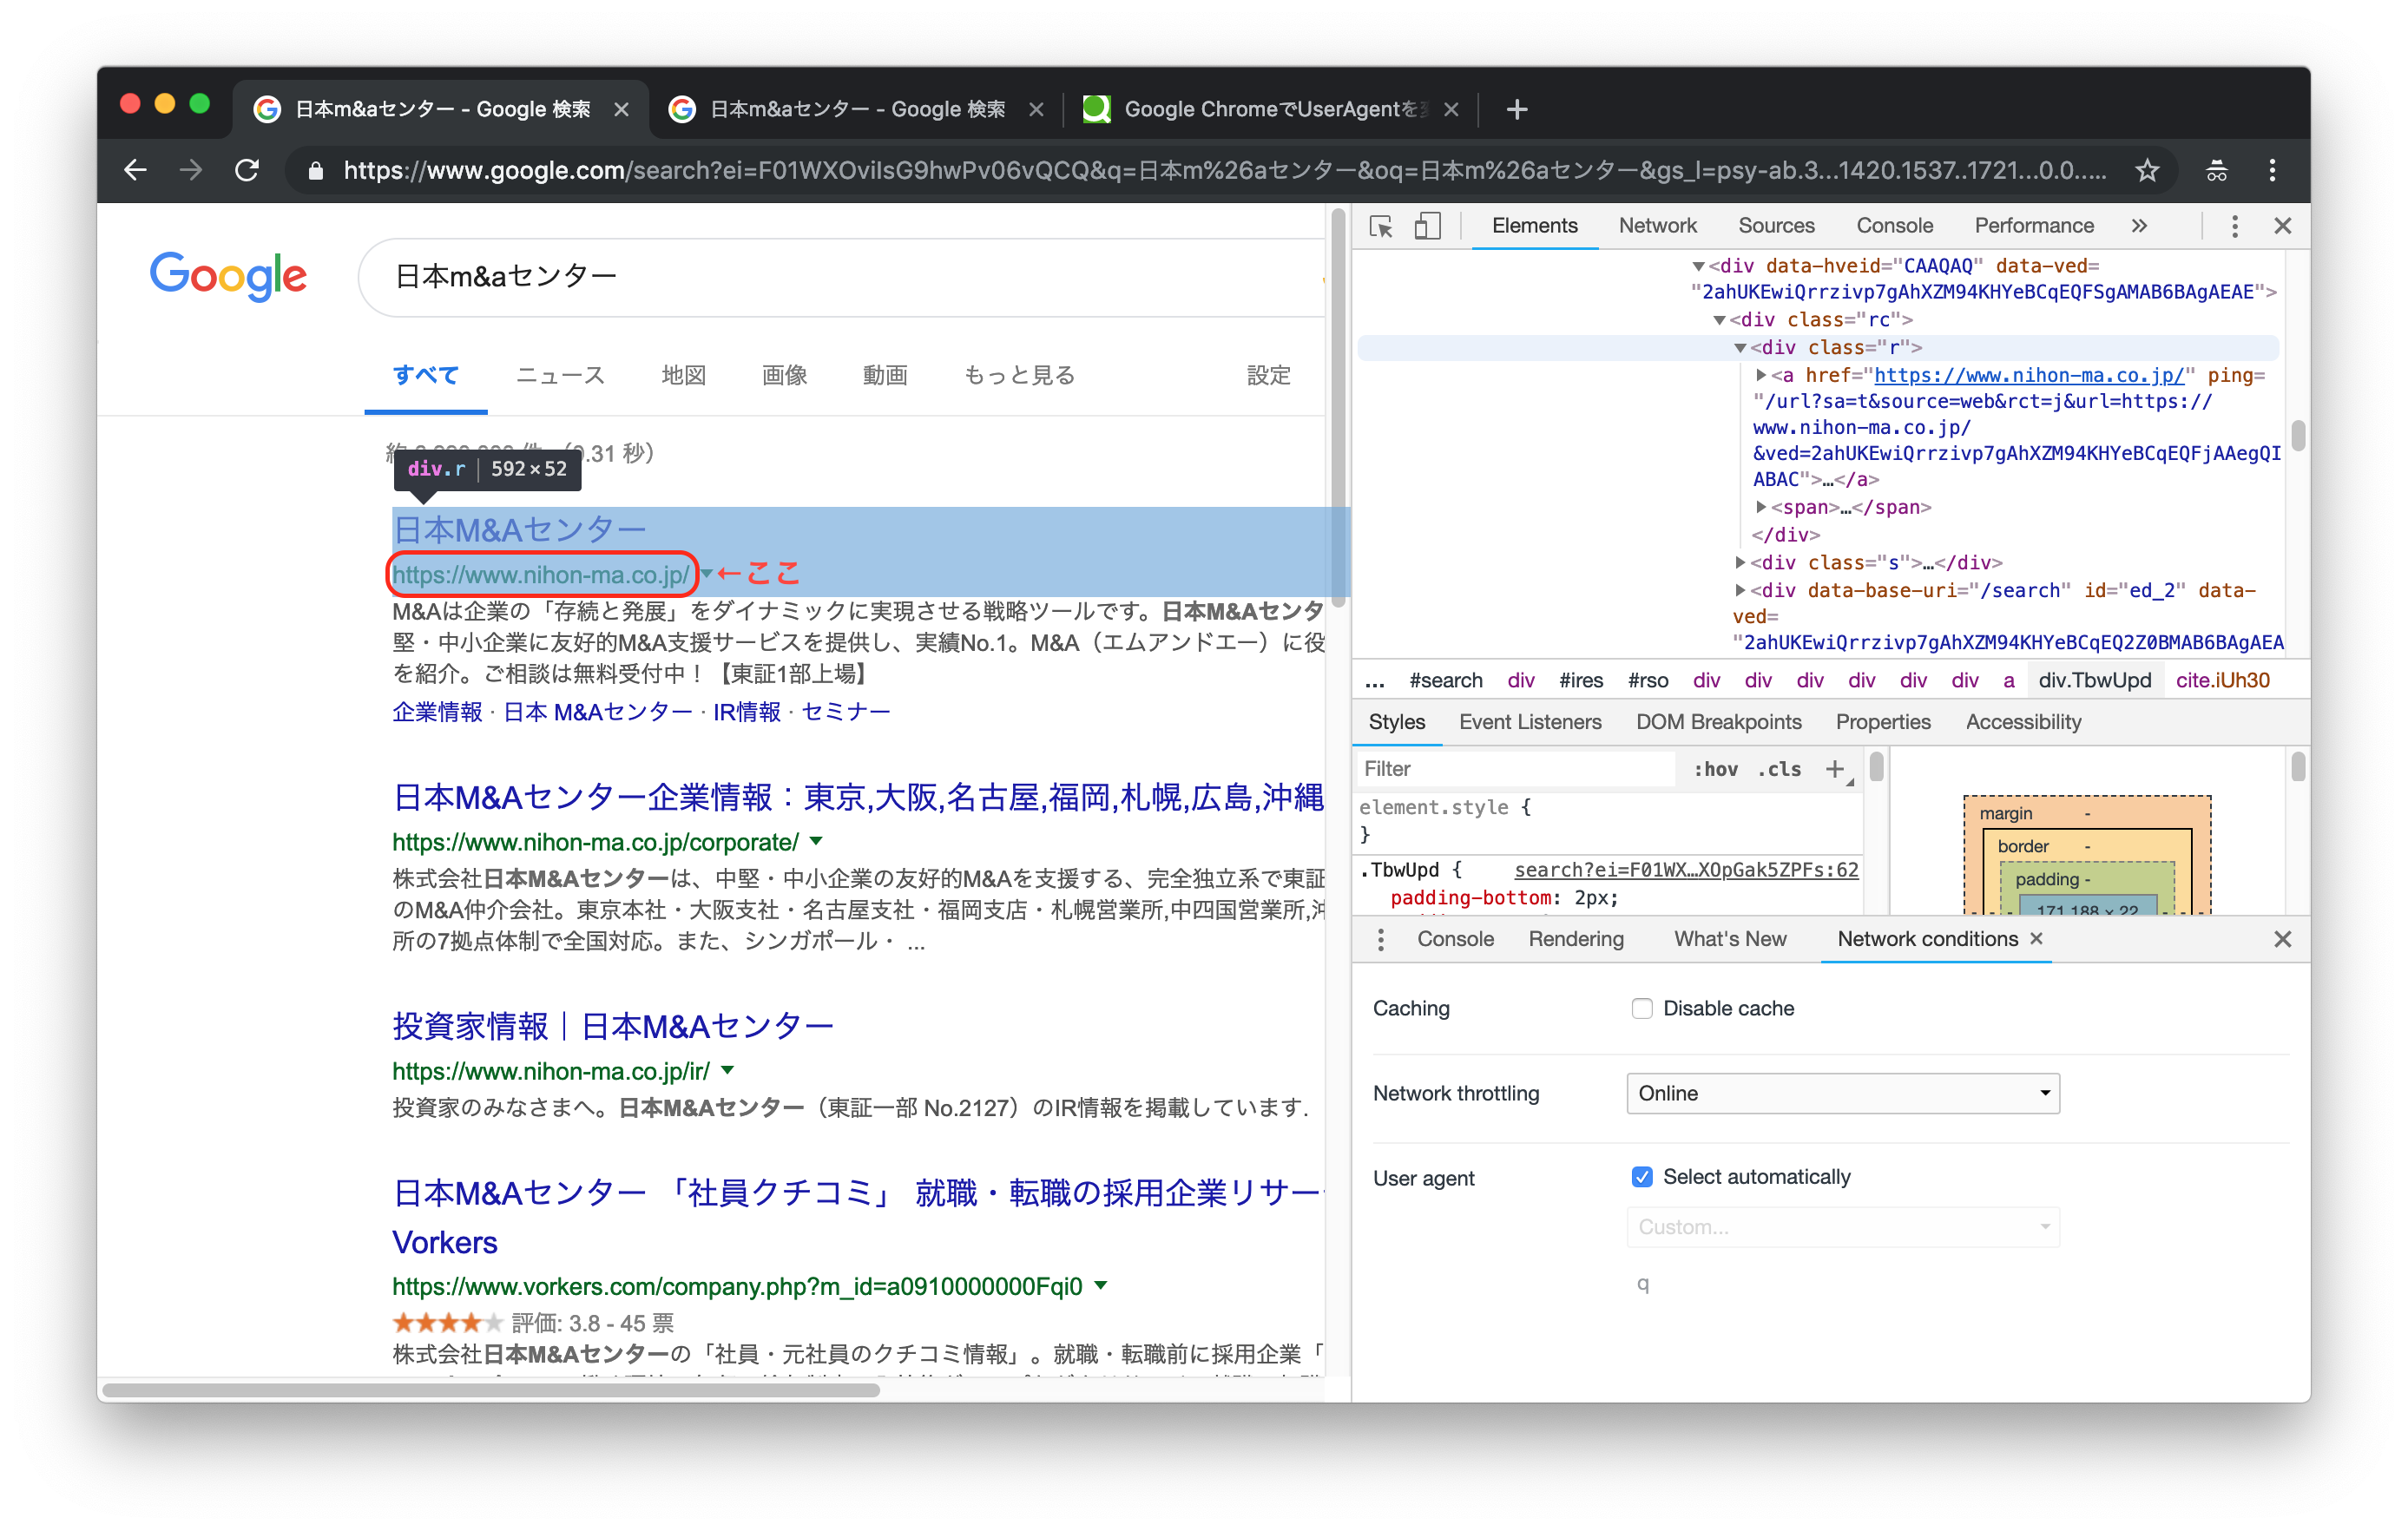
まずはUser-Agentの設定を何も変えずに検索してみます。
(User-Agent設定はChromeのdeveloper toolから見られます)
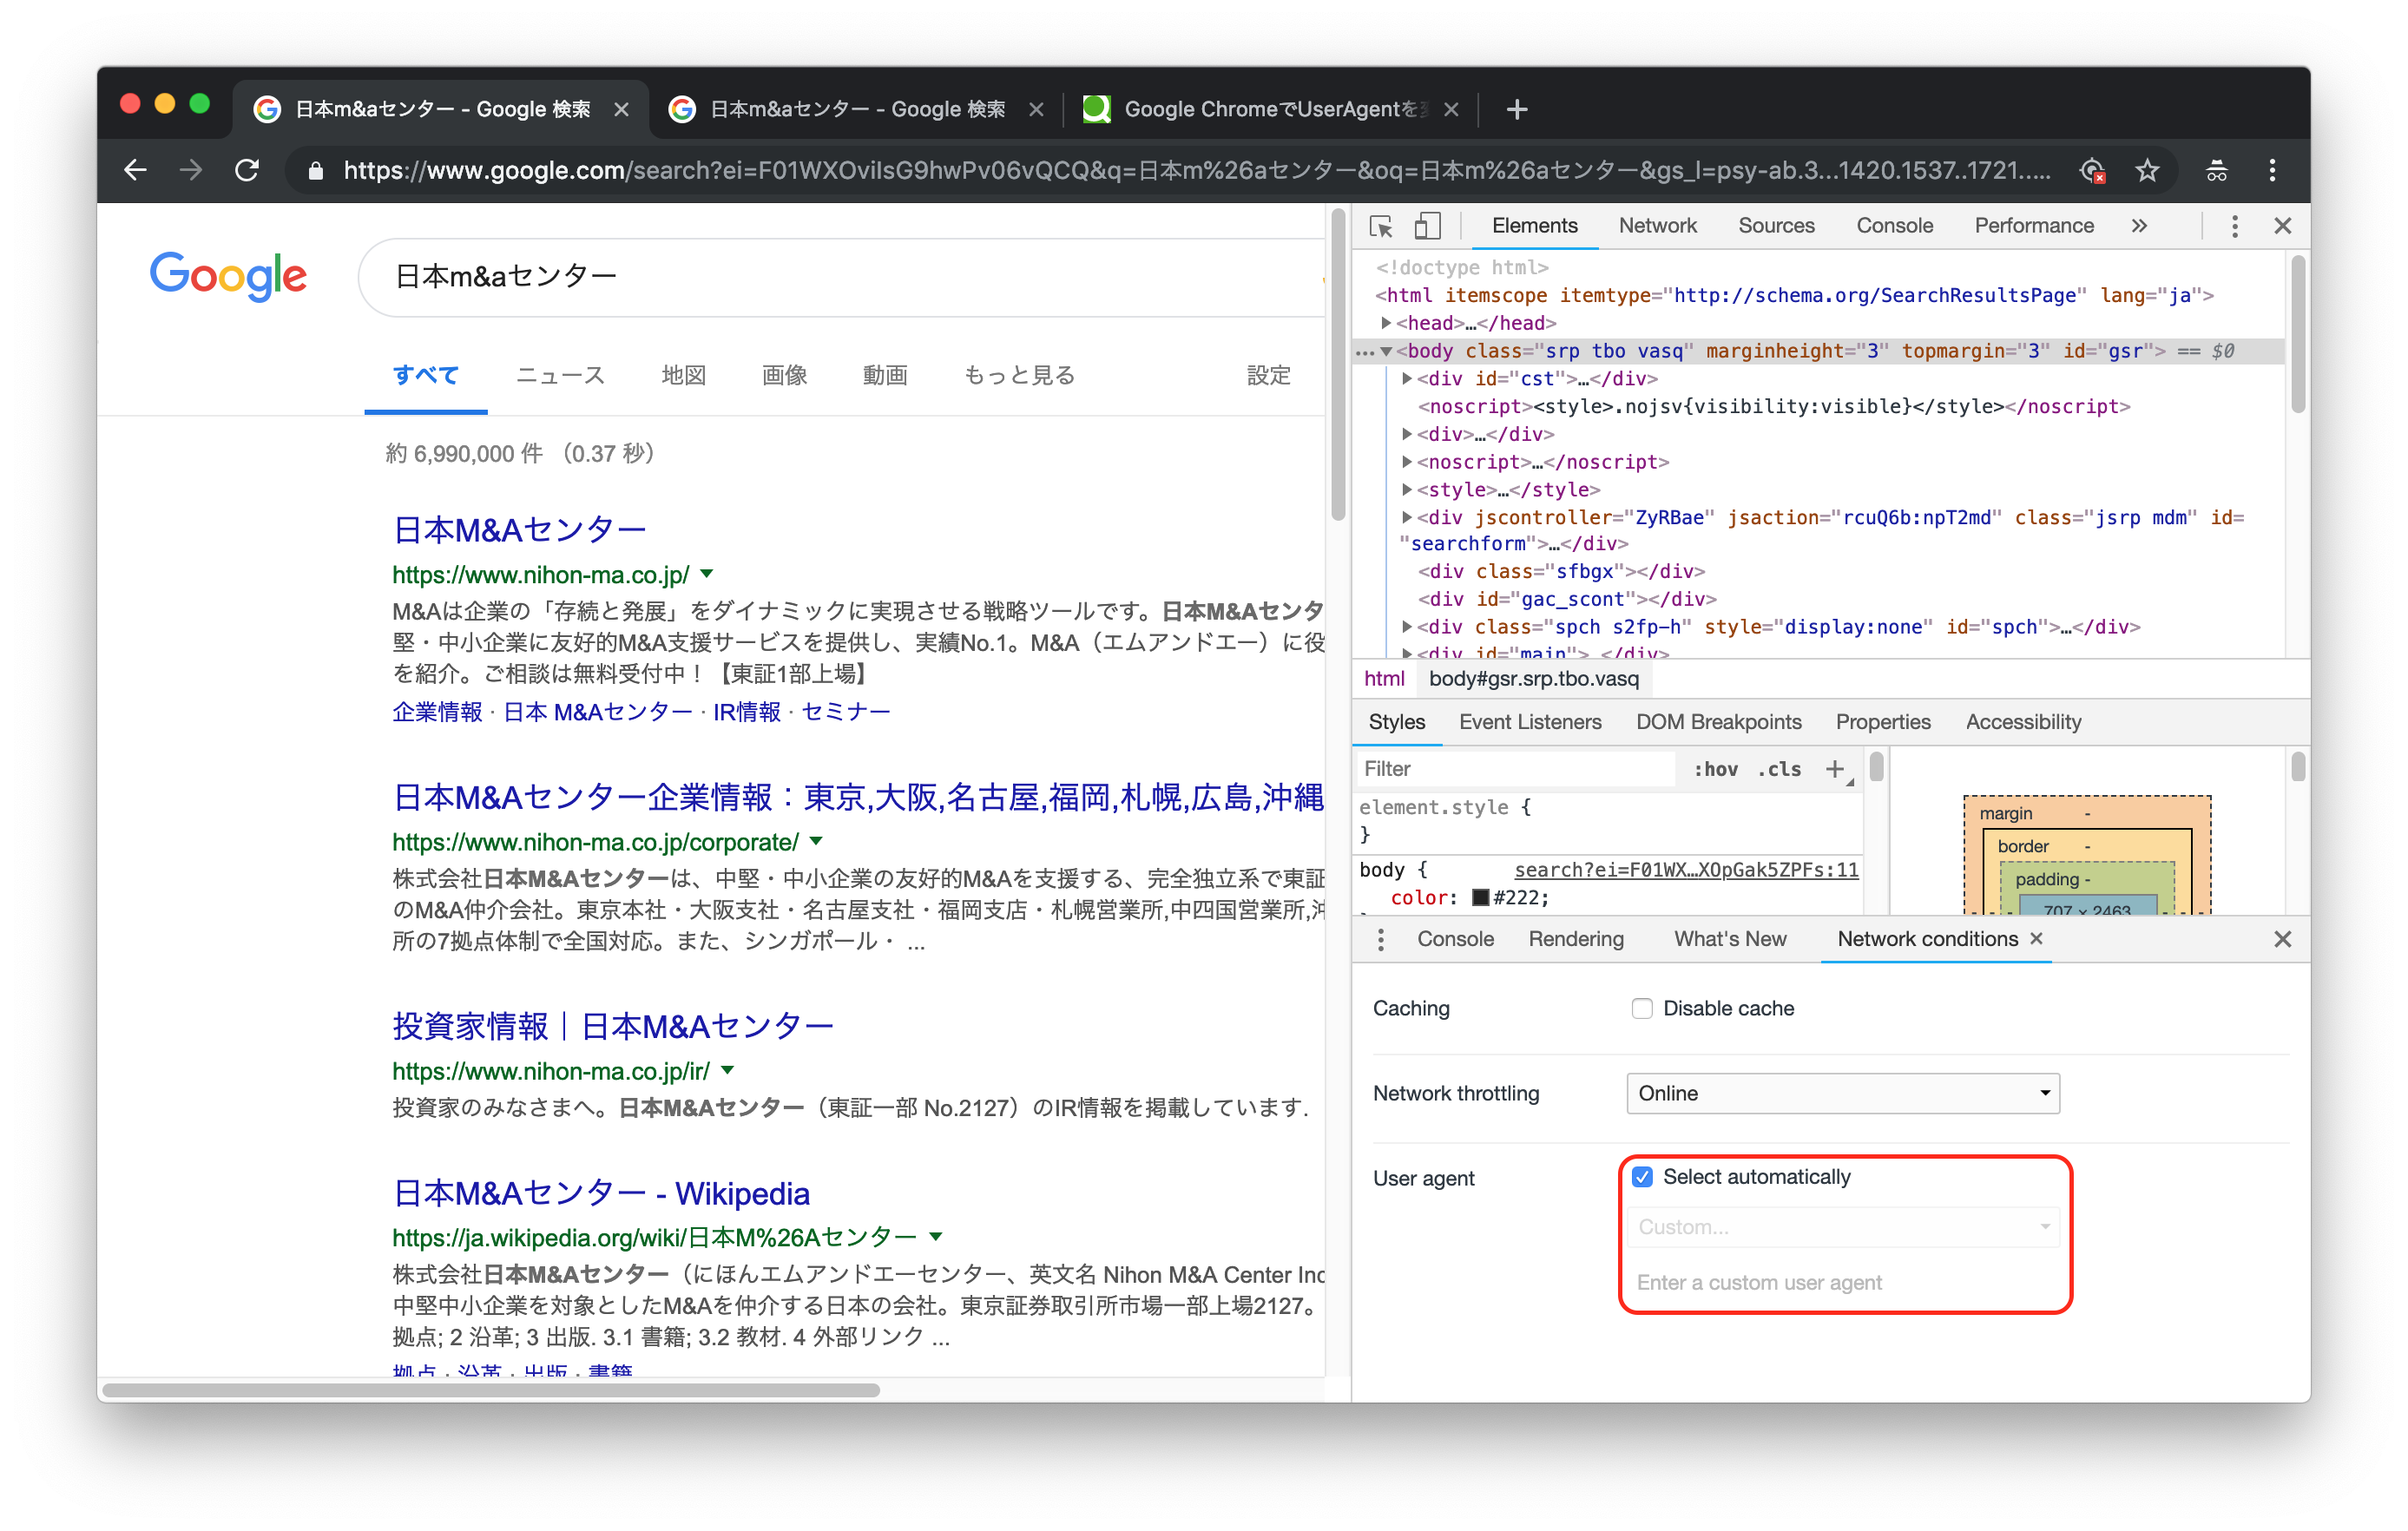
この場合、自分の環境ではUser-Agentは以下のような設定になっています。"Mozilla/5.0 (Macintosh; Intel Mac OS X 10_14_2) AppleWebKit/537.36 (KHTML, like Gecko) Chrome/72.0.3626.81 Safari/537.36"では次にUser-Agentに意味のない文字を設定して、同じ画面を表示してみます。
検索結果の画面が変わったことがわかるでしょうか。
表示されている内容が大きく変わったわけではありませんが、レイアウトやスタイルが変更されています。これがUser-Agentを設定せずにGoogle検索をおこなった場合のレスポンス、というわけです。
この状態でもスクレイピングは可能なのですが、要素のxpathが変わってしまうため、Chromeを見ながらスクレイピングするということがやりにくく、非常に開発がしづらくなってしまいます。対策
対策としては、User-Agentを明示的に設定してあげればよいです。
というわけで修正したソースコードがこちら。user_agent = "Mozilla/5.0 (Macintosh; Intel Mac OS X 10_14_2) AppleWebKit/537.36 (KHTML, like Gecko) Chrome/72.0.3626.81 Safari/537.36" search_url = "https://www.google.co.jp/search?hl=jp&gl=JP&" query = URI.encode_www_form(q: "日本M&Aセンター") search_url += query charset = nil html = open(search_url, 'User-Agent' => user_agent) do |f| charset = f.charset f.read end doc = Nokogiri::HTML.parse(html, nil, charset) link = doc.xpath('//div[@class="r"]/a') link[0].attribute('href').textこれで、自分の使用しているChrome環境と同じレスポンスを取得できるようになります。
スクレイピングのマナーとしてもUser-Agentは設定するべきですので、良いことづくめですね。余談
ちなみにGoogleの検索結果をスクレイピングするにあたっていろいろ調べたのですが、Googleは検索結果のスクレイピングを認めていないようですね。
robots.txtにも、以下の記載がありますので。User-agent: * Disallow: /searchとはいっても、実際はある程度黙認されているようです。
何にせよ、スクレイピングは自己責任で行うべきですね。

- 投稿日:2019-02-03T09:49:18+09:00
Ruby 文字列とシンボルの違い
今日は、文字列とシンボルの違いについて説明します。
結論から言うと文字列(クラスがStirng)は
同じ文字列の指定であっても
Rubyのインタプリタは毎回新たに
Stringのインスタンスを作成します。
(=毎回新しいオブジェクトを作成)一方、同じシンボルを指定した際は、
一度できたSymbolのインスタンス
を参照するのでオブジェクトは一つです。
(=オブジェクトは新たに作成されない)ん、訳わかんないですね
下の方で絵で解説しています。まずは実際に文字列とシンボルを指定して
オブジェクトのidを確認してみましょう。diff_Str_Sym.rbst1 = "moji" st2 = "moji" sy1 = :moji sy2 = :moji p st1.object_id p st2.object_id p sy1.object_id p sy2.object_idこれを実行した結果を -> で書いてます。
diff_Str_Sym.rbp st1.object_id #->70123700938120 p st2.object_id #->70123700938060 p sy1.object_id #->938588 p sy2.object_id #->938588Stringではオブジェクトidが異なるのに対して
Symbolはオブジェクトidが同じ。
Stirng(文字列)は同じ文字の並びを指定したときでも
オブジェクトが新しく作られていることがわかります。
Symbol(シンボル)は同じオブジェクトですね。絵で描いてみます。
じゃあ、文字列はコピーとか連結したらどうなるの???
と思う方、いると思います。
例えば以下のようなコピーの場合、オブジェクトは一つしか生まれません。copy.rbst1 = "moji" st2 = st1これはst2にはオブジェクトを参照する矢印がコピーされていると考えるとわかりやすいと思います。
文字列の連結の場合は以下のようになります。
add.rbst1 += "add"
"add"のオブジェクトが作られて、"moji"のオブジェクトと連結して
新しい"mojiadd"オブジェクトが作られる。
st1は"mojiadd"オブジェクトを参照する。
st2には影響無し。他にも不思議に思ったことがあった場合は
この概念と.object_idを使ってに確かめてみましょう!


