- 投稿日:2021-03-29T22:23:02+09:00
[Django REST Framework]とReactで詳細表示
実行環境
MacOS BigSur -- 11.2.1
Python3 -- 3.8.2
Django -- 3.1.7
djangorestframework -- 3.12.2
npm -- 6.14.4
react -- 17.0.1
react-dom -- 17.0.1
axios -- 0.21.1DRF(バックエンド)
DRFとReactを用いたWebアプリケーションの作成中、詳細表示の仕方がよく分からず困ったので今回はその詳細表示をまとめていきます。
前回の記事⇨
https://qiita.com/kachuno9/items/c72f91203dba9356c605
でAPI連携部分は終わっているのでその続きからです。
ちなみに、DRF側ではhttp://localhost:8000/api/v1/post で一覧表示、
http://localhost:8000/api/v1/post/○ で詳細表示が出来る様にURLを設定しています。React(フロントエンド)
今回はTrend.jsで一覧を表示させ、PostDetail.jsでそれぞれの詳細を表示させるという処理を実装しました。
一覧表示
Trend.jsimport React, { Component } from 'react'; import axios from 'axios'; import PostCard from './PostCard'; class Trend extends Component { state = { posts: [] }; componentDidMount() { this.getPosts(); } getPosts() { axios .get('http://localhost:8000/api/v1/post') .then(res => { this.setState({ posts: res.data }); }) .catch(err => { console.log(err); }); } render() { return ( <div> <MenuBar active={"/trend"}/> <h1>トレンドです</h1><hr /> {this.state.posts.map(item => ( <PostCard title={item.title} owner={item.owner} created_at={item.created_at} detail_link={`post/${item.id}`}/> ))} </div> ) } }; export default Trend;axiosを用いて指定したURLからデータを受け取っています。ちなみに表示にはReact-BootstrapのCardを用いており、PostCard.jsは以下の様になっています。
PostCard.jsimport React from 'react'; import Card from 'react-bootstrap/Card'; const PostCard = (props) => { return ( <Card style={{ width: '90%' }} border="success"> <Card.Body> <Card.Title >{props.title}</Card.Title><hr /> <Card.Text> {props.text} </Card.Text> <Card.Link href="#">{props.owner}</Card.Link> <Card.Link href={props.detail_link}>詳細</Card.Link><hr /> <Card.Footer> <Card.Subtitle className="mb-2 text-muted">{props.created_at}</Card.Subtitle> </Card.Footer> </Card.Body> </Card> ) }; export default PostCard;これによりこのように記事一覧を表示しています。
詳細表示
さて、今回の本題はこれらの一覧から詳細ページに移りたい!と言うことです。
色々な記事を調べた結果、React HooksのuseParams()を用いてURLからパラメータを取得する方法を見つけました。他にはpropsでコンポーネント間でパラメータを受け渡す方法もありますが、useParams()を使うとコンポーネントに関係なくどこからでもURLからパラメータを簡単に取得できるそうです。しかし、ここでReact Hookを理解していなかったためにクラスコンポーネント内でuseParams()を使おうとしてもどうしてもエラーが出て原因が分からず行き詰まりました。
ということで自分が躓いたReact Hooksについての注意事項を少しだけまとめておきます。React Hooks注意事項
- 関数コンポーネント内での仕様が大前提
- Hookは関数のトップレベルでのみ呼び出す(ループやif条件などの内部で呼び出さない)
- クラスコンポーネントでのライフサイクル(componentDidMount()等)は、HookではuseEffect()を用いる
ということで、詳細表示は以下の様な関数コンポーネントで実装しました。
PostDetail.jsimport React, { Component } from 'react'; import axios from 'axios'; import { useParams,Link } from 'react-router-dom'; import { useEffect,useState,toJson } from 'react'; const PostDetail = () => { const {id} = useParams(); const [title, setTitle] = useState([]) const [text, setText] = useState([]) const [created_at, setCreatedAt] = useState([]) const [owner, setOwner] = useState([]) useEffect(async () => { const result = await axios( 'http://localhost:8000/api/v1/post/'+id, ); setTitle(result.data.title); setText(result.data.text); setCreatedAt(result.data.created_at); setOwner(result.data.owner); }); return( <div> <h1>{title}</h1> <p>{created_at}</p><hr /> <p>{text}</p> <Link to="/trend">Return</Link> </div> ) } export default PostDetail;ちなみに、
const [title, setTitle] = useState([])
は配列の分割代入をしていて、useState()でtitleの初期化を行い、setTitle()でtitleに値を代入できるという処理を意味しています。JavaScriptに慣れていないのでこの辺の処理の意味の理解もまあまあ時間がかかりました。。。これで無事詳細表示の実装ができました。
React HooksはReact16.8で追加された新機能で、より多くのReactの機能をクラスを使わずに使用できる様にしているそうで、これからはHooksでどんどん実装していきたいです。

- 投稿日:2021-03-29T17:24:02+09:00
[React Next.js] Consoleに[Fast Refresh] rebuildingが表示されたままコンテナが落ちる問題
環境
Dockerで
- Next.js & GraphQL
- Rails
- MySQL DB
のDevServerを立てていて
VSCodeのRemoteContainerでComponentを編集している状態問題
ブラウザでページを表示(こちらは大丈夫)
Reactのファイルを編集し、ブラウザが自動的にfast refreshを始める
そしてそのままエラーでコンテナが落ちる
以下がそのエラーコンテナのログclient_1 | wait - compiling... client_1 | Killed client_1 | error Command failed with exit code 137. client_1 | info Visit https://yarnpkg.com/en/docs/cli/run for documentation about this command.解決策
error 137 はメモリ不足のエラーなのでコンテナの割り当てメモリを増やせばOK
MacのDockerであれば右上の歯車→Resources→ADVANCEDで設定できる最後に
エラーコードはちゃんと読みましょう(戒め)
- 投稿日:2021-03-29T11:14:50+09:00
Reactでdata-driven-formsを使ってみる
data driven forms
JSONで渡したデータをもとに、動的にフォームを生成するために、data driven formsを使う。
Data Driven Forms converts JSON form definitions (schemas) into fully functional React forms with the provided set of features.
公式ページから引用環境構築
create react appを使ってReactの環境を作成npx create-react-app data-driven-forms --template typescripttypescriptを使うため、
--template typescriptで作成
- 作成したファイルに移動する
cd data-driven-formsdata driven formsの準備
- data driven formsを使うには
form rendererのインストールと使用するコンポーネントの選択が必要。ここで使用するコンポーネントはAnt Design を選択。
form rendererのインストールyarn add @data-driven-forms/react-form-renderer
- Ant Designをインストール
yarn add antdyarn add @data-driven-forms/ant-component-mapperAnt Designのラジオボタンを表示する
1.
Radiobutton.tsxを作成し、必要なモジュールをインポートする。Radiobutton.tsximport React from 'react'; import FormRenderer from '@data-driven-forms/react-form-renderer/form-renderer'; import FormTemplate from '@data-driven-forms/ant-component-mapper/form-template'; import componentMapper from '@data-driven-forms/ant-component-mapper/component-mapper'; import 'antd/dist/antd.css' import radiobutton from './schema'2. ラジオボタンを表示させるための
schemaを定義するschema.tsconst radiobutton = { "fields": [ { "component": "radio", "label": "Radio", "name": "radio", "options": [ { "label": "Dogs", "value": "1" }, { "label": "Cats", "value": "2" }, { "label": "Hamsters", "value": "3" } ] } ] }; export default radiobutton3.
Radiobutton.tsxのreturnに描画処理を追加Radiobutton.tsxexport const Radiobutton = () => { return ( <div style={{ margin: 24 }}> <FormRenderer schema={radiobutton} FormTemplate={FormTemplate} componentMapper={componentMapper} onSubmit={console.log} /> </div> ) }onSubmit={console.log}だとonSubmitが実行されない
→
onSubmit={value => console.log(value)}とするとonSubmitが実行されるようになった
(REACT FINAL FORMのFAQページ中盤のVia Closure部分)Radiobutton.tsxexport const Radiobutton = () => { return ( <div style={{ margin: 24 }}> <FormRenderer schema={radiobutton} FormTemplate={FormTemplate} componentMapper={componentMapper} onSubmit={value => console.log(value)} /> </div> ) }同じものをクラスで書くと下記のようになります。
Radiobutton.tsxclass Radiobutton extends Component { render() { return ( <div style={{ margin: 24 }}> <FormRenderer schema={radiobutton} FormTemplate={FormTemplate} componentMapper={componentMapper} onSubmit={console.log} /> </div> ); } } export default Radiobutton;4. App.tsxにRadiobuttonコンポーネントをインポートして表示する
App.tsximport { Radiobutton } from './components/Radiobutton/Radiobutton' function App() { return ( <div className="App"> <Radiobutton /> </div> ); } export default App;ここまで完了後、実行すると下記のようになりました。
5.schemaの読み込みをJSONから行う
schema.tsで定義しているschemaをJSONで読み込むように変更する
src直下にschemaフォルダを作成。そこにradioButton.jsonファイルを作成。 ファイルの中身はschema.tsと同じです。radioButton.json{ "fields": [ { "component": "radio", "label": "Radio", "name": "radio", "options": [ { "label": "Dogs", "value": "1" }, { "label": "Cats", "value": "2" }, { "label": "Hamsters", "value": "3" } ] } ] }
- 作成したJSONを
Radiobutton.tsxでインポートする
Radiobutton.tsximport radiobutton from '../../schemas/radioButton.json'radiobuttonとしてインポートし、schemaに渡す。
Data-Driven-FormsでAnt Designのラジオボタンの表示ができました。
他のcssフレームワークを使う場合も基本的な流れは同じです。

- 投稿日:2021-03-29T08:11:43+09:00
すごいReactパッケージ5選
本記事は、Varun Chilukuri氏による「Five awesome React packages to check out」(2020年9月8日公開)の和訳を、著者の許可を得て掲載しているものです。
すごいReactパッケージ5選
小さくてもインパクトのある変更で、あなたのアプリを競合他社から引き離します。
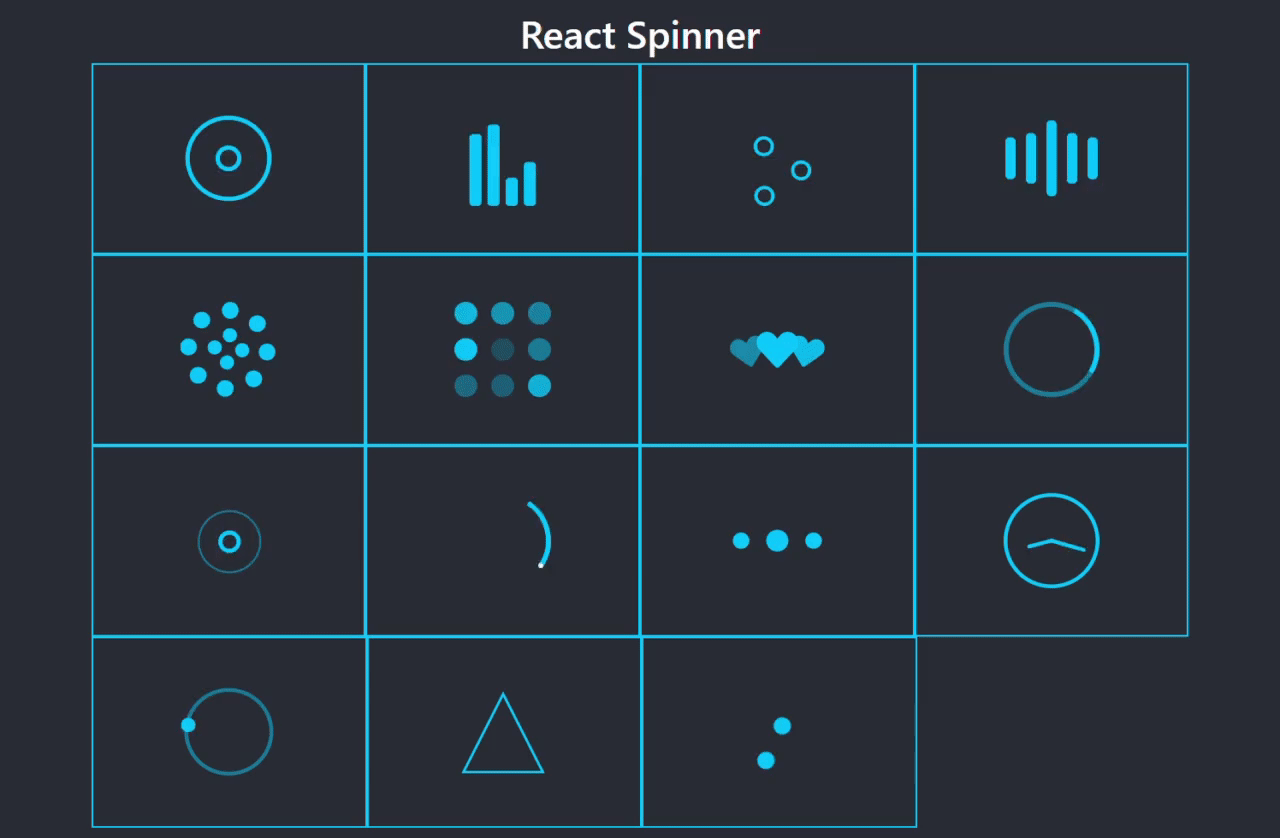
1. React Loader Spinner
待つのが好きな人はいません。今やユーザーは最低限の条件として、ウェブサイトが高速であることを求めています。アプリが重いか遅い場合は、コンテンツの読み込み中、この最新のローディングアニメーションを表示しましょう。アプリの美観を向上させるだけでなく、ユーザーを維持するのにも役立ちます。
このパッケージで提供する全ローディングアニメーション
npmまたはyarnから直接インストールします。npm i react-loader-spinner //or yarn add react-loader-spinner次に、必要なimport文を追加します。
import Loader from 'react-loader-spinner'そして、以下をプロジェクトに追加します。
<Loader type="Puff" color="#00BFFF" height={100} width={100} timeout={3000} //3 secs />詳細については、ドキュメントを参照してください。
react-loader-spinner
react-spinner-loaderは、非同期の待機中の動作を実装できる、単純なReact SVGスピナーコンポーネントです。
www.npmjs.com2. React Animated Burgers
このパッケージは、ナビゲーションバーにアニメーション付きメニューアイコンを追加します。無数のアイコンとアニメーションが用意されています。とても簡単に、カスタマイズとプロジェクトへの追加ができます。私は喜んで何度も使っています。
このパッケージで提供するさまざまなアニメーションの例
他の
npm/yarnパッケージと同様に、1行で簡単にインストールできます。npm i react-animated-burgers //or yarn add react-animated-burgers styled-componentsアニメーションアイコンを1つ選択してimportするだけで、プロジェクトに追加できます。
import { HamburgerSpin } from 'react-animated-burgers'そうすると、ヘッダーやナビゲーションバーに簡単に追加できます。
<HamburgerSpin buttonColor="red" //optional barColor="#F5F5F5" //optional {...{ isActive, toggleButton }} />最も正確で新しい情報については、ドキュメントを参照してください。
react-animated-burgers
パッケージのインストールは、npm i -S react-animated-burgers styled-components またはyarn add react-animated-burgers...
www.npmjs.com3. React Responsive Carousel
多くのウェブサイトでは、カルーセルを設置して、商品、チームメンバー、会社に関する一般的な情報を表示しています。サイトにカルーセルを設置したいと思っているなら、おそらく多くの中途半端またはいまいちなパッケージを見たことがあるでしょう。これは、他のパッケージとは違い、インパクトがあり軽量、完全にカスタマイズ可能です。
カルーセルの動作デモ
パッケージをインストールします。
npm i react-responsive-carousel //or yarn add react-responsive-carouselimport文を追加して、プロジェクトに追加します。
import { Carousel } from 'react-responsive-carousel' import "react-responsive-carousel/lib/styles/carousel.min.css";以下をウェブサイトに簡単に追加できます。
<Carousel> <div> <img src="assets/1.jpeg" /> <p className="legend">Legend 1</p> </div> <div> <img src="assets/2.jpeg" /> <p className="legend">Legend 2</p> </div> <div> <img src="assets/3.jpeg" /> <p className="legend">Legend 3</p> </div> </Carousel>このパッケージは、制御方法が多く自由度が高いです。このプロジェクトを十分に活用するには、GitHubリポジトリなどを見てください。
react-responsive-carousel
インパクトがあり軽量、完全にカスタマイズ可能なReactアプリ用カルーセルコンポーネントです。レスポンシブモバイルフレンドリーです...
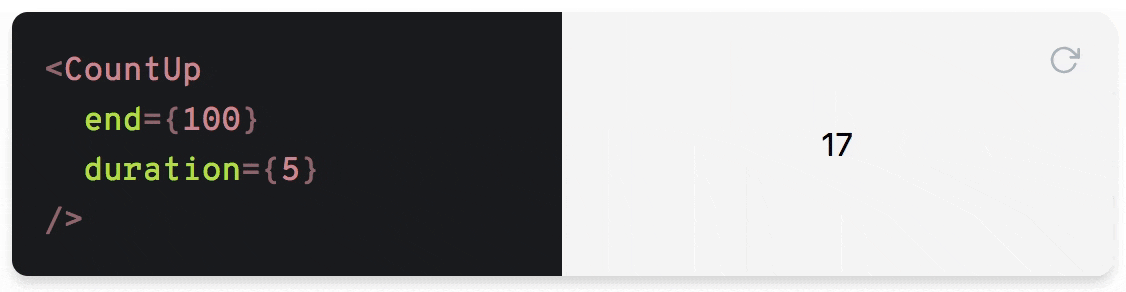
www.npmjs.com4. React CountUp
企業の統計情報をウェブサイトに表示することは、かつてない程に簡単になりました。このパッケージでは、動的カウンターを使って、印象的な数字を目立たせて強調表示できます(溶け込んでしまう静的テキストとは違います)。
パッケージをインストールします。
npm i react-countup //or yarn add react-countup以下をプロジェクトファイルの先頭に追加して、プロジェクトに追加します。
import CountUp from 'react-countup';以下は、3つの簡単な使用例です。
<CountUp end={100} /> <CountUp delay={2} end={100} /> <CountUp duration={5} end={100} />より高度な機能と自由度については、パッケージのページを参照してください。
react-countup
CountUp.jsのReactコンポーネントラッパーです。
www.npmjs.com5. React Markdown
Markdown言語が提供する効率性とシンプルさが好きな人にとっては朗報です。ReactコードでMarkdownを使う簡単な方法があります。このパッケージを使うだけです!
npmでインストールします。npm i react-markdown注:残念ながらこのパッケージは、yarnによるインストールをサポートしていません。
必要な文をコードに追加します。
const ReactMarkdown = require('react-markdown')使い始めましょう!
const React = require('react') const ReactDOM = require('react-dom') const ReactMarkdown = require('react-markdown') const input = '# This is a header\n\nAnd this is a paragraph' ReactDOM.render(<ReactMarkdown source={input} />, document.getElementById('container'))最も正確で新しい情報については、公式ページを参照してください。
react-markdown
Markdownを純粋なReactコンポーネントとしてレンダリングします。デモはこちらで見られます。https://rexxars.github.io/react-markdown/ react-markdown...
www.npmjs.comおわりに
この記事が参考になり、アプリに追加したいと思うパッケージが1つでもあったなら幸いです。
この記事などで使われているコードはすべて、私のGitHubレポジトリにあります。
この記事が役に立った場合は、フォローをお願いします!React.jsに関する記事がもっとあります。フィードバックやコメントもお待ちしています。
JavaScriptを分かりやすく解説
私たちが3つのパブリケーションとYouTubeチャンネルを持っていることを知っていますか?すべてのリンクはこちらplainenglish.io!
翻訳協力
この記事は以下の方々のご協力により公開する事ができました。改めて感謝致します。
Original Author: Varun Chilukuri
Original Article: Five awesome React packages to check out
Thank you for letting us share your knowledge!選定担当: @gracen
翻訳担当: @gracen
監査担当: -
公開担当: @gracenご意見・ご感想をお待ちしております
今回の記事はいかがでしたか?
・こういう記事が読みたい
・こういうところが良かった
・こうした方が良いのではないか
などなど、率直なご意見を募集しております。
頂いたお声は、今後の記事の質向上に役立たせて頂きますので、お気軽に
コメント欄にてご投稿ください。Twitterでもご意見を受け付けております。
皆様のメッセージをお待ちしております。


- 投稿日:2021-03-29T06:49:13+09:00
netlifyにReactプロジェクトをデプロイ
最近書いたコードはGithubにプッシュをして何かしらのツールでデプロイすることを心がけています。
折角毎日朝起きてコードを書いているのにも関わらず、それを証明するものがTwitterしかないのは心許ないですよね。
それであれば普通に使ったことのあるGithubに草を生やし、作ったアプリは誰でも触れるようにしていきたいと思いました。
今回はGithub経由でNetlifyにデプロイしたいと思います。
netlifyのコマンドをインストールする
まずコマンドをインストールします。
npm install -g netlify-cliインストール出来たか確認するためバージョンを見ます
netlify -vReactのプロジェクトを立ち上げる
次にデプロイするReactの準備をします。
定番の方法でやります。npm create-react-app ~~~~~それから今作ったディレクトリに移動します
cd ~~~~~一応インストール出来ているか立ち上げて確認します。
npm startこれでReactの公式ページが見れたらここまで問題ないです。
gitに上げる準備
ここは簡潔にまとめてしまいます。
git init
git add -A
git commit -m "first commit"
git remote add origin https://github.com/ユーザー名/プロジェクト名.git
git push -u origin master
これでgitへのpushは成功しました。
netlifyでプロジェクトを立ち上げ
ここからnetlifyにログイン/サインアップしてください。
githubアカウントで登録するのが楽だと思います。ログインするとトップページの真ん中に
があると思うので、ここをクリックします。それからGithubとnetliryを連携します。
New site from Gitをクリックした後のページに
- Github
- GitLab
- BitBuchet
の3つから連携する画面になるので今回はGithubを選択してインストールまで進めていってください。完了したらもう一度同じ手順でGitHubでプロジェクトを立ち上げて下さい。
次は3つの中からGithubを選択するとGItHubにあるリモートリポジトリが表示されるので、先ほど作ったプロジェクト名のリポジトリを選択してください。
そしたらCreate a new siteと表示され、色々いじれる画面に遷移したと思います。
しかし今回はどこもいじらずDeploy Siteをクリックしてください。
完了
そしたら次の画面で
このような場所があると思います。
立ち上げた直後は緑のPublishedが黄色で表示されるので緑なるまで待ちます。緑になったらeloquent-~~~~~.netlify.appをクリックして下さい。
これで無事Reactのサイトを表示出来たら成功です。
まとめ
どうでしたでしょうか?
Firebaseなどよりも簡単に立ち上げる事が出来たのではないでしょか?少しセットアップを加えるだけでGithubに草を生やしつつプロジェクトを公開できるのでオススメです!
今後はGit操作なしでnetlifyに立ち上げたりFIrebaseで立ち上げる方法を書いていきたいと思います!


- 投稿日:2021-03-29T01:46:35+09:00
【Gatsby.js】グローバル CSS を反映させたいときは、gatsby-browser.js に設定を記述するか、共有コンポーネントを作成する
Gatsby.js 製のサイトにグローバル CSS を使いたい
こんにちは、@ndj です。
表題の通りです。
フォントの設定とか、margin や padding の初期設定をすべてのページ全体に反映させたいときにいちいちコンポーネントごとにスタイルを読み込んだりするのは面倒です。
Gatsby: Standard Styling with Global CSS Filesを確認したところ、方法が見つかったので、備忘録として残しておきます。環境
- Gatsby.js: v3.1.1
- React.js: v17.0.1
結論
- グローバル CSS ファイルを作成する
- gatsby-browser.js でグローバル CSS ファイルを読み込む記述を追加する
手順
1. グローバル CSS ファイルを作成する
なにはともあれ、まずは CSS ファイルを作成します。
テストがてら body 要素を真っ赤にしておきましょう。global.cssbody { background-color: red; }2. gatsby-browser.js にグローバル CSS ファイルを読み込む記述を追加する
次は、gatsby-browser.js というファイルに、先ほど作成した global.css を読み込ませます。
Gatsby プロジェクトの root に gatsby-browser.js という名前のファイルを作成します。
そして、以下の記述を追加します。
global.css の場所は適宜確認してください。gatsby-browser.jsimport './global.css'; //もしくは、 //require('./global.css');これで OK です!
注意!
もし開発サーバーが動いていたら、再起動が必要です。
1. Ctrl+C を押して停止
2. gatsby develop を実行
gatsby-browser.js とは
Gatsby: Gatsby Browser APIsによると以下のような記述がありました。
Introduction
The file gatsby-browser.js lets you respond to actions within the browser, and wrap your site in additional components. The Gatsby Browser API gives you many options for interacting with the client-side of Gatsby.サイト全体をコンポーネントでラップできたりするらしいです。
アナリティクスの API なんかはここに設定するみたいです(訳にあまり自信がないです…)。
だがとりあえず、グローバル CSS を利用する際はあまり深く考える必要はないっぽい。What is gatsby-browser.js? Don’t worry about this too much and for now, just know that gatsby-browser.js is one of a handful of special files that Gatsby looks for and uses (if they exist). Here, the naming of the file is important. If you do want to explore more now, check out the docs.
Gatsby: Introduction to Styling in Gatsbyよりその他の方法
共有レイアウトコンポーネントを作成する方法もあるみたいです。
参考 Gatsby: Standard Styling with Global CSS Files参考
Gatsby: Introduction to Styling in Gatsby
Gatsby: Standard Styling with Global CSS Files
Gatsby: Gatsby Browser APIsさいごに
今後は、gatsby-browser.js についてもっと深く調べた記事なども書いていきたいと思います。
誤字脱字、間違いご指摘などありましたらコメントいただけますと幸いです。
ここまで読んでくださり、ありがとうございました。
- 投稿日:2021-03-29T01:46:35+09:00
【Gatsby.js】グローバル CSS を反映させたいときは、gatsby-browser.js に設定を記述する
Gatsby.js 製のサイトにグローバル CSS を使いたい
こんにちは、@ndj です。
表題の通りです。
フォントの設定とか、margin や padding の初期設定をすべてのページ全体に反映させたいときにいちいちコンポーネントごとにスタイルを読み込んだりするのは面倒です。
Gatsby: Standard Styling with Global CSS Filesを確認したところ、方法が見つかったので、備忘録として残しておきます。環境
- Gatsby.js: v3.1.1
- React.js: v17.0.1
結論
- グローバル CSS ファイルを作成する
- gatsby-browser.js でグローバル CSS ファイルを読み込む記述を追加する
手順
1. グローバル CSS ファイルを作成する
なにはともあれ、まずは CSS ファイルを作成します。
テストがてら body 要素を真っ赤にしておきましょう。global.cssbody { background-color: red; }2. gatsby-browser.js にグローバル CSS ファイルを読み込む記述を追加する
次は、gatsby-browser.js というファイルに、先ほど作成した global.css を読み込ませます。
Gatsby プロジェクトの root に gatsby-browser.js という名前のファイルを作成します。
そして、以下の記述を追加します。
global.css の場所は適宜確認してください。gatsby-browser.jsimport './global.css'; //もしくは、 //require('./global.css');これで OK です!
注意!
もし開発サーバーが動いていたら、再起動が必要です。
1. Ctrl+C を押して停止
2. gatsby develop を実行
gatsby-browser.js とは
Gatsby: Gatsby Browser APIsによると以下のような記述がありました。
Introduction
The file gatsby-browser.js lets you respond to actions within the browser, and wrap your site in additional components. The Gatsby Browser API gives you many options for interacting with the client-side of Gatsby.サイト全体をコンポーネントでラップできたりするらしいです。
アナリティクスの API なんかはここに設定するみたいです(訳にあまり自信がないです…)。
だがとりあえず、グローバル CSS を利用する際はあまり深く考える必要はないっぽい。What is gatsby-browser.js? Don’t worry about this too much and for now, just know that gatsby-browser.js is one of a handful of special files that Gatsby looks for and uses (if they exist). Here, the naming of the file is important. If you do want to explore more now, check out the docs.
Gatsby: Introduction to Styling in Gatsbyよりその他の方法
共有レイアウトコンポーネントを作成する方法もあるみたいです。
参考 Gatsby: Standard Styling with Global CSS Files参考
Gatsby: Introduction to Styling in Gatsby
Gatsby: Standard Styling with Global CSS Files
Gatsby: Gatsby Browser APIsさいごに
今後は、gatsby-browser.js についてもっと深く調べた記事なども書いていきたいと思います。
誤字脱字、間違いご指摘などありましたらコメントいただけますと幸いです。
ここまで読んでくださり、ありがとうございました。
- 投稿日:2021-03-29T00:28:36+09:00
素人基盤エンジニアがDockerでDjango REST Frameworkとreactを触るシリーズ③:reactの導入
素人基盤エンジニアがDockerでDjango REST Frameworkとreactを触るシリーズ②:Django REST Frameworkのつづき。
①からみたい場合はこちら。素人基盤エンジニアがDockerでDjango REST Frameworkとreactを触るシリーズ①:Djangoの導入reactの導入
最終的には、S3上にreactのアプリを配置してCloudFront経由で表示させたいが、構築/テストまでは同じEC2上でreactとdocker上のDjango REST frameworkを動作させて連携させることとする。
動作が確認出来たら、ビルドしS3に移行する。node.jsの導入
reactのビルド環境として、node.jsが必要なので、下記手順に従いインストールする。
https://docs.aws.amazon.com/ja_jp/sdk-for-javascript/v2/developer-guide/setting-up-node-on-ec2-instance.htmlcurl -o- https://raw.githubusercontent.com/nvm-sh/nvm/v0.34.0/install.sh | bash. ~/.nvm/nvm.shnvm install nodenode -e "console.log('Running Node.js ' + process.version)"Running Node.js v15.12.0
↑のような形でバージョンが表示されたらインストールは完了。create-react-app
今回は、reactアプリを簡単に作成することができるツールであるcreate-react-appを利用する。
(本格的にreactアプリを作成したい場合は自分で一から作成したほうが良いと思うが、今回はあくまでreactとDjango REST Frameworkを利用してとりあえず動くものを作るというところを目標とする。)
djangoのためのファイル群をbackendというディレクトリに作成したので、一旦/home/ec2-userまで戻り、下記コマンドを実行する。cd /home/ec2-user npm install -g yarn yarn global add create-react-app create-react-app frontendしばらくすると、frontendというディレクトリが作成され、下記のような構成になっているはず。
frontend
∟node_modules
 ∟パッケージ多数
∟package.json
∟public
 ∟favicon.ico
 ∟index.html
 ∟logo192.png
 ∟logo512.png
 ∟manifest.json
 ∟robots.txt
∟README.md
∟src
 ∟App.css
 ∟App.test.js
 ∟index.js
 ∟reportWebVitals.js
 ∟App.js
 ∟index.css
 ∟logo.svg
 ∟setupTests.js
∟yarn.lock
まずはデフォルトの状態で、reactアプリを起動させてみる。
cd frontend
yarn start
http://<ip-address>:3000
にアクセスする。
reactアプリが動作していることがわかる。
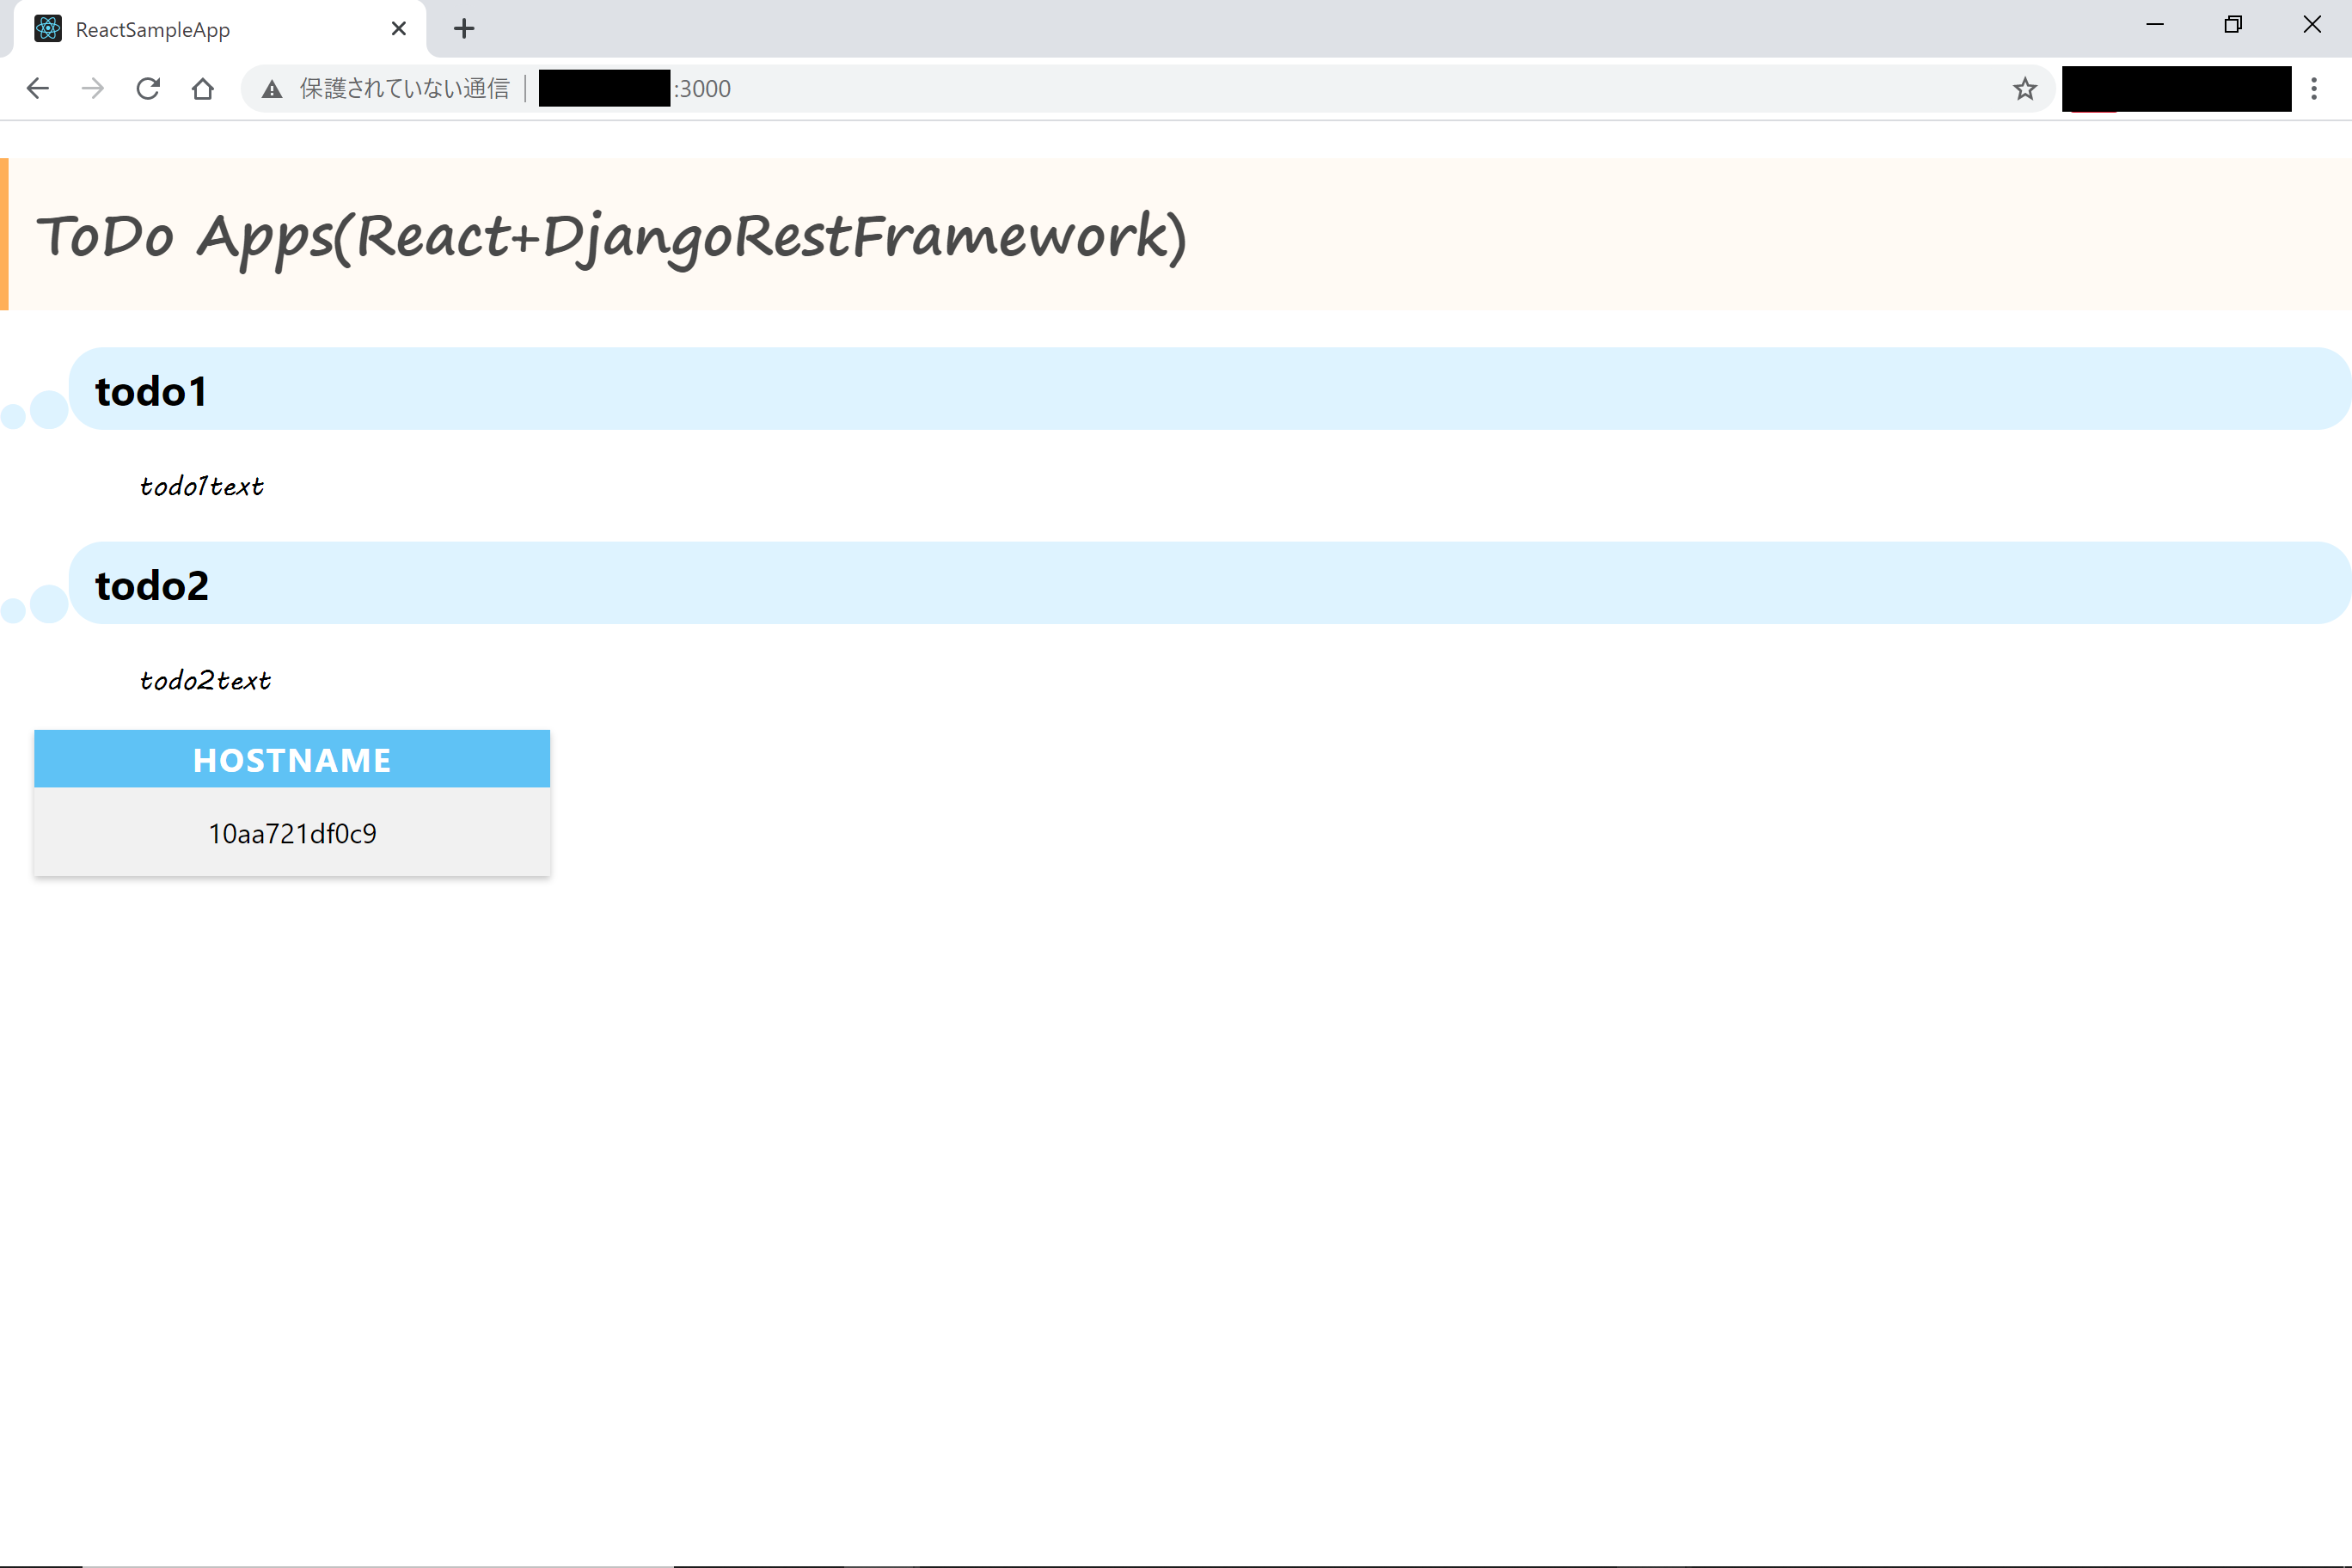
ctrl+Cで一旦終了し、下記ソースを修正してみる。public/index.html<!DOCTYPE html> <html lang="ja"> <head> <meta charset="utf-8" /> <link rel="icon" href="%PUBLIC_URL%/favicon.ico" /> <link href="https://use.fontawesome.com/releases/v5.6.1/css/all.css" rel="stylesheet"> <title>ReactSampleApp</title> </head> <body> <h1 class="title">ToDo Apps(React+DjangoRestFramework)</h1> <div id="root"></div> </body> </html>src/App.jsimport React, { Component } from 'react'; import axios from 'axios'; class App extends Component { constructor(props) { super(props); this.state = { todos: [], hostname: "" }; } componentDidMount() { this.getTodos(); this.getHostname(); } getTodos() { axios .get('http://<ip-address>:8000/api/todos/') .then(res => { this.setState({ todos: res.data }); }) .catch(err => { console.log(err); }); } getHostname() { axios .get('http://<ip-address>:8000/api/hostname/') .then(res => { this.setState({ hostname: res.data }); }) .catch(err => { console.log(err); }); } render() { return ( <div> {this.state.todos.map(item => ( <div key={item.id}> <h2>{item.title}</h2> <p className="item_body">{item.body}</p> </div> ))} <div className="box30"> <div className="box-title">HOSTNAME</div> <p>{this.state.hostname.hostname}</p> </div> </div> ); } } export default App;<ip-address>の部分を、EC2のIPアドレスにすることを忘れないように注意。
ここは、CloudFrontでの構成に移行すればIPアドレスを書かなくてもよくなる。src/index.cssbody { margin: 0; font-family: -apple-system, BlinkMacSystemFont, 'Segoe UI', 'Roboto', 'Oxygen', 'Ubuntu', 'Cantarell', 'Fira Sans', 'Droid Sans', 'Helvetica Neue', sans-serif; -webkit-font-smoothing: antialiased; -moz-osx-font-smoothing: grayscale; } code { font-family: source-code-pro, Menlo, Monaco, Consolas, 'Courier New', monospace; } h1.title { font-family: 'Segoe Print',sans-serif; padding: 0.5em; color: #494949;/*文字色*/ background: #fffaf4;/*背景色*/ border-left: solid 5px #ffaf58;/*左線(実線 太さ 色)*/ } .box30 { margin: 0 auto 0 20px; width: 300px; background: #f1f1f1; box-shadow: 0 2px 4px rgba(0, 0, 0, 0.22); } .box30 .box-title { font-size: 1.2em; background: #5fc2f5; padding: 4px; text-align: center; color: #FFF; font-weight: bold; letter-spacing: 0.05em; } .box30 p { text-align: center; padding: 15px 20px; margin: 0 0; } h2 { position: relative; padding: 8px 15px; margin-left: 40px; background: #def3ff; border-radius: 20px; } h2:before { font-family: "Font Awesome 5 Free"; content: "\f111"; position: absolute; font-size: 15px; left: -40px; bottom: 0; color: #def3ff; } h2:after { font-family: "Font Awesome 5 Free"; content: "\f111"; position: absolute; font-size: 23px; left: -23px; bottom: 0; color: #def3ff; } p.item_body { font-family: 'Mv Boli',sans-serif; margin-left: 80px; }ソース内で、axiosというパッケージを利用しているので、frontendディレクトリで下記コマンドを利用してパッケージを追加しておく。
yarn add axiosまた、Django側の設定も、別サイトからのクロスオリジンアクセスがあるため、下記のように書き換える。
backend/todo_project/settings.pyMIDDLEWARE = [ 'corsheaders.middleware.CorsMiddleware', 'django.middleware.common.CommonMiddleware', 'django.middleware.security.SecurityMiddleware', 'django.contrib.sessions.middleware.SessionMiddleware', 'django.middleware.common.CommonMiddleware', 'django.middleware.csrf.CsrfViewMiddleware', 'django.contrib.auth.middleware.AuthenticationMiddleware', 'django.contrib.messages.middleware.MessageMiddleware', 'django.middleware.clickjacking.XFrameOptionsMiddleware', ] CORS_ORIGIN_ALLOW_ALL = True一行目のcorsheaders~と最後のCORS_ORIGIN_ALLOW_ALLを追加。
docker-compose upでdbとdjangoのコンテナを起動する。
(この後reactも起動したいのでバックエンドで起動する。)cd backend docker-compose up &コンテナを起動させたまま、reactを起動。
cd ../frontend
yarn start
http://<ip-address>:3000/
にアクセスしてみる。
無事、todoとhostnameが表示されていることがわかる。
次回は、今回構築したreactアプリをビルドしS3へ配置して最終系であるCloudfrontの形に変更する。つづく