- 投稿日:2021-02-21T22:20:53+09:00
中国から日本のVPSサーバーへポートスキャンをかける
中国の国内から日本のサーバーに対してポートスキャンをかけてみました。
中国の環境:MacbookAir Catalina10.15.7
日本のサーバ:さくらのVPS1.MACにポートスキャンツールをインストール
brewコマンドでnmapをインストールします。
$ brew install nmap
==> Downloading https://nmap.org/dist/nmap-7.70.tar.bz2
############################################################################################ 100.0%
==> ./configure --prefix=/usr/local/Cellar/nmap/7.70 --with-libpcre=included --with-liblua=included

==> make
==> make install
Error: An unexpected error occurred during the `brew link` step
The formula built, but is not symlinked into /usr/local
Permission denied @ dir_s_mkdir - /usr/local/lib
Error: Permission denied @ dir_s_mkdir - /usr/local/lib
$
エラーが出ているのでフォルダを作成します。
$ sudo mkdir /usr/local/lib
$
$
$ ls -la
total 0
drwxr-xr-x  12 root                wheel  384 Jan 24 19:41 .
drwxr-xr-x@ 11 root                wheel  352 Aug 26 20:20 ..
-rw-r--r--   1 root                wheel    0 Feb  8  2020 .com.apple.installer.keep
drwxrwxr-x   6 user  admin  192 Jan 24 18:32 Cellar
drwxrwxr-x  17 user  admin  544 Oct 21  2018 Homebrew
drwxrwxr-x  12 user  admin  384 Jan 24 18:45 bin
drwxrwxr-x   7 user  admin  224 Oct 21  2018 etc
drwxr-xr-x   2 root                wheel   64 Jan 24 19:41 lib
drwxrwxr-x   8 user  admin  256 Jan 24 18:45 opt
drwxrwxr-x   3 user  admin   96 Oct 21  2018 sbin
drwxrwxr-x   5 user  admin  160 Jan 24 18:45 share
drwxrwxr-x   3 user  admin   96 Oct 21  2018 var
所有者がrootになっているのでユーザーに変更します。
root# chown user:admin lib

oot# ls -la
total 0
drwxr-xr-x  12 root                wheel  384 Jan 24 19:41 .
drwxr-xr-x@ 11 root                wheel  352 Aug 26 20:20 ..
-rw-r--r--   1 root                wheel    0 Feb  8  2020 .com.apple.installer.keep
drwxrwxr-x   6 user  admin  192 Jan 24 18:32 Cellar
drwxrwxr-x  17 user  admin  544 Oct 21  2018 Homebrew
drwxrwxr-x  12 user  admin  384 Jan 24 18:45 bin
drwxrwxr-x   7 user  admin  224 Oct 21  2018 etc
drwxr-xr-x   2 user  admin   64 Jan 24 19:41 lib
drwxrwxr-x   8 user  admin  256 Jan 24 18:45 opt
drwxrwxr-x   3 user  admin   96 Oct 21  2018 sbin
drwxrwxr-x   5 user  admin  160 Jan 24 18:45 share
drwxrwxr-x   3 user  admin   96 Oct 21  2018 var
もう一度nmapのインストールを実行すると、
なんだかRubyのエラーが出ています。$ brew install nmap Updating Homebrew... /usr/local/Homebrew/Library/Homebrew/brew.rb:17:in `<main>': HOMEBREW_REQUIRED_RUBY_VERSION was not exported! Please call bin/brew directly! (RuntimeError)brew doctorコマンドで不具合箇所を確認してみます。
$ brew doctor
==> Downloading https://homebrew.bintray.com/bottles-portable-ruby/portable-ruby-2.6.3_2.yosemite.bottle.tar.gz
###########################                                                                   29.8%
curl: (56) LibreSSL SSL_read: SSL_ERROR_SYSCALL, errno 54
Error: Checksum mismatch.
Expected: b065e5e3783954f3e65d8d3a6377ca51649bfcfa21b356b0dd70490f74c6bd86
  Actual: 27e4ed5659dc705a7dcb86c7ab20f3dc61379a15ba0297e2656fdb51cfb9b986
 Archive: /Users/Library/Caches/Homebrew/portable-ruby-2.6.3_2.yosemite.bottle.tar.gz
To retry an incomplete download, remove the file above.
Error: Failed to upgrade Homebrew Portable Ruby!
どうやらRubyのアップデートに失敗したようです。
homebrewってruby使ってるんですね、知らなかったです。チェックサムのミスマッチと言っているので、ファイルを削除してから
もう一度brew doctorを実行してみます。$ brew doctor ==> Downloading https://homebrew.bintray.com/bottles-portable-ruby/portable-ruby-2.6.3_2.yosemite.bottle.tar.gz #################################################################################################################################### 100.0% ==> Pouring portable-ruby-2.6.3_2.yosemite.bottle.tar.gz Please note that these warnings are just used to help the Homebrew maintainers with debugging if you file an issue. If everything you use Homebrew for is working fine: please don't worry or file an issue; just ignore this. Thanks! Warning: The following directories do not exist: /usr/local/Frameworks /usr/local/include You should create these directories and change their ownership to your account. sudo mkdir -p /usr/local/Frameworks /usr/local/include sudo chown -R $(whoami) /usr/local/Frameworks /usr/local/include Warning: You have unlinked kegs in your Cellar. Leaving kegs unlinked can lead to build-trouble and cause brews that depend on those kegs to fail to run properly once built. Run `brew link` on these: nmap Warning: Broken symlinks were found. Remove them with `brew cleanup`: /usr/local/share/man/man1/brew-cask.1 $1つ目のwarningから対応していきます。
$ sudo mkdir -p /usr/local/Frameworks /usr/local/include
Password:
$ sudo chown -R $(whoami) /usr/local/Frameworks /usr/local/include
$ ll /usr/local/Frameworks
bash: ll: command not found
$
$
$ ls -la /usr/local/Frameworks
total 0
drwxr-xr-x   2 user  wheel   64 Jan 25 11:06 .
drwxr-xr-x  14 root                wheel  448 Jan 25 11:06 ..
$ ls -la /usr/local/include
total 0
drwxr-xr-x   2 user  wheel   64 Jan 25 11:06 .
drwxr-xr-x  14 root                wheel  448 Jan 25 11:06 ..
$
2つ目のwarning対応。
[hiroshinoMacBook-ea:/usr/local $ brew link nmap
Linking /usr/local/Cellar/nmap/7.70... 25 symlinks created
3つ目のwarning
$ brew cleanup
Removing: /Users/Library/Caches/Homebrew/openssh-7.7p1.high_sierra.bottle.tar.gz... (1.6MB)
Removing: /Users/Library/Caches/Homebrew/openssl-1.0.2o_2.high_sierra.bottle.tar.gz... (3.7MB)
Removing: /Users/Library/Caches/Homebrew/bash-completion-1.3_3.high_sierra.bottle.tar.gz... (142.2KB)
Removing: /Users/Library/Caches/Homebrew/linkage.db... (24KB)
Removing: /Users/Library/Logs/Homebrew/openssh... (64B)
Removing: /Users/Library/Logs/Homebrew/openssl... (64B)
Removing: /Users/Library/Logs/Homebrew/bash-completion... (64B)
Pruned 1 symbolic links and 2 directories from /usr/local
そして確認。
$ brew doctor
Your system is ready to brew.
インストールされていることを確認。
$ nmap -v
Starting Nmap 7.70 ( https://nmap.org ) at 2021-01-25 11:16 CST
Read data files from: /usr/local/bin/../share/nmap
WARNING: No targets were specified, so 0 hosts scanned.
Nmap done: 0 IP addresses (0 hosts up) scanned in 0.07 seconds
2.ポートスキャンを実施
nmapで日本のVPSサーバに対してポートスキャン実施。
$ nmap 133.125.50.166
Starting Nmap 7.70 ( https://nmap.org ) at 2021-01-25 11:18 CST
Note: Host seems down. If it is really up, but blocking our ping probes, try -Pn
Nmap done: 1 IP address (0 hosts up) scanned in 3.05 seconds
なぜかpingが飛ばない。。
切り分けのため、中国国内のサーバにnmapを実施してみる。$ nslookup baidu.com Server: 219.149.6.99 Address: 219.149.6.99#53 Non-authoritative answer: Name: baidu.com Address: 220.181.38.148 Name: baidu.com Address: 39.156.69.79 $ nmap 220.181.38.148 Starting Nmap 7.70 ( https://nmap.org ) at 2021-01-25 11:19 CST Nmap scan report for 220.181.38.148 Host is up (0.021s latency). Not shown: 998 filtered ports PORT STATE SERVICE 80/tcp open http 443/tcp open https Nmap done: 1 IP address (1 host up) scanned in 44.74 seconds問題無くスキャンできました。
ということでポートスキャンの通信はGFWでブロックされている可能性が高そうです。
- 投稿日:2021-02-21T22:20:45+09:00
Windows USキーボードでMac風(Alt + Space)の日本語と英数の入力切り替え
こんにちは.
Sadmachineです.
WindowsのUSキーボード使用環境でMacみたいな日本語と英数の切り替えを行えるようにしていきます.
Windowsをクリーンインストールしたついでにサクッとまとめます.目次
AutoHotKeyのインストールと設定
この項ではAlt + Spaceで日本語と英数の切り替えを行えるようにします.
AutoHotKeyのインストール
以下のURLからAutoHotKeyをダウンロードします.
https://autohotkey.com/download/
”Download AutoHotkey Installer” を押せばインストーラーがダウンロードされます.
.exeファイルを実行 → Express Installationを押す → Installation completeが表示されたらインストールの完了です.AutoHotKeyの設定
1.AutoHotKeyのスプリクトを新規作成
好きなディレクトリで 右クリック → 新規作成 → AutoHotKey Scriptを押す.
新規スクリプトの名前は適当に altspace.ahk とでもしておきましょう.
(以下,altspace.ahkという名前に設定したとして進めていきます)2.AutoHotKeyのスプリクトを編集
altspace.ahkを右クリックしてEdit Scriptを選択するとメモ帳などで以下のような文言が書かれたスクリプトが開かれます.
altspace.ahk(書き換え前)#NoEnv ; Recommended for performance and compatibility with future AutoHotkey releases. ; #Warn ; Enable warnings to assist with detecting common errors. SendMode Input ; Recommended for new scripts due to its superior speed and reliability. SetWorkingDir %A_ScriptDir% ; Ensures a consistent starting directory.altspace.ahkのスクリプトの中身を全て消して以下の内容に書き換えます.
altspace.ahk(書き換え後)!Space::Send, {vkF3sc029}書き換えたら保存.
altspace.ahkを右クリックして「ショートカットの作成」を押し,ショートカットを作成します.
デフォルトでは ”altspace.ahk - ショートカット” とかになっているはず.
このショートカットは次項「起動時にAutoHotKeyを起動させる」で使用するものです.起動時にAutoHotKeyを起動させる
”altspace.ahk - ショートカット”を以下の場所に移動させます.
C:\Users\ユーザー名\AppData\Roaming\Microsoft\Windows\Start Menu\Programs\Startup日本語での表記は以下のようになっています.
C:\Users\ユーザー名\AppData\Roaming\Microsoft\Windows\スタートメニュー\プログラム\スタートアップ移動させ終えたら,”再起動”をしてAlt + Spaceで日本語と英数の入力切り替えができるか確認してください.
※AppDataは隠しフォルダになっている可能性があるため,見当らなかった場合は隠しフォルダ・ファイルを表示できるようにしましょう.
まとめ
Windows USキーボードでもMac風(Alt + Space)の日本語と英数の入力切り替え方法を紹介しました.
備忘録的なまとめですが,誰かの参考になれば嬉しいです.
少しでも参考になりましたらLGTMやフォロー,Twitterでの拡散をしていただければ幸いです.参考サイト
- 投稿日:2021-02-21T21:59:38+09:00
初学者がDocker composeでPostgreSQLとpdAdmin4の環境を構築する
概要
初学者がDocker composeを使って、PostgreSQLとpgAdmin4の環境を構築しました。とりあえず作成した環境なので、ボリュームのマウントなどは行っていません。
※Dockerのインストール等は既に完了しています。
docker-compose.ymlを作成
docker-compose.yml
version: '3'

services:
  db:
    image: postgres
    container_name: pg-docker
    ports:
      -  '5432:5432'
    environment:
        - 'POSTGRES_USER=postgres'
        - 'POSTGRES_PASSWORD=postgres'
        - 'POSTGRES_DB=pg_db'

  pgadmin4:
    image: dpage/pgadmin4
    container_name: pgadmin4
    ports:
      - '80:80'
    environment:
      - 'PGADMIN_DEFAULT_EMAIL=xxx@yyy.com'
      - 'PGADMIN_DEFAULT_PASSWORD=pga4_pw'
docker-compose.ymlを実行
デタッチモード: -dでdocker-composeを実行します。docker-compose upでbuildとrunが同時にできるので便利です。
$ docker-compose.yml up -dコンテナの状態を確認
StateがUpになっていることを確認します。
$ docker-compose ps
  Name                Command              State              Ports
------------------------------------------------------------------------------
postgres   docker-entrypoint.sh postgres   Up      0.0.0.0:5432->5432/tcp
pgadmin4   /entrypoint.sh                  Up      443/tcp, 0.0.0.0:80->80/tcp
自分のIPアドレスを確認
色々な方法があると思いますが、とりあえず私はシステム環境設定からネットワークを開き、IPアドレスを確認しました。
ブラウザからpdAdmin4にアクセス
ブラウザを開き、IPアドレス:80にアクセスします(80番ポートは、docker-compose.ymlで設定)。タイプミスなどが無ければ、pdAdmin4のトップページが表示されると思います。
ログインの情報はdocker-compose.ymlのpgadmin4のenvironmentに記述した内容を入力します。
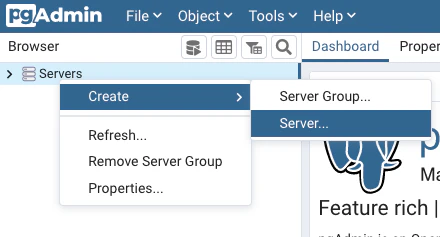
サーバー(postgre)に接続
ログインが完了したら、右側のメニューからServersを右クリックし、Createにマウスポインターを合わせ、Server...を選択します。
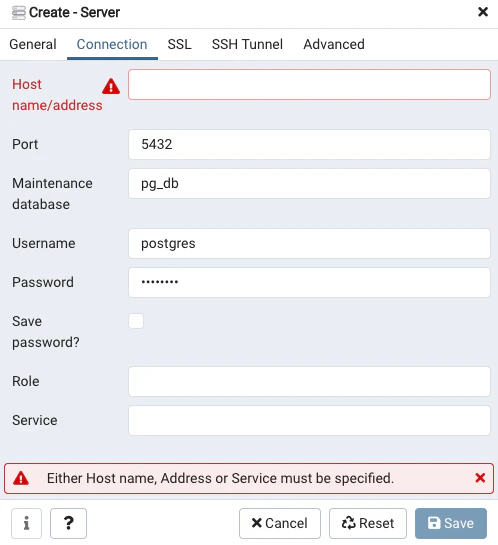
Create-Serverウィンドウが表示されるので、GeneralタブのNameにpd-dockerと入力します。一応、docker-compose.ymlで記述したcontainer-nameと合わせていますが、必要ないかもしれません。
Connectionタブをクリックし、HostはPCのIPアドレス、Portは5432を入力します。Maintenance databaseとUsernameとPasswordは、docker-compose.ymlのenvironmentで設定した値を入力します。
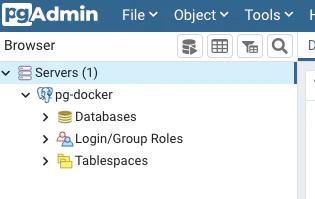
Saveボタンをクリックし、問題がなければ接続が完了します。
注意点
冒頭にも書きましたが、ボリュームをマウントしていないのでコンテナがUpでなくなると(消すと?)、データベースも消えてしまうので運用する際は注意が必要です。

- 投稿日:2021-02-21T18:01:42+09:00
macOS Big Surにアップデート後、pyenvを使用したpython3.8.5~のインストールが失敗するようになった問題の対処法
・MacOS Big Sur 11.2.1
・xcode.app: 12.4
・pyenv: 1.2.22こんなエラー
BUILD FAILED (OS X 11.2.1 using python-build 20180424)

Inspect or clean up the working tree at /var/folders/7t/s4sxvwqd5pqcy3jh_n5vfpjr0000gn/T/python-build.20210221175447.57865
Results logged to /var/folders/7t/s4sxvwqd5pqcy3jh_n5vfpjr0000gn/T/python-build.20210221175447.57865.log

Last 10 log lines:
extern int _NSGetExecutablePath(char* buf, uint32_t* bufsize)                 __OSX_AVAILABLE_STARTING(__MAC_10_2, __IPHONE_2_0);
                                                     ^
clang -Wno-unused-result -Wsign-compare -Wunreachable-code -DNDEBUG -g -fwrapv -O3 -Wall -I/Applications/Xcode.app/Contents/Developer/Platforms/MacOSX.platform/Developer/SDKs/MacOSX.sdk/usr/include   -I/Applications/Xcode.app/Contents/Developer/Platforms/MacOSX.platform/Developer/SDKs/MacOSX.sdk/usr/include   -std=c99 -Wextra -Wno-unused-result -Wno-unused-parameter -Wno-missing-field-initializers -Wstrict-prototypes -Werror=implicit-function-declaration  -I./Include/internal  -I. -I./Include -I/usr/local/opt/readline/include -I/usr/local/opt/readline/include -I/Users/~/.pyenv/versions/3.8.2/include  -I/usr/local/opt/readline/include -I/usr/local/opt/readline/include -I/Users/~/.pyenv/versions/3.8.2/include   -DPy_BUILD_CORE_BUILTIN  -DPy_BUILD_CORE_BUILTIN -I./Include/internal -c ./Modules/posixmodule.c -o Modules/posixmodule.o
./Modules/posixmodule.c:9197:15: error: implicit declaration of function 'sendfile' is invalid in C99 [-Werror,-Wimplicit-function-declaration]
        ret = sendfile(in, out, offset, &sbytes, &sf, flags);
              ^
1 error generated.
make: *** [Modules/posixmodule.o] Error 1
make: *** Waiting for unfinished jobs....
1 warning generated.
試したこと
・App StoreからXcodeをインストールする(時間掛かるカモ)
・アクティブデベロッパディレクトリにインストールしたXcodeアプリケーションのDeveloperディレクトリを指定する
$ sudo xcode-select --switch /Applications/Xcode.app/Contents/Developer・xcodebuildを実行する。
sudo xcodebuild -runFirstLaunch・pythonをインストールする
$ pyenv install 3.8.5

python-build: use openssl@1.1 from homebrew
python-build: use readline from homebrew
Installing Python-3.8.5...
python-build: use readline from homebrew
python-build: use zlib from xcode sdk
Installed Python-3.8.5 to /Users/~/.pyenv/versions/3.8.5
python3.8.2 および それより下のバージョンについては相変わらずエラーが出てしまう状態。
issuesより、下記コマンドで3.8.2はインストールできました。
ただ、修正対応も頑張ってくれているっぽい。$ CFLAGS="-I$(brew --prefix openssl)/include -I$(brew --prefix bzip2)/include -I$(brew --prefix readline)/include -I$(xcrun --show-sdk-path)/usr/include" LDFLAGS="-L$(brew --prefix openssl)/lib -L$(brew --prefix readline)/lib -L$(brew --prefix zlib)/lib -L$(brew --prefix bzip2)/lib" pyenv install --patch 3.8.2 < <(curl -sSL https://github.com/python/cpython/commit/8ea6353.patch\?full_index\=1)
3.7系は上記コマンドでも相変わらずエラー。。。(上記patchはMacOS v11サポート用だから、v3.7はまた別?)
3.7系はpyenv installで普通にインストールでけた$ pyenv install 3.7.8 python-build: use openssl@1.1 from homebrew python-build: use readline from homebrew Installing Python-3.7.8... python-build: use readline from homebrew python-build: use zlib from xcode sdk Installed Python-3.7.8 to /Users/~/.pyenv/versions/3.7.8

- 投稿日:2021-02-21T18:01:42+09:00
macOS Big Surにアップデート後、pyenvを使用したpythonインストールが失敗するようになった問題の対処法
・MacOS Big Sur 11.2.1
・xcode.app: 12.4
・pyenv: 1.2.22こんなエラー
BUILD FAILED (OS X 11.2.1 using python-build 20180424)

Inspect or clean up the working tree at /var/folders/7t/s4sxvwqd5pqcy3jh_n5vfpjr0000gn/T/python-build.20210221175447.57865
Results logged to /var/folders/7t/s4sxvwqd5pqcy3jh_n5vfpjr0000gn/T/python-build.20210221175447.57865.log

Last 10 log lines:
extern int _NSGetExecutablePath(char* buf, uint32_t* bufsize)                 __OSX_AVAILABLE_STARTING(__MAC_10_2, __IPHONE_2_0);
                                                     ^
clang -Wno-unused-result -Wsign-compare -Wunreachable-code -DNDEBUG -g -fwrapv -O3 -Wall -I/Applications/Xcode.app/Contents/Developer/Platforms/MacOSX.platform/Developer/SDKs/MacOSX.sdk/usr/include   -I/Applications/Xcode.app/Contents/Developer/Platforms/MacOSX.platform/Developer/SDKs/MacOSX.sdk/usr/include   -std=c99 -Wextra -Wno-unused-result -Wno-unused-parameter -Wno-missing-field-initializers -Wstrict-prototypes -Werror=implicit-function-declaration  -I./Include/internal  -I. -I./Include -I/usr/local/opt/readline/include -I/usr/local/opt/readline/include -I/Users/~/.pyenv/versions/3.8.2/include  -I/usr/local/opt/readline/include -I/usr/local/opt/readline/include -I/Users/~/.pyenv/versions/3.8.2/include   -DPy_BUILD_CORE_BUILTIN  -DPy_BUILD_CORE_BUILTIN -I./Include/internal -c ./Modules/posixmodule.c -o Modules/posixmodule.o
./Modules/posixmodule.c:9197:15: error: implicit declaration of function 'sendfile' is invalid in C99 [-Werror,-Wimplicit-function-declaration]
        ret = sendfile(in, out, offset, &sbytes, &sf, flags);
              ^
1 error generated.
make: *** [Modules/posixmodule.o] Error 1
make: *** Waiting for unfinished jobs....
1 warning generated.
App StoreからXcodeをインストールする(時間掛かるカモ)
アクティブデベロッパディレクトリに、先ほどインストールしたXcodeアプリケーションのDeveloperディレクトリを指定する
$ sudo xcode-select --switch /Applications/Xcode.app/Contents/Developerxcodebuildを実行する。
sudo xcodebuild -runFirstLaunch↓とりあえずエンターキー押す。
You have not agreed to the Xcode license agreements. You must agree to both license agreements below in order to use Xcode.

Hit the Return key to view the license agreements at '/Applications/Xcode.app/Contents/Resources/English.lproj/License.rtf'
↓agree と入力してエンター
.
..
...
By typing 'agree' you are agreeing to the terms of the software license agreements. Type 'print' to print them or anything else to cancel, [agree, print, cancel]
By typing 'agree' you are agreeing to the terms of the software license agreements. Type 'print' to print them or anything else to cancel, [agree, print, cancel] agree You can view the license agreements in Xcode's About Box, or at /Applications/Xcode.app/Contents/Resources/English.lproj/License.rtf Install Started 1%.........20.........40.........60.........80........Install SucceededInstall Succeededが表示されれば完了です
python3.8.5インストール
$ pyenv install 3.8.5

python-build: use openssl@1.1 from homebrew
python-build: use readline from homebrew
Installing Python-3.8.5...
python-build: use readline from homebrew
python-build: use zlib from xcode sdk
Installed Python-3.8.5 to /Users/~/.pyenv/versions/3.8.5
python 3.9.0もインストールできた。
python3.8.2インストール
python3.8.2 および それより下のバージョンについては相変わらずエラーが出てしまう状態。
issuesより、下記コマンドで3.8.2はインストールできました。
ただ、修正対応も頑張ってくれているっぽい。$ CFLAGS="-I$(brew --prefix openssl)/include -I$(brew --prefix bzip2)/include -I$(brew --prefix readline)/include -I$(xcrun --show-sdk-path)/usr/include" LDFLAGS="-L$(brew --prefix openssl)/lib -L$(brew --prefix readline)/lib -L$(brew --prefix zlib)/lib -L$(brew --prefix bzip2)/lib" pyenv install --patch 3.8.2 < <(curl -sSL https://github.com/python/cpython/commit/8ea6353.patch\?full_index\=1)python3.7.8インストール
3.7系は上記コマンドでも相変わらずエラー。。。(上記patchはMacOS v11サポート用だから、v3.7はまた別?)
3.7.8はpyenv installで普通にインストールできたので、3.7系も大丈夫かな・・・。(3.7.Xによってはエラーになるかもしれない)$ pyenv install 3.7.8 python-build: use openssl@1.1 from homebrew python-build: use readline from homebrew Installing Python-3.7.8... python-build: use readline from homebrew python-build: use zlib from xcode sdk Installed Python-3.7.8 to /Users/~/.pyenv/versions/3.7.8
- 投稿日:2021-02-21T14:10:43+09:00
[Mac版] 複数のフォルダを一括で生成する
例えば品番ごとの情報をスプレッドシートで管理し、個々の品番名のフォルダ複数を一括で生成したい時に使えるコマンドです。
Mac コンピュターのデフォルトアプリケーション「ターミナル」を使えば、数百あるフォルダも一瞬で生成することができます。
ターミナルからフォルダを一括で生成する
Step1 カレントディレクトリに移動
まずは複数のフォルダを一括生成する場所を指定する必要があります。
cd + 半角スペース→ フォルダをドラッグ・ドロップ上記で生成する場所の指定ができた状態になります。
ちなみに、生成したい場所のフォルダを右クリックし、
optionキーを押すと、"フォルダ"のパス名をコピーというメニューが表示されます。
こちらをコピーすれば下記のようなフォルダがある位置を取得することができます。
/Users/ユーザー名/プロジェクト/製品こちらを
cd + 半角スペース + /Users/ユーザー名/プロジェクト/製品 + enterとしても結果は同じことになります。Step2 sublime text にフォルダ名一覧を記載
例えば 100行分のフォルダ(100個)を作成したい場合、
- sublime text に 100行分の品番をコピペ
- 「クイック全検索」で全行を選択する
- それぞれの行頭に
mkdir + 半角スペースを挿入Step3 ターミナルにコピペしてフォルダを一括生成
- 上記の
mkdirが入った行をすべてコピー- ターミナルにペースト
enterキー押下で複数のフォルダが数秒で一括生成されます。