- 投稿日:2021-01-03T21:58:27+09:00
laravel + vue.jsのファイルアップロードについて
この記事を書いたきっかけ
これから始めるvue.js実践入門(山田祥寛)のファイルアップロードの項目を見ていて、laravel+vueの時には同じ書き方だと動かないことに気づいたから。
vue.jsでは普通はどうするの?
test.vuenew Vue({ el: '#app', data: { message: '' }, methods: { onchange: function() { let that = this; let fl = this.$refs.upfile.files[0]; let data = new FormData(); data.append('upfile', fl, fl.name); fetch('upload.php', { method: 'POST', body: data, }) .then(function (response) { return response.text(); }) .then(function (text) { that.message = text; }) .catch(function (error) { window.alert('Error: ' + error.message); }); } } });(upload.phpは省略します。下にあるtest.blade.phpと内容は同じです。)
試したこと1
resources/js/app.jsと、resources/js/components/Mycomponents.vueに上記のファイルの内容を配置しupload.phpをcomponents配下にupload.phpを置いてみる(雑。)
結果:
fileupload後に、「No input file specified. file upload」のメッセージが返ってくる。(失敗)寄り道はこれくらいにして・・・・・・
myComponent.vue<form> <input ref="upfile" type="file" v-on:change="onchange3" /> <input type="hidden" name="_token" v-bind:value="csrf"> </form> <br /> <p>{{ message }}</p> <br /> <script> data: function () { return { csrf: document.head.querySelector('meta[name="csrf-token"]').content, }; }, methods: { onchange3: function() { let that = this; let fl = this.$refs.upfile.files[0]; let data = new FormData(); data.append('upfile', fl, fl.name); fetch('/hello/fileupload',{ method: 'POST', body: data, headers: {"X-Requested-With": "XMLHttpRequest", 'X-CSRF-TOKEN':this.csrf} }) .then(function(response){ return response.text(); }) .then(function(text){ that.message = text; }) .catch(function(error){ window.alert('Error:' + error.message3); }); } } </script>web.phpRoute::post('/hello/fileupload', [HelloController::class, 'file']);HelloController.phpclass HelloController extends Controller { public function file() { return view('hello.test'); } }test.blade.php<?php $error = false; if ($_FILES['upfile']['error'] !== UPLOAD_ERR_OK) { $error = true; } else { $src = $_FILES['upfile']['tmp_name']; $dest = mb_convert_encoding($_FILES['upfile']['name'], 'SJIS-WIN', 'UTF-8'); if (!move_uploaded_file($src, $dest)) { $error = true; } } if ($error) { header('HTTP/1.1 500 Internal Server Error'); print 'アップロードできませんでした。'; } else { print 'アップロード成功:'.$dest; } ?>index.blade.php<!doctype html> <html lang="ja"> <head> <title>Index</title> <link href="{{ mix('css/app.css') }}" rel="stylesheet" type="text/css"> <meta name="csrf-token" content="{{ csrf_token() }}"> </head> <body> <-- 以下省略 -->これでとりあえずは(?)うまくいっているように見えました。
・非同期処理でaxiosをつかっていないところ
・laravelのファイルアップロード機能をつかっていないところ等、通常のやり方でないところもあると思うのですが、一応一つのやり方のメモとして参考になればと存じます。ここまで読んでいただきありがとうございました。
- 投稿日:2021-01-03T14:13:08+09:00
なぜmixinではなくVue Composition APIを使うのか
Composition APIはVue2のOptions APIに存在していた以下の問題点を解決するために策定されました。
- コンポーネントが大きくなると可読性が低下する
- コードを再利用するメカニズムがない
- 型インターフェースとの相性が悪い
この内1つ目と2つ目の問題点に関してはmixinでも実現できそうに感じますが、Composition APIの公式ドキュメントではmixinの欠点について言及されていて、Composition APIを使う方がより望ましいと言われています。
この記事では以下の公式ドキュメントを基に、なぜmixinではなくComposition APIを使用する方が望ましいのかについて解説していきます。
Composition API RFCMixinの欠点
公式ドキュメントではmixinの欠点について以下の2点に言及されています。
Unclear sources for properties exposed on the render context. For example, when reading the template of a component using multiple mixins, it can be difficult to tell from which mixin a specific property was injected from.
Namespace clashing. Mixins can potentially clash on property and method names.
翻訳すると以下のような感じです。
mixinはプロパティの出所が不明確です。例えば複数のmixinを使用している場合にはtemplate内のプロパティがどのmixinから注入されたのか判断するのが難しい場合があります。
名前の衝突。mixinはプロパティ名またはメソッド名が衝突する可能性があります。
1つ1つ見ていきましょう。
出所が不明確
公式ドキュメントで言及されているように、mixinを使用すると出所が不明確になります。
次の状況を考えてみます。
以下の2つのmixinから
- formatMixin.js
- textListMixin.js
以下の4つのdata・methodを
- text
- textList
- append
- join
App.vueに注入しています。
App.vueのコードを見てみましょう。
src/App.vue<template> <div> <input type="text" v-model="text" /> <button @click="append">+</button> <div>{{ join(textList) }}</div> </div> </template> <script> import formatMixin from "@/mixins/formatMixin"; import textListMixin from "@/mixins/textListMixin"; export default { mixins: [formatMixin, textListMixin], }; </script>
Mixinのソースも見たい方はこちら
src/mixins/textListMixin.jsconst textListMixin = { data() { return { text: "", textList: [] }; }, methods: { append() { this.textList.push(this.text); this.text = ""; } } }; export default textListMixin;src/mixins/formatMixin.jsconst formatMixin = { methods: { join(textList) { return textList.join(", "); } } }; export default formatMixin;このようにApp.vueのコードだけではtemplate内で使用されているtext・textList・append・joinがどのmixinから注入されたものなのかを判断することができません。
このように短いコードだとあまりデメリットを感じられないかもしれませんが、これが何百行ものコードになってくると、1つ1つのmixinのソースを読んで確認しなければならないので、このコンポーネント1つを読み解くのにも相当苦労しそうです。
名前の衝突
mixinを使用した場合に名前が衝突してしまうと、使用する側ではどうすることもできません。
次の状況を考えてみます。
以下の2つのmixinから
- joinWithColonMixin.js
- joinWithCommnaMixin.js
以下の同名のmethodが
- join
App.vueに注入されています。
src/App.vue<template> <div> <!-- 最後に登録されたmixinのjoinが呼ばれます --> <div>{{ join(textList) }}</div> </div> </template> <script> import joinWithColonMixin from "@/mixins/joinWithColonMixin"; import joinWithCommaMixin from "@/mixins/joinWithCommaMixin"; export default { mixins: [joinWithColonMixin, joinWithCommaMixin], data() { return { textList: ["a", "b", "c"], }; }, }; </script>
Mixinのソースも見たい方はこちら
src/mixins/joinWithColonMixin.jsconst joinWithColonMixin = { methods: { join(textList) { return textList.join(":"); } } }; export default joinWithColonMixin;src/mixins/joinWithCommaMinxin.jsconst joinWithCommaMixin = { methods: { join(textList) { return textList.join(","); } } }; export default joinWithCommaMixin;このように2つのmixinが同名のjoinメソッドを注入する場合、App.vueのmixinsで最後に追加したmixinのjoinメソッドがマージされることになります。
つまりこの例では、joinWithCommaMixinのjoinメソッドがtemplate内で呼ばれることになります。
これを回避してjoinWithColonMixinのjoinとjoinWithCommaMixinのjoinをどちらもApp.vueから使いたかったとしても、App.vueからはどうすることもできず、joinWithColonMixinまたはjoinWithCommaMixinのjoinメソッドの名前を変更するしかありません。
名前を変更するぐらい大した問題にはならないと感じるかもしれませんが、全てのmixinで名前の衝突を考慮した命名をすることになるので、かなり冗長な命名になってしまいます。
Vue Composition APIで解決
ここまでmixinの欠点を見てきましたが、これらは全てComposition APIで解決することができます。
1つ1つ見ていきましょう。
出所が不明確
mixinではコンポーネントのソースを読むだけではそれぞれのプロパティがどのmixinから注入されたのかが不明確でした。
Composition APIでは合成関数から明示的にエクスポートされるのでコンポーネントのソースを読むだけで、どの合成関数から注入されたものなのかを読み解くことができます。
公式ドキュメントでは以下のように説明されています。
Properties exposed to the template have clear sources since they are values returned from composition functions.
翻訳すると以下のような感じです。
テンプレートに公開されているプロパティは合成関数から返される値であるため、出所が明確です。
mixinの時と同じ状況で考えてみます。
src/App.vue<template> <input type="text" v-model="textRef" /> <button @click="append">+</button> <div>{{ join(textListRef) }}</div> </template> <script> import useFormat from "@/functions/useFormat"; import useTextList from "@/functions/useTextList"; export default { setup() { // joinはuseFormatから注入されている!! const { join } = useFormat(); // textRef・textListRef・appendはuseTextListから注入されている!! const { textRef, textListRef, append } = useTextList(); return { join, textRef, textListRef, append, }; }, }; </script> <style> </style>
Mixinのソースも見たい方はこちら
src/functions/useFormat.jsimport { toRefs } from "vue"; export default function useFormat() { const join = (textList) => { console.log(textList); return textList.join(", "); }; return toRefs({ join }); }src/functions/useTextList.jsimport { ref } from "vue"; export default function useTextList() { const textRef = ref(""); const textListRef = ref([]); const append = () => { textListRef.value.push(textRef.value); textRef.value = ""; }; return { textRef, textListRef, append }; }このようにsetup関数を見れば
joinの出所はuseFormat
textRef・textListRef・appendの出所はuseTextList
とすぐに判断することができます。以下の部分が該当します。
// joinはuseFormatから注入されている!!
const { join } = useFormat();
// textRef・textListRef・appendはuseTextListから注入されている!!
const { textRef, textListRef, append } = useTextList();
名前の衝突
mixinでは名前が衝突してしまうとmixinを使用する側ではどうすることもできませんでした。
Composition APIでは関数からの分割代入時に別名を付与することができるので、名前の衝突を防ぐことができます。
公式ドキュメントでは以下のように説明されています。
Returned values from composition functions can be arbitrarily named so there is no namespace collision.
翻訳すると以下のような感じです。
合成関数からの戻り値には任意の名前を付与することができるので、名前の衝突を防ぐことができます。
mixinの時と同じ状況で考えてみます。
src/App.vue<template> <div>{{ joinWithColon(textListRef) }}</div> <div>{{ joinWithComma(textListRef) }}</div> <div></div> </template> <script> import useJoinWithColon from "@/functions/useJoinWithColon"; import useJoinWithComma from "@/functions/useJoinWithComma"; import { ref } from "vue"; export default { setup() { const textListRef = ref(["a", "b", "c"]); // joinに別名を付与 const { join: joinWithColon } = useJoinWithColon(); // joinに別名を付与 const { join: joinWithComma } = useJoinWithComma(); return { textListRef, joinWithColon, joinWithComma, }; }, }; </script> <style> </style>
Mixinのソースも見たい方はこちら
src/functions/useJoinWithColon.jsexport default function useJoinWithColon() { const join = (textList) => { return textList.join(":"); }; return { join }; }src/functions/useJoinWithComma.jsexport default function useJoinWithCommna() { const join = (textList) => { return textList.join(","); }; return { join }; }このようにComposition APIでコンポーネントに注入する際には合成関数からの戻り値を使用するため別名を付与することで簡単に名前の衝突を防ぐことができます。
以下の部分が該当します。
// joinに別名を付与
const { join: joinWithColon } = useJoinWithColon();
// joinに別名を付与
const { join: joinWithComma } = useJoinWithComma();
まとめ
今回見てきたようにVue2のOptions APIに存在していた以下の問題点は
- コンポーネントが大きくなると可読性が低下する
- コードを再利用するメカニズムがない
についてはmixinでも解決することができますが、mixinにも以下の欠点があり、
- 出所が不明確
- 名前の衝突
Composition APIを使用するとこれらのmixinの問題点も解決することができます。
Composition APIのメリットをしっかり理解して使いこなしていきたいですね。
- 投稿日:2021-01-03T11:51:00+09:00
【備忘】【Vue.js】動的ルートマッチングを利用して、遷移後のコンポーネント内での挙動を制御する
こんな実装をしていた
簡単な日記アプリを作っていた。
下記のような実装
- 日記の新規作成と編集機能がある
- 新規作成と編集は同じコンポーネント
- 新規作成では、フォームに値は何も入っていない
- 編集では、フォームに編集前の値が入力されいている
やりたかったこと
同じコンポーネントを使いつつ、遷移後にコンポーネントの表示内容を変えたい。
選んだ方法
動的ルートマッチングを利用した。
具体的には、遷移時にURLにパラメーターを与え、そのパラメーターで新規作成か編集かを切り替えるようにした。router/index.js{ // 遷移先のコンポーネントにeditorTypeという値(ルートパラメーター)を渡す path: 'editor/:editorType', name: 'diaryEditor', component: DiaryEditor, // propsをtrueにして、コンポーネントでルートパラメーターを利用できるようにする props: true }components/DiaryEditor.vue(遷移先)<script> export default { // ルートパラメーターを受け取る props: ["editorMode"], data() { return { diary: Object } } methods: { initializeEditor() { if(editorMode == "edit") { // 編集モードならば値を入力 this.diary = [値を入力] } // 編集モードじゃない(新規作成)なら、diaryは空のまま } } } </script>viewer.vue(遷移元)// エディターを編集モードで開く場合 this.$router.push({name: "diaryEditor", params: { editorMode: "edit" }}) // エディターを新規作成モードで開く場合 this.$router.push({name: "diaryEditor", params: { editorMode: "new" }})遷移後のURLは下記のようになる。
編集モード:editor/edit
新規作成モード:editor/new
備考
this.$route.editorModeを利用するのではなく、
propsでデータを受け取ったのは、ルートとコンポーネントの依存度を下げるため。どういうことかというと。。。
もし
Editor.vueを他のルートでも利用したいとなった場合
例)URL:xxx/editor
this.$route.editorModeという記述があれば、「そんなパラメータないよ!」と怒られちゃう。コンポーネントの使い方が縛られていしまう。
そうならないためにpropsでデータを受けましょう、という話。
- 投稿日:2021-01-03T11:09:43+09:00
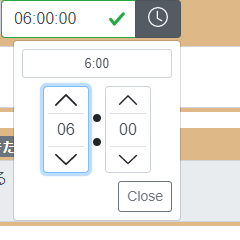
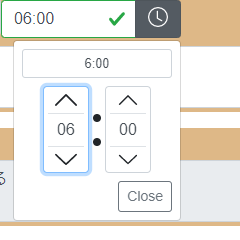
テキスト入力フィールド付きTimePickerで秒を非表示にする
概要
Vue.jsにてBootstrapのTimePickerを利用しているときの話です。
サンプルコードはVue.js前提ですが、論じている機能としてはBootstrap自体の話です。TimePickerで、「秒を非表示にする」方法を説明します。
これ自体は、属性「show-seconds」を外すことで実現できます。ref. https://bootstrap-vue.org/docs/components/form-timepicker#enabling-of-seconds-spinbutton
問題は、TimePickerに「任意の入力フィールド(直接入力したい要求のため)」を設けている場合です。この時、TimePickerが返却する値は「秒を含む」ため、「入力フィールドに秒が表示」されてしまいます。その際の解決方法を述べます。
対処方法
「TimePickerに任意の入力フィールドを設けている」とは、
たとえば、次のように実装している場合です。<div class="div-timepicker"> <b-input-group class="mb-2"> <b-form-input :id="idOfTimeInput" v-model="timeCurrent" v-bind:state="isTimeCurrentValid" type="text" ></b-form-input> <b-input-group-append> <b-form-timepicker v-model="timeCurrent" button-only right locale="ja" :aria-controls="idOfTimeInput" ></b-form-timepicker> </b-input-group-append> </b-input-group> </div>ref. https://bootstrap-vue.org/docs/components/form-timepicker#button-only-mode
このとき、
b-form-timepickerの戻り値は「HH:MM:SS」の形式となります。ref. https://bootstrap-vue.org/docs/components/form-timepicker#v-model-return-value
このため、
b-form-inputの値は「HH:MM:SS」の形式に更新されてしまい、「秒が表示」されてしまいます。
この現象は、次の2つを行うことで回避できます。
b-form-input要素側にbindする変数を別にする- 別とした変数のgetter/setterタイミングで「秒の削除」と元のpicker側の変数との同期をする
本サンプルでは「
timeCurrent」に代わって「timeCurrentInput」を設け、そのgetter時にtimeCurrentから取得することで同期し、setter時にtimeCurrentへも反映することで、同期します。<div class="div-timepicker"> <b-input-group class="mb-2"> <b-form-input :id="idOfTimeInput" v-model="timeCurrentInput" v-bind:state="isTimeCurrentValid" type="text" ></b-form-input> <b-input-group-append> <b-form-timepicker v-model="timeCurrent" button-only right locale="ja" :aria-controls="idOfTimeInput" ></b-form-timepicker> </b-input-group-append> </b-input-group> </div>computed : { timeCurrentInput: { get: function () { return (this.timeCurrent && this.timeCurrent.length > 5) ? this.timeCurrent.substr(0,5) : this.timeCurrent; }, set: function (newTime) { this.timeCurrent = (newTime && newTime.length == 5) ? newTime + ":00" : newTime; } }, }
以上です。
P.S. 本当にこんな解決方法で良いの?もっとスマートな方法(input要素側にオプション付けるだけ、とか)があるのでは?
- 投稿日:2021-01-03T10:04:34+09:00
さぁ、firebaseでユーザーが管理者かどうかの判別を行おう!
皆さん、「管理者のユーザーだけこのテキスト、ボタンを表示したい」とか、「ユーザーにはこのテキスト、ボタンを表示したい」と思ったこと一度はありますよね???
firebaseの関数
firebase.auth().currentUserやfirebase.auth().onAuthStateChanged()でユーザーの管理者かどうかを判断するプロパティは存在しないんです。悲しい。。。なので、firebaseでユーザーの管理者かどうかを判別する方法をご紹介します!!
そんなに難しくないので、是非学習の参考にしてください!
それでは一緒に順を追って説明を見ていきましょう!!(ここからはfirebase-functionsを利用します。firebase-functionsの説明は致しませんのでご了承ください。)
また、この記事を書くにあたってFirebase で公開するウェブサイトに「管理者機能」を付けるを参考にさせて頂きました。ご協力ありがとうございます!
権限を付与する関数を作成
functions/index.jsconst functions = require('firebase-functions'); const admin = require('firebase-admin'); //ユーザー権限(管理者)付与 exports.addAdminClaim = functions.firestore.document('admin_users/{docID}').onCreate((snap) => { const newAdminUser = snap.data(); if (newAdminUser === undefined) { return; } modifyAdmin(newAdminUser.uid, true); //true: 管理者 });権限を消去する関数を作成
functions/index.jsconst functions = require('firebase-functions'); const admin = require('firebase-admin'); //ユーザー権限(管理者)付与 exports.addAdminClaim = functions.firestore.document('admin_users/{docID}').onCreate((snap) => { const newAdminUser = snap.data(); if (newAdminUser === undefined) { return; } modifyAdmin(newAdminUser.uid, true); //true: 管理者 }); //ユーザー権限(管理者)消去 exports.removeAdminClaim = functions.firestore.document('admin_users/{docID}').onDelete((snap) => { const deletedAdminUser = snap.data(); if (deletedAdminUser === undefined) { return; } modifyAdmin(deletedAdminUser.uid, false); //false: 管理者ではないユーザー });権限付与・消去を行う関数
functions/index.jsconst functions = require('firebase-functions'); const admin = require('firebase-admin'); //ユーザー権限(管理者)付与 exports.addAdminClaim = functions.firestore.document('admin_users/{docID}').onCreate((snap) => { const newAdminUser = snap.data(); if (newAdminUser === undefined) { return; } modifyAdmin(newAdminUser.uid, true); //true: 管理者 }); //ユーザー権限(管理者)消去 exports.removeAdminClaim = functions.firestore.document('admin_users/{docID}').onDelete((snap) => { const deletedAdminUser = snap.data(); if (deletedAdminUser === undefined) { return; } modifyAdmin(deletedAdminUser.uid, false); //false: 管理者ではないユーザー }); function modifyAdmin (uid, isAdmin) { admin.auth().setCustomUserClaims(uid, {admin: isAdmin}).then(() => { // The new custom claims will propagate to the user's ID token the // next time a new one is issued. }); }後は、「firebase console」を開き、以下の手順に沿ってコレクションを作成してください。
まず、初めに「Authentication」を開き、管理者の権限を付与したいユーザーの「ユーザー UID」をコピーしてください。(IDではなくユーザー UIDです!間違えないように!!!)
次に、Cloud firestore → コレクションを開始 → コレクションIDに「admin_users」と入力 → ドキュメントIDを作成(自動IDをクリック) → フィールドに「uid」と入力 → タイプは「string」 → 値には先ほどコピーしたUIDをペーストしてください。
これで、設定は終わりです。
あとは、これを判別する関数を呼び出すだけ!
呼び出したいページで以下の関数を実行してください。
index.jsfirebase.auth().onAuthStateChanged((user) => { user.getIdTokenResult(true).then((idTokenResult) => { if (idTokenResult.claims.admin) { commit("userRights"); } }); })これで実行結果が
trueならば管理者、falseならユーザーという結果になります。実際にこのコードを追加して頂くだけで実行できるかと思います。
色々なところで活用できると思うので、ぜひ使ってください!!!!
以上、「firebaseでユーザーが管理者かどうかの判別を行う方法」でした!!
良ければ、LGTM、コメントお願いします。
また、何か間違っていることがあればご指摘頂けると幸いです。
他にも初心者さん向けに記事を投稿しているので、時間があれば他の記事も見て下さい!!
Thank you for reading
- 投稿日:2021-01-03T09:57:13+09:00
【備忘】【Vue.js】<router-view>を利用して表示するコンポーネントにpropsでデータを渡す
こんな実装をしていた
簡単な日記アプリを作っていた。
下記のようなレイアウト
- 各日付ごとの日記をリストにして左側に並べる
- 左側の日記を選択するとリストの右側に日記の内容を表示する
- 右側の日記を表示する箇所は、編集ボタンを押すと編集画面に切り替わる
疑問に思ったこと
<router-view>で、編集と閲覧のコンポーネントを切り替えようと思ったが、はたして親コンポーネントから<router-view\を介して子コンポーネントにpropsでデータ(日記の内容)を渡せるのだろうか?
結論
ふつうにできた。
親コンポーネント<router-view :diary="diary"></router-view>子コンポーネント(編集)props = ["diary"]子コンポーネント(閲覧)props = ["diary"]これで編集&閲覧のどちらのコンポーネントでも日記データを受け取ることができます。
- 投稿日:2021-01-03T09:19:45+09:00
【Vue.js】メニュー機能の実装 実装編 rails6
はじめに
クリックするとメニューが開いたり閉じたりする機能をVue.jsで実装します。
この記事では、rails6で実装してますので、導入につまずいてる方がいらっしゃったら、下記の「Vue.js導入編」をご参照ください。【Vue.js】メニュー機能の実装 Vue.js導入編 rails6
https://qiita.com/AKI3/items/e87203c590322c908946目次
1.Vue.js
2.html
3.scss開発環境
Vue 2.6.12
rails 6.0.0
ruby 2.6.5実装
それでは実装していきます〜
1. Vue.js
app/javascript/packs/menu_vue.jsconst app = new Vue({ el: '#app', data: { ActiveBtn: false }, })Veu.js自体の実装は簡単です。
2. html
app/views/tops/new.html.erb<div class="top-editor-wrap"> <div id="app"> <!--メニューのボタン--> <div class="top-editor_btn" v-on:click='ActiveBtn=!ActiveBtn'> ←ここがveu.js <h1>ボタン</h1> </div> <!--サイドバー--> <transition name="editor-side"> <div class="editor-side" v-show="ActiveBtn"> ←ここがveu.js <div class="editor"> <h3>メニュー</h3> <p>項目1</p> <p>項目2</p> <p>項目3</p> </div> </div> </transition> </div> </div>
v-on:click='ActiveBtn=!ActiveBtn'が、ボタンがクリックされたらActiveBtnの真偽値を逆にする(反転する)という記述。3. scss
app/assets/stylesheets/editor.scss.top-editor_btn { position: fixed; top: 30px; left: 40px; cursor: pointer; z-index: 50; } .top-editor_btn img { width: 65px; } .editor-side { position: fixed; background-color: hsla(0, 0%, 57%, 0.829); z-index: 30; width: 325px; height: 100vh; top: 0; }以上で完成です!!
まとめ
この機能では
ActiveBtnがポイントでした。
もちろんJSだけ同じ機能を作る事は可能ですが、Veu.jsを使用するメリットはコードの量が圧倒的に減る事でした。
まだまだ勉強しはじめたばかりなので、さらに学んで行きたい思ってます〜最後に
私はプログラミング初学者ですが、同じ様に悩んでる方々の助けになればと思い、記事を投稿しております。
それでは、また次回お会いしましょう〜
参考
【公式】
https://jp.vuejs.org/v2/guide/【Vue.js】メニュー機能の実装 Vue.js導入編
https://qiita.com/AKI3/items/e87203c590322c908946大変参考にさせていただきました。ありがとうございます。
https://qiita.com/helloworld193/items/9aed3870be1e739c3ad2ともすたの谷口さん
https://www.youtube.com/playlist?list=PLh6V6_7fbbo-SZYHHBVFstU2tp0dDZMAW
- 投稿日:2021-01-03T09:19:45+09:00
完【Veu.js】メニュー機能の実装 実装編 rails6
はじめに
クリックするとメニューが開いたり閉じたりする機能をVue.jsで実装します。
この記事では、rails6で実装してますので、導入につまずいてる方がいらっしゃったら、下記の「Vue.js導入編」をご参照ください。【Vue.js】メニュー機能の実装 Vue.js導入編 rails6
https://qiita.com/AKI3/items/e87203c590322c908946目次
1.Veu.js
2.html
3.scss開発環境
Vue 2.6.12
rails 6.0.0
ruby 2.6.5実装
それでは実装していきます〜
1. Veu.js
app/javascript/packs/menu_vue.jsconst app = new Vue({ el: '#app', data: { ActiveBtn: false }, })Veu.js自体の実装は簡単です。
2. html
app/views/tops/new.html.erb<div class="top-editor-wrap"> <div id="app"> <!--メニューのボタン--> <div class="top-editor_btn" v-on:click='ActiveBtn=!ActiveBtn'> ←ここがveu.js <h1>ボタン</h1> </div> <!--サイドバー--> <transition name="editor-side"> <div class="editor-side" v-show="ActiveBtn"> ←ここがveu.js <div class="editor"> <h3>メニュー</h3> <p>項目1</p> <p>項目2</p> <p>項目3</p> </div> </div> </transition> </div> </div>
v-on:click='ActiveBtn=!ActiveBtn'が、ボタンがクリックされたらActiveBtnの真偽値を逆にする(反転する)という記述。3. scss
app/assets/stylesheets/editor.scss.top-editor_btn { position: fixed; top: 30px; left: 40px; cursor: pointer; z-index: 50; } .top-editor_btn img { width: 65px; } .editor-side { position: fixed; background-color: hsla(0, 0%, 57%, 0.829); z-index: 30; width: 325px; height: 100vh; top: 0; }以上で完成です!!
まとめ
この機能では
ActiveBtnがポイントでした。
もちろんJSだけ同じ機能を作る事は可能ですが、Veu.jsを使用するメリットはコードの量が圧倒的に減る事でした。
まだまだ勉強しはじめたばかりなので、さらに学んで行きたい思ってます〜最後に
私はプログラミング初学者ですが、同じ様に悩んでる方々の助けになればと思い、記事を投稿しております。
それでは、また次回お会いしましょう〜
参考
【公式】
https://jp.vuejs.org/v2/guide/【Vue.js】メニュー機能の実装 Vue.js導入編
https://qiita.com/AKI3/items/e87203c590322c908946大変参考にさせていただいました。ありがとうございます。
https://qiita.com/helloworld193/items/9aed3870be1e739c3ad2ともすたの谷口さん
https://www.youtube.com/playlist?list=PLh6V6_7fbbo-SZYHHBVFstU2tp0dDZMAW
- 投稿日:2021-01-03T09:19:45+09:00
【Veu.js】メニュー機能の実装 実装編 rails6
はじめに
クリックするとメニューが開いたり閉じたりする機能をVue.jsで実装します。
この記事では、rails6で実装してますので、導入につまずいてる方がいらっしゃったら、下記の「Vue.js導入編」をご参照ください。【Vue.js】メニュー機能の実装 Vue.js導入編 rails6
https://qiita.com/AKI3/items/e87203c590322c908946目次
1.Veu.js
2.html
3.scss開発環境
Vue 2.6.12
rails 6.0.0
ruby 2.6.5実装
それでは実装していきます〜
1. Veu.js
app/javascript/packs/menu_vue.jsconst app = new Vue({ el: '#app', data: { ActiveBtn: false }, })Veu.js自体の実装は簡単です。
2. html
app/views/tops/new.html.erb<div class="top-editor-wrap"> <div id="app"> <!--メニューのボタン--> <div class="top-editor_btn" v-on:click='ActiveBtn=!ActiveBtn'> ←ここがveu.js <h1>ボタン</h1> </div> <!--サイドバー--> <transition name="editor-side"> <div class="editor-side" v-show="ActiveBtn"> ←ここがveu.js <div class="editor"> <h3>メニュー</h3> <p>項目1</p> <p>項目2</p> <p>項目3</p> </div> </div> </transition> </div> </div>
v-on:click='ActiveBtn=!ActiveBtn'が、ボタンがクリックされたらActiveBtnの真偽値を逆にする(反転する)という記述。3. scss
app/assets/stylesheets/editor.scss.top-editor_btn { position: fixed; top: 30px; left: 40px; cursor: pointer; z-index: 50; } .top-editor_btn img { width: 65px; } .editor-side { position: fixed; background-color: hsla(0, 0%, 57%, 0.829); z-index: 30; width: 325px; height: 100vh; top: 0; }以上で完成です!!
まとめ
この機能では
ActiveBtnがポイントでした。
もちろんJSだけ同じ機能を作る事は可能ですが、Veu.jsを使用するメリットはコードの量が圧倒的に減る事でした。
まだまだ勉強しはじめたばかりなので、さらに学んで行きたい思ってます〜最後に
私はプログラミング初学者ですが、同じ様に悩んでる方々の助けになればと思い、記事を投稿しております。
それでは、また次回お会いしましょう〜
参考
【公式】
https://jp.vuejs.org/v2/guide/【Vue.js】メニュー機能の実装 Vue.js導入編
https://qiita.com/AKI3/items/e87203c590322c908946大変参考にさせていただいました。ありがとうございます。
https://qiita.com/helloworld193/items/9aed3870be1e739c3ad2ともすたの谷口さん
https://www.youtube.com/playlist?list=PLh6V6_7fbbo-SZYHHBVFstU2tp0dDZMAW