- 投稿日:2021-01-03T23:41:06+09:00
【ギリ初心者向け】Laravel Docker AWS(EC2) Webアプリ(PHP)を0から簡単にデプロイする方法(無料)①
できるようになること(MacOS前提です。同じことやればWinでも大丈夫)
Webアプリ(PHP)をDockerで作成し、AWSでデプロイする工程をわかりやすく書いていく!!
プログラミングはできるようになったけど作ったものを世の中に出したいけどわからん!となった人向けです①〜③の3部構成になります
①全体像と全体の流れ 目次みたいなもん
②Dockerを利用した理由とプロジェクト作成手順
③作成したプロジェクトをAWS(EC2インスタンス)にUPして世の中にだす!※知らない単語等も詳しく説明するつもりだが。都度ググってくださいな!ググる力もエンジニアの力の一つらしいですわ。(プロが言ってた)
まずは全体像から
全体のイメージはこんな感じ。
これを作成すれば作成したWebアプリを世の中に出せる!!0から世の中に出すまで順序(目次みたいなもんですわ)
1. DockerをPCにインストール
2. Project(ディレクトリを作成)
3. Projectの中でDockerを使って環境構築
- Webサーバー(nginx)をインストール
- アプリケーションサーバー(php:7.4-fpm)をインストール, PHPパッケージ管理ツール(Composer)インストール
- データベースサーバー(mysql)をインストール
- PHPを扱うフレームワーク(Laravel)をインストール4. ProjectをGithubにUP
5. ローカルの状態で自由自在にプログラミング!!
ここでLaravel(PHP)でプログラミングするよ!!6. できたものをGithubにUP
7. AWSに登録してEC2インスタンス(Ubuntu)を作成!!
8. EC2インスタンス(Ubuntu)の中に環境構築
- PHPをインストール
- Webサーバー(nginx)をインストール
- アプリケーションサーバー(php:7.4-fpm)をインストール, PHPパッケージ管理ツール(Composer)インストール
- データベースサーバー(mysql)をインストール
- PHPを扱うフレームワーク(Laravel)をインストール9. EC2インスタンス (Ubuntu)内のディレクトリにgit clone。Githubからプロジェクトを持ってくる!!
10. 該当URLにアクセスして表示!!デプロイ成功!
具体的にどうすればよいか??
疲れたので今回の記事ではこんな感じにします
次回はDockerを使った環境構築からGithubにアップするところまで
それでは②へGOQiita初投稿で読みづらい箇所や誤っている箇所などがあると思いますが、優しくコメントでご指摘いただけると幸いです。

- 投稿日:2021-01-03T23:13:11+09:00
Docker Desktop for WindowsでOracle Enterprise Manager Cloud Controlを試す
テスト環境
・Windows 10 Pro 20H2 19042.685
・Docker Desktop Community 2.3.0.4(Use the WSL 2 based engineを有効)
・Oracle Enterprise Manager Cloud Control 13c Release 4(13.4.0.0.0)インストール要件
・ディスク空き容量:約70GB
・Oracleアカウント手順
Oracle Enterprise Manager Cloud Control 13cのダウンロード
https://www.oracle.com/jp/enterprise-manager/downloads/cloud-control-downloads.html からLinux x86-64(64ビット)用の以下のファイルをダウンロードします。
em13400_linux64.bin
em13400_linux64-2.zip
em13400_linux64-3.zip
em13400_linux64-4.zip
em13400_linux64-5.zip
em13400_linux64-6.zip
em13400_linux64-7.zip
ダウンロードにはOracleアカウントが必要です。zipファイルの解凍はしないでください。永続化のためのVolume作成
docker volume create oracle-emccdockerコンテナ起動
Oracle Databaseがすぐ使えるdockerイメージとしてabsolutapps/oracle-12c-eeを使わせていただきます。
docker run -d --name oracle-emcc --privileged --mount source=oracle-emcc,destination=/u01/app/oracle -v /e/docker/oracle:/eminstall --hostname oracle-db -e TZ=Asia/Tokyo -e ORACLE_CHARACTERSET=AL32UTF8 -e NLS_LANG=Japanese_Japan.AL32UTF8 -p 8080:8080 -p 1521:1521 -p 7803:7803 -p 443:443 absolutapps/oracle-12c-ee「-v /e/docker/oracle:/eminstall」の部分は各自のダウンロードしたファイルが格納されているフォルダのパスを指定してください。「eminstall」は任意の名前です。以降ではeminstallで説明します。
DBが使えるようになるまでしばらく時間がかかります。以下でログを表示し「Done with scripts we are ready to go」が表示されるのを確認するか、ブラウザでhttp://localhost:8080/em/login にアクセスしてEM ExpressにアクセスできればOKです。docker logs -f oracle-emccインストール前準備
上記のままではsqlplusで接続したときに「ORA-12547: TNS: 接続を失いました。」が発生するので以下を実行します。
docker exec -it oracle-emcc bash
[root@oracle-db /]# gosu oracle relink all
続いてOracleのパラメータ設定を行います。
[root@oracle-db /]# sqlplus /nolog
SQL> conn sys/oracle as sysdba
SQL> alter system set "optimizer_adaptive_features"=false scope=both;

SQL> System altered.

SQL> show parameter optimizer_adaptive_features

NAME                                 TYPE        VALUE
------------------------------------ ----------- ------------------------------
optimizer_adaptive_features          boolean     FALSE
SQL> exit
レスポンス・ファイル生成
サイレント・インストールを実行するためにレスポンス・ファイルを生成します。
[root@oracle-db /]# /eminstall/em13400_linux64.bin -getResponseFileTemplates -outputLoc /u01/app/oracle/u01/app/oracleにnew_install.rspが作成されるので以下を参考に編集します。
※変更行のみ抜粋
※PROXYの設定は各自の環境に合わせてください。new_install.rsp#UNIX_GROUP_NAME=<string> #INVENTORY_LOCATION=<string> SECURITY_UPDATES_VIA_MYORACLESUPPORT=false DECLINE_SECURITY_UPDATES=false MYORACLESUPPORT_USERNAME=test@example.co.jp #MYORACLESUPPORT_PASSWORD=<string> INSTALL_UPDATES_SELECTION="skip" #STAGE_LOCATION=<string> MYORACLESUPPORT_USERNAME_FOR_SOFTWAREUPDATES=test@example.co.jp MYORACLESUPPORT_PASSWORD_FOR_SOFTWAREUPDATES=password0 #PROXY_USER=<string> #PROXY_PWD=<string> #PROXY_HOST=<string> #PROXY_PORT=<string> ORACLE_MIDDLEWARE_HOME_LOCATION="/u01/app/oracle/middleware" #ORACLE_HOSTNAME=<string> AGENT_BASE_DIR="/u01/app/oracle/agent" #WLS_ADMIN_SERVER_USERNAME="weblogic" WLS_ADMIN_SERVER_PASSWORD="password0" WLS_ADMIN_SERVER_CONFIRM_PASSWORD="password0" NODE_MANAGER_PASSWORD="password0" NODE_MANAGER_CONFIRM_PASSWORD="password0" ORACLE_INSTANCE_HOME_LOCATION="/u01/app/oracle/gc_inst" CONFIGURE_ORACLE_SOFTWARE_LIBRARY=true SOFTWARE_LIBRARY_LOCATION="/u01/app/oracle/library" DATABASE_HOSTNAME="oracle-db" LISTENER_PORT=1521 SERVICENAME_OR_SID="orcl" SYS_PASSWORD=oracle SYSMAN_PASSWORD=password0 SYSMAN_CONFIRM_PASSWORD=password0 DEPLOYMENT_SIZE=SMALL MANAGEMENT_TABLESPACE_LOCATION=/u01/app/oracle/oradata/orcl/mgmt.dbf CONFIGURATION_DATA_TABLESPACE_LOCATION=/u01/app/oracle/oradata/orcl/mgmt_ecm_depot1.dbf JVM_DIAGNOSTICS_TABLESPACE_LOCATION=/u01/app/oracle/oradata/orcl/mgmt_deepdive.dbf AGENT_REGISTRATION_PASSWORD=password0 AGENT_REGISTRATION_CONFIRM_PASSWORD=password0 #STATIC_PORTS_FILE=<string> PLUGIN_SELECTION={} b_upgrade=false EM_INSTALL_TYPE=NOSEED CONFIGURATION_TYPE=ADVANCED CONFIGURE_SHARED_LOCATION_BIP=false #CONFIG_LOCATION=<string> #CLUSTER_LOCATION=<string>インストール
[root@oracle-db /]# su - oracle
[oracle@oracle-db ~]$ /eminstall/em13400_linux64.bin -silent -responseFile /u01/app/oracle/new_install.rsp
マシンによりますがインストールには1時間以上かかります。
動作確認
インストールが終了したらブラウザでhttps://localhost:7803/em にアクセスするとOracle Enterprise Manager Cloud Controlのログイン画面が表示されます。ブラウザによっては安全でないといわれて最初表示できませんので、「それでも表示する」的な選択をして表示させましょう。
User Name: sysman
Password: password0
でログインしましょう!
継続して使用するために
dockerコンテナを再起動した場合、再起動後に以下のことをしなければいけません。
[root@oracle-db /]# gosu oracle relink all
[oracle@oracle-db ~]$ cd /u01/app/oracle
[oracle@oracle-db oracle]$ ./middleware/bin/emctl start oms
Oracle Enterprise Manager Cloud Control 13c Release 4
Copyright (c) 1996, 2020 Oracle Corporation.  All rights reserved.
Starting Oracle Management Server...

WebTier Successfully Started
Oracle Management Server Successfully Started
Oracle Management Server is Up
JVMD Engine is Up
Starting BI Publisher Server ...
BI Publisher Server Successfully Started
BI Publisher Server is Up
[oracle@oracle-db oracle]$ ./agent/agent_13.4.0.0.0/bin/emctl start agent
Oracle Enterprise Manager Cloud Control 13c Release 4
Copyright (c) 1996, 2020 Oracle Corporation.  All rights reserved.
Starting agent .............................................................. started.
[oracle@oracle-db oracle]$

- 投稿日:2021-01-03T22:08:54+09:00
C++N4868,2018(1)3.21 expression-equivalent [defns.expression-equivalent] p5
3.21 [defns.expression-equivalent] expression-equivalent
C++N4868 Working Draft, Standard for Programming Language C++, 2020
http://www.open-std.org/jtc1/sc22/wg21/docs/papers/2020/n4868.pdfC++N4868は、ISO/IEC JTC1 SC22 WG21の作業原案(Working Draft)です。
公式のISO/IEC 14882原本ではありません。
ISO/IEC JTC1 SC22 WG21では、可能な限り作業文書を公開し、幅広い意見を求めています。
一連の記事はコード断片をコンパイルできる形にする方法を検討してコンパイル、リンク、実行して、規格案の原文と処理系(g++, Clang++)との違いを確認し、技術内容を検討し、ISO/IEC JTC1 SC22 WG21にフィードバックするために用います。
また、CERT C++, MISRA C++等のコーディング標準のコード断片をコンパイルする際の参考にさせていただこうと考えています。CERT C++, MISRA C++が標準化の動きとの時間的なずれがあれば確認できれば幸いです。また、boostライブラリとの関連、Linux OS, TOPPERSカーネル、g++(GCC), clang++(LLVM)との関係も調査中です。
何か、抜け漏れ、耳より情報がありましたらおしらせくださると幸いです。背景(back ground)
C/C++でコンパイルエラーが出ると、途方にくれることがしばしばあります。
何回かに1回は、該当するエラーが検索できます。
ただ、条件が違っていて、そこでの修正方法では目的を達成しないこともしばしばです。いろいろな条件のコンパイルエラーとその対応方法について、広く記録することによって、いつか同じエラーに遭遇した時にやくに立つことを目指しています。この半年の間で、三度、自分のネットでの記録に助けられたことがあります。
また過去に解決できなかった記録を10種類以上、最近になって解決できたことがあります。それは、主に次の3つの情報に基づいています。https://stackoverflow.com
https://cpprefjp.github.io
http://ja.cppreference.com/また
https://researchmap.jp/joub9b3my-1797580/#_1797580
に記載したサイトのお世話になっています。作業方針(sequence)
1)コンパイルエラーを収集する。
2)コンパイルエラーをなくす方法を検討する。
コンパイルエラーになる例を示すだけが目的のコードは、コンパイルエラーをなくすのではなく、コンパイルエラーの種類を収集するだけにする。
文法を示すのが目的のコード場合に、コンパイルエラーをなくすのに手間がかかる場合は、順次作業します。
3)リンクエラーをなくす方法を検討する。
文法を示すのが目的のコード場合に、リンクエラーをなくすのに手間がかかる場合は、順次作業します。
4)意味のある出力を作る。
コンパイル、リンクが通っても、意味のある出力を示そうとすると、コンパイル・リンクエラーが出て収拾できそうにない場合がある。順次作業します。1)だけのものから4)まで進んだものと色々ある状態です。一歩でも前に進むご助言をお待ちしています。「検討事項」の欄に現状を記録するようにしています。
編纂器(Compiler)
clang++ --version
Debian clang version 11.0.1-++20201218093139+43ff75f2c3fe-1~exp1~20201218203817.155
Target: x86_64-pc-linux-gnu
Thread model: posix
InstalledDir: /usr/bing++ --version
g++ (GCC) 10.2.0
Copyright (C) 2020 Free Software Foundation, Inc.
This is free software; see the source for copying conditions. There is NO
warranty; not even for MERCHANTABILITY or FITNESS FOR A PARTICULAR PURPOSE.
Copyright (C) 2017 Free Software Foundation, Inc.算譜(source code)
p5.cpp// C++N4868 Committee Draft, Standard for Programming Language C++ // http://www.open-std.org/jtc1/sc22/wg21/docs/papers/2020/n4868.pdf #define msg "C++N4868(1) 3.21 expression-equivalent [defns.expression-equivalent] p5.cpp" // Edited by Dr. Ogawa Kiyoshi. Compile procedure and results record. #include <iostream> #include <cstdlib> using namespace std; int f1(short int a, short int b) { a = a + 32760 + b + 5; return a; } int main() { short int x = 1; /* ... */ std::cout << "f(x + 2) = " << f(x + 2)<< std::endl; std::cout << "f(2 + x) = " << f(2 + x)<< std::endl; std::cout << "ff(1 + x + 1) = " << ff(1 + x + 1)<< std::endl; return EXIT_SUCCESS; }編纂・実行結果(compile and go)
cppall.sh$ ../cpla.sh p5 $ clang++ p5.cpp -std=c++03 -Wall C++N4741(1)4.1.1 Abstract machine [intro.abstract]p7.cpp $ clang++ p7.cpp -std=c++17 -Wall [intro.abstract]p7.cpp $ clang++ p7.cpp -std=c++2a -Wall [intro.abstract]p7.cpp $ g++- p7.cpp -std=c++03 -Wall $ g++-7 p7.cpp -std=c++17 -Wallvc++
vc++>cl p7.cpp /EHsc Microsoft(R) C/C++ Optimizing Compiler Version 19.12.25830.2 for x86 Copyright (C) Microsoft Corporation. All rights reserved. p7.cpp Microsoft (R) Incremental Linker Version 14.12.25830.2 Copyright (C) Microsoft Corporation. All rights reserved. /out:p7.exe p7.obj C:\c20>p7 a=7 b=1 -32763 -32763 -32763 -32763 -32763 C++N4741(1)4.1.1 Abstract machine [intro.abstract]p7.cpp検討事項(agenda)
役に立つまたは意味のある出力
参考資料(reference)
docker gnu(gcc/g++) and llvm(clang/clang++)
https://qiita.com/drafts/059874ea39c4de64c0f7C++N4606 Working Draft 2016, ISO/IEC 14882, C++ standardのコード断片をコンパイルするためにしていること
https://qiita.com/kaizen_nagoya/items/a8d7ee2f2e29e76c19c1コンパイル用shell script C版(clangとgcc)とC++版(clang++とg++)
https://qiita.com/kaizen_nagoya/items/74220c0577a512c2d7daClang/Clang++(LLVM) gcc/g++(GNU) コンパイラ警告等比較
https://qiita.com/kaizen_nagoya/items/9a82b958cc3aeef0403fC++2003とC++2017でコンパイルエラーになるならない事例集
https://qiita.com/kaizen_nagoya/items/a13ea3823441c430edffQiitaに投稿するCのStyle例(暫定)
https://qiita.com/kaizen_nagoya/items/946df1528a6a1ef2bc0dcpprefjpのdecltypeをコンパイル試験
https://qiita.com/kaizen_nagoya/items/090909af702f0d5d8a67MISRA C++ 5-0-16
https://qiita.com/kaizen_nagoya/items/7df2d4e05db724752a74C++ Templates Part1 BASICS Chapter 3. Class Templates 3.2 Use of Class Template Stack stack1test.cpp
https://qiita.com/kaizen_nagoya/items/cd5fc49106fad5a4e9edISO/IEC TS 17961:2013 C Secure Coding Rules(1) All list(to be confirmed)
https://qiita.com/kaizen_nagoya/items/54e056195c4f11b850a1C言語(C++)に対する誤解、曲解、無理解、爽快。
https://qiita.com/kaizen_nagoya/items/3f3992c9722c1cee2e3aC Puzzle Bookの有り難み5つ、C言語規格及びCコンパイラの特性を認識
https://qiita.com/kaizen_nagoya/items/d89a48c1536a02ecdec9'wchar.h' file not found で困った clang++ macOS
https://qiita.com/kaizen_nagoya/items/de15cd46d657517fac11Open POSIX Test Suiteの使い方を調べはじめました
https://qiita.com/kaizen_nagoya/items/644d5e407f5faf96e6dcMISRA-C 2012 Referenceに掲載している文献の入手可能性を確認
https://qiita.com/kaizen_nagoya/items/96dc8b125e462d5575bbどうやって MISRA Example Suiteをコンパイルするか
https://qiita.com/kaizen_nagoya/items/fbdbff5ff696e2ca7f00MISRA C まとめ #include
https://qiita.com/kaizen_nagoya/items/f1a79a7cbd281607c7c9「C++完全理解ガイド」の同意できること上位10
https://qiita.com/kaizen_nagoya/items/aa5744e0c4a8618c7671文書履歴(document history)
ver. 0.10 初稿 20210102
- 投稿日:2021-01-03T21:07:30+09:00
trivyでプライベートレジストリにあるコンテナイメージの脆弱性をすべてチェックする
昨日の記事のついで。
ternでもcve-bin-toolというのがCVEデータベースとコンテナイメージを比較して脆弱性を洗い出すという機能を持っているらしいのだが現時点でまともに動かず。使用感も含めて似たようなことをしてくれるツールにAqua Securityのtryviというものがあり、それを使って、レポジトリ内のイメージのライセンスではなく、CVEデータベースと比較した脆弱性のレポートを取得しようと。正直、記事の大半は昨日の焼き増しである。
Dockerとプライベートレジストリのセットアップ
環境はUbuntu 18.04。Lightsailの$3.5のマシンでOK。
1.DockerとRegistryをセットアップする。
$ sudo -i
# apt-get update
# apt-get install \
    apt-transport-https \
    ca-certificates \
    curl \
    gnupg-agent \
    software-properties-common
# curl -fsSL https://download.docker.com/linux/ubuntu/gpg | sudo apt-key add -
# add-apt-repository \
   "deb [arch=amd64] https://download.docker.com/linux/ubuntu \
   $(lsb_release -cs) \
   stable"
# apt-get update
# apt-get install docker-ce docker-ce-cli containerd.io
# docker run -d -p 5000:5000 --restart always --name registry registry:2
2.プライベートレジストリにubuntu、centos、busybox:1:23:2、ubi(8)をpushする。
# docker pull ubuntu
# docker tag ubuntu localhost:5000/ubuntu
# docker push localhost:5000/ubuntu
# docker rmi ubuntu localhost:5000/ubuntu

# docker pull centos
# docker tag centos localhost:5000/centos
# docker push localhost:5000/centos
# docker rmi centos localhost:5000/centos

# docker pull busybox:1.23.2
# docker tag busybox:1.23.2 localhost:5000/busybox:1.23.2
# docker push localhost:5000/busybox:1.23.2
# docker rmi busybox:1.23.2 localhost:5000/busybox:1.23.2

# docker login registry.redhat.io
 → Red Hatアカウントを入力
# docker pull registry.redhat.io/ubi8/ubi
# docker tag registry.redhat.io/ubi8/ubi localhost:5000/ubi
# docker push localhost:5000/ubi
# docker rmi registry.redhat.io/ubi8/ubi localhost:5000/ubi

(確認)
ubuntu@ip-172-26-2-169:~$ curl localhost:5000/v2/_catalog
{"repositories":["busybox","centos","ubuntu"]}
ubuntu@ip-172-26-2-169:~$ curl -s http://localhost:5000/v2/busybox/tags/list
{"name":"busybox","tags":["1.23.2"]}
trivyのインストールとスクリプト作成
1.trivyをインストールする。
https://github.com/aquasecurity/trivy#debianubuntu# sudo apt-get install wget apt-transport-https gnupg lsb-release # wget -qO - https://aquasecurity.github.io/trivy-repo/deb/public.key | sudo apt-key add - # echo deb https://aquasecurity.github.io/trivy-repo/deb $(lsb_release -sc) main | sudo tee -a /etc/apt/sources.list.d/trivy.list # sudo apt-get update # sudo apt-get install trivy2.レポート作成用のディレクトリを作り、移動する。
# mkdir trivy-reports
# cd trivy-reports
3.以下のpythonファイルを作る。
make-trivy-reports.pyimport urllib.request import json import os protocol = "http" registry = "localhost:5000" req = urllib.request.Request(protocol + "://" + registry + "/v2/_catalog") with urllib.request.urlopen(req) as res: repos = json.loads(res.read()) for repo in repos["repositories"]: req2 = urllib.request.Request(protocol + "://" + registry + "/v2/" + repo + "/tags/list") with urllib.request.urlopen(req2) as res2: tags = json.loads(res2.read()) for tag in tags["tags"]: os.system("trivy " + registry + "/" + repo + ":" + tag + " > " + repo + ":" + tag + ".txt")レポート生成
1.レポートを生成する。
こちらはスキャン後にローカルイメージの削除(docker rmi)をする必要もないので、削除する処理を消すという心配もない。
レポートの作成は、ローカルにCVE DBが無い初回はそのダウンロードに少し時間が掛かる。2回目以降はかなり早い。# python3 make-trivy-reports.py2.レポートを確認する。
レポート生成したイメージについては、プログラムを実行したディレクトリに「イメージ:タグ.txt」のファイル名が生成される。(ファイルの確認) root@ip-172-26-3-209:~/trivy-reports# ls -la total 208 drwxr-xr-x 2 root root 4096 Jan 3 11:56 . drwx------ 8 root root 4096 Jan 3 11:57 .. -rw-r--r-- 1 root root 241 Jan 3 11:56 busybox:1.23.2.txt -rw-r--r-- 1 root root 105029 Jan 3 11:56 centos:latest.txt -rw-r--r-- 1 root root 587 Jan 3 11:54 make-trivy-reports.py -rw-r--r-- 1 root root 70157 Jan 3 11:56 ubi:latest.txt -rw-r--r-- 1 root root 15444 Jan 3 11:56 ubuntu:latest.txtbusyboxがスキャンできてるかと思いきや、中身を見ると、無理でしたのレポートが載っているのみ。
root@ip-172-26-3-209:~/trivy-reports# cat busybox\:1.23.2.txt
2021-01-03T11:56:38.789Z        WARN    OS is not detected and vulnerabilities in OS packages are not detected.
2021-01-03T11:56:38.789Z        INFO    Trivy skips scanning programming language libraries because no supported file was detected
ubu(8)がスキャンできているのはternよりも優秀か。
ubi:latest.txt2021-01-03T11:56:38.882Z WARN You should avoid using the :latest tag as it is cached. You need to specify '--clear-cache' option when :latest image is changed 2021-01-03T11:56:38.900Z INFO Detecting RHEL/CentOS vulnerabilities... 2021-01-03T11:56:38.903Z INFO Trivy skips scanning programming language libraries because no supported file was detected localhost:5000/ubi:latest (redhat 8.3) ====================================== Total: 111 (UNKNOWN: 0, LOW: 43, MEDIUM: 67, HIGH: 1, CRITICAL: 0) +------------------------+------------------+----------+--------------------+---------------+-----------------------------------------+ | LIBRARY | VULNERABILITY ID | SEVERITY | INSTALLED VERSION | FIXED VERSION | TITLE | +------------------------+------------------+----------+--------------------+---------------+-----------------------------------------+ | bash | CVE-2019-18276 | LOW | 4.4.19-12.el8 | | bash: when effective UID is not | | | | | | | equal to its real UID the... | | | | | | | -->avd.aquasec.com/nvd/cve-2019-18276 | +------------------------+------------------+----------+--------------------+---------------+-----------------------------------------+ | brotli | CVE-2020-8927 | MEDIUM | 1.0.6-2.el8 | | brotli: buffer overflow when | | | | | | | input chunk is larger than 2GiB | | | | | | | -->avd.aquasec.com/nvd/cve-2020-8927 | +------------------------+------------------+----------+--------------------+---------------+-----------------------------------------+ | bzip2-libs | CVE-2019-12900 | LOW | 1.0.6-26.el8 | | bzip2: out-of-bounds write | | | | | | | in function BZ2_decompress | | | | | | | -->avd.aquasec.com/nvd/cve-2019-12900 | +------------------------+------------------+----------+--------------------+---------------+-----------------------------------------+ | coreutils-single | CVE-2017-18018 | MEDIUM | 8.30-8.el8 | | coreutils: race condition | | | | | | | vulnerability in chown and chgrp | | | | | | | -->avd.aquasec.com/nvd/cve-2017-18018 | +------------------------+------------------+ +--------------------+---------------+-----------------------------------------+ | curl | CVE-2020-8284 | | 7.61.1-14.el8_3.1 | | curl: dangerous nature | | | | | | | of PASV command could | | | | | | | be used to make curl... | | | | | | | -->avd.aquasec.com/nvd/cve-2020-8284 | + +------------------+ + +---------------+-----------------------------------------+ | | CVE-2020-8285 | | | | curl: malicious FTP server can | | | | | | | trigger stack overflow when | | | | | | | CURLOPT_CHUNK_BGN_FUNCTION | | | | | | | is used... | | | | | | | -->avd.aquasec.com/nvd/cve-2020-8285 | + +------------------+ + +---------------+-----------------------------------------+ | | CVE-2020-8286 | | | | curl: inferior OCSP verification | | | | | | | -->avd.aquasec.com/nvd/cve-2020-8286 | + +------------------+----------+ +---------------+-----------------------------------------+ | | CVE-2020-8231 | LOW | | | curl: Expired pointer | | | | | | | dereference via multi API with | | | | | | | `CURLOPT_CONNECT_ONLY` option set | | | | | | | -->avd.aquasec.com/nvd/cve-2020-8231 | +------------------------+------------------+----------+--------------------+---------------+-----------------------------------------+ | file-libs | CVE-2019-18218 | MEDIUM | 5.33-16.el8 | | file: heap-based buffer overflow | | | | | | | in cdf_read_property_info in cdf.c | | | | | | | -->avd.aquasec.com/nvd/cve-2019-18218 | + +------------------+----------+ +---------------+-----------------------------------------+ | | CVE-2019-8905 | LOW | | | file: stack-based buffer over-read | | | | | | | in do_core_note in readelf.c | | | | | | | -->avd.aquasec.com/nvd/cve-2019-8905 | + +------------------+ + +---------------+-----------------------------------------+ | | CVE-2019-8906 | | | | file: out-of-bounds read in | | | | | | | do_core_note in readelf.c | | | | | | | -->avd.aquasec.com/nvd/cve-2019-8906 | +------------------------+------------------+----------+--------------------+---------------+-----------------------------------------+ | glib2 | CVE-2019-9633 | MEDIUM | 2.56.4-8.el8 | | glib: | | | | | | | g_socket_client_connected_callback | | | | | | | in gio/gsocketclient.c allows | | | | | | | to cause denial of service | | | | | | | -->avd.aquasec.com/nvd/cve-2019-9633 | + +------------------+----------+ +---------------+-----------------------------------------+ | | CVE-2018-16428 | LOW | | | glib2: NULL pointer dereference in | | | | | | | g_markup_parse_context_end_parse() | | | | | | | function in gmarkup.c | | | | | | | -->avd.aquasec.com/nvd/cve-2018-16428 | + +------------------+ + +---------------+-----------------------------------------+ | | CVE-2018-16429 | | | | glib2: Out-of-bounds read in | | | | | | | g_markup_parse_context_parse() | | | | | | | in gmarkup.c | | | | | | | -->avd.aquasec.com/nvd/cve-2018-16429 | + +------------------+ + +---------------+-----------------------------------------+ | | CVE-2019-13012 | | | | glib2: insecure permissions | | | | | | | for files and directories | | | | | | | -->avd.aquasec.com/nvd/cve-2019-13012 | +------------------------+------------------+----------+--------------------+---------------+-----------------------------------------+ | glibc | CVE-2019-1010022 | MEDIUM | 2.28-127.el8 | | glibc: stack guard protection bypass | | | | | | | -->avd.aquasec.com/nvd/cve-2019-1010022 | + +------------------+ + +---------------+-----------------------------------------+ | | CVE-2019-9169 | | | | glibc: regular-expression | | | | | | | match via proceed_next_node | | | | | | | in posix/regexec.c leads to | | | | | | | heap-based buffer over-read... | | | | | | | -->avd.aquasec.com/nvd/cve-2019-9169 | + +------------------+----------+ +---------------+-----------------------------------------+ | | CVE-2019-1010023 | LOW | | | glibc: running ldd on malicious ELF | | | | | | | leads to code execution because of... | | | | | | | -->avd.aquasec.com/nvd/cve-2019-1010023 | + +------------------+ + +---------------+-----------------------------------------+ | | CVE-2020-27618 | | | | glibc: iconv when processing | | | | | | | invalid multi-byte input | | | | | | | sequences fails to advance the... | | | | | | | -->avd.aquasec.com/nvd/cve-2020-27618 | +------------------------+------------------+----------+ +---------------+-----------------------------------------+ | glibc-common | CVE-2019-1010022 | MEDIUM | | | glibc: stack guard protection bypass | | | | | | | -->avd.aquasec.com/nvd/cve-2019-1010022 | + +------------------+ + +---------------+-----------------------------------------+ | | CVE-2019-9169 | | | | glibc: regular-expression | | | | | | | match via proceed_next_node | | | | | | | in posix/regexec.c leads to | | | | | | | heap-based buffer over-read... | | | | | | | -->avd.aquasec.com/nvd/cve-2019-9169 | + +------------------+----------+ +---------------+-----------------------------------------+ | | CVE-2019-1010023 | LOW | | | glibc: running ldd on malicious ELF | | | | | | | leads to code execution because of... | | | | | | | -->avd.aquasec.com/nvd/cve-2019-1010023 | + +------------------+ + +---------------+-----------------------------------------+ | | CVE-2020-27618 | | | | glibc: iconv when processing | | | | | | | invalid multi-byte input | | | | | | | sequences fails to advance the... | | | | | | | -->avd.aquasec.com/nvd/cve-2020-27618 | +------------------------+------------------+----------+ +---------------+-----------------------------------------+ | glibc-minimal-langpack | CVE-2019-1010022 | MEDIUM | | | glibc: stack guard protection bypass | | | | | | | -->avd.aquasec.com/nvd/cve-2019-1010022 | + +------------------+ + +---------------+-----------------------------------------+ | | CVE-2019-9169 | | | | glibc: regular-expression | | | | | | | match via proceed_next_node | | | | | | | in posix/regexec.c leads to | | | | | | | heap-based buffer over-read... | | | | | | | -->avd.aquasec.com/nvd/cve-2019-9169 | + +------------------+----------+ +---------------+-----------------------------------------+ | | CVE-2019-1010023 | LOW | | | glibc: running ldd on malicious ELF | | | | | | | leads to code execution because of... | | | | | | | -->avd.aquasec.com/nvd/cve-2019-1010023 | + +------------------+ + +---------------+-----------------------------------------+ | | CVE-2020-27618 | | | | glibc: iconv when processing | | | | | | | invalid multi-byte input | | | | | | | sequences fails to advance the... | | | | | | | -->avd.aquasec.com/nvd/cve-2020-27618 | +------------------------+------------------+----------+--------------------+---------------+-----------------------------------------+ | gnupg2 | CVE-2018-1000858 | MEDIUM | 2.2.20-2.el8 | | gnupg2: Cross site request | | | | | | | forgery in dirmngr resulting | | | | | | | in an information disclosure... | | | | | | | -->avd.aquasec.com/nvd/cve-2018-1000858 | +------------------------+------------------+ +--------------------+---------------+-----------------------------------------+ | json-c | CVE-2020-12762 | | 0.13.1-0.2.el8 | | json-c: integer overflow | | | | | | | and out-of-bounds write | | | | | | | via a large JSON file | | | | | | | -->avd.aquasec.com/nvd/cve-2020-12762 | +------------------------+------------------+ +--------------------+---------------+-----------------------------------------+ | krb5-libs | CVE-2020-28196 | | 1.18.2-5.el8 | | krb5: unbounded recursion via an | | | | | | | ASN.1-encoded Kerberos message | | | | | | | in lib/krb5/asn.1/asn1_encode.c | | | | | | | may lead... | | | | | | | -->avd.aquasec.com/nvd/cve-2020-28196 | +------------------------+------------------+ +--------------------+---------------+-----------------------------------------+ | libarchive | CVE-2017-14502 | | 3.3.2-9.el8 | | libarchive: Off-by-one error | | | | | | | in the read_header function | | | | | | | -->avd.aquasec.com/nvd/cve-2017-14502 | + +------------------+ + +---------------+-----------------------------------------+ | | CVE-2020-21674 | | | | libarchive: heap-based | | | | | | | buffer overflow in | | | | | | | archive_string_append_from_wcs | | | | | | | function in archive_string.c | | | | | | | -->avd.aquasec.com/nvd/cve-2020-21674 | + +------------------+----------+ +---------------+-----------------------------------------+ | | CVE-2017-14166 | LOW | | | libarchive: Heap-based buffer | | | | | | | over-read in the atol8 function | | | | | | | -->avd.aquasec.com/nvd/cve-2017-14166 | + +------------------+ + +---------------+-----------------------------------------+ | | CVE-2017-14501 | | | | libarchive: Out-of-bounds | | | | | | | read in parse_file_info | | | | | | | -->avd.aquasec.com/nvd/cve-2017-14501 | + +------------------+ + +---------------+-----------------------------------------+ | | CVE-2018-1000879 | | | | libarchive: NULL pointer dereference in | | | | | | | ACL parser resulting in a denial of... | | | | | | | -->avd.aquasec.com/nvd/cve-2018-1000879 | + +------------------+ + +---------------+-----------------------------------------+ | | CVE-2018-1000880 | | | | libarchive: Improper input | | | | | | | validation in WARC parser | | | | | | | resulting in a denial of... | | | | | | | -->avd.aquasec.com/nvd/cve-2018-1000880 | +------------------------+------------------+----------+--------------------+---------------+-----------------------------------------+ | libcom_err | CVE-2019-5188 | MEDIUM | 1.45.6-1.el8 | | e2fsprogs: Out-of-bounds | | | | | | | write in e2fsck/rehash.c | | | | | | | -->avd.aquasec.com/nvd/cve-2019-5188 | +------------------------+------------------+ +--------------------+---------------+-----------------------------------------+ | libcurl | CVE-2020-8284 | | 7.61.1-14.el8_3.1 | | curl: dangerous nature | | | | | | | of PASV command could | | | | | | | be used to make curl... | | | | | | | -->avd.aquasec.com/nvd/cve-2020-8284 | + +------------------+ + +---------------+-----------------------------------------+ | | CVE-2020-8285 | | | | curl: malicious FTP server can | | | | | | | trigger stack overflow when | | | | | | | CURLOPT_CHUNK_BGN_FUNCTION | | | | | | | is used... | | | | | | | -->avd.aquasec.com/nvd/cve-2020-8285 | + +------------------+ + +---------------+-----------------------------------------+ | | CVE-2020-8286 | | | | curl: inferior OCSP verification | | | | | | | -->avd.aquasec.com/nvd/cve-2020-8286 | + +------------------+----------+ +---------------+-----------------------------------------+ | | CVE-2020-8231 | LOW | | | curl: Expired pointer | | | | | | | dereference via multi API with | | | | | | | `CURLOPT_CONNECT_ONLY` option set | | | | | | | -->avd.aquasec.com/nvd/cve-2020-8231 | +------------------------+------------------+ +--------------------+---------------+-----------------------------------------+ | libdb | CVE-2019-2708 | | 5.3.28-39.el8 | | libdb: data store execution | | | | | | | leads to partial DoS | | | | | | | -->avd.aquasec.com/nvd/cve-2019-2708 | +------------------------+ + + +---------------+ + | libdb-utils | | | | | | | | | | | | | | | | | | | | +------------------------+------------------+----------+--------------------+---------------+-----------------------------------------+ | libgcc | CVE-2018-20673 | MEDIUM | 8.3.1-5.1.el8 | | libiberty: Integer overflow in | | | | | | | demangle_template() function | | | | | | | -->avd.aquasec.com/nvd/cve-2018-20673 | + +------------------+----------+ +---------------+-----------------------------------------+ | | CVE-2018-20657 | LOW | | | libiberty: Memory leak in | | | | | | | demangle_template function | | | | | | | resulting in a denial of service... | | | | | | | -->avd.aquasec.com/nvd/cve-2018-20657 | + +------------------+ + +---------------+-----------------------------------------+ | | CVE-2019-14250 | | | | binutils: integer overflow in | | | | | | | simple-object-elf.c leads to | | | | | | | a heap-based buffer overflow | | | | | | | -->avd.aquasec.com/nvd/cve-2019-14250 | +------------------------+------------------+----------+--------------------+---------------+-----------------------------------------+ | libgcrypt | CVE-2019-12904 | MEDIUM | 1.8.5-4.el8 | | Libgcrypt: physical addresses | | | | | | | being available to other processes | | | | | | | leads to a flush-and-reload... | | | | | | | -->avd.aquasec.com/nvd/cve-2019-12904 | +------------------------+------------------+ +--------------------+---------------+-----------------------------------------+ | libidn2 | CVE-2019-18224 | | 2.2.0-1.el8 | | libidn2: heap-based buffer overflow | | | | | | | in idn2_to_ascii_4i in lib/lookup.c | | | | | | | -->avd.aquasec.com/nvd/cve-2019-18224 | +------------------------+------------------+----------+--------------------+---------------+-----------------------------------------+ | libssh | CVE-2020-16135 | LOW | 0.9.4-2.el8 | | libssh: NULL pointer | | | | | | | dereference in sftpserver.c | | | | | | | if ssh_buffer_new returns NULL | | | | | | | -->avd.aquasec.com/nvd/cve-2020-16135 | +------------------------+ + + +---------------+ + | libssh-config | | | | | | | | | | | | | | | | | | | | | | | | | | | +------------------------+------------------+----------+--------------------+---------------+-----------------------------------------+ | libstdc++ | CVE-2018-20673 | MEDIUM | 8.3.1-5.1.el8 | | libiberty: Integer overflow in | | | | | | | demangle_template() function | | | | | | | -->avd.aquasec.com/nvd/cve-2018-20673 | + +------------------+----------+ +---------------+-----------------------------------------+ | | CVE-2018-20657 | LOW | | | libiberty: Memory leak in | | | | | | | demangle_template function | | | | | | | resulting in a denial of service... | | | | | | | -->avd.aquasec.com/nvd/cve-2018-20657 | + +------------------+ + +---------------+-----------------------------------------+ | | CVE-2019-14250 | | | | binutils: integer overflow in | | | | | | | simple-object-elf.c leads to | | | | | | | a heap-based buffer overflow | | | | | | | -->avd.aquasec.com/nvd/cve-2019-14250 | +------------------------+------------------+ +--------------------+---------------+-----------------------------------------+ | libtasn1 | CVE-2018-1000654 | | 4.13-3.el8 | | libtasn1: Infinite loop in | | | | | | | _asn1_expand_object_id(ptree) | | | | | | | leads to memory exhaustion | | | | | | | -->avd.aquasec.com/nvd/cve-2018-1000654 | +------------------------+------------------+----------+--------------------+---------------+-----------------------------------------+ | libxml2 | CVE-2020-24977 | MEDIUM | 2.9.7-8.el8 | | libxml2: Buffer Overflow | | | | | | | vulnerability in | | | | | | | xmlEncodeEntitiesInternal | | | | | | | at libxml2/entities.c | | | | | | | -->avd.aquasec.com/nvd/cve-2020-24977 | +------------------------+------------------+ +--------------------+---------------+-----------------------------------------+ | lua-libs | CVE-2020-15945 | | 5.3.4-11.el8 | | lua: segmentation fault | | | | | | | in changedline in ldebug.c | | | | | | | -->avd.aquasec.com/nvd/cve-2020-15945 | + +------------------+----------+ +---------------+-----------------------------------------+ | | CVE-2020-24370 | LOW | | | lua: segmentation fault in getlocal | | | | | | | and setlocal functions in ldebug.c | | | | | | | -->avd.aquasec.com/nvd/cve-2020-24370 | +------------------------+------------------+----------+--------------------+---------------+-----------------------------------------+ | lz4-libs | CVE-2019-17543 | MEDIUM | 1.8.3-2.el8 | | lz4: heap-based buffer | | | | | | | overflow in LZ4_write32 | | | | | | | -->avd.aquasec.com/nvd/cve-2019-17543 | +------------------------+------------------+ +--------------------+---------------+-----------------------------------------+ | ncurses-base | CVE-2019-17594 | | 6.1-7.20180224.el8 | | ncurses: heap-based buffer | | | | | | | overflow in the _nc_find_entry | | | | | | | function in tinfo/comp_hash.c | | | | | | | -->avd.aquasec.com/nvd/cve-2019-17594 | + +------------------+ + +---------------+-----------------------------------------+ | | CVE-2019-17595 | | | | ncurses: heap-based buffer | | | | | | | overflow in the fmt_entry | | | | | | | function in tinfo/comp_hash.c | | | | | | | -->avd.aquasec.com/nvd/cve-2019-17595 | + +------------------+----------+ +---------------+-----------------------------------------+ | | CVE-2018-19211 | LOW | | | ncurses: Null pointer | | | | | | | dereference at function | | | | | | | _nc_parse_entry in parse_entry.c | | | | | | | -->avd.aquasec.com/nvd/cve-2018-19211 | + +------------------+ + +---------------+-----------------------------------------+ | | CVE-2018-19217 | | | | ncurses: Null pointer dereference | | | | | | | at function _nc_name_match | | | | | | | -->avd.aquasec.com/nvd/cve-2018-19217 | +------------------------+------------------+----------+ +---------------+-----------------------------------------+ | ncurses-libs | CVE-2019-17594 | MEDIUM | | | ncurses: heap-based buffer | | | | | | | overflow in the _nc_find_entry | | | | | | | function in tinfo/comp_hash.c | | | | | | | -->avd.aquasec.com/nvd/cve-2019-17594 | + +------------------+ + +---------------+-----------------------------------------+ | | CVE-2019-17595 | | | | ncurses: heap-based buffer | | | | | | | overflow in the fmt_entry | | | | | | | function in tinfo/comp_hash.c | | | | | | | -->avd.aquasec.com/nvd/cve-2019-17595 | + +------------------+----------+ +---------------+-----------------------------------------+ | | CVE-2018-19211 | LOW | | | ncurses: Null pointer | | | | | | | dereference at function | | | | | | | _nc_parse_entry in parse_entry.c | | | | | | | -->avd.aquasec.com/nvd/cve-2018-19211 | + +------------------+ + +---------------+-----------------------------------------+ | | CVE-2018-19217 | | | | ncurses: Null pointer dereference | | | | | | | at function _nc_name_match | | | | | | | -->avd.aquasec.com/nvd/cve-2018-19217 | +------------------------+------------------+----------+--------------------+---------------+-----------------------------------------+ | openldap | CVE-2019-13057 | MEDIUM | 2.4.46-15.el8 | | openldap: Information disclosure | | | | | | | issue in slapd component | | | | | | | -->avd.aquasec.com/nvd/cve-2019-13057 | + +------------------+ + +---------------+-----------------------------------------+ | | CVE-2020-12243 | | | | openldap: denial of service | | | | | | | via nested boolean expressions | | | | | | | in LDAP search filters... | | | | | | | -->avd.aquasec.com/nvd/cve-2020-12243 | +------------------------+------------------+ +--------------------+---------------+-----------------------------------------+ | p11-kit | CVE-2020-29361 | | 0.23.14-5.el8_0 | | p11-kit: integer overflow when | | | | | | | allocating memory for arrays | | | | | | | or attributes and object... | | | | | | | -->avd.aquasec.com/nvd/cve-2020-29361 | + +------------------+ + +---------------+-----------------------------------------+ | | CVE-2020-29362 | | | | p11-kit: out-of-bounds read in | | | | | | | p11_rpc_buffer_get_byte_array | | | | | | | function in rpc-message.c | | | | | | | -->avd.aquasec.com/nvd/cve-2020-29362 | + +------------------+ + +---------------+-----------------------------------------+ | | CVE-2020-29363 | | | | p11-kit: out-of-bounds write in | | | | | | | p11_rpc_buffer_get_byte_array_value | | | | | | | function in rpc-message.c | | | | | | | -->avd.aquasec.com/nvd/cve-2020-29363 | +------------------------+------------------+ + +---------------+-----------------------------------------+ | p11-kit-trust | CVE-2020-29361 | | | | p11-kit: integer overflow when | | | | | | | allocating memory for arrays | | | | | | | or attributes and object... | | | | | | | -->avd.aquasec.com/nvd/cve-2020-29361 | + +------------------+ + +---------------+-----------------------------------------+ | | CVE-2020-29362 | | | | p11-kit: out-of-bounds read in | | | | | | | p11_rpc_buffer_get_byte_array | | | | | | | function in rpc-message.c | | | | | | | -->avd.aquasec.com/nvd/cve-2020-29362 | + +------------------+ + +---------------+-----------------------------------------+ | | CVE-2020-29363 | | | | p11-kit: out-of-bounds write in | | | | | | | p11_rpc_buffer_get_byte_array_value | | | | | | | function in rpc-message.c | | | | | | | -->avd.aquasec.com/nvd/cve-2020-29363 | +------------------------+------------------+----------+--------------------+---------------+-----------------------------------------+ | pcre | CVE-2019-20838 | LOW | 8.42-4.el8 | | pcre: buffer over-read in | | | | | | | JIT when UTF is disabled | | | | | | | -->avd.aquasec.com/nvd/cve-2019-20838 | + +------------------+ + +---------------+-----------------------------------------+ | | CVE-2020-14155 | | | | pcre: integer overflow in libpcre | | | | | | | -->avd.aquasec.com/nvd/cve-2020-14155 | +------------------------+------------------+----------+--------------------+---------------+-----------------------------------------+ | platform-python | CVE-2019-18348 | MEDIUM | 3.6.8-31.el8 | | python: CRLF injection via the | | | | | | | host part of the url passed to... | | | | | | | -->avd.aquasec.com/nvd/cve-2019-18348 | + +------------------+ + +---------------+-----------------------------------------+ | | CVE-2020-26116 | | | | python: CRLF injection via HTTP | | | | | | | request method in httplib/http.client | | | | | | | -->avd.aquasec.com/nvd/cve-2020-26116 | + +------------------+ + +---------------+-----------------------------------------+ | | CVE-2020-27619 | | | | python: Python 3 eval of http | | | | | | | resources during test suite runs | | | | | | | -->avd.aquasec.com/nvd/cve-2020-27619 | + +------------------+----------+ +---------------+-----------------------------------------+ | | CVE-2019-9674 | LOW | | | python: Nested zip file (Zip bomb) | | | | | | | vulnerability in Lib/zipfile.py | | | | | | | -->avd.aquasec.com/nvd/cve-2019-9674 | +------------------------+------------------+----------+ +---------------+-----------------------------------------+ | python3-libs | CVE-2019-18348 | MEDIUM | | | python: CRLF injection via the | | | | | | | host part of the url passed to... | | | | | | | -->avd.aquasec.com/nvd/cve-2019-18348 | + +------------------+ + +---------------+-----------------------------------------+ | | CVE-2020-26116 | | | | python: CRLF injection via HTTP | | | | | | | request method in httplib/http.client | | | | | | | -->avd.aquasec.com/nvd/cve-2020-26116 | + +------------------+ + +---------------+-----------------------------------------+ | | CVE-2020-27619 | | | | python: Python 3 eval of http | | | | | | | resources during test suite runs | | | | | | | -->avd.aquasec.com/nvd/cve-2020-27619 | + +------------------+----------+ +---------------+-----------------------------------------+ | | CVE-2019-9674 | LOW | | | python: Nested zip file (Zip bomb) | | | | | | | vulnerability in Lib/zipfile.py | | | | | | | -->avd.aquasec.com/nvd/cve-2019-9674 | +------------------------+------------------+----------+--------------------+---------------+-----------------------------------------+ | python3-libxml2 | CVE-2020-24977 | MEDIUM | 2.9.7-8.el8 | | libxml2: Buffer Overflow | | | | | | | vulnerability in | | | | | | | xmlEncodeEntitiesInternal | | | | | | | at libxml2/entities.c | | | | | | | -->avd.aquasec.com/nvd/cve-2020-24977 | +------------------------+------------------+ +--------------------+---------------+-----------------------------------------+ | python3-pip-wheel | CVE-2020-14422 | | 9.0.3-18.el8 | | python: DoS via inefficiency | | | | | | | in IPv{4,6}Interface classes | | | | | | | -->avd.aquasec.com/nvd/cve-2020-14422 | + +------------------+----------+ +---------------+-----------------------------------------+ | | CVE-2018-20225 | LOW | | | python-pip: when --extra-index-url | | | | | | | option is used and package | | | | | | | does not already exist... | | | | | | | -->avd.aquasec.com/nvd/cve-2018-20225 | +------------------------+------------------+----------+--------------------+---------------+-----------------------------------------+ | sqlite-libs | CVE-2019-5827 | HIGH | 3.26.0-11.el8 | | chromium-browser: | | | | | | | out-of-bounds access in SQLite | | | | | | | -->avd.aquasec.com/nvd/cve-2019-5827 | + +------------------+----------+ +---------------+-----------------------------------------+ | | CVE-2019-13750 | MEDIUM | | | sqlite: dropping of shadow tables | | | | | | | not restricted in defensive mode | | | | | | | -->avd.aquasec.com/nvd/cve-2019-13750 | + +------------------+ + +---------------+-----------------------------------------+ | | CVE-2019-13751 | | | | sqlite: fts3: improve | | | | | | | detection of corrupted records | | | | | | | -->avd.aquasec.com/nvd/cve-2019-13751 | + +------------------+ + +---------------+-----------------------------------------+ | | CVE-2019-19242 | | | | sqlite: SQL injection in | | | | | | | sqlite3ExprCodeTarget in expr.c | | | | | | | -->avd.aquasec.com/nvd/cve-2019-19242 | + +------------------+ + +---------------+-----------------------------------------+ | | CVE-2019-19603 | | | | sqlite: mishandles certain SELECT | | | | | | | statements with a nonexistent | | | | | | | VIEW, leading to DoS... | | | | | | | -->avd.aquasec.com/nvd/cve-2019-19603 | + +------------------+ + +---------------+-----------------------------------------+ | | CVE-2019-19645 | | | | sqlite: infinite recursion via | | | | | | | certain types of self-referential | | | | | | | views in conjunction with... | | | | | | | -->avd.aquasec.com/nvd/cve-2019-19645 | + +------------------+ + +---------------+-----------------------------------------+ | | CVE-2019-19880 | | | | sqlite: invalid pointer dereference | | | | | | | in exprListAppendList in window.c | | | | | | | -->avd.aquasec.com/nvd/cve-2019-19880 | + +------------------+ + +---------------+-----------------------------------------+ | | CVE-2020-13434 | | | | sqlite: integer overflow | | | | | | | in sqlite3_str_vappendf | | | | | | | function in printf.c | | | | | | | -->avd.aquasec.com/nvd/cve-2020-13434 | + +------------------+ + +---------------+-----------------------------------------+ | | CVE-2020-13435 | | | | sqlite: NULL pointer dereference | | | | | | | leads to segmentation fault in | | | | | | | sqlite3ExprCodeTarget in expr.c... | | | | | | | -->avd.aquasec.com/nvd/cve-2020-13435 | + +------------------+ + +---------------+-----------------------------------------+ | | CVE-2020-15358 | | | | sqlite: heap-based buffer overflow in | | | | | | | multiSelectOrderBy due to mishandling | | | | | | | of query-flattener optimization... | | | | | | | -->avd.aquasec.com/nvd/cve-2020-15358 | + +------------------+----------+ +---------------+-----------------------------------------+ | | CVE-2019-19244 | LOW | | | sqlite: allows a crash | | | | | | | if a sub-select uses both | | | | | | | DISTINCT and window... | | | | | | | -->avd.aquasec.com/nvd/cve-2019-19244 | + +------------------+ + +---------------+-----------------------------------------+ | | CVE-2019-9936 | | | | sqlite: heap-based buffer | | | | | | | over-read in function | | | | | | | fts5HashEntrySort in sqlite3.c | | | | | | | -->avd.aquasec.com/nvd/cve-2019-9936 | + +------------------+ + +---------------+-----------------------------------------+ | | CVE-2019-9937 | | | | sqlite: null-pointer | | | | | | | dereference in function | | | | | | | fts5ChunkIterate in sqlite3.c | | | | | | | -->avd.aquasec.com/nvd/cve-2019-9937 | +------------------------+------------------+----------+--------------------+---------------+-----------------------------------------+ | systemd | CVE-2018-20839 | MEDIUM | 239-41.el8_3.1 | | systemd: mishandling of the | | | | | | | current keyboard mode check | | | | | | | leading to passwords being... | | | | | | | -->avd.aquasec.com/nvd/cve-2018-20839 | + +------------------+ + +---------------+-----------------------------------------+ | | CVE-2019-3842 | | | | systemd: Spoofing of XDG_SEAT | | | | | | | allows for actions to be checked | | | | | | | against "allow_active"... | | | | | | | -->avd.aquasec.com/nvd/cve-2019-3842 | + +------------------+ + +---------------+-----------------------------------------+ | | CVE-2020-13776 | | | | systemd: mishandles numerical | | | | | | | usernames beginning with decimal | | | | | | | digits or 0x followed by... | | | | | | | -->avd.aquasec.com/nvd/cve-2020-13776 | +------------------------+------------------+ + +---------------+-----------------------------------------+ | systemd-libs | CVE-2018-20839 | | | | systemd: mishandling of the | | | | | | | current keyboard mode check | | | | | | | leading to passwords being... | | | | | | | -->avd.aquasec.com/nvd/cve-2018-20839 | + +------------------+ + +---------------+-----------------------------------------+ | | CVE-2019-3842 | | | | systemd: Spoofing of XDG_SEAT | | | | | | | allows for actions to be checked | | | | | | | against "allow_active"... | | | | | | | -->avd.aquasec.com/nvd/cve-2019-3842 | + +------------------+ + +---------------+-----------------------------------------+ | | CVE-2020-13776 | | | | systemd: mishandles numerical | | | | | | | usernames beginning with decimal | | | | | | | digits or 0x followed by... | | | | | | | -->avd.aquasec.com/nvd/cve-2020-13776 | +------------------------+------------------+ + +---------------+-----------------------------------------+ | systemd-pam | CVE-2018-20839 | | | | systemd: mishandling of the | | | | | | | current keyboard mode check | | | | | | | leading to passwords being... | | | | | | | -->avd.aquasec.com/nvd/cve-2018-20839 | + +------------------+ + +---------------+-----------------------------------------+ | | CVE-2019-3842 | | | | systemd: Spoofing of XDG_SEAT | | | | | | | allows for actions to be checked | | | | | | | against "allow_active"... | | | | | | | -->avd.aquasec.com/nvd/cve-2019-3842 | + +------------------+ + +---------------+-----------------------------------------+ | | CVE-2020-13776 | | | | systemd: mishandles numerical | | | | | | | usernames beginning with decimal | | | | | | | digits or 0x followed by... | | | | | | | -->avd.aquasec.com/nvd/cve-2020-13776 | +------------------------+------------------+----------+--------------------+---------------+-----------------------------------------+ | tar | CVE-2019-9923 | LOW | 2:1.30-5.el8 | | tar: null-pointer dereference | | | | | | | in pax_decode_header in sparse.c | | | | | | | -->avd.aquasec.com/nvd/cve-2019-9923 | +------------------------+------------------+ +--------------------+---------------+-----------------------------------------+ | vim-minimal | CVE-2018-20786 | | 2:8.0.1763-15.el8 | | libvterm: NULL pointer dereference | | | | | | | in vterm_screen_set_callbacks | | | | | | | -->avd.aquasec.com/nvd/cve-2018-20786 | +------------------------+------------------+----------+--------------------+---------------+-----------------------------------------+お、、結構、脆弱なんだな。。
- 投稿日:2021-01-03T19:40:35+09:00
【Terraform】ECS自動デプロイ - Terraform編 -
参考文献
- [Terraform][Backends][v0.9]tfstateファイルの管理方法
- グループ会社のインフラをECS/Fargateに移行して振り返る
- [AWS][Terraform][Fargate]ECSでコンテナをALB配下に置く
- circleci/aws-ecs@1.4.0
- AWS ECR/ECS へのデプロイ
ツリー図
.
├── acm.tf
├── alb.tf
├── backend.tf
├── ecs.tf
├── files
│   └── task-definitions
│       └── container.json
├── rds.tf
├── security_group.tf
├── terraform.tfvars
├── variables.tf
├── vpc.tf
├── vpc_gateway.tf
├── vpc_routetable.tf
└── vpc_subnet.tf
Terraform / AWS CLIコマンド
◆ AWS CLIコマンド
/// ECS
$ aws ecs list-task-definitions --region ap-northeast-1
$ aws ecs list-clusters
$ aws ecs register-task-definition --family sample-service  --cli-input-json file://container.json

/// RDS
$ mysql -h sample-rds.XXXXXX.XXXXXX.rds.amazonaws.com -P 3306 -u XXXX -p
◆ EC2インストール
$ sudo yum install git
$ yum list installed | grep mariadb
$ sudo yum remove mariadb-libs
$ sudo yum-config-manager --disable mysql57-community
$ sudo yum-config-manager --enable mysql80-community
$ sudo yum install -y mysql-community-client
$ mysql --version
各tfファイル
◆ ecs.tf
ecs.tf# ==================== # Cluster # ==================== resource "aws_ecs_cluster" "sample-cluster" { name = "sample-cluster" } # ==================== # CloudWatch logs # ==================== resource "aws_cloudwatch_log_group" "sample-log-group" { name = "sample-log-group" tags = {} } # ==================== # task_definition # ==================== resource "aws_ecs_task_definition" "sample-task-definition" { //family:複数のタスク定義をまとめる際に使用 family = "sample-service" requires_compatibilities = ["FARGATE"] network_mode = "awsvpc" task_role_arn = "arn:aws:iam::${var.aws_account_id}:role/ecsTaskExecutionRole" execution_role_arn = "arn:aws:iam::${var.aws_account_id}:role/ecsTaskExecutionRole" cpu = 1024 memory = 2048 container_definitions = file("files/task-definitions/container.json") } # ==================== # Service # ==================== resource "aws_ecs_service" "sample-service" { cluster = aws_ecs_cluster.sample-cluster.id launch_type = "FARGATE" deployment_minimum_healthy_percent = 100 deployment_maximum_percent = 200 name = "sample-service" task_definition = aws_ecs_task_definition.sample-task-definition.arn //desired_count:タスク数 desired_count = 1 /// autoscalingで動的に変化する値を無視する /// lifecycle { ignore_changes = [desired_count, task_definition] } load_balancer { target_group_arn = aws_alb_target_group.sample-target-group.arn container_name = "sample-container" container_port = 80 } network_configuration { subnets = [aws_subnet.sample-subnet-1.id, aws_subnet.sample-subnet-2.id] security_groups = [aws_security_group.sample-security-group-app.id, aws_security_group.sample-security-group-rds.id] assign_public_ip = "true" } }◆ container.json
files/container.json[ { "image": "XXXXXX.dkr.ecr.XXXXXX.amazonaws.com/sample_dev:latest", "logConfiguration": { "logDriver": "awslogs", "options": { "awslogs-group": "sample-log-group", "awslogs-region": "ap-northeast-1", "awslogs-stream-prefix": "ecs" } }, "cpu": 512, "memory": 1024, "mountPoints": [], "environment": [], "networkMode": "awsvpc", "name": "sample-container", "essential": true, "portMappings": [ { "hostPort": 80, "containerPort": 80, "protocol": "tcp" } ], "command": [ "/usr/bin/supervisord" ] } ]◆ alb.tf
alb.tf# ==================== # ALB # ==================== resource "aws_alb" "sample-alb" { name = "sample-alb" security_groups = [aws_security_group.sample-security-group-alb.id] subnets = [aws_subnet.sample-subnet-1.id, aws_subnet.sample-subnet-2.id] internal = false enable_deletion_protection = false } # ==================== # Target Group # ==================== resource "aws_alb_target_group" "sample-target-group" { name = "sample-target-group" depends_on = [aws_alb.sample-alb] port = 80 protocol = "HTTP" vpc_id = aws_vpc.sample-vpc.id target_type = "ip" health_check { protocol = "HTTP" path = "/ping" port = 80 unhealthy_threshold = 5 timeout = 5 interval = 10 matcher = 200 } } # ==================== # ALB Listener HTTP # ==================== resource "aws_alb_listener" "sample-alb-http" { load_balancer_arn = aws_alb.sample-alb.arn port = 80 protocol = "HTTP" default_action { target_group_arn = aws_alb_target_group.sample-target-group.arn type = "forward" } } # ==================== # ALB Listener HTTPS # ==================== resource "aws_alb_listener" "sample-alb-https" { load_balancer_arn = aws_alb.sample-alb.arn port = "443" protocol = "HTTPS" ssl_policy = "ELBSecurityPolicy-2015-05" certificate_arn = aws_acm_certificate.sample-acm.arn default_action { target_group_arn = aws_alb_target_group.sample-target-group.arn type = "forward" } } # ==================== # listener_rule # ==================== resource "aws_alb_listener_rule" "sample-listener-rule" { depends_on = [aws_alb_target_group.sample-target-group] listener_arn = aws_alb_listener.sample-alb-http.arn priority = 100 action { type = "forward" target_group_arn = aws_alb_target_group.sample-target-group.arn } condition { path_pattern { values = ["*"] } } }◆ acm.tf
acm.tf# ==================== # ACM # ==================== resource "aws_acm_certificate" "sample-acm" { domain_name = "sample.com" subject_alternative_names = ["*.sample.com"] validation_method = "DNS" lifecycle { create_before_destroy = true } }◆ rds.tf
rds.tf# ==================== # db_subnet_group # ==================== resource "aws_db_subnet_group" "sample-rds-subnet-group" { name = "sample-rds-subnet-group" description = "sample-rds-subnet-group" subnet_ids = [aws_subnet.sample-subnet-1.id, aws_subnet.sample-subnet-2.id] } # ==================== # db_instance # ==================== resource "aws_db_instance" "sample-rds" { identifier = "sample-rds" allocated_storage = 20 storage_type = "gp2" engine = "mysql" engine_version = "5.7" instance_class = "db.t2.micro" username = "test" password = "XXXXXX" parameter_group_name = "default.mysql5.7" port = "3306" vpc_security_group_ids = [aws_security_group.sample-security-group-rds.id] db_subnet_group_name = "${aws_db_subnet_group.sample-rds-subnet-group.name}" skip_final_snapshot = true }◆ security_group.tf
security_group.tf# ==================== # Security Group (app) # ==================== resource "aws_security_group" "sample-security-group-app" { vpc_id = aws_vpc.sample-vpc.id name = "sample-security-group-app" ingress { from_port = 80 to_port = 80 protocol = "tcp" cidr_blocks = ["X.X.X.X/16"] security_groups = [aws_security_group.sample-security-group-alb.id] } egress { from_port = 0 to_port = 0 protocol = "-1" cidr_blocks = ["0.0.0.0/0"] } tags = { Name = "sample-security-group-app" } } # ==================== # Security Group(ALB) # ==================== resource "aws_security_group" "sample-security-group-alb" { name = "sample-security-group-alb" description = "sample-security-group-alb" vpc_id = aws_vpc.sample-vpc.id ingress { from_port = 80 to_port = 80 protocol = "tcp" cidr_blocks = ["0.0.0.0/0"] } ingress { from_port = 443 to_port = 443 protocol = "tcp" cidr_blocks = ["0.0.0.0/0"] } egress { from_port = 0 to_port = 0 protocol = "-1" cidr_blocks = ["0.0.0.0/0"] } tags = { Name = "sample-security-group-alb" } } # ==================== # Security Group (RDS) # ==================== resource "aws_security_group" "sample-security-group-rds" { name = "sample-security-group-rds" description = "sample-security-group-rds" vpc_id = aws_vpc.sample-vpc.id ingress { from_port = 3306 to_port = 3306 protocol = "tcp" security_groups = [aws_security_group.sample-security-group-app.id] } ingress { from_port = 3306 to_port = 3306 protocol = "tcp" cidr_blocks = ["X.X.X.X/16"] description = "sample-security-group-rds" } ingress { from_port = 3306 to_port = 3306 protocol = "tcp" cidr_blocks = ["X.X.X.X/28"] description = "sample-security-group-rds" } egress { from_port = 0 to_port = 0 protocol = "-1" cidr_blocks = ["0.0.0.0/0"] } tags = { Name = "sample-security-group-rds" } }◆ vpc.tf
vpc.tf# ==================== # VPC # ==================== resource "aws_vpc" "sample-vpc" { cidr_block = "X.X.X.X/16" tags = { Name = "sample-vpc" } }◆ vpc_subnet.tf
vpc_subnet.tf# ==================== # Subnet # ==================== resource "aws_subnet" "sample-subnet-1" { cidr_block = "X.X.X.X/24" availability_zone = "ap-northeast-1a" vpc_id = aws_vpc.sample-vpc.id tags = { Name = "sample-subnet-1" } } resource "aws_subnet" "sample-subnet-2" { cidr_block = "X.X.X.X/24" availability_zone = "ap-northeast-1c" vpc_id = aws_vpc.sample-vpc.id tags = { Name = "sample-subnet-2" } }◆ vpc_routetable.tf
vpc_routetable.tf# ==================== # Subnet # ==================== resource "aws_subnet" "sample-subnet-1" { cidr_block = "X.X.X.X/24" availability_zone = "ap-northeast-1a" vpc_id = aws_vpc.sample-vpc.id tags = { Name = "sample-subnet-1" } } resource "aws_subnet" "sample-subnet-2" { cidr_block = "X.X.X.X/24" availability_zone = "ap-northeast-1c" vpc_id = aws_vpc.sample-vpc.id tags = { Name = "sample-subnet-2" } }◆ vpc_gateway.tf
vpc_gateway.tf# ==================== # Internet Gateway # ==================== resource "aws_internet_gateway" "sample-gateway" { vpc_id = aws_vpc.sample-vpc.id tags = { Name = "sample-gateway" } }◆ variables.tf
variables.tf/// tfファイルで使用する変数定義 /// /// 変数の中身はterraform.tfvarsに記載 /// variable "aws_access_key" {} variable "aws_secret_key" {} variable "region" {} variable "aws_account_id" {}◆ backend.tf
backend.tfprovider "aws" { access_key = "${var.aws_access_key}" secret_key = "${var.aws_secret_key}" region = "${var.region}" profile = "s3-profile" } terraform { backend "s3" { bucket = "sample-s3-file" key = "terraform.tfstate" region = "ap-northeast-1" shared_credentials_file = "~/.aws/credentials" profile = "s3-profile" } }
- 投稿日:2021-01-03T18:58:14+09:00
最速Docker導入(Windows10編)
最速Docker導入(Windows10編)
Dockerのインストールまでの最速手順です。
前提条件
- Docker Desktop v3.0.0を使用します
- Hyper-Vを使います
- WSL2を有効にして使います
インストーラーダウンロード
https://hub.docker.com/editions/community/docker-ce-desktop-windows
「Get Docker」をクリックすればインストーラーをダウンロードできます。インストーラーを実行
※Hyper-VとWSL2を使うのでチェックボックスの上から二つはつけてください
しばし☕タイム再起動
もしWSL2をインストールしろと言われたら、下記を手順に導入してください。
https://docs.docker.com/docker-for-windows/wsl/
https://docs.microsoft.com/en-us/windows/wsl/install-win10導入完了
Docker for windowsには下記が含まれています。
- Docker Engine
- Docker CLI クライアント
- Docker Compose
- Notary
- Kubernetes
- Credential Helper
Visual Studio Codeの拡張機能をうまく活用すれば色々便利です。
Hyper-V, WSL2は状況によって使用有無の判断があると思うので、そこはご自身で判断をお願いします。
とりあえずこれで後はイメージを準備したりして終わりです。続きはまた別記事で!


- 投稿日:2021-01-03T18:41:44+09:00
【CircleCI】ECS自動デプロイ - CircleCI編 -
参考文献
- [Terraform][Backends][v0.9]tfstateファイルの管理方法
- グループ会社のインフラをECS/Fargateに移行して振り返る
- [AWS][Terraform][Fargate]ECSでコンテナをALB配下に置く
- circleci/aws-ecs@1.4.0
- AWS ECR/ECS へのデプロイ
CircleCIコマンド
◆ config.ymlチェック
$ yamllint .circleci/config.yml◆ CircleCI jobチェック
$ circleci orb validate .circleci/config.yml
$ circleci local execute -c .circleci/config.yml --job build
$ circleci build --job rspec .circleci/config.yml
.circleci/config.yml
.circleci/config.ymlversion: 2.1 orbs: aws-ecr: circleci/aws-ecr@6.12.2 aws-ecs: circleci/aws-ecs@1.3.0 /// executors: ジョブのステップ実行する環境を定義 /// executors: default: docker: - image: circleci/ruby:2.7.1-node-browsers-legacy environment: BUNDLE_JOBS: 3 BUNDLE_RETRY: 3 BUNDLE_PATH: vendor/bundle RAILS_ENV: test DATABASE_HOST: '127.0.0.1' DB_USERNAME: 'root' DB_PASSWORD: 'XXXXXX' - image: circleci/mysql:5.7 environment: MYSQL_DATABASE: sample_dev MYSQL_USER: 'root' MYSQL_ROOT_PASSWORD: 'XXXXXX' docker_build: machine: docker_layer_caching: true /// commands: ジョブ内で実行する一連のステップをマップとして定義 /// commands: bundle_install_rspec: steps: - run: name: Which bundler? command: bundle -v /// ジョブのキャッシュを復元することで、ジョブ高速化 /// - restore_cache: keys: - cache-gem-{{ checksum "Gemfile.lock" }} - cache-gem- - run: name: Bundle Install command: bundle check || bundle install - save_cache: key: cache-gem-{{ checksum "Gemfile.lock" }} paths: - vendor/bundle - run: name: Database create command: DISABLE_SPRING=true bin/rake db:create --trace - run: name: Database setup command: DISABLE_SPRING=true bin/rake db:schema:load --trace - run: name: Run rspec command: | TZ=Asia/Tokyo \ bundle exec rspec --profile 10 \ --out test_results/rspec.xml \ --format progress \ $(circleci tests glob "spec/**/*_spec.rb" | circleci tests split --split-by=timings) /// Vueインストール /// vue-installation: steps: - restore_cache: keys: - cache-yarn-{{ checksum "yarn.lock" }} - cache-yarn- - run: name: Yarn Install command: yarn install - save_cache: key: cache-yarn-{{ checksum "yarn.lock" }} paths: - node_modules /// jobs:実行処理 /// jobs: rspec: working_directory: ~/rspec executor: default steps: - checkout - bundle_install_rspec - vue-installation deploy_app: working_directory: ~/app executor: default steps: - setup_remote_docker - checkout /// workflows:全てのジョブのオーケストレーション /// workflows: version: 2 build-and-deploy: jobs: - rspec - deploy_app: requires: - rspec - aws-ecr/build-and-push-image: requires: - deploy_app account-url: AWS_ECR_ACCOUNT_URL aws-access-key-id: AWS_ACCESS_KEY_ID aws-secret-access-key: AWS_SECRET_ACCESS_KEY region: AWS_DEFAULT_REGION repo: "${AWS_RESOURCE_NAME_PREFIX}" dockerfile: docker/dev/app/Dockerfile tag: "${CIRCLE_SHA1}" - aws-ecs/deploy-service-update: requires: - aws-ecr/build-and-push-image aws-region: AWS_DEFAULT_REGION family: "${AWS_RESOURCE_NAME_PREFIX}-service" cluster-name: "${AWS_RESOURCE_NAME_PREFIX}-cluster" container-image-name-updates: "container=${AWS_RESOURCE_NAME_PREFIX}-container,image-and-tag=${AWS_ECR_ACCOUNT_URL}/${AWS_RESOURCE_NAME_PREFIX}:${CIRCLE_SHA1}" - aws-ecs/run-task: requires: - aws-ecs/deploy-service-update cluster: "${AWS_RESOURCE_NAME_PREFIX}-cluster" aws-region: AWS_DEFAULT_REGION task-definition: "${AWS_RESOURCE_NAME_PREFIX}-task-definition" count: 1 launch-type: FARGATE awsvpc: true subnet-ids: subnet-XXXXXX,subnet-XXXXXX security-group-ids: sg-XXXXXX,sg-XXXXXX overrides: "{\\\"containerOverrides\\\":[{\\\"name\\\": \\\"${AWS_RESOURCE_NAME_PREFIX}-container\\\",\\\"command\\\": [\\\"bundle\\\", \\\"exec\\\", \\\"rake\\\", \\\"db:migrate\\\", \\\"RAILS_ENV=test\\\"]}]}"
- 投稿日:2021-01-03T17:56:32+09:00
WSL2 + Docker + VSCode で C++ と Python の実行環境を作る
競プロで C++ と Python を使っていて,Windows での実行環境が欲しかったので作ってみました.
開発用ではないので必要最低限の設定になっています.対象
- C++ や Python の簡単な実行環境を作りたい方
- Windows ユーザ
- Docker 導入済み
- VSCode を使っている方
使用環境 / ツール
- GitHub
- Windows 10 + WSL2
- Docker Desktop for Windows (v3.0.0)
- VSCode (v1.52.1)
この記事で作れる実行環境のサンプルリポジトリ : https://github.com/e5pe0n/algo-training-sample
GitHub にリポジトリを作る
コードを管理しやすいように GitHub にリポジトリを作ります.
適当な Repository Name を入力し,Add a README fileにチェックを入れて Create Repository をクリックします.
.gitignore はあとから作るのでここではチェックしません.
Dev Container の作成
いま作ったリポジトリを,実行環境となる Docker コンテナにクローンします.
VSCode に Remote Development を入れる
まずは VSCode からコンテナに接続できるように, VSCode を開いて拡張機能 Remote Development (ms-vscode-remote.vscode-remote-extensionpack) をインストールします.
VSCode と GitHub を紐づける
インストールが完了すると,エディタの一番左下に Remote Development の機能が使える緑色のボタンが表示されるので,それをクリックします.
出てきたメニューの中からRemote-Containers: Clone Repository in Container Volumeをクリックします.
リポジトリの URL を入力してエンターを押します.
初回では,VSCode で GitHub アカウントにサインインするかのダイアログが表示されたり,ブラウザに飛んで VSCode が GitHub にアクセスすることを許可するか聞かれたりするので,それぞれ Yes や Continue をクリックします.
クローンするブランチ
VSCode と GitHub が紐づけられると,クローンするブランチを聞かれるので
mainを選択します.
ボリュームの種類
ほかのリポジトリと併用しないので今回は
Create a unique volumeを選択します.
コンテナの種類
コンテナの種類は
Ubuntuにしましょう.
続いてバージョンを聞かれますがfocalにします.
これでひとまずリポジトリに紐づいたコンテナを作ることができました.
ここからは C++ や Python が実行できるようにコンテナの設定を整えていきます.コンテナの設定
初めてコンテナが作られたときは以下のようなディレクトリ構成になっていると思います.
ここから設定ファイルを編集したり,新しく設定ファイルを追加したりしていきます./workspaces/<repo-name> ├── .devcontainer │ ├── devcontainer.json │ └── Dockerfile ├── .git └── README.md最終的なディレクトリ構成はこんな感じです.
/workspaces/<repo-name>
├── .clang-format
├── .devcontainer
│   ├── devcontainer.json
│   └── Dockerfile
├── .git
├── .gitignore
├── README.md
└── requirements.txt
.gitignore の作成
リポジトリのディレクトリ直下で
touch .gitignoreを実行して空のファイルを作っておきます.
gitignore.io でvscode,C++,Pythonを入力して Create をクリックします.
表示された内容を全部先ほど作成した .gitignore にコピーして完成です.
必要があれば編集してください.Dockerfile の編集
Dockerfile の
# [Optional] Uncomment this ...以下の部分に,コンテナが作られるときに実行されるコマンドを追加していきます.
apt-getでインストールする build-essential は C++ のコンパイラ g++ が入っていて,clang-format は C++ ファイルのフォーマット用です.
また,デフォルトでは Python 3.8.2 が入っていますが,Python のパッケージインストーラ pip が入っていないので python3-pip をインストールします.# See here for image contents: https://github.com/microsoft/vscode-dev-containers/tree/v0.154.0/containers/ubuntu/.devcontainer/base.Dockerfile # [Choice] Ubuntu version: bionic, focal ARG VARIANT="focal" FROM mcr.microsoft.com/vscode/devcontainers/base:0-${VARIANT} # [Optional] Uncomment this section to install additional OS packages. RUN apt-get update && export DEBIAN_FRONTEND=noninteractive \ && apt-get -y install --no-install-recommends \ build-essential \ clang-format \ python3-pip.clang-format の作成
C++ ファイルのフォーマットの設定ファイルとして .clang-format を用意します.
VSCode のオートフォーマットを on にして C++ のフォーマッターを Clang-Format に設定することで,.clang-format の設定通り自動的にコードをフォーマットできます.
設定できる項目はめっちゃいっぱいある( https://clang.llvm.org/docs/ClangFormatStyleOptions.html )のでお好みで.
自分は正直よくわかってないのでとりあえず気になったものだけ設定しています.ColumnLimit: 110 AllowShortBlocksOnASingleLine: true AllowShortFunctionsOnASingleLine: Empty AllowShortIfStatementsOnASingleLine: true BinPackArguments: false BinPackParameters: false BreakBeforeBinaryOperators: NonAssignment ConstructorInitializerAllOnOneLineOrOnePerLine: true IndentWidth: 2requirements.txt の作成
requirements.txt は Python のパッケージ管理に使うファイルです.
ここにパッケージを列挙しておき,pip3 install -r requirements.txtを実行することで必要なパッケージを 1 コマンドでインストールすることができます.
導入するのは次のパッケージです.
パッケージ 説明 numpy 行列演算・数値計算とか用 flake8 リンター autopep8 フォーマッター これらを
pip3 installでインストールしたあと,インストールしたパッケージの一覧をpip3 freezeで requirements.txt に書き出します.$ pwd /workspaces/<repo-name> $ pip3 install numpy flake8 autopep8 $ pip3 freeze > requirements.txt依存しているパッケージも合わせると requirements.txt は次のようになっていると思います.
requirements.txtautopep8==1.5.4 flake8==3.8.4 mccabe==0.6.1 numpy==1.19.4 pycodestyle==2.6.0 pyflakes==2.2.0 toml==0.10.2devcontainer.json の編集
コンテナの設定ファイルです.
この中に VSCode の設定やコンテナが作られたあとのコマンドなどを書いておくことで,コンテナを作成したとき設定が自動的に反映されます.
オプション 説明 settings コンテナ独自の VSCode の設定 extensions コンテナで使う VSCode の拡張機能 postCreatedCommand コンテナが作られたあとに実行したいコマンド settings
VSCode の設定を書く部分です.
オプション 説明 editor.formatOnSave trueでファイル保存時に自動フォーマットpython.languageServer Python IntelliCode のサーバ python.pythonPath 使用する Python インタプリタのパス python.linting.flake8Args flake8 の引数 python.formatting.provider Python のフォーマッタを選択 [cpp]->editor.tabSize C++ ファイルでのインデントの文字数 [cpp]->editor.defaultFormatter C++ のフォーマッタを選択 extensions
インストールしたい VSCode の拡張機能を列挙するところです.
自分はとりあえず以下のものを書いています.
拡張機能 ID 説明 Visual Studio IntelliCode visualstudioexptteam.vscodeintellicode AI アシスタントがコード補完を提示してくれる C/C++ ms-vscode.cpptools C++ 用 Clang-Format xaver.clang-format C++ ファイル用フォーマッタ Git Extension Pack donjayamanne.git-extension-pack Git 用 Python ms-python.python Python 用 Pylance ms-python.vscode-pylance Python 用 Bracket Pair Colorizer 2 coenraads.bracket-pair-colorizer-2 対応する括弧をカラーリングしてくれる Trailing Spaces shardulm94.trailing-spaces 余分なスペースをハイライト・除去 Vim vscodevim.vim VSCode 用 Vim エミュレータ postCreateCommand
コンテナ作成後に実行されるコマンドを書くところです.
pip3 install -r requirements.txtをここに書いておくことで,先ほど書いた requirements.txt のパッケージを自動的にインストールしてくれます.remoteUser
root でコンテナに接続したいときは以下のようにコメントアウトします.
パーミッションまわりがいろいろ面倒なので自分は基本 root で使っています.// "remoteUser": "vscode"これらを設定すると devcontainer.json はこんな感じになります.
// For format details, see https://aka.ms/devcontainer.json. For config options, see the README at:
// https://github.com/microsoft/vscode-dev-containers/tree/v0.154.0/containers/ubuntu
{
    "name": "Ubuntu",
    "build": {
        "dockerfile": "Dockerfile",
        // Update 'VARIANT' to pick an Ubuntu version: focal, bionic
        "args": {
            "VARIANT": "focal"
        }
    },
    // Set *default* container specific settings.json values on container create.
    "settings": {
        "terminal.integrated.shell.linux": "/bin/bash",
        "editor.formatOnSave": true,
        "python.languageServer": "Pylance",
        "python.pythonPath": "/usr/bin/python3",
        "python.linting.flake8Args": [
            "--max-line-length", // 1 行あたりの文字数を 110 に設定
            "110"
        ],
        "python.formatting.provider": "autopep8",
        "python.formatting.autopep8Args": [
            "--max-line-length", // 1 行あたりの文字数を 110 に設定
            "110"
        ],
        "[cpp]": {
            "editor.tabSize": 2,
            "editor.defaultFormatter": "xaver.clang-format" // 拡張機能 Clang-Format を選択
        },
    },
    // Add the IDs of extensions you want installed when the container is created.
    "extensions": [
        "visualstudioexptteam.vscodeintellicode",
        "ms-vscode.cpptools",
        "xaver.clang-format",
        "donjayamanne.git-extension-pack",
        "ms-python.python",
        "ms-python.vscode-pylance",
        "coenraads.bracket-pair-colorizer-2",
        "shardulm94.trailing-spaces",
        "vscodevim.vim"
    ],
    // Use 'forwardPorts' to make a list of ports inside the container available locally.
    // "forwardPorts": [],

    // Use 'postCreateCommand' to run commands after the container is created.
    "postCreateCommand": "pip3 install -r requirements.txt",

    // Comment out connect as root instead. More info: https://aka.ms/vscode-remote/containers/non-root.
    // "remoteUser": "vscode"
}
以上でコンテナの設定は完了です.
コンテナのリビルド
仕上げとして,設定に基づいてコンテナをリビルドします.
左下の緑色のDev Container: Ubuntuをクリックし,Remote-Containers: Rebuild Containerを選択します.
これで C++ と Python の実行環境ができました.
リビルドが完了したあと,例えば次の hello.cpp,hello.py をコンテナ内で実行できます.hello.cpp#include <bits/stdc++.h> using namespace std; int main() { cout << "I'm C++!" << endl; }# g++ -o hello hello.cpp # ./hello I'm C++!hello.pyprint("I'm Python!!")# python3 hello.py I'm Python!!あとはこれをリモートのリポジトリにプッシュしておけば,同じ環境をすぐに作ることができます.
おまけ
自分は新しくディレクトリを作るとき C++ と Python のディレクトリを分けたいので,テンプレートとして次のディレクトリをリポジトリに入れています.
template ├── cpp │ ├── build // C++ の実行ファイル置き場 │ │ └── .gitkeep │ ├── .gitkeep │ └── run.sh // C++ ファイル実行用スクリプト └── python └── .gitkeeprun.shf=`echo $1 | sed -e 's/\(.*\).cpp/\1/'` current_dir=$(eval pwd) g++ -std=c++17 -g -o ${current_dir}/build/${f}.out $1 eval ${current_dir}/build/${f}.outrun.sh は C++ ファイルをコンパイル + 実行するスクリプトで,
sh run.sh A.cppみたいに使います.
競プロをやっていく上でもっといい運用方法があればぜひ教えてほしいです!


![devcontainer.json - algo-training-sample [Dev Container_ Ubuntu] - Visual Studio Code 1_3_2021 5_20_06 PM_LI.jpg](https://qiita-user-contents.imgix.net/https%3A%2F%2Fqiita-image-store.s3.ap-northeast-1.amazonaws.com%2F0%2F319282%2F9cf99cc5-96d5-1e2e-0d21-758830db9f60.jpeg?ixlib=rb-1.2.2&auto=format&gif-q=60&q=75&s=18ea340c645095ef366c4e07f80b57db)
- 投稿日:2021-01-03T17:43:52+09:00
【Docker】ECS自動デプロイ - Docker編 -
参考文献
- [Terraform][Backends][v0.9]tfstateファイルの管理方法
- グループ会社のインフラをECS/Fargateに移行して振り返る
- [AWS][Terraform][Fargate]ECSでコンテナをALB配下に置く
- circleci/aws-ecs@1.4.0
- AWS ECR/ECS へのデプロイ
ツリー図
docker/dev├── app │ ├── Dockerfile │ ├── nginx │ │ ├── app.conf │ │ └── nginx.conf │ └── supervisor │ ├── app.conf │ └── supervisord.conf ├── db │ ├── data │ └── mysql_initDockerコマンド
◆ dockerコンテナ削除
$ docker rm -f `docker ps -a -q`◆ dockerイメージ削除
$ docker rmi `docker images -q`◆ dockerイメージ作成
$ docker build -f docker/dev/app/Dockerfile -t sample_dev .◆ ECRプッシュコマンド
$ docker tag XXXXXX sample/dev  //Docker hubリポジトリ
$ docker images
$ docker push sample/dev
$ docker tag sample/dev:latest XXXXXX.dkr.ecr.XXXXXX.amazonaws.com/ecs-sample:latest
$ docker push XXXXXX.dkr.ecr.XXXXXX.amazonaws.com/ecs-sample:latest
◆ dockerコンテナ内実行コマンド
$ bundle install
$ bundle exec rake db:create db:migrate

// supervisor起動
$ /usr/bin/supervisorctl restart app

// production用データベース作成
$ bundle exec rails db:migrate RAILS_ENV=production

// アセットプリコンパイル
$ bundle exec rake assets:precompile RAILS_ENV=production
◆ database.ymlコマンド
$ export RAILS_DATABASE_USERNAME=test
$ export RAILS_DATABASE_PASSWORD=password
$ export RAILS_DATABASE_HOST=rds.XXXXXX.XXXXXX.rds.amazonaws.com
$ export RAILS_DATABASE_PORT=3306
◆ nginx && pumaコマンド
// ポート確認
$ ps -ef | grep nginx
$ ps aux | grep nginx

// nginx停止コマンド
$ nginx -s stop

// PID関連コマンド
$ touch /var/run/nginx.pid
$ touch /run/nginx.pid

// ポート占有確認
$ sudo lsof -i:80
$ ps ax | grep rails

// puma起動
$ bundle exec puma -C config/puma.rb
$ bundle exec pumactl start
◆ supervisorコマンド
// supervisor起動
$ /etc/init.d/supervisor start
$ supervisord -c /etc/supervisor/supervisord.conf

// supervisorのsocketコマンド
$ sudo touch /var/run/supervisor.sock
$ sudo chmod 777 /var/run/supervisor.sock
$ supervisorctl help stop

// supervisordの設定の「/var/run」を「/dev/shm」 に変更する
$ sed -i "s/\/var\/run/\/dev\/shm/g" /etc/supervisor/supervisord.conf
Dockerfile
DockerfileFROM ruby:2.7.1 ENV APP_ROOT /var/www/sample_dev ENV LANG C.UTF-8 ENV TZ Asia/Tokyo /// ディレクトリ作成 /// RUN mkdir -p $APP_ROOT RUN mkdir -p /root/tmp WORKDIR $APP_ROOT /// Node.js、Nginx, supervisorインストール /// RUN apt-get update -y && \ apt-get upgrade -y && \ apt-get install -y --no-install-recommends \ bash \ build-essential \ git \ libcurl4-openssl-dev \ libghc-yaml-dev \ libqt5webkit5-dev \ libxml2-dev \ libxslt-dev \ libyaml-dev \ linux-headers-amd64 \ default-mysql-client \ nginx \ nodejs \ openssl \ ruby-dev \ ruby-json \ tzdata \ vim \ supervisor \ zlib1g-dev && \ apt-get clean -y && \ rm -rf /var/cache/apt/archives/* /var/lib/apt/lists/* /// supervisor用logディレクトリ作成 /// RUN mkdir -p /var/log/supervisor /// nginx.conf, conf.d/app.conf作成 /// COPY app/nginx/nginx.conf /etc/nginx/nginx.conf COPY app/nginx/app.conf /etc/nginx/conf.d/app.conf /// supervisord.conf, conf.d/app.conf作成 /// COPY app/supervisor/supervisord.conf /etc/supervisor/supervisord.conf COPY app/supervisor/app.conf /etc/supervisor/conf.d/app.conf /// シンボリックリンク(ヘルスチェックログ) /// /// 各nginxアクセスログ /// RUN ln -sf /dev/stdout /var/log/nginx/access.log RUN ln -sf /dev/stdout /var/log/nginx/app.access.log RUN ln -sf /dev/stderr /var/log/nginx/app.error.log /// アプリケーションログ(pumaログ) /// RUN ln -sf /dev/stdout $APP_ROOT/log/development.log RUN ln -sf /dev/stdout $APP_ROOT/log/production.log CMD [ "/usr/bin/supervisord" ]docker-compose.ymlversion: '3' services: app: build: context: . dockerfile: app/Dockerfile volumes: - ~/sample_dev:/var/www/sample_dev /// ホスト側で80番ポートの許可が必要 /// /// nginxでバーチャルホストを設定する /// ports: - 80:80 environment: MYSQL_ROOT_PASSWORD: XXXXXX depends_on: - db tty: true stdin_open: true db: image: mysql:5.7 ports: - 3306:3306 volumes: # mysql初期化 - ./db/mysql_init:/docker-entrypoint-initdb.d - ./db/data:/var/lib/mysql environment: MYSQL_ROOT_PASSWORD: XXXXXXNginx
nginx.confuser root; worker_processes 1; pid /var/run/nginx.pid; events { worker_connections 1024; } http { include /etc/nginx/mime.types; default_type application/octet-stream; log_format main '$remote_addr - $remote_user [$time_local] "$request" ' '$status $body_bytes_sent "$http_referer" ' '"$http_user_agent" "$http_x_forwarded_for"'; access_log /var/log/nginx/access.log main; sendfile on; keepalive_timeout 65; include /etc/nginx/conf.d/*.conf; }app.conf/// アクセスログ、エラーログ設定 /// access_log /var/log/nginx/access.log main; error_log /var/log/nginx/error.log warn; upstream app { server unix:///var/www/sample_dev/tmp/sockets/puma.sock; } server { listen 80; server_name dev.sample.com; /// URLのパス設定 /// location / { /// リバースプロキシ設定 /// proxy_pass http://app; proxy_set_header X-Forwarded-For $proxy_add_x_forwarded_for; proxy_set_header Host $http_host; proxy_redirect off; } }puma
config/puma.rbthreads_count = ENV.fetch('RAILS_MAX_THREADS') { 5 }.to_i threads threads_count, threads_count # ポートを開放しておかないと、socketのlistenが行われない #port ENV.fetch('PORT') { 3000 } environment ENV.fetch('RAILS_ENV') { 'development' } plugin :tmp_restart app_root = File.expand_path('../..', __FILE__) # nginxのhttpディレクティブでsocket通信を行う bind "unix://#{app_root}/tmp/sockets/puma.sock" stdout_redirect "#{app_root}/log/puma.stdout.log", "#{app_root}/log/puma.stderr.log", truesupervisor
supervisord.conf/// supervisor.sock作成 /// [unix_http_server] file=/var/run/supervisor.sock [supervisord] /// nodaemon=true: supervisorがforground(最前面)プロセスで振舞う /// nodaemon=true logfile=/var/log/supervisor/supervisord.log pidfile=/var/tmp/supervisord.pid /// rpcinterfaceを有効にすると、supervisorctlが有効になる /// [rpcinterface:supervisor] supervisor.rpcinterface_factory = supervisor.rpcinterface:make_main_rpcinterface /// supervisorctlを使ってプロセス管理を可能にする /// [supervisorctl] serverurl=unix:///var/run/supervisor.sock [include] files = /etc/supervisor/conf.d/*.confapp.conf[program:app] command=bundle exec puma -C ./config/puma.rb autostart=true autorestart=true stopsignal=TERM user=root directory=/var/www/sample_dev/ stdout_logfile=/dev/stdout stdout_logfile_maxbytes=0 stderr_logfile=/dev/stderr stderr_logfile_maxbytes=0 [program:nginx] command=/usr/sbin/nginx -g "daemon off;" autostart=true autorestart=true stopsignal=TERM user=root stdout_logfile=/dev/stdout stdout_logfile_maxbytes=0 stderr_logfile=/dev/stderr stderr_logfile_maxbytes=0
- 投稿日:2021-01-03T16:06:49+09:00
Dockerとvctlコンテナでkind
kind (kubernetes in docker)
kindは、Dockerコンテナをノードとしたkubernetesクラスタを構築できるツールです。
本記事では、通常どおりDockerコンテナを利用して、kubernetesクラスタを構築するパターンを試した後、Dockerコンテナの代わりに、VMware Fusionのvctlコンテナを利用するパターンを試します。
Dockerコンテナのパターンについてはこちら、vctlコンテナのパターンについてはこちらの記事を参考にさせていただきました。環境
- macOS Catalina 10.15.7
- zsh v5.7.1
- go v1.15.6
- kind v0.5.1
- VMware Fusion v12.1.0
Dockerコンテナを使うパターン
kindを使うには、goのv1.14以上が必要なので、まず、goをインストールします。
$ brew install go
または
$ brew upgrade go
goのPATHを通すため、以下を~/.zshrcに追記しておきます。
export PATH=$PATH:/usr/local/go/bin
export PATH=$PATH:$(go env GOPATH)/bin
kindをインストールします。
$ GO111MODULE="on" go get sigs.k8s.io/kind@v0.5.1

# インストールの確認
$ kind version
v0.5.1
シングルノードクラスタを構築してみます。以下のコマンドを実行するだけです。
$ kind create clusterkubectlコマンドを使うには環境変数の設定が必要です。
※デフォルトでkindというクラスタ名になるため、--nameオプションにはkindを指定します。export KUBECONFIG="$(kind get kubeconfig-path --name="kind")"クラスタを削除するには以下のコマンドを実行します。
$ kind delete cluster --name kind $ unset KUBECONFIGマルチノードクラスタの構築については、こちらの記事をご参照、ということで割愛します。同様の手順で構築することができました。
vctlコンテナを使うパターン
前提条件
構築するクラスタのノード数によって必要な空きメモリが変わります。
1ノードで2GB、2ノードで4GBの空きメモリが必要になる模様。
事前にMacの空きメモリを調べておきましょう。以下のコマンドで、vctlコンテナランタイムを起動します。
$ vctl system start
Downloading 3 files...
Downloading [kubectl 93.95% kind-darwin-amd64 13.11% crx.vmdk 4.31%]
Finished kubectl 100.00%
Downloading [kind-darwin-amd64 95.58% crx.vmdk 45.76%]
Finished kind-darwin-amd64 100.00%
Downloading [crx.vmdk 97.06%]
Finished crx.vmdk 100.00%
3 files successfully downloaded.
Preparing storage...
Container storage has been prepared successfully under
/Users/****/.vctl/storage
Launching container runtime...
Container runtime has been started.
以下のコマンドで、vctlベースのkindを利用できるようにします。
$ kind versionを実行すると、先ほどインストールしたkindとは別のバージョンになっているため、vctlベースのものに切り替わったことが分かります。$ vctl kind vctl-based KIND is ready now. KIND will run local Kubernetes clusters by using vctl containers as "nodes" * All Docker commands has been aliased to vctl in the current terminal. Docker commands performed in current window would be executed through vctl. If you need to use regular Docker commands, please use a separate terminal window. # インストールの確認 $ kind version kind v0.9.0 go1.15.2 darwin/amd64クラスタの構築
Dockerコンテナの場合と同様に、以下のコマンドでクラスタを構築します。$ kind create cluster構築に失敗する場合は、メモリ不足の可能性があるため、空きメモリを確認してください。
※ノードに割り当てるメモリサイズは、以下のコマンドで変更することができますが、2GBより小さくすることはできません。$ vctl system config --k8s-mem 2g以上で、kindを使ったkubernetesクラスタの構築ができました。ローカル環境に、軽量・高速に(シングル・マルチノードの)クラスタを構築できるため、実環境に寄せたテスト環境などとして利用すると便利かと思いました。
ただ、vctlベースのkindでマルチノードのクラスタを構築する場合には、大容量のメモリ(3ノードでも最低6GBの空きメモリが要求されます)とそれなりのマシンスペックが必要になりそうですので、ご注意ください。
- 投稿日:2021-01-03T15:49:54+09:00
【環境構築】docker-compose upで「WARNING: Found orphan containers (...) for this project. ...」が表示されたので「-p」でプロジェクト名をつけてみた。
どうも、たかふみです。
dockerを使って環境構築をしようとdocker-compose upしたところ、下記メッセージが出てきました。MacBook-Pro:env moriyama$ docker-compose up --build WARNING: Found orphan containers (app_go, env_web_1, env_db_1, env_mysql_1) for this project. If you removed or renamed this service in your compose file, you can run this command with the --remove-orphans flag to clean it up. Building bot_wordwolf Step 1/11 : FROM alpine今回はこの「Found orphan containers」について調べてみました。
「orphans」とは何か調べてみる。
↓のstackoverflowに全部書いてありました。
docker compose orphan containers warning
https://stackoverflow.com/questions/50947938/docker-compose-orphan-containers-warningどうやら、docker-compose.ymlでコンテナを生成する際につけられるコンテナ名はディレクトリ名を使ってつけられるようです。僕の場合、
env\docker-compose.ymlのディレクトリ構造で環境構築することが多いため、「env_web/ env_db/env_mysql」というコンテナが量産されてしまい、他のプロジェクトで生成したコンテナ名と競合して今回のWARNINGが表示されていたようです。参考にしたstackoverflowで解決策として記載されていたのが、プロジェクト名をつけるというもの。
オプション 「-p」を使うことでつけられるとのことです。docker-compose [-f <arg>...] [options] [--] [COMMAND] [ARGS...]これでupしてみましょう。
MacBook-Pro:env moriyama$ docker-compose -p wordwolf up -d
Creating network "wordwolf_default" with the default driver
Building bot_wordwolf
Step 1/11 : FROM alpine
WARNINGが出ずに作成が始まっている!
そのほかにも「COMPOSE_PROJECT_NAME」という環境変数で指定をする方法や、docker-comose.ymlファイルと同ディレクトリに.envファイルを配置して「COMPOSE_PROJECT_NAME=myproject」を指定する方法もあるようです。
まとめ:-pでプロジェクト名をつける方法もある
今回は参考にしたサイトで書かれていた方法を試しましたが、WARNINGメッセージに表示されている
--remove-orphansをつけて実行すれば今回のWARNINGは表示されずコンテナが起動できるので、特に理由がなければメッセージの通り、--remove-orphansをつけての実行で良さそうです。■docker docsより
--remove-orphans
→Remove containers for services not defined in the Compose file.
引用:https://docs.docker.com/compose/reference/up/僕は開発環境を作るときは、{プロジェクト名をつけたディレクトリ}\env\docker-compose.ymlの構成が多いので、プロジェクト名をつけたいときは
-pでdocker-compose upすると良さそうです。それでは!
※12/27追記
「-p」をつけてupしたら、docker-compose psでdocker-compose.yml内に記載したコンテナが表示されない。docker psだと表示されなくなりました。-pつけると同一ネットワークのコンテナとして認識されないのでしょうか? こちらについては調査中です。参考:
・docker compose orphan containers warning
https://stackoverflow.com/questions/50947938/docker-compose-orphan-containers-warning・docker-compose up
https://docs.docker.com/compose/reference/up/
- 投稿日:2021-01-03T12:36:10+09:00
AWS LambdaがコンテナイメージをサポートしたのでPuppeteerしてみた
あけましておめでとうございます。
AWS Lambdaがコンテナイメージをサポートしたので、Puppeteerでキャプチャを取るLambdaをつくてみました。
クラスメソッドさんの以下の記事の通りで、ローカルでの実行はうまくいきましたが、Lambdaへのデプロイするとうまく動作しませんでした。(Chromeの起動タイミングでエラー?)
Lambda コンテナイメージで Puppeteer を使ってみた | Developers.IO
https://dev.classmethod.jp/articles/try-using-puppeteer-with-a-lambda-container-image/試行錯誤の結果が、こちらとなります。
ソース
全体はこちらにアップロード済みです。
https://github.com/moritalous/m5core2-yweather/tree/master/lambdaDockerfile
クラスメソッドさんはGoogle Chromeとpuppeteer-coreの組み合わせでしたが、puppeteer単体で動かしたかったので、インストールするパッケージを変えました。
インストールするパッケージはこちらを参考にしました。
日本語フォントgoogle-noto-sans-japanese-fontsもインストールします。FROM amazon/aws-lambda-nodejs:12 RUN yum -y install libX11 libXcomposite libXcursor libXdamage libXext libXi libXtst cups-libs libXScrnSaver libXrandr alsa-lib pango atk at-spi2-atk gtk3 google-noto-sans-japanese-fonts COPY app.js package*.json ./ RUN npm install CMD [ "app.lambdaHandler" ]ソースコード
依存ライブラリーは
puppeteerとsharpです。
sharpは取得したスクリーンショットをリサイズするために追加しました。package.json"dependencies": { "puppeteer": "^5.5.0", "sharp": "^0.27.0" }
puppeteer.launchに指定するargsについて
ローカルでの実行の場合は--no-sandboxと--disable-setuid-sandboxの指定だけでうまくいきましたが、Lambda上ではエラーになりました。
/tmpディレクトリ以外が読み取り専用だからではないでしょうか?試行錯誤した結果、こんな感じです。
app.jsconst browser = await puppeteer.launch({ headless: true, args: [ '--no-sandbox', '--disable-setuid-sandbox', '-–disable-dev-shm-usage', '--disable-gpu', '--no-first-run', '--no-zygote', '--single-process', ] });キャプチャを撮って、リサイズして、PNGにしました。
API Gateway経由で返却したので、Base64エンコードしてレスポンスにセットします。app.jsbuff = await page.screenshot({ clip: rect }); buff = await sharp(buff).resize(320, 240).png().toBuffer(); base64 = buff.toString('base64'); await browser.close(); const response = { statusCode: 200, headers: { 'Content-Length': Buffer.byteLength(base64), 'Content-Type': 'image/png', 'Content-disposition': 'attachment;filename=weather.png' }, isBase64Encoded: true, body: base64 };ECRへプッシュ
Lambdaのコンテナイメージサポートですが、
- コンテナレジストリはECRでかつプライベート
ということのようです。
はじめはGitHub Container Registryで試してだめで、次にECRのパブリックで試してだめでした。。
$ aws ecr get-login-password --region ap-northeast-1 | docker login --username AWS --password-stdin [AWSアカウントID].dkr.ecr.ap-northeast-1.amazonaws.com
$ docker build -t [AWSアカウントID].dkr.ecr.ap-northeast-1.amazonaws.com/[リポジトリ名]:latest .
$ docker push [AWSアカウントID].dkr.ecr.ap-northeast-1.amazonaws.com/[リポジトリ名]:latest
Lambdaの作成
基本的にウィザードに従うだけです。
一点注意ですが、ECRに新しいイメージをプッシュするたびに、Lambdaで使用するイメージを指定し直す必要があります。
sha256ダイジェストの値を見ているようで、latestタグだとしても毎回指定する必要があります。API Gatewayの作成
Lambdaの画面でトリガーを追加します。かんたんです。
REST APIだと昔はバイナリサポートを有効化するとか色々手順があった気がしますが、何もしなくてもPNGイメージの返却ができました。
完成
ヤフーの天気をPNG画像にしてみました。


- 投稿日:2021-01-03T08:43:14+09:00
Dockefileの基本書式
Dockerfileで使う基本書式について、簡単にまとめました。
Dockerfileは、docker buildコマンドで、Dockerイメージをビルドするためのテキストファイルです。基本記述書式
書式 説明 FROM <image> Docker imageのベースとなるDocker imageを指定。サイズが大きくなりすぎないように、必要最低限のを指定するといい。Linux例:ubuntu:latest、alpine:latest RUN <command> コマンドを実行。よく使うコマンド:apt-get update && apt-get install -y CMD ["executable", "param1", "param2", ...] コンテナを実行したときのデフォルトコマンド その他書式
書式 説明 COPY ファイルやフォルダをコピーする場合 ADD tarの圧縮ファイルをコピーして解凍するする場合 ENTRYPOINT CMDと似ている。runで実行するときに、デフォルトコマンドを上書きされたなく場合に使う。 ENV 環境変数を設定する WORKDIR Dockerfileに記述された内容を実行するディレクトリを変更する。anacondaをインストールする場合にroot直下ではなく、/opt/anaconda3にインストールしたり。 参考:公式ドキュメント
- 投稿日:2021-01-03T07:47:14+09:00
Dockerfileについて
Dockerfile
dockerfileはdockerの新しいイメージを作成する際に使用するもので
この設定ファイルにはrailsアプリケーション実行に必要なファイルやパッケージを
イメージに含めるための定義が書かれている。Dockerfile.1 FROM ruby:2.4.5 2 RUN apt-get update -qq && apt-get install -y build-essential nodejs 3 RUN mkdir /app 4 WORKDIR /app 5 COPY Gemfile /app/Gemfile 6 COPY Gemfile.lock /app/Gemfile.lock 7 RUN bundle install 8 COPY . /app1 :から前の部分をリポジトリとよぶ。:から後の部分をタグという。
この場合rubyリポジトリの2.4.5タグを示している。2 ruby 2.4.5のイメージからコンテナを起動してコンテナ内で実行するコマンドを定義している
ubuntuのパッケージ管理システムであるapt-getでbuild-essential nodejsをインストールしてる
Railsの動作に必要3 ルートディレクトリにappディレクトリを作成
4 作業用ディレクトリをappディレクトリに移動
5,6 PC上にあるGemfileとGemfilelockをappディレクトリにコピー
7 gemのインストールコマンドを実行
8 dockerファイルの置いてあるフォルダの内容を全ての内容をappディレクトリにコピー
dockerfile→build→dockerimageが作成される
- 投稿日:2021-01-03T07:11:55+09:00
Ruby on Rails 基礎学習 ①
まず開発環境について
dockerを使うメリット
実際の現場では,Dockerを仮想環境として使っているのがほとんど。
dockerは起動スピードが早い。
AWSにはコンテナを実行するサービスがあるためサービスの公開が容易。dockerを使用した開発環境
dockerをインストールすると軽量なリナックス(Moby Linux)がインストールされる。
dockerでrubyのコンテナを立ち上げるとMoby Linux上でRubyの実行環境コンテナが立ち上がる。
コンテナの基になるものをimageという。
- 投稿日:2021-01-03T05:38:25+09:00
ternでプライベートレジストリにあるコンテナイメージのライセンスをすべてチェックする
Linuxコンテナイメージをsaveしたtarファイルでベンダーから顧客に提供するときに、例えばベースイメージがUbuntuだったらGPL適用なので全体的にGPL適用になってしまう問題。今までは業界を挙げて目を瞑っていたのが2020年中頃から真面目に議論され始めている様で。RHEL UBIベースだとRed Hatの特殊理論と友達圧力で封殺できるかもしれない訳ではありますが。
これはCI/CDやToolchainの仕組みを考える上でちょっと重要かもしれず、つまりベンダー内でコンテナイメージのビルドまでして、そのdocker saveファイルを顧客に提供するのはGPL適用になる可能性が高いが、Dockerイメージのビルドを顧客環境内で行って都度pullして利用するだけならGPLの適用要件(ソースコードの要求者への開示義務)が不要になるんだろうと。だけというのはもちろん、開発コードそのものはGPLソースからのコピペが存在しない前提で。
あとは多分、Docker hub等公的レジストリに登録した開発イメージを顧客がpullするという形で引き渡すなら、こちらもソースコード開示義務が無い(GPL適用となるベースイメージ部分は別レイヤー・別バイナリとして個別にダウンロードされるため、ベンダーがベースイメージ部分を提供していない形になる)。というのが私の認識。てな事を、ternというツールがあるのを知って思った次第。
ternは、コンテナイメージに存在するベースイメージを含めた全レイヤーで使用ライセンスを洗い出してくれるツールで、Linux Foundation肝入りなのか何なのか(?)
https://www.linuxfoundation.org/blog/tern-1-0-0-is-generally-available/そういうツールがあるならプライベートレジストリにあるコンテナイメージのライセンス、全部洗いだして見たくなりますよね、と。
Dockerとプライベートレジストリのセットアップ
環境はUbuntu 18.04。Lightsailの$3.5のマシンでOK。
1.DockerとRegistryをセットアップする。
$ sudo -i
# apt-get update
# apt-get install \
    apt-transport-https \
    ca-certificates \
    curl \
    gnupg-agent \
    software-properties-common
# curl -fsSL https://download.docker.com/linux/ubuntu/gpg | sudo apt-key add -
# add-apt-repository \
   "deb [arch=amd64] https://download.docker.com/linux/ubuntu \
   $(lsb_release -cs) \
   stable"
# apt-get update
# apt-get install docker-ce docker-ce-cli containerd.io
# docker run -d -p 5000:5000 --restart always --name registry registry:2
2.プライベートレジストリにubuntu、centos、busybox:1:23:2、ubi(8)をpushする。
# docker pull ubuntu
# docker tag ubuntu localhost:5000/ubuntu
# docker push localhost:5000/ubuntu
# docker rmi ubuntu localhost:5000/ubuntu

# docker pull centos
# docker tag centos localhost:5000/centos
# docker push localhost:5000/centos
# docker rmi centos localhost:5000/centos

# docker pull busybox:1.23.2
# docker tag busybox:1.23.2 localhost:5000/busybox:1.23.2
# docker push localhost:5000/busybox:1.23.2
# docker rmi busybox:1.23.2 localhost:5000/busybox:1.23.2

# docker login registry.redhat.io
 → Red Hatアカウントを入力
# docker pull registry.redhat.io/ubi8/ubi
# docker tag registry.redhat.io/ubi8/ubi localhost:5000/ubi
# docker push localhost:5000/ubi
# docker rmi registry.redhat.io/ubi8/ubi localhost:5000/ubi

(確認)
ubuntu@ip-172-26-2-169:~$ curl localhost:5000/v2/_catalog
{"repositories":["busybox","centos","ubuntu"]}
ubuntu@ip-172-26-2-169:~$ curl -s http://localhost:5000/v2/busybox/tags/list
{"name":"busybox","tags":["1.23.2"]}
ternのインストールとスクリプト作成
1.ternをインストールする。
# sudo apt-get install attr
# sudo apt-get install python3-pip
# pip3 install tern
2.レポート作成用のディレクトリを作り、移動する。
# mkdir reports
# cd reports
3.以下のpythonファイルを作る。
make-reports.pyimport urllib.request import json import os protocol = "http" registry = "localhost:5000" req = urllib.request.Request(protocol + "://" + registry + "/v2/_catalog") with urllib.request.urlopen(req) as res: repos = json.loads(res.read()) for repo in repos["repositories"]: req2 = urllib.request.Request(protocol + "://" + registry + "/v2/" + repo + "/tags/list") with urllib.request.urlopen(req2) as res2: tags = json.loads(res2.read()) for tag in tags["tags"]: os.system("tern report -i " + registry + "/" + repo + ":" + tag + " -o " + repo + ":" + tag + ".txt") os.system("docker rmi " + registry + "/" + repo + ":" + tag)レポート生成
1.レポートを生成する。
動作としては、レポジトリのイメージ毎に:
レポジトリをローカルイメージとしてpull
ternでスキャン
ローカルイメージを削除
としているので、ローカルイメージを削除してほしくない場合はpythonファイル最後の「os.system("docker rmi~」の行を削除すること。
レポートの作成は結構、数分時間が掛かる。# python3 make-reports.py2.レポートを確認する。
レポート生成したイメージについては、プログラムを実行したディレクトリに「イメージ:タグ.txt」のファイル名が生成される。
ubuntu、centosは成功したが、busybox、ubiはternが途中でエラーを吐いて終了する。まだあまり安定しているものでは無い。(ファイルの確認) root@ip-172-26-2-169:~/reports# ls -l total 28 -rw-r--r-- 1 root root 5798 Jan 2 19:45 centos:latest.txt -rw-r--r-- 1 root root 666 Jan 2 19:33 make-reports.py -rw-r--r-- 1 root root 7095 Jan 2 19:47 tern.log -rw-r--r-- 1 root root 7129 Jan 2 19:47 ubuntu:latest.txtさて肝心のファイルの中身は。。
centos:latest.txtThis report was generated by the Tern Project Version: 2.3.0 Docker image: localhost:5000/centos:latest: Layer 1: File licenses found in Layer: None Packages found in Layer: crypto-policies-20200713, python3-pip-wheel-9.0.3, ncurses-base-6.1, dnf-data-4.2.23, dbus-common-1.12.8, centos-linux-release-8.3, setup-2.12.2, basesystem-11, libselinux-2.9, glibc-minimal-langpack-2.28, glibc-2.28, libsepol-2.9, xz-libs-5.2.4, libcap-2.26, info-6.5, libcom_err-1.45.6, libxml2-2.9.7, expat-2.2.5, libuuid-2.32.1, chkconfig-1.13, gmp-6.1.2, libattr-2.4.48, coreutils-single-8.30, sed-4.5, libcap-ng-0.7.9, libffi-3.1, libzstd-1.4.4, lz4-libs-1.8.3, libgcrypt-1.8.5, gzip-1.9, libunistring-0.9.9, libassuan-2.5.1, keyutils-libs-1.5.10, p11-kit-trust-0.23.14, pcre-8.42, systemd-libs-239, dbus-tools-1.12.8, libusbx-1.0.23, ca-certificates-2020.2.41, libdb-5.3.28, ima-evm-utils-1.1, libdb-utils-5.3.28, xz-5.2.4, gdbm-1.18, shadow-utils-4.6, libutempter-1.1.6, acl-2.2.53, nettle-3.4.1, glib2-2.56.4, libcomps-0.1.11, findutils-4.6.0, cpio-2.12, ipcalc-0.2.4, iproute-5.3.0, libpcap-1.9.1, libseccomp-2.4.3, gawk-4.2.1, krb5-libs-1.18.2, libnsl2-1.2.0, platform-python-3.6.8, libpwquality-1.4.0, util-linux-2.32.1, curl-7.61.1, rpm-libs-4.14.3, device-mapper-1.02.171, cryptsetup-libs-2.3.3, elfutils-libs-0.180, systemd-239, iputils-20180629, libkcapi-hmaccalc-1.2.0, dracut-049, python3-libcomps-0.1.11, dhcp-client-4.3.6, cyrus-sasl-lib-2.1.27, libyaml-0.1.7, npth-1.5, gpgme-1.13.1, libdnf-0.48.0, python3-hawkey-0.48.0, rpm-build-libs-4.14.3, python3-dnf-4.2.23, yum-4.2.23, binutils-2.30, vim-minimal-8.0.1763, less-530, rootfiles-8.1, libgcc-8.3.1, python3-setuptools-wheel-39.2.0, tzdata-2020d, libreport-filesystem-2.9.5, dhcp-common-4.3.6, centos-gpg-keys-8, centos-linux-repos-8, filesystem-3.8, pcre2-10.32, ncurses-libs-6.1, glibc-common-2.28, bash-4.4.19, zlib-1.2.11, bzip2-libs-1.0.6, libgpg-error-1.31, elfutils-libelf-0.180, libxcrypt-4.1.1, sqlite-libs-3.26.0, libstdc++-8.3.1, popt-1.16, readline-7.0, json-c-0.13.1, libacl-2.2.53, libblkid-2.32.1, libmount-2.32.1, audit-libs-3.0, libsmartcols-2.32.1, lua-libs-5.3.4, p11-kit-0.23.14, file-libs-5.33, cracklib-2.9.6, libidn2-2.2.0, gdbm-libs-1.18, libtasn1-4.13, lzo-2.08, grep-3.1, dbus-libs-1.12.8, dhcp-libs-4.3.6, procps-ng-3.3.15, openssl-libs-1.1.1g, kmod-libs-25, kmod-25, libarchive-3.3.2, squashfs-tools-4.3, libsemanage-2.9, dbus-daemon-1.12.8, libfdisk-2.32.1, mpfr-3.1.6, gnutls-3.6.14, snappy-1.1.8, libmetalink-0.1.3, libksba-1.3.5, ethtool-5.0, libmnl-1.0.4, libnghttp2-1.33.0, iptables-libs-1.8.4, libsigsegv-2.11, libverto-0.3.0, libtirpc-1.1.4, platform-python-setuptools-39.2.0, python3-libs-3.6.8, pam-1.3.1, libcurl-minimal-7.61.1, rpm-4.14.3, libsolv-0.7.11, device-mapper-libs-1.02.171, elfutils-default-yama-scope-0.180, systemd-pam-239, dbus-1.12.8, libkcapi-1.2.0, systemd-udev-239, dracut-squash-049, bind-export-libs-9.11.20, dracut-network-049, openldap-2.4.46, libmodulemd-2.9.4, gnupg2-2.2.20, librepo-1.12.0, python3-libdnf-0.48.0, python3-gpg-1.13.1, python3-rpm-4.14.3, dnf-4.2.23, kexec-tools-2.0.20, tar-1.30, hostname-3.20, langpacks-en-1.0 Licenses found in Layer: LGPLv2+, MIT and Python and ASL 2.0 and BSD and ISC and LGPLv2 and MPLv2.0 and (ASL 2.0 or BSD), MIT, GPLv2+ and GPLv2 and GPL, (GPLv2+ or AFL) and GPLv2+, GPLv2, Public Domain, LGPLv2+ and LGPLv2+ with exceptions and GPLv2+ and GPLv2+ with exceptions and BSD and Inner-Net and ISC and Public Domain and GFDL, GPLv3+, BSD, LGPLv3+ or GPLv2+, BSD and GPLv2, GPLv2+ and BSD, GPLv3+ and GFDL, GPLv2+ or LGPLv3+, LGPLv2+ and GPLv3+, GPLv2+ and LGPLv2+, LGPLv2+ and MIT, BSD and LGPLv2 and Sleepycat, GPLv2+ and Public Domain, BSD and GPLv2+, GPLv2+, BSD with advertising, LGPLv2, GPLv3+ and GPLv2+ and LGPLv2+ and BSD, BSD and LGPLv2+, Python, BSD or GPLv2+, GPLv2 and GPLv2+ and LGPLv2+ and BSD with advertising and Public Domain, GPLv2+ and LGPLv2+ with exceptions, LGPLv2+ and MIT and GPLv2+, BSD or GPLv2, ISC, Vim and MIT, GPLv3+ or BSD, GPLv3+ and GPLv3+ with exceptions and GPLv2+ with exceptions and LGPLv2+ and BSD, zlib and Boost, LGPLv2+ and BSD and Public Domain, (GPLv2+ or LGPLv3+) and GPLv3+, GPLv3+ and LGPLv2+, GPL+ and GPLv2 and GPLv2+ and GPLv3+ and LGPLv2+, OpenSSL and ASL 2.0, LGPLv3+ and GPLv3+ and GFDL, (LGPLv3+ or GPLv2+) and GPLv3+, GPLv2 and Artistic 2.0 and ISC, SISSL and BSD, MPLv2.0, OpenLDAP ------------------------------------------------ ########################################### # Summary of licenses found in Container: # ########################################### GPL+ and GPLv2 and GPLv2+ and GPLv3+ and LGPLv2+, LGPLv3+ or GPLv2+, OpenLDAP, GPLv2+ and BSD, Python, MIT, (LGPLv3+ or GPLv2+) and GPLv3+, GPLv2, MIT and Python and ASL 2.0 and BSD and ISC and LGPLv2 and MPLv2.0 and (ASL 2.0 or BSD), GPLv2+ and Public Domain, LGPLv2+ and BSD and Public Domain, GPLv3+ and GFDL, GPLv3+ and LGPLv2+, GPLv3+, BSD, BSD with advertising, GPLv2 and Artistic 2.0 and ISC, zlib and Boost, ISC, LGPLv2+ and GPLv3+, GPLv2+, BSD and GPLv2, GPLv2+ and LGPLv2+, LGPLv2+ and MIT, GPLv3+ and GPLv2+ and LGPLv2+ and BSD, GPLv3+ and GPLv3+ with exceptions and GPLv2+ with exceptions and LGPLv2+ and BSD, LGPLv2+, LGPLv2+ and MIT and GPLv2+, LGPLv2+ and LGPLv2+ with exceptions and GPLv2+ and GPLv2+ with exceptions and BSD and Inner-Net and ISC and Public Domain and GFDL, LGPLv3+ and GPLv3+ and GFDL, SISSL and BSD, LGPLv2, GPLv2+ and GPLv2 and GPL, BSD or GPLv2, BSD and LGPLv2+, GPLv2+ or LGPLv3+, Vim and MIT, GPLv2 and GPLv2+ and LGPLv2+ and BSD with advertising and Public Domain, OpenSSL and ASL 2.0, (GPLv2+ or AFL) and GPLv2+, BSD and GPLv2+, BSD and LGPLv2 and Sleepycat, BSD or GPLv2+, GPLv2+ and LGPLv2+ with exceptions, (GPLv2+ or LGPLv3+) and GPLv3+, MPLv2.0, Public Domain, GPLv3+ or BSDubuntu:latest.txtThis report was generated by the Tern Project Version: 2.3.0 Docker image: localhost:5000/ubuntu:latest: Layer 1: File licenses found in Layer: None Packages found in Layer: adduser-3.118ubuntu2, apt-2.0.2ubuntu0.1, base-files-11ubuntu5.2, base-passwd-3.5.47, bash-5.0-6ubuntu1.1, bsdutils-1:2.34-0.1ubuntu9.1, bzip2-1.0.8-2, coreutils-8.30-3ubuntu2, dash-0.5.10.2-6, debconf-1.5.73, debianutils-4.9.1, diffutils-1:3.7-3, dpkg-1.19.7ubuntu3, e2fsprogs-1.45.5-2ubuntu1, fdisk-2.34-0.1ubuntu9.1, findutils-4.7.0-1ubuntu1, gcc-10-base-10.2.0-5ubuntu1~20.04, gpgv-2.2.19-3ubuntu2, grep-3.4-1, gzip-1.10-0ubuntu4, hostname-3.23, init-system-helpers-1.57, libacl1-2.2.53-6, libapt-pkg6.0-2.0.2ubuntu0.1, libattr1-1:2.4.48-5, libaudit-common-1:2.8.5-2ubuntu6, libaudit1-1:2.8.5-2ubuntu6, libblkid1-2.34-0.1ubuntu9.1, libbz2-1.0-1.0.8-2, libc-bin-2.31-0ubuntu9.1, libc6-2.31-0ubuntu9.1, libcap-ng0-0.7.9-2.1build1, libcom-err2-1.45.5-2ubuntu1, libcrypt1-1:4.4.10-10ubuntu4, libdb5.3-5.3.28+dfsg1-0.6ubuntu2, libdebconfclient0-0.251ubuntu1, libext2fs2-1.45.5-2ubuntu1, libfdisk1-2.34-0.1ubuntu9.1, libffi7-3.3-4, libgcc-s1-10.2.0-5ubuntu1~20.04, libgcrypt20-1.8.5-5ubuntu1, libgmp10-2:6.2.0+dfsg-4, libgnutls30-3.6.13-2ubuntu1.3, libgpg-error0-1.37-1, libhogweed5-3.5.1+really3.5.1-2, libidn2-0-2.2.0-2, liblz4-1-1.9.2-2, liblzma5-5.2.4-1ubuntu1, libmount1-2.34-0.1ubuntu9.1, libncurses6-6.2-0ubuntu2, libncursesw6-6.2-0ubuntu2, libnettle7-3.5.1+really3.5.1-2, libp11-kit0-0.23.20-1build1, libpam-modules-1.3.1-5ubuntu4.1, libpam-modules-bin-1.3.1-5ubuntu4.1, libpam-runtime-1.3.1-5ubuntu4.1, libpam0g-1.3.1-5ubuntu4.1, libpcre2-8-0-10.34-7, libpcre3-2:8.39-12build1, libprocps8-2:3.3.16-1ubuntu2, libseccomp2-2.4.3-1ubuntu3.20.04.3, libselinux1-3.0-1build2, libsemanage-common-3.0-1build2, libsemanage1-3.0-1build2, libsepol1-3.0-1, libsmartcols1-2.34-0.1ubuntu9.1, libss2-1.45.5-2ubuntu1, libstdc++6-10.2.0-5ubuntu1~20.04, libsystemd0-245.4-4ubuntu3.3, libtasn1-6-4.16.0-2, libtinfo6-6.2-0ubuntu2, libudev1-245.4-4ubuntu3.3, libunistring2-0.9.10-2, libuuid1-2.34-0.1ubuntu9.1, libzstd1-1.4.4+dfsg-3, login-1:4.8.1-1ubuntu5.20.04, logsave-1.45.5-2ubuntu1, lsb-base-11.1.0ubuntu2, mawk-1.3.4.20200120-2, mount-2.34-0.1ubuntu9.1, ncurses-base-6.2-0ubuntu2, ncurses-bin-6.2-0ubuntu2, passwd-1:4.8.1-1ubuntu5.20.04, perl-base-5.30.0-9ubuntu0.2, procps-2:3.3.16-1ubuntu2, sed-4.7-1, sensible-utils-0.0.12+nmu1, sysvinit-utils-2.96-2.1ubuntu1, tar-1.30+dfsg-7, ubuntu-keyring-2020.02.11.2, util-linux-2.34-0.1ubuntu9.1, zlib1g-1:1.2.11.dfsg-2ubuntu1.2 Licenses found in Layer: GPLv2+, PD, GPL-2, public-domain, LGPL-2.1+, BSD-2-clause, GPL-2+, LGPL, LGPL-2+, LGPL-3+, GPL-3+, BSD-4-clause, BSD-3-clause, MIT, BSD-variant, public-domain-s-s-d, public-domain-md5, GPL-3+ or BSD-3-clause, CC0-1.0, Expat, permissive, TinySCHEME, RFC-Reference, LGPL-2.1, LGPLv3+_or_GPLv2+, GPLv3+, Public domain., LGPLv2.1+, Apache-2.0, LGPL-2.1+ or BSD-3-clause, g10-permissive, GPL-2+ with Autoconf exception, GAP, other, LGPL-3+ or GPL-2+, Unicode, permissive-nowarranty, config-h, probably-PD, Autoconf, PD-debian, noderivs, none, permissive-fsf, permissive-like-automake-output, ISC, BSD-3-Clause, same-as-rest-of-p11kit, GPL-2.0+, LGPL-2.0+, GPL-2 with Linux-syscall-note exception, GPL-3+ or GFDL-1.2+, GPL-2+ with distribution exception, GFDL-1.2+, FreeSoftware, BSD-3-clause and GPL-2, zlib, REGCOMP, and GPL-1+ or Artistic, BSD-4-clause-POWERDOG, GPL-1+ or Artistic, and BSD-4-clause-POWERDOG, GPL-1+, Artistic or GPL-1+ or Artistic-dist, DONT-CHANGE-THE-GPL, GPL-1+ or Artistic, and Unicode, REGCOMP, GPL-3+-WITH-BISON-EXCEPTION, BSD-3-clause-GENERIC, HSIEH-DERIVATIVE, GPL-2+ or Artistic, GPL-1+ or Artistic, TEXT-TABS, GPL-1+ or Artistic or Artistic-dist, BSD-3-clause-with-weird-numbering, Expat or GPL-1+ or Artistic, GPL-1+ or Artistic, and BSD-3-clause-GENERIC, ZLIB, SDBM-PUBLIC-DOMAIN, RRA-KEEP-THIS-NOTICE, BZIP, Artistic-2, Artistic, HSIEH-BSD, GPL-1+ or Artistic, and Expat, Artistic-dist, installsh, All-permissive, configure, Zlib ------------------------------------------------ Layer 2: warning: Unrecognized Commands:set -xe echo #!/bin/sh > /usr/sbin/policy-rc.d echo exit 101 >> /usr/sbin/policy-rc.d chmod +x /usr/sbin/policy-rc.d dpkg-divert --local --rename --add /sbin/initctl cp -a /usr/sbin/policy-rc.d /sbin/initctl sed -i s/^exit.*/exit 0/ /sbin/initctl echo force-unsafe-io > /etc/dpkg/dpkg.cfg.d/docker-apt-speedup echo DPkg::Post-Invoke { rm -f /var/cache/apt/archives/*.deb /var/cache/apt/archives/partial/*.deb /var/cache/apt/*.bin || true > /etc/apt/apt.conf.d/docker-clean echo APT::Update::Post-Invoke { rm -f /var/cache/apt/archives/*.deb /var/cache/apt/archives/partial/*.deb /var/cache/apt/*.bin || true >> /etc/apt/apt.conf.d/docker-clean echo Dir::Cache::pkgcache Dir::Cache::srcpkgcache >> /etc/apt/apt.conf.d/docker-clean echo Acquire::Languages none > /etc/apt/apt.conf.d/docker-no-languages echo Acquire::GzipIndexes true Acquire::CompressionTypes::Order:: gz > /etc/apt/apt.conf.d/docker-gzip-indexes echo Apt::AutoRemove::SuggestsImportant false > /etc/apt/apt.conf.d/docker-autoremove-suggests File licenses found in Layer: None Packages found in Layer: None Licenses found in Layer: None ------------------------------------------------ Layer 3: warning: Unrecognized Commands:mkdir -p /run/systemd echo docker > /run/systemd/container File licenses found in Layer: None Packages found in Layer: None Licenses found in Layer: None ------------------------------------------------ ########################################### # Summary of licenses found in Container: # ########################################### LGPL, GPL-3+ or GFDL-1.2+, none, LGPL-2+, RFC-Reference, GPL-1+ or Artistic, GPL-1+ or Artistic or Artistic-dist, permissive-nowarranty, permissive-like-automake-output, TinySCHEME, noderivs, Expat or GPL-1+ or Artistic, ZLIB, ISC, BZIP, Public domain., GPL-1+ or Artistic, and Expat, MIT, public-domain, BSD-3-clause and GPL-2, GPL-1+, LGPL-2.0+, GPL-2+ or Artistic, TEXT-TABS, Apache-2.0, LGPL-3+ or GPL-2+, LGPL-2.1+, CC0-1.0, g10-permissive, probably-PD, Artistic-2, LGPL-3+, BSD-4-clause-POWERDOG, GPL-1+ or Artistic, and BSD-4-clause-POWERDOG, PD, BSD-variant, GPL-2.0+, zlib, Artistic or GPL-1+ or Artistic-dist, BSD-3-clause-GENERIC, BSD-2-clause, LGPL-2.1+ or BSD-3-clause, same-as-rest-of-p11kit, config-h, permissive-fsf, configure, GPL-2+ with Autoconf exception, BSD-3-clause-with-weird-numbering, public-domain-s-s-d, GPL-2 with Linux-syscall-note exception, GPL-3+ or BSD-3-clause, GAP, SDBM-PUBLIC-DOMAIN, RRA-KEEP-THIS-NOTICE, Artistic, GPLv2+, REGCOMP, and GPL-1+ or Artistic, BSD-3-Clause, LGPLv3+_or_GPLv2+, GPL-2, All-permissive, DONT-CHANGE-THE-GPL, GPL-3+, BSD-4-clause, LGPL-2.1, GPL-1+ or Artistic, and Unicode, REGCOMP, GPL-3+-WITH-BISON-EXCEPTION, HSIEH-DERIVATIVE, GPL-2+, Autoconf, PD-debian, Expat, Unicode, public-domain-md5, BSD-3-clause, FreeSoftware, GPLv3+, other, GFDL-1.2+, Zlib, GPL-1+ or Artistic, and BSD-3-clause-GENERIC, installsh, permissive, GPL-2+ with distribution exception, HSIEH-BSD, Artistic-dist, LGPLv2.1+まじか。こんなにライセンスの種類あるのか。
これは。。会社の弁護士さんも気乗りしないわ。。(追記)似たような仕組みで、イメージの脆弱性のチェック。
https://qiita.com/rk05231977/items/062410b319f4cc28c89b
- 投稿日:2021-01-03T01:20:55+09:00
sudoなしでdockerコマンドを使うようにする。
sudo groupadd docker
sudo usermod -aG docker $USER
newgrp docker
docker run hello-world
- 投稿日:2021-01-03T01:12:32+09:00
DockerでReact+Django+Nginx+MySQLの環境構築
はじめに
Docker環境でコマンドを打つだけで一発でDjango,React,MySQLなどを立ち上げて開発をできるようにしたくて、今回の記事を書きました。
この記事は一から環境を構築することを目指していますが、完成形だけをみたいかたはこちらのGitHubからどうぞ:django-react-nginx-mysql-docker
(READMEに書いてあることを実行すれば、うまくいくはずです)目標
- 仮想環境などは一切使わず、終始dockerでプロジェクトの作成などを行う
docker-compose upでウェブ開発に必要なすべてのコンテナが立ち上がるようにする- 最終的にK8sにデプロイする(次回の記事になると思います)。
最初は仮想環境で立ち上げて、そのあとにdockerfileを作成して環境構築をできるようにする、という記事は多く見かけます。ですが私は
virtualenvとかyarnをローカルに入れるのが面倒なので、終始Dockerで全部プロジェクトの管理を行いたいと思います。前提
- Dockerインストール済み
- docker-composeインストール済み
- LinuxまたはMac(強めのCPUとメモリがあるのが好ましいです)
流れ
以下のように進めていきます。
- バックエンドとDBの構築
- バックエンドのAPIを実際に触ってみて、データを追加してみる
- フロントエンドの構築
- APIでデータを取得し、フロントにて表示してみる
使う技術
- Docker (docker-compose)
- django (django rest framework)
- nginx
- mysql
- react
- next
- typescript
ルートディレクトリにフォルダ作成
ではまずフォルダの作成から始めます。
プロジェクトフォルダを作成して、その直下で以下のコマンドを打ちます。$ mkdir backend $ mkdir frontend $ mkdir mysql $ mkdir mysql_volume $ mkdir sql $ touch docker-compose.yml以下のようになっているはずです。
$ tree
.
├── backend
├── docker-compose.yml
├── frontend
├── mysql
├── mysql_volume
└── sql

5 directories, 1 file
1. BackendとDBの構築
web-backとnginxのフォルダを作成します。nginxとweb-backは今後K8sにデプロイするときには同じポッドにしようと思っているので、このような構成になります。フロントのときのweb-frontとnginxも同じです。$ cd backend $ mkdir web-back $ mkdir nginxweb-backの用意
$ cd web-back
$ touch .env Dockerfile requirements.txt
.envはAPIのKEYなど、センシティブな情報を含むファイルです。今はシークレットキーなどはないので、とりあえずテキトーに埋めておきます。backend/web-back/.envSECRET_KEY='XXXXXXXXXXXXXXXXXXXXXXXXXXXXXXXXXXXXXXXXXXX' DEBUG=FalsePython環境のDockerfileです。
# backend/web-back/Dockerfile
# set base image
FROM python:3.7

# set environment variables
ENV PYTHONDONTWRITEBYTECODE 1
ENV PYTHONUNBUFFERED 1

# set work directory
WORKDIR /code

# install dependencies
COPY requirements.txt ./
RUN python3 -m pip install --upgrade pip setuptools
RUN pip install -r requirements.txt

# Copy project
COPY . ./

# Expose application port
EXPOSE 8000
pipでインストールするモジュールです。
backend/web-back/requirements.txtasgiref==3.2.7 Django==3.0.5 django-cors-headers==3.2.1 djangorestframework==3.11.0 gunicorn==20.0.4 psycopg2-binary==2.8.5 python-dotenv==0.13.0 pytz==2019.3 sqlparse==0.3.1 mysqlclient==2.0.2nginxの用意
nginxフォルダに入ってDockerfileとconfファイルを作成します。
今後デプロイするとき用にファイルを分けたいので、devを入れておいて区別できるようにします。$ cd ../nginx $ touch Dockerfile.dev default.dev.confnginxのDockerfileです。
backend/nginx/Dockerfile.devFROM nginx:1.17.4-alpine RUN rm /etc/nginx/conf.d/default.conf COPY default.dev.conf /etc/nginx/conf.dnginxコンテナに回ってきた通信をすべてdjangoのコンテナに流すようにします。
backend/nginx/default.dev.confupstream django { server web-back:8000; } server { listen 80; location = /healthz { return 200; } location / { proxy_pass http://django; proxy_set_header Host $host; proxy_set_header X-Forwarded-For $proxy_add_x_forwarded_for; proxy_redirect off; } location /static/ { alias /code/staticfiles/; } }MySQLの用意
mysqlフォルダ直下にDockerfileとmy.cnfを作成します。$ cd ../../mysql $ touch Dockerfile my.cnfmysqlのバージョンは
8.0.0を使うことにします。FROM mysql:8.0.0 RUN echo "USE mysql;" > /docker-entrypoint-initdb.d/timezones.sql && mysql_tzinfo_to_sql /usr/share/zoneinfo >> /docker-entrypoint-initdb.d/timezones.sql COPY ./my.cnf /etc/mysql/conf.d/my.cnf文字コードなどの設定を
my.cnfに書き込みます。mysql/my.cnf# MySQLサーバーへの設定 [mysqld] # 文字コード/照合順序の設定 character_set_server=utf8mb4 collation_server=utf8mb4_bin # タイムゾーンの設定 default_time_zone=SYSTEM log_timestamps=SYSTEM # デフォルト認証プラグインの設定 default_authentication_plugin=mysql_native_password # mysqlオプションの設定 [mysql] # 文字コードの設定 default_character_set=utf8mb4 # mysqlクライアントツールの設定 [client] # 文字コードの設定 default_character_set=utf8mb4sqlフォルダの用意
SQLフォルダに移動し、
init.sqlを作成します。$ cd ../sql $ touch init.sqlsql/init.sqlGRANT ALL PRIVILEGES ON test_todoList.* TO 'user'@'%'; FLUSH PRIVILEGES;docker-composeでバックエンドの立ち上げ
ここまででファイルは以下のようになっているはずです。
$ tree -a
.
├── backend
│   ├── nginx
│   │   ├── default.dev.conf
│   │   └── Dockerfile.dev
│   └── web-back
│       ├── Dockerfile
│       ├── .env
│       └── requirements.txt
├── docker-compose.yml
├── frontend
├── mysql
│   ├── Dockerfile
│   └── my.cnf
├── mysql_volume
└── sql
    └── init.sql

7 directories, 9 files
フロントエンドはまたあとでやるので、とりあえずバックエンドの立ち上げを行っていきます。以下のように
docker-compose.ymlファイルを用意します。docker-compose.ymlversion: "3.7" services: web-back: container_name: python-backend env_file: ./backend/web-back/.env build: ./backend/web-back/. volumes: - ./backend/web-back:/code/ - static_volume:/code/staticfiles # <-- bind the static volume stdin_open: true tty: true command: gunicorn --bind :8000 config.wsgi:application networks: - backend_network environment: - CHOKIDAR_USEPOLLING=true - DJANGO_SETTINGS_MODULE=config.local_settings depends_on: - db backend-server: container_name: nginx_back build: context: ./backend/nginx/. dockerfile: Dockerfile.dev volumes: - static_volume:/code/staticfiles # <-- bind the static volume ports: - "8080:80" depends_on: - web-back networks: - backend_network db: build: ./mysql command: mysqld --character-set-server=utf8mb4 --collation-server=utf8mb4_unicode_ci ports: - "3306:3306" environment: MYSQL_ROOT_PASSWORD: root MYSQL_DATABASE: todoList MYSQL_USER: user MYSQL_PASSWORD: password TZ: 'Asia/Tokyo' volumes: - ./mysql_volume:/var/lib/mysql - ./sql:/docker-entrypoint-initdb.d networks: - backend_network networks: backend_network: driver: bridge volumes: static_volume:内容が多いので少し難しいですね。
今回はとりあえず動くものを作りたいので、意味については割愛させていただきます。
ではDjangoのプロジェクトを作成しましょう!まずはconfigというプロジェクトを作成します。$ docker-compose run --rm web-back sh -c "django-admin startproject config ." Creating backend_web-back_run ... done etc..... $ docker-compose run --rm web-back sh -c "python manage.py startapp todo" Creating backend_web-back_run ... doneうまくいったら以下のように
configとtodoが作成されているはずです。$ tree . ├── backend │ ├── nginx │ │ ├── default.dev.conf │ │ └── Dockerfile.dev │ └── web-back │ ├── config │ │ ├── asgi.py │ │ ├── __init__.py │ │ ├── settings.py │ │ ├── urls.py │ │ └── wsgi.py │ ├── Dockerfile │ ├── manage.py │ ├── requirements.txt │ ├── staticfiles │ └── todo │ ├── admin.py │ ├── apps.py │ ├── __init__.py │ ├── migrations │ │ └── __init__.py │ ├── models.py │ ├── tests.py │ └── views.py ............................開発環境用のsettingファイルの作成
開発環境と本番環境で設定ファイルを分けたいので、
configフォルダにてlocal_setting.pyファイルを作成します。settings.pyの情報を引き継ぐようにして、データベースの情報だけここで塗り替えます。config/local_settings.pyfrom .settings import * DEBUG = True ALLOWED_HOSTS = ['*'] DATABASES = { 'default': { 'ENGINE': 'django.db.backends.mysql', 'NAME': 'todoList', 'USER': 'user', 'PASSWORD': 'password', 'HOST': 'db', 'PORT': '3306', } }これでビルドしてみましょう。
$ docker-compose up --build
Starting python-backend ... done
Starting nginx          ... done
Attaching to python-backend, nginx
python-backend | [2020-12-28 14:59:49 +0000] [1] [INFO] Starting gunicorn 20.0.4
python-backend | [2020-12-28 14:59:49 +0000] [1] [INFO] Listening at: http://0.0.0.0:8000 (1)
python-backend | [2020-12-28 14:59:49 +0000] [1] [INFO] Using worker: sync
python-backend | [2020-12-28 14:59:49 +0000] [10] [INFO] Booting worker with pid: 10
これで
localhost:8080にアクセスしてみましょう。以下の画面が出てくるはずです。
8080ポートにアクセスすると、nginxが8000ポートに通信を流してくれます。それによってdjangoの提供してくれるページにアクセスできます。
マイグレーションの準備と実行
- rest frameworkを使いたい
- APIを操作するための管理画面ページを使いたい
上記がまだできていないので、ここではそのためのデータベースのマイグレーションの準備を行います。以下3つのファイルを編集していきます。
settings.pytodo/models.pytodo/admin.py
settings.pyを以下のように編集します。ついでにこの際にcorsの部分も追加し、あとからフロントエンドからバックエンドのAPIを呼び出せるようにしておきます。config/settings.py""" Django settings for config project. Generated by 'django-admin startproject' using Django 3.0.5. For more information on this file, see https://docs.djangoproject.com/en/3.0/topics/settings/ For the full list of settings and their values, see https://docs.djangoproject.com/en/3.0/ref/settings/ """ import os from dotenv import load_dotenv # 追加 # Build paths inside the project like this: os.path.join(BASE_DIR, ...) BASE_DIR = os.path.dirname(os.path.dirname(os.path.abspath(__file__))) PROJECT_DIR = os.path.basename(BASE_DIR) # 追加 # .envの読み込み load_dotenv(os.path.join(BASE_DIR, '.env')) # 追加 # Quick-start development settings - unsuitable for production # See https://docs.djangoproject.com/en/3.0/howto/deployment/checklist/ # SECURITY WARNING: keep the secret key used in production secret! SECRET_KEY = '1_vj5u9p3nm4fwufe_96e9^6li1htp9avbg8+7*i#h%klp#&0=' # SECURITY WARNING: don't run with debug turned on in production! DEBUG = True ALLOWED_HOSTS = ["*"] # Application definition INSTALLED_APPS = [ 'django.contrib.admin', 'django.contrib.auth', 'django.contrib.contenttypes', 'django.contrib.sessions', 'django.contrib.messages', 'django.contrib.staticfiles', # 3rd party 'rest_framework', 'corsheaders', # Local 'todo.apps.TodoConfig', ] MIDDLEWARE = [ 'django.middleware.security.SecurityMiddleware', 'django.contrib.sessions.middleware.SessionMiddleware', 'django.middleware.common.CommonMiddleware', 'django.middleware.csrf.CsrfViewMiddleware', 'django.contrib.auth.middleware.AuthenticationMiddleware', 'django.contrib.messages.middleware.MessageMiddleware', 'django.middleware.clickjacking.XFrameOptionsMiddleware', 'corsheaders.middleware.CorsMiddleware', ] ROOT_URLCONF = 'config.urls' TEMPLATES = [ { 'BACKEND': 'django.template.backends.django.DjangoTemplates', 'DIRS': [os.path.join(BASE_DIR, 'templates')], 'APP_DIRS': True, 'OPTIONS': { 'context_processors': [ 'django.template.context_processors.debug', 'django.template.context_processors.request', 'django.contrib.auth.context_processors.auth', 'django.contrib.messages.context_processors.messages', ], }, }, ] WSGI_APPLICATION = 'config.wsgi.application' # Password validation # https://docs.djangoproject.com/en/3.0/ref/settings/#auth-password-validators AUTH_PASSWORD_VALIDATORS = [ { 'NAME': 'django.contrib.auth.password_validation.UserAttributeSimilarityValidator', }, { 'NAME': 'django.contrib.auth.password_validation.MinimumLengthValidator', }, { 'NAME': 'django.contrib.auth.password_validation.CommonPasswordValidator', }, { 'NAME': 'django.contrib.auth.password_validation.NumericPasswordValidator', }, ] # Internationalization # https://docs.djangoproject.com/en/3.0/topics/i18n/ LANGUAGE_CODE = 'ja' TIME_ZONE = 'UTC' USE_I18N = True USE_L10N = True USE_TZ = True # Static files (CSS, JavaScript, Images) # https://docs.djangoproject.com/en/3.0/howto/static-files/ STATIC_URL = '/static/' # 開発環境下で静的ファイルを参照する先 STATICFILES_DIRS = [os.path.join(BASE_DIR, 'static')] # 追加 # 本番環境で静的ファイルを参照する先 STATIC_ROOT = os.path.join(BASE_DIR, 'staticfiles') # 追加 # メディアファイルpath MEDIA_URL = '/media/' # 追加 # 追加 REST_FRAMEWORK = { 'DEFAULT_PERMISSION_CLASSES': [ 'rest_framework.permissions.AllowAny', ] } CORS_ORIGIN_WHITELIST = ( 'http://localhost', )
todoの中のmodels.pyを編集します。todo/models.pyfrom django.db import models class Todo(models.Model): title = models.CharField(max_length=200) body = models.TextField() def __str__(self): return self.title
todoの中のadmin.pyを編集します。todo/admin.pyfrom django.contrib import admin from .models import Todo admin.site.register(Todo)これでマイグレーションを以下のように実行します。ついでにsuperuserも作成しておきます。パスワードなどは好きなように設定してください。
$ docker-compose run --rm web-back sh -c "python manage.py makemigrations"
Creating backend_web-back_run ... done
Migrations for 'todo':
  todo/migrations/0001_initial.py
    - Create model Todo

$ docker-compose run --rm web-back sh -c "python manage.py migrate"
Creating backend_web-back_run ... done
Operations to perform:
  Apply all migrations: admin, auth, contenttypes, sessions, todo
Running migrations:
  Applying contenttypes.0001_initial... OK
........

$ docker-compose run --rm web-back sh -c "python manage.py createsuperuser"
Creating backend_web-back_run ... done
ユーザー名 (leave blank to use 'root'):
メールアドレス: example@gmail.com
Password:root
.........
URLの設定
adminとapiのページに飛べるように設定します。backend/web-back/config/urls.pyfrom django.contrib import admin from django.urls import path, include urlpatterns = [ path('admin/', admin.site.urls), path('api/', include('todo.urls')) # 追加 ]
todoでもURLの設定などを行わなければいけません。また、JSONに変換するserializerファイルも作成します。backend/web-back/todo $ touch urls.py serializers.pyurls.pyfrom django.urls import path, include from .views import ListTodo, DetailTodo urlpatterns = [ path('<int:pk>/', DetailTodo.as_view()), path('', ListTodo.as_view()) ]serializers.pyfrom rest_framework import serializers from .models import Todo class TodoSerializer(serializers.ModelSerializer): class Meta: model = Todo fields = ('id', 'title', 'body')viewも編集します。
views.pyfrom django.shortcuts import render # Create your views here. from django.shortcuts import render from rest_framework import generics from .models import Todo from .serializers import TodoSerializer class ListTodo(generics.ListAPIView): queryset = Todo.objects.all() serializer_class = TodoSerializer class DetailTodo(generics.RetrieveAPIView): queryset = Todo.objects.all() serializer_class = TodoSerializer2.APIを触ってデータを追加してみる。
もう一度走らせて、
adminとapiにアクセスするこのままではcssファイルなどが反映されないので、staticなファイルをまず整理してから立ち上げます。
$ cd backend/web-back
$ mkdir static
$ docker-compose run --rm web-back sh -c "python manage.py collectstatic"
Starting ... done

163 static files copied to '/code/staticfiles'.
$ docker-compose up
localhost:8080/adminは以下のようになります。先ほど作成したsuperuserでログインしましょう。
ログインしたらtodoの管理などができる画面に入ります。
こんな感じで追加しておきます。
これで
localhost:8080/api/1に行くと、見つかります。
これで以下のことができるようになりました。
- 管理画面へのログイン
- APIでデータの取得
これでフロントエンドの構築を始めることができます。
mysql dbでも確認してみる
以下のようにコンテナに入って確認すると、たしかにデータが格納されています。
$ docker exec -it container_db bash
root@e34e5d2a20e1:/# mysql -u root -p

mysql> use todoList;

mysql> select * from todo_todo;
+----+-------------+--------------+
| id | title       | body         |
+----+-------------+--------------+
|  1 | do homework | finish maths |
+----+-------------+--------------+
1 row in set (0.00 sec)
(余談)テストファイルの作成と実行
今すぐ必要というわけではないですが、テストファイルの作成と実行も一通りここでやっておきます。以下のテストファイルを走らせます。
backend/web-back/todo/tests.pyfrom django.test import TestCase # Create your tests here. from django.test import TestCase from .models import Todo class TodoModelTest(TestCase): @classmethod def setUpTestData(cls): Todo.objects.create(title="first todo", body="a body here") def test_title_content(self): todo = Todo.objects.get(id=1) excepted_object_name = f'{todo.title}' self.assertEqual(excepted_object_name, 'first todo') def test_body_content(self): todo = Todo.objects.get(id=1) excepted_object_name = f'{todo.body}' self.assertEqual(excepted_object_name, 'a body here')テストをコンテナの中で走らせます。うまく通るはずです。
$ docker-compose run --rm web-back sh -c "python manage.py test"
Creating backend_web-back_run ... done
Creating test database for alias 'default'...
System check identified no issues (0 silenced).
..
----------------------------------------------------------------------
Ran 2 tests in 0.005s

OK
Destroying test database for alias 'default'...
3. フロントエンドの構築
それでは、フロントエンドのほうのnginxとreact+next.jsの環境を構築していきます。
$ cd frontend/
$ mkdir nginx web-front

$ cd nginx
$ touch Dockerfile.dev default.dev.conf wait.sh
以下のようなファイル構成にします。
$ cd ../
$ tree
.
├── nginx
│   ├── default.dev.conf
│   ├── Dockerfile.dev
│   └── wait.sh
└── web-front

2 directories, 3 files
以下の2つのファイルはバックエンドのときとほぼ同じです。
frontend/nginx/default.dev.confupstream react { server web-front:3000; } server { listen 80; location = /healthz { return 200; } location / { proxy_pass http://react; proxy_set_header Host $host; proxy_set_header X-Forwarded-For $proxy_add_x_forwarded_for; proxy_redirect off; } location /sockjs-node { proxy_pass http://react; proxy_http_version 1.1; proxy_set_header Upgrade $http_upgrade; proxy_set_header Connection "upgrade"; } error_page 500 502 503 504 /50x.html; location = /50x.html { root /usr/share/nginx/html; } }frontend/nginx/Dockerfile.devFROM nginx:1.17.4-alpine RUN apk add --no-cache bash COPY wait.sh /wait.sh RUN chmod +x /wait.sh CMD ["/wait.sh", "web-front:3000", "--", "nginx", "-g", "daemon off;"] RUN rm /etc/nginx/conf.d/default.conf COPY default.dev.conf /etc/nginx/conf.dこのまま進めると、reactのコンテナは毎回nginxより遅く立ち上がってしまい、nginxは接続エラーだと勘違いしてexitしてしまいます。それを阻止するために以下のシェルファイルを用意してnginxコンテナの立ち上げを遅らせます。こちらのファイルはvishnubob/wait-for-itのレポジトリからコピーしてきたものです。
wait.sh#!/usr/bin/env bash # Use this script to test if a given TCP host/port are available WAITFORIT_cmdname=${0##*/} echoerr() { if [[ $WAITFORIT_QUIET -ne 1 ]]; then echo "$@" 1>&2; fi } usage() { cat << USAGE >&2 Usage: $WAITFORIT_cmdname host:port [-s] [-t timeout] [-- command args] -h HOST | --host=HOST Host or IP under test -p PORT | --port=PORT TCP port under test Alternatively, you specify the host and port as host:port -s | --strict Only execute subcommand if the test succeeds -q | --quiet Don't output any status messages -t TIMEOUT | --timeout=TIMEOUT Timeout in seconds, zero for no timeout -- COMMAND ARGS Execute command with args after the test finishes USAGE exit 1 } wait_for() { if [[ $WAITFORIT_TIMEOUT -gt 0 ]]; then echoerr "$WAITFORIT_cmdname: waiting $WAITFORIT_TIMEOUT seconds for $WAITFORIT_HOST:$WAITFORIT_PORT" else echoerr "$WAITFORIT_cmdname: waiting for $WAITFORIT_HOST:$WAITFORIT_PORT without a timeout" fi WAITFORIT_start_ts=$(date +%s) while : do if [[ $WAITFORIT_ISBUSY -eq 1 ]]; then nc -z $WAITFORIT_HOST $WAITFORIT_PORT WAITFORIT_result=$? else (echo -n > /dev/tcp/$WAITFORIT_HOST/$WAITFORIT_PORT) >/dev/null 2>&1 WAITFORIT_result=$? fi if [[ $WAITFORIT_result -eq 0 ]]; then WAITFORIT_end_ts=$(date +%s) echoerr "$WAITFORIT_cmdname: $WAITFORIT_HOST:$WAITFORIT_PORT is available after $((WAITFORIT_end_ts - WAITFORIT_start_ts)) seconds" break fi sleep 1 done return $WAITFORIT_result } wait_for_wrapper() { # In order to support SIGINT during timeout: http://unix.stackexchange.com/a/57692 if [[ $WAITFORIT_QUIET -eq 1 ]]; then timeout $WAITFORIT_BUSYTIMEFLAG $WAITFORIT_TIMEOUT $0 --quiet --child --host=$WAITFORIT_HOST --port=$WAITFORIT_PORT --timeout=$WAITFORIT_TIMEOUT & else timeout $WAITFORIT_BUSYTIMEFLAG $WAITFORIT_TIMEOUT $0 --child --host=$WAITFORIT_HOST --port=$WAITFORIT_PORT --timeout=$WAITFORIT_TIMEOUT & fi WAITFORIT_PID=$! trap "kill -INT -$WAITFORIT_PID" INT wait $WAITFORIT_PID WAITFORIT_RESULT=$? if [[ $WAITFORIT_RESULT -ne 0 ]]; then echoerr "$WAITFORIT_cmdname: timeout occurred after waiting $WAITFORIT_TIMEOUT seconds for $WAITFORIT_HOST:$WAITFORIT_PORT" fi return $WAITFORIT_RESULT } # process arguments while [[ $# -gt 0 ]] do case "$1" in *:* ) WAITFORIT_hostport=(${1//:/ }) WAITFORIT_HOST=${WAITFORIT_hostport[0]} WAITFORIT_PORT=${WAITFORIT_hostport[1]} shift 1 ;; --child) WAITFORIT_CHILD=1 shift 1 ;; -q | --quiet) WAITFORIT_QUIET=1 shift 1 ;; -s | --strict) WAITFORIT_STRICT=1 shift 1 ;; -h) WAITFORIT_HOST="$2" if [[ $WAITFORIT_HOST == "" ]]; then break; fi shift 2 ;; --host=*) WAITFORIT_HOST="${1#*=}" shift 1 ;; -p) WAITFORIT_PORT="$2" if [[ $WAITFORIT_PORT == "" ]]; then break; fi shift 2 ;; --port=*) WAITFORIT_PORT="${1#*=}" shift 1 ;; -t) WAITFORIT_TIMEOUT="$2" if [[ $WAITFORIT_TIMEOUT == "" ]]; then break; fi shift 2 ;; --timeout=*) WAITFORIT_TIMEOUT="${1#*=}" shift 1 ;; --) shift WAITFORIT_CLI=("$@") break ;; --help) usage ;; *) echoerr "Unknown argument: $1" usage ;; esac done if [[ "$WAITFORIT_HOST" == "" || "$WAITFORIT_PORT" == "" ]]; then echoerr "Error: you need to provide a host and port to test." usage fi WAITFORIT_TIMEOUT=${WAITFORIT_TIMEOUT:-15} WAITFORIT_STRICT=${WAITFORIT_STRICT:-0} WAITFORIT_CHILD=${WAITFORIT_CHILD:-0} WAITFORIT_QUIET=${WAITFORIT_QUIET:-0} # Check to see if timeout is from busybox? WAITFORIT_TIMEOUT_PATH=$(type -p timeout) WAITFORIT_TIMEOUT_PATH=$(realpath $WAITFORIT_TIMEOUT_PATH 2>/dev/null || readlink -f $WAITFORIT_TIMEOUT_PATH) WAITFORIT_BUSYTIMEFLAG="" if [[ $WAITFORIT_TIMEOUT_PATH =~ "busybox" ]]; then WAITFORIT_ISBUSY=1 # Check if busybox timeout uses -t flag # (recent Alpine versions don't support -t anymore) if timeout &>/dev/stdout | grep -q -e '-t '; then WAITFORIT_BUSYTIMEFLAG="-t" fi else WAITFORIT_ISBUSY=0 fi if [[ $WAITFORIT_CHILD -gt 0 ]]; then wait_for WAITFORIT_RESULT=$? exit $WAITFORIT_RESULT else if [[ $WAITFORIT_TIMEOUT -gt 0 ]]; then wait_for_wrapper WAITFORIT_RESULT=$? else wait_for WAITFORIT_RESULT=$? fi fi if [[ $WAITFORIT_CLI != "" ]]; then if [[ $WAITFORIT_RESULT -ne 0 && $WAITFORIT_STRICT -eq 1 ]]; then echoerr "$WAITFORIT_cmdname: strict mode, refusing to execute subprocess" exit $WAITFORIT_RESULT fi exec "${WAITFORIT_CLI[@]}" else exit $WAITFORIT_RESULT fidocker-compose.ymlの編集
docker-compose.ymlversion: "3.7" services: web-back: container_name: python-backend env_file: ./backend/web-back/.env build: ./backend/web-back/. volumes: - ./backend/web-back:/code/ - static_volume:/code/staticfiles # <-- bind the static volume stdin_open: true tty: true command: gunicorn --bind :8000 config.wsgi:application networks: - backend_network environment: - CHOKIDAR_USEPOLLING=true - DJANGO_SETTINGS_MODULE=config.local_settings depends_on: - db backend-server: container_name: nginx_back build: context: ./backend/nginx/. dockerfile: Dockerfile.dev volumes: - static_volume:/code/staticfiles # <-- bind the static volume ports: - "8080:80" depends_on: - web-back networks: - backend_network db: build: ./mysql command: mysqld --character-set-server=utf8mb4 --collation-server=utf8mb4_unicode_ci ports: - "3306:3306" environment: MYSQL_ROOT_PASSWORD: root MYSQL_DATABASE: todoList MYSQL_USER: user MYSQL_PASSWORD: password TZ: 'Asia/Tokyo' volumes: - ./mysql_volume:/var/lib/mysql - ./sql:/docker-entrypoint-initdb.d networks: - backend_network web-front: image: node:14.13.1 volumes: - ./frontend/web-front:/home/app/frontend ports: - 3000:3000 working_dir: /home/app/frontend command: [bash, -c, yarn upgrade --no-progress --network-timeout 1000000 && yarn run dev] networks: - frontend_network frontend-server: container_name: nginx_frontend build: context: ./frontend/nginx/. dockerfile: Dockerfile.dev ports: - "80:80" depends_on: - web-front networks: - frontend_network networks: backend_network: driver: bridge frontend_network: driver: bridge volumes: static_volume:これでファイルの用意はできました。
reactのプロジェクトの作成
docker-compose run --rm web-front sh -c "npx create-react-app ."web-frontはnode_modulesを除くと以下のようにプロジェクトができているはずです。
$ tree web-front -I node_modules
web-front
├── package.json
├── public
│   ├── favicon.ico
│   ├── index.html
│   ├── logo192.png
│   ├── logo512.png
│   ├── manifest.json
│   └── robots.txt
├── README.md
├── src
│   ├── App.css
│   ├── App.js
│   ├── App.test.js
│   ├── index.css
│   ├── index.js
│   ├── logo.svg
│   ├── reportWebVitals.js
│   └── setupTests.js
└── yarn.lock

2 directories, 17 files
next.jsのための準備
必要なモジュールを今のうちに入れておきましょう。
docker-compose run --rm web-front sh -c "yarn add next axios"
docker-compose run --rm web-front sh -c "yarn add --dev typescript @types/react"
package.jsonでdevの項目を追加します。これがないとdevが見つからないといってエラーになります。package.json"scripts": { "dev": "next dev", //追加 "start": "react-scripts start", "build": "react-scripts build", "test": "react-scripts test", "eject": "react-scripts eject" },
pagesフォルダをsrcの下に作って、テキトーなtypescriptファイルをおいてみます。next.jsではpagesの下にページを置くことがルールとなっています。pages/index.tsximport { FC } from 'react' export default (() => { return ( <div> hello world </div> ) }) as FCこれで
docker-compose upしてみましょう。
フロントエンドにアクセスするときは、localhostだけで大丈夫です、ポート番号は必要ありません。hello worldと返されているのが見えるはずです。
4. APIのデータを取得して表示
- index.tsxの編集
pages/index.tsximport React, { FC, useEffect, useState } from 'react' import axios, { AxiosInstance } from 'axios' type Todo = { id: string title: String body: String } export default (() => { const [todos, setTodo] = useState<Todo[]>([]) const getAPIData = async () => { let instance: AxiosInstance instance = axios.create({ baseURL: 'http://localhost:8080', }) try { const response = await instance.get('/api/') console.log(response?.data) const tododata = response?.data as Todo[] setTodo(tododata) } catch (error) { console.log(error) } } return ( <div> hello world <button onClick={getAPIData}>click</button> {todos.map((item) => ( <div key={item.id}> <h1>{item.title}</h1> <p>{item.body}</p> </div> ))} </div> ) }) as FC
localhostにアクセスすると、以下のようにボタンが現れると思います。
ボタンを押したらAPIを通してデータが取得されます。
CSSやらBootstrapなどを使っていないのでしょうもないものですが、一応フロントエンドとバックエンドで通信ができていることを確認できました!
とりあえずここまでにしておいて、今後K8sへのデプロイについての記事を書くかもしれません。
参考
ゼロからGKEにDjango+Reactをデプロイする(1)backendの開発 - Nginx + Django
wait-for-it.sh


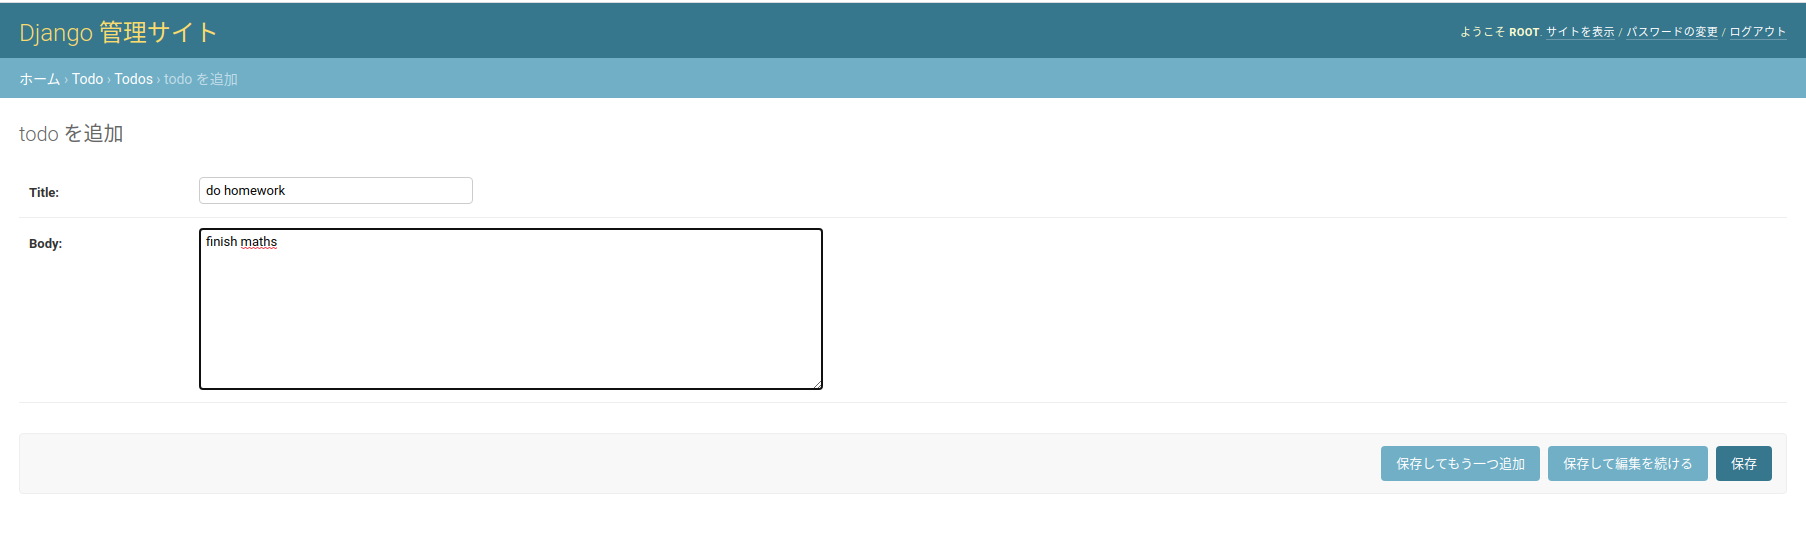
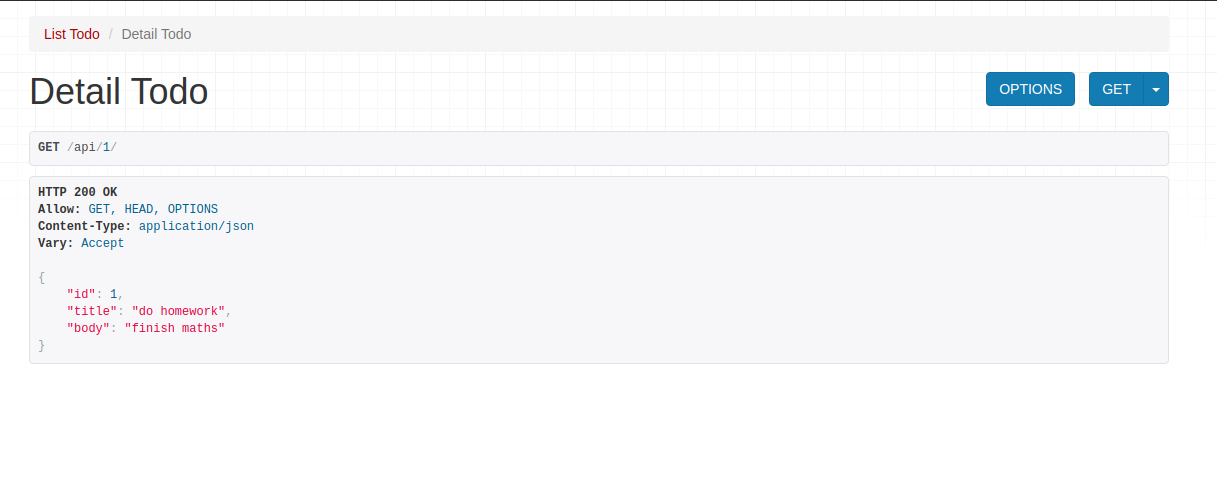


- 投稿日:2021-01-03T01:07:01+09:00
E: The repository 'http://ppa.launchpad.net/daniel.pavel/solaar/ubuntu focal Release' does not have a Release file.
- 投稿日:2021-01-03T01:00:22+09:00
cronをGUIで操作したいのでDkronを入れてみる
やりたいこと
自分用の便利ツールをcronで実行するケースが増えてきた。
cronでもいいんだけど、WEBでJOBを確認したり、止めたりしたい。
自前のサーバで動作するため、Dockerで動かせたい。
クラスタとか、マルチ構成はやらない。Dkronとは
簡単で信頼性の高いCronジョブらしい
Install
公式イメージがあるためDockerコマンドで一発起動。
オプションについて
Webのポートを8080でそのままフォワード
ジョブ情報は外だししたいのでdkron.dataボリュームをマウント
マウントしたボリュームをdkronの起動オプション(--data-dir)に設定
クラスタ構成にしないのでbootstrap-expectは1
ノード名を付けないとランダム名になりdocker rm dkron → docker run っとすると前回の情報をうまく引き継げないので適当につける(node-name)docker run --name dkron -p 8080:8080 -d -v dkron.data:/dkron.data dkron/dkron agent --server --bootstrap-expect=1 --data-dir=/dkron.data --node-name=node1Job登録
以下のURLよりダッシュボードへ遷移してJOBを登録する。
昔のdkronは/dashboard がパスだったらしく迷ったのでメモもちろんHTTPからAPIつついてもJOB登録可能
curl localhost:8080/v1/jobs -XPOST -d '{
  "name": "job1",
  "schedule": "@every 10s",
  "timezone": "Europe/Berlin",
  "owner": "Platform Team",
  "owner_email": "platform@example.com",
  "disabled": false,
  "tags": {
    "server": "true:1"
  },
  "metadata": {
    "user": "12345"
  },
  "concurrency": "allow",
  "executor": "shell",
  "executor_config": {
    "command": "date"
  }
}'
Jobの動作確認
以下のURLより確認する。
先ほどAPIで登録したjob1が10秒ごとに動いてるっぽい。http://localhost:8080/ui/#/jobs/job1/show/executions


- 投稿日:2021-01-03T01:00:22+09:00
DkronでGUIでcronっぽいことをしたい
やりたいこと
自分用の便利ツールをcronで実行するケースが増えてきた。
cronでもいいんだけど、WEBでJOBを確認したり、止めたりしたい。
自前のサーバで動作するため、Dockerで動かせたい。
クラスタとか、マルチ構成はやらない。Dkronとは
簡単で信頼性の高いCronジョブらしい
Install
公式イメージがあるためDockerコマンドで一発起動。
オプションについて
Webのポートを8080でそのままフォワード
ジョブ情報は外だししたいのでdkron.dataボリュームをマウント
マウントしたボリュームをdkronの起動オプション(--data-dir)に設定
クラスタ構成にしないのでbootstrap-expectは1
ノード名を付けないとランダム名になりdocker rm dkron → docker run っとすると前回の情報をうまく引き継げないので適当につける(node-name)docker run --name dkron -p 8080:8080 -d -v dkron.data:/dkron.data dkron/dkron agent --server --bootstrap-expect=1 --data-dir=/dkron.data --node-name=node1Job登録
以下のURLよりダッシュボードへ遷移してJOBを登録する。
昔のdkronは/dashboard がパスだったらしく迷ったのでメモもちろんHTTPからAPIつついてもJOB登録可能
curl localhost:8080/v1/jobs -XPOST -d '{
  "name": "job1",
  "schedule": "@every 10s",
  "timezone": "Europe/Berlin",
  "owner": "Platform Team",
  "owner_email": "platform@example.com",
  "disabled": false,
  "tags": {
    "server": "true:1"
  },
  "metadata": {
    "user": "12345"
  },
  "concurrency": "allow",
  "executor": "shell",
  "executor_config": {
    "command": "date"
  }
}'
Jobの動作確認
以下のURLより確認する。
先ほどAPIで登録したjob1が10秒ごとに動いてるっぽい。http://localhost:8080/ui/#/jobs/job1/show/executions