- 投稿日:2020-10-21T20:18:30+09:00
全プログラミング言語の用語整理
言語自体の整理
1. 動的型付けのプログラミング言語
プログラムでは様々な「型」を扱います。例えば、文字列値と整数値と少数値は異なる型です。この他にも様々な型があり、プログラムにミスがあって異なった型を指定しまう事でエラーを発生させることがあります。
動的型付けのプログラミング言語の場合はプログラムを実行時に型検査を行います。厳格なエラーを対処しなくてもプログラムは動作するので初心者には学びやすい言語が多くなっています。しかしその反面、非常に分かりにくい不具合を作り込んでしまう可能性もあります。
言語名 F-S Initial release 起源 JavaScript FS HTML と合わせて使用して動きのある WEB ページを開発するために使用 1995 Ruby FS 日本人により開発された。可読性を重視した構文 1995 Python FS 最近ではAI やデータ解析処理の場面において利用されおり注目度の高い言語 1990 PHP S 動的な WEB サイトを実装する為の言語であるため、ライブラリを用いなくても WEB アプリケーション向けの処理が実装 1995 2. 静的型付けのプログラミング言語
動的型付けのプログラミング言語の場合、「コンパイル」を行う事でプログラミング時に型チェックを行います。静的型付けのプログラミング言語に比べて型チェックが厳格になっているので実装する処理も多くなります。
静的型付けのプログラミング言語に比べて難易度は高いと言えます。
言語名 F-S Initial release 起源 C - 高速に動作。システムの共通言語として様々なplatformで使用。garbage collection等、最近の機能は実装されてなく習得難易度はとても高い 1972 C++ - C を元にオブジェクト指向や例外処理等の概念を取り入れた言語 1993-2 C# - Microsoft が開発した .Net Framework と言うプラットフォーム上で動作させるためのプログラム 2000 Objective-C / Swift - Apple 社の MacOS や iOS 用のアプリケーションを開発するためのプログラム言語 1984/2014-6 SQL - データベースから情報の取得、追加、更新、削除と言った処理を行う為の言語 1974 各言語詳細
1. フロントエンド
JavaScript
(npmやYarn: パッケージ管理)
ーVue  Initial release: February 2014;
ーーnuxt VueのFramework  Initial release: October 26, 2016;
ーーーVuexなどのライブラリ


ーReact  Initial release: May 29, 2013;
ーーNext ReactのFramework
ーーーReduxなどのライブラリ
ーーーMaterial UI Reactのcomponents、Vuetifyみたいな感じかな

react native Initial-March 26, 2015

angular Initial release 2.0 / 14 September 2016;
Python First appeared: 1990
(pip: パッケージ管理)
ーDjango Python-web-framework Initial release: July 2005Ruby 1995
(gem: パッケージ管理)
ーーrails August 2004;2. サーバーエンド
PHP
(composer: パッケージ管理)
ーLaravel PHPのFramework Initial release: June 2011JavaScript
Node Initial release: May 27, 2009;
Node express November 16, 2010;
3. その他
Rust
(cargo: パッケージ管理)
- 投稿日:2020-10-21T19:51:01+09:00
環境構築, Buildまで - C# 編-
C#のコンパイル
プロジェクトファイルやソリューションファイルを作るには
やっぱり Visual Studio があった方が楽なのですけれど。。
Visual Studio は遅いし重いしあまりインストールしたくないので
以下の方法を使います。基本的にCLIのみですましたいと考えております。。
(Android studioもCLIのみを使用しています。).NET Frameworkを利用
実行ファイルの場所
パスを通すとよい。
(Windows: システムのプロパティ→環境変数→Payh追加)C:\Windows\Microsoft.NET\Framework64\v4.0.30319\csc.exe C:\Windows\Microsoft.NET\Framework64\v4.0.30319\MSbuild.exe実際にC#コードをコンパイルしていく。
1. csc.exe
直接コードをコンパイルする。
csc.exe demo.cs

//dll作製
csc.exe -target:library sub1.cs sub2.cs

//exe作製
csc.exe -reference:sub1.dll main.cs
2. MSbuild.exe
・プロジェクトファイル(.csproj)
・ソリューションファイル(.sln)
を作れば MSBuild でコンパイルすることもできます。//コンパイル MSbuild
- 投稿日:2020-10-21T19:51:01+09:00
C#コンパイル基礎
C#のコンパイル
プロジェクトファイルやソリューションファイルを作るには
やっぱり Visual Studio があった方が楽なのですけれど。。
Visual Studio は遅いし重いしあまりインストールしたくないので
以下の方法を使います。基本的にCLIのみですましたいと考えております。。
(Android studioもCLIのみを使用しています。).NET Frameworkを利用
実行ファイルの場所
パスを通すとよい。
(Windows: システムのプロパティ→環境変数→Payh追加)C:\Windows\Microsoft.NET\Framework64\v4.0.30319\csc.exe C:\Windows\Microsoft.NET\Framework64\v4.0.30319\MSbuild.exe実際にC#コードをコンパイルしていく。
1. csc.exe
直接コードをコンパイルする。
csc.exe demo.cs

//dll作製
csc.exe -target:library sub1.cs sub2.cs

//exe作製
csc.exe -reference:sub1.dll main.cs
2. MSbuild.exe
・プロジェクトファイル(.csproj)
・ソリューションファイル(.sln)
を作れば MSBuild でコンパイルすることもできます。//コンパイル MSbuild
- 投稿日:2020-10-21T15:35:38+09:00
【Unity】デフォルトで配列とListを並び替え可能にするエディタ拡張【ReorderableList】
https://t.co/UV7XdLWg9z
— su10@ハイパーカジュアルゲーム開発 (@su10_dev) October 20, 2020
入れるだけで配列とListをReorderableにしてくれるエディタ拡張作った。
Odinみたいに簡単にカスタマイズとかできないけど、素のUnityの状態よりはマシかな。 pic.twitter.com/PLONGK4Avx
ーー 2020/10/22追記 ーー
ScriptableObjectを選択したときに表示がバグる不具合を確認したので直るまで使用しないでください。
というかQiitaって記事を公開したら限定公開にできないのね。。ーー 追記ここまでーー
はじめに
Odin を入れると自動で配列や
Listが並び替え可能かつ様々な拡張が可能になって便利なのですが、Odinは最近ライセンスが変更されて会社利用しにくくなりました(詳細はPricingのページ参照)。コガネブログ様の記事によるとUnity2020.2bからはデフォルトで配列や
ListがReorderableになるらしいのですが、OdinなしのUnity2019でも特別な対応無しで並べ替え可能にしたかったのでいろいろ調べました。ソースコード
Gistにも載せてますが、大して長くもないので全文掲載しておきます。適当に
Assets/Editor/とかに入れると自動で適用されます。配列・List側がクラスを継承したり特別な属性を付与する必要もありません。コードはこちらを元にUnity2019で表示がおかしかったのを修正&リファクタリングしたものです。
ReorderableListEditor.cs/* MIT License Copyright (c) 2018 ANURAG DEVANAPALLY Permission is hereby granted, free of charge, to any person obtaining a copy of this software and associated documentation files (the "Software"), to deal in the Software without restriction, including without limitation the rights to use, copy, modify, merge, publish, distribute, sublicense, and/or sell copies of the Software, and to permit persons to whom the Software is furnished to do so, subject to the following conditions: The above copyright notice and this permission notice shall be included in all copies or substantial portions of the Software. THE SOFTWARE IS PROVIDED "AS IS", WITHOUT WARRANTY OF ANY KIND, EXPRESS OR IMPLIED, INCLUDING BUT NOT LIMITED TO THE WARRANTIES OF MERCHANTABILITY, FITNESS FOR A PARTICULAR PURPOSE AND NONINFRINGEMENT. IN NO EVENT SHALL THE AUTHORS OR COPYRIGHT HOLDERS BE LIABLE FOR ANY CLAIM, DAMAGES OR OTHER LIABILITY, WHETHER IN AN ACTION OF CONTRACT, TORT OR OTHERWISE, ARISING FROM, OUT OF OR IN CONNECTION WITH THE SOFTWARE OR THE USE OR OTHER DEALINGS IN THE SOFTWARE. */ #if UNITY_EDITOR using System.Collections.Generic; using System.Reflection; using UnityEditor; using UnityEditorInternal; using UnityEngine; // SEE: https://github.com/andeart/UnityLabs.ReorderableListEditor namespace Andeart.ReorderableListEditor { /// <summary> /// Custom editor to allow re-orderable lists/arrays in Unity Inspector automatically. /// This custom editor overrides Unity's default SerializedProperty drawing for arrays and lists. /// This is inspired by Valentin Simonov's blog article here: /// http://va.lent.in/unity-make-your-lists-functional-with-reorderablelist/ , along with additional tweaks/functionality. /// </summary> /// <inheritdoc /> [CustomEditor(typeof(Object), true)] [CanEditMultipleObjects] public class ReorderableListEditor : Editor { private Dictionary<string, ReorderableListProperty> _reorderableListDict; protected virtual void OnEnable() { _reorderableListDict = new Dictionary<string, ReorderableListProperty>(); } protected virtual void OnDestroy() { _reorderableListDict.Clear(); _reorderableListDict = null; } public override void OnInspectorGUI() { var propertyValueColor = GUI.color; serializedObject.Update(); var property = serializedObject.GetIterator(); if (property.NextVisible(true)) { do { GUI.color = propertyValueColor; DrawProperty(property); } while (property.NextVisible(false)); } serializedObject.ApplyModifiedProperties(); } private void DrawProperty(SerializedProperty property) { var isPropertyMonoBehaviourId = property.name.Equals("m_Script") && property.type.Equals("PPtr<MonoScript>") && (property.propertyType == SerializedPropertyType.ObjectReference) && property.propertyPath.Equals("m_Script"); if (isPropertyMonoBehaviourId) { EditorGUI.BeginDisabledGroup(true); EditorGUILayout.PropertyField(property); EditorGUI.EndDisabledGroup(); return; } if (property.isArray && property.propertyType != SerializedPropertyType.String) { this.DrawListProperty(property); } else { EditorGUILayout.PropertyField(property, property.isExpanded); } } private void DrawListProperty(SerializedProperty property) { var reorderableListProperty = this.GetReorderableList(property); if (reorderableListProperty.property.isExpanded == false) { reorderableListProperty.DoListHeader(); } else { reorderableListProperty.DoLayoutList(); } EditorGUILayout.GetControlRect(true, -2f); } private ReorderableListProperty GetReorderableList(SerializedProperty property) { if (_reorderableListDict.TryGetValue(property.name, out var reorderableListProperty)) { reorderableListProperty.property = property; return reorderableListProperty; } reorderableListProperty = new ReorderableListProperty(property); _reorderableListDict[property.name] = reorderableListProperty; return reorderableListProperty; } private class ReorderableListProperty { private const float HeaderLeftMargin = 10f; private const float ElementTopMargin = 2f; private const float ElementLeftMargin = 9f; private const float ElementVerticalMargin = 4f; private static readonly FieldInfo ReorderableListDefaultsField = typeof(ReorderableList).GetField("s_Defaults", BindingFlags.Static | BindingFlags.NonPublic); private static readonly MethodInfo DoListHeaderMethod = typeof(ReorderableList).GetMethod("DoListHeader", BindingFlags.Instance | BindingFlags.NonPublic | BindingFlags.InvokeMethod); private ReorderableList _list; private SerializedProperty _property; public SerializedProperty property { get => _property; set { _property = value; _list.serializedProperty = _property; } } public ReorderableListProperty(SerializedProperty property) { _property = property; _list = new ReorderableList(_property.serializedObject, _property, true, true, true, true); _list.drawHeaderCallback += this.OnDrawHeader; _list.drawElementCallback += this.OnDrawElement; _list.elementHeightCallback += this.OnElementHeight; _list.onCanRemoveCallback += this.OnCanRemove; } ~ReorderableListProperty() { _property = null; _list = null; } private void OnDrawHeader(Rect rect) { _property.isExpanded = EditorGUI.Foldout( new Rect(rect.x + HeaderLeftMargin, rect.y, rect.width, rect.height), _property.isExpanded, _property.displayName, true, EditorStyles.foldout ); } private void OnDrawElement(Rect rect, int index, bool active, bool focused) { rect.y += ElementTopMargin; rect.height = EditorGUIUtility.singleLineHeight; var propertyChild = _property.GetArrayElementAtIndex(index); if (propertyChild.propertyType == SerializedPropertyType.Generic) { rect.x += ElementLeftMargin; rect.width -= ElementLeftMargin; EditorGUI.LabelField(rect, propertyChild.displayName); } EditorGUI.PropertyField(rect, propertyChild, GUIContent.none, true); _list.elementHeight = rect.height + ElementVerticalMargin; } private float OnElementHeight(int index) { return Mathf.Max( EditorGUIUtility.singleLineHeight, EditorGUI.GetPropertyHeight(_property.GetArrayElementAtIndex(index), GUIContent.none, true) ) + ElementVerticalMargin; } private bool OnCanRemove(ReorderableList list) { return 0 < _list.count; } public void DoListHeader() { if (ReorderableListDefaultsField.GetValue(null) == null) { ReorderableListDefaultsField.SetValue(null, new ReorderableList.Defaults()); } var rect = GUILayoutUtility.GetRect(0.0f, _list.headerHeight, GUILayout.ExpandWidth(true)); DoListHeaderMethod.Invoke(_list, new object[] {rect}); } public void DoLayoutList() { _list.DoLayoutList(); } } } } #endif所感
[CustomEditor(typeof(Object), true)]なカスタムエディタを書けばデフォルトのInspector表示も変更できるの知らなかった。参考
- UnityLabs.ReorderableListEditor
- Unity: make your lists functional with ReorderableList
- 【Unity】【エディタ拡張】ReorderableListの使い方(LIGHT11)
- ReorderableListのすすめ - Synamon's Engineer blog
- カスタムエディタが楽に書けるやつ
- Reorderable List
- Odinみたいに多機能だけどカスタムエディタを書くか継承が必要なやつ
- 投稿日:2020-10-21T06:58:30+09:00
C# - ListViewに右クリックメニュー(ContextMenu)を追加する
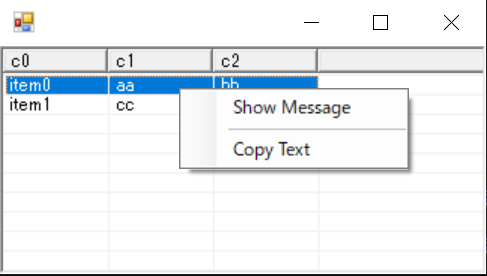
画面キャプチャ
ソースコード
using System;
using System.Drawing;
using System.Windows.Forms;

class ListViewContextMenuSample : Form
{
    ListView lsv;
    ListViewContextMenuInfo contextMenuInfo;

    ListViewContextMenuSample()
    {
        ClientSize = new Size(500, 300);

        Controls.Add(lsv = new ListView() {
            Dock = DockStyle.Fill,
            View = View.Details,
            FullRowSelect = true,
            GridLines = true,
        });
        lsv.Columns.Add("c0", 70, HorizontalAlignment.Left);
        lsv.Columns.Add("c1", 70, HorizontalAlignment.Left);
        lsv.Columns.Add("c2", 70, HorizontalAlignment.Left);
        lsv.Items.Add(new ListViewItem(new string[]{"item0","aa","bb"}));
        lsv.Items.Add(new ListViewItem(new string[]{"item1","cc","dd"}));

        var a = new ContextMenuStrip();
        a.Items.Add(new ToolStripMenuItem("Show Message", null, ToolStripMenuItem_Click, "Show"));
        a.Items.Add(new ToolStripSeparator());
        a.Items.Add(new ToolStripMenuItem("Copy Text",    null, ToolStripMenuItem_Click, "Copy"));
        a.Opening += ContextMenuStrip_Opening;
        lsv.ContextMenuStrip = a;
    }

    // 注意:この sender は ContextMenuStrip 型であり、ListViewではない。
    void ContextMenuStrip_Opening(object sender, System.ComponentModel.CancelEventArgs e)
    {
        Point p = lsv.PointToClient(Cursor.Position);
        ListViewHitTestInfo info = lsv.HitTest(p);
        ListViewItem item = info.Item;

        contextMenuInfo = null;

        if (item == null) {
            e.Cancel = true;
        }
        else if ( item.Bounds.Contains(p) ) {
            contextMenuInfo = new ListViewContextMenuInfo(item, info.SubItem);
        }
        else {
            e.Cancel = true;
        }
    }

    // ToolStripMenuItem.Click イベント
    void ToolStripMenuItem_Click(object sender, EventArgs e)
    {
        var mi = (ToolStripMenuItem)sender;

        if ( contextMenuInfo != null ) {
            if ( mi.Name == "Show" ) {
                MessageBox.Show(contextMenuInfo.SelectedSubItem.Text);
            }
            else if ( mi.Name == "Copy" ) {
                ClipboardSetTextWithRetryOnce(contextMenuInfo.SelectedSubItem.Text);
            }
        }
    }


    void ClipboardSetTextWithRetryOnce(string s)
    {
        try { Clipboard.SetText(s); }
        catch ( System.Runtime.InteropServices.ExternalException ) { // クリアに失敗
            // 1回だけリトライする
            try { Clipboard.SetText(s); }
            catch ( System.Runtime.InteropServices.ExternalException e2 ) { Console.WriteLine(e2); }
        }
    }

    [STAThread]
    static void Main(string[] args)
    {
        Application.Run(new ListViewContextMenuSample());
    }

    // -----
    class ListViewContextMenuInfo
    {
        public ListViewItem    SelectedItem{get;private set;}
        public ListViewItem.ListViewSubItem SelectedSubItem{get;private set;}

        public ListViewContextMenuInfo(ListViewItem selectedItem, ListViewItem.ListViewSubItem selectedSubItem)
        {
            SelectedItem = selectedItem;
            SelectedSubItem = selectedSubItem;
        }
    }
}
参考
- 投稿日:2020-10-21T06:58:30+09:00
C# - ListViewに右クリックメニュー(ContextMenu)を追加する。コードべた書き(Visual Studio不使用)。
画面キャプチャ
ソースコード
using System;
using System.Drawing;
using System.Windows.Forms;

class ListViewContextMenuSample : Form
{
    ListView lsv;
    ListViewContextMenuInfo contextMenuInfo;

    ListViewContextMenuSample()
    {
        ClientSize = new Size(500, 300);

        Controls.Add(lsv = new ListView() {
            Dock = DockStyle.Fill,
            View = View.Details,
            FullRowSelect = true,
            GridLines = true,
        });
        lsv.Columns.Add("c0", 70, HorizontalAlignment.Left);
        lsv.Columns.Add("c1", 70, HorizontalAlignment.Left);
        lsv.Columns.Add("c2", 70, HorizontalAlignment.Left);
        lsv.Items.Add(new ListViewItem(new string[]{"item0","aa","bb"}));
        lsv.Items.Add(new ListViewItem(new string[]{"item1","cc","dd"}));

        var a = new ContextMenuStrip();
        a.Items.Add(new ToolStripMenuItem("Show Message", null, ToolStripMenuItem_Click, "Show"));
        a.Items.Add(new ToolStripSeparator());
        a.Items.Add(new ToolStripMenuItem("Copy Text",    null, ToolStripMenuItem_Click, "Copy"));
        a.Opening += ContextMenuStrip_Opening;
        lsv.ContextMenuStrip = a;
    }

    // 注意:この sender は ContextMenuStrip 型であり、ListViewではない。
    void ContextMenuStrip_Opening(object sender, System.ComponentModel.CancelEventArgs e)
    {
        Point p = lsv.PointToClient(Cursor.Position);
        ListViewHitTestInfo info = lsv.HitTest(p);
        ListViewItem item = info.Item;

        contextMenuInfo = null;

        if (item == null) {
            e.Cancel = true;
        }
        else if ( item.Bounds.Contains(p) ) {
            contextMenuInfo = new ListViewContextMenuInfo(item, info.SubItem);
        }
        else {
            e.Cancel = true;
        }
    }

    // ToolStripMenuItem.Click イベント
    void ToolStripMenuItem_Click(object sender, EventArgs e)
    {
        var mi = (ToolStripMenuItem)sender;

        if ( contextMenuInfo != null ) {
            if ( mi.Name == "Show" ) {
                MessageBox.Show(contextMenuInfo.SelectedSubItem.Text);
            }
            else if ( mi.Name == "Copy" ) {
                ClipboardSetTextWithRetryOnce(contextMenuInfo.SelectedSubItem.Text);
            }
        }
    }


    void ClipboardSetTextWithRetryOnce(string s)
    {
        try { Clipboard.SetText(s); }
        catch ( System.Runtime.InteropServices.ExternalException ) { // クリアに失敗
            // 1回だけリトライする
            try { Clipboard.SetText(s); }
            catch ( System.Runtime.InteropServices.ExternalException e2 ) { Console.WriteLine(e2); }
        }
    }

    [STAThread]
    static void Main(string[] args)
    {
        Application.Run(new ListViewContextMenuSample());
    }

    // -----
    class ListViewContextMenuInfo
    {
        public ListViewItem    SelectedItem{get;private set;}
        public ListViewItem.ListViewSubItem SelectedSubItem{get;private set;}

        public ListViewContextMenuInfo(ListViewItem selectedItem, ListViewItem.ListViewSubItem selectedSubItem)
        {
            SelectedItem = selectedItem;
            SelectedSubItem = selectedSubItem;
        }
    }
}
参考
- 投稿日:2020-10-21T00:44:35+09:00
自作アプリを実機に入れたいが...
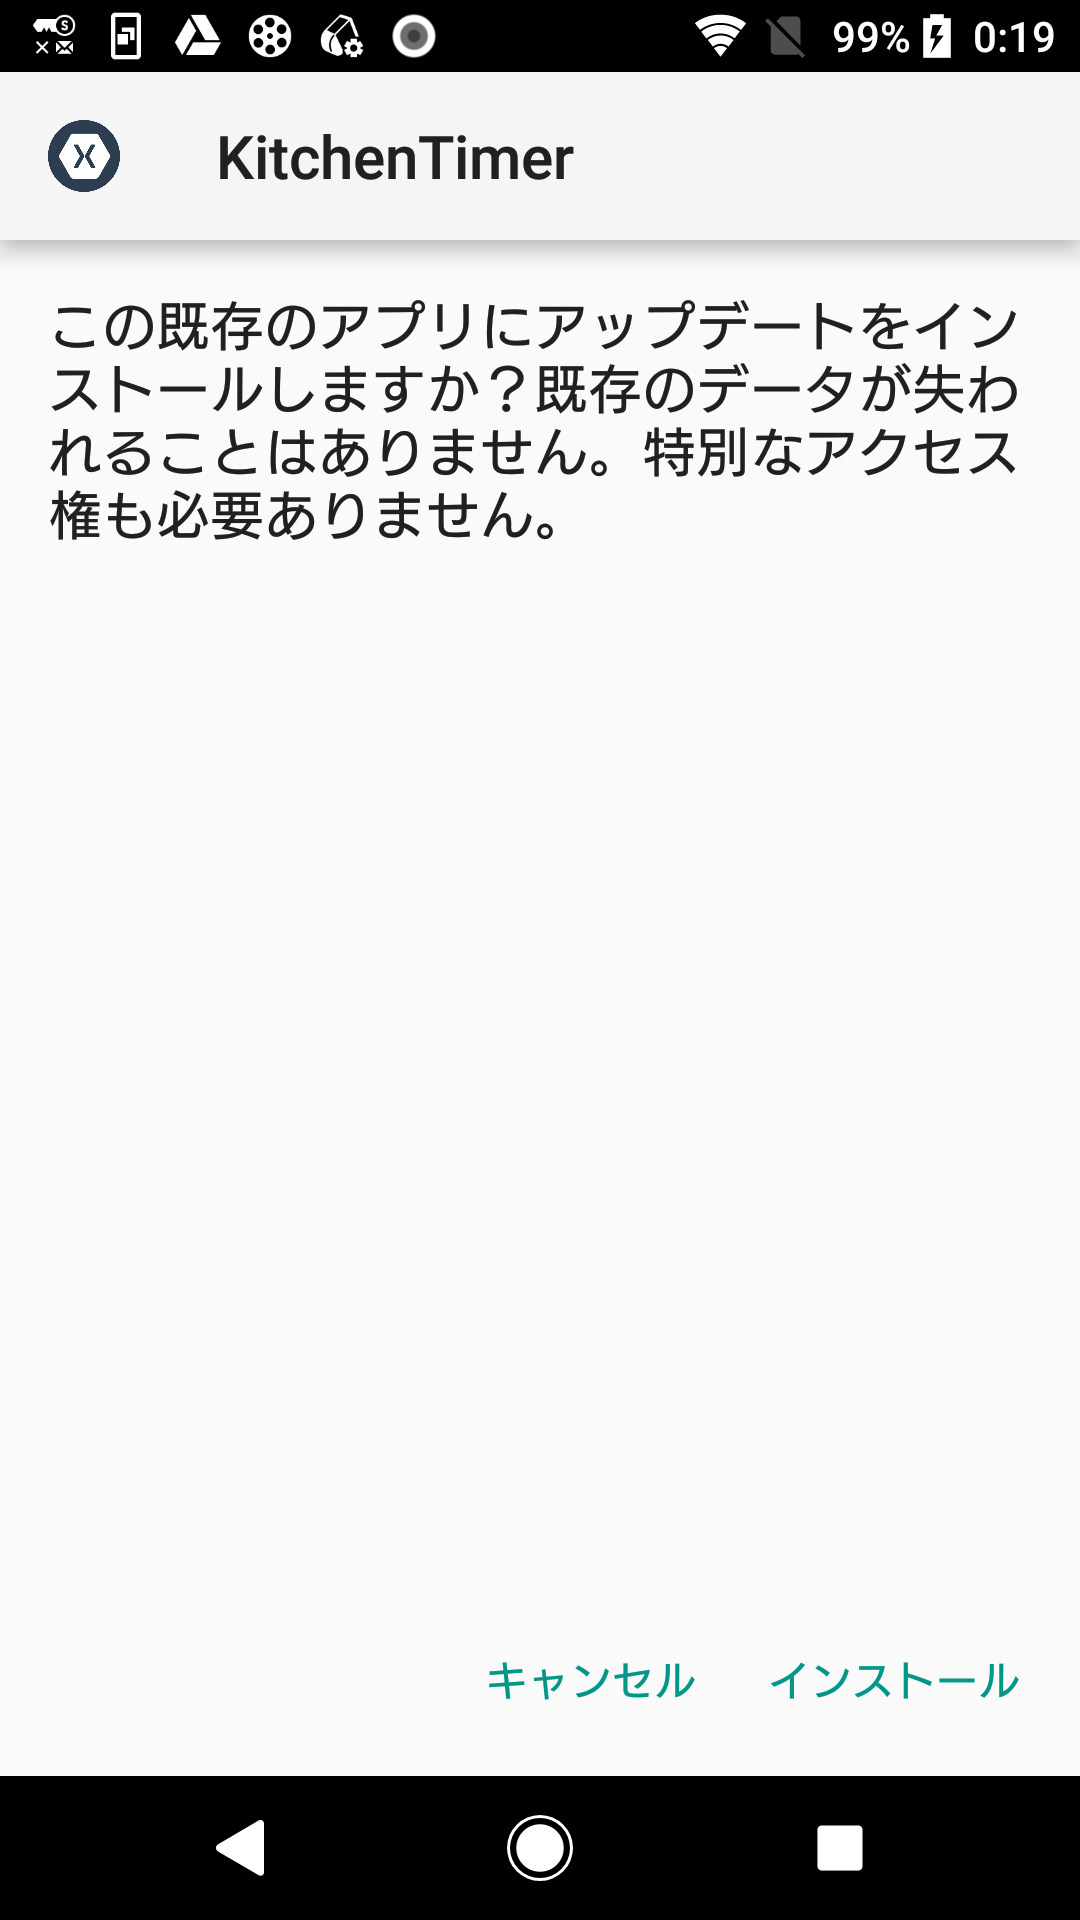
・新規でAndroid8.0端末にインストールしようとしましたが失敗します。
>以下キャプチャ
実機デバッグでインストールすることはできますが、インストーラからのインストールができないです。
調べてみたが原因らしい原因が見当たらないです。
署名方法に問題があるのかと思い、調べてみましたが入力内容は何が正解なのか分からないです。
何か心当たりがある方はコメントに指摘、対処を願います。開発環境
VisualStudio2019
Xamarin
C#使用端末
Xperia XZ

