- 投稿日:2020-08-09T19:37:43+09:00
Macでjupyter notebookを簡単に起動する方法
jupyter notebookを起動する時、ターミナル開いて、
jupyter-notebookを実行して、開きたいファイルがあるディレクトリまで移動する...この作業を毎回やるのめんどくさく感じませんか?
今回はその手間を省くために、シェルコマンドをアプリケーション化する方法を紹介します。やり方
やり方は超簡単です。
まずテキストエディタで次の一行を入力します。
jupyter-notebook 開きたいディレクトリのパス

#例
jupyter-notebook ~/Desktop/hoge
拡張子を
.commandにして、デスクトップに保存します。
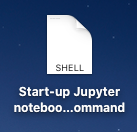
↓こんな感じ
.commandってついてるのがダサいので、拡張子を非表示にします。あと、アイコンもお好みで変更すると良いでしょう。
↓自分はこんな感じ
そして最後に、このファイルに実行権限を与えます。chmod 777 ***.commandこれで完成です!
あとはこれをダブルクリックするだけで、自動でターミナルのコマンドが実行されてブラウザが起動されます。
とても便利。まとめ
今回は簡単にjupyter-notebookを起動する方法について紹介しました。
他にも簡単な方法はあるかもしれませんが、もし参考になったら是非試してみてください。
- 投稿日:2020-08-09T19:13:32+09:00
sshfs + osxfuse で Mac にサーバ上のディレクトリをマウント
sshfs+osxfuseで Mac にサーバ上のディレクトリをマウントはじめに
仕事をしていると往々にしてサーバ上のファイルを直接いじりたい場面があると思います。
そんなときに便利なのが、sshfsです。
サーバのディレクトリをローカルにマウントすることができるので、自分の好きなエディタでいじることができます。
ちなみに osxfuse は Mac のファイルシステムを操作するためのライブラリです。環境
- Mac(Mojave)
- Homebrew
インストール
brew cask install osxfuse
brew install sshfs
マウント
# sshfs [ユーザー名]@[ホスト名]:[ディレクトリ] [ローカルのマウントしたい場所]
sshfs takiguchi-yu@test-server001:/home/takiguchi-yu/app/src/ ~/Desktop/hogehoge/
アンマウント
diskutil unmount force ~/Desktop/hogehoge/最後に
パソコンを閉じるとマウントが切れてしまうため、自動化したい。
マウントが切れたときは、アンマウント→マウントし直すと直ります。
- 投稿日:2020-08-09T17:50:30+09:00
Mac セットアップ(5)
思考の速度でコーディングしたい。
Macの余計なアニメーションとかキーボードの設定を変更する
Macの余計なアニメーションを消す
# Finderのファイルを開くときのすべてのアニメーションを無効化
defaults write com.apple.finder DisableAllAnimations -boolean true; killall Finder
# 元に戻す場合 → defaults delete com.apple.finder DisableAllAnimations; killall Finder

# スクロールが弾むアニメーションを無効化
defaults write -g NSScrollViewRubberbanding -bool no; killall Finder
#元に戻す場合 → defaults delete -g NSScrollViewRubberbanding; killall Finder

# スクリーンショットから影を取り除く
defaults write com.apple.screencapture disable-shadow -boolean true;killall SystemUIServer

# オートマチックウィンドウアニメーションを全て無効化
defaults write NSGlobalDomain NSAutomaticWindowAnimationsEnabled -bool NO
# 元に戻す場合 → defaults write NSGlobalDomain NSAutomaticWindowAnimationsEnabled -bool YES

# Launchpadのアニメーションを全て無効化
defaults write com.apple.dock springboard-show-duration -float 0
defaults write com.apple.dock springboard-hide-duration -float 0
defaults write com.apple.dock springboard-page-duration -float 0
# 元に戻す場合↓
# defaults delete com.apple.dock springboard-show-duration; killall Dock
# defaults delete com.apple.dock springboard-hide-duration ; killall Dock
# defaults delete com.apple.dock springboard-page-duration ; killall Dock

# スムーズスクローリング全て無効
defaults write -g NSScrollAnimationEnabled -bool false;

#クイックルック表示時のアニメーション全て無効
defaults write -g QLPanelAnimationDuration -float 0

# リサイジングアニメーション全て無効
defaults write -g NSDocumentRevisionsWindowTransformAnimation -bool false

#カラムアニメーション全て無効
defaults write -g NSBrowserColumnAnimationSpeedMultiplier -float 0

# ダイアログの表示速度高速化
defaults write -g NSWindowResizeTime 0.001
# 元に戻す場合 → defaults delete -g NSWindowResizeTime

# アイコンをドラッグした時のアニメーション高速化
defaults write com.apple.finder AnimateSnapToGrid -boolean false; killall Finder
# 元に戻す場合 → defaults write com.apple.finder AnimateSnapToGrid -boolean true; killall Finder

# クイックルックで表示したテキストをコピペ有効化
defaults write com.apple.finder QLEnableTextSelection -bool true; killall Finder
# 元に戻す場合 → defaults delete com.apple.finder QLEnableTextSelection; killall Finder

# 他アプリに切り替えたらクイックルックを非表示
defaults write com.apple.finder QLHidePanelOnDeactivate -bool true;killall Finder
# 元に戻す場合 defaults delete com.apple.finder QLHidePanelOnDeactivate;killall Finder

# ダッシュボードを無効にしてメモリ節約と高速化。
defaults write com.apple.dashboard mcx-disabled -boolean true; killall Dock
# 元に戻す場合 → defaults delete com.apple.dashboard mcx-disabled; killall Dock

# Dockアニメーション高速化
defaults write com.apple.dock autohide-time-modifier -float 0;killall Dock
defaults write com.apple.dock autohide-delay -float 0;killall Dock
# 元に戻す場合 → defaults delete com.apple.dock autohide-time-modifier;killall Dock

# Dockが表示される時間を0に設定
defaults write com.apple.dock autohide-delay -float 0;killall Dock

# Dockに格納するエフェクトをSuckに変更
defaults write com.apple.dock mineffect suck; killall Dock

# ミッションコントロールのアニメーション時間を変更
defaults write com.apple.dock expose-animation-duration -float 0.1;killall Dock

# アプリがデスクトップ間を移動する際の速度を変更
defaults write com.apple.dock workspaces-edge-delay -float 0.2;killall Dock

# ファインダーのアニメーションを削除
defaults write com.apple.finder AnimateInfoPanes -boolean false;killall Finder
# 元に戻すdefaults delete com.apple.finder AnimateInfoPanes;killall Finder

# ネットワークドライブで.DS_Storeファイルを作成しないよう設定
defaults write com.apple.desktopservices DSDontWriteNetworkStores true

# キーリピート速度変更
defaults write -g InitialKeyRepeat -int 12
# normal minimum is 15 (225 ms)
defaults write -g KeyRepeat -int 1
# normal minimum is 2 (30 ms)
Karabiner 設定
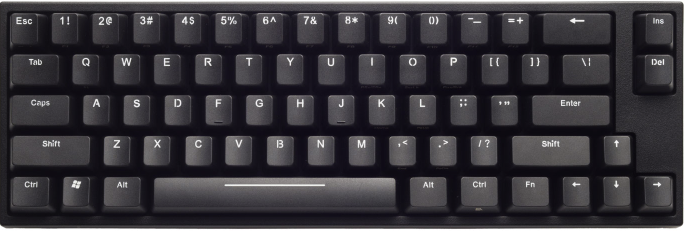
ぼくはこちらのキーボードを使っているのですが、いろいろ変更しています。
(ちなみにぼくは赤軸と黒軸が好きです!)
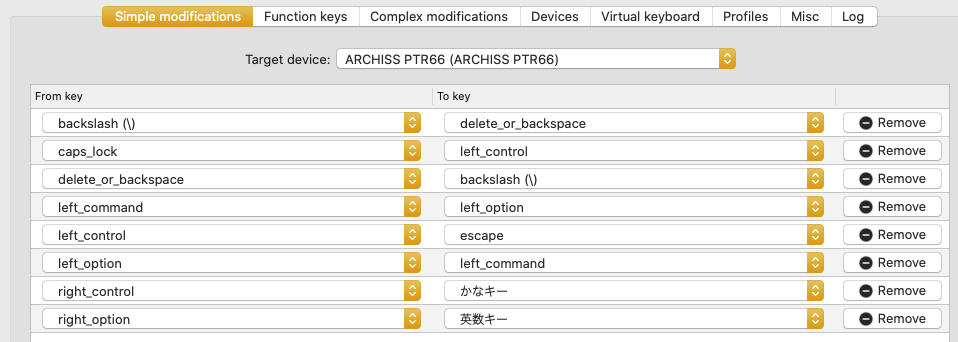
Karabinerの設定を以下のようにしています
※キーボードの後ろのスイッチは変更していません。
- 投稿日:2020-08-09T17:17:39+09:00
Lombok Macにインストール(STS使用)
SpringToolSuite4にLombokをインストールする。
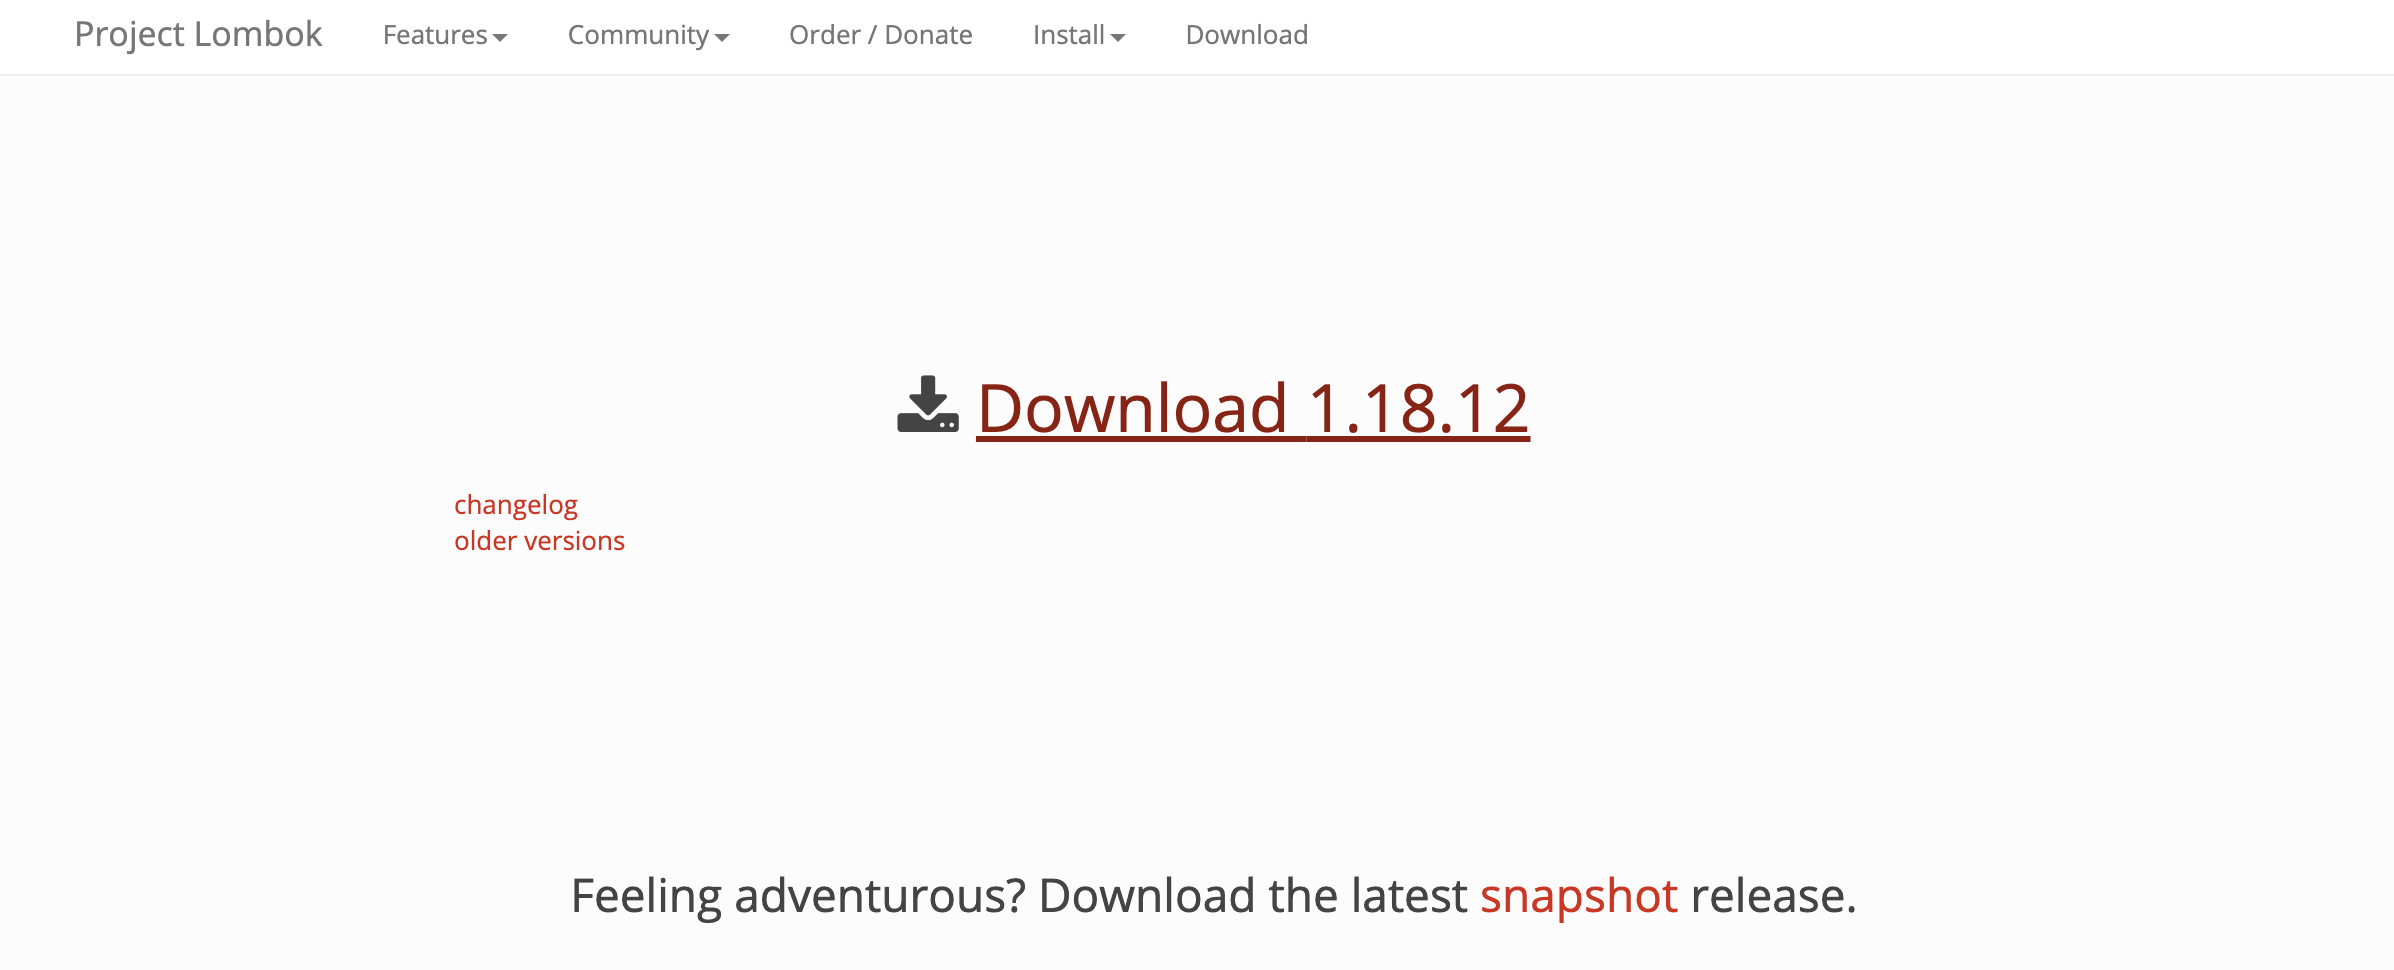
MACのSTSでLombokを利用するにあたり、メモしたいと思います。①公式サイトからダウンロード
https://projectlombok.org/download
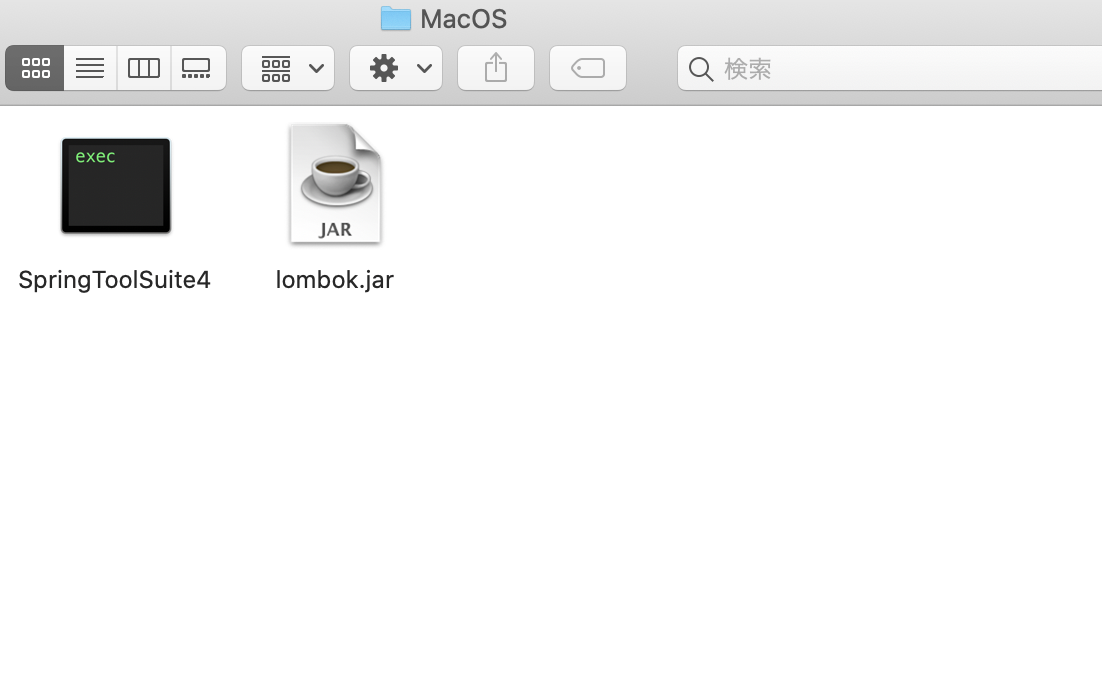
②ダウンロードファイル(lombok.jar)をSpringToolSuite4のインストール場所に設置
/Applications/SpringToolSuite4.app/Contents/MacOS/ここに配置
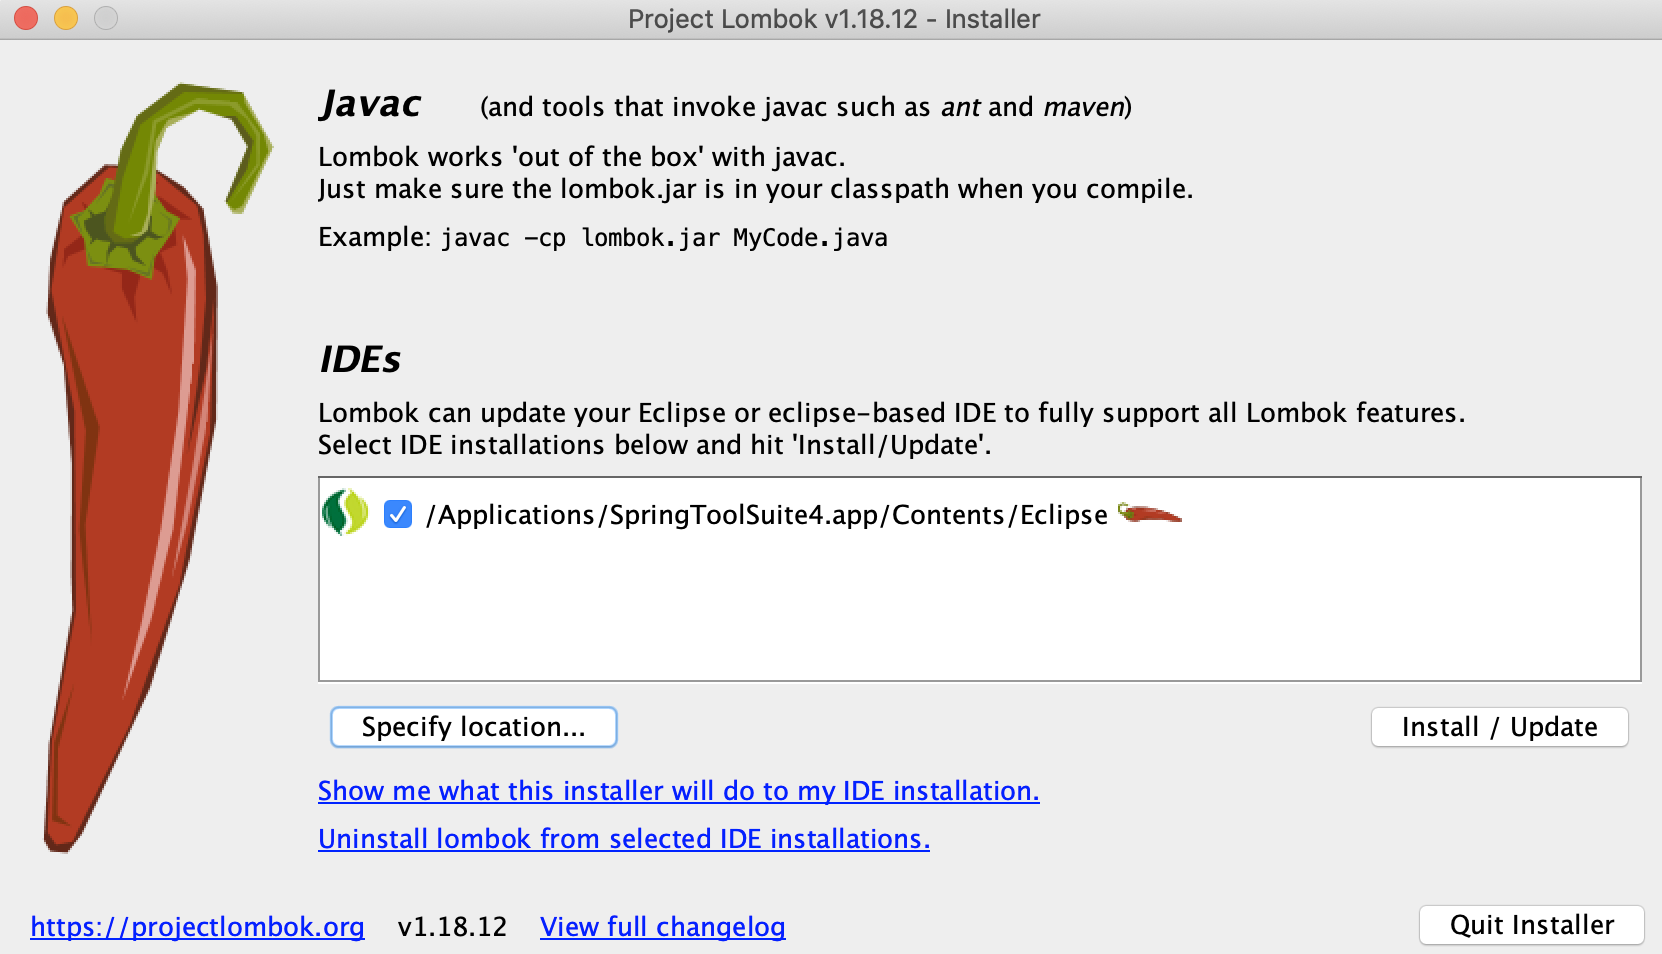
③lombok.jarを起動しインストール(一覧にインストール先がない場合[Specifylocation]ボタンを押して、対象を選択)
インストール先:/Applications/SpringToolSuite4.app/Contents/Eclipse/eclipse.ini
選択後:install/UpdateをクリックさらにQuit Installerクリック
- 投稿日:2020-08-09T14:23:35+09:00
Mac(Catalina)でgdbを動かす方法
macでgdbを動かそうとしたらうまく行かなかったので試行錯誤した記録です。
実行環境 macOS Catalina ver-10.15.6
homebrewを使ってgdbをインストールし、githubから拡張のpedaもインストールしました。
いざ動かそうと思ったらgdbUnable to find Mach task port for process-id 923: (os/kern) failure (0x5). (please check gdb is codesigned - see taskgated(8))という文字が。
gdbにコード署名をしないと使えないようです。コード署名をする (参考ページhttps://sira.dev/2019/09/17/macos-gdb-codesign.html )
まず参考ページにある通りに自己署名証明書を作りました。
「最後に,作成した証明書を選択し,”When using this certificate” を “Always Trust” に変更する.」という部分がわからなかったのですが、(https://www.ssk.or.jp/seikyushiharai/rezept/iryokikan/download/index.files/tejunsyo_m.pdf )に書いてありました。次にコード署名ですが
zsh$ sudo codesign -fs gdb-cert $(which gdb)で簡単にできました。
実はこれだけでは
gdbDuring startup program terminated with signal ?, Unknown signalと出て正常に動作しません。
そこで.gdbinitにset startup-with-shell offと書き込みます。
zsh$ echo "set startup-with-shell off" >> ~/.gdbinit.gdbinitはgdbの初期化スクリプトファイルで起動時に定型コマンドを自動で実行できるとのこと。
pedaをインストールすれば勝手にできていますし、なければホームディレクトリに作ればよいです。
これで、gdbが動くようになりました。(頭にsudoをつけないとコード署名されてない判定になって動きません。)pedaを入れている場合はノーマルなgdbを起動するときに
zsh$ sudo gdb --nxと打つことになると思いますが、これは.gdbinitを無視することでpedaに切り替えないようにしています。
そのためgdbを起動したのち、gdbset startup-with-shell offと打ち込まないと正常に動作しません。
まとめ
参考ページにはCatalinaではgdbは正常に動かない問題があるとのことでしたが、ちゃんと動きました。
結果的に解決しましたが、面倒臭かったので、ubuntuを使うのをお勧めします。
- 投稿日:2020-08-09T14:10:06+09:00
Mac セットアップ(4)
- 投稿日:2020-08-09T14:03:55+09:00
Mac セットアップ(4)
Haskellインストール
ghcupを使用してghcとcabal-installをインストールことが推奨されているのでこちらをインストールする。
ghcup
YES
https://www.haskell.org/ghcup/curl --proto '=https' --tlsv1.2 -sSf https://get-ghcup.haskell.org | shログ
Welcome to Haskell!

This script will download and install the following binaries:
  * ghcup - The Haskell toolchain installer (for managing GHC/cabal versions)
  * ghc   - The Glasgow Haskell Compiler
  * cabal - The Cabal build tool

ghcup installs only into the following directory, which can be removed anytime:
  /Users/rouc/.ghcup

Press ENTER to proceed or ctrl-c to abort.
Note that this script can be re-run at any given time.


  % Total    % Received % Xferd  Average Speed   Time    Time     Time  Current
                                 Dload  Upload   Total   Spent    Left  Speed
100 7921k  100 7921k    0     0  4171k      0  0:00:01  0:00:01 --:--:-- 4169k
[ Info  ] Upgrading GHCup...
[ Warn  ] No GHCup update available

System requirements
  Note: On OS X, in the course of running ghcup you will be given a dialog box to install the command line tools. Accept and the requirements will be installed for you. You will then need to run the command again.

Press ENTER to proceed or ctrl-c to abort.
Installation may take a while.


[ Info  ] downloading: https://downloads.haskell.org/~ghc/8.8.4/ghc-8.8.4-x86_64-apple-darwin.tar.xz
  % Total    % Received % Xferd  Average Speed   Time    Time     Time  Current
                                 Dload  Upload   Total   Spent    Left  Speed
100  181M  100  181M    0     0  14.3M      0  0:00:12  0:00:12 --:--:-- 12.0M
[ Info  ] verifying digest of: ghc-8.8.4-x86_64-apple-darwin.tar.xz
[ Info  ] Unpacking: ghc-8.8.4-x86_64-apple-darwin.tar.xz to /var/folders/w3/3ff4d6l96xqbrm31fw8g17nm0000gn/T/ghcup-E795Eq
[ Info  ] Installing GHC (this may take a while)
[ Info  ] GHC installation successful
[ Warn  ] New GHC version available: 8.10.1. To upgrade, run 'ghcup install ghc 8.10.1'
[ Info  ] GHC 8.8.4 successfully set as default version
[ Warn  ] New GHC version available: 8.10.1. To upgrade, run 'ghcup install ghc 8.10.1'
[ Info  ] downloading: https://downloads.haskell.org/~cabal/cabal-install-3.2.0.0/cabal-install-3.2.0.0-x86_64-apple-darwin17.7.0.tar.xz
  % Total    % Received % Xferd  Average Speed   Time    Time     Time  Current
                                 Dload  Upload   Total   Spent    Left  Speed
100 3269k  100 3269k    0     0  9008k      0 --:--:-- --:--:-- --:--:-- 9008k
[ Info  ] verifying digest of: cabal-install-3.2.0.0-x86_64-apple-darwin17.7.0.tar.xz
[ Info  ] Unpacking: cabal-install-3.2.0.0-x86_64-apple-darwin17.7.0.tar.xz to /var/folders/w3/3ff4d6l96xqbrm31fw8g17nm0000gn/T/ghcup-RDRUWd
[ Info  ] Installing cabal
[ Info  ] Cabal installation successful
Config file path source is default config file.
Config file /Users/rouc/.cabal/config not found.
Writing default configuration to /Users/rouc/.cabal/config
Downloading the latest package list from hackage.haskell.org

Installation done!

In order to run ghc and cabal, you need to adjust your PATH variable.
You may want to source '/Users/rouc/.ghcup/env' in your shell
configuration to do so (e.g. ~/.bashrc).

Detected zsh shell on your system...
If you want ghcup to automatically add the required PATH variable to "/Users/rouc/.zshrc"
answer with YES, otherwise with NO and press ENTER.
Haskell本体
https://docs.haskellstack.org/en/stable/README/
curl -sSL https://get.haskellstack.org/ | shログ
Using generic bindist...

  % Total    % Received % Xferd  Average Speed   Time    Time     Time  Current
                                 Dload  Upload   Total   Spent    Left  Speed
  0     0    0     0    0     0      0      0 --:--:-- --:--:-- --:--:--     0
100   640  100   640    0     0    574      0  0:00:01  0:00:01 --:--:--  625k
100 7828k  100 7828k    0     0  1865k      0  0:00:04  0:00:04 --:--:-- 3711k
Installing Stack to: /usr/local/bin/stack...

-------------------------------------------------------------------------------

Stack has been installed to: /usr/local/bin/stack

NOTE: You may need to run 'xcode-select --install' and/or
      'open /Library/Developer/CommandLineTools/Packages/macOS_SDK_headers_for_macOS_10.14.pkg'
      to set up the Xcode command-line tools, which Stack uses.

WARNING: '/Users/rouc/.local/bin' is not on your PATH.
    For best results, please add it to the beginning of PATH in your profile.
追記
よくわからないが、こちらでインストールbrew install ghc cabal-install stackこちらで対話モードで実行できる。
stack exec ghci
- 投稿日:2020-08-09T13:44:35+09:00
Mac セットアップ(3)
Reactインストール
https://itsakura.com/react-hello
npm install -g create-react-appElixirインストール
https://elixir-lang.jp/install.html
brew install elixirログ
Updating Homebrew...
==> Auto-updated Homebrew!
Updated 1 tap (homebrew/core).
==> Updated Formulae
Updated 1 formula.

==> Downloading https://homebrew.bintray.com/bottles/openssl%401.1-1.1.1g.catalina.bottle.tar.gz
==> Downloading from https://d29vzk4ow07wi7.cloudfront.net/1926679569c6af5337de812d86f4dad2b21ff883ad3a5d2cd9e8836ac5ac7ffe?response-content-disposition=attachment%3Bfilename%3D%22openssl%401.1-1.1.
######################################################################## 100.0%
==> Downloading https://homebrew.bintray.com/bottles/jpeg-9d.catalina.bottle.tar.gz
==> Downloading from https://d29vzk4ow07wi7.cloudfront.net/8f7b82a952fb3937889c7f22da1403e5338cd320495917eb26b0c5b2e614791c?response-content-disposition=attachment%3Bfilename%3D%22jpeg-9d.catalina.b
######################################################################## 100.0%
==> Downloading https://homebrew.bintray.com/bottles/libpng-1.6.37.catalina.bottle.tar.gz
==> Downloading from https://d29vzk4ow07wi7.cloudfront.net/c8e74da602c21f978cd7ee3d489979b4fc6681e71f678a1d99012943ee3a909f?response-content-disposition=attachment%3Bfilename%3D%22libpng-1.6.37.cata
######################################################################## 100.0%
==> Downloading https://homebrew.bintray.com/bottles/libtiff-4.1.0.catalina.bottle.tar.gz
==> Downloading from https://d29vzk4ow07wi7.cloudfront.net/449bd9123e73e4c4eab85b77322d769cc9df0f6adab05e9b9319b012d1215a68?response-content-disposition=attachment%3Bfilename%3D%22libtiff-4.1.0.cata
######################################################################## 100.0%
==> Downloading https://homebrew.bintray.com/bottles/wxmac-3.0.5.1_1.catalina.bottle.tar.gz
==> Downloading from https://d29vzk4ow07wi7.cloudfront.net/110aa0b2134d8bff1647de0cd8500f160133794b347f789bba3e1894b991b788?response-content-disposition=attachment%3Bfilename%3D%22wxmac-3.0.5.1_1.ca
######################################################################## 100.0%
==> Downloading https://homebrew.bintray.com/bottles/erlang-23.0.3.catalina.bottle.tar.gz
==> Downloading from https://d29vzk4ow07wi7.cloudfront.net/cc5b720aa2ef96e1d4f29620f2cc1243008bf450ef6451140ab6ab0679877916?response-content-disposition=attachment%3Bfilename%3D%22erlang-23.0.3.cata
######################################################################## 100.0%
==> Downloading https://homebrew.bintray.com/bottles/elixir-1.10.4.catalina.bottle.tar.gz
==> Downloading from https://d29vzk4ow07wi7.cloudfront.net/ed5f1be4059b41113c35f0a3ae1f01ae5042b143869d22457428507c4a976812?response-content-disposition=attachment%3Bfilename%3D%22elixir-1.10.4.cata
######################################################################## 100.0%
==> Installing dependencies for elixir: openssl@1.1, jpeg, libpng, libtiff, wxmac and erlang
==> Installing elixir dependency: openssl@1.1
==> Pouring openssl@1.1-1.1.1g.catalina.bottle.tar.gz
==> Caveats
A CA file has been bootstrapped using certificates from the system
keychain. To add additional certificates, place .pem files in
  /usr/local/etc/openssl@1.1/certs

and run
  /usr/local/opt/openssl@1.1/bin/c_rehash

openssl@1.1 is keg-only, which means it was not symlinked into /usr/local,
because macOS provides LibreSSL.

If you need to have openssl@1.1 first in your PATH run:
  echo 'export PATH="/usr/local/opt/openssl@1.1/bin:$PATH"' >> ~/.zshrc

For compilers to find openssl@1.1 you may need to set:
  export LDFLAGS="-L/usr/local/opt/openssl@1.1/lib"
  export CPPFLAGS="-I/usr/local/opt/openssl@1.1/include"

==> Summary
?  /usr/local/Cellar/openssl@1.1/1.1.1g: 8,059 files, 18MB
==> Installing elixir dependency: jpeg
==> Pouring jpeg-9d.catalina.bottle.tar.gz
?  /usr/local/Cellar/jpeg/9d: 21 files, 775.2KB
==> Installing elixir dependency: libpng
==> Pouring libpng-1.6.37.catalina.bottle.tar.gz
?  /usr/local/Cellar/libpng/1.6.37: 27 files, 1.2MB
==> Installing elixir dependency: libtiff
==> Pouring libtiff-4.1.0.catalina.bottle.tar.gz
?  /usr/local/Cellar/libtiff/4.1.0: 247 files, 3.7MB
==> Installing elixir dependency: wxmac
==> Pouring wxmac-3.0.5.1_1.catalina.bottle.tar.gz
?  /usr/local/Cellar/wxmac/3.0.5.1_1: 810 files, 23.0MB
==> Installing elixir dependency: erlang
==> Pouring erlang-23.0.3.catalina.bottle.tar.gz
==> Caveats
Man pages can be found in:
  /usr/local/opt/erlang/lib/erlang/man

Access them with `erl -man`, or add this directory to MANPATH.
==> Summary
?  /usr/local/Cellar/erlang/23.0.3: 7,949 files, 466.9MB
==> Installing elixir
==> Pouring elixir-1.10.4.catalina.bottle.tar.gz
?  /usr/local/Cellar/elixir/1.10.4: 430 files, 5.9MB
==> Caveats
==> openssl@1.1
A CA file has been bootstrapped using certificates from the system
keychain. To add additional certificates, place .pem files in
  /usr/local/etc/openssl@1.1/certs

and run
  /usr/local/opt/openssl@1.1/bin/c_rehash

openssl@1.1 is keg-only, which means it was not symlinked into /usr/local,
because macOS provides LibreSSL.

If you need to have openssl@1.1 first in your PATH run:
  echo 'export PATH="/usr/local/opt/openssl@1.1/bin:$PATH"' >> ~/.zshrc

For compilers to find openssl@1.1 you may need to set:
  export LDFLAGS="-L/usr/local/opt/openssl@1.1/lib"
  export CPPFLAGS="-I/usr/local/opt/openssl@1.1/include"

==> erlang
Man pages can be found in:
  /usr/local/opt/erlang/lib/erlang/man

Access them with `erl -man`, or add this directory to MANPATH.
- 投稿日:2020-08-09T13:28:40+09:00
Mac セットアップ(2)
コマンドラインインストール
brew
/bin/bash -c "$(curl -fsSL https://raw.githubusercontent.com/Homebrew/install/master/install.sh)"途中でXCodeのインストール確認があるのでEnterを押す
Node
nodebrewでバージョンを管理したい
brew install nodebrew途中経過
Updating Homebrew...
==> Auto-updated Homebrew!
Updated 1 tap (homebrew/core).
==> New Formulae
osm
==> Updated Formulae
Updated 10 formulae.

==> Downloading https://github.com/hokaccha/nodebrew/archive/v1.0.1.tar.gz
==> Downloading from https://codeload.github.com/hokaccha/nodebrew/tar.gz/v1.0.1
######################################################################## 100.0%
==> Caveats
You need to manually run setup_dirs to create directories required by nodebrew:
  /usr/local/opt/nodebrew/bin/nodebrew setup_dirs

Add path:
  export PATH=$HOME/.nodebrew/current/bin:$PATH

To use Homebrew's directories rather than ~/.nodebrew add to your profile:
  export NODEBREW_ROOT=/usr/local/var/nodebrew

Bash completion has been installed to:
  /usr/local/etc/bash_completion.d

zsh completions have been installed to:
  /usr/local/share/zsh/site-functions
==> Summary
?  /usr/local/Cellar/nodebrew/1.0.1: 8 files, 38.6KB, built in 2 seconds
インストールできたか確認
nodebrew -v(成功した場合の)結果
nodebrew 1.0.1

Usage:
    nodebrew help                         Show this message
    nodebrew install <version>            Download and install <version> (from binary)
    nodebrew compile <version>            Download and install <version> (from source)
    nodebrew install-binary <version>     Alias of `install` (For backword compatibility)
    nodebrew uninstall <version>          Uninstall <version>
    nodebrew use <version>                Use <version>
    nodebrew list                         List installed versions
    nodebrew ls                           Alias for `list`
    nodebrew ls-remote                    List remote versions
    nodebrew ls-all                       List remote and installed versions
    nodebrew alias <key> <value>          Set alias
    nodebrew unalias <key>                Remove alias
    nodebrew clean <version> | all        Remove source file
    nodebrew selfupdate                   Update nodebrew
    nodebrew migrate-package <version>    Install global NPM packages contained in <version> to current version
    nodebrew exec <version> -- <command>  Execute <command> using specified <version>

Example:
    # install
    nodebrew install v8.9.4

    # use a specific version number
    nodebrew use v8.9.4
zshにパスを追加
vi ~/.zsh_profile以下を追加
export PATH=$HOME/.nodebrew/current/bin:$PATHセットアップをしてnodebrewのインストールを完了する
nodebrew setup結果
Fetching nodebrew...
Installed nodebrew in $HOME/.nodebrew

========================================
Export a path to nodebrew:

export PATH=$HOME/.nodebrew/current/bin:$PATH
========================================
Node v10.xをインストール
v10.22.0が最新なので以下のコマンドでインストールする
nodebrew install-binary v10.22.0結果
Fetching: https://nodejs.org/dist/v10.22.0/node-v10.22.0-darwin-x64.tar.gz
############################################################################################################################################################################################### 100.0%
Installed successfully
rouc@roucnombp ~ %
インストールできたか確認
nodebrew ls結果
v10.22.0

current: none
スイッチする
nodebrew use v10.22.0スイッチされたか確認
nodebrew ls結果
v10.22.0

current: v10.22.0 ## <<<--- 現在どのバージョンが使われているかが表示されている
- 投稿日:2020-08-09T09:58:36+09:00
Mac セットアップ(1)
新たにMacBook Pro 16インチを購入したのでその時のセットアップメモ
Install Apps
- Karabiner-Element
- iterm
- XCode
- Clipy
- VSCode
- Intellij
- Line
- Rectangle
- JustFocus
- カスペルスキー
- google IME
zsh 設定
こちらを参照
https://qiita.com/guuuuuchan/items/fe1d8c8889a9332fbd66
vi 設定
こちらを参照
https://qiita.com/guuuuuchan/items/6207387ee0b3db9e749c
git 設定
こちらを参照
- 投稿日:2020-08-09T03:38:51+09:00
Mac ruby 2.0.0におけるDEFAULT_CERT_FILEのディレクトリ情報
過去記事でopenssl、curl、rubyをソースビルド、インストールしたMacとは別のMacがある。
MacOSX 10.11はhomebrewが動作するが削除し概ねクリーンにした。ruby 2.0.0に戻る。すると
$ ruby -ropenssl -e "p OpenSSL::X509::DEFAULT_CERT_FILE"
"/System/Library/OpenSSL/cert.pem"OpenSSL $ ls -la
total 8
drwxr-xr-x 6 root wheel 204B 2 5 2016 .
drwxr-xr-x 82 root wheel 2.7K 8 28 2018 ..
drwxr-xr-x 2 root wheel 68B 2 5 2016 certs
drwxr-xr-x 8 root wheel 272B 2 5 2016 misc
-rw-r--r-- 1 root wheel 9.2K 2 5 2016 openssl.cnf
drwxr-xr-x 2 root wheel 68B 2 5 2016 private
OpenSSL $ cd certs
certs $ ls -la
total 0
drwxr-xr-x 2 root wheel 68B 2 5 2016 .
drwxr-xr-x 6 root wheel 204B 2 5 2016 ..
certs $以上、メモ書き。
- 投稿日:2020-08-09T00:32:14+09:00
docker-compose up でエラーが発生した話
目的
- dockerのコンテナを起動しようとした時にエラーが発生し解決した話をまとめる
実施環境
- 下記の方法でDocker Desktop for Macをインストールした。
問題までの経緯
dockerファイルが存在するディレクトリに移動し下記コマンドを実行してコンテナの起動を試みた。
$ docker-compose up -d問題
下記のエラーが発生した。
ERROR: for コンテナ名  Cannot start service php: Ports are not available: listen tcp 0.0.0.0:80: bind: address already in use

ERROR: for php  Cannot start service php: Ports are not available: listen tcp 0.0.0.0:80: bind: address already in use
ERROR: Encountered errors while bringing up the project.
解決までの経緯
下記コマンドを実行して使用されているポートを調べた。apacheが動いている様である。
$ sudo lsof -i -P | grep ":80"
> httpd      339            _www    4u  IPv6 0x666e8ad53dfbd5c3      0t0  TCP *:80 (LISTEN)
下記コマンドを実行してhttpdを止めようとした。(皆さんは下記コマンドでhttpdを止められるはずである。)
$ sudo service httpd restart先のコマンドを実行したがhttpdはすでに停止している旨の出力が得られた。
Macローカルのhttpdは現在使用しておらず強制停止しても問題ないこと、Dockerのコンテナ起動を急いでいたことから下記コマンドを実行してヒットしたプロセスをkillした。
$ kill -l 339下記コマンドを実行したら正常にコンテナが起動した。
$ docker-compose up -d
