- 投稿日:2020-04-30T23:30:08+09:00
Reactチュートリアルをやってみて
■ やってみたこと
- Reactチュートリアル
- 五目並べを作りつながらReactを学んでいくチュートリアル
- チュートリアルの最終結果 に少し手を加えた。
- 各componentをファイルに分割
- React Hooks を使うように変更
- Jest, Enzymeでテストを実装
- コードはここに置いてあります https://github.com/ckona/tic-tac-toe-with-react
■ チュートリアルの最終結果
function Square(props) {
  return (
    <button className="square" onClick={props.onClick}>
      {props.value}
    </button>
  );
}

class Board extends React.Component {
  renderSquare(i) {
    return (
      <Square
        value={this.props.squares[i]}
        onClick={() => this.props.onClick(i)}
      />
    );
  }

  render() {
    return (
      <div>
        <div className="board-row">
          {this.renderSquare(0)}
          {this.renderSquare(1)}
          {this.renderSquare(2)}
        </div>
        <div className="board-row">
          {this.renderSquare(3)}
          {this.renderSquare(4)}
          {this.renderSquare(5)}
        </div>
        <div className="board-row">
          {this.renderSquare(6)}
          {this.renderSquare(7)}
          {this.renderSquare(8)}
        </div>
      </div>
    );
  }
}

class Game extends React.Component {
  constructor(props) {
    super(props);
    this.state = {
      history: [
        {
          squares: Array(9).fill(null)
        }
      ],
      stepNumber: 0,
      xIsNext: true
    };
  }

  handleClick(i) {
    const history = this.state.history.slice(0, this.state.stepNumber + 1);
    const current = history[history.length - 1];
    const squares = current.squares.slice();
    if (calculateWinner(squares) || squares[i]) {
      return;
    }
    squares[i] = this.state.xIsNext ? "X" : "O";
    this.setState({
      history: history.concat([
        {
          squares: squares
        }
      ]),
      stepNumber: history.length,
      xIsNext: !this.state.xIsNext
    });
  }

  jumpTo(step) {
    this.setState({
      stepNumber: step,
      xIsNext: (step % 2) === 0
    });
  }

  render() {
    const history = this.state.history;
    const current = history[this.state.stepNumber];
    const winner = calculateWinner(current.squares);

    const moves = history.map((step, move) => {
      const desc = move ?
        'Go to move #' + move :
        'Go to game start';
      return (
        <li key={move}>
          <button onClick={() => this.jumpTo(move)}>{desc}</button>
        </li>
      );
    });

    let status;
    if (winner) {
      status = "Winner: " + winner;
    } else {
      status = "Next player: " + (this.state.xIsNext ? "X" : "O");
    }

    return (
      <div className="game">
        <div className="game-board">
          <Board
            squares={current.squares}
            onClick={i => this.handleClick(i)}
          />
        </div>
        <div className="game-info">
          <div>{status}</div>
          <ol>{moves}</ol>
        </div>
      </div>
    );
  }
}

// ========================================

ReactDOM.render(<Game />, document.getElementById("root"));

function calculateWinner(squares) {
  const lines = [
    [0, 1, 2],
    [3, 4, 5],
    [6, 7, 8],
    [0, 3, 6],
    [1, 4, 7],
    [2, 5, 8],
    [0, 4, 8],
    [2, 4, 6]
  ];
  for (let i = 0; i < lines.length; i++) {
    const [a, b, c] = lines[i];
    if (squares[a] && squares[a] === squares[b] && squares[a] === squares[c]) {
      return squares[a];
    }
  }
  return null;
}
■ 最終的にファイル分割して、React Hooks を使うようにしたVer
/src/index.jsをGameコンポーネントの呼び出しをするだけに。/src/components/ディレクトリを切り、そこに各コンポーネントを移動する。- classコンポーネントをやめて、React Hooks を使ってみる
- thisが無くなるので見やすくなりますね。
index.js
import React from 'react';
import ReactDOM from 'react-dom';

import './index.css';
import Game from './components/Game';

ReactDOM.render(
  <Game />,
  document.getElementById('root')
);
Square
import React from 'react';

const Square = props => (
  <button className="square" onClick={props.onClick}>
    {props.value}
  </button>
);

export default Square;
Board
import React from 'react';
import Square from './Square';

const Board = props => {
  const renderSquare = i => (
    <Square
      value={props.squares[i]}
      onClick={() => props.onClick(i)}
    />
  );

  return (
    <div>
      <div className="board-row">
        {renderSquare(0)}
        {renderSquare(1)}
        {renderSquare(2)}
      </div>
      <div className="board-row">
        {renderSquare(3)}
        {renderSquare(4)}
        {renderSquare(5)}
      </div>
      <div className="board-row">
        {renderSquare(6)}
        {renderSquare(7)}
        {renderSquare(8)}
      </div>
    </div>
  );
};

export default Board;
Game
import React, { useState } from 'react';
import Board from './Board';

const Game = () => {
  const [history, setHistory] = useState([{squares: Array(9).fill(null)}]);
  const [stepNumber, setStepNumber] = useState(0);
  const [xIsNext, setXIsNext] = useState(true);

  const handleClick = i => {
    const _history = history.slice(0, stepNumber + 1);
    const current = _history[_history.length - 1];
    const squares = current.squares.slice();
    if (calculateWinner(squares) || squares[i]) {
      return;
    }
    squares[i] = xIsNext ? 'X' : 'O';
    setHistory(_history.concat([{squares: squares,}]));
    setStepNumber(_history.length);
    setXIsNext(!xIsNext);
  };

  const jumpTo = step => {
    setStepNumber(step);
    setXIsNext((step % 2) === 0);
  };

  const current = history[stepNumber];

  const moves = history.map((step, move) => {
    const desc = move ?
          'Go to move #' + move :
          'Go to game start';
    return (
      <li key={move}>
        <button onClick={() => jumpTo(move)}>{desc}</button>
      </li>
    );
  });

  const status = () => {
    const winner = calculateWinner(current.squares);
    if (winner) {
      return 'Winner: ' + winner;
    } else {
      return 'Next player: ' + (xIsNext ? 'X' : 'O');
    }
  };

  const calculateWinner = squares => {
    const lines = [
      [0, 1, 2],
      [3, 4, 5],
      [6, 7, 8],
      [0, 3, 6],
      [1, 4, 7],
      [2, 5, 8],
      [0, 4, 8],
      [2, 4, 6]
    ];
    for (let i = 0; i < lines.length; i++) {
      const [a, b, c] = lines[i];
      if (squares[a] && squares[a] === squares[b] && squares[a] === squares[c]) {
        return squares[a];
      }
    }
    return null;
  };

  return (
    <div className="game">
      <div className="game-board">
        <Board
          squares={current.squares}
          onClick={(i) => handleClick(i)}
        />
      </div>
      <div className="game-info">
        <div>{status()}</div>
        <ol>{moves}</ol>
      </div>
    </div>
  );
};

export default Game;
■ Jest, Enzyme でテストを実装
準備
必要なライブラリ
- jest
- enzyme
- enzyme-adapter-react-16
- react-test-renderer
最新のVerを下記コマンドで調べて、yarn addで追加する
e.g.
$ npm info jest
$ yarn add --dev jest@25.4.0
最終的な package.json
  "devDependencies": {
    "enzyme": "3.11.0",
    "enzyme-adapter-react-16": "1.15.2",
    "jest": "25.4.0",
    "react-test-renderer": "16.13.1"
  }
テストコードを書くまで
/src直下に以下のようなファイルを作る。
create react app で作成したプロジェクトの場合、ここに置けば自動で読み込んでくれる。
それ以外の場合は、package.json?あたりにsetupFileのパスを設定してあげれば良いと思う。ref.
- https://github.com/enzymejs/enzyme/issues/1265#issuecomment-336740161
- https://github.com/enzymejs/enzyme/issues/1265#issuecomment-336872722/src/setupTests.js
import { configure } from 'enzyme';
import Adapter from 'enzyme-adapter-react-16';

configure({ adapter: new Adapter() });
テストコードを書く場所
テストコードは、テストしたいコンポーネントがあるディレクトリに
__tests__ディレクトリを切り、その中に作成する。
具体的には下記のような感じに配置する。├── components │ ├── Board.jsx │ ├── Game.jsx │ ├── Square.jsx │ └── __tests__ │ ├── Board.test.jsx │ ├── Game.test.jsx │ └── Square.test.jsx ├── index.css ├── index.js └── setupTests.js実際のテストコード
Squareコンポーネントを例に取る。
Ruby の Rspec を書いたことがある人であれば、すんなり理解できると思う。Square
import React from 'react';

// shallow関数は、引数に渡されたReactコンポーネントのみをテストするために使う。
import { shallow } from 'enzyme';

import Square from '../Square';

describe('<Square />', () => {
  const propsValue = 'sample text';

  // mock関数
  const onClickFunction = jest.fn();
  const props = {
    value: propsValue,
    onClick: onClickFunction,
  };

  // こうすることでテストのための便利な関数等が使えるようになる
  const wrapper = shallow(<Square {...props} />);

  it('text is equal props value.', () => {
    expect(wrapper.text()).toEqual(propsValue);
  });

  it('when click, onClick function is called.', () => {
    // コンポーネントをクリックする
    wrapper.simulate('click');

    // onClickFunctionが呼ばれることを確認する
    expect(onClickFunction).toBeCalled();
  });
});
console.log(wrapper.debug())で中身が見れるので、うまくテストが通らないとき等に使うと良い
- styled-component を使用すると、指定した名前と変わってしまっていることがある。
最後に
- 冒頭でもリンクを載せたが、そんなこんなで最終的に出来上がったコードがこちら
- チュートリアル終わった後でも色々とやれることはあるなー。
参考
- 投稿日:2020-04-30T22:45:09+09:00
【React】大きなフォームの値管理
Reactでの状態管理は主にstateを用いて行います。
フォームにインプットされた値をstateで管理することで、リアルタイムにバリデーションを行ったりすることができます。しかし大きなフォームとなってくると、stateの記述量がかなり大きくなっていきます。
巨大なフォームをクリーンに管理するには、いくつか方法があります。stateでフォームを管理する
以下はユーザー情報を入力するフォームの例です。
各フォームの値をstateで管理しています。const StateForm: React.FC = () => { const [name, setName] = useState(""); const [email, setEmail] = useState(""); const [zipCode, setZipCode] = useState(""); const [country, setCountry] = useState(""); const [city, setCity] = useState(""); const [address, setAddress] = useState(""); return ( <div className="form"> <Input label="name" onChange={(e: React.ChangeEvent<HTMLInputElement>) => setName(e.target.value)} /> <Input label="email" onChange={(e: React.ChangeEvent<HTMLInputElement>) => setEmail(e.target.value)} /> <Input label="zipCode" onChange={(e: React.ChangeEvent<HTMLInputElement>) => setZipCode(e.target.value)} /> <Input label="country" onChange={(e: React.ChangeEvent<HTMLInputElement>) => setCountry(e.target.value)} /> <Input label="city" onChange={(e: React.ChangeEvent<HTMLInputElement>) => setCity(e.target.value)} /> <Input label="address" onChange={(e: React.ChangeEvent<HTMLInputElement>) => setAddress(e.target.value)} /> </div> ); };現実でこの方法でフォームの値管理をする際、フォームのバリデーションエラー等の状態を管理するため、
エラーの状態を格納するstateが必要になってきます。エラーメッセージもstateで持ったりすると・・・かなり大変です。const StateForm: React.FC = () => { const [name, setName] = useState(""); const [nameIsError, setNameIsError] = useState(false) const [email, setEmail] = useState(""); const [emailIsError, setEmailIsError] = useState(false) // 略 };stateを大きなオブジェクトとして管理する
先ほどの問題を解消するため、state自体を大きなオブジェクトにできないかと考えるようになります。
これは、更新関数をすこし工夫すれば、実現可能です。
useStateの更新関数は、stateを丸ごと上書きするため、スプレッド構文等を利用して、専用の更新関数を用意します。type FormState = { name: string; email: string; zipCode: string; country: string; city: string; address: string; }; const initialFormState: FormState = { name: "", email: "", zipCode: "", country: "", city: "", address: "", }; const ObjectStateForm: React.FC = () => { const [formState, setFormState] = useState(initialFormState); const setState = (value: Partial<FormState>) => { setFormState({ ...formState, ...value, }); }; const inputCallback = { name: (e: React.ChangeEvent<HTMLInputElement>) => setState({ name: e.target.value }), email: (e: React.ChangeEvent<HTMLInputElement>) => setState({ email: e.target.value }), zipCode: (e: React.ChangeEvent<HTMLInputElement>) => setState({ zipCode: e.target.value }), country: (e: React.ChangeEvent<HTMLInputElement>) => setState({ country: e.target.value }), city: (e: React.ChangeEvent<HTMLInputElement>) => setState({ city: e.target.value }), address: (e: React.ChangeEvent<HTMLInputElement>) => setState({ address: e.target.value }), }; return ( <div className="form"> <Input label="name" onChange={inputCallback.name} /> <Input label="email" onChange={inputCallback.email} /> <Input label="zipCode" onChange={inputCallback.zipCode} /> <Input label="country" onChange={inputCallback.country} /> <Input label="city" onChange={inputCallback.country} /> <Input label="address" onChange={inputCallback.address} /> </div> ); };エラー等も管理する場合、同様の方法でstateを管理できるので先ほどに比べてかなり簡潔になりました。
値の更新のみであれば、この方法でも問題なく行えます。useReducerでフォームの値を管理
useReducerを用いて、同様の管理を行えます。エラーと値を同じオブジェクトで管理します。
Actionのtypeやreducerを別ファイルで管理します。type FormValue = { name: string; email: string; zipCode: string; country: string; city: string; address: string; }; type ErrorValue = { [key in keyof FormValue]?: boolean; }; export type FormState = { value: FormValue; error: ErrorValue; }; type Action = | { type: "update"; value: Partial<FormValue>; } | { type: "error"; error: Partial<ErrorValue>; }; export const initialFormState: FormState = { value: { name: "", email: "", zipCode: "", country: "", city: "", address: "", }, error: { name: false, email: false, zipCode: false, country: false, city: false, address: false, }, }; // reducer // stateとactionを受け取ってstateを返す純粋な関数 export const reducer = (state: FormState, action: Action): FormState => { switch (action.type) { case "update": { return { ...state, value: { ...state.value, ...action.value, }, }; } case "error": { return { ...state, error: { ...state.error, ...action.error, }, }; } } };const ReducerForm: React.FC = () => { const [formState, dispatch] = useReducer(reducer, initialFormState); const handleInput = { name: (e: React.ChangeEvent<HTMLInputElement>) => dispatch({ type: "update", value: { name: e.target.value } }), email: (e: React.ChangeEvent<HTMLInputElement>) => dispatch({ type: "update", value: { email: e.target.value } }), zipCode: (e: React.ChangeEvent<HTMLInputElement>) => dispatch({ type: "update", value: { zipCode: e.target.value } }), country: (e: React.ChangeEvent<HTMLInputElement>) => dispatch({ type: "update", value: { country: e.target.value } }), city: (e: React.ChangeEvent<HTMLInputElement>) => dispatch({ type: "update", value: { city: e.target.value } }), address: (e: React.ChangeEvent<HTMLInputElement>) => dispatch({ type: "update", value: { address: e.target.value } }) }; return ( <div className="form"> <Input label="name" onChange={handleInput.name} /> <Input label="email" onChange={handleInput.email} /> <Input label="zipCode" onChange={handleInput.zipCode} /> <Input label="country" onChange={handleInput.country} /> <Input label="city" onChange={handleInput.city} /> <Input label="address" onChange={handleInput.address} /> </div> ); };この方法で値管理をする利点は、公式リファレンスに記述されている通りです。
通常、useReducer が useState より好ましいのは、複数の値にまたがる複雑な state ロジックがある場合や、前の state に基づいて次の state を決める必要がある場合です。また、useReducer を使えばコールバックの代わりに dispatch を下位コンポーネントに渡せるようになるため、複数階層にまたがって更新を発生させるようなコンポーネントではパフォーマンスの最適化にもなります。
複数stateを参照してstateを更新する場合、パフォーマンス部分を気にする場合に利点があるとのこと。
私が身近に恩恵を感じるのは、期待する動作が増えた場合だと思います。
フォームをクリアする、他のフォームの値を参照して値を埋める・・・等の実装をView(コンポーネント)側に記述しなくてよいというのは大きな利点です。
また、stateのオブジェクトの階層が増えてきた場合も活躍します。
- 投稿日:2020-04-30T21:09:20+09:00
[第4章:Gatsbyにおけるデータの扱い方 編] Gatsby公式ドキュメントを翻訳してみた。
はじめに
このシリーズでは、英語ソースばかりで「Gatsby使ってみたいけど、よくわからない...」という方々のために、公式Docを翻訳(ところどころざっくり要約)していきます。
実際の公式ドキュメントはこちら
(この章では、GraphQLの概要を理解して実際にサイト内の情報を取得・表示させることがゴールです)
〜〜 以下、翻訳となります 〜〜
4. Gatsbyにおけるデータの扱い方
この章では、WordpressやMarkdownファイル、その他CMSなど様々なソースからデータを引っ張ってくることができるGatsbyサイトのデータ構造について学んでいきましょう。
Gatsbyのデータ構造は、GraphQLによって成り立っています。詳しく知りたい方は、こちら(英語)
基本的なことですが、Webサイトは次の4つから成り立っていますよね。
- HTML
- CSS
- JavaScript
- データそれではまず、そのデータについて学びましょう。
データとは?
コンピュータサイエンスっぽく説明すると、「データとは、文字列(
"string")や整数(42)、オブジェクト({ pizza: true})といったような型をもったものの総称」です。しかし、Gatsbyの学習においては、「Reactコンポーネントの外側にあるもの全て」と考えてもらった方がわかりやすいと思います。
この章に進むまで、あなたはコンポーネントの中に直接テキストや画像を書き込んでいました。しかし、自分が作成したコンポーネントの外にある情報やイメージをサイトに表示させたいこともあるでしょう。
例えば、もしWordpressとGatsbyを使用してサイトを作成しているのであれば、投稿した写真やテキストなどのデータを自分の作成したコンポーネントの中に引っ張ってきて表示させることが可能です。
これから学ぶGraphQLを使いこなせば、どんなソースからでも直接コンポーネントにデータを渡して表示できるようになります。
GraphQLがどのようにしてコンポーネントにデータを渡しているのか
データを取得してReactコンポーネントに渡す方法はたくさんあります。その中でも最も有名で人気なのが、このGraphQLです。
GraphQLは、Facebookによって開発されたクエリ(query)言語です。クエリとは、クライアントとサーバー間の通信を行うときに利用されるもので、データベースに直接干渉するために使われます。
Gatsbyは、そのコンポーネントが必要としているデータを宣言するためにこのGraphQLというクエリを使います。
GraphQLは大規模で複雑なサイトにおいて大きな力を発揮します。あなたの作成するサイトが小規模でデータの受け渡しも少ない場合は
createPagesのAPIなど、他の方法を使うことも検討した方がいいかもしれません。GraphQLを使用せずにGatsbyを使用したい場合は、こちら(英語)をご覧ください。サイトを作成してGraphQLを使ってみよう
これから、パンダがたくさんの食べ物を食べている写真や動画を載せる「Pandas Eating Lots」というマークダウン式のブログサイトを作ります。これを通して。GraphQLの技術やGatsbyにおけるマークダウン形式ファイルの使いやすさを実感できることでしょう。
1 . まず、新しくターミナルのタブを開いて次のコマンドを実行します。
gatsby new tutorial-part-four https://github.com/gatsbyjs/gatsby-starter-hello-world
cd tutorial-part-four
2 . 次に、作業中のディレクトリに必要なnpmパッケージをインストールしましょう。Typographyの
"Kirkham"というテーマとCSS-in-JSライブラリの"Emotion"を使います。npm install --save gatsby-plugin-typography typography react-typography typography-theme-kirkham gatsby-plugin-emotion @emotion/core第3章で作成したようなサイトを作ってみましょう。
src/components/layout.js
import React from "react"
import { css } from "@emotion/core"
import { Link } from "gatsby"

import { rhythm } from "../utils/typography"

export default ({ children }) => (
  <div
    css={css`
      margin: 0 auto;
      max-width: 700px;
      padding: ${rhythm(2)};
      padding-top: ${rhythm(1.5)};
    `}
  >
    <Link to={`/`}>
      <h3
        css={css`
          margin-bottom: ${rhythm(2)};
          display: inline-block;
          font-style: normal;
        `}
      >
        Pandas Eating Lots
      </h3>
    </Link>
    <Link
      to={`/about/`}
      css={css`
        float: right;
      `}
    >
      About
    </Link>
    {children}
  </div>
)
src/pages/index.js
import React from "react"
import Layout from "../components/layout"

export default () => (
  <Layout>
    <h1>Amazing Pandas Eating Things</h1>
    <div>
      <img
        src="https://2.bp.blogspot.com/-BMP2l6Hwvp4/TiAxeGx4CTI/AAAAAAAAD_M/XlC_mY3SoEw/s1600/panda-group-eating-bamboo.jpg"
        alt="Group of pandas eating bamboo"
      />
    </div>
  </Layout>
)
src/pages/about.js
import React from "react"
import Layout from "../components/layout"

export default () => (
  <Layout>
    <h1>About Pandas Eating Lots</h1>
    <p>
      We're the only site running on your computer dedicated to showing the best
      photos and videos of pandas eating lots of food.
    </p>
  </Layout>
)
src/utils/typography.js
import Typography from "typography"
import kirkhamTheme from "typography-theme-kirkham"

const typography = new Typography(kirkhamTheme)

export default typography
export const rhythm = typography.rhythm
下記の
gatsby-config.jsは、必ず最上層のディレクトリに設置しましょう。gatsby-config.js
module.exports = {
  plugins: [
    `gatsby-plugin-emotion`,
    {
      resolve: `gatsby-plugin-typography`,
      options: {
        pathToConfigModule: `src/utils/typography`,
      },
    },
  ],
}
上記全てのファイルを追加して、
gatsby developを実行しましょう。このようになっていればOKです。
lauoutコンポーネントと2つのpageコンポーネントをもつサイトが完成しました。それでは、クエリを行なっていきましょう。
GraphQLを使ってみよう
サイトを作成する時、サイトのタイトルなどのように複数ページで繰り返し使いまわしたいデータ(情報やイメージ)が少なからず出てきますよね。例えば、先ほど作成した
/aboutページの中では、layoutコンポーネントのヘッダーの中にあるサイトタイトル(Pandas Eating Lots)がabout.jsの中の<h1/>の中でも使われています。しかし、もし将来あなたがサイトタイトルを変更したいと思ったらどうでしょうか?作ったのが昔であまり覚えていないあなたは、全てのコンポーネントを確認してサイトタイトルを表示している部分を見つけて直したいですか?
そうではなく、そういったデータの保存先を1つだけ用意しておいて必要な時に他のファイルからそのデータを呼び出してコンポーネントの中で表示する形にすれば、探す手間も省けますし、エラーも起きにくくて管理もしやすいです。
Gatsbyサイトでは、タイトルのような一般的なデータは全て
gatsby-config.jsの中のsiteMetadataに保存します。あなたのサイトのタイトルを実際に入れて使ってみましょう。gatsby-config.js
module.exports = {
  siteMetadata: {
    title: `Title from siteMetadata`,
  },
  plugins: [
    `gatsby-plugin-emotion`,
    {
      resolve: `gatsby-plugin-typography`,
      options: {
        pathToConfigModule: `src/utils/typography`,
      },
    },
  ],
}
クエリを実行してみよう
それでは、
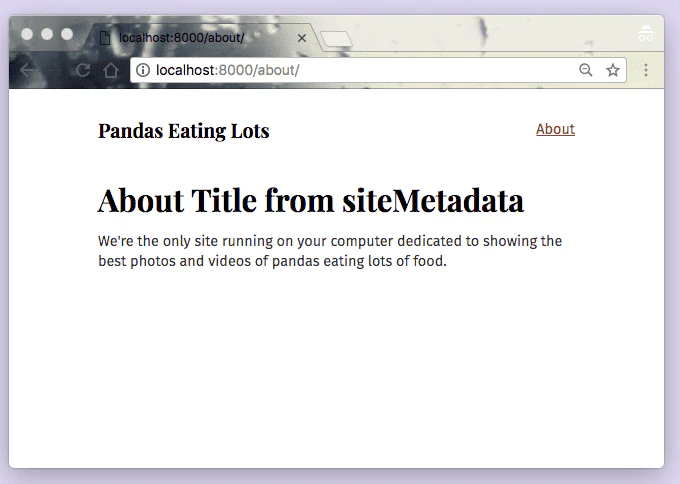
about.jsを下記のように編集して、localhost:8000/aboutにアクセスしてみましょう。src/pages/about.js
import React from "react"
import { graphql } from "gatsby"
import Layout from "../components/layout"

export default ({ data }) => (
  <Layout>
    <h1>About {data.site.siteMetadata.title}</h1>
    <p>
      We're the only site running on your computer dedicated to showing the best
      photos and videos of pandas eating lots of food.
    </p>
  </Layout>
)

export const query = graphql`
  query {
    site {
      siteMetadata {
        title
      }
    }
  }
`
次のように、タイトルがちゃんと表示されましたか?
今回行なったクエリは、以下のGraphQLコードです。
{
  site {
    siteMetadata {
      title
    }
  }
}
これはpageクエリと呼ばれるもので、基本的にpageコンポーネントの最後の方に書かれます。実は、このpageクエリはpageコンポーネントでしか実行することができません。
StaticQueryを使ってみよう
StaticQueryはGatsbyのv2から導入された新しいAPIで、pageコンポーネント以外でも実行することができます。useStaticQueryというものを実際にimportして使ってみましょう。
src/components/layout.jsを以下のように編集してみましょう。src/components/layout.js
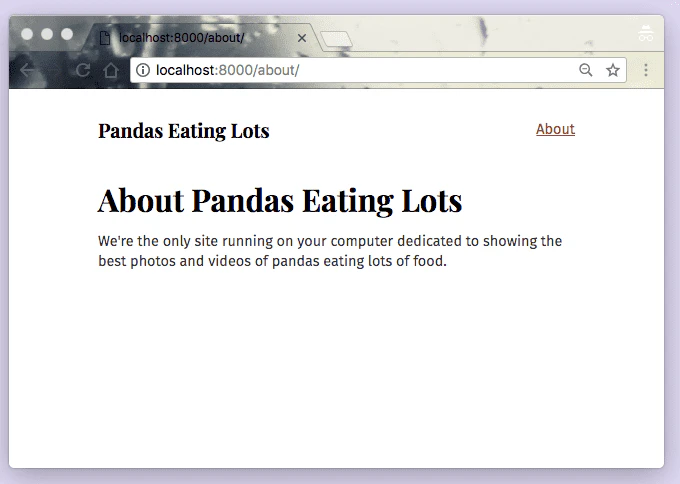
import React from "react"
import { css } from "@emotion/core"
import { useStaticQuery, Link, graphql } from "gatsby"

import { rhythm } from "../utils/typography"
export default ({ children }) => {
  const data = useStaticQuery(
    graphql`
      query {
        site {
          siteMetadata {
            title
          }
        }
      }
    `
  )
  return (
    <div
      css={css`
        margin: 0 auto;
        max-width: 700px;
        padding: ${rhythm(2)};
        padding-top: ${rhythm(1.5)};
      `}
    >
      <Link to={`/`}>
        <h3
          css={css`
            margin-bottom: ${rhythm(2)};
            display: inline-block;
            font-style: normal;
          `}
        >
          {data.site.siteMetadata.title}
        </h3>
      </Link>
      <Link
        to={`/about/`}
        css={css`
          float: right;
        `}
      >
        About
      </Link>
      {children}
    </div>
  )
}
下記のように、layoutコンポーネントにもGraphQLで取得したタイトルが表示されましたか?
とりあえず、今回はpageコンポーネントにしか使えないクエリとそれ以外にも使えるクエリがあるということだけ覚えておいてください。5〜7章でもデータについて学びますし、まだGraphQLの学習は始まったばかりです。
最後に、サイトのタイトルを元の
“Pandas Eating Lots”に戻しておきましょう。gatsby-config.jsの中のtitleを編集するだけです。
お疲れさまでした!
参考文献:Gatsby公式ドキュメント
次の章のテーマは、
「プラグインを活用してGraphQLを使ってみよう」です。お楽しみに!!
[第0章:環境構築編] Gatsby公式ドキュメントを翻訳してみた。
[第1章:Gatsbyサイトの理解 編] Gatsby公式ドキュメントを翻訳してみた。


- 投稿日:2020-04-30T19:10:47+09:00
material-tableでページネーションをサーバーサイドで行いたいwithReduxのひと
こんにちは。あまりにも長いことハマってしまったので備忘録として書いておきます。
material-tableというOSSをとあるプロジェクトで使っていました。
https://material-table.com
ちょっとオプションを書けばこんな感じで簡単なCRUDが実装できるナウでヤングなOSSです。material-uiの公式でもtableで色々やりたいならこれを使えと言われており、サイコーという感じで実装を進めていました。
この実装を進めている過程でハマったポイントを紹介していきたいと思います。
- material-tableは渡ってきたデータを参照を切らない状態でそのまま編集している
- dataについてpromiseを返さないといけない
- createRefでrefをつくってonQueryChangeを叩かないと正しくデータが更新されない
material-tableは渡ってきたデータの参照を切らないまま新しいキーを追加したりする
さて、このmaterial-table、ページネーション機能はついてはおりますがクライアントサイドに渡ったデータでしかページネーションしません。
まあそれは当たり前なので、ページネーションのコンポーネントを何とかしてこちらが実装したサーバサイドにリクエストを飛ばす関数に置き換えたいなと思うわけです。ドキュメントを見ていたら
Component Overrideというまさにというやつがあったので、それを見つつページネーションのコンポーネントを置き換えてみます。<MaterialTable {...other props} data={inputData} // storeから受け取るarrayデータ components={{ Pagination: props => ( <TablePagination {...props} rowsPerPageOptions={[5, 10]} count={totalRowCount} page={page - 1} rowsPerPage={pageNum} onChangePage={(e, _page) => getTableData({ page: _page + 1, pageNum })} onChangeRowsPerPage={event => getTableData({ page, pageNum: event.target.value })} /> ) }} />これで完璧や!ページネーションボタンポチー
... 最初のページは表示できていたのに、急に真っ白になってしまいました。なんでや。ちなみにこれは1ページに表示する件数を変えても同じことが起こりました。
エラーメッセージでissueを放浪しているとどうやら結構な人が困っているぽく、しかもみんなreduxを使っていました。妙だな...
https://github.com/mbrn/material-table/issues/1074
しかしまあ、
Failed prop type: Invalid propchildrensupplied toForwardRef(TableCell), expected a ReactNode.では要領を得ないわけです。何もわからない...ウーンと唸りながらRedux Debuggerを見てみます。すると妙な挙動に気づきました。
これは1ページに表示する件数を5件から10件に変更した際のdiffを見ているところなのですが、追加した覚えのない
tableDataなどというキーが生えていました。
元々のデータ形式は{id: 5, name: 'ddd', ...}みたいな感じでネストした構造のデータは持っていなかったため、なんだこれはと言う感じです。デバッガを行き来しつつ、closeしていないissueにも広げて確認していたら以下のようなissueがありました。
https://github.com/mbrn/material-table/issues/666
When rendering rows in the grid, the property tableData is added to every row. This is a big problem with redux as its state MUST never be changed. Therefore, issue mentioning a readonly property may come from the fact that immutability frameworks like immer lock objects from the state for them not to be amended afterwards (as redux demands reducers and components to be pure).
tableDataはmaterial-tableが勝手に追加しているだと...
This is a big problem with redux as its state MUST never be changed.いやほんとだよここを見つつ、エラーメッセージの意味の有りそうなところを掘っていくと、次のような記述を見つけることが出来ました。
Uncaught Error: Objects are not valid as a React child (found: object with keys {id}). If you meant to render a collection of children, use an array instead.
ネストしたオブジェクトを入れるんじゃねえ、と怒られていますね。自分ではarrayをdataに入れているつもりだったのでこのエラーを最初はすっ飛ばしていたのですが、
material-tableさんが勝手にstoreのデータを変更しているとあれば話は別です。
つまり、
- storeに入れたarrayデータをmaterial-tableに入れる
- renderする際にmaterial-tableが参照を切らないまま
tableData: {id:0}みたいなキーを生やす- storeのデータにも同じキーが生える
- ページネーションしてstoreのデータを更新し直そうとする際に、material-tableが更新される前に
tableDataキーが生えたstoreのデータを読む(ここのタイミングはよくわかってない)- material-tableは入力される時点ではarrayデータを期待しているので、エラーを吐く (
Uncaught Error: Objects are not valid as a React child (found: object with keys {id}). If you meant to render a collection of children, use an array instead.)というわけで、こっちからstoreのデータとmaterial-tableに渡すデータとの参照を切ることにします。
<MaterialTable
  {...other props}
  data={JSON.parse(JSON.stringify(inputData))} // storeから受け取ったinputData(array)を生成し直す
  components={{
    Pagination: props => (
      <TablePagination
        {...props}
        rowsPerPageOptions={[5, 10]}
        count={totalRowCount}
        page={page - 1}
        rowsPerPage={pageNum}
        onChangePage={(e, _page) => getTableData({ page: _page + 1, pageNum })}
        onChangeRowsPerPage={event => getTableData({ page, pageNum: event.target.value })}
      />
    )
  }}
/>
これでやっとページネーションボタンを押した瞬間に真っ白になることはなくなりました。この時点で1日ほど時間を溶かしています。
material-tableにdataがサーバサイドから来ていることを教える必要がある
よしこれで解決や!とウキウキしながらページサイズを変更してみたところ、真っ白にはなりませんが以下のような事象が起きました。第二ラウンドです。
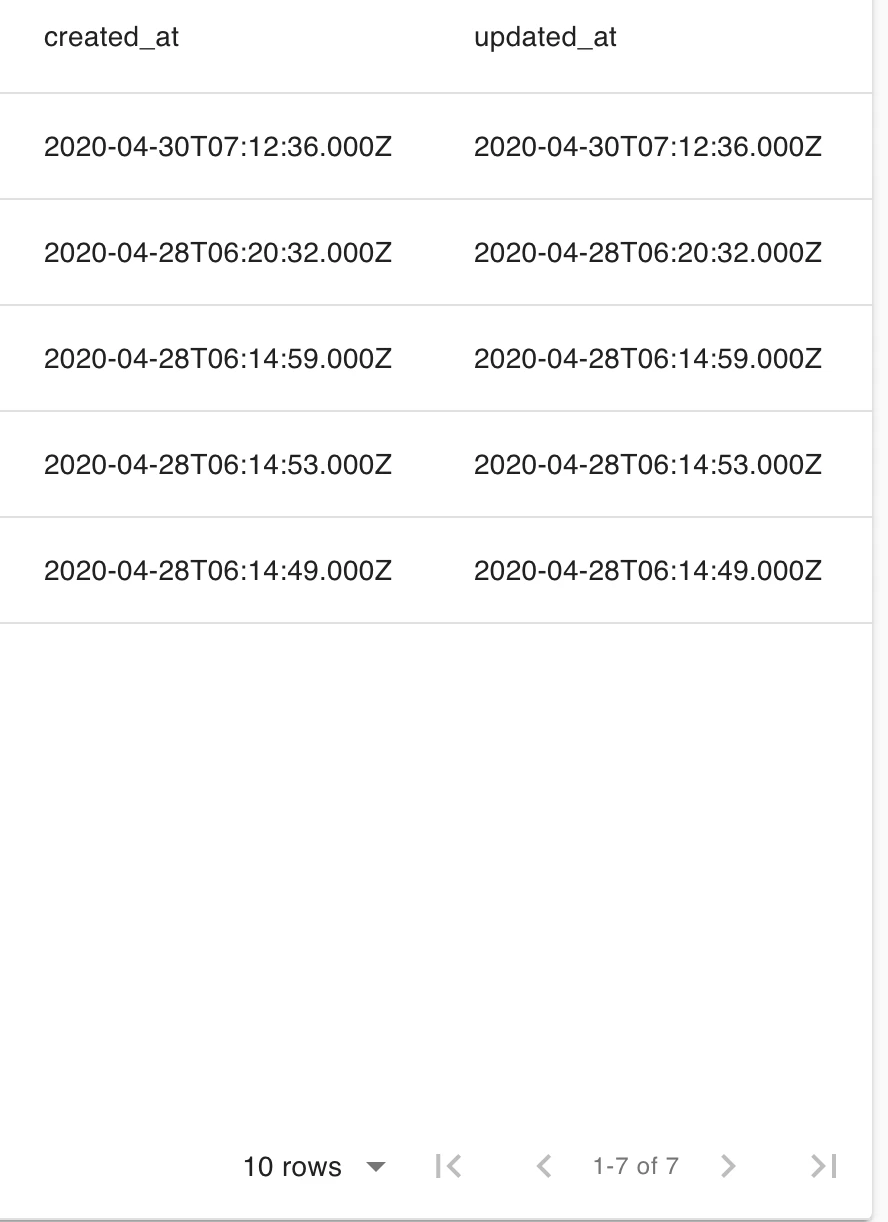
10件表示したいのに、5件しかデータが出てこないわけですね...全部で7件のデータがあるのに...
んーなんでだ、と思いながらまたドキュメントの海を放浪します。するとまた見逃していた記述が出てきました。
https://material-table.com/#/docs/features/remote-data
import MaterialTable from 'material-table';

<MaterialTable
    // other props
    data={query =>
        new Promise((resolve, reject) => {
            // prepare your data and then call resolve like this:
            resolve({
                data: // your data array
                page: // current page number
                totalCount: // total row number
            });
        })
    }
/>;
なるほど、dataに必要なデータとともにpromiseを返してやればいいのか。これでmaterial-table側でdataを使ったstateの更新とかをやってくれるのかな?やったるぜ。optionsにpageSizeも渡しておこう。
<MaterialTable
  {...other props}
  data={query =>
    new Promise((resolve, reject) => {
      resolve({
        data: JSON.parse(JSON.stringify(inputData)),// 参照を切るためにstoreから受け取ったinputData(array)を生成し直す
        page: page - 1,
        totalCount: totalRowCount
      })
    })
  }
  options={{ pageSize: pageNum }}
  components={{
    Pagination: props => (
      <TablePagination
        {...props}
        rowsPerPageOptions={[5, 10]}
        count={totalRowCount}
        page={page - 1}
        rowsPerPage={pageNum}
        onChangePage={(e, _page) => getTableData({ page: _page + 1, pageNum })}
        onChangeRowsPerPage={event => getTableData({ page, pageNum: event.target.value })}
      />
    )
  }}
/>
さてこれでどうだ!データを5件から10件に変更します。
ん?なんか縦に長くなった?ていうか件数は5件のままでは?
なんで下に伸びてるんだろう。
...空のtrがめっちゃ生えている。その数を合計すると10件になります。え、どういう操作してるの?
とりあえず10件になったぞということは認識されたようですが、store側で更新されたデータが認識されていないようです。
これは上の状態時のmaterial-tableのstateを覗いている様子です。5件しかないことになっている...
redux debuggerでstoreを確認すると正しく10件で取得したデータが来ていて5件以上になっているので、material-table側でpropsとして渡ってはいるものの、stateの更新が行われていないことになります。ええ...
この時点で追加でもう一日溶かしています。泣いた。
createRefでrefをつくってonQueryChangeを叩かないと正しくデータが更新されない
泣きながらまたissueを探します。しかし今回はエラーが出ていないので探すべきエラーメッセージもわからず...
それっぽいタイトルのissueを見ていく。
Redux with Remote Dataとな...https://github.com/mbrn/material-table/issues/630
!!!
If you use remote data feature and change data manually, you should call onQueryChange function of table manually after data changes. Please check documentation examples of remote data feature. It has an example of tableRef usage.
イ!?
onQueryChangeを呼んでくれだと? remote dataのexampleに書いてあるわいと言われ、ほんまか?と思いながら見に行きます。https://material-table.com/#/docs/features/remote-data
いや、文章としてそんな記述はどこにもないが...
と思いましたが、
Refresh Data Exampleのところに例がありました。class RefreshData extends React.Component { constructor(props) { super(props); this.tableRef = React.createRef(); } render() { return ( <MaterialTable title="Refresh Data Preview" tableRef={this.tableRef} columns={[ { title: 'Avatar', field: 'avatar', render: rowData => ( <img style={{ height: 36, borderRadius: '50%' }} src={rowData.avatar} /> ), }, { title: 'Id', field: 'id' }, { title: 'First Name', field: 'first_name' }, { title: 'Last Name', field: 'last_name' }, ]} data={query => new Promise((resolve, reject) => { let url = 'https://reqres.in/api/users?' url += 'per_page=' + query.pageSize url += '&page=' + (query.page + 1) fetch(url) .then(response => response.json()) .then(result => { resolve({ data: result.data, page: result.page - 1, totalCount: result.total, }) }) }) } actions={[ { icon: 'refresh', tooltip: 'Refresh Data', isFreeAction: true, onClick: () => this.tableRef.current && this.tableRef.current.onQueryChange(), } ]} /> ) } }
tableRefってこの一番下のactionをオーバーライドして追加しているところのことだったようです。更新ボタンを押したらref経由でonQueryChangeをたたけと...僕が今まで書いていたのはナウでヤングなstateless functional componentだったので、classでしか生やせないRefがある時点で面倒だ...と思いました
が、更にナウでヤングなHooksにcreateRefがあったことを思い出し、何とか書くことが出来ました。サンキューHooks。const MTable: React.FunctionComponent<MTableProps> = ({ [...input props] }) => { const tableRef = React.useRef() // refを作る React.useEffect(() => { const tableRefCurrent: any = tableRef.current if (tableRef && tableRefCurrent) { tableRefCurrent.onQueryChange() } }, [inputData]) // データが更新されたことを検知する副作用を作って、この中でonQueryChangeを叩く return ( <> <MaterialTable {...other props} tableRef={tableRef} // ここでrefを渡す data={query => new Promise((resolve, reject) => { resolve({ data: JSON.parse(JSON.stringify(inputData)), //参照を切るために生成し直す page: page - 1, totalCount: totalRowCount }) }) } options={{ pageSize: pageNum }} components={{ Pagination: props => ( <TablePagination {...props} rowsPerPageOptions={[5, 10]} count={totalRowCount} page={page - 1} rowsPerPage={pageNum} onChangePage={(e, _page) => getTableData({ page: _page + 1, pageNum })} onChangeRowsPerPage={event => getTableData({ page, pageNum: event.target.value })} /> ) }} /> </> ) }やったか!?
...なんとかなりました。ここまで、累計3日溶かしました。
まとめ
再掲です。
- material-tableは渡ってきたデータを参照を切らない状態でそのまま編集している
- dataについてpromiseを返さないといけない
- createRefでrefをつくってonQueryChangeを叩かないと正しくデータが更新されない
はい、ということで解決しました。解決した感想ですが、Reduxぽくない、stateless functional componentの流れを前提としていないのがmaterial-tableということで、想定よりもすごく時間を溶かしてしまいました。
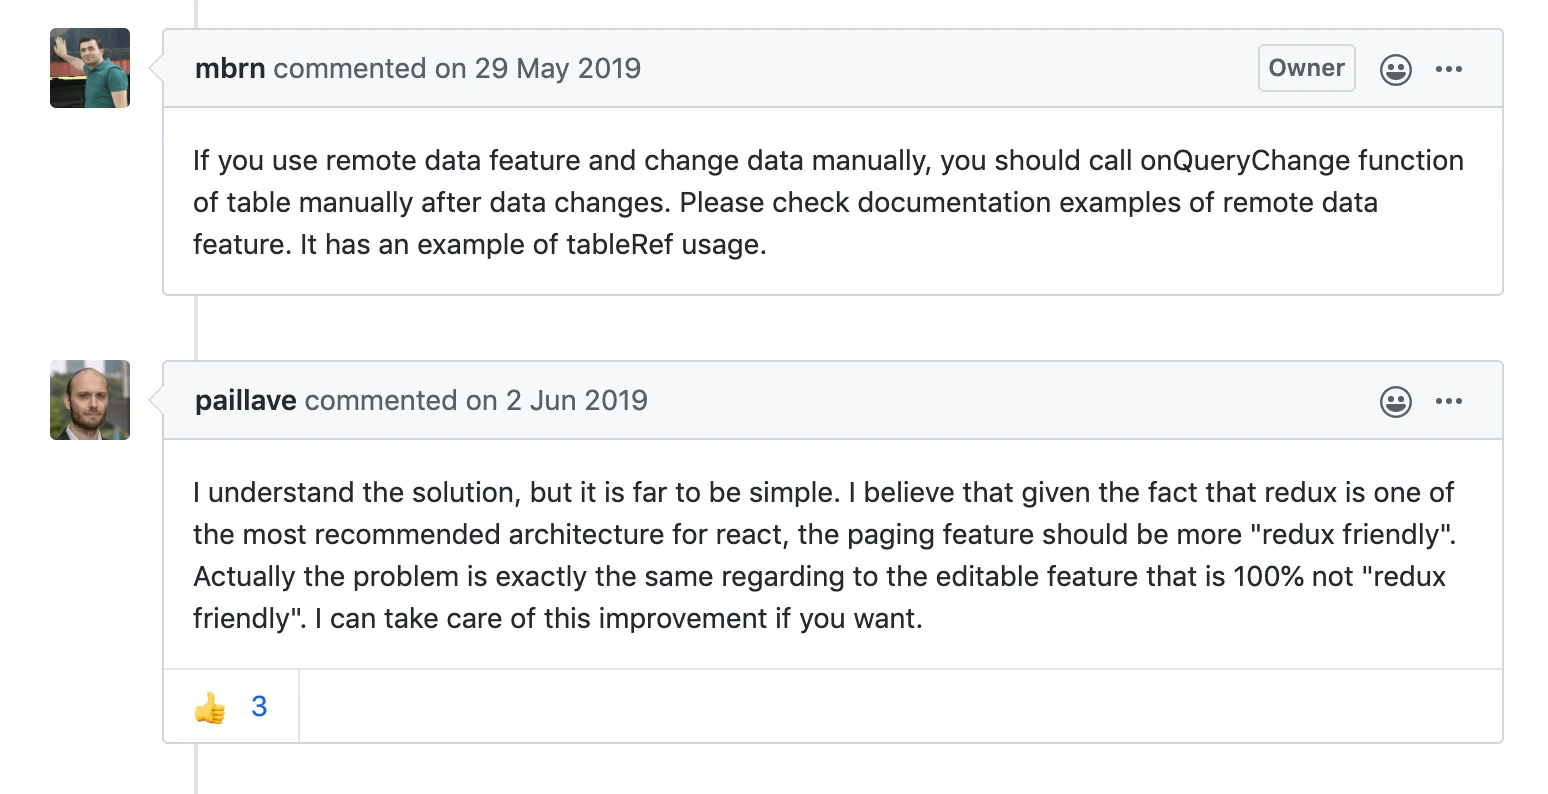
同じことを思っていた人はissueにも散見されて、I understand the solution, but it is far to be simple. I believe that given the fact that redux is one of the most recommended architecture for react, the paging feature should be more "redux friendly". Actually the problem is exactly the same regarding to the editable feature that is 100% not "redux friendly". I can take care of this improvement if you want.
という趣旨のコメントが何件かありました。まったくもってそのとおりでございます。。。
フロントを書くたびに新しい発見があって嬉しい限りです(?)。今後もがんばります。


- 投稿日:2020-04-30T17:44:34+09:00
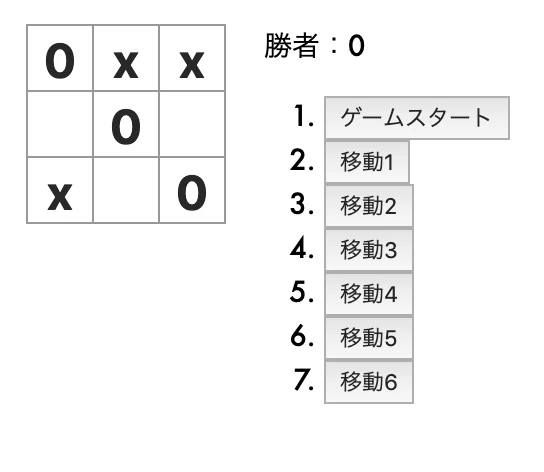
Reactチュートリアル ◯×ゲーム
Reactで作る ◯×ゲーム
公式サイト https://ja.reactjs.org/tutorial/tutorial.html
公式の最終コード https://codepen.io/gaearon/pen/gWWZgR?editors=0010変更するのは一つのファイル(index.js)だけ
デザインを変えたければindex.cssを変更するプロジェクトディレクトリ/src/index.jsimport React from 'react'; import ReactDOM from 'react-dom'; import './index.css'; function Square(props) { return ( <button className="square" onClick={props.onClick} > {props.value} </button> ); } class Board extends React.Component { renderSquare(i) { return ( <Square value={this.props.squares[i]} onClick={() => this.props.onClick(i)} /> ); } render() { return ( <div> <div className="board-row"> {this.renderSquare(0)} {this.renderSquare(1)} {this.renderSquare(2)} </div> <div className="board-row"> {this.renderSquare(3)} {this.renderSquare(4)} {this.renderSquare(5)} </div> <div className="board-row"> {this.renderSquare(6)} {this.renderSquare(7)} {this.renderSquare(8)} </div> </div> ); } } class Game extends React.Component { constructor(props) { super(props); this.state = { history: [{ squares: Array(9).fill(null) }], stepNumber: 0, xIsNext: true, }; } handleClick(i) { const history = this.state.history.slice(0, this.state.stepNumber + 1); const current = history[history.length - 1]; const squares = current.squares.slice(); if (calculateWinner(squares) || squares[i]) { return; } squares[i] = this.state.xIsNext ? 'x' : '0'; this.setState({ history: history.concat([{ squares: squares, }]), stepNumber: history.length, xIsNext: !this.state.xIsNext, }); } jumpTo(step) { this.setState({ stepNumber: step, xIsNext: (step % 2) === 0, }); } render() { const history = this.state.history; const current = history[this.state.stepNumber]; const winner = calculateWinner(current.squares); const moves = history.map((step, move) => { const desc = move ? '移動' + move : 'ゲームスタート'; return ( <li key={move}> <button onClick={() => this.jumpTo(move)} >{desc}</button> </li> ); }); let status; if (winner) { status = '勝者:' + winner; } else { status = '次のプレイヤー:' + (this.state.xIsNext ? 'X' : '0'); } return ( <div className="game"> <div className="game-board"> <Board squares={current.squares} onClick={(i) => this.handleClick(i)} /> </div> <div className="game-info"> <div>{ status }</div> <ol>{ moves }</ol> </div> </div> ); } } // ======================================== ReactDOM.render( <Game />, document.getElementById('root') ); function calculateWinner(squares) { const lines = [ [0, 1, 2], [3, 4, 5], [6, 7, 8], [0, 3, 6], [1, 4, 7], [2, 5, 8], [0, 4, 8], [2, 4, 6], ]; for (let i = 0; i < lines.length; i++) { const [a, b, c] = lines[i]; if (squares[a] && squares[a] === squares[b] && squares[a] === squares[c]) { return squares[a]; } } return null; }イメージ
ゲームスタートで新規ゲーム開始
ゲーム途中に移動ができる

- 投稿日:2020-04-30T17:44:34+09:00
Reactチュートリアル ◯✖️ゲーム
Reactで作る ◯✖️ゲーム
公式サイト https://ja.reactjs.org/tutorial/tutorial.html
公式の最終コード https://codepen.io/gaearon/pen/gWWZgR?editors=0010変更するのは一つのファイル(index.js)だけ
デザインを変えたければindex.cssを変更するプロジェクトディレクトリ/src/index.jsimport React from 'react'; import ReactDOM from 'react-dom'; import './index.css'; function Square(props) { return ( <button className="square" onClick={props.onClick} > {props.value} </button> ); } class Board extends React.Component { renderSquare(i) { return ( <Square value={this.props.squares[i]} onClick={() => this.props.onClick(i)} /> ); } render() { return ( <div> <div className="board-row"> {this.renderSquare(0)} {this.renderSquare(1)} {this.renderSquare(2)} </div> <div className="board-row"> {this.renderSquare(3)} {this.renderSquare(4)} {this.renderSquare(5)} </div> <div className="board-row"> {this.renderSquare(6)} {this.renderSquare(7)} {this.renderSquare(8)} </div> </div> ); } } class Game extends React.Component { constructor(props) { super(props); this.state = { history: [{ squares: Array(9).fill(null) }], stepNumber: 0, xIsNext: true, }; } handleClick(i) { const history = this.state.history.slice(0, this.state.stepNumber + 1); const current = history[history.length - 1]; const squares = current.squares.slice(); if (calculateWinner(squares) || squares[i]) { return; } squares[i] = this.state.xIsNext ? 'x' : '0'; this.setState({ history: history.concat([{ squares: squares, }]), stepNumber: history.length, xIsNext: !this.state.xIsNext, }); } jumpTo(step) { this.setState({ stepNumber: step, xIsNext: (step % 2) === 0, }); } render() { const history = this.state.history; const current = history[this.state.stepNumber]; const winner = calculateWinner(current.squares); const moves = history.map((step, move) => { const desc = move ? '移動' + move : 'ゲームスタート'; return ( <li key={move}> <button onClick={() => this.jumpTo(move)} >{desc}</button> </li> ); }); let status; if (winner) { status = '勝者:' + winner; } else { status = '次のプレイヤー:' + (this.state.xIsNext ? 'X' : '0'); } return ( <div className="game"> <div className="game-board"> <Board squares={current.squares} onClick={(i) => this.handleClick(i)} /> </div> <div className="game-info"> <div>{ status }</div> <ol>{ moves }</ol> </div> </div> ); } } // ======================================== ReactDOM.render( <Game />, document.getElementById('root') ); function calculateWinner(squares) { const lines = [ [0, 1, 2], [3, 4, 5], [6, 7, 8], [0, 3, 6], [1, 4, 7], [2, 5, 8], [0, 4, 8], [2, 4, 6], ]; for (let i = 0; i < lines.length; i++) { const [a, b, c] = lines[i]; if (squares[a] && squares[a] === squares[b] && squares[a] === squares[c]) { return squares[a]; } } return null; }イメージ
ゲームスタートで新規ゲーム開始
ゲーム途中に移動ができる
- 投稿日:2020-04-30T17:17:49+09:00
Reactで開発するときのプロジェクトセットアップ手順
今更ながらReactに入門しました。
ということで、Reactでアプリケーションを開発していくときに、何をどうセットアップしていくかをまとめてみたいと思います。
宣伝
本題に入る前に少し宣伝させてください。
今回、Reactでタスクのトラッキングアプリを作ってみました。
もしよかったら、一度さわってみてもらえると嬉しいです。(すみません、PCのChromeでみてください)
https://tasktrack.web.app/tasksこちらに紹介記事を書いているので、もしよかったらこちらも読んでみてください。
https://note.com/digitalshuufei/n/nf7e9d9644d13この記事でやること
- create-react-appでプロジェクト作成
- eslintの設定
- formatter(Prettier)の設定
- eslintとPrettierの共存
- CSS in JSツール(Emotion)の導入
- Reduxの導入
実際のコードはこちらにあります。
https://github.com/shuufei/react-project-setupcreate-react-appでプロジェクト作成
公式の手順を参考に作成していきます。
https://github.com/facebook/create-react-app#creating-an-appTypescriptで開発したいので、
--typescriptオプションをつけます。> npx create-react-app test-app --typescriptプロジェクトの作成が終わったら、一度動かして確認してみます。
> cd test-app
> npm run start
localhost:3000でアクセスして下記のよう画面になっていれば問題ないかと思います。
問題なく起動できることが確認できたら、このタイミングでpackageを整理しておくと良いかもしれません。
create-react-appでプロジェクトを作ると、開発時にしか使わないpackageもdependenciesに入っているので、devDependenciesに移動してインストールしなおします。修正後のpackage.jsonは下記です。
package.json"dependencies": { - "@testing-library/jest-dom": "^4.2.4", - "@testing-library/react": "^9.5.0", - "@testing-library/user-event": "^7.2.1", - "@types/jest": "^24.9.1", - "@types/node": "^12.12.37", - "@types/react": "^16.9.34", - "@types/react-dom": "^16.9.7", "react": "^16.13.1", "react-dom": "^16.13.1", "react-scripts": "3.4.1", - "typescript": "^3.7.5" }, + "devDependencies": { + "@testing-library/jest-dom": "^4.2.4", + "@testing-library/react": "^9.5.0", + "@testing-library/user-event": "^7.2.1", + "@types/jest": "^24.9.1", + "@types/node": "^12.12.37", + "@types/react": "^16.9.34", + "@types/react-dom": "^16.9.7", + "typescript": "^3.7.5" + },package.jsonを修正したら、installしなおします。
> rm -rf node_modules
> rm -f package-lock.json
> npm install
installしなおしたら念のため動作を確認しておきましょう。
> npm run starteslintの設定
次にeslintを導入して設定していきます。
今回Typescriptを使って開発していきますが、tslintは非推奨になり、eslintの方に移行していく流れがあるらしいのでeslintを利用します。
https://github.com/palantir/tslint/issues/4534こちらを参考に導入していきます。
https://github.com/typescript-eslint/typescript-eslint/blob/master/docs/getting-started/linting/README.md> npm install -D eslint @typescript-eslint/parser @typescript-eslint/eslint-pluginインストールできたら、
.eslintrc.jsと.eslintignoreファイルを作成します。.eslintrc.jsmodule.exports = { root: true, parser: '@typescript-eslint/parser', plugins: [ '@typescript-eslint', ], extends: [ 'eslint:recommended', 'plugin:@typescript-eslint/eslint-recommended', 'plugin:@typescript-eslint/recommended', ], };.eslintignore# don't ever lint node_modules node_modules # don't lint build output (make sure it's set to your correct build folder name) dist # don't lint nyc coverage output coveragepackage.jsonにlintのscriptを追加し、実行してみましょう。
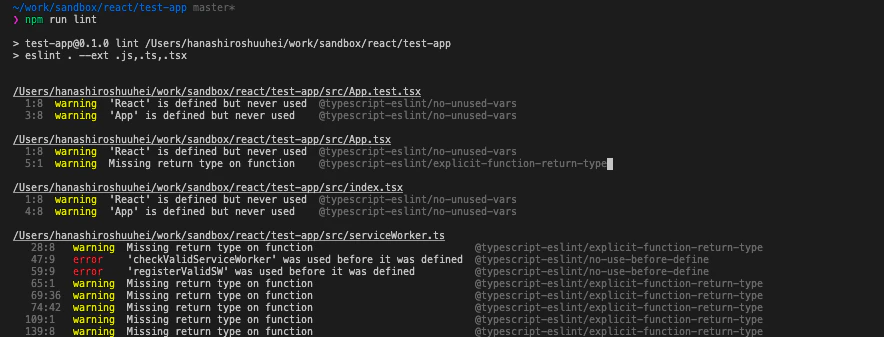
App.tsxなどでlintのエラーが発生するはずなので、エラーが発生したらうまく導入できると思います。package.json"scripts": { "start": "react-scripts start", "build": "react-scripts build", "test": "react-scripts test", "eject": "react-scripts eject", + "lint": "eslint . --ext .js,.ts,.tsx", + "lint:fix": "npm run lint -- --fix", },> npm run lint発生するエラー↓
ここまで確認できたら、lintのルールを拡張しましょう。
eslint-config-airbnb-typescript を利用すると楽っぽいので、それを使ってみます。公式の手順を参考に導入していきます。
https://www.npmjs.com/package/eslint-config-airbnb-typescript> npm install -D \ eslint-config-airbnb-typescript \ eslint-plugin-import@2.20.1 \ eslint-plugin-jsx-a11y@6.2.3 \ eslint-plugin-react@7.19.0 \ eslint-plugin-react-hooks@2.5.0 \ @typescript-eslint/eslint-plugin@2.24.0インストールできたら、.eslintrc.jsを書き換えます。
.eslintrc.jsmodule.exports = { root: true, parser: "@typescript-eslint/parser", plugins: [ "@typescript-eslint" ], extends: [ - 'eslint:recommended', - 'plugin:@typescript-eslint/eslint-recommended', - 'plugin:@typescript-eslint/recommended', + "airbnb-typescript" ], + parserOptions: { + project: "./tsconfig.json", + }, };これで、reactやhooksまわりのlintのルール等が追加されました。
formatter(Prettier)の導入
次にformatterとしてPrettierを導入していきます。
これも公式の手順を参考に導入していきます。
https://prettier.io/docs/en/install.html> npm install -D --save-exact prettierインストールできたら、prettierの設定ファイルを作成し、設定を記述します(この辺は好みで)。
.prettierrc{ "tabWidth": 2, "useTabs": false, "singleQuote": true, "semi": true }package.jsonにformatを実行するscriptを追加して実行してみましょう。
package.json"scripts": { "start": "react-scripts start", "build": "react-scripts build", "test": "react-scripts test", "eject": "react-scripts eject", "lint": "eslint . --ext .js,.ts,.tsx", + "format": "prettier --write \"./**/*.ts\" \"./**/*.tsx\"" },> npm run format実行すると、App.tsxなどのファイルがformatされているかと思います。
eslintとPrettierの共存
eslintのfixを実行するとformatは実施されるので、prettierのformatと競合するケースがあります。
なので、 eslintのformat時に.prettierrcをみてもらうように設定し、prettierでのformatは実施しまないようにします。まずはeslintのprettier puluginをインストールします。
> npm i -D eslint-plugin-prettier eslint-config-prettierインストールできたら、.eslintrc.jsを下記のように修正します。
.eslintrc.jsmodule.exports = { root: true, parser: "@typescript-eslint/parser", plugins: ["@typescript-eslint"], extends: [ "airbnb-typescript", + "plugin:prettier/recommended", + "prettier/react" ], parserOptions: { project: "./tsconfig.json", }, };vscodeでeslintのプラグインをインストールし、
settings.jsonで下記のように設定しておけば、ファイル保存時にformatを実施してくれるので便利です。settings.json"editor.codeActionsOnSave": { "source.fixAll.eslint": true }※eslintの設定と競合するprettierの設定は修正しておかないといけないです。
※package.jsonに追加したformatのscriptはもう使わないと思うので、削除しておくとよいでしょう。CSS in JS(Emotion)の導入
今回はStyleをあてていくツールとして、Emotionを利用しました。
emotionはCSS in JSになります。styled-componentのようにも記述できますが、わざわざcomponentをwrapする書き方が煩しそうだったので、このemotionを利用しました。
ts側とstyle側で変数を共有できたり、styleの再利用が容易だったり、template側でクラス名を意識せずにすんだりと、とても開発しやすかったです。
普段Angularで開発してるんですが、Componentを作ることに関しては、ReactでtsxとCSS in JSを利用して作る方が楽しかったです。
これも公式の手順通りに導入していきます。
https://emotion.sh/docs/install> npm install @emotion/coreインストールできたら、試しにstyleあててみます。
App.tsximport React from 'react'; + /** @jsx jsx */ + import { jsx, css } from '@emotion/core'; import logo from './logo.svg'; import './App.css'; function App() { return ( <div className="App"> <header className="App-header"> <img src={logo} className="App-logo" alt="logo" /> <p> Edit <code>src/App.tsx</code> and save to reload. </p> <a className="App-link" href="https://reactjs.org" target="_blank" rel="noopener noreferrer" + css={css` + color: red; + `} > Learn React </a> </header> </div> ); } export default App;これで
Learn Reactのテキストカラーが赤色になったかと思います。Reduxの導入
最後にReduxを導入していきます。
まず必要なpackageをinstallします。
> npm install react-redux redux > npm install -D @types/react-reduxreducerでstateをイミュータブルに更新しやすくするためにimmerも入れておきます。
> npm install immer次に、store周りの実装を追加していきます。
今回はtodoのstoreを追加してみます。src/store/todo/state.tsexport type Todo = { id: number; title: string; isDone: boolean; }; export type State = { todos: Todo[]; }; export const initState: State = { todos: [], };src/store/todo/actions.tsimport { Action } from 'redux'; import { Todo } from './state'; export interface AddTodoAction extends Action { type: 'ADD_TODO'; payload: { todo: Todo }; } export const addTodo = (payload: AddTodoAction['payload']): AddTodoAction => ({ type: 'ADD_TODO', payload, }); export type Actions = AddTodoAction; export const actionCreator = { addTodo, };src/store/todo/reducer.tsimport produce from 'immer'; import { Actions } from './actions'; import { State, initState } from './state'; export const reducer = (state: State = initState, action: Actions) => { switch (action.type) { case 'ADD_TODO': return produce(state, (draft) => { draft.todos.push(action.payload.todo); }); default: return state; } };src/store/todo/index.tsexport * from './actions'; export * from './reducer'; export * from './state';次にRootStoreを作成し、そこにtodoStoreを追加します。
src/store/root-store.tsimport { combineReducers, createStore } from 'redux'; import * as Todo from './todo'; export type RootState = { todo: Todo.State; }; export const rootReducer = combineReducers({ todo: Todo.reducer }); export const actionCreator = { todo: Todo.actionCreator }; export const store = createStore(rootReducer);最終的なstoreのディレクトリ構成は下記のようになっていると思います。
src/store
├── root-store.ts
└── todo
    ├── actions.ts
    ├── index.ts
    ├── reducer.ts
    └── state.ts
これでstoreの実装ができたので、実際にComponentから使ってみます。
src/index.tsximport React from 'react'; import ReactDOM from 'react-dom'; import './index.css'; import { Provider } from 'react-redux'; import App from './App'; + import * as serviceWorker from './serviceWorker'; + import { store } from './store/root-store'; ReactDOM.render( <React.StrictMode> - <App /> + <Provider store={store}> + <App /> + </Provider> </React.StrictMode>, document.getElementById('root') ); // If you want your app to work offline and load faster, you can change // unregister() to register() below. Note this comes with some pitfalls. // Learn more about service workers: https://bit.ly/CRA-PWA serviceWorker.unregister();最終的なApp.tsx ↓
App.tsximport React from 'react'; import { useDispatch, useSelector } from 'react-redux'; /** @jsx jsx */ import { jsx, css } from '@emotion/core'; import { RootState } from './store/root-store'; import { actionCreator } from './store/todo'; const App: React.FC = () => { const dispatch = useDispatch(); const todos = useSelector((state: RootState) => state.todo.todos); return ( <div className="App"> <button type="button" onClick={() => dispatch( actionCreator.addTodo({ todo: { id: 0, title: '牛乳買う', isDone: false, }, }) ) } > Add todo </button> {todos.map((v) => ( <p css={css` margin-top: 8px; `} > {v.title} </p> ))} </div> ); }; export default App;画面に表示された
Add todoボタンを押下すと、追加されたtodoのタイトルが画面に表示されると思います。これでアプリケーションにReduxの導入ができたので、これをベースに拡張していけばよいです。
最後に
これでReactで開発を進めていく準備が整いました。
あとはがりがり実装していくだけです!そしてがりがり実装して作ったものを再掲しておきます。
https://tasktrack.web.app
https://note.com/digitalshuufei/n/nf7e9d9644d13今回のソースコードはこちら。
https://github.com/shuufei/react-project-setup参考
https://github.com/facebook/create-react-app#creating-an-app
https://github.com/palantir/tslint/issues/4534
https://github.com/typescript-eslint/typescript-eslint/blob/master/docs/getting-started/linting/README.md
https://www.npmjs.com/package/eslint-config-airbnb-typescript
https://prettier.io/docs/en/install.html
https://emotion.sh/docs/install
https://react-redux.js.org/introduction/quick-start

- 投稿日:2020-04-30T09:22:14+09:00
データサイエンティストがフロントエンド 入門がてらReact + typescriptでWEBアプリを作ってみた
概略
普段フロントエンドに一切タッチしないデータサイエンティストが、フロントエンドの勉強をしてアプリを公開してみたので備忘録を残してみる。
作ってみたもの
画像のアノテーションツール。アノテーションを行いたい画像URLの一覧と画像パーツの候補ラベルの一覧をjson形式のファイルでアップロードし、ブラウザ上で画像にバウンディングボックスを引き、それぞれのボックスにラベル情報を選択して与えるというもの。
これがサービスのリンク。
Image Annotator下記の画像のようにバウンディングボックスごとに登録しておいたラベルを結びつけることができる。また、画像ごとにメモも残せる。画像群のアノテーションが終了したら結果をexportでき、全てのバウンディングボックスの画像内での座標とラベル、メモがjsonファイルに出力される。
動機
普段はブラジル、サンパウロでデータサイエンティスト/機械学習エンジニアとして働いており、データトランスフォーマーのロジックを書いたりモデルを作ったり、デプロイに苦戦したりしている。私生活でも、論文を読んだり、時々実装したりしているのだが、ユーザーを想定した開発は行っていない。個人的に、毎年少しずつでも自分の分野から離れたものを学んでいきたいと思っているので今回はフロントエンドにタッチしてみようと決めた。今年中にもう少しDevOpsよりの知見も深めたいところ。
先日、第一子が生まれ、育児休暇もあるので、育児しがてら進めてみた感じ。作ってみるにあたって
作成期間が育児休暇であるため、そんなに時間はないし、正直、フロントエンドはほぼ何も知らない状態だったので、目標は低く設定した。
- 機能は少なく
- デザインはウルトラシンプルに
- 最新の技術に拘らず
- デプロイ優先
収益化などを考えてるわけではなく、限られた時間での入門、勉強が目的なので何よりもデプロイを優先して、後に繋げることを目標に設定。
制作過程
勉強段階
普段は、公式ドキュメントや論文などの読み物中心でインプットを行うのが好きなのだが、今回は趣向を変えて動画コンテンツを進めてみた。
Udemyで以下の二つのコースを取って、動画速度を二倍速にして一気に試聴。動画のように時間をコントロールしにくい媒体はあまり好きではないけれど、上記の二つは結構良いコースだったと思う。ちょっと、冗長にも感じた。
個人的にはやっぱり、公式ドキュメントなり書籍なり読んだ方が楽だったとは思う。HTML操作、jQuery、Reactと進めていって漠然と感じたのは(多分全く正確じゃない)
HTMLの操作勉強時: 『フロントエンドって結局HTMLをひたすら操作してく感じ??』
↓
jQueryの勉強時: 『DOM操作が楽になる感じ??Stateの管理とそれに合わせた画面描写管理がまだ課題??』
↓
Reactの勉強時: 『Stateやrenderの前後での操作を定義できて全体的に管理が楽になる感じ??』
くらいに漠然とそれぞれの必要性を捉えてた。
開発段階
そのあとは、一気に開発。困ったのは、『作りたいものがわからない』という点だった。学習を踏まえた初手なのであまり複雑なものは避けたいし、フロントエンドにフォーカスしたいので今回はバックエンドが複雑になるものもパス。
そういえば、何かと画像アノテーションを行う必要がたびたびあって、その度に場当たり的に対応してるなーと思ったので、今回は画像アノテーターを作成することに決定。
使用する言語は、型がある言語が好みなのでtypescript。初期段階では、『そんなに難しいものでもないし、セマンティックにコンポーネント分けて、状態を持たせるか決めるだけ』と気楽に進めていた。
実際に進めていくと、なんだかんだで、UIが気に入らずにやり直し。その際の変更に伴い、既存のStateの保持場所だと都合が悪く、Stateの管理を変えたりとなんだかんだで時間を食うというのを繰り返し、三歩進んで二歩戻る感じだった。地味に一番時間を食ったのはCSSだった。デザインを完全に決めずに漠然と進めたので、『あ、こうしたい』と色々弄ってみるもうまくいかず。結局、全部破棄して考えうる限り最もシンプルな形にした。CSS難しい。
とはいえ、目に見えて動くものを作っていくのはとても楽しかった。
デプロイ段階
デプロイは比較的楽に済んだ。
以前、Qiitaの記事で最も低コストでプロダクトを公開したいというのを見かけたので、今回はそれを採用。Gitに結びつけてお手軽デプロイ。今回やらなかったこと
フロントエンドに入門して、開発してデプロイまで行ったが、今回、やらなかったこと、問題点はいくつかある。
duplicatedなメソッドを使用している
最新のReactでnot recommendedなメソッドを使用してる。後で直す。テストを書いてない
これはよろしくない。フロントエンドでのテストの書き方を調べてなかったので今回はスキップしてしまったが、早めに書き方のキャッチアップをしたいところ。全体的にvalidationがきちんと書かれてない
inputファイルに対する最低限のvalidationは書かれてるが、ここの画像URLの確認などのvalidationが抜けている。これも書いておくべき。実際に作ってみて
感じたことはいくつかある。
一つ目。流石に、育児休暇中でまとまった時間が取れたとは言えなかったので色々すっ飛ばしながらなので、補完する必要があるなという感じ。
二つ目。プロダクトとして、利益が出るか出ないかという視点で言うと今回作ったものは『箸にも棒にもかからない』のではないかというのが、作成段階で感じたこと。もしも公開するにしても、ソースコードをgithubで公開して、ローカルのファイルをそのままアノテーションできる方が遥かに便利だと思う。次回何かを作るときはペルソナ分析をして、必要にあったものを作っていこうと思う。
三つ目。CSSが難しい。その場しのぎにひたすらググってどうにかしようと思ったが、かなりキツかった。きちんと時間を取って、体系立てて学んでいこうと思う。
四つ目。動くものを作るのはモチベーションが上がって楽しい。業務で使うことはあんまりなさそうだけど、個人的には色々勉強していきたい。
五つ目。デザインって難しい。
六つ目。雑に作ることを良しとして始めたが、実際に雑なものが仕上がると気持ち的には微妙。
七つ目。終盤、色々と失速したので、少し早い段階でデプロイフローを整えた方が多分開発のモチベーションが保てた。
八つ目。今回は動くものを作るのが目的だったためフォーカスはしなかったが、それでも、ユーザーが自然に感じる挙動について考えると色々難しいところがあった。

- 投稿日:2020-04-30T02:06:10+09:00
Next.jsをExpressカスタムサーバ + TypeScriptで動かす設定
プロジェクトの作成
npx create-next-app [project-name]
cd [project-name]
# Nextjsで利用するファイル mkdir src mv pages src/ mv src/index.js src/index.tsx # NextjsをTypeScriptでコーディングするために必要なパッケージをインストール yarn add -D typescript @types/react @types/node # カスタムサーバとして利用するExpressのパッケージをインストール yarn add express yarn add -D @types/express ts-node # カスタムサーバで利用するファイルを作成 mkdir server touch server/index.ts touch tsconfig.server.json
server/index.tsの編集Expressをカスタムサーバとして利用する。
以下のように編集する。import express, { Request, Response } from "express"; import next from "next"; const dev = process.env.NODE_ENV !== "production"; const app = next({ dev }); const handle = app.getRequestHandler(); const port = process.env.PORT || 3001; async function main() { try { await app.prepare(); const server = express(); server.all("*", (req: Request, res: Response) => { return handle(req, res); }); server.listen(port, (err?: any) => { if (err) throw err; console.log(`> Ready on localhost:${port} - env ${process.env.NODE_ENV}`); }); } catch (e) { console.error(e); process.exit(1); } } main();
tsconfig.server.json{ "extends": "./tsconfig.json", // tsconfig.jsonの設定を継承する "compilerOptions": { "module": "commonjs", // Next.jsとExpressの両方を連携させるために、commmonjsを利用する "outDir": "dist", // ビルドファイルの出力先 "noEmit": false // Next.jsはBebelを使用してTypeScriptをコンパイルするので、TSコンパイラはjsを出力しない。設定を上書きする。 }, "include": ["server"] // TSコンパイラにserverディレクトリのみをコンパイル対象として認識させる。 }
package.jsonの編集
scriptsを以下のように編集する。"scripts": { "dev": "ts-node --project tsconfig.server.json server/index.ts", "build:next": "next build", "build:server": "tsc --project tsconfig.server.json", "start": "NODE_ENV=production node dist/index.js" },開発モードで起動
yarn devビルド & 本番起動
yarn build:next
yarn build:server

yarn start
- 投稿日:2020-04-30T01:02:21+09:00
基礎からのRedux
Reduxの基礎を理解するためのメモ.
参照:Redux入門【ダイジェスト版】10分で理解するReduxの基礎Reduxの概念とデータフローについて学ぶ
Reduxとは
アプリケーションを作成する際,DB上のデータをpropsでバケツリレーのように受け渡しするのは非効率.加えて,親コンポーネントのstateに子コンポーネントが影響する構造は,全体のstateを把握するのが困難となり,不具合の原因となる.
この問題を解決するのが,ReactJSが扱うUIのstate管理のためのフレームワークであるReduxである.Reduxを用いることでアプリケーション全体(App.js)の状態を管理し,更新,描画することが容易になる.
Reduxの要素
- ActionCreatorメソッド
- Actionオブジェクト
- Store
- State
- Reducerメソッド
これらの要素が機能することでアプリケーション全体のデータを操作することが可能となる.
Reduxのフロー
ToDoアプリを例に説明する.
ユーザがtodoのテキストを入力して追加ボタンを押した場合を考える.
ActionCreatorメソッドこのとき入力されたテキストが
ActionCreatorメソッドに渡される.todo.jsfunction addTodo(text) { return { type: ADD_TODO, text: `${text}` } }
ActionオブジェクトActionオブジェクトは,「何をする」という情報をtypeプロパティに持つ.このActionオブジェクトが,ActionCreatorメソッドにより作成される.
todo.js{ type: 'ADD_TODO', text: 'Build my first Redux app' }
dispatch文dispatch文によって,ActionCreatorメソッドによって作成されたActionオブジェクトがStoreに渡される.
todo.jsdispatch(addTodo(text))
StoreStoreは,アプリケーションの状態(state)を保持している場所.
index.jsに作成され,そこでreducerが適応される.Storeは,dispatchされると,引数のactionと現在保持するStateを,Reducerへと渡し,新しいStateを作成する.
index.jsimport { createStore } from 'redux' import reducer from './reducer' //Storeの作成とreducerの適応 const composeEnhancers = window.__REDUX_DEVTOOLS_EXTENSION_COMPOSE__ || compose const thunkWithClient = thunk.withExtraArgument(client) const store = createStore(reducer, composeEnhancers(applyMiddleware(thunkWithClient)))reducer.jsimport { combineReducers } from 'redux' import todoApp from './reducers'
Stateアプリケーションでの状態.
下記の例では,「現在表示されている表示/非表示」,「todoリスト」をstateとして保持.{ visibilityFilter: 'SHOW_ALL', todos: [ { text: 'Consider using Redux', completed: true, }, { text: 'Keep all state in a single tree', completed: false } ] }
reducerメソッドreducerメソッドは,actionとstateから新しいstateを作成して返すメソッド.
reducerの実装は,actionのtypeに応じて処理を書く.
todo.jsfunction todos(state = [], action) { switch (action.type) { case ADD_TODO: return [ ...state, { text: action.text, completed: false } ] case COMPLETE_TODO: return [ ...state.slice(0, action.index), Object.assign({}, state[action.index], { completed: true }), ...state.slice(action.index + 1) ] default: return state } } function visibilityFilter(state = SHOW_ALL, action) { switch (action.type) { case SET_VISIBILITY_FILTER: return action.filter default: return state } } function todoApp(state = {}, action) { return { visibilityFilter: visibilityFilter(state.visibilityFilter, action), todos: todos(state.todos, action) } }アプリケーション全体で見てみると...
App.js/render()
↓
初回はinitialStateを用いてレンダリング
↓
App.js/componentDidMount()
↓
/ActionCreator()呼び出し
↓
todo.js/ActionCreator()
↓
/dispatch
↓
reducers.js
↓
todo.js/reducer
↓
App.jsのstate更新
↓
App.js/render()
- 投稿日:2020-04-30T00:07:37+09:00
GoogleMapGeocodingAPIをReactで使用する
やりたいこと
GoogleMapをアプリで使用する際に、場所の検索ができると思いますが、その機能をAPIでも実現したいです。
GoogleMapにはGeocodingAPIが用意されていて、場所の名前から緯度・経度を返してくれます。これをReactで使用するときのサンプルを紹介します。前提等
- GeocodingAPIを、有効化していることを前提としてます。有効化の手順はGoogle Geolocation APIキーを取得する方法を参照してください。
- 地図用のライブラリとして、google-maps-reactを使います。
- ライブラリの使い方やReactの実装方式やstateの管理は、【React】GoogleMapで地図をドラッグして移動した後にMarkerを更新すると同様とします。
- Geocodingの実装についてはAdding multiple markers to react google maps while using geocoderを参考にしています。
サンプル
GoogleMapComponent.jsimport React, { useContext } from "react"; import { GoogleApiWrapper, Map } from "google-maps-react"; import { MapStore } from "../../store/MapStore"; export const GoogleMapComponent = ({ google }) => { const { state, dispatch } = useContext(MapStore); const location = state.currentLocation; const [place, setPlace] = useState(""); function handleChangePlace(e) { setPlace(e.target.value); } // 地名での検索 function handleSearch() { if (place !== "") { const geocoder = new google.maps.Geocoder(); // Geocodingの呼び出し geocoder.geocode( { address: place, region: "jp", }, function (results, status) { if (status === "OK") { const geometryLoc = results[0].geometry.location; dispatch({ type: "CHANGE_LOCATION", currentLocation: { latitude: geometryLoc.lat(), longitude: geometryLoc.lng(), }, }); } } ); } } return ( <input type="text" name="place" value={place} onChange={handleChangePlace} /> <input type="button" value="検索する" onClick={handleSearch} /> <Map google={google} zoom={15} center={{ lat: location.latitude, lng: location.longitude }} initialCenter={{ lat: location.latitude, lng: location.longitude }} /> ); }; export default GoogleApiWrapper({ apiKey: process.env.REACT_APP_GOOGLE_MAP_API_KEY, })(GoogleMapComponent);