- 投稿日:2020-02-05T23:29:23+09:00
htmlとcssの雛形
自分用のメモです.
最初のページ
home.html
<!DOCTYPE html>
<html>
  <head>
    <link rel="stylesheet" href="home.css">
  </head>

  <body>
    <h2 id="home_title">機能一覧</h2>
    <form>
        <button class="btn-flat-logo">機能1</button>
    </form>
    <form>
        <button class="btn-flat-logo">機能2</button>
    </form>

  </body>
</html>
home.css
h2#home_title {
    color: #505050;/*文字色*/
    padding: 0.5em;/*文字周りの余白*/
    display: inline-block;/*おまじない*/
    line-height: 1.3;/*行高*/
    background: #dbebf8;/*背景色*/
    vertical-align: middle;
    border-radius: 25px 0px 0px 25px;/*左側の角を丸く*/
}

h2#home_title:before {
    content: '●';
    color: white;
    margin-right: 8px;
}

.btn-flat-logo {
    position: relative;
    display: inline-block;
    font-weight: bold;
    font-size: 1.0em;
    padding: 10px 30px;
    margin: 10px 30px;
    text-decoration: none;
    color: #FFF;
    background: #00bcd4;
    transition: .2s;
    border-radius: 25px 25px 25px 25px;
}

.btn-flat-logo:hover {
    background: #1ec7bb;
}
機能1の入力フォーム
func1.html
<!DOCTYPE html>
<html>
  <head>
    <link rel="stylesheet" href="func1.css">
  </head>

  <body>
    <h2 id="func1_title">機能1</h2>
    <div class="box26">
      <span class="box-title">機能説明</span>
      <p>
        機能1では製品とその製品情報を指定することで,データベース中から指定した情報を検索しデータを整形して出力する.
      </p>
    </div>

    <table>
        <p class="form-items">製品名</p>
      <tr>
        <td><input class="textarea" type="text"></td>
      </tr>
    </table>

    <div>
      <a class="form-items">詳細設定</a>
      <button class="btn-change">+</button>
    </div>
    <table>
      <tr>
        <td><input class="textarea" type="tel"></td>
        <td><button class="btn-change">ー</button></td>
      </tr>
      <tr>
        <td><input class="textarea" type="tel"></td>
        <td><button class="btn-change">ー</button></td>
      </tr>
      <tr>
        <td><input class="textarea" type="tel"></td>
        <td><button class="btn-change">ー</button></td>
      </tr>
    </table>

    <button id="button-search" class="simple_square_btn6">
      検索
    </button>
    <div>

    </div>
    <button id="button-back" class="btn-open">
      戻る
    </button>

  </body>
</html>
func1.css
body {
    font-family: "Avenir Next";
}

h2#func1_title:first-letter {
    font-size: 1.5em;
    color: #7172ac;
}

.box26 {
    position: relative;
    margin: 2em 0;
    padding: 1em 1em;
    width: 20%;
    border: solid 3px #95ccff;
    border-radius: 8px;
}
.box26 .box-title {
    position: absolute;
    display: inline-block;
    top: -13px;
    left: 10px;
    padding: 0 9px;
    line-height: 1;
    font-size: 18px;
    background: #FFF;
    color: #95ccff;
    font-weight: bold;
}
.box26 p {
    font-size: 12px;
    margin: 0;
    padding: 0;
}

.textarea {
    /* width: 50%; 親要素いっぱい広げる */
    padding: 10px 15px; /*ボックスを大きくする*/
    font-size: 16px;
    border-radius: 3px; /*ボックス角の丸み*/
    border: 2px solid #ddd; /*枠線*/
    box-sizing: border-box; /*横幅の解釈をpadding, borderまでとする*/
}

table {
    border-collapse: separate;
    border-spacing: 10px;
}

.form-items {
    color: #2b546a;
    font-weight: bold;
    margin: 0;
}

.form-items:before {
    content: '●';
    color: #2b546a;
    margin-right: 8px;
}


.btn-change {
    display: inline-block;
    position: relative;
    box-sizing: border-box;
    text-decoration: none;
    width: 30px;
    height: 30px;
    padding: 5px;
    border-radius: 50%;
    text-align: center;
    font-weight: bold;
    box-shadow: inset 0 2px 0px rgba(255, 255, 255, 0.25), inset 0 -2px 0px rgba(0, 0, 0, 0.18);
    transition: .2s;
}

.btn-change:hover {
    box-shadow: none;
}

.btn-change:active {
    -webkit-transform: translateY(1px);
    transform: translateY(1px);
    box-shadow: 0 0 2px rgba(0, 0, 0, 0.35);
    border-bottom: none;
}

.center-obj {
    text-align: center;
}

.simple_square_btn6 {
    left: 30px;
    display: block;
    position: relative;
    width: 160px;
    padding: 0.8em;
    text-align: center;
    text-decoration: none;
    color: white;
    background: #0bc8b6;
    border-radius: 30px;
    -webkit-backface-visibility: hidden;
    -moz-backface-visibility: hidden;
    backface-visibility: hidden;
    font-weight: bold;
    font-size: 12px;
}
.simple_square_btn6:hover {
    cursor: pointer;
    text-decoration: none;
    -webkit-animation: simple_square_btn6 0.5s both;
    -moz-animation: simple_square_btn6 0.5s both;
    animation: simple_square_btn6 0.5s both;
}
@-webkit-keyframes simple_square_btn6 {
  0% {
    -webkit-transform: scale(1);
            transform: scale(1);
  }
  100% {
    -webkit-transform: scale(1.1);
            transform: scale(1.1);
  }
}
@-moz-keyframes simple_square_btn6 {
  0% {
    -webkit-transform: scale(1);
            transform: scale(1);
  }
  100% {
    -webkit-transform: scale(1.1);
            transform: scale(1.1);
  }
}
@keyframes simple_square_btn6 {
  0% {
    -webkit-transform: scale(1);
            transform: scale(1);
  }
  100% {
    -webkit-transform: scale(1.1);
            transform: scale(1.1);
  }
}

.btn-open {
    display: inline-block;
    top: 50px;
    /* left: 200px; */
    left: 0;
    width: 50px;
    height: 35px;
    text-align: center;
    background-color: #9ec34b;
    font-size: 10px;
    border-radius: 10px;
    color: #FFF;
    text-decoration: none;
    font-weight: bold;
    border: 2px solid #9ec34b;
    position: relative;
    overflow: hidden;
    z-index: 1;
}

.btn-open:after{
    width: 100%;
    height: 0;
    content:"";
    position: absolute;
    top: 50%;
    left: 50%;
    background : #FFF;
    opacity: 0;
    transform: translateX(-50%) translateY(-50%) rotate(45deg);
    transition: .2s;
    z-index: -1;
}

.btn-open:hover{
    color: #9ec34b;
}

.btn-open:hover:after{
    height: 240%;
    opacity: 1;
}

.btn-open:active:after{
    height: 340%;
    opacity: 1;
}
機能1の結果
result1.html
<!DOCTYPE html> <html> <head> <link rel="stylesheet" href="result1.css"> </head> <body> <table> <p id="product-title">製品名</p> <p id="product-name">プリンター</p> </table> <table> <p id="spec-title">スペック一覧</p> <tr> <td class="form-items">電力</td> <td> 2.0</td> </tr> <tr> <td class="form-items">最大消費電力</td> <td> 2.0</td> </tr> <tr> <td class="form-items">大きさ</td> <td> 2.0</td> </tr> </table> <button id="button-back" class="btn-open"> 戻る </button> </body> </html>result1.css
body {
    font-family: "Avenir Next";
}

p#product-title {
    max-width: 70px;
    font-size: 20px;
    font-weight: bold;
    /*線の種類(点線)2px 線色*/
    border-bottom: dashed 2px #6594e0;
}

p#product-name {
    margin: 100;
    font-size: 20px;
    color: #2b546a;
}

p#spec-title {
    max-width: 140px;
    font-size: 20px;
    font-weight: bold;
    /*線の種類(点線)2px 線色*/
    border-bottom: dashed 2px #6594e0;
}

.form-items {
    color: #2b546a;
    font-weight: bold;
    margin: 0;
}

.form-items:before {
    content: '●';
    color: #2b546a;
    margin-right: 8px;
}

.btn-open {
    display: inline-block;
    top: 50px;
    left: 0;
    width: 50px;
    height: 35px;
    text-align: center;
    background-color: #9ec34b;
    font-size: 10px;
    border-radius: 10px;
    color: #FFF;
    text-decoration: none;
    font-weight: bold;
    border: 2px solid #9ec34b;
    position: relative;
    overflow: hidden;
    z-index: 1;
}

.btn-open:after{
    width: 100%;
    height: 0;
    content:"";
    position: absolute;
    top: 50%;
    left: 50%;
    background : #FFF;
    opacity: 0;
    transform: translateX(-50%) translateY(-50%) rotate(45deg);
    transition: .2s;
    z-index: -1;
}

.btn-open:hover{
    color: #9ec34b;
}

.btn-open:hover:after{
    height: 240%;
    opacity: 1;
}

.btn-open:active:after{
    height: 340%;
    opacity: 1;
}
準備中ページ
mainte.html
<!DOCTYPE html>
<html>
  <head>
    <link rel="stylesheet" href="mainte.css">
    <link href="https://use.fontawesome.com/releases/v5.6.1/css/all.css" rel="stylesheet">
    <link rel="stylesheet" href="https://cdnjs.cloudflare.com/ajax/libs/font-awesome-animation/0.0.10/font-awesome-animation.css" type="text/css" media="all" />
  </head>

  <body>
    <h1 class="ready">
        <i class="fas fa-redo-alt fa-spin"></i>
        準備中...
        <i class="fas fa-truck-pickup faa-passing animated"></i>
    </h1>
  </body>
</html>
mainte.css
body {
    font-family: "Avenir Next";
}

.ready {
    text-align:center;
    font-size: 70px;
    color: darkslategray;
}

.fa-redo-alt {
    font-size: 50px;
    font-family: "Font Awesome 5 Free";
    color: #5ab9ff; /*アイコン色*/
    right: 10px;
}

.fa-truck-pickup {
    font-family: "Font Awesome 5 Free";
    color: black;
}
- 投稿日:2020-02-05T23:20:29+09:00
IFRAMEにコンテンツをフィットさせるには
固定サイズのHTMLを、それよりも小さいサイズのIFRAMEに縮小して表示したかったので、その対処方法です。
課題
たとえば1440px X 1000pxの大きさのHTMLを幅800pxのIFRAMEに表示します。
解決方法
index.html<!DOCTYPE html> <html lang="ja"> <head> <meta charset="utf-8"> <meta http-equiv="X-UA-Compatible" content="IE=edge"> <meta name="viewport" content="width=device-width, initial-scale=1"> <link rel="stylesheet" href="https://maxcdn.bootstrapcdn.com/bootstrap/3.3.7/css/bootstrap.min.css" integrity="sha384-BVYiiSIFeK1dGmJRAkycuHAHRg32OmUcww7on3RYdg4Va+PmSTsz/K68vbdEjh4u" crossorigin="anonymous"> <link rel="stylesheet" href="default.css"> </head> <body> <div id="wrapper"> <h1>Resize 1440px X 1000px iframe to width 800px</h1> <iframe id="iframe" src="iframe-content.html"></iframe> </div> <a href="iframe-content.html" target="_blank">iframe-content.html</a> </body> <script src="https://code.jquery.com/jquery-3.4.1.min.js" integrity="sha256-CSXorXvZcTkaix6Yvo6HppcZGetbYMGWSFlBw8HfCJo=" crossorigin="anonymous"></script> <script src="default.js"></script> </html>default.cssbody { text-align: center; } #wrapper { margin: 0 auto 0 auto; overflow: hidden; width: 800px; } #iframe { height: 1000px; width: 1440px; }default.js(function (window, document, $) { let iframe = $('#iframe'); let wrapper = iframe.parent(); let width = wrapper.width(); let ratio = width / iframe.width(); console.log(`Ratio: ${ratio}`); // IFRAME自体は読み込みページの大きさにCSSで適用している。 // それを#wrapperのサイズにスケールインする。 // https://stackoverflow.com/questions/166160/how-can-i-scale-the-content-of-an-iframe iframe .css('-ms-transform', `scale(${ratio})`) .css('-moz-transform', `scale(${ratio})`) .css('-o-transform', `scale(${ratio})`) .css('-webkit-transform', `scale(${ratio})`) .css('transform', `scale(${ratio})`) .css('-ms-transform-origin', '0 0') .css('-moz-transform-origin', '0 0') .css('-o-transform-origin', '0 0') .css('-webkit-transform-origin', '0 0') .css('transform-origin', '0 0'); // #iframeのひとつ上のラッパー#wrapperの高さを同じ倍率で変更する。 // これをしないとうまくもともとのIFRAMEの高さのままになる。 wrapper.height(wrapper.height() * ratio); })(window, window.document, window.jQuery);ポイント
- 同じ倍率で高さも変える必要もあるので、JavaScriptで対応します。
- 参考サイトにある通り、CSSで縮小します。
- IFRAMEのサイズは読み込んでいるコンテンツのサイズと同じにしておく。
- IFRAMEをラッパーで囲みます。CSSで指定したサイズの領域が取られているのでラッパーのdivで高さを調整しています。
- 面倒だったのでjQueryを使用。
参考サイト
- 投稿日:2020-02-05T22:31:59+09:00
Next.jsでCSSを読み込む方法
Next.jsでCSSを読み込むときは、Headを定義しlinkタグにて読み込む
以下のような感じ
linkタグで読み込めばOKimport React from "react"; import Header from "../includes/header"; import Head from "next/head"; const MainLayout = props => { return ( <> <Head> <title>My Awesome app</title> <link href="https://fonts.googleapis.com/css?family=Roboto:300,400,500,700&display=swap" rel="stylesheet" /> <link href="https://stackpath.bootstrapcdn.com/bootstrap/4.4.1/css/bootstrap.min.css" rel="stylesheet" integrity="sha384-Vkoo8x4CGsO3+Hhxv8T/Q5PaXtkKtu6ug5TOeNV6gBiFeWPGFN9MuhOf23Q9Ifjh" crossorigin="anonymous" /> <link href="#" rel="stylesheet" /> </Head> <Header /> {props.children} </> ); }; export default MainLayout;
- 投稿日:2020-02-05T20:44:40+09:00
Prettierとstylelintで保存するときに自動整形する
概要
CSSの記述をPrettierとstylelintで保存するときに自動整形できるようにします。
最小限の設定です。
プロパティの並びはアルファベット順にします。手順
インストールと設定ファイル作成
npm i -D stylelint stylelint-config-recommendedでインストールnpm i -D prettier stylelint-config-prettier@7.0.0 stylelint-prettierでインストール
バージョンを指定しないとstylelint-plusとの組み合わせ時に動作しないため
参考npm i -D stylelint-order stylelint-config-recess-orderでインストール- ルートディレクトリに
.stylelintrc.jsonファイルを作成し、中身を記述↓.stylelintrc.json{ "extends": [ "stylelint-config-recommended", "stylelint-config-recess-order", "stylelint-prettier/recommended" ] }package.jsonにscriptを追加
package.json"scripts": { "lint:css": "stylelint --fix ./**/*.css" }VScodeにExtensionを追加
- インストールするExtension
stylelint-plus- setting.jsonを開く
- 下記を追加
setting.json{ "css.validate": false, "scss.validate": false, "stylelint.autoFixOnSave": true, "[css]": { "editor.formatOnSave": false }, "[scss]": { "editor.formatOnSave": false } }これで保存時に自動で整形されます。
- 投稿日:2020-02-05T20:03:44+09:00
初心者によるプログラミング学習ログ 230日目
100日チャレンジの230日目
twitterの100日チャレンジ#タグ、#100DaysOfCode実施中です。
すでに100日超えましたが、継続。100日チャレンジは、ぱぺまぺの中ではプログラミングに限らず継続学習のために使っています。
230日目は
おはようございます
— ぱぺまぺ@webエンジニアを目指したい社畜 (@yudapinokio) February 4, 2020
230日目
・udemyで、css+javascript講座
・webサイト部分的模写#早起きチャレンジ#駆け出しエンジニアと繋がりたい#100DaysOfCode
- 投稿日:2020-02-05T14:28:32+09:00
Jenkinsの成果物HTMLにCSSを適用する
はじめに
Jenkinsのビルド結果を確認するためにHTMLを成果物として登録したはいいものの、インラインで定義したCSSが適用されない…
という状況に遭遇したのでメモ原因
JenkinsはContent Security Policy(CSP)のデフォルト設定をキツめにしているようです。以下がデフォルト設定です。
sandbox; default-src 'none'; img-src 'self'; style-src 'self';CSSは自ドメインのファイルのみ許可されていて、インラインでの実行は許可されていません。
解決方法
解決方法としては以下の2つが考えられますが、今回は後者を選択しました。
- デフォルト設定を変更し、インラインで実行できるようにする
- デフォルト設定に従う(CSSを表示できる状態に変更する)
- CSSをファイル化して、Jenkinsと同ドメイン配下に配置
- HTMLは上記CSSファイルを読み込む
Jenkinsはユーザが静的コンテンツを配置するための仕組みを用意していますので、そこにCSSファイルを配置します。
例として、
$JENKINS_HOME/userContent/assets/css/test.cssに配置した場合、https://[任意のドメイン]/jenkins/userContent/assets/css/test.cssでアクセス可能となります。あとはHTMLでCSSファイルを読み込むようにすれば完了です。
...
<link rel="stylesheet" href="/jenkins/userContent/assets/css/test.css">
...
終わりに
今回は、
- 成果物のHTMLはJenkins上でのみ閲覧
- 自作のHTML
という前提条件だったのでCSPを変更せずに解決できましたが、大体の場合はCSPを変更する必要があると思います。その場合は、以下のように設定を変更して対応できるかと思います。
JenkinsのClover pluginを利用したカバレッジレポートページにCSSが適用されない参考リンク
- 投稿日:2020-02-05T07:58:07+09:00
固定幅の親の子を横幅100%にするCSS
子要素をブラウザ横幅100%表示するCSSです。
レスポンシブデザインで多く使うためmixinで登録しておくと便利です。デモ
See the Pen OJVLZLv by harumi-sato (@harumi-sato) on CodePen.
コード
SCSS//@include fullsize @mixin fullsize { width: 100vw; position: relative; left: 50%; right: 50%; margin-left: -50vw; margin-right: -50vw; } .contents{ width:600px; //固定幅 margin:0 auto; background:lightgreen; } .child{ @include fullsize; img{ width:100%; height:auto; } }HTML<div class="contents"> <p>テキストが入ります。テキストが入ります。テキストが入ります。テキストが入ります。テキストが入ります。テキストが入ります。テキストが入ります。</p> <div class="child"><img src="//via.placeholder.com/350x150" alt=""></div> <p>テキストが入ります。テキストが入ります。テキストが入ります。テキストが入ります。テキストが入ります。テキストが入ります。テキストが入ります。</p> </div>まとめ
- 投稿日:2020-02-05T07:58:07+09:00
固定幅の親要素の子要素を横幅100%にするCSS
子要素をブラウザ横幅100%表示するCSSです。
レスポンシブデザインでコンテンツが固定幅、画像は横幅100%という場面で
多く使うためmixinで登録しておくと便利です。デモ
See the Pen OJVLZLv by harumi-sato (@harumi-sato) on CodePen.
コード
横幅をブラウザ幅に設定=100vw
左右のmarginを-50vwで計算している。
(子の数値に影響されずスマートな解決方法ですね!)
SCSS//@include fullsize @mixin fullsize { width: 100vw; position: relative; left: 50%; right: 50%; margin-left: -50vw; margin-right: -50vw; } .contents{ width:600px; //固定幅 margin:0 auto; background:lightgreen; } .child{ @include fullsize; img{ width:100%; height:auto; } }HTML<div class="contents"> <p>テキストが入ります。テキストが入ります。テキストが入ります。テキストが入ります。テキストが入ります。テキストが入ります。テキストが入ります。</p> <div class="child"><img src="//via.placeholder.com/350x150" alt=""></div> <p>テキストが入ります。テキストが入ります。テキストが入ります。テキストが入ります。テキストが入ります。テキストが入ります。テキストが入ります。</p> </div>まとめ
-50vwでマイナスmarginを設定するため、
子要素の幅に影響されず横幅100%に指定できる。
- 投稿日:2020-02-05T03:33:38+09:00
レスポンシブ設計 キホンの基本 part2~flex-wrap: wrap;
前回はレスポンシブのための一歩目をやりました⤵︎
https://qiita.com/zakaryo/items/ee0a799f4d1bb61f2517今回は折り返しについてやっていきます。
いざdisplayをflexにし横並びにすることができたとしても、
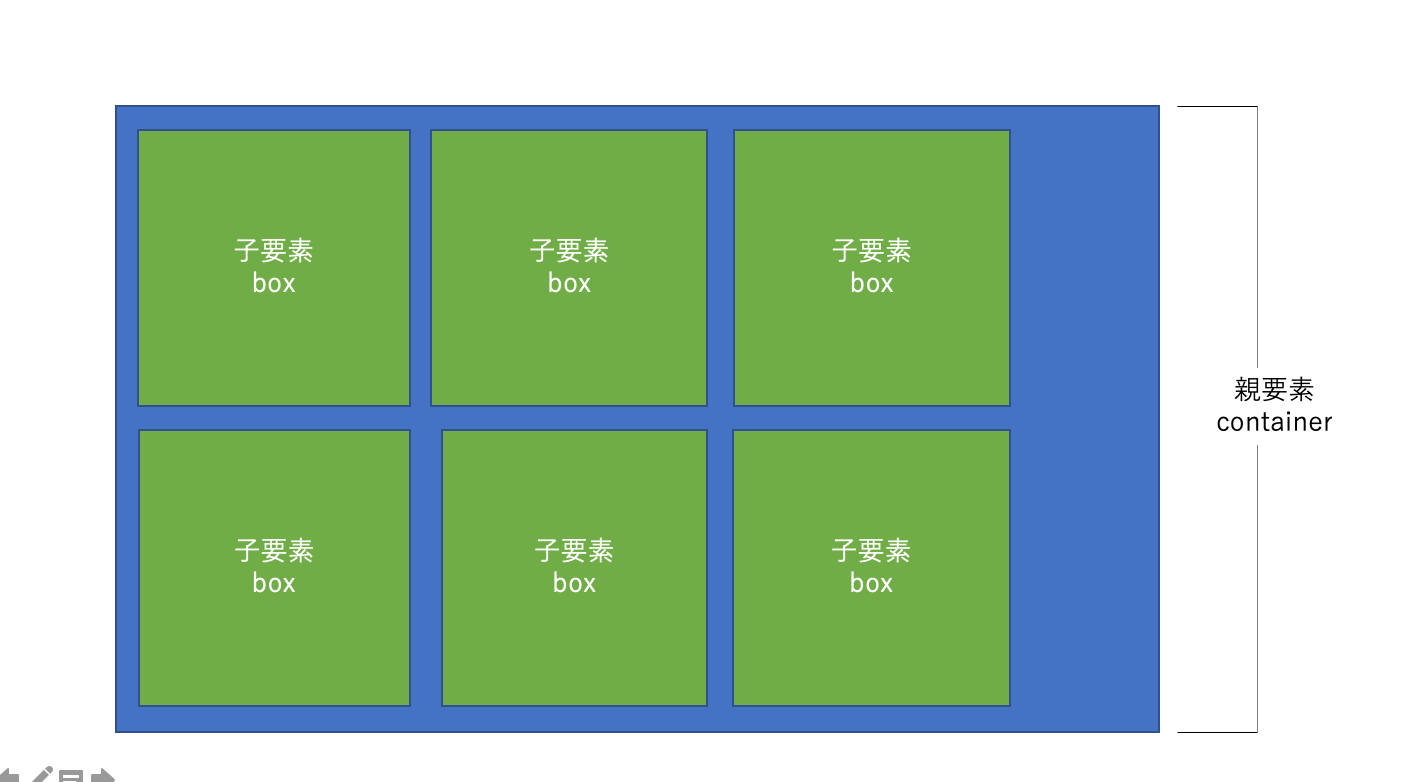
そのままだと子要素のコンテンツが増えたときに、延々と詰め込まれてしまいうことになります。
こんな感じに。
style.css.container { display: flex; } .box { width: 300px; height: 300px; margin: 10px 5px; }本来300x300の正方形を並べたいのに、画面いっぱいに詰め込まれ縮んでしまいます。
そこで親要素にflex-wrap:wrap;を指定してみましょう。
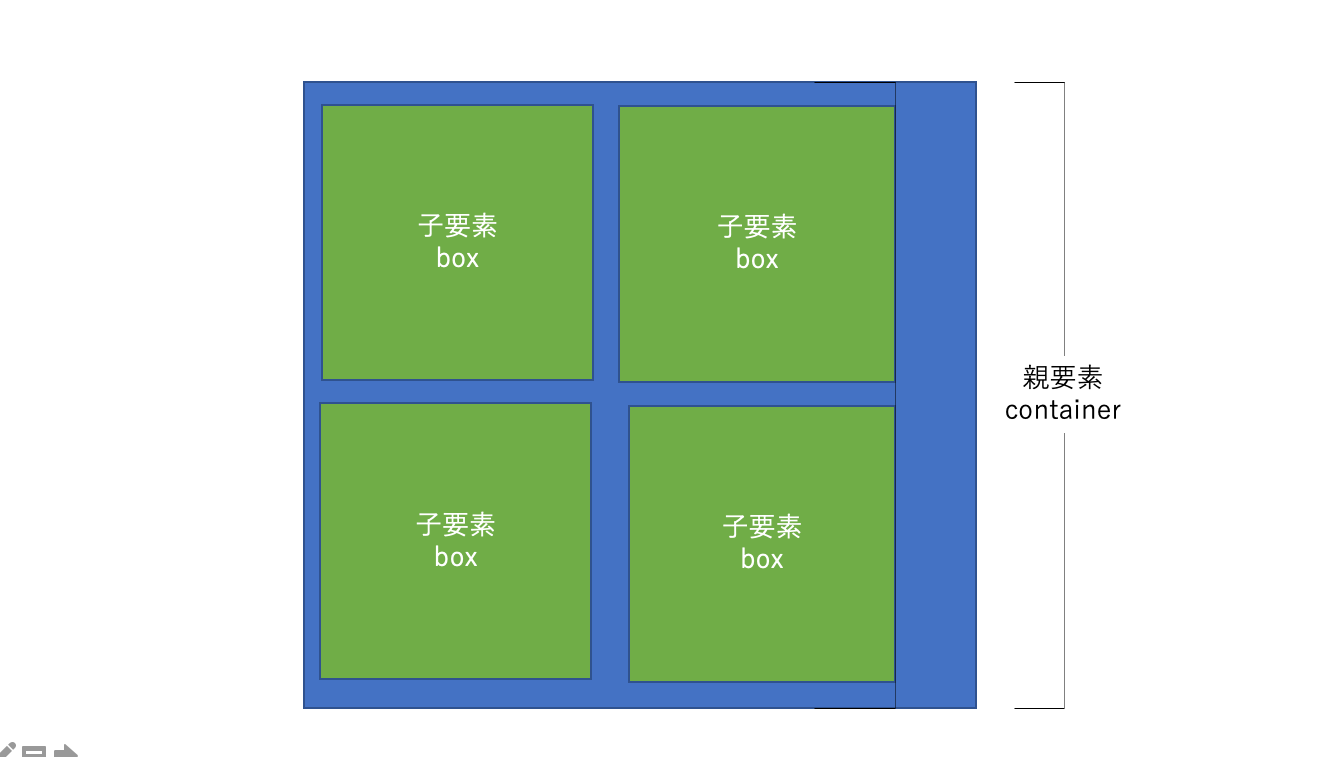
style.css.container { display: flex; flex-wrap: wrap; } .box { width: 300px; height: 300px; margin: 10px 5px; }このように無理につめこまれるのではなくて、width:300px;が適用され
はみ出る分は一段下に落とされます。
さらに親要素にmax-widthを指定してあげれば1段に何個の子要素を入れるかを決めることができます。
style.css.container { display: flex; flex-wrap: wrap; max-width:700px; } .box { width: 300px; height: 300px; margin: 10px 5px; }実際は下に子要素の数分続いています。
以上のようにするとflexboxにおいて折り返しができるのではないでしょうか。
- 投稿日:2020-02-05T02:49:08+09:00
CSSのみで表示をコントロールする時に使える便利な記法
表示の切り替えをする時、大抵の場合 JavaScript を使わないとできないとなるのだが、CSSのみで対応可能な場合もあるので、検討する時に使えるテクニックを集める。
切り替えを行う
ID アンカーを使うと URL内の #以降の文字列でターゲットの指定ができる。
<div id="modal" class="overlay">Dummy Modal</div>.overlay { visibility: hidden; } .overlay:target { visibility: visible; }https://test.dev/link
https://test.dev/link#modalと言うそれぞれにアクセスすることで表示非表示が切り替えられる。
modal が css上の target にあたるかどうかで切り替えられる。
アコーディオンやその他いろいろな箇所で応用できる。
中の要素があるかないか
中身があるかないかでの切り替えも可能。要素を差し込んだりする場合に有効になってくる。
要素がない場合、余計なスペースを残してしまうとデザインが崩れることがあるのでそれを補正したい。<div class="footer"> <button>Cancel</button> <button>OK</button> </div>.footer { margin: 20px; padding: 20px; } .footer:empty { margin: 0; padding: 0; }
- 投稿日:2020-02-05T01:30:20+09:00
【未経験】ポートフォリオサイトを作成してみた。
自己紹介
現職は不動産管理会社のフロントマンをしています。
WEBデザイナーへの転職を考えてHTMLとCSSを勉強中です。
主にProgateを利用して勉強を進めております。ポートフォリオサイト
Photoshopで作成したデザインを元にコーディングしてみました。
デザインする際には「どのようにしたらコーディングできるか」を意識しました。
デザイン~コーディングまで1週間と少しくらいかかりました。
偶然に3連休が入らなければ確実に終わらなかったと思います(笑)。1.ポートフォリオサイト
プロフィール・スキル・作品・連絡先をシンプルにまとめました。
Progateのレッスンでは与えられていた画像のサイズなど、
基本情報から自分で考えなければならなかったのが大変でした。https://tomohiro34685.github.io/portfolio-site/
2.架空のサイト
ポートフォリオサイトに載せる作品として作成しました。
デザインはファッションブランドのサイトを参考に作成しました。
まだ掲示できる作品としてのサイトが殆どないので、
勉強のためにも少しずつ増やしていきたいと思っています。https://tomohiro34685.github.io/portofolio/
使用ソフト・参考サイト
1.使用ソフト
- Photoshop
- Atom2.参考サイト
- Progate
- Unsplash作ってみての感想
直すべき箇所は枚挙に暇がありませんが、サイトを作り上げた達成感があって嬉しいです。
サイトのデザインからコーディングまで、すべてを自分一人でやるのはとても苦労しましたし、途中で投げ出したくなる瞬間もありましたが、1つ自身に繋げられたと思います。
今はまだ知識もないので、その場しのぎの対応を調べて試すという繰り返しのサイトなので、とても不格好なものになっていると思います。
これからも自己研鑽を続けていくので、少しずつでもサイトを更新していけたらと思っております。
最後までご覧になっていただきありがとうございました。


