- 投稿日:2019-10-11T18:47:22+09:00
Googleスプレッドシートを使ったUnityコラボ開発 (ScriptableObject、Addressables 対応版)
はじめに
- この記事は、過去に公開した記事の焼き直しで、
ScriptableObjectとAddressablesに対応した版です。- また、スプレッドシート側の計算式を使わずに、シート全体を取得して解析するように変更しています。
前提
- unity 2018.4.8f1
- Addressables 1.2.4
- Googleスプレッドシート
- Googleアカウント
このシステムのセキュリティについて
- このシステムのセキュリティ
- スプレッドシート
- 特別な共有設定は不要で、共同編集者のGoogleアカウントに対する共有のみを設定します。
- ドキュメントIDが、平文でエディターの設定内(EditorPrefs)に保存されます。
- GAS (Google Apps Script)
- URLを知っていれば誰でも使用できるように設定します。
- 承認したGoogleアカウントの権限で実行され、承認者のGoogleドライブに保存された全てのスプレッドシートにアクセス可能です。
- URLが、平文でエディターの設定内(EditorPrefs)に保存されます。
できること
- 言語別テキストや定数などをGoogleスプレッドシートで共同編集できます。
- 編集結果は、任意のタイミングでプロジェクトへ取り込むことができます。
- 「シナリオやユーザー向けメッセージなどの編集者」や「各種の初期値を設定する担当者」がプログラマーでない場合に共同制作が容易になります。
- 多言語対応のテキストと、言語に依存しない固定値 (int、float、string、bool)を扱えます。
特徴
- 取り込んだスプレッドシートの情報を、C#スクリプトと言語別ScriptableObjectに変換します。
- ScriptableObjectはAddressablesで管理されます。
- スプレッドシートの取り込みは、別スレッドで実行され、エディターをブロックしません。
導入
アセットの入手 (GitHub)
- ダウンロード ⇒ GetSharedData.unitypackage
Google Apps Script の作成
- The Apps Script Dashboardへアクセスします。
- 「新規スクリプト」を作成し、
getspreadseetと名付けます。- 「コード.gs」の中身を、以下のコードで置き換えます。
getspreadseet/コード.gsfunction doGet(e) { if (e.parameter.k == '《Access Key》') { var spreadsheet = SpreadsheetApp.openById(e.parameter.d); if (e.parameter.w == null) { // 読み出し if (e.parameter.a != null) { // セル var value = spreadsheet.getSheetByName(e.parameter.s).getRange(e.parameter.a).getValue(); Logger.log (value); return ContentService.createTextOutput(value).setMimeType(ContentService.MimeType.TEXT); } else if (e.parameter.s != null) { // シート var values = spreadsheet.getSheetByName(e.parameter.s).getDataRange().getValues(); Logger.log(values); return ContentService.createTextOutput(JSON.stringify(values)).setMimeType(ContentService.MimeType.TEXT); } else if (e.parameter.id != null) { // シートID一覧 var sheets = spreadsheet.getSheets(); var sheetids = [sheets.length]; for (var i = 0; i < sheets.length; i++) { sheetids [i] = sheets [i].getSheetId(); } Logger.log(sheetids); return ContentService.createTextOutput(JSON.stringify(sheetids)).setMimeType(ContentService.MimeType.TEXT); } else { // シート名一覧 var sheets = spreadsheet.getSheets(); var sheetnames = [sheets.length]; for (var i = 0; i < sheets.length; i++) { sheetnames [i] = sheets [i].getName(); } Logger.log(sheetnames); return ContentService.createTextOutput(JSON.stringify(sheetnames)).setMimeType(ContentService.MimeType.TEXT); } return ContentService.createTextOutput("[]").setMimeType(ContentService.MimeType.TEXT); // 空json } else { // 書き込み if (e.parameter.a != null) { // セル spreadsheet.getSheetByName(e.parameter.s).getRange(e.parameter.a).setValue(e.parameter.w); } else if (e.parameter.s != null) { // シート var sheet = spreadsheet.getSheetByName(e.parameter.s); if (sheet != null) { sheet.getDataRange().clear(); } else { sheet = spreadsheet.insertSheet(e.parameter.s); } var values = JSON.parse(e.parameter.w); sheet.getRange(1,1,values.length,values[0].length).setValues(values); sheet.autoResizeColumns (1, values[0].length); if (e.parameter.r != null) { sheet.setFrozenRows(e.parameter.r); } if (e.parameter.c != null) { sheet.setFrozenColumns(e.parameter.c); } } return ContentService.createTextOutput("").setMimeType(ContentService.MimeType.TEXT); // 空 } } } function doPost (e) { return doGet (e); }
- スクリプト冒頭の「《Access Key》」を、キーワードで書き換えてください。
- これは秘密のURLの一部になるので、ランダムで十分長い文字列にしてください。
- このキーワードは、後で使用しますので、何処か安全な場所に控えておいてください。
- スクリプトを保存します。
- 「公開」メニューから、「ウェブ アプリケーションとして導入」を選び、以下を選択します。
- プロジェクト バージョン:
New- 次のユーザーとしてアプリケーションを実行:
自分(~)- アプリケーションにアクセスできるユーザー:
全員(匿名ユーザーを含む)- 「導入」ボタンを押します。
続いて、スクリプトを「承認」する必要があります。
- 承認の進め方
- 「承認が必要です」と言われたら「許可を確認」するボタンを押します。
- 「このアプリは確認されていません」と表示されたら「詳細」をクリックします。
- 「getspreadsheet(安全ではないページ)に移動」と表示されるので、クリックします。
- 「getspreadsheet が Google アカウントへのアクセスをリクエストしています」と表示されるので、「許可」します。
- 「現在のウェブ アプリケーションの URL」が表示されます。
- このURLは、後で使用しますので、何処か安全な場所に控えておいてください。
- これによって、URLを知る誰でも、承認したアカウントの権限で、スクリプトが実行可能になります。
- スクリプトは、アカウントにアクセス権がありドキュメントIDが分かる任意のスプレッドシートを読み取ることができます。
- スクリプトと権限は、いつでもThe Apps Script Dashboardから削除可能です。
プロジェクトの準備
スプレッドシートの用意
- スプレッドシートの雛形を開き、ファイルメニューから「コピーを作成…」を選びます。
- フォルダを選んで保存します。
- Googleドライブに保存されます。(ドライブの容量は消費しません。)
- マイドライブから保存したフォルダへ辿り、コピーされたスプレッドシートを開きます。
- 開いたスプレッドシートのURLで、
https://docs.google.com/spreadsheets/d/~~~/edit#gid=~の「/d/~~~/edit#」の部分に注目してください。
- この「~~~」の部分が、このスプレッドシートの
Document IDです。- このIDは、後で使用しますので、何処か安全な場所に控えておいてください。
Addressablesの導入
- パッケージマネージャーを使ってAddressablesを導入します。
- Window (Menu) > Package Manager > Pakkages (Window) > Addressables > Install (Button)
アセットの導入と設定
- プロジェクトにアセット「GetSharedData.unitypackage」を導入してください。
- 「Window」メニューの「GetSharedData > OPen Setting Window」を選択しウインドウを開きます。
- 「Application URL*」に、控えておいた「ウェブ アプリケーションの URL」を記入します。
- 「Access Key*」に、控えておいたキーワードを記入します。
- 「Document ID」に、控えておいたスプレッドシートのIDを記入します。
- 「Asset Folder」は、プロジェクトのフォルダ構造に合わせて書き換え可能です。
- 設定はエディターを終了しても保存されます。
- 「*」の付く設定は、プロジェクトを跨いで共有されます。
- その他の設定はプロジェクト毎に保持されます。
- プロジェクトは、
Player SettingsのCompany NameとProduct Nameで識別されますので、適切に設定してください。- 全ての設定は、EditorPrefsに平文で保存されます。
使い方
スプレッドシート
- 「Text」と「Const」は、シート名として予約されています。
- シートの追加や並び替えは任意に行うことができますが、シート名の重複はできません。
- 「Text」シートに記載したものは言語切り替えテキスト、「Const」シートに記載したものは定数に変換されます。
- 他のシートは無視されます。
- シートでは、行を3つの部分(「列ラベル」、「列ラベルより上」、「列ラベルより下」)に分けます。
- 「Key」と書かれたセルが最初に見つかった行が、列ラベルになります。
- 列ラベルより上は無視されます。
- 「Key」、「Type」、「Value」、「Comment」、および、
UnityEngine.SystemLanguageで定義されている名前は、列ラベル名として予約されています。
- ラベルの文字種や空白文字の有無は区別されます。
- 予約されていない名前の列は無視されます。
- セルの値(計算結果)だけが使われ、シートの計算式や書式は無視されます。
- 「Text」シートでは、「Key」および「Comment」列と、任意の数の言語名の列を記入します。
- 最も左の列の言語がデフォルトになります。
- セル内改行は、改行文字
\nに変換されます。- 「Const」シートでは、「Key」、「Type」、「Value」、「Comment」列を記入します。
- キーとして、「BuildNumber」、「BundleVersion」が予約されています。
Unityエディター
- GetSharedDataウィンドウの「GetSharedData」ボタンを押すか、Windowメニューの「GetSharedData > Get Spreadsheet」を選ぶか、そのメニュー項目に表示されるキーボードショートカットを使うことで、スプレッドシートの情報が取り込まれ、コンパイルされます。
Addressables
- 言語別テキストを格納したアセット
Text_言語名.assetは、Addressablesに入れてください。
- アドレスを単純化(Simplify)して、名前だけにしておいてください。
- 再取り込みを行う際は、ファイルは作り直されずに内容だけが上書きされます。
- Unityエディターで内容を編集することは想定していません。
スクリプトでの使用
using SharedConstant;を指定してください。テキスト
- システムの言語設定(
Application.systemLanguage)に従って初期設定されます。SystemLanguage Txt.Locale言語 (プロパティ)
SystemLanguage型の値を代入することで、強制的に言語を切り替えます。SystemLanguage.Unknownを指定すると、システムの言語設定に従います。- 相当する言語がアセットにない場合は、デフォルト(シート最左)の言語が使われます。
- 切り替えてから実際に値が変化するまでには、アセットをロードする時間分のラグがあります。
string Txt.S (Nam.key[, ...])テキスト (メソッド)
- キーを指定して現在設定されている言語のテキストを返します。
- キーを列挙すると該当するテキストを連結して返します。
string Txt.F (Nam.key, object arg[, ...])フォーマットテキスト (メソッド)
- 指定したキーをフォーマットとして他の引数を展開したテキストを返します。
int Txt.N (string str)キーの逆引き (メソッド)
Txt.S (~)で得たテキストを渡すと、該当のキーを返します。- 未定義なら
-1を返します。- キー
Nam.~は、const intとして定義された文字列のインデックスです。数値
- キーは
constとして定義されます。Cns.~として使用します。Cns.BuildNumber、Cns.BundleVersionが自動的に定義されます。Unity使用者が複数いる場合の留意点
- 例えば、「Unityを使わない企画者、Unityを使うデザイナとプログラマの3人」といったように、スプレッドシートからUnityに情報を取り込むメンバーが複数いる場合は以下の点に留意してください。
- メンバーで共有するアセットの設定は、「Document ID」と「Assets/Scripts/ Folder」だけです。
- 「Application URL*」と「Access Key*」は共有してはいけません。つまり、各メンバーそれぞれがGoogle Apps Script の作成を行う必要があります。
- なお、これらの設定は、プロジェクトのフォルダには保存されないので、GitHubなどによるアセットの共有で問題が生じることはありません。
- 投稿日:2019-10-11T13:02:38+09:00
Unity玉転がしチュートリアル 2-2.プレイエリアの構成
この記事の対象者
- Unity入門したい人
- 最初の一歩が踏み出せない人
OSとか環境とか
- Windows 10 Pro
- macOS Mojave
- Unity 2019.2.8f1
- Rider 2019.2.2
補足
- 公式動画にて利用しているのはMacなので、Windowsユーザーはある程度脳内変換して見る事
- 筆者はWindows、Macの両方の環境で確認。Ubuntuとかでは検証してない。
- 基本Unityは英語メニューで利用
- 間違いがあったらツッコミ大歓迎
公式
https://unity3d.com/jp/learn/tutorials/projects/roll-ball-tutorial/setting-play-area
プレイエリアの作成
4方向を壁で囲まれたシンプルで奥深いプレイエリア
という条件の元、プレイエリアを作成するオブジェクトの整理
GameObject>Create Emptyで名前をWallsとしてGameObjectを作成する
→これは親オブジェクトとなり、壁群を整理する為に利用するProjectの整理はフォルダ
Hierarchyの整理にはゲームオブジェクトを利用
→Emptyはフォルダのように利用出来るので覚えておく事追加したらいつもどおり原点に配置
壁の追加
GameObject>3D Object>Cubeで名前をWest wallとしてGameObjectを作成する
Wallsの子としてWast Wallを配置する
CubeのTransformでスケールのXYZをゲームエリアに合わせる
今回は
Scale
X:0.5
Y:2.0
Z:20.5Position
X:-10
とする上記値を入れると、プレイエリアにぴったりな壁が出来ます
※出来ない場合は、GroundのScaleを調整しましょう
このまま4つの壁を同様の手順で追加しても良いが、せっかくなのでコピーする
Edit>Duplicateで複製が可能複製したら名前をEast Wallへ変更する
Position
X:10
とすれば、逆側に壁が出来上がる同じく残りの壁も作成する
パラメータはこんな感じですNorth Wall
Scale
X:20.5
Y:2.0
Z:0.5Position
Z:10South Wall
Scale
X:20.5
Y:2.0
Z:0.5Position
Z:-104つ配置したら、玉が外に出ていかないエリアが完成します
気の済むまでボールを動かしましょうここまで来るとある程度「あれ?ゲーム出来る?」って感じがします


- 投稿日:2019-10-11T12:15:39+09:00
ROLL-A-BALL TUTORIAL #2
Creating stage
At first, we must create materials for the composing stage.
Ex. ground and walls and so on.1. Creating groud
At first, we create the ground. See below for creating "Game Object" to have function "Panel" in this "Scene".
- Click "Create" in "Hierarchy"
- Select "Panel" in "3D Object".

About "GameObject ・・・ "In “Unity”, we call all putting materials in “Scene” by “Game Object”. “Game Object” is appeared 3D meshes, lights (stage lighting), physical objects, transparent sounds, and triggers. Unity manages all materials, assigns and controls scripts optionally.
2. Setting ground
We adjust the ground to size. There are two options. Option 1 is setting Panels. Option 2 is stretching. Today choose a setting, it’s no reason.
- Select “Panel” in the “Hierarchy” view, and select the right-click and “Duplicate”.
- Select the newly created “Panel” position, and change the “Move Object” mode in control mode at the left top panel.
- Adjust a “Panel” position by operating an appeared arrow.
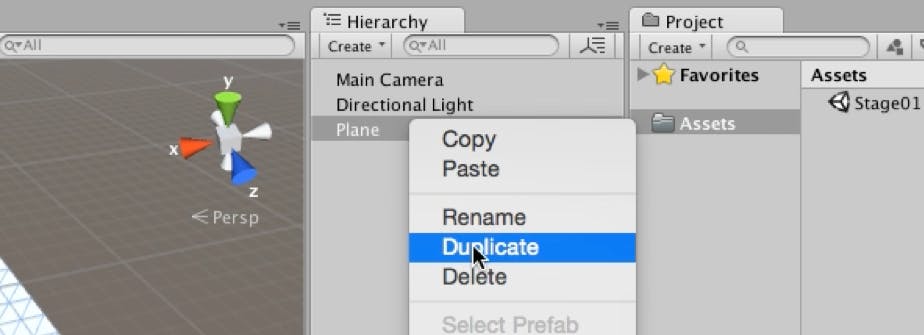
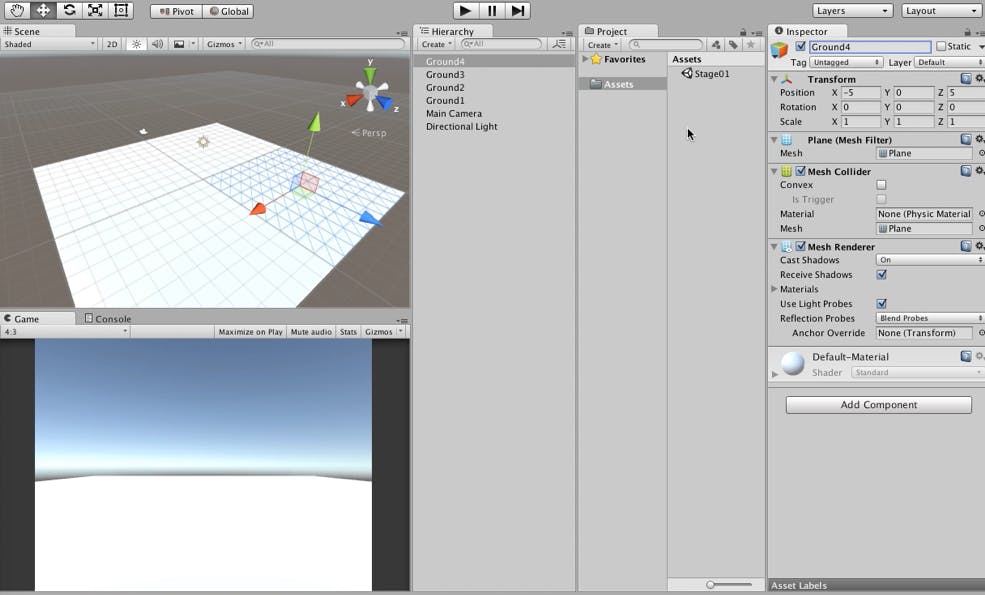
We will make ground by 4 “Panel”s.
Then, we should change “Panel” names. We change “Panel” names to “Ground1”, “Ground2”, “Ground3”, and “Ground4” as the object names. We can change object name at the name in the top of Inspector View
3. Adjusting position
At last, we should adjust the position numerally. When adjusting the position, we would find that change selection and each time change the parameter in the inspector view on the right of the editor.
This inspector view shows a component detail to compose Game Object is selected. There are components as “icon”, “checkbox for enabling or disable”, “component name”, “option” from the left side to the right side. There is “help” on the left side of “option”, and we can see help documents.4. Setting up 4 Panels
Actually. We will adjust coordinates. The transform component manages coordinates. “Position” manage coordinates of the object, “Rotation” manage spin of an object, and “Scale” manage the size of the object. Today, we adjust the position, see below.
● Ground1(x:5, y:0, z:-5),
● Ground2(x:5, y:0, z:5),
● Ground3(x:-5, y:0, z:-5),
● Ground4(x:-5, y:0, z:5)
5. Painting ground color
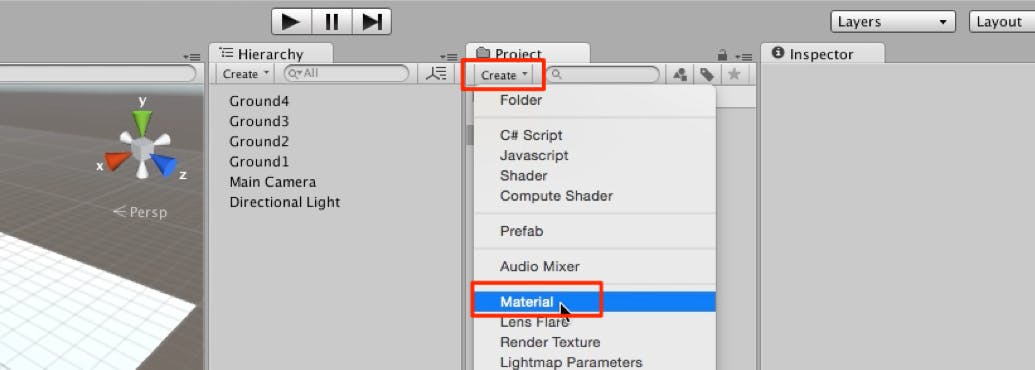
We will set the color on the floor.
2 ways set the color on “Model”. 1st way is setting texture, and 2nd way is setting the color of all models. “Material” file manage material of these color and reflection.
- Click the “Create” button on Project Browser.
- Select “Material” in the list.
- Change the name to “GroundMaterial”.
5-1. Setting color at “Material”
Next, we set the color at “Material”.
1. Select “GroundMaterial” that created before this.
2. Select “O” of the left side, and select “Default Checker”.
5-2. Setting “Material” on “Ground”
Next, we will paint color on Ground that used Material detail.
1. Drag & drop “Ground” on Ground(1-4) in Hierarchy view6. Creating a wall
We will make a stage that have 4 walls all around. There are walls all around, function to the ball cannot go outside.
Then, shall we create walls?
1. Click the “Create” button in the “Hierarchy” view.
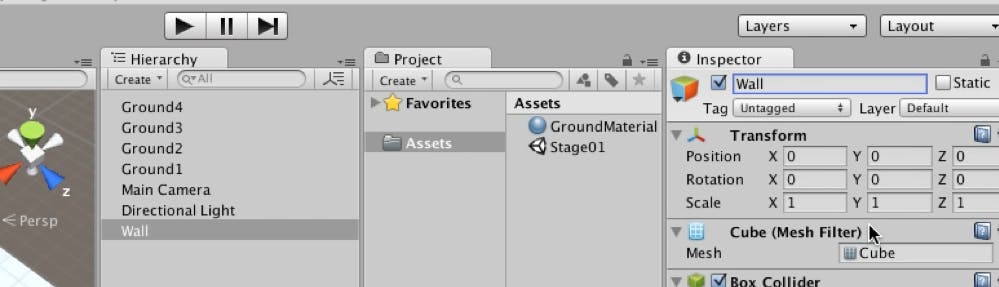
2. Create “Cube” from “3D Object > Cube”.
3. Rename created “Cure” to “Wall”.
6-1 . Setting wall color
We will change the wall color.
1. Click the “Create” button in the “Project” browser.
2. Select “Material”.
3. Rename “WallMaterial”.
4. Select “WallMaterial” and set “albedo” to color like red.
5. Drag & drop “WallMaterial” onto the “Wall” object.
6-2. Putting wall
Next, Use a way of stretch, to change wall size to create.
When stretching, select the scale model from the top left panel, and select the object, and drag the block in the direction you want to stretch.
Next, select the created Cube in Move mode, and hold down “V” to move. By moving while holding down V, it moves as to suck at the apex of another model, so you can easily adjust it.
We adjust to the inspector's view of completeness. “Panel” size corresponds to “Cube”'s 10x10, so change the below size.
Position(x:-0.5, 0.5, -9.5)
Scale(x:19, y:1, z:1)
Put on the opposite. Duplicate the created “Cube”, and put on the opposite.
Position(x:0.5, 0.5, 9.5)
Scale(x:19, y:1, z:1)
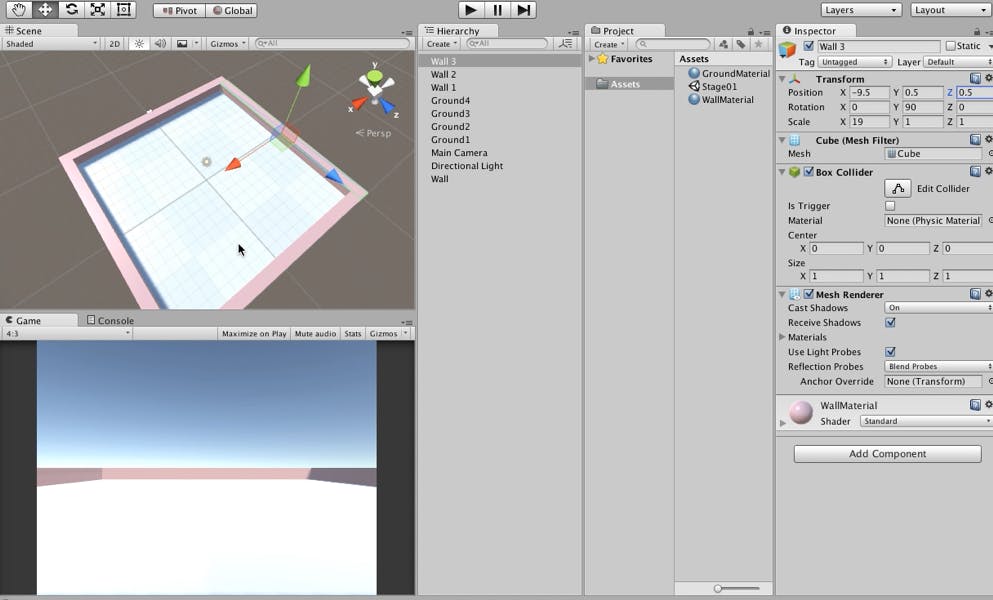
6-3. Rotating object
We have two ideas to put the walls on both sides. 1st idea is to "stretched Cube stick" by “rotate 90 degrees”. 2nd idea is creating a stick that stretches to a different direction ((x: 1, y: 1, z: 19).
We can use the way “rotate 90 degrees”. Because explain the way of rotation.
To rotate, select rotation mode, and drag the displayed outer frame. Operating while pressing Ctrl (Command) and so rotates by 45 degrees each time.
But set on Inspector view. First, duplicate one of the “Cube” and create “Cube 3”. Next, set below for “Cube3”’s rotation.
Position(x:-9.5, y:0.5, z:0.5)
Rotation(x:0, y:90, z:0)
Duplicate “Cube3”, and create “Cube4”. Adjust the following position.
Position(x:9.5, y:0.5, z:-0.5)
7. Rearrange object
It becomes troublesome to clutter an object and a scene in the project. So, we use an empty object and organize the objects.
7-1. Setting Material
Make a “Material” folder for a Materials list, and save it in this folder.
1. Click “Create” on the Project browser.
2. Select Folder.
3. Change the Folder name to "Material".
4. Select "GroundMaterial" and "WallMaterial". Drag & drop to the "Material" folder.7-2. Create a blank "Stage" object
Next, sort out objects in the "Hierarchy" view. Create a blank "Stage" object.
1. Click the "Create" button in the "Hierarchy" view.
2. Select "Create empty".
3. Change object name to "Stage".
4. Select the list of “Wall” and “Ground” last step created in the “Hierarchy” view. Drag & drop to “Stage” object.
7-3. Putting on “Stage” as a static object
In the last step, the stage object is not a dynamic object, then putting the static object. Because performance and visual will be improved.
1. Select the "Stage" object in "Hierarchy" view.
2. Check the "Static" button on the "Stage" object in the "Inspector" view.
3. Show "Do you want to enable the static flags for all the child objects as well?" and we select "Yes Change Children".


- 投稿日:2019-10-11T11:18:44+09:00
ROLL-A-BALL TUTORIAL #1
My First Unity
1. Create a Project
At first, we create a new project for our game. Take some operations following terms.
- Invoke Unity editor. Click “New Project…” from “File” on the menu bar. (after here, write this operation as “File -> New Project…”)
Click the “New Project” button in the upper-right.
Display dialog is shown. Input the name of the game in “Project Name”. In this time, the name is “Roll-a-Ball”.
Select a folder for saving the project in “Location”.
Select the 3D game.
At last, click the “Create project” button.
2. Save a scene
Take some operations following terms for making a scene. After these operations, the Scene file(***.unity) is made.
- Click “File -> Save Scene”.
- Input the scene name. At this time, the name is “stage01”.
*note: relation about project and scene
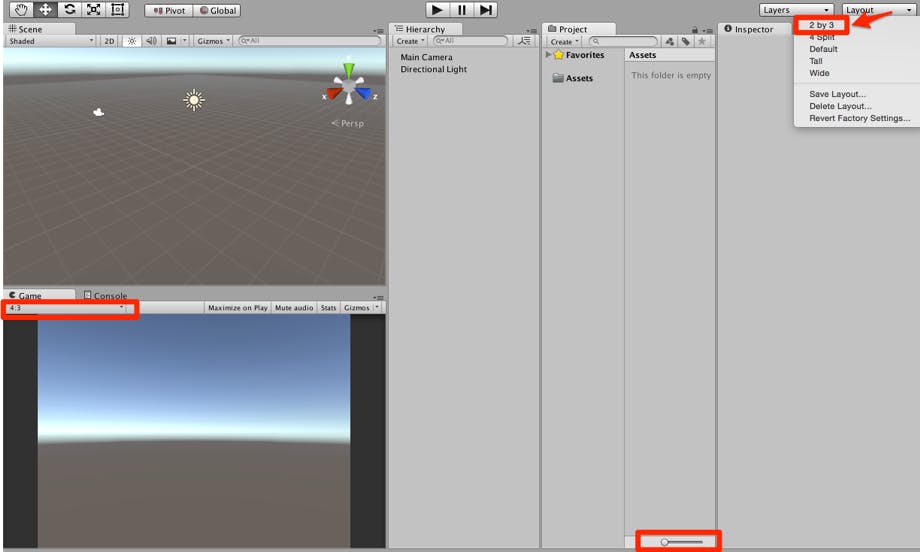
At Unity, the composition of the whole game is called “Project”. And each stage or scene which compose a game is called “Scene”. One game “Project” has some stage or scene.3. Get editor layout ready
Get editor layout ready for explaining easier.
- Click “Layout” on the upper-right. And select “2 by 3”.
- Click the “Game” tab. And select “Free Aspect” to “4:3”.
- Slide to left at the below of “Project Browser”.
4. Way to use about the interface
Scene View
This shows a game scene being made. We can watch the scene from various points and angles.Game View
This is a game display. The player watch game through this view when playing.Inspector View
This shows some object information that is selected in “Scene View”. And we can edit it.Hierarchy View
This shows a list of objects which exist in “Scene View”. We can edit it, copy, paste or change the object’s name, etc.Project Browser
This show resource files included project (scene, script, graphic, sound, etc.). We can import some packages from outside at here.
5. Way to move “Scene View”
We can move a viewpoint in “Scene View”
Operation Action Scroll a mouse wheel Scale up or down a “Scene View” Drag clicking right Rotate viewpoint Drag clicking left Parallel move a “Scene View” Double click object Focus the object clicked