- 投稿日:2019-07-07T21:27:21+09:00
【Mac】nodebrewでNode.jsのバージョン管理を行う
自分のメモ用に。
OSのバージョン
mac OS Mojave 10.14.5
前提
Homebrew、Nodeberewをインストールしてあること
現在インストールされているバージョンを表示する
nodebrew lsインストール可能なバージョンを表示する
nodebrew ls-remoteバージョンを指定してインストールする
nodebrew install [バージョン名]バージョンを指定してアンインストールする
nodebrew uninstall [バージョン名]使用するバージョンを切り替える
nodebrew use [バージョン名]バージョンを切り替える際は、以下のようにすると良いでしょう。
- 使用したいバージョンをインストールする
- バージョンを切り替える
- 不要なバージョンをアンインストールする
バージョン確認
最後に、今使用しているバージョンを確認し、使用したいバージョンに切り替わっていればOKです。
node -v
- 投稿日:2019-07-07T20:01:14+09:00
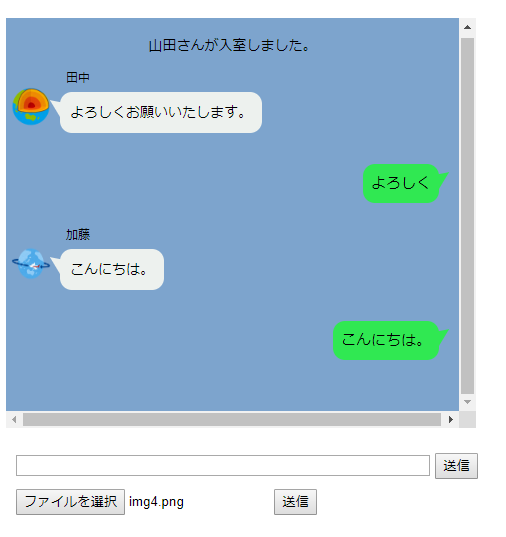
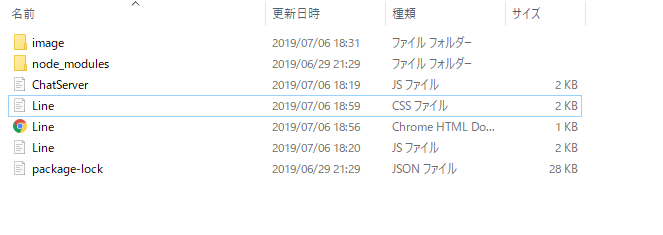
Node.jsとsocket.ioでLine風チャットを作成してみた4
node.jsとsocket.ioを使用する機会があったので、簡単にチャットを作ることにしました。
作成イメージ
ディレクトリ
完成コード
hello.html<!DOCTYPE html> <html> <head> <meta charset="UTF-8"> <title></title> <link rel="stylesheet" type="text/css" href="./Line.css"> <script type="text/javascript" src="https://cdnjs.cloudflare.com/ajax/libs/socket.io/2.2.0/socket.io.js"></script> <script src="https://ajax.googleapis.com/ajax/libs/jquery/3.2.1/jquery.min.js"></script> <script src="./Line.js"></script> </head> <body> <div class="line"> </div> <div class="submit"> <input class="form-control" id="msgForm" autocomplete="off" maxlength="120"> <input type="button" id="sendButton" onclick="window.message()" value="送信"> </div> <div class="file"> <input type="file" name="upfile" id="upfile" accept="image/*" capture="camera" /> <input type="button" onclick="upload()" value="送信"> </div> </body> </html>hello.CSS.line { overflow:scroll; float: left; width:750px; height:370px; padding: 20px 10px; max-width: 450px; margin: 15px auto; font-size: 14px; background: #7da4cd; } .joincomment{ text-align:center; } .others{ display: inline-block; position: relative; left: -80px; } .icon{ display: inline-block; border-radius: 50%; width: 40px; height: 40px; position: relative; top:10px; left:75px; } .name{ display: inline-block; font-size: 12px; position: relative; top:-35px; left:90px; } .othercomment { display: inline-block; position: relative; left:10px; margin: 0 0 0 50px; padding: 10px; max-width: 250px; border-radius: 12px; background: #edf1ee; text-align: left; } .othercomment:after { content: ""; display: inline-block; position: absolute; top: 3px; left: -19px; border: 8px solid transparent; border-right: 18px solid #edf1ee; -webkit-transform: rotate(35deg); transform: rotate(35deg); } .othercomment p { margin: 0; padding: 0; } .mycomment { margin: 10px 0; text-align: right; } .mycomment p { display: inline-block; position: relative; margin: 0 10px 0 0; padding: 8px; max-width: 250px; border-radius: 12px; background: #30e852; font-size: 15px; } .mycomment p:after { content: ""; position: absolute; top: 3px; right: -19px; border: 8px solid transparent; border-left: 18px solid #30e852; -webkit-transform: rotate(-35deg); transform: rotate(-35deg); } .submit{ position: relative; top: 450px; left: -460px; } #msgForm{ width:410px; } .file{ position: relative; top: 460px; left: -460px; }Line.jsvar socket = io.connect('http://localhost:3000'); var name = prompt('ニックネームを入力してください', ''); joinUser(name); socket.on("server_to_client", function (data) { appendOtherMsg(data.otherMsg, data.name, data.img); }); socket.on("server_to_client_join", function (data) { appendJoinMsg(data.join); }); function appendJoinMsg(message) { $(".line").append('<div class="joincomment">' + message + '</div><br>'); $('.line').animate({ scrollTop: $('.line')[0].scrollHeight }, 'fast'); } function appendOtherMsg(message, name, img) { $(".line").append('<div class="others"><img src="' + img + '" class="icon"><span class="name">' + name + '</span><div class="othercomment"><p>' + message + '</p></div></div><br><br>'); $('.line').animate({ scrollTop: $('.line')[0].scrollHeight }, 'fast'); } function appendMyMsg(message) { $(".line").append('<div class="mycomment"><p>' + message + '</p></div><br>'); $('.line').animate({ scrollTop: $('.line')[0].scrollHeight }, 'fast'); } function message() { if ($("#msgForm").val() != '') { var message = $("#msgForm").val(); appendMyMsg(message); $("#msgForm").val(''); socket.emit("client_to_server", { message: message, name: name }); } } function joinUser(name) { var selectRoom = 1; socket.emit("client_to_server_join", { room: selectRoom, name: name }); } function upload() { var img = $("#upfile").val().split("\\"); socket.emit("client_to_sever_upload", { img: './image/' + img.pop() }); } $('#msgForm').keypress(function (e) { if (e.which == 13 && $("#msgForm").val() != ' ') { message(); return false; } });chatServer.jsvar http = require('http'); var socketio = require('socket.io'); var server = http.createServer(function (req, res) { }).listen(3000); var io = socketio.listen(server); io.sockets.on('connection', function (socket) { var room = ''; var name = ''; var img = './image/icon.jpg'; socket.on('client_to_server_join', function (data) { room = data.room; name = data.name; socket.join(room); io.to(room).emit('server_to_client_join', { join: name + "さんが入室しました。" }); }); socket.on('client_to_sever_upload', function (data) { img = data.img; }); socket.on('client_to_server', function (data) { socket.broadcast.to(room).emit('server_to_client', { otherMsg: data.message, name: name, img: img }); }); socket.on('disconnect', function () { if (name == '') { console.log("未入室のまま、どこかへ去っていきました。"); } else { io.to(room).emit('server_to_client_join', { join: name + "さんが退室しました。" }); } }); });感想
データベースなしで作成したため、画像の持ち方は悪いと思います。
CSSに関しては得意ではないので、都度修正してください。画面のサイズでUIが変わると思います。
参考程度にしてください。
- 投稿日:2019-07-07T20:00:51+09:00
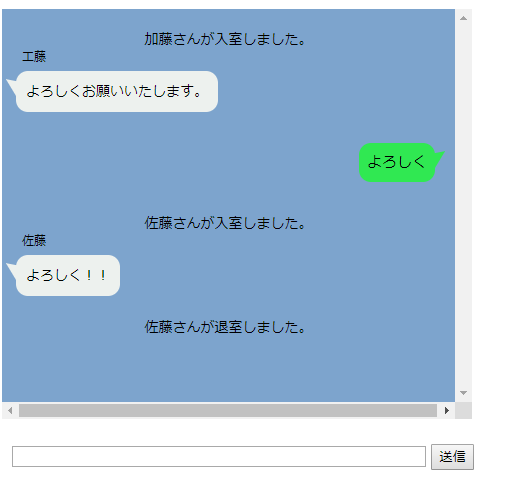
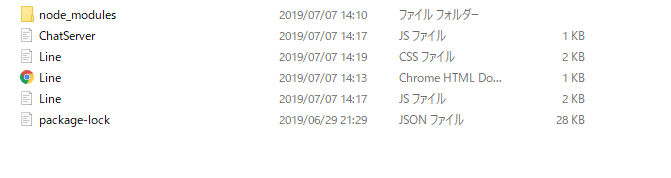
Node.jsとsocket.ioでLine風チャットを作成してみた3
node.jsとsocket.ioを使用する機会があったので、簡単にチャットを作ることにしました。
今回はアイコンつけてみます。
作成イメージ
ディレクトリ
image追加 画像を入れてください。
コード
bodyタグ最後に追加
hello.html<div class="file"> <input type="file" name="upfile" id="upfile" accept="image/*" capture="camera" /> <input type="button" onclick="upload()" value="送信"> </div>CSS追加
hello.CSS.file{ position: relative; top: 460px; left: -460px; }Line.jsvar socket = io.connect('http://localhost:3000'); var name = prompt('ニックネームを入力してください', ''); joinUser(name); socket.on("server_to_client", function (data) { appendOtherMsg(data.otherMsg, data.name, data.img); }); socket.on("server_to_client_join", function (data) { appendJoinMsg(data.join); }); function appendJoinMsg(message) { $(".line").append('<div class="joincomment">' + message + '</div><br>'); $('.line').animate({ scrollTop: $('.line')[0].scrollHeight }, 'fast'); } function appendOtherMsg(message, name, img) { $(".line").append('<div class="others"><img src="' + img + '" class="icon"><span class="name">' + name + '</span><div class="othercomment"><p>' + message + '</p></div></div><br><br>'); $('.line').animate({ scrollTop: $('.line')[0].scrollHeight }, 'fast'); } function appendMyMsg(message) { $(".line").append('<div class="mycomment"><p>' + message + '</p></div><br>'); $('.line').animate({ scrollTop: $('.line')[0].scrollHeight }, 'fast'); } function message() { if ($("#msgForm").val() != '') { var message = $("#msgForm").val(); appendMyMsg(message); $("#msgForm").val(''); socket.emit("client_to_server", { message: message, name: name }); } } function joinUser(name) { var selectRoom = 1; socket.emit("client_to_server_join", { room: selectRoom, name: name }); } function upload() {//アイコンデータ送信 var img = $("#upfile").val().split("\\"); socket.emit("client_to_sever_upload", { img: './image/' + img.pop() }); } $('#msgForm').keypress(function (e) { if (e.which == 13 && $("#msgForm").val() != ' ') { message(); return false; } });chatServer.jsvar http = require('http'); var socketio = require('socket.io'); var server = http.createServer(function (req, res) { }).listen(3000); var io = socketio.listen(server); io.sockets.on('connection', function (socket) { var room = ''; var name = ''; var img = './image/icon.jpg';//初期アイコンURL 必要に応じて変えてください。 socket.on('client_to_server_join', function (data) { room = data.room; name = data.name; socket.join(room); io.to(room).emit('server_to_client_join', { join: name + "さんが入室しました。" }); }); socket.on('client_to_sever_upload', function (data) { img = data.img;//アイコン変更 }); socket.on('client_to_server', function (data) { socket.broadcast.to(room).emit('server_to_client', { otherMsg: data.message, name: name, img: img });//アイコンも送信 }); socket.on('disconnect', function () { if (name == '') { console.log("未入室のまま、どこかへ去っていきました。"); } else { io.to(room).emit('server_to_client_join', { join: name + "さんが退室しました。" }); } }); });感想
データベースなしで作成したため、画像の持ち方は悪いと思います。
CSSに関しては得意ではないので、都度修正してください。画面のサイズでUIが変わると思います。
参考程度にしてください。
一応、4に全体のコードを載せます。
https://qiita.com/Catatataki/items/03ce43785466603dadac
- 投稿日:2019-07-07T19:52:12+09:00
Node.jsとsocket.ioでLine風チャットを作成してみた2
node.jsとsocket.ioを使用する機会があったので、簡単にチャットを作ることにしました。
今回はユーザーに名前を付けてみます。
完成品だけ見たい場合は4を見てください
https://qiita.com/Catatataki/items/03ce43785466603dadac
作成イメージ
ディレクトリ
コード
hello.html前回から変更なしCSS追加
hello.CSS.joincomment{ text-align:center; } .name{ display: inline-block; font-size: 12px; position: relative; top:-35px; left:90px; }JS変更
Line.jsvar socket = io.connect('http://localhost:3000'); var name = prompt('ニックネームを入力してください', ''); joinUser(name); socket.on("server_to_client", function (data) { appendOtherMsg(data.otherMsg, data.name, data.img); }); socket.on("server_to_client_join", function (data) { appendJoinMsg(data.join); }); function appendJoinMsg(message) {//参加退出コメント $(".line").append('<div class="joincomment">' + message + '</div><br>'); $('.line').animate({ scrollTop: $('.line')[0].scrollHeight }, 'fast'); } function appendOtherMsg(message, name) {//名前追加 $(".line").append('<div class="others"><span class="name">' + name + '</span><div class="othercomment"><p>' + message + '</p></div></div><br><br>'); $('.line').animate({ scrollTop: $('.line')[0].scrollHeight }, 'fast'); } function appendMyMsg(message) { $(".line").append('<div class="mycomment"><p>' + message + '</p></div><br>'); $('.line').animate({ scrollTop: $('.line')[0].scrollHeight }, 'fast'); } function message() { if ($("#msgForm").val() != '') { var message = $("#msgForm").val(); appendMyMsg(message); $("#msgForm").val(''); socket.emit("client_to_server", { message: message, name: name }); } } function joinUser(name) { var selectRoom = 1; socket.emit("client_to_server_join", { room: selectRoom, name: name }); } $('#msgForm').keypress(function (e) { if (e.which == 13 && $("#msgForm").val() != ' ') { message(); return false; } });chatServer.jsvar http = require('http'); var socketio = require('socket.io'); var server = http.createServer(function (req, res) { }).listen(3000); var io = socketio.listen(server); io.sockets.on('connection', function (socket) { var room = ''; var name = ''; socket.on('client_to_server_join', function (data) { room = data.room; name = data.name;//名前追加 socket.join(room); io.to(room).emit('server_to_client_join', { join: name + "さんが入室しました。" });//ルーム全体にブロードキャスト }); socket.on('client_to_server', function (data) { socket.broadcast.to(room).emit('server_to_client', { otherMsg: data.message, name: name });//名前も送信 }); socket.on('disconnect', function () {//接続切れ処理 if (name == '') { console.log("未入室のまま、どこかへ去っていきました。"); } else { io.to(room).emit('server_to_client_join', { join: name + "さんが退室しました。" });//ルーム全体にブロードキャスト } }); });次回
次はアイコンをつけようと思います。
https://qiita.com/Catatataki/private/e9b71d1bbe5b7188751a
- 投稿日:2019-07-07T19:38:26+09:00
サーバからの処理結果をリアルタイムで送信可能なSocketのサーバを作成する
初めに
APIを用いた通信では,サーバにリクエストした処理が全て終了してからレスポンスが返される.そのため処理に時間がかかるプロセスを実行したい場合に,クライアント側がかなりの時間サーバからのレスポンスを待つ状態になってしまう.
リアルタイムに逐次的にサーバの実行結果を返してくれる通信方法にはWebSocketがあるので,リアルタイム通信としてnodejsのWebSocketを用いて実装した.WebSocketの通信流れとしては
1. クライアントとサーバがSocket接続を確立
2. 受け取ったサーバが,サーバサイドで処理の実行
3. サーバがクラアントに処理結果を逐次的に送信
4. 処理が終了したらSocket接続を切断実装
開発環境は以下の通り.
- node 10.9.0
- npm 6.2.0
ライブラリのインストール
WebSocketのライブラリは有名なsocket.ioを使う.
しかしsocket.ioはサーバサイド専用のライブラリなので,クライントとして用いることはできない.そのためSocket通信のクラアントを作成する場合はsocket.io-clientライブラリを使用する必要がある.$ npm install --save socket.io $ npm install --save socket.io-clientsocket.ioではサーバクライアント問わず原則,
- socket.on():待ち受け
- socket.emmit():送信
で通信を行う.
Socketサーバの作成
処理を実行するサーバサイドを実装する.
初めにio.on('connection')でクライアントからのコネクションを待ち受ける.そして,クライアントから接続要求を受け取り,コネクションを開始する.ソケット通信中は,socketオブジェクトでクライアントからの処理のトリガーを待ち受け,トリガーを受け取ったら処理を開始する.サーバからクライアントに処理結果を返す場合は,socket.emit()にトリガー名を指定して実行し,クライアントに送信する.server.jsconst io = require('socket.io')(8023); const exec = require('child_process').exec; var execCmd; /* * サーバの接続 */ io.on('connection', function ( socket ) { // コマンドの実行 socket.on('exec', function ( command ) { execCmd = exec(command); console.log(execCmd.pid); execCmd.stdout.on('data',function(data) {// 実行中の出力を受け取る console.log(data); data = data.split(/\r\n|\n/); io.sockets.emit('response', {data:data}); }); execCmd.stderr.on('data', function (data) {// エラーの出力を受け取る console.log(data); data = data.split(/\r\n|\n/); io.sockets.emit('response', {data:data}); }); execCmd.on('exit', function (code) {// 処理が終了したことをクライアントに送信 io.sockets.emit('exit', {data:code}); }); }); }); console.log('Start socket server : http://127.0.0.1:8023');ソケット通信開始後に
execのトリガーを受け取ったら,child_processでnodejsからターミナルコマンドの実行をし,1行出力されるたびにその出力結果をresponseトリガーでクライアントに返すというサーバを作成した.クラアント側の作成
今回は実験のために,1秒ごとに現在の時間をターミナル出力する処理を5回繰り返すコマンドを作成し,それをサーバ側で実行してもらう.
client.js
cconst io = require('socket.io-client');

// 1秒ごとに現在の時間をプリントするコマンド
var command = 'for i in `seq 1 5`; do date; sleep 1s; done';
var socket = io.connect('http://localhost:8023');//接続先のサーバを指定

console.log(command);

socket.on('connect' ,function (data) {//コネクションの接続
  socket.emit('exec',command,function(msg){//シェルコマンドを送る
    console.log(msg);
  });

  socket.on('response',function(msg){//サーバからのレスポンスを受け取る
    msg = msg['data'];
    console.log(msg);
  });

  socket.on('exit',function(msg){//終了を受け取ったらSocket通信を終了する
    console.log(msg);
    socket.disconnect()
  });
});
クライアントではサーバからの
socket.on('response')トリガーを待ち受け,受け取ったレスポンスをクライアント側のターミナルに出力する.
重要なのはsocket.on('exit')の部分.処理が終わったらSocket通信を切断しなければ,通信しっぱなしになってしまうので,終了処理は必ず入れておく.実行
初めにSocketサーバの起動
サーバ側$ node server.js Start socket server : http://127.0.0.1:8023クライアントからSocketサーバに向けて処理の実行要求.
クライアント側$ node client.js実行結果は以下の通り.
最初の出力は被ったが,概ね正常に1秒ごとに5回処理が繰り返され,接続が切断されたことが確認できた.
終わりに
処理に時間がかかるもの,
APIとWebSocket,用途によって使い分けられると良さそう.
- 投稿日:2019-07-07T18:04:44+09:00
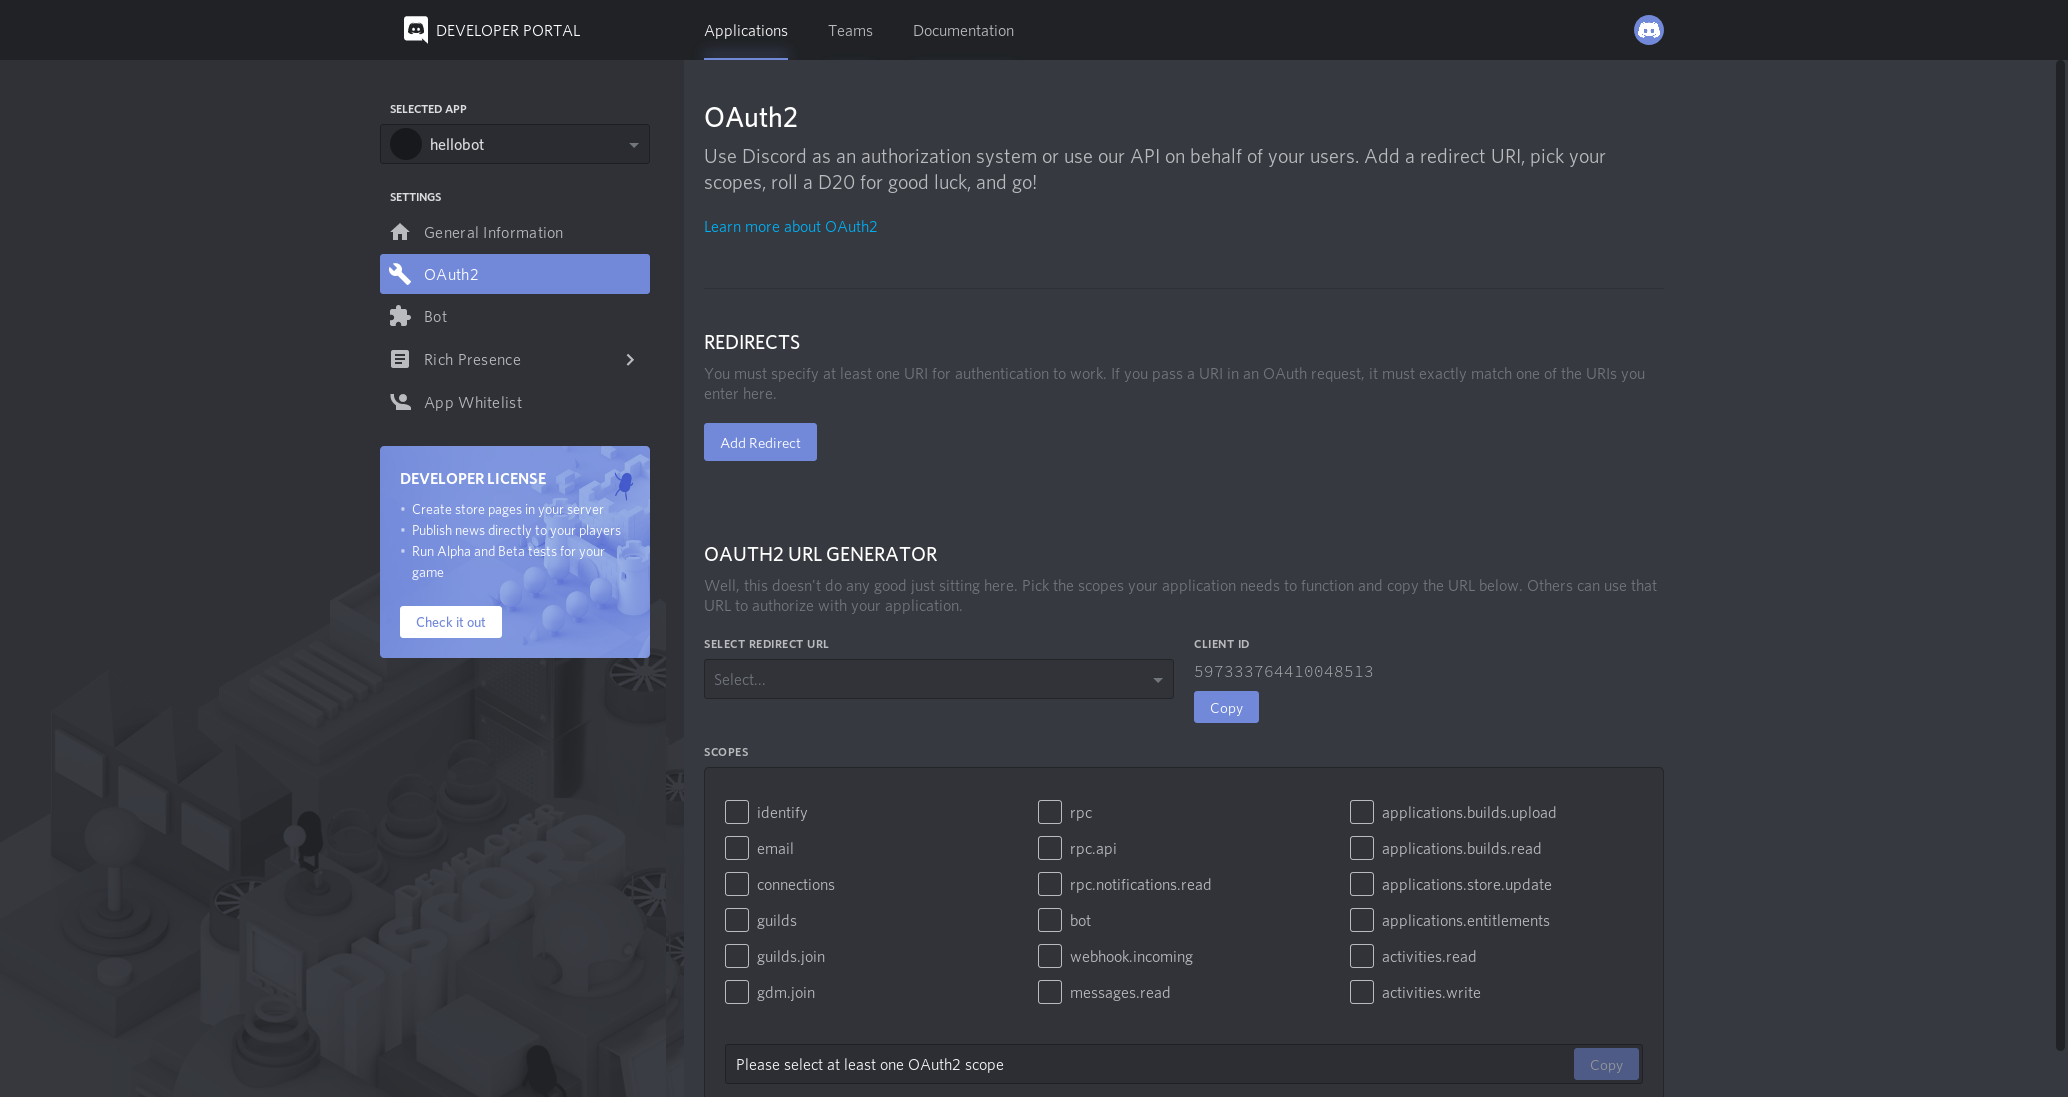
Glitchを使ってDiscordBotを動かしてみる[2019/7/7最新版]
どうもこんにちは、久しぶりです。
今回は無料でNode.jsのアプリケーションを稼働できるサイト,Glitchを使ってDiscordのBOTを動かしてみよう、という内容です。
これは@allegrogikenさんの「Glitchを使ってNode.js製Discord Botを動かしてみる」(https://qiita.com/allegrogiken/items/f437c5e89aeabc587a96) を最新版にした記事です。はじめに
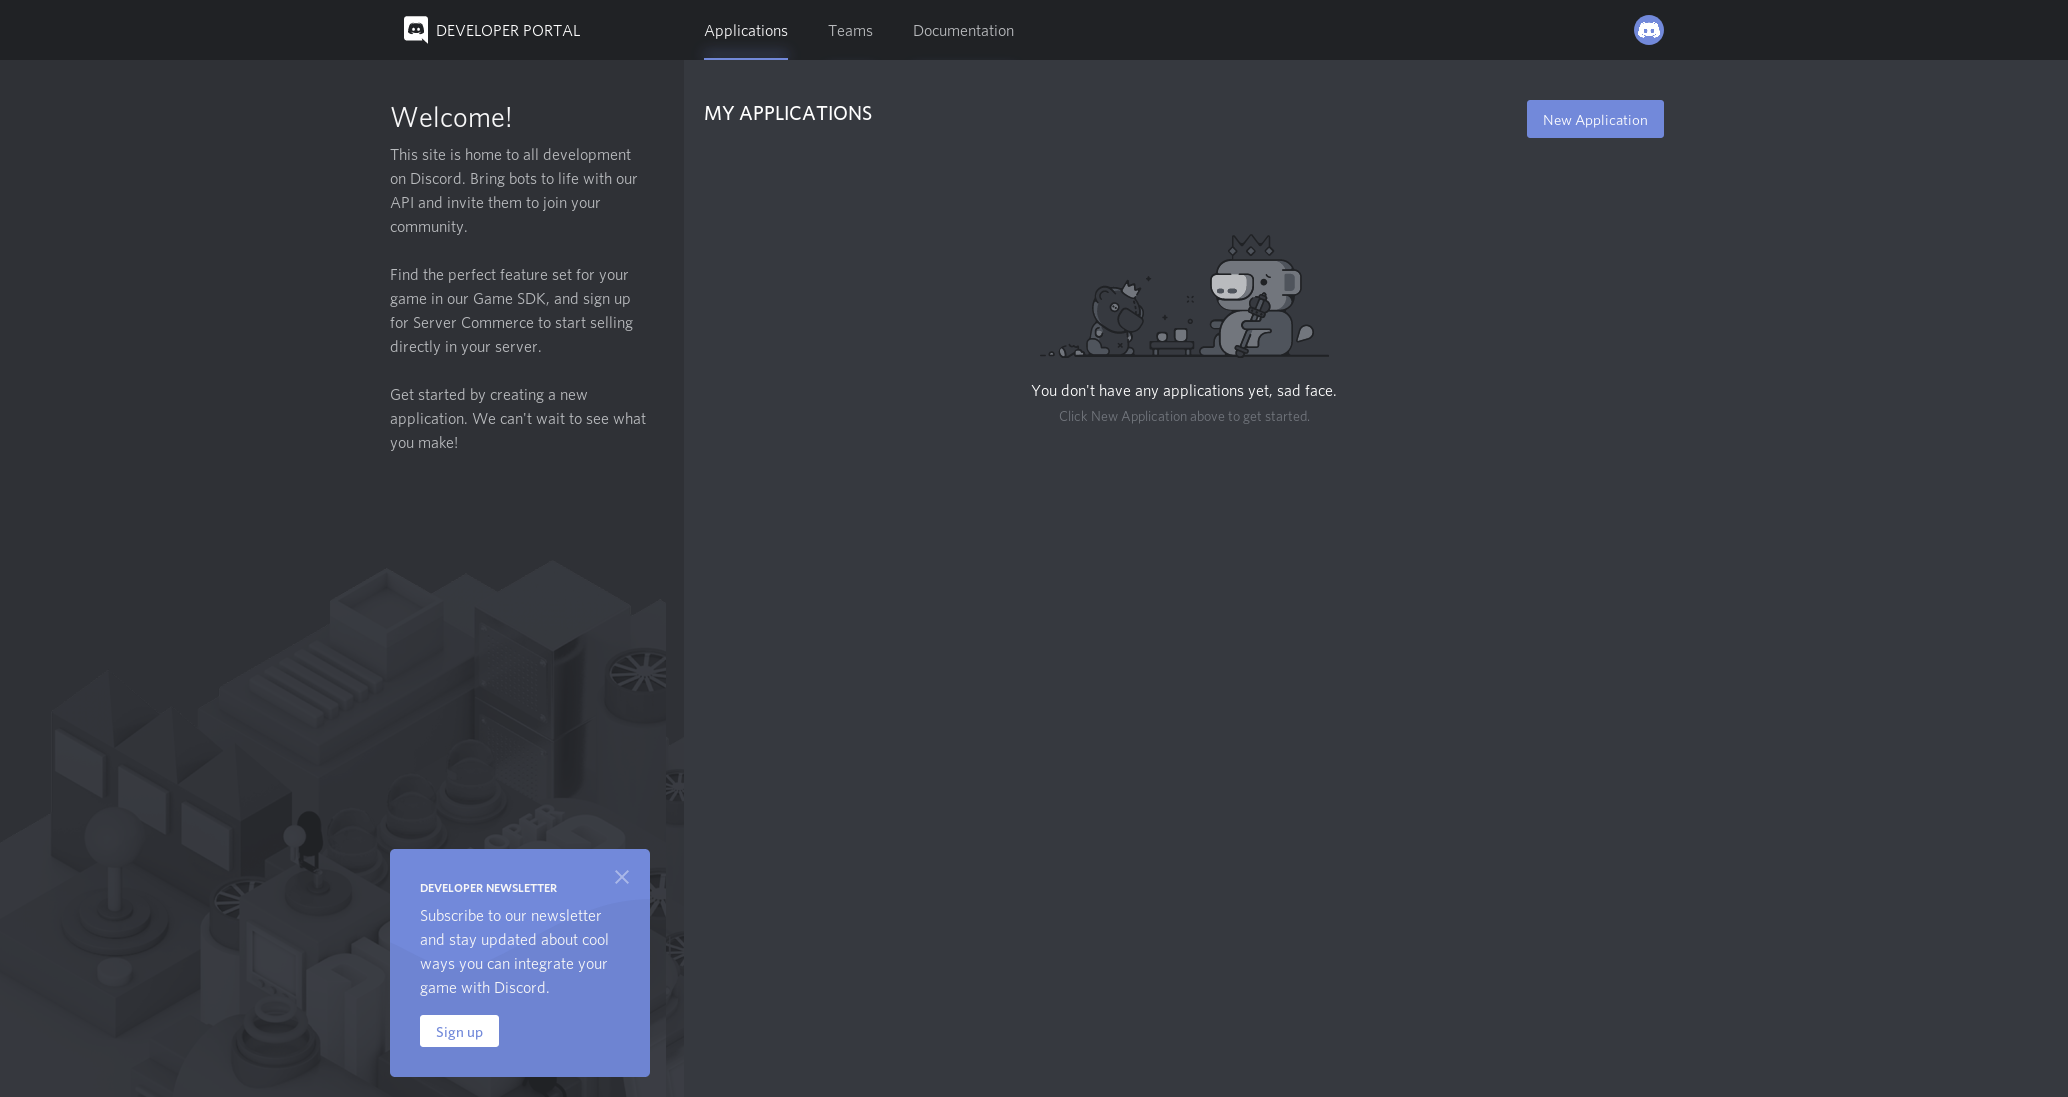
まずはDeveloper Portalでトークンを取得しましょう。
トークンの取得方法
まず上のDeveloper Portalにアクセスします
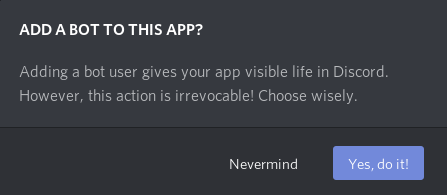
この画面が出てきたら、を押します。
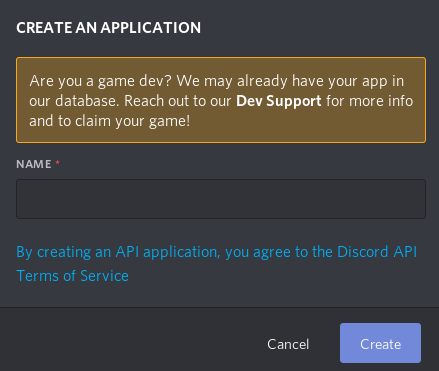
そうしたら
この画面が出ると思うのででbotの名前を決めます。
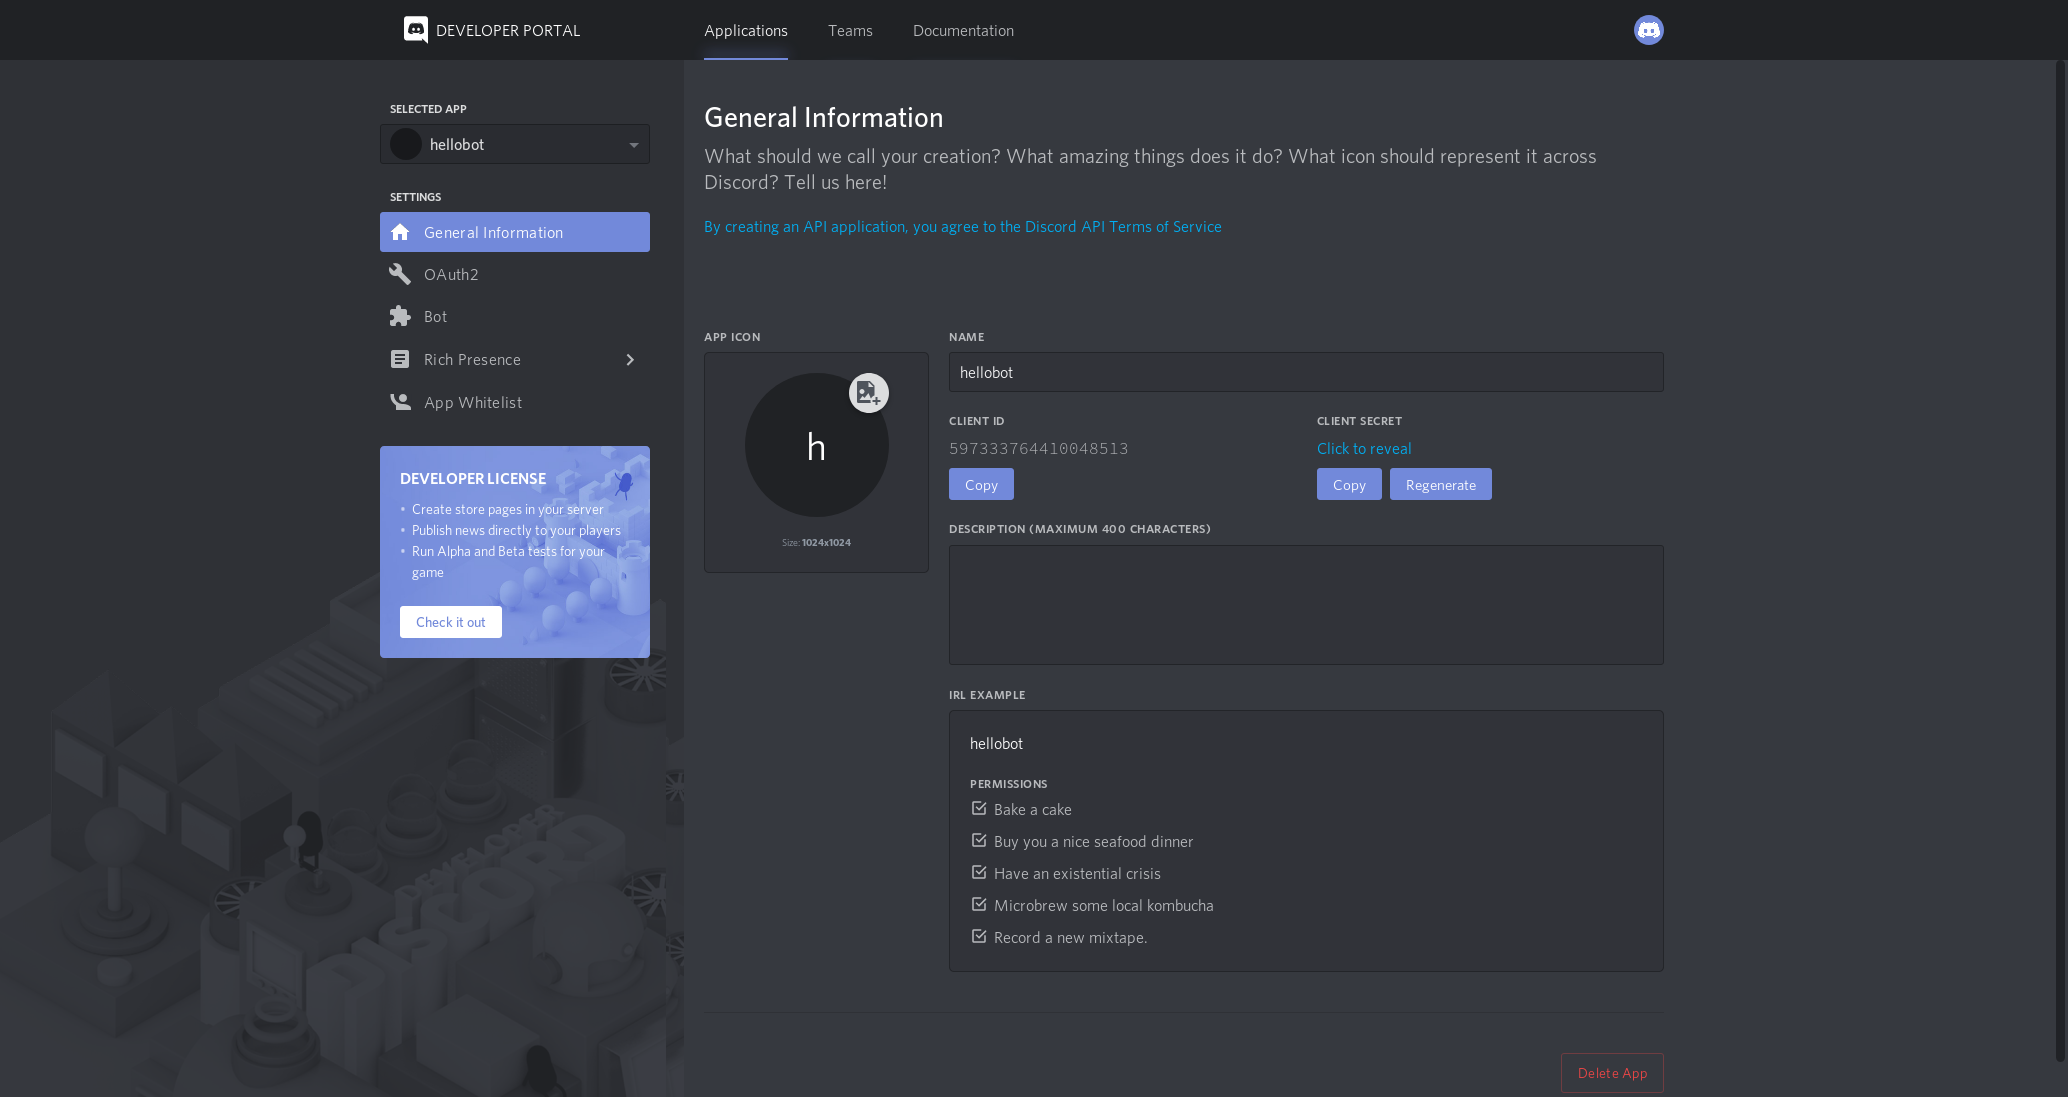
Createを押したら、この画面になると思うのでに行って
の
を押します。
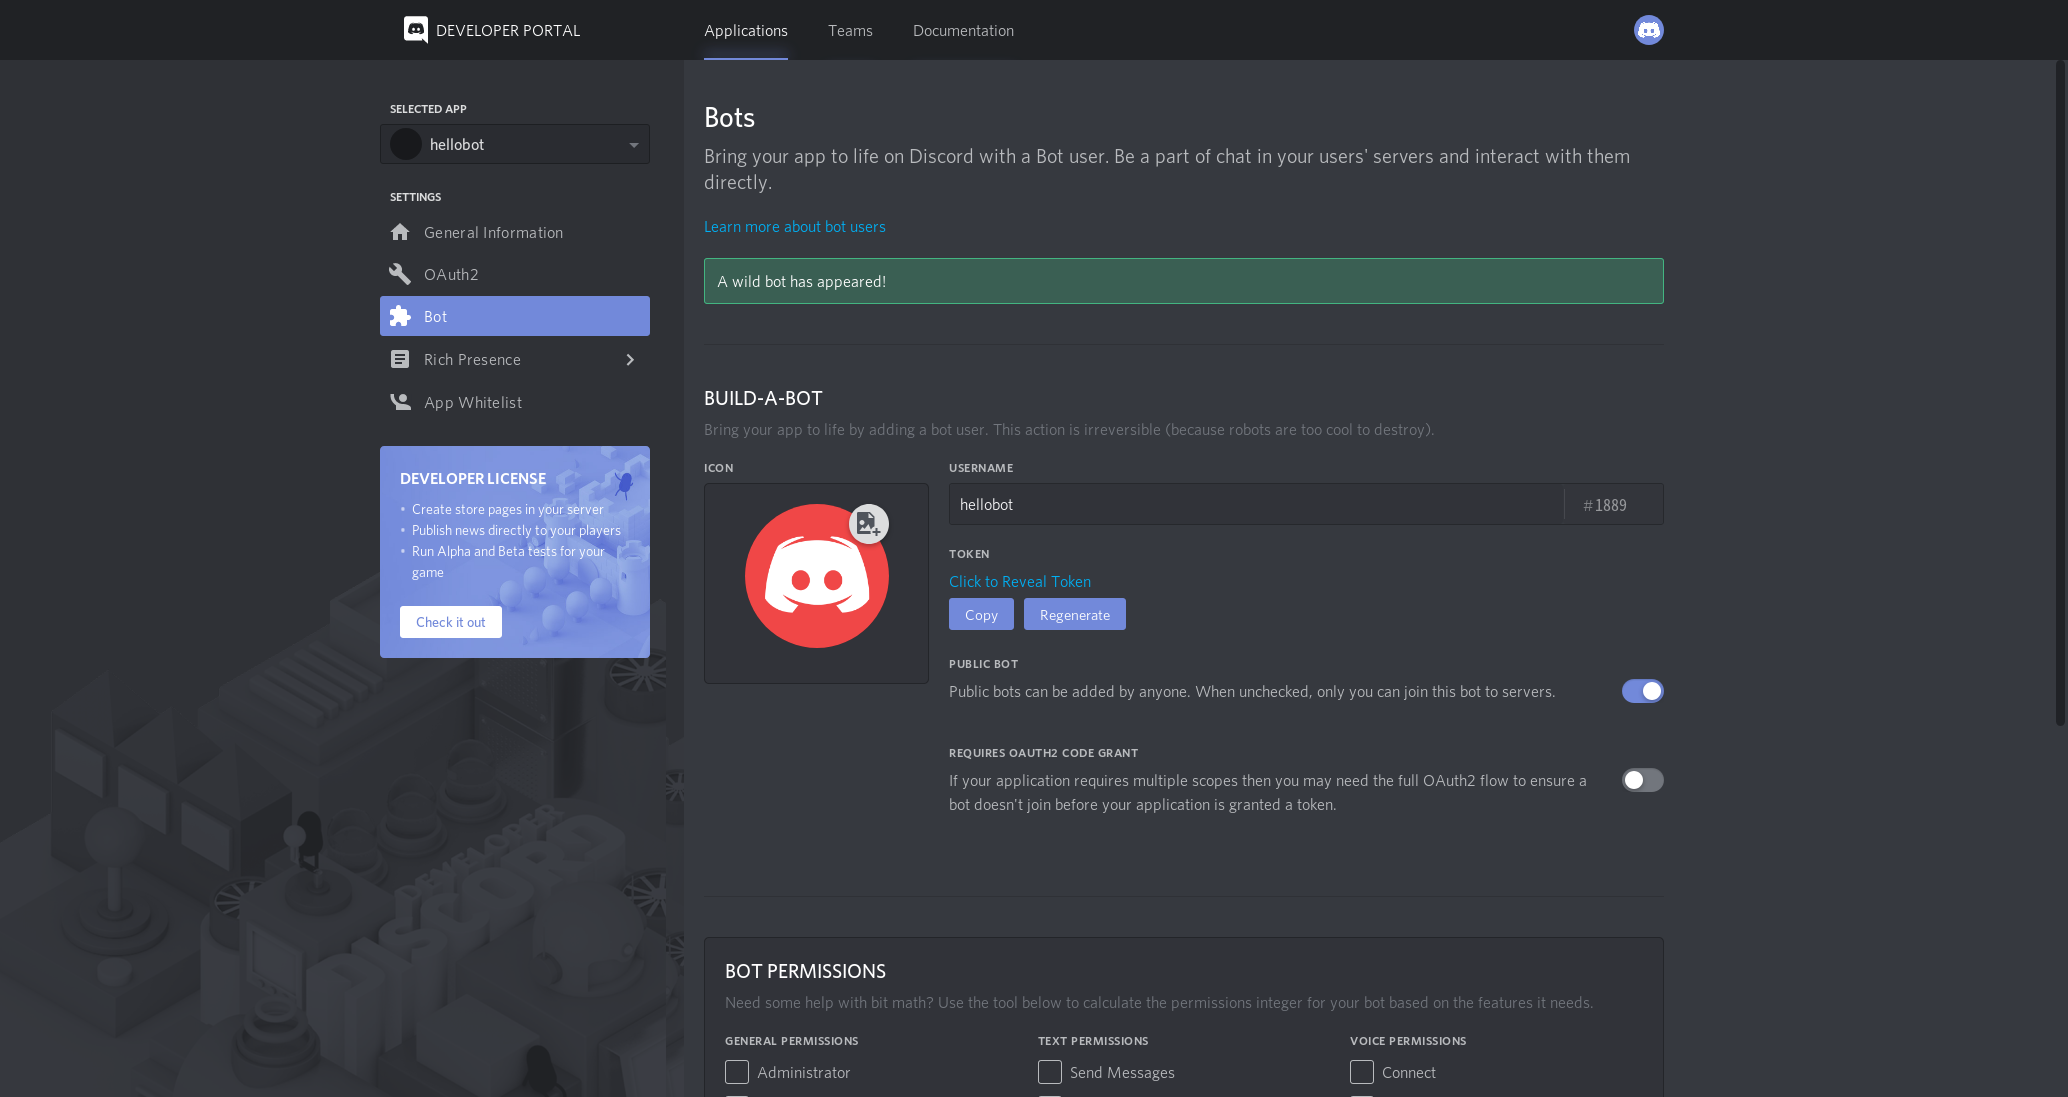
この画面が出るのでを押してbotユーザーを作ります。
そしたらこの画面が出るのでのCopyをしてメモ帳にメモしましょう。
※注意
トークンを漏らしてしまうと悪用されてしまうので人に見つからない場所に保管しましょう。本題
Glitchのアカウントはgoogle、githubから作れるのでここでは省きます。
botのセットアップ
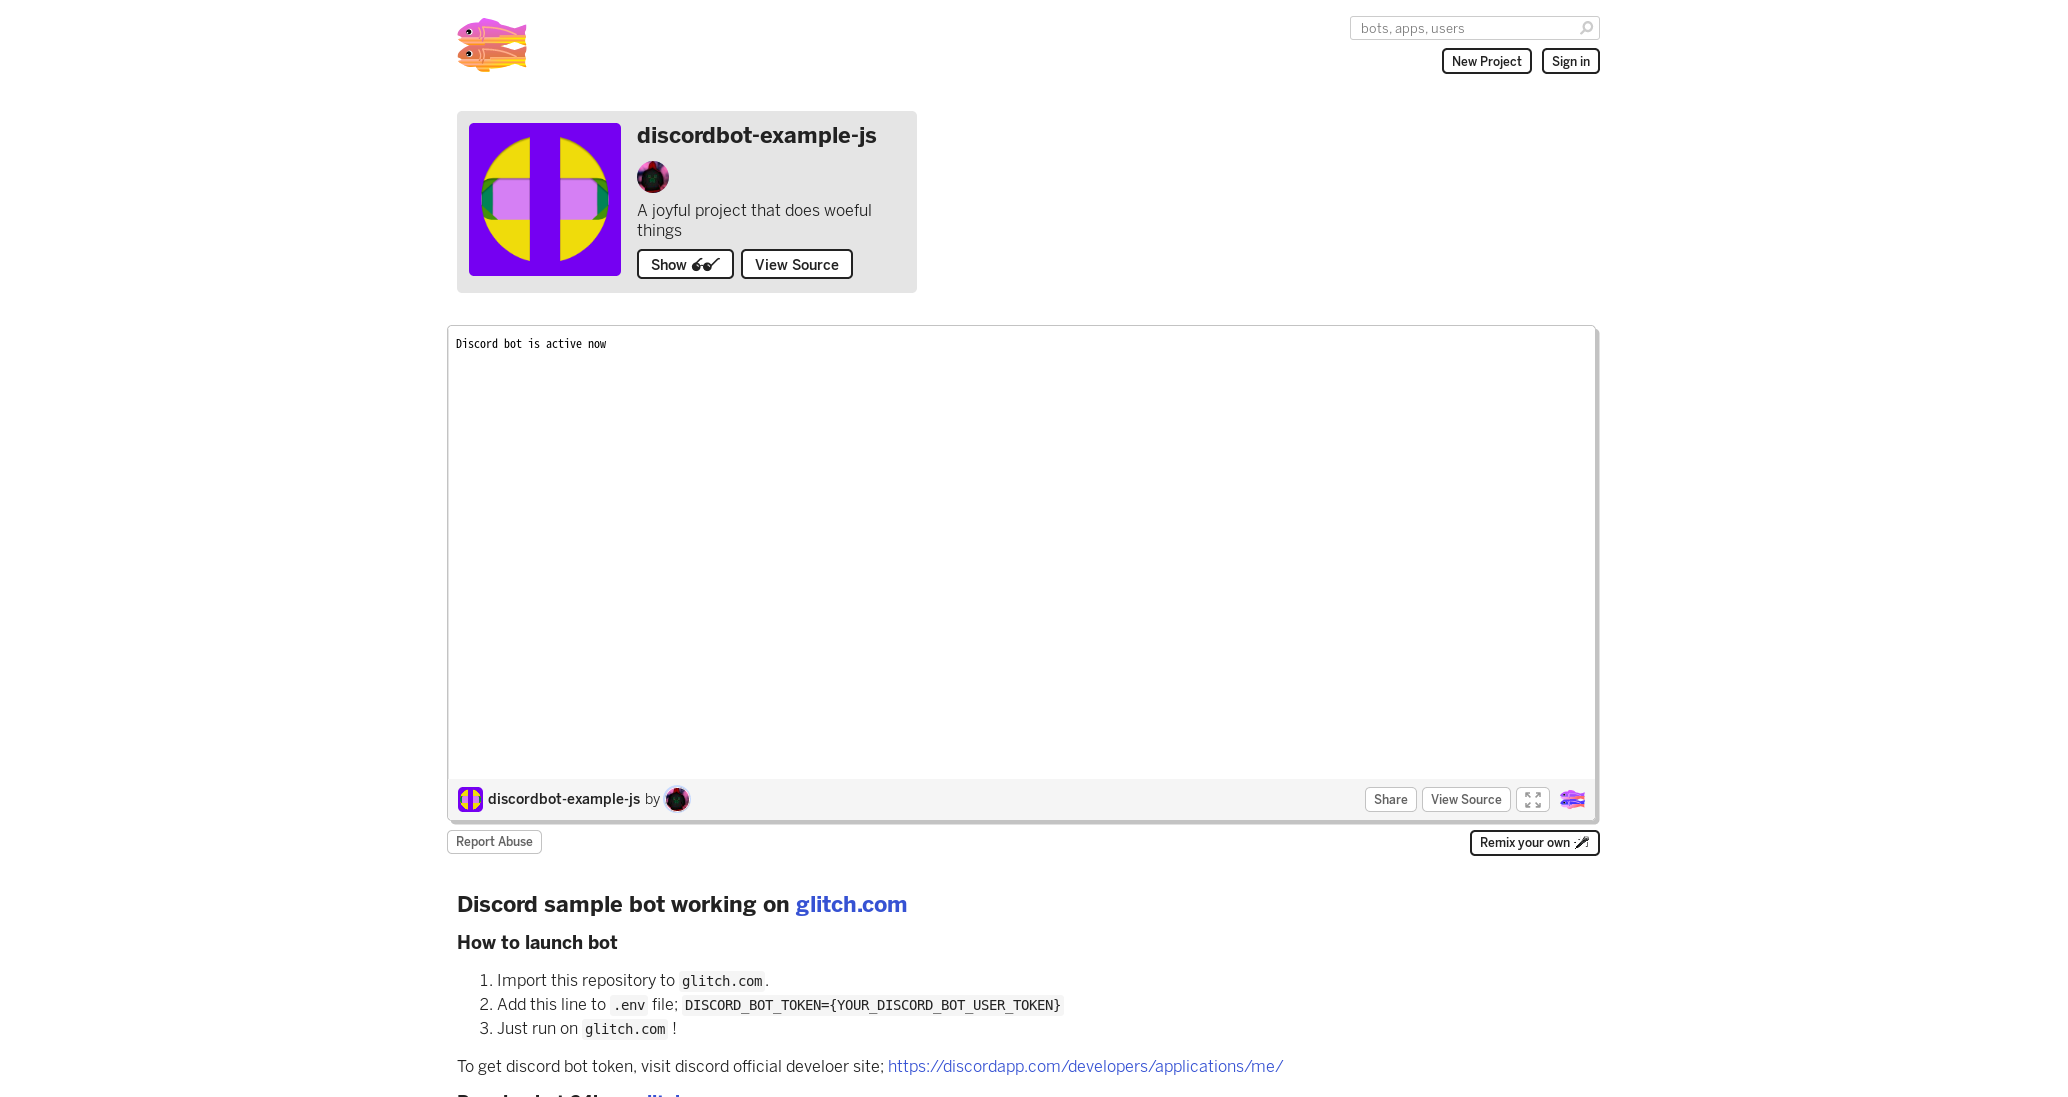
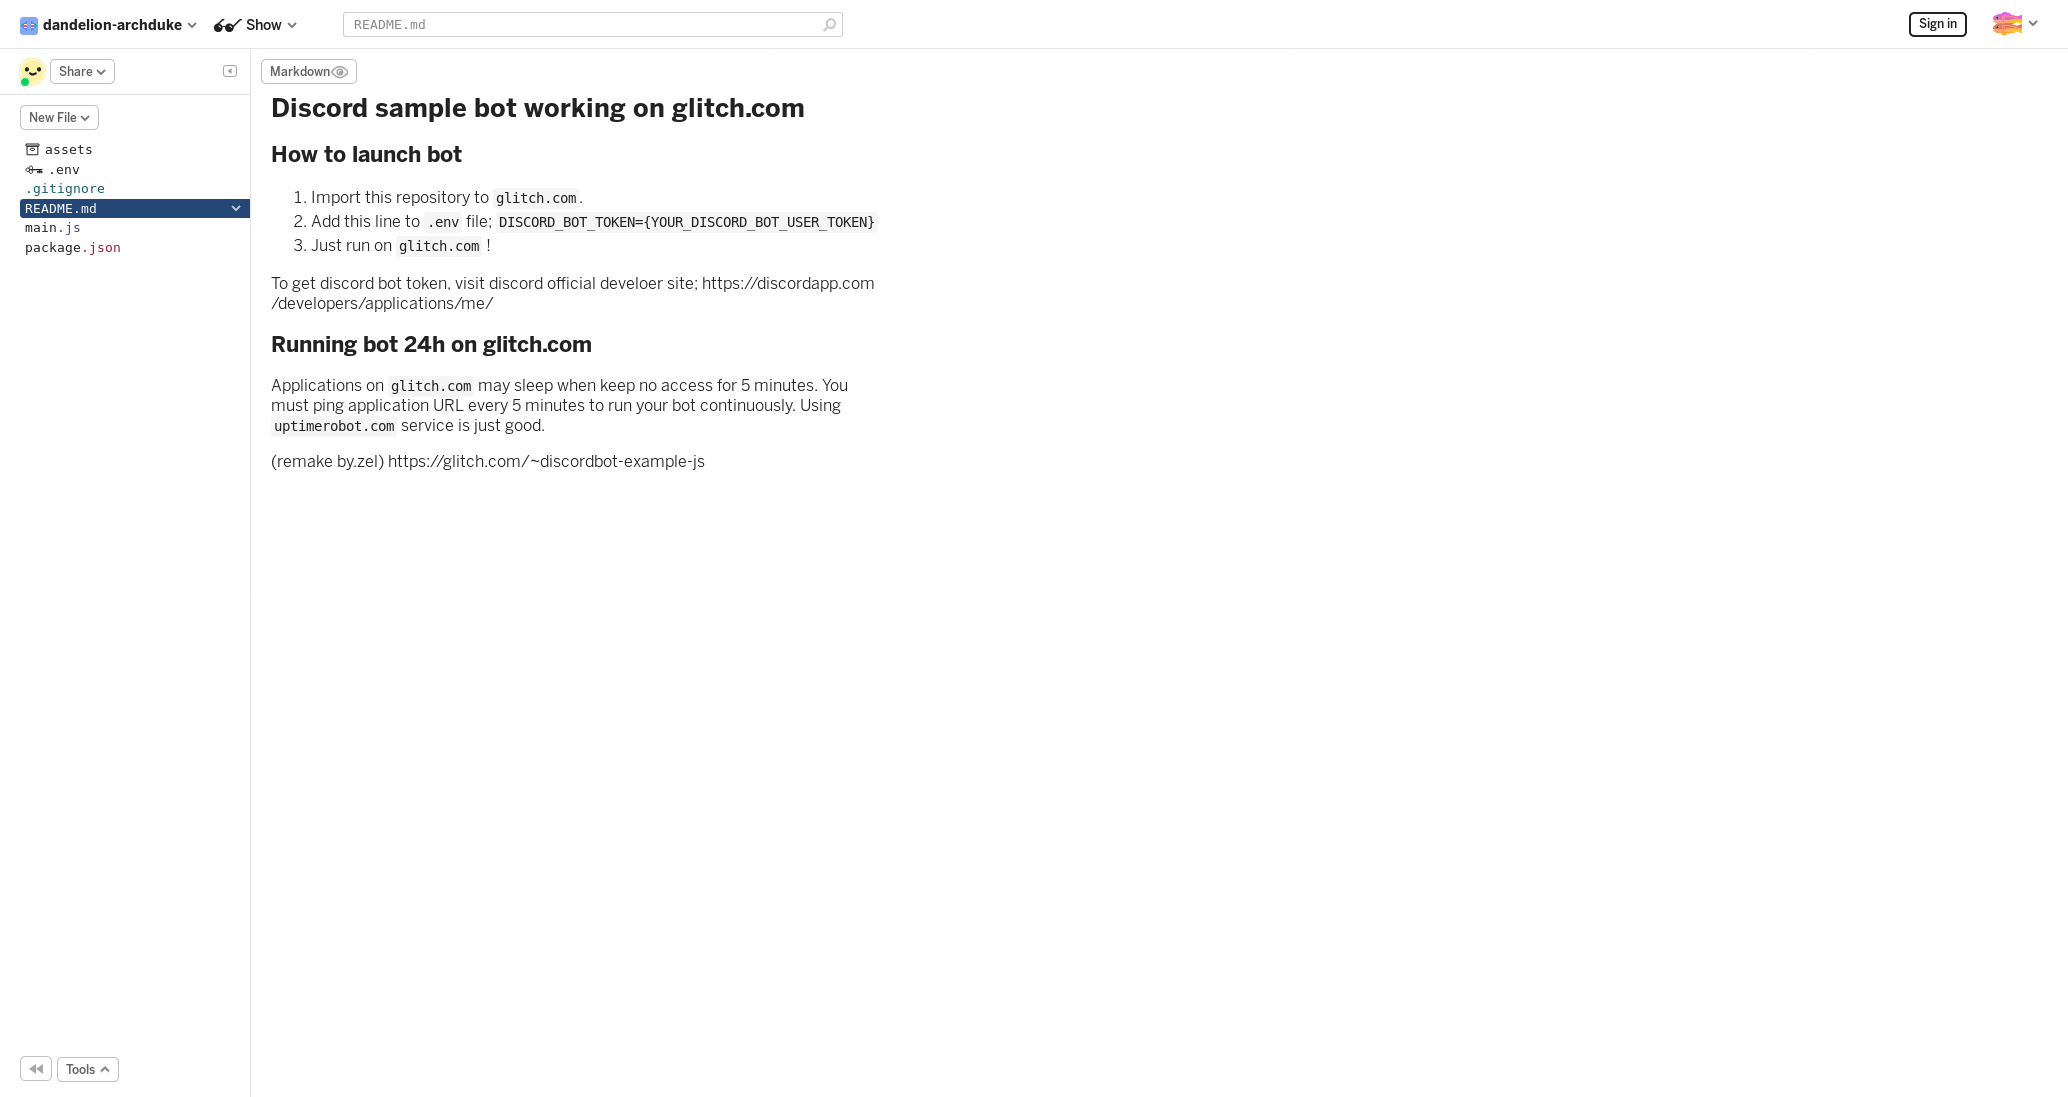
まずここにアクセスします。
アクセスしたらこのサイトに飛ぶと思うので、をおします。
この画面になったら、先程メモ(コピー)したトークンをのDISCORD_BOT_TOKEN=にペーストします。
botの招待
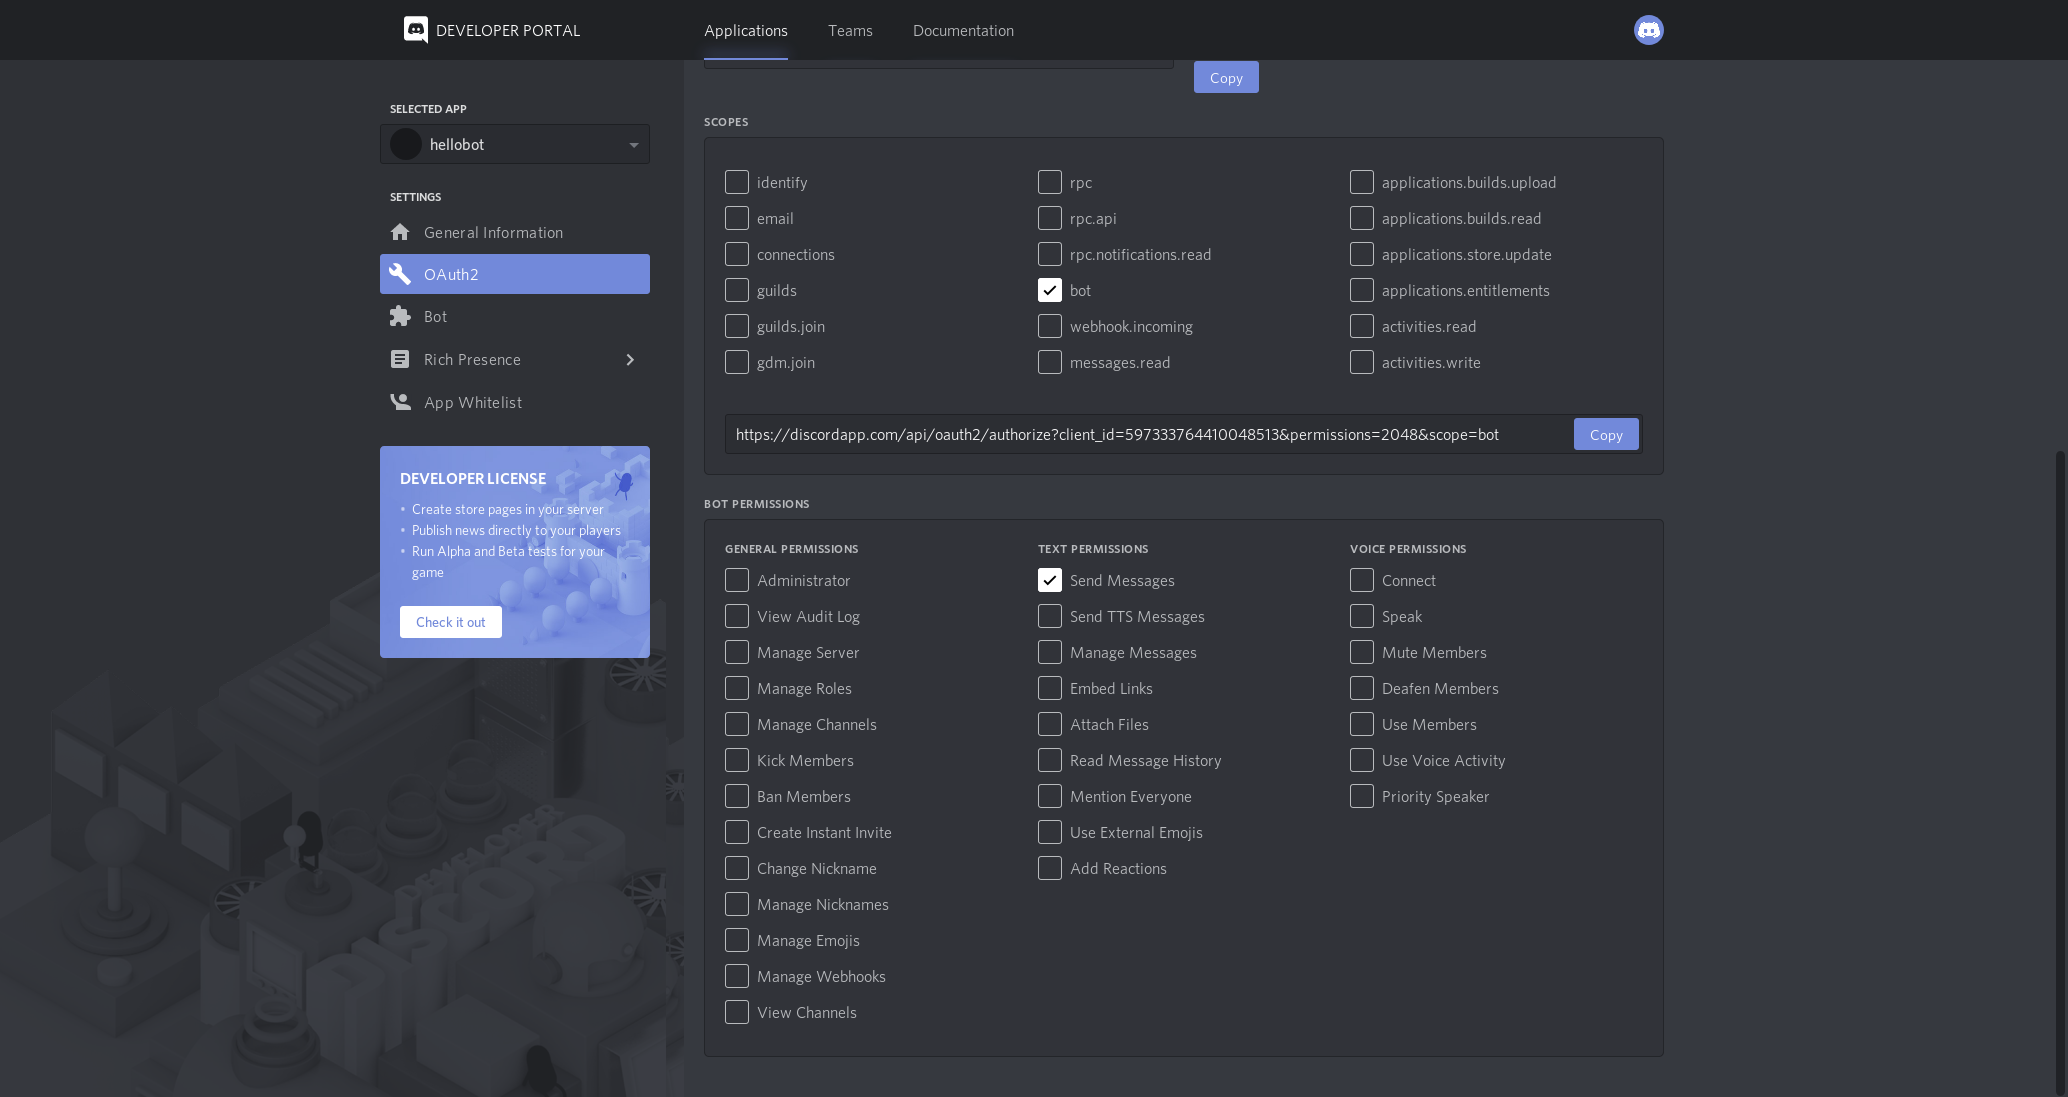
Developer Portalに戻って先程作ったbotアカウントにいきます。
このページに行き、に行きます。
この画面に行き、をチェックを入れ
メッセージを送信にチェックを入れ、を押して
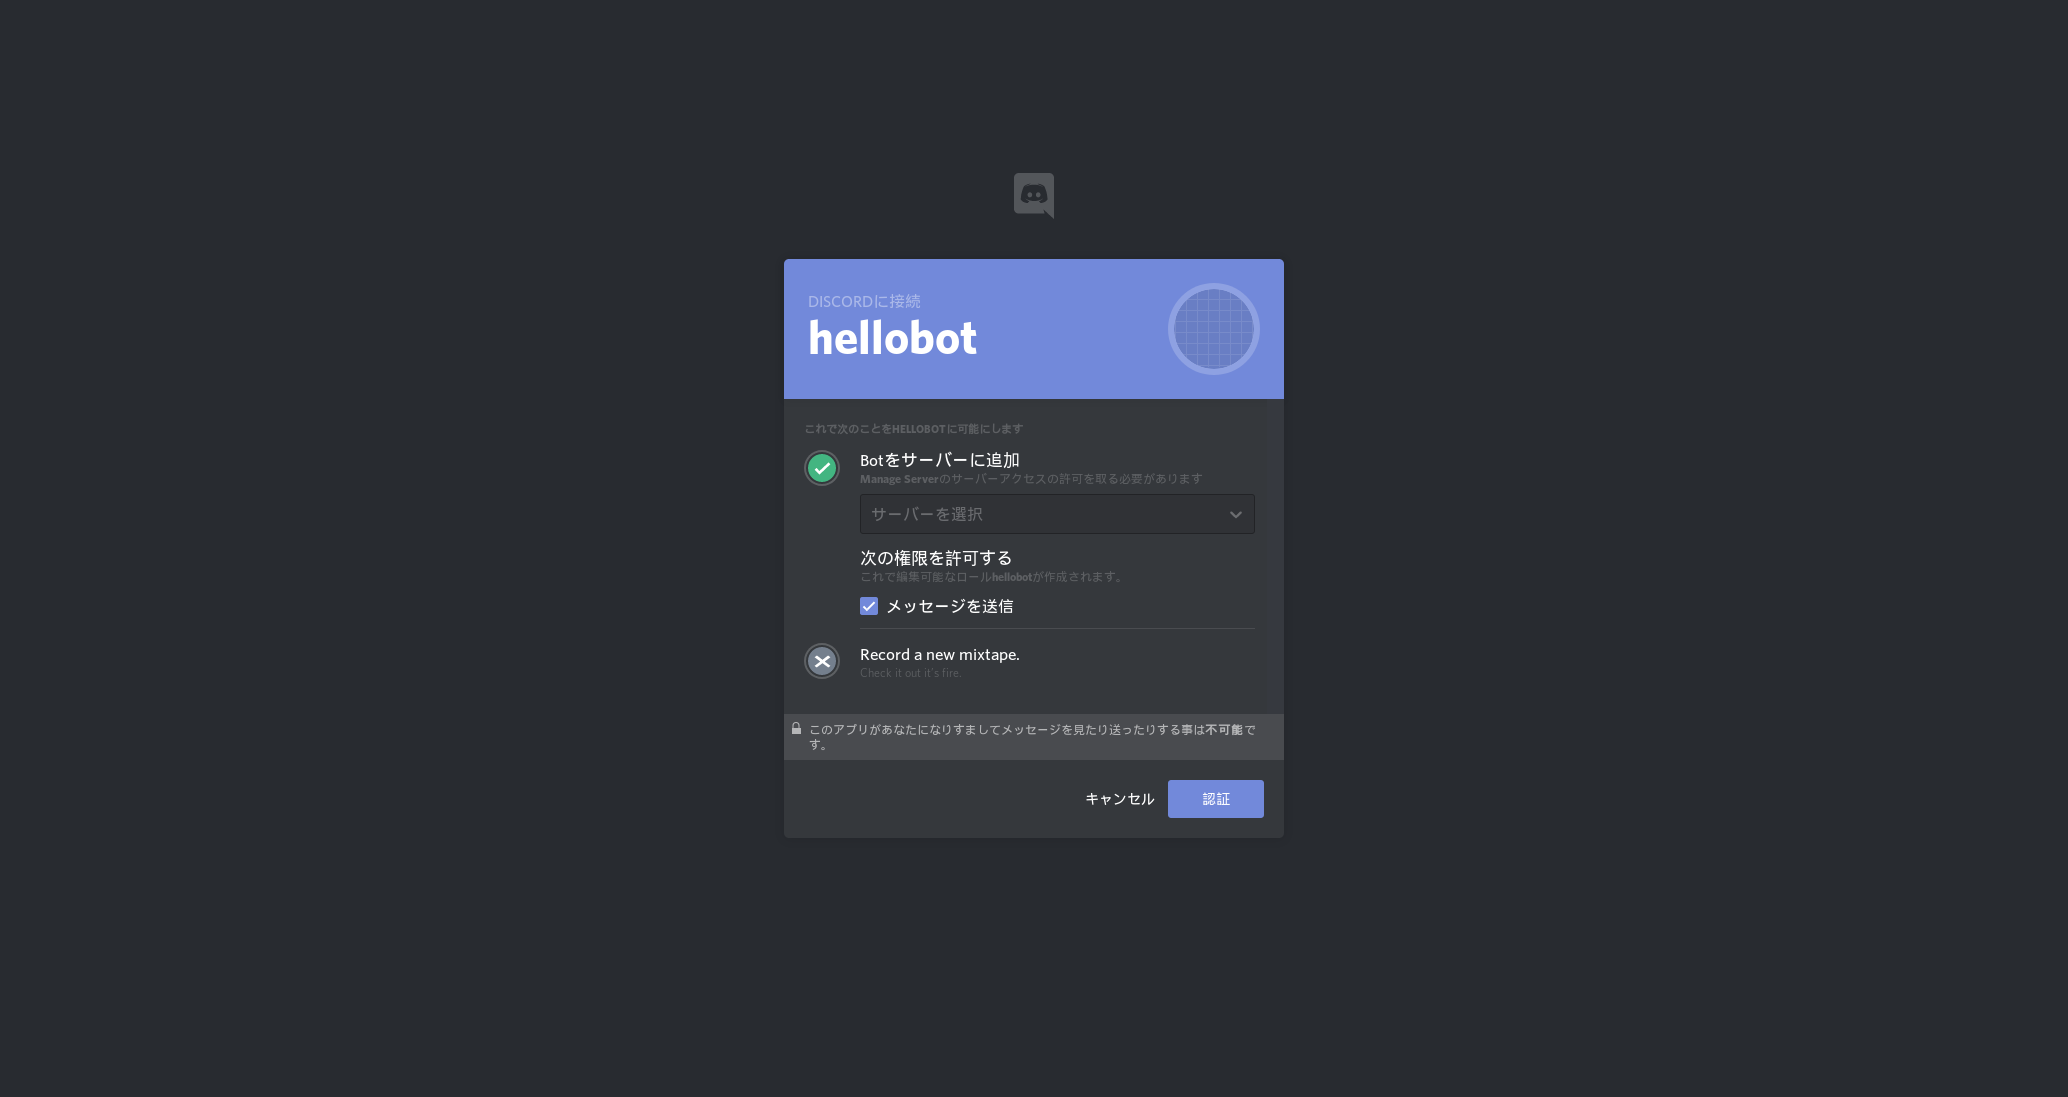
アドレスバーに貼り付けします。
この画面が出るので自分のサーバーを選択し、「認証」を押し、認証したらサーバーにbotが来ます。botの動作確認
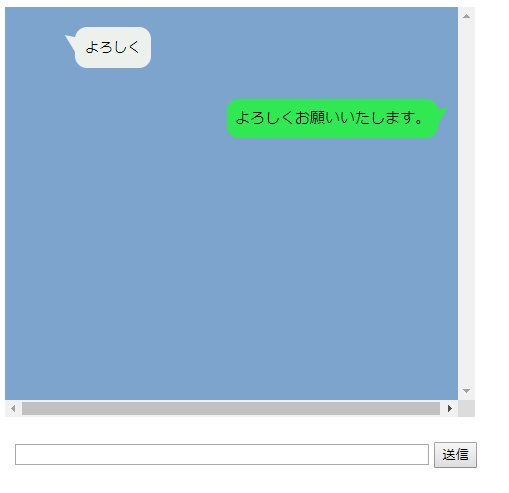
「!ping」を打つと、botが「pong!」と返します。
「!echo <好きな文字>」で好きな文字を返します。終わりに
ちょっと説明の仕方が変なのは許してください。
UpTimeRobotで24時間やる方法はいつか出します、すみません


- 投稿日:2019-07-07T14:38:07+09:00
Node.jsとsocket.ioでLine風チャットを作成してみた1
node.jsとsocket.ioを使用する機会があったので、簡単にチャットを作ることにしました。
今回はチャット部分を作成します。
完成品だけ見たい場合は4を見てください
https://qiita.com/Catatataki/items/03ce43785466603dadac
作成イメージ
ディレクトリ
手順
node.jsでsocket.ioをインストール
node chatServerでsocket.ioを起動
htmlを開くコード
npm install save socket.iohello.html<!DOCTYPE html> <html> <head> <meta charset="UTF-8"> <title></title> <link rel="stylesheet" type="text/css" href="./Line.css"> <script type="text/javascript" src="https://cdnjs.cloudflare.com/ajax/libs/socket.io/2.2.0/socket.io.js"></script> <script src="https://ajax.googleapis.com/ajax/libs/jquery/3.2.1/jquery.min.js"></script> <script src="./Line.js"></script> </head> <body> <div class="line"> </div> <div class="submit"> <input class="form-control" id="msgForm" autocomplete="off" maxlength="120"> <input type="button" id="sendButton" onclick="window.message()" value="送信"> </div> </body> </html>hello.CSS.line { overflow:scroll; float: left; width:750px; height:370px; padding: 20px 10px; max-width: 450px; margin: 15px auto; font-size: 14px; background: #7da4cd; } .others{ display: inline-block; position: relative; left: 0px; } .othercomment { display: inline-block; position: relative; left:10px; margin: 0 0 0 50px; padding: 10px; max-width: 250px; border-radius: 12px; background: #edf1ee; text-align: left; } .othercomment:after { content: ""; display: inline-block; position: absolute; top: 3px; left: -19px; border: 8px solid transparent; border-right: 18px solid #edf1ee; -webkit-transform: rotate(35deg); transform: rotate(35deg); } .othercomment p { margin: 0; padding: 0; } .mycomment { margin: 10px 0; text-align: right; } .mycomment p { display: inline-block; position: relative; margin: 0 10px 0 0; padding: 8px; max-width: 250px; border-radius: 12px; background: #30e852; font-size: 15px; } .mycomment p:after { content: ""; position: absolute; top: 3px; right: -19px; border: 8px solid transparent; border-left: 18px solid #30e852; -webkit-transform: rotate(-35deg); transform: rotate(-35deg); } .submit{ position: relative; top: 450px; left: -460px; } #msgForm{ width:410px; }Line.jsvar socket = io.connect('http://localhost:3000');//chatServer.jsとコネクト joinUser(); socket.on("server_to_client", function (data) { //chatServer.jsからデータ受信 appendOtherMsg(data.otherMsg, data.name, data.img); }); function appendOtherMsg(message) { $(".line").append('<div class="others"><div class="othercomment"><p>' + message + '</p></div></div><br><br>'); $('.line').animate({ scrollTop: $('.line')[0].scrollHeight }, 'fast'); } function appendMyMsg(message) { $(".line").append('<div class="mycomment"><p>' + message + '</p></div><br>'); $('.line').animate({ scrollTop: $('.line')[0].scrollHeight }, 'fast'); } function message() { if ($("#msgForm").val() != '') { var message = $("#msgForm").val(); appendMyMsg(message); $("#msgForm").val(''); socket.emit("client_to_server", { message: message }); //chatServer.jsにデータ送信 } } function joinUser() { var selectRoom = 1; socket.emit("client_to_server_join", { room: selectRoom }); //chatServer.jsにデータ送信 } $('#msgForm').keypress(function (e) { if (e.which == 13 && $("#msgForm").val() != ' ') { message(); return false; } });chatServer.jsvar http = require('http'); var socketio = require('socket.io'); var server = http.createServer(function (req, res) { }).listen(3000); var io = socketio.listen(server); io.sockets.on('connection', function (socket) { var room = ''; socket.on('client_to_server_join', function (data) { //roomに参加 room = data.room; socket.join(room); }); socket.on('client_to_server', function (data) { socket.broadcast.to(room).emit('server_to_client', { otherMsg: data.message }); //他の参加者にメッセージをブロードキャスト }); });node chatSever次回
次はメッセージに名前を付けていこうと思います。
https://qiita.com/Catatataki/private/62b58a75ecceb5c8eecc
- 投稿日:2019-07-07T14:37:01+09:00
sequelize v5とtypescript
はじめに
Node.jsを使う場合、ORMにsequelizeを使うことが多いと思います。
そのsequelizeをtypescriptでちゃんと型定義してあげると、sequelizeのモデルに生えているメソッドを推論してくれたり、
findOneなどの引数に渡す検索のoptionの推論をしてくれたり、
取ってきたデータがどんなカラムを持っているのかがわかったりします。
sequelizeとtypescriptを組み合わせるには、sequelize-typescriptを使えばできたりしますが、sequelize v5からは、公式がtypescriptをサポートしてくれています。
その公式のやり方を使って、sequelizeとtypescriptを組み合わせてみます。
前提
sequelizeを使う場合、 俺が作った最高のmodelGenerator みたいなコードができがちです。
今回、ここに載せた例も一例に過ぎないので作り方は色々あります。
HasManyGetAssociationsMixinとか適当なsequelizeのメソッド名でgithubを検索すれば、世の中の人がどんな感じでsequelizeとtypescriptを組み合わせているのか、例がたくさん出てきます。コード
モデル定義
usersとuser_detailsというテーブルがあると仮定して、usersとuser_detailsが一対一で繋がっているようなモデルを定義していきます。
src
├── models
│   ├── hoge
│   │   ├── index.ts
│   │   ├── schema.ts
│   │   ├── user_details.ts
│   │   └── users.ts
usersのモデル定義
user_detailsというテーブルと一対一で繋がる。
interfaceの末尾に!をつけるとそのカラムはnullになることはないという意味。!についての詳細はこちら
このモデルのclassで定義したプロパティが、推論を行なってくれるカラムになってきます。src/models/hoge/users.tsimport { Sequelize, Model, DataTypes } from 'sequelize'; import { UserDetails } from './user_details'; const TABLE_NAME = 'users'; class Users extends Model { public id!: number; public email!: string; public created_at!: Date; public updated_at!: Date; public user_detail!: UserDetails; public static attach(sequelize: Sequelize): void { this.init( { id: { type: DataTypes.INTEGER, autoIncrement: true, allowNull: false, primaryKey: true, }, email: { type: DataTypes.STRING, allowNull: false, defaultValue: '', }, created_at: { type: DataTypes.DATE, allowNull: false, }, updated_at: { type: DataTypes.DATE, allowNull: false, }, }, { tableName: TABLE_NAME, underscored: true, sequelize: sequelize, } ); } public static associate(): void { Users.hasOne(UserDetails, { foreignKey: 'user_id', }); } } const factory = (sequelize: Sequelize) => { Users.attach(sequelize); return Users; }; export { Users, factory };user_detailsのモデル定義
interfaceの末尾に?がついたカラムはnullの場合もあるカラム。
src/models/hoge/user_details.tsimport { Sequelize, Model, DataTypes } from 'sequelize'; import { Users } from './users'; const TABLE_NAME = 'user_details'; class UserDetails extends Model { public id!: number; public user_id!: number; public nick_name?: string; public first_name?: string; public last_name?: string; public created_at!: Date; public updated_at!: Date; public static attach(sequelize: Sequelize): void { this.init( { id: { type: DataTypes.INTEGER, autoIncrement: true, allowNull: false, primaryKey: true, }, user_id: { type: DataTypes.INTEGER, allowNull: false, }, nick_name: { type: DataTypes.STRING, allowNull: true, }, first_name: { type: DataTypes.STRING, allowNull: true, }, last_name: { type: DataTypes.STRING, allowNull: true, }, created_at: { type: DataTypes.DATE, allowNull: false, }, updated_at: { type: DataTypes.DATE, allowNull: false, }, }, { tableName: TABLE_NAME, underscored: true, sequelize: sequelize, } ); } public static associate(): void { UserDetails.hasOne(Users, { foreignKey: 'user_id', as: 'user_detail', }); } } const factory = (sequelize: Sequelize) => { UserDetails.attach(sequelize); return UserDetails; }; export { UserDetails, factory };各モデルをまとめてimportできるファイル
このファイルは型定義のために使ったり、モデルの作成のために使います。
src/models/hoge/schema.tsimport * as users from './users'; import * as userDetails from './user_details'; export default { users, user_details: userDetails };dbアクセス時のエントリーポイントとなるファイル
dbにアクセスしたい際は、このファイルをimportします。
model_generatorはsetModel()を受け取るようにしておき、使う側が利用するモデル群をハンドリングできるようにしました。(そうしておけば例えば、dbが違う別サービスでも共通したmodel_generatorが使えるようになる)src/models/hoge/index.tsimport { Sequelize } from 'sequelize'; import { hogeModelGenerate } from '../../utils/model_generator'; import dbConfig from '../../config/db'; import schema from '../../models/hoge/schema'; const setModel = (sequelize: Sequelize): HogeDB => { const db: any = {}; Object.keys(schema).forEach(tableName => { db[tableName] = schema[tableName].factory(sequelize); }); // associationを貼るのは各Modelのinit()が全て終わってから // (全モデルのinit()が終わる前にassociationを貼るとそんなモデル知らないみたいなエラーで死ぬ) Object.keys(schema).forEach(tableName => { if ('associate' in db[tableName]) { db[tableName].associate(db); } }); return db; }; const modelGenerator = hogeModelGenerate(dbConfig.service); const db = modelGenerator(setModel); export default db;モデルの型定義
モデルの型を定義します。
(@typesディレクトリはtsconfigのtypeRootsに指定しておき、グローバルに読めるようにしておく)src ├── @types │ ├── hoge │ │ └── index.d.tssrc/@types/hoge/index.d.ts/* eslint @typescript-eslint/camelcase: 0 */ import schema from '../../../models/hoge/schema'; declare interface HogeDB { users: typeof schema.users.Users; user_details: typeof schema.users.UserDetails; }モデルをgenerateするファイル
Sequelizeのインスタンスを作って各モデルのinitをします。
このmodel_generatorを使う側は、setModel()の実装を渡してもらう必要があります。src └── utils └── model_generator.tssrc/utils/model_generator.tsimport { Sequelize, Op } from 'sequelize'; export default class ModelGenerater { public sequelize: Sequelize; public constructor(dbConfig: any) { this.sequelize = new Sequelize(dbConfig.database, dbConfig.username, dbConfig.password, { host: dbConfig.host, dialect: 'mysql', port: 3306, logging: true, omitNull: true, }); } } export const hogeModelGenerate = (dbConfig: any) => { const modelGenerator = new ModelGenerater(dbConfig); return (setModel: any) => { const db: HogeDB = setModel(modelGenerator.sequelize); return { ...db, Sequelize, sequelize: modelGenerator.sequelize, Op, }; }; };constructorに渡しているdbConfigはこんな感じの、DB周りの設定を環境変数から読み込むようなやつです。
export default {
  host: process.env.HOGE_SERVICE_DB_HOST || '127.0.0.1',
  username: process.env.HOGE_SERVICE_DB_USER || 'root',
  password: process.env.HOGE_SERVICE_DB_PASSWORD || '',
  database: process.env.HOGE_SERVICE_DB_DATABASE || 'hoge',
};
使い方
src/models/hoge/index.tsをimportして
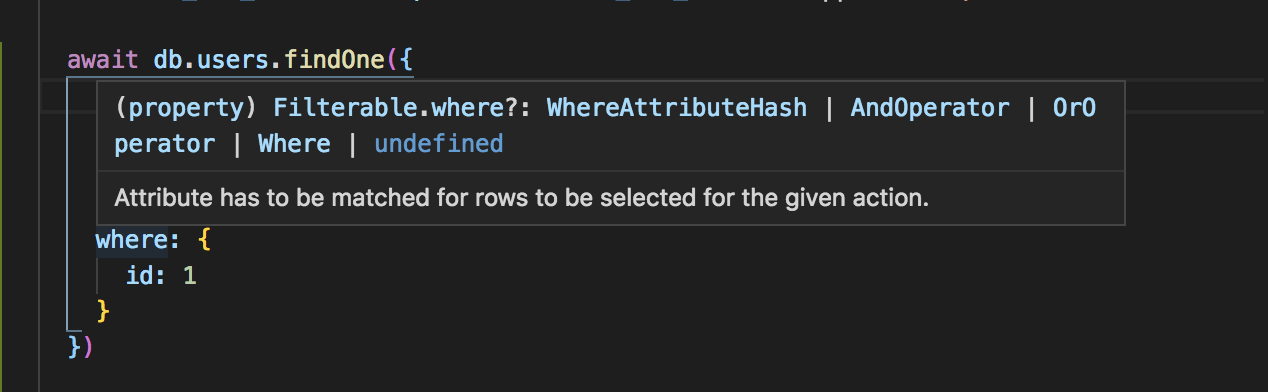
db.users.findOne() みたいな感じで使えば、冒頭に紹介したような感じで推論してくれるようになってます。


- 投稿日:2019-07-07T04:16:32+09:00
盛れる!ベンチマーク!
はじめに
TwitterでD言語の日本語情報増やしたいなーとか言っていたところ、タイミングよく文字列操作で良い記事があったのでちょっと読んでいました。
- 文字列を改行で確実に分割する
Pythonも速いんだなーとか思いつつ、この言語の並びならD言語が1番じゃない…?と思ったので、ベンチマーク部分について軽く追試しつつ盛れるだけ盛ってやろうと思った次第です。(盛ってはいけない)
ちなみに比較対象は、元から結果が上位だった Python(pypy3) と JavaScript(Node) に絞りますのでご了承ください
(たまたま手元で計測が容易だったものともいう)前置き
計測にあたり元のソースコードは何も変更していませんのでベースはそちら参照してください。
https://github.com/yosgspec/splitspypy3やnodeの引数は詳しくないので最適化っぽいものは何もやっていません。
というか言語のタイプが違いすぎるのであまり意味のある比較ではないという認識はあります。
それでもそれなりに肉薄してるので、これはそういうコンテンツなのだと思っていただければ幸いです。何度でも書くけどネタ記事だよ!
計測
諸々書いてしまうと盛れないので先に結果発表です。
結果
- 傾向だけ見れればいいかということで、元のコードをローカル環境でそれぞれ10回計測しました
- 元々各言語で3種類の結果がありましたが、そのなかで一番速かったパターンを採用しています
- D言語はdmdとldc2という2つのコンパイラで実行しています
結果を表にまとめると以下の通りでした。
単位はミリ秒(msecs)で、????というのが盛ったやつです。詳細は後述します。結果データ
# dmd ldc2 pypy3 Node dmd + ???? ldc2 + ???? 1 335 174 198 272 78 0 2 297 166 195 280 87 0 3 301 184 194 274 81 0 4 298 198 199 273 88 0 5 297 173 192 279 79 0 6 298 174 198 275 79 0 7 302 176 201 275 80 0 8 297 171 195 286 78 0 9 315 179 193 282 84 0 10 295 178 198 287 88 0 集計値
dmd ldc2 pypy3 Node dmd + ???? ldc2 + ???? 平均 303.5 177.3 196.3 278.3 82.2 0 中央値 298 175 196.5 277 80.5 0 最大値 335 198 201 287 78 0 最小値 295 166 192 272 88 0 標準偏差 12.44 6.60 2.91 5.38 4.16 0 盛らなくてもldc2が速かった!
そして盛ったdmdは速かったpypy3より倍以上速い!ldc2に至っては無限倍速い!すごい!!!
(素のdmd…お前…負けたんか…)補足
- pypy3では
splitlinesよりreplaceとsplitの組み合わせの方が速かったのでそちらを採用しました
- 単純な
splitelinesのほうは平均で約370msecsでした。元記事より遅いのでなんか変ですね?そういうもの?計測方法
環境
使ったのは Surface Book2 の Windows10 環境です。
CPUは、 第 8 世代 インテル® Core™ i7-8650U クアッド コア プロセッサ、4.2GHz Max Turbo
スペック:https://www.microsoft.com/ja-jp/p/surface-book-2/8mcpzjjcc98c?activetab=pivot:techspecstabD言語
主要なコンパイラが3つありますが、今回は公式コンパイラのdmdとLLVMベースのldc2の2つを使います。
語弊がありますが、dmdはビルドが速い公式コンパイラ、ldc2はLLVMベースの実行が速いコンパイラです。ちなみにどちらも2019年7月6日時点でそれぞれ最新版です。
dmd
バージョンdmd --version DMD32 D Compiler v2.087.0 Copyright (C) 1999-2019 by The D Language Foundation, All Rights Reserved written by Walter Bright実行コマンドdmd splits_d.d -O -release -inline -boundscheck=off app.exeLDC
バージョンldc2 --version LDC - the LLVM D compiler (1.16.0): based on DMD v2.086.1 and LLVM 8.0.0 built with LDC - the LLVM D compiler (1.16.0) Default target: x86_64-pc-windows-msvc Host CPU: skylake http://dlang.org - http://wiki.dlang.org/LDC実行コマンドldc2 splits_d.d -O3 -release -boundscheck=off app.exeNode
2019/07/06時点のLTS版 v10.16.0 です。最新版は試していません。
バージョンnode --version v10.16.0実行コマンドnode splits.jsPython(pypy3)
Windows向けのpypy3を拾ってきて使いました。
バージョンpypy3 --version Python 3.6.1 (784b254d6699, Apr 16 2019, 12:10:48) [PyPy 7.1.1-beta0 with MSC v.1910 32 bit]実行コマンドpypy3 splits.pyベンチマークを盛る
盛るっていうよりなんだこれ?という結果ですが、何をしたかといえばD言語の特徴である
CTFE(コンパイル時関数評価)です。D言語の関数には通称
CTFEableと呼ばれる分類があり、一定の条件を満たすとコンパイル時に計算を実行でき、結果を定数として保持できます。
C++でもconstexprがありますし、ぼちぼちメジャーな機能ではあります。
CTFEableな任意の式は定数として保持できるので、この手のベンチマークならちょっと書き換えるだけで実行時間はほぼゼロになるだろう、という魂胆です。
(というかdmdはなんでゼロにならないんでしょうかね…?)やったこと
というわけで書き換えたのは2行です。変数宣言と計算のところをenumにするだけ。
変更前auto words = "asdff\nastgrw3h\r\nwtegole\rkserlhge3t\nearsgh\nergh\rsagr\r\nerghe\r"; // 中略 wordList = words.splitLines();変更後enum words = "asdff\nastgrw3h\r\nwtegole\rkserlhge3t\nearsgh\nergh\rsagr\r\nerghe\r"; // 中略 enum temp = words.splitLines(); wordList = temp;まとめ
- 盛らなくてもD言語が1番速かった(よかった…)
- 改行で分割するのは
std.stringのsplitLinesで安定。- ベンチマークを書くときは変に気を回す必要なし
- enumやグローバル変数の初期化式を書かない限りCTFEされない(条件は公式ドキュメントに書いてありそう)
- コンパイル時に評価することを期待する場合、
enumで1回変数に落とすのが確実- pypy3はやはり速い。JITは正義。
- NodeのRegexは正規表現の中では異様に速い…裏で何かやってそう…
- pypy3もNodeも処理単体で見れば普通にdmdより速い(まじか)
あとがき
ぶっちゃけD言語のCTFEは「任意の式がCTFEできるかどうかチェックして、できるならやる」という仕組みだと思っていました。
なので最初にソース見たときの感想は「なんでこれで実行時間測れてるの?」です。今回の結果から、ちゃんとCTFEするにはenumに1回入れる必要があることがわかりました。
「ベンチマークしたいときは普通に書いておけば大丈夫」ということですが、逆に言えば「何かの式で一部がCTFEされることはない」ので「定数っぽいところは1回enum挟んだほうが無難」ということになりそうです。(要追試)
ローカルのプログラムをいくつか見てみたところ、長い式を普通に書いてるところが結構見つかったので、要所にenum挟んでやればまだまだ速くできる余地がありそうです。
というわけでいろいろがんばっていきます!
- 投稿日:2019-07-07T03:08:44+09:00
PHPが思ったよりパフォーマンス良かった件
ことの発端
最近ちょっとPythonを勉強してみようと思いまして。
まずは感覚をつかむために素数をアウトプットするプログラム書きますよね。で、折角なのでC、PHP、JavaScript(Node.js)、Python3で速度を比較してみました。
バージョン
Cコンパイラ
$ gcc --version
gcc (Ubuntu 8.3.0-6ubuntu1) 8.3.0
Copyright (C) 2018 Free Software Foundation, Inc.
This is free software; see the source for copying conditions.  There is NO
warranty; not even for MERCHANTABILITY or FITNESS FOR A PARTICULAR PURPOSE.
PHP
$ php --version
PHP 7.2.19-0ubuntu0.19.04.1 (cli) (built: Jun  4 2019 14:44:42) ( NTS )
Copyright (c) 1997-2018 The PHP Group
Zend Engine v3.2.0, Copyright (c) 1998-2018 Zend Technologies
    with Zend OPcache v7.2.19-0ubuntu0.19.04.1, Copyright (c) 1999-2018, by Zend Technologies
Node.js
$ node --version
v10.16.0
Python
$ python --version
Python 3.7.3
ソースコード
C
#include <stdio.h>
#include <stdlib.h>
#include <string.h>
#include <math.h>
#include <stdbool.h>

int main()
{
    int maxNum = 65536;
    bool *a = (bool *)calloc(maxNum, sizeof(bool));
    a[2] = true;
    for (int i = 3; i < maxNum; i += 2) {
        bool p = true;
        int checkMax = (int)round(sqrt((double)i));
        for (int j = 2; j <= checkMax; ++j) {
            if (!a[j]) {
                continue;
            }
            if (i % j == 0) {
                p = false;
                break;
            }
        }
        if (p) {
            a[i] = true;
        }
    }
    for (int i = 2; i < maxNum; ++i) {
        if (a[i]) {
            printf("%d\n", i);
        }
    }
    return 0;
}
PHP
<?php

$maxNum = 65536;
$a = array_fill(0, $maxNum, false);
$a[2] = true;
for ($i = 3; $i < $maxNum; $i += 2) {
    $p = true;
    $checkMax = (int)round(sqrt((double)$i));
    for ($j = 2; $j <= $checkMax; ++$j) {
        if (!$a[$j]) {
            continue;
        }
        if ($i % $j === 0) {
            $p = false;
            break;
        }
    }
    if ($p) {
        $a[$i] = true;
    }
}
for ($i = 2; $i < $maxNum; ++$i) {
    if ($a[$i]) {
        printf("%d\n", $i);
    }
}
JavaScript
const maxNum = 65536;
const a = Array(maxNum);
a.fill(false);
a[2] = true;
for (let i = 3; i < maxNum; i += 2) {
    let p = true;
    const checkMax = parseInt(Math.round(Math.sqrt(parseFloat(i))));
    for (let j = 2; j <= checkMax; ++j) {
        if (!a[j]) {
            continue;
        }
        if (i % j === 0) {
            p = false;
            break;
        }
    }
    if (p) {
        a[i] = true;
    }
}
for (i = 2; i < maxNum; ++i) {
    if (a[i]) {
        console.log(i);
    }
}
Python
import math
from decimal import Decimal, ROUND_HALF_UP, ROUND_HALF_EVEN

maxNum = 65536
a = [False] * maxNum;
a[2] = True
for i in range(3, maxNum, 2):
    p = True
    checkMax = int(Decimal(str(math.sqrt(i))).quantize(Decimal('0'), rounding=ROUND_HALF_UP))
    for j in range(2, checkMax + 1):
        if not a[j]:
            continue
        if i % j  == 0:
            p = False;
            break;
    if p:
        a[i] = True;
for i in range(2, maxNum):
    if a[i]:
        print('%d' % i)
結果
C
コンパイルは以下の通り。
最適化とかも特に指定せず。$ gcc p.c -lm$ time ./a.out > /dev/null ./a.out > /dev/null 0.02s user 0.00s system 76% cpu 0.021 totalPHP
$ time php p.php > /dev/null
php p.php > /dev/null  0.22s user 0.01s system 93% cpu 0.249 total
Cの10倍かかる。
Node.js
$ time node p.js > /dev/null
node p.js > /dev/null  0.53s user 0.04s system 74% cpu 0.768 total
Cの30倍。
Python
$ time python p.py > /dev/null
python p.py > /dev/null  0.77s user 0.02s system 77% cpu 1.020 total
Cの50倍。
まとめ
ということでPHPが以外と速かった。
Cが一番速いのはこれはもうしょうがない。ちなみに出力結果をファイルにリダイレクトしてハッシュ値求めた結果は以下の通りです。
$ md5sum *.txt
3c22247fa4a5c6a8b9009cfc70961f90  result_c.txt
3c22247fa4a5c6a8b9009cfc70961f90  result_js.txt
3c22247fa4a5c6a8b9009cfc70961f90  result_php.txt
3c22247fa4a5c6a8b9009cfc70961f90  result_python.txt
$ sha512sum *.txt ae4a60fb2903b488179a36be80b5569153cc27a4989001af9015355fcd5ffa0ddd94cf64d0beeeaff4a51bd3cf8c8594d0d47379825b50a185d259840b20202c result_c.txt ae4a60fb2903b488179a36be80b5569153cc27a4989001af9015355fcd5ffa0ddd94cf64d0beeeaff4a51bd3cf8c8594d0d47379825b50a185d259840b20202c result_js.txt ae4a60fb2903b488179a36be80b5569153cc27a4989001af9015355fcd5ffa0ddd94cf64d0beeeaff4a51bd3cf8c8594d0d47379825b50a185d259840b20202c result_php.txt ae4a60fb2903b488179a36be80b5569153cc27a4989001af9015355fcd5ffa0ddd94cf64d0beeeaff4a51bd3cf8c8594d0d47379825b50a185d259840b20202c result_python.txt全部同じ出力が得られた模様。
実際に素数一覧として正しいかの検証はしていません。
同じようなアルゴリズムで実行速度がどう違うかの検証ですので。並列処理とか入ってくると標準ではマルチスレッドできないPHPは不利なんだろうなぁ。