- 投稿日:2019-07-07T23:43:22+09:00
【C#】シンプルなロガークラスを自作してみた
自己紹介
はじめまして!非実在系PG女子の水無月 美玖(みなつき みく)です!
都心近郊で暮らしながら、お仕事でプログラムを書いたりしてます。
巷で#バーチャル高専女子というものが流行っている?らしいので、私みたいなジャンルのヒトがいてもいいのかなーということでアカウントの開設を行いました。
QiitaではC#やJava、git等の記事をメインで書いていこうかなーと考えてますので、なにとぞよろしくおねがいしますね。
Twitter: @miku_minatsukiLogger
さて、みなさんはアプリケーションの『ログ出力』ってどうしてますか?
Microsoft.Build.Framework.Loggerを使う方もいれば、NLogやlog4netを使う方もいらっしゃると思います。
私もしっかりしたアプリケーションを開発したりするときはNLogやlog4netを使うのですが、
ちょっとしたAPIのテストだったり、小さなアプリケーションを作る際にそこまでしっかりした造りのロガーじゃなくてもいいなー…って思うことが多々あります。
わざわざ設定ファイル作ったりするほどじゃないけど、一応日時の出力やログレベルくらいは欲しい…。実際、ロガーがやっているお仕事って、メソッドが呼ばれたときにファイルに文字列を書き込んでるだけなんですよね。
たったそれくらいであれば、機能を絞ってシンプルなのを自作してみてもいいんじゃないかな?って思いまして。
しばらく前に作ったのですが、この度公開してみようと思います。コード
特に複雑なこともしていないので、ファイル1つで十分でした。
Logger.csusing System; using System.IO; using System.Text; public class Logger { private static readonly string LOG_FORMAT = "{0} {1} {2}"; private static readonly string DATETIME_FORMAT = "yyyy/MM/dd HH:mm:ss.fff"; private StreamWriter stream = null; private readonly bool consoleOut; private static Logger singletonInstance = null; public static Logger GetInstance(string logFilePath, bool consoleOut = false) { if (singletonInstance == null) { singletonInstance = new Logger(logFilePath, consoleOut); } return singletonInstance; } public static void Init(string logFilePath, bool consoleOut = false) { singletonInstance = new Logger(logFilePath, consoleOut); } private Logger(string logFilePath, bool consoleOut) { if (string.IsNullOrWhiteSpace(logFilePath)) { throw new Exception("logFilePath is empty."); } var logFile = new FileInfo(logFilePath); if (!Directory.Exists(logFile.DirectoryName)) { Directory.CreateDirectory(logFile.DirectoryName); } stream = new StreamWriter(logFile.FullName, true, Encoding.Default); stream.AutoFlush = true; this.consoleOut = consoleOut; } private void write(Level level, string text) { string log = string.Format(LOG_FORMAT, DateTime.Now.ToString(DATETIME_FORMAT), level.ToString(), text); stream.WriteLine(log); if (consoleOut) { Console.WriteLine(log); } } public void Error(string text) { write(Level.ERROR, text); } public void Error(Exception ex) { write(Level.ERROR, ex.Message + Environment.NewLine + ex.StackTrace); } public void Error(string format, object arg) { Error(string.Format(format, arg)); } public void Error(string format, params object[] args) { Error(string.Format(format, args)); } public void Warn(string text) { write(Level.WARN, text); } public void Warn(string format, object arg) { Warn(string.Format(format, arg)); } public void Warn(string format, params object[] args) { Warn(string.Format(format, args)); } public void Info(string text) { write(Level.INFO, text); } public void Info(string format, object arg) { Info(string.Format(format, arg)); } public void Info(string format, params object[] args) { Info(string.Format(format, args)); } public void Debug(string text) { write(Level.DEBUG, text); } public void Debug(string format, object arg) { Debug(string.Format(format, arg)); } public void Debug(string format, params object[] args) { Debug(string.Format(format, args)); } public void Trace(string text) { write(Level.TRACE, text); } public void Trace(string format, object arg) { Trace(string.Format(format, arg)); } public void Trace(string format, params object[] args) { Trace(string.Format(format, args)); } private enum Level { ERROR, WARN, INFO, DEBUG, TRACE } }使い方
使い方は至ってシンプルですが、2通りの使い方があります。
どちらもシングルトンインスタンスを初期化し、それを取得してログ出力メソッドを呼び出すという点は変わりません。Program.csでのみ使う場合
- Logger.csをプロジェクトに導入する
- Program.csでフィールドとして
private static Logger log = Logger.GetInstance(logFilePath, consoleOut);を宣言。
logFilePathは絶対パスでも相対パスでもok。
consoleOutは記述しなければfalseとなり、コンソールへの出力はされない。必要に応じてtrueを渡す。log.Error();なりlog.Info();なりご自由に複数のクラスから呼び出す場合(普通のプロジェクトで使う場合)
- Logger.csをプロジェクトに導入する
Mainメソッド内でLogger.init(logFilePath, consoleOut)を呼び出す。logFilePathは絶対パスでも相対パスでもok。
consoleOutは記述しなければfalseとなり、コンソールへの出力はされない。必要に応じてtrueを渡す。- 使いたいクラス内で、フィールドとして
private static Logger log = Logger.GetInstance();を宣言。log.Error();なりlog.Info();なりご自由に使用例
たとえば、こんなProgram.csがあったとします。
Program.csusing System; using System.Diagnostics; using System.Threading; namespace Test { public class Program { private static Logger log = Logger.GetInstance("calc.log", true); static void Main(string[] args) { var sw = new Stopwatch(); log.Info("Start to calculation."); sw.Start(); int result = 0; var rand = new Random(); for (int i = 0; i < 10; i++) { int add = rand.Next(1, 1000000); result += add; log.Debug("add: {0}, result: {1}", add, result); Thread.Sleep(100); } sw.Stop(); log.Info("Finished to process. result: {0}, time: {1}ms", result, sw.ElapsedMilliseconds); } } }このProgram.csを実行してできあがるのが、以下のcalc.logです。
calc.log2019/07/07 23:25:44.942 INFO Start to calculation. 2019/07/07 23:25:44.945 DEBUG add: 849335, result: 849335 2019/07/07 23:25:45.046 DEBUG add: 817967, result: 1667302 2019/07/07 23:25:45.148 DEBUG add: 709783, result: 2377085 2019/07/07 23:25:45.249 DEBUG add: 945058, result: 3322143 2019/07/07 23:25:45.350 DEBUG add: 76153, result: 3398296 2019/07/07 23:25:45.451 DEBUG add: 519537, result: 3917833 2019/07/07 23:25:45.551 DEBUG add: 140003, result: 4057836 2019/07/07 23:25:45.652 DEBUG add: 555771, result: 4613607 2019/07/07 23:25:45.753 DEBUG add: 604428, result: 5218035 2019/07/07 23:25:45.853 DEBUG add: 687503, result: 5905538 2019/07/07 23:25:45.954 INFO Finished to process. result: 5905538, time: 1009msおわりに
ロガークラスの自作って、けっこういろんな方がされていると思います。
私の書き方が絶対ってことはないですし、もっと便利に作ってる方はたくさんいらっしゃるハズです。
今回は私自身の勉強も兼ねて自作してみましたが、広く公開するようなアプリケーションを作る場合はNLogやlog4netのように、設定ファイルによって様々な設定ができるロガーを使うほうが良いでしょう。
でも私みたいに(設定ファイル作るの面倒だなー…)って思っても許される程度の規模での開発なら、今回作ったLoggerクラスくらいのものでも十分に役割を果たせるのではないかと!何かありましたら、お気軽にコメントしてくださいね。
Twitterでのフォロー等もお待ちしております|ω・)
- 投稿日:2019-07-07T17:41:18+09:00
C#学習 -ラムダ式-
C#学習中のため、学習内容をメモしていく。
間違いやアドバイスがあればコメントからよろしくお願いします。ラムダ式
メソッドの引数としてメソッドを引き渡すことができたりする。
匿名メソッドを短く、簡単にしたものをラムダ式という。指定した文字列を[]で囲んで表示を行うプログラムを、匿名メソッド、ラムダ式の場合で表すと以下のようになる。
匿名メソッドの場合
    class Program
    {
        static void Main(string[] args)
        {
            var data = new[] {"あいうえお", "かきくけこ", "さしすせそ" };
            var lt = new Program();

            // 匿名メソッド
            lt.ArrayWalk(data, delegate (string d)
            {
                return $"[{d}]";
            });
        }

        void ArrayWalk(string[] data, Func<string, string> output)
        {
            foreach (var val in data)
            {
                Console.WriteLine(output(val));
            }
        }
    }
delegateキーワードを利用してメソッドを直接埋め込んでいる。
ラムダ式の場合
    class Program
    {
        static void Main(string[] args)
        {
            var data = new[] {"あいうえお", "かきくけこ", "さしすせそ" };
            var p = new Program();

            // ラムダ式
            p.ArrayWalk(data, (string d) =>
            {
                return $"[{d}]";
            });
        }

        void ArrayWalk(string[] data, Func<string, string> output)
        {
            foreach (var val in data)
            {
                Console.WriteLine(output(val));
            }
        }
    }
delegateキーワードの代わりに=>で引数とメソッドの本体をつないでいる。
ラムダ式は条件によりさらに簡素化することができる。
・メソッド本体が一文の場合{ }を省略可能
・式の戻りがそのまま戻り値と見なされるので、return命令を省略可能p.ArrayWalk(data, (string d) => $"[{d}]");・引数の型は暗黙的に推論されるので、ラムダ式では省略可能
p.ArrayWalk(data, (d) => $"[{d}]");・引数が1個の場合は、引数をくくるカッコも省略可能
ただし、引数がない場合はカッコの省略は不可p.ArrayWalk(data, d => $"[{d}]");参考した本
独習C#
おわり。
- 投稿日:2019-07-07T17:05:50+09:00
C#でOOPを活用してジャンケンゲームを作ろう
はじめに
C#でジャンケンを作っていきたいと思います。
具体的な仕様をまずは考えていきます。
- 環境はコンソールアプリケーション。
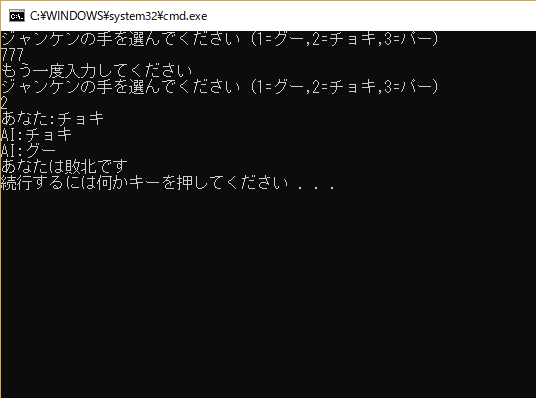
- ジャンケンの手を選んでください(1=グー,2=チョキ,3=パー)」と表示させる。
- ユーザーは1,2,3のいずれかを入力する。(それ以外を入力されたら、再度入力するよう要求)。
- AIがランダムで手を出す。
- 勝敗を出力する。
まあ、だいたいこんな感じでしょうか。
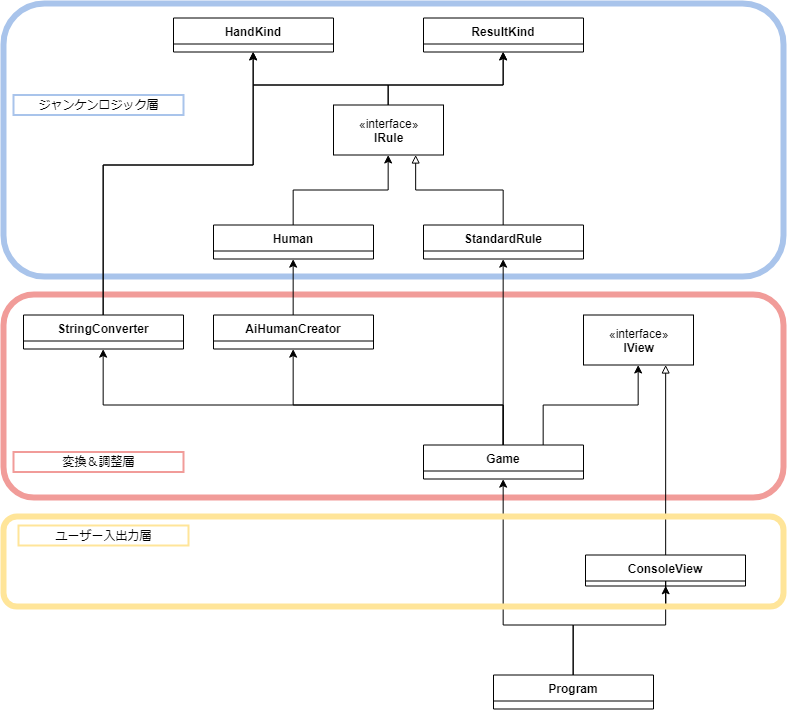
アーキテクチャとしては、レイヤードアーキテクチャを意識しつつやってみます。
完成図
ロジック分析
早速開発!っと行きたい所ですが、まずはジャンケンについて深く分析しておきます。
- ジャンケンは複数の人間で遊ぶことができる。
- ジャンケンの勝敗の種類は勝ち、負け、引き分けがある。
- ジャンケンのルールを人間全員が共通理解した上でジャンケンは行われる。
- 人間はグー、チョキ、パーいずれかの手を出し、他の人間達の出した手と見比べ、自身の勝敗の種類をジャンケンのルールに基づいて知ることができる。
ここで、ジャンケンに存在するオブジェクトを抽出していきましょう。
- 勝敗の種類
- 手
- ジャンケンのルール
- 人間
ですね。
この三つがあればジャンケンの純粋なロジック部分を実装できそうです。早速これらをコードに落とし込んでいきましょう。
ロジックの実装
まずは勝敗の種類です。
勝敗の種類は勝ち、負け、引き分けでしたのでそれを表現していきましょう。ResultKind.csnamespace Domain { // 勝敗の種類 enum ResultKind { Win, Lose, Draw } }次は手です。
手はグー、チョキ、パーの種類を持つオブジェクトですのでそれを表現していきましょう。HandKind.csnamespace Domain { // 手の種類 enum HandKind { Guu, Tyoki, Paa } }次にジャンケンのルールです。
ジャンケンのルールとは、手の組み合わせから勝敗の判定をするものです。
ジャンケンのルールはローカルルールなどで、複数ある可能性があります。
そこも考慮しつつ、コードに落とし込んでみましょう。IRule.csusing System.Collections.Generic; namespace Domain { // ジャンケンのルールを表すインターフェイス interface IRule { // 勝敗を判定する ResultKind Judge(HandKind myHand, IEnumerable<HandKind> otherHands); } }次に実際のジャンケンのルールを1つ定義しておきましょうか。
もっとも一般的なジャンケンのルールを定義したいと思います。StandardRule.csusing System.Collections.Generic; // Enum名の省略 using static Domain.HandKind; using static Domain.ResultKind; namespace Domain { // もっとも一般的なジャンケンのルール class StandardRule : IRule { // 勝敗を判定する public ResultKind Judge(HandKind myHand, IEnumerable<HandKind> otherHands) { uint winCount = 0; uint loseCount = 0; foreach (var otherHand in otherHands) { var resultKind = Judge(myHand, otherHand); if (resultKind == Win) winCount++; else if (resultKind == Lose) loseCount++; } if (winCount * loseCount != 0 || winCount + loseCount == 0) return Draw; if (winCount != 0) return Win; return Lose; } // 1対1の時の勝敗判定 private ResultKind Judge(HandKind myHand, HandKind otherHand) { if (myHand == otherHand) return Draw; if ( (myHand == Guu && otherHand == Paa) || (myHand == Tyoki && otherHand == Guu) || (myHand == Paa && otherHand == Tyoki) ) return Lose; return Win; } } }最後に人間を表現していきましょう。
人間は、
ジャンケンのルールを人間全員が共通理解した上でジャンケンは行われる。
人間はグー、チョキ、パーいずれかの手を出し、他の人間達の出した手と見比べ、自身の勝敗の種類をジャンケンのルールに基づいて知ることができる。
でした。
ポイントは
- 同じジャンケンのルールを共有した人間どうしでのみジャンケンができる。
- 手を出すことができる。
- 自分の出した手と他の人間の出した手から勝敗を知ることができる。
です。
Human.csusing System.Linq; namespace Domain { // ジャンケンをする人間を表す class Human<Rule> where Rule : IRule { private readonly Rule rule; public HandKind Hand { get; } // ルールと出す手をセット public Human(Rule rule, HandKind hand) { this.rule = rule; this.Hand = hand; } // 勝敗を知る public ResultKind KnowResult(Human<Rule>[] otherHumen) => rule.Judge(Hand, otherHumen.Select(x => x.Hand)); } }コツは、
Human<Rule>という風にジェネリクスを使い、同じルールの人間としかジャンケンができなくした点です。入出力の実装
ひと通り、重要なロジックの実装は完成したので、次は入出力の処理を実装していきましょう。
・「ジャンケンの手を選んでください(1=グー,2=チョキ,3=パー)」と表示させる。
・ユーザーは1,2,3のいずれかを入力する。(それ以外を入力されたら、再度入力するよう要求)。
です。依存を分離しておきたいので、先に入出力のインターフェイスを定義します。
IView.csusing System; using System.Collections.Generic; namespace Application { // ユーザーとのやりとりをするインターフェイス interface IView { event Action<string> OnInput; // 入力を促す void ShowRequest(); // 再入力を促す void ShowTryRequest(); // 勝敗を出力する void ShowResult(string result, string myHand, IEnumerable<string> aiHands); } }これを元にコンソールの入出力を実装したクラスを作成します。
ConsoleView.csusing System; using System.Collections.Generic; namespace UserInterface { // コンソールの入出力をするクラス class ConsoleView : Application.IView { public event Action<string> OnInput; // 入力を促す public void ShowRequest() { Console.WriteLine("ジャンケンの手を選んでください(1=グー,2=チョキ,3=パー)"); var input = Console.ReadLine(); OnInput(input); } // 再入力を促す public void ShowTryRequest() { Console.WriteLine("もう一度入力してください"); ShowRequest(); } // 勝敗を出力する public void ShowResult(string result, string myHand, IEnumerable<string> aiHands) { Console.WriteLine("あなた:" + myHand); foreach (var aiHand in aiHands) Console.WriteLine("AI:" + aiHand); Console.WriteLine("あなたは" + result + "です"); } } }これで、入出力とジャンケンゲームのロジックは完成しました。
でもこれだけでは、まだ足りないところがあります。
最後に、入出力とロジックを上手くつなぎ合わせるコードを書いていきましょう。つなぎ合わせる
入出力では文字でやりとりしていますが、
ジャンケンロジックの方では、Enumを使って値をやり取りしています。
そのため、両者には値の変換作業が必要です。
まずはそれをするクラスを作ります。StringConverter.csusing Domain; namespace Application { // 文字列と相互変換する static class StringConverter { // 文字列をHandKindへ変換("1"=グー,"2"=チョキ,"3"=パー) static public HandKind? StringToHandKind(string consoleString) { int result; if (int.TryParse(consoleString, out result) == false) return null; if (result < 1 || result > 3) return null; var handKinds = new HandKind[] { HandKind.Guu, HandKind.Tyoki, HandKind.Paa }; return handKinds[result - 1]; } // ResultKindを文字列へ変換 static public string ResultKindToString(ResultKind resultKind) { switch (resultKind) { case ResultKind.Draw: return "引き分け"; case ResultKind.Win: return "勝利"; default: return "敗北"; } } // ResultKindを文字列へ変換 static public string HandKindToString(HandKind handKind) { switch (handKind) { case HandKind.Guu: return "グー"; case HandKind.Tyoki: return "チョキ"; default: return "パー"; } } } }次にユーザーと対戦する、ランダムな手を出す人間を生成するクラスを作っておきます。
AiHumanCreator.csusing System; using Domain; namespace Application { // Aiの人間を生成するクラス class AiHumanCreator { private readonly Random rand; public AiHumanCreator(Random rand) => this.rand = rand; // Aiの人間を複数生成する public Human<Rule>[] CreateAiHumen<Rule>(Rule rule, uint size) where Rule : IRule { var handKinds = new HandKind[] { HandKind.Guu, HandKind.Tyoki, HandKind.Paa }; var aiHumen = new Human<Rule>[size]; for (int i = 0; i < aiHumen.Length; i++) { var aiHandKind = handKinds[rand.Next(3)]; aiHumen[i] = new Human<Rule>(rule, aiHandKind); } return aiHumen; } } }これで、最後です。
今までの全てをつなぎ合わせ、ジャンケンゲームをするクラスを作ります。Game.csusing System.Linq; using Domain; namespace Application { // ゲームを表す class Game { // ジャンケンゲームを開始する public Game(IView view, AiHumanCreator aiHumanCreator) { view.OnInput += input => { var handKind = StringConverter.StringToHandKind(input); if (handKind == null) { view.ShowTryRequest(); return; } var player = new Human<StandardRule>(new StandardRule(), (HandKind)handKind); var aiHumen = aiHumanCreator.CreateAiHumen(new StandardRule(), 2); view.ShowResult( StringConverter.ResultKindToString( player.KnowResult(aiHumen) ), StringConverter.HandKindToString(player.Hand), aiHumen.Select(x => StringConverter.HandKindToString(x.Hand)) ); }; view.ShowRequest(); } } }後は、
Main関数から呼び出します。Program.csusing System; class Program { static void Main(string[] args) { new Application.Game( new UserInterface.ConsoleView(), new Application.AiHumanCreator(new Random()) ); } }アーキテクチャ
今回のプログラムの全体図を載せておきます。
ソースコード全部
https://github.com/elipmoc/jyanken
終わりに
これは、私が設計の練習として思考したものを記事にしたものです。
未熟ですので、「もっとこうした方が良いよ」などのマサカリは歓迎します。
少しでも設計の参考になることを願います。
- 投稿日:2019-07-07T17:05:50+09:00
C#でオブジェクト指向を活用してジャンケンゲームを作ろう
はじめに
C#でジャンケンを作っていきたいと思います。
具体的な仕様をまずは考えていきます。
- 環境はコンソールアプリケーション。
- ジャンケンの手を選んでください(1=グー,2=チョキ,3=パー)」と表示させる。
- ユーザーは1,2,3のいずれかを入力する。(それ以外を入力されたら、再度入力するよう要求)。
- AIがランダムで手を出す。
- 勝敗を出力する。
まあ、だいたいこんな感じでしょうか。
アーキテクチャとしては、レイヤードアーキテクチャを意識しつつやってみます。
完成図
ロジック分析
早速開発!っと行きたい所ですが、まずはジャンケンについて深く分析しておきます。
- ジャンケンは複数の人間で遊ぶことができる。
- ジャンケンの勝敗の種類は勝ち、負け、引き分けがある。
- ジャンケンのルールを人間全員が共通理解した上でジャンケンは行われる。
- 人間はグー、チョキ、パーいずれかの手を出し、他の人間達の出した手と見比べ、自身の勝敗の種類をジャンケンのルールに基づいて知ることができる。
ここで、ジャンケンに存在するオブジェクトを抽出していきましょう。
- 勝敗の種類
- 手
- ジャンケンのルール
- 人間
ですね。
この三つがあればジャンケンの純粋なロジック部分を実装できそうです。早速これらをコードに落とし込んでいきましょう。
ロジックの実装
まずは勝敗の種類です。
勝敗の種類は勝ち、負け、引き分けでしたのでそれを表現していきましょう。ResultKind.csnamespace Domain { // 勝敗の種類 enum ResultKind { Win, Lose, Draw } }次は手です。
手はグー、チョキ、パーの種類を持つオブジェクトですのでそれを表現していきましょう。HandKind.csnamespace Domain { // 手の種類 enum HandKind { Guu, Tyoki, Paa } }次にジャンケンのルールです。
ジャンケンのルールとは、手の組み合わせから勝敗の判定をするものです。
ジャンケンのルールはローカルルールなどで、複数ある可能性があります。
そこも考慮しつつ、コードに落とし込んでみましょう。IRule.csusing System.Collections.Generic; namespace Domain { // ジャンケンのルールを表すインターフェイス interface IRule { // 勝敗を判定する ResultKind Judge(HandKind myHand, IEnumerable<HandKind> otherHands); } }次に実際のジャンケンのルールを1つ定義しておきましょうか。
もっとも一般的なジャンケンのルールを定義したいと思います。StandardRule.csusing System.Collections.Generic; // Enum名の省略 using static Domain.HandKind; using static Domain.ResultKind; namespace Domain { // もっとも一般的なジャンケンのルール class StandardRule : IRule { // 勝敗を判定する public ResultKind Judge(HandKind myHand, IEnumerable<HandKind> otherHands) { uint winCount = 0; uint loseCount = 0; foreach (var otherHand in otherHands) { var resultKind = Judge(myHand, otherHand); if (resultKind == Win) winCount++; else if (resultKind == Lose) loseCount++; } if (winCount * loseCount != 0 || winCount + loseCount == 0) return Draw; if (winCount != 0) return Win; return Lose; } // 1対1の時の勝敗判定 private ResultKind Judge(HandKind myHand, HandKind otherHand) { if (myHand == otherHand) return Draw; if ( (myHand == Guu && otherHand == Paa) || (myHand == Tyoki && otherHand == Guu) || (myHand == Paa && otherHand == Tyoki) ) return Lose; return Win; } } }最後に人間を表現していきましょう。
人間は、
ジャンケンのルールを人間全員が共通理解した上でジャンケンは行われる。
人間はグー、チョキ、パーいずれかの手を出し、他の人間達の出した手と見比べ、自身の勝敗の種類をジャンケンのルールに基づいて知ることができる。
でした。
ポイントは
- 同じジャンケンのルールを共有した人間どうしでのみジャンケンができる。
- 手を出すことができる。
- 自分の出した手と他の人間の出した手から勝敗を知ることができる。
です。
Human.csusing System.Linq; namespace Domain { // ジャンケンをする人間を表す class Human<Rule> where Rule : IRule { private readonly Rule rule; public HandKind Hand { get; } // ルールと出す手をセット public Human(Rule rule, HandKind hand) { this.rule = rule; this.Hand = hand; } // 勝敗を知る public ResultKind KnowResult(Human<Rule>[] otherHumen) => rule.Judge(Hand, otherHumen.Select(x => x.Hand)); } }コツは、
Human<Rule>という風にジェネリクスを使い、同じルールの人間としかジャンケンができなくした点です。入出力の実装
ひと通り、重要なロジックの実装は完成したので、次は入出力の処理を実装していきましょう。
・「ジャンケンの手を選んでください(1=グー,2=チョキ,3=パー)」と表示させる。
・ユーザーは1,2,3のいずれかを入力する。(それ以外を入力されたら、再度入力するよう要求)。
です。依存を分離しておきたいので、先に入出力のインターフェイスを定義します。
IView.csusing System; using System.Collections.Generic; namespace Application { // ユーザーとのやりとりをするインターフェイス interface IView { event Action<string> OnInput; // 入力を促す void ShowRequest(); // 再入力を促す void ShowTryRequest(); // 勝敗を出力する void ShowResult(string result, string myHand, IEnumerable<string> aiHands); } }これを元にコンソールの入出力を実装したクラスを作成します。
ConsoleView.csusing System; using System.Collections.Generic; namespace UserInterface { // コンソールの入出力をするクラス class ConsoleView : Application.IView { public event Action<string> OnInput; // 入力を促す public void ShowRequest() { Console.WriteLine("ジャンケンの手を選んでください(1=グー,2=チョキ,3=パー)"); var input = Console.ReadLine(); OnInput(input); } // 再入力を促す public void ShowTryRequest() { Console.WriteLine("もう一度入力してください"); ShowRequest(); } // 勝敗を出力する public void ShowResult(string result, string myHand, IEnumerable<string> aiHands) { Console.WriteLine("あなた:" + myHand); foreach (var aiHand in aiHands) Console.WriteLine("AI:" + aiHand); Console.WriteLine("あなたは" + result + "です"); } } }これで、入出力とジャンケンゲームのロジックは完成しました。
でもこれだけでは、まだ足りないところがあります。
最後に、入出力とロジックを上手くつなぎ合わせるコードを書いていきましょう。つなぎ合わせる
入出力では文字でやりとりしていますが、
ジャンケンロジックの方では、Enumを使って値をやり取りしています。
そのため、両者には値の変換作業が必要です。
まずはそれをするクラスを作ります。StringConverter.csusing Domain; namespace Application { // 文字列と相互変換する static class StringConverter { // 文字列をHandKindへ変換("1"=グー,"2"=チョキ,"3"=パー) static public HandKind? StringToHandKind(string consoleString) { int result; if (int.TryParse(consoleString, out result) == false) return null; if (result < 1 || result > 3) return null; var handKinds = new HandKind[] { HandKind.Guu, HandKind.Tyoki, HandKind.Paa }; return handKinds[result - 1]; } // ResultKindを文字列へ変換 static public string ResultKindToString(ResultKind resultKind) { switch (resultKind) { case ResultKind.Draw: return "引き分け"; case ResultKind.Win: return "勝利"; default: return "敗北"; } } // ResultKindを文字列へ変換 static public string HandKindToString(HandKind handKind) { switch (handKind) { case HandKind.Guu: return "グー"; case HandKind.Tyoki: return "チョキ"; default: return "パー"; } } } }次にユーザーと対戦する、ランダムな手を出す人間を生成するクラスを作っておきます。
AiHumanCreator.csusing System; using Domain; namespace Application { // Aiの人間を生成するクラス class AiHumanCreator { private readonly Random rand; public AiHumanCreator(Random rand) => this.rand = rand; // Aiの人間を複数生成する public Human<Rule>[] CreateAiHumen<Rule>(Rule rule, uint size) where Rule : IRule { var handKinds = new HandKind[] { HandKind.Guu, HandKind.Tyoki, HandKind.Paa }; var aiHumen = new Human<Rule>[size]; for (int i = 0; i < aiHumen.Length; i++) { var aiHandKind = handKinds[rand.Next(3)]; aiHumen[i] = new Human<Rule>(rule, aiHandKind); } return aiHumen; } } }これで、最後です。
今までの全てをつなぎ合わせ、ジャンケンゲームをするクラスを作ります。Game.csusing System.Linq; using Domain; namespace Application { // ゲームを表す class Game { // ジャンケンゲームを開始する public Game(IView view, AiHumanCreator aiHumanCreator) { view.OnInput += input => { var handKind = StringConverter.StringToHandKind(input); if (handKind == null) { view.ShowTryRequest(); return; } var player = new Human<StandardRule>(new StandardRule(), (HandKind)handKind); var aiHumen = aiHumanCreator.CreateAiHumen(new StandardRule(), 2); view.ShowResult( StringConverter.ResultKindToString( player.KnowResult(aiHumen) ), StringConverter.HandKindToString(player.Hand), aiHumen.Select(x => StringConverter.HandKindToString(x.Hand)) ); }; view.ShowRequest(); } } }後は、
Main関数から呼び出します。Program.csusing System; class Program { static void Main(string[] args) { new Application.Game( new UserInterface.ConsoleView(), new Application.AiHumanCreator(new Random()) ); } }アーキテクチャ
今回のプログラムの全体図を載せておきます。
ソースコード全部
https://github.com/elipmoc/jyanken
終わりに
これは、私が設計の練習として思考したものを記事にしたものです。
未熟ですので、「もっとこうした方が良いよ」などのマサカリは歓迎します。
少しでも設計の参考になることを願います。
- 投稿日:2019-07-07T14:59:55+09:00
C#学習 -シングルトン-
C#学習中のため、学習内容をメモしていく。
間違いやアドバイスがあればコメントからよろしくお願いします。シングルトン
クラスがロードされた初回に一度だけインスタンスが生成され、以降のインスタンスは生成されない。
コード例
   class MySingleton
    {
        // アプリで保持すべき唯一のインスタンスをクラスフィールドとして保存
        private static MySingleton instance = new MySingleton();

        // コンストラクターをprivate宣言することで1度だけしかインスタンスが生成されない
        private MySingleton()
        {
            Console.WriteLine("シングルトンの生成");
        }

        // 唯一のインスタンスを取得するプロパティ
        public static MySingleton Instance
        {
            get { return instance; }
        }

        private string _str;

        public string str
        {
            get { return _str; }
            set { _str = value; }
        }
    }

    class Program
    {
        static void Main(string[] args)
        {
            var obj = MySingleton.Instance;
            obj.str = "シングルトン1";

            var obj2 = MySingleton.Instance;

            // インスタンスは1つしか生成されないため、dataの内容は「シングルトン1」となる
            Console.WriteLine(obj2.str);
        }
    }
参考した本
独習C#
おわり。
- 投稿日:2019-07-07T14:56:13+09:00
c# Chartコントロール 大量プロットでスクロールするチャートの高速化
はじめに
c#始めて1年が経ちました。
最初にやったのがChartコントロールで、その時は普通の使い方で済んだのですが、最近関係したChartプログラムは思い切り性能の問題がありました。
例えば10msごとに変化する10種類のデータを過去5分間分表示すると、プロット数は30万個になります。これを100msに1回表示更新するとどうなるか。
標準Chartだとたぶんダメなのでサンプリングを10回に1回にするとプロット数は3万個。
妥協も必要ですが、精度を落とした上これで本当に大丈夫と言えるでしょうか?スクロールチャートの高速化
スクロールチャートの前提
ここで実装するスクロールチャートとは以下のようなものです。
- X軸が経過時間、Y軸が値で最新値を右側に表示します。
- 短い時間にデータが入力されるので高頻度での更新に耐えられるものとします。
- 棒グラフでも可能ですが今回は折れ線グラプ(Lineチャート)を扱います。
- 最大のプロット数を決め、最大プロット数を超えた場合、左側の最旧データを削除します。
- ほぼ定周期でデータを得られるデータを対象とし、データ数から経過時間を推定します。
- Y軸の値は無効データ(DataPoint#IsEmpty=true)を含んでも良いものとします。
高速化の要約
最終的な実装だけ知るのであれば途中経過は必要ないかも知れませんね。
プロット数が1万点のときの描画時間です。
プロット数が30万点でも問題なく描画できました。
時間は目安です。描画量や描画面積により大きく変動します。
# 項目 時間(ms) 補足 1 ChartType=Line 132 全点描画していると思われる 2 ChartType=FastLine 31 全点描画していると思われる 3 Graphicsで直接描画(DrawLine使用) 34 全点描画 4 Graphicsで直接描画(DrawPath使用) 25 全点描画 5 DrawImageとDrawPathで描画 1 N回に1回全点描画(#4)の時間がかかる LineとFastLine
ChartType=LineのときDataPointで指定したX,Yの値でプロットされます。線以外にマーカーが指定できます。
ChartType=FastLineでもX,Yの値を指定できますがXの値を0以外にしない限りデータ並びで等間隔にプロットされるようです。
また同じデータでも描画の感じが異なります。
定周期でデータを取得するなど、時刻が厳密な意味を持たない場合FastLineを利用した方が良いと思います。
ただFastLineでもプロット数が多いと描画に時間がかかるため、Graphicsでの直接描画を試すことにしました。Graphicsで直接描画
Graphicsで描画するためにはChartのプロット領域を割り出す必要があります。
簡単に取得する方法が判らなかったので以下のように計算しました。
DrawImageの使用
DrawPathを使用しても所詮データ量が多いと遅くなります。
そこで毎回全点を描画しない方法を考えてみました。
以下のような感じです。
(1)N回に1回全点描画し背景が透明なBitmapに保存する
(2)プロットデータを更新するごとにBitmapを水平移動してDrawImageで描画する
(3)(1)以降に更新されたプロットデータを描画する
(4)プロットデータがN回更新されたら(1)から繰り返す
まとめ
今回のアイデアは実際には採用されていません。個人的に試してみただけのものです。
途中間引きによる高速化も検討しました。
「Largest Triangle Three Bucketsアルゴリズム」というものです。
ノイズなど特異点を捨てないという利点があり、欠測もfloat.MaxValueとかに置き換えれば機能します。
しかしながら最初のデータが毎回変わると結果も変わるため、スクロールチャートには不向きであることが判りました。但し起点を変えない工夫をすれば実用になると思います。
また、X軸に経過時間を入れることもできそうですが、今回は見合わせています。
細かいことですがグラフの起点は常に右側で良いと今更ながら思った次第です。
またソースは取りあえずひとまとめにして動作確認したというだけで、コンポーネントとしてはまったく不十分ですよね。
それでもこの記事がどなたかのお役に立てれば嬉しいです。開発環境
PC --- Windows7(Intel Core i5-2300,メモリ8GB)
開発環境 --- Visual Studio Community 2017
ターゲットフレームワーク --- .NET Fremawork 4.6.1
ソースコート
チャートプログラム
ScrollChart.csusing System; using System.Collections.Generic; using System.Data; using System.Drawing; using System.Drawing.Drawing2D; using System.Linq; using System.Windows.Forms; using System.Windows.Forms.DataVisualization.Charting; namespace FastChart { public partial class ScrollChart : Chart { public Dictionary<Series, LargeSeries> ScrollSeries = new Dictionary<Series, LargeSeries>(); public List<LargeSeries> SeriesList = new List<LargeSeries>(); private Bitmap ChartImage; private int ImageDataCount; public ScrollChart() { this.Paint += new System.Windows.Forms.PaintEventHandler(this.Chart_Paint); } public void AddSeries(Series series, int maxPoints, int maxShiftCount) { var ser = new LargeSeries(this.ChartAreas[0], series, maxPoints, maxShiftCount); SeriesList.Add(ser); ScrollSeries[series] = ser; series.Points.Add(new DataPoint() { IsEmpty = true }); } public void ChartUpdate() { foreach(var ser in SeriesList) { ser.PlotCounter = ser.SeriesData.Count; } this.Update(); } private void Chart_Paint(object sender, PaintEventArgs e) { Graphics g = e.Graphics; g.SmoothingMode = SmoothingMode.AntiAlias; var plotArea = new PlotArea(this); e.Graphics.SetClip(plotArea.ClipRect()); DrawLines(e.Graphics, plotArea); } private void DrawLines(Graphics g, PlotArea plotArea) { if (SeriesList.Count == 0) return; var maxPlotCounter = SeriesList.Select(x => x.PlotCounter - x.MaxShiftCount).Max(); if (maxPlotCounter > 0) { ChartImage = new Bitmap(this.Width, this.Height); ImageDataCount = SeriesList[0].SeriesData.Count; var gx = Graphics.FromImage(ChartImage); gx.SmoothingMode = SmoothingMode.AntiAlias; foreach(var ser in SeriesList) { var pen = new Pen(ser.BaseSeries.Color, ser.BaseSeries.BorderWidth); //System.Drawing.Drawing2D.DashStyleと //System.Windows.Forms.DataVisualization.Charting.ChartDashStyleは等価でない ser.DrawLines(gx, pen, plotArea, ser.MaxPoints); ser.PlotCounter = 0; } gx.Dispose(); } if(ChartImage != null) { var ser = SeriesList[0]; var shift = 0; if(ser.SeriesData.Count >= ser.MaxPoints) { shift = Math.Max(0,ser.PlotCounter - (ser.SeriesData.Count -ImageDataCount)); } g.DrawImage(ChartImage, new PointF(-shift * plotArea.Width / ser.MaxPoints, 0)); } foreach (var ser in SeriesList) { var st = Math.Max(0, ser.SeriesData.Count - ser.PlotCounter - 1); //var pen = new Pen(Color.Cyan, 1); var pen = new Pen(ser.BaseSeries.Color, ser.BaseSeries.BorderWidth); ser.DrawLines(g,pen, plotArea, ser.PlotCounter + 1); } } public class LargeSeries { public List<DataPoint> SeriesData { get; set; } public int MaxPoints; public int MaxShiftCount; private ChartArea _area; public Series BaseSeries; public int PlotCounter; public LargeSeries(ChartArea area, Series series, int maxPoints, int maxShiftCount) { _area = area; BaseSeries = series; MaxPoints = maxPoints; MaxShiftCount = maxShiftCount; SeriesData = new List<DataPoint>(); } public void AddPoint(DataPoint dataPoint) { SeriesData.Add(dataPoint); if (SeriesData.Count > MaxPoints) { SeriesData.RemoveAt(0); } PlotCounter++; } public void DrawLines(Graphics g, Pen pen, PlotArea plotArea, int size) { var path = new GraphicsPath(); var pathPoints = new List<PointF>(); if (SeriesData.Count > 0) { var sposi = Math.Max(SeriesData.Count - size, 0); for (var i = sposi; i < SeriesData.Count; i++) { var dataPoint = SeriesData[i]; //欠測の場合線を繋がない if (dataPoint.IsEmpty) { if (pathPoints.Count > 0) { path.AddLines(pathPoints.ToArray()); path.StartFigure(); pathPoints.Clear(); } } else { var plot = new PointF(plotArea.PositionX(MaxPoints, i), plotArea.PositionY((float)_area.AxisY.Minimum, (float)_area.AxisY.Maximum, (float)dataPoint.YValues[0])); pathPoints.Add(plot); } } } if (pathPoints.Count > 0) { path.AddLines(pathPoints.ToArray()); } g.DrawPath(pen, path); } } public class PlotArea { public float X0 { get; set; } public float Y0 { get; set; } public float Width { get; set; } public float Height { get; set; } private ChartArea _area; public PlotArea(Chart chart) { _area = chart.ChartAreas[0]; ; Calc(chart); } private void Calc(Chart chart) { var area_x = chart.Width * _area.Position.ToRectangleF().X / 100; X0 = area_x + chart.Width * _area.Position.ToRectangleF().Width / 100 * _area.InnerPlotPosition.ToRectangleF().X / 100; Width = chart.Width * _area.Position.ToRectangleF().Width / 100 * _area.InnerPlotPosition.ToRectangleF().Width / 100 - 1; float area_y = chart.Height * _area.Position.ToRectangleF().Y / 100; Y0 = area_y + chart.Height * _area.Position.ToRectangleF().Height / 100 * _area.InnerPlotPosition.ToRectangleF().Y / 100; Height = chart.Height * _area.Position.ToRectangleF().Height / 100 * _area.InnerPlotPosition.ToRectangleF().Height / 100 - 1; } public RectangleF ClipRect() { return new RectangleF(X0, Y0, Width, Height); } public float PositionX(float max, float posi) { return X0 + (Width * posi / max); } public float PositionY(float ymin, float ymax, float yValue) { return Y0 + Height - (Height * (yValue - ymin) / (ymax - ymin)); } } } }呼び出し例
- ScrollChart#AddSeriesでChartのSeries,最大プロット数,リアルタイムに描画するプロット数を指定します。X軸の上下限値を指定する拡張も可能と思います。
LargeSeriesによって値が違う場合は?・・・あまり厳密に考えていません。- Chart#Seriesにはポイントデータを登録せず、その代わりLargeSeries#AddPointを使用します。
Chart#Seriesにデータを登録しないのでかなりの属性は無視されます。
X軸ラベルとY軸ラベルは自動算出されないため、固定で上下限値などを設定します。
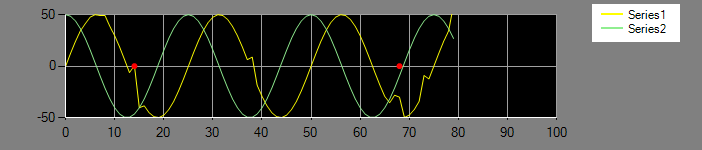
必要あればFormatNumberイベントかCustomLabelで軸ラベルを指定します。public partial class SampleChart : Form { private int MAX_PLOTS = 100; private void SampleChart_Load(object sender, EventArgs e) { Series series1 = new Series(); series1.ChartType = SeriesChartType.FastLine; series1.Color = Color.Yellow; var area = chart1.ChartAreas[0]; area.AxisX.Minimum = 0; //プログラムでは無視している area.AxisX.Maximum = 100; area.AxisY.Minimum = -50; area.AxisY.Maximum = 50; chart1.Series.Add(series1); //10回に1回Bitmap Imageを作る chart1.AddSeries(series1, MAX_PLOTS, 10); } private void Timer1_Tick(object sender, EventArgs e) { chart1.SeriesList[0].AddPoint(SinCalc.NextValue()); //データ入力 chart1.Invalidate(); } }


- 投稿日:2019-07-07T00:10:59+09:00
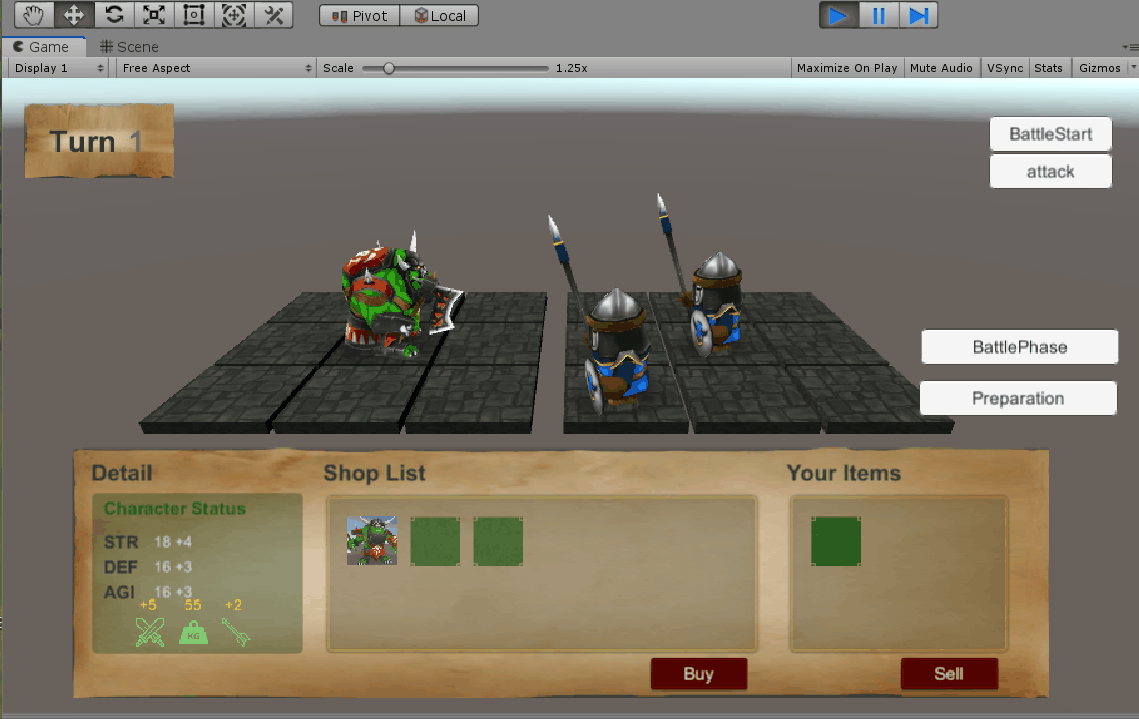
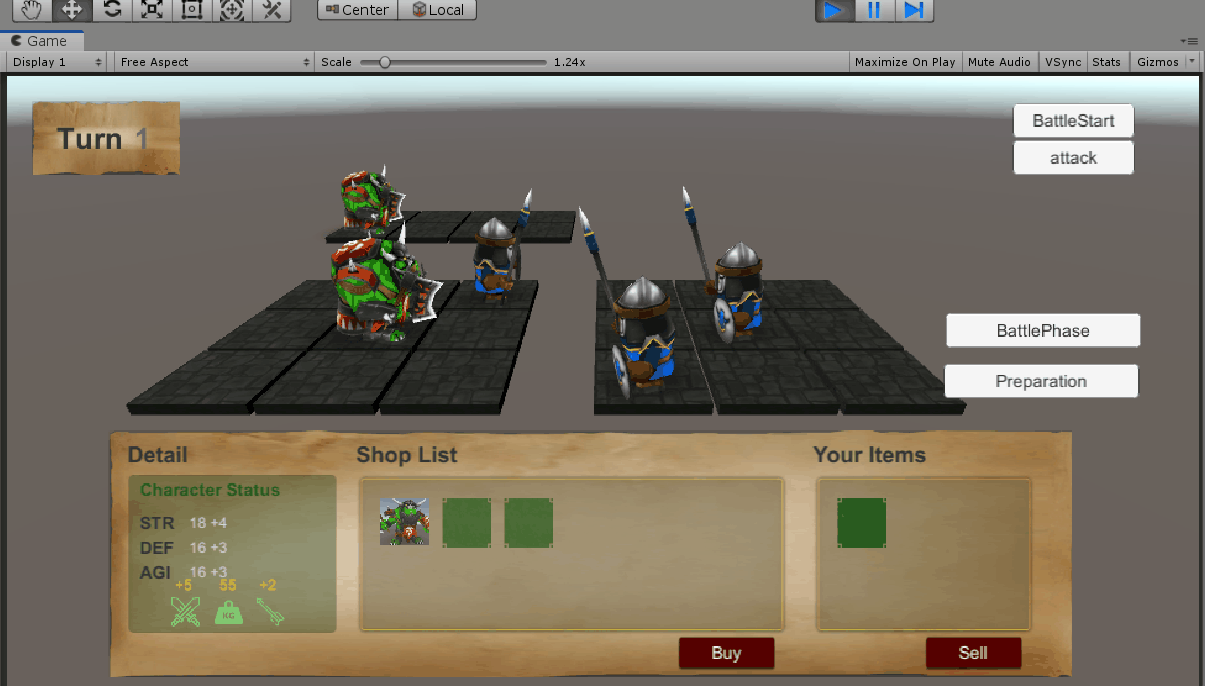
【Unity】Raycastを使ってオブジェクトを配置・入れ替えしてみる
はじめに
- Unity 2ヶ月目くらいの初心者がゲーム開発をする上で詰まったポイントをまとめます。
- 自分と同じような初心者向けなので、上級者の方はブラウザバックを推奨します。
やりたいこと
Auto ChessRTSっぽいサムシングを作りたい
- 盤面に配置する駒をマスに配置・移動させたい
詰まったこと
最初はCanvasからWorldSpaceにドラッグ&ドロップで実現したかった・・・
が、ダメ・・・!
CanvasはあくまでUIを配置するものであり、CanvasのUIそのものが直接的に3D空間に影響を与える目的で用意されたものでない(という予想)
では、どのようにしてオブジェクトの配置をするべきなのか?
そもそも、3d空間でクリックやドラッグ&ドロップしてオブジェクトを検知する方法ってどうするんだ・・・?そんな悩みを解決してくれたのがRaycastでした
Raycastとは
- 光線を放つ、的な意味
- ある始点から指定の方向に光線を放ってみて、ぶつかった物体があればその情報を取得できるというもの
- 参考
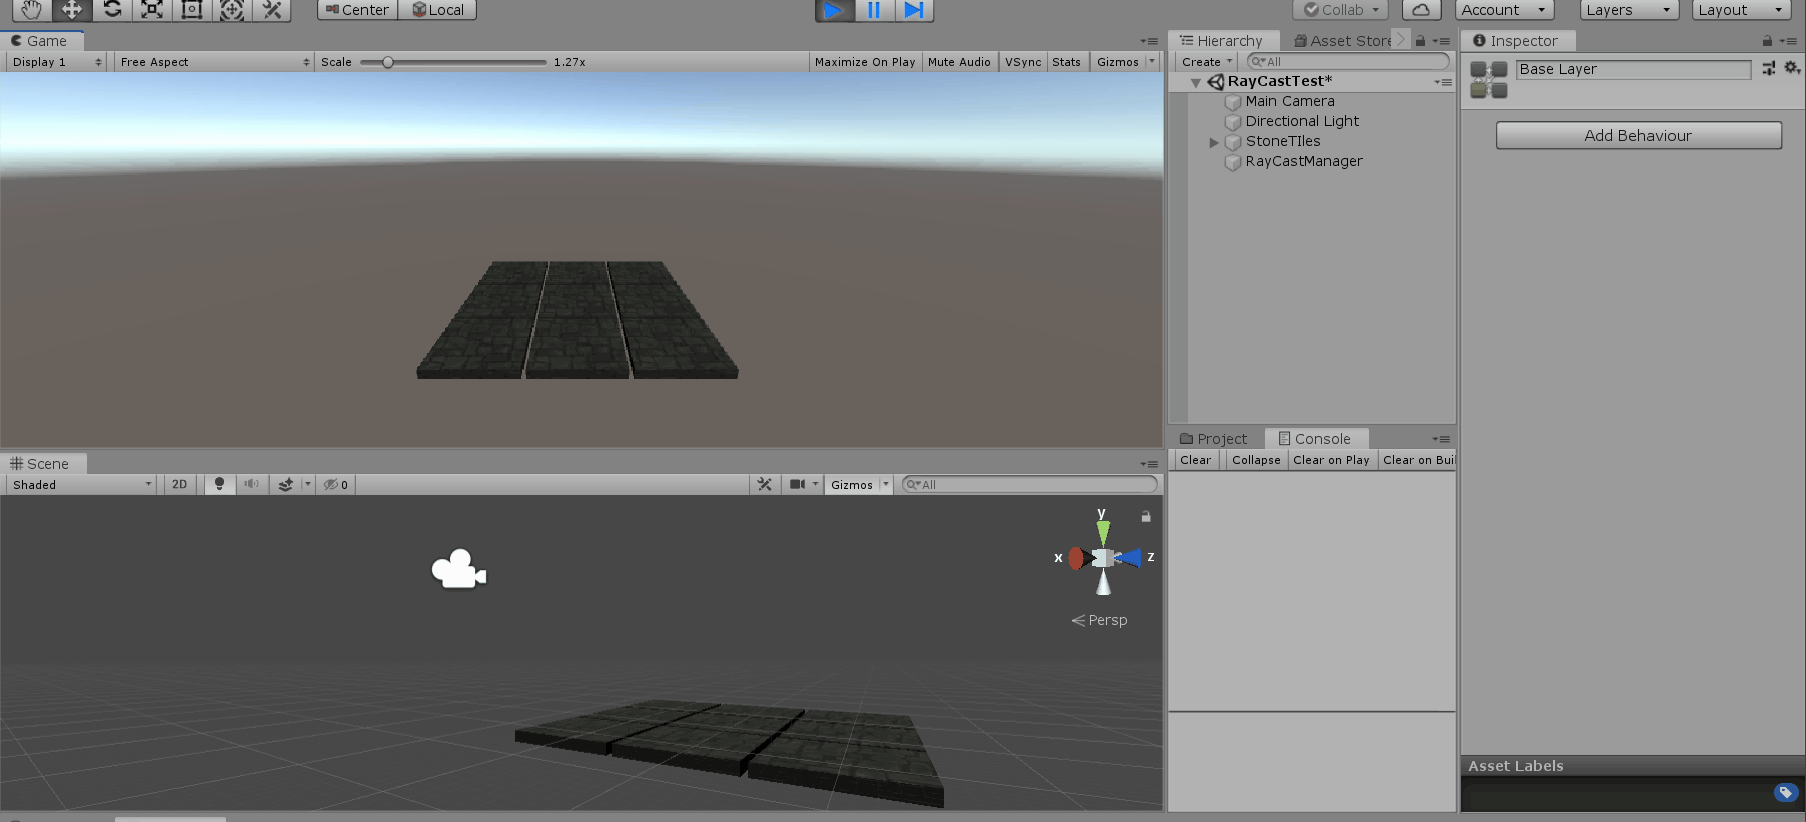
- 試しに以下のようなコードを適当なGameObjectにattachして動かしてみます。
  using UnityEngine;

  public class RayCastTest : MonoBehaviour
  {
      GameObject gameObject;

      void Update()
      {
          // Click確認
          if (Input.GetMouseButtonDown(0))
          {
              Ray ray = Camera.main.ScreenPointToRay(Input.mousePosition);
              RaycastHit hit;

              if (Physics.Raycast(ray, out hit, 100))
              {
                  gameObject = hit.collider.gameObject;
                  Debug.DrawRay(ray.origin, ray.direction * 3, Color.green, 5, false);
                  Debug.Log(gameObject);
              }
          }
      }
  }
Cameraからクリックした箇所に向けてRayが描画されてるのがわかります。
Rayが当たらない?
よしやってみようということで、サンプルコードを使ってフリーのAssetに対してやってみると、当たるものと当たらないものがある・・・
当たるものも、見た目通りに当たらない?そもそもRayが当たる条件はどう判定されているのか?
その条件に使われるのがColliderです
coliderとは
- 物理衝突のためのオブジェクト形状を定義
- 必ずしもモデルと同じ形状をとる必要はない
- 見えざる判定を加えることも可能
- 参考
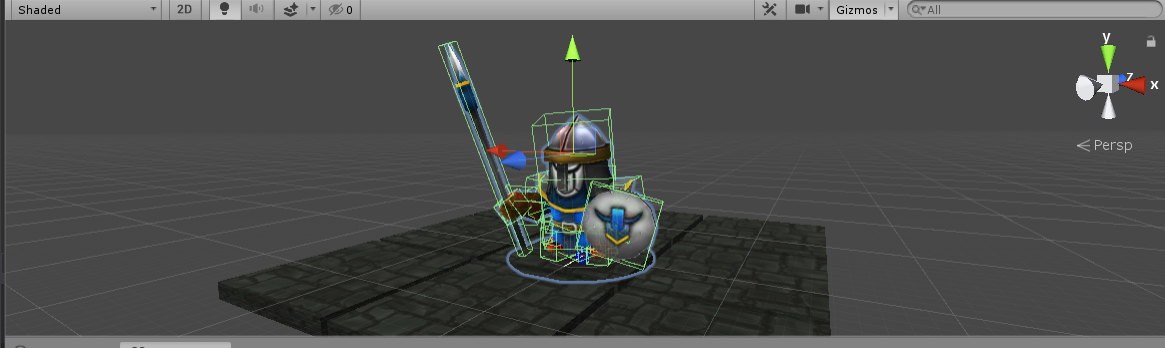
AssetにColliderが設定されているとは限らない
今回Assetストアから適当なキャラクタモデルを使わせてもらいましたが、その中には必ずしもColliderが設定されているとは限りません。
当然自身で、Colliderを設定しないと目的は達成できませんが、キャラクタは各パーツが複数組み合わせってできていて、一つ一つ手でColliderを設定していくのは面倒です。そこで今回はSA collider builderというものを利用させていただきました。
ここでは紹介を省きますが、詳しくはこちらの記事が参考になると思いますので、ご参照ください
Add Componentでこちらを足せば、自動的にこんな感じ(緑枠)のそれっぽいColliderを作ってくれます。
Mesh Colliderよりも軽いし、ボタン一つで子オブジェクトにも自動で反映されてめっちゃ簡単です。
colliderを設定したはいいが・・・
Rayが当たる箇所はキャラクターを生成するそれぞれの部品で、腕や足の部分など様々です。
やりたいことはそれをまとめる親オブジェクトを丸ごと動かすことですが、Assetを使っている以上、
どのような階層関係になっているかはasset次第です。そのため、指定のcomponentをもったobjectを再帰的に探すことにしました。
GameObjectの拡張メソッド実装
GameObjectやTransoformなどに対して拡張メソッドを定義することができます。
今回は以下のようなコードを用意して、GameObjectおよびTransformの親オブジェクトを再帰的に調べるコードを作りました。
ついでに子を持っているか、指定componentをもっているか、調べるメソッドも追加しました。using System.Collections; using System.Collections.Generic; using UnityEngine; public static partial class GameObjectExtensions { public static bool HasChild(this GameObject gameObject) { return 0 < gameObject.transform.childCount; } public static bool HasComponent<T>(this GameObject self) where T : Component { return self.GetComponent<T>() != null; } public static Transform FindInParents<T>(this GameObject g) where T : Component { object comp; Transform t = g.transform; while (t != null) { comp = t.GetComponent<T>(); if (comp == null) { t = t.transform.parent; } else { break; } } return t; } } public static partial class TransformExtensions { public static bool HasChild(this Transform transform) { return 0 < transform.childCount; } public static bool HasComponent<T>(this Transform self) where T : Component { return self.GetComponent<T>() != null; } public static Transform FindInParents<T>(this Transform t) where T : Component { object comp; while (t != null) { comp = t.GetComponent<T>(); if (comp == null) { t = t.transform.parent; } else { break; } } return t; } }いいから実装だ!
駒の配置および入れ替えを行うソースコードです
前提条件として駒を置くタイルオブジェクトにはTileというタグを付与した状態で、
キャラクタのrootオブジェクトにはPieceAbstractという(クラスを継承した)componentを付与しています。using UnityEngine; public class PreparationManager : MonoBehaviour { GameObject clickedGameObject; private Transform selectedPiece = null; private bool isSelected = false; void Update() { // Click確認 if (Input.GetMouseButtonDown(0)) { clickedGameObject = null; Ray ray = Camera.main.ScreenPointToRay(Input.mousePosition); RaycastHit hit = new RaycastHit(); Debug.DrawRay(ray.origin, ray.direction * 1, Color.green, 5, false); // Collider objectの存在確認(RayHit) if (Physics.Raycast(ray, out hit)) { clickedGameObject = hit.collider.gameObject; //非選択モードか確認 if (!isSelected) { // PieceAbstract objectか判定 selectedPiece = clickedGameObject.FindInParents<PieceAbstract>(); if (selectedPiece != null) { // 選択状態をTrueに isSelected = true; } } //選択モードの場合 else { // Tile objecetの判定 if (clickedGameObject.gameObject.tag == "Tile") { // 既に駒が配置されていた場合は、その駒とswap if (clickedGameObject.HasChild()) { foreach(Transform child in clickedGameObject.transform) { //念のためPieceか確認 if (child.HasComponent<PieceAbstract>()) { swapPiece(child, selectedPiece); //Childは一つのはずだが、念のためBreak break; } } } // tileにpieceObjectを配置 else { setPiece(selectedPiece, clickedGameObject.transform); } // effect解除 } else if(clickedGameObject.FindInParents<PieceAbstract>()){ //swap処理 swapPiece(selectedPiece, clickedGameObject.FindInParents<PieceAbstract>().transform); } // 選択状態をFalseに isSelected = false; selectedPiece = null; } } // RayCastがhitしなかった場合 else { isSelected = false; selectedPiece = null; } } } private void setPiece(Transform piece, Transform tile) { //Pieceの親オブジェクトにTileを設定 piece.parent = tile.transform; //TileObjectを親としたローカルポジションを設定 piece.localPosition = new Vector3(0, 0, 0); } private void swapPiece(Transform piece1, Transform piece2) { //各Pieceの親となるTileオブジェクトを見つける Transform tile1 = piece1.parent; Transform tile2 = piece2.parent; //親となるTileをそれぞれ入れかえ piece1.parent = tile2; piece2.parent = tile1; //駒を新しい親Tileの場所に移動(Swap) piece2.localPosition = new Vector3(0, 0, 0); piece1.localPosition = new Vector3(0, 0, 0); } };動作は以下のようになります。
参考になれば幸いです。
また、至らない点が多々あると思いますので、もっといい方法などぜひコメントお願いします。