- 投稿日:2019-06-27T22:58:32+09:00
[WPF]子要素のBindingを忘れて親要素が勝手にBindingされる問題
問題
ビジュアルツリー上の親子関係があり親子で同名のプロパティをBindingしていた時、子要素のBindingがされていないと親要素のプロパティがBindingされて表示されてしまいました。
具体的にコードで示してみます。
まず、親要素MainWindowに子要素SubWindowを表示します。MainWindow.xaml<Window x:Class="WpfSample.MainWindow" xmlns="http://schemas.microsoft.com/winfx/2006/xaml/presentation" xmlns:x="http://schemas.microsoft.com/winfx/2006/xaml" xmlns:local="clr-namespace:DoubleLoadWpf" Title="MainWindow" Height="450" Width="800"> <Grid> <Grid.RowDefinitions> <RowDefinition/> <RowDefinition/> </Grid.RowDefinitions> <StackPanel Orientation="Vertical"> <TextBlock Grid.Row="0" Text="MainWindow" Foreground="Red"/> <TextBlock Grid.Row="0" Text="{Binding Message}" Foreground="Red"/> </StackPanel> <local:SubWindow Grid.Row="1"/> </Grid> </Window>子要素SubWindowには、親要素のMainWindowと同名のプロパティMessageをBindingしておきます。
SubWindow.xaml<UserControl x:Class="WpfSample.SubWindow" xmlns="http://schemas.microsoft.com/winfx/2006/xaml/presentation" xmlns:x="http://schemas.microsoft.com/winfx/2006/xaml"> <Grid> <StackPanel Orientation="Vertical"> <TextBlock Grid.Row="0" Text="SubWindow" Foreground="Blue"/> <TextBlock Grid.Row="0" Text="{Binding Message}" Foreground="Blue"/> </StackPanel> </Grid> </UserControl>親要素MainWindowのみBindingします。
コードビハインドでDataCotextとMainViewModelを紐づけます。MainWindow.xaml.cspublic MainWindow() { InitializeComponent(); this.DataContext = new MainViewModel(); }MainViewModelではプロパティMessageに値を入れておきます。
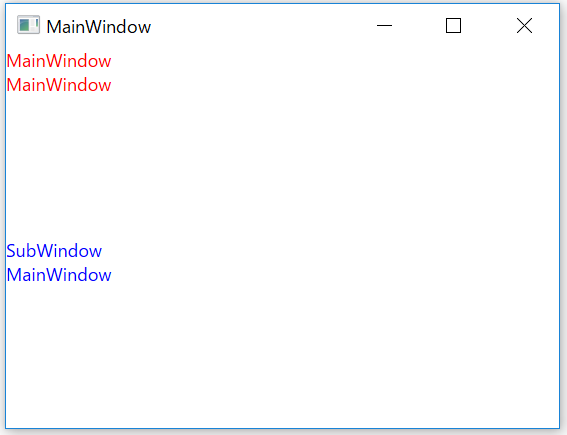
MainViewModel.csinternal class MainViewModel { public string Message { get; } = "MainWindow"; }■実行結果
原因
SubWindowのMessageでは、親要素MainWindowのMessageがBindingされて「MainWindow」が表示されていることが分かります。
これは、SubWindowでDataCotextがBindingされていないため、親要素MainWindowのDataContextがBindingされてしまったためです。因みに
DataContextが継承される件は、WPF、怒りのツリー外DataContext伝播によると、WEPerには常識のようです・・・。悲しい。
PrismのRegionManagerで画面遷移していたりすると気づきにくく発見が遅れました。改めて基礎大事。
- 投稿日:2019-06-27T22:10:35+09:00
[C#]private、internalなメソッドのUnitTest
やりたいこと
作ったクラスやメソッドのUnitTestをしたいが、privateやinternalにしているメソッドはUnitTestプロジェクトのコードから見えないので、普通にはテストできなかった。どうにかしてテストしたい。
やり方
PrivateObjectやPrivateTypeクラスを使う。
private、internalメソッドを外から呼ぶ
PrivateObjectクラスのInvokeメソッドを使う。
- テスト対象クラスをnewする
- それを引数にして、PrivateObjectクラスをnewする
- そのインスタンスで、PrivateObjectのInvokeメソッドを呼ぶ
- Invokeの第一引数には対象のprivateのメソッド名を渡す
- Invokeの第二引数以降にはそのメソッドに渡す引数を渡す
var cls1 = new Class1();
var pbObj = new PrivateObject(cls1);
ret = (string)pbObj.Invoke("AddPrivate", 1, 2);
private static、internal staticメソッドを外から呼ぶ
PrivateTypeクラスのInvokeStaticメソッドを使う。
- テスト対象のクラスのtypeを引数にして、PrivateTypeをnewする
- そのインスタンスで、PrivateTypeのInvokeStaticメソッドを呼ぶ
- InvokeStaticの第一引数には対象のprivateのメソッド名を渡す
- InvokeStaticの第二引数以降にはそのメソッドに渡す引数を渡す
PrivateType privateType = new PrivateType(typeof(Class1));
ret = (string)privateType.InvokeStatic("AddPrivateStatic", 1, 2);
子クラスから見た親クラスのprivateメソッドを外から呼ぶ
PrivateObjectクラスのInvokeメソッドを使う。
その際、PrivateObjectをnewするときの引数を変える。(詳細はサンプル参照)
- テスト対象クラス(子クラス)をnewする
- それを第一引数、第二引数に親クラスのtypeを引数にしたPrivateTypeをnewしたものを渡して、PrivateObjectクラスをnewする
- そのインスタンスで、PrivateObjectのInvokeメソッドを呼ぶ
var clssub = new Class1Sub();
var pbObjSub = new PrivateObject(clssub, new PrivateType(typeof(Class1)));
ret = (string)pbObjSub.Invoke("AddPrivate", 1, 2);
サンプルコード
テストしたいdllを呼んで、UnitTestを行うためのプロジェクトのコード。
UnitTest1.csusing System; using Microsoft.VisualStudio.TestTools.UnitTesting; using ClassLibrary1; namespace UnitTestProject1 { // 参考:https://www.gesource.jp/weblog/?p=7742 [TestClass] public class UnitTest1 { [TestMethod] public void TestMethod1() { var ret = ""; var cls1 = new Class1(); // publicなメソッドのテスト ret = cls1.AddPublic(1, 2); ret = Class1.AddPublicStatic(1, 2); // private、internalなメソッドのテスト var pbObj = new PrivateObject(cls1); ret = (string)pbObj.Invoke("AddPrivate", 1, 2); ret = (string)pbObj.Invoke("AddInternal", 1, 2); // private static、internal staticなメソッドのテスト PrivateType privateType = new PrivateType(typeof(Class1)); ret = (string)privateType.InvokeStatic("AddPrivateStatic", 1, 2); ret = (string)privateType.InvokeStatic("AddInternalStatic", 1, 2); // 子クラスから見た親クラスのprivateメソッドをテスト var clssub = new Class1Sub(); var pbObjSub = new PrivateObject(clssub, new PrivateType(typeof(Class1))); ret = (string)pbObjSub.Invoke("AddPrivate", 1, 2); ret = (string)pbObjSub.Invoke("AddInternal", 1, 2); // 子クラスから見た親クラスのprivate staticメソッドは、 // 親クラスのprivate staticテストと同じ。 } } }UnitTestから呼ぶ実験用dllのコード。
public、private、internalなメソッドと、その3つをstaticにしたメソッドを含む。Class1.csusing System; using System.Collections.Generic; using System.Linq; using System.Text; using System.Threading.Tasks; using System.Reflection; namespace ClassLibrary1 { public class Class1 { public string AddPublic(int val1, int val2) { return MethodBase.GetCurrentMethod().Name + " " + (val1 + val2).ToString(); } internal string AddInternal(int val1, int val2) { return MethodBase.GetCurrentMethod().Name + " " + (val1 + val2).ToString(); } private string AddPrivate(int val1, int val2) { return MethodBase.GetCurrentMethod().Name + " " + (val1 + val2).ToString(); } public static string AddPublicStatic(int val1, int val2) { return MethodBase.GetCurrentMethod().Name + " " + (val1 + val2).ToString(); } internal static string AddInternalStatic(int val1, int val2) { return MethodBase.GetCurrentMethod().Name + " " + (val1 + val2).ToString(); } private static string AddPrivateStatic(int val1, int val2) { return MethodBase.GetCurrentMethod().Name + " " + (val1 + val2).ToString(); } } public class Class1Sub : Class1 { } }コード
https://github.com/tera1707/WPF-/tree/master/028_PrivateClassUnitTest
参考
MSTestでprivateメソッドをテストする
ほぼこちらを参考にさせていただいています。ありがとうございます。
https://www.gesource.jp/weblog/?p=7742
- 投稿日:2019-06-27T15:08:16+09:00
【C#】②MicrosoftのXamarinチュートリアルを進めつつ補足する
前回、パソコンの中にAndroidを出したとこからの続きです。
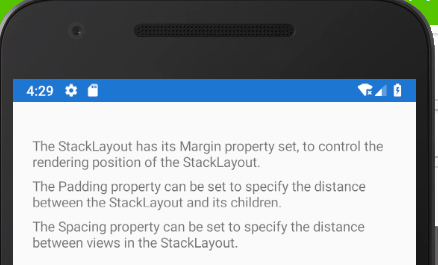
①はこちらStackLayoutの例は前回も出しましたが、
要は、画面の中で表示するテキストを自由に脚色できるのです。前回はチュートリアルに沿ってテキストを縦に並べるとこまで
やりました。今回は、まずこのテキスト2行ペアを縦並びから
横並びに変えてみましょう。
前回記述したコードのStackLayoutタブに、
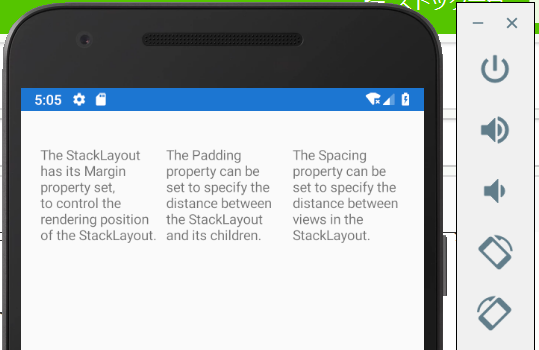
Orientaitonメソッドを追加して、文章の向きを変えてみましょう。<?xml version="1.0" encoding="utf-8"?> <ContentPage xmlns="http://xamarin.com/schemas/2014/forms" xmlns:x="http://schemas.microsoft.com/winfx/2009/xaml" x:Class="StackLayoutTutorial.MainPage"> <StackLayout Margin="20,35,20,25" Orientation="Horizontal"> <Label Text="The StackLayout has its Margin property set, to control the rendering position of the StackLayout." /> <Label Text="The Padding property can be set to specify the distance between the StackLayout and its children." /> <Label Text="The Spacing property can be set to specify the distance between views in the StackLayout." /> </StackLayout> </ContentPage><ざっくり解説>
Orientationは日本語で「適応、順応、方向付け」という意味です。
StackLayoutタブに「Orientaion + やりたいこと」を記述すると、
既述したStackLayoutタブ内の要素(今回はテキスト)の向きをまとめて変更する
ことができます。(中学校とかで4月にオリエンテーションってありますよね。
無垢な子供たちを社会に望ましい人物に"適応"させるのです)今回は「Orientation = Horizontal(水平な、横の)」として、
StackLayoutタブ内の要素を横に並べる指示を付け加えました。Orientationのように、単体では影響を及ぼしませんが、
「A = B」で具体的な指示語(B)を代入すると意味を持つようになる
キーワードをメソッドと呼びます。便利アイテムですね~本題に戻ります
コードを上記の通り修正したら、前回Androidを起動したときと同じ
▷ボタンを押してください。再実行の場合は「↺」このマークになってます。自動でビルド(検証・構築)してくれた後、
エラーがなければAndroidが再起動されます。縦に3つ並んでいたテキストが、横に3つ並びました。
Labelごとに配置や背景色を設定する
Oriantationメソッドは全体的な設定には便利ですが、
Labelごとに個別で置く場所を変えたいのが普通ですよね。残念ながらLabelタブ内ではOrientationメソッドを使えないので、
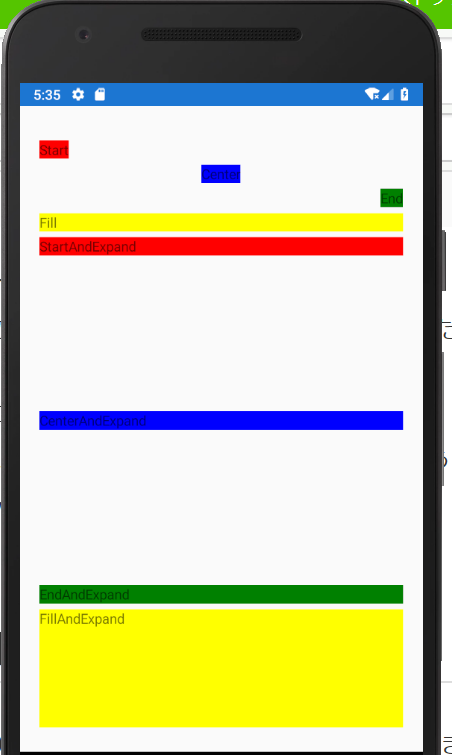
Labelごとに配置や背景色の設定を変えていきます。<?xml version="1.0" encoding="utf-8"?> <ContentPage xmlns="http://xamarin.com/schemas/2014/forms" xmlns:x="http://schemas.microsoft.com/winfx/2009/xaml" x:Class="StackLayoutTutorial.MainPage"> <StackLayout Margin="20,35,20,25"> <Label Text="Start" HorizontalOptions="Start" BackgroundColor="Red"/> <Label Text="Center" HorizontalOptions="Center" BackgroundColor="Blue"/> <Label Text="End" HorizontalOptions="End" BackgroundColor="Green"/> <Label Text="Fill" HorizontalOptions="Fill" BackgroundColor="Yellow"/> <Label Text="StartAndExpand" VerticalOptions="StartAndExpand" BackgroundColor="Red" /> <Label Text="CenterAndExpand" VerticalOptions="CenterAndExpand" BackgroundColor="Blue" /> <Label Text="EndAndExpand" VerticalOptions="EndAndExpand" BackgroundColor="Green" /> <Label Text="FillAndExpand" VerticalOptions="FillAndExpand" BackgroundColor="Yellow" /> </StackLayout> </ContentPage><ざっくり解説>
Orientationメソッドを消して、
各Label内で配置と背景色を設定しています。
※Textの「Start、Center~」は意味を持ちません。
StartAndExpandがEndやFillの下に表示されているのは
単にコード内で書いてる順番通りに上から並んでいるだけです。各単語の意味は以下の通りです。
・HorizontalOptionsで横位置を決める。
(Start=左端、Center=真ん中、End=右端、Fill=横幅Max)
・VerticalOptionsで縦位置を決める。
(「~andExpand」が後ろにつくことで、該当ラベルはMax範囲を
持つようになります。Fillだけが元々Max範囲を有するため、
FillandExpandだけが、本来のVeriticalOptionメソッド通り、
縦のMax範囲を持っているため、該当幅が全て黄色になっています)上記のコードで再実行↺すると以下のようになります
(色が濃すぎた…)
ここまででMicrosoftのStackLayoutチュートリアルは完了です。
お疲れさまでした。この後は「Label」のチュートリアルです。
(今やった気がする)また気まぐれで更新します。
ご質問・ご意見はもちろん、
「おい、その解釈違うぞ」ってのがあったら教えてください。
助かります