- 投稿日:2019-06-27T21:53:51+09:00
FirebaseAuthでOAuth2.0を使ったアプリをGoogle Play Storeにリリースする際はまった件
少し前から、GooglePlayStoreでアプリ内課金を使ったアプリを個人的にリリースすべく作業をしていまして、初めて扱うKotlinやGoogle Purchasesなどでいくつか記事を投稿させてもらいました。
https://qiita.com/taedookim/items/a4280ed9d66288c24b51
https://qiita.com/taedookim/items/698982a89f97e3576544
https://qiita.com/taedookim/items/66cdfcad526b33fd03e2そんなわけで四苦八苦していたアプリが、一応基本的な動作については問題なく動くところまで来ましたので、リリース手続きをしまして、いざ公開!となったところで躓いたお話です。
先に結論から言いますと、FirebaseAuthというよりはそこで利用しているGoogle Sign-InやFacebook Loginの要件が満たせていなかった、ということだったのですが、開発作業を進めている中ではいろいろと気づかないまま進んでしまった結果見落としていたポイントでしたので、自戒も込めて書かせていただきます。
やっていたこと
上記の通り、アプリではGoogle Play Storeのアプリ内課金を利用する想定でいたため、ユーザー管理のため、Firebaseを使おうと考えて実装を進めていました。
何分個人アプリなのであまりユーザー管理などに運用の労力は裂きたくないなというのが正直なところでして、OAuthを使い、GoogleアカウントやFacebookアカウントを使ってログインしてもらい、ユーザー識別だけできればいいや、と考えていたのが発端です。実装の対応としては、FirebaseAuthの公式ドキュメントを参考にしていました。
https://firebase.google.com/docs/auth/android/firebaseui?hl=ja
UIまで用意されているし、簡単に実装できるものなんだなぁ~と思いながら、公式ドキュメントの指示に従い、FirebaseConsoleの設定を行って比較的開発初期の段階で無事、ログインできるようになり、課金などのアプリ部分の実装へ。
すべてが整って、いざリリース手続きということで、クローズドテストを設定したところ、Play Storeからダウンロードしたアプリでは、サインインに失敗する、という事象が起きました。確認したこと
開発環境から直接端末にインストールして実行するとやはり正常にサインイン可能。
ということで、何が違うんだ??と、PlayStoreからインストールしたバイナリを実行している端末をPCにつないでLogを確認したところ、サインインを実行したところで以下のようなエラーが出ていました。(エラーメッセージ自体は消してしまったのですが、検索時に見つけたサイトに記載されていた内容からの抜粋でこんな感じのメッセージだったはずです)com.google.android.gms.common.api.ApiException: 10:GoogleからAPIエラーが出ているというのはわかりましたが、10というエラーコードの意味がわからず検索してみたところ
https://stackoverflow.com/questions/47437678/why-do-i-get-com-google-android-gms-common-api-apiexception-10
このページに行き着きました。ページ内に記載のアドバイスに従い、今度はFirebaseUIではなく、GCPのコンソール上で各種環境設定を行い、Google Sign-Inを使ってみるが、やはり同様に開発環境ではOKなのにPlay Store経由になるとNG。
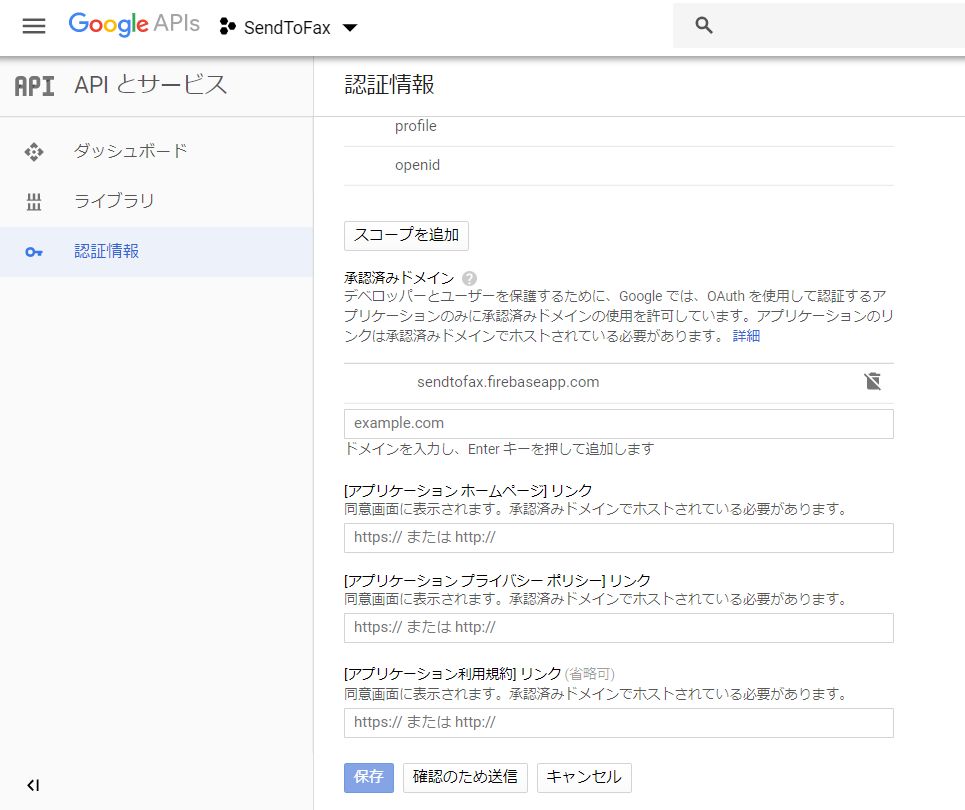
続いて、Firebaseと連動させていたFacebookを使って実装してみましたがそれでも事象は解消されず。ここまで来てふと、GCPのコンソールをよく見て気づいたのが、ドメインの承認に関する項目。
OAuth同意画面の項目にあるこれらの項目ですが、一番下の「アプリケーション利用規約リンク」の欄には (省略可) とあるのに、その上2か所、アプリケーションホームページリンクとアプリケーションプライバシーポリシーリンクの欄には、その文言がありませんでした。
ここにきてようやく「あ!もしかしてこれ、専用ドメインのWebサイトが必要なんじゃ?!」という初歩的なことに気づいたのでした…
対処方法
今回のアプリでは、FirebaseとGoogle Play課金機能の実装を試したいというのが主目的で、個人でやっているということもあり、特にサービスサイトなどは作成は予定していませんでした。
よくよく考えてみたら、こんな怪しいサービス提供者に各SNSのアカウントを利用させるって、結構リスクが高いことだよなぁ~ということで、どう考えてもセキュリティ的にNGか。ときっぱり諦めまして、Firebaseで提供されている、Email認証を採用することにしました。そもそもEmail認証を採用しなかった理由としては、先ほど書いた、アカウントはあくまで識別できればよくてこちらで管理をするためのコストをかけたくないな、という点と、アカウント認証できたほうがユーザーにとって便利だろう、という2点でした。
ただ、いざEmail認証を実装してみると、そもそもEmailの初期値として実行中のAndroid端末に登録されているGoogleアカウントのメールアドレスが入力候補として表示され自動入力できますし、パスワードだけ登録する必要はありましたがそのパスワードもSmart Linkで自動的に記録されて、ユーザーの手間暇はほとんどなアカウント認証と変わらないな~というのが実感でした。ということで、各種APIを使うならともかく、アプリ内で最低限のユーザー識別さえできればいい、ということであれば、Email認証で十分だし、最初からこれを採用していればよかったな…というお話でした。
同じような境遇になる人はあまりいない気もします(大体は業務で開発した場合は、きちんとサービスサイトは用意されると思いますし…)が、もし、これからアプリ開発をするのに、どういう認証方法を選ぼうか、ということを考えている人がいましたら、併せて「何をやらなきゃいけないか」を認識するのに一助となれば幸いです。
- 投稿日:2019-06-27T19:46:07+09:00
AndroidX関連の変更によるReact Native Androidのビルドエラーを回避した
経緯
2019年6月17日にあるアプリをリリースしたですが、リリースビルドしたのは2019年6月14日だったと記憶しています。
こちらに記載の通り、AndroidX関連の変更があり、本日ビルドしてみたらエラーが発生してビルドできなくなってしまいました。
https://developers.google.com/android/guides/releasesThis release is a MAJOR version update and breaking change.
Migration from Android Support Libraries to Jetpack (AndroidX) Libraries. Libraries will not work unless you make the following changes in your app:対応したこと
結論だけ書きます。
jetifier
jetifierは、Supportライブラリ等々をandroidxに対応してくれるツールです。
StackOverflowで見つけました。yarn add jetifier npx jetifyAndroidXを使うことを明記
android/gradle.properties
android.useAndroidX=true
android.enableJetifier=true
splash
これだけエラーが残ったので、修正
- import android.support.v7.app.AppCompatActivity;
+ import androidx.appcompat.app.AppCompatActivity;
以上
- 投稿日:2019-06-27T19:33:32+09:00
[Android] NavigationでSafeArgsを使って引数付き画面遷移をする
SafeArgsとは
みなさん,ActivityやFragment間の遷移で引数を受け渡しする時はどうしているでしょうか.
まだBundleを使っている方もいるかもしれませんね.Navigation Componentの1機能であるSafeArgsを使えば,型安全な引数の受け渡しが実現できます.みんな使っているからいっぱい記事があるかと思いきや,alphaやbetaの記事ばかりなのでstable版としてまとめておきたいと思います.
(あれから便利な拡張関数がサイレントで登場したりしている)Navigationの基本的な使い方は理解している前提から始めますので,微妙という方は以下の記事からキャッチアップしてきてください!
[Android] 10分で作る、Navigationによる画面遷移
https://qiita.com/tktktks10/items/7df56b4795d907a4cd31作るもの
最終的な実装は下記レポジトリに置いてあります.
tks10/safeargs-example
https://github.com/tks10/safeargs-example仕様はミニマムな感じでいきましょう.
MainActivityの上にFragmentを乗せて遷移をしていく,1Activtity多Fragmentなかんじです.
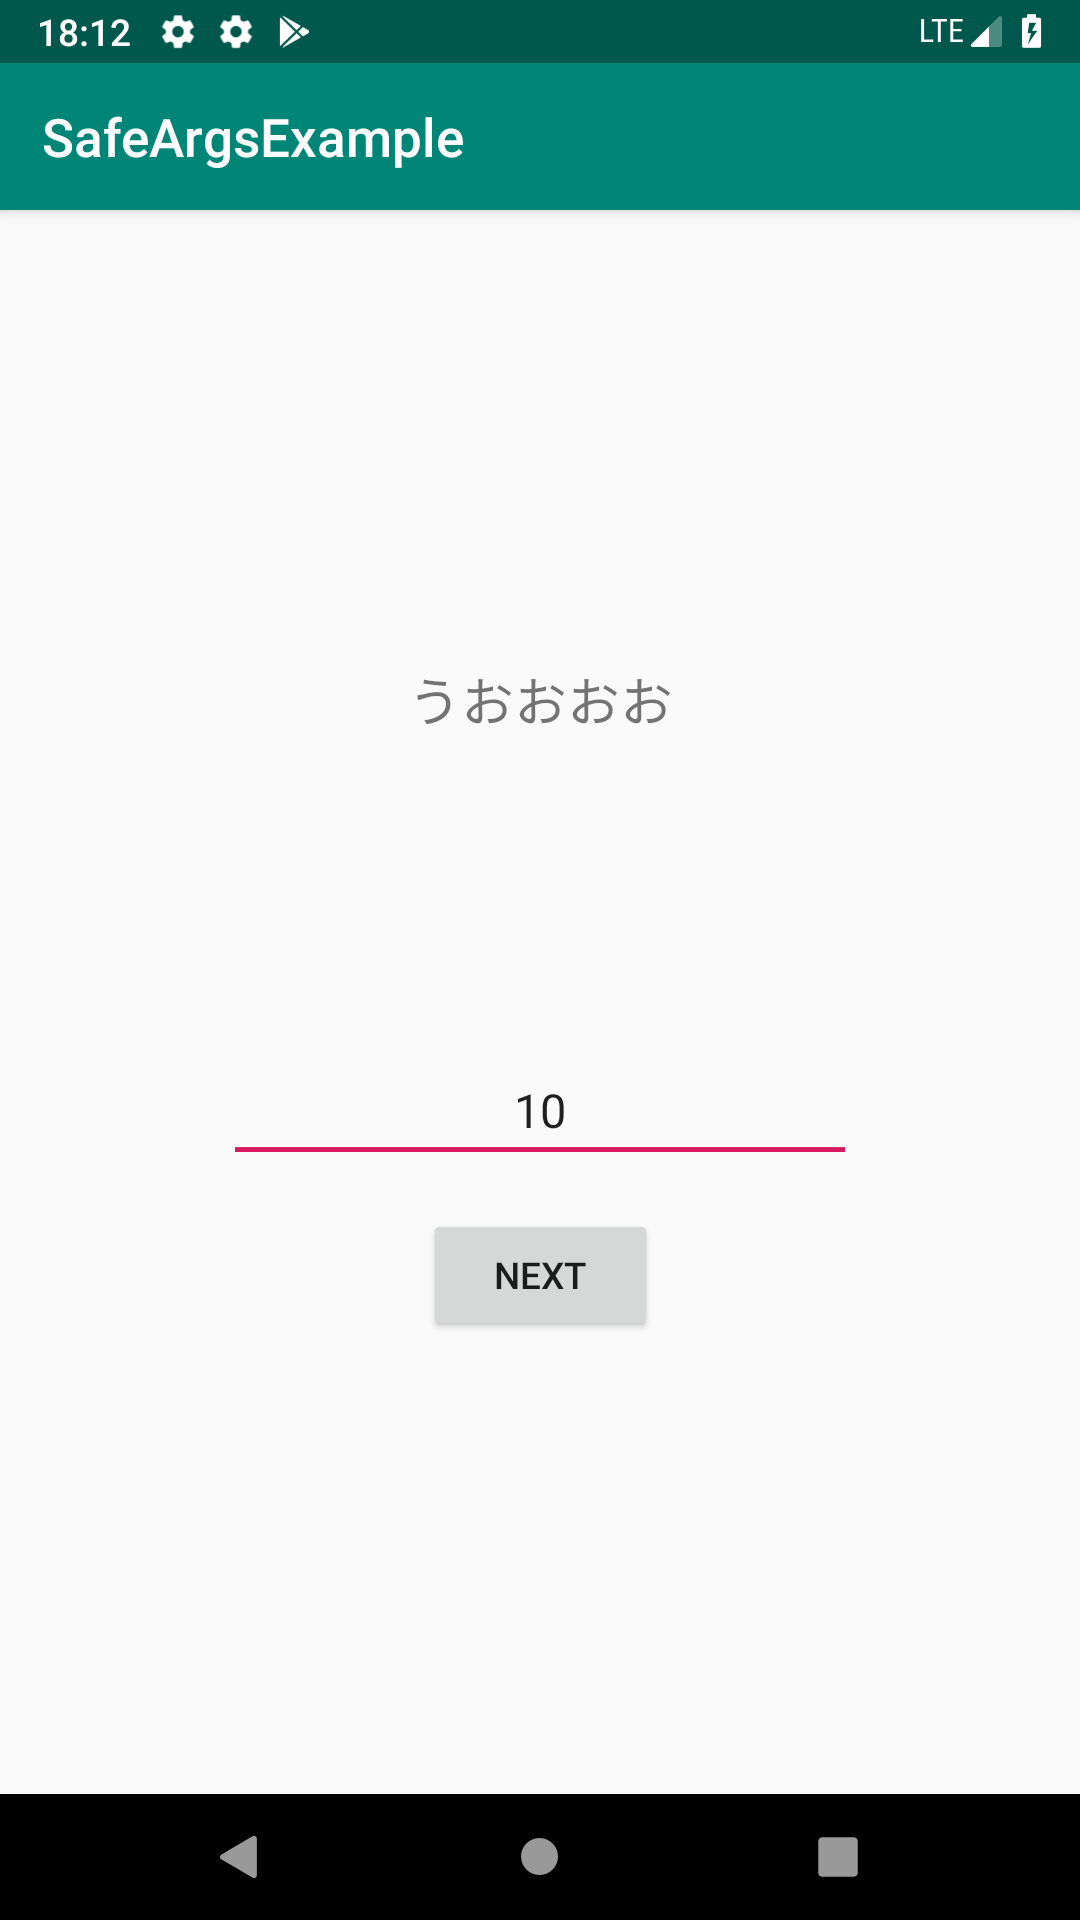
FirstFragmentにはEditTextとButtonがあり,ButtonをおしたらEditTextの内容とともにSecondFragmentに遷移してその内容を表示します.左の画面でNextを押すと,右に画面になるやつですね.
→
ではやっていきましょう.
事前準備
以下をgradleに追記.
project/build.gradlebuildscript { ... dependencies { ... classpath "android.arch.navigation:navigation-safe-args-gradle-plugin:1.0.0" } }app/build.gradleapply plugin: "androidx.navigation.safeargs" dependencies { ... implementation "android.arch.navigation:navigation-fragment:1.0.0" implementation "android.arch.navigation:navigation-ui:1.0.0" implementation "android.arch.navigation:navigation-fragment-ktx:1.0.0" implementation "android.arch.navigation:navigation-ui-ktx:1.0.0" }初期状態
1から作っていては冗長なので,各Fragmentとnavigationグラフの初期配置が完了した時点から始めます.ちなみに現時点でnavigationグラフは下記のようになっており,FirstFragmentからSecondFragmentにただの遷移をするだけのactionが1つだけ定義されている状況です.
navigation_graph.xml<?xml version="1.0" encoding="utf-8"?> <navigation xmlns:android="http://schemas.android.com/apk/res/android" xmlns:app="http://schemas.android.com/apk/res-auto" xmlns:tools="http://schemas.android.com/tools" android:id="@+id/navigation_graph" app:startDestination="@id/firstFragment"> <fragment android:id="@+id/firstFragment" android:name="com.tks10.safeargsexample.FirstFragment" android:label="fragment_first" tools:layout="@layout/fragment_first"> <action android:id="@+id/action_first_to_second" app:destination="@id/secondFragment"/> </fragment> <fragment android:id="@+id/secondFragment" android:name="com.tks10.safeargsexample.SecondFragment" android:label="fragment_second" tools:layout="@layout/fragment_second"> </fragment> </navigation>FirstFragmentではSecondFragmentに遷移する処理だけを記述した状態です.
FirstFragment.ktclass FirstFragment : Fragment() { override fun onCreateView(inflater: LayoutInflater, container: ViewGroup?, savedInstanceState: Bundle?): View? { return inflater.inflate(R.layout.fragment_first, container, false) } override fun onViewCreated(view: View, savedInstanceState: Bundle?) { super.onViewCreated(view, savedInstanceState) view.nextButton.setOnClickListener { findNavController().navigate(R.id.action_first_to_second) } } }また,FisrtFragmentとSecondFragmentのxmlは下記のようになっています.
fragment_fisrt.xml<?xml version="1.0" encoding="utf-8"?> <androidx.constraintlayout.widget.ConstraintLayout xmlns:android="http://schemas.android.com/apk/res/android" xmlns:app="http://schemas.android.com/apk/res-auto" android:layout_width="match_parent" android:layout_height="match_parent"> <androidx.appcompat.widget.AppCompatEditText android:id="@+id/contentEditText" android:layout_width="240dp" android:layout_height="wrap_content" android:gravity="center" app:layout_constraintTop_toTopOf="parent" app:layout_constraintBottom_toTopOf="@id/nextButton" app:layout_constraintStart_toStartOf="parent" app:layout_constraintEnd_toEndOf="parent" app:layout_constraintVertical_chainStyle="packed"/> <androidx.appcompat.widget.AppCompatButton android:id="@+id/nextButton" android:layout_width="wrap_content" android:layout_height="wrap_content" android:text="Next" android:layout_marginTop="16dp" app:layout_constraintTop_toBottomOf="@id/contentEditText" app:layout_constraintBottom_toBottomOf="parent" app:layout_constraintStart_toStartOf="parent" app:layout_constraintEnd_toEndOf="parent"/> </androidx.constraintlayout.widget.ConstraintLayout>fragment_second.xml<?xml version="1.0" encoding="utf-8"?> <androidx.constraintlayout.widget.ConstraintLayout xmlns:android="http://schemas.android.com/apk/res/android" xmlns:app="http://schemas.android.com/apk/res-auto" android:layout_width="match_parent" android:layout_height="match_parent"> <androidx.appcompat.widget.AppCompatTextView android:id="@+id/resultTextView" android:layout_width="wrap_content" android:layout_height="wrap_content" android:textSize="20sp" app:layout_constraintTop_toTopOf="parent" app:layout_constraintBottom_toBottomOf="parent" app:layout_constraintStart_toStartOf="parent" app:layout_constraintEnd_toEndOf="parent"/> </androidx.constraintlayout.widget.ConstraintLayout>当然この状態では引数の受け渡しは行なっていないので,遷移しても何も表示されません.
実装
それではこれを改造してsafeargsを使っていきましょう!
safeargsを使うにはnavigationグラフにargumentタグを追加することから始めます.この時argumentタグは,引数を受け取る側に追加します.下記のようにSecondFragment内にargumentタグを追加しましょう.この時指定するのは,変数名を示す
android:nameと型を示すandroid:argTypeの2つです.navigation_graph.xml<?xml version="1.0" encoding="utf-8"?> <navigation xmlns:android="http://schemas.android.com/apk/res/android" xmlns:app="http://schemas.android.com/apk/res-auto" xmlns:tools="http://schemas.android.com/tools" android:id="@+id/navigation_graph" app:startDestination="@id/firstFragment"> <fragment android:id="@+id/firstFragment" android:name="com.tks10.safeargsexample.FirstFragment" android:label="fragment_first" tools:layout="@layout/fragment_first"> <action android:id="@+id/action_first_to_second" app:destination="@id/secondFragment"/> </fragment> <fragment android:id="@+id/secondFragment" android:name="com.tks10.safeargsexample.SecondFragment" android:label="fragment_second" tools:layout="@layout/fragment_second"> <!-- ココに定義する --> <argument android:name="content" app:argType="string"/> </fragment> </navigation>なんとnavigationグラフの変更はこれで終わりです.
それでは次に行く・・・,前にRebuild Projectをしておきましょう.
現状DataBindingのようにリアルタイムにコードが生成されず,自動生成系のクラスが見つからん!などとハマります.さて,RebuildがおわったらFirstFragmentをいじっていきます.先ほどはただnavigateしていただけの部分を,以下のように書き換えてみましょう.
FirstFragment.ktoverride fun onViewCreated(view: View, savedInstanceState: Bundle?) { super.onViewCreated(view, savedInstanceState) view.nextButton.setOnClickListener { // EditTextの中身を取り出す val content = view.contentEditText.text.toString() // 生成されたクラスに引数を渡して遷移 val action = FirstFragmentDirections.actionFirstToSecond(content) findNavController().navigate(action) } }先ほどargumentタグをSecondFragment側に追加したことにより,SecondFragmentをDestinationとするactionのクラスとメソッドが自動生成されているはずです.今回だと,
FirstFragmentDirections#actionFirstToSecond
ですね.actionタグにつけたidから自動的にメソッド名をつけてくれます.このメソッドの引数に先ほど追加したargumentを受け取るようになっていることがわかります.これで実行時に名前が違って落ちた...なんてことがなくなりますね.さてここで満足して終わりそうですが,引数を受け取る側の処理が残っています.
SecondFragmentで引数を受け取ってみましょう.といっても,実は1行で終わります.それではSecondFragmentの頭の方に以下の1行を加えてみましょう.
SecondFragment.ktclass SecondFragment : Fragment() { private val args: SecondFragmentArgs by navArgs() .... }
navArgs()というFragmentに対する拡張関数が気がついたら提供されており,
args.content
みたいなかんじで受け取った引数にアクセスできるようになっています.あとはこれをTextViewにセットしてあげるだけです.
SecondFragment.ktclass SecondFragment : Fragment() { private val args: SecondFragmentArgs by navArgs() .... override fun onViewCreated(view: View, savedInstanceState: Bundle?) { super.onViewCreated(view, savedInstanceState) view.resultTextView.text = args.content } }
お疲れ様です!
複数の引数を指定する
なるほどわかった,でも複数渡すことだって多いでしょ?
と突っ込んきた人のために書くこととしましょう.先ほど受け取った引数に加えてもう1つ値をEditTextに入力し,計2つの引数を次のFragmentに渡したいと思います.全く同じだとなんなので,整数にしましょう.下記のような感じです.
→
流れは先ほどと全く同じで,目的地であるThirdFragment側にargumentタグを追加します.何も考えずに並列に追加するだけで問題ありません.そして忘れずにRebuildをします.
あと,SecondFragmentからThirdFragmentへのaction定義も忘れないようにしましょう.
navigation_graph.xml... <fragment android:id="@+id/secondFragment" android:name="com.tks10.safeargsexample.SecondFragment" android:label="fragment_second" tools:layout="@layout/fragment_second"> <argument android:name="content" app:argType="string"/> <action android:id="@+id/action_second_to_third" app:destination="@id/thirdFragment"/> </fragment> <fragment android:id="@+id/thirdFragment" android:name="com.tks10.safeargsexample.ThirdFragment" android:label="fragment_third" tools:layout="@layout/fragment_third"> <argument android:name="content" app:argType="string"/> <argument android:name="value" app:argType="integer"/> </fragment>そうしたら,SecondFragmentを改造していきます.viewのxmlは以下のようになり,しれっとEditTextとButtonを追加しています.
fragment_second.xml<?xml version="1.0" encoding="utf-8"?> <androidx.constraintlayout.widget.ConstraintLayout xmlns:android="http://schemas.android.com/apk/res/android" xmlns:app="http://schemas.android.com/apk/res-auto" android:layout_width="match_parent" android:layout_height="match_parent"> <androidx.appcompat.widget.AppCompatTextView android:id="@+id/resultTextView" android:layout_width="wrap_content" android:layout_height="wrap_content" android:textSize="20sp" android:layout_marginBottom="120dp" app:layout_constraintTop_toTopOf="parent" app:layout_constraintBottom_toTopOf="@id/valueEditText" app:layout_constraintStart_toStartOf="parent" app:layout_constraintEnd_toEndOf="parent" app:layout_constraintVertical_chainStyle="packed"/> <androidx.appcompat.widget.AppCompatEditText android:id="@+id/valueEditText" android:layout_width="240dp" android:layout_height="wrap_content" android:gravity="center" android:inputType="number" app:layout_constraintTop_toBottomOf="@id/resultTextView" app:layout_constraintBottom_toTopOf="@id/nextButton" app:layout_constraintStart_toStartOf="parent" app:layout_constraintEnd_toEndOf="parent"/> <androidx.appcompat.widget.AppCompatButton android:id="@+id/nextButton" android:layout_width="wrap_content" android:layout_height="wrap_content" android:text="Next" android:layout_marginTop="16dp" app:layout_constraintTop_toBottomOf="@id/valueEditText" app:layout_constraintBottom_toBottomOf="parent" app:layout_constraintStart_toStartOf="parent" app:layout_constraintEnd_toEndOf="parent"/> </androidx.constraintlayout.widget.ConstraintLayout>さて,プログラムの方は以下のように改造してみましょう.
SecondFragment.ktoverride fun onViewCreated(view: View, savedInstanceState: Bundle?) { super.onViewCreated(view, savedInstanceState) view.resultTextView.text = args.content view.nextButton.setOnClickListener { val content = args.content val value = view.valueEditText.text.toString().toInt() // argumentを増やすと,このメソッドの引数も対応して増える val action = SecondFragmentDirections.actionSecondToThird(content, value) findNavController().navigate(action) } }シンプルですね.actionのメソッドが受け取る引数が素直に増えます.
ここにEditTextから取得した値を渡してあげましょう.そして忘れずに受け取る側も書きます.
xmlとプログラムは下記の通りです.ThirdFragment.ktclass ThirdFragment : Fragment() { private val args: ThirdFragmentArgs by navArgs() override fun onCreateView(inflater: LayoutInflater, container: ViewGroup?, savedInstanceState: Bundle?): View? { return inflater.inflate(R.layout.fragment_third, container, false) } override fun onViewCreated(view: View, savedInstanceState: Bundle?) { super.onViewCreated(view, savedInstanceState) view.contentTextView.text = args.content view.valueTextView.text = args.value.toString() } }fragment_third.xml<?xml version="1.0" encoding="utf-8"?> <androidx.constraintlayout.widget.ConstraintLayout xmlns:android="http://schemas.android.com/apk/res/android" xmlns:app="http://schemas.android.com/apk/res-auto" android:layout_width="match_parent" android:layout_height="match_parent"> <androidx.appcompat.widget.AppCompatTextView android:id="@+id/contentTextView" android:layout_width="wrap_content" android:layout_height="wrap_content" android:textSize="20sp" app:layout_constraintTop_toTopOf="parent" app:layout_constraintBottom_toBottomOf="parent" app:layout_constraintStart_toStartOf="parent" app:layout_constraintEnd_toStartOf="@id/valueTextView" app:layout_constraintHorizontal_chainStyle="packed"/> <androidx.appcompat.widget.AppCompatTextView android:id="@+id/valueTextView" android:layout_width="wrap_content" android:layout_height="wrap_content" android:textSize="20sp" android:layout_marginStart="16dp" app:layout_constraintBaseline_toBaselineOf="@id/contentTextView" app:layout_constraintStart_toEndOf="@id/contentTextView" app:layout_constraintEnd_toEndOf="parent"/> </androidx.constraintlayout.widget.ConstraintLayout>
お疲れ様です!
自作クラスを指定する
ん,じゃぁ自作で作ったdata classはどうするんだと.では書きましょう.
結論から言うと,Parcelableを継承していればsafeargsを利用することができます.では今回は,下記のクラスをsafeargsで渡すことを考えてみましょう.
MyData.ktdata class MyData( val content: String, val value: Int, val message: String )完成予想図はこんな感じです.(messageには適当に文字列をいれています)
→
まずはじめに,このクラスにParcelableを実装しましょう,,,と言ってもめんどくさいので,
@Parcelizeアノテーションを使います.Experimentalをenableにしましょう.app/build.gradleandroid { ... androidExtensions { experimental = true } }MyDataに対して以下のようにアノテーションをつけます.
MyData.kt@Parcelize data class MyData( val content: String, val value: Int, val message: String ): Parcelableあとはこれまでの流れと同じになります.まずはnavigationグラフに追加しましょう.
navigation_graph.xml... <fragment android:id="@+id/thirdFragment" android:name="com.tks10.safeargsexample.ThirdFragment" android:label="fragment_third" tools:layout="@layout/fragment_third"> <argument android:name="content" app:argType="string"/> <argument android:name="value" app:argType="integer"/> <action android:id="@+id/action_third_to_fourth" app:destination="@id/fourthFragment"/> </fragment> <fragment android:id="@+id/fourthFragment" android:name="com.tks10.safeargsexample.FourthFragment" android:label="fragment_fourth" tools:layout="@layout/fragment_fourth"> <argument android:name="myData" app:argType="com.tks10.safeargsexample.MyData"/> </fragment>プリミティブなクラス(stringとかintegerとか)以外はフルパスでargTypeを指定してあげましょう.たとえばParcelableを実装しているBitmapとかも渡せたりします.
もうお察しでしょうが,ThirdFragmentでは以下のように記述します.
ThirdFragment.ktclass ThirdFragment : Fragment() { private val args: ThirdFragmentArgs by navArgs() override fun onCreateView(inflater: LayoutInflater, container: ViewGroup?, savedInstanceState: Bundle?): View? { return inflater.inflate(R.layout.fragment_third, container, false) } override fun onViewCreated(view: View, savedInstanceState: Bundle?) { super.onViewCreated(view, savedInstanceState) view.contentTextView.text = args.content view.valueTextView.text = args.value.toString() view.nextButton.setOnClickListener { val myData = MyData( args.content, args.value, "LGTM!!" ) val action = ThirdFragmentDirections.actionThirdToFourth(myData) findNavController().navigate(action) } } }受け取るFourthFragmentは以下のようになります.
(xmlは省略しますが,messageを表示するTextViewが増えただけです)FourthFragment.ktclass FourthFragment : Fragment() { private val args: FourthFragmentArgs by navArgs() override fun onCreateView(inflater: LayoutInflater, container: ViewGroup?, savedInstanceState: Bundle?): View? { return inflater.inflate(R.layout.fragment_fourth, container, false) } override fun onViewCreated(view: View, savedInstanceState: Bundle?) { super.onViewCreated(view, savedInstanceState) val myData = args.myData view.contentTextView.text = myData.content view.valueTextView.text = myData.value.toString() view.messageTextView.text = myData.message } }おわりに
以上,SafeArgsによる引数の受け渡しでした.複数の受け渡しや自作クラスの受け渡しもできるようになったかと思います.
これまでalphaやbetaでコロコロと記述が変わりましたが,ようやくstableになって固定された感があります.
型安全になるだけでもかなりメリットですし,navigationグラフをみたときに引数が一覧できるのも良いと思います.
ぜひ既存のプロジェクトでも部分的に取り入れていきたいところですね.


- 投稿日:2019-06-27T18:37:02+09:00
【Android】パパっと使えるAlertDialog一覧
はじめに
普段使いたい場面で使い方を忘れるAlertDialogを、パパっと使うための備忘録です。
@suzukihrさんが書かれている【コピペしてすぐ使えるアラートダイアログ集】を参考に、
さらに初心者向けに追記しKotlinで書き直したものとなります。※ActivityやFragmentなどに直接コピペして使用できますが、
画面回転時にメモリリークが発生する可能性があるため、
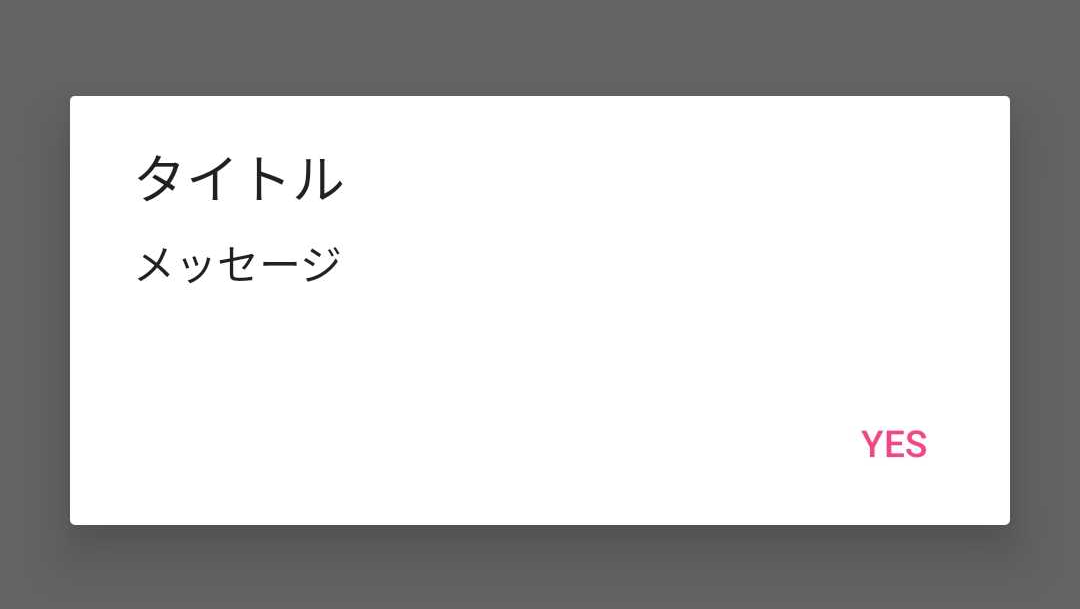
DialogFragmentを継承したクラスを作って使用することをおすすめします。通常ダイアログ(Yesのみ)
AlertDialog.Builder(this) // FragmentではActivityを取得して生成
        .setTitle("タイトル")
        .setMessage("メッセージ")
        .setPositiveButton("OK", { dialog, which ->
            // TODO:Yesが押された時の挙動
        })
        .show()
通常ダイアログ(Yes・No)
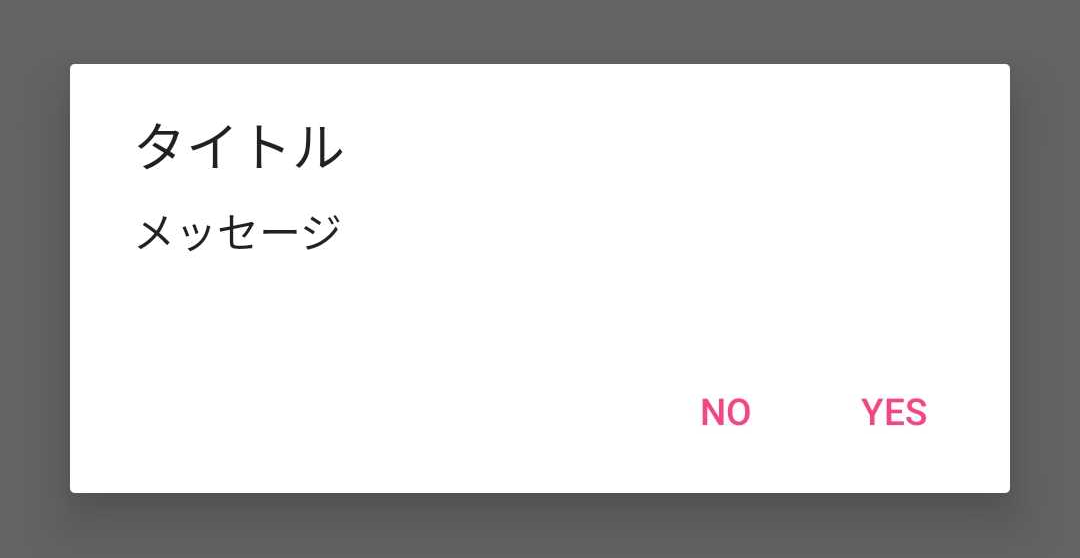
AlertDialog.Builder(this) // FragmentではActivityを取得して生成
        .setTitle("タイトル")
        .setMessage("メッセージ")
        .setPositiveButton("OK", { dialog, which ->
            // TODO:Yesが押された時の挙動
        })
        .setPositiveButton("No", { dialog, which ->
            // TODO:Noが押された時の挙動
        })
        .show()
通常ダイアログ(Yes・No・その他)
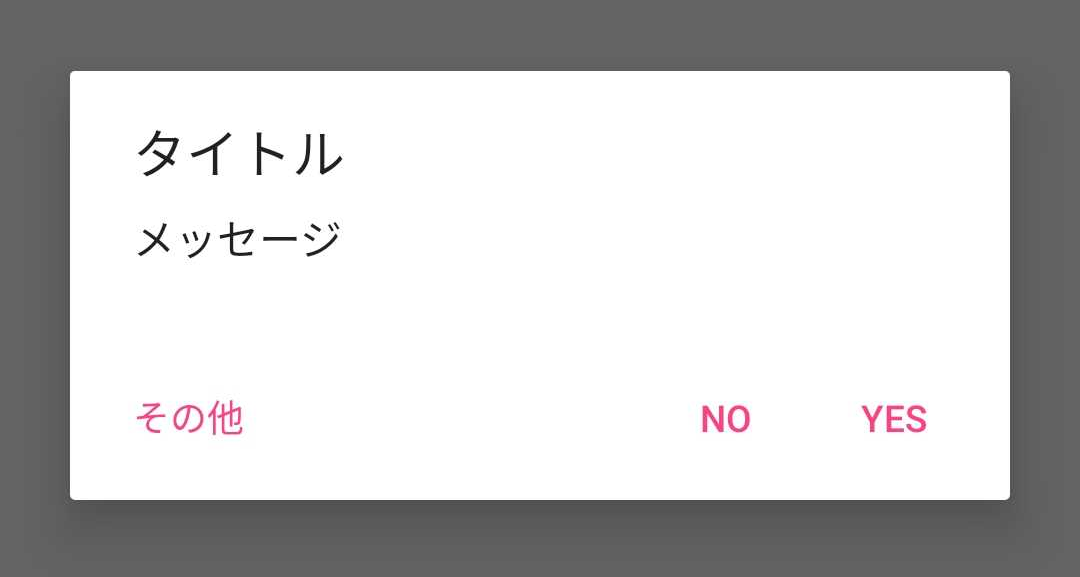
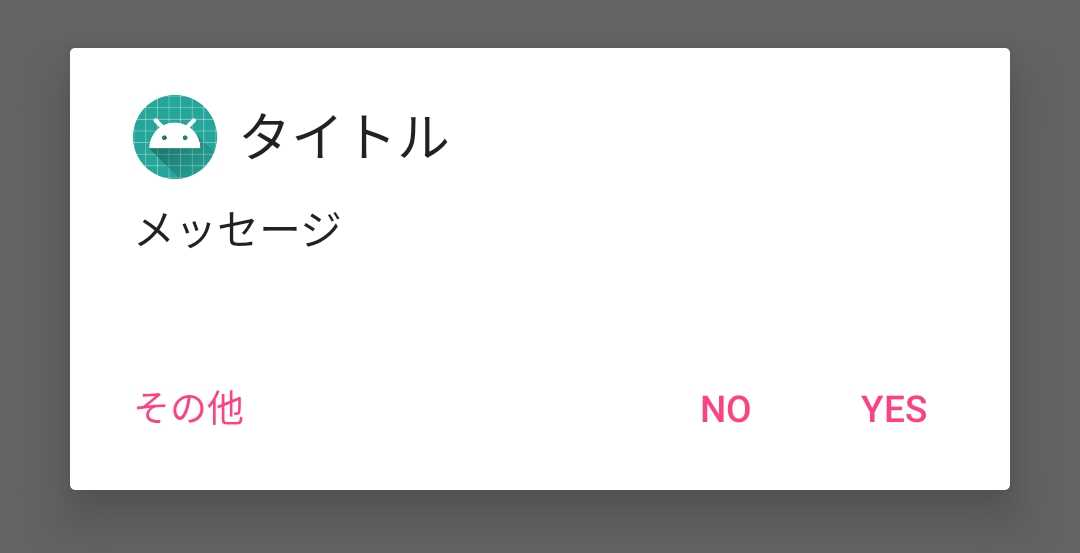
AlertDialog.Builder(this) // FragmentではActivityを取得して生成
        .setTitle("タイトル")
        .setMessage("メッセージ")
        .setPositiveButton("OK", { dialog, which ->
            // TODO:Yesが押された時の挙動
        })
        .setPositiveButton("No", { dialog, which ->
            // TODO:Noが押された時の挙動
        })
        .setNeutralButton("その他", { dialog, which ->
            // TODO:その他が押された時の挙動
        })
        .setIcon(R.mipmap.ic_launcher)
        .show()
通常ダイアログ(アイコン付き)
AlertDialog.Builder(this) // FragmentではActivityを取得して生成
        .setTitle("タイトル")
        .setMessage("メッセージ")
        .setPositiveButton("OK", { dialog, which ->
            // TODO:Yesが押された時の挙動
        })
        .setPositiveButton("No", { dialog, which ->
            // TODO:Noが押された時の挙動
        })
        .setNeutralButton("その他", { dialog, which ->
            // TODO:その他が押された時の挙動
        })
        .show()
リスト項目選択ダイアログ
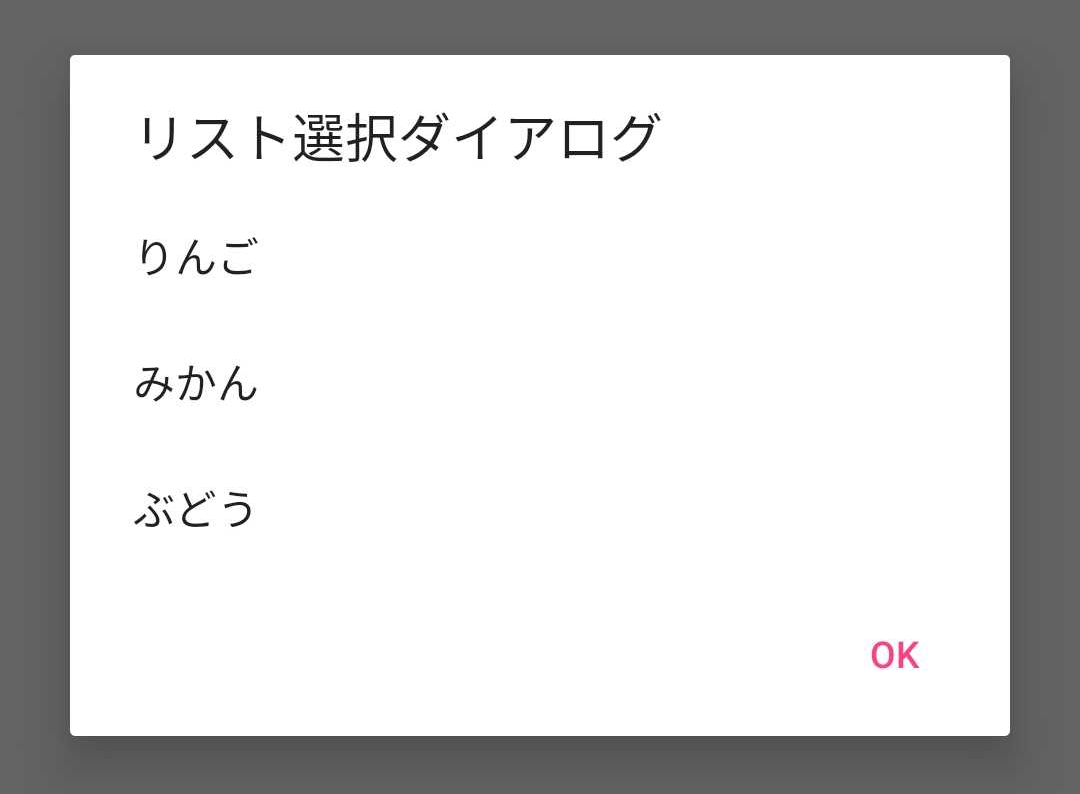
リスト表示では setItems を使用します。
第1引数(CharSequence[]):リスト表示する文字配列
第2引数(OnClickListener):項目クリック時のクリックリスナー
val strList = arrayOf("りんご","みかん","ぶどう")

AlertDialog.Builder(this) // FragmentではActivityを取得して生成
        .setTitle("リスト選択ダイアログ")
        .setItems(strList, { dialog, which ->
            // TODO:アイテム選択時の挙動
        })
        .setPositiveButton("OK", { dialog, which ->
            // TODO:Yesが押された時の挙動
        })
        .show()
ラジオボタン項目選択ダイアログ
ラジオボタン表示では setSingleChoiceItems を使用します。
第1引数(CharSequence[]):リスト表示する文字配列
第2引数(int):デフォルトでチェックを入れる位置
第3引数(OnClickListener):項目クリック時のクリックリスナー
val strList = arrayOf("りんご","みかん","ぶどう")

AlertDialog.Builder(this) // FragmentではActivityを取得して生成
        .setTitle("ラジオボタン選択ダイアログ")
        .setSingleChoiceItems(strList, 0, { dialog, which ->
            // TODO:アイテム選択時の挙動
        })
        .setPositiveButton("OK", { dialog, which ->
            // TODO:Yesが押された時の挙動
        })
        .show()
チェックボックス選択ダイアログ
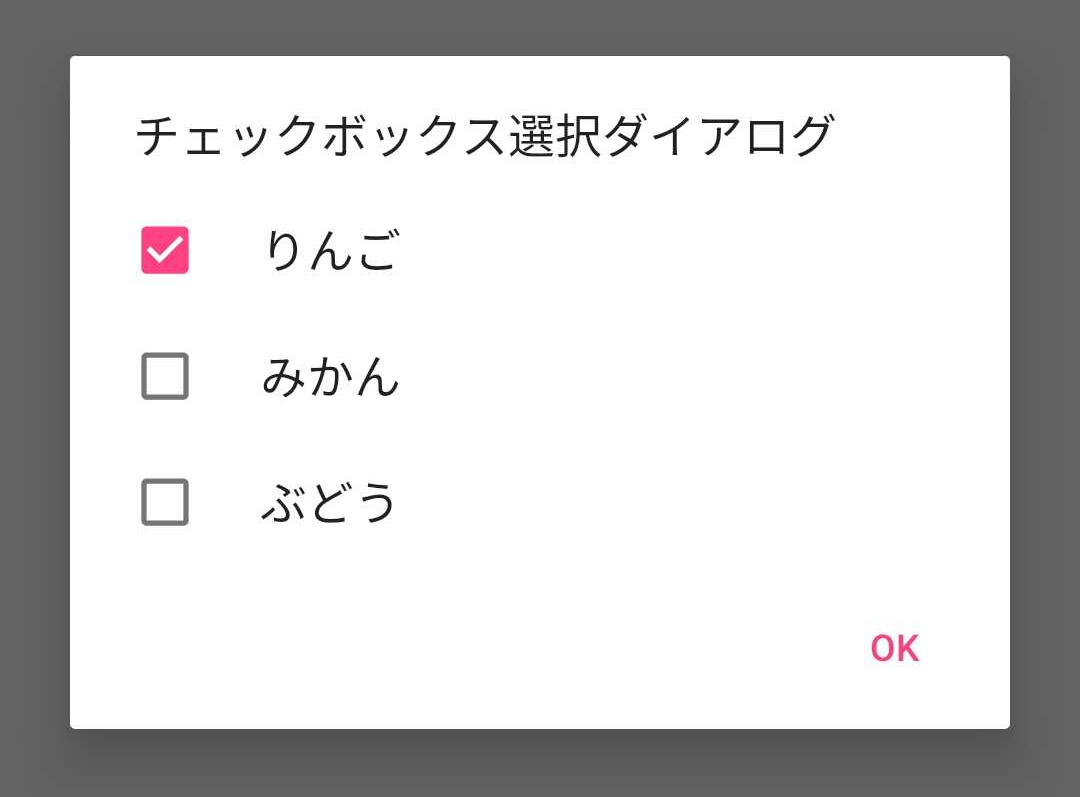
チェックボックス表示では setMultiChoiceItems を使用します。
第1引数(CharSequence[]):リスト表示する文字配列
第2引数(boolean[]):デフォルトでチェックを入れておく状態を管理する配列
第3引数(OnClickListener):項目クリック時のクリックリスナー
val strList = arrayOf("りんご","みかん","ぶどう")
val checkedItems = booleanArrayOf(true, false, false)

AlertDialog.Builder(this) // FragmentではActivityを取得して生成
        .setTitle("チェックボックス選択ダイアログ")
        .setMultiChoiceItems(strList, checkedItems, { dialog, which, isChecked ->
            // TODO:アイテム選択時の挙動
        })
        .setPositiveButton("OK", { dialog, which ->
            // TODO:Yesが押された時の挙動
        })
        .show()
その他、設定関連
■setCancelable
ダイアログの表示範囲外をタップした際に、ダイアログが閉じれるかどうかを設定します。setCancelable(cancelable : Boolean)
■setView
自分で作ったレイアウトやViewを直接セットするときに使用します。setView(layoutResId : Int)
or
setView(view : View)

- 投稿日:2019-06-27T17:14:51+09:00
Kotlin + Retrofit でAPIコールしてみた
はじめに
二年目になりました。
kotlinでAndroid開発を勉強中です。
とりあえずAPIでとってきたデータを表示するところまでできたので、メモ書き程度に残します。やりたいこと
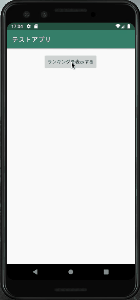
楽天ウェブサービスの楽天商品ランキングAPIで総合ランキングをとってきて、リストに表示する!
(本当は順位や画像、価格など表示したいのですが、一旦商品名だけ出します)
環境と使うもの
環境
- Mac OS Mojave v10.14.5
- Android Studio 3.4.1
使う物
- 楽天ウェブサービス(https://webservice.rakuten.co.jp/)
- Kotlin 1.3.31
- Retrofit 2.4.0
やってみよう
1.環境を整える
2.表示する場所をつくる
3.APIからの返り値を置く場所を作る
4.APIを呼ぶ環境を整える
- 楽天ウェブサービスに登録する
楽天ウェブサービスに登録し、APIをコールする際に必要になる
applicationIdを取得します。
取得の仕方はこちらを参考にさせていただきました。
→楽天(Rakuten Developers)のアプリIDとアフィリエイトIDを取得する方法
- retrofitを使えるように
build.gradleに以下を追加するbuild.gradledef retrofitVersion = '2.4.0' implementation "com.squareup.retrofit2:retrofit:$retrofitVersion" implementation "com.squareup.retrofit2:adapter-rxjava:$retrofitVersion" implementation "com.squareup.retrofit2:converter-gson:$retrofitVersion"
- HTTP通信ができるように、
AndroidManifest.xmlに以下を追加するAndroidManifest.xml<uses-permission android:name="android.permission.INTERNET"/>manifestタグ内に入れましょう。
これがないとHTTP通信ができません!
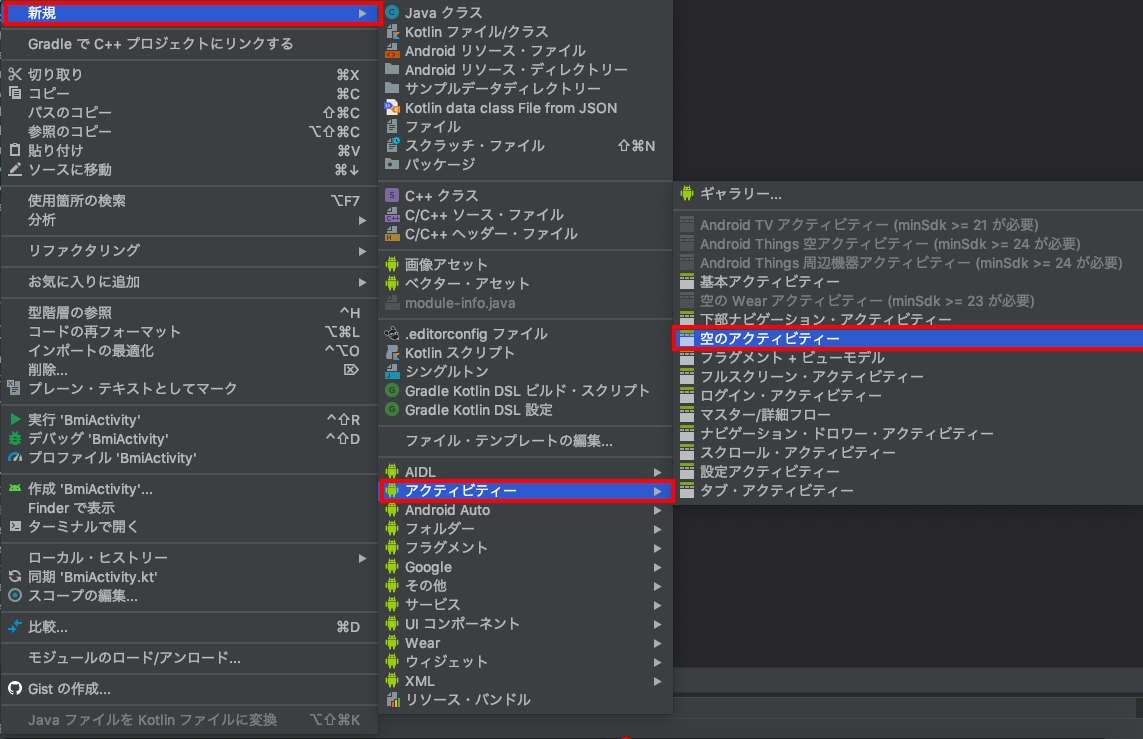
- Activityを作成する
プロジェクトビューで左クリックし、
新規 > アクティビティー > 空のアクティビティー
と選択します。
アクティビティー名を入力し、
レイアウトファイルを生成するにチェックをいれます。
レイアウト名が自動で入ります。(好きなように変更できます)
パッケージ名はご自身の環境にあるものをお使いください。
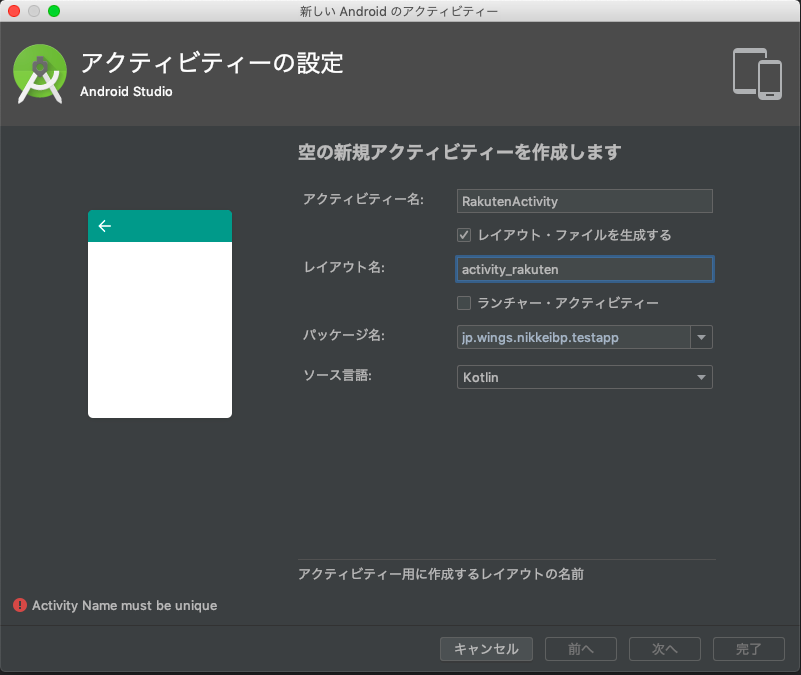
完了を押すと、以下の2つのファイルが生成されます。
- RakutenActivity.kt
- activity_rakuten.xml
表示する場所を作る
先程作成した
activity_rakuten.xmlで、レイアウトを作成していきます。
GUIで作成することが可能ですが、今回は完成しているものをxmlで載せておきます。activity_rakuten.xml<?xml version="1.0" encoding="utf-8"?> <androidx.constraintlayout.widget.ConstraintLayout xmlns:android="http://schemas.android.com/apk/res/android" xmlns:tools="http://schemas.android.com/tools" xmlns:app="http://schemas.android.com/apk/res-auto" android:layout_width="match_parent" android:layout_height="match_parent" tools:context=".RakutenActivity"> <Button android:text="ランキングを表示する" android:layout_width="wrap_content" android:layout_height="wrap_content" android:id="@+id/button" app:layout_constraintStart_toStartOf="parent" android:layout_marginLeft="8dp" android:layout_marginStart="8dp" app:layout_constraintEnd_toEndOf="parent" android:layout_marginEnd="8dp" android:layout_marginRight="8dp" app:layout_constraintHorizontal_bias="0.498" android:onClick="getRanking" android:layout_marginTop="16dp" app:layout_constraintTop_toTopOf="parent"/> <TextView android:layout_width="0dp" android:layout_height="36dp" android:id="@+id/titleRanking" android:textSize="18sp" android:gravity="center_horizontal|center_vertical" android:layout_marginStart="8dp" app:layout_constraintStart_toStartOf="parent" android:layout_marginLeft="8dp" android:layout_marginEnd="8dp" app:layout_constraintEnd_toEndOf="parent" android:layout_marginRight="8dp" app:layout_constraintHorizontal_bias="0.0" android:layout_marginTop="8dp" app:layout_constraintTop_toBottomOf="@+id/button"/> <ListView android:layout_width="395dp" android:layout_height="618dp" android:id="@+id/listRanking" app:layout_constraintEnd_toEndOf="parent" android:layout_marginEnd="8dp" android:layout_marginRight="8dp" android:layout_marginTop="8dp" app:layout_constraintTop_toBottomOf="@+id/titleRanking"/> </androidx.constraintlayout.widget.ConstraintLayout>
Buttonを押すと、getRankingイベントが起こり、
TextViewタグ内にランキングのタイトルを、
ListViewタグ内にランキング上位から商品の名前を詰めていきます。APIからの返り値を置く場所を作る
データクラスなるものを作ります。
JsonToKotlinClassというプラグインを使用しました。
以下の記事の通りに行いました。
kotlinでJSON扱うならJsonToKotlinClassが便利記事のとおりに行うと以下のようなクラスが出来上がります。
RakutenRankingResult.ktdata class RakutenRankingResult( val Items: List<Item>, val lastBuildDate: String, val title: String ) data class Item( val affiliateRate: String, val affiliateUrl: String, val asurakuArea: String, val asurakuClosingTime: String, val asurakuFlag: Int, val availability: Int, val carrier: Int, val catchcopy: String, val creditCardFlag: Int, val endTime: String, val genreId: String, val imageFlag: Int, val itemCaption: String, val itemCode: String, val itemName: String, val itemPrice: String, val itemUrl: String, val mediumImageUrls: List<String>, val pointRate: Int, val pointRateEndTime: String, val pointRateStartTime: String, val postageFlag: Int, val rank: Int, val reviewAverage: String, val reviewCount: Int, val shipOverseasArea: String, val shipOverseasFlag: Int, val shopCode: String, val shopName: String, val shopOfTheYearFlag: Int, val shopUrl: String, val smallImageUrls: List<String>, val startTime: String, val taxFlag: Int )APIを呼ぶ
前半で作成した
RakutenActivity.ktに書き足していきます。interface
APIを表現、定義します。
@の後に基本のURLに続くURLを書きます。
本来であればクエリパラメータとして渡すのが正しい方法のような気はしますが、本記事ではできるだけシンプルに記述したいので、べた書きしてます。
applicationIdは、最初に取得したご自身のIDを書いてください。[]は不要ですRakutenActivity.ktprivate val itemInterface by lazy { createService() } interface ItemInterface { @GET("IchibaItem/Ranking/20170628?formatVersion=2&applicationId=[applicationId]") fun items(): retrofit2.Call<RakutenRankingResult> }HttpClient
基底URLの定義などを行います。
baseApiUrlが基本のURLです。
/まで入れるのが基本?と見たような気がします。ソースは不明です。申し訳ありません。RakutenActivity.ktfun createService(): ItemInterface { val baseApiUrl = "https://app.rakuten.co.jp/services/api/" val httpLogging = HttpLoggingInterceptor().setLevel(HttpLoggingInterceptor.Level.BODY) val httpClientBuilder = OkHttpClient.Builder().addInterceptor(httpLogging) val retrofit = Retrofit.Builder() .addConverterFactory(GsonConverterFactory.create()) .baseUrl(baseApiUrl) .client(httpClientBuilder.build()) .build() return retrofit.create(ItemInterface::class.java) }Retrofit instance
このserviceは、APIを定義したinterfaceをインスタンス化したものであり、実際にAPIコールを行う際に利用されます。
メソッド名
getRankingは、レイアウトで作成したボタンのonClick属性に入力します。
onFailureがAPIコール失敗時に呼ばれる処理、onResponseが成功時に呼ばれる処理です。
onFailureには何も書いていません。エラーハンドリングしたい方はここに書きましょう。
titleにランキングのタイトルをつめて、titleRankingというidのtextViewで表示しています。for文でレスポンスのItemsを回し、
itemNameをitemsにつめていきます。
ArrayAdapterを使用し、itemsにつめたitemNameを、listRankingに順番に表示します。RakutenActivity.ktfun getRanking(v: View){ itemInterface.items().enqueue(object : retrofit2.Callback<RakutenRankingResult> { override fun onFailure(call: retrofit2.Call<RakutenRankingResult>?, t: Throwable?) { } override fun onResponse(call: retrofit2.Call<RakutenRankingResult>?, response: retrofit2.Response<RakutenRankingResult>) { if (response.isSuccessful) { response.body()?.let { var items = mutableListOf<String>() var res = response.body()?.Items?.iterator() var title = response.body()!!.title titleRanking.text = "$title" if (res != null) { for (item in res) { items.add(item.itemName) } } val adapter = ArrayAdapter(this@RakutenActivity, android.R.layout.simple_list_item_1, items) val list: ListView = findViewById(R.id.listRanking) list.adapter = adapter } } } }) }以上で完成です。ランキングは出てきましたか?
さいごに
はじめてandroid開発を行っています。
java経験もほぼ皆無なので苦戦中です。
なにか間違っていることや、もっとスマートな書き方等あればお教えいただきたいです。参考
- 投稿日:2019-06-27T15:08:16+09:00
【C#】②MicrosoftのXamarinチュートリアルを進めつつ補足する
前回、パソコンの中にAndroidを出したとこからの続きです。
①はこちらStackLayoutの例は前回も出しましたが、
要は、画面の中で表示するテキストを自由に脚色できるのです。前回はチュートリアルに沿ってテキストを縦に並べるとこまで
やりました。今回は、まずこのテキスト2行ペアを縦並びから
横並びに変えてみましょう。
前回記述したコードのStackLayoutタブに、
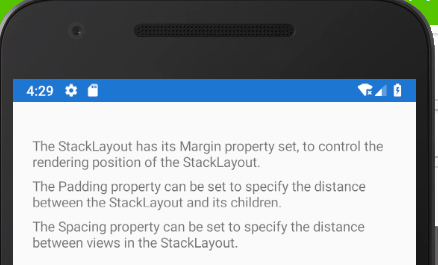
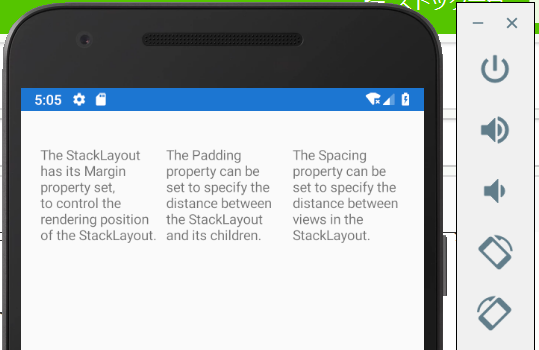
Orientaitonメソッドを追加して、文章の向きを変えてみましょう。<?xml version="1.0" encoding="utf-8"?> <ContentPage xmlns="http://xamarin.com/schemas/2014/forms" xmlns:x="http://schemas.microsoft.com/winfx/2009/xaml" x:Class="StackLayoutTutorial.MainPage"> <StackLayout Margin="20,35,20,25" Orientation="Horizontal"> <Label Text="The StackLayout has its Margin property set, to control the rendering position of the StackLayout." /> <Label Text="The Padding property can be set to specify the distance between the StackLayout and its children." /> <Label Text="The Spacing property can be set to specify the distance between views in the StackLayout." /> </StackLayout> </ContentPage><ざっくり解説>
Orientationは日本語で「適応、順応、方向付け」という意味です。
StackLayoutタブに「Orientaion + やりたいこと」を記述すると、
既述したStackLayoutタブ内の要素(今回はテキスト)の向きをまとめて変更する
ことができます。(中学校とかで4月にオリエンテーションってありますよね。
無垢な子供たちを社会に望ましい人物に"適応"させるのです)今回は「Orientation = Horizontal(水平な、横の)」として、
StackLayoutタブ内の要素を横に並べる指示を付け加えました。Orientationのように、単体では影響を及ぼしませんが、
「A = B」で具体的な指示語(B)を代入すると意味を持つようになる
キーワードをメソッドと呼びます。便利アイテムですね~本題に戻ります
コードを上記の通り修正したら、前回Androidを起動したときと同じ
▷ボタンを押してください。再実行の場合は「↺」このマークになってます。自動でビルド(検証・構築)してくれた後、
エラーがなければAndroidが再起動されます。縦に3つ並んでいたテキストが、横に3つ並びました。
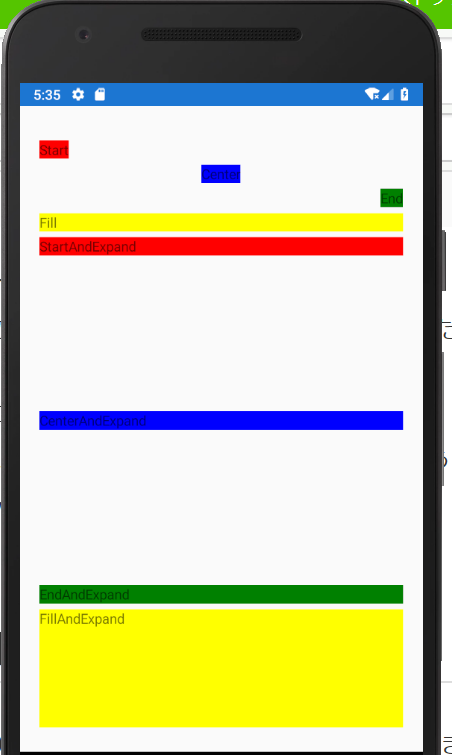
Labelごとに配置や背景色を設定する
Oriantationメソッドは全体的な設定には便利ですが、
Labelごとに個別で置く場所を変えたいのが普通ですよね。残念ながらLabelタブ内ではOrientationメソッドを使えないので、
Labelごとに配置や背景色の設定を変えていきます。<?xml version="1.0" encoding="utf-8"?> <ContentPage xmlns="http://xamarin.com/schemas/2014/forms" xmlns:x="http://schemas.microsoft.com/winfx/2009/xaml" x:Class="StackLayoutTutorial.MainPage"> <StackLayout Margin="20,35,20,25"> <Label Text="Start" HorizontalOptions="Start" BackgroundColor="Red"/> <Label Text="Center" HorizontalOptions="Center" BackgroundColor="Blue"/> <Label Text="End" HorizontalOptions="End" BackgroundColor="Green"/> <Label Text="Fill" HorizontalOptions="Fill" BackgroundColor="Yellow"/> <Label Text="StartAndExpand" VerticalOptions="StartAndExpand" BackgroundColor="Red" /> <Label Text="CenterAndExpand" VerticalOptions="CenterAndExpand" BackgroundColor="Blue" /> <Label Text="EndAndExpand" VerticalOptions="EndAndExpand" BackgroundColor="Green" /> <Label Text="FillAndExpand" VerticalOptions="FillAndExpand" BackgroundColor="Yellow" /> </StackLayout> </ContentPage><ざっくり解説>
Orientationメソッドを消して、
各Label内で配置と背景色を設定しています。
※Textの「Start、Center~」は意味を持ちません。
StartAndExpandがEndやFillの下に表示されているのは
単にコード内で書いてる順番通りに上から並んでいるだけです。各単語の意味は以下の通りです。
・HorizontalOptionsで横位置を決める。
(Start=左端、Center=真ん中、End=右端、Fill=横幅Max)
・VerticalOptionsで縦位置を決める。
(「~andExpand」が後ろにつくことで、該当ラベルはMax範囲を
持つようになります。Fillだけが元々Max範囲を有するため、
FillandExpandだけが、本来のVeriticalOptionメソッド通り、
縦のMax範囲を持っているため、該当幅が全て黄色になっています)上記のコードで再実行↺すると以下のようになります
(色が濃すぎた…)
ここまででMicrosoftのStackLayoutチュートリアルは完了です。
お疲れさまでした。この後は「Label」のチュートリアルです。
(今やった気がする)また気まぐれで更新します。
ご質問・ご意見はもちろん、
「おい、その解釈違うぞ」ってのがあったら教えてください。
助かります
- 投稿日:2019-06-27T12:18:25+09:00
AndroidStudioで『エラー: パッケージorg.apache.httpは存在しません』を解消する
古いアプリのSDKが21だったためバージョンを上げたら次のようなエラーが
エラー: パッケージorg.apache.httpは存在しませんAndroid 6.0(API レベル 23)以降
org.apacheパッケージ削除
org.apacheパッケージが削除されたようです。詳細はこちら
https://developer.android.com/sdk/api_diff/23/changes.html?hl=ja対応
とりあえず動けばということで古いパッケージを使います。
build.gradleに以下を追加build.gradleandroid { useLibrary 'org.apache.http.legacy' }※自ブログからの転載です
http://akinov.hatenablog.com/entry/2019/06/27/121906