- 投稿日:2019-06-25T15:52:26+09:00
RecyclerViewでnotifyItemInsertedやnotifyItemRemovedを使う時の注意点
背景
notifyItemInsertedやnotifyItemRemovedを使っていると、消したいデータと違うデータが消えたり、IndexOutOfExceptionが起こってアプリがクラッシュしたので、原因を調べてみました。以下の3つを順番に実行した時の
Adapter内のリストの状態・RecyclerViewのデータ項目の状態・アプリ画面の状態がどうなっているのか図で示しながら解説していきます。その後、対処法を示していきます。
- RecyclerViewを初期化した時
- リストにデータを追加した時
- notifyItemInsertedを呼び出した時
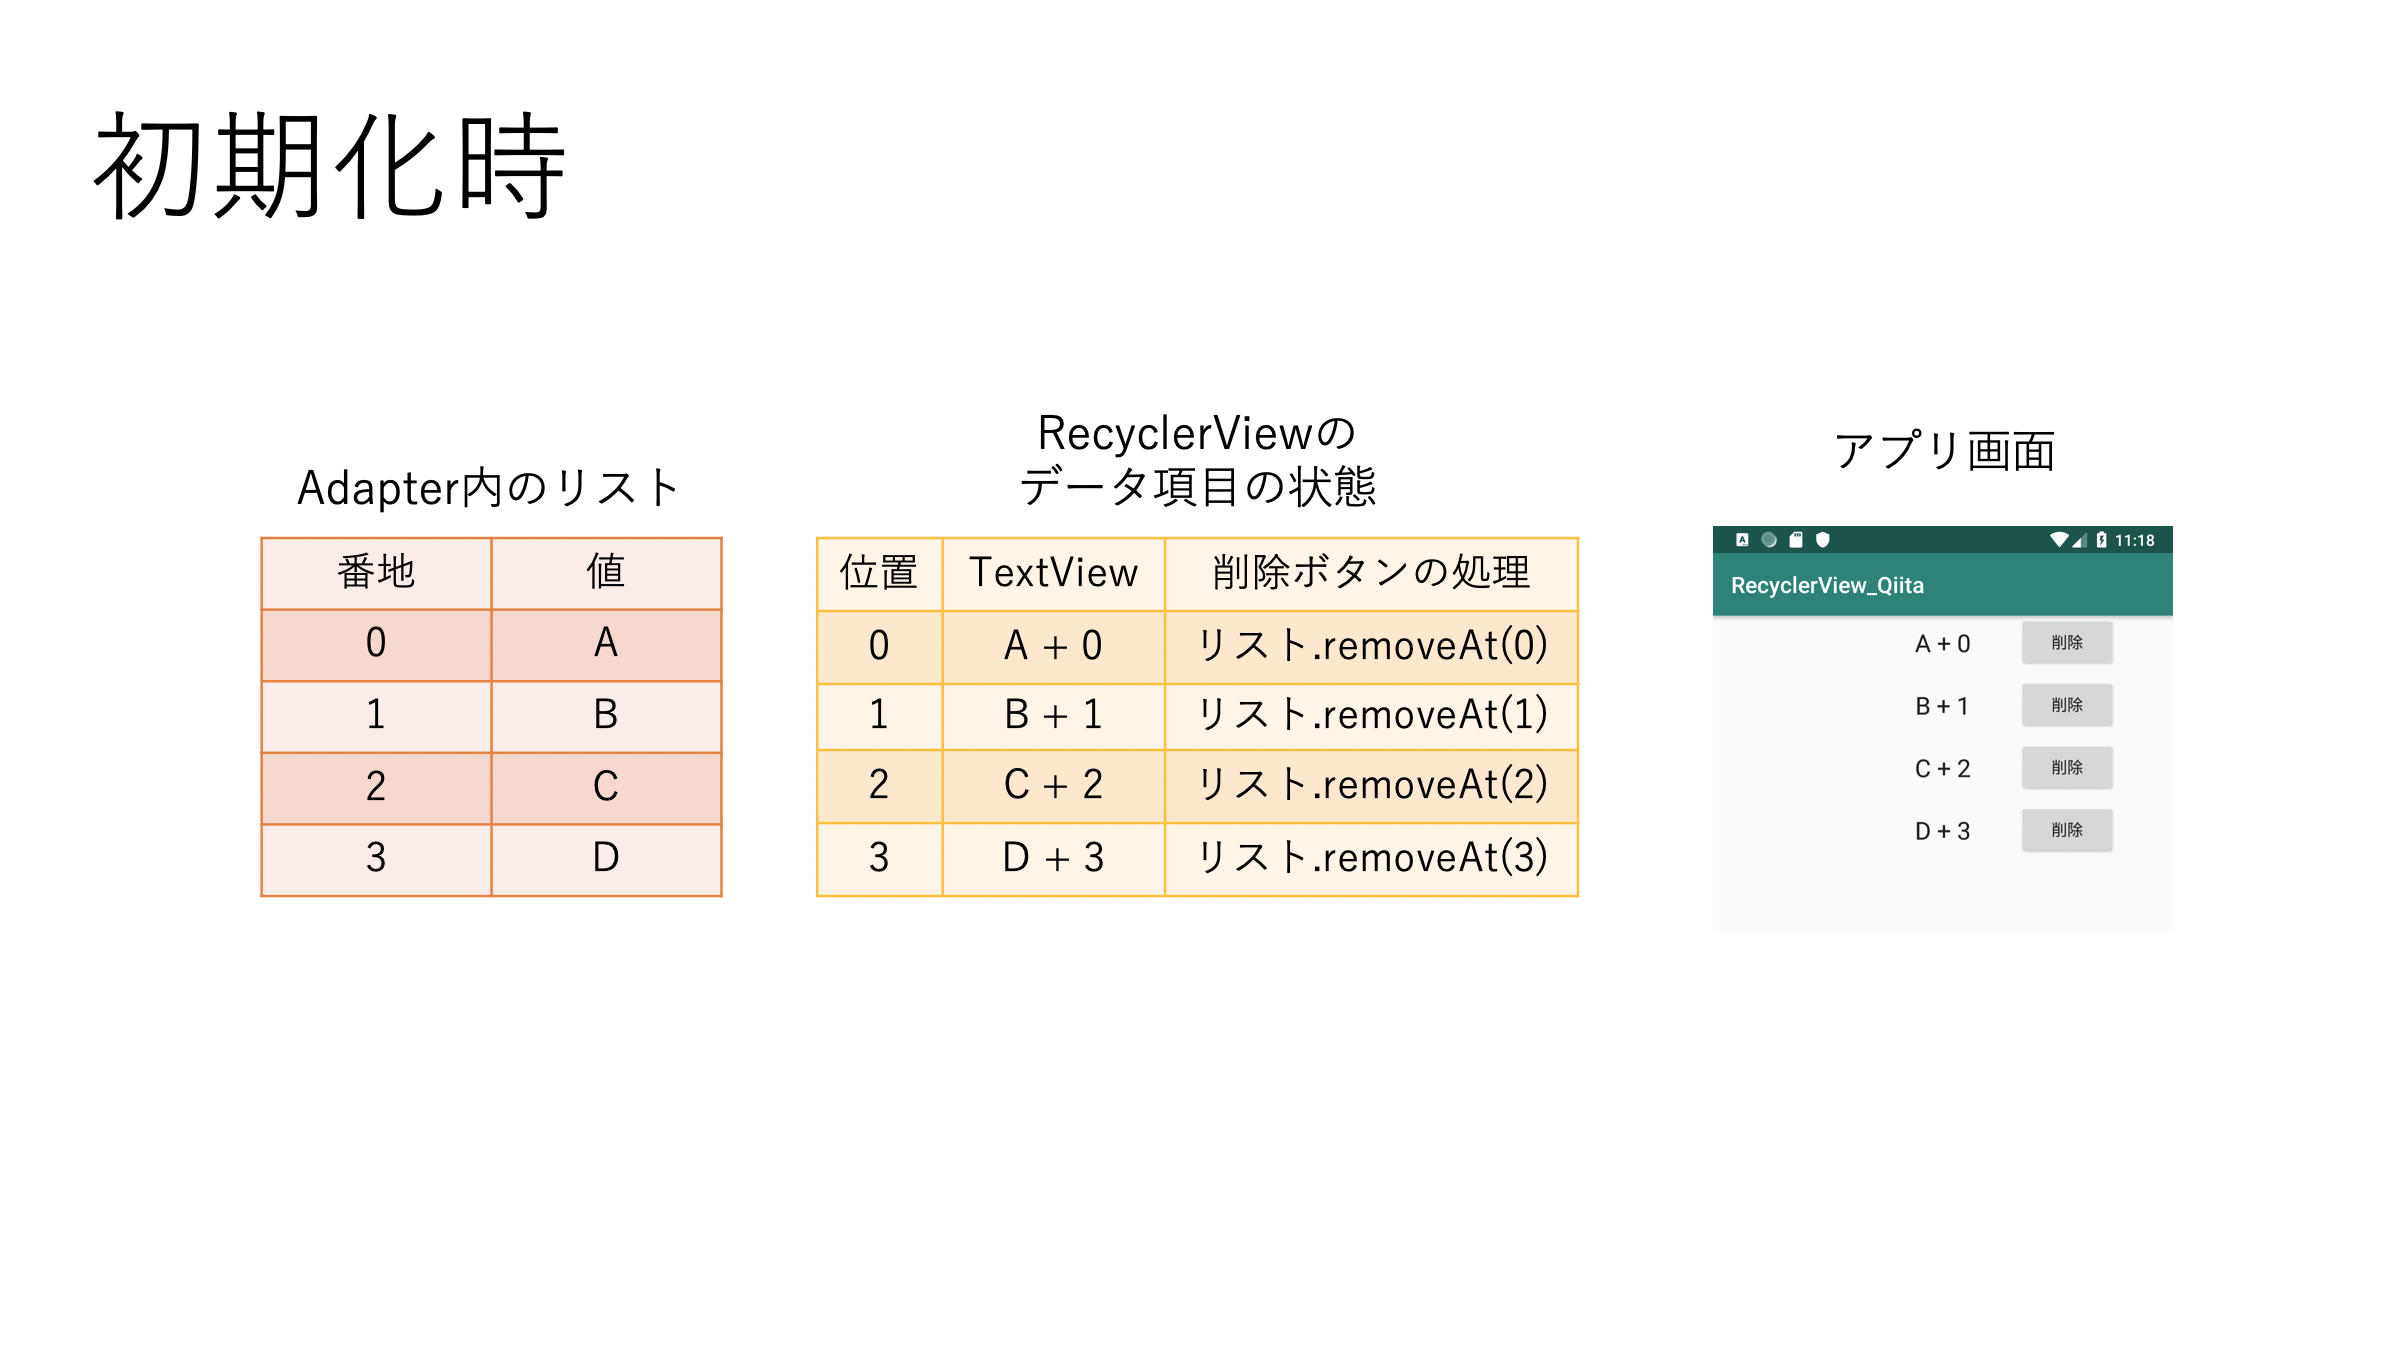
RecyclerViewを初期化した時
今回、原因を調べるために作ったAdapterクラスです。それぞれの状態だけを見ると、間違っていなさそうに見えます。
しかし、この状態で削除ボタン(R.id.deleteButton)を押すと、一度目は正しいデータが削除されますが、二度目は、違うデータが消えたり、IndexOutOfExceptionが起こります。MyRecyclerViewAdapter.ktclass MyRecyclerViewAdapter(private val context: Context, private val sampleList: MutableList<String>) : RecyclerView.Adapter<MyRecyclerViewAdapter.MyViewHolder>() { class MyViewHolder(view: View) : RecyclerView.ViewHolder(view) { val contentTextView: TextView = view.findViewById(R.id.content) val deleteButton: Button = view.findViewById(R.id.deleteButton) } override fun onCreateViewHolder(parent: ViewGroup, viewType: Int): MyViewHolder { return MyViewHolder(LayoutInflater.from(context).inflate(R.layout.sample_list, parent, false)) } override fun getItemCount(): Int = sampleList.size override fun onBindViewHolder(holder: MyViewHolder, position: Int) { holder.contentTextView.text = "${sampleList[position]} + $position" holder.deleteButton.setOnClickListener { sampleList.removeAt(position) notifyItemRemoved(position) } } fun addItem(position: Int, string: String){ sampleList.add(position, string) } }
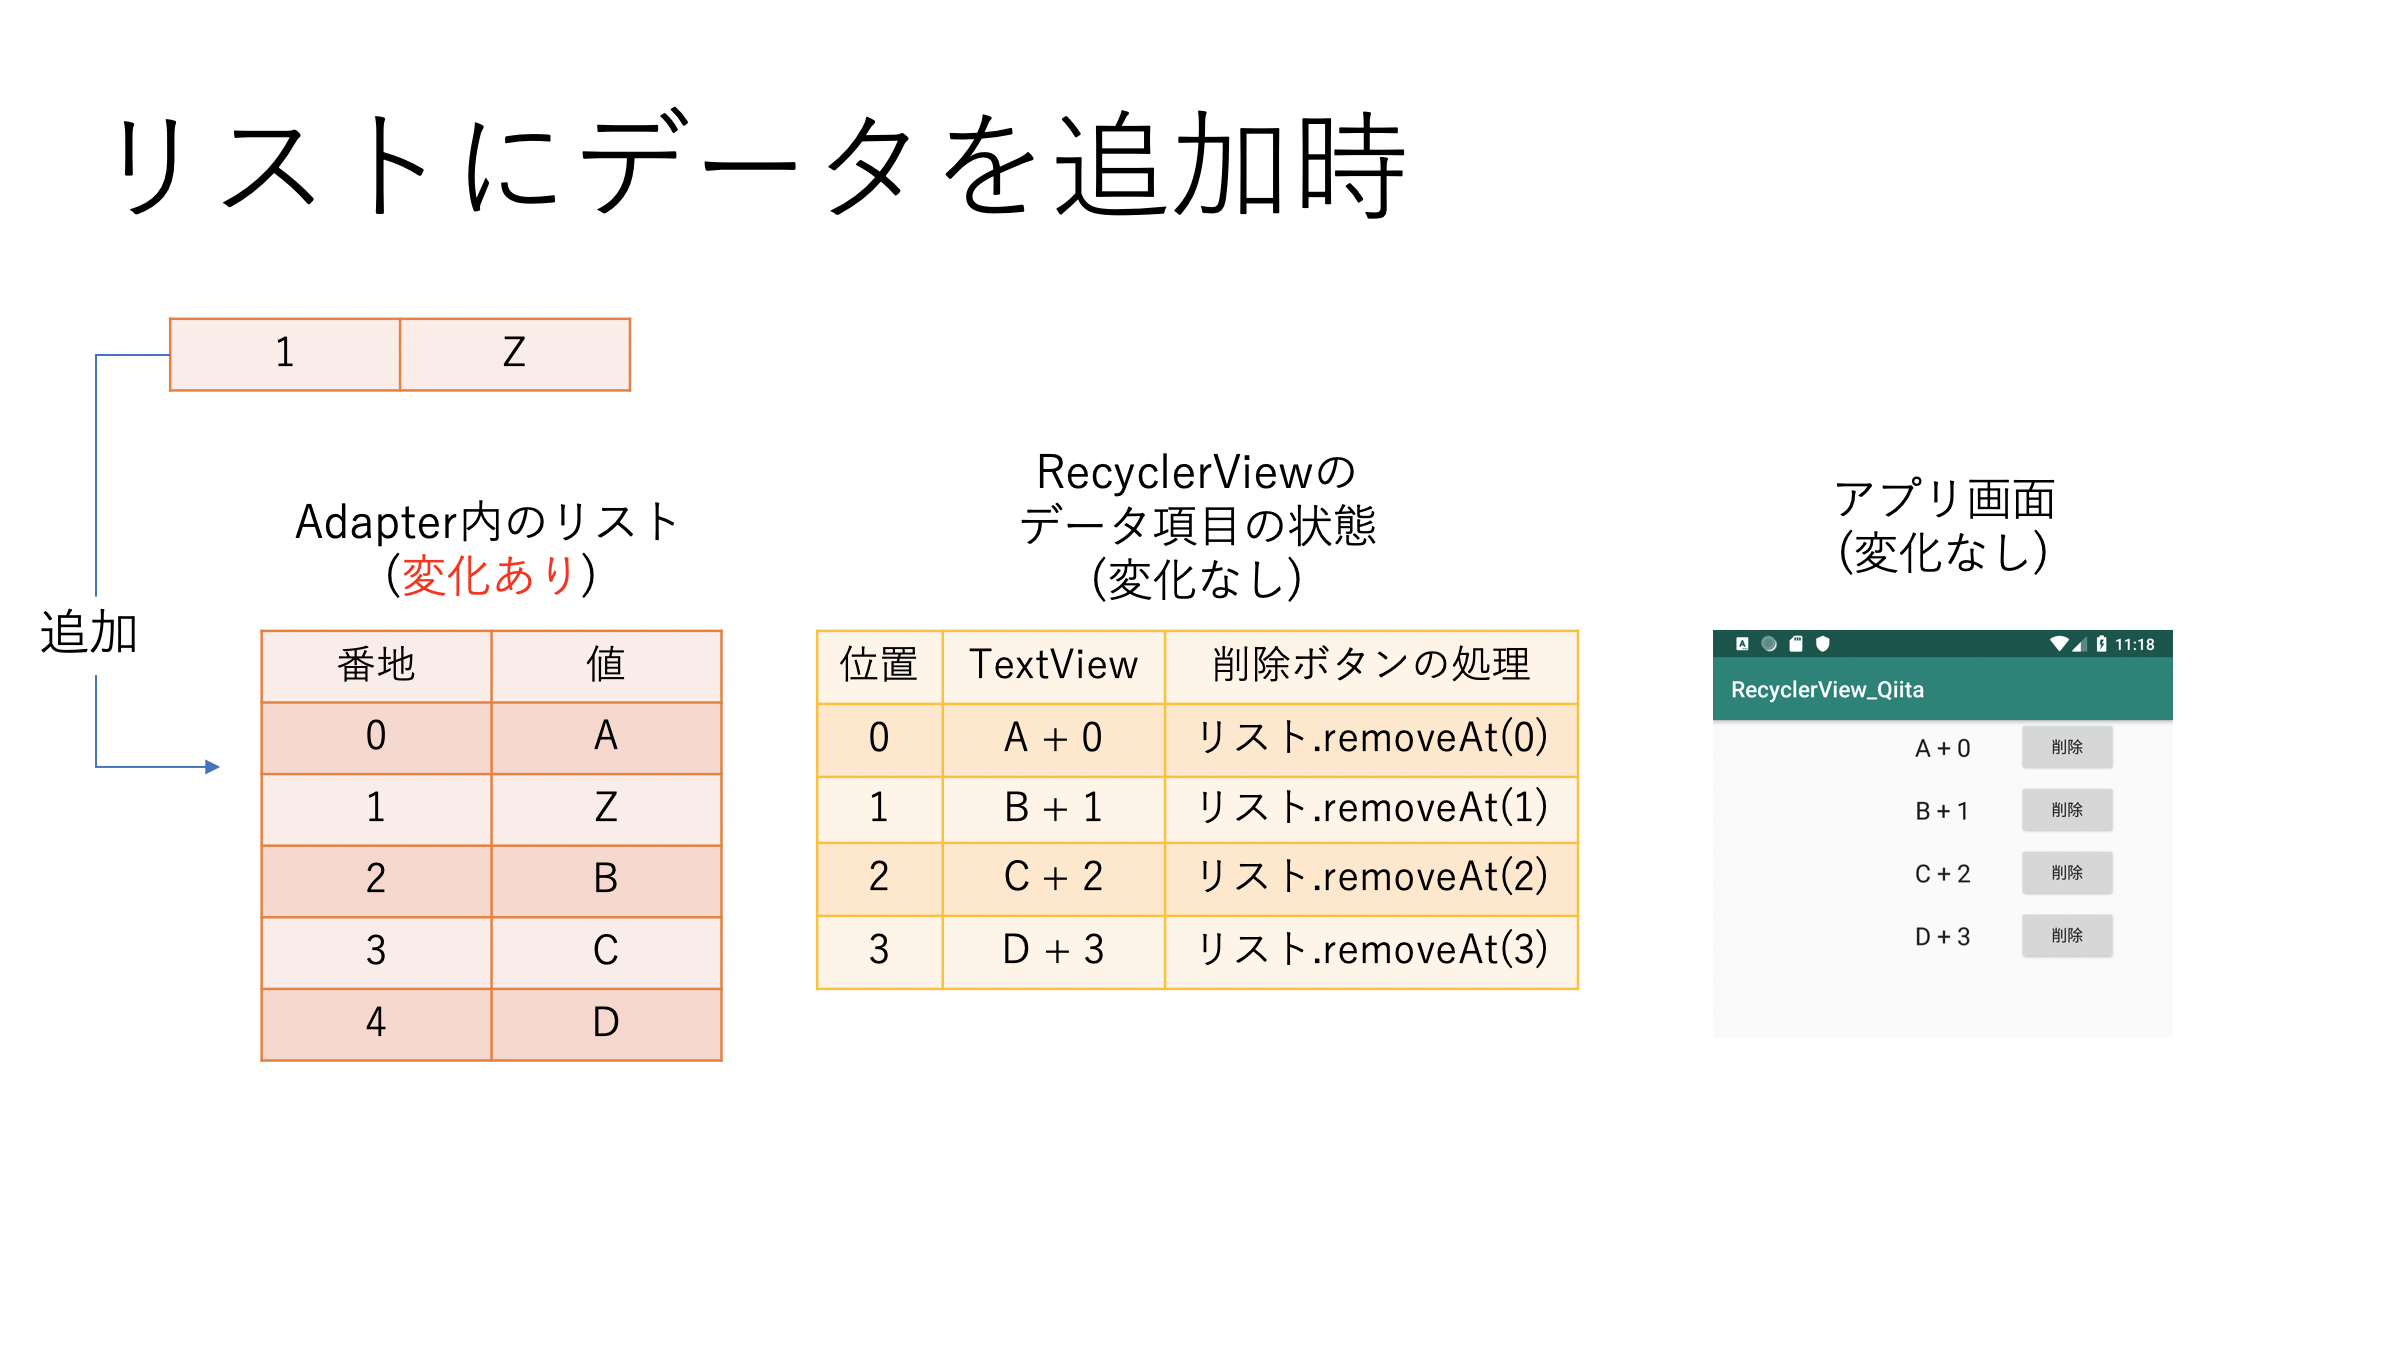
リストにデータを追加した時
Adapter内のリストには変化がありますが、データを追加したことを通知していないため、RecyclerViewのデータ項目の状態やアプリ画面に変化はありません。
MainActivity.kt//追加するコード addButton.setOnClickListener { (recyclerView.adapter as MyRecyclerViewAdapter).addItem(1, "Z") }
notifyItemInserted(position=1)を実行した時
notifyItemInserted(position: Int)は、指定した位置に新しいデータが追加されたことを通知しています。指定した位置にあったデータ項目は元の位置 + 1されます。追加したデータは指定した位置でバインドされます。しかし、位置がズレたデータ項目は、リバインドされないのでTextViewや削除ボタンの処理が更新されません。そのため位置2にある削除ボタンの処理を実行すると、リスト.removeAt(1)が実行され、消したいデータと違ったデータが削除されるわけです。MainActivity.ktaddButton.setOnClickListener { (recyclerView.adapter as MyRecyclerViewAdapter).addItem(1, "Z") //追加するコード recyclerView.adapter?.notifyItemInserted(1) }
対処方法
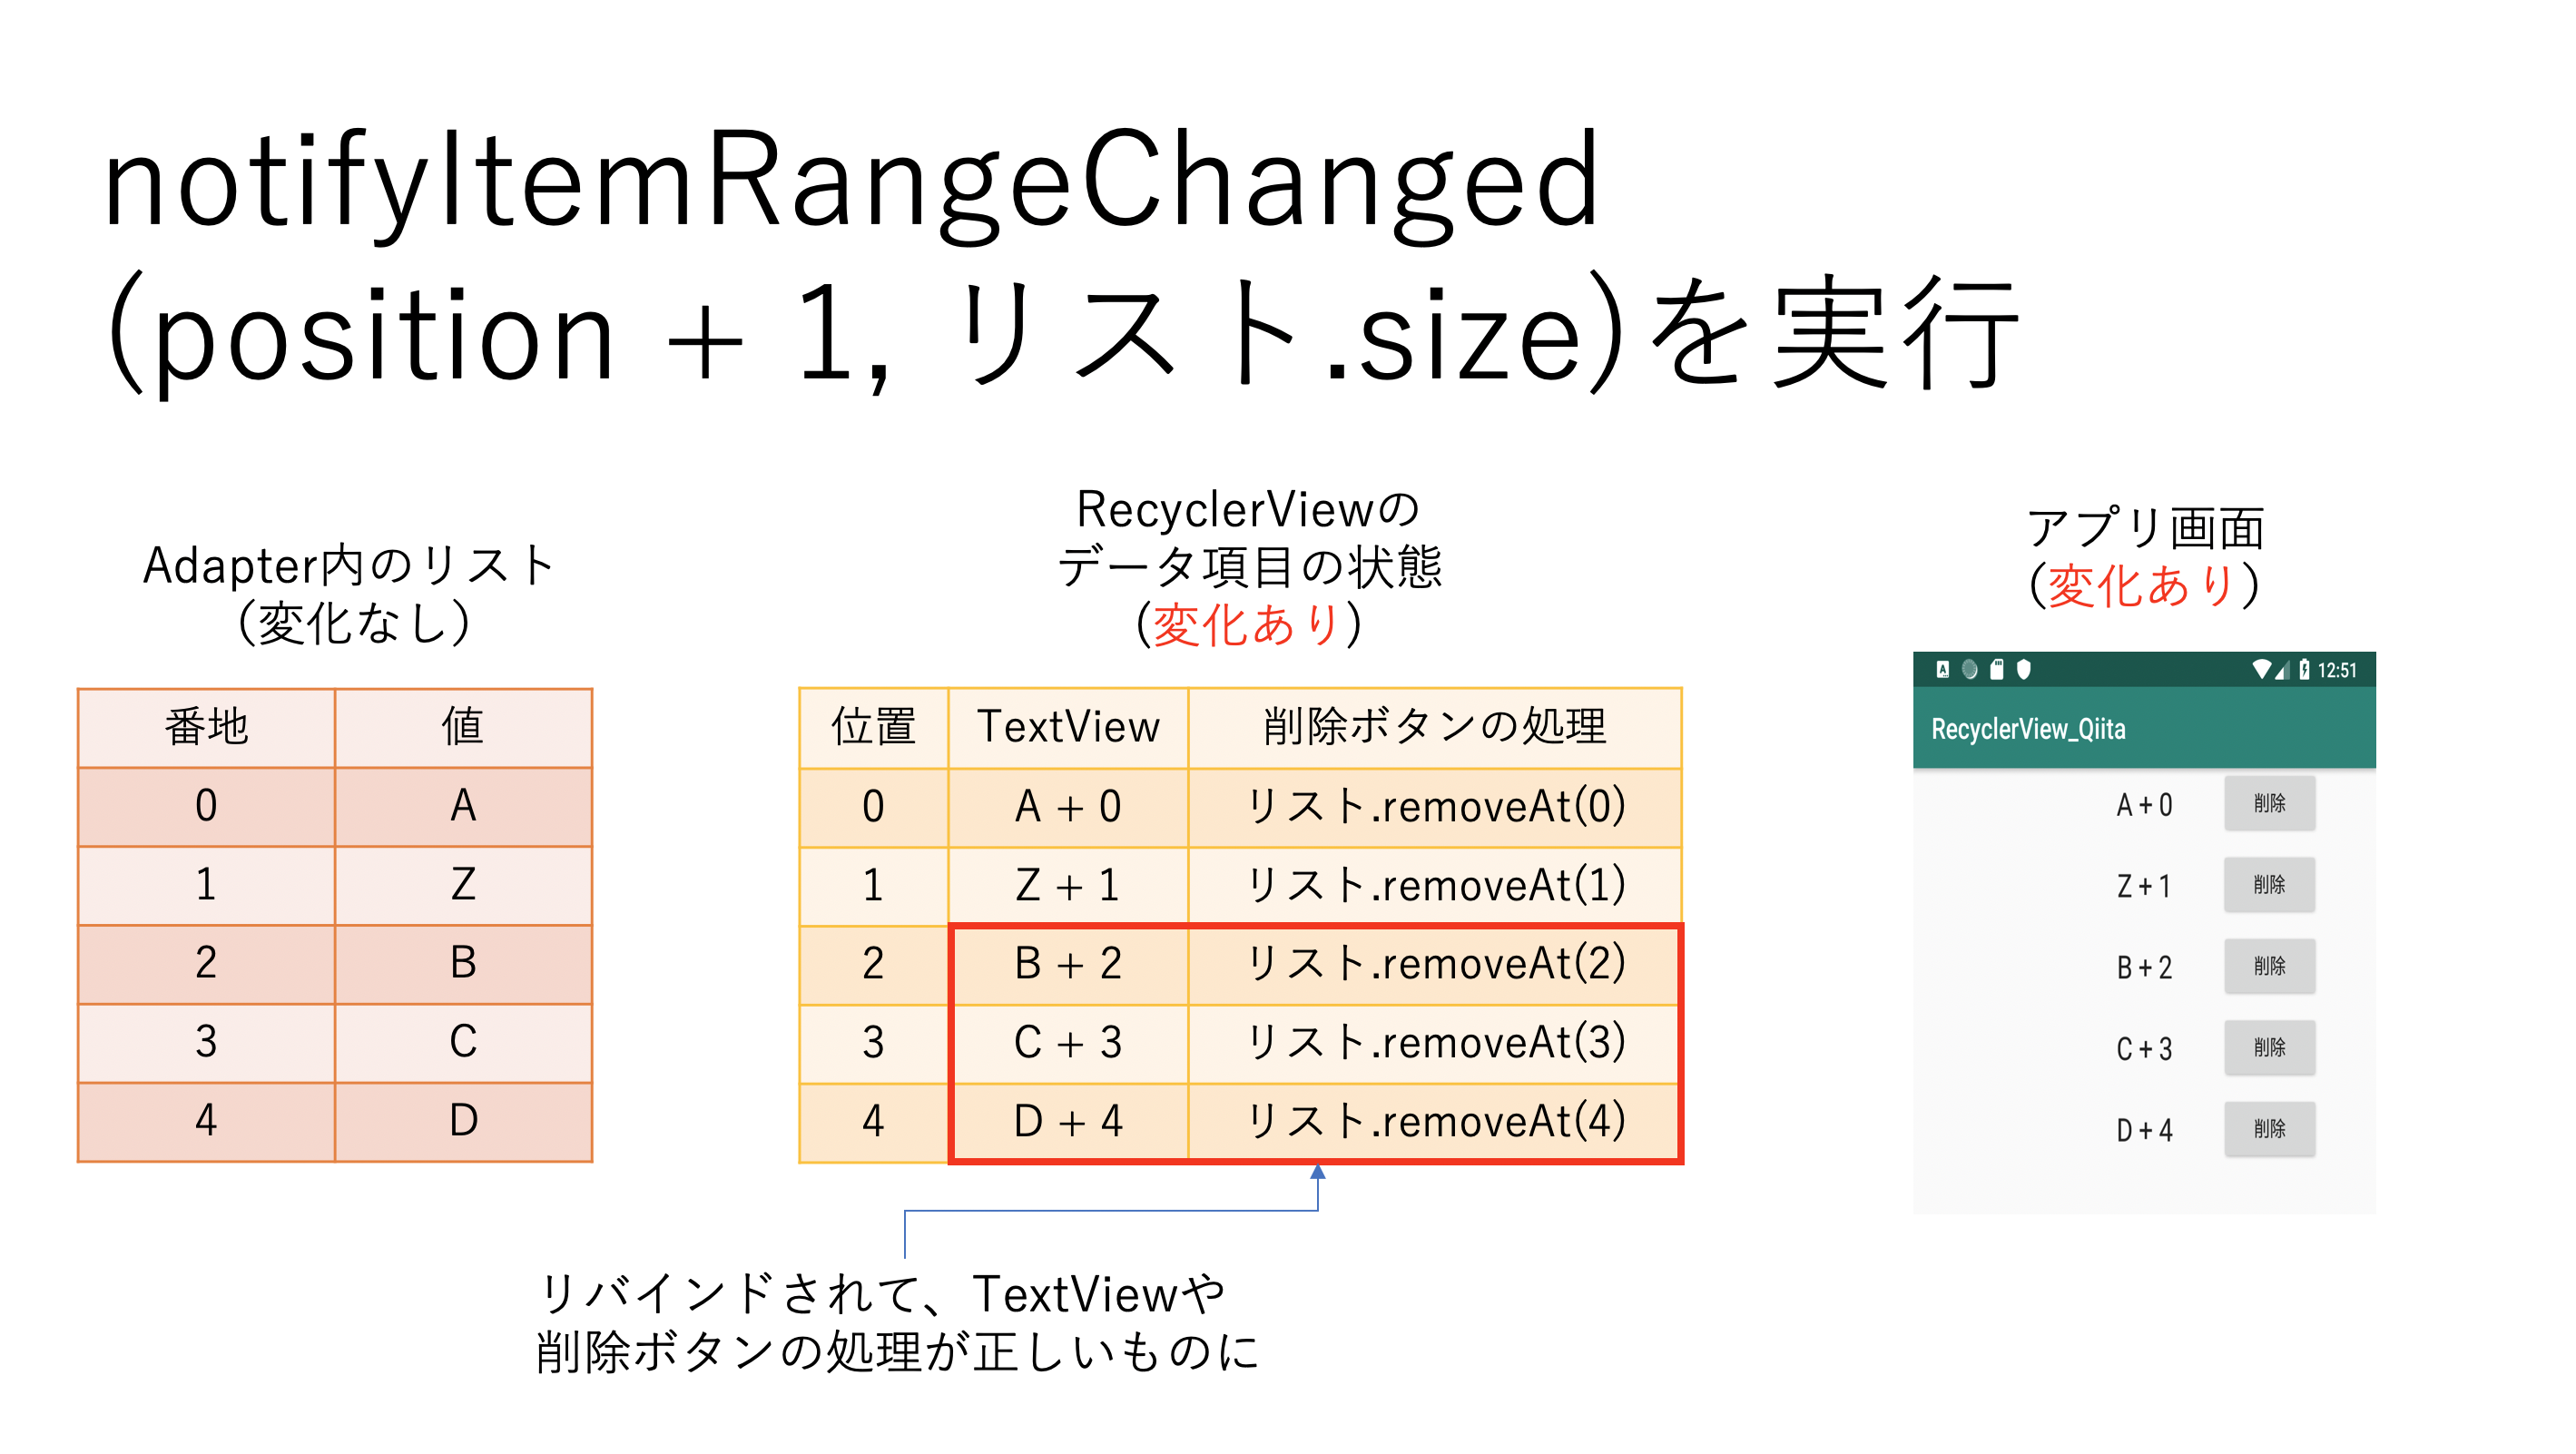
追加や削除を通知した後、notifyItemRangeChangedを使う
notifyItemRangeChanged(startPosition: Int, itemCount: Int)は、startPositionからitemCountまでの範囲に、データの変更があったことを通知し、リバインドしてくれます。そのため、TextViewの値や削除ボタンの処理が適したものに更新されます。MainActivity.ktaddButton.setOnClickListener { (recyclerView.adapter as MyRecyclerViewAdapter).addItem(1, "Z") recyclerView.adapter?.notifyItemInserted(1) //追加するコード recyclerView.adapter?.notifyItemRangeChanged(2, sampleList.size) }MyRecyclerViewAdapter.ktoverride fun onBindViewHolder(holder: MyViewHolder, position: Int) { holder.contentTextView.text = "${sampleList[position]} + $position" holder.deleteButton.setOnClickListener { sampleList.removeAt(position) notifyItemRemoved(position) //追加するコード notifyItemRangeChanged(position, itemCount) } }
まとめ
notifyItemInsertedやnotifyItemRemovedを使うなら、notifyItemRangeChangedを一緒に使いましょう。
notifyDataSetChangedを使うとどちらもやってくれますが、Documentであまりおすすめされていないのとアニメーションがされません。
もし、ここ間違っているよ等あれば、コメントで教えてください!

- 投稿日:2019-06-25T15:02:03+09:00
TextViewのEllipsizeする行数を動的に変更する
TextViewの高さが親と兄弟のレイアウトによって可変になる場合に以下のように、長すぎるテキストが見切れてしまうことがあります。
linesとellipsizeを設定すれば良さそうですが、ビューの高さが可変なのでlinesも可変にする必要があります。
この問題は以下のようにサブクラスを定義することで解決できます。DynamicEllipsizeTextViewclass DynamicEllipsizeTextView : TextView { constructor(context: Context?) : super(context) constructor(context: Context?, attrs: AttributeSet?) : super(context, attrs) constructor(context: Context?, attrs: AttributeSet?, defStyleAttr: Int) : super(context, attrs, defStyleAttr) constructor(context: Context?, attrs: AttributeSet?, defStyleAttr: Int, defStyleRes: Int) : super( context, attrs, defStyleAttr, defStyleRes ) override fun onLayout(changed: Boolean, left: Int, top: Int, right: Int, bottom: Int) { super.onLayout(changed, left, top, right, bottom) adjustEllipsize(bottom - top) } private fun adjustEllipsize(containerHeight: Int) { // レイアウトが確保した高さ内に収まる行数に設定 val ableToShowLineCount = containerHeight / lineHeight setLines(ableToShowLineCount) // 更新を反映するために再度テキストを設定 text = text } }結果はこのようになります。
4行表示できる高さでは4行で省略し、5行表示できる高さでは5行で省略します。
- 投稿日:2019-06-25T11:57:27+09:00
Android Studio からエミュレータを実行できないとき(一時的な対処)
対象
Andoroid Studioでソースを記述。
実行(U) - 実行(U)
を選択して以下のようなエラーがビルド出力に出てエミュレータが起動できないときの対処を記述します。Invalid escape sequence at line 1 column 28 path $[0].name対処
build.gradleを開く
プロジェクト中にあるbuild.gradleをエディタで開きます。
build.gradle// Top-level build file where you can add configuration options common to all sub-projects/modules. buildscript { ext.kotlin_version = '1.3.31' repositories { google() jcenter() } dependencies { classpath 'com.android.tools.build:gradle:3.4.1' classpath "org.jetbrains.kotlin:kotlin-gradle-plugin:$kotlin_version" // NOTE: Do not place your application dependencies here; they belong // in the individual module build.gradle files } } allprojects { repositories { google() jcenter() } } task clean(type: Delete) { delete rootProject.buildDir }こちらのclasspath 'com.android.tools.build:gradle:3.4.1'のバージョンを3.2.1に変更します。
バージョン自体はお使いのAndroidStudioに依存します。build.gradle// Top-level build file where you can add configuration options common to all sub-projects/modules. buildscript { ext.kotlin_version = '1.3.31' repositories { google() jcenter() } dependencies { classpath 'com.android.tools.build:gradle:3.2.1' classpath "org.jetbrains.kotlin:kotlin-gradle-plugin:$kotlin_version" // NOTE: Do not place your application dependencies here; they belong // in the individual module build.gradle files } } allprojects { repositories { google() jcenter() } } task clean(type: Delete) { delete rootProject.buildDir }保存して再度
実行(U) - 実行(U)
を行います。
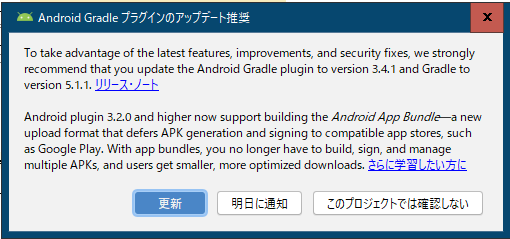
上記のようなダイアログが表示されますので「明日に通知」か「このプロジェクトでは確認しない」を押してください。
「更新」をクリックすると再びcom.android.tools.build:gradleのバージョンが最新に変更されます。
一度は起動するのですが、再度実行時にエラーとなります。根本的な対処はまた後日。